You might have heard of some of the most popular directory websites. eBay, Yahoo, Facebook, Bing, Foursquare, and Yelp are just some of the many websites which list products and services for us to browse. You can easily create a directory website to list almost anything. Indeed, you can find examples of real estate, local businesses, cars. You name it, you can list it.
What Is a Directory Website?
A directory website is a website that lists products and services you can browse through. To create one in WordPress:
- Choose a niche
- Find a way to monetize
- Take care of branding
- Set up your directory website
- Implement the main features
This is why directory websites are one of the most popular types of websites to create and to try and make money from.
But as with any complex project, it is crucial to make sure you follow the right path to ensuring yours becomes a success. Within this article, we’ll take you through all the key steps for you to create a directory website.
Picking a Niche for Your Directory Website
Now that you have decided to create such a website, the most important question is:
What exactly are you going to list on your directory website?
Identifying your market could be the difference between your next profitable business and one which will simply become yet another failed project on the web.
Here are the steps you should take to evaluate what your directory website will specialize in.
Think About What You Would Be Interested in Selling:
At first, it is important to think about what types of products, industries, and services you’re interested in. If you start with this goal in mind, you’ll be more passionate about your project and it’ll hopefully come easier to you to find four or five types of industries, niches, or verticals that you can use as the foundation for the rest of your research.
For example, if you enjoy going out to eat with friends, you’ll have a good idea of the most popular restaurants in your town/city, the type of food they serve, and what their best dishes are.
This provides you with the right type of knowledge you could use to start targeting specific restaurants, which you know they’re great, instead of wasting resources on others.
See What People Are Searching For:
Once you’re clear on what you’d like to sell, you can then move on to doing some in-depth research to uncover the most popular businesses in your preferred niche. One of the most effective ways is looking at what people are searching for online. To do so, there are plenty of SEO tools you can use, such as Google Keyword Planner, Ahrefs or Moz.
The key point here is to find the right long-tail keywords, which have that magic combination of high popularity and relatively low competition.
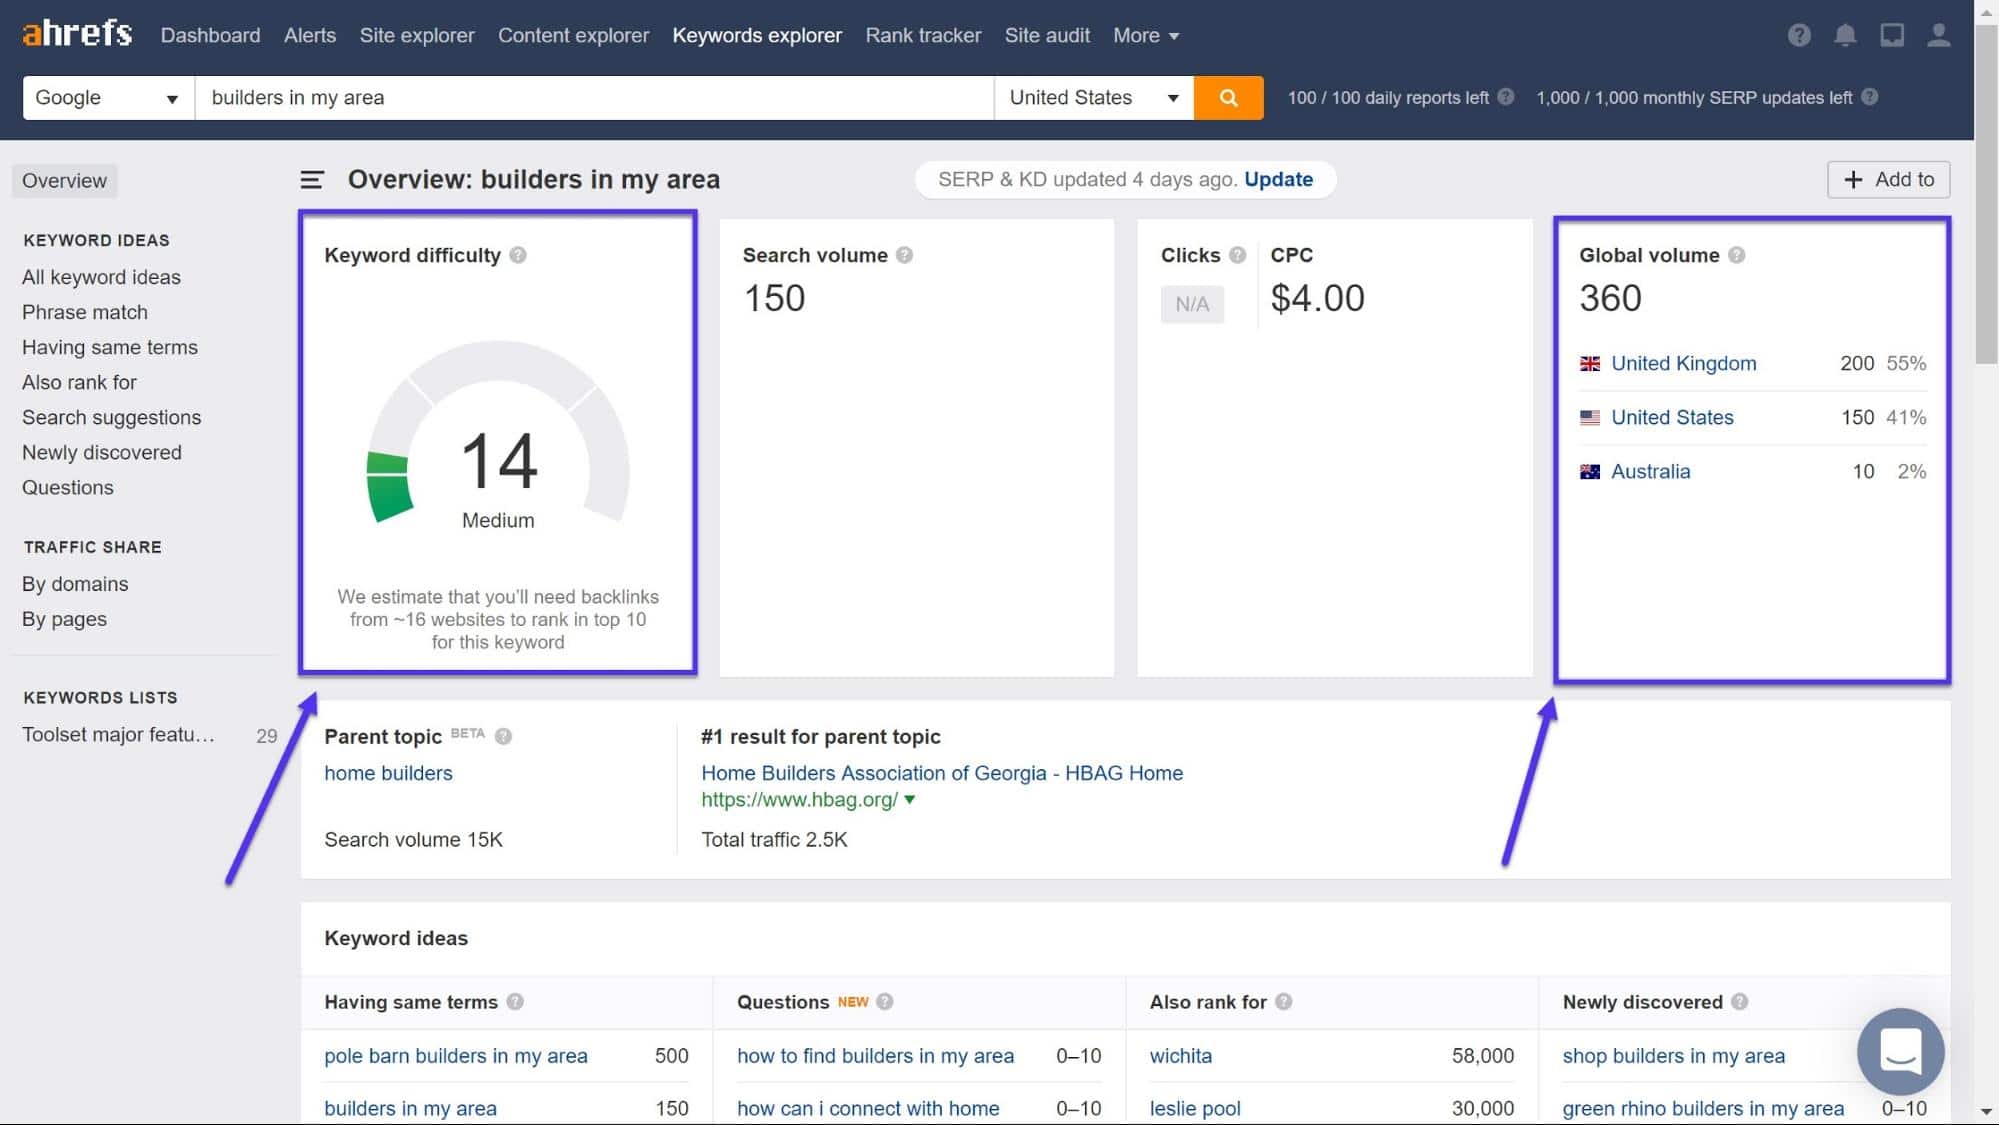
Here’s what I mean: let’s imagine you have decided to create a directory website for people to find local builders. I used Ahrefs to find search terms that are popular (above 200 searches a month) and are not too competitive (a keyword difficulty rating of less than 50). Here’s a list of them:
- Builders in my area
- Fence builders in my area
- Home builders in my area
- Home builders near me
- Custom home builders
- Home builders
- Garage builders
- Holiday builders
- Pool builders near me
From this, you’ll see what keywords you should target to get your website ranking higher. But there’s more: thanks to this research, you’ll be able to see what types of builders people look for. As an example, the query “pool builders near me” is a popular research you might want to create a dedicated section for on your directory website.
More information on optimizing your website’s SEO can be found in Kinsta’s SEO checklist.
Check Whether There Are Any Websites Already Serving Your Niche:
Having a list of popular long-tail keywords is one thing, but that will be less useful if there are directory websites serving them already. You can use SEO tools to explore who is ranking higher for the searches. You can also see how competitive each of your keywords is. If there is a lack of competition then you have found the right market.
Continuing with our builders directory example, these are the websites that rank well for “fence builders.”
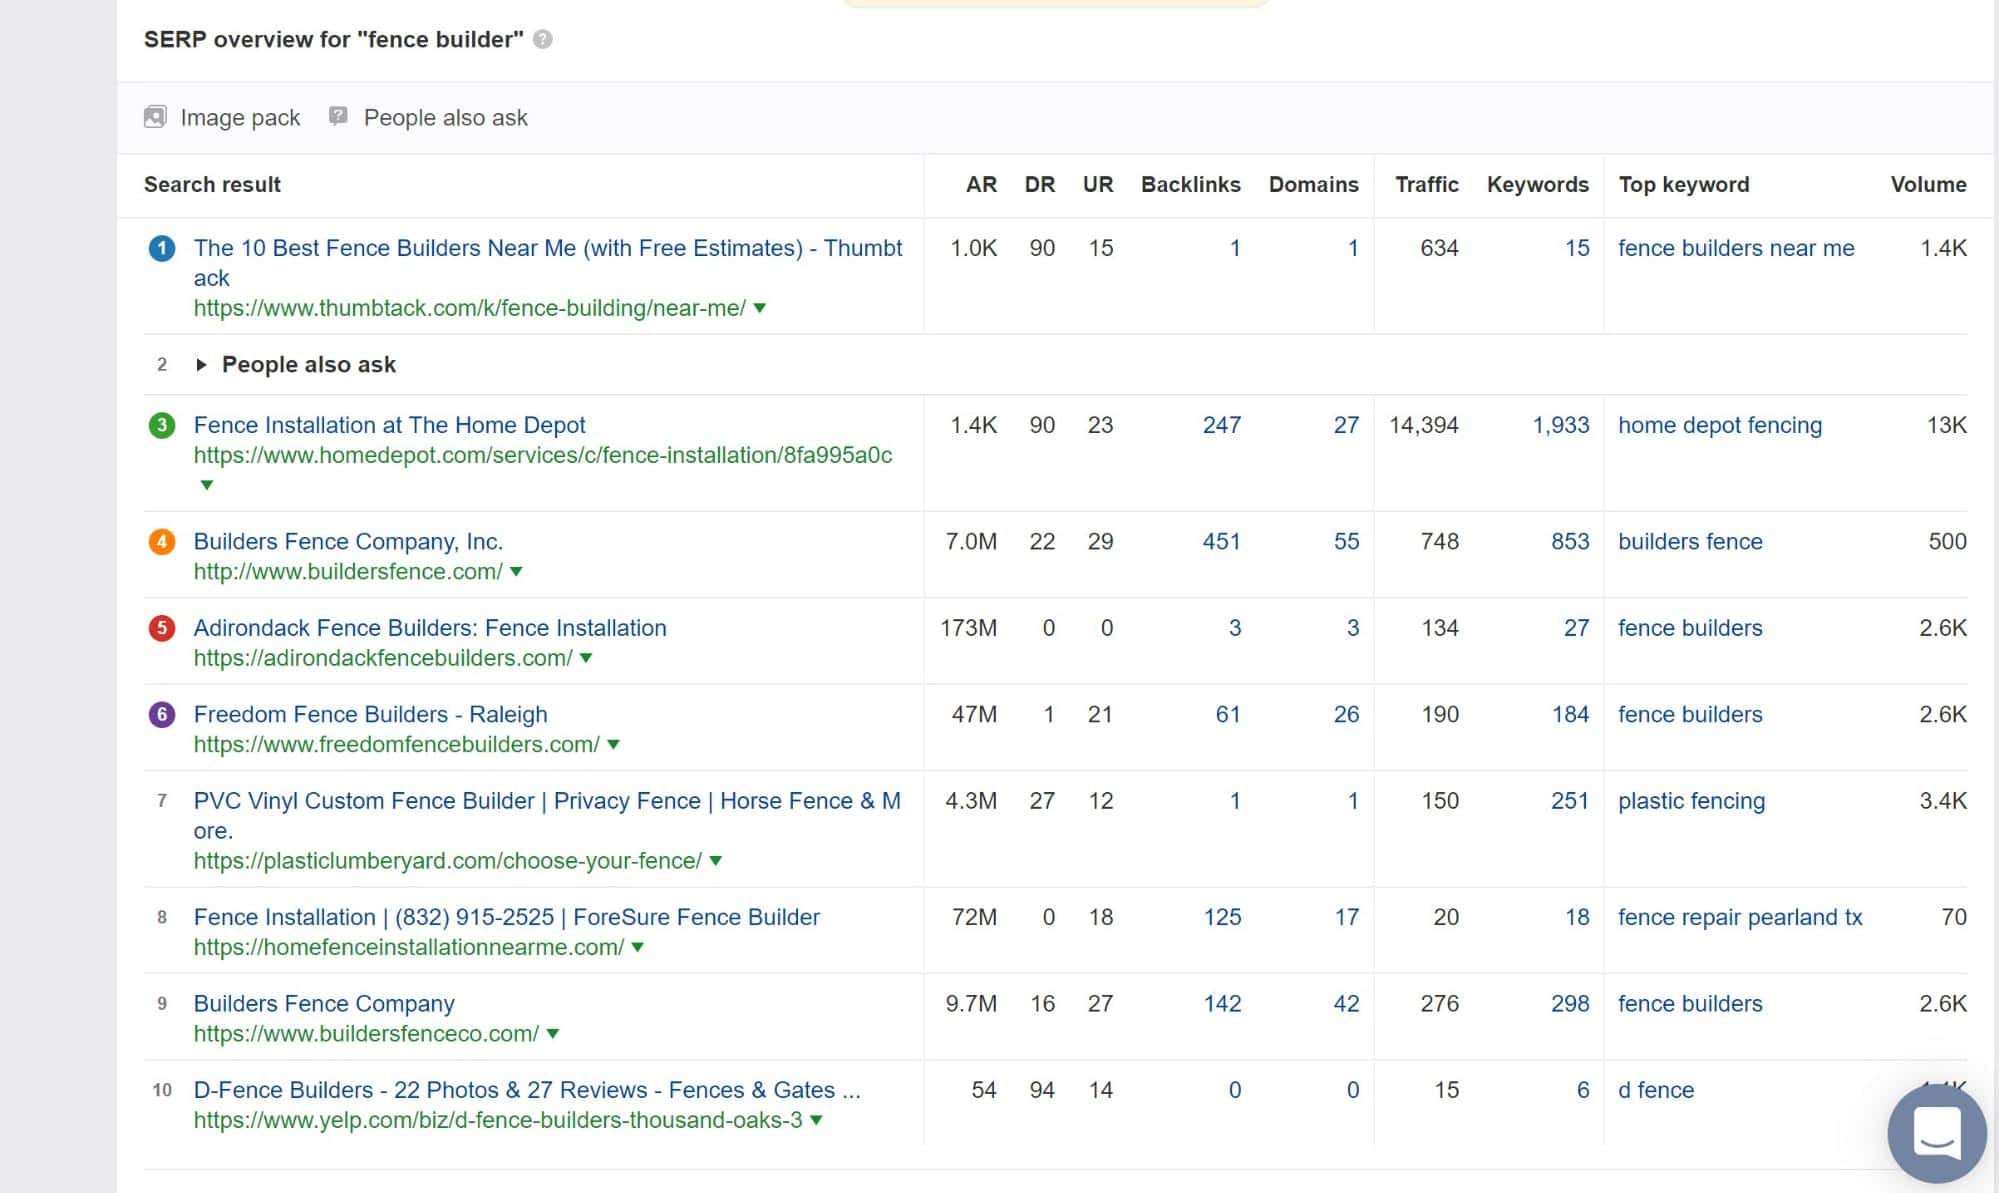
As you can see, there are not many builders directory websites. Furthermore, those that do rank in the top 10 do not have a great Ahrefs rank meaning we should be able to outrank them if we’re smart with our SEO.
Look for Businesses That Will Be Keen to Use Your Directory Website:
Now that you know there is a demand for your niche, you need to speak to businesses to see if they will be happy to pay to use your service. For example, if you are creating a real estate directory site in New York, will real estate companies be willing to use your platform to advertise their properties?
You will need to contact them later once your directory website starts performing well, but it is always a good idea for them to have you on your radar so that they remember who you are when you do return to them.
How to Monetize Your Directory Website
There are two easy ways you can start making money through your directory website in no time:
1. Charging for Listings
Once you start bringing valuable traffic to your website, which leads to conversions for listings, companies will start to take notice and will want to submit more content for your website.
This is when you can start charging them for that privilege. You can offer premium listings which will rank at the top of search results (similar to Google search results) and never expire.
You can either set up monthly fees for regular listers or a simple one-time payment for those who are not planning on submitting large volumes of content.
2. Sell Advertising Space
Given the (hopefully) large numbers of visitors to your website, you will be able to further monetize it by providing relevant ads.
You can use tools such as Google Analytics (learn how to connect Google Analytics to WordPress) to understand what is bringing users to your website and whether there are relevant products that you can sell to them. For example, if users are swarming to your website in search of builders for their new swimming pool there might be other products that they will be willing to buy such as swimming costumes. Then you can get in touch with companies and sell them on the benefits of advertising with you.
Another easy way is to use Google Adsense and its alternatives, which will be able to identify the most relevant high-quality adverts for your website and automatically place them there. Read our guide on how to add Google AdSense to your WordPress site.
3. Membership or Subscription-Based Website
Once your directory website becomes a reliable source of listings in a particular field you’ll be able to charge both listers and users to access your information.
Listers will want access to the large number of potential clients visiting your website. Therefore, they will be willing to pay for benefits such as listings without an expiry date or featured listings which appear at the top of searches.
Similarly, customers may be inclined to pay to see the best deals on your website. Alternatively, you can allow users to see all of your listings but only provide access to contact details if they are a paid up member.
There are a number of WordPress membership plugins that can help you take care of all your access control needs.
Branding
Before you dive into actually building your website it is important to plan your branding strategy.
Of course, you’ll be hoping to attract two types of users: those looking for listings and those looking to sell listings. As such, you will need to think about what works for both groups.
Important aspects of your brand need to include:
Your name – Take a look at these tips on how to choose a domain name
The look of your website – Consider the theme, colors, font style and any other design options. With WordPress, there are a number of free and paid themes to choose from.
Your blogging style – What content will work for you? What will your tone be? How will you communicate with your readers? Check out Kinsta’s blogging tips for more information about all of these and more.
Other ways you will promote your website – Besides good SEO there are other ways for you to drive traffic to your website. For paid advertising consider exploring GoogleAds to see which adverts are the most effective for your website. In addition, social media such as Facebook is another obvious route to success. Follow our guide to leveraging Facebook for marketing success for more information.
Set up Your Directory Website
Before you start adding features and content to your directory website, there are four elements you will need to set up.
1. Choosing Your Website Platform
There are a number of free platforms such as WordPress.com which might seem appealing if you’re hoping to keep costs down. But if you really want an advanced directory website which you can monetize then you will need something far more robust.
The best solution is WordPress.org which gives you the complete freedom to customize your directory site and will be able to support the thousands (hopefully!) of visitors to your site. Have a look at the differences between WordPress.com and WordPress.org for more information.
Here are a few reasons why choosing WordPress.org makes sense for your directory website:
- Around one in every three websites is powered by WordPress
- Some of the most popular websites including CNN use WordPress
- Thanks to its popularity you can rely on one of the largest Open Source communities of developers, designers, editors and content writers
- It is cheaper to create a website on WordPress than on the likes of Drupal
- WordPress offers thousands of themes and plugins for you to customize your directory website
- You can add complex features without PHP coding (we’ll get to some of these in a bit)
2. Pick a Reliable Web Host
Given that you are running a directory website which you are hoping to monetize and will experience consistent growth in traffic you will need a reliable web host for your peace of mind.
Web hosting is like an actual house which your website points to. Within this “house,” your web host will hold all of your website’s files.
When you choose a host for a directory website you will want an option which can handle spikes in traffic, enhance your site’s performance and has a track record of reliability when it comes to avoiding outages.
The best option for your directory website is Kinsta which will give you the security you need for your growing business. In addition to the advantages above, Kinsta stands out from the competition thanks to a number of other features:
- WordPress-specific features and tools which other hosts do not provide such as MyKinsta
- 24/7 customer support with an average ticket response time of less than five minutes
- Faster page load times

- A number of security measures to prevent malicious code or detect DDoS attacks
3. Customize Your Website’s Look with a Great Theme
Once you have your WordPress website installed you now need to decide how it will look. The most important step is choosing your website’s theme.
WordPress offers a number of great free and paid options, many of which will cater to directory websites. Besides the look of your theme there are a few other questions worth asking before you decide on the best one for you:
- How often is the theme maintained?
- What are the reviews like?
- Are its layouts responsive to different screen sizes?
- Is it multilingual ready?
- Will it help you appear at the top of Google search results?
- Will it support your plugins?
4. Choosing the Plugin to Build Your Directory Website
A quick search for directory plugins will bring a host of options. But which one is best? Whichever plugin you choose will need to be able to help you create the features you will need quickly and easily to help your website stand out.
I used Toolset Directory to create my directory website for classic cars which I will use as an example for the rest of this article. I used Astra as my theme.

I used Toolset because:
- It provides all of the features I need for a directory website without using other plugins
- There is no need to use PHP to add these features
- It is compatible with other plugins such as WooCommerce, Elementor, and WPML
- It works with major themes
Before we start going through the features, make sure to follow the guide to installing the Toolset plugins to create a directory website.
Creating the Features for a Directory Website
These are the features I will go through which I created for my classic cars directory website:
- Custom post types
- Custom fields
- Custom taxonomies
- A template to display each of your items (classic cars in our case)
- A search for users to browse our cars
- A front-end form for users to submit their listings
There are other features that you can add to a directory website but, according to other developers I have spoken to, these are the most important ones to get you up and running.
Let’s get started!
Suggested reading: Advanced Custom Fields Tutorial: Your Ultimate Guide
Create Custom Post Types
A custom post type lets you create different sections for your website. WordPress comes with two default sections – posts and pages. Of course, we need a section to store our classic cars which we will add now.
I added a custom post type called Listings which is where I display all of my classic cars.
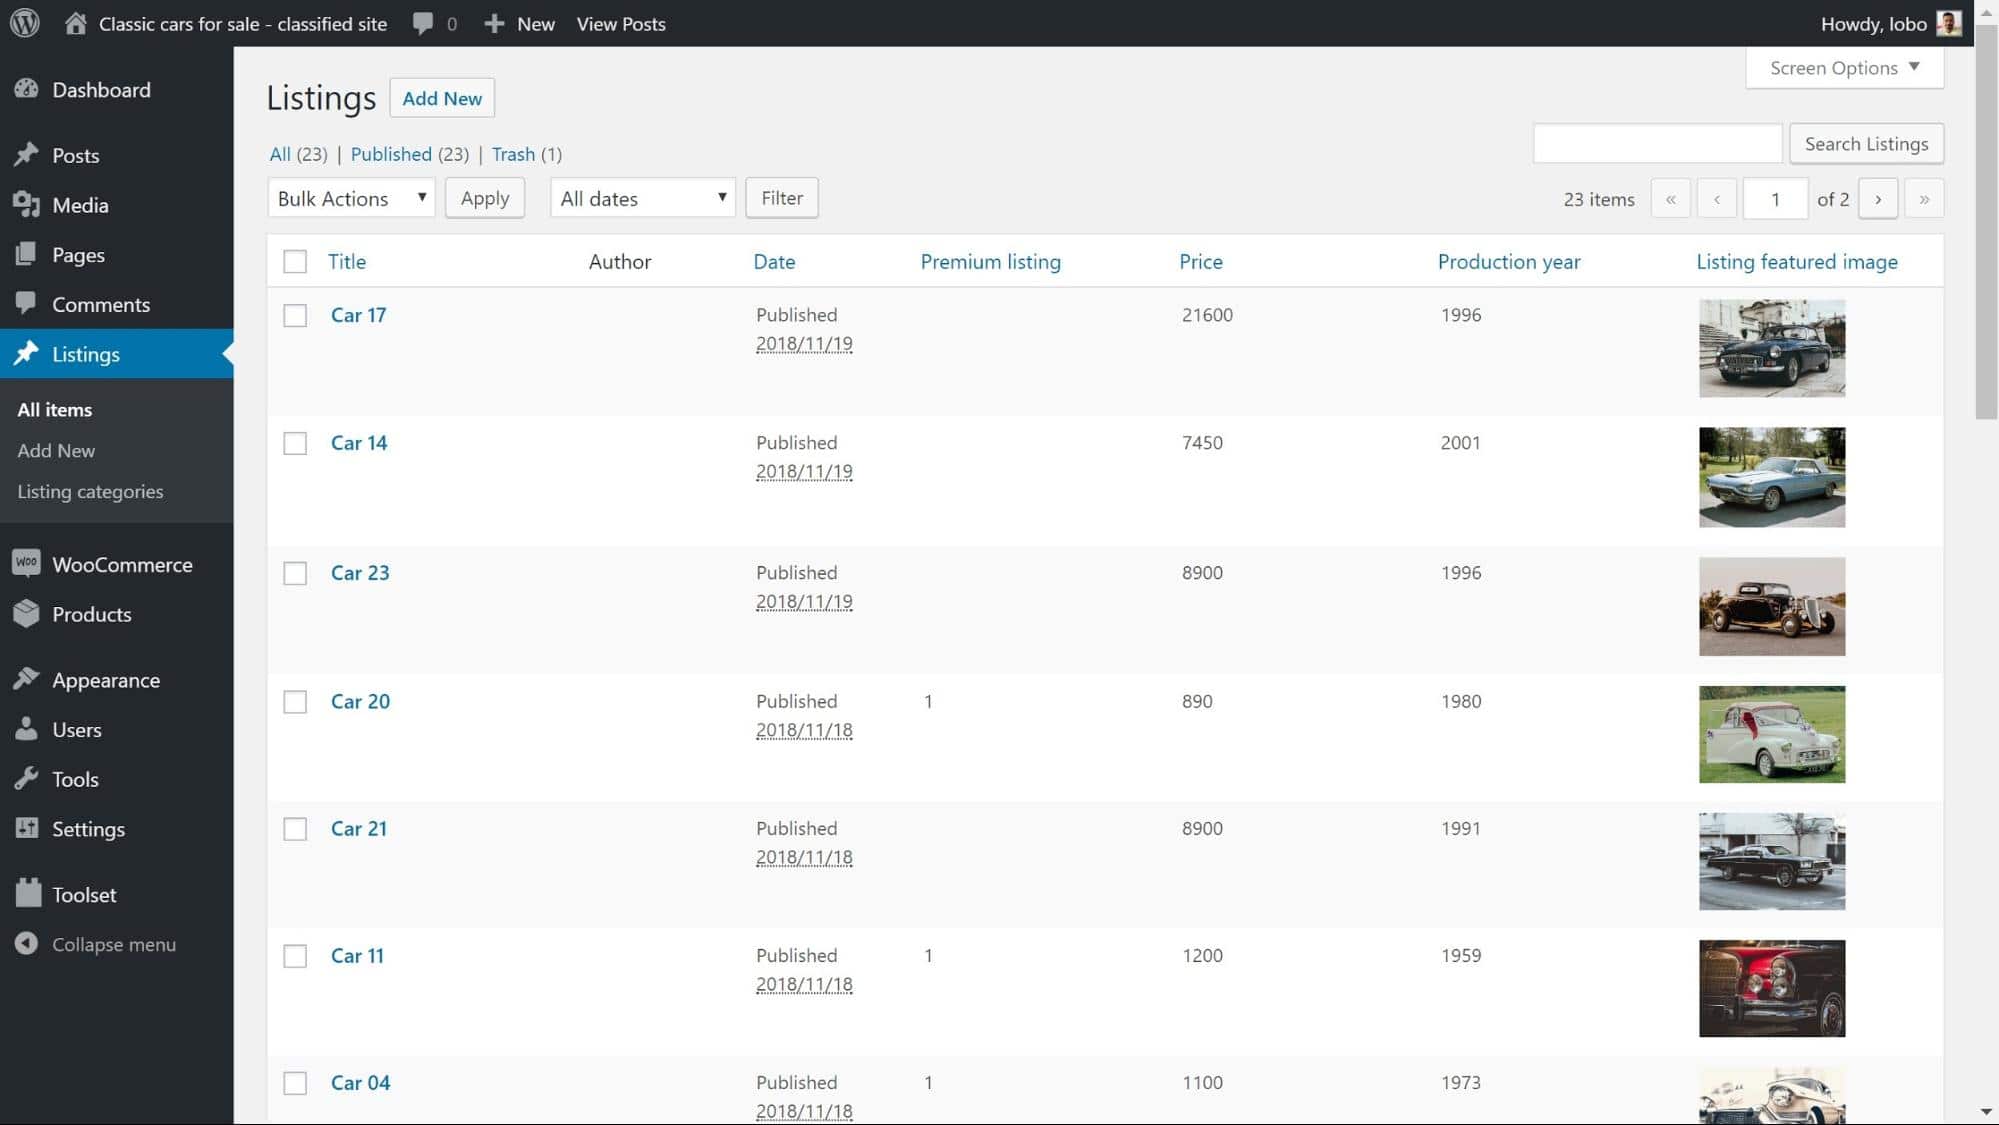
1. On your WordPress admin, head to Toolset dashboard and click Add new post type.
2. Enter the following in the Name and Description section:
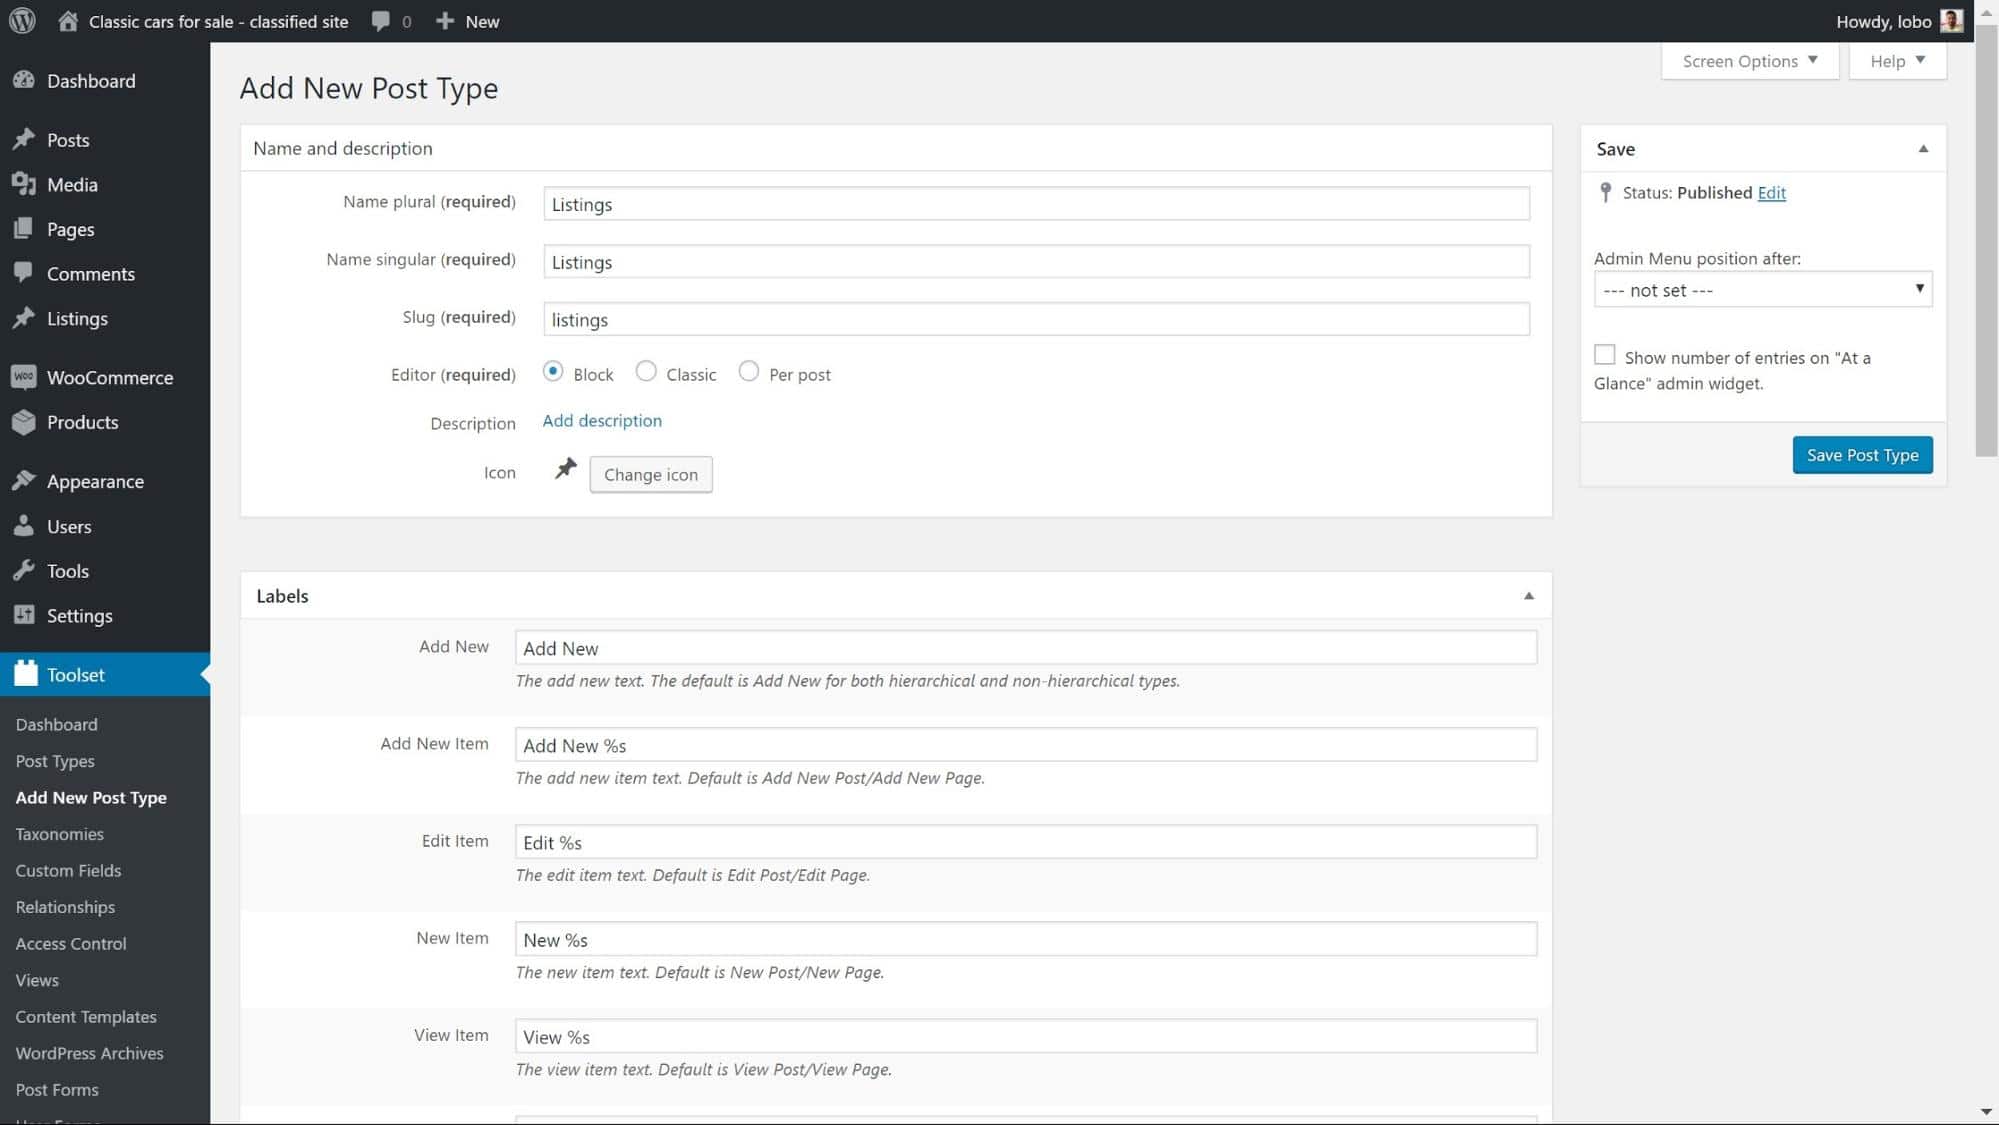
3. Click Save Post Type and your post type is ready.
Create Custom Fields
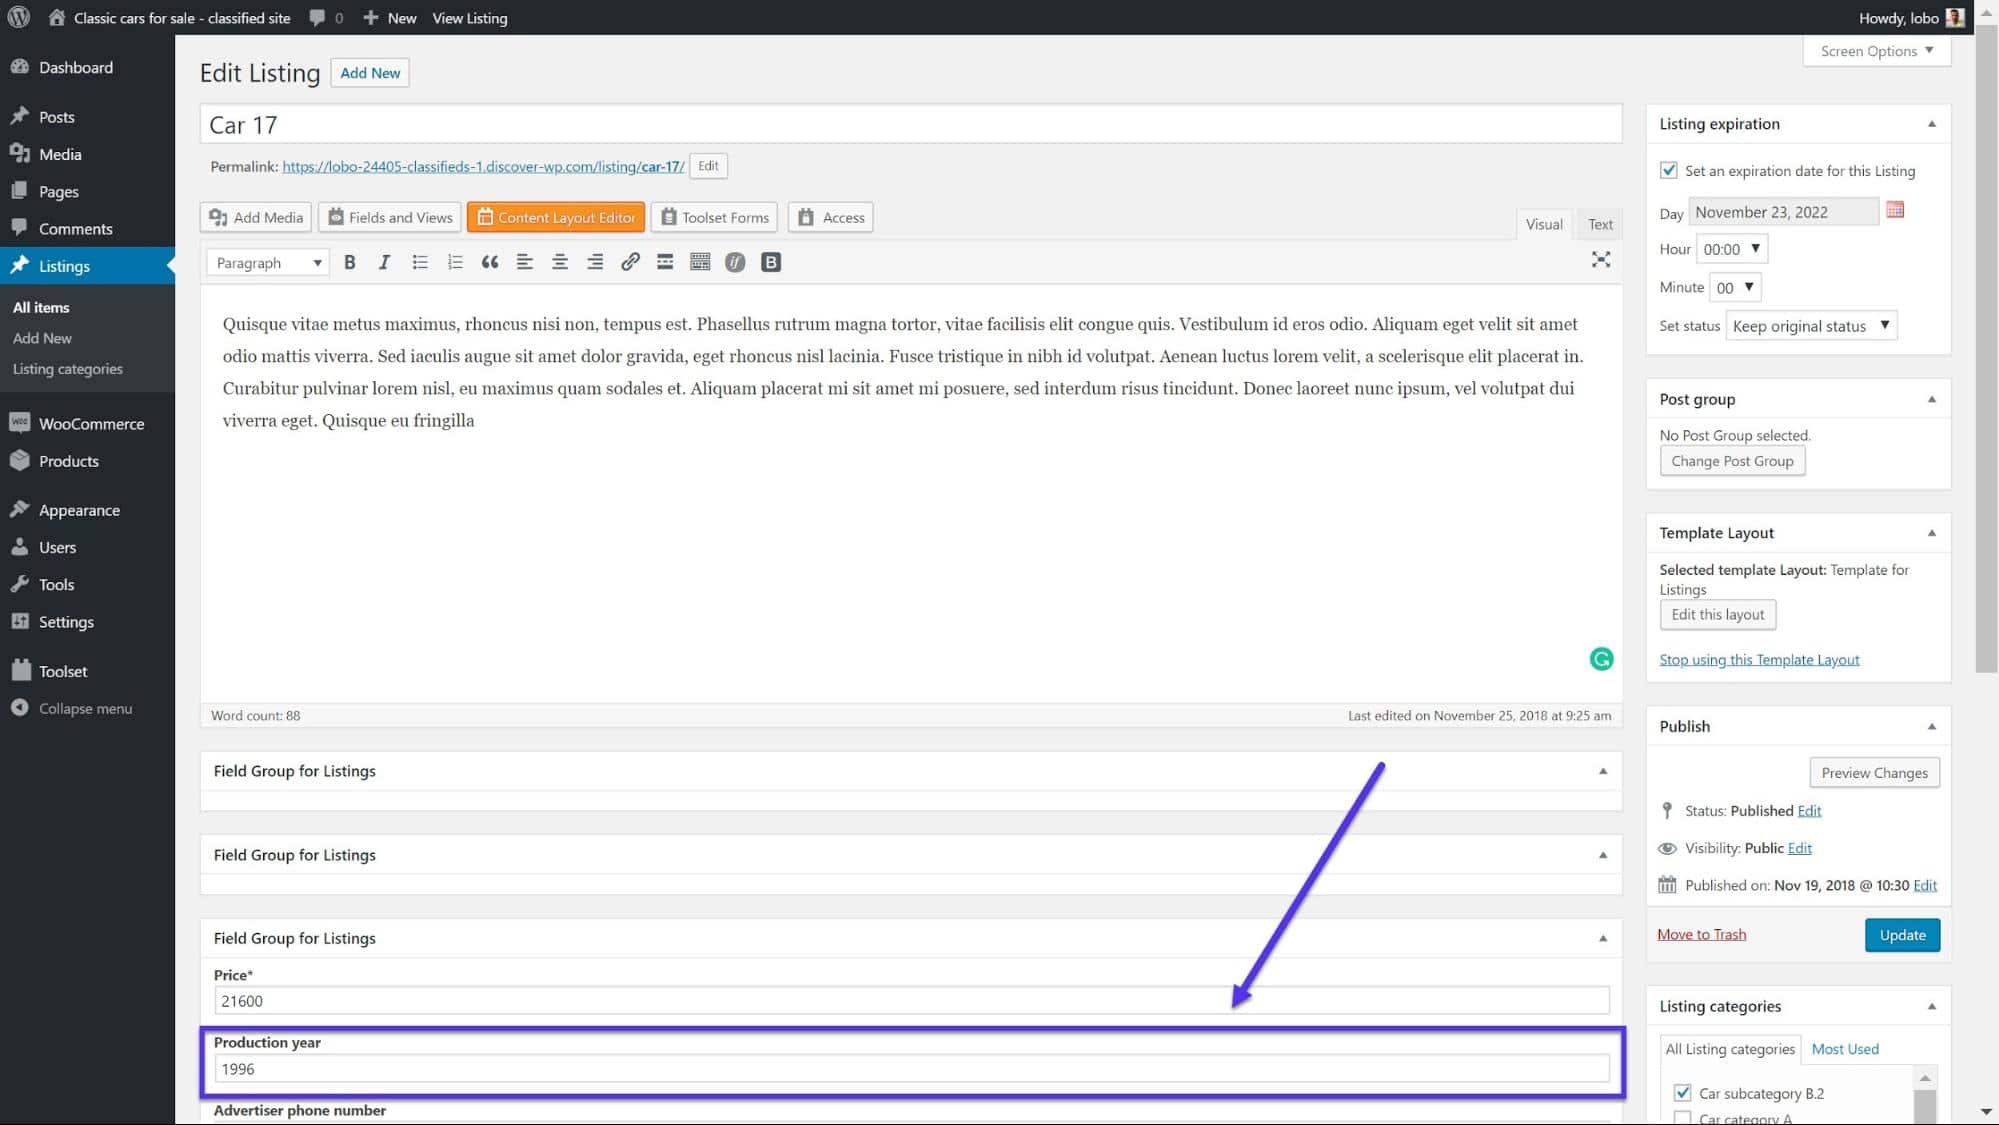
We use custom fields to store each of the pieces of information about our listings. In our classic cars example, we want to provide our users with the information they want to know about each of them.
This includes knowing the production year, the price, the make, the mileage and lots of other information. For each piece of information, we need to create a custom field. That way all we will need to do is fill in each section as we edit our listing and it will appear on the front-end (once we have created our template of course which we’ll get to later).
Here are the steps to creating a custom field for Production year:
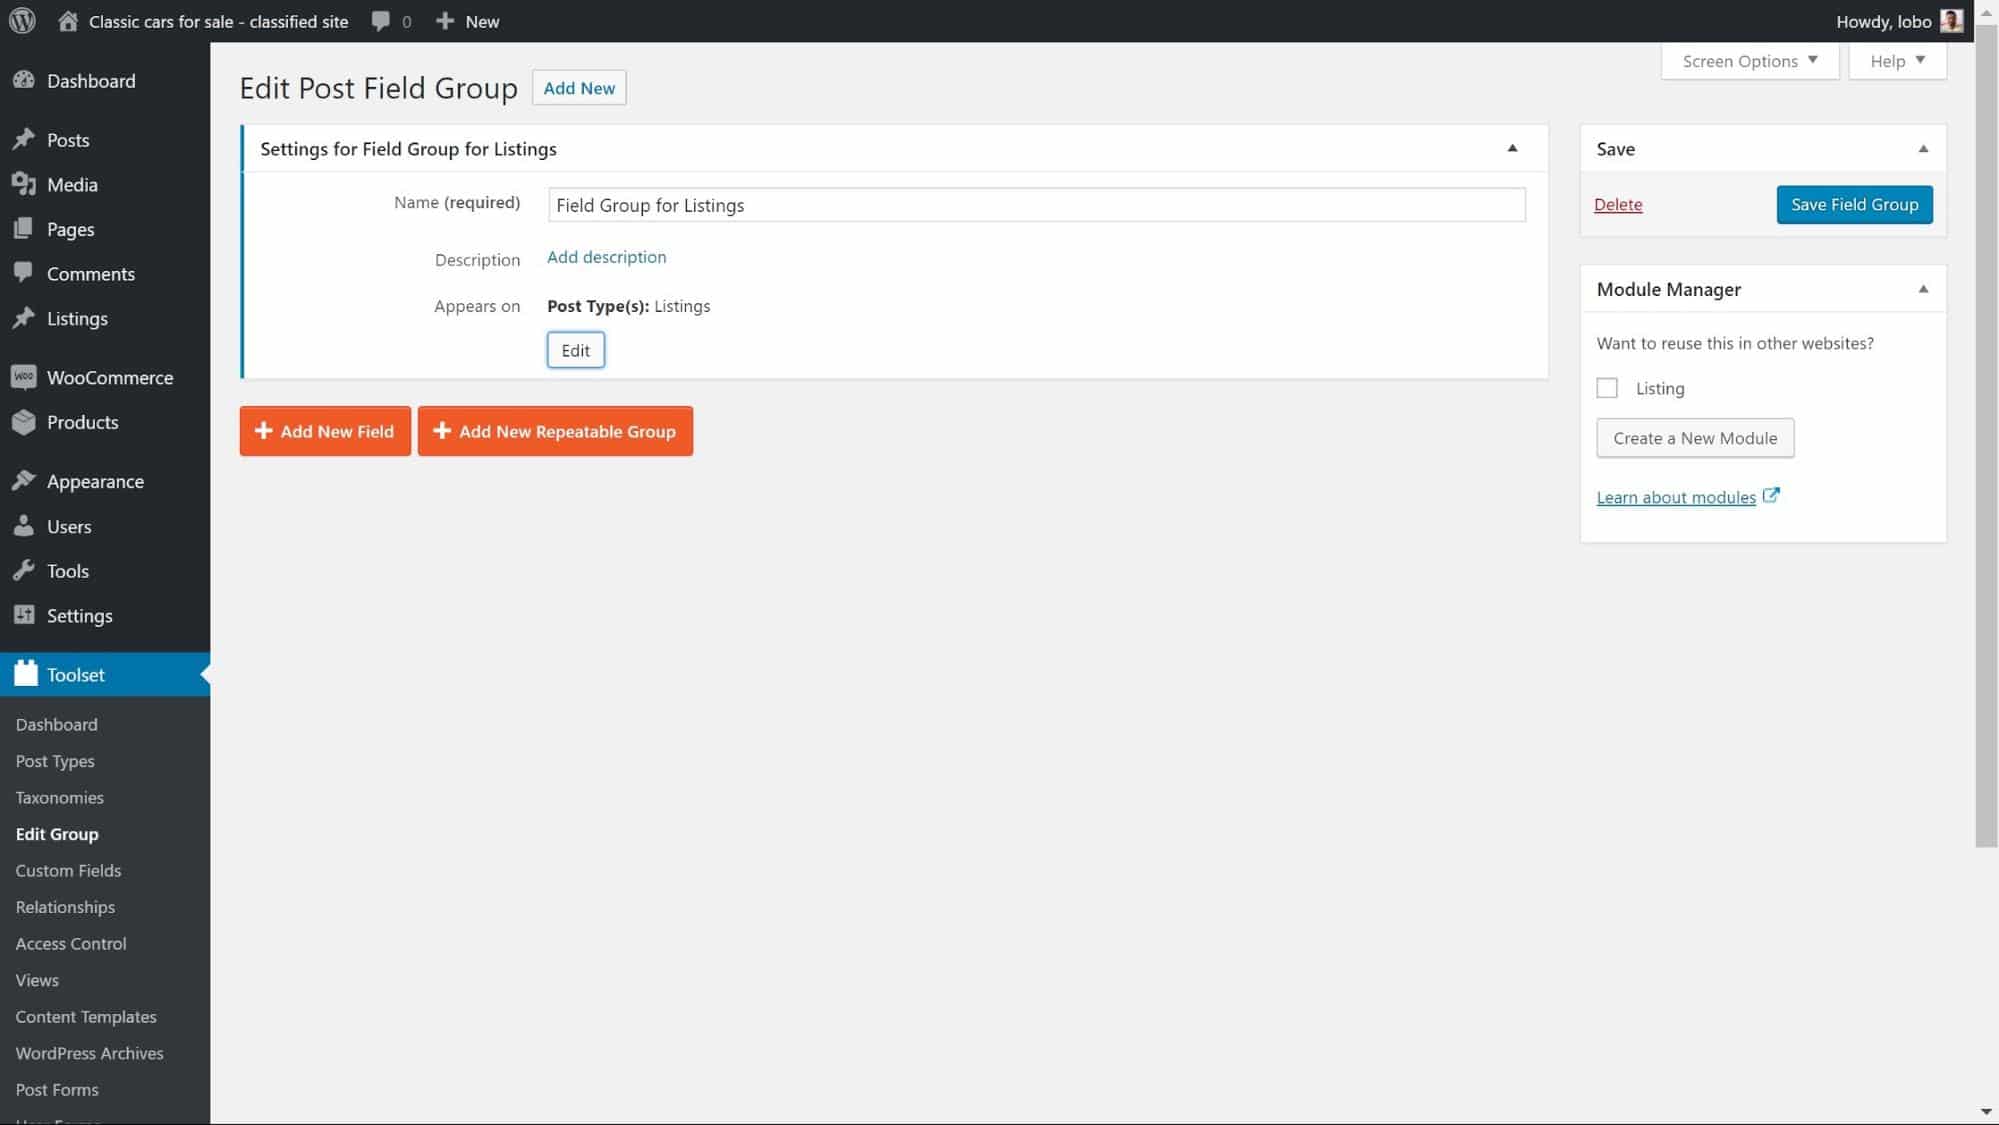
1. On the Toolset dashboard, click on Create field group next to your Listings custom post type.
2. On the next page enter a name for your field and a description if you feel it is necessary. I have named mine Field group for listings.
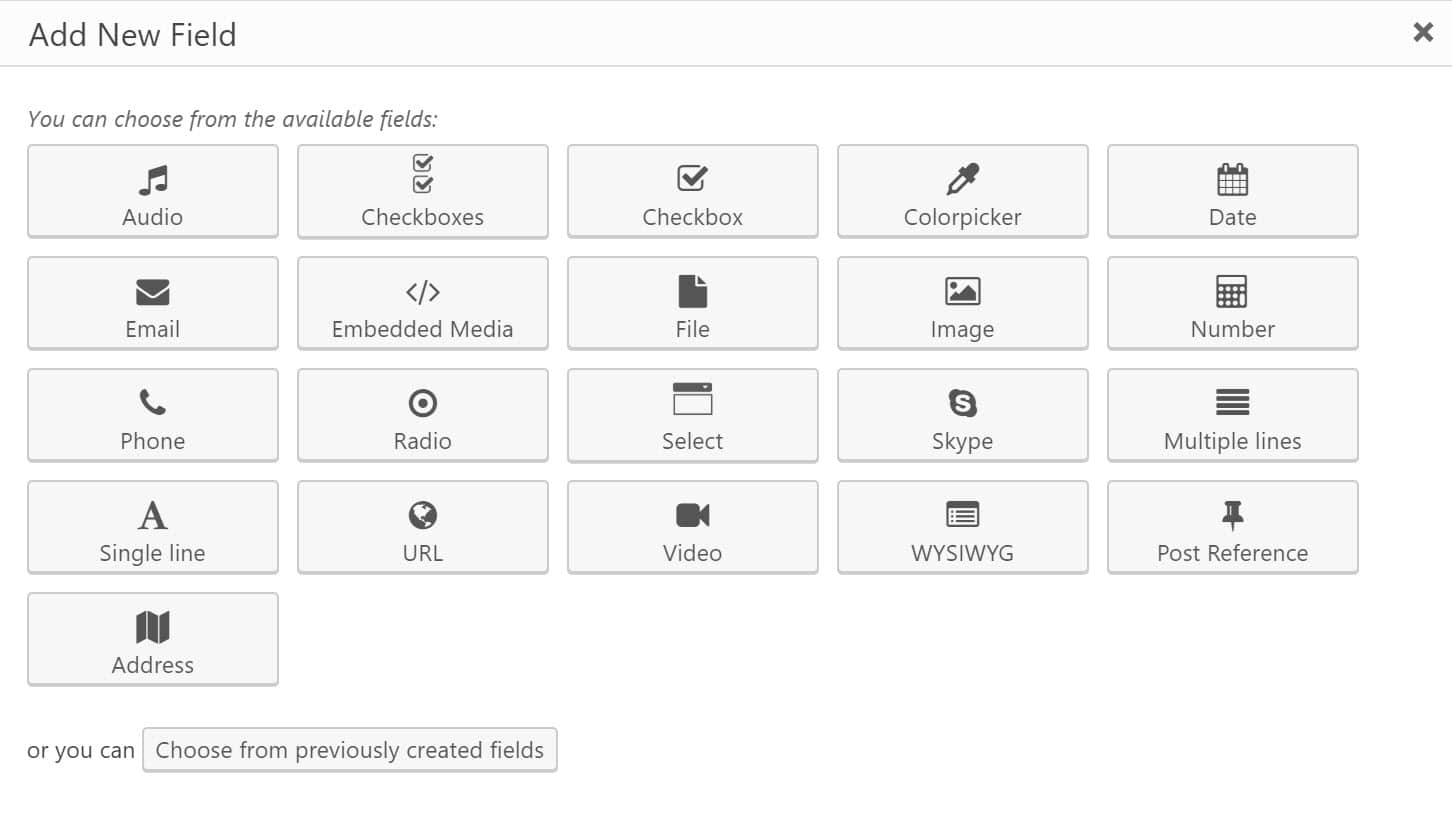
3. Click on Add New Field. You can now see a list of the different types of fields that you can add. For example, if you wanted to add a website you would select URL, for an address you would use Address or for a phone number Phone. The production year we will always display a year so we select Number.
4. Add in the details for your custom field including the Field name and the Field slug. I called mine Production year. The rest of the fields you can ignore for the purpose of this field.
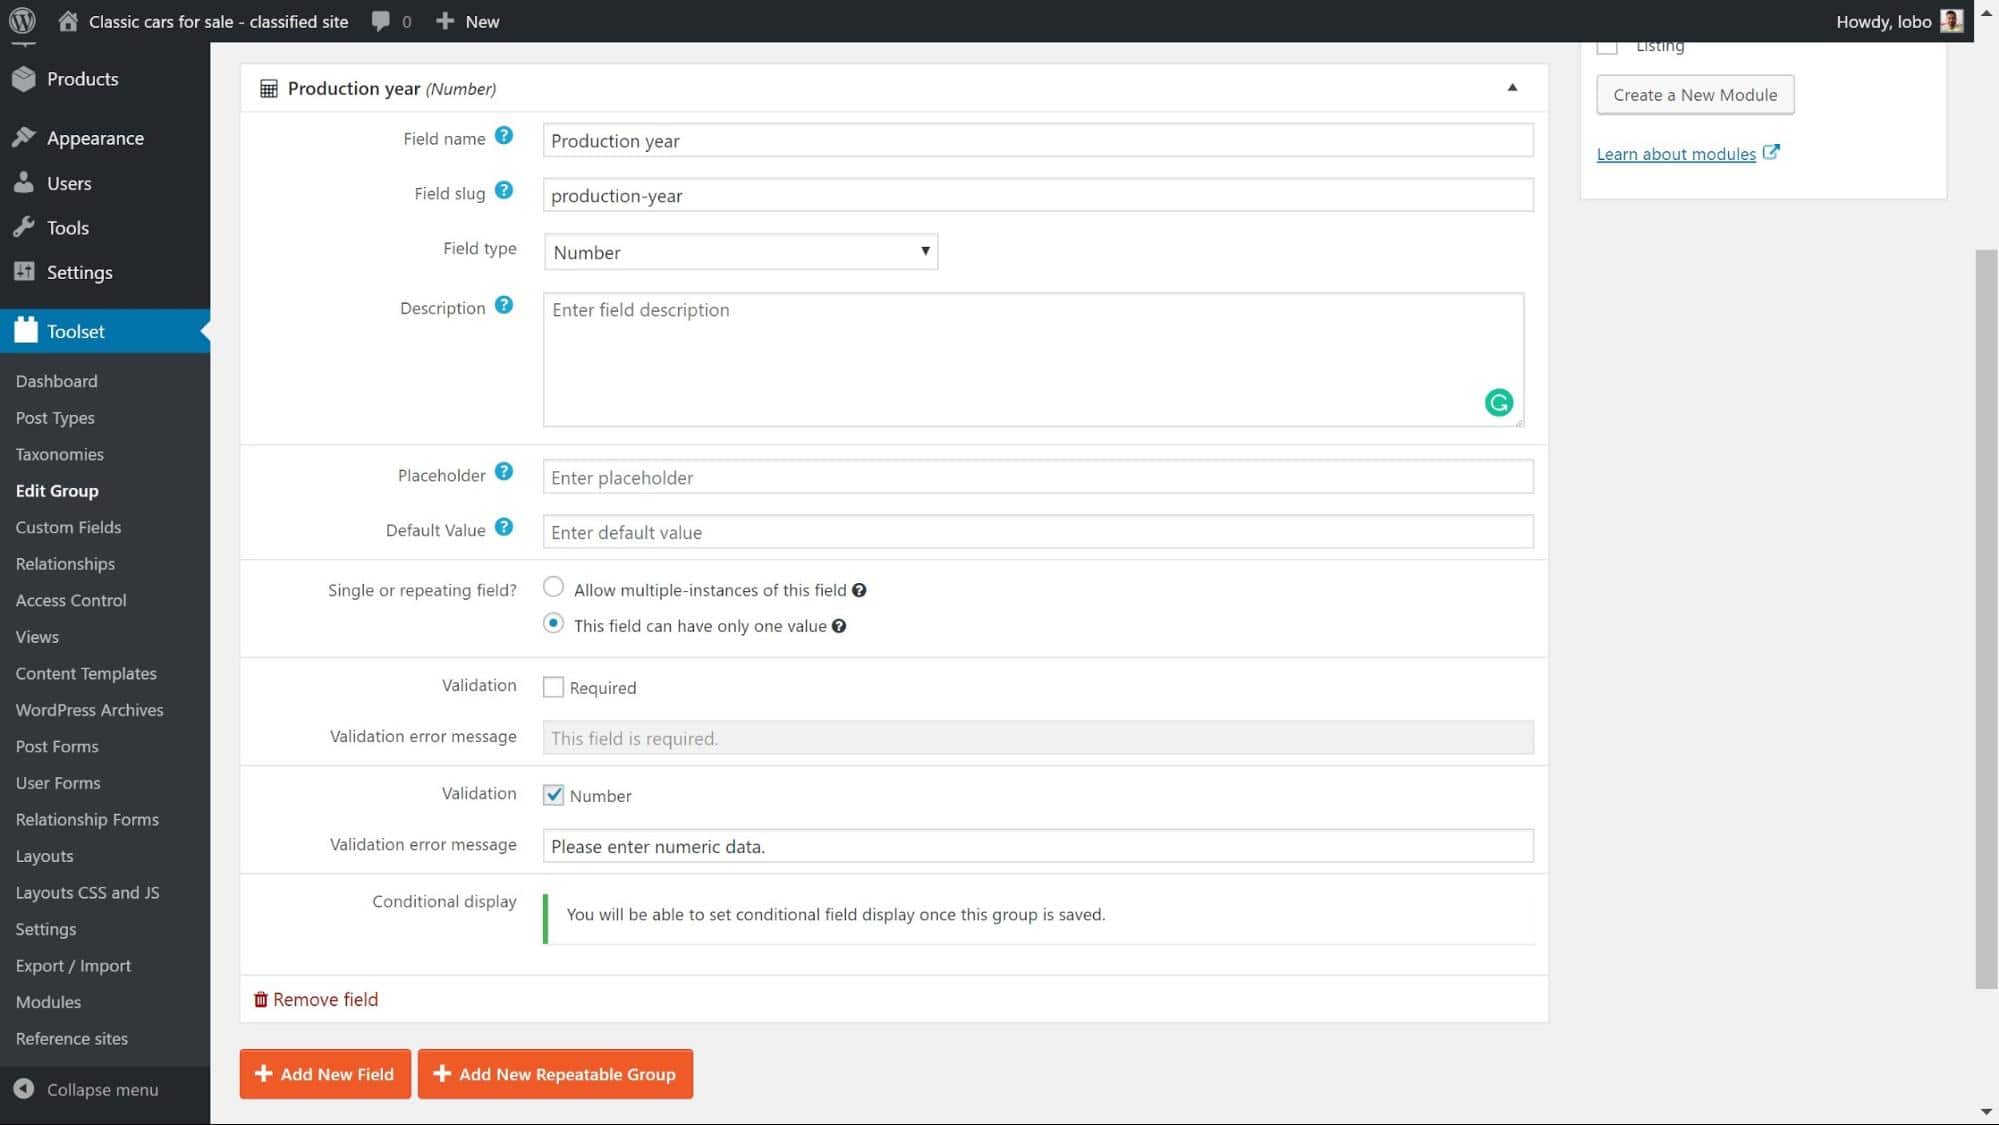
5. Click Save field group and the custom field will now appear while you edit your posts for your custom post type.
Create Custom Taxonomies
We use custom taxonomies to categorize our content. To illustrate, if we are listing restaurants then we might use taxonomies to separate each of our listings based on the cuisine. Therefore, we might have taxonomies for Indian, Italian, Chinese, Hamburgers and many other types of restaurants.
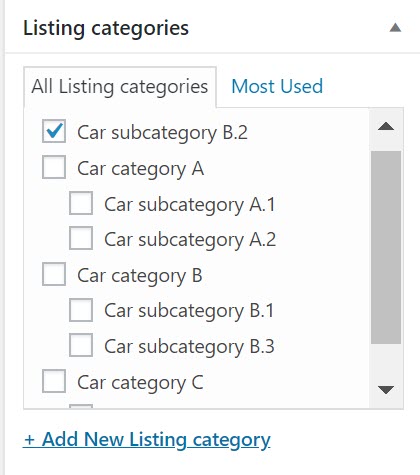
In my classic cars directory example, I have created taxonomies for the different types of cars which I am listing. Here are the categories that appear when I edit one of my Listings posts:
Here is how I made it:
1. On the Toolset Dashboard click on Add custom taxonomy
2. Enter the name of your taxonomy under Name and description:

3. In the next section called Taxonomy type choose whether you want a Hierarchical or Flat taxonomy. A Hierarchical taxonomy will contain a parent taxonomy (such as Italian food) and a series of child taxonomies related to it (such as pizza, pasta, ice cream). Meanwhile, a Flat taxonomy is simply a set of categories.
4. Select for which post type you want to assign these taxonomies. In my example, I have assigned them to the Listings custom post type.
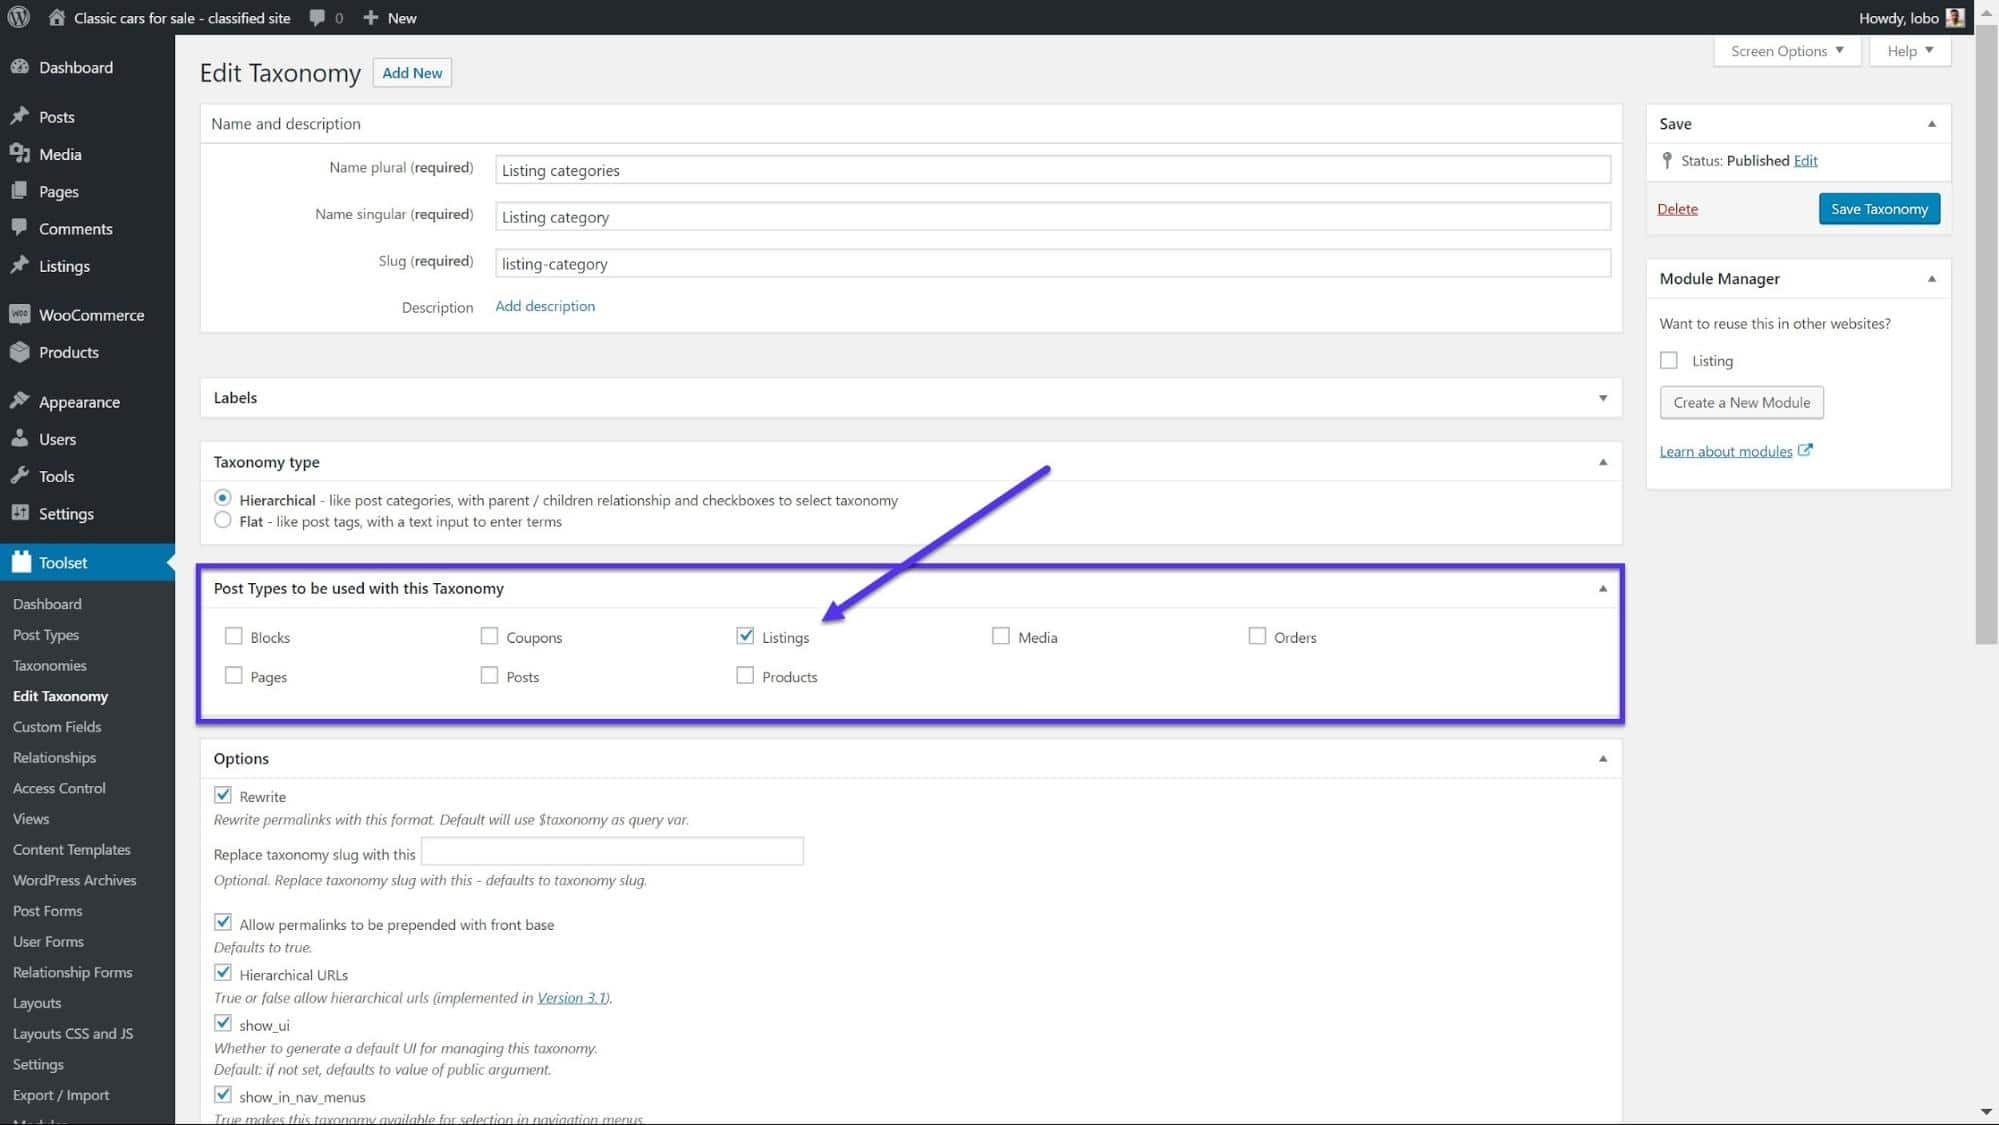
5. Click Save taxonomy
6. Return to your Listings post type and when you edit one of your post types or create a new one, you can start to add your taxonomy terms.
7. Under [Taxonomy name] categories click on Add New [Taxonomy name] category.
8. Type in the name of the new category. Here you can also select whether you want it to be a parent category if your taxonomies are hierarchical.
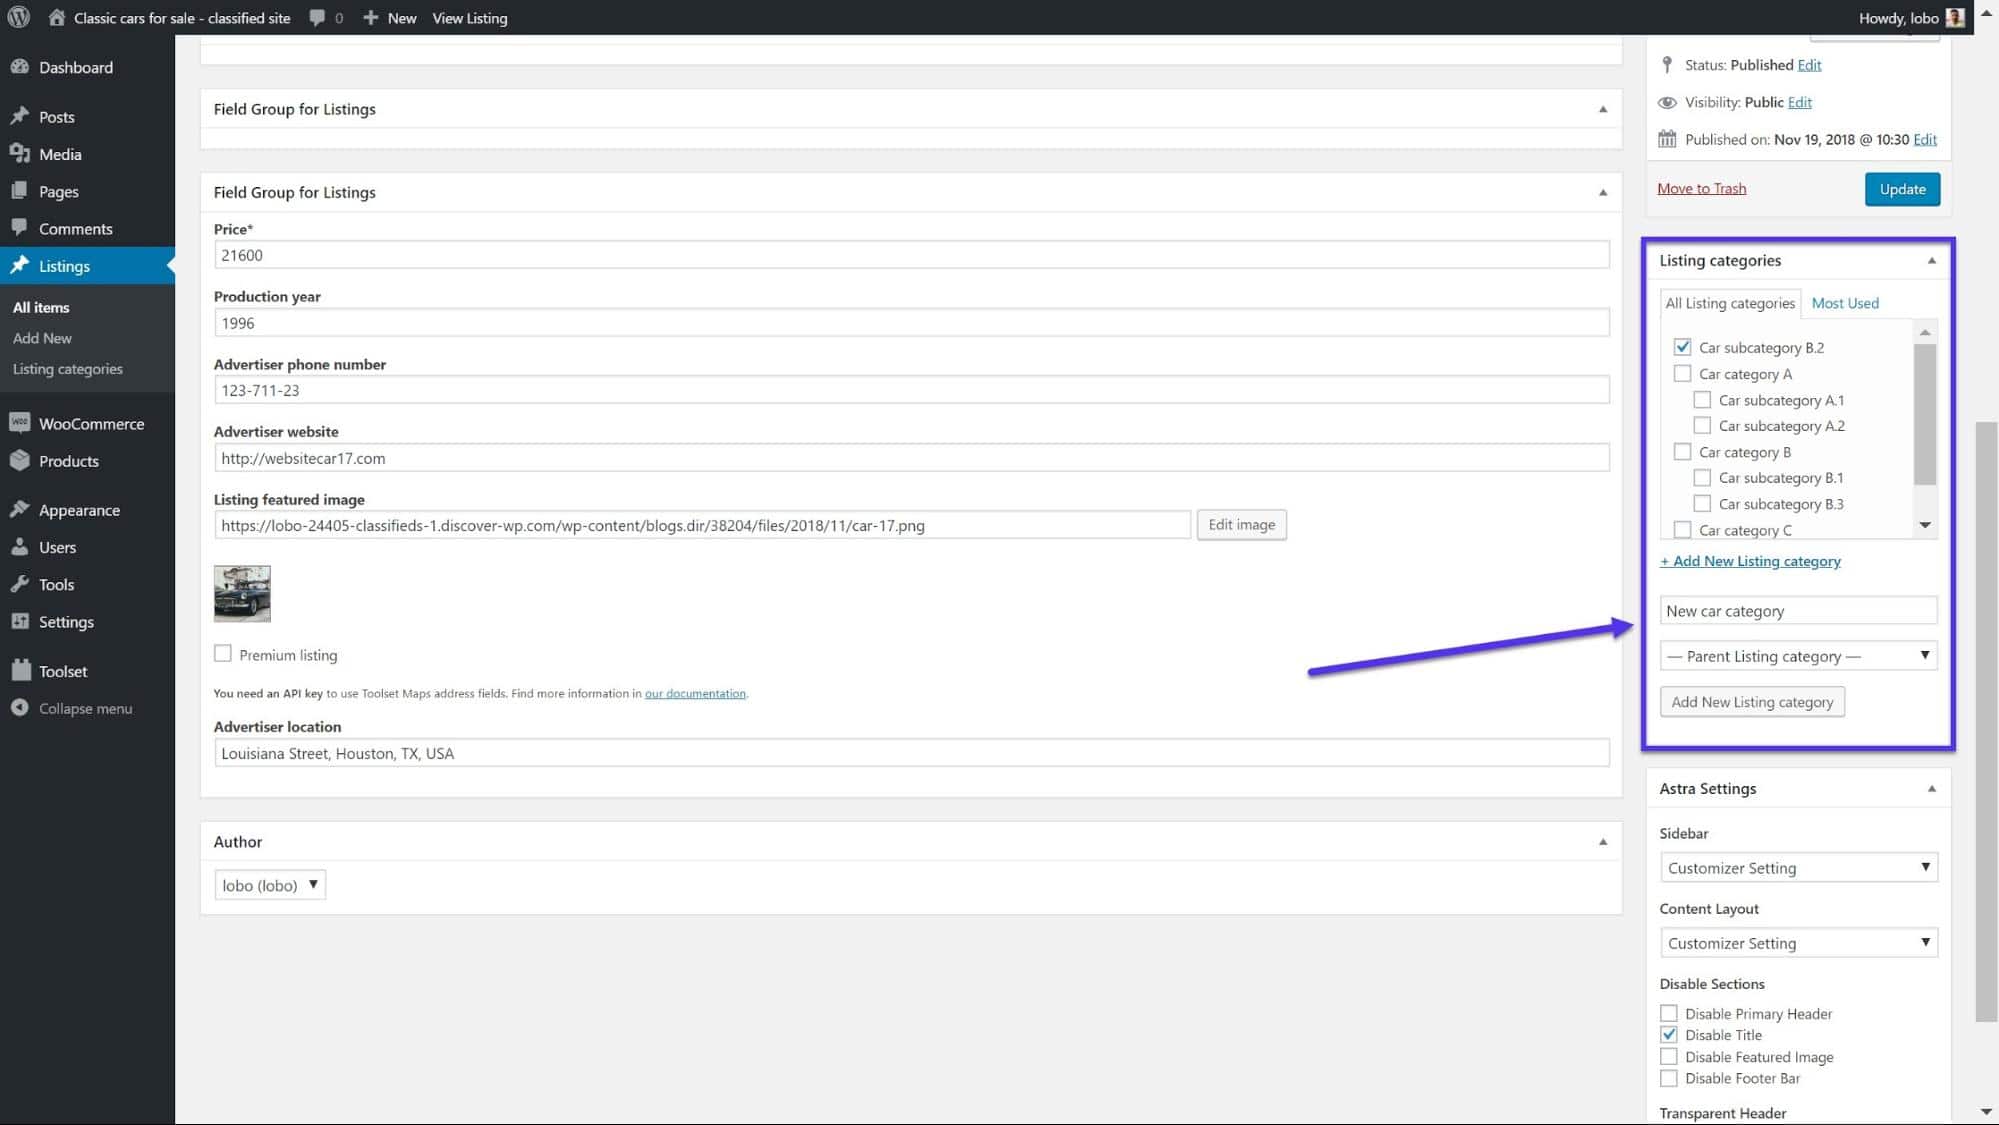
You can now use the checkboxes to assign taxonomy terms to each of your listings.
A Template to Display Each of Our Items
Now that we have added our custom types, the next question is how do we display it on the front-end? To do this we can create a template for each of our listings.
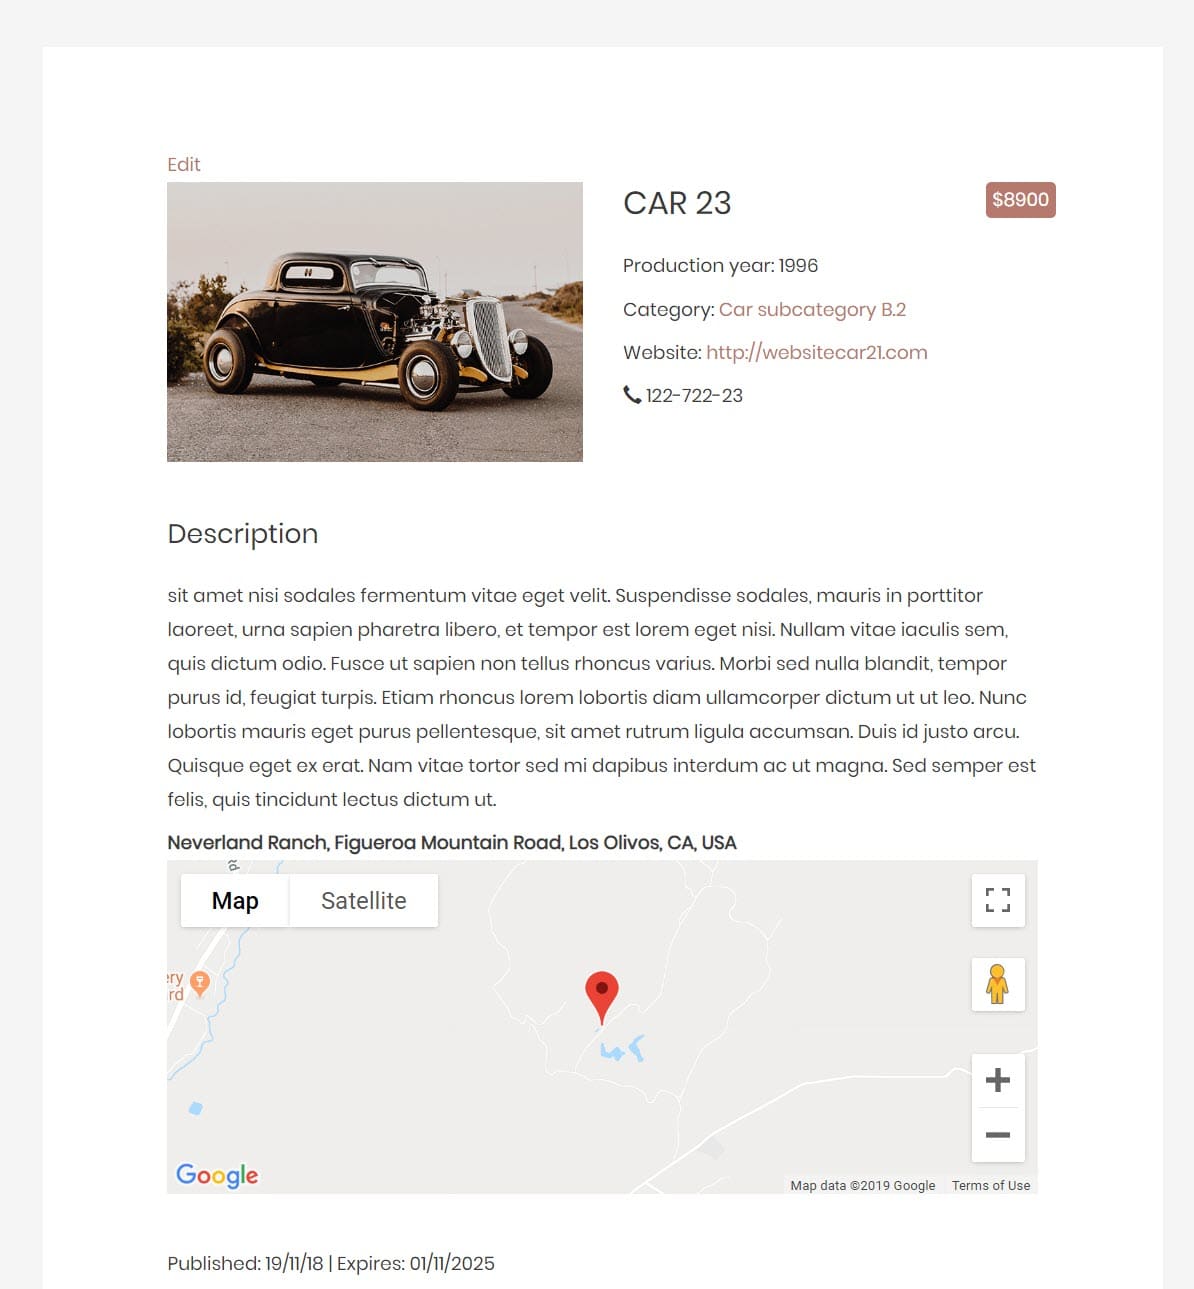
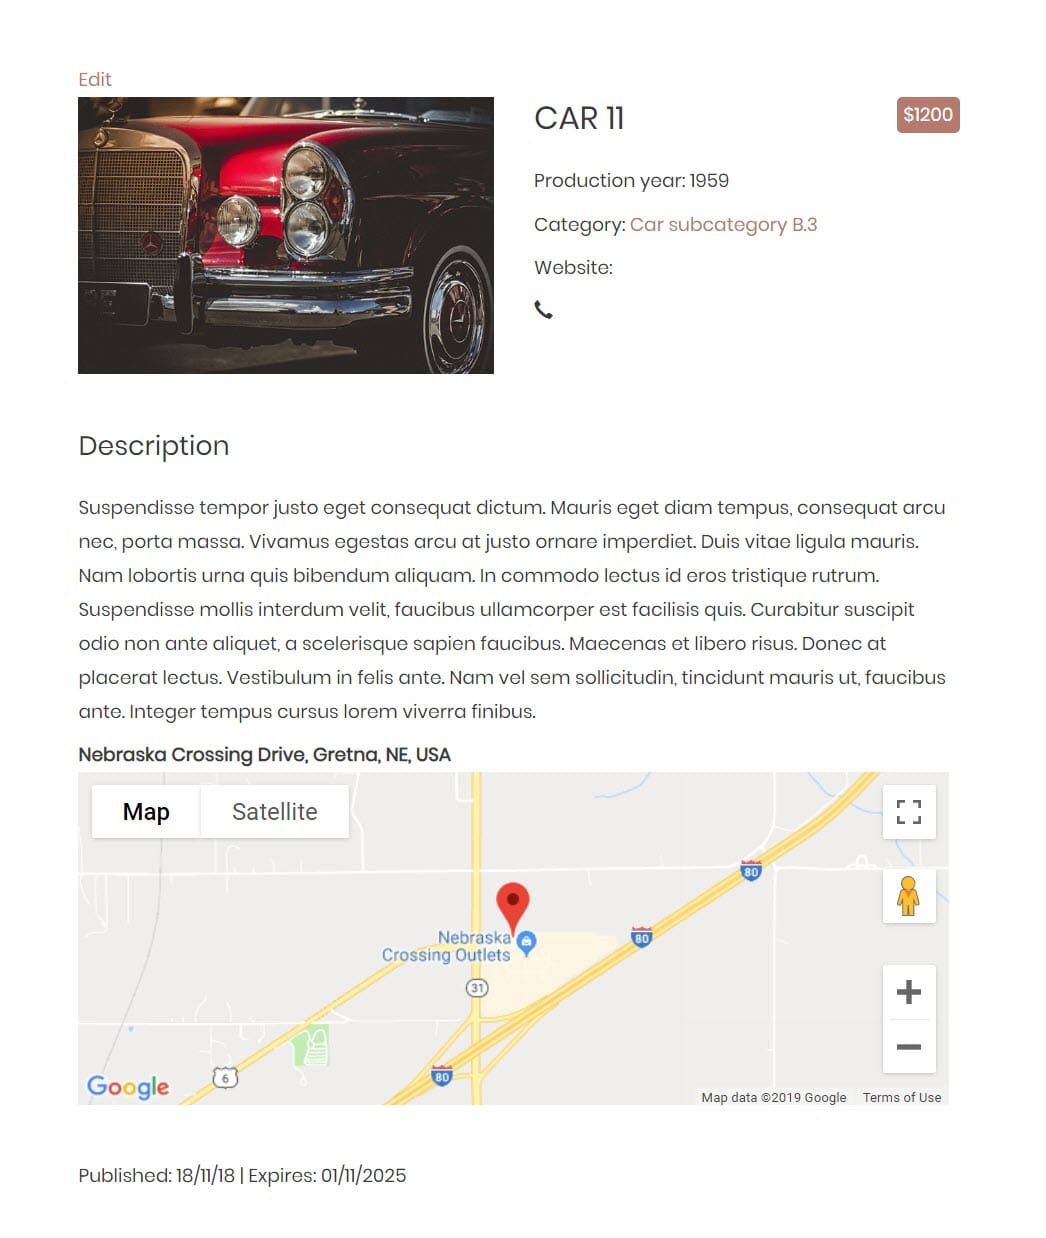
Here is how my template looks on the front-end for each of my classic cars listings:
1. Go to Toolset Dashboard and click Create template next to your custom post type. This will open the Toolset Layouts drag and drop editor where we can arrange where we want to display the content.
Before we continue, a quick aside to explain how Layouts works and what are some of the cells we need to use.
Toolset Layout is based on the Bootstrap grid which displays your page in rows of 12 columns. This means, for example, if you want to display an image on the left-hand side of the page you will select the first six columns on left for it to go.
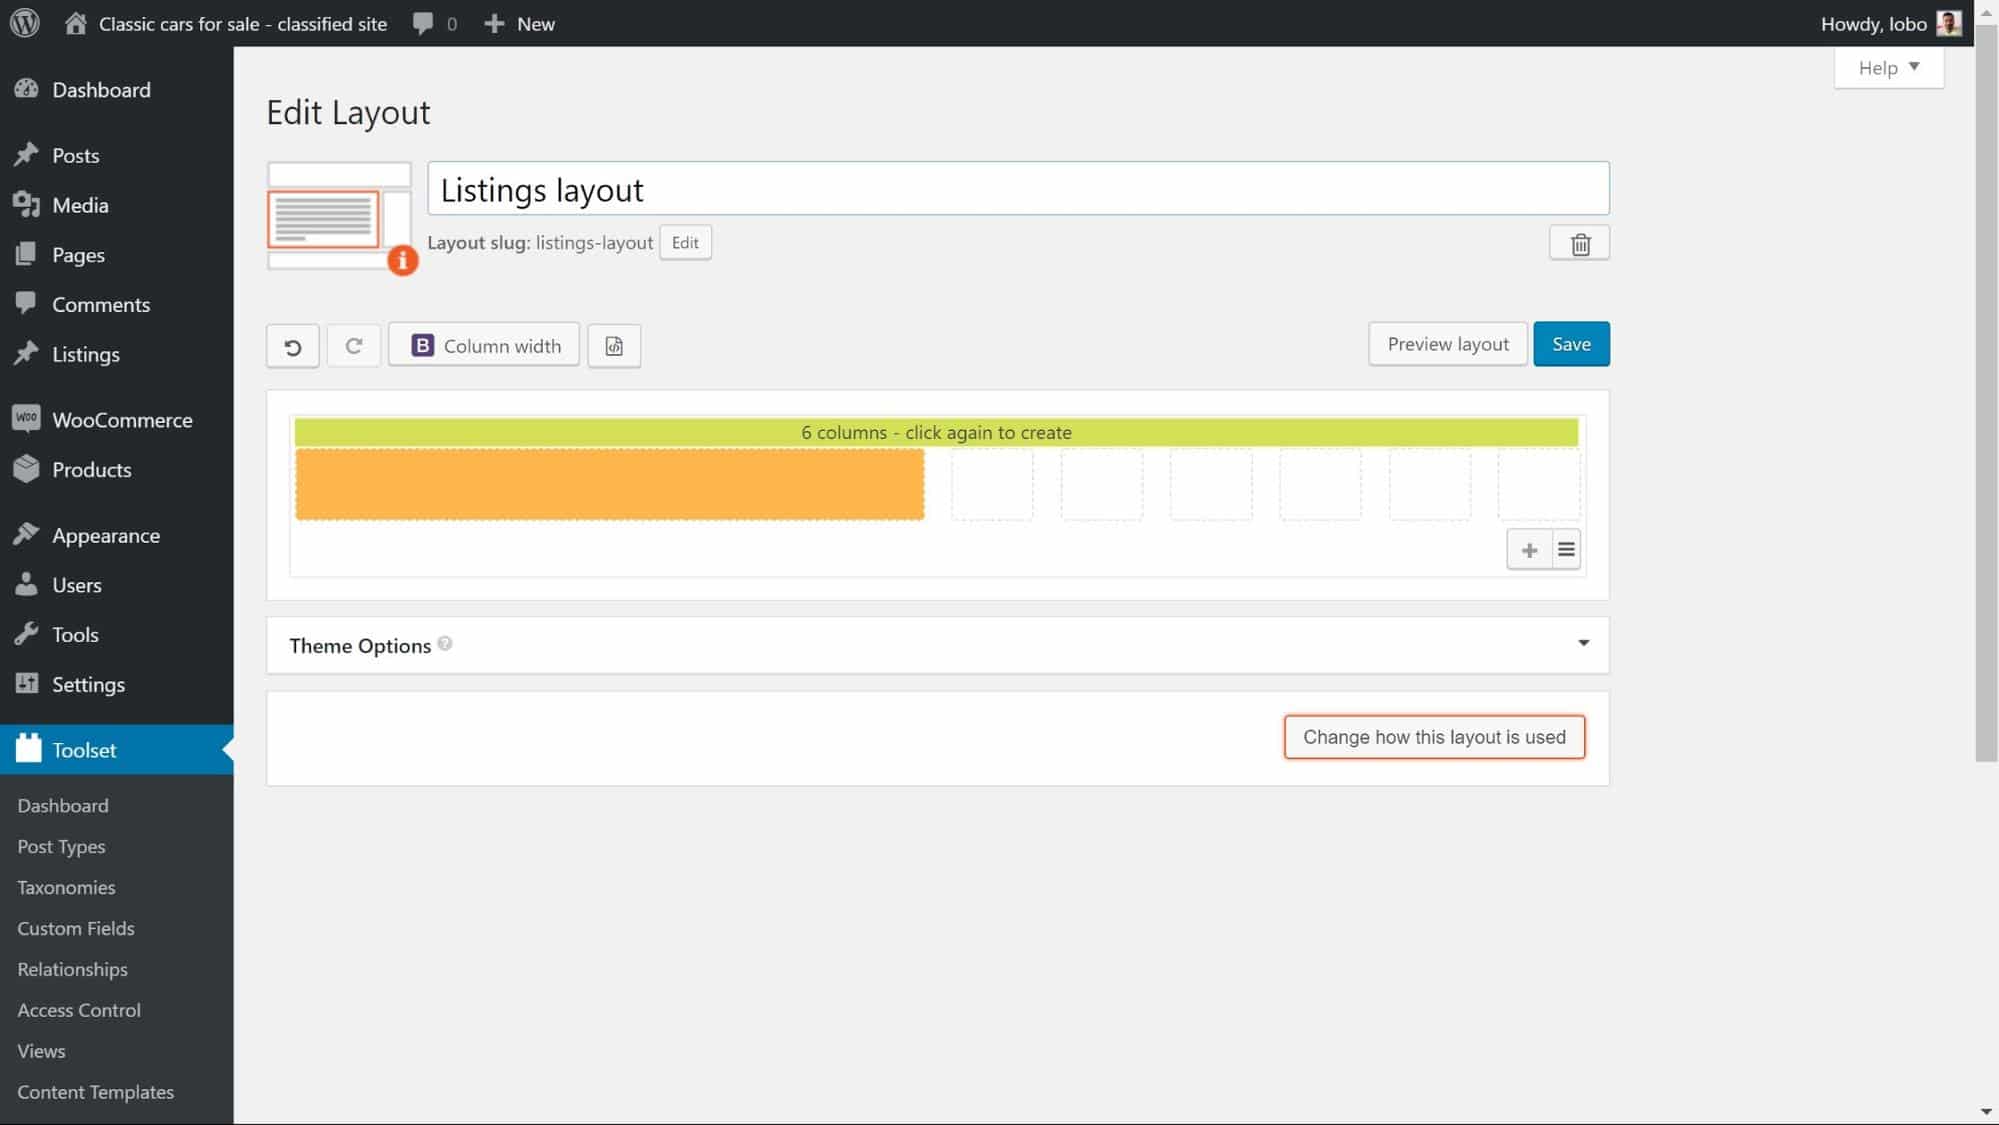
You can use the + button to add more rows to your template.
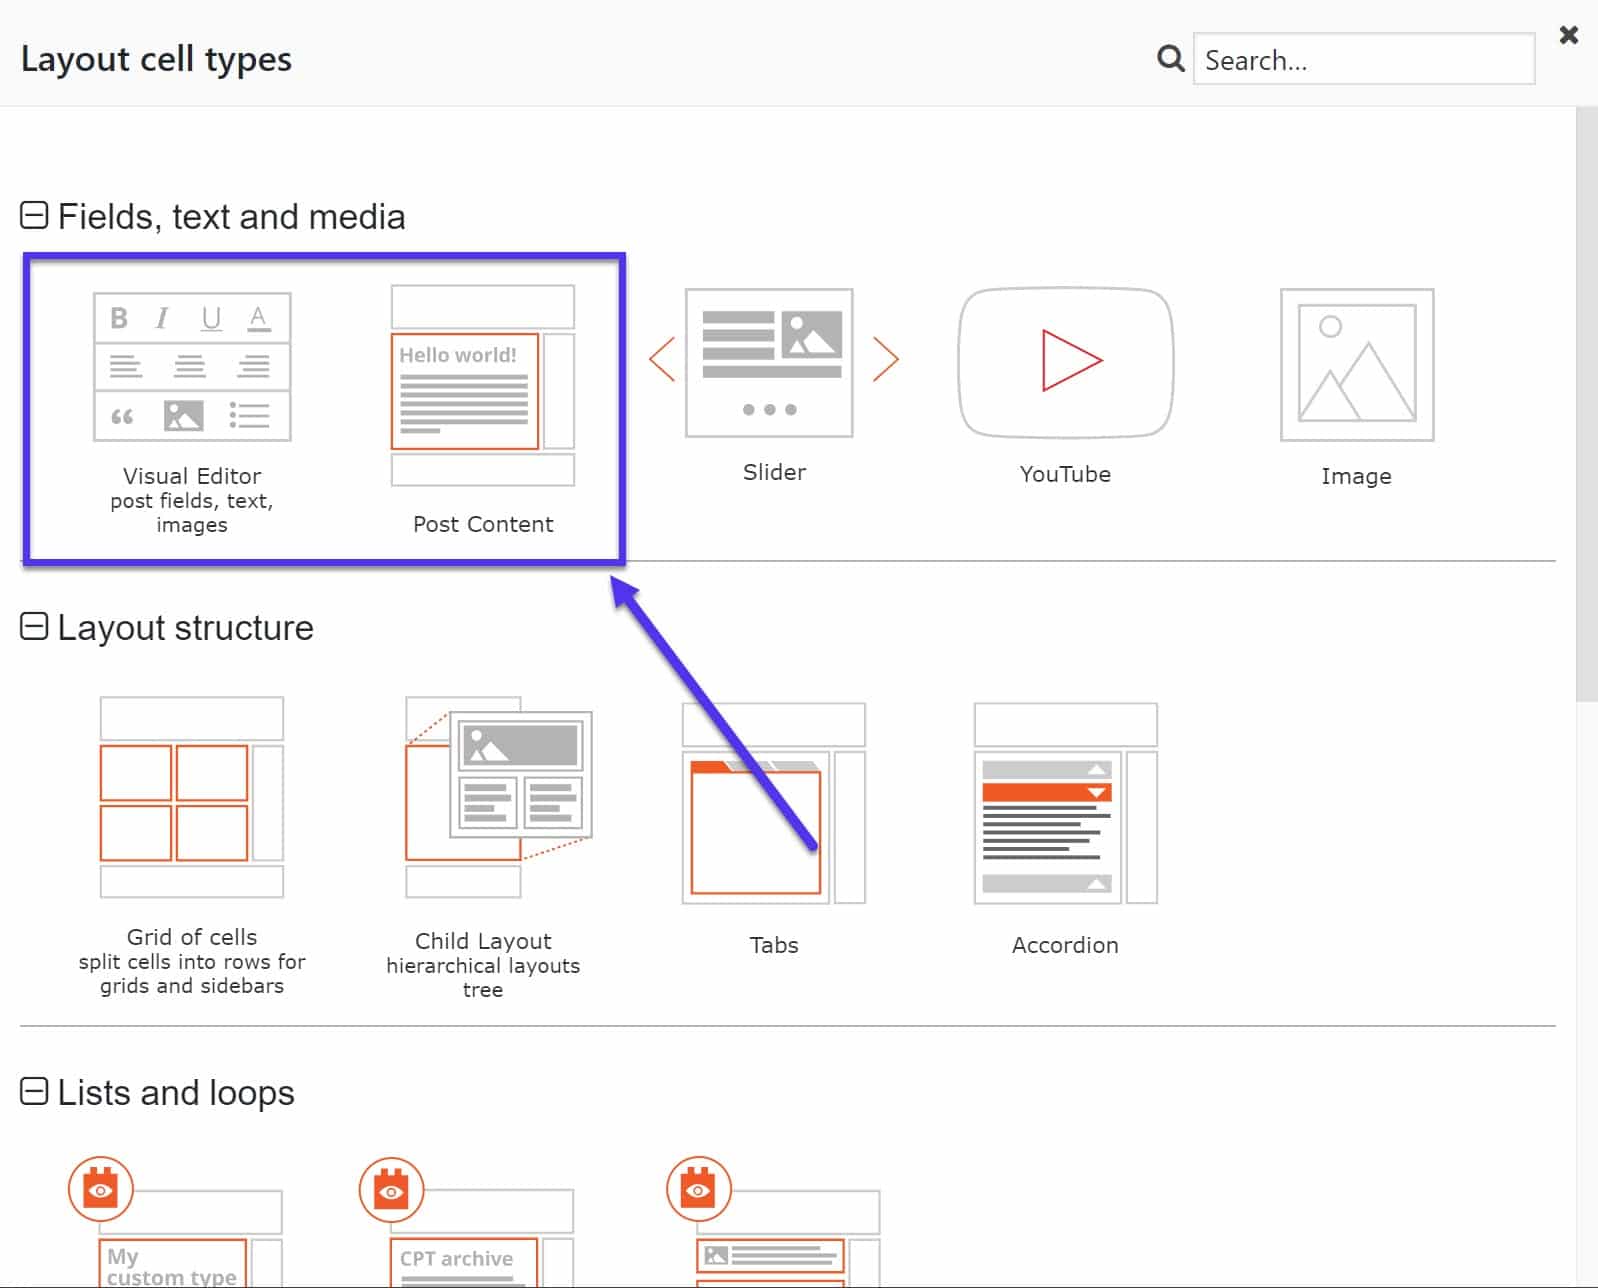
When you select the cells in which you want to display content there are two types of cells which are relevant for this particular task.
- The visual editor – To add brand new text or insert shortcodes for our custom fields and taxonomies. This is the one we would use to insert the custom types we have already made.
- The post content – To add any content that comes from your post body. For example, in my post type for my classic cars, I will insert this cell to display the description of each car which I have entered on the edit page.
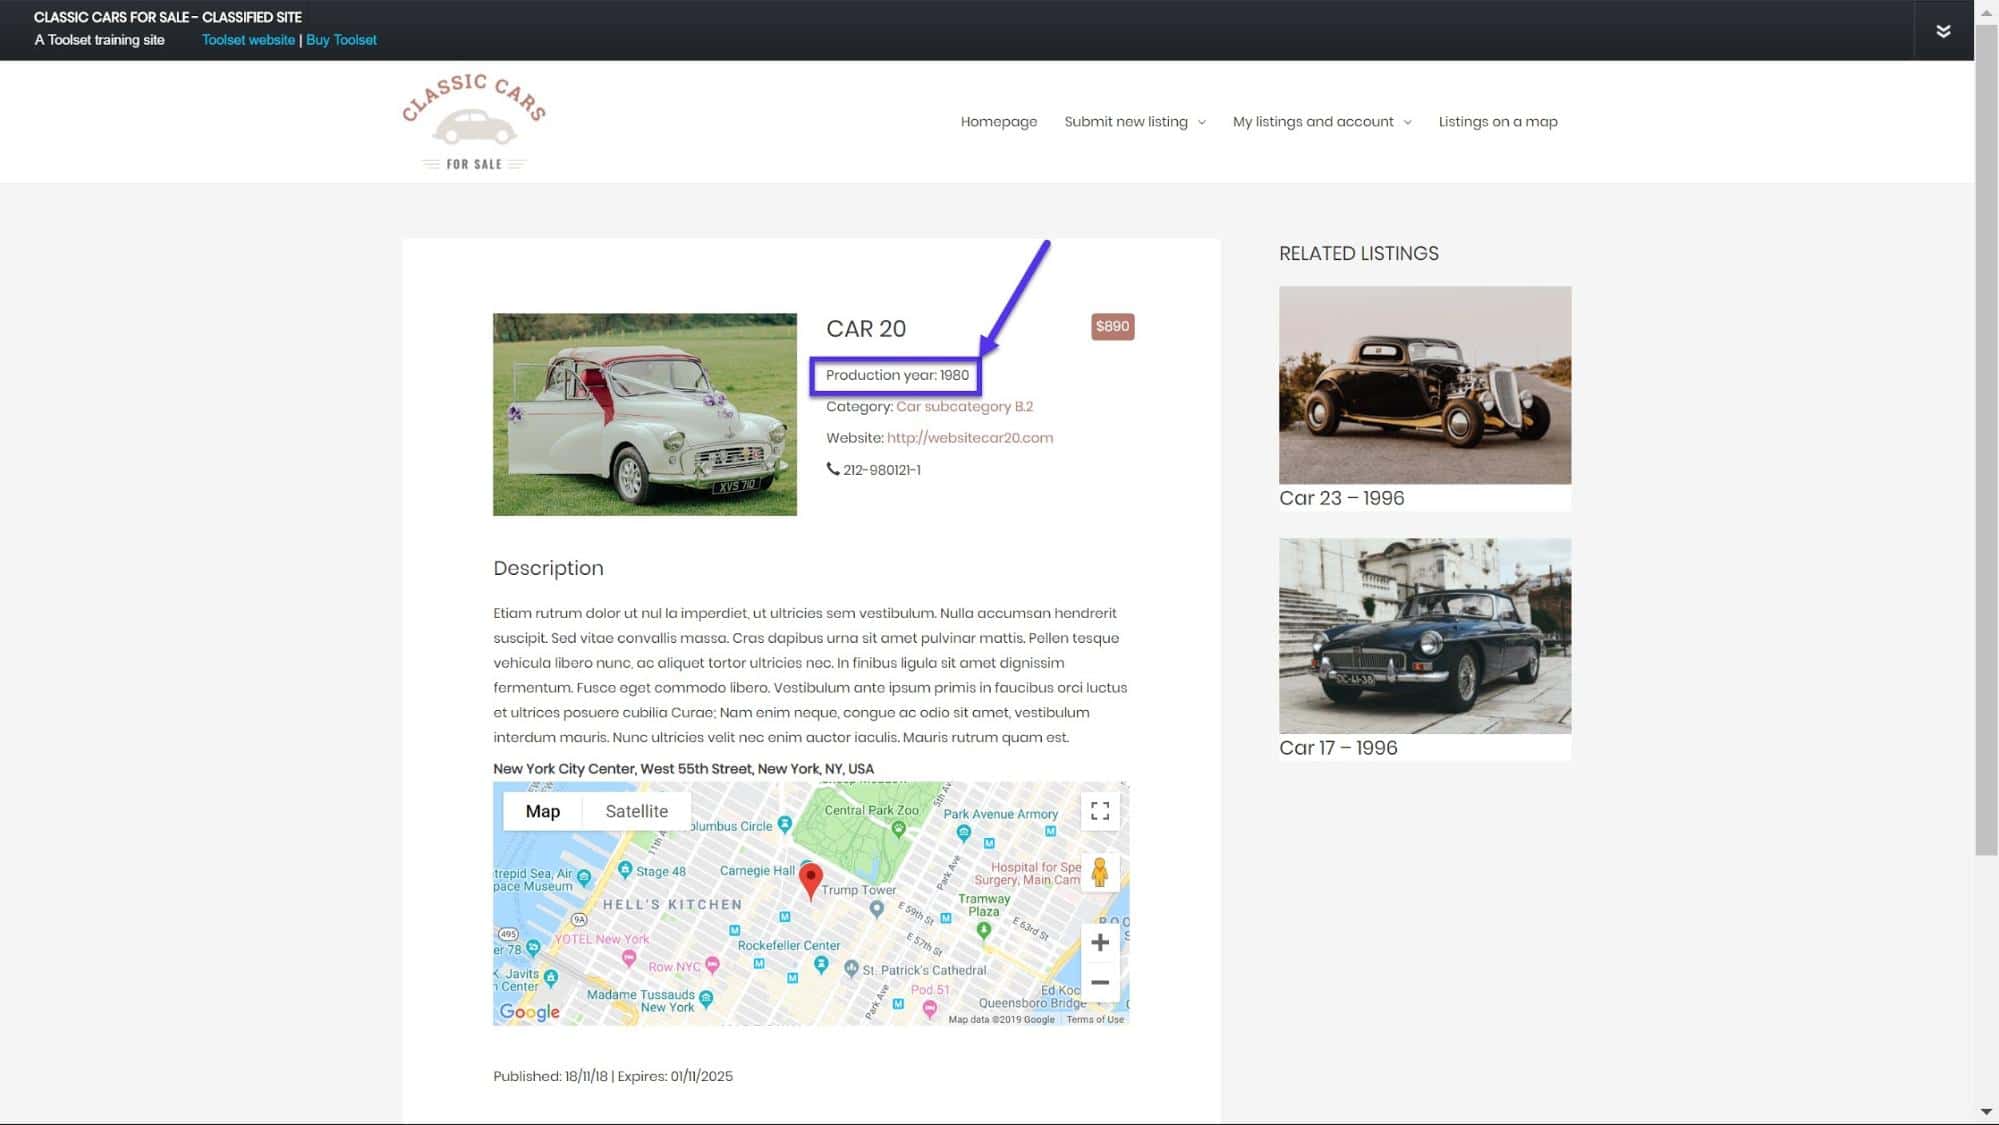
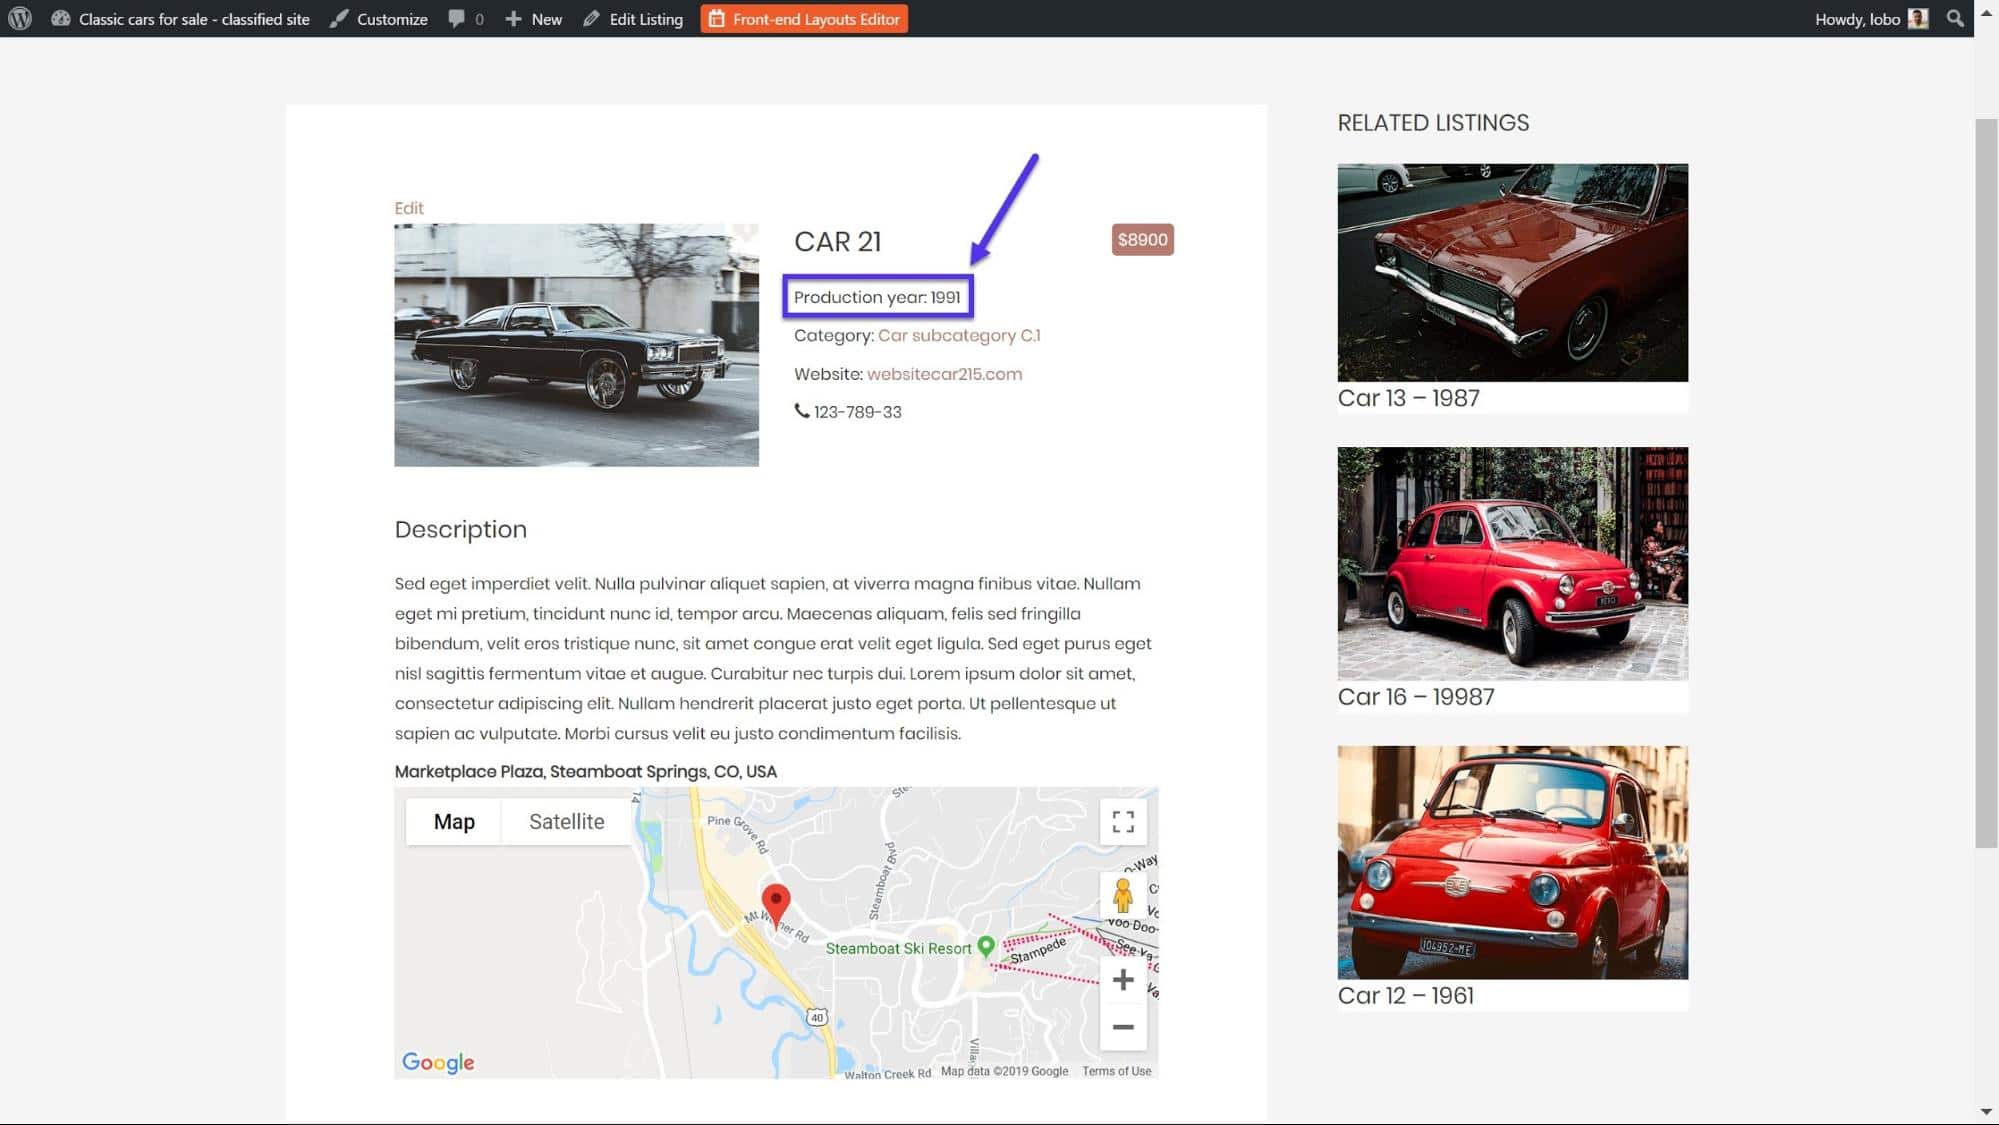
Now we can resume. Let’s continue by showing how I displayed the custom field for Production year which you can see in the image below of my template:
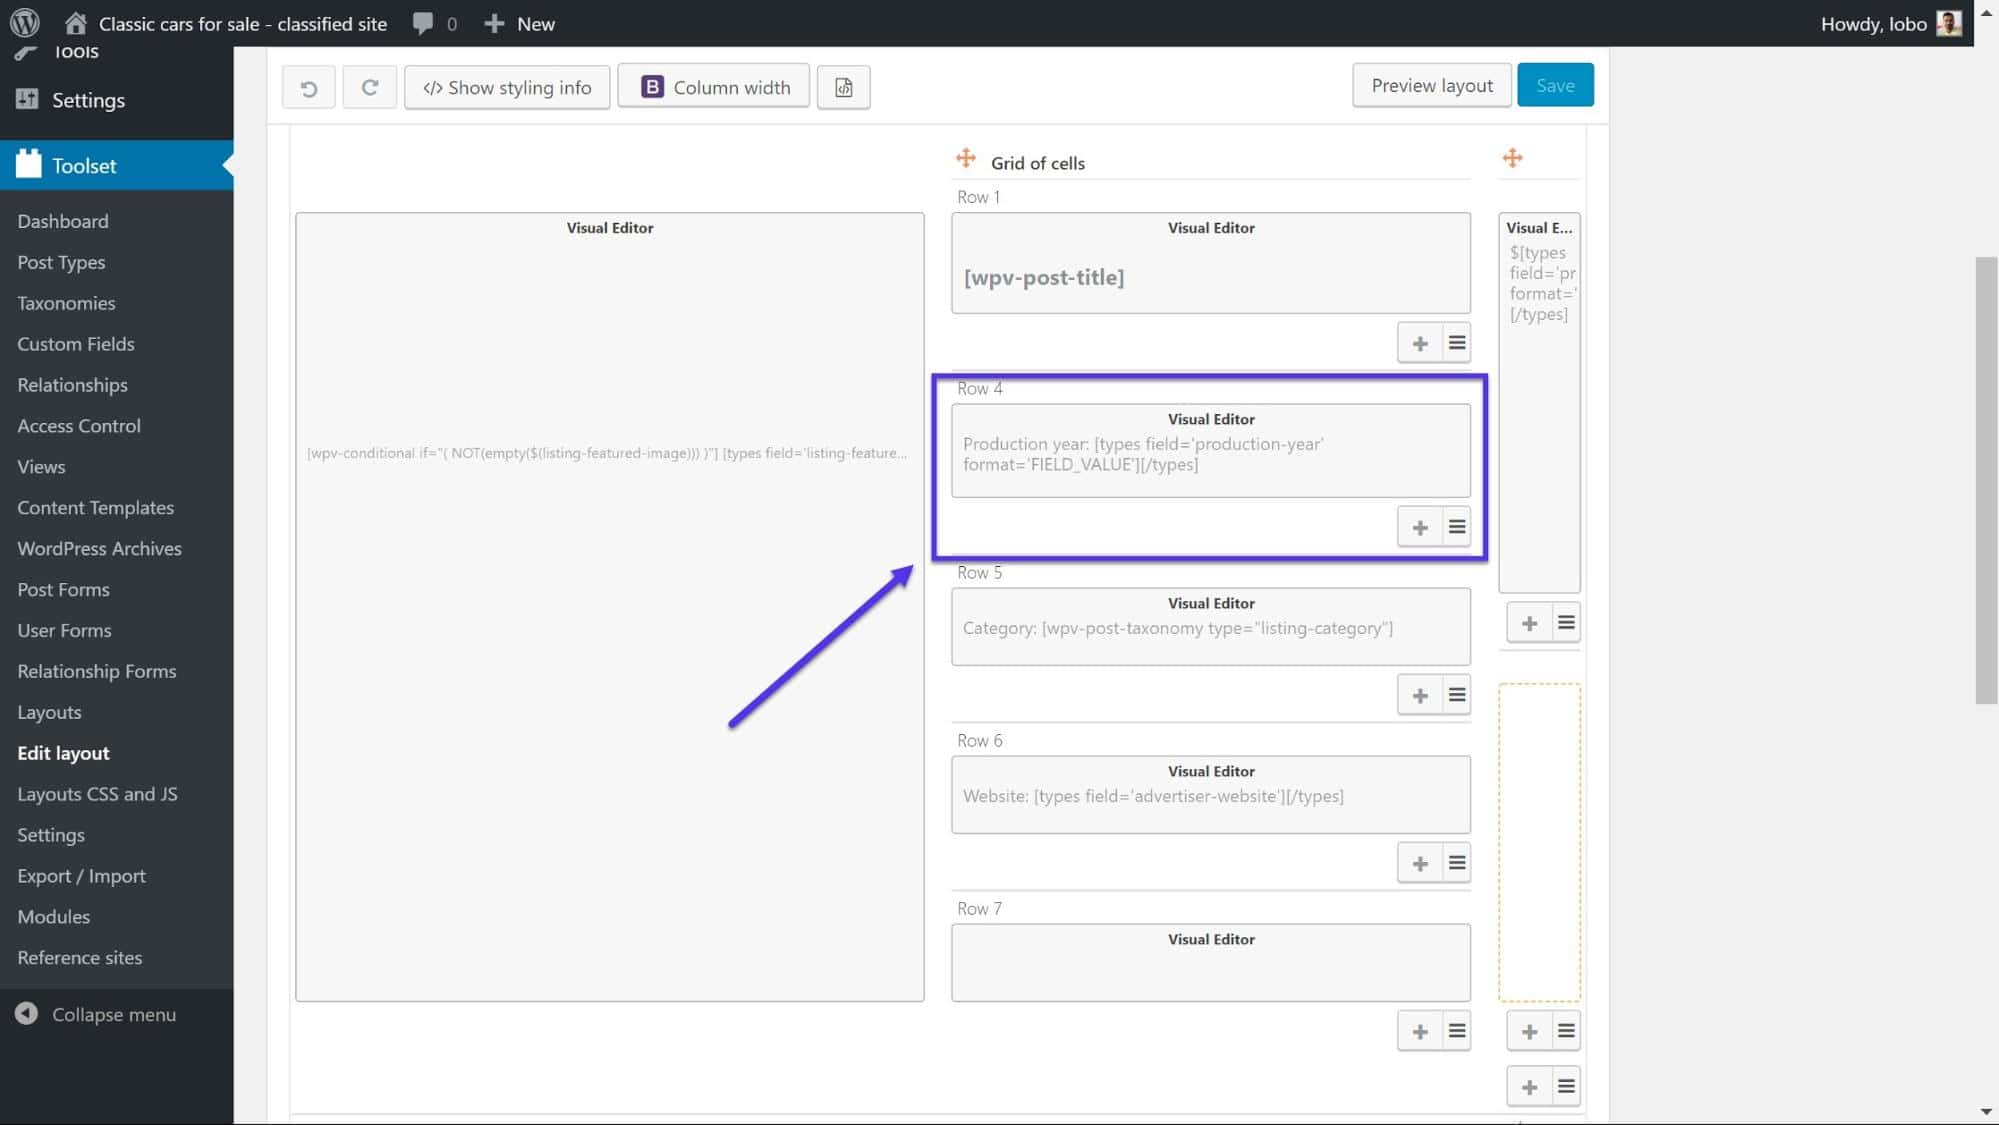
2. Select the number of columns you want the cell to take up – in my case I chose four.
3. You will now see the list of Layout cell types which you are already familiar with. Select the Visual editor.
4. Click on Fields and Views where you will be taken to the list of shortcodes we can add. Scroll until you find the name of your list of custom fields (in my case Field group for listings) and select Production year.
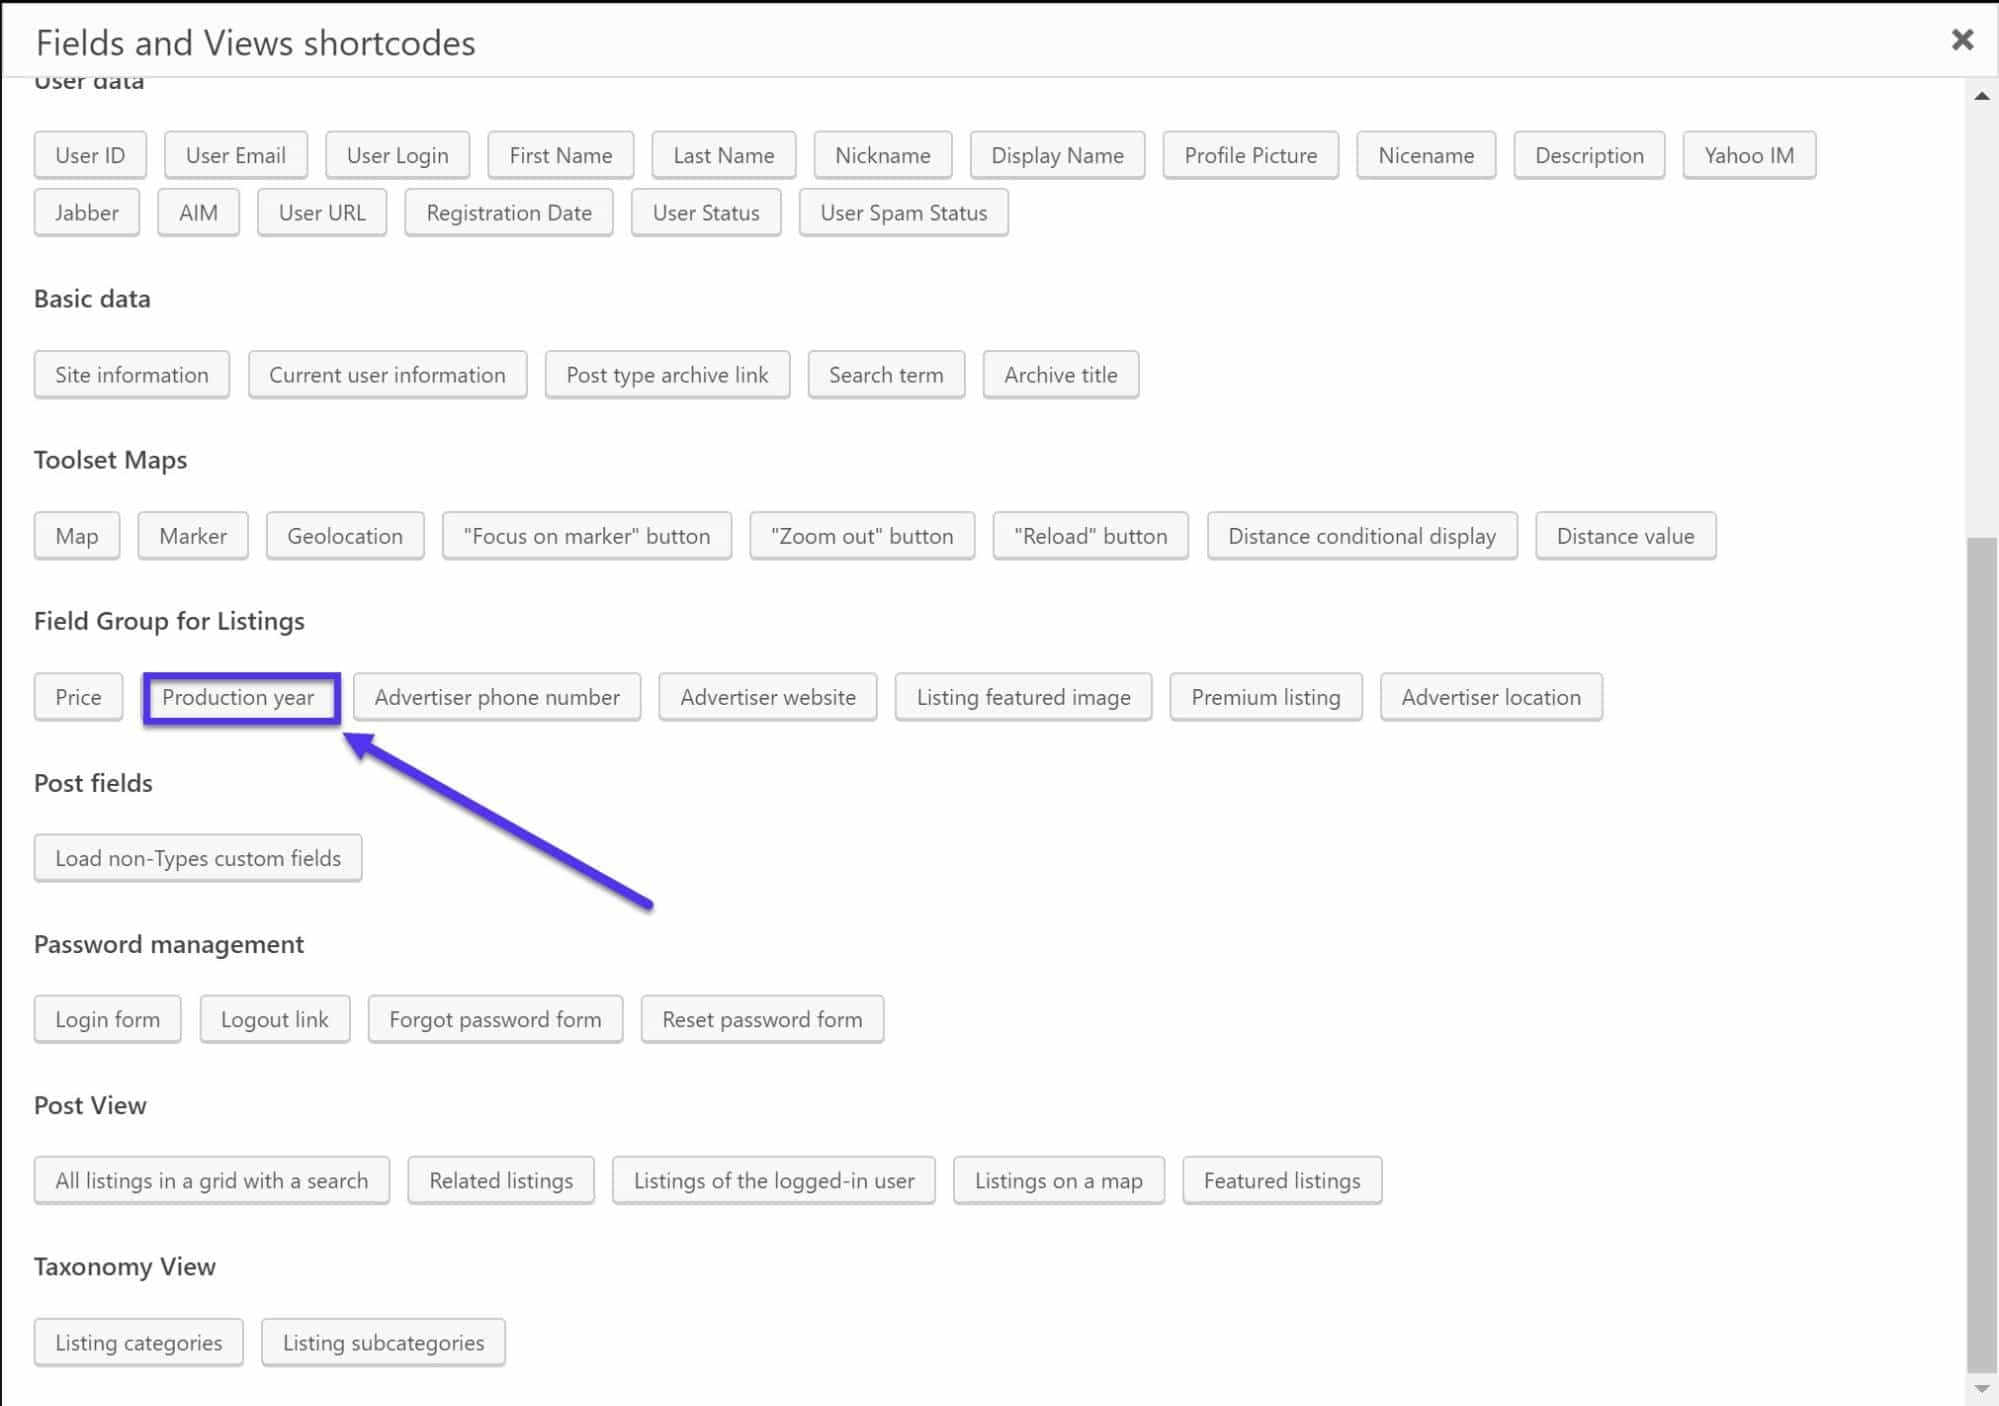
5. Click Insert shortcode.
6. We can now see the shortcode in our editor cell. This means users will now see the production year for the car they have selected. But now we need to add a title next to it so user’s know what the year means. I typed in Production year and a bit of HTML for styling. I have put the shortcode in a box in the image below so you can see how it looks:
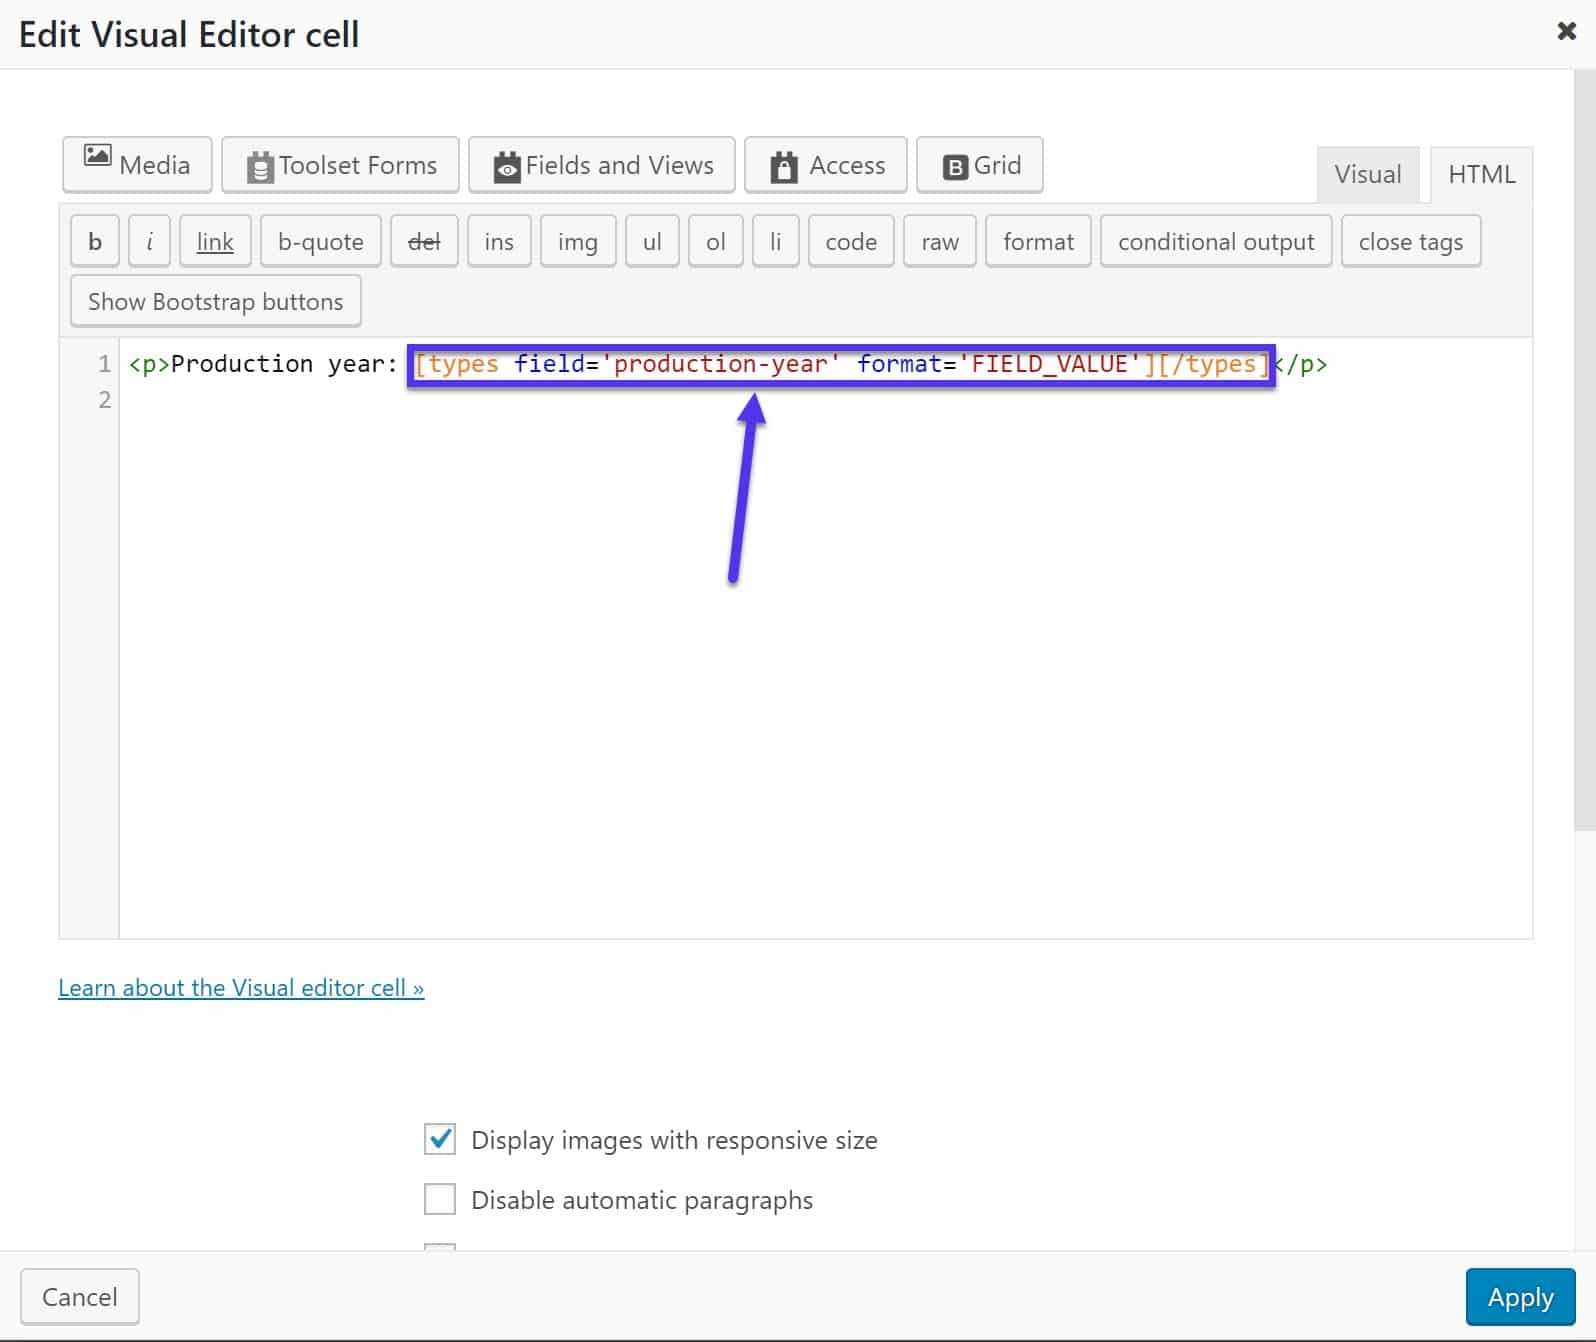
7. Click Apply and the cell is complete.
Here is how the custom field looks on the front-end after a bit of CSS styling:
Add a Search
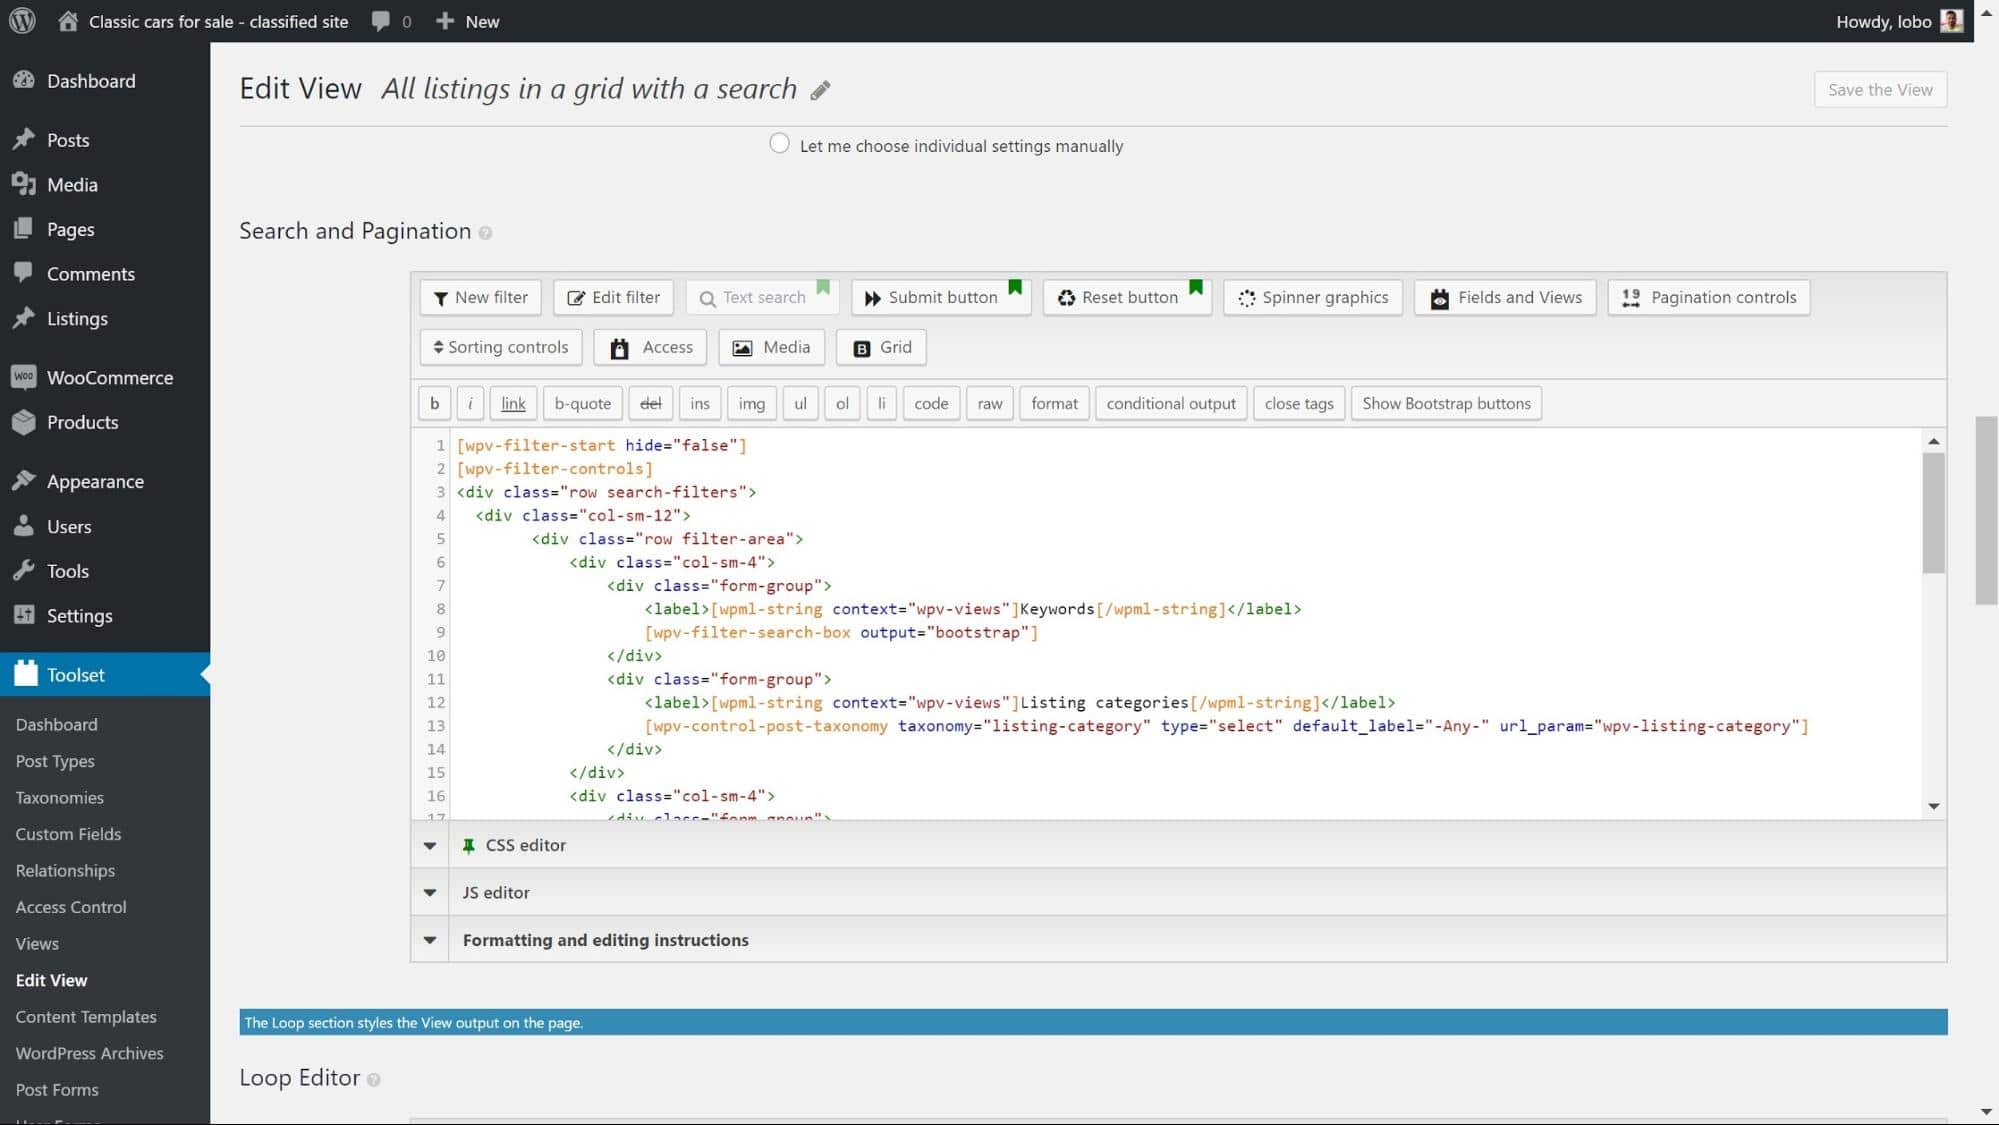
We can create a search tool with multiple filters which will let users find the exact listing they want.
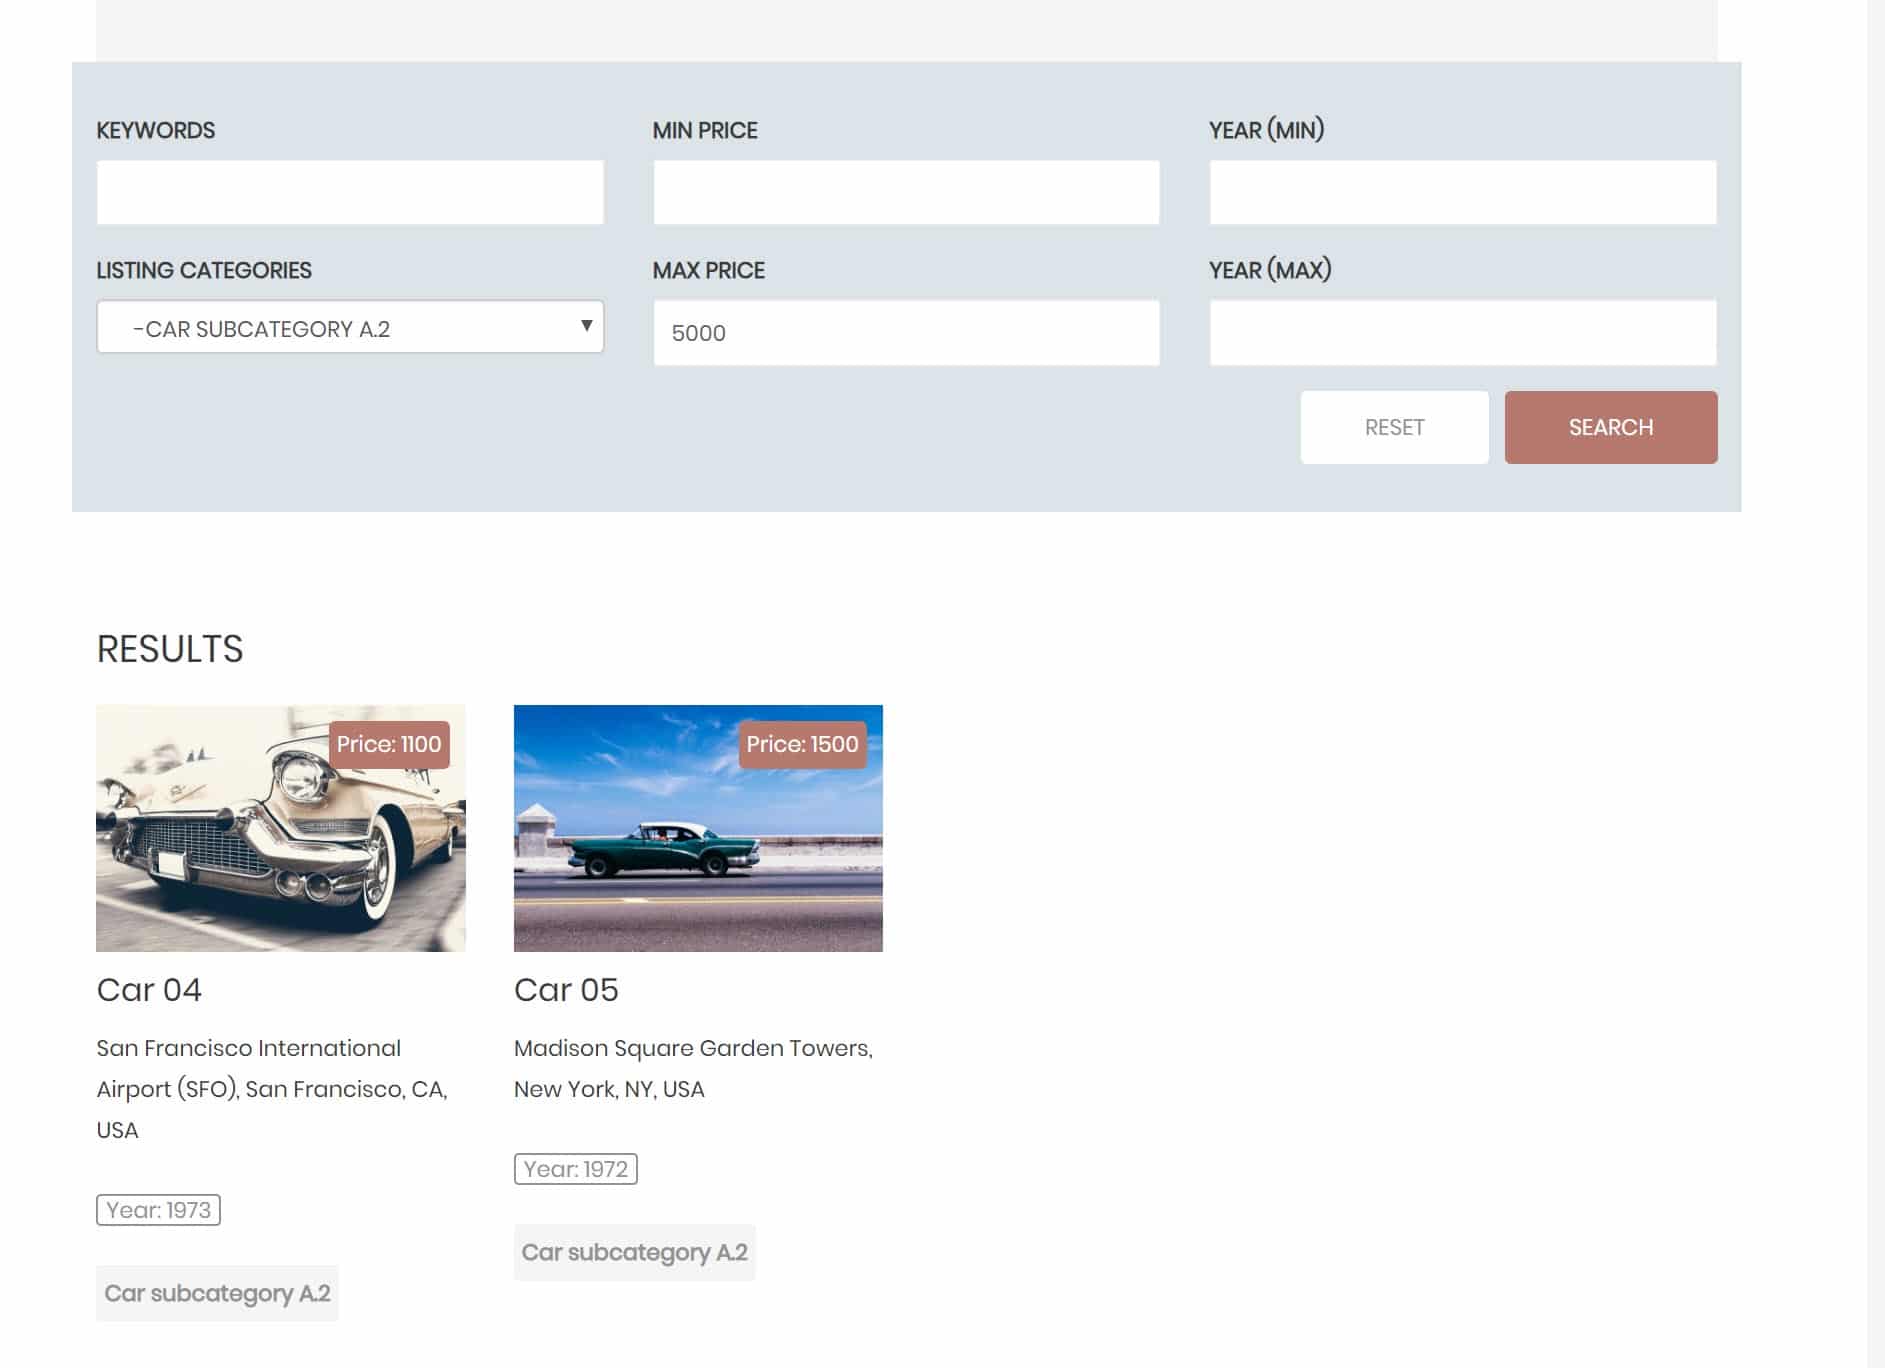
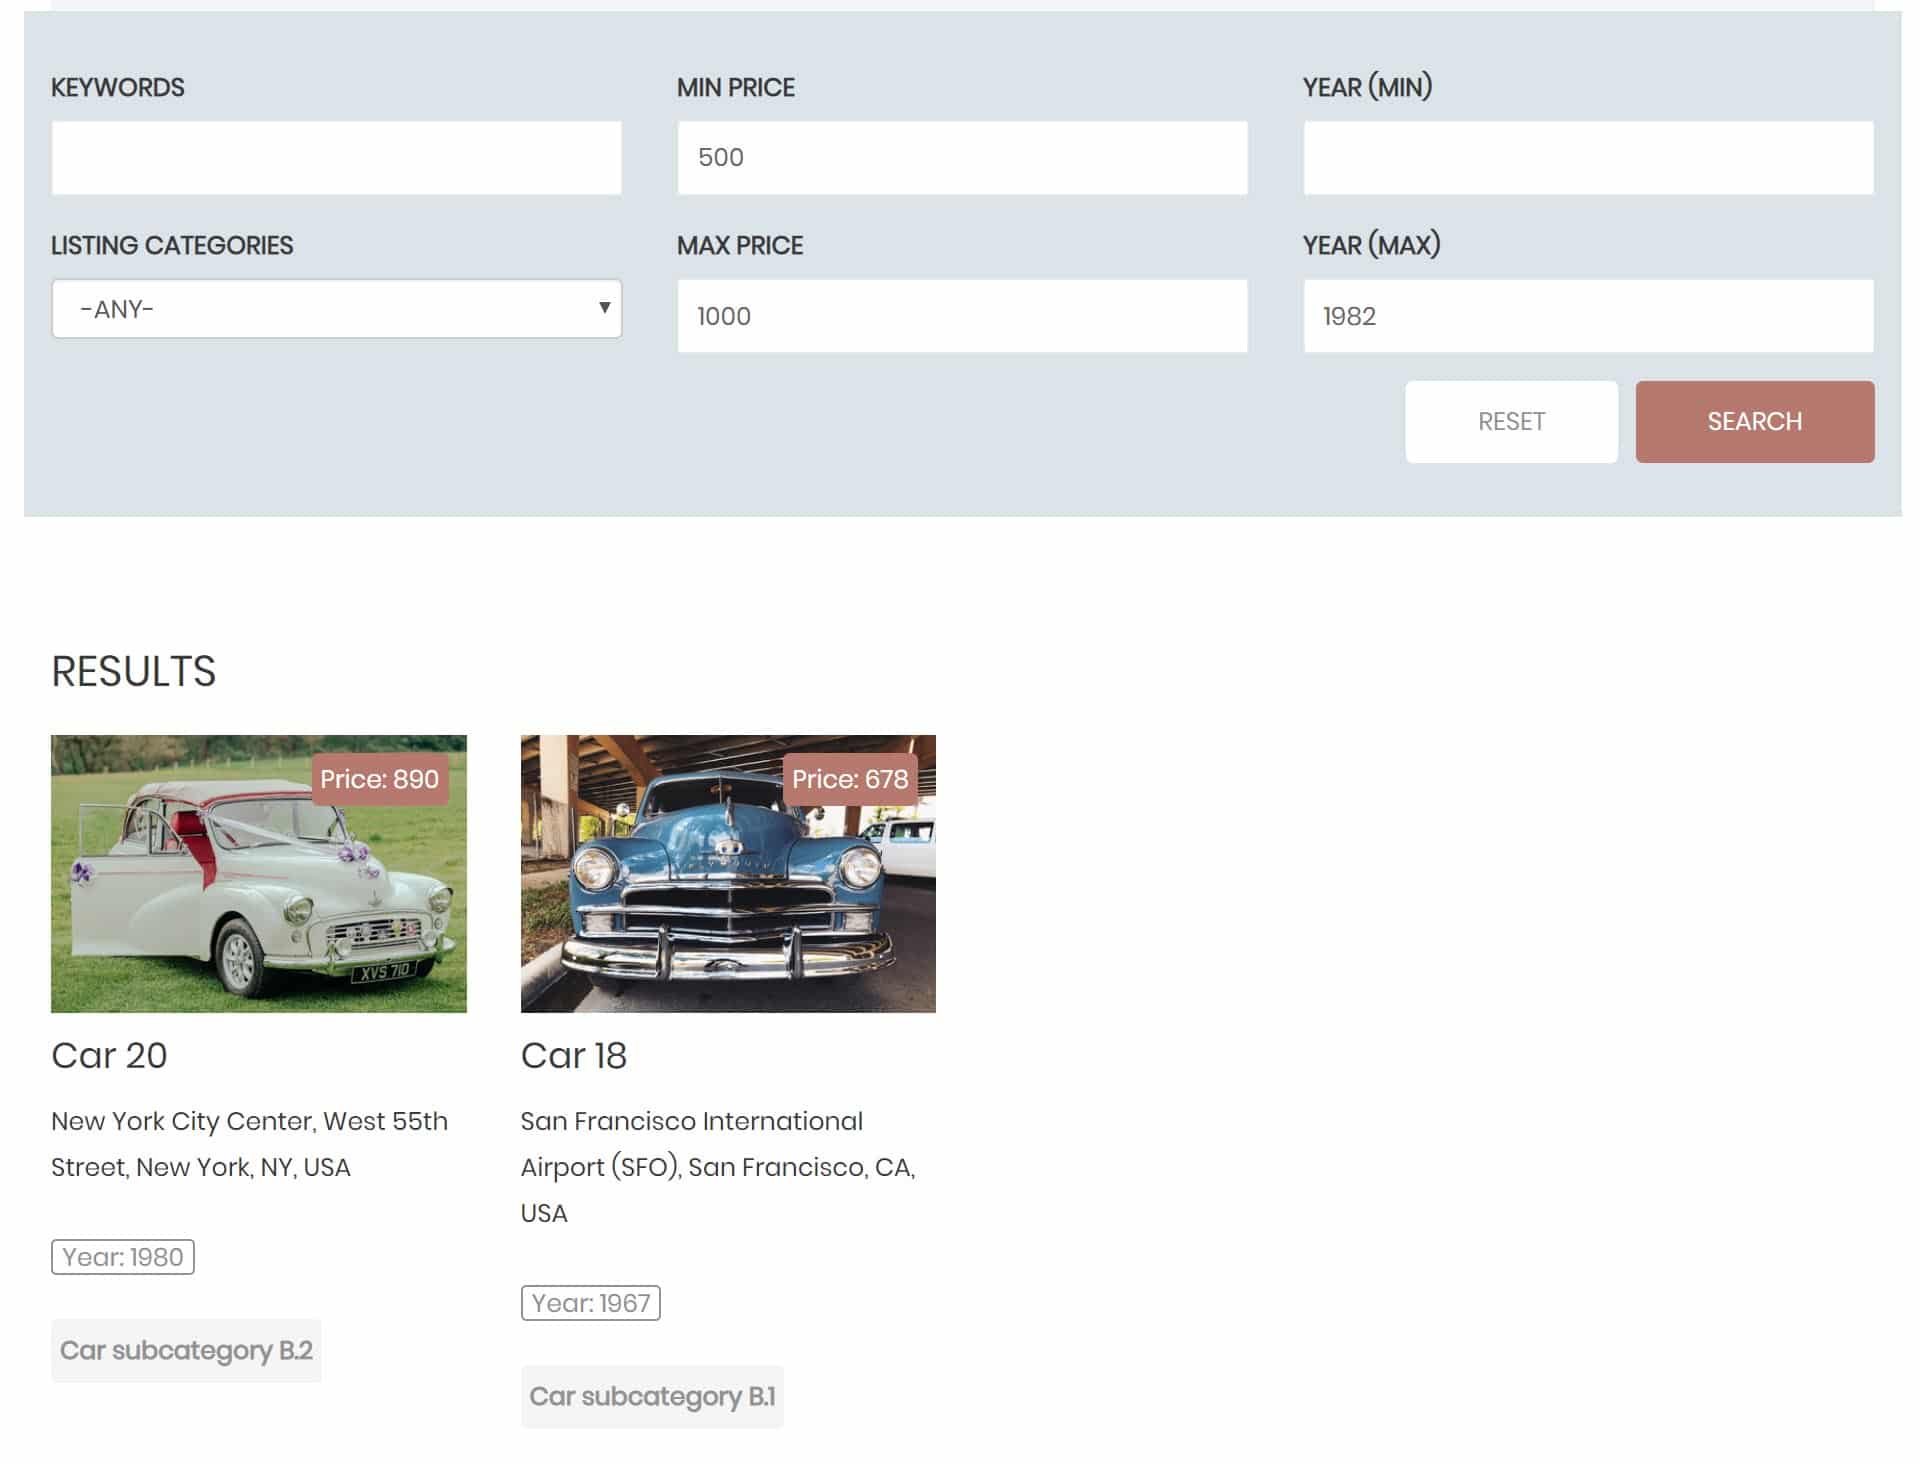
Here is the search I added to my classic cars directory website. I have six filters which you can see at the top in the search bar:
Firstly, where do you want your custom search to go? You can display it on your homepage, on its own page, in a widget or in an archive.
I added my custom search to the homepage. Here is how I did it:
1. Under Toolset > Layouts create a new template and click to add a cell.
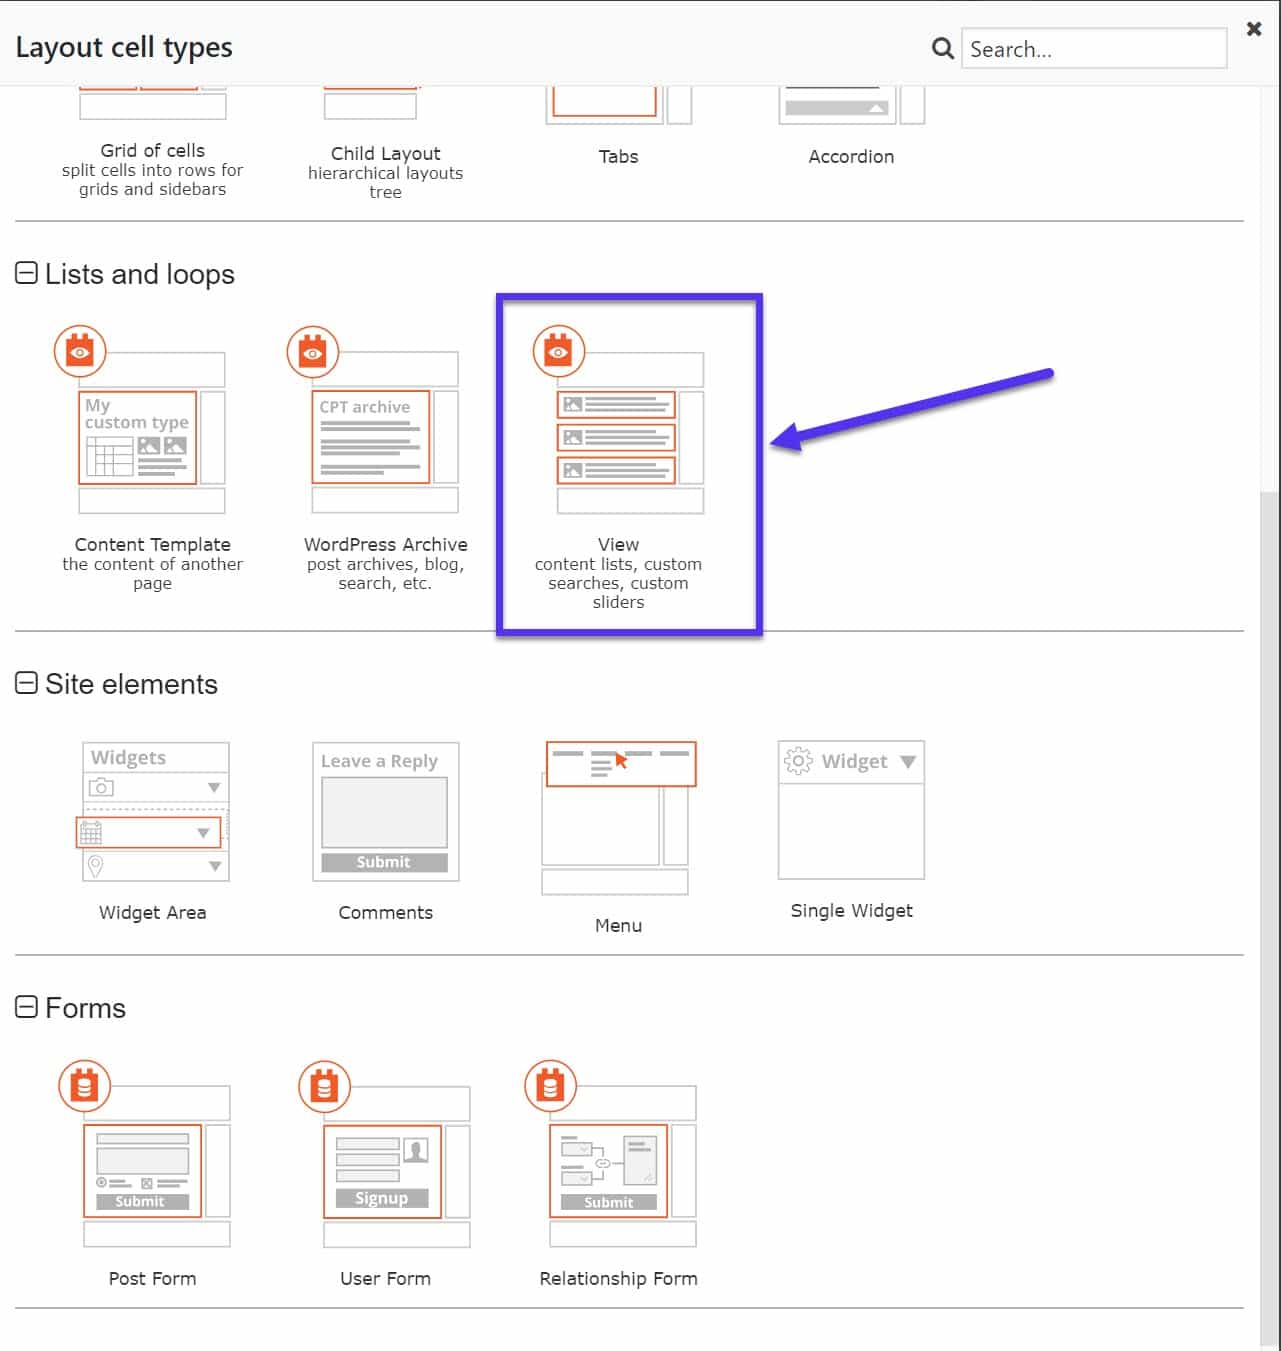
2. Select the View cell
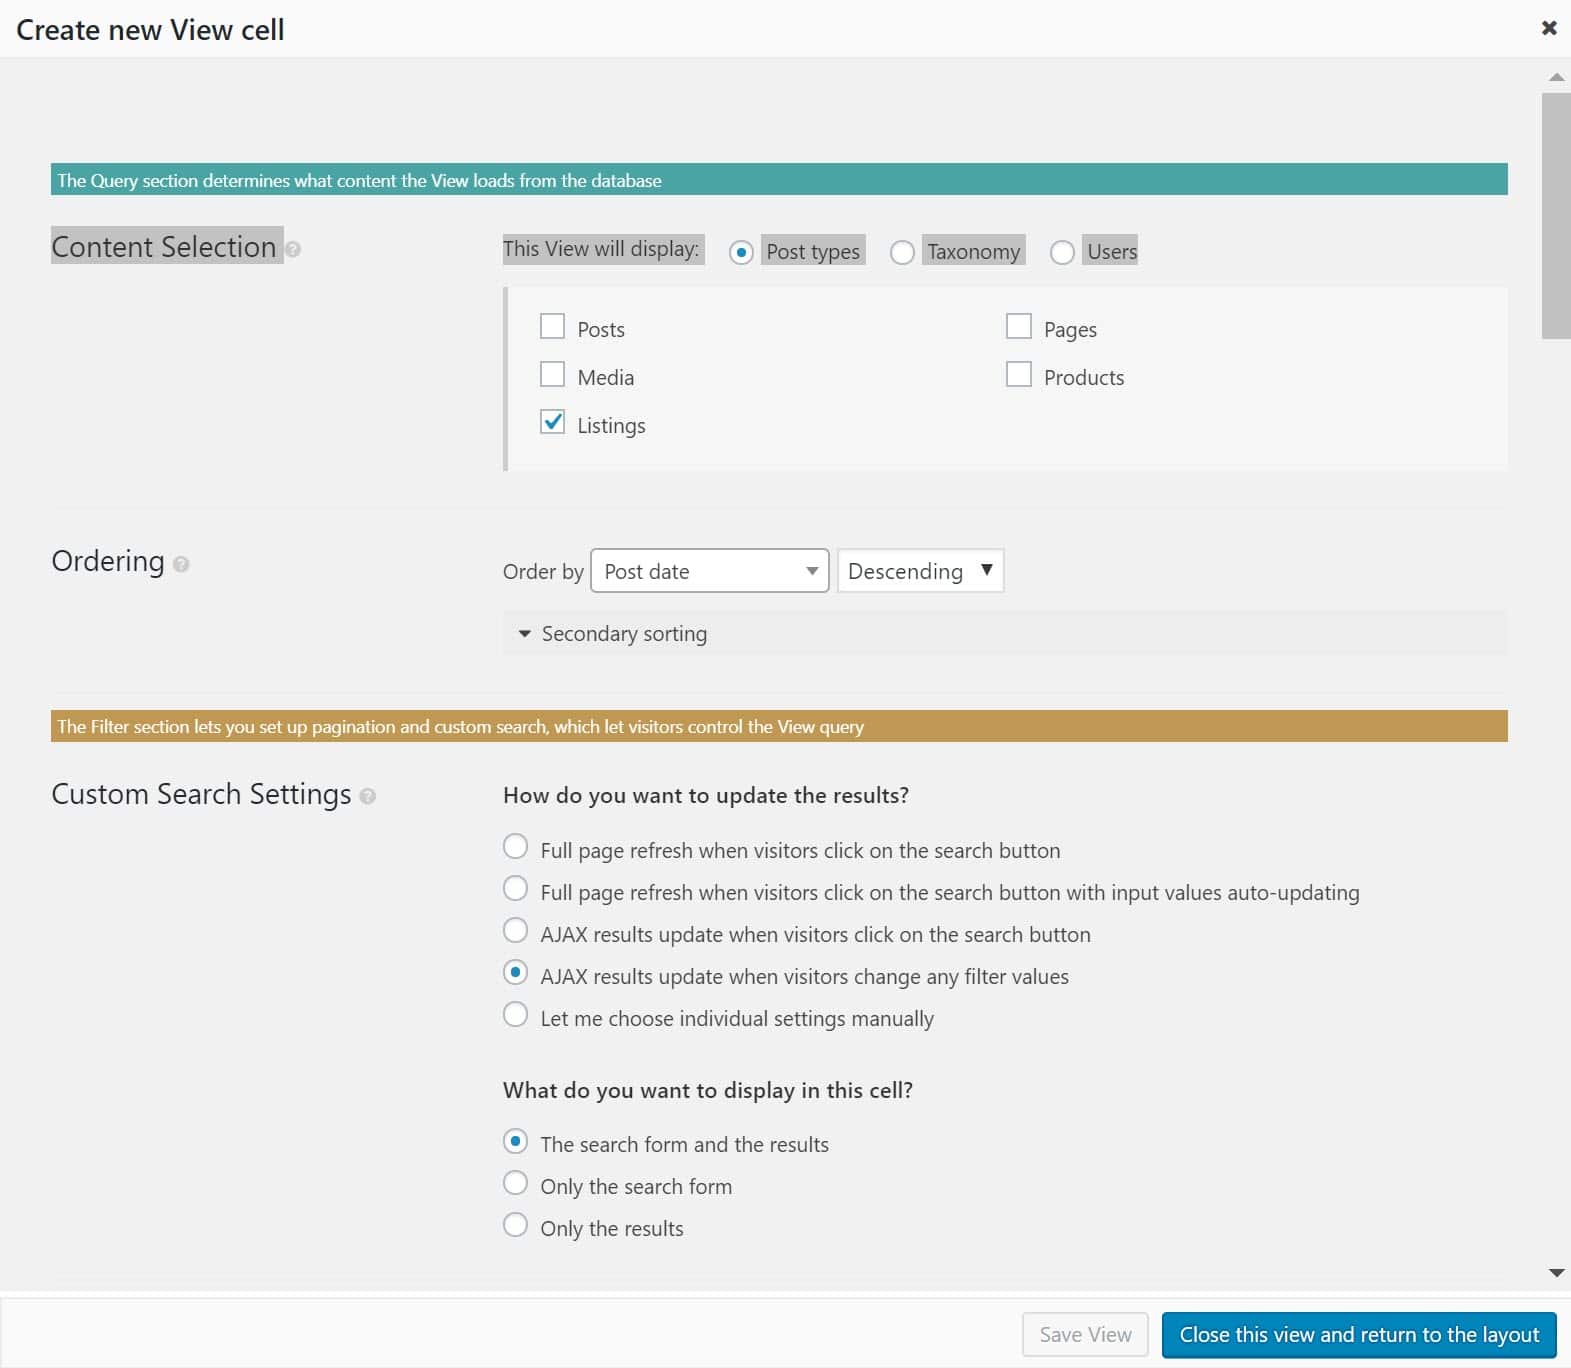
3. On the next page, select the Display the results as a custom search option and click Create.
4. Under Content selection, choose which content you want to search through. In my example, I will select the Listings post type.
5. Under Custom Search Settings, choose how your search updates the results. For example, you can select AJAX updates (update your results without reloading the page) among other options.
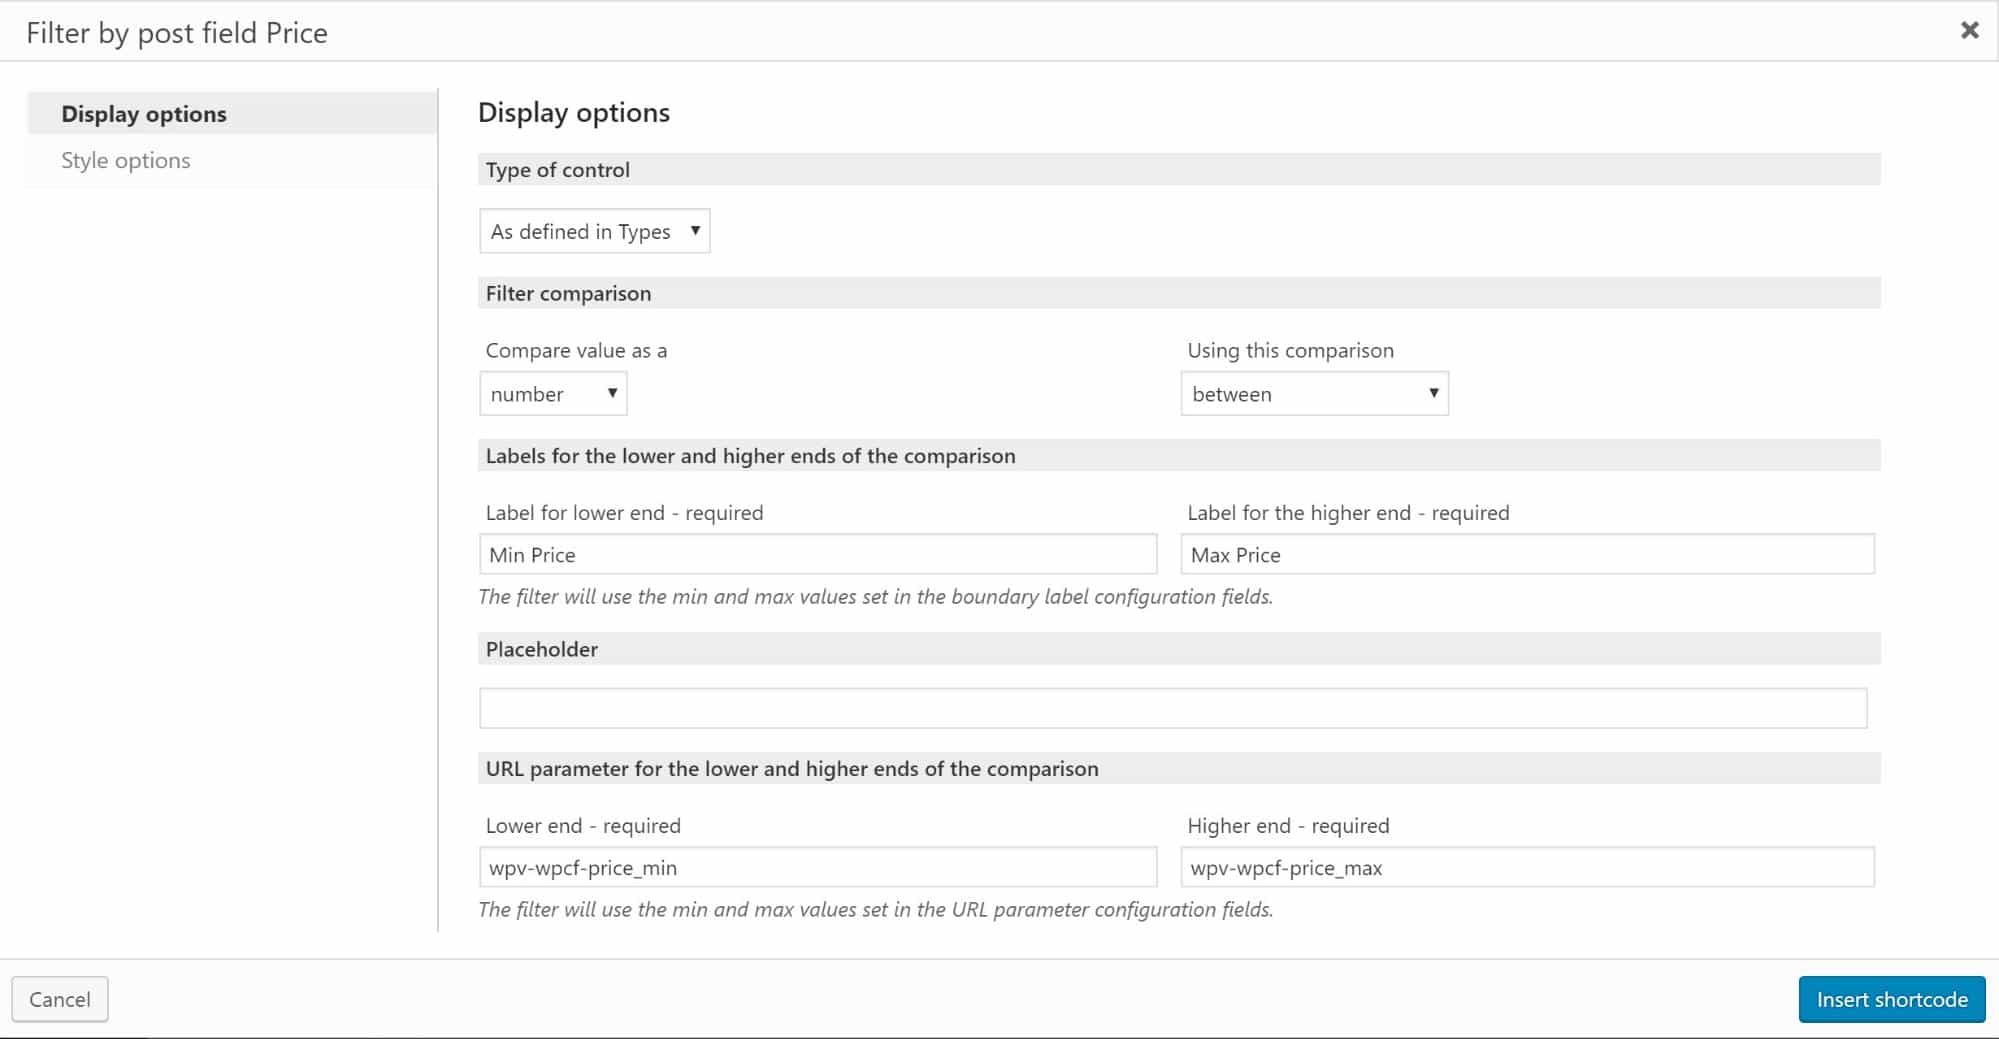
6. Under Search and Pagination, you can add the filters for your search which users will utilize to narrow down their results. These can include custom fields, taxonomies and post relationships. For example, I used my Price custom field to add a Minimum price and Maximum price filter to my search. Click on New filter and search for the custom field you want to filter (in my case it is the Price).
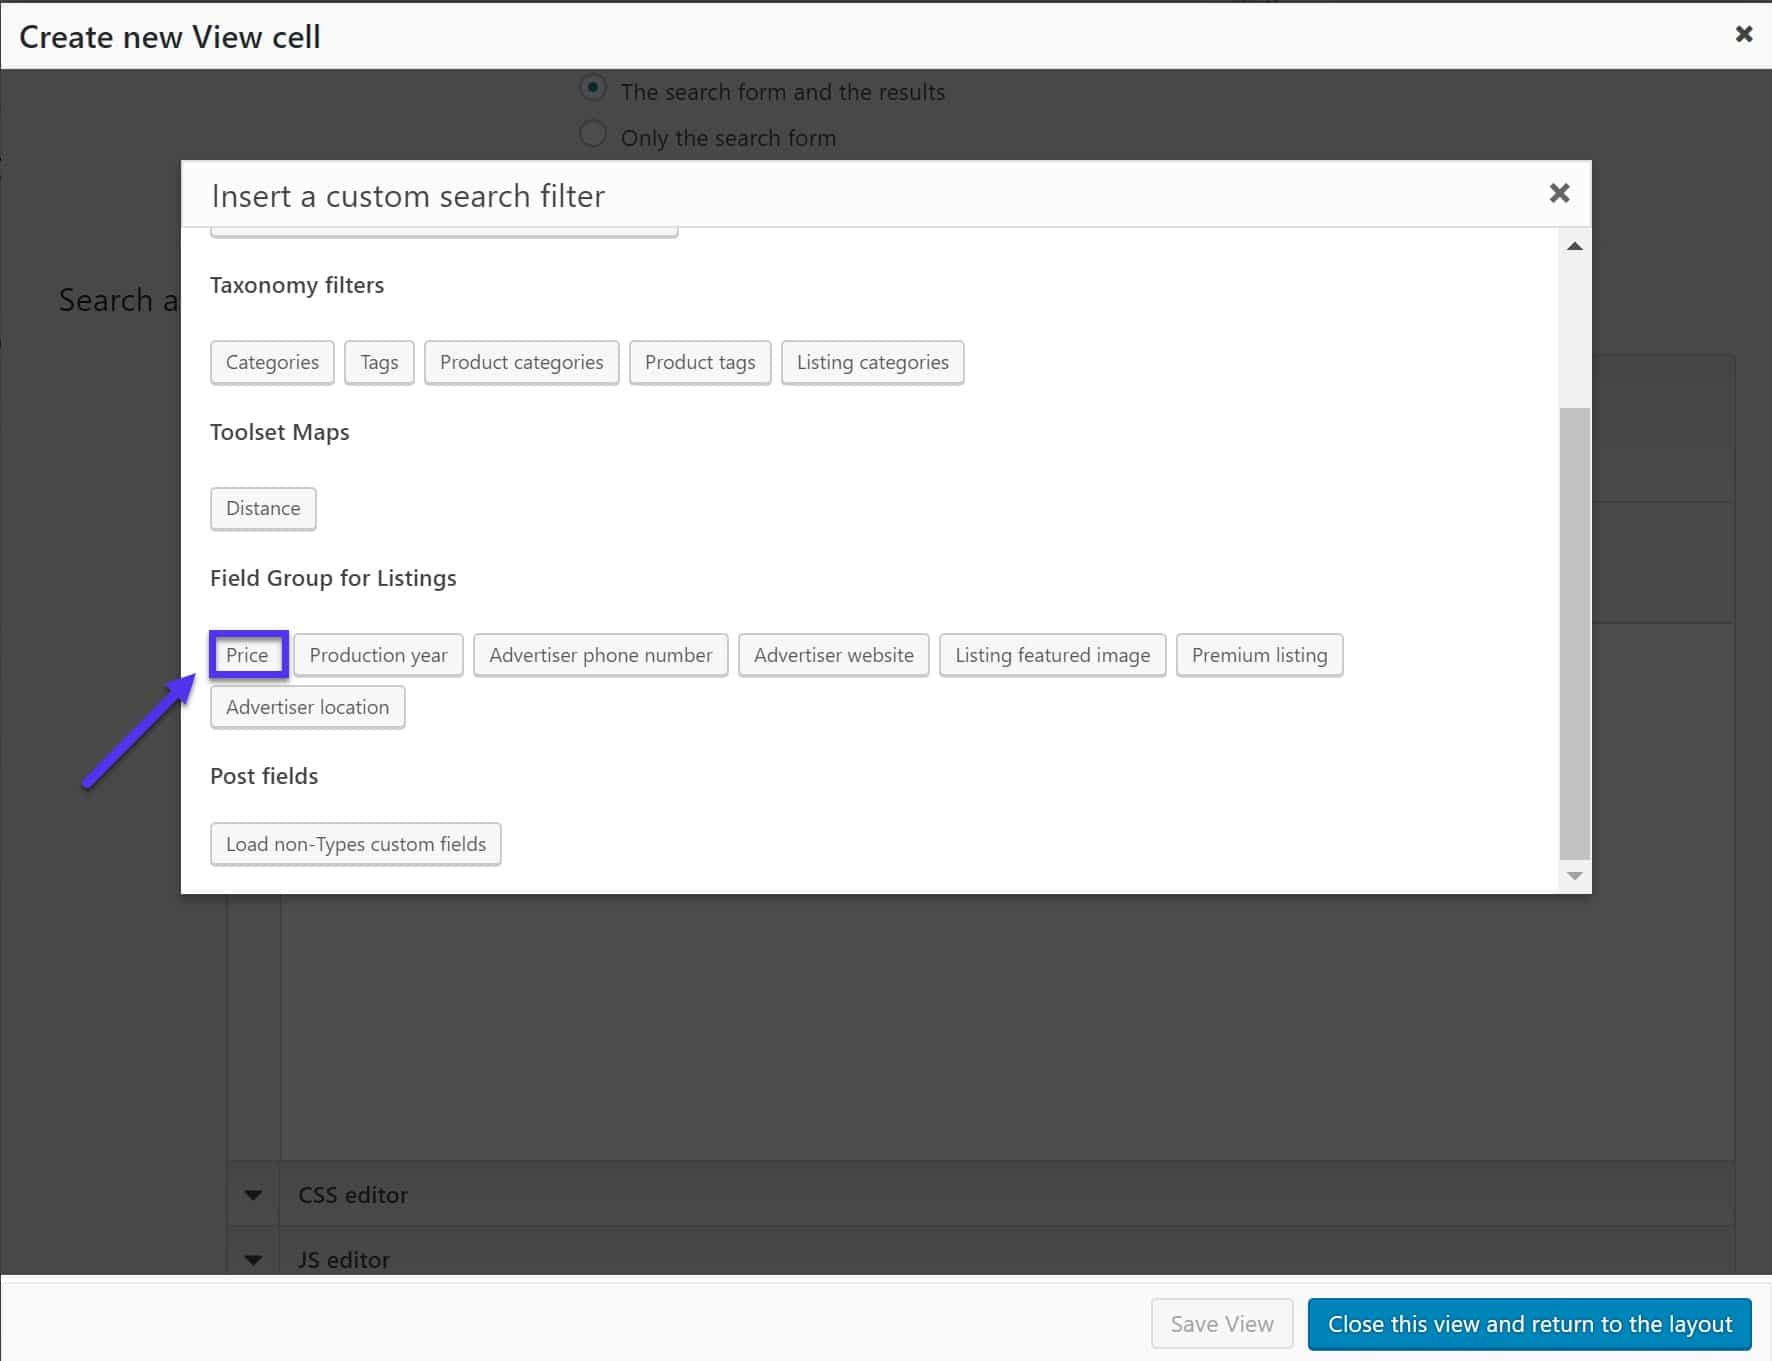
7. On the next page change, the options to read like the image below then click Insert shortcode. Here is how the Search and Pagination looks after I’ve added in my filters. The filters look good out-of-the-box but I added a little HTML and CSS for styling.
8. Click Submit button to add the button users will click to see the results.
9. Click Reset button to add a button to allow users to reset their filters.
Our search is now ready to go. All we need to do now is design our results.
Design the Search Results
We might have designed our custom search but we still need to decide how our results will be displayed. We can do this on the same page where we created our search.
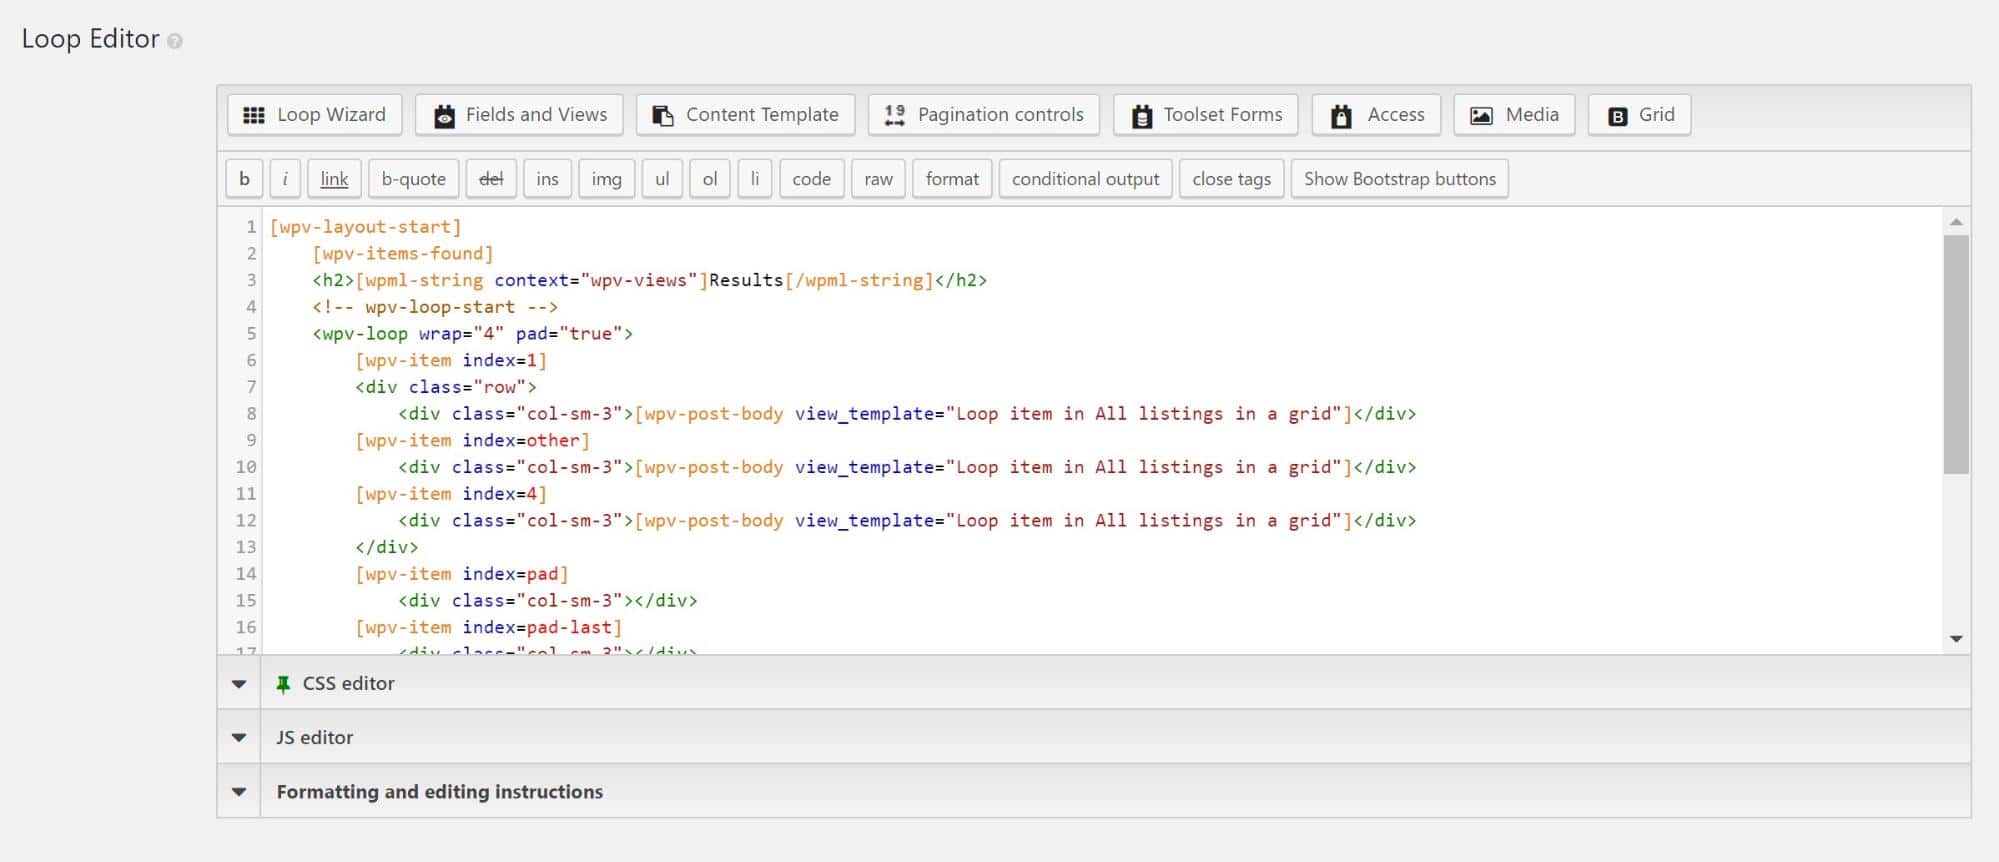
Underneath Search and Pagination, we can find another section called Loop Editor where we can design the output of the results.
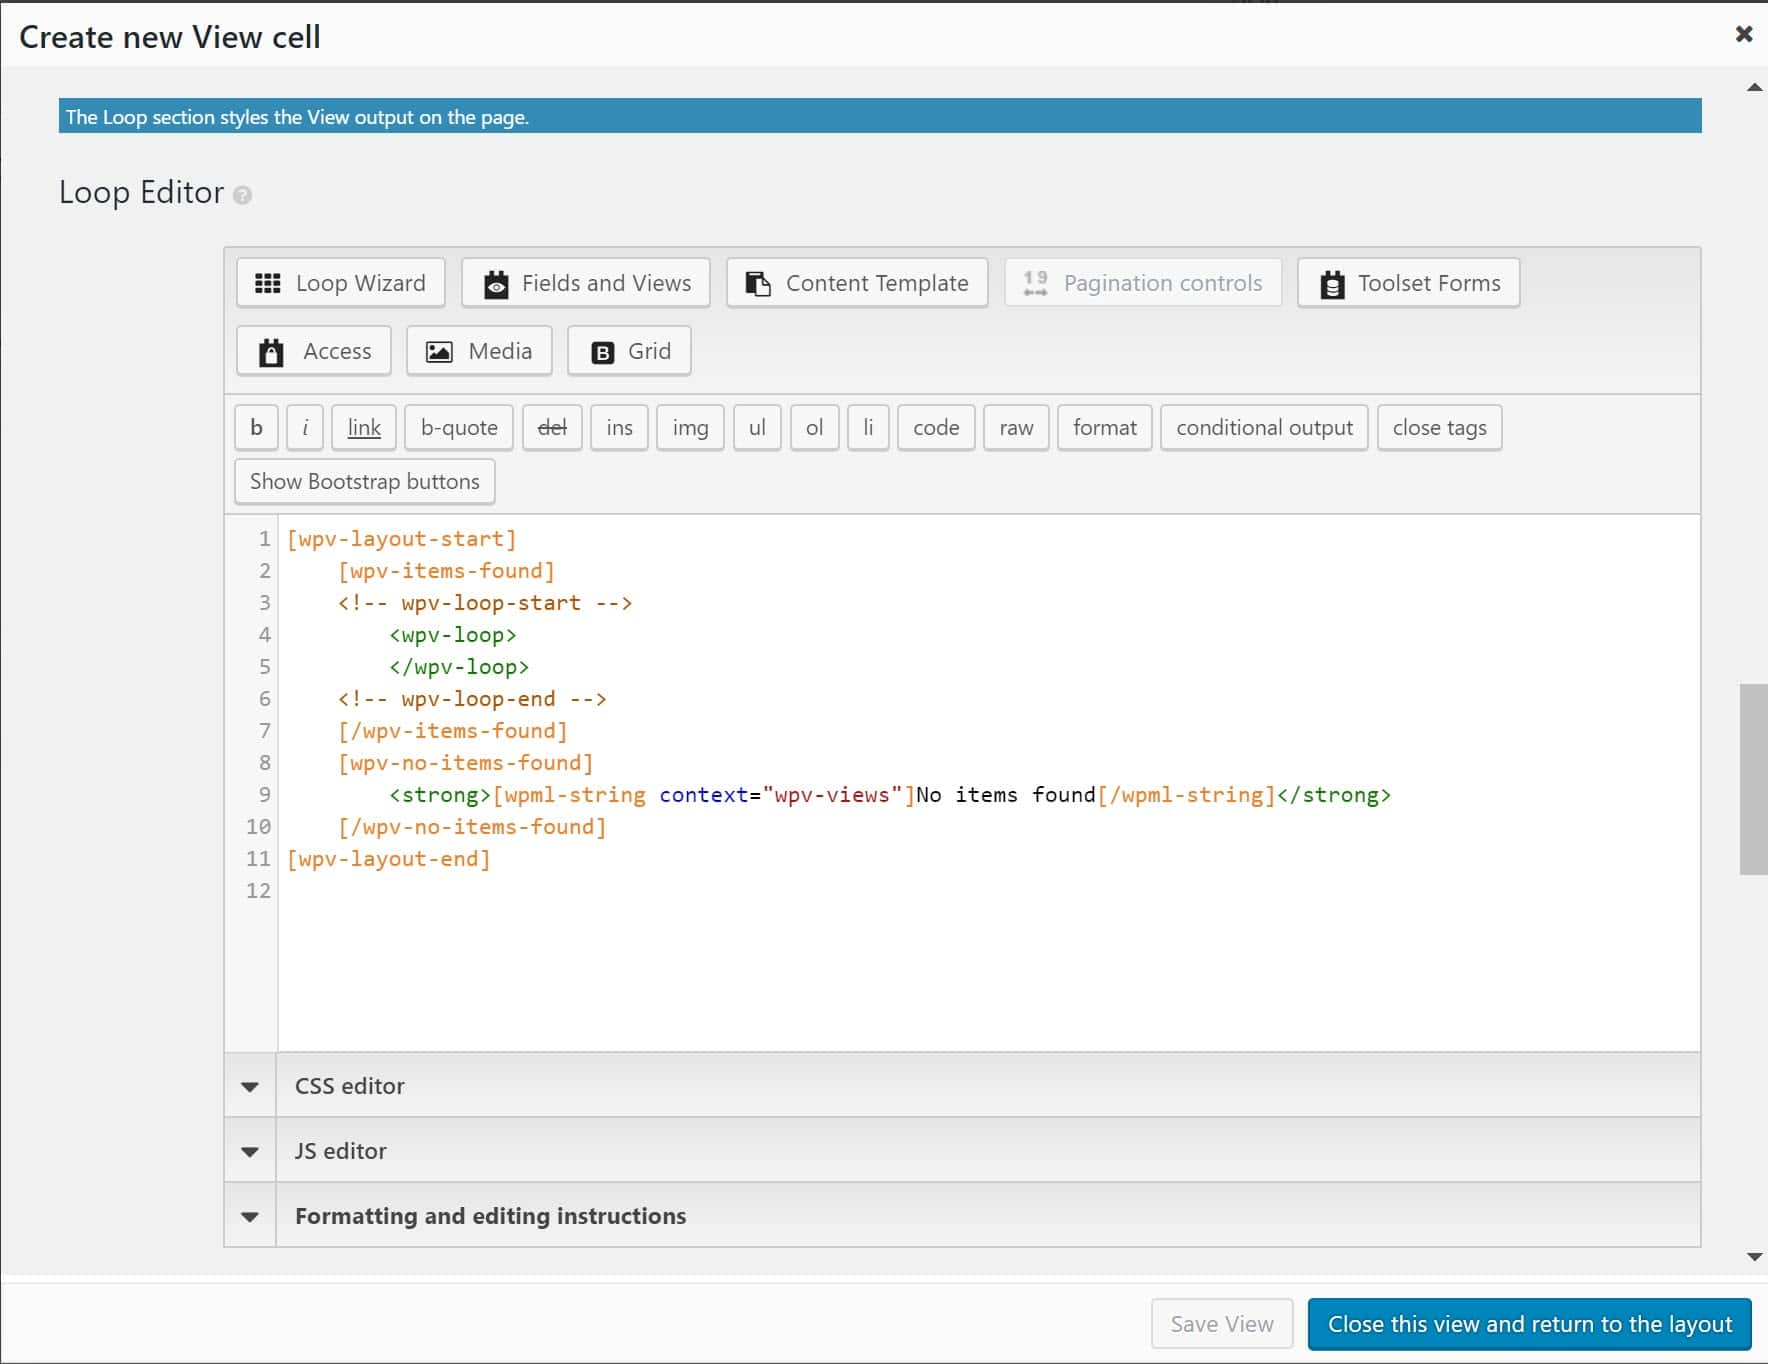
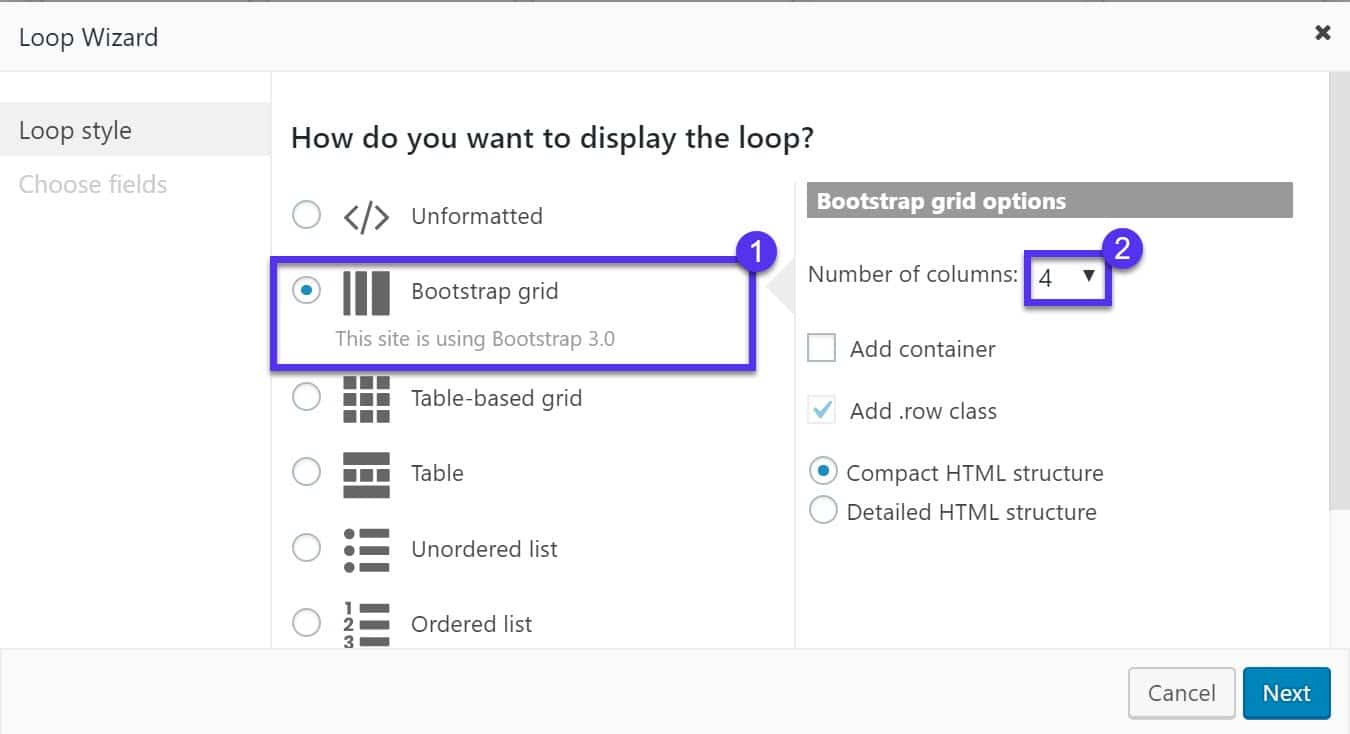
1. Click Loop Wizard and select how you want to display the loop. For my classic cars directory website, I used the Bootstrap grid with four columns for the results.
2. On the next page, we can add the filters that will be displayed as part of the results. Below are the filters I added for my classic cars directory website.
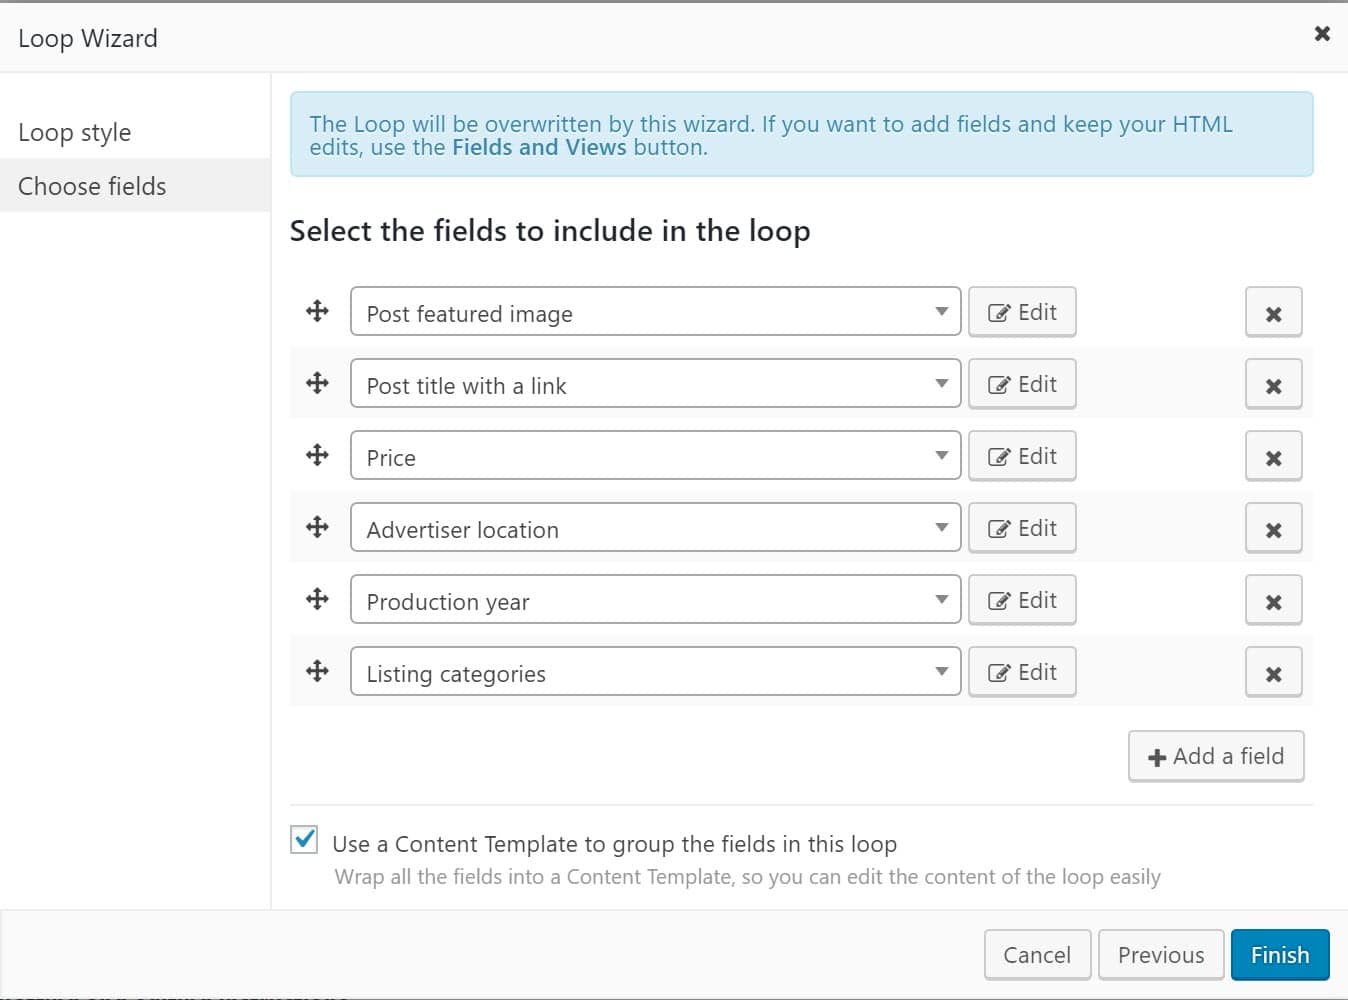
3. Click Finish. You should now see your fields in the Loop Editor.
4. Click Save View at the bottom of the page.
5. Click Save on your Layout and it is now ready for the front-end.
Here is how mine looks:
Create a Front-End Form
Front-end forms are a great way for your users to add their listings in the style and format you want. All they need to do is fill in and submit the form and it can appear on the front-end.
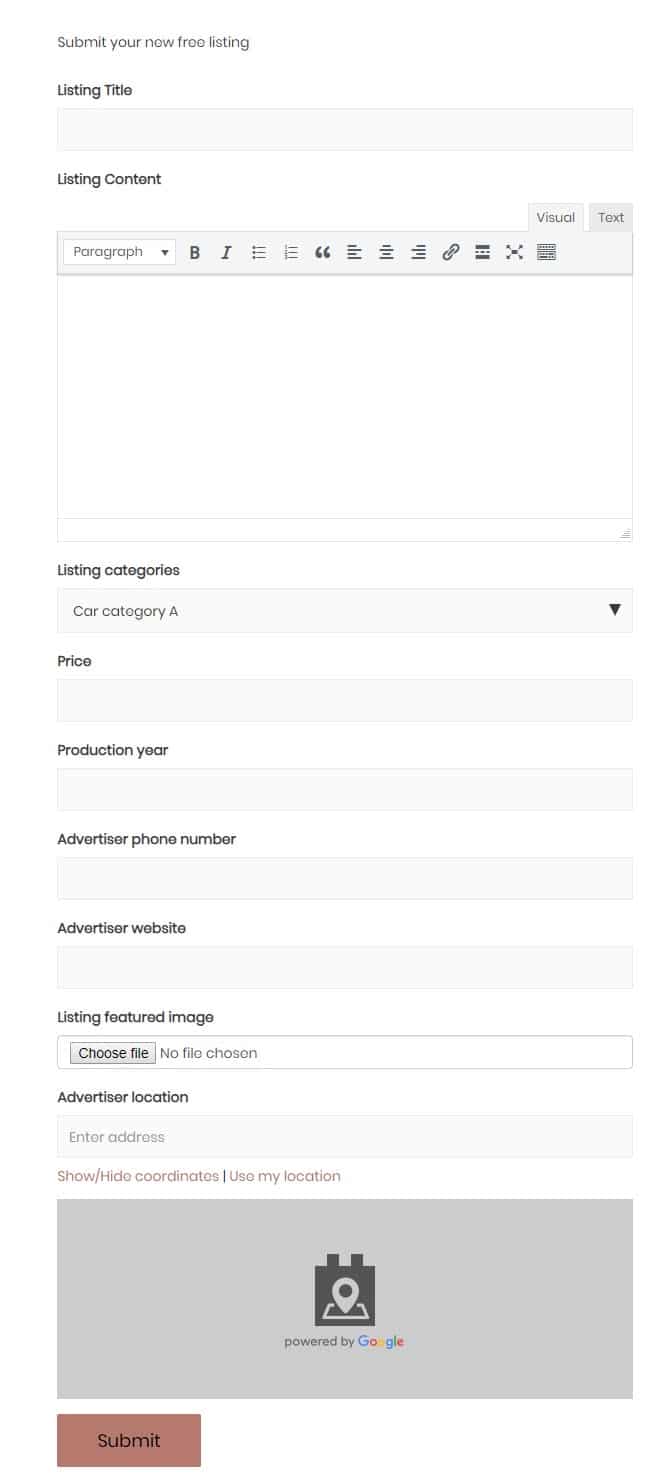
Here is an example of a form I created for my classic cars directory website:
Once a user fills it out, this is how it a listing will look on the front-end:
Here is how I made it:
1. Go to Toolset > Post Forms and click Add New.
2. The Toolset Wizard appears. Click Continue and enter a title for your form.
3. In the Settings section fill in the details that work for your form. Here you can decide what page users see once they submit the form, whether the listing is published immediately or as a draft and whether the post expires. Here’s what I set for mine:
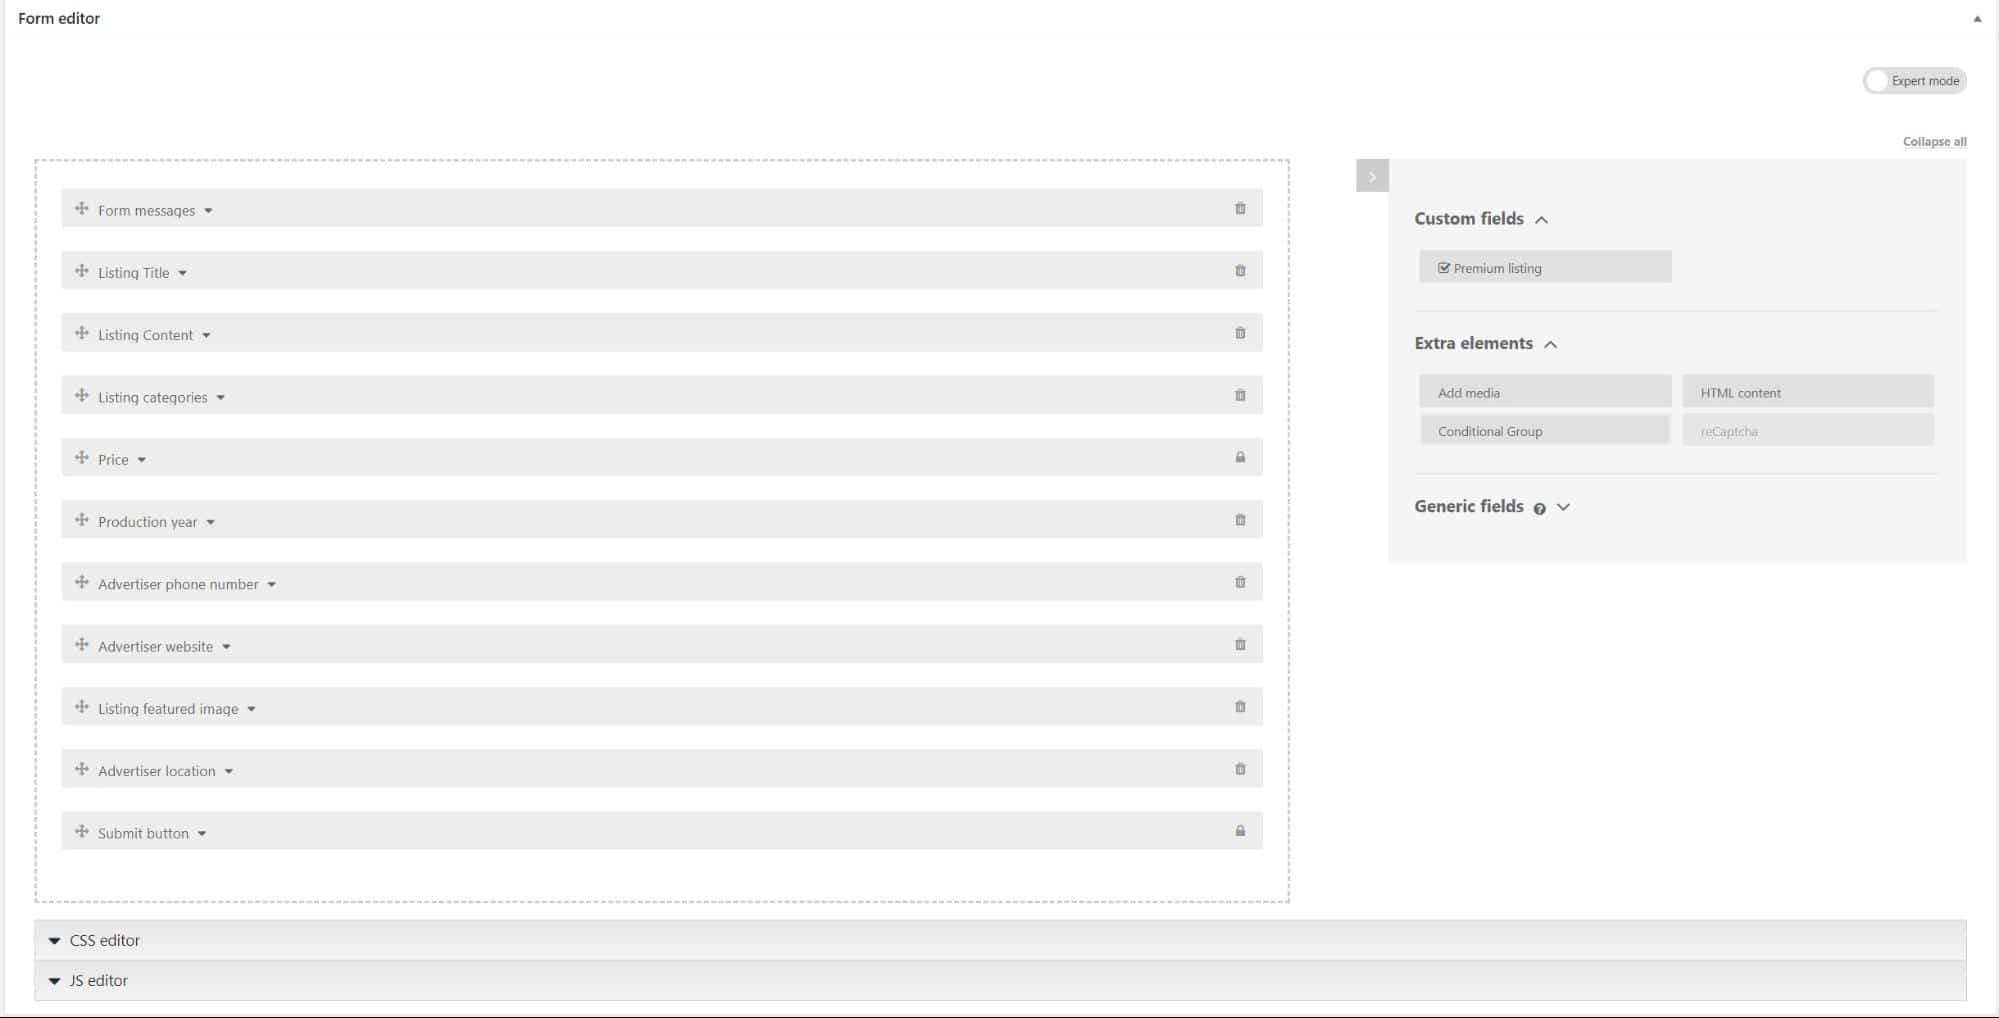
4. Use Toolset’s forms drag and drop editor to decide which fields you want users to fill in. You can also add extra elements and style is using CSS. Here is how mine looks:
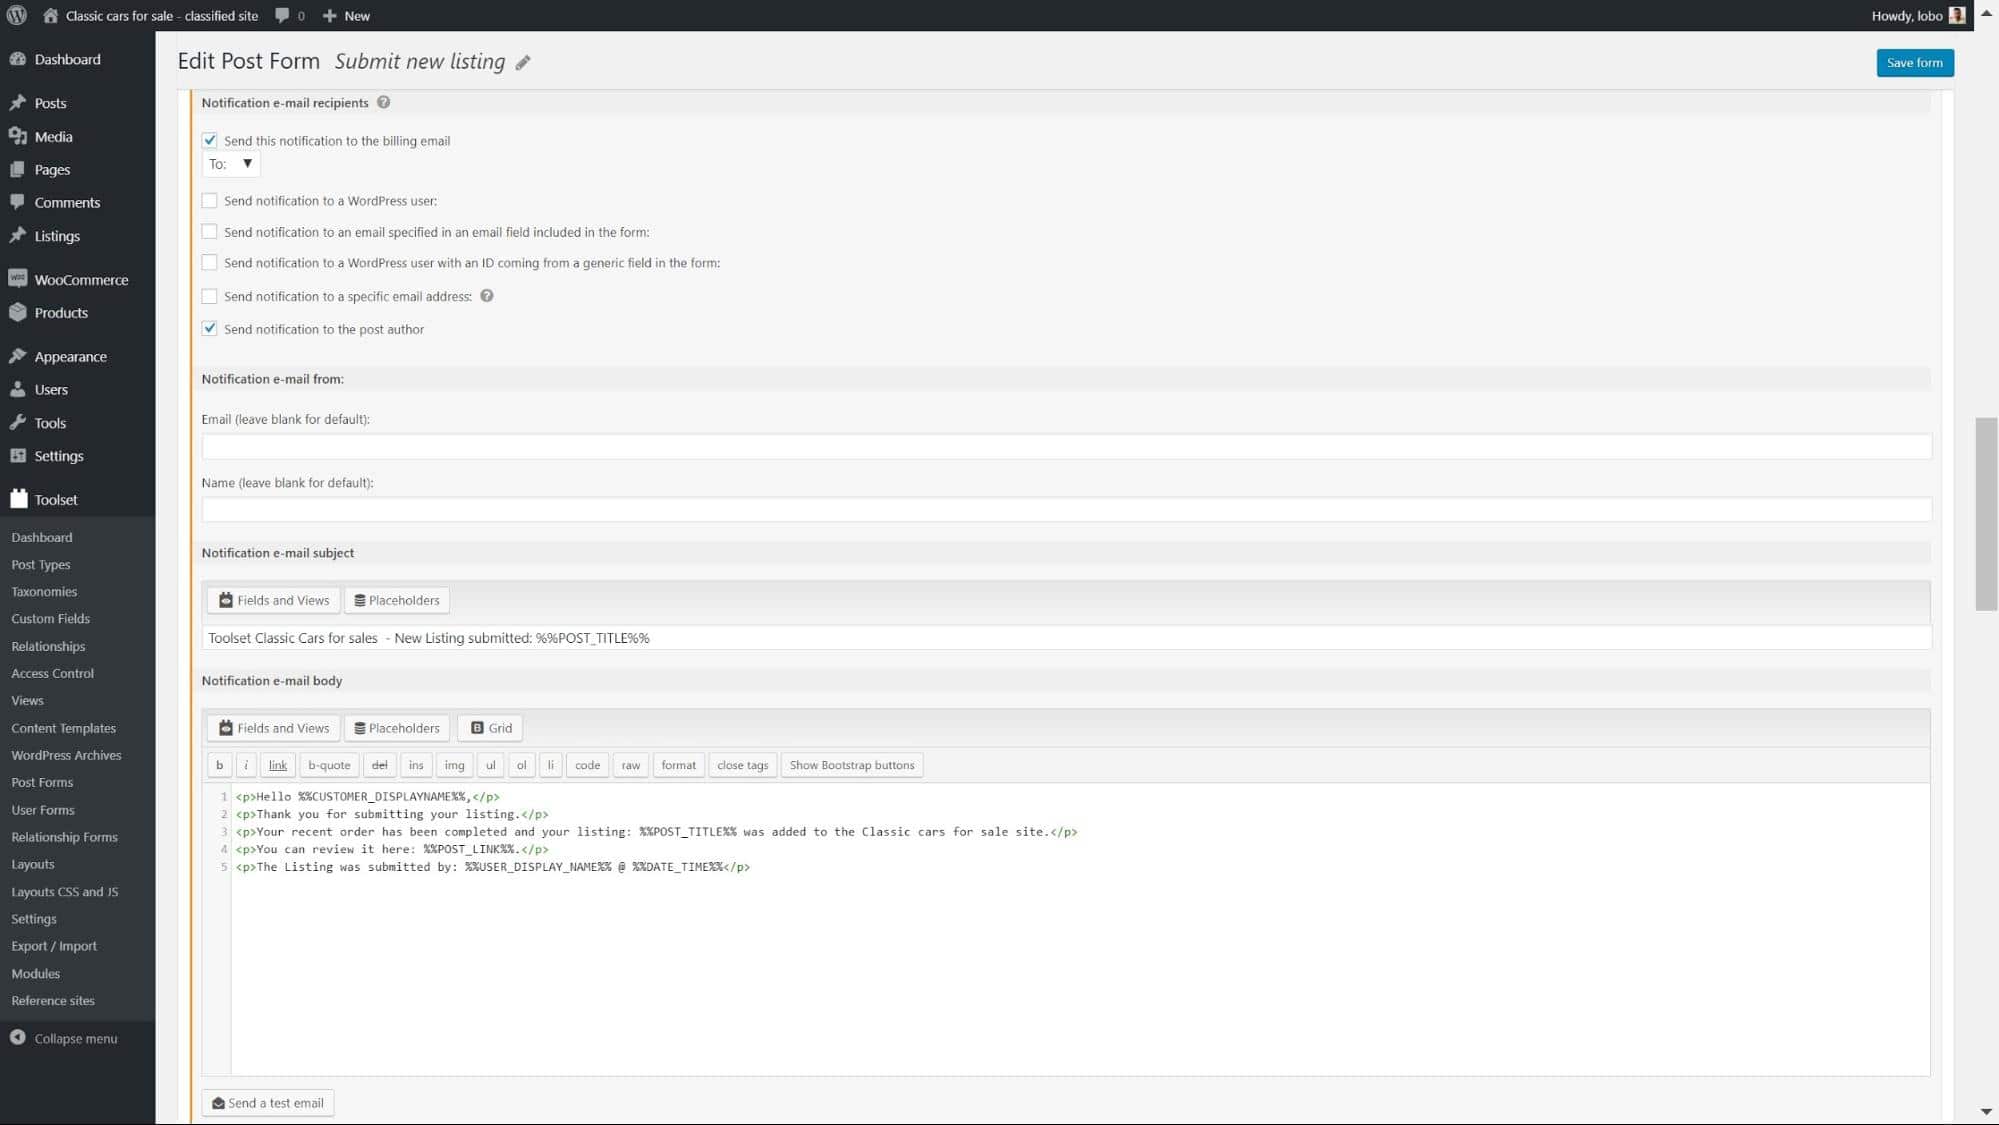
5. The final step allows you to edit the email notifications users and managers of the directory website receive when a form is submitted. Below is an example of one that I created which will inform the lister when they post has been reviewed and is live.
Of course, you can add additional emails to other people if needed.
6. Now it’s time to display the form on the front-end. Just like with the other content, I will add it as a cell in one of my Layouts. Head to Toolset > Layouts, create a new Layout and click to insert a cell.
7. Click the Post Form cell and click to Create Cell.
Save your Layout and you can now see your form on the front-end.
Summary
As I mentioned before there are far more features such as maps, a membership section, and related listings which you can add to a directory website. But these are the core ones you need to get you started in as little time as possible.
What are your tips for creating a directory website? Tweet at @Kinsta and we’ll share the best insights! Or drop them below in the comments.