
One of the most common ways to monetize your site is by running ads on it. Google AdSense is Google’s platform that lets any website owner run ads on their site and make money from it.
If you want to get more from Google AdSense, or you like the idea of making some money from your site, this guide will help you learn more about how Google AdSense works and how to use AdSense on your WordPress site.
What is Google AdSense?
Google AdSense is probably the most famous platform you can use to run ads on your website (although not your only option, check AdSesnse alternatives). Those ads are served by Google, based on the browsing history of the people visiting your site.
So when one person visits your site, they’ll see different ads from another person. For example, if you run a travel blog, you’d show ads related to booking sites. If you’re running a business site, ads from B2B companies would show up.
But Google AdSense is more intelligent than that. It knows what each individual who visits your site has looked at online and will tailor the ads according to that information. Meaning that they’re more likely to click on the ads, hence you’re more likely to make money from them.
Google AdSense vs Google Adwords
Google Adwords is Google’s other advertising platform, but it does a very different job.
Instead of letting website owners display ads, Google Adwords lets you create ads that will be displayed on Google’s search result pages.
Check out How to Use Google AdWords for Your Business (Beginner’s Guide) to get started with it.
Now, back to Google Adsense…
Pros and Cons of Running AdSense on Your WordPress Site
Why run other people’s ads on your site? After all, your site exists to promote your own business.
There are some scenarios in which you wouldn’t want to run third-party ads. Instead, you might choose to place ads for your own products, encouraging people who’ve found your site to browse your products.
If you want to do this, you can use the plugins described in this post to place your own ads into your site, without using AdSense.
But if your site has regular traffic and isn’t making you money directly by selling products or services, running ads is a good way to make some cash from your site. So if your WordPress site has a significant audience but isn’t directly selling to that audience, ads can be a great way to make some money from it.
How to Create a Google Adsense Account
So you’ve decided to run ads on your WordPress site with Google Adsense. How do you get started?
The first step is to set up an AdSense account. To do so, start by going to the Google AdSense website.

Here, you’ll need to add your website address and your email address. Choose whether you want to be added to the mailing list for tips on running ads. Enter those and click the Save and Continue button.
If you already have a Google account, your account details will then appear so you can confirm you want to use that account. If you don’t, click the Use a Different Account link and sign in to the account you want to use. Or if you don’t already have a Google account, you’ll need to set one up.
Select your country or territory, read and accept the conditions, and click Create Account.
You’ll then be taken to a screen which will take you through the process of setting up your account. Click the Get Started button.

Start by typing in your contact details (or checking them if you have an existing account). Click Submit to continue.
You’ll then be shown some code you can use to connect your site to AdSense. Which is what we’re going to look at next.
What to Do If Your AdSense Account Isn’t Approved
Once you’ve set up your account, you’ll have to wait for Google to verify your details and approve your account before you can run any ads. Sometimes your application for an account may be rejected.
If this does happen, you will be sent an email with the reasons your account has been ‘disapproved’. In most cases, the cause is related to issues with your website, which might include lack of content, code or security issues, or content which Google believes is plagiarized.
If your site is brand new, it’s got a higher chance of being rejected because of lack of content. Google wants to know its ads are being served on high-quality, genuine websites that will drive traffic to those ads.
So instead of reapplying instantly, take some time to improve your site. Add more content to it. Fix any security issues. Make sure everything you publish is yours or you have the right to publish it, and you haven’t copied it from elsewhere on the internet.
Once you’re confident you’ve solved any problems Google warns you about, and that your site is working well, then you can reapply.
You don’t have to wait until your account is approved to connect it to your site though, so let’s move on to doing that.
How to Connect Google AdSense to Your WordPress Site
The next step for adding Google AdSense to WordPress is to hook up your WordPress site to your AdSense account. This way Google is able to serve ads correctly.
You’ll already have noticed that Google Adsense gives you some code you can add to the <head> section of your site. Resist the temptation to open up the theme editor in your dashboard and type it in. When you update your WordPress theme, the new code will be lost and your ads will break.
Instead, use one of these options.
Connect WordPress and Google AdSense with a Plugin
The easiest way to add Google Adsense to WordPress is to use an Adsense plugin such as Advanced Ads.
This will let you add the code to your site without having to access files and will also manage the process of displaying ads for you without you having to use widgets. It also gives you a Gutenberg block for ads so you can add them wherever you want in your posts.
Here’s how you add the code for your Google Adsense account using this plugin.
Start by installing and activating the plugin. Go to Advanced Ads > Settings and then click the AdSense tab.
Click the Connect to Adsense account button. You’ll then be prompted to sign in to Google with the same account you used for AdSense. Once you’ve done that, you’ll be asked to confirm that you’re happy for the plugin to access data from Google Adsense.

You’ll then see a screen with a code for you to paste into the application. Copy this, then close the popup. Paste it into the screen that appears next.
The AdSense tab will now populate with the details of your account.

The top field will have your unique AdSense account identifier. Below that there’s a checkbox for adding the verification code. Check that so that the plugin can add the code to your site’s <head> section. Then click the Save settings on this page button and move on to verifying the code.
Add AdSense Code to Your WordPress Site’s Head with a Plugin
If you don’t want to use a plugin to manage the whole ads process and you also don’t want to (or are unable to) edit the code in your theme, you can use a plugin to add code to the header or footer of your pages (in this case, it’s the header).
The Head, Footer and Post Injections plugin lets you copy code into a settings screen that is then inserted into the head or footer of your site.
Install the plugin, and then go to Settings > Header and Footer.

Now get back to your Google AdSense account and copy the code that Google gives you to link your site. Return to WordPress and copy it into the <HEAD> PAGE SECTION INJECTION ON EVERY PAGE field.
Click the save button. Now skip to the section on verifying the code with AdSense.
How to Manually Add Google AdSense Code to Your WordPress Site
The next option is to manually add the code that Google AdSense gives you to your WordPress theme. This is the more lightweight approach, without the extra code that a plugin adds, and could be your preferred option if you’re comfortable editing your theme.
If you’re using a third-party theme on your site, you must never directly edit the code in the theme. This is because any changes you make will be lost when you next update the theme.
If that’s the case, you’ll need to create a child theme. Replicate the header.php file from your parent theme, then edit that. WordPress will use that file instead of the one from the parent theme.
If you don’t want to go to the trouble of doing that, it might be easier to use one of the plugins above.
Open the header.php file in your theme and find the <head> section, which is at the beginning fo the file.
Scroll down the bottom of this section and find the line that says wp_head();.
Above that, copy in the code provided to you in your Google Adsense account. Save the file.
Now skip to the section on verifying with AdSense.
Manually Add Google AdSense Code Through a Custom Plugin
If you’re happy writing plugins, then another way to add the code is to write your own plugin.
This is the best way to do it and will speed your site up if you have more than one ad running on each page, as the script won’t be called more than once.
Create a new plugin in your wp-content/plugins folder.
Firstly add commented out the text to tell WordPress what this plugin does (making sure you edit the code to reflect your name, URI etc.):
<?php
/*
Plugin Name: Google AdSense Code
Plugin URI: https://kinsta.com
Description: A plugin to add the script for AdSense to this site
Author: Rachel McCollin
Author URI: https://rachelmccollin.com
Text Domain: kinsta
Version: 1.0
*/
Now, below that, add the function to enqueue the script from Google AdSense:
function kinsta_adsense() {
 wp_enqueue_script( 'adsense', '//pagead2.googlesyndication.com/pagead/js/adsbygoogle.js', false );
}
add_action( 'wp_enqueue_scripts', 'kinsta_adsense' );
This will add the script that makes Google Adsense work, but it doesn’t link to your AdSense user account. To do that, you need to add an extra function to your plugin:
function kinsta_adsense_id( $tag, $handle ) {
 if ( 'adsense' !== $handle ) {
  return $tag;
 }
 return str_replace( ' src', ' data-ad-client="ca-pub-111111111111111" src', $tag );
}
add_filter( 'script_loader_tag', 'kinsta_adsense_id' );
In that code, you’ll need to replace ca-pub-111111111111111 with the unique identifier from your own AdSense account.
Save the plugin and activate it.
Verify the Link with Adsense
Whichever method you use to add the code to your site, you’ll need to verify it with Adsense.
Now go back to AdSense and check the I’ve pasted the code into my site checkbox.
Google will then check your site to see if it can find the code. You should see a message telling you it’s succeeded.

How to Create Ad Units in Google Adsense
Now that you’ve linked your WordPress site to Google AdSense, it’s time to create an ad unit. This is a unit you create in Google AdSense that will then be used to send ads to your site.
An ad unit is a piece of code that allows ads to be displayed within it. The actual ad that displays will vary according to your settings and your users’ browsing history, so you can create one ad unit and it will display multiple ads at different times.
If you want to display ads differently in different parts of your site (for example having a banner ad at the top of the page and a square ad in the sidebar), you’d create more than one ad unit.
In your Google AdSense account, you’ll see a notification telling you your account is activated. Click the Set Up Ads button.
Alternatively, if your account was already activated, go to Ads > Overview and click the Ad Unit tab.

Google Adsense gives you three types of ads to choose from:
- Display ads are all-purpose ads but will generally work best outside the flow of your content, in the header, footer, or sidebar. These are the most flexible and customizable kind of ad but can be ignored by visitors as they are outside the area of the page where they are looking.
- In-feed ads will be placed in the flow of your content on archive pages, in between post listings. These will get people’s attention on your main blog page or archive pages.
- In-article ads will be placed in the flow of your posts, within the content. These have the benefit of being where people are looking but some people find them irritating.
Let’s start by creating a display ad, as that’s the most straightforward.
Click on Display ads to access the setup screen. Work through the following steps:
- Name your ad: users won’t see this so use something that will help you identify it again.
- Choose the format of your ad: horizontal, vertical, or square. Which you choose will depend on where you’re planning to place it (square ads look good in the sidebar, while horizontal ads work better in the header or footer).
- Choose whether the ad size will be fixed or responsive: responsive ads are the default and will resize on different sized screens. Don’t forget that most people will probably be viewing your ad on mobile, so it’s good practice to stick with the Responsive option.
Click the Create button.

You now have your first ad unit. Adsense will give you the code you need to add it to your site. Whether you need to use this will depend on the method you’re using to insert ads into your site – if you’re using a plugin, it might not be necessary.
Now let’s add the ad to our site.
How to Insert Ads from Google AdSense in Your WordPress Site
Once you’ve created an ad with Google Adsense, you need to insert it into your WordPress site.
Remember: when you’re adding an ad on your site, it’s an ad unit you’re inserting (not the ad itself). The ad will be fetched and displayed when a user visits your site, depending on which ad Google thinks that user will be most likely to respond to.
Where to Put Your Ads
Before you insert your ad unit in your site, take some time to consider the best ads placement. This will vary according to your your site layout and design and where you get most of your traffic.
Adverts aren’t what people came to your site for. They came to find out more about you or to consume a piece of content they found via a search. A screen full of ads will give the impression that your site only exists to make money from ads and not to provide quality content. We’ve all seen those sites… and we’ve all instantly used the back button to leave them!
So, consider the ration between ads that people will click on vs content that people will want to consume. Encouraging them to stick around for longer and come back again, which will ultimately make you more money.
When planning the placement of ads, consider:
- Positioning: are the ads in a spot that’s going to catch people’s attention, but not dominate the page or prevent people from consuming your your site’s content?
- Size: Are the ads big enough to be noticeable but not so large they dominate the page or make it impossible for people to see your content?
It’s a good idea to run some ads and test how they perform, then try again with some different ad unit configurations until you find the one that works best for site and your visitors. Testing rigorously will mean you’re able to make more money from your ads and gain your audience’s loyalty.
There are a few different ways to insert your ads, depending on whether you’re using a plugin or inserting the code manually.
Let’s start by looking at how you do it with a plugin.
Using a Plugin to Insert Ads in WordPress
You can use a plugin to manage the whole process of inserting the ads or simply to add the code. There is a range of plugins for Google Adsense available, here I’ll show you how to use two different approaches.
Using a Plugin to Insert Ad Code into Your Site
Your first option is to use the Head, Footer and Post Injections plugin we used earlier to add the code linking your site to Google Adsense. You can also use it to add code to your pages and posts.
If you haven’t already installed the plugin, install and activate it now, then go to Settings > Header and Footer. Click on the Posts tab.

Now go back to Google Adsense and grab the code for your ad unit. If it isn’t still open from when you created it, go to Ads > Overview, find the ad unit in the list and click on the code symbol next to it.

In your site, paste the code into the relevant field in the Posts tab. If you want to create two ad units of different dimensions for mobile and desktop, you can paste different code into each field. Or if you want to insert the ad on mobile and desktop, paste it into both.
Click the save button at the bottom of the screen and your ad unit placement will be saved.
Using a Plugin to Insert Ads Automatically
If you don’t want to worry about copying and pasting code and you’ve already used the Advanced Ads plugin to link your site and your AdSense account as shown above, you can use the plugin to insert your ad unit into your site.
Go to Advanced Ads > Ads. Select the AdSense Ad radio button and click Next.
The plugin will find the ad units you’ve created in Google AdSense. Select the one you want to work with and click the Next button. If the plugin doesn’t find your ad unit, copy the code from AdSense and it will set the ad up.

You’re then prompted to define conditions when the ad won’t show. You might decide not to show ads to logged-in visitors, for example, or to hide them from specific pages such as your landing page if you have one.
If you’re happy showing the ad in all conditions, leave the settings on the default then click the Next button.
After that, you’ll be asked to choose where you want to display the ad. You can choose from before the content, within the content, after the content, using a shortcode or some PHP, in the sidebar or header. If you want to use custom positions, you’ll have to upgrade the plugin.
I’m going to select After Content. Click on the preferred option and the plugin will place the ad in that location.

If you were to choose the sidebar or footer, the plugin would take you straight to the Widgets screen where you can drag the Advanced Ads widget into your sidebar and configure it. It’s easier to do this straight from the Widgets screen or the Customizer, which saves you going into the plugin settings screens.
Drag the widget to the widget area where you want it displayed and select the ad unit you want to show.

The ad will then show up on your site.
Inserting the Ad Unit Code Manually
If you’d prefer not to use a plugin, you can choose to insert the ad unit’s code manually.
You can do this in one of two ways: by pasting the code into a text widget or by pasting the code into your theme’s template files.
Let’s take a look at each.
1. Inserting the Ad Code in a Text Widget
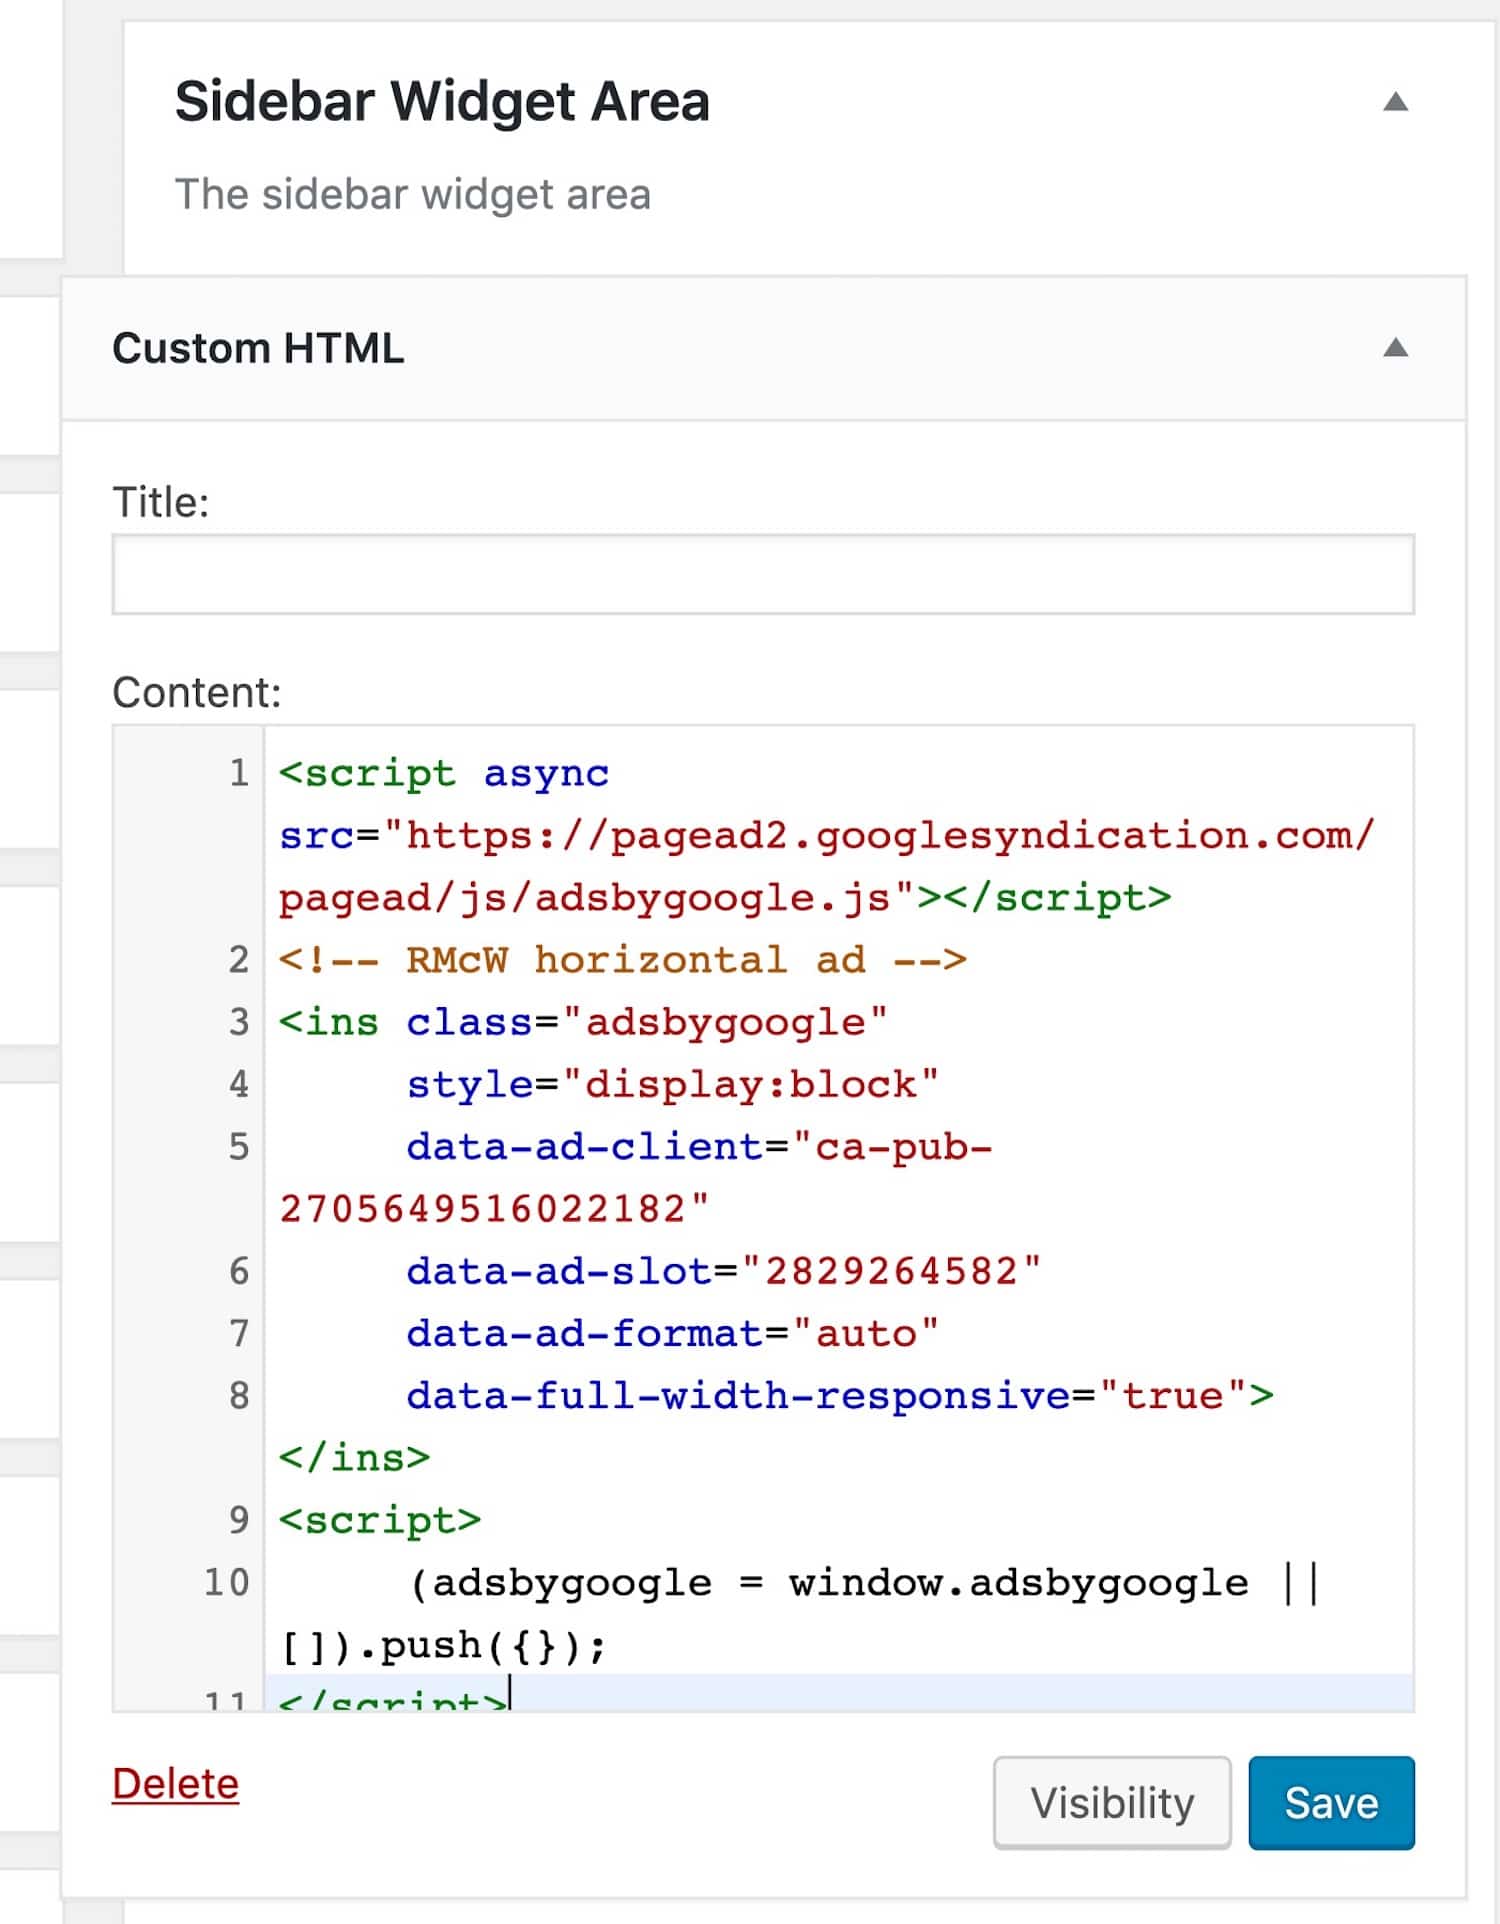
One of the easiest ways to insert an ad into your site is by copying the code into a text widget. However, this will only work if your theme has a widget area in the location where you want to display your ad.
Go to Appearance > Widgets or open the Customizer and select Widgets. Select the widget area where you want the ad to show up.
Add a Custom HTML Widget to the widget area. Open the widget and copy in the Google Adsense code for the ad unit. When you set up the ad unit, make sure you use a layout that will work in your widget area. Square is good.
2. Inserting the Ad Code in a Theme Template File
You should only do this if you have access to your theme to edit it, as you’ll have to insert the code into every template file that displays content where you want your ad to appear. If you’re working with a third-party theme, always create a child theme and edit that instead or your changes will be lost next time you update the theme.
If your theme includes action or filter hooks inside the template files, you can use these to write your own plugin to add the code. I’ll show you how to do that shortly.
First, choose the content type(s) in which you want to display ads. Let’s assume it’s single posts, in which case you’ll need to edit post.php.
If you’re working with a child theme, make a duplicate of posts.php from your parent theme and copy it to your child theme. You’ll then edit that, and WordPress will use it to display single posts instead of the equivalent file from the parent theme.
If your theme doesn’t have a post.php file, then copy the next file in the template hierarchy: it’ll be single.php, singular.php or index.php.
Call your duplicate file post.php and edit out the parts that aren’t relevant to posts (if you aren’t confident doing this, either leave the file as it is or use a plugin to insert the ads instead).
Find the location in your theme template file where you want to display the ad and copy the code in from your Google Adsense account. You can find it by going to Ads > Overview, finding the ad you want to use, and clicking the code icon next to it.
Now save the template file and the ads will be displayed in your content.
Inserting the Ad Code in a Function
A more robust way of doing this is by writing your own plugin to hook the code to an action hook in your theme.
If your theme has action hooks in the content, you can write a function and then hook it to the relevant action hook to output the code in that spot in the template file.
I’m going to imagine that my theme has a hook called kinsta_after_content, which is after the content. I only want to display my ads on single pages, so I’ll include a conditional tag to ensure that.
You can either add this code to your functions.php file or create a plugin for it.
function kinsta_insert_adsense_after_content() {
 if( is_singular( ‘post’ ) { ?>
  // add the script from AdSense here
 <?php }
}
add_action( ‘kinsta_after_content’, ‘kinsta_insert_adsense_after_content’ );
The script code is taken directly from Adsense. Note that I’ve included closing and opening PHP tags as the script isn’t in PHP.
Save your file and check your site – the ad should be displayed.
How to Change the Way Your Ads Look
Whichever method you’ve used to implement Google AdSense, your ad should now be displayed in the right place on your WordPress site.

If your ad doesn’t look quite right where it is, try changing the positioning or the layout options, or using a different ad unit in that slot.
Nevertheless, if you want to adjust your ads, you can.
Adjusting the Layout of Your Ads
Whichever method you’ve used to add your ad unit to your WordPress site, it will now be displayed in the spot you chose.
But what if it doesn’t look quite right?
Adjusting the Layout of Your Ads with a Plugin
If you use a plugin to display ads, it may let you adjust the way your ads look and the exact positioning. For example, you can have your content wrapping around your ad.
In the Advanced Ads plugin, go to Advanced Ads > Ads. Select the ad you want to adjust.
Scroll down to the Layout/Output section (if you can’t see this, you might need to stop the wizard).

Here you can configure wraps and floats, and you can add a class or ID to your ad’s container so that you can style it in your theme’s stylesheet or via the Additional CSS option in the Customizer.
Adjusting the Layout of Your Ads with the Manual Method
If you’ve used the manual method to add the Adsense code to your WordPress website, you can style the code by adding a containing element.
So for example if you’d write a plugin for your ad, you would adjust the code as follows:
function kinsta_insert_adsense_after_content() {
 if( is_singular( ‘post’ ) { ?>
  <aside class=“ad-wrapper”>
   // add the script from AdSense here
  </aside>
 <?php }
}
add_action( ‘kinsta_after_content’, ‘kinsta_insert_adsense_after_content’ );
I’ve used an aside element because its content isn’t part of the main content, but something aside from it.
Adjusting Ad Positioning
If you want to automatically place ads in places other than the sidebar or before or after the content, there are plugins that can help you do that.
One popular spot to place ads is in the flow of the content. You might place them centered so that they arrest the eye as the visitor scrolls down through a post or maybe have them floated left/right so that the content warps around them, preserving the way users consume your content.
The Ad Inserter plugin is designed to insert your ads in a range of positions. It lets you insert ads:
- Before or after the content.
- Before or after a random paragraph or multiple paragraphs.
- Before or after images.
- Relative to a given position in a post.
- Before or after the comments or the excerpt.
Ad Inserter works by letting you create blocks for each of your ads. For each one, you specify which content type you want it to appear in and where you want it.

Create as many of these as you need and insert them in the locations where you want them to show up.
Alternatively, the Adsense Reloaded plugin lets you display multiple ads on a page in a variety of pf positions. Locations include the beginning and end of the content, after specific paragraphs, after the ‘more’ tag and more. It includes shortcodes you can add when editing a post and quick tags you can code into your template files to quickly insert an ad.
Getting the Most from Google AdSense and WordPress
Now that you have your Google AdSense code implemented and unit ads set up running on your WordPress site, your work isn’t done.
If you want your ads to work hard for you, you’ll need to maintain and monitor them.
To do so, you can track earnings from your ads in Google AdSense by going to Ads > Overview and clicking the Report icon to the right of the ad’s name.
Google will give you data on the number of clicks, your earnings, and more. Use this data to identify which ads are the most profitable for you. If one ad unit is working better for you, you might choose to replicate that in other locations in your site to replace other units that performing so well.
Make sure you also monitor your site stats and check that your ads aren’t having any negative impact on your bounce rate or the number of pages people are viewing. If ads are distracting people from browsing your site, you may want to adjust them.
Spending some time on these optimization tasks regularly will help you to get your ads as high performing as you can and ensure you make more money from them.
And don’t forget: if people are going to click on your ads, you need them visiting your site in the first place, so make sure you review your SEO and make it as effective as possible too.
How to Use Google AdSense with Google AMP
If the bulk of your website traffic comes from mobile devices (and on many websites it will), you might benefit from using Google AMP. Let’s look at how that works and how you can integrate it with your ads.
What is Google AMP?
Google AMP is short for Google Accelerated Mobile Pages. AMP is designed to speed up your site on mobile devices and could enhance your search engine rankings.
It works by accessing Google’s cache, which stores and delivers your content so it can load faster. You can use it to speed up landing pages on your site, reducing bounce rate, and with ads.
Using AMP with Google Adsense and WordPress
You can use AMP with WordPress by installing an AMP plugin. Most ads plugins are also compatible with AMP. Examples include Ad Inserter Pro, the premium version of the free plugin mentioned above, and AMP for WP, which is also a premium plugin.
Summary
Adding Google AdSense to WordPress and displaying ads can help you make a new stream of money and could be your perfect side-hustle. Especially, if you have high traffic and your site isn’t designed to sell your own products or services.
To link WordPress to your Google AdSense account you have a few options to choose from:
- Use a plugin.
- Add the code to your theme’s header or footer.
- Add the code manually.
- Create a custom plugin.
Now you know everything you need to start cashing in some money from Google AdSense. What’s your experience with Google AdSense? Let us know in the comment below!

Rachel McCollin has been helping people build websites with WordPress since 2010. She's a huge fan of self-hosted WordPress and wants to help as many people as possible create an awesome website with it.

