Testing emails in a local development environment can be challenging. It’s a real pain to know whether your website’s or web app’s outgoing emails are actually reaching the recipient’s inbox. Enter, MailHog!
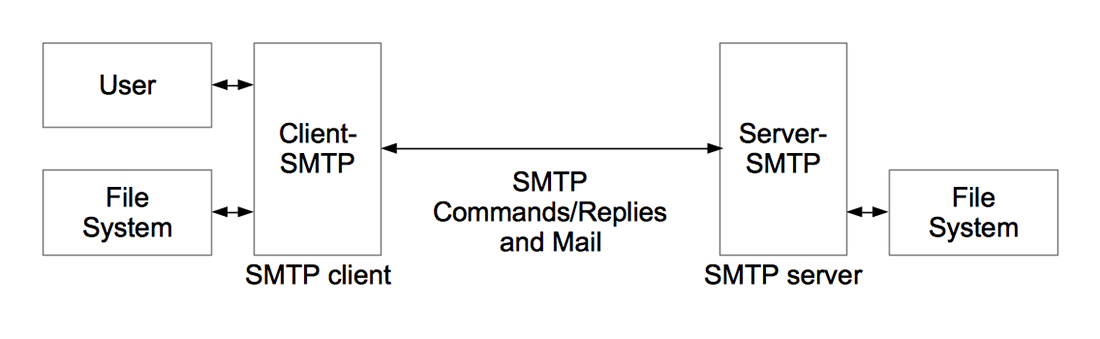
MailHog is an email testing tool that makes it super easy to install and configure a local email server. MailHog sets up a fake SMTP server. You can configure your preferred web applications to use MailHog’s SMTP server to send and receive emails.
For instance, you can configure a local WordPress site to use MailHog for email deliveries. That’s exactly what DevKinsta does to power its built-in SMTP server for testing emails locally.
In this article, you’ll learn the ins and outs of MailHog, including its installation, configuration, how to test emails locally, and much more!
Ready to dive in? Let’s go!
Prefer to watch the video version?
What is MailHog?

MailHog is an open source email testing tool primarily aimed at developers. It enables you to test your web app’s email sending and receiving capabilities more efficiently.
Built with the Go programming language, MailHog can be run on multiple operating systems, including Windows, Linux, FreeBSD, and macOS. MailHog is maintained by Ian Kent and released under the MIT license, so you can deploy it freely for personal and commercial uses.
But why do you even need MailHog in the first place?
Why You Need MailHog
MailHog solves many of email testing’s major problems.
Say you’re developing a WordPress website in a local development environment. If you want to test a contact form or any other outgoing email from it, it can be a dire task.
Typically, the web application’s default SMTP server takes care of this task. In a local development environment, it almost always never works due to multiple reasons.
You can read our extensive guide on free SMTP servers to know more about how an SMTP server works.
First, you need to set up your operating system, webserver, and web app to enable emails in a local environment. Then you’ll have to make sure that the emails arrive successfully in your recipient’s inbox, which can end up wasting your time (and inbox space).
And then there’s the issue of using a real email address for testing. It can hurt your private email’s credibility.
MailHog solves all the above issues. It sets up a fake SMTP server that you can set your web application to send and receive emails. It even stores the sent and received emails in a nifty web UI, so you can go through them just like you’d with a real email inbox.
Lastly, MaiilHog also lets you retrieve those emails with an API for automated testing. It’s a powerful feature, and how you use the API is up to you.
MailHog Features
MailHog comes equipped with many features out-of-the-box. Here are some of its major highlights:
- Lightweight and Portable: You don’t need to install MailHog to use it. It’s one of MailHog’s major advantages. That makes it highly portable to run it on almost any operating system or web server.
- Extended SMTP Support: Not only does MailHog support setting up a fake SMTP server, but you can also use it to set up an ESMTP server (Extended SMTP). It also includes support for SMTP AUTH and PIPELINING.
- API Support: You can use MailHog’s built-in HTTP API (or JSON API) to retrieve, list, and delete emails.
- Failure Testing: You can invite Jim, MailHog’s Chaos Monkey (yes, it’s actually called that), to the party to test out your web app’s email deliverability. It does this by randomly creating common email deliverability problems, such as rejected connections/authentications and rate-limited connections.
- Real-time Updates: MailHog uses the EventSource web interface to provide instantaneous updates.
- Emails Capture and Storage: The captured emails can be stored in in-memory message storage and persisted in a MongoDB database and file-based stored system.
- Download Attachments: MailHog supports the download of individual MIME parts.
- Web UI: You can use MailHog’s Web UI to view emails as plain text, HTML, or source. It also supports multipart MIME and encoded headers.
- Authentication: MailHog supports HTTP basic authentication for both its Web UI and API.
- Release Captured Emails: You can configure MailHog to release captured emails to real SMTP servers for delivery.

Apart from the above features, MailHog currently has two client libraries for PHP and NodeJS environments to interact with the MailHog API easily.
Deploying MailHog on Various Platforms
As mentioned before, MailHog doesn’t need to be installed. However, you still have to download it and set it up in your development environment.
Let’s get started with downloading MailHog. Then we’ll show you how to set it up on various platforms. There are many ways you can go about doing it.
MailHog on Windows
First, head to MailHog releases page on GitHub to download its latest stable version for Windows. After downloading MailHog, you can run it as is without any external dependencies.

Note: As of writing this article, MailHog 1.0.1 is the latest release version. You can download it precompiled for Windows, Linux, and Darwin (macOS) platforms. If you’re using a niche platform, you can also download its source code and compile it for your specific use case.
As MailHog for Windows is a simple self-executable program, you can just run the downloaded .exe file. If you’re presented with any security alerts, make sure to allow MailHog to run on your localhost environment without firewall restrictions.
Here’s how MailHog looks on Windows 10.
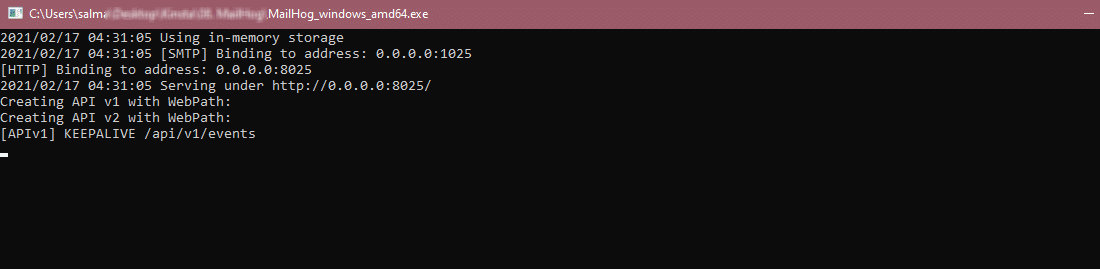
You can see that the SMTP server is on port 1025 and the HTTP server is on port 8025.
Nothing too fancy yet, but it’s a confirmation that MailHog is running on your system.
Now, you can visit localhost:8025 or 127.0.0.1:8025 in your web browser to view the MailHog Web UI.

You cannot find any email listed here yet, as we haven’t configured any of our web applications to use MailHog. We’ll cover that later in this article.
MailHog on Linux
If you’re using Linux (Ubuntu/Debian), here’s how you can deploy MailHog:
sudo apt-get -y install golang-go
sudo apt-get install git
go install github.com/mailhog/MailHog
The first Linux command installs the Golang programming language on your development environment (if you don’t have it already). You can skip this line if you’ve installed Go already. The next command installs git on your machine (you can skip this too if it’s already installed).
The third command uses Go’s directive to get MailHog’s latest stable release from its GitHub repository.
Next, you can run /path/to/MailHog through your terminal to start MailHog. The exact path may vary depending on your Linux flavor. As Go’s bin files on Ubuntu are stored under the ~/go/bin/ directory, you can run the below code to start MailHog:
~/go/bin/MailHogThat’s pretty much it. MailHog is now running on your Linux machine. This is how it looks.

If you want to start MailHog automatically on every login, you can set it to start as a daemon serve using supervisord, upstart, etc. You can also use the init script or Ansible role provided by geerlingguy to do the same.
Just like with Windows, you can see that the SMTP server starts on port 1025 and the HTTP server starts on port 8025.
Visit localhost:8025 or 127.0.0.1:8025 in your web browser to see the MailHog Web UI.

MailHog on macOS
Apple users can install MailHog using Homebrew. Open up your terminal and run the following command:
brew install mailhogThat’ll install MailHog on your macOS. Next, you can start MailHog with:
mailhog
If you want MailHog to launch automatically on login and run as a background service, you can run the following command instead:
brew services start mailhogThat’s pretty much it. MailHog is now installed on your macOS. You can view its Web UI by visiting 127.0.0.1:8025 or localhost:8025 in your browser.
MailHog on Docker
Docker is one of the easiest ways to set up MailHog across any platform.
First, make sure that you have Docker installed on your machine. Next, you can start MailHog directly from Docker Hub by running the following command:
docker run -d -p 1025:1025 -p 8025:8025 mailhog/mailhogLet’s break down the above command and its directives:
docker runstarts a docker container.
-ddirective runs the docker container in the background.
-p 1025:1025and-p 8025:8025directives expose MailHog’s default SMTP ports to your local ones.
mailhog/mailhoggrabs the latest MailHog build from Docker Hub.
Alternately, if you want to mount MailHog’s Maildir to your local filesystem (instead of inside a Docker container), you can run the following command:
docker run -d -e "MH_STORAGE=maildir" -v $PWD/maildir:/maildir -p 1025:1025 -p 8025:8025 mailhog/mailhogLike before, you can visit localhost:8025 or 127.0.0.1:8025 in your browser to use MailHog Web UI.
MailHog on Docker Compose
Docker Compose is an extension of Docker that makes it easy to run multiple Docker containers with a single command. You do this by defining all the containers you want to run in a YAML file.
By default, Docker Compose requires you to name this file as docker-compose.yaml.
To run MailHog with Docker Compose, here’s how your docker-compose.yaml file should look:
version: "3"
services:
  mailhog:
    image: mailhog/mailhog:latest
    restart: always
    ports:
      - 1025:1025
      - 8025:8025
Inside the folder where this file resides, run the following command to start MailHog in the background:
docker-compose up -d mailhogIt works exactly like with Docker. Except here, you don’t have to mention many directives as you’ve defined them already.
You can now enter localhost:8025 or 127.0.0.1:8025 in your browser to view MailHog Web UI.
In addition to the above methods, MailHog’s GitHub repo also includes a guide for deploying MailHog on AWS Elastic Beanstalk.
Configuring MailHog with mhsendmail
MailHog redirects emails from web apps to its SMTP server using mhsendmail, a sendmail replacement created specifically for MailHog. It ensures that your web app’s emails are sent and received using localhost:1025 SMTP server, which MailHog is configured to handle by default.
To get started, you need to download and install mhsendmail. Depending on your platform, you can approach this in various ways.
For instance, if you’re using Ubuntu, you can download mhsendmail from its GitHub repository by using the following command:
wget https://github.com/mailhog/mhsendmail/releases/download/v0.2.0/mhsendmail_linux_amd64Next, make this file executable and move it to your user directory. To do this, use the following command:
sudo chmod +x mhsendmail_linux_amd64
sudo mv mhsendmail_linux_amd64 /usr/local/bin/mhsendmail
Alternately, you can also get mhsendmail on Golang or Homebrew by running this command:
go install github.com/mailhog/mhsendmailMake sure that Go is installed before you run the above command. If you’re on Linux, refer to the MailHog on Linux section above. For installing Go with Homebrew, run the following command:
brew install goWith mhsendmail downloaded, you can now proceed with installing it:
go install github.com/mailhog/mhsendmailNext, you need to configure your web app to use MailHog’s mhsendmail as its email routing service. Most Linux systems have it set to use sendmail by default.
You can do this by editing your php.ini file. On most servers, you can find the php.ini file in the root directory. You can also execute the following command to find where it is:
php -i | grep 'php.ini'For Linux machines running Ubuntu, you need to set the value of sendmail_path to:
sendmail_path = /usr/local/bin/mhsendmailInstead of the above value, you can also use the value shown below to get the same result:
sendmail_path = /usr/sbin/sendmail -S mail:1025If you used Go to install mhsendmail, or if you’re using any other variant of Linux, the path may vary slightly depending on your platform/configuration. Make sure to link to the proper mhsendmail directory.
Mac users need to edit their Postfix config file to set up MailHog properly. You can use the following Postfix configuration:
myhostname = localhost
relayhost = [127.0.0.1]:1025
For WordPress sites, you can use the free MailHog for WordPress plugin to route your site’s emails to MailHog. To use it, install and activate the plugin in your WordPress admin dashboard. A better alternative is to use DevKinsta. We’ll cover it in depth later.
Read the MailHog documentation for information about how to set it up on various other platforms/configurations.
Additional MailHog Configuration Options
You can configure MailHog using its various environment variables or command line options.
For example, you can change its default hostname from mailhog.example to a custom name by using the MH_HOSTNAME environment variable or the -hostname command line option.
For more information, you can check out the MailHog configuration options documentation.
Local Email Testing with MailHog
Finally, let’s test our MailHog setup to see whether it’s configured properly.
You can send an email with Mailhog’s CLI by using the following mhsendmail directives:
mhsendmail [email protected] <<EOF
From: Salman <[email protected]>
To: Test <[email protected]>
Subject: Hello, MailHog!

Hey there,
Missing you pig time.

Hogs & Kisses,
Salman
EOF
In the above code, the <<EOF directive sets a custom delimiter so that you can enter the test email details interactively inside the terminal. It executes all the input when you type in the delimiter again. Here, it sends a mail using the mhsendmail command.

You can verify whether the email was delivered successfully by visiting the MailHog Web UI.

You can also click on the test email to verify its body content.

That’s a wrap! We can now conclude that MailHog has been configured successfully.
Adding to the above method, there are other ways you can send a test email. For instance, on macOS, you can send a test email by running the following command in your terminal:
date | mail -s "Hello, MailHog!" [email protected]On Windows, you can send an email with PowerShell by executing the following code:
Send-MailMessage -To "[email protected]" -From "[email protected]" -Subject "Hello, MailHog!" -SmtpServer "localhost" -Port 1025You can also define a PHP script with all the mail data and use PHP’s mail() function to send a test email. To do that, define your PHP script like below and execute it from the terminal:
<?php
$to = "[email protected]";
$subject = "Hey, I’m Pi Hog Pi!";
$body = "Hello, MailHog!";
$headers = "From: [email protected]" . "\r\n";
mail($to,$subject,$body,$headers);
?>
Lastly, you can use MailHog API to test whether an email has been delivered successfully. If you’re working exclusively in a non-GUI environment (e.g. Linux terminal, Windows PowerShell), the MailHog API super handy to list, retrieve and delete emails.
DevKinsta and MailHog: Hassle-Free Local Email Testing
Our local WordPress development tool, DevKinsta, uses MailHog to power its email testing features. As it also Docker to containerize individual sites, you’ll have a separate MailHog inbox for every local site you’re developing.

Like MailHog Web UI, you can use DevKinsta’s local email inbox to view and manipulate emails (delete, mark as read, view source).

You can also check for DevKinsta’s MailHog logs by running the following Docker command:
docker logs -f devkinsta_mailhogHead to DevKinsta’s knowledgebase section for more information.
Summary
MailHog makes email testing a breeze. It’s a great, practical solution to test your website’s or web app’s emails. Moreover, MailHog is simple to set up on almost all popular platforms and has an easy-to-use Web UI.
Like MailHog, DevKinsta is a great way to get started with local WordPress development. Not only does it include MailHog for testing emails locally, but it also comes preloaded with Adminer for easy database management.
With MailHog (and DevKinsta) on your side, you’ll find that testing emails locally has never been easier.
If you want to share your experience or challenges with testing emails locally, please drop us a line in the comment section below.