
If you’re having problems with sending and receiving emails from your WordPress site, using a free SMTP server can offer improved reliability and deliverability at no cost.
By default, WordPress tries to send transactional emails via PHP mail, which leads to all kinds of problems. Transactional emails are your site’s automated emails such as password resets, order confirmations, etc.
SMTP, short for Simple Mail Transfer Protocol, lets you send your site’s emails via a dedicated email server. This means your site can send emails more reliably and those emails are less likely to end up in users’ spam folders.
In this post, we’ll look at seven free SMTP server options that you can use with your WordPress site, including the free Gmail SMTP server.
For each option, we’ll briefly introduce you to it, share any limitations with the free plan, and show you how to set it up on WordPress.
Check out this Video Guide to using a free SMTP server for WordPress emails
What you need to use a free SMTP server with WordPress
To integrate any of these tools into your WordPress site, you’ll need a plugin.
Some of these tools offer their own dedicated integration plugins. If not, you can find several quality free SMTP plugins at WordPress.org, like Post SMTP Mailer/Email Log which is a 100% free relaunch of the popular Postman SMTP plugin.
For the tutorials below, we will use:
- A service’s dedicated WordPress plugin when available.
- Post SMTP Mailer/Email Log when a dedicated plugin isn’t available. You should be able to follow the same basic instructions with other plugins, though.
Ready? Let’s start!
7 free SMTP server solutions to use with WordPress
Here are the free SMTP providers that we’ll cover – keep reading for more detail on each tool:
Gmail SMTP server
You probably already know Gmail for its free email offering. However, Google also lets you use Gmail as an SMTP server to send emails from your website.
With a free Gmail account, you can send up to 500 emails per rolling 24 hour period. Or, if you’re a paid Google Workspace subscriber ($6 per month), you can send up to 2,000 emails during the rolling 24 hour period.
Setting up the free Gmail SMTP server is a little more labor-intensive than some of these other tools. However, the extra effort is worth it as Gmail also offers the highest free sending limit of any tool on this list.
You can use Gmail’s SMTP server information in a number of different places. You can use this in your local email client like Microsoft Outlook or within your WordPress site, which is what we’ll focus on.
To set up Gmail with your WordPress site, you’ll need to:
- Create a Google cloud project
- Configure your WordPress site to send via the app using a plugin
If you want to send emails from a custom domain (e.g. [email protected]) instead of Gmail ([email protected]), you’ll first need to set up and pay for Google Workspace. We have an entire post on why we like Google Workspace, as well as how to set up Google Workspace MX records to connect Google Workspace to your custom domain name.
If you’re fine sending emails from a Gmail address, you don’t need to do anything before starting the tutorial.
Here’s how to use the Gmail SMTP server to send WordPress emails…
1. Install and configure Post SMTP Mailer/Email Log plugin
To get started, you need to install and activate the free Post SMTP Mailer/Email Log plugin from WordPress.org. This is what lets you configure your WordPress site to send emails via the Gmail API/SMTP server.
After activating the plugin, click the Start the Wizard button.
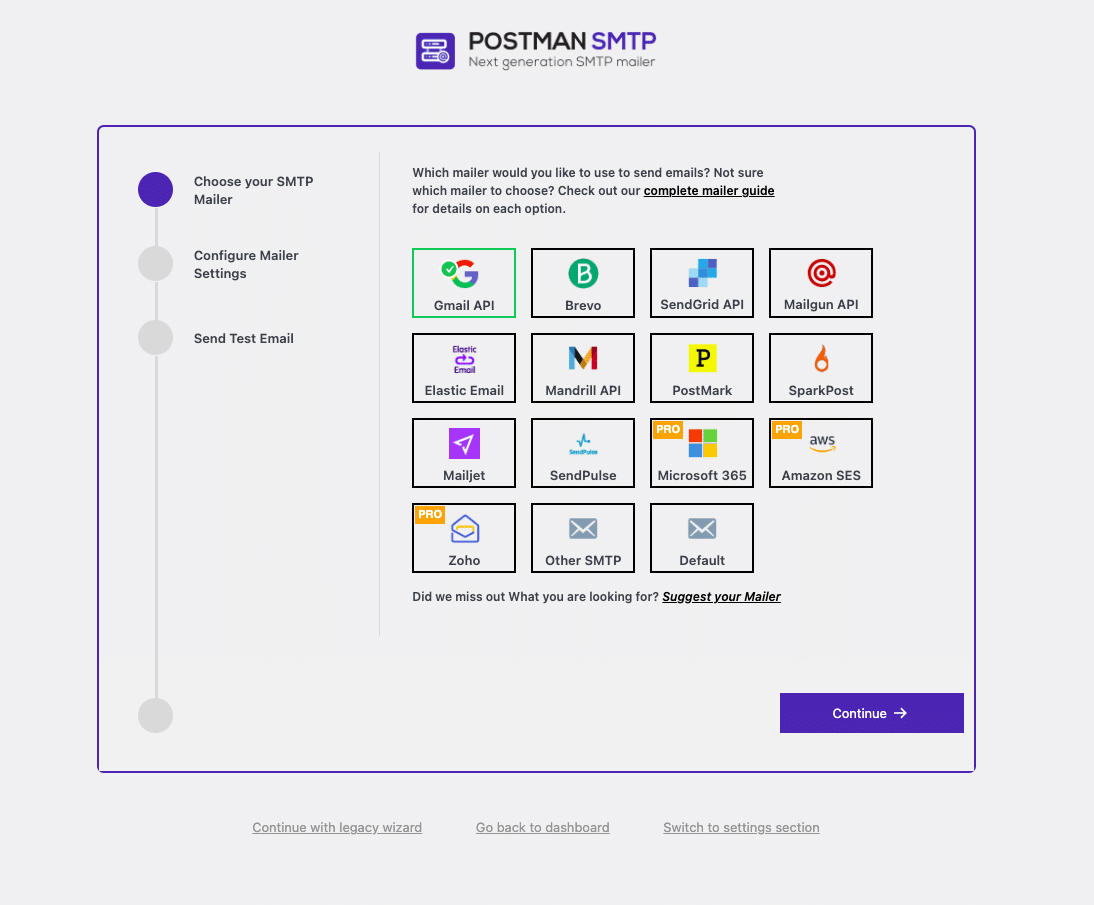
This brings you to a page showing the 3-Step Setup Wizard, where you must select the SMTP mailer, which in this case is Gmail API. After that, click Continue.
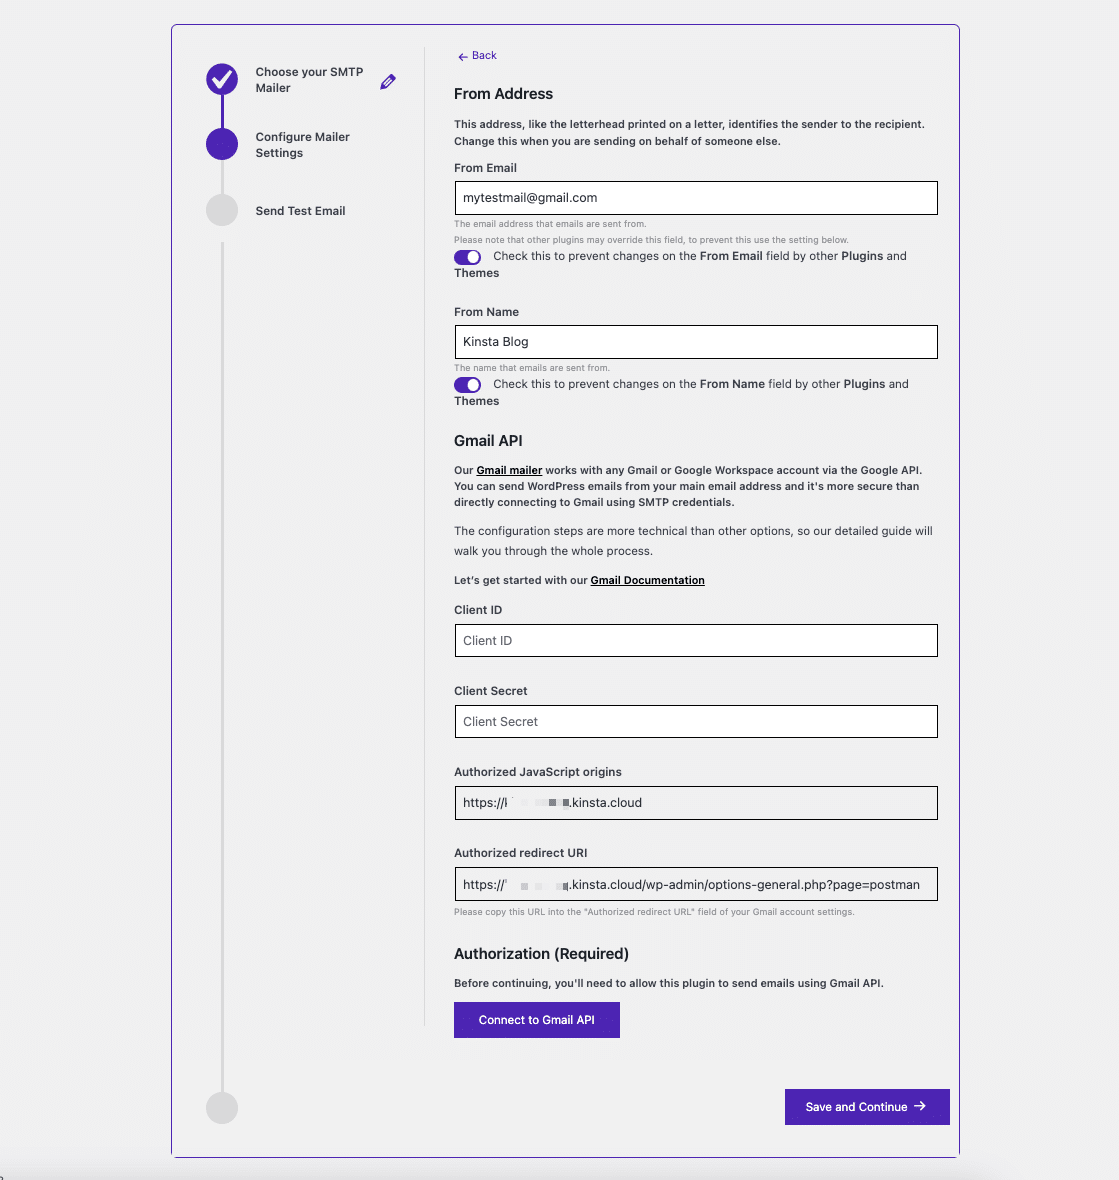
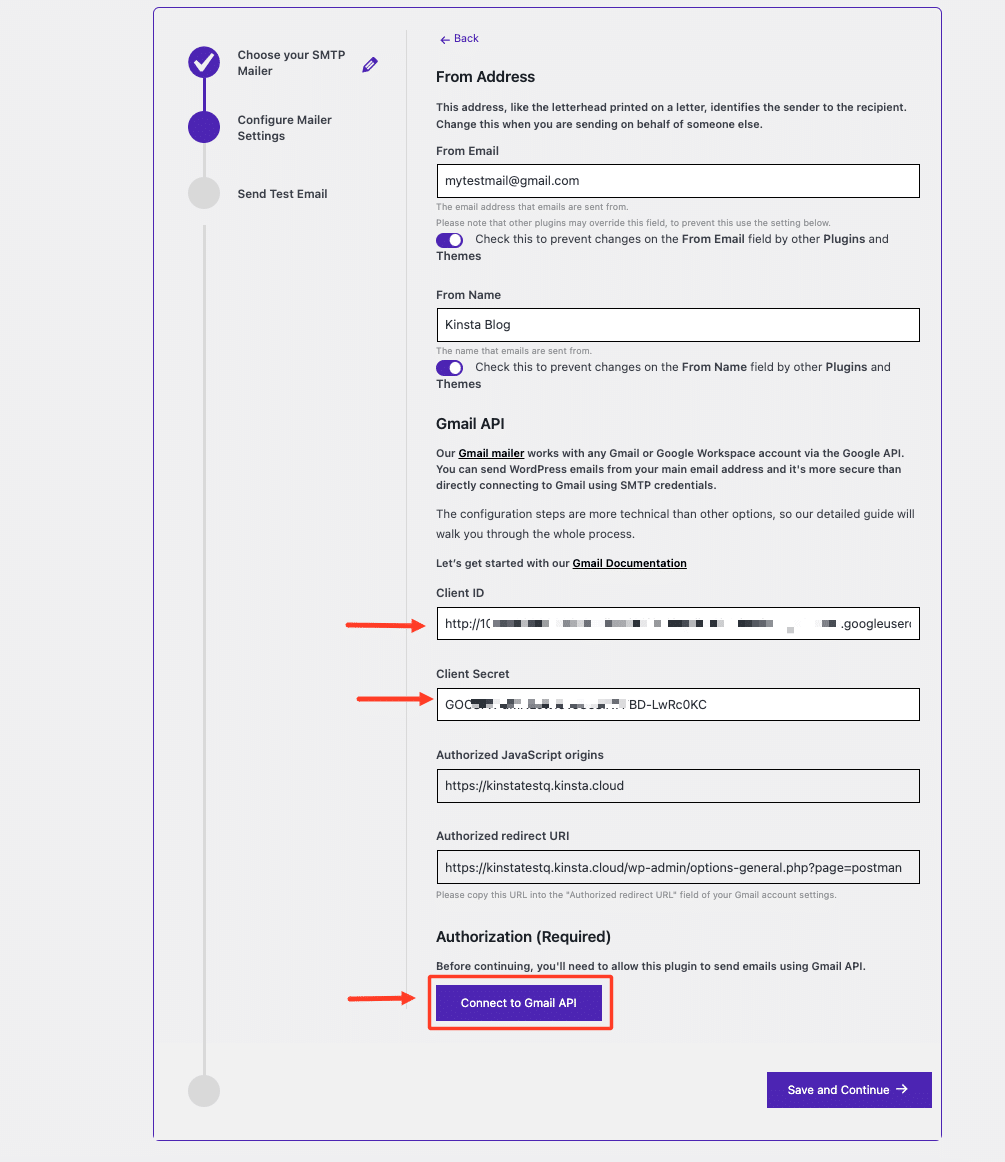
The next step displays a form where you can set the “From Address” information, which includes the email address and the name that the emails is sent from.
There is also a section to configure your chosen SMTP mailer — in this case, the Gmail API. To connect the Gmail API with your WordPress site, you need a Client ID and Client Secret. These are obtained by creating a project in your Google Cloud Console.
Keep this page open, as you also need to provide the Authorized JavaScript Origins and Authorized Redirect URI details when setting up the app. This process essentially involves an exchange of information between the plugin and the Gmail API to establish a secure connection.
2. Create your Google Cloud project
To get started, open a new tab and go to the Google Developers Console. Here, you’ll need to create a new project.
If this is your first time using Google Cloud Console, you’ll be prompted to select your country, agree to the Terms of Service, and click AGREE AND CONTINUE.
On the next screen, click on CREATE PROJECT (found on the right-hand side), a form appears where you can enter your project name and organization (if applicable).
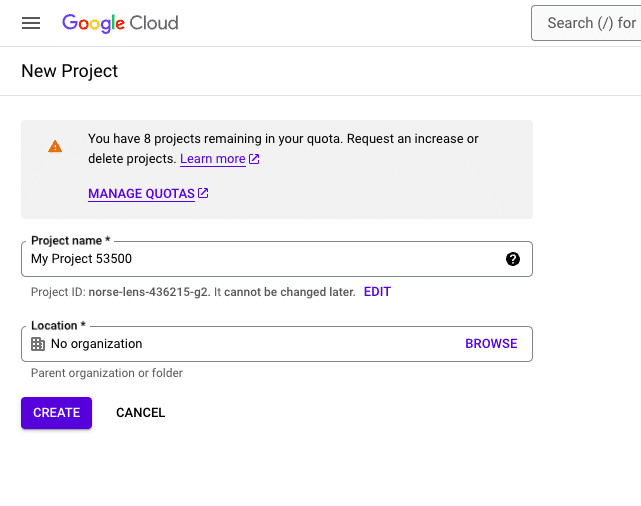
After filling out the information, click CREATE.
Once your project is created successfully, make sure you’re navigated to your project by checking that it appears in the field next to the Google Cloud logo. Then, navigate to APIs & Services > Library in the Google Cloud Console sidebar.
Scroll down to find the Gmail API under the Google Workspace section and click on it.
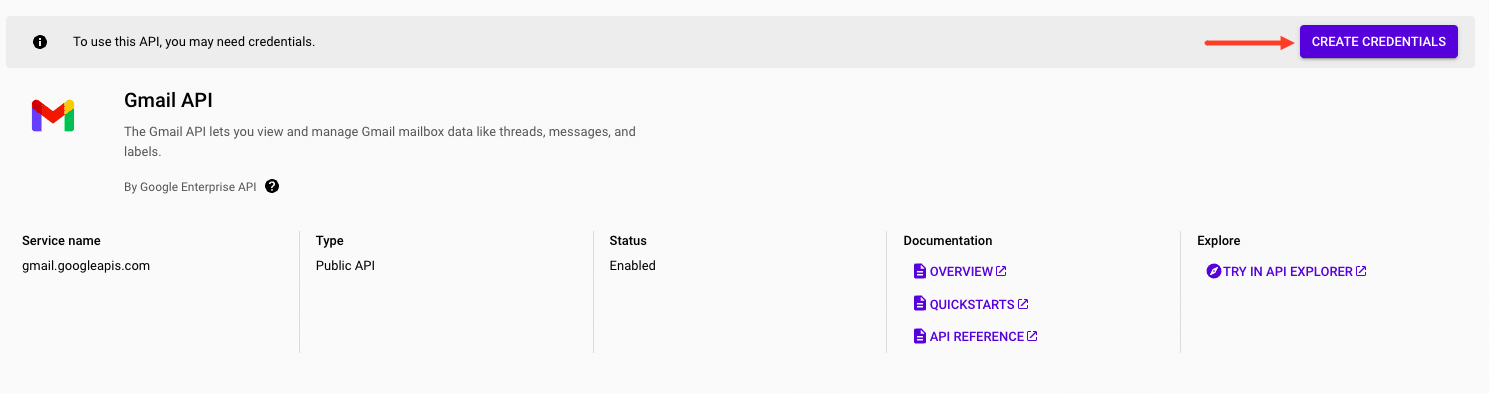
On the Gmail API details page, click the ENABLE button.
After enabling the Gmail API, you’ll be directed to the Gmail API Overview page. From there, click the CREATE CREDENTIALS button as shown in the screenshot below.
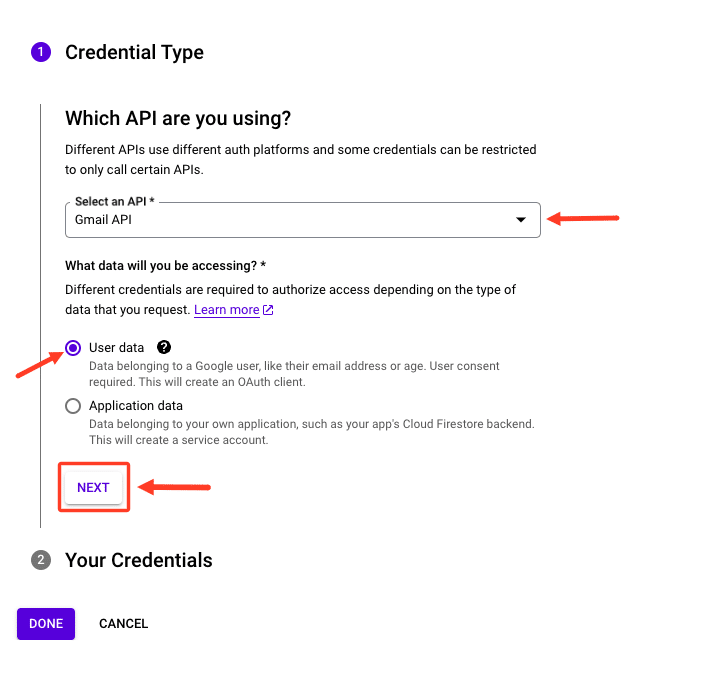
On the next page, select Gmail API from the dropdown and choose User data under “What data will you be accessing?”. Then, click NEXT.
Now, you’ll need to provide some basic information about your app:
- App name
- User support email (enter your Gmail address)
- App logo (optional)
- Developer contact information (enter your email address)
After entering this information, click SAVE AND CONTINUE.
In the next section for setting scopes, this step is optional. You can scroll down to the end of the section and click SAVE AND CONTINUE to move on.
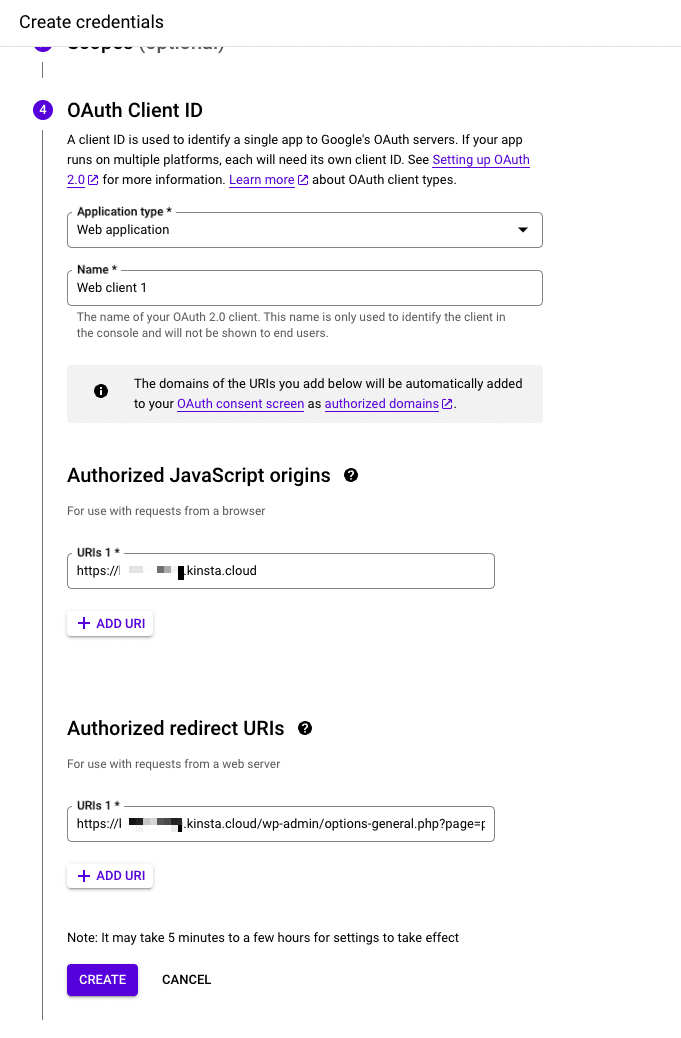
For the next step, you’ll configure your credentials by providing information about your OAuth Client ID. In the Application type dropdown, select Web application. You can leave the Name field as default.
Scroll down and click + ADD URI to add the Authorized JavaScript origins and Authorized redirect URIs that were generated when configuring the Post SMTP settings. Then, click CREATE.
Once your app is created, you’ll see your Client ID. Copy this ID and save it somewhere, or paste it directly into the Client ID field in the Post SMTP plugin configuration. After that, return to the Google Cloud project as you’ll also need the Client Secret.
Click DONE at the bottom of the page.
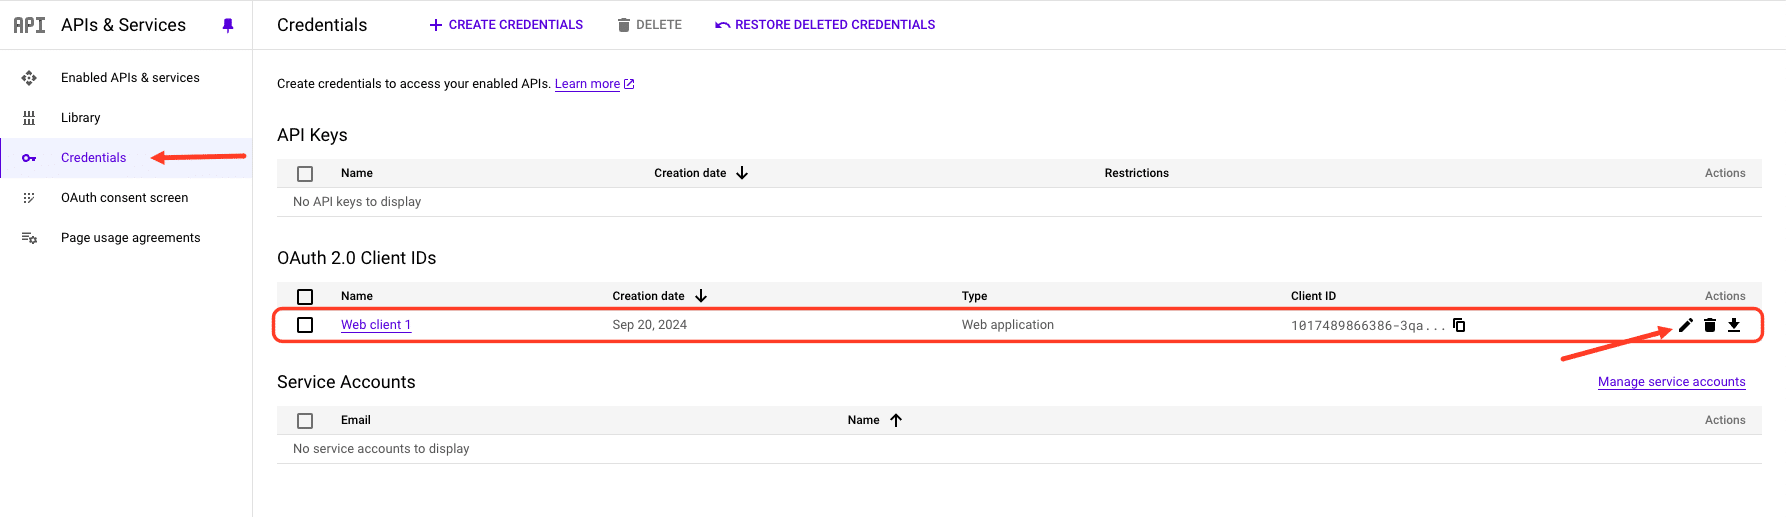
To get the Client Secret, navigate to the Credentials tab. Find the OAuth Client ID we just created and click the pencil icon to edit.
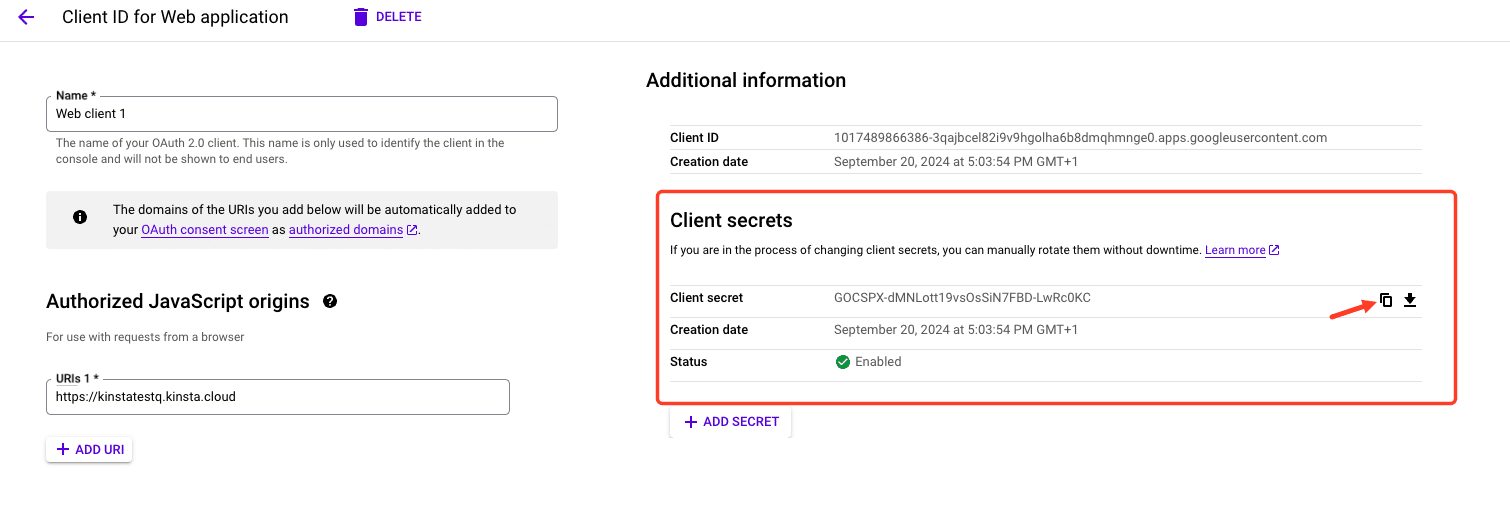
The Client Secret information appears. Copy the Client Secret and either save it for later or paste it into the corresponding field in the Post SMTP plugin configuration.
Once you’ve configured your OAuth consent screen and created your app, the next step is to add a test user. This is essential for testing the authorization process before going live with your integration.
To add a test user:
- Go to the OAuth consent screen section in your Google Cloud Console.
- Scroll down to the Test users section.
- Click the + ADD USERS button to open the user addition form.
- Enter the email addresses of the users you want to add. You can add multiple email addresses separated by commas. Make sure these users have Google accounts.
- Once you’ve added the email addresses, click SAVE.
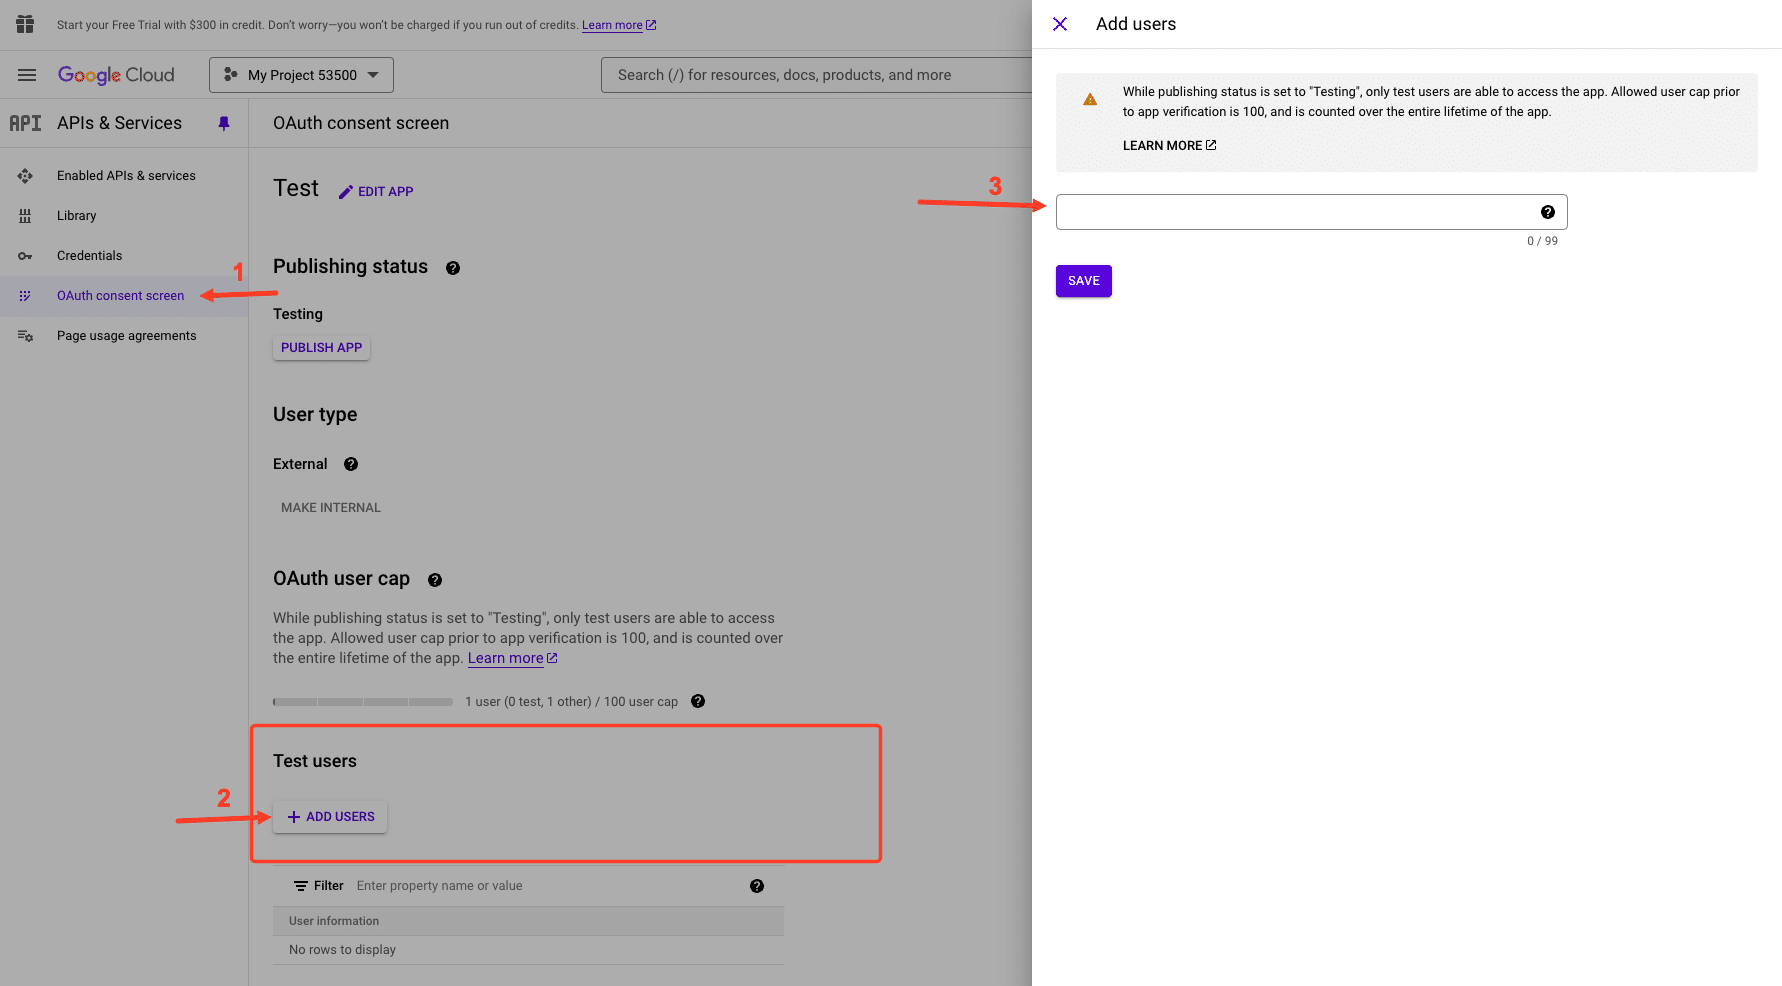
Adding test users allows you to simulate the OAuth flow for specific accounts without needing to publish your app publicly. This way, you can ensure that everything works properly before releasing it to a wider audience.
3. Add Gmail Client IDs to Post SMTP Mailer/Email Log
To finish the setup, go back to the Post SMTP Mailer/Email Log settings in your WordPress dashboard and paste in the Client ID and Client secret from the previous step and click Connect to Gmail API.
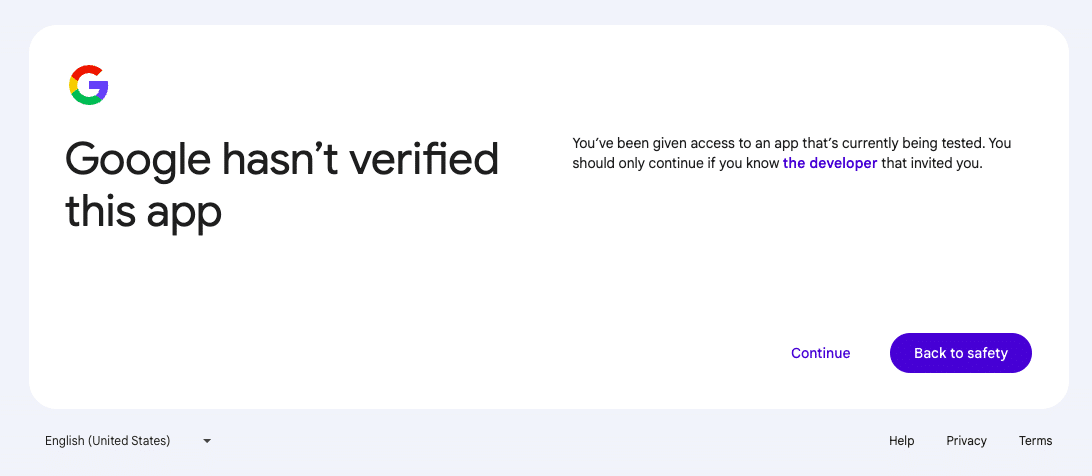
Next, log in to your Google account. Make sure it’s the same account you used to create the web app in your Google Cloud project.
The following screen appears. Click Continue:
Afterward, you’ll be prompted to give kinsta.cloud access to your Google account. Click Continue to authorize:
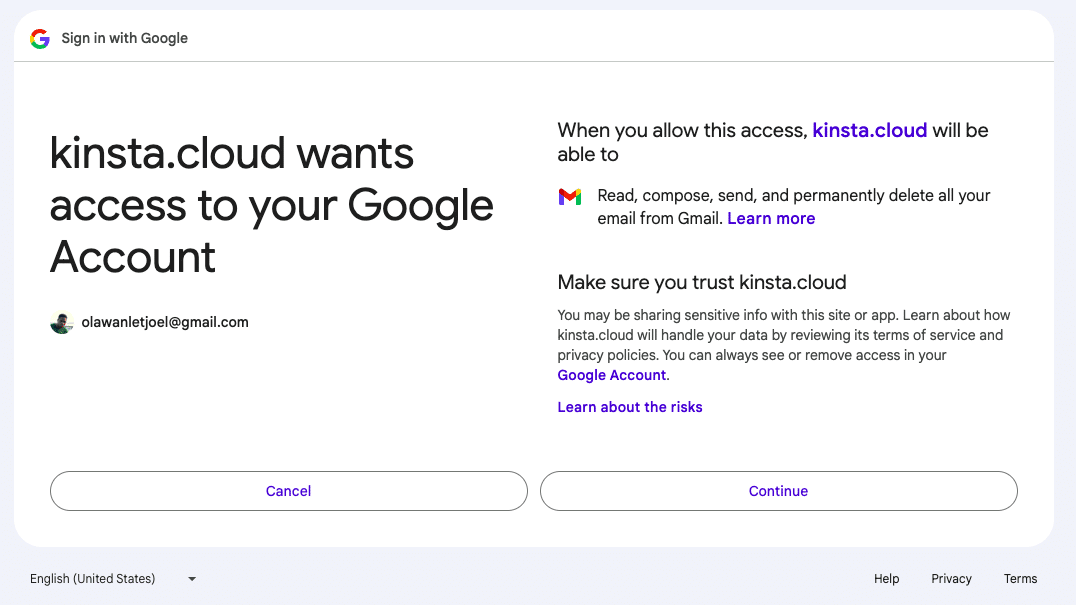
Once the connection is successful, you’ll be redirected back to the Post SMTP configuration page, where you’ll see this message: “The OAuth 2.0 authorization was successful. Ready to send e-mail.”
Finally, click the Save and Continue button to complete the process.
Once you complete the authorization process, you’re all finished!
To verify that everything is working, the Post SMTP Mailer/Email Log plugin includes a feature to let you send a test email.
SendGrid
SendGrid is a popular transactional email service that’s easy to set up with WordPress thanks to its API integration method. It also gives you detailed analytics and logging.
SendGrid offers a one-month free trial that lets you send up to 40,000 emails. After your first month ends, you can continue to send up to 100 emails per day forever.
For smaller WordPress sites, this limit should be fine. If you do need to exceed the free limit, the paid plans start at $14.95 per month for up to 40,000 emails.
SendGrid also offers a separate service to let you send marketing emails if you’re interested. To set up SendGrid with WordPress, you’ll need to:
- Generate a SendGrid API key
- Add the API to WordPress using the dedicated WordPress plugin or a separate SMTP plugin
For the full tutorial, we have an entire post on how to use SendGrid with WordPress.
Pepipost
Pepipost is strictly an email sending service. You can connect it to any app or service, including your WordPress site. You’ll also get real-time reports to analyze the emails that you send.
Pepipost lets you send up to 100 emails per day for free forever. You’ll also be able to send up to 30,000 emails during your first 30 days.
If you need to exceed that limit, there’s no à la carte pricing. The next cheapest plan is $25 per month for up to 150,000 emails.
Here’s how to use Pepipost to deliver WordPress emails.
1. Authenticate domain name and access API key
To get started, register for a free Pepipost account to generate your API key.
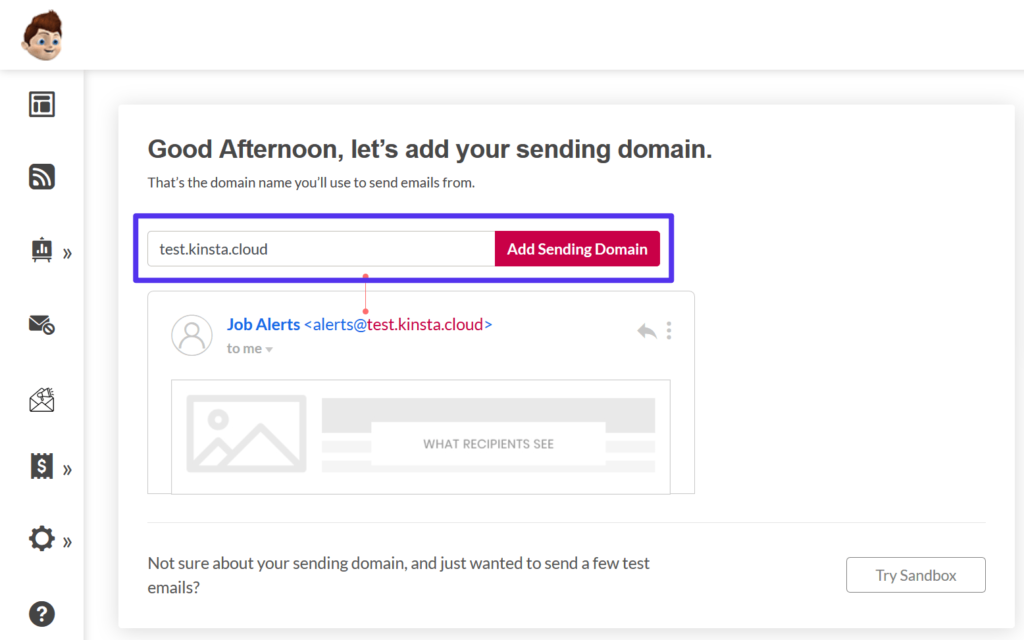
Once you create your account, you’ll be prompted to add your WordPress site’s URL as a sending domain:
You’ll then need to add two TXT records to your DNS records to authenticate your domain name.
If you’re hosting at Kinsta, you can add these TXT records to your domain from the Kinsta DNS tab in your MyKinsta dashboard. If you’re not sure how to do this, you can follow our guide to email authentication to learn how to add these DNS records and why they’re important.
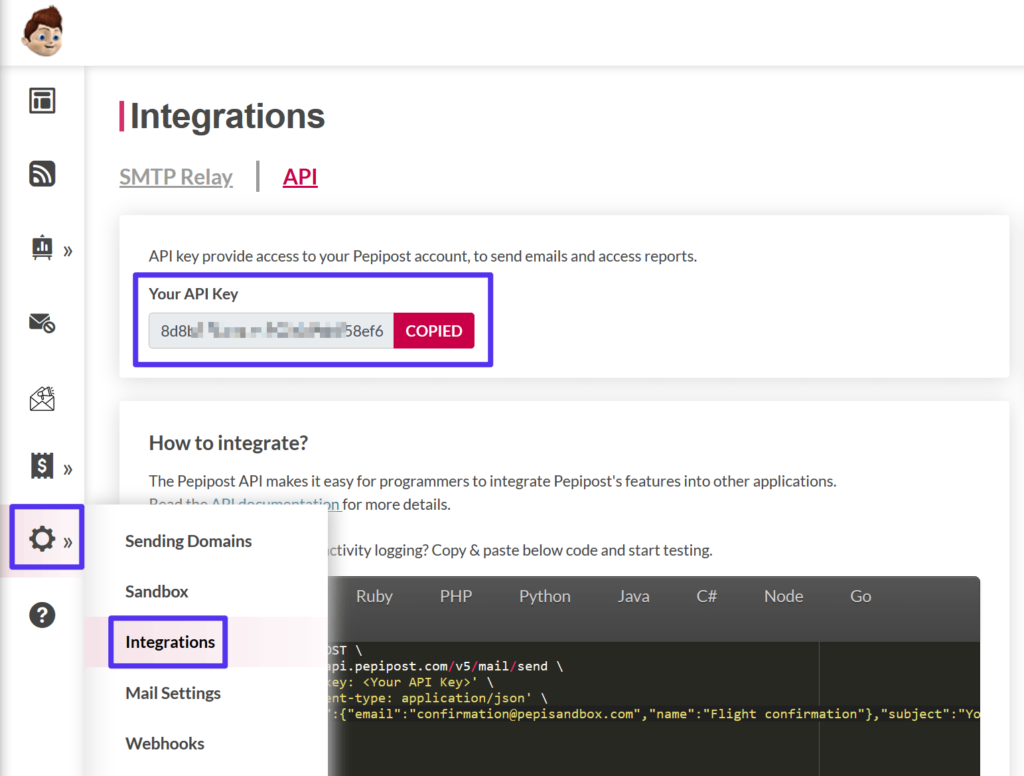
Once you’ve authenticated your domain name, go to Settings → Integrations in your Pepipost dashboard to find your API key. Keep this value handy because you’ll need it in the next step:
2. Install and configure official Pepipost plugin
Once you have your Pepipost API key, you can install the official Pepipost plugin from WordPress.org.
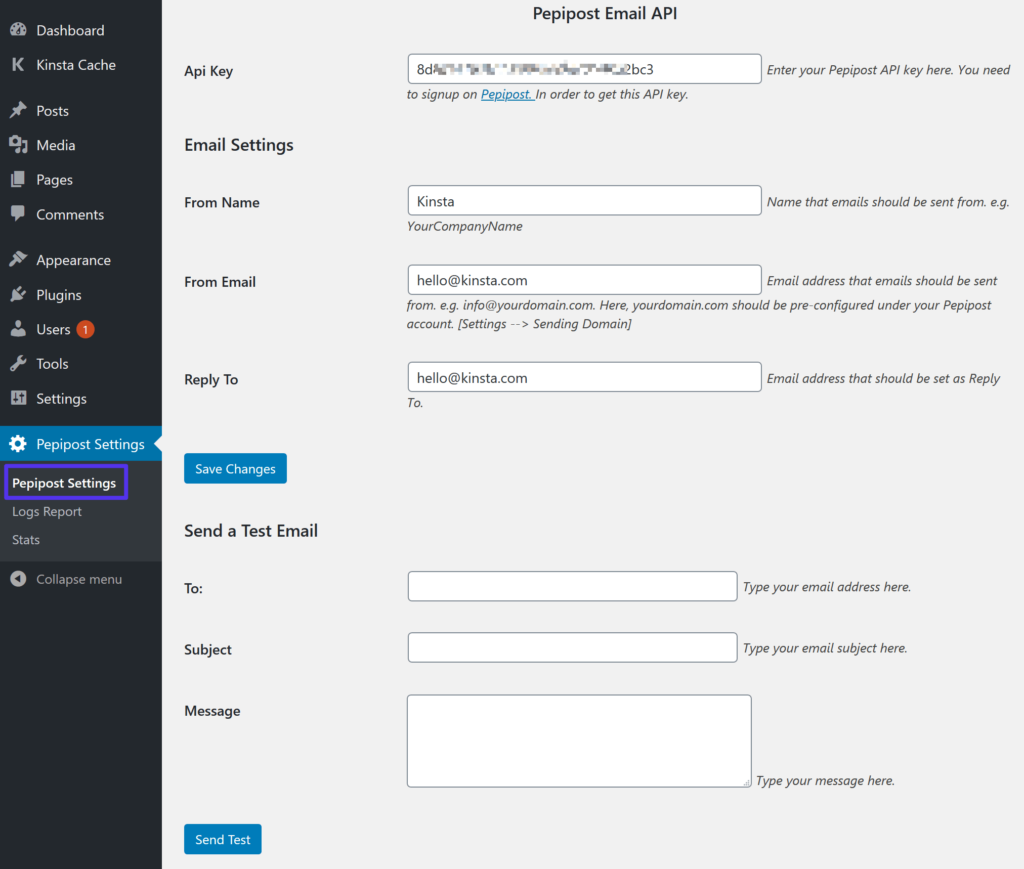
Then, go to the new Pepipost Settings tab in your WordPress dashboard and add your API key to the Api Key box.
Below that, you’ll also want to configure basic sender information, such as your from name and from email address.
Once you save your changes, you should be good to go. You can use the Send a Test Email section to make sure that everything is working properly:
Brevo (formerly Sendinblue)
Brevo can help you send both marketing emails and transactional emails (it’s also a good Mailchimp alternative). It has more of a focus on the marketing side of things, with marketing automation features and more.
Brevo also has one of the higher free sending limits, letting you send up to 300 emails per day forever. However, if you need to exceed those limits, the cheapest option is $25 per month for up to 40,000 emails/month. So, if you think there’s a chance that you’ll exceed 300 emails per day, this one might not be a good option.
To help you use Brevo with WordPress, the Brevo team offers a dedicated WordPress plugin.
Here’s how to use Sendinblue to deliver WordPress transactional emails for free.
1. Register and generate API key
To get started, register for a free Brevo account.
Once you’ve logged into your account, click on your username in the top-right corner and select the SMTP & API option. Or, you can visit this page while logged in.
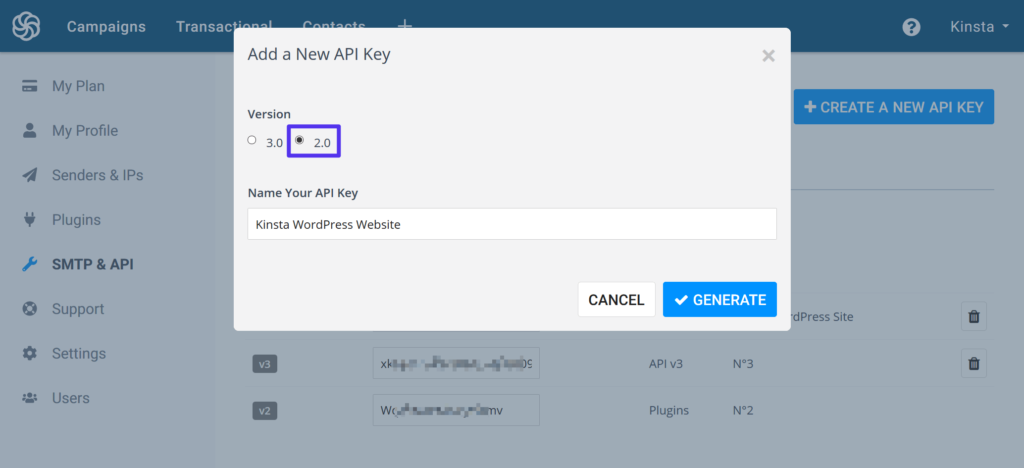
Then, click the Create a New API key button. In the popup:
- Choose Version 2.0
- Give it a name to help you remember it (e.g. the name of your WordPress site)
- Click Generate
You should then see the value for your API key – keep this handy because you’ll need it in the next step.
2. Install Sendinblue (Brevo) plugin
Next, install and activate the official Sendinblue plugin from WordPress.org.
Then, click on the new Sendinblue tab in your WordPress dashboard and add your API key to the box. Then, click Login.
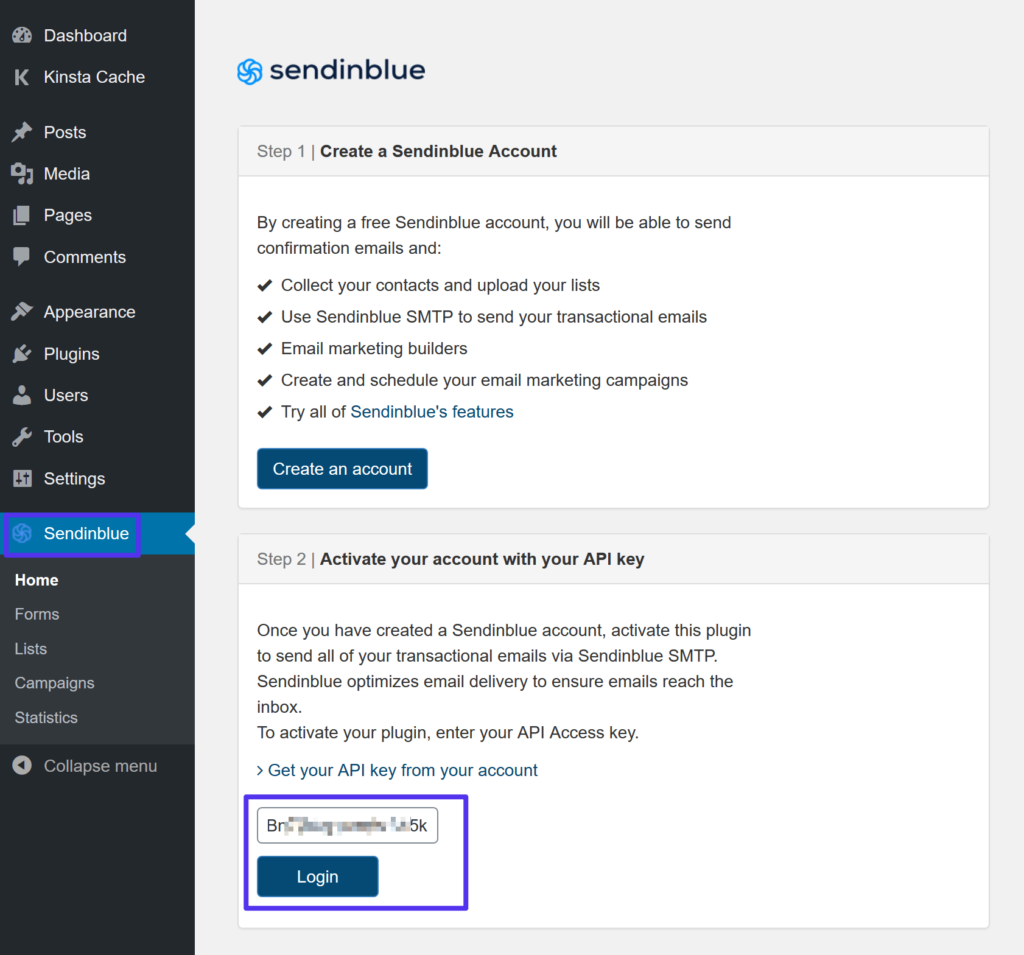
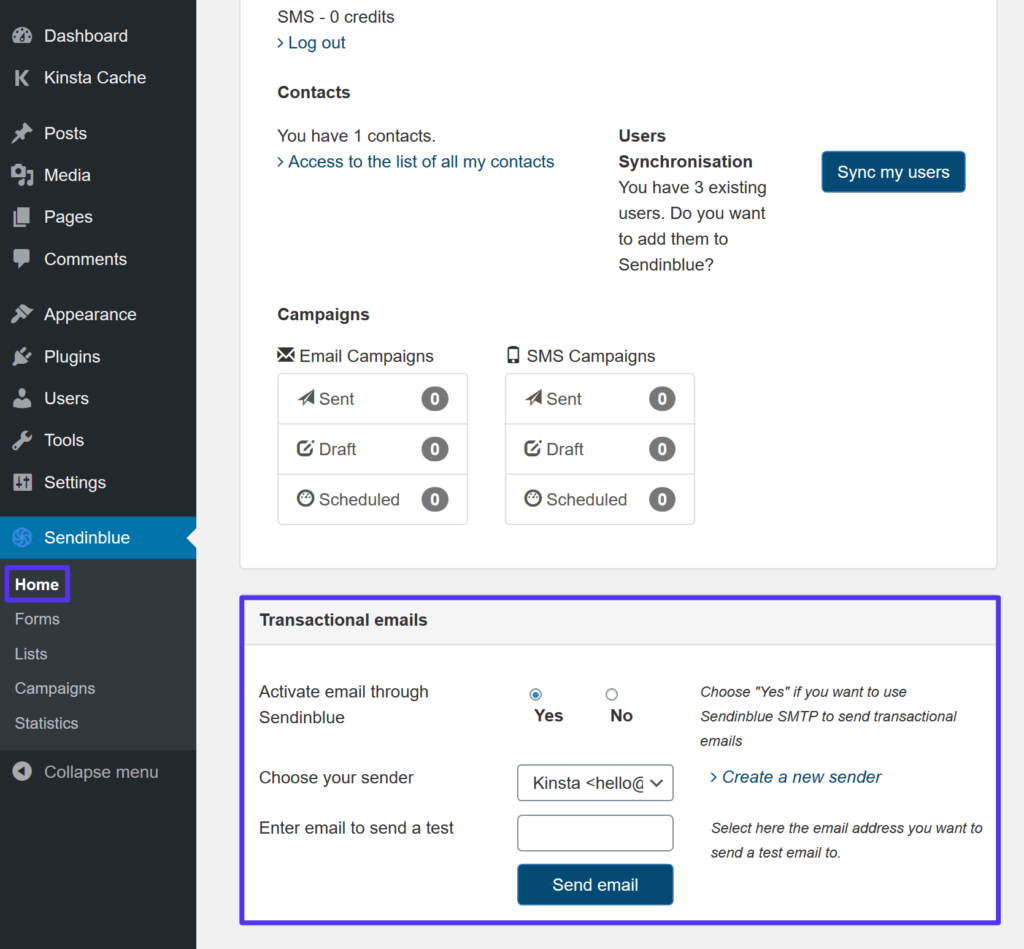
You should then see the plugin’s full settings area.
To start sending your site’s transactional emails via Sendinblue’s free SMTP server, select the Yes radio button in the Transactional emails section.
Then, you can select your sender information (you can control this from your Sendinblue dashboard) and send a test email:
Mailjet
Mailjet is an affordable email solution that can help with both marketing emails and transactional emails. For the SMTP sending service, you can send up to 200 emails per day for free forever, though your emails will include the Mailjet logo in the footer.
To remove the logo and/or increase your sending limit, paid plans start at just $9.65 per month for up to 30,000 emails per month.
Here’s how to use Mailjet to send WordPress emails.
1. Register and access API key
To get started, register for a free Mailjet account to access your Mailjet API key.
Once you activate your Mailjet account, go to Transactional → Overview in your Mailjet dashboard to find your API keys:
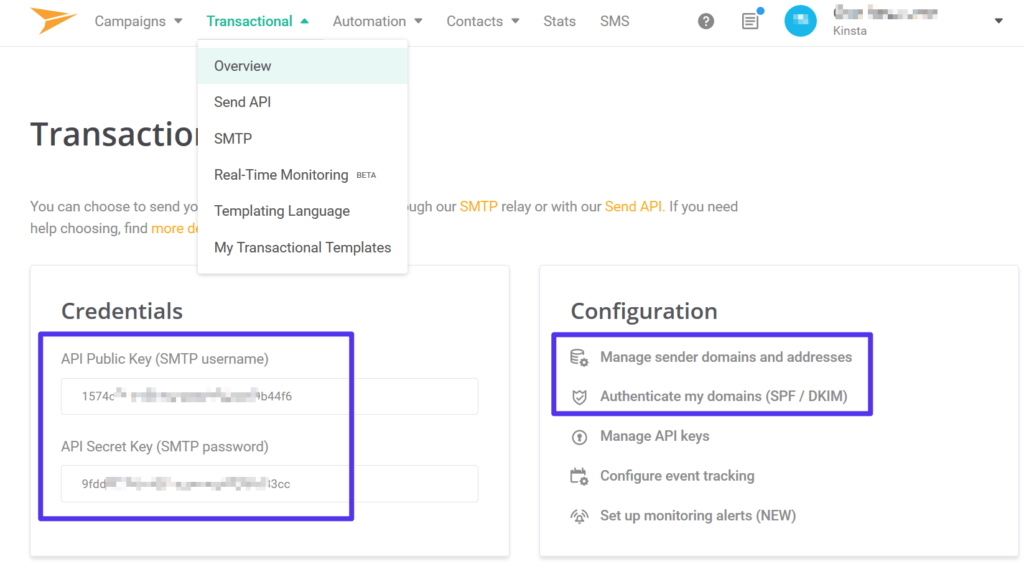
You can also use the Configuration options on the right to add and authenticate your sender domains and addresses. This will help improve the deliverability of your emails.
2. Install official plugin
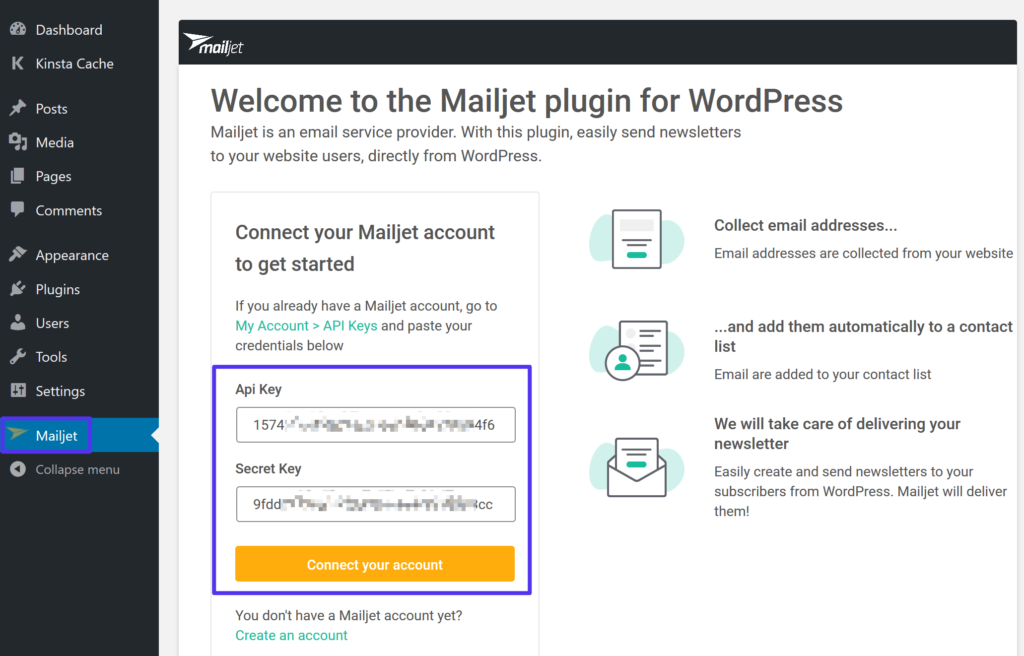
To configure your WordPress site to send transactional emails via Mailjet, Mailjet offers a dedicated integration plugin at WordPress.org.
Once you’ve installed and activated the plugin, go to the new Mailjet tab in your WordPress dashboard and add the API keys from your Mailjet account:
After connecting your Mailjet account, you’ll see an option to sync your registered WordPress users with Mailjet. If you only want to use Mailjet for transactional emails, you can just click the button to Skip this step.
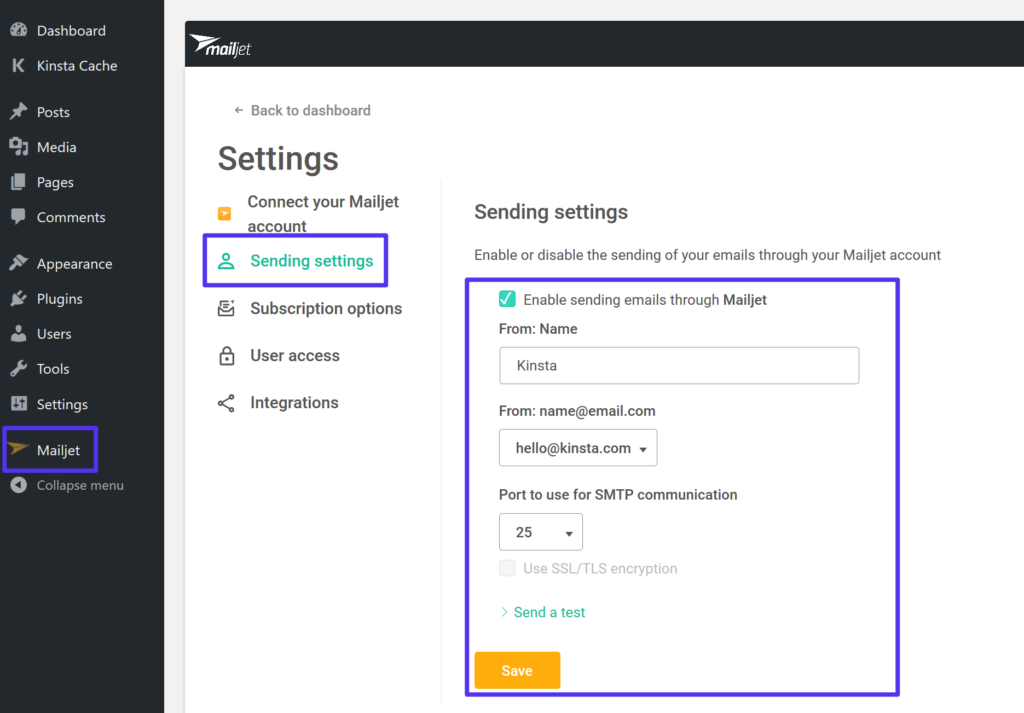
Then, open the Mailjet plugin settings in your WordPress dashboard (Mailjet → Settings) and select Sending settings.
Check the box to Enable sending emails through Mailjet. Then, fill out your sender information and send a test email to make sure everything is working:
Elastic email
Elastic Email offers an affordable SMTP sending service with a forever free plan and cheap pay-as-you-go pricing. With the forever free plan, you can send up to 100 emails per day. To go beyond that limit, you’ll only pay for your usage – $0.09 per 1,000 emails.
You can also purchase a private IP address for $1 per day, as well as several other add-ons (such as email attachments).
1. Register and access API key
To get started, register for a free Elastic Email account to access your Elastic Email API key.
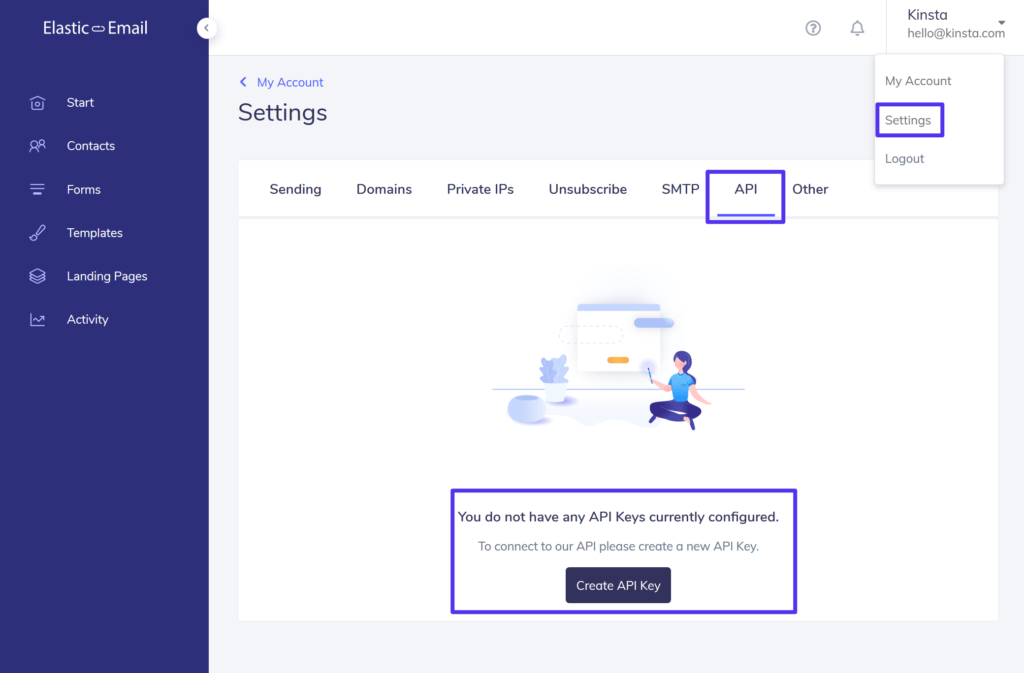
Once you activate your account, click on your username in the top-right corner and select Settings.
Then, go to the API tab and give consent that you won’t spam users. Once you give consent, Elastic Email will show you a button to Create API Key:
Give the API key a name to help you remember it and select Plugin for the Permissions level:
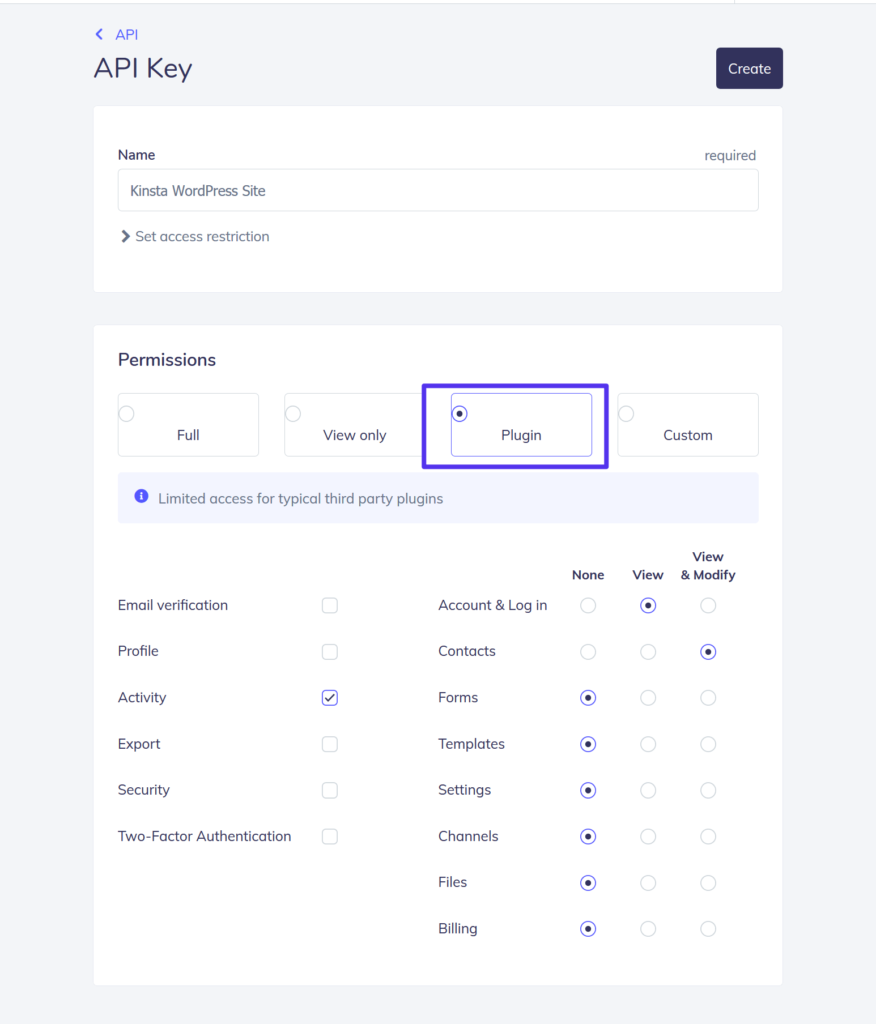
Then, you should see the value for your API key. Make sure to keep this window open because you’ll need it in the next step and Elastic Email will only show this once.
2. Install official plugin
To help you use Elastic Email with WordPress, Elastic Email offers an official plugin at WordPress.org called Elastic Email Sender.
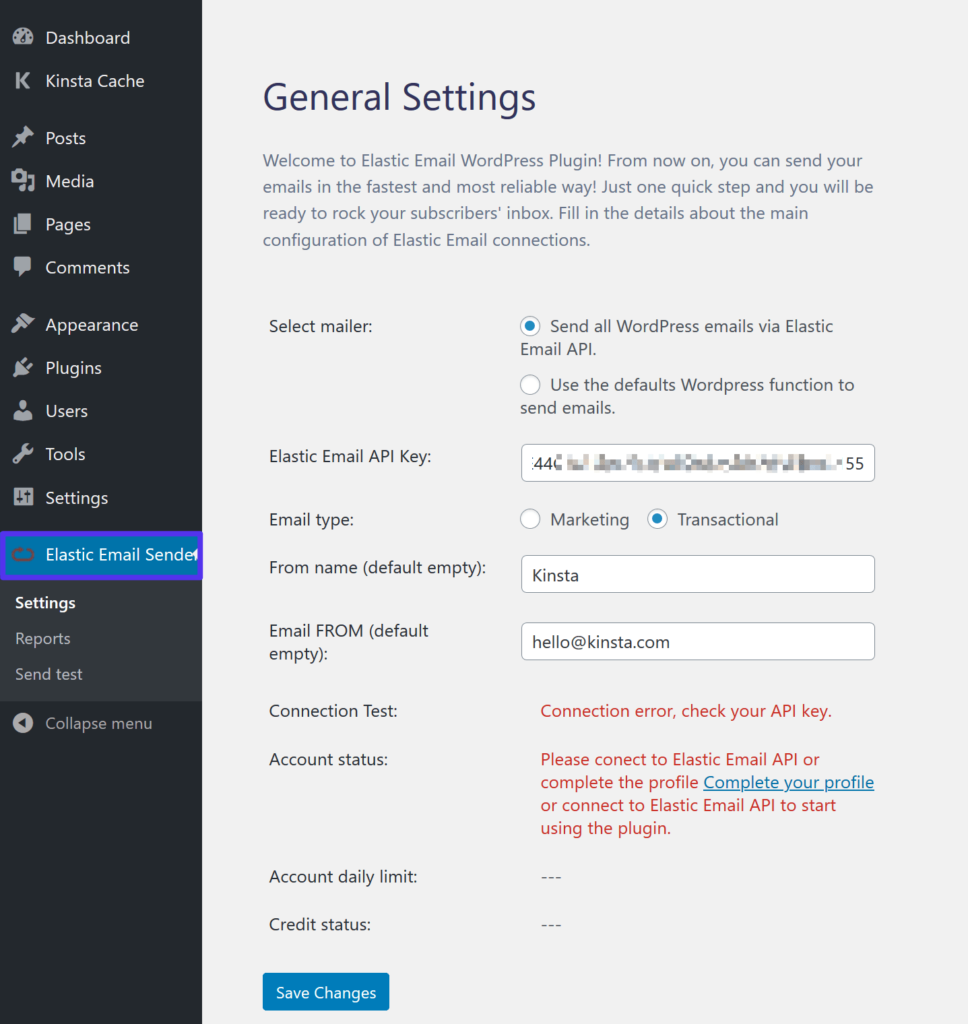
Once you install and activate the plugin on your WordPress site, you can go to the new Elastic Email Sender tab in your WordPress dashboard. Then configure the following details:
- Select mailer – Send all WordPress emails via Elastic Email API.
- Elastic Email API Key – add the API key from the previous step.
- Email type – Transactional
- From name and email
Then, click Save Changes:
You should then see a success message.
To make sure everything is working properly, go to Elastic Email Sender → Send test to send a test email.
Mailgun
Mailgun no longer offers a forever free plan like these other tools. However, we’re still including it because it offers a lengthy three-month trial, as well as affordable pay-as-you-go pricing after that. Still, if you want something that’s 100% free forever, Mailgun is no longer an option.
Mailgun offers an easy API-based sending service that you can integrate with WordPress in just a few minutes.
You can send up to 5,000 emails per month for your first three months for free. After that, you can use pay-as-you-go pricing starting at $0.80 per 1,000 emails.
We have an entire guide on how to use Mailgun with WordPress.
Summary
By default, the way that WordPress sends emails leads to all kinds of issues with reliability and deliverability. To fix issues with your WordPress site’s transactional emails, you should use a dedicated SMTP server, rather than relying on WordPress’s default options.
Thankfully, with a free SMTP server, you can get access to reliable WordPress transactional emails without spending a dime.
Here are the key aspects you should know about the different solutions you could take advantage of:
- Gmail SMTP server – lets you send up to 500 emails per 24 hour period with a free Gmail account or 2,000 emails if you pay for Google Workspace.
- SendGrid – lets you send 100 emails per day forever (and 40,000 emails free during your first month).
- Pepipost – lets you send 100 emails per day forever (and 30,000 emails free during your first 30 days).
- Sendinblue – lets you send 300 emails per day forever.
- Mailjet – lets you send up to 200 emails per day forever.
- Elastic Email – lets you send up to 100 emails per day forever, with cheap pay-as-you-go pricing after that.
- Mailgun – lets you send 5,000 emails per month for free but only for your first 3 months. After that, it has cheap pay-as-you-go pricing, though.
For the highest free sending limit, you can set up the Gmail SMTP server. However, Gmail also has the most labor-intensive setup process.
For simpler setups, you can consider other free options such as Sendinblue (300 emails per day) or SendGrid (100 emails per day).

Head of Content at Kinsta and Content Marketing Consultant for WordPress plugin developers. Connect with Matteo on Twitter.