
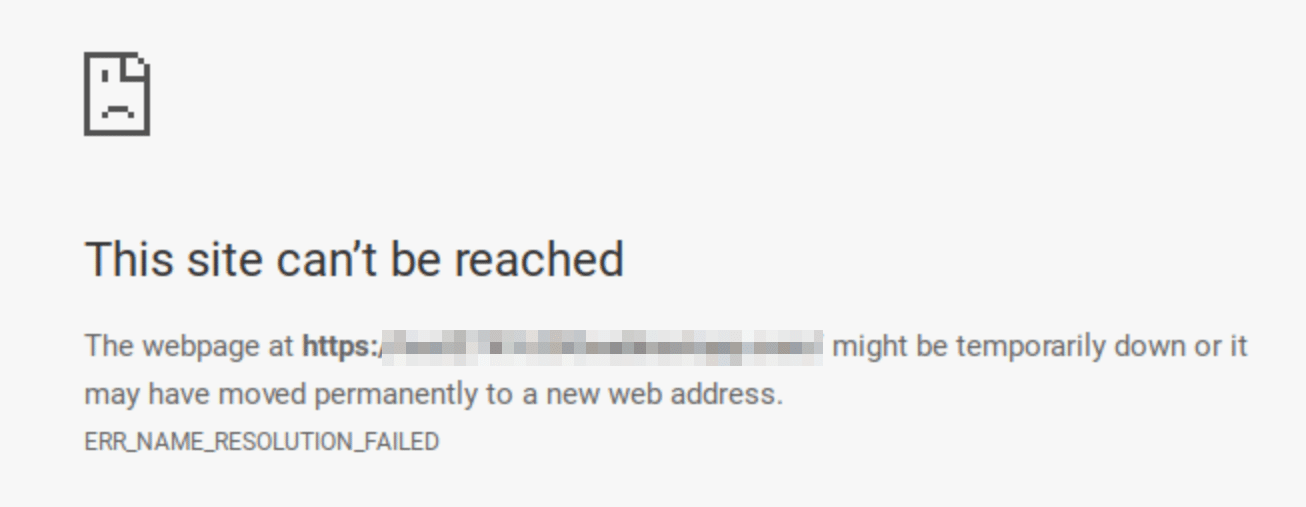
The “ERR_NAME_RESOLUTION_FAILED” error mostly appears in Google Chrome. Usually, this message pops up due to connectivity issues on your end. However, until you resolve the error, you won’t be able to access any websites through the browser.
There are several ways to troubleshoot a name resolution error in Chrome. Some fixes only take minutes, such as clearing your browsing data and resetting the browser settings. Knowing how to troubleshoot this error will also help with similar browser connectivity issues.
Check Out Our Video Guide to Fixing the “ERR_NAME_RESOLUTION_FAILED” Error
In this article, we’ll talk about what “ERR_NAME_RESOLUTION_FAILED” means and its causes. Then we’ll go over six ways to troubleshoot the error in Chrome. Let’s get to it!
What Does “ERR_NAME_RESOLUTION_FAILED” Mean?
“ERR_NAME_RESOLUTION_FAILED” is an error that can appear when your browser fails to load a website. Typically, your browser will tell you that it couldn’t connect to the site and mention potential causes.
The name resolution error message points toward a connectivity issue on your end.
Connectivity issues can prevent you from accessing other websites, too. A quick way to confirm if that’s the case is by visiting different URLs. If all pages show the same error, it’s safe to say the problem lies in your network or the browser itself.
What Causes the “ERR_NAME_RESOLUTION_FAILED” Message?
When we think about connectivity errors, the first possibility is that your internet connection might be down. If that’s the case, you should be able to verify it by checking your router or trying to navigate the web using other devices connected to the network.
Assuming that your internet connection works, the problem behind the “ERR_NAME_RESOLUTION_FAILED” error can be one of several things:
- A problem with your assigned Domain Name System (DNS)
- Browser misconfiguration issues
- Network misconfiguration issues
- A malware infection
In most cases, all those problems have relatively simple fixes.
In the next section, we’ll show you how to troubleshoot the name resolution error step by step.
How To Fix the “ERR_NAME_RESOLUTION_FAILED” Error (6 Ways)
We’re going to walk you through the potential fixes for the name resolution failed error, starting with the most straightforward solutions. Let’s begin with something simple – deleting browser data.
1. Clear Browsing Data
By clearing browser data, we mean emptying the cache. Issues with cached files can cause errors when loading websites in Chrome (this local browser cache is not the same as the Google cache).
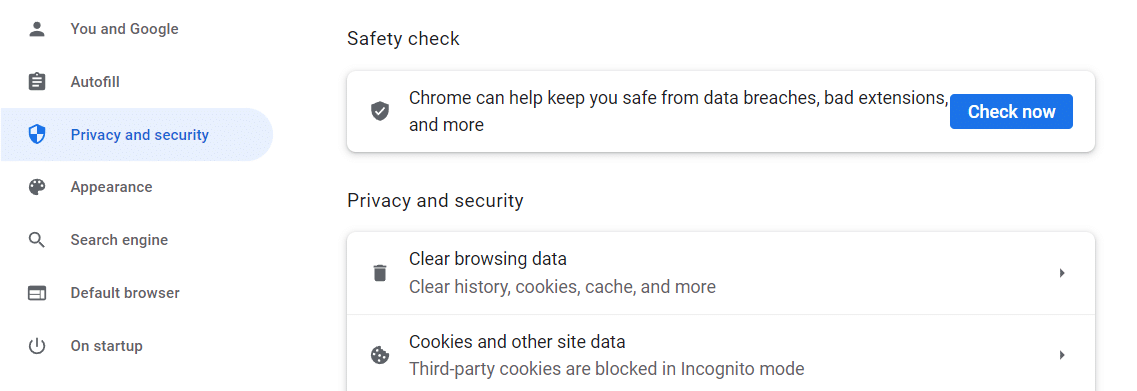
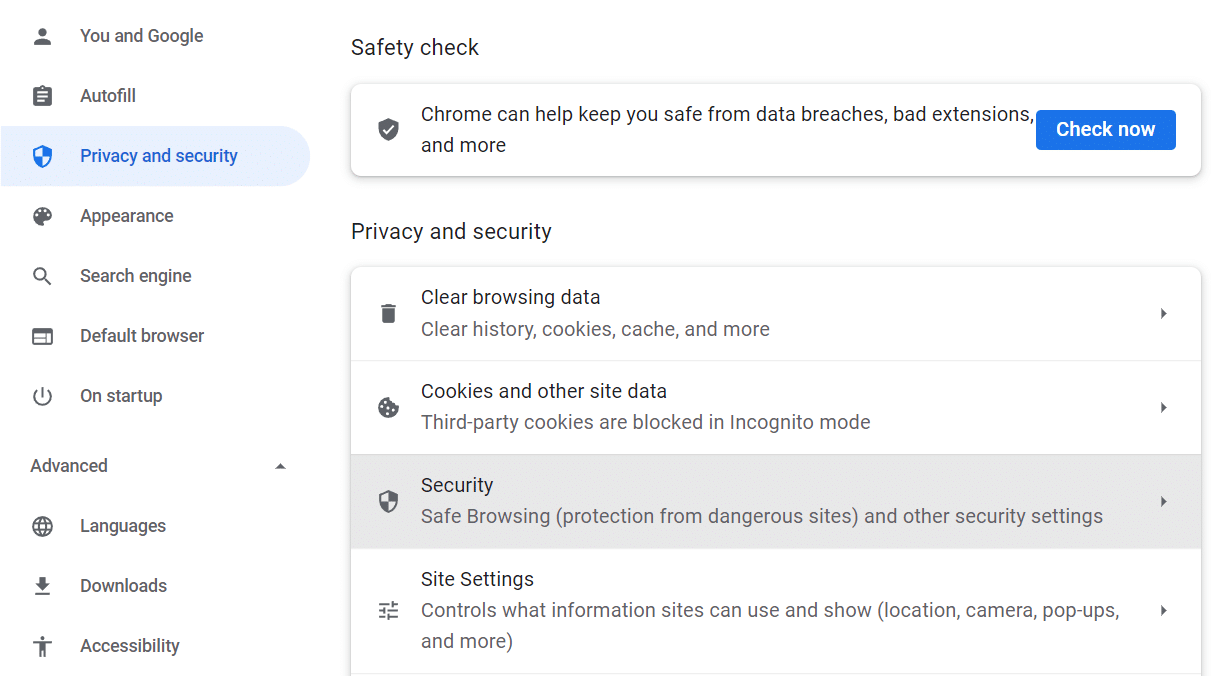
To empty your Google Chrome cache, open the Chrome Settings menu, go to the Privacy and security tab, and select the Clear browsing data option:
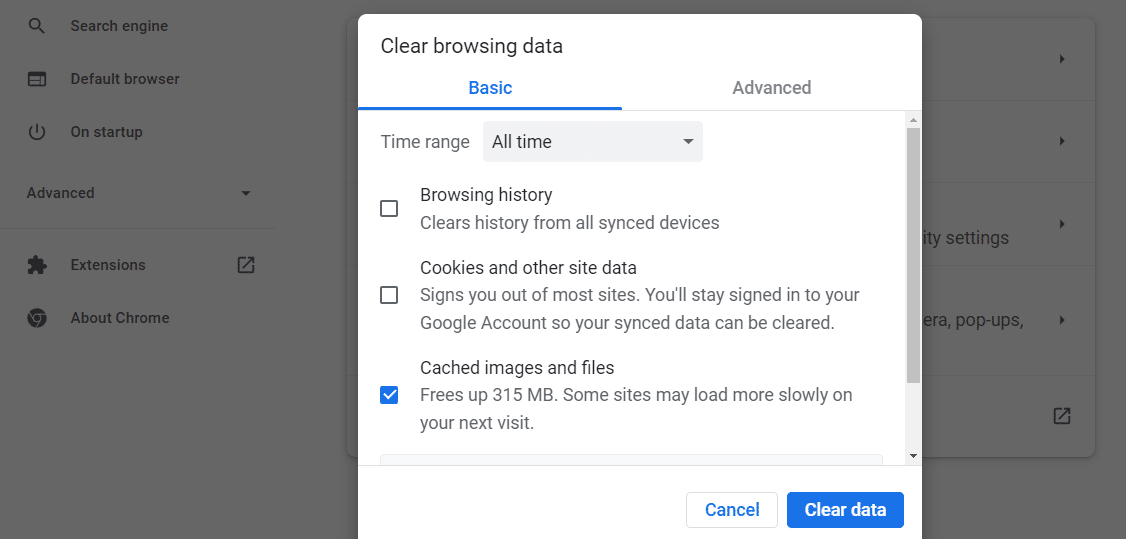
A window will pop up, enabling you to choose what data you want to clear. Neither browsing history nor cookies should impact the name resolution failed error.
Select the Cached images and files option for the All time range and click on Clear data:
After clearing the cache, try accessing any page to see if the error persists. If it does, it’s time to try resetting Chrome’s settings.
2. Reset Chrome’s Settings
Resetting Google Chrome’s default settings will uninstall all extensions. It will also delete all temporary data, including browsing history, cookies, and cached files.
If you’re wary about a full reset, you can try disabling Chrome extensions manually to see if that solves the “ERR_NAME_RESOLUTION_FAILED” error.
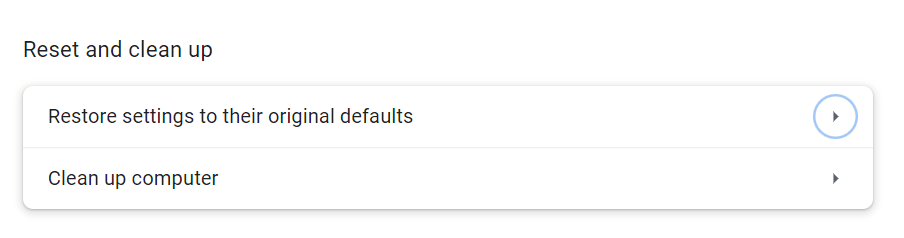
To reset Chrome’s settings, open the Settings > Advanced menu and select the Reset and clean up option. On the next page, click on Restore settings to their original defaults:
After resetting Chrome’s settings, you might need to spend some time configuring the browser to fit your preferences. Before getting to that, check to see if the name resolution error persists.
3. Change the DNS Address
Typìcally, your network will use the default DNS server set by your Internet Service Provider (ISP). If that DNS server is down, you can encounter connectivity problems.
To change the default DNS address in Chrome, open the Settings menu, go to the Privacy and security tab, and select the Security option:
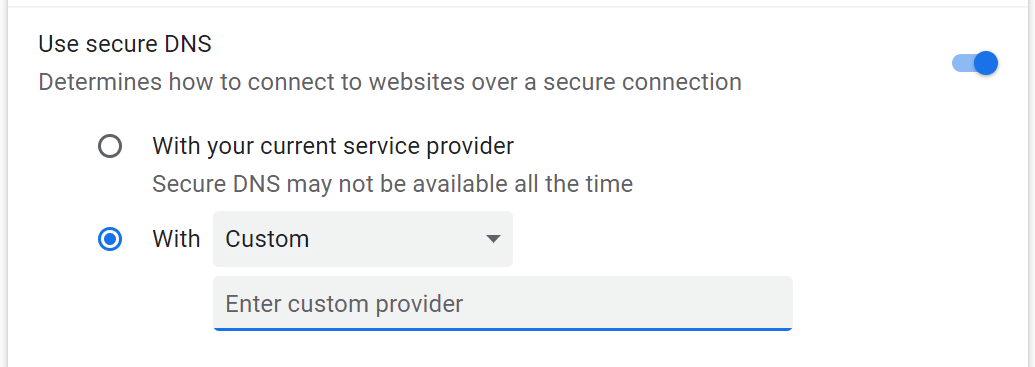
On the next page, scroll down until you find Use secure DNS. That setting should be enabled by default with the With your current service provider option.
Tick the option that says Custom and add a new DNS address in the field below:
There are plenty of free DNS options that you can use. In some cases, using a DNS other than the one provided by your ISP can decrease loading times as you navigate the web.
Two of the most popular free DNS options that you can use include:
- Google: 8.8.8.8 or 8.8.4.4
- OpenDNS: 208.67.222.222 or 208.67.220.220
Enter the custom DNS address and save the changes to Chrome’s settings. Now try accessing a website to see if the error still pops up.
4. Reset the Network Settings
At this point, you can rule out Chrome as the source of the “ERR_NAME_RESOLUTION_FAILED” error. If none of the above fixes worked, it’s time to try resetting the network settings. That means your internet connection will go down briefly, and your computer will flush its DNS cache.
To reset the network settings in Windows, open the terminal and type in the following commands. You need to enter the commands in the exact order that they appear below and hit ENTER after typing each line:
ipconfig /release

ipconfig /all

ipconfig /flushdns

ipconfig /renew

netsh int ip set dns

netsh winsock reset
The Windows terminal might take a moment to execute each command. After the last one, your connection might take a minute to reset, so wait a while before you try navigating the web again.
To reset the network settings on a mac OS device, you can follow these steps:
- Open the System Preferences menu and select the Network > Wi-Fi option.
- Click on the minus icon at the bottom of the Network menu while the Wi-Fi option is highlighted, then click on Apply. This will remove the Wi-Fi connection from your network settings.
- Click on the plus sign menu, select the Wi-Fi option and click on Apply.
By removing and re-adding the Wi-Fi network connection in mac OS, you’ll reset its settings. That same process applies if you’re using a wired connection.
5. Check for Malware
In some cases, specific types of malware may prevent you from connecting to the internet by affecting your network settings. This scenario is relatively rare, and it shouldn’t happen if you use your OS’ built-in virus and threat protection tools.
Most modern OSs have antivirus and malware removal tools. If you’re using Windows, you can open the Windows Security settings and go into the Virus & threat protection tab. Inside, look for the Current threats section:
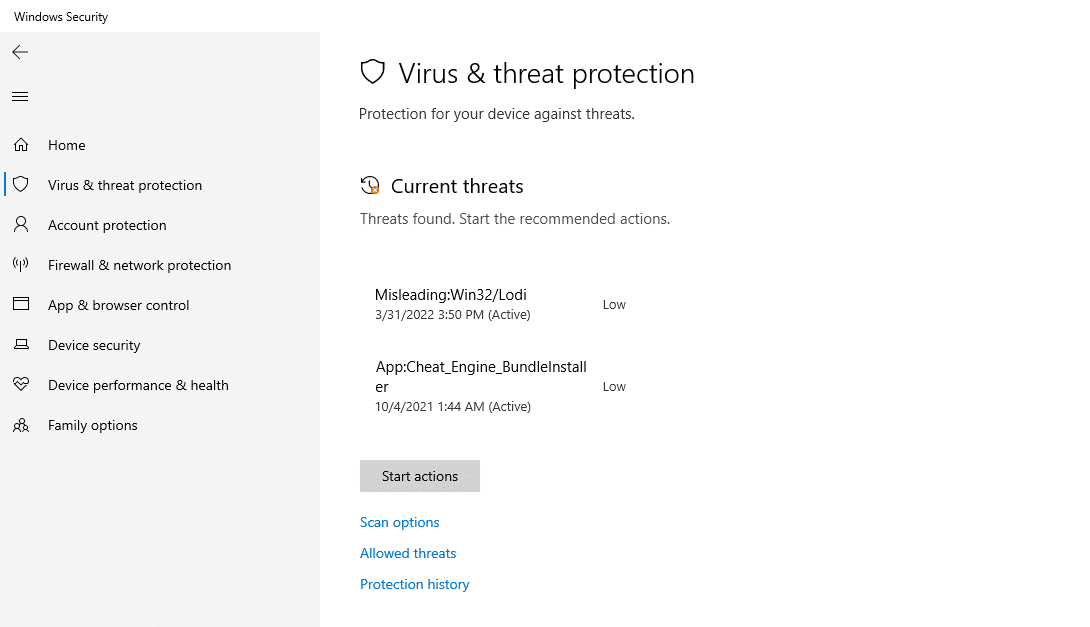
By default, Windows will scan your device continuously for threats. That means you don’t need to run a scan unless you have the Real-time protection option disabled (which you shouldn’t).
If there are existing threats, click on any of them and select either the Quarantine or Remove options. Either option should disable the threat. Now you can check to see if the “ERR_NAME_RESOLUTION_FAILED” error still pops up.
If you’re not using Windows or you have other antivirus software, the process for scanning and removing malware will be different. In that case, we recommend reading the antivirus documentation to see how the process works.
6. Use a Virtual Private Network (VPN)
In some cases, using a VPN will enable you to bypass local connectivity issues, particularly if they’re related to configuration errors. Using a VPN, you should be able to access the rest of the web without running into name resolution errors.
Choosing a VPN can be a challenge. There are plenty of great budget options and others better suited for remote work due to higher security standards.
In any case, we recommend against using a VPN constantly because it can lead to issues with some websites and online accounts. Some examples include email services such as Gmail or banking platforms. These websites can detect if you’re trying to access them from a new IP address, and they’ll ask you to confirm your identity.
Some platforms will even temporarily block your account if they see that you’re accessing them from multiple IP addresses in short intervals of time. That’s why switching back and forth from a VPN connection can be tricky. We also don’t recommend it unless you’re using public internet networks or need a VPN for work purposes.
Summary
The “ERR_NAME_RESOLUTION_FAILED” error can be scary because it prevents you from accessing any website. However, it’s pretty easy to troubleshoot in Chrome.
If it’s a browser issue, you can solve it by either clearing the cache, changing the DNS address, or resetting Chrome’s settings. If the problem is a network connectivity issue, you can check for malware or use a VPN temporarily. Alternatively, you can try resetting the network settings.
With Kinsta, if you run into any WordPress errors, they won’t come from your hosting configuration. All of our plans offer rock-solid WordPress hosting, and we’ll help you troubleshoot any issues that you might run into!


