
Want to install WordPress on a subdomain?
In general, installing WordPress on a subdomain works almost the same as installing WordPress on a root domain.
However, there are a few tweaks that you’ll want to account for, which is why we created this complete guide to installing WordPress on a subdomain.
We’ll kick things off with a brief discussion of the use cases and pros and cons of using a subdomain for your WordPress site.
Then, we’ll share step-by-step tutorials for three different ways to install WordPress on a subdomain – using Kinsta, using cPanel, and setting things up manually.
Why Install WordPress on a Subdomain?
There are a lot of situations in which you might want to install WordPress on a subdomain.
Typically, you’ll use this approach when you want to create separation between your subdomain install and your main WordPress install.
You might want this separation for branding reasons or for technical reasons (or both). For example, you might want to use a different theme or install different plugins.
Here are some examples:
- Knowledge base/support – e.g. docs.yoursite.com
- Blog – e.g. blog.yoursite.com
- Localization/translation – e.g. uk.yoursite.com for UK visitors
- eCommerce store – e.g. shop.yoursite.com (great for standalone WooCommerce installs)
- Courses – e.g. courses.yoursite.com
- Events – e.g. events.yoursite.com
You also might have situations where this is your only WordPress install. For example, maybe you created your eCommerce store with Shopify but you want to use WordPress for your store’s blog because WordPress offers more powerful blogging functionality.
Pros and Cons of Installing WordPress on a Subdomain
There are both pros and cons to installing WordPress on a subdomain. Let’s go through them…
Pros:
- The subdomain separates your install from your main site, which is good if it has a different purpose – e.g. one install is a content blog and the other is an eCommerce store
- You can use different themes/plugins for this WordPress install. For example, you could use a completely different theme and design for the subdomain, which would be a lot more complicated to accomplish if you used the same WordPress install.
- While you get to create some separation between the parent domain name, you still maintain the same overall branding, which you wouldn’t do if you changed to a completely separate domain name.
- You can use different hosting if you want to further separate it from your main site and avoid them affecting one another. This can be helpful if the content on the subdomain is especially resource-intensive. For example, you’ll see some membership sites host their members’ areas on a subdomain because membership content is more resource-intensive.
- You can back up sites on separate schedules that are optimized for each. This can help you save money/resources while still keeping your data safe.
- You don’t have to worry about URL conflicts like you would if you tried to install WordPress in a subfolder.
Cons:
- Google is more likely to treat subdomains as separate sites (vs using subfolders), which can negatively affect your subdomain’s SEO because it won’t benefit from the full authority of your main domain (whereas a subfolder would benefit from the authority). There is some disagreement among SEO experts about how important this is, though.
- If you have two separate WordPress installs, that adds some complexity when it comes to managing your site (e.g. 2X as many updates to apply). If you’re worried about this, using WordPress multisite might be an option that you want to consider.
- Beyond WordPress, you’ll need two of a lot of other services since most services treat subdomains as separate sites. For example, you might want to set up two separate properties in Google Search Console (though Google does now offer a universal domain verification option that includes subdomains).
- If you want to use the same plugin on both sites, you’ll often need to purchase two licenses. For example, the popular Elementor Pro plugin counts a subdomain as a separate site for license purposes (because a subdomain is technically a unique domain name). Many other popular plugins do the same.
How To Install WordPress on a Subdomain: 3 Options
Now, we’ll get into the actual step-by-step tutorials for how to install WordPress on a subdomain.
We’ll share 3 different methods – you can pick the method that works for you depending on your platform:
- Using Kinsta
- Using cPanel
- Installing WordPress manually
How to Install WordPress on a Subdomain at Kinsta
Here’s the basic process to install WordPress on a subdomain at Kinsta:
- Use the Kinsta WordPress installer to create a new WordPress install.
- Add your subdomain to that WordPress install and set it as the site’s primary domain name.
- Add a CNAME record via the Kinsta DNS area (or wherever you manage your domain’s DNS records).
Create a New WordPress Install
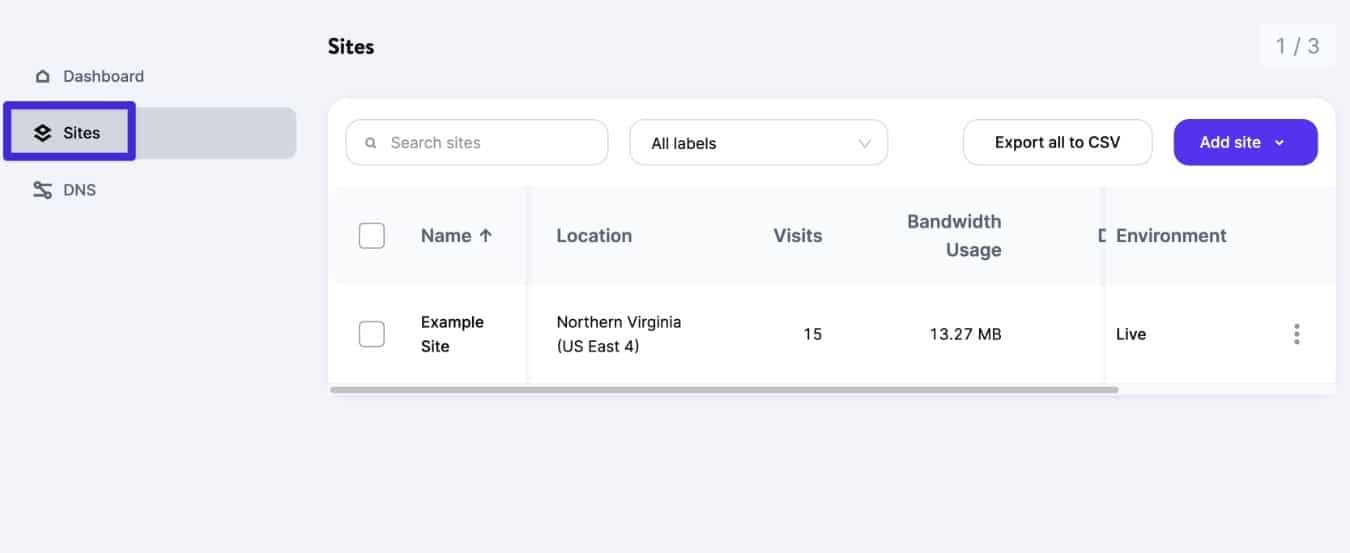
To begin, go to the Sites tab in your MyKinsta dashboard and click the Add site button to add a new site.
A subdomain still counts as its own unique site, so you’ll need to make sure that your Kinsta plan still has a site available.
Then, go through the WordPress installer tool and fill it out according to your preferences:
- Choose Install WordPress on the first screen.
- Enter an internal site name and choose your data center.
- Enter your WordPress site title and user credentials.
Kinsta will now set up your site on a temporary kinsta.cloud subdomain.
Add Subdomain to WordPress Site
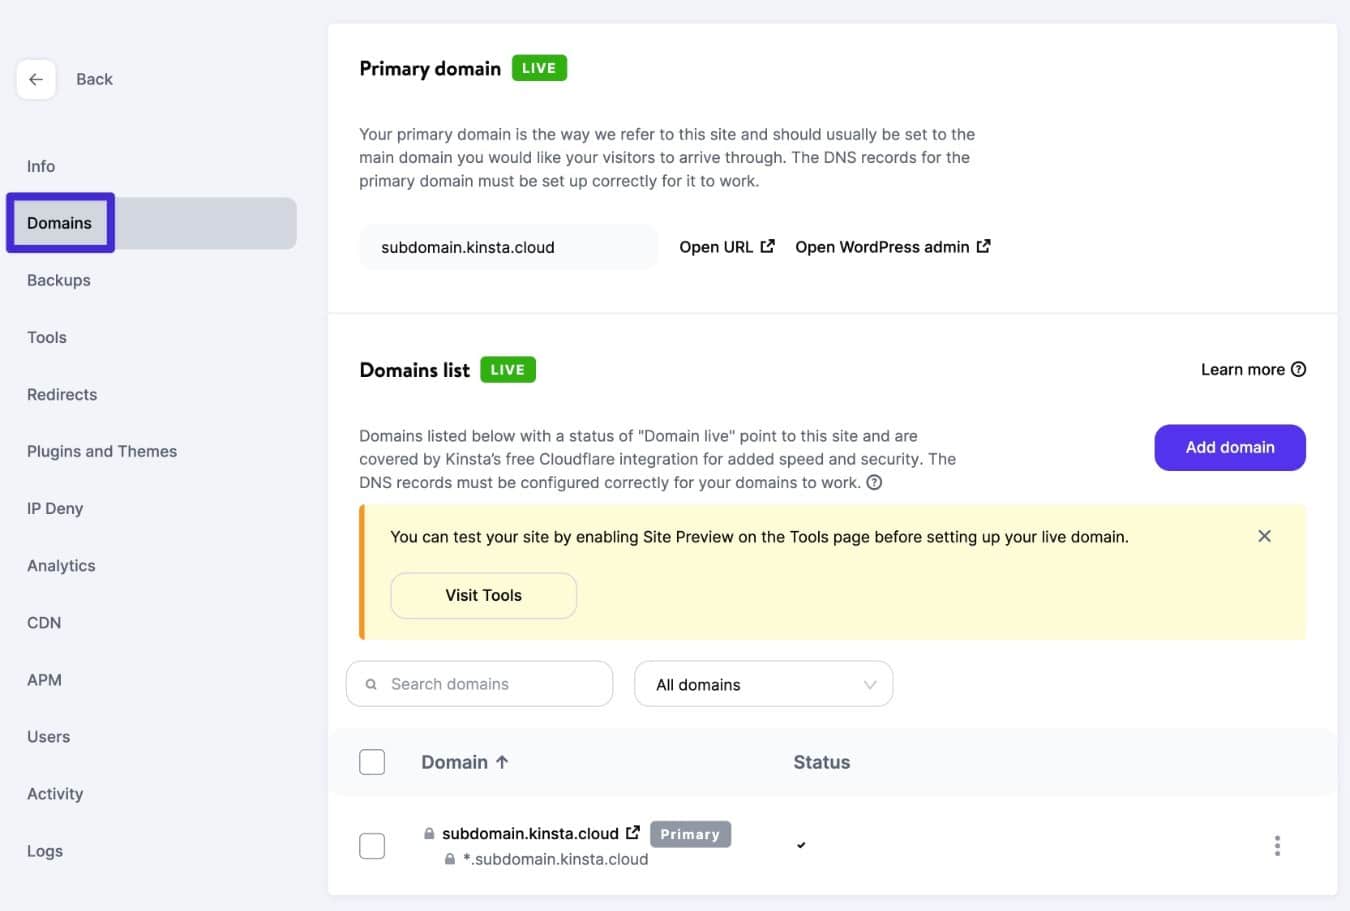
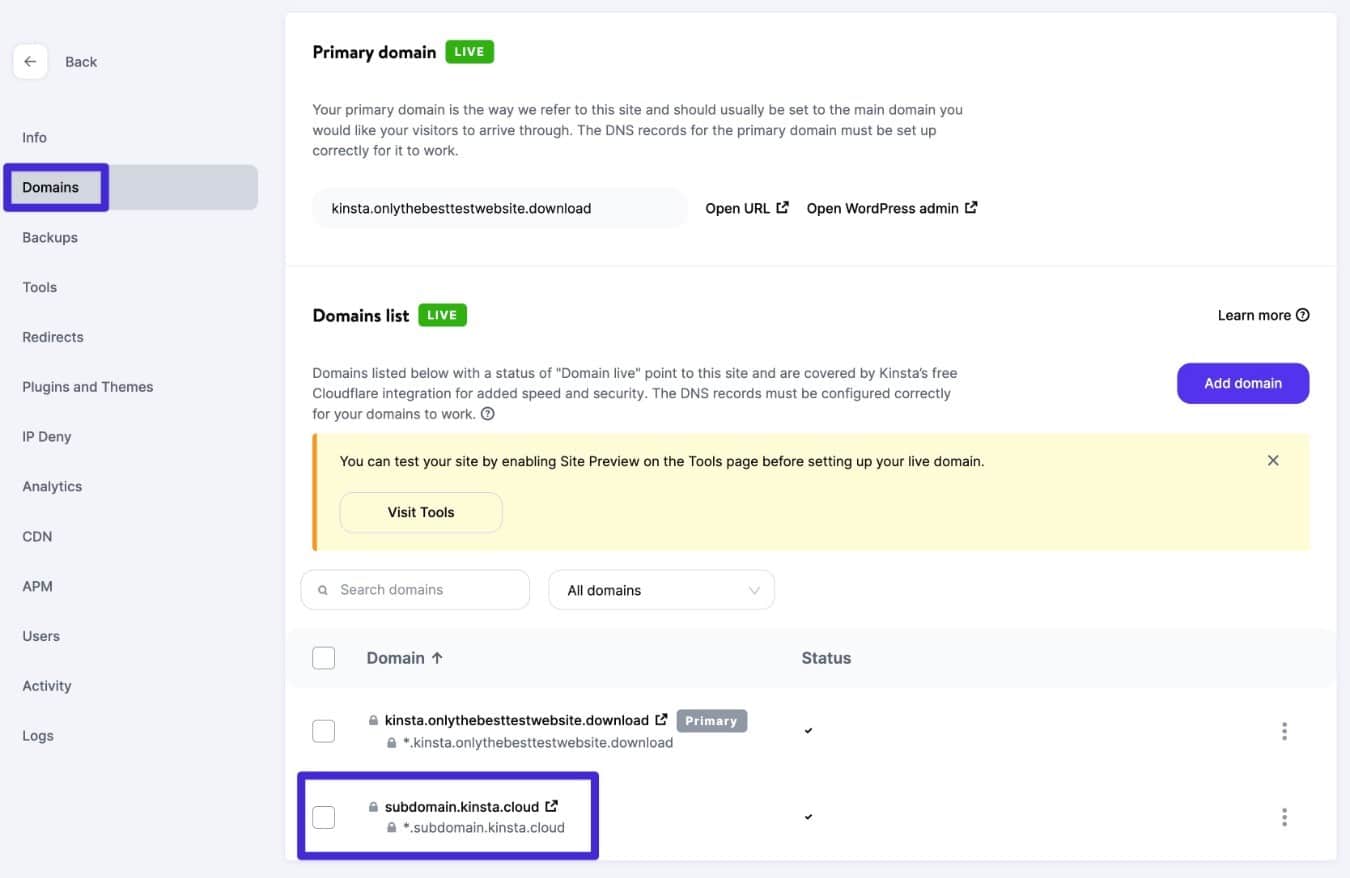
Once Kinsta has finished setting up your site, you can add your subdomain by going to the Domains tab of that site’s dashboard in MyKinsta.
Click the Add domain button under Domains list:
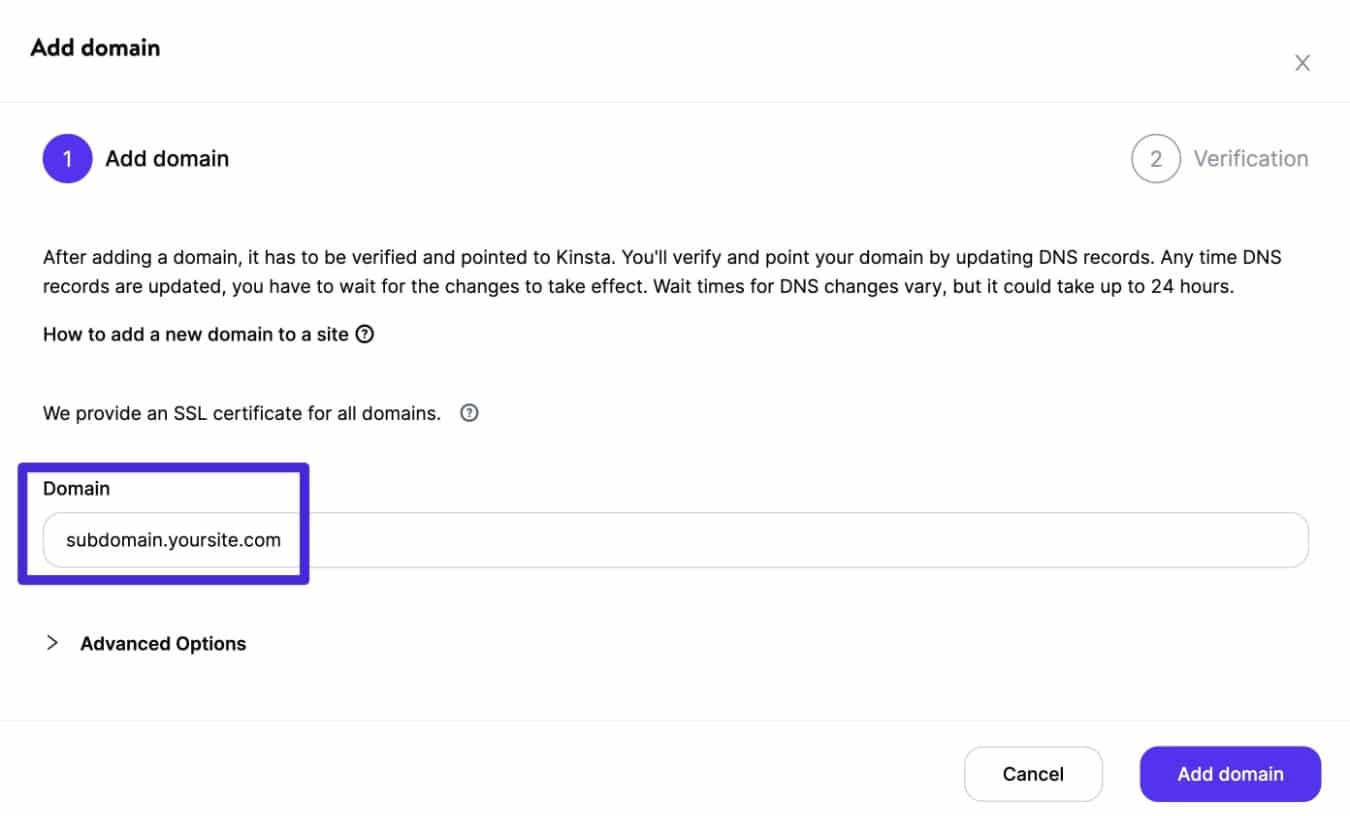
In the popup, enter your full subdomain in the Domain box and then click Add domain:
You’ll now have a short wait while Kinsta adds your subdomain to this WordPress install.
Depending on your domain’s configuration, you might also be prompted to verify your domain name at Cloudflare.
Need some help here? Check out the full guide to adding a domain to Kinsta.
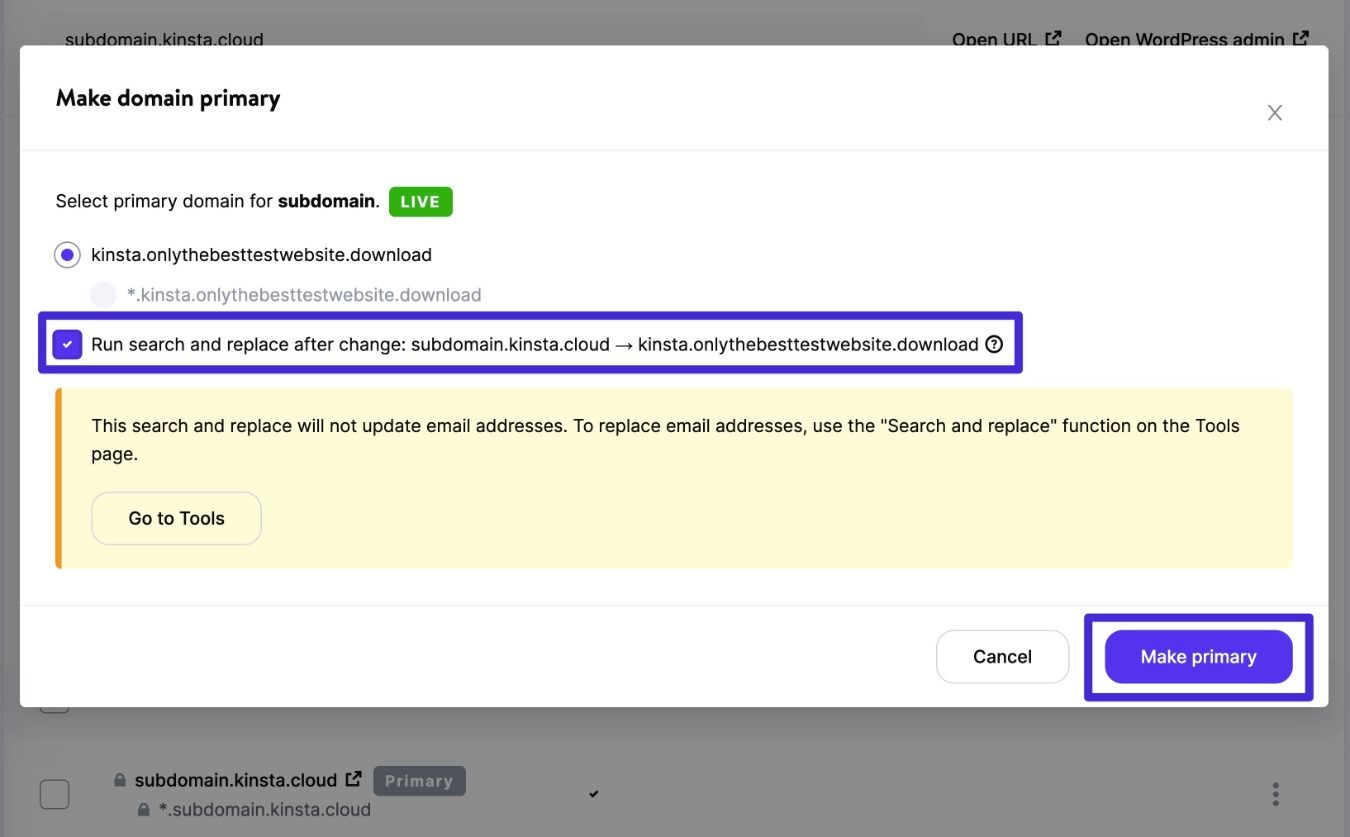
Once you see your subdomain in the Domain list, click the three dots icon and then choose the Make primary domain option to make the subdomain your site’s primary domain name.
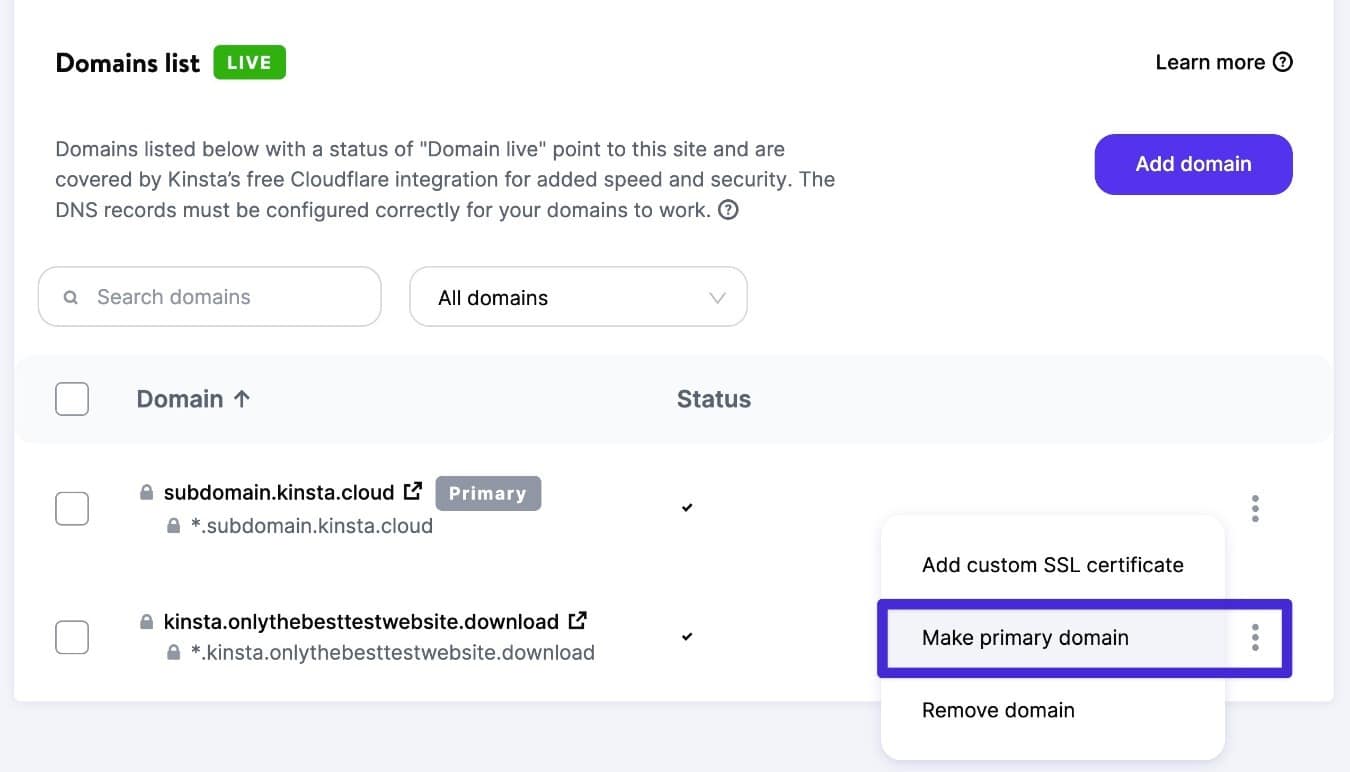
In the popup, make sure to choose the option to run a search and replace to make sure that everything on your site uses this subdomain.
Point Your Subdomain to Your WordPress Install
Once you’ve installed WordPress and added your subdomain, the last step is to point your subdomain to this WordPress install.
If you’re using Kinsta’s nameservers, you can set up your subdomain from the DNS tab of the MyKinsta dashboard.
However, if you’re using other nameservers and pointing your domain to Kinsta via an A record or CNAME record, you’ll need to set up your subdomain from that service (e.g. Cloudflare or your domain registrar).
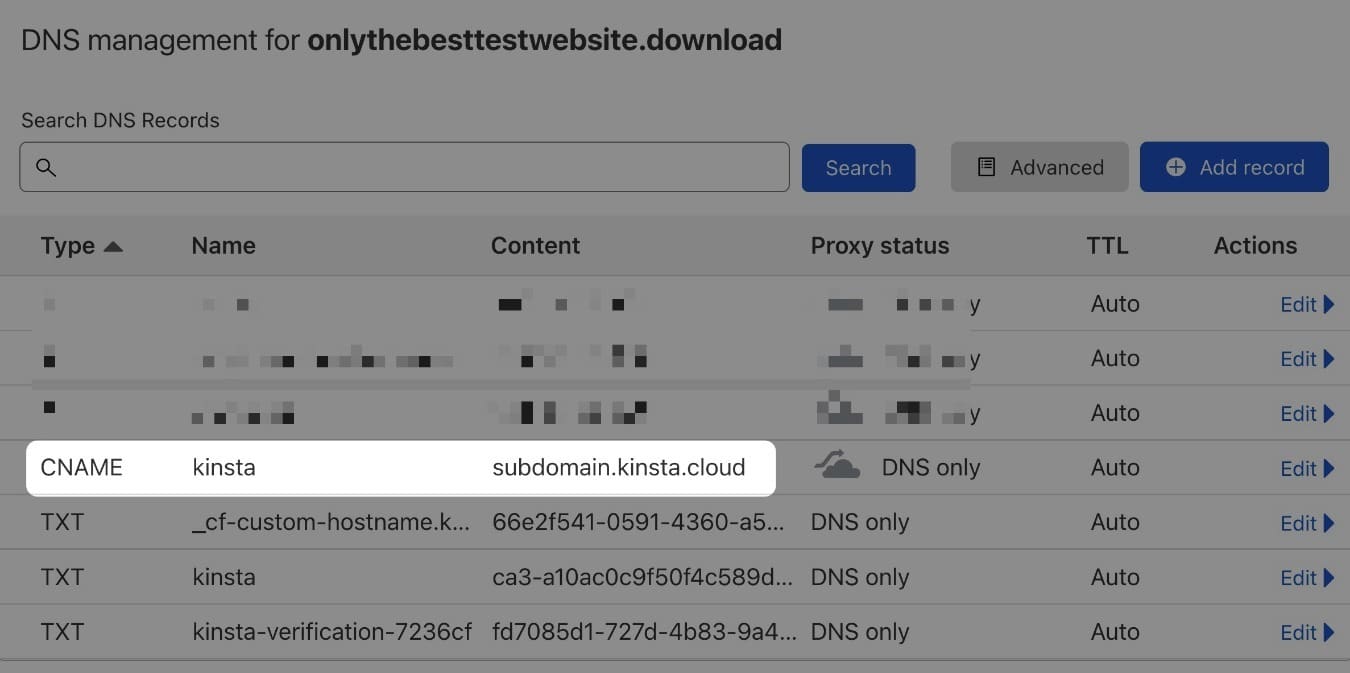
Either way, you want to add a CNAME record that points to your subdomain WordPress install’s kinsta.cloud domain, which should appear below your primary domain name in the Domains list.
Here’s an example of what that CNAME record looks like at Cloudflare:
- Name – the actual subdomain. E.g. if your subdomain is blog.yoursite.com, you would enter blog.
- Content – your kinsta.cloud URL.
Note – there might be a short wait for DNS propagation, so don’t be surprised if it takes a few minutes (or longer) for your subdomain to start working.
Once you’ve added this record, you should be able to access your WordPress install when you enter the subdomain.
How to Install WordPress on a Subdomain With cPanel
If you’re using a web host that offers the cPanel dashboard, the process looks a little bit different as you’ll first need to add your subdomain via cPanel before you can install WordPress using the cPanel installer tool.
Here’s how it works…
1. Add Subdomain in cPanel
To get started, you’ll want to add your subdomain to cPanel.
How you do this will depend on which version of cPanel your host is using.
Older versions of cPanel (version 106 or lower) offer a dedicated Subdomains interface. However, newer versions of cPanel (versions 107 or later) have removed this separate interface and merged it into the main Domains tool.
Current Version of cPanel (Version 107 or Higher)
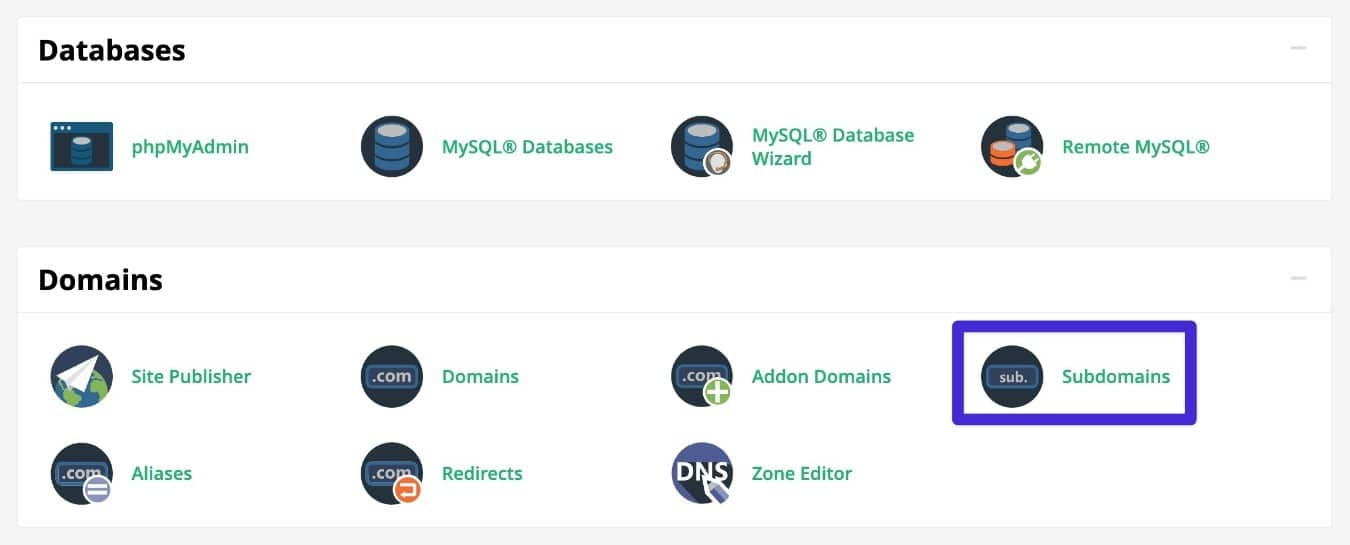
Assuming you’re using a recent version of cPanel, get started by opening the main Domains tool, which should be listed under the Domains section.
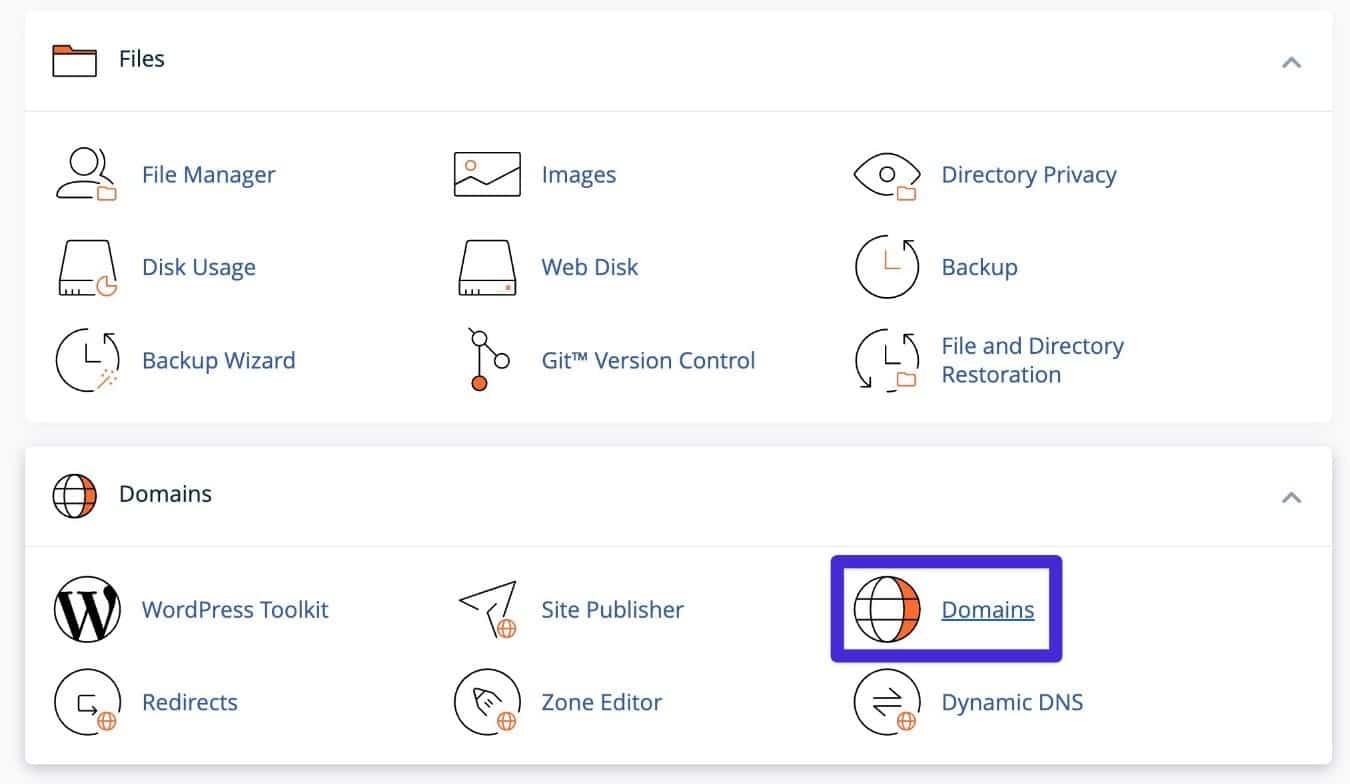
In the main Domains interface, click the button to Create A New Domain and enter your desired subdomain in the box.
Then, cPanel should automatically generate the document root file system location, but you’re free to edit it if desired.
Finally, click Submit to add the subdomain.

Depending on how you have your domain configured, you might also need to add a CNAME or A record that points to your subdomain. If your domain is using your host’s nameservers, cPanel should automatically add the relevant records (but you still might want to double-check in the Zone Editor tool).
If you’re managing your domain’s nameservers elsewhere (e.g. Cloudflare), you’ll need to add the record directly via Cloudflare.
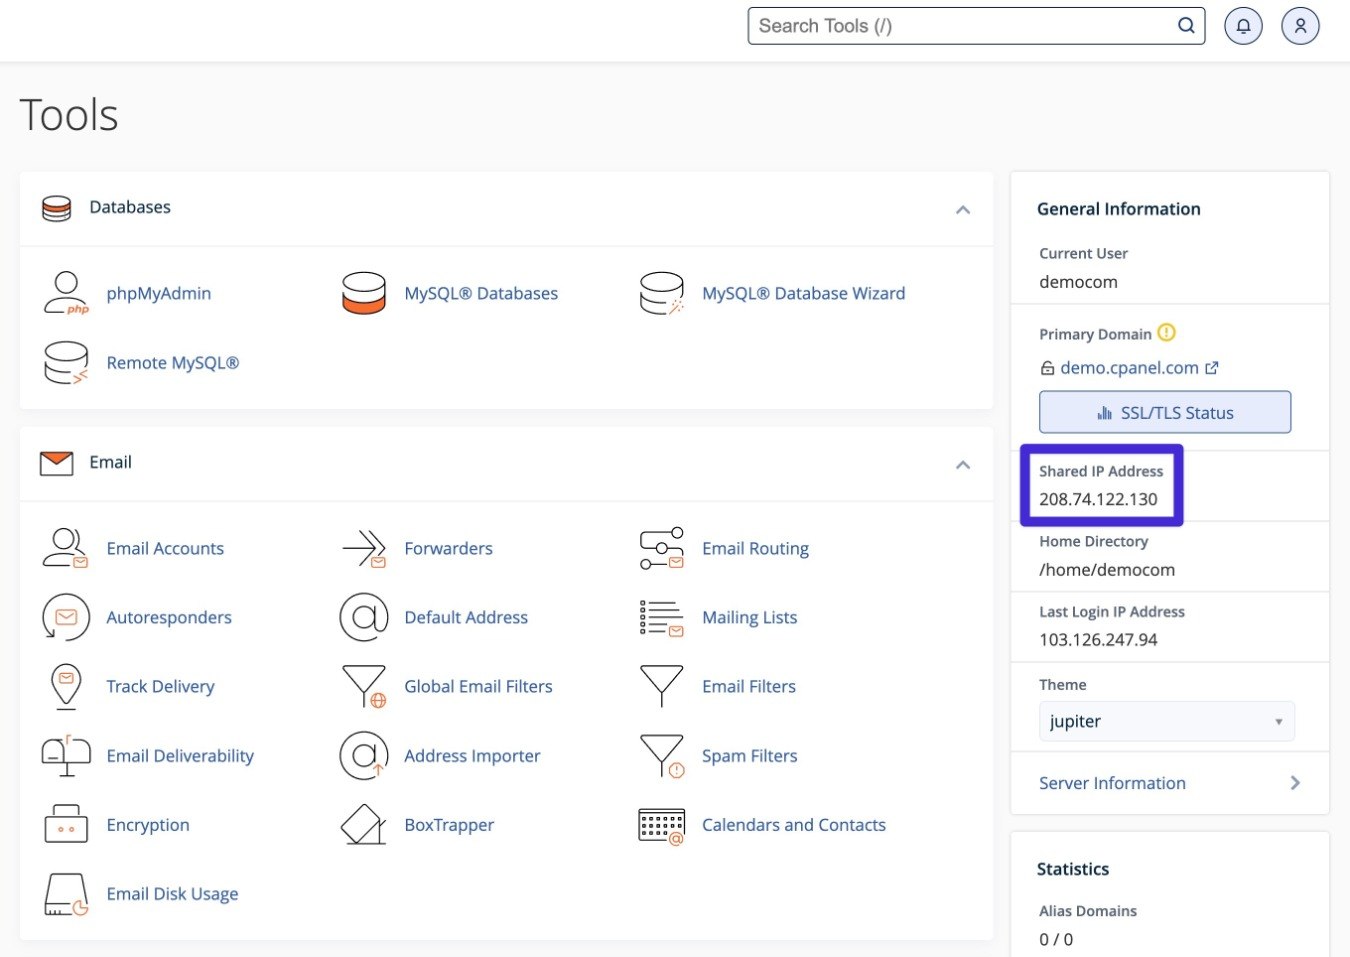
You’ll typically want to point this record to the Shared IP Address that you see in the cPanel dashboard.
Older Versions of cPanel (Version 106 or Lower)
If you’re using an older version of cPanel, you might see a separate Subdomains tool. In that case, you should use the Subdomains tool to add your subdomain instead of the main Domains interface that current versions of cPanel use.
2. Use the cPanel Installer Tool
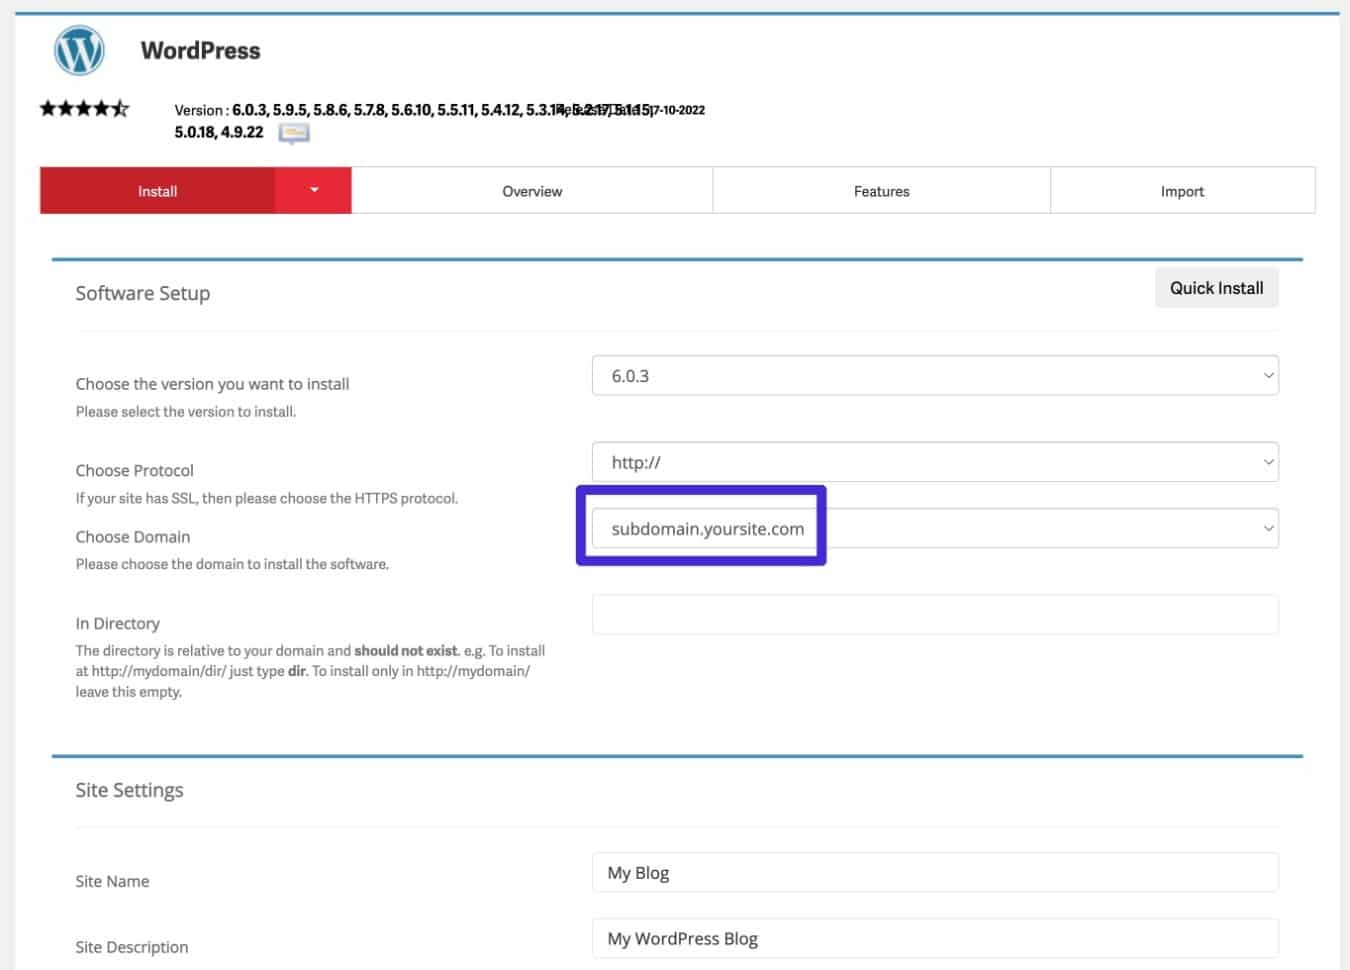
Once you’ve added your subdomain to cPanel, you can use the automatic WordPress installer tool just like you would for any other domain.
Just make sure to choose your subdomain as the domain name for your new WordPress site.
Here’s what it might look like in Softaculous:
Once the WordPress installer finishes, you should be able to access your fresh WordPress install at that subdomain.
How To Manually Install WordPress on a Subdomain
If you’re more of a DIY type, you can also manually install WordPress on a subdomain.
The process is pretty much the same as manually installing WordPress on a root domain – just with a few tweaks for the subdomain.
1. Set Up Your Subdomain File System and DNS Records
Before you run the manual WordPress install, you’ll first need to set up your subdomain at your host. This involves:
- Setting up the file system to store the files for this WordPress install.
- Adding the DNS records to your domain to point your subdomain to your hosting.
How you do this will depend on your hosting provider and/or your hosting control panel.
If you’re using cPanel, you can follow the same instructions from the previous section to add a subdomain via cPanel.
If you’re using a different tool, you’ll want to consult that tool’s documentation if you’re not sure where to begin.
2. Perform the Manual WordPress Install
Finally, you’ll want to perform the manual WordPress install, just like you would if you were installing WordPress on a root domain.
This approach generally includes the following steps:
- Upload the files via FTP.
- Create a database via your hosting dashboard.
- Edit the wp-config.php file and add the database credentials.
- Run the WordPress installer that appears the first time you try to access your subdomain.
If you want to see these steps in more detail, you can follow our full step-by-step guide on how to install WordPress manually.
All of the steps will be the same – the only difference is that you’re using a subdomain (you’ll also need to upload the files to the file system folder for your subdomain).
Summary
Using a subdomain for WordPress has both pros and cons, but it can make sense in a lot of situations.
If you feel that the pros outweigh the cons for your site, installing WordPress on a subdomain works similarly to installing WordPress on a root domain.
The main difference is that you might need to set up your subdomain before you can install WordPress, which is the case with cPanel.
However, if you’re using Kinsta, you can install WordPress on a subdomain following pretty much the exact same process as setting up a new Kinsta install on a root domain. The only difference is that you’ll use a subdomain as your site’s primary domain.
Depending on your use case, it might also work better to use WordPress multisite instead of creating a separate WordPress install on a subdomain. To learn more about this, you can read our introduction to WordPress multisite, along with our guides to creating a multisite network, using multisite subdomains, and setting up domain mapping.
Kinsta offers WordPress multisite hosting so you can use this approach with Kinsta, as well. If you do use multisite, the free Kinsta APM tool can help you optimize its performance to ensure that your network loads just as fast as separate WordPress installs.


