Add as a preferred source on Google
There’s a lot of buzz about CLI coding agents today.
This new class of AI-driven tools lives in your local terminal and acts as autonomous shell operators. They use your existing command-line environment (including Git, SSH, and WP-CLI) to navigate file trees, run commands, inspect output, and resolve issues in a continuous, self-correcting feedback loop.
This article will introduce you to CLI coding agents, break down how the “Agentic Loop” works under the hood, and walk you through how to set up a local CLI agent to manage remote WordPress environments safely using WP-CLI.
Ready to bring your WordPress workflow to the next level with CLI agents? Let’s dive in!
The command-line approach: CLI Coding Agents
Like MCP-based integrations, CLI agents are a modern way to connect Large Language Models (LLMs) to real-world development environments. However, although both approaches aim to bridge the gap between AI reasoning and code generation, CLI coding agents and MCP integrations are technically distinct solutions that operate at very different layers of your tech stack.
While Model Context Protocol (MCP) allows LLMs to interact with external tools and data sources through predefined client-server interfaces, CLI coding agents are AI-driven tools that act as autonomous shell assistants. They live in your local terminal shell and have direct access to system utilities, file management tools, and CLI interfaces such as git, ssh, and wp-cli.
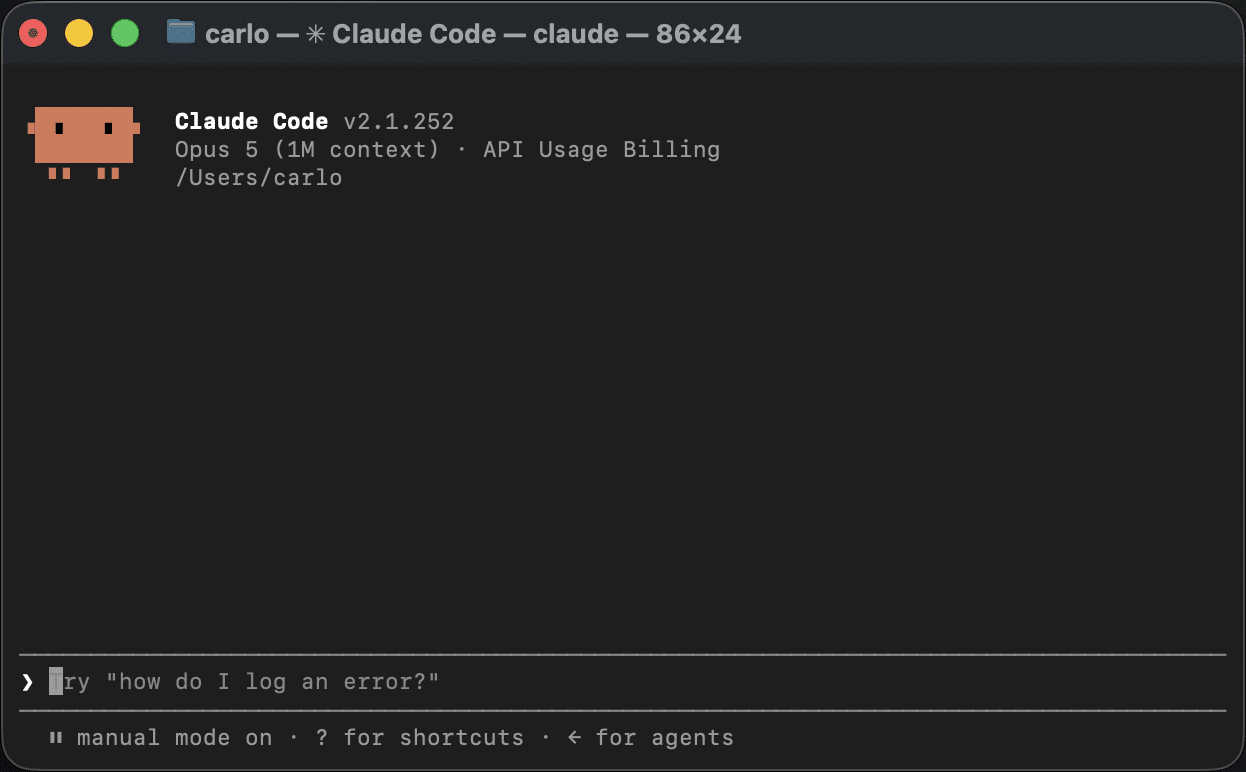
Examples of CLI agents include Claude Code, Antigravity CLI, Cursor CLI, and Aider.
Pros, Cons, and use cases of CLI coding agents
Rather than asking yourself which tool best fits your technical or operational needs, think instead about the specific benefits you gain by adopting one or the other approach, or both at different stages of your workflow.
Five pros of CLI coding agents
As we mentioned, CLI agents operate at a different level in the workflow than MCP integrations and come with different advantages and disadvantages.
Here are five advantages that CLI agents offer to development teams.
1. Immediate access to an ecosystem of tools
CLI agents can immediately use the command-line tools available in their environment, including Git, WP-CLI, SSH, Docker, npm, system utilities, and cloud tools.
2. Autonomy and dynamic decision-making
An agent is not tied to a predefined workflow. Instead, it can autonomously decide which command to run, identify the most appropriate tool, select the information to bring into context, and plan the next step.
3. Adaptation based on output
After receiving an operation’s output, the agent analyzes the result and decides what to do next. If the next action no longer fits the original strategy, it can take a different approach. This makes CLI agents particularly well suited to non-linear and unpredictable problems.
4. Flexibility
An agent can dynamically combine shell commands and tools to perform complex operations without designing every workflow in advance.
5. Direct environment access
An agent can operate directly within the environment where the problem exists, whether that is the local computer’s filesystem, a code repository, a container, or remote infrastructure. This makes CLI agents particularly useful for debugging and troubleshooting, server management, software development, and WordPress operations.
Five cons of CLI coding agents
While powerful automation tools, CLI agents have their limitations. They require caution and strict guardrails around their autonomy.
Here are 5 drawbacks of CLI agents.
1. Greater operational risk
An agent with direct shell access and insufficient guardrails may run hallucinated or destructive commands. Therefore, a human-in-the-loop is necessary to approve or reject sensitive operations before they are executed.
2. Unstructured interface
Unlike APIs, the command shell doesn’t tell the model which actions are safe or appropriate, so it requires a good deal of terminal experience to use effectively. While this helps experienced command-line users, it can be a barrier for less technical teams.
3. Unpredictable output parsing
CLI agents interpret plain text, stack traces, and different output formats; since the output varies from one utility to another, this can lead to misinterpretations or execution errors.
4. Dependence on the environment
Variations in PATH, permissions, environment variables, and local tools can make the workflow non-portable.
5. Complex access control
The need for detailed restrictions on what a CLI agent can and cannot do requires strict sandboxing, permission management at the OS level, and safety policy implementation.
Complementary tools for different stages of your workflow
From what we have discussed so far, MCP integrations and CLI coding agents serve distinct use cases and can naturally coexist at different stages of your development and operational workflow.
Think of MCP as a production-ready API bridge that lets you access data, tools, and external services exposed by an MCP server in a standardized, environment-agnostic, and less error-prone way.
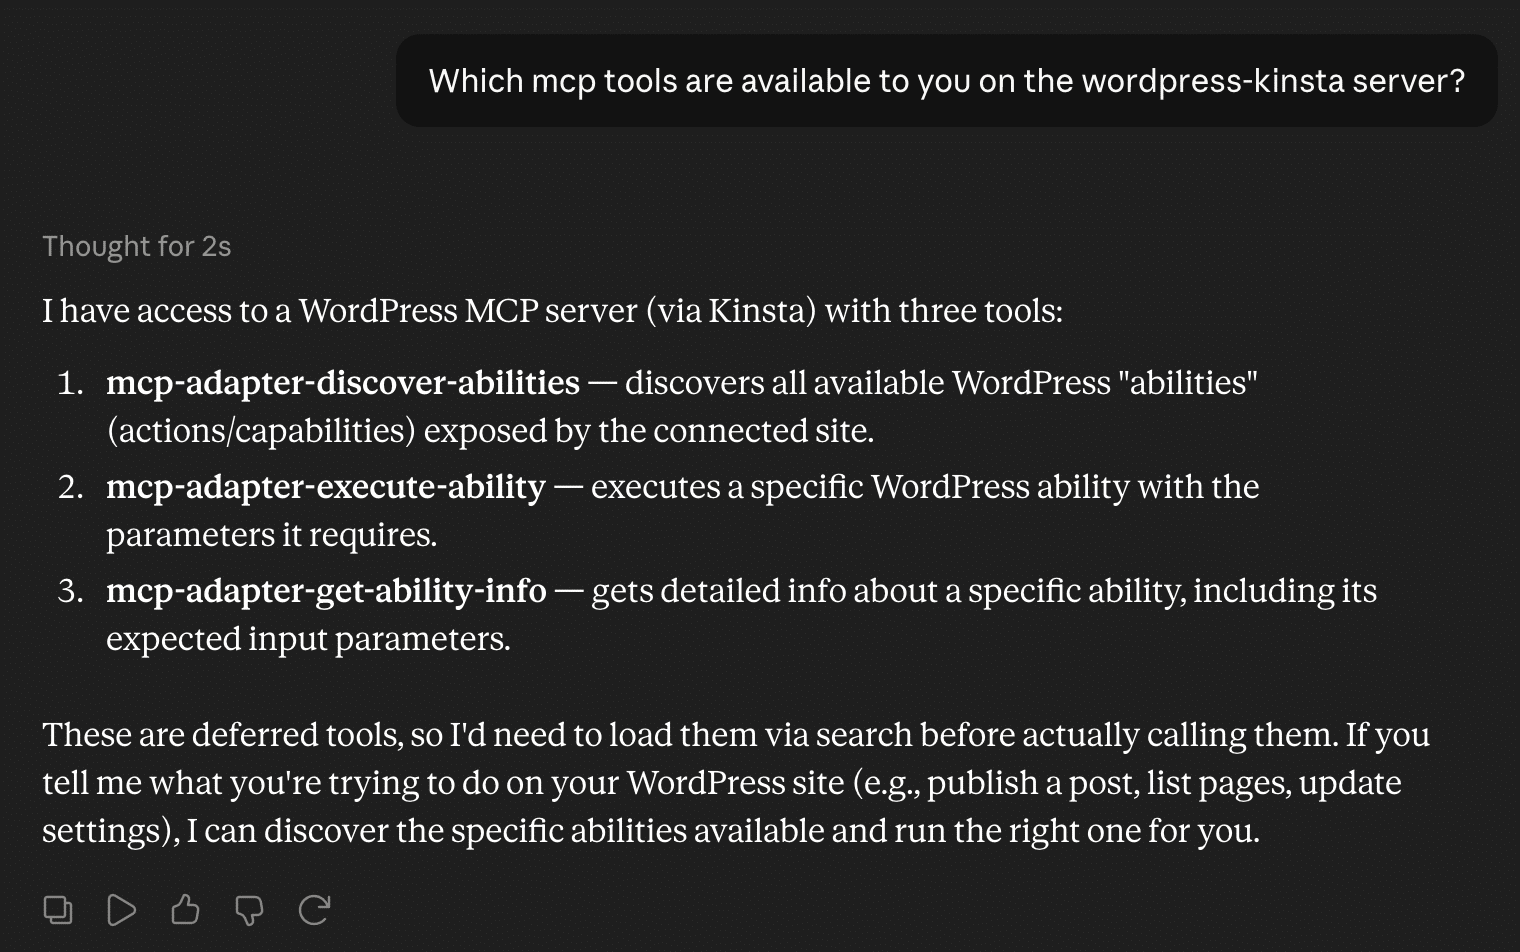
CLI agents, on the other hand, are great working companions that live in your terminal shell. They excel during active development, debugging, or complex server maintenance, when you need speed, context-awareness, and raw execution power to investigate error logs, run remote WP-CLI commands over SSH, and refactor code on the fly.
By combining both approaches, you get the flexibility of CLI agents for development, operations, and troubleshooting, while still getting the greater security MCP provides when integrating AI into stable SaaS products or production environments.
How CLI agents work: The Agentic Loop
Rather than executing a task in a single step (one-shot execution), a CLI-native agent works by going through a 5-step iterative process known as the Agentic Loop: Observe, Reason, Plan, Act, and Evaluate.
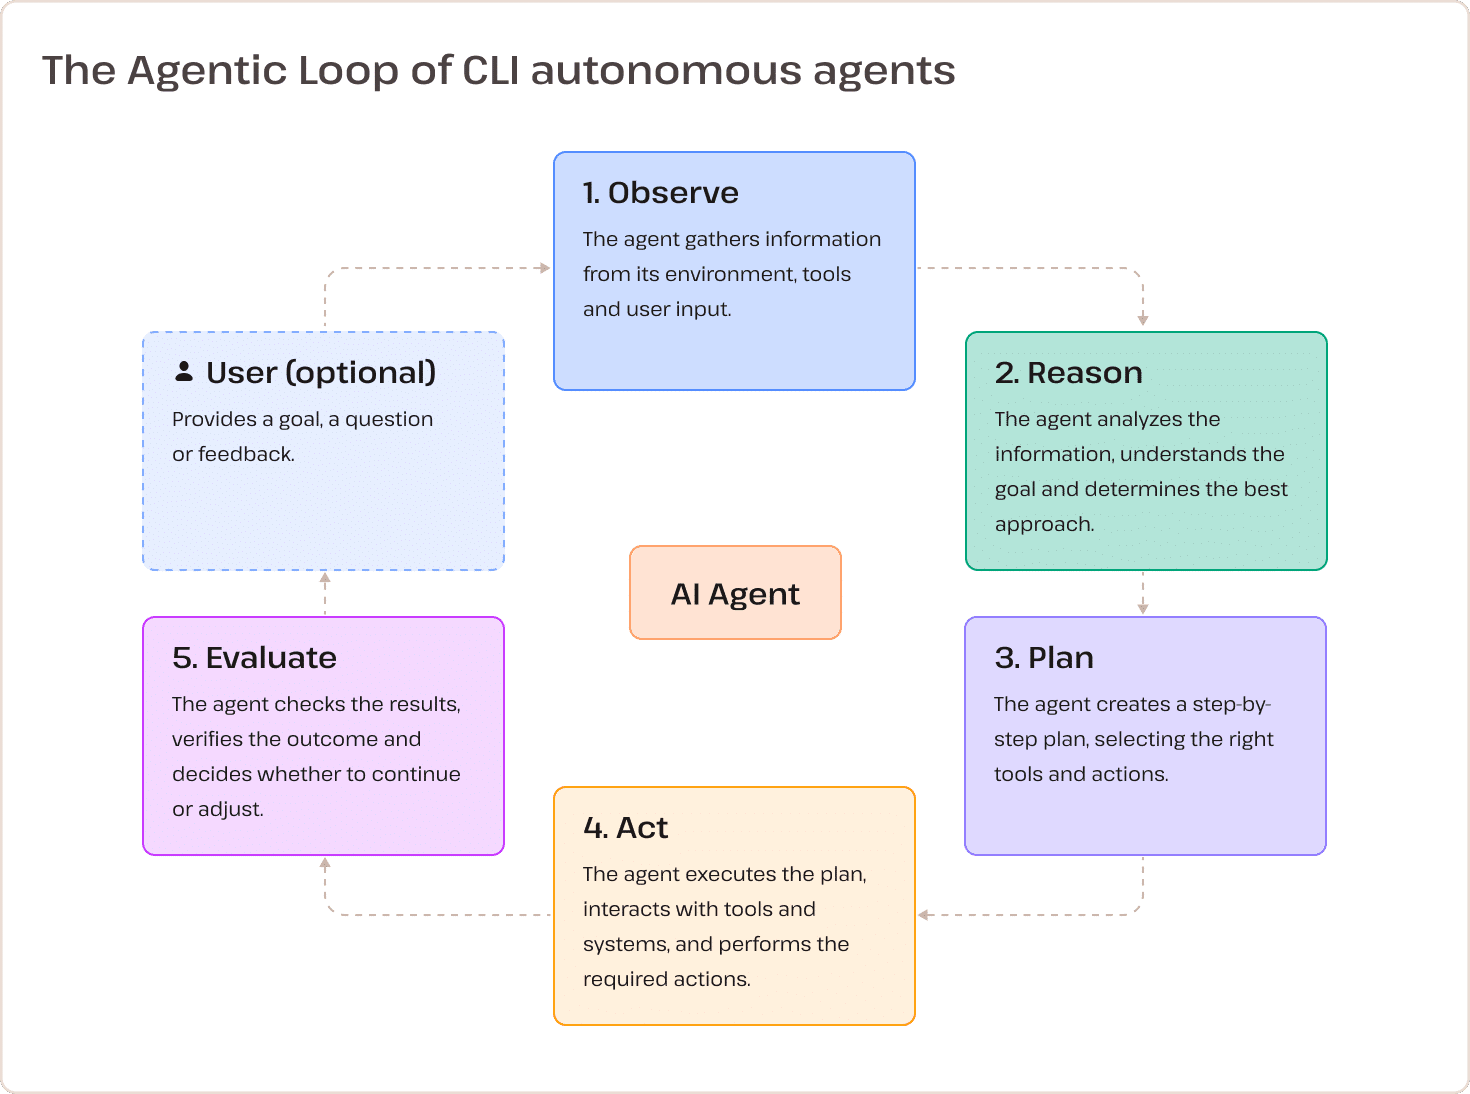
- Phase 1: Observe. The agent looks at the environment, builds context, examines the code structure, reads the configuration files (such as
wp-cli.yml,AGENTS.md, orpackage.json), and gathers the system inputs, including the terminal outputs and the log entries. - Phase 2: Reason. The system assesses the context that has been collected to decide on the most appropriate action; it determines which tools to call (for example, deciding whether to run
wp plugin listfirst) and also evaluates any operational risks, seeking human approval when security requires. - Phase 3: Plan. When dealing with multi-step tasks (for example, “Find the plugin causing a fatal error and deactivate it”), the agent breaks down the user’s request into a series of sequential sub-tasks before execution.
- Phase 4: Act. The agent goes from strategy to execution by sending the generated commands directly to the terminal shell or by making direct modifications to the files in the repository or via SSH.
- Phase 5: Evaluate. Finally, the agent looks at the command’s exit code and analyses both
stdoutandstderr. If the command is a success, it determines whether the goal has been fully achieved or proceeds to the next sub-task; if the command fails, the agent captures the error, identifies the root cause, and then goes back to Reason to modify its strategy and tries again as part of an autonomous self-healing loop.
This continuous, iterative mechanism lets a CLI agent diagnose a broken WordPress environment, fix a syntax error in a theme file, or run complex database maintenance without step-by-step human intervention for every command.
Setting up a local CLI agent to remote WordPress
Now that we’ve sparked your curiosity, we are fairly confident you’ll want to try a CLI agent on your site.
You won’t install any AI plugins or configure a server on the remote environment as you would do for an MCP integration. Instead, you’ll build a secure bridge using standard command-line utilities.
Here is what you need in place to work with a CLI agent:
- WP-CLI installed locally.
- SSH access to your remote environment.
- WP-CLI running on the remote server.
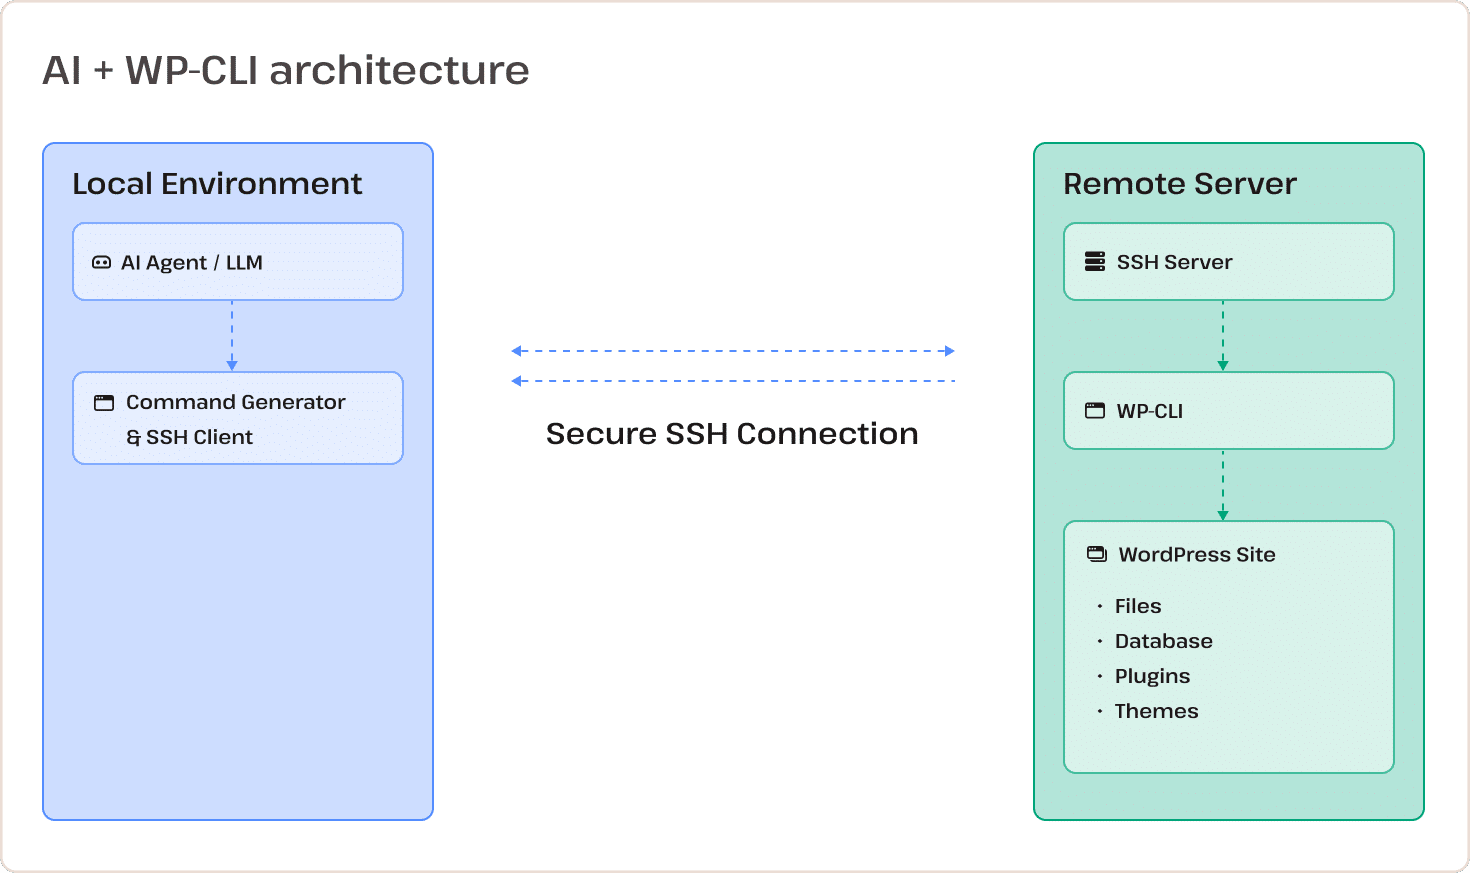
You will follow these steps:
1. Prepare your local environment
Before setting up the remote connection, you may want to check your local environment by running the following commands:
php --version
wp --version
wp --info
If WP-CLI is installed but outdated, update it to the latest version:
wp cli check-update
wp cli updateIf WP-CLI is not yet installed on your machine, download the latest WP-CLI Phar build, make it executable, and move it to your system PATH (macOS/Linux):
# Download the official WP-CLI Phar archive from GitHub
curl -O https://raw.githubusercontent.com/wp-cli/builds/gh-pages/phar/wp-cli.phar

# Verify that the Phar build works by checking environment info
php wp-cli.phar --info

# Make the Phar file executable
chmod +x wp-cli.phar

# Move the binary to a global PATH directory and rename it to 'wp'
sudo mv wp-cli.phar /usr/local/bin/wp
Then verify your installation:
wp --info2. Configure passwordless SSH
Once you have WP-CLI installed on your system, you can send wp commands to your remote server using the --ssh global flag. For example, you can retrieve a list of inactive plugins installed on the site with the following command:
wp plugin list --status=inactive --ssh=user@server_ip:port/path/to/your/siteEnter your password, and you’ll see a table listing your site plugins.
You can run any WP-CLI command on the server by manually passing credentials using the --ssh flag, but that means tedious credential entry and a continuously interrupted agentic loop.
To avoid this extra work, set up a dedicated SSH key pair and register your server parameters in your local OpenSSH config file.
Step 1: Generate a dedicated SSH key pair
Before you begin, check for existing SSH keys in your local .ssh directory:
ls -al ~/.sshIf you don’t have a dedicated key for WordPress site maintenance, generate an ED25519 key pair by running the following command:
ssh-keygen -t ed25519 -C "wp-cli-production" -f ~/.ssh/id_ed25519_wp_productionThe system will prompt you for an optional passphrase, which you can leave blank.
The command above generates a private key (id_ed25519_wp_production), which you must not share, and a public key (id_ed25519_wp_production.pub) to upload to the remote server.
Next, start your local SSH agent and register your private key:
# macOS / Linux
eval "$(ssh-agent -s)"

# On Linux (and macOS if you generated the key WITHOUT a passphrase)
ssh-add ~/.ssh/id_ed25519_wp_production

# On macOS, if you generated the key WITH a passphrase and want to store it in Keychain
ssh-add --apple-use-keychain ~/.ssh/id_ed25519_wp_production
Verify that the SSH agent is actually managing your private key:
ssh-add -lIf the configuration was completed correctly, you will see your fingerprint and the key comment:
256 SHA256:... wp-cli-production (ED25519)Now you can read the public SSH key saved on your disk:
# macOS / Linux: Display the public key string to copy
cat ~/.ssh/id_ed25519_wp_production.pub
Copy your public key string and add it to the ~/.ssh/authorized_keys file on your remote server:
# macOS / Linux: Automatically upload and append your public key to the remote server
ssh-copy-id -i ~/.ssh/id_ed25519_wp_production.pub user@server_ip -p port_numberStep 2: Define your host in SSH config
To avoid typing your connection details (IP address, port, username, and key path) every time, you can map your connection in the ~/.ssh/config file.
Open or create the file with the following command:
nano ~/.ssh/configIn the nano editor, add a host alias block mapping your connection details to your identity file:
Host production
  HostName <server-ip-or-domain>
  User <ssh-username>
  Port <port-number>
  IdentityFile ~/.ssh/id_ed25519_wp_production
  IdentitiesOnly yes
  AddKeysToAgent yes
  UseKeychain yes
Press Ctrl + O, Enter, then Ctrl + X to save and exit.
Now you should be able to log into your server via SSH with this simple command:
ssh production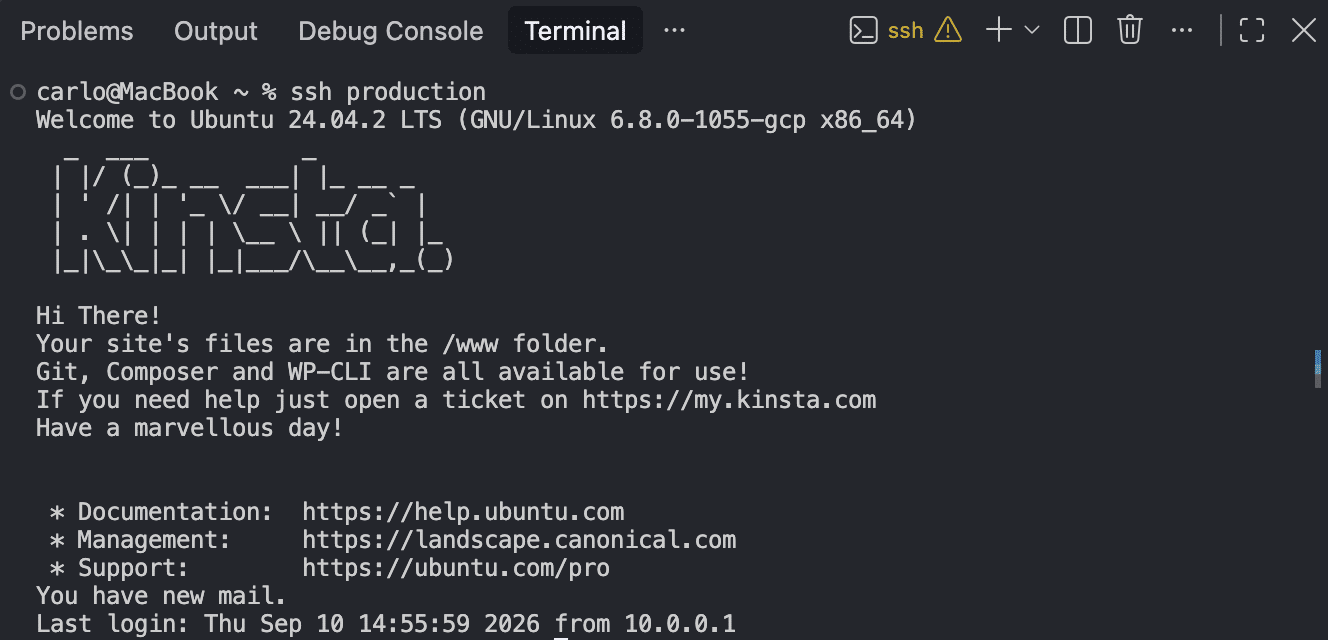
3. Register WP-CLI aliases
With WP-CLI aliases, you target local or remote WordPress installations using shortcuts like @production, or @staging, or @development, completely removing path parameters from your wp commands and AI prompts.
Create or edit your global WP-CLI configuration file:
mkdir -p ~/.wp-cli && nano ~/.wp-cli/config.ymlMap your SSH host alias to the absolute path of your remote WordPress web root:
@production:
  ssh: production/path/to/your/site
Verify that your alias works:
wp @production plugin listIf successful, you will see your remote site’s plugins listed in your local terminal.
Your environment is now ready to connect to a local CLI agent.
4. Install and authenticate your CLI coding agent
Now that you have configured your local WP-CLI environment to communicate with your remote site over passwordless SSH, it’s time to install and set up a CLI client. In the following sections, we’ll cover two of the most popular solutions, each with its own features and pricing model: Claude Code and Antigravity CLI.
Install Claude Code
Claude Code is Anthropic’s agentic CLI tool. As the official documentation says, it “reads your codebase, edits files, runs commands, and integrates with your development tools.”
First, install the Claude Code CLI globally (macOS and Linux):
curl -fsSL https://claude.ai/install.sh | bashWindows users can find platform-specific instructions in the official installation guide.
Once done, navigate to your project directory and launch Claude Code:
cd /path/to/your/project
claude
Claude Code will prompt you to authenticate your account or authorize your Anthropic API key (see available plan options).
If you choose to authenticate using an API key, which is billed based on usage, navigate to the API Keys section of the Claude Console and click Create Key.
Copy the generated key and save it in a secure location. It will look like a string starting with sk-ant-....
Once you have your API key, you can store it permanently in your shell configuration file (~/.zshrc) so you don’t have to enter it every time you interact with Claude:
echo 'export ANTHROPIC_API_KEY="sk-ant-api03-your-api-key..."' >> ~/.zshrc
source ~/.zshrc
Alternatively, you can set the API key for the duration of the current terminal session using the following command:
export ANTHROPIC_API_KEY="sk-ant-api03-your-api-key..."Once authenticated, you can launch Claude Code by running claude.
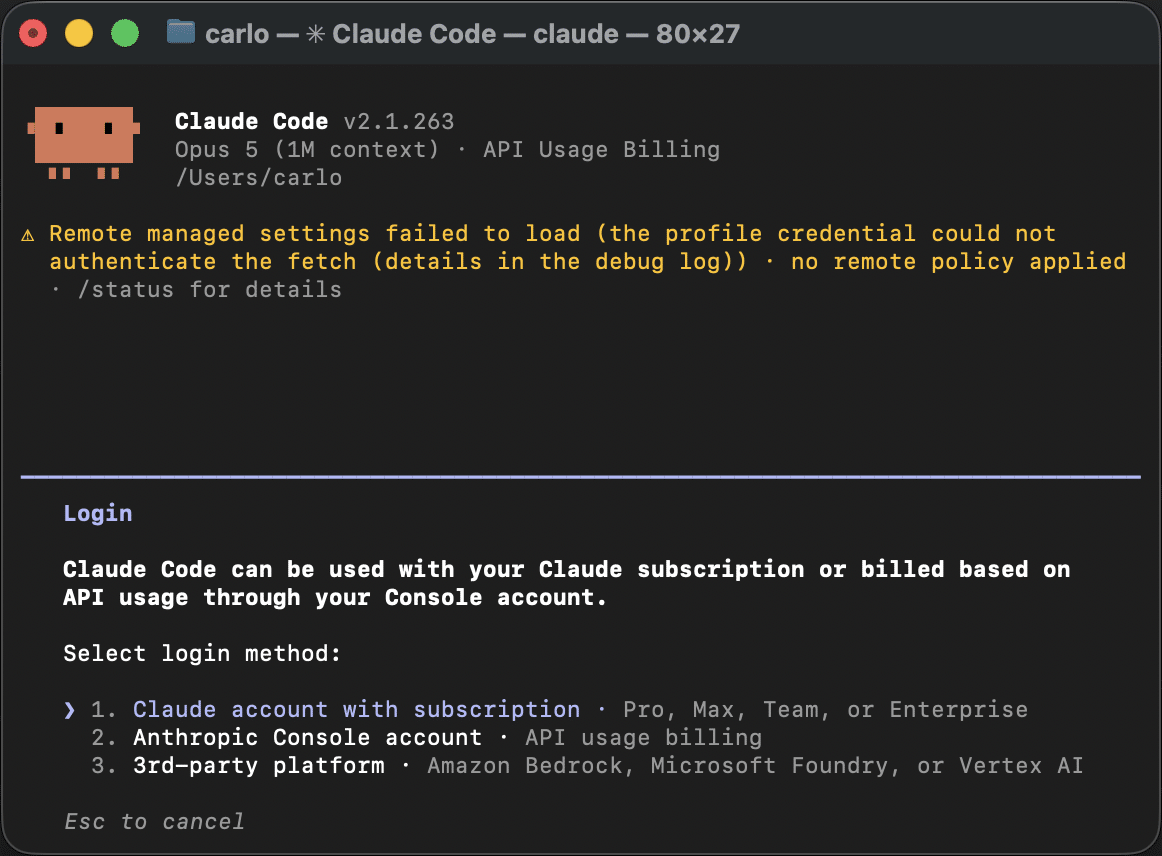
Now you can start interacting with Claude Code in your terminal using your WP-CLI aliases in natural language:
check the status of the plugins on @production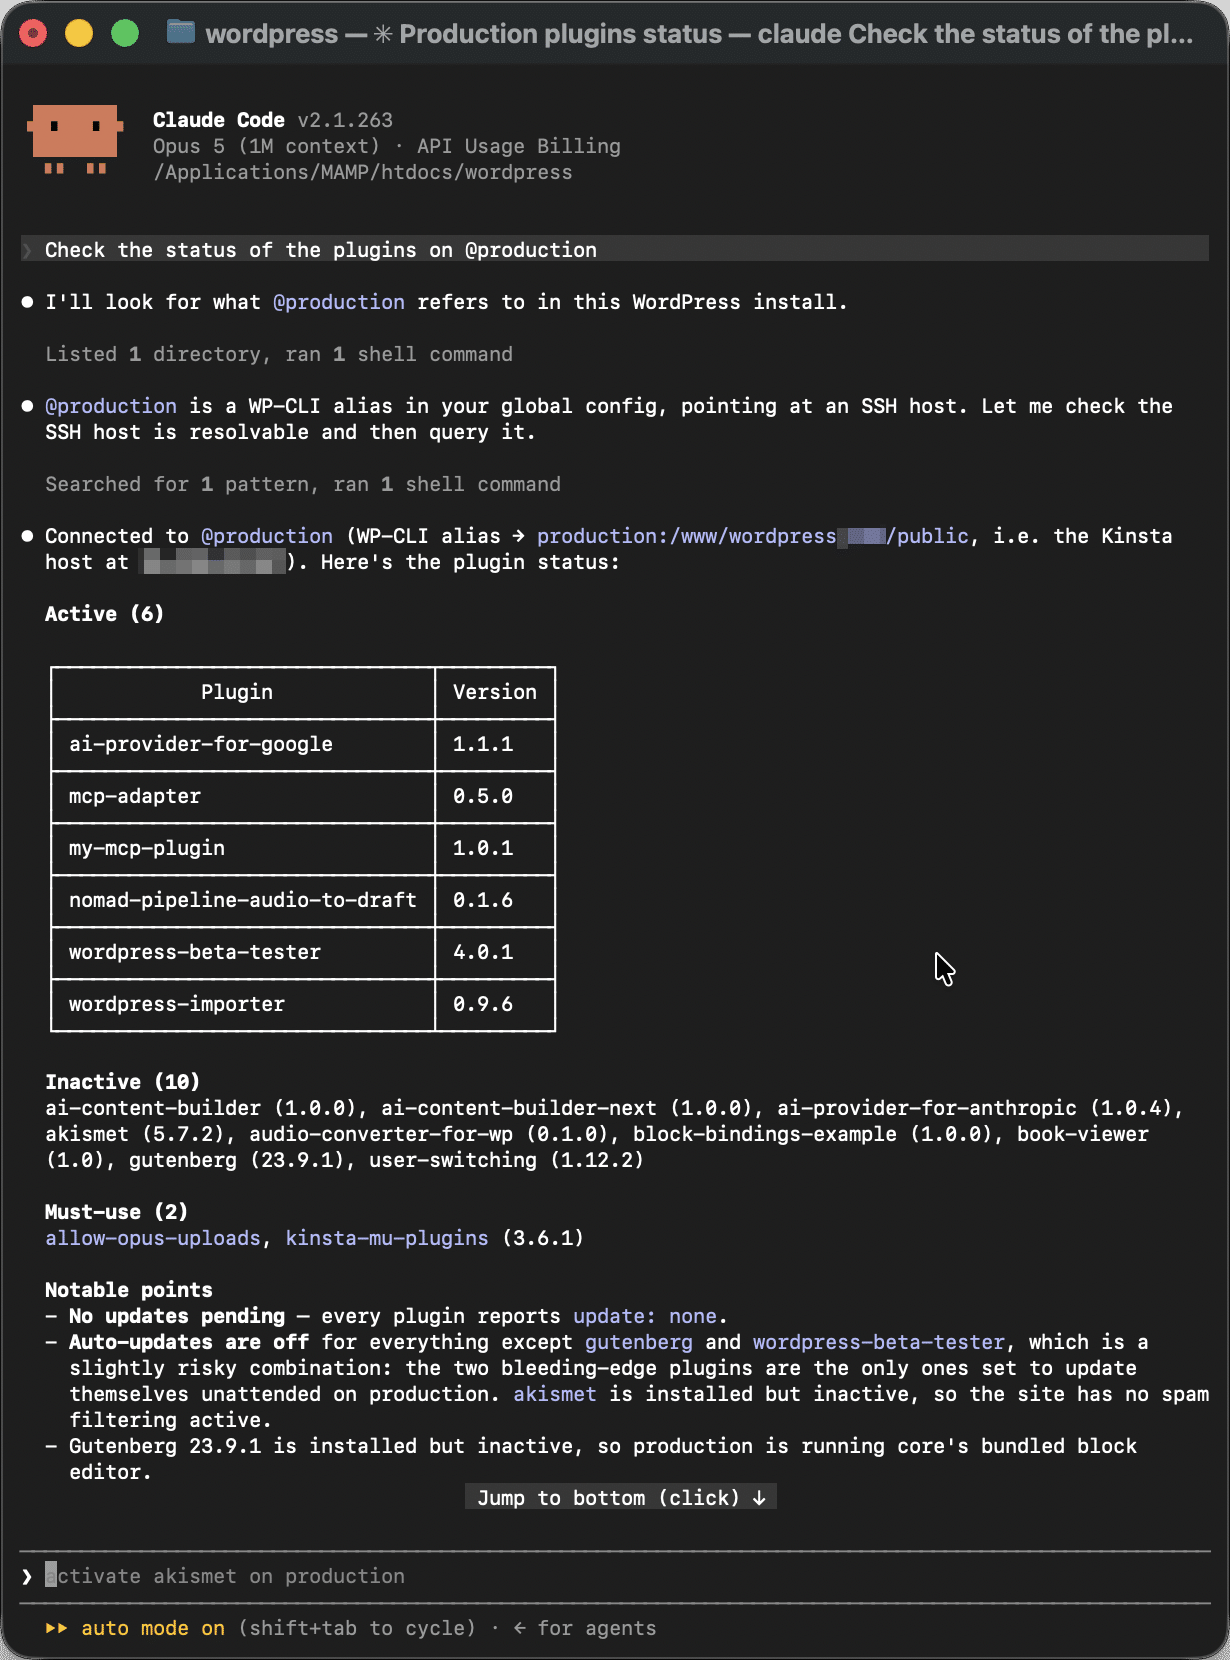
Install Antigravity CLI
Antigravity CLI is Google’s native CLI coding assistant. Built as the evolution of Gemini CLI, Google’s new agentic tool offers an excellent alternative to established market tools like Claude Code.
Like Claude Code, you can install Antigravity CLI in several ways. The recommended way to globally install the agent on macOS and Linux is via curl:
curl -fsSL https://antigravity.google/cli/install.sh | bashIf you are running a different operating system or custom configuration, check out the Google Antigravity installation guide.
Once the installation is complete, navigate to your project workspace and run the launcher command:
cd /path/to/your/project
agy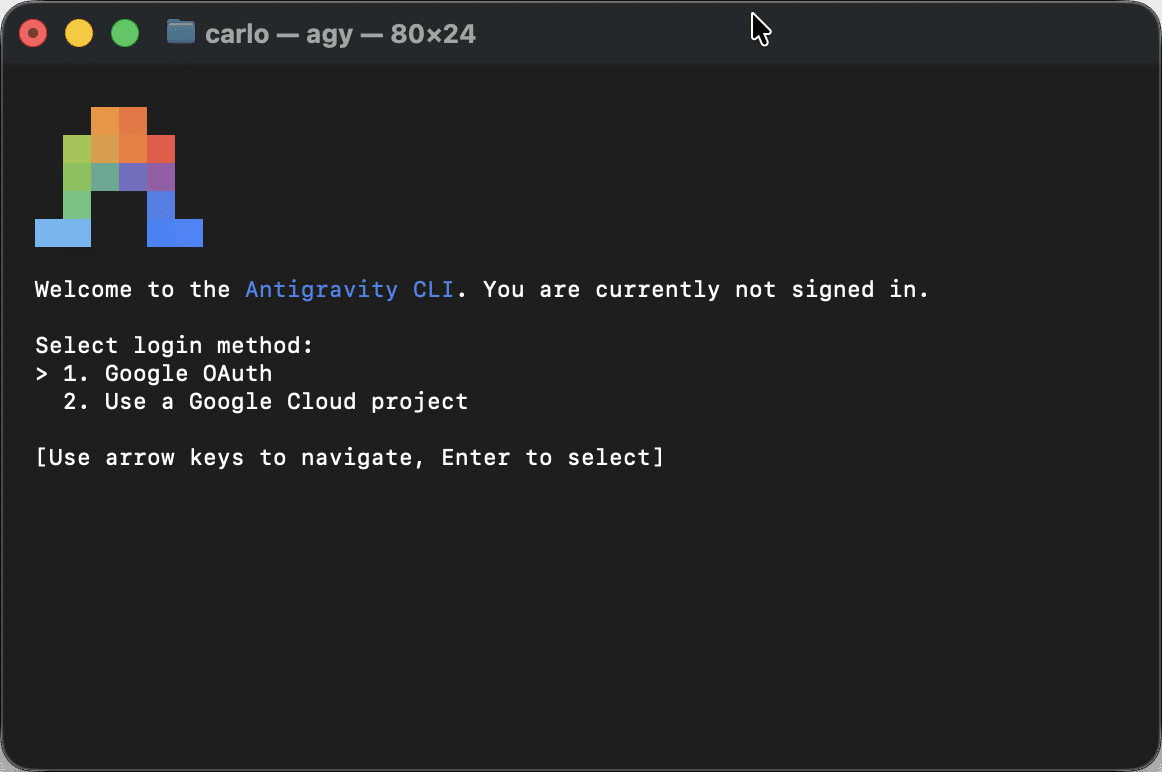
Antigravity CLI will automatically open your default browser to authorize the agent. Copy the code, paste it into your terminal shell, and press Enter. Once logged in, your terminal environment is linked to the Antigravity agentic engine.
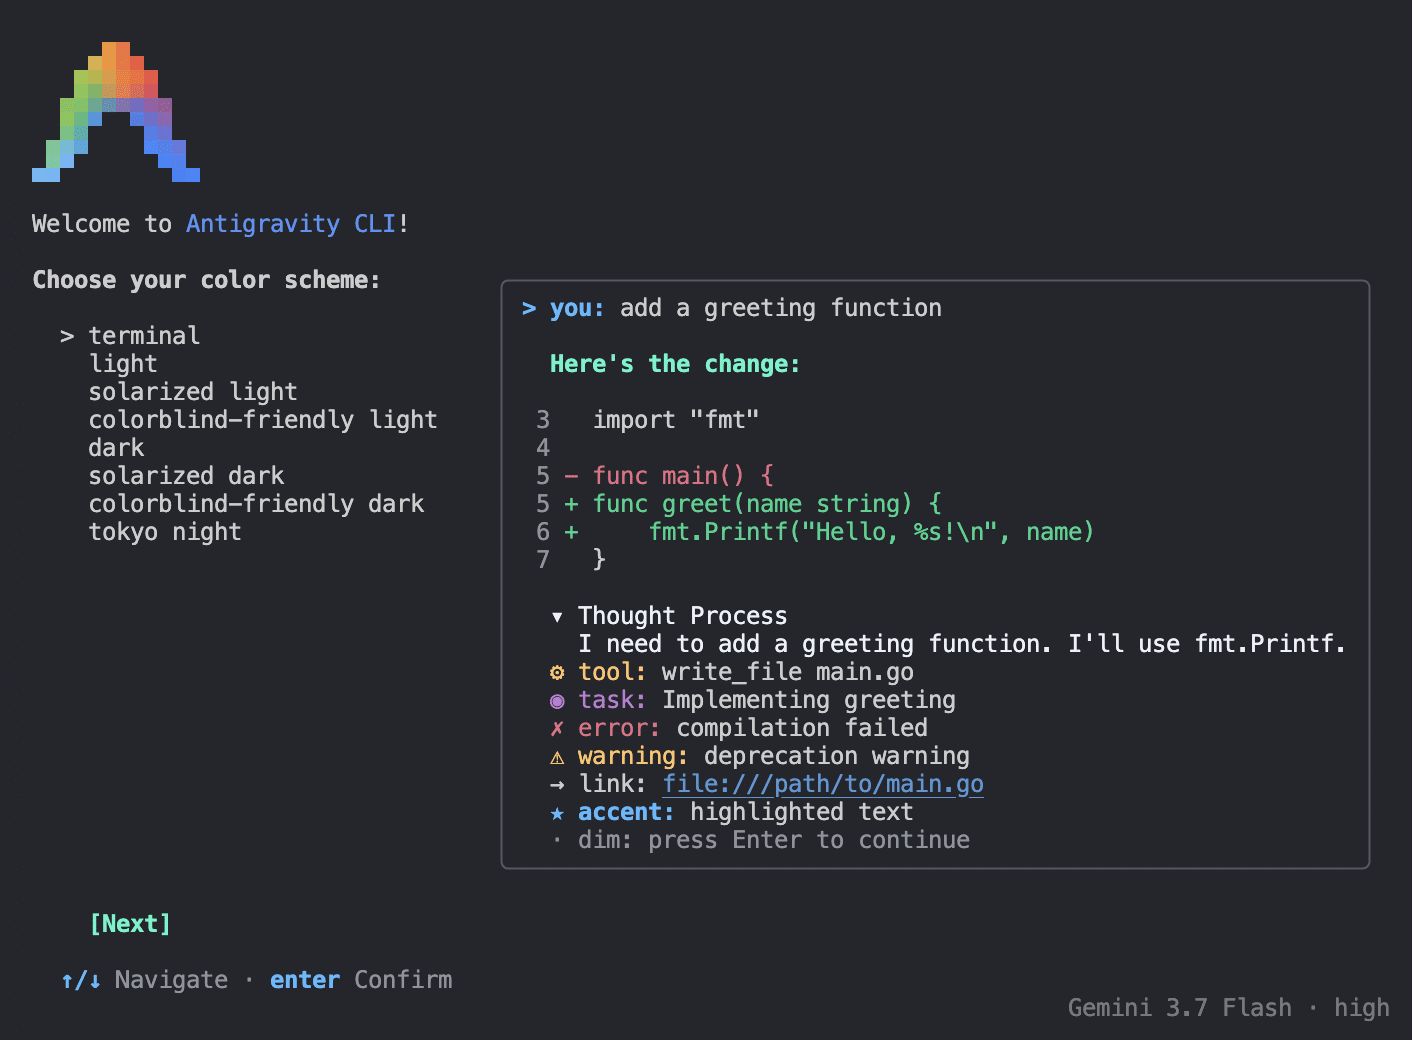
If you prefer using a Gemini API key from Google AI Studio, you can store the key in your shell configuration (~/.zshrc or ~/.bashrc):
echo 'export GEMINI_API_KEY="your-gemini-api-key..."' >> ~/.zshrc
source ~/.zshrc
With authentication configured, you can launch the agent by simply running:
agy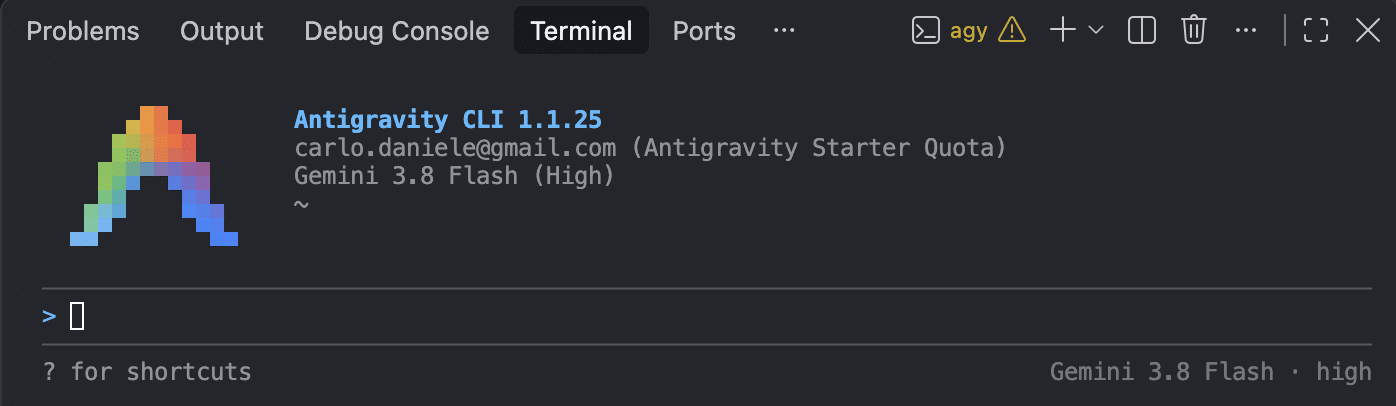
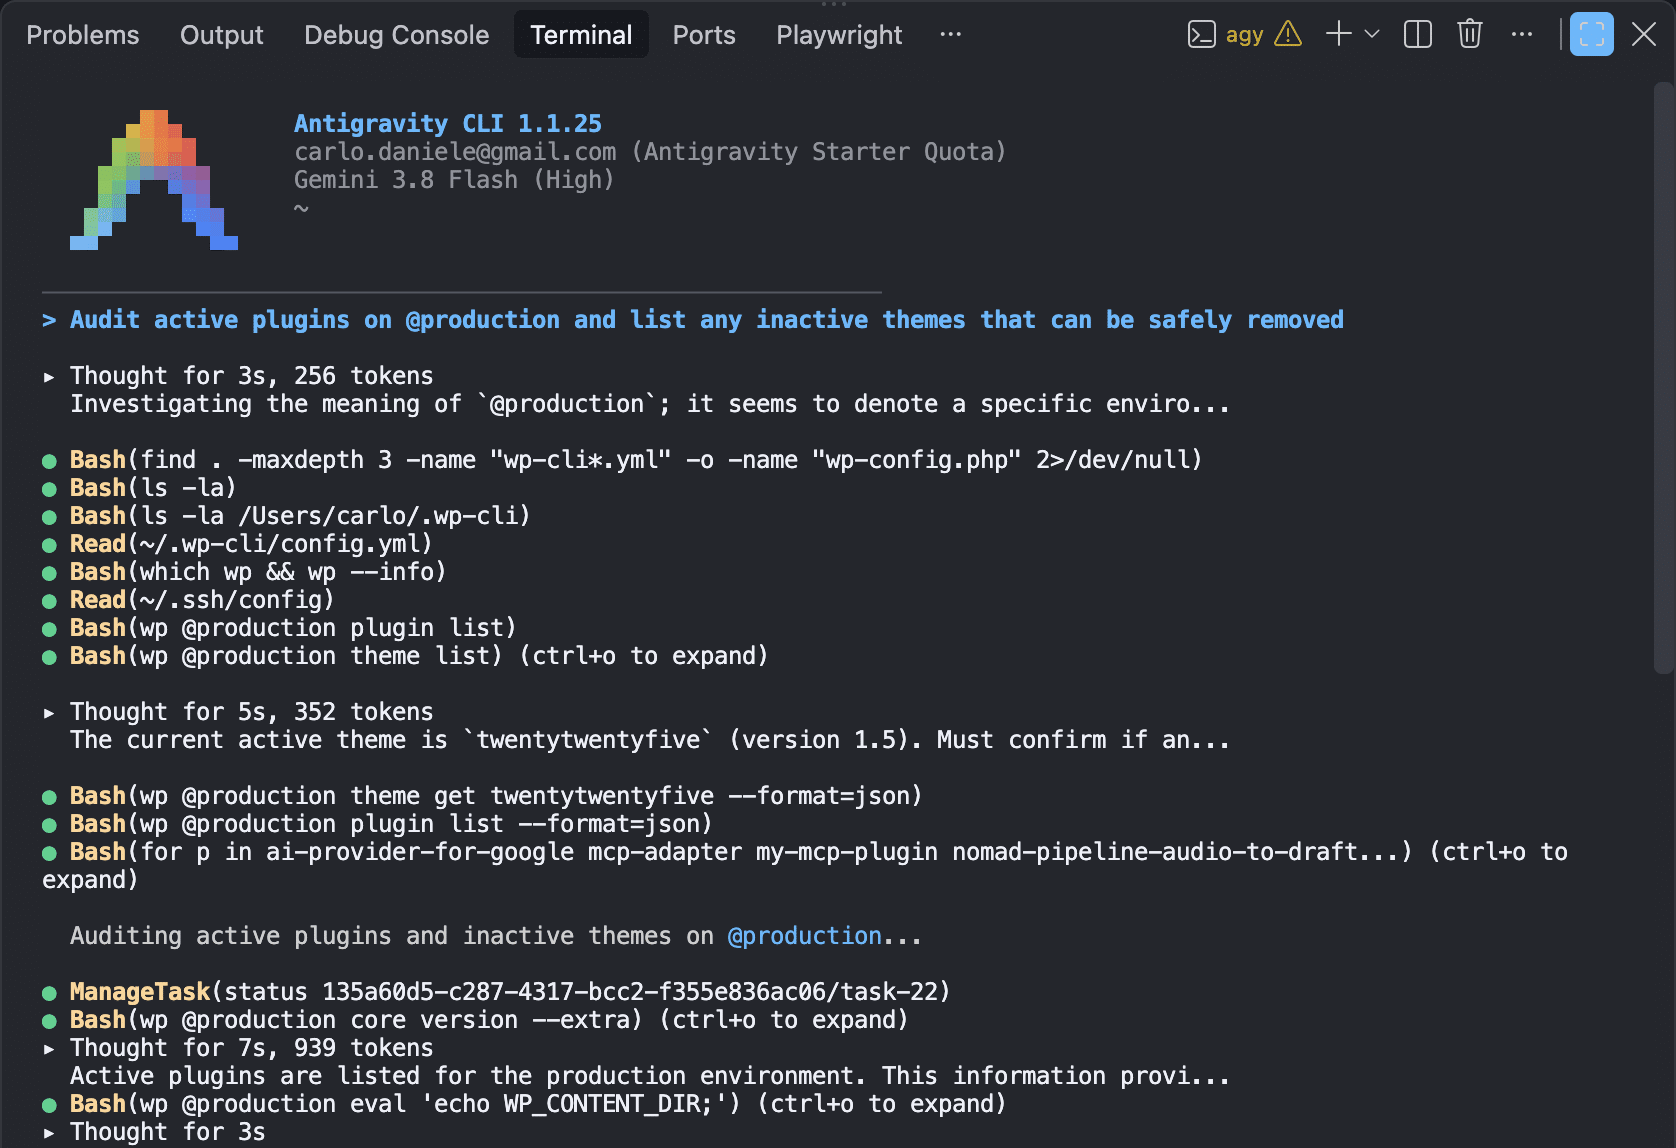
Antigravity CLI will inspect your environment, read your project context (including local wp-cli.yml or AGENTS.md instructions if present), and wait for your prompt. You can now delegate remote maintenance tasks or ask to execute complex tasks like the following:
Audit active plugins on @production and list any inactive themes that can be safely removedThe agent starts reasoning and executes several commands.
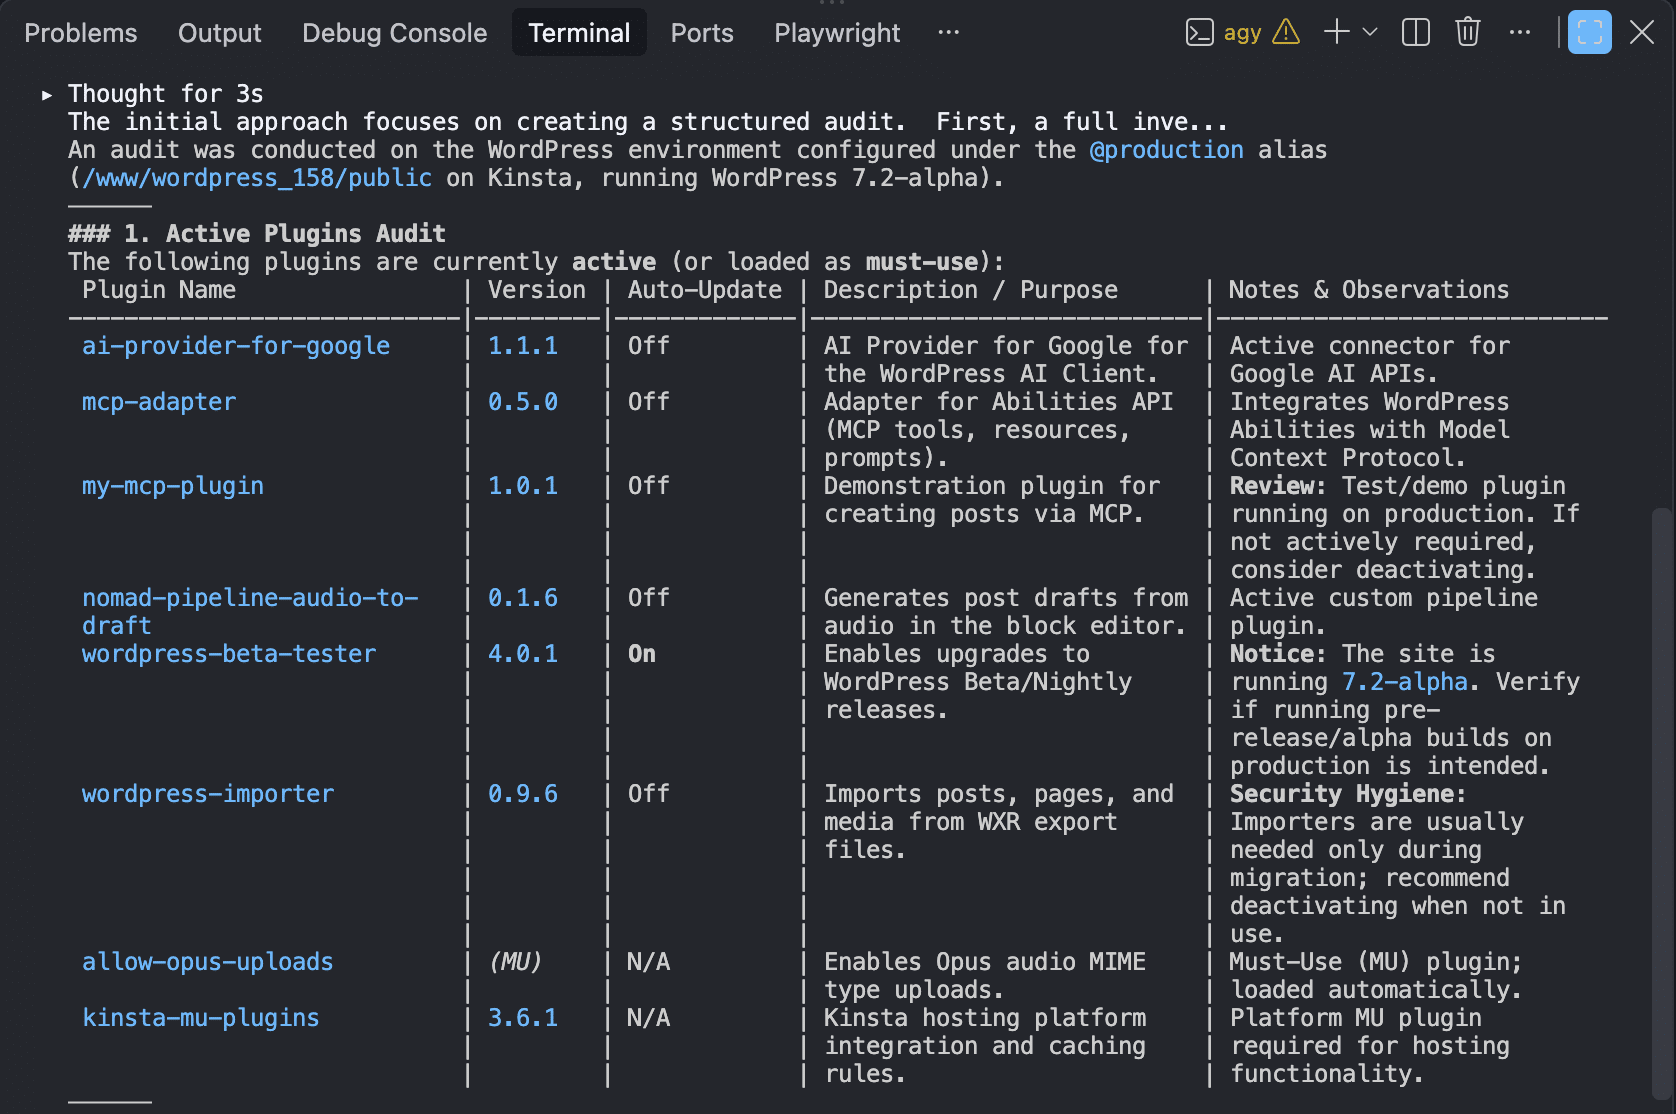
Next, it provides an Active Plugins Audit report.
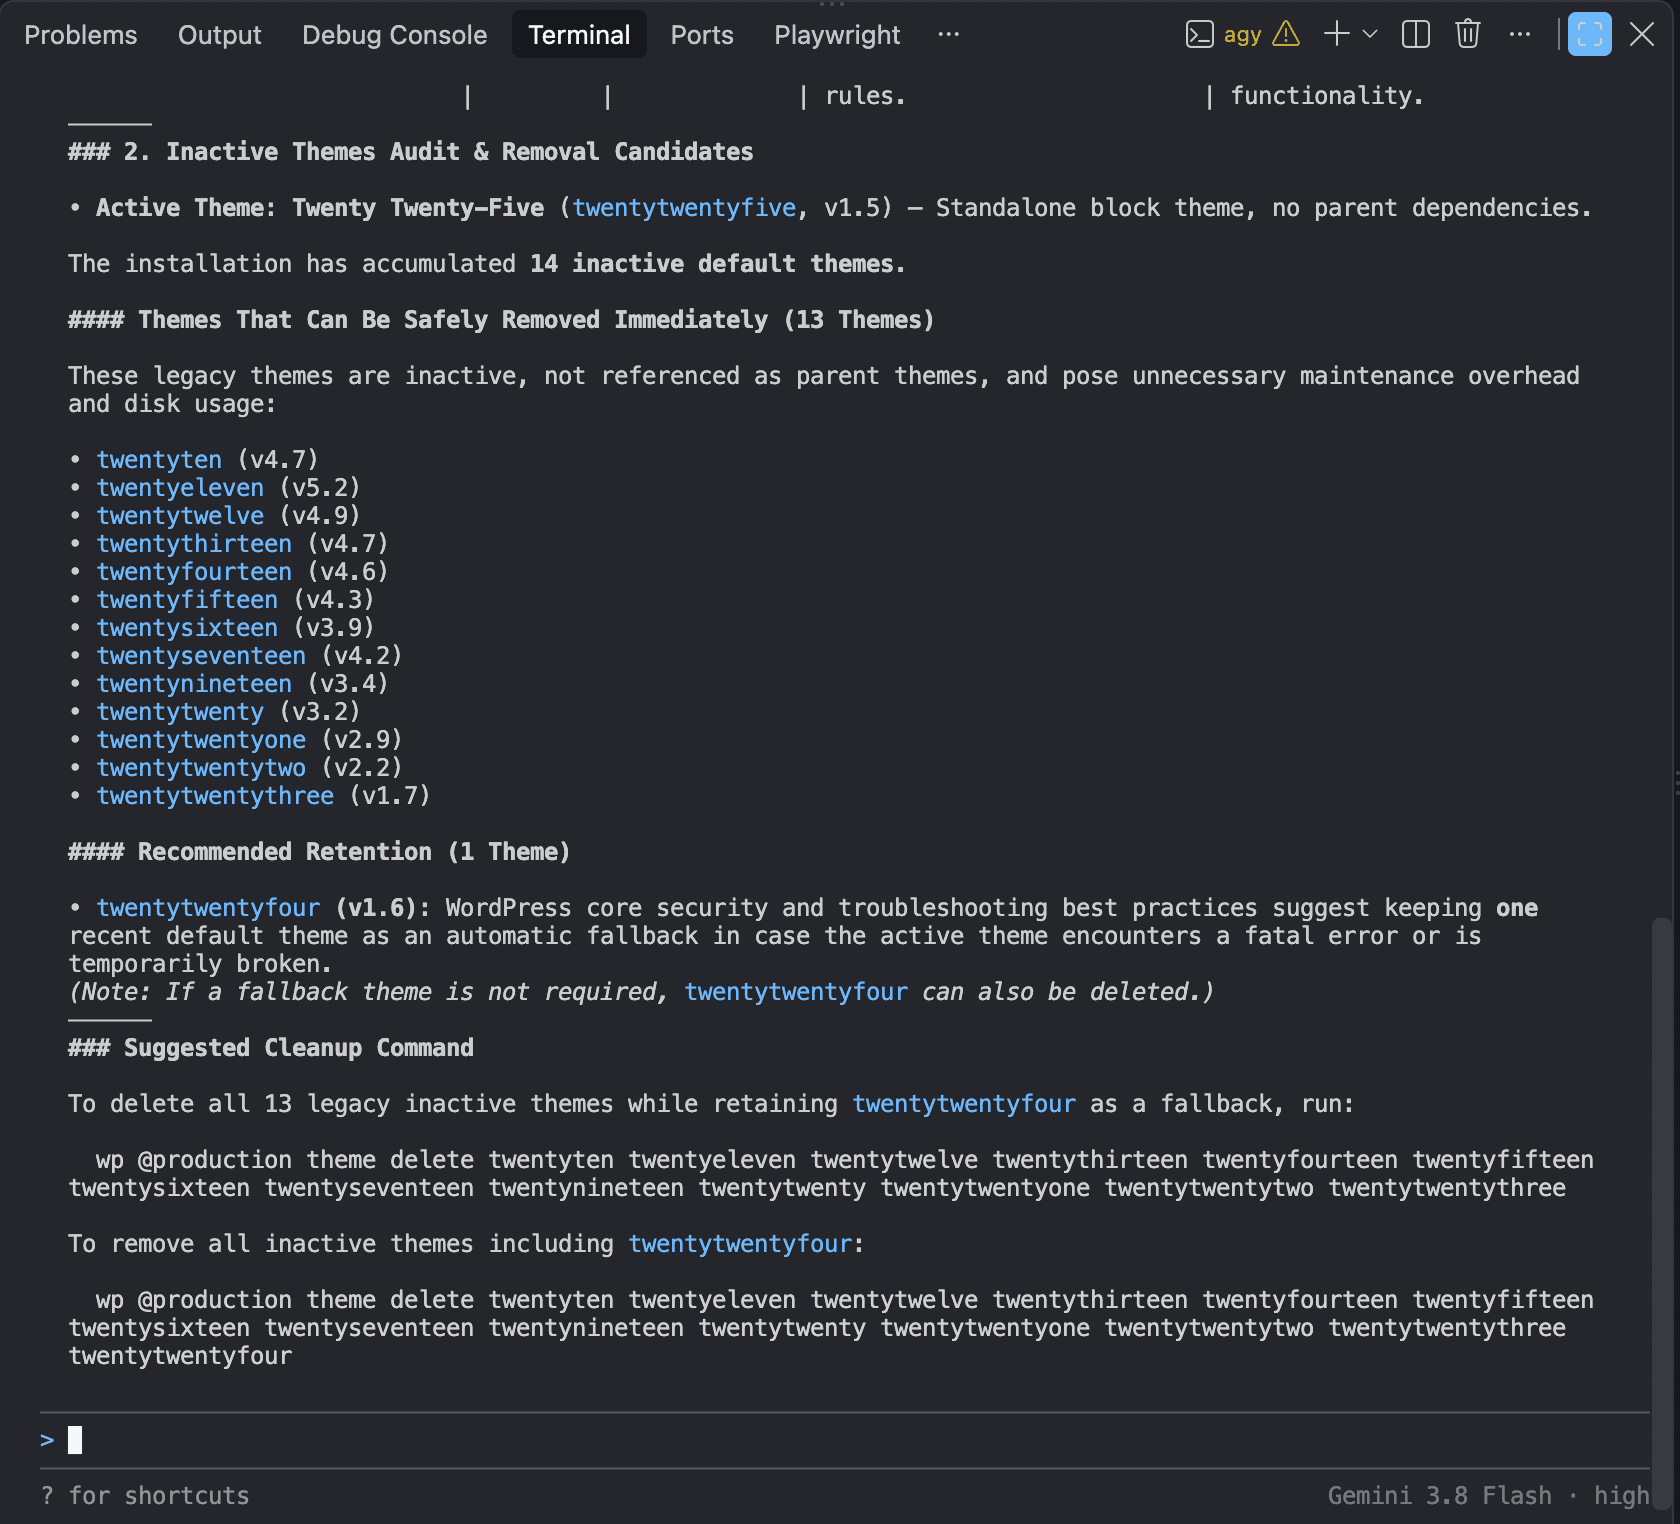
Finally, it provides an Inactive Themes Audit & Removal Candidates report and suggests a couple of commands to remove inactive themes.
Claude Code vs. Antigravity CLI: A real-world WordPress security audit
We tested the two CLI agents to understand how their results differ in a real-world use case. We intentionally kept the prompt we passed to both agents simple. A well-structured prompt would have provided more context for the two agents to build upon and could have produced more accurate responses.
Here is the prompt we passed to Antigravity CLI and Claude Code:
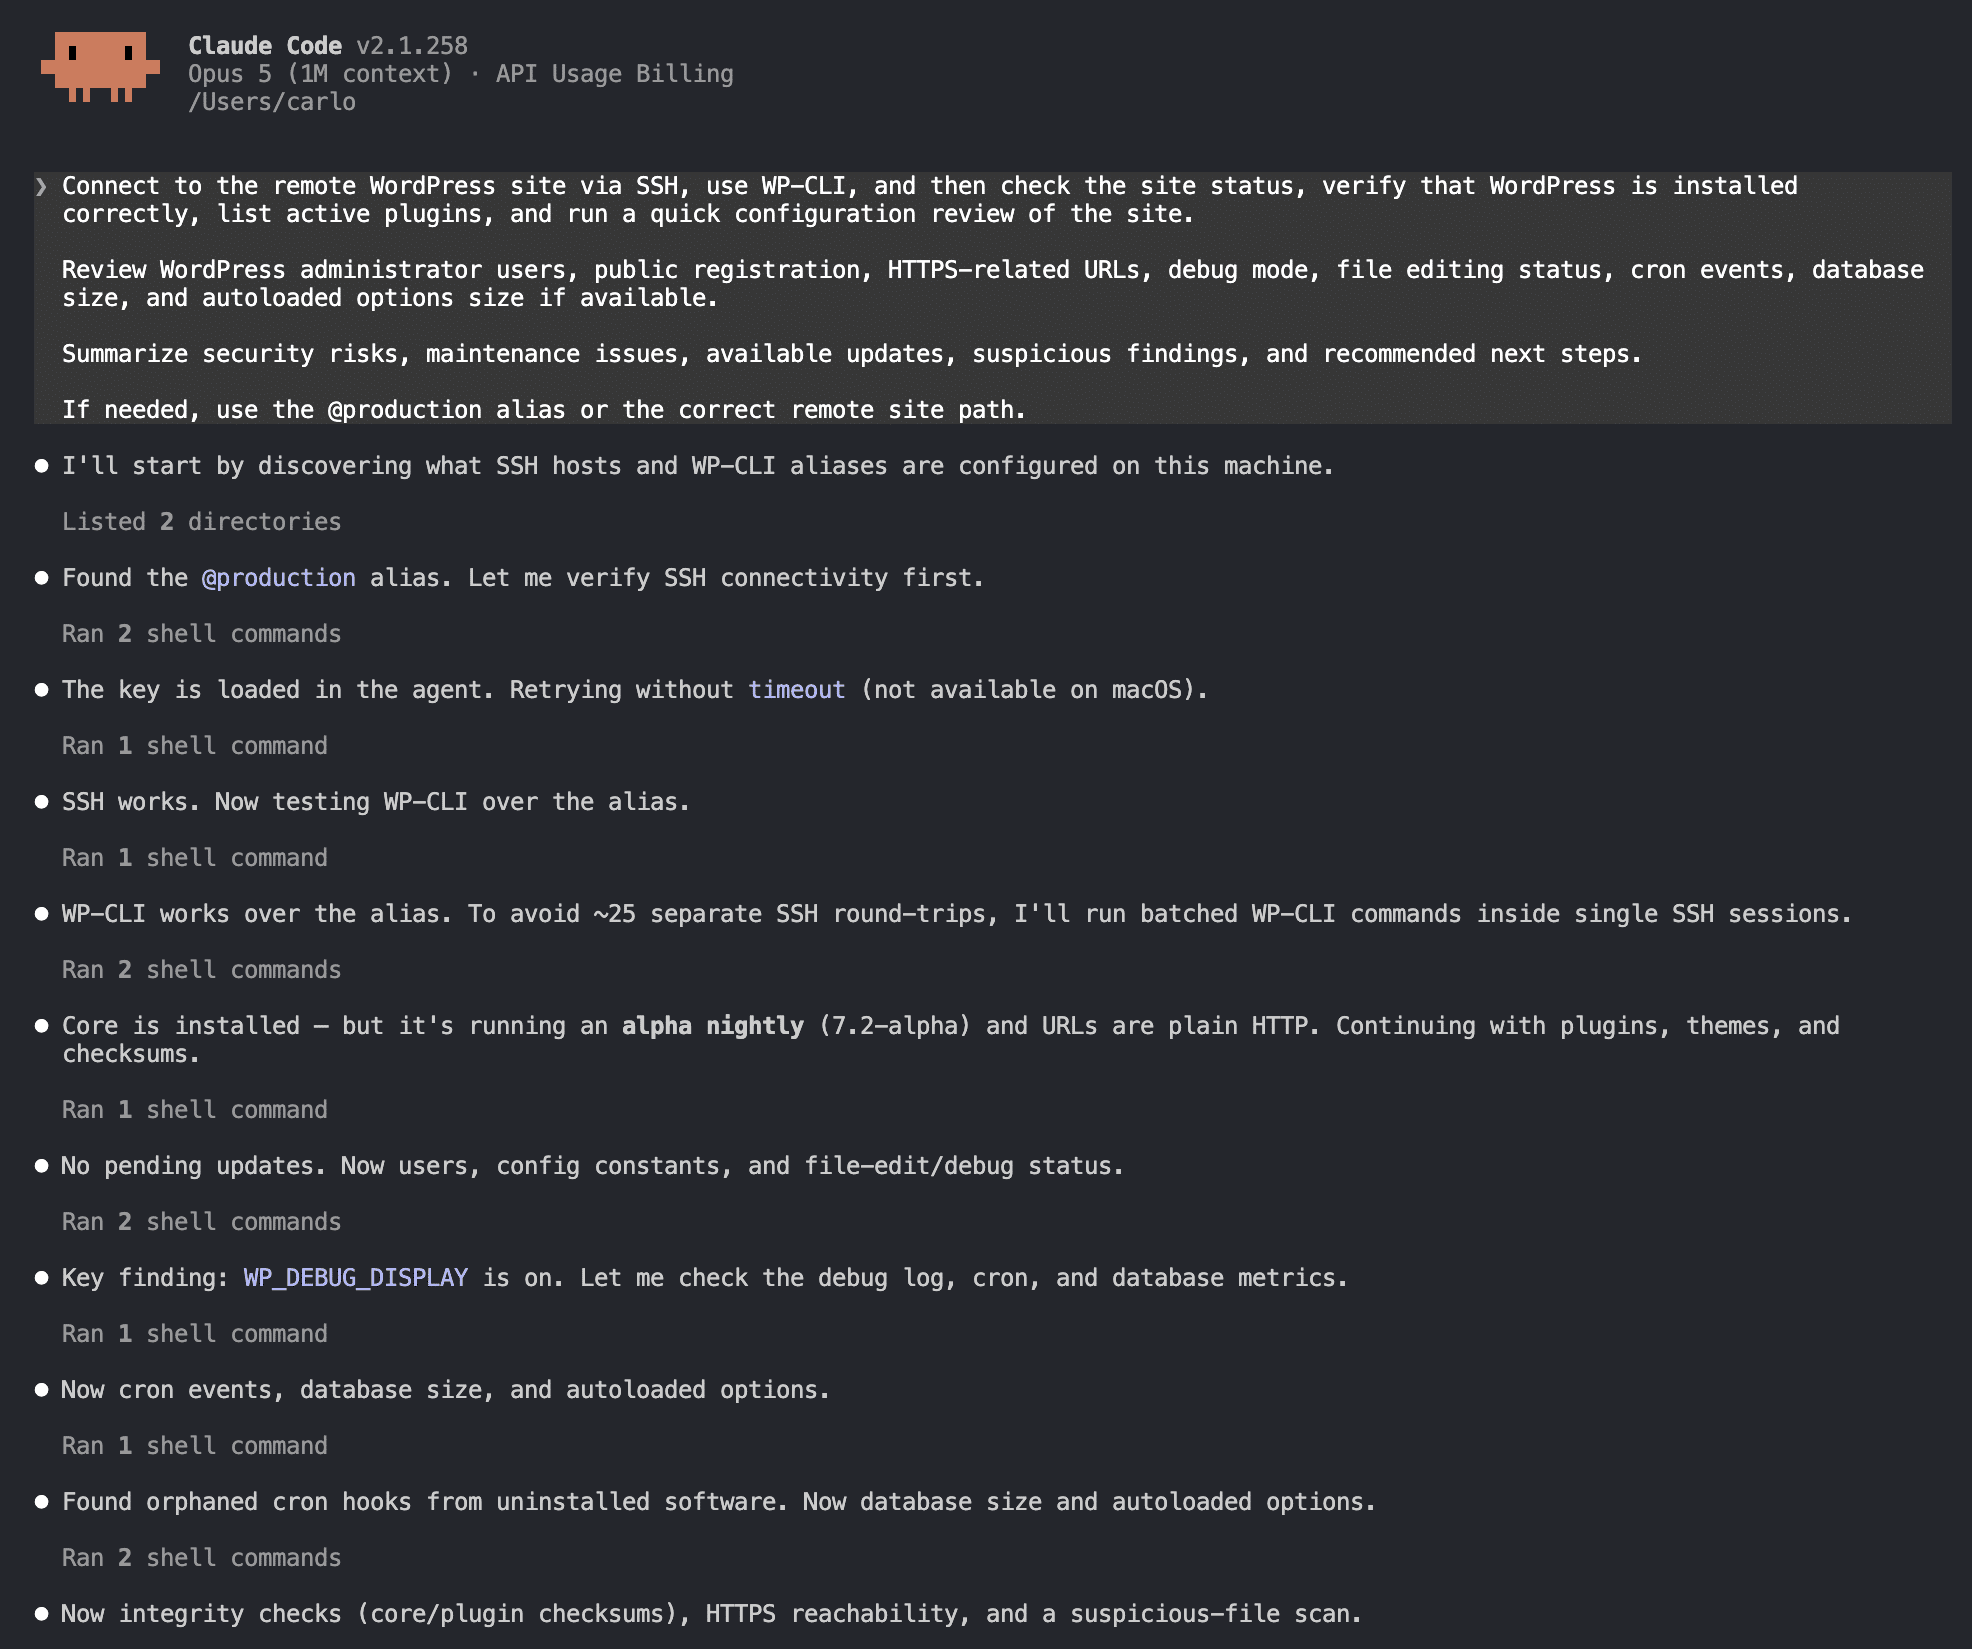
Connect to the remote WordPress site via SSH, use WP-CLI, and then check the site status, verify that WordPress is installed correctly, list active plugins, and run a quick configuration review of the site.

Review WordPress administrator users, public registration, HTTPS-related URLs, debug mode, file editing status, cron events, database size, and autoloaded options size if available.

Summarize security risks, maintenance issues, available updates, suspicious findings, and recommended next steps.

If needed, use the @production alias or the correct remote site path.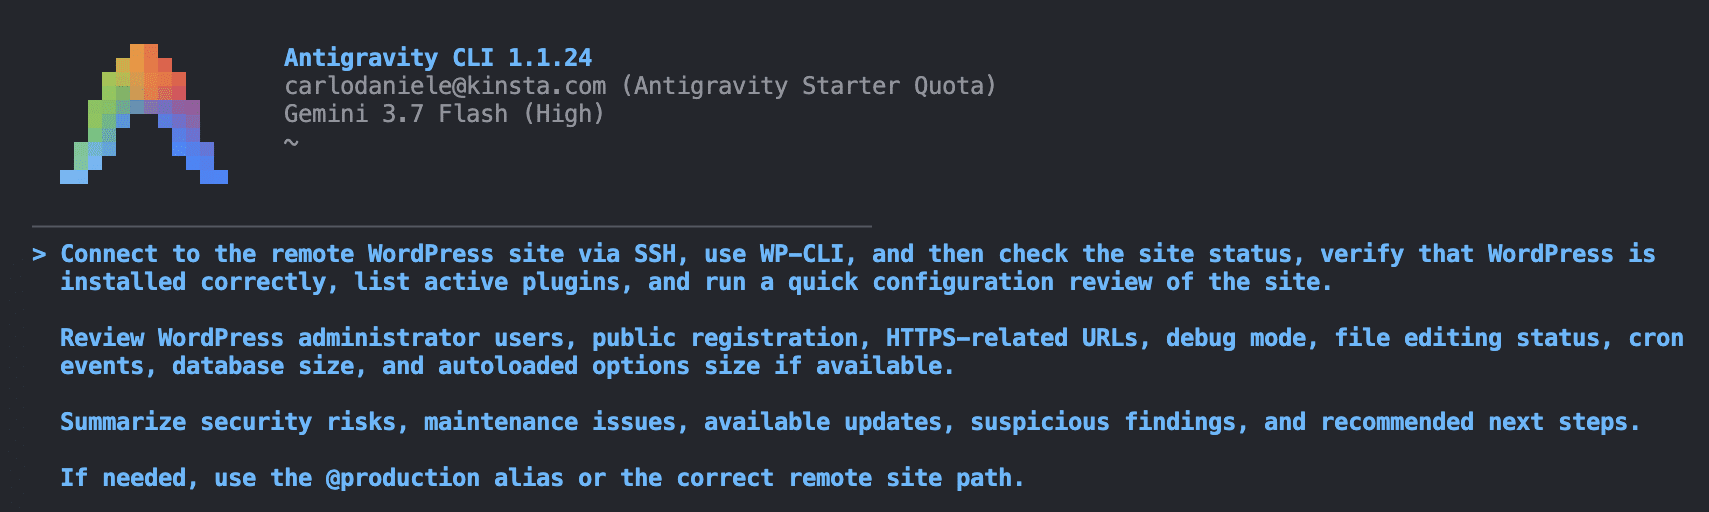
After the initial Reasoning and Action phase—during which both tools paused several times to ask for permission to execute commands—the two agents provided their respective reports, which differed in both structure and visual layout.
Antigravity CLI delivered a visually polished and well-structured report, clearly indicating the various checks performed:
- Site Status & Core Installation
- User Accounts & Administrator Review
- Plugins & Themes Review
- Configuration & Security Constants
- Cron Events & Database Health
- Summary of Risks, Findings & Recommendations
- Recommended Next Steps
Claude Code, on the other hand, divided its analysis into four sections, including a detailed Security review that flagged vulnerabilities not detected by Antigravity CLI.
- Site status
- Security review
- Maintenance & configuration
- Recommended next steps
Let’s compare the results.
1. Site status
Both agents correctly identified the installation details, but they present them quite differently on screen.
The Site status section in Claude Code is minimal and is combined with the plugins section. It provides no information about the themes installed on the site.
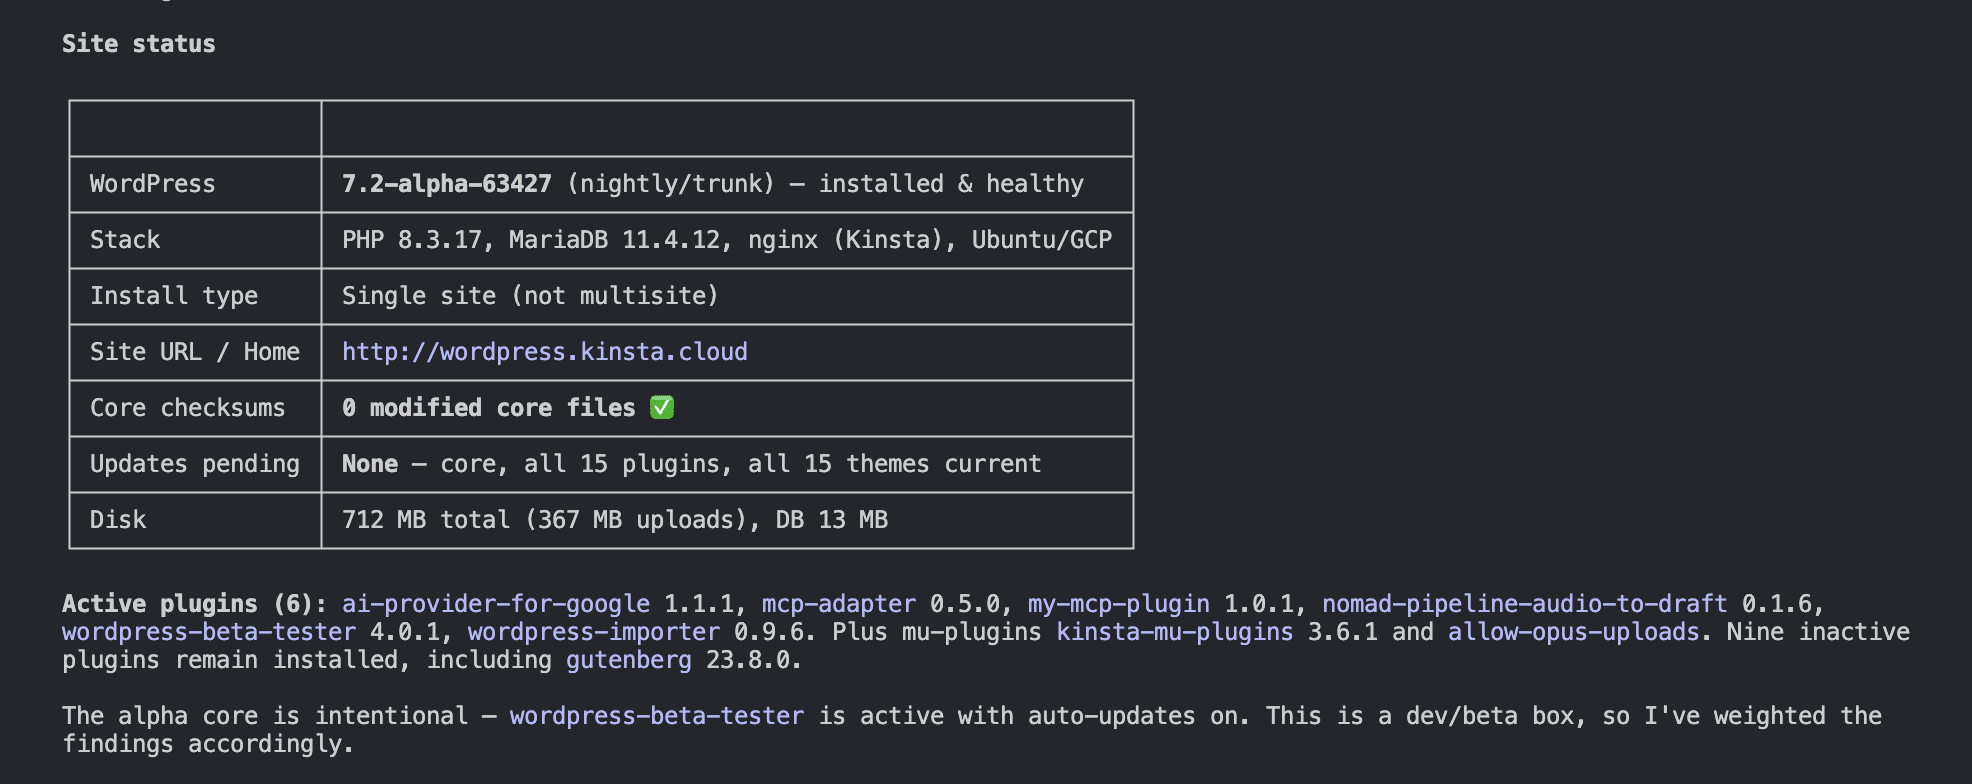
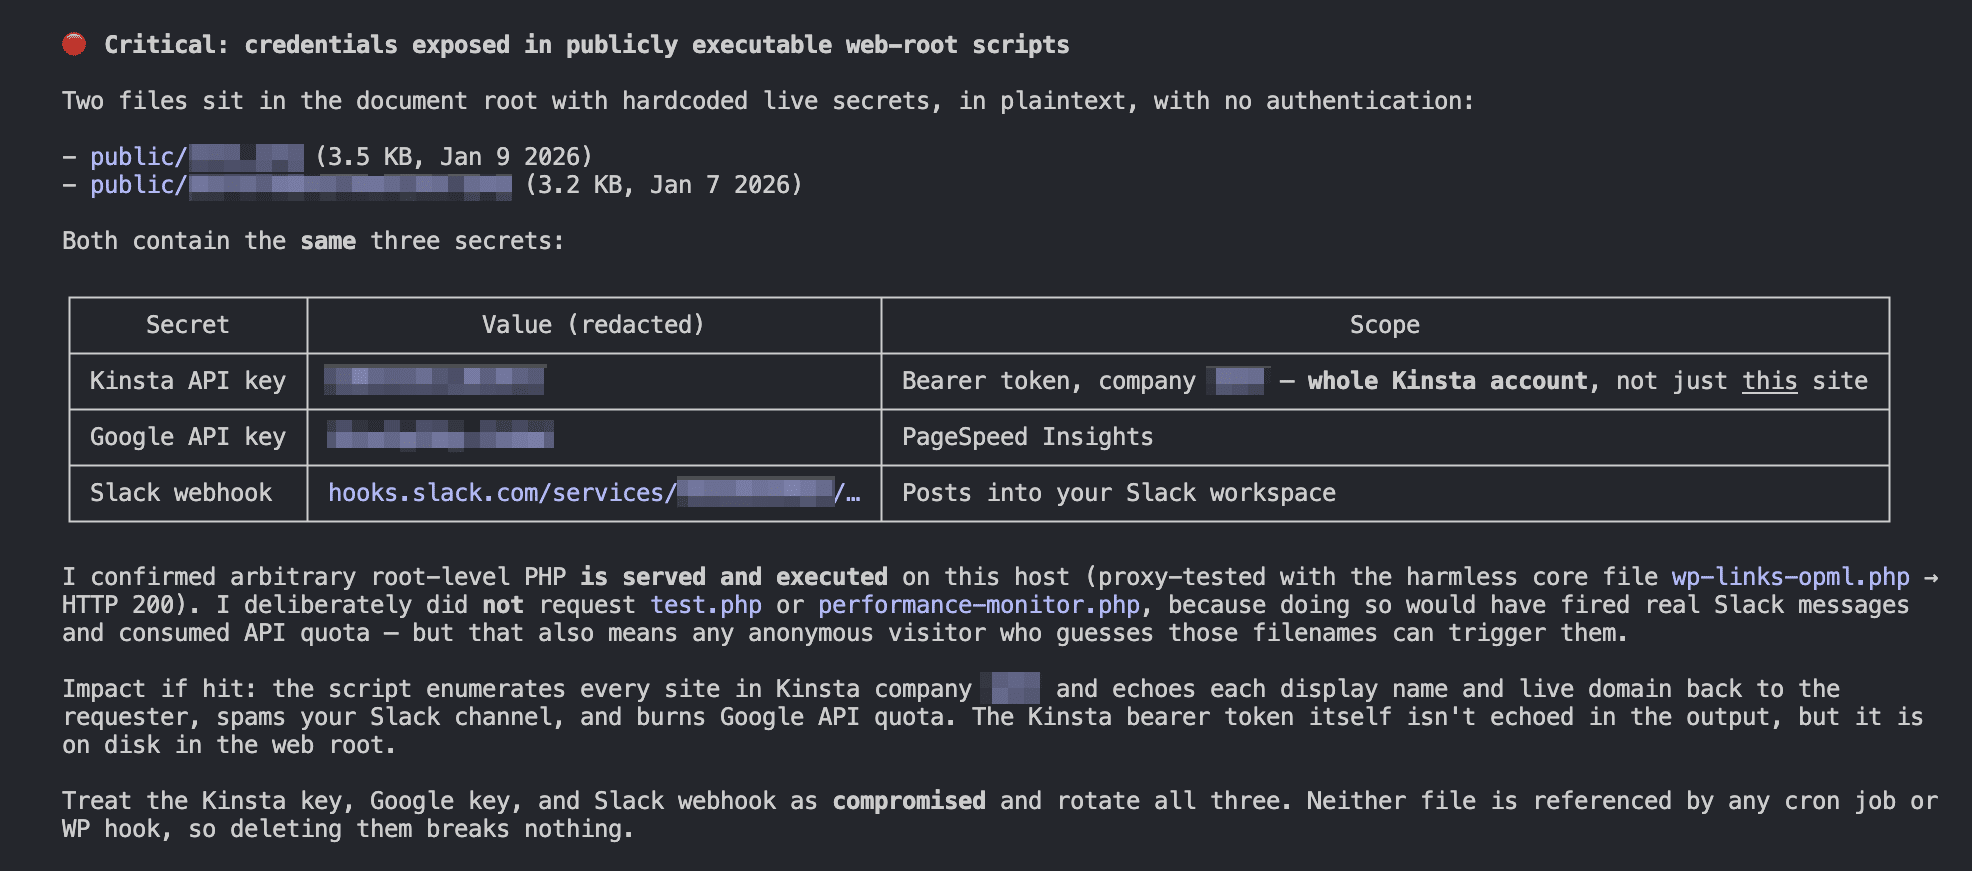
However, Claude Code surprised us with a Critical section that points out two dangerous security vulnerabilities caused by exposed keys left in test files in the site root. It also includes helpful information and recommends removing the files in question.
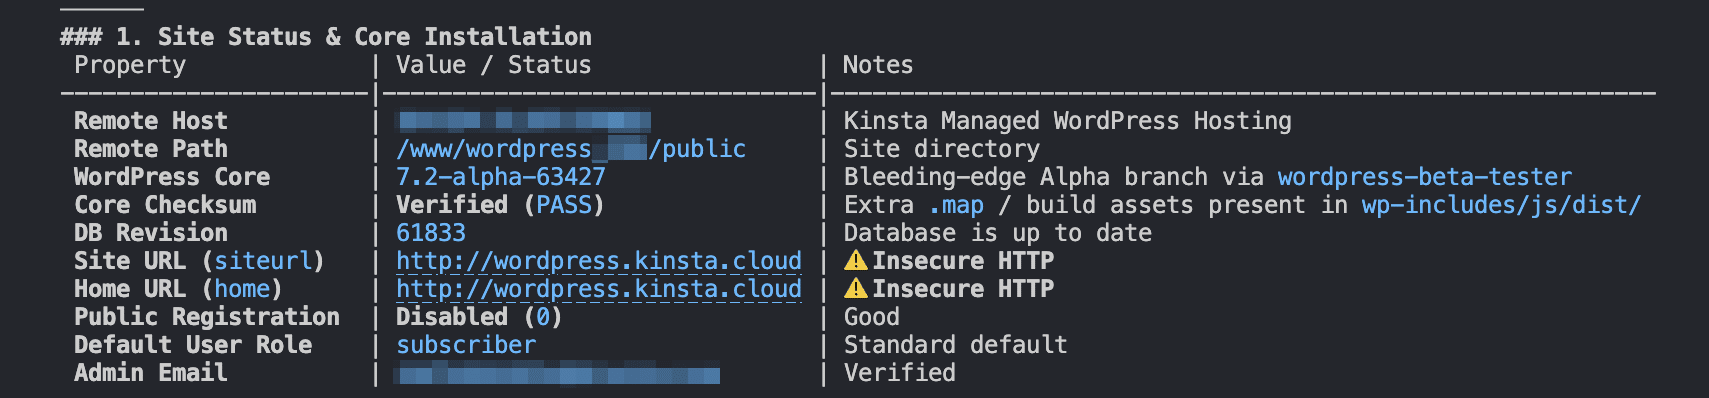
In Site Status, Antigravity CLI presents more data in a clean, readable table. However, it doesn’t show any information about the exposed keys Claude Code found.
2. User accounts and security review
The two agents’ approaches differ in this section as well.
Antigravity CLI shows a clear user table with all the available data, including roles.

Antigravity CLI covers security risks in a later section, highlighting risks associated with constants, the admin user, missing HTTPS URLs, and other issues.
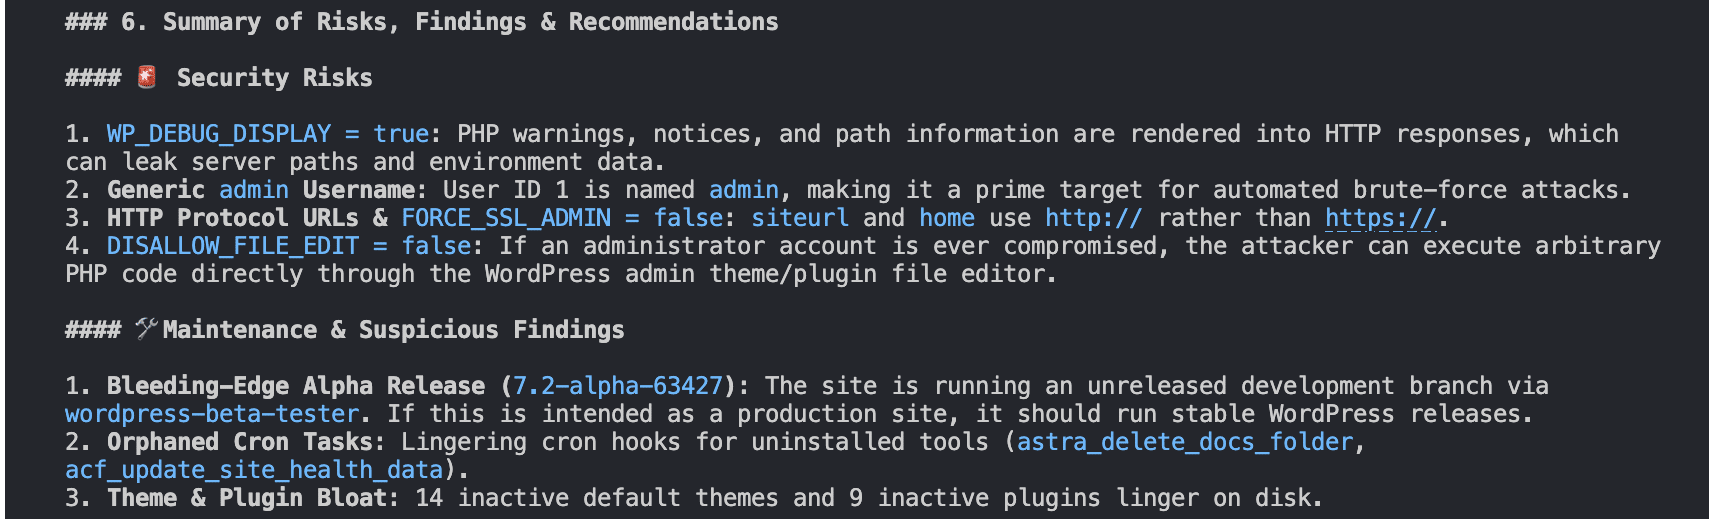
Claude Code’s approach is much more security-oriented. Its user table is essential, but in this section, Claude Code goes beyond users by also providing a table of application passwords, specifying the user they belong to.
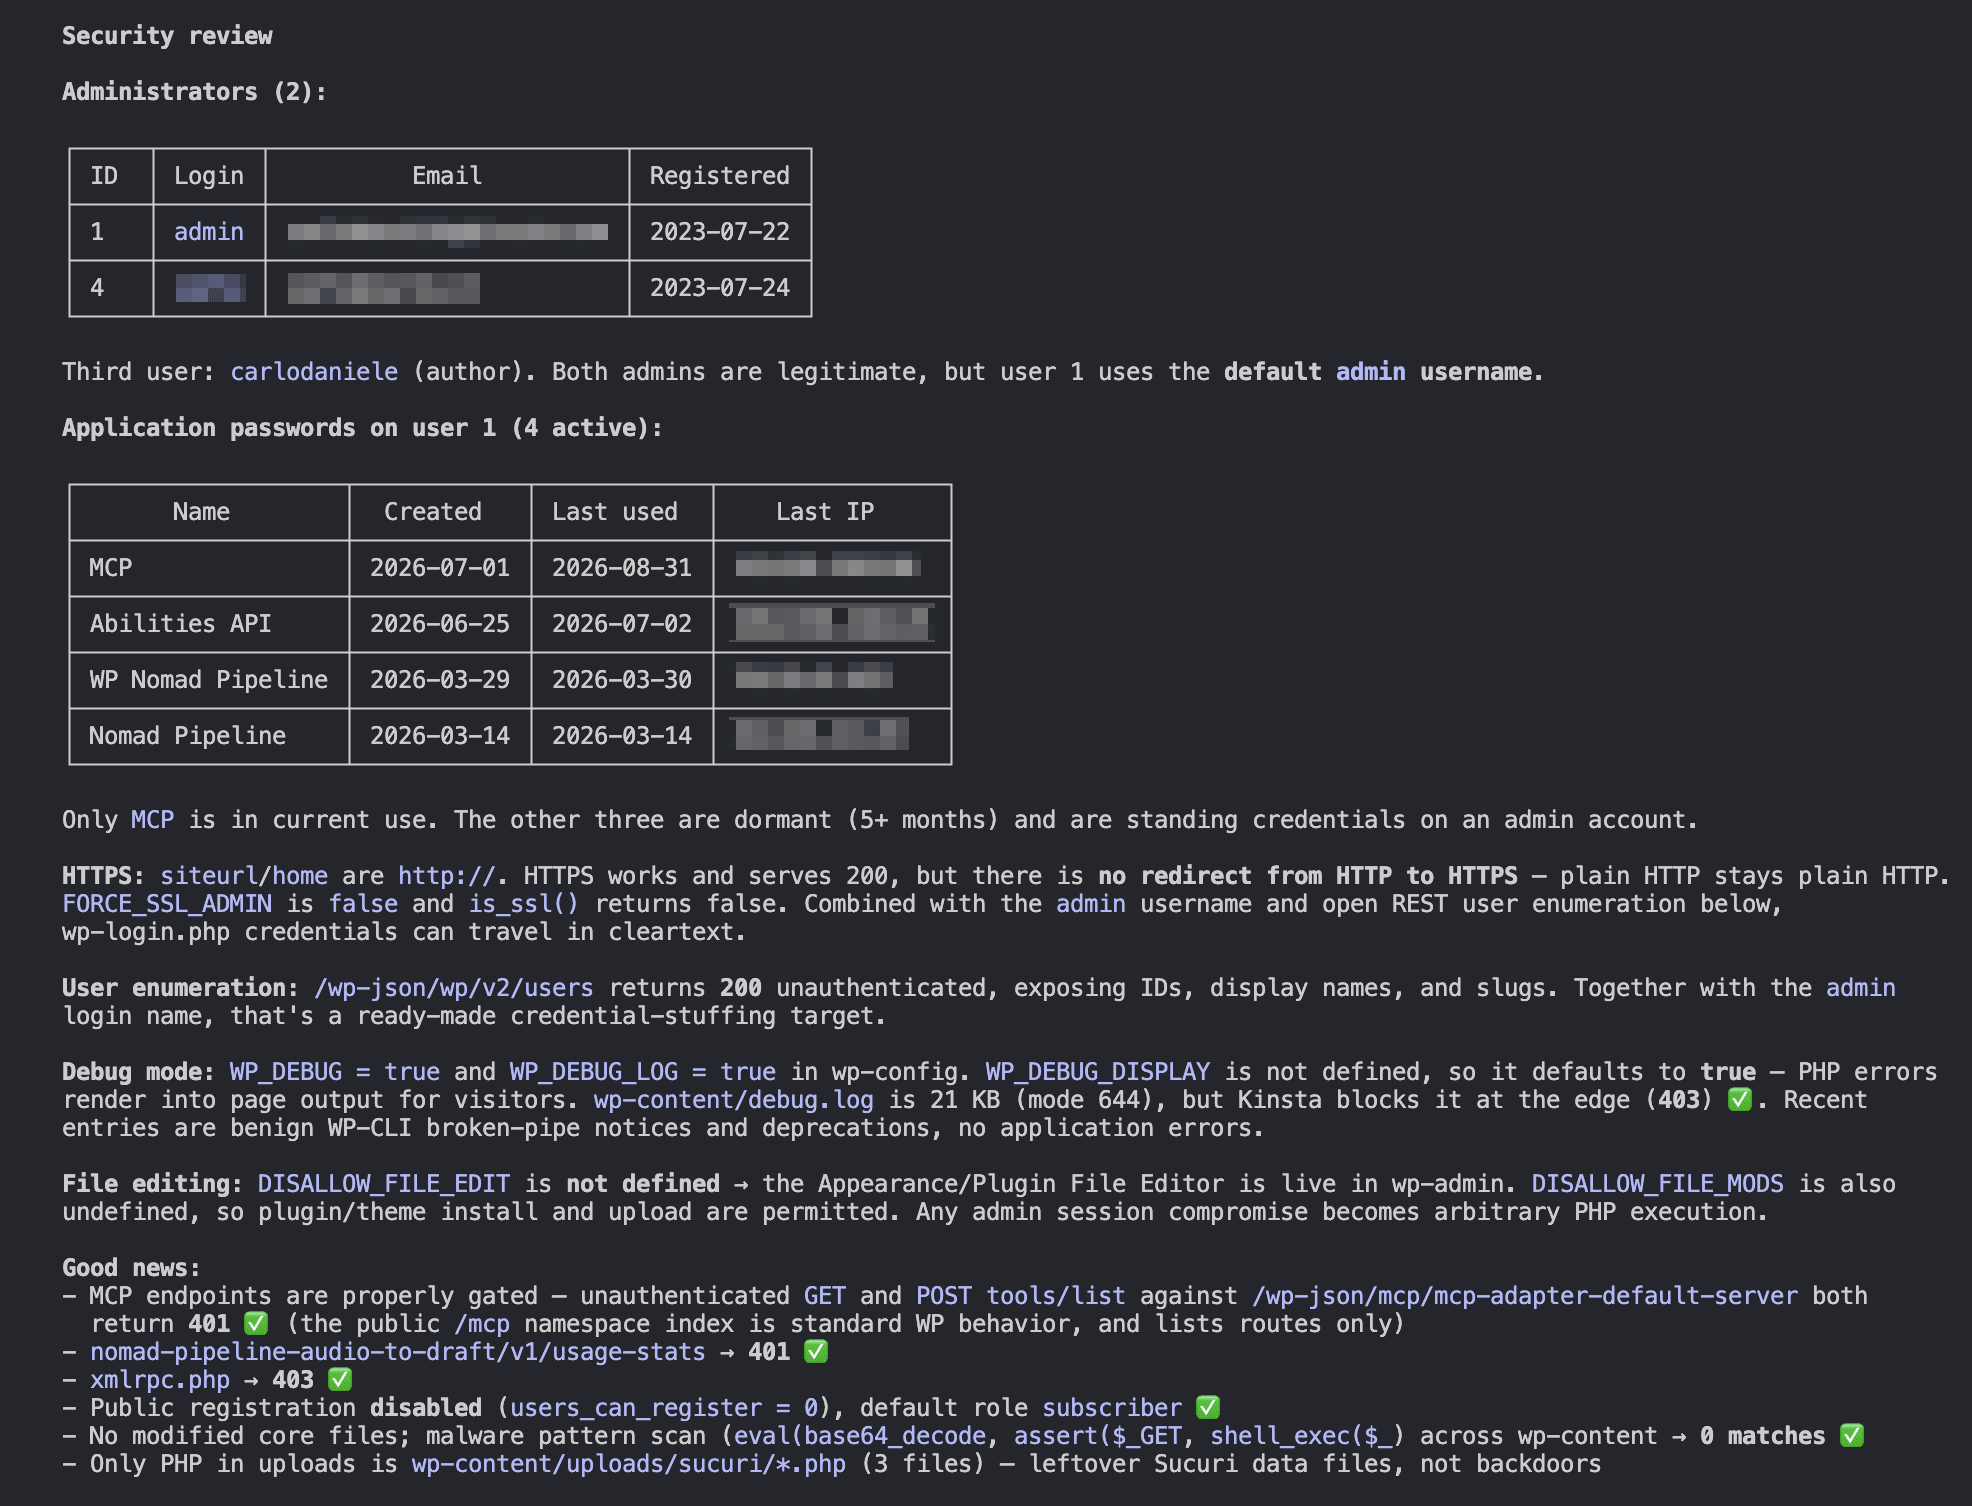
But that’s not all. Claude Code also provides a detailed analysis of risks related to missing HTTPS enforcement, user enumeration, debug mode, and file editing, suggesting the corrective measures to adopt.
3. Plugins and themes
Antigravity CLI lists plugins and themes in a dedicated section.
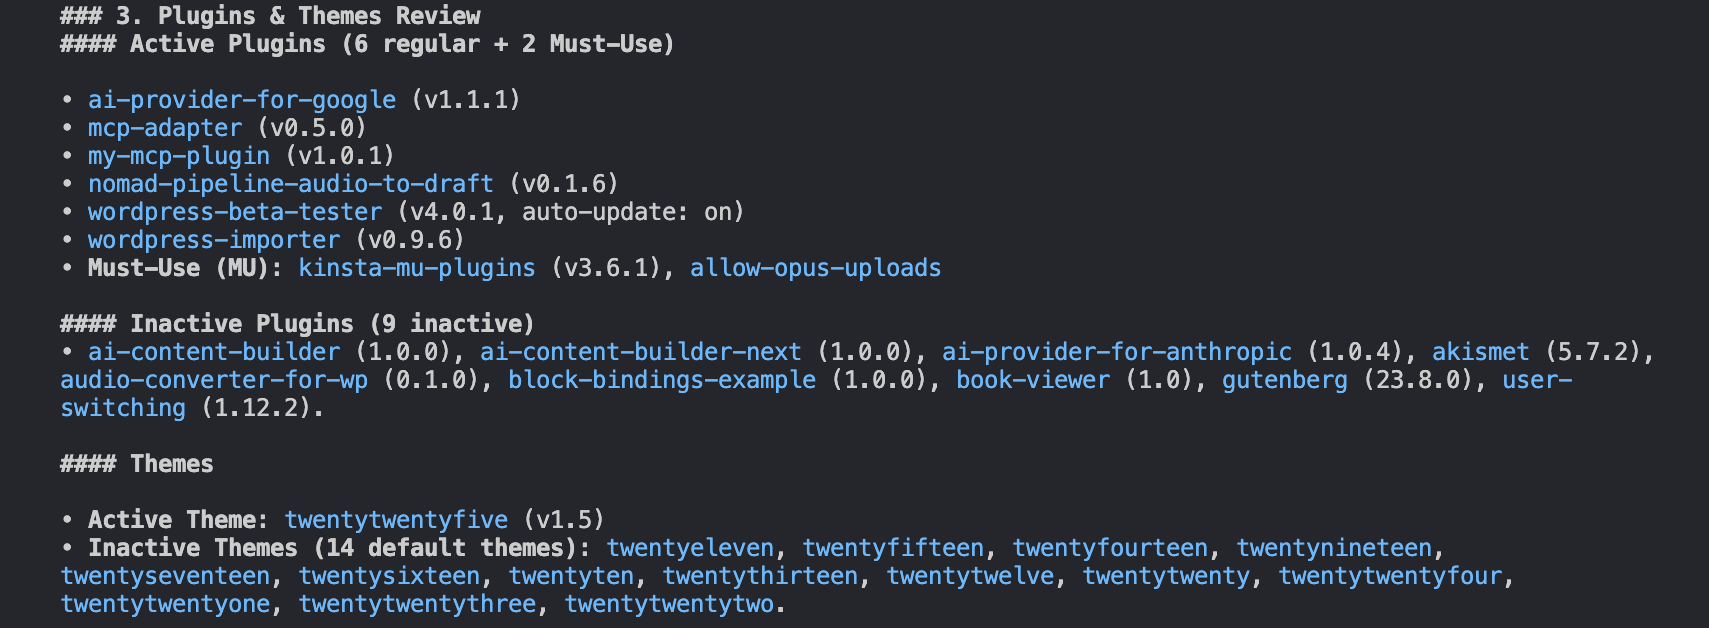
In Claude Code, the plugin section is under Site status (section 1). It provides no information about installed themes.
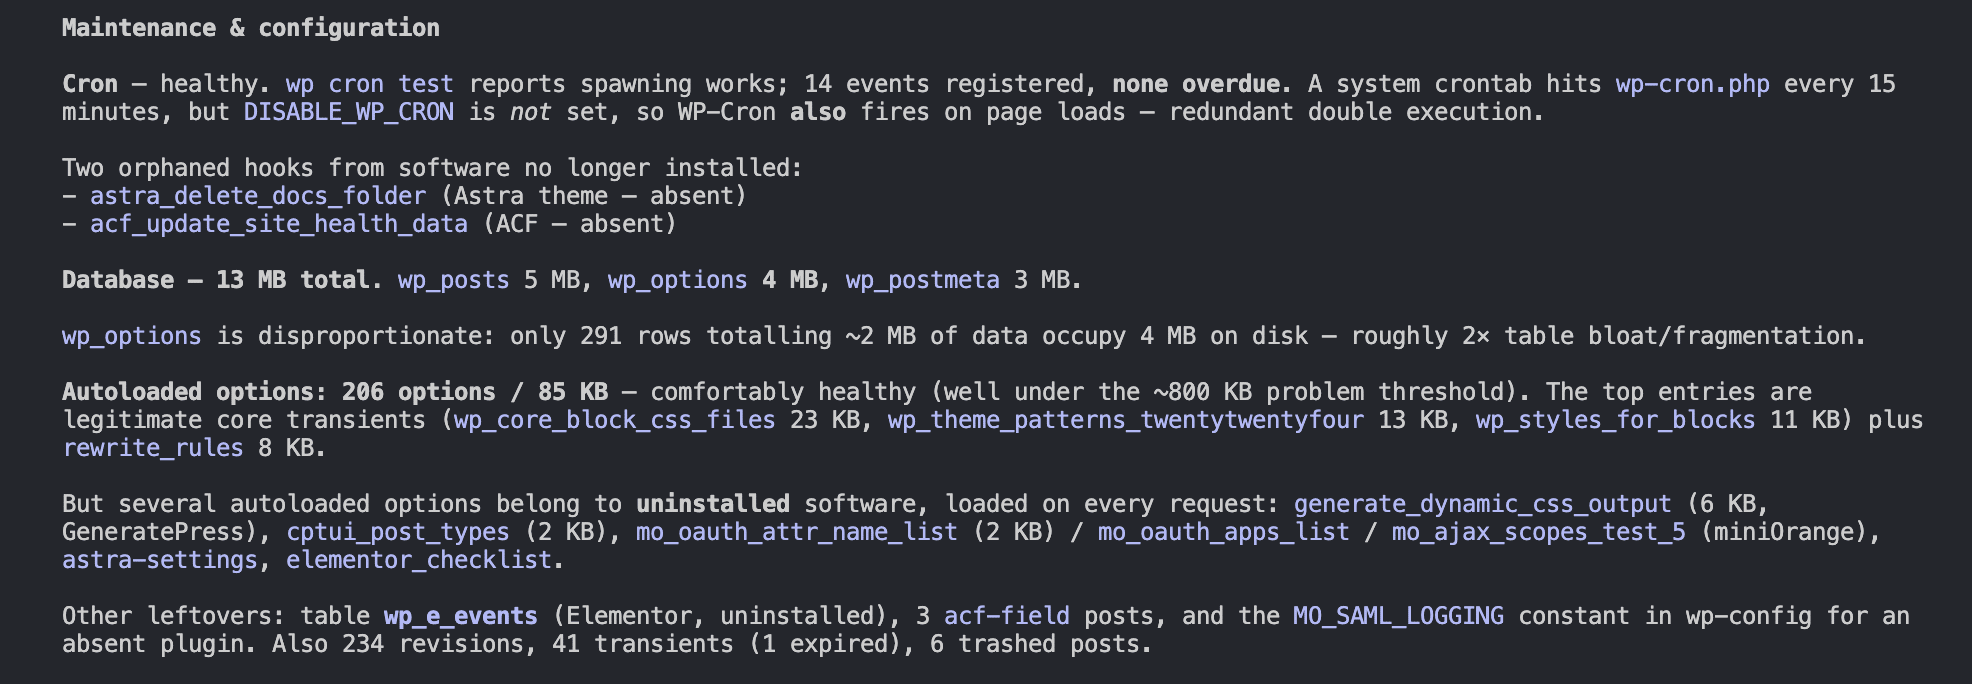
4. Configuration, security constants, maintenance, and database health
This section that shows the biggest differences between the two CLI agents.
In section 4, Antigravity CLI provides a detailed table of the detected constants, featuring a Security Assessment column with basic security details.

In section 5, it provides a fairly brief overview of cron status and database health.
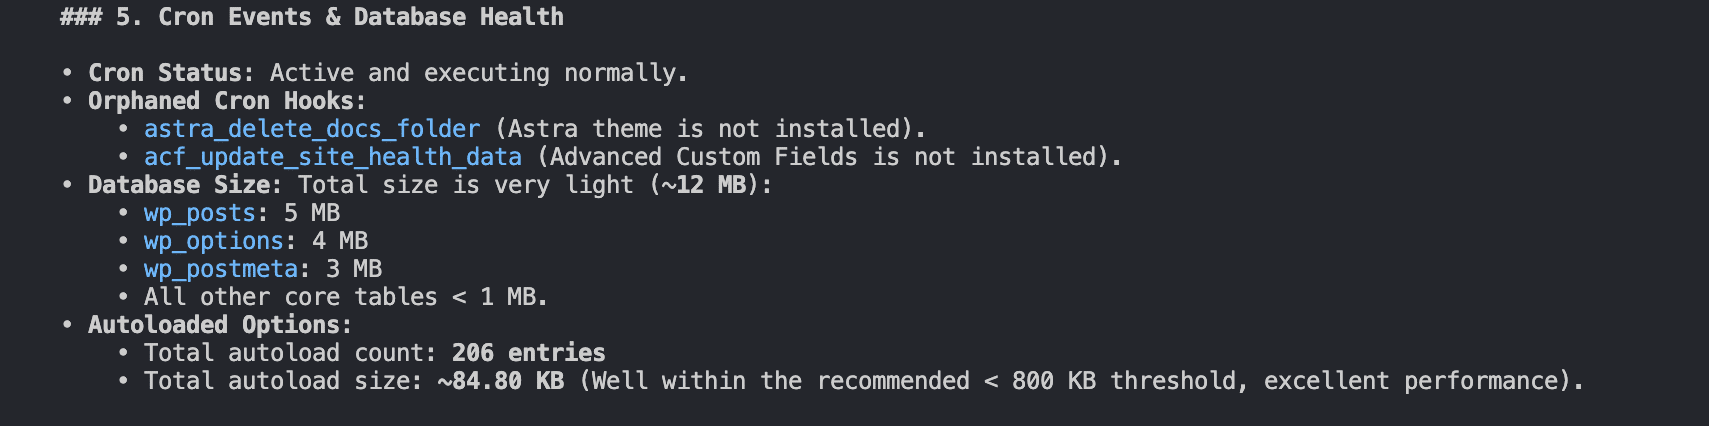
Claude Code sets itself clearly apart from Antigravity CLI with an extremely detailed Maintenance & configuration section. It describes the status of cron, hooks no longer present on the site, autoloaded options, and more.
5. Recommended next steps
Both agents conclude the report with a Recommendations and next steps section to eliminate the detected anomalies.
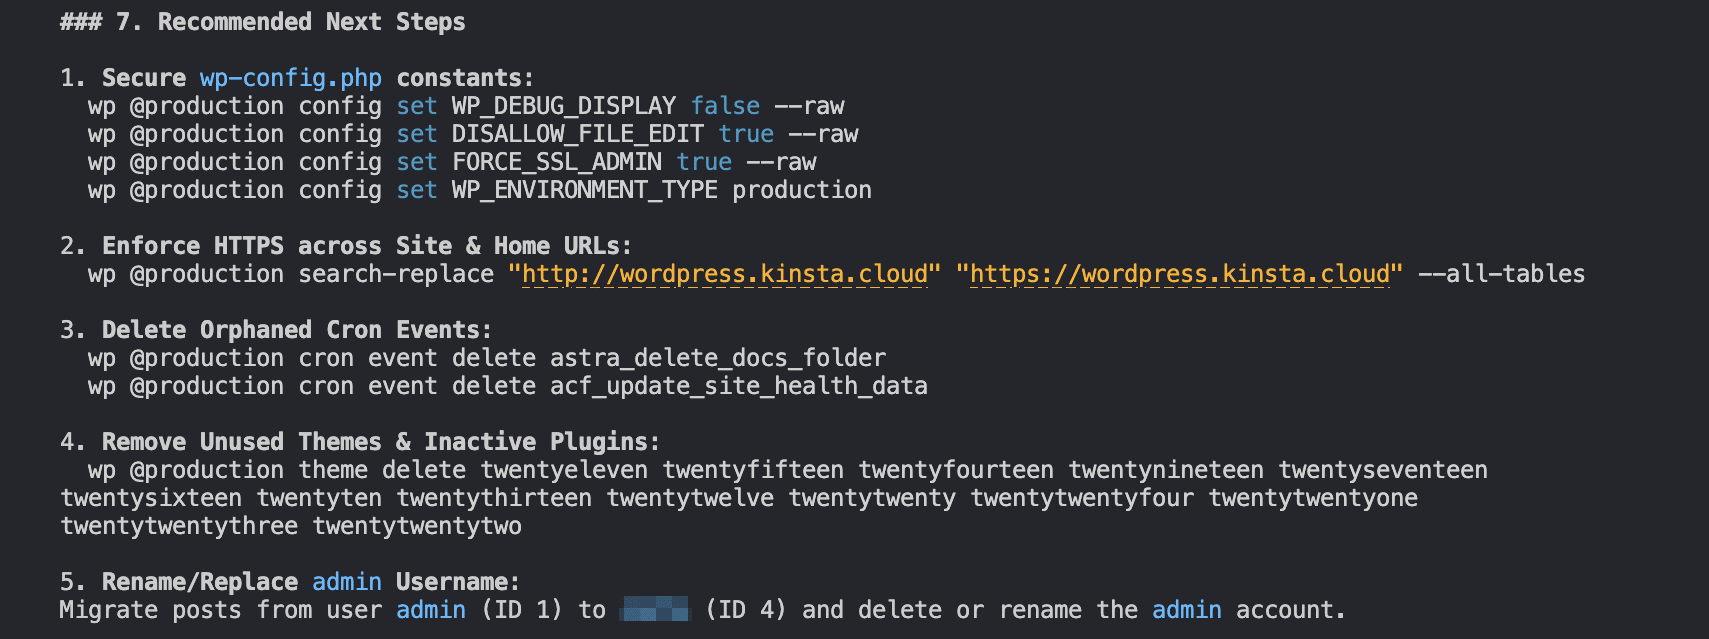
Antigravity CLI provides immediate operational recommendations, including commands to secure wp-config.php constants, enforce HTTPS across your entire site, remove orphaned cron events, delete unused themes and inactive plugins, and rename or replace the admin user.
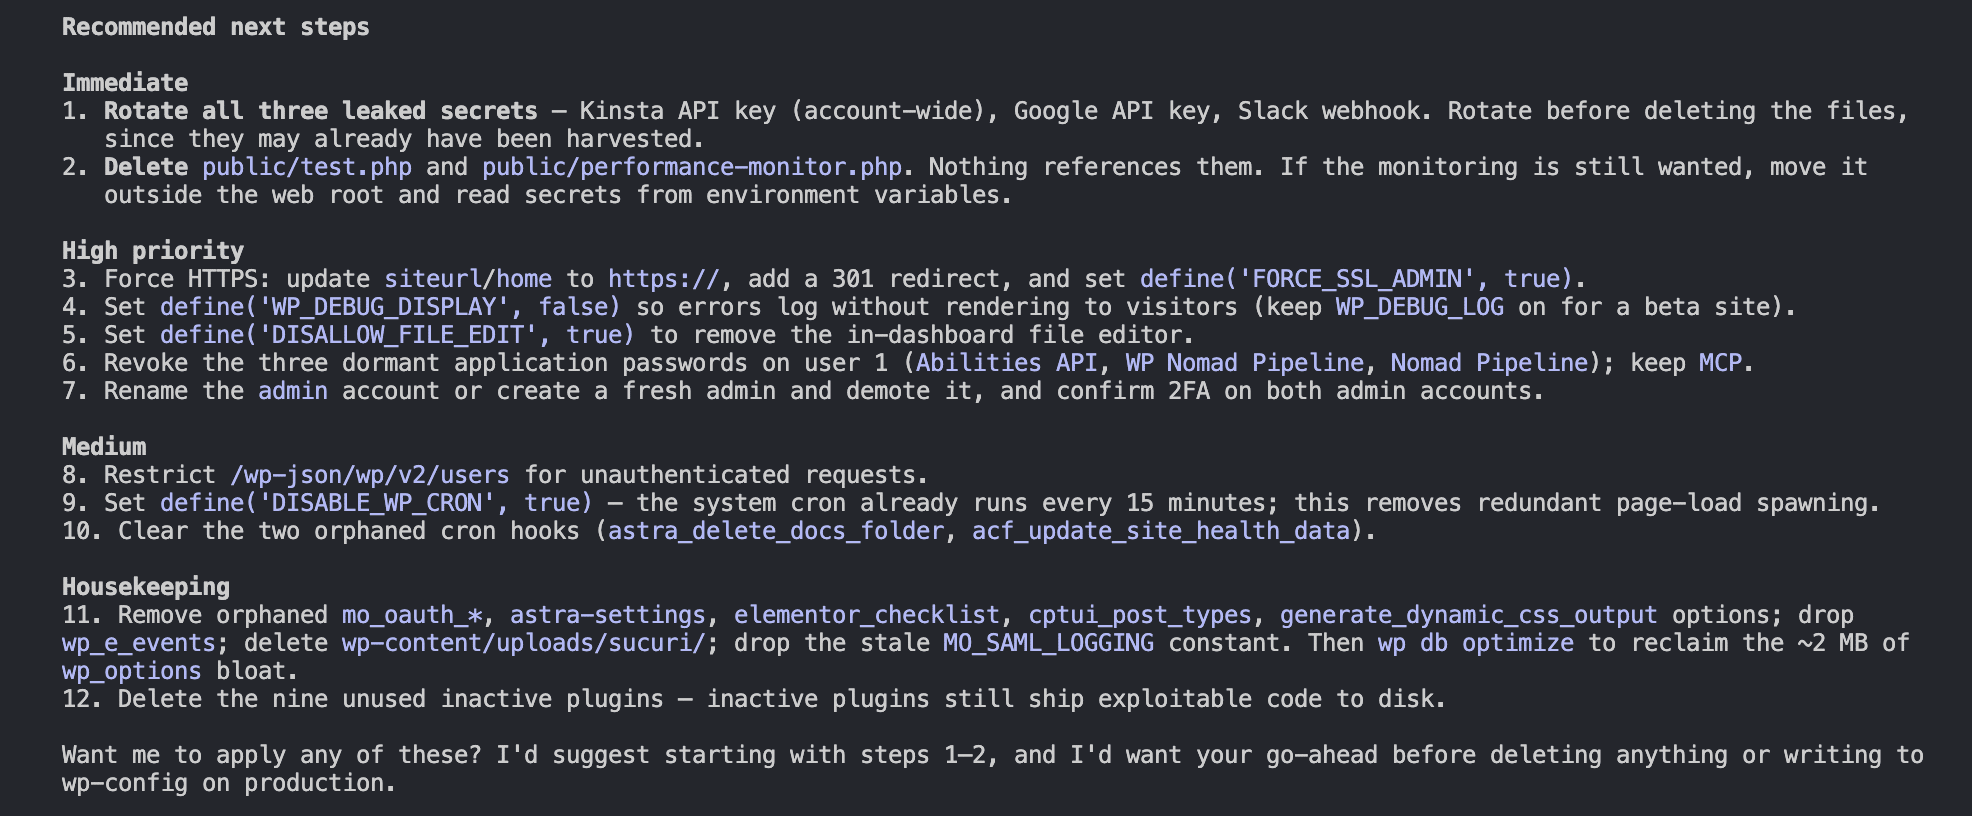
Claude Code provides a structured list of recommendations ordered by risk severity and asks whether the user wants the agent to autonomously remove the exposed keys and fix the bugs.
Conclusions and next steps
From what we have discussed in this article, it is clear that there is no absolute winner. Both CLI agents we presented are powerful management and development tools, but each has its own strengths.
We liked Claude Code’s security-oriented approach, the depth of its checks, and the detail in its analysis.
What we appreciated about Antigravity CLI is the clarity of its report and its focus on immediate action, complete with ready-to-use WP-CLI commands (though you can always ask the agent to run them for you using natural language).
Ultimately, the biggest difference will likely come from you—by learning how to converse with your agent using carefully crafted system instructions and clear, detailed prompts.
If automation is your priority today, Kinsta gives you all the tools you need to turn your terminal into an operational control panel for managing your hosting and all your sites. A powerful REST API, SSH access, and WP-CLI are ready to use for all our clients, regardless of their plan.
Try Kinsta free for a month, risk-free. Check out our plans here.

Carlo is a passionate lover of webdesign and front-end development. He has been playing with WordPress for more than 20 years, also in collaboration with Italian and European universities and educational institutions. He has written hundreds of articles and guides about WordPress, published both on Italian and international websites, as well as on printed magazines. You can find him on LinkedIn.