In July 2018, Google Chrome began marking all non-HTTPS sites as “Not Secure,” regardless of whether they collect data. Since then, HTTPS has become more critical than ever!
In today’s post, we will dive deep into an HTTP to HTTPS migration and share practical tips to hopefully make the transition for your WordPress site as smooth as possible. For WordPress site owners, it is always great if you can be proactive.
Due to new web protocols, SEO benefits, and even more accurate referral data, there has never been a better time to migrate your WordPress site to HTTPS. Find out more of the why and how below.
What Is HTTPS?
HTTPS (Hypertext Transfer Protocol Secure) is a mechanism that allows your browser or web application to connect with a website securely. HTTPS is one of the measures to help keep your browsing safe and secure.
This includes logging into your banking website, capturing credit card information, and even logging into the back end of your WordPress site. HTTPS on your WordPress website requires that you have an SSL certificate for encryption. This ensures that no data is ever passed in plain text.
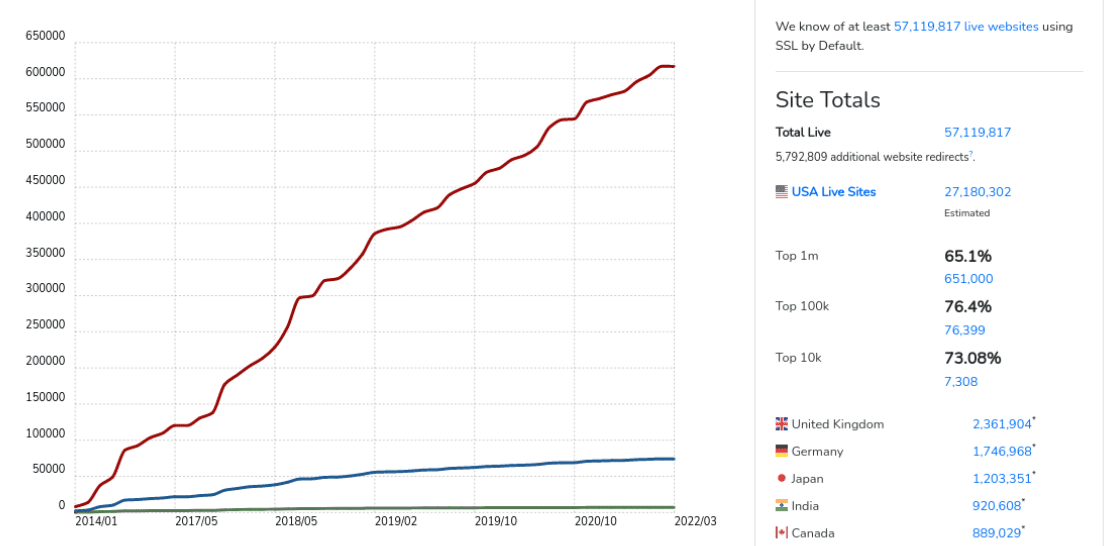
According to Builtwith, as of March 2022, 73.08% of the top 10,000 websites are using HTTPS. That is up from 49.8% back in February 2018:
As of May 2022, MozCast reports that over 98.9% of search queries are over HTTPS, up from 26% in January 2016. This suggests that a lot of sites are migrating from HTTP to HTTPS.
Even Google is pushing for that 100% encryption mark across its products and services. As of May 2022, around 95% of traffic to Google is over HTTPS, up from 48% back in December 2013.

According to Firefox telemetry data and Let’s Encrypt stats, over 78% of page loads are now HTTPS.
Why Should You Care About HTTPS?
There are quite a few reasons why WordPress website owners should care about HTTPS and think about migrating from HTTP to HTTPS now rather than later.
1. Security
Of course, the biggest reason for HTTPS is the added security. You are now serving your website over an encrypted SSL/TLS connection by migrating from HTTP to HTTPS. This means that data and information are no longer passed in plain text. For eCommerce sites that process credit card information, this is a must-have. It is not technically required by law, but it is your responsibility as a business to protect your customer’s data.
This also applies to your WordPress login pages or blogs. If you’re running multi-author WordPress websites over HTTP, every time a person logs in, that information is passed to the server in plain text. HTTPS is vital in maintaining a secure website and browser connection. This way, you can better prevent hackers from gaining access to your website.
2. SEO
Google has officially said that HTTPS is a ranking factor. While it is only a small ranking factor, most of you would probably take any advantage you can get in SERPs to beat your competitors.
Due to Google’s push for everyone to redirect HTTP to HTTPS, you can bet that the weight of this ranking factor will most likely increase in the future. A Semrush study has found that 98% of the best-performing Featured Snippet content on Google uses HTTPS.
3. Trust and Credibility
According to recent studies, most internet users are concerned about how their data is being intercepted or misused online.
HTTPS can help your business by building what we call SSL trust. By seeing that padlock icon next to your URL, customers will have more peace of mind knowing that their data is more secure.
4. Referral Data
This reason is for all of you marketers out there. If you use Google Analytics, you are probably familiar with referral data. Many people don’t realize that HTTPS to HTTP referral data is blocked in Google Analytics. So what happens to the data? Most of it is just lumped with the “direct traffic” section. The referrer is still passed if someone is going from HTTP to HTTPS.
This is also important because if your referral traffic has suddenly dropped, but direct traffic has gone up, it could mean one of your bigger referrers has recently migrated to HTTPS. The inverse is also true.
5. Chrome Warnings
As of 2018, versions of Chrome 68 and higher have been marking all non-HTTPS sites as “Not Secure” even if they don’t collect data:

In 2021, the browser began defaulting to HTTPS for incomplete URLs. For instance, if a user types “domain.com,” Chrome will automatically use “https://domain.com.” If the HTTPS fails because it lacks SSL/TLS, it’ll revert to HTTP.
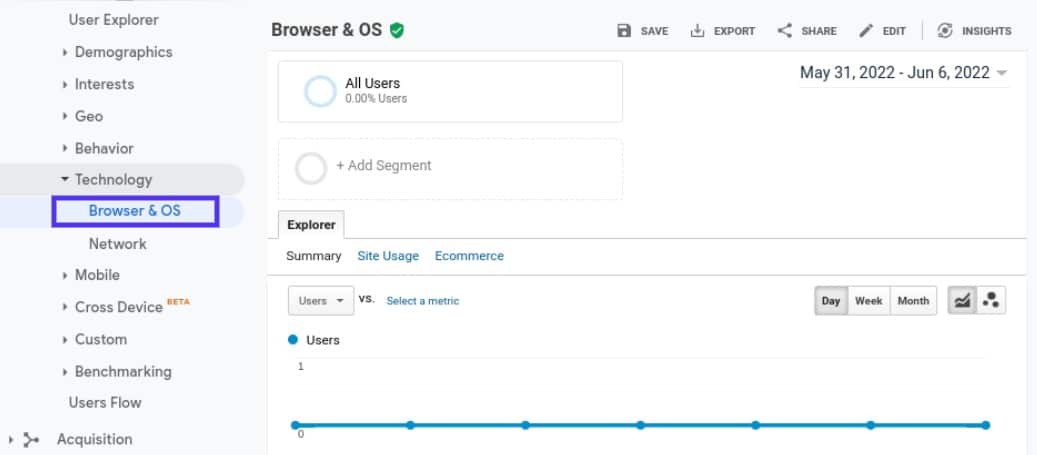
Chrome holds over 77% of the browser market share, so this will impact many of your visitors. You can also check which browsers your visitors are using in Google Analytics under Audience > Technology > Browser & OS:
Google is making it clear to visitors that your WordPress website might not run on a secured connection. Here are some tips from Google on how to avoid the warning.
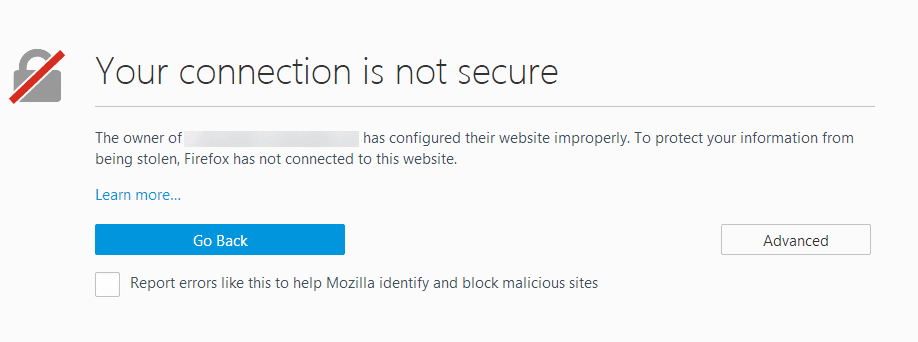
Firefox also followed suit with the release of Firefox 51 in 2017, showing a gray padlock with a red line for non-secure sites that collect passwords. Of course, if you migrate your entire site to HTTPS, then you don’t have to worry about this:
You might also start getting the following warnings from Google Search Console if you haven’t migrated over to HTTPS yet:
To: owner of http://www.domain.com
The following URLs include input fields for passwords or credit card details that will trigger the new Chrome warning. Review these examples to see where these warnings will appear, and you can take action to help protect users’ data. The list is not exhaustive.
http://www.domain.com
The new warning is the first stage of a long-term plan to mark all pages served over the non-encrypted HTTP protocol as “Not Secure.”
6. Performance
Last but not least, we have performance. Due to a protocol called HTTP/2, those running properly optimized sites over HTTPS can often see speed improvements.
HTTP/2 requires HTTPS because of browser support. The performance improvement is due to various reasons, such as HTTP/2 being able to support better multiplexing, parallelism, HPACK compression with Huffman encoding, the ALPN extension, and server push. There used to be quite a bit of TLS overhead running over HTTPS, but that is much less now.
TLS 1.3 is also out, which speeds up HTTPS connections even more! Kinsta supports TLS 1.3 on all of our servers and our Kinsta CDN.
It is also important to note that web performance optimizations such as domain sharding and concatenation can harm your performance. These are now obsolete and, for the most part, and should no longer be used.
Everything on the web should be encrypted by default. – Jeff Atwood, co-founder of Stack Overflow
HTTP to HTTPS Migration Guide
It’s time to get down to the fun part: migrating your WordPress site from HTTP to HTTPS. Let’s first go over some of the basic requirements, plus some things to be aware of.
- You will need an SSL certificate. We will go more into detail about this below.
- Double-check to ensure that your WordPress host and CDN provider support HTTP/2. Kinsta has HTTP/2 support for all of our customers. This is not required, but you will want this for performance.
- You will want to set aside a good block of time to redirect HTTP to HTTPS. Migration isn’t something that can be done in 5 minutes.
- Double-check to ensure all external services and scripts you use have an HTTPS version available.
- It is important to know that you will lose social share counts on all your posts and pages unless you use a plugin that supports share recovery. This is because your share counts are based on an API looking at the HTTP version, and you have no control over 3rd party social networks.
- Depending on the size of your site, it may take Google a while to re-crawl all your new HTTPS pages and posts. During this period, you could see variations in traffic or rankings.
- Don’t forget about local citations.
We recommend turning off your CDN integration and disabling any caching plugins before beginning, as these can complicate matters.
1. Choosing an SSL Certificate
The very first thing you will need to do is purchase an SSL certificate if you don’t have one. There are three primary types of certificates you can choose from:
- Domain Validation: Single domain or subdomain (email or DNS validation), issued within minutes. These can typically be bought for as low as $9 a year.
- Business/Organization Validation: Single domain or subdomain requires business verification which provides a higher level of security/trust, issued within 1-3 days.
- Extended Validation: Single domain or subdomain requires business verification which provides a higher level of security/trust, issued within 2-7 days.
At Kinsta, we provide free Cloudflare SSLs for all sites via our Cloudflare integration. Our Cloudflare SSLs are automatically issued after you configure a domain in MyKinsta, and they even come with wildcard domain support!
Google recommends using a 2048-bit key certificate or higher. You can buy certificates from Comodo, DigiCert, GeoTrust, Thawte, Rapid SSL, or Trustwave. There are also cheaper alternatives such as GoGetSSL, Namecheap, and GoDaddy.
Let’s Encrypt
Let’s Encrypt also offers a way to get free SSL certificates. Check with your WordPress host and CDN provider to see if they have a Let’s Encrypt integration. You can also follow the Certbot guide on how to install them manually. Let’s Encrypt certificates expire every 90 days, so it is essential to have an automated system in place.
2. Installing a Custom SSL Certificate
If you have purchased an SSL certificate, you need to install the SSL certificate on your WordPress site. You are asked to provide the server type when going through the certificate set up with the vendor. If you are a Kinsta customer, our web servers are Nginx. If that option is not available, then Other will work as well.
The SSL provider will need a CSR code to create/sign the certificate file. For generating a CSR code and RSA key, please complete the following form: https://www.ssl.com/online-csr-and-key-generator/.
We recommend filling out every field, but at a minimum, you should fill in the following (as seen in the screenshot below):
- Common name (domain name)
- Email Address
- Organization
- City / Locality
- State / County / Region
- Country
Note: For the common name field, if you are generating a wildcard certificate, you will need to input your domain name like *.domain.com.

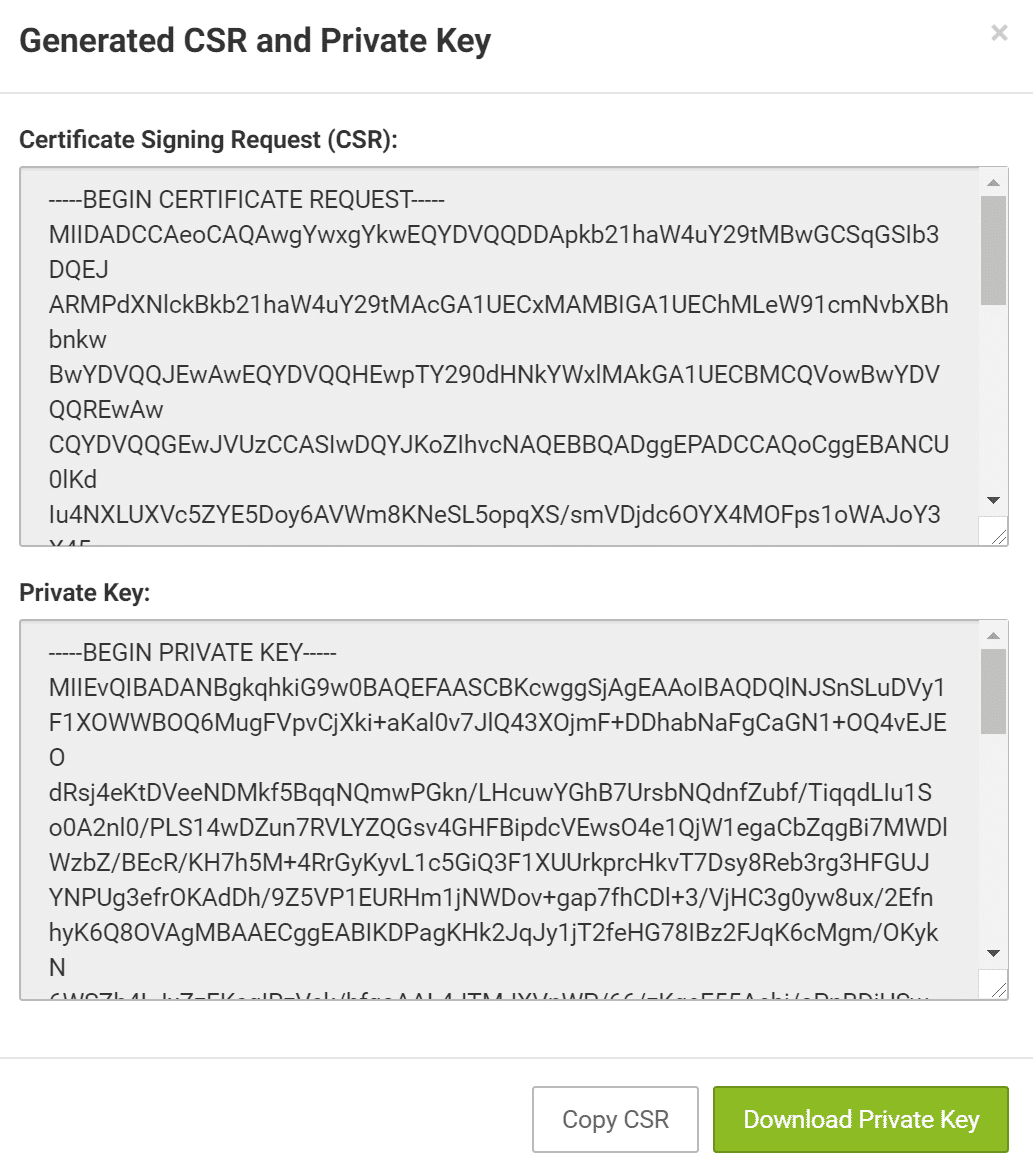
The form will generate your private key file and the CSR. Make sure to save both of them, as the certificate will be unusable without them:
Next, upload your CSR with your SSL provider to regenerate your SSL certificate (.cert).
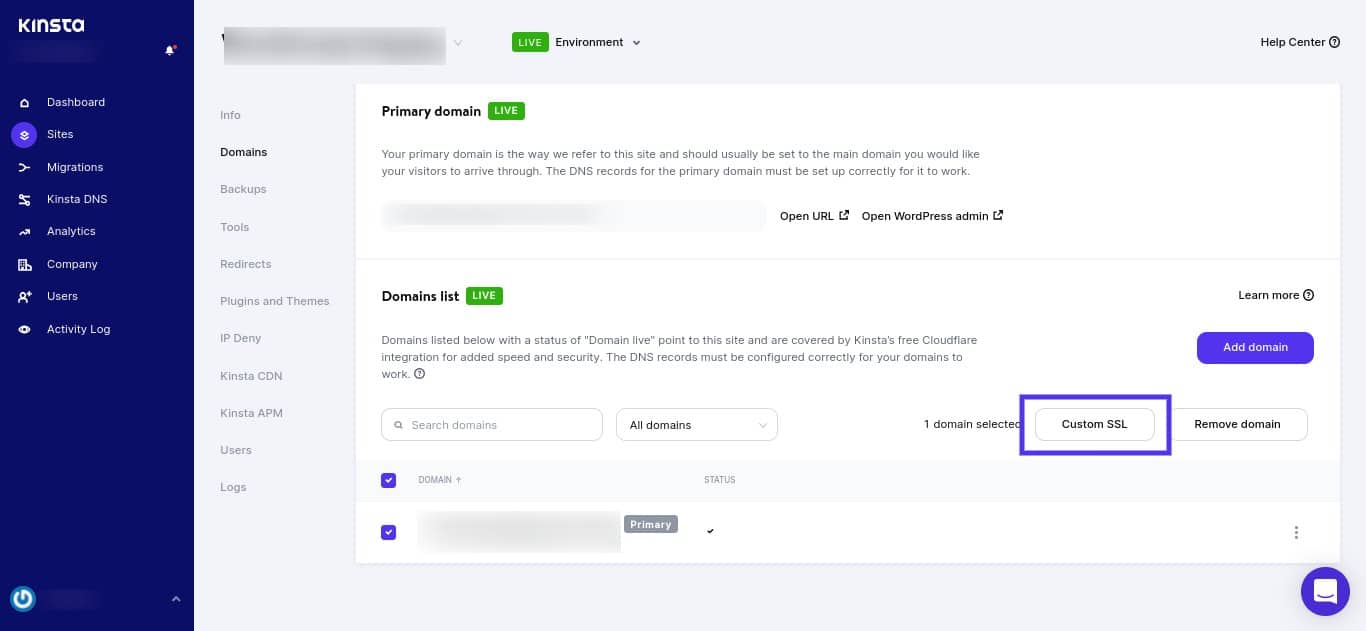
You will then need to go to your WordPress host and give them the certificate and private key. If you are a Kinsta customer, you can log in to the dashboard and click on a site. Next, go to the Domains tab and select your domain, followed by the Custom SSL button:
You’ll then be able to add your private key and certificate right there:
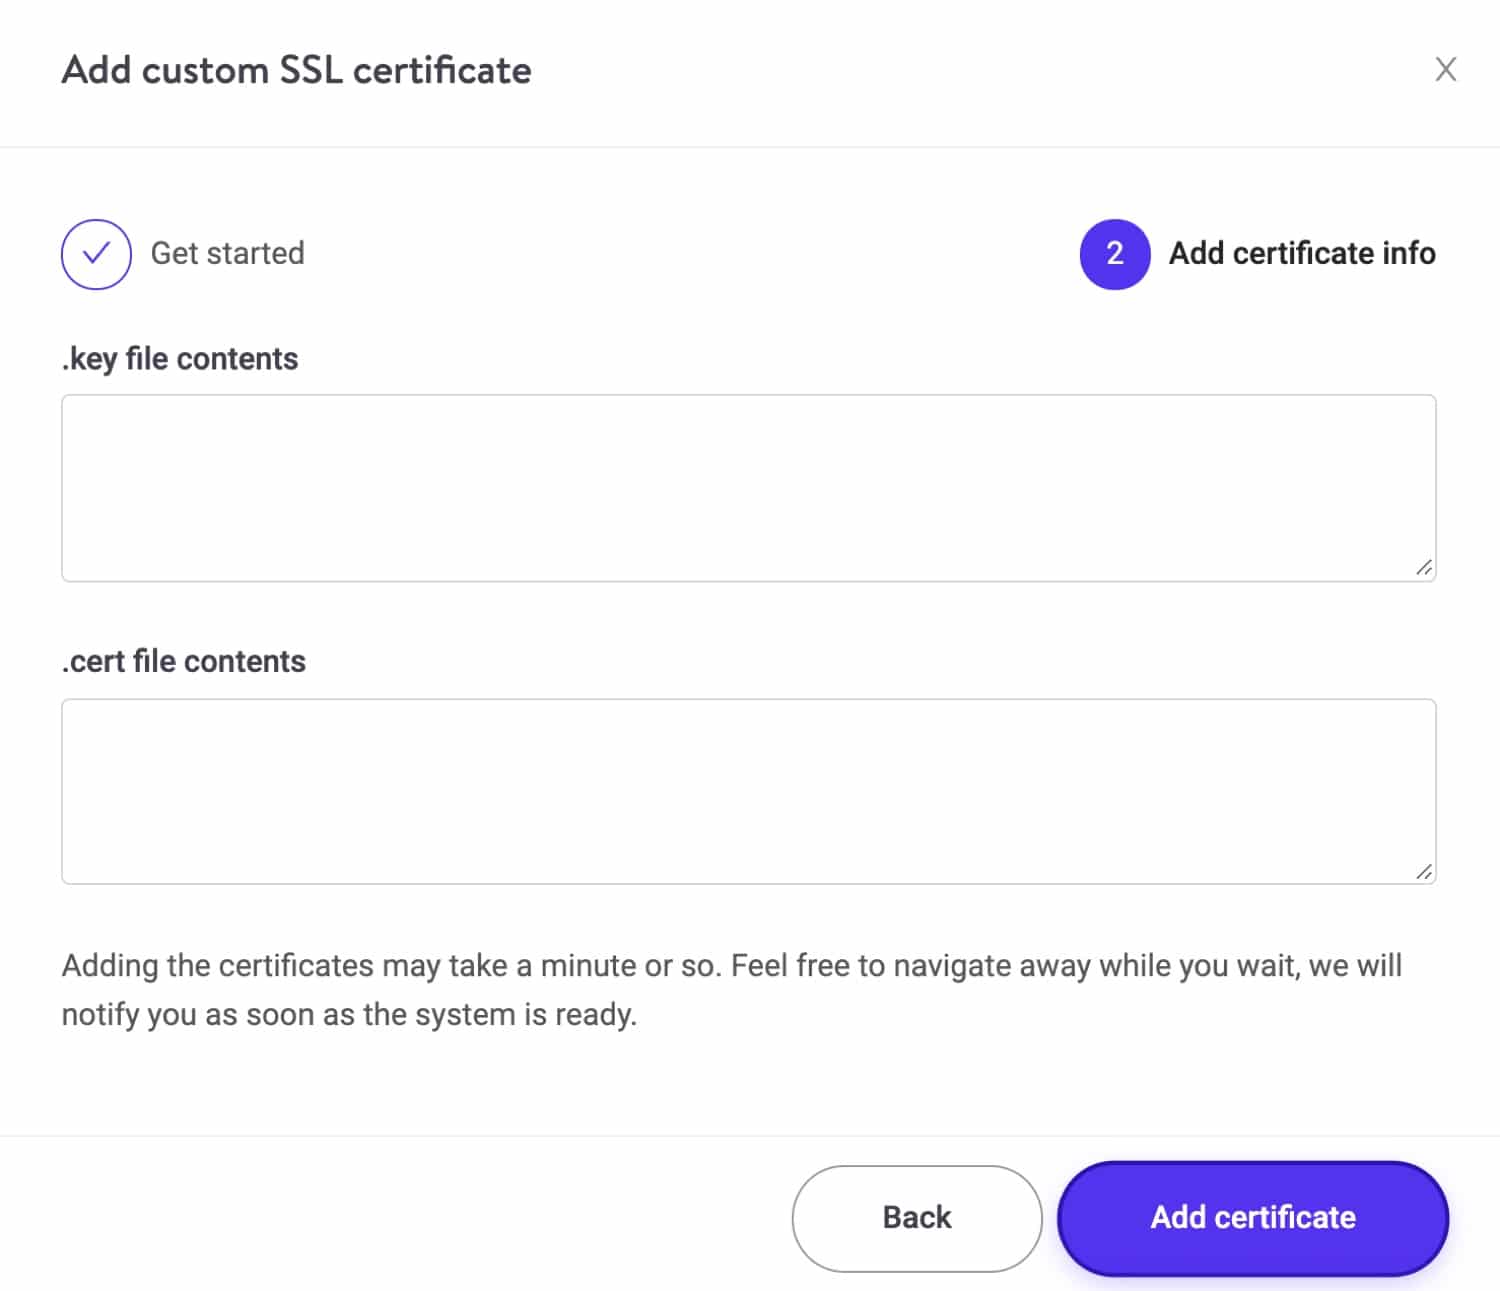
When you’re done, select Add certificate to save your changes.
3. Verify Your SSL Certificate
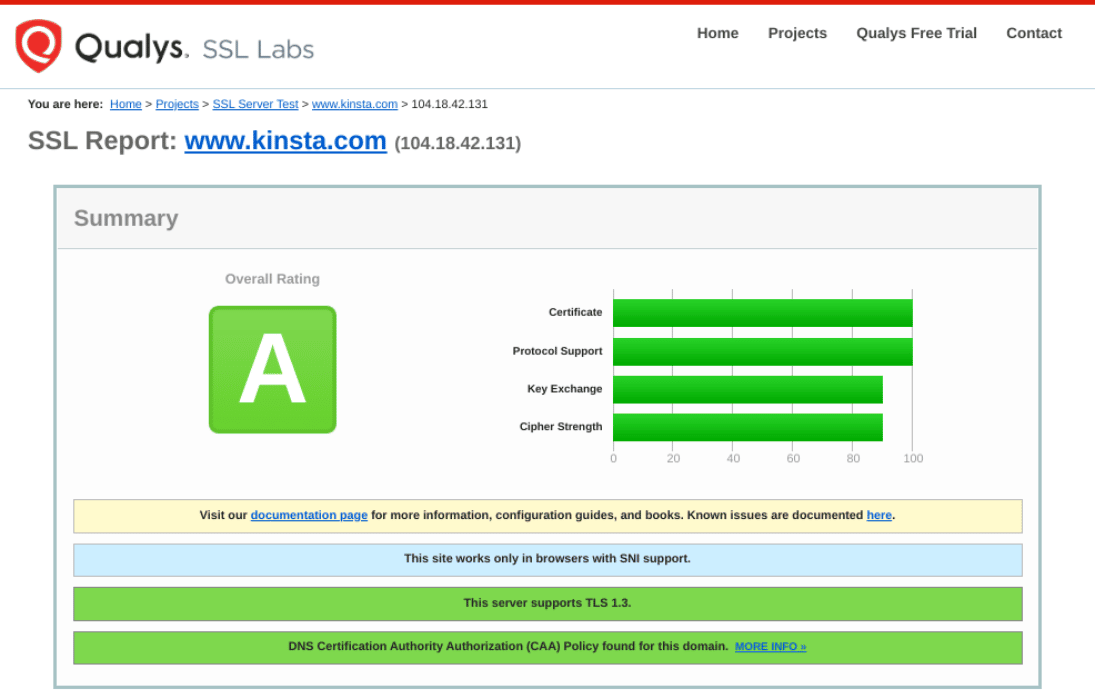
Now that you have your SSL certificate installed, you’ll need to verify it to ensure everything is set up correctly. A quick and easy way to do this is to use the free SSL check tool from Qualys SSL Labs. If everything is correct, you should get an A letter grade on the test, as shown below:
Check out our more in-depth tutorial on how to perform an SSL check.
4. Redirect HTTP to HTTPS
After you have verified your SSL certificate, you next must permanently redirect all the HTTP traffic to HTTPS. There are a couple of options when redirecting HTTP to HTTPS in WordPress.
If you’re a Kinsta client, using our Force HTTPS tool is the easiest method. This enables you to automatically redirect HTTP traffic to HTTPS with a few clicks at the server level. You could also do it manually in your web server’s config or with a free WordPress plugin.
Note: Our examples all include a 301 redirect directive, which is the correct way to implement it regarding SEO. Using a different type of redirect could harm your rankings. It is also essential to be aware that 301 redirects might not pass 100% of the link juice, even though Google might say they do. Check out this post from Cyrus over at Moz regarding HTTPS migrations and 301 redirects.
Option 1: Redirect HTTP to HTTPS on MyKinsta
If you’re a Kinsta user, you can easily redirect HTTP to HTTPS using MyKinsta. This is an excellent option as it eliminates the need to install a plugin on your site.
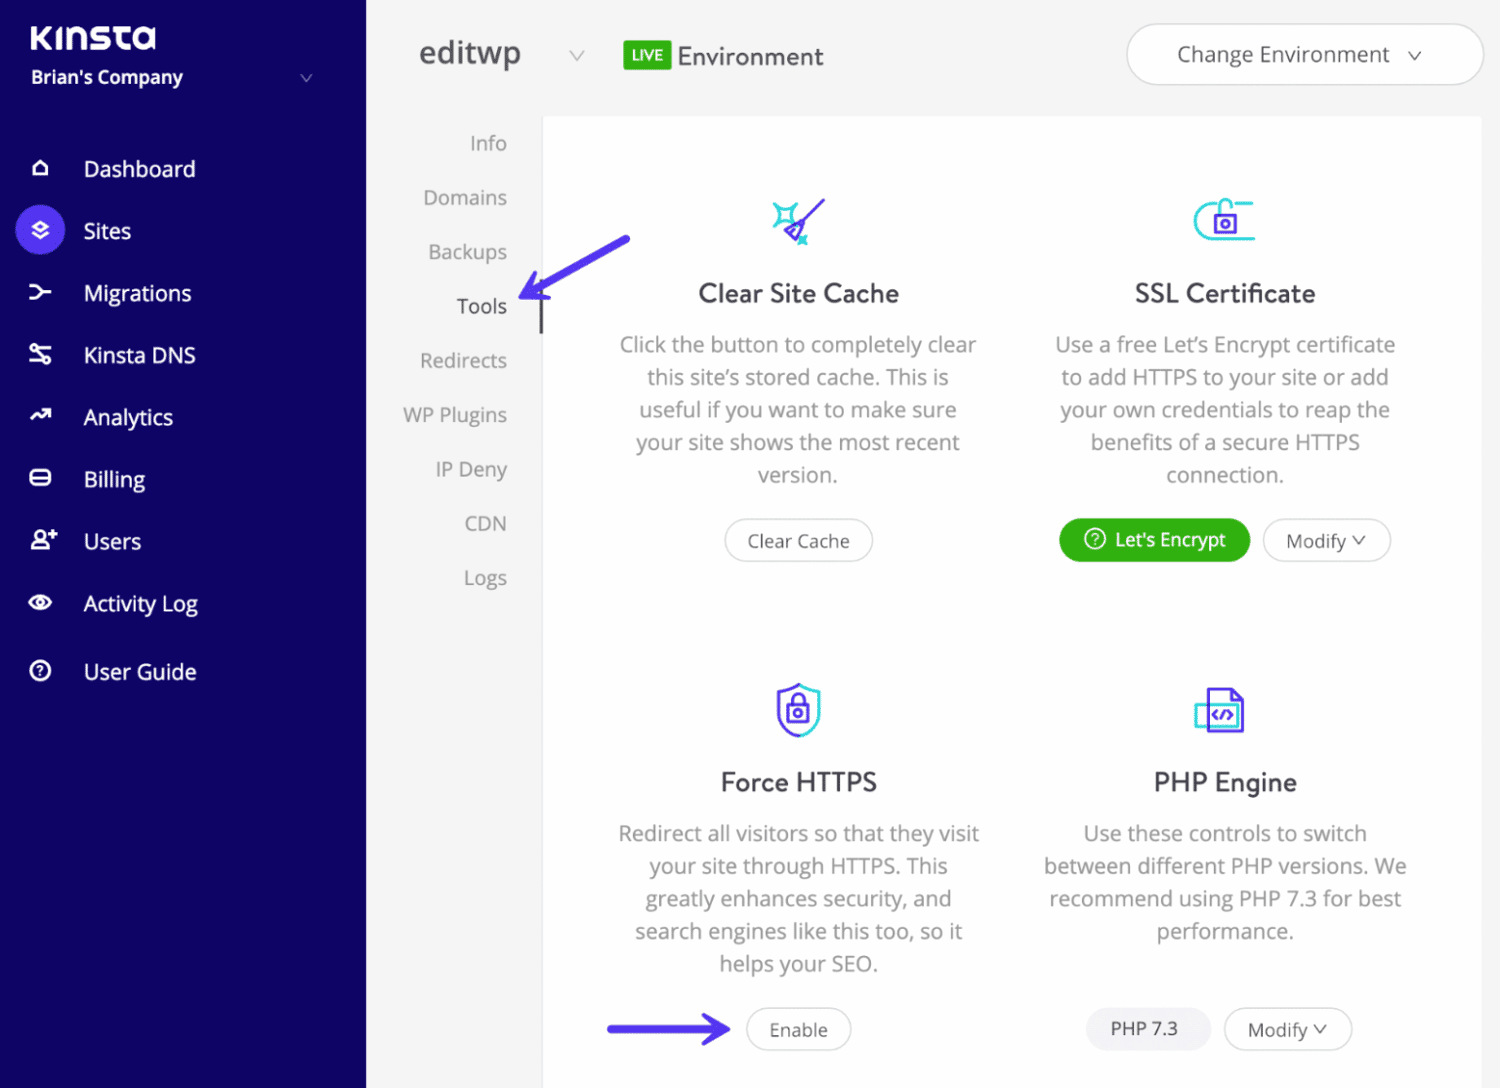
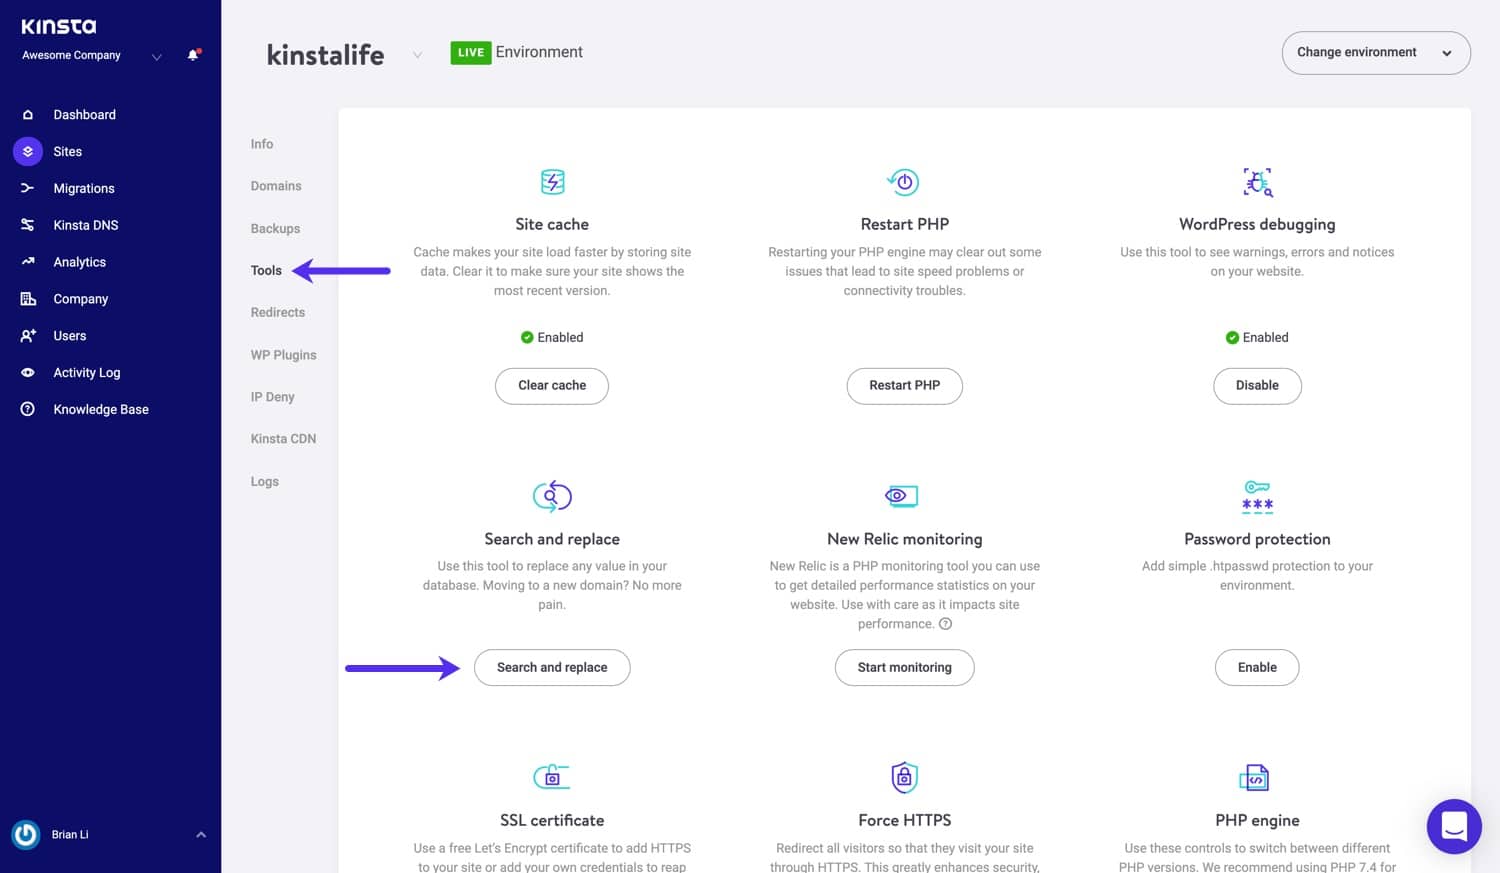
To get started, log in to the MyKinsta dashboard, browse your site, and then click on Tools.
Next, select the Enable button under Force HTTPS:
.
You can use your primary domain as the destination or a requested alternative domain. Then, click on Force HTTPS:
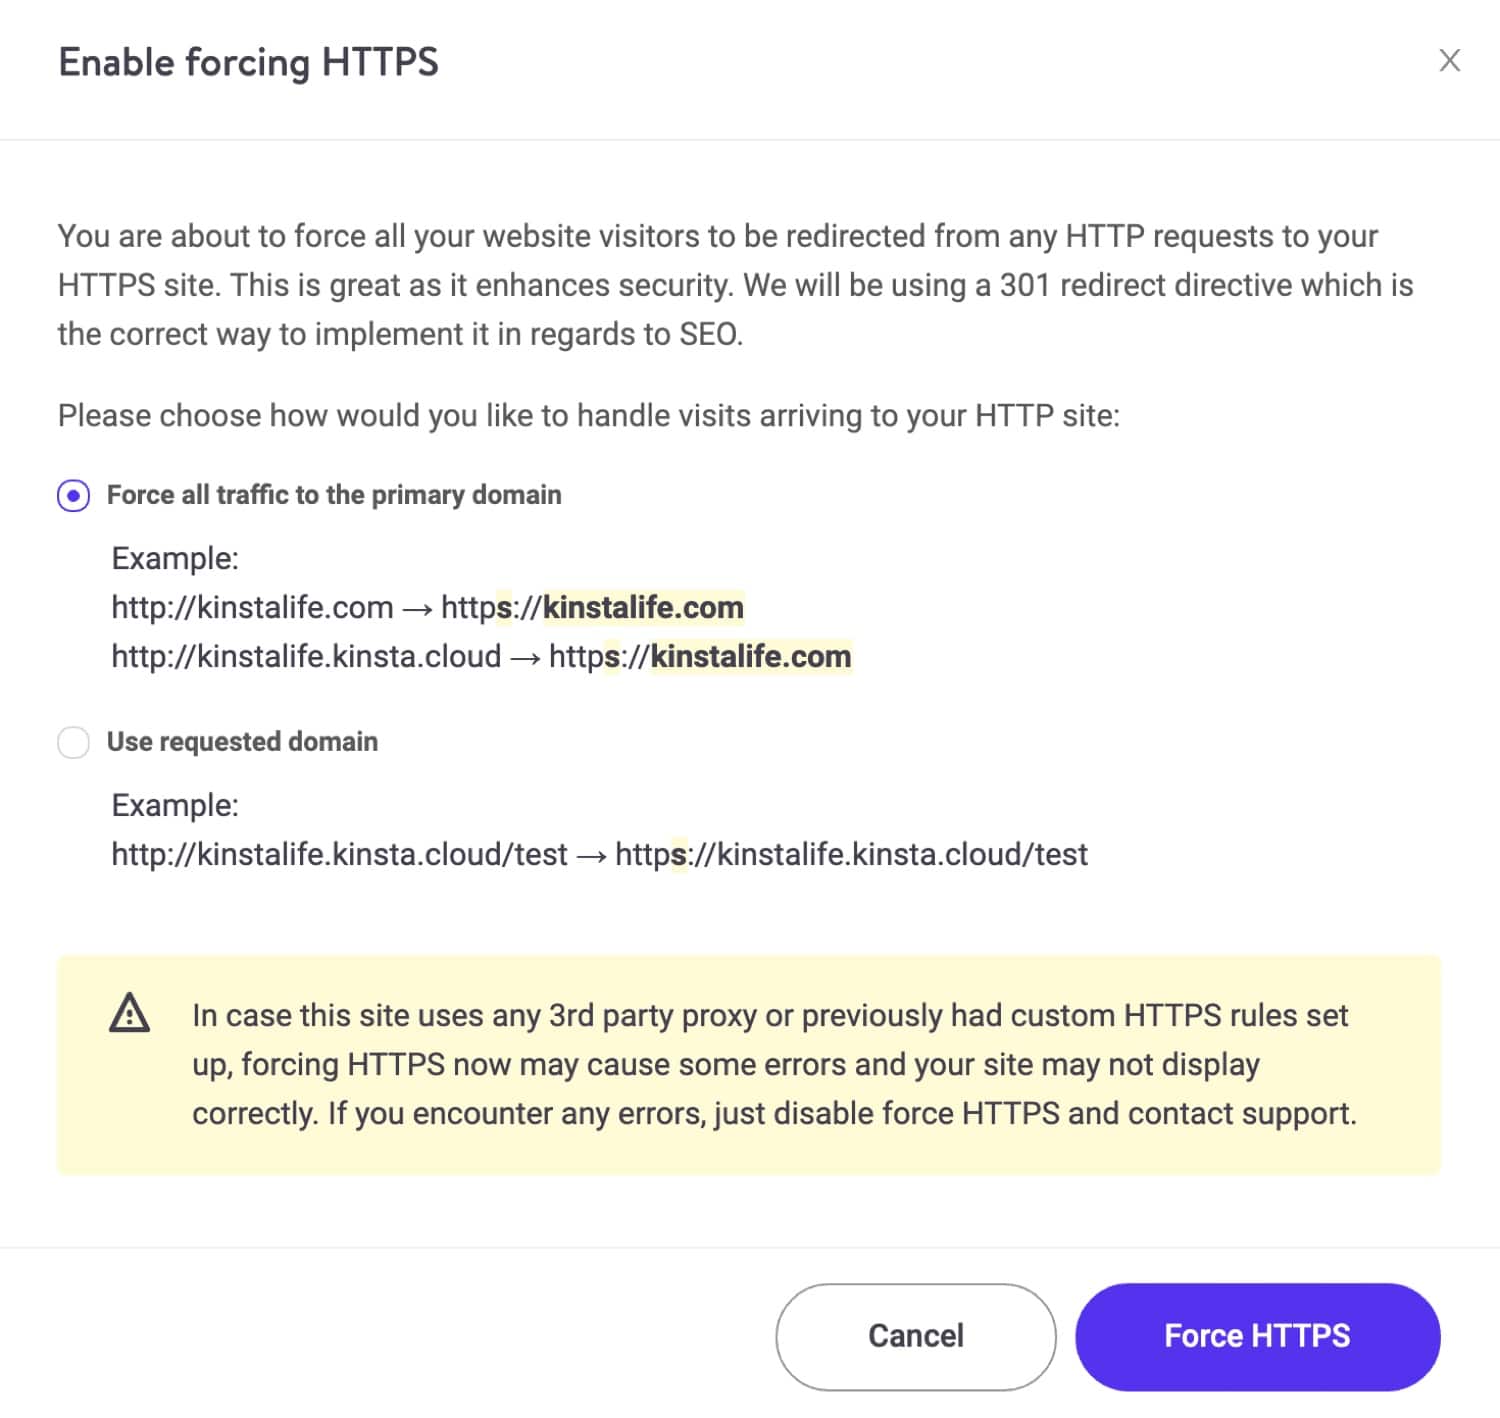
If you had custom HTTPS rules configured or used third-party proxies, you might run into some issues when forcing HTTPS. If you encounter any errors, you can disable HTTPS forcing, then reach out to Kinsta support for assistance.
Option 2: Redirect HTTP to HTTPS in Nginx
If your web server is running Nginx, you can easily redirect HTTP to HTTPS by adding the following code to your Nginx config file:
server {

listen 80;

server_name domain.com www.domain.com;

return 301 https://domain.com$request_uri;

}
This is the recommended method for redirecting WordPress running on Nginx.
Redirect HTTP to HTTPS in Apache
If your web server is running Apache, you can redirect all of your HTTP traffic to HTTPS by adding the following code to your .htaccess file:
RewriteEngine On

RewriteCond %{HTTPS} off

RewriteRule ^(.*)$ https://%{HTTP_HOST}%{REQUEST_URI} [L,R=301]
This is the recommended method for redirecting WordPress running on Apache.
None of Kinsta’s servers are running Apache.
Option 3: Redirect HTTP to HTTPS with the Really Simple SSL Plugin
The third option you have to redirect from HTTP to HTTPS is to use the free WordPress Really Simple SSL plugin:

We don’t recommend this method as a permanent solution because third-party plugins can introduce another layer of problems and compatibility issues. It is a good temporary solution, but you should update your hard-coded HTTP links, as we will show you in the next step.
Implement HSTS Header (optional)
HSTS (HTTP Strict Transport Security) is a security header that you add to your web server that forces the browser to use secure connections when a site runs over HTTPS. This can help prevent man-in-the-middle attacks (MitM) and cookie hijacking. You can use the above 301 redirects along with the HSTS header. Check out our in-depth article on how to add HSTS.
5. Check For Too Many Redirects
After you add a redirect from HTTP to HTTPS, you should double-check to ensure you don’t have too many redirects. This problem is quite common and can affect the speed of your WordPress site. You can use Patrick Sexton’s Redirect mapper tool to see how many redirects you have on your site quickly.
Below you’ll see an example of redirects that have been set up incorrectly. This is easily spottable when using the redirect mapper:
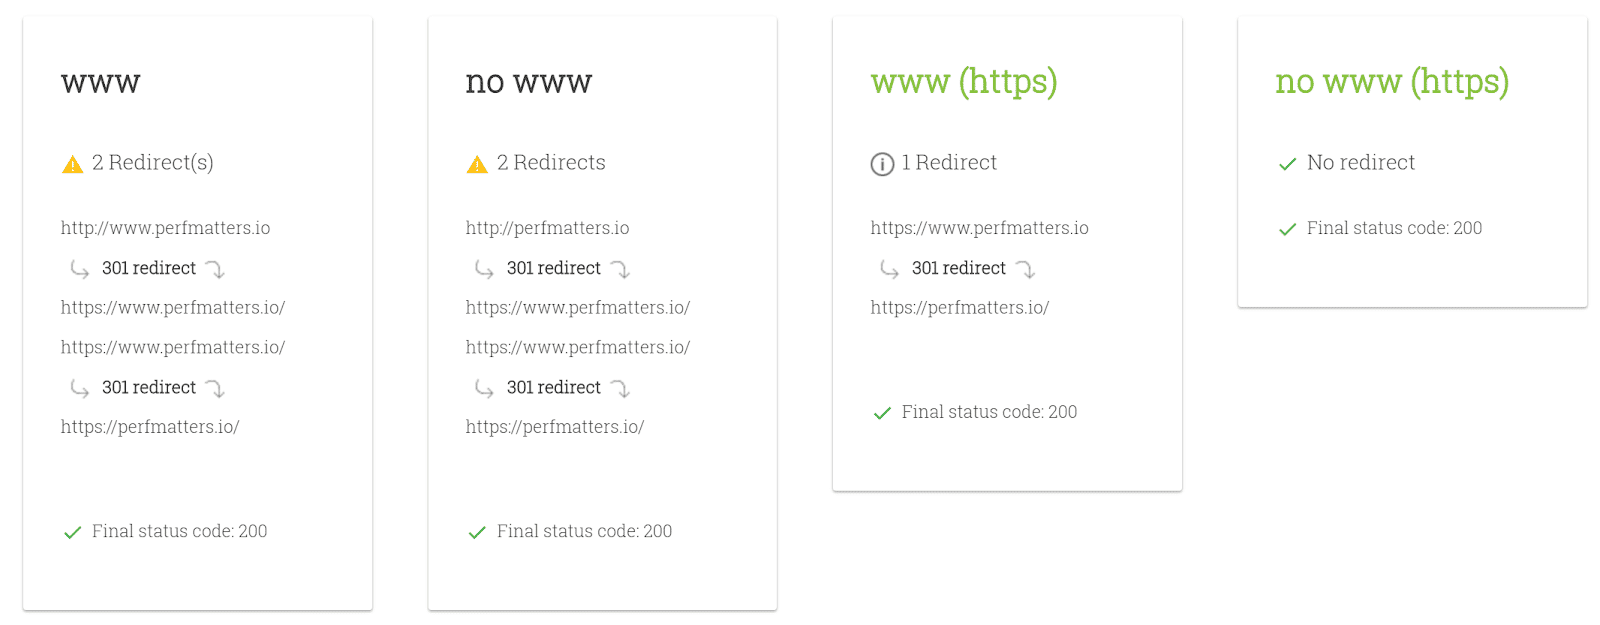
You can see that there are duplicate HTTPS redirects happening on both the www and non-www versions.
Below is an example of redirects set up correctly:
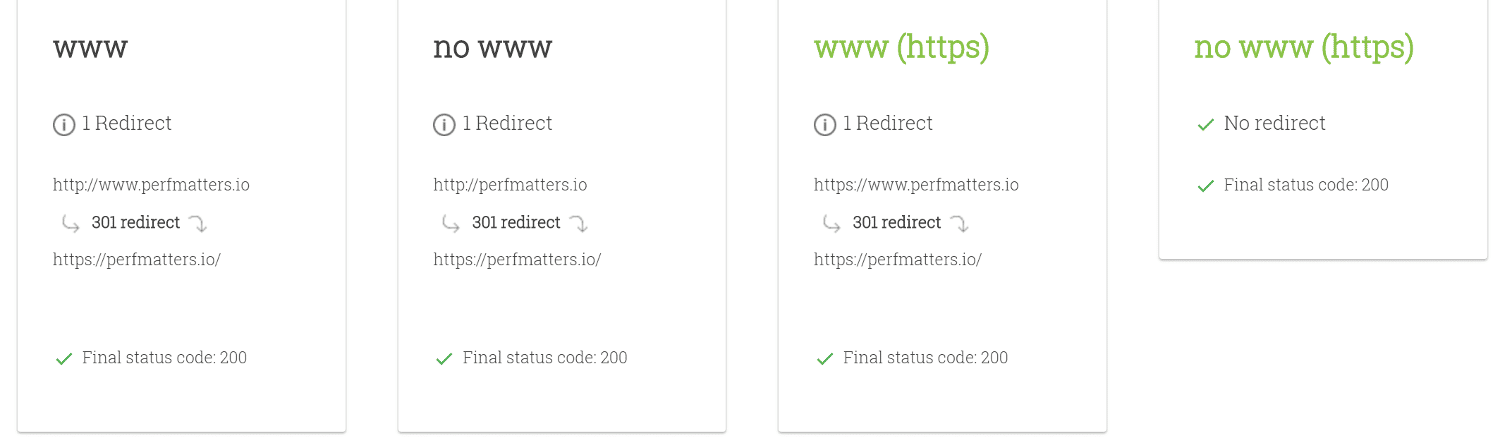
As you can see, there is only one redirect. You check out our in-depth post on WordPress redirects and best practices for faster performance.
6. Update Hard-Coded HTTP Links
Now that you have redirects, it is time to fix all those hard-coded HTTP URLs. Generally, it is not recommended to hard-code URLs. However, over time, you most likely will (we all do it). Below are a few options for updating your HTTP links to HTTPS.
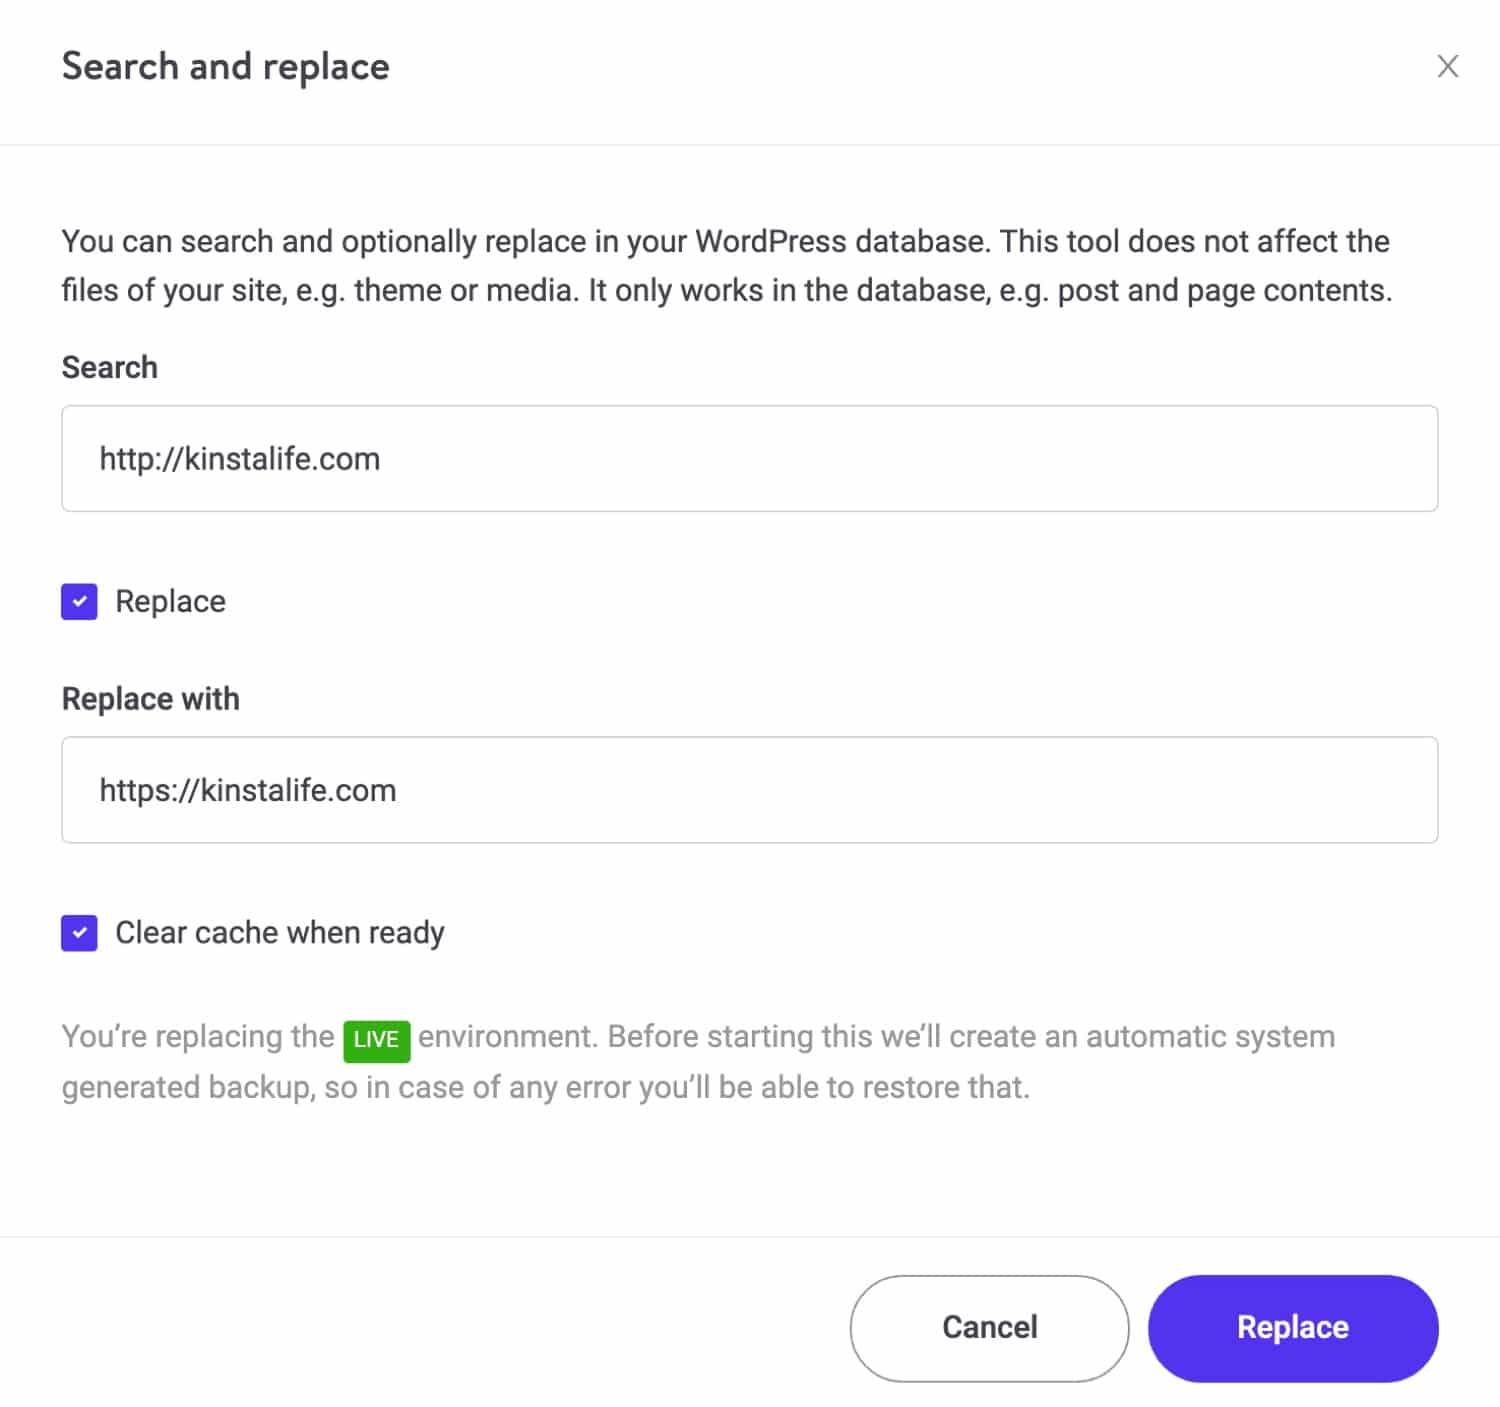
Option 1: Kinsta Search and Replace Tool
If you’re a Kinsta client, we have an easy-to-use Search and Replace tool in our MyKinsta dashboard:
Here are simple steps to update from HTTP to HTTPS URLs:
- Enter in the search field the value you want to search for in the database, which in this case is our HTTP domain: http://kinstalife.com.
- Enter the new value that should be used to replace the value you are searching for in the replace field. In this case, it is our HTTPS domain, https://kinstalife.com.
- Click on the Replace button to start the search and replace process.
Check out our search and replace tutorial, or click on the video guide below for additional details.
Option 2: Better Search Replace Plugin
Another easy tool you can use is a free plugin called Better Search Replace by the WordPress team over at Delicious Brains:
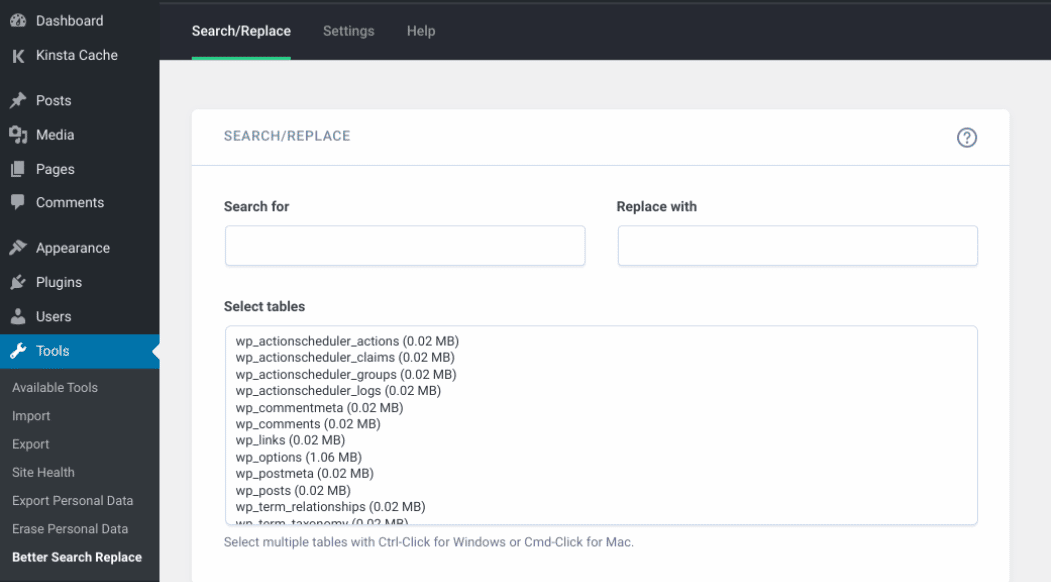
The plugin is free to use. Once installed and activated on your site, you can navigate to Tools > Better Search Replace to start using it.
Option 3: interconnect/it Search Replace DB PHP Script
A third option for running a WordPress search and replace is to use a free PHP script from interconnect/it called Search Replace DB. This is one of our favorite tools for any HTTP to HTTPS migration.
Important! Using this script could break your WordPress website if you don’t know what you are doing. If you are not comfortable doing this, please check with a developer or your web host first.
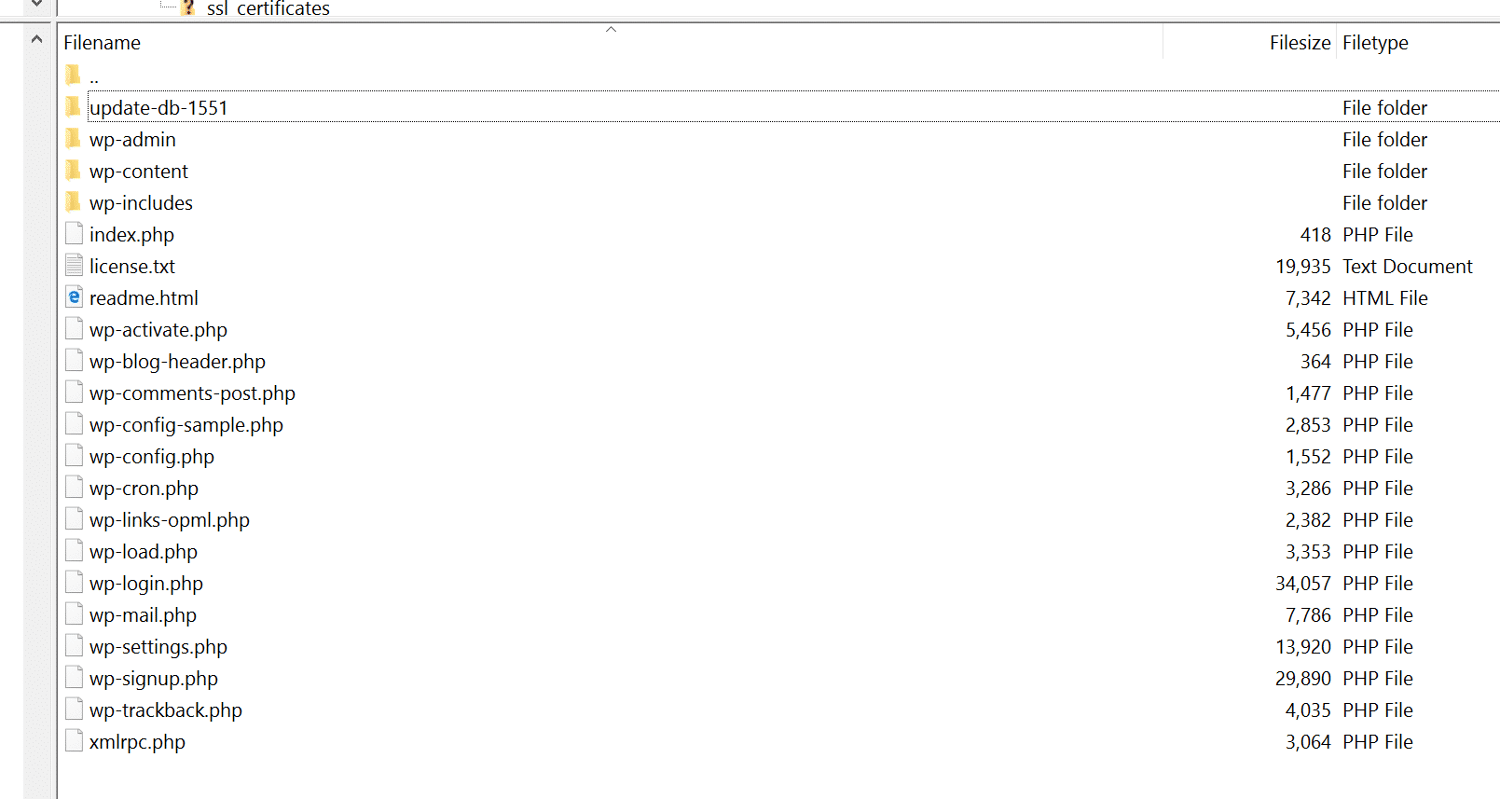
To use the script, simply download the zip file, extract the folder called search-replace-db-master, and rename it to something else. In our example, we renamed it to update-db-1551. Then, upload it to your web server’s public directory via FTP, SFTP, or SCP. This is typically the same directory that contains your /wp-content folder.
Then navigate to your secret folder in your browser, such as https://domain.com/update-db-1551:
The script will automatically attempt to find and populate the database field, but you must check that the details are correct and that it is for the database on which you wish to carry out a search/replace operation. You can click on Dry Run first to see what it will be updating/replacing. Then when you are ready, click on Live Run, which will perform the database updates and the WordPress search and replace.
An example of an HTTPS migration would be to replace “http://yourdomain.com” with “https://yourdomain.com.”

Due to security reasons, it is also crucial that you delete this script after you are done. You can click on the Delete me button. If you don’t, it could leave your website open to attacks.
It is also recommended to double-check on your web server and confirm that the folder/script has been completely removed. Note: This script will update all of your entries in your database, including your WordPress Site URL, hardcoded links on pages and posts, etc.
If you hard-coded your home, site, or WP content areas in your wp-config.php file, make sure to update them to HTTPS:
define('WP_HOME', 'https://yourdomain.com');

define('WP_SITEURL', 'https://yourdomain.com');

define( 'WP_CONTENT_URL', 'https://yourdomain.com/wp-content' );
If you have a CDN and use a CNAME, such as cdn.domain.com, you will probably also want to run the script above a second time to do a find for any hard-coded http://cdn.domain.com URLs and replace them with https://cdn.domain.com.
Option 4: Search and Replace with WP-CLI
You can also update your links using WP-CLI for the more tech-savvy folks and developers who don’t like to leave the command line. We recommend checking out this advanced search and replace the WP-CLI guide.
7. Update Custom Scripts and External Libraries
Now that you have your old hard-coded URLs updated, you will want to check any custom scripts or external libraries that you might have added to your header, footer, etc. This could include Google jQuery, Font Awesome, CrazyEgg, AdRoll, Facebook, Hotjar, etc.
For Google jQuery, you would simply update it to point to the HTTPS version:
<script src="https://ajax.googleapis.com/ajax/libs/jquery/3.1.0/jquery.min.js"></script>Every provider and service should have an HTTPS version that you can switch to.
8. Migrate CDN From HTTP to HTTPS
Next, if you are using a CDN, you will also want to migrate that to HTTPS. Otherwise, you will run into mixed-content warning issues on your WordPress site. If you’re using Kinsta CDN, you can skip this step as everything runs from our Cloudflare-powered CDN over HTTPS by default.
Cloudflare CDN Alternatives
There are plenty of options if you’re looking for a Cloudflare CDN alternative. One of the most popular is KeyCDN.
This high-performance CDN speeds up the delivery of your website’s content to visitors by caching it on servers worldwide. It also provides security and protection against DDoS attacks and other threats.
Two additional options are Amazon CloudFront, part of Amazon Web Services (AWS), and Sucuri, which helps optimize website performance and speed. It comes with a wide range of security features.
Here are some helpful links and tutorials on installing and setting up SSL for different third-party CDN providers.
- Setup SSL on KeyCDN
- Setup SSL on Cloudflare (we recommend using Full SSL)
- Setup SSL on MaxCDN
- Setup SSL on Amazon CloudFront
Note: Some even have a Let’s Encrypt integration, meaning SSL is free. If you have problems, you can always check with your CDN provider to help with your HTTP to HTTPS migration.
Once you have the CDN updated, you will want to make sure to update that in whatever WordPress plugin you use for the integration. In the example below, we are using CDN Enabler:
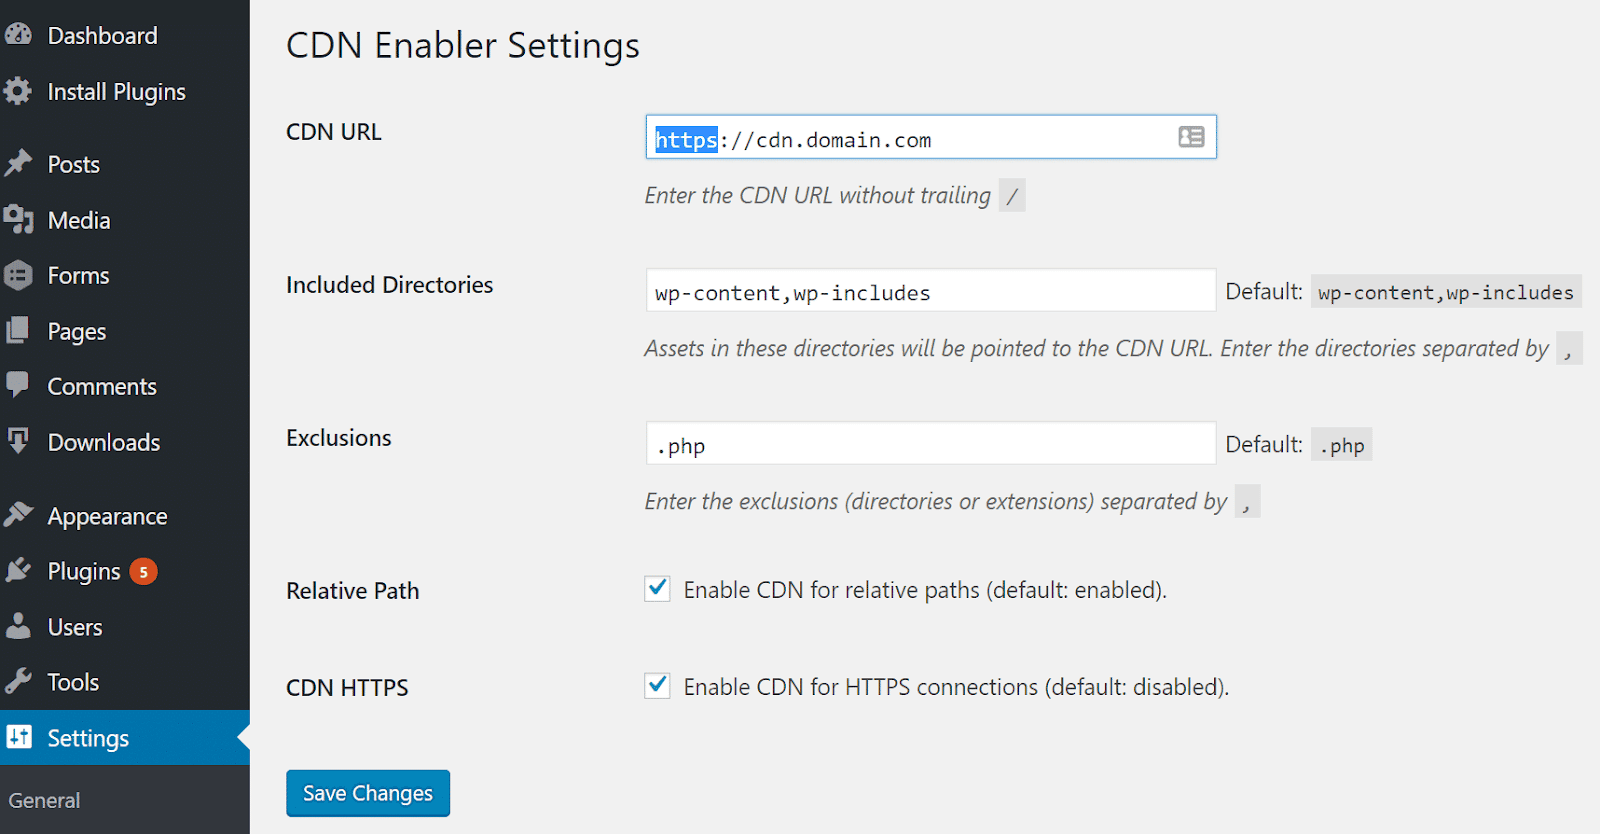
We flip the URL over HTTP to HTTPS, then enable the CDN HTTPS option at the bottom. When you’re done, select the Save Changes button.
9. Check Your Website For Mixed Content Warnings
Next, you will want to check your WordPress site to ensure you aren’t getting mixed content warnings. These warnings appear when loading HTTPS and HTTP scripts or content. You can’t load both.
When you migrate to HTTPS, everything needs to be running over HTTPS. Wired documented their transition from HTTP to HTTPS and a snag they ran into:
one of the biggest challenges of moving to HTTPS is preparing all of our content to be delivered over secure connections. If a page is loaded over HTTPS, all other assets (like images and Javascript files) must also be loaded over HTTPS. We are seeing a high volume of reports of these “mixed content” issues, or events in which an insecure, HTTP asset is loaded in the context of a secure, HTTPS page. To do our rollout right, we need to ensure that we have fewer mixed content issues—that we are delivering as much of WIRED.com’s content as securely possible.
Below are some examples of what happens in the browsers if you don’t fix these warnings.
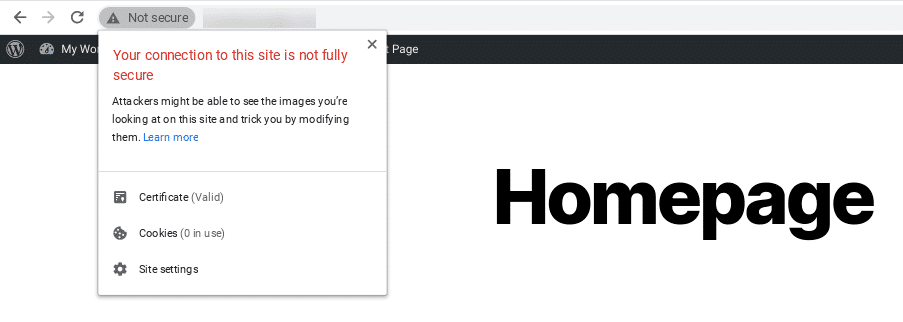
Chrome Mixed Content Warning Example
Here is an example of what happens in Chrome when a mixed content warning fires:
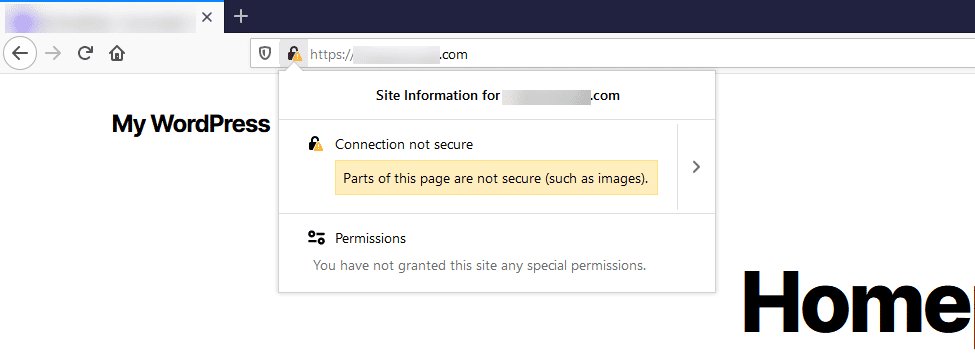
Firefox Mixed Content Warning Example
Here is an example of what happens in Firefox when a mixed content warning fires:
Internet Explorer Mixed Content Warning Example
Here is an example of what happens in Internet Explorer when a mixed content warning fires:
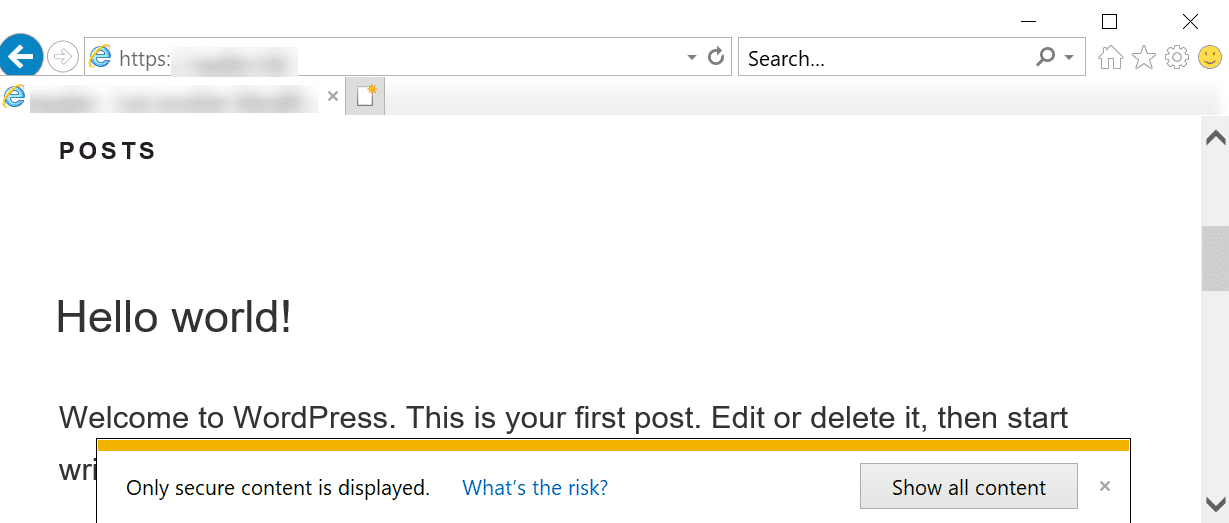
As you can see, IE is probably one of the worst because it breaks the rendering of the page until the popup is clicked.
There is a great free little tool called SSL Check from JitBit, which you can run to quickly scan your website or URL for non-secure content. The tool will crawl your HTTPS WordPress site and search for non-secure images, scripts, and CSS files that will trigger a warning message in browsers. The number of pages crawled is limited to 200 per website.
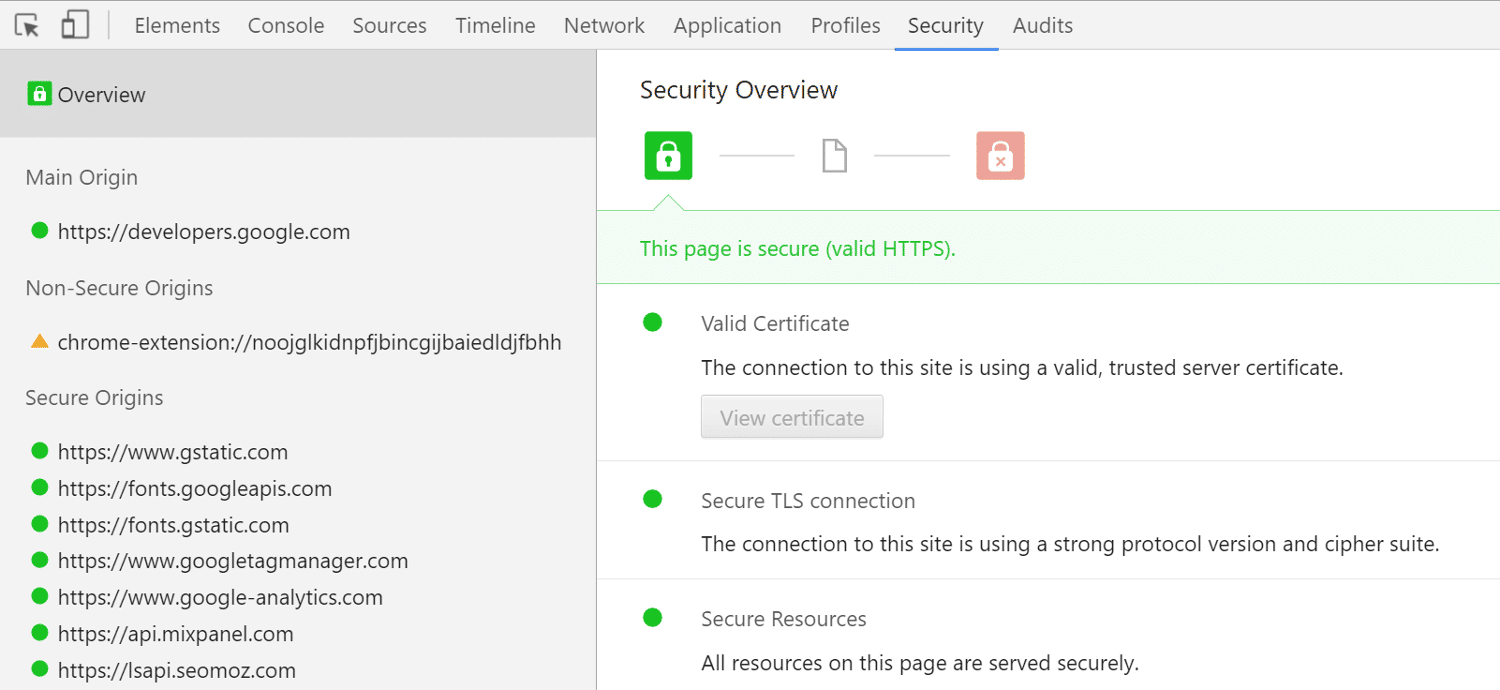
You can also use Chrome DevTools to quickly check any page by looking at the network requests panel. The security panel is also actually quite useful. You can immediately see any non-secure origins and then click into the Requests to see what they are coming from:
There is also desktop software called HTTPS Checker which you can install to scan your site:
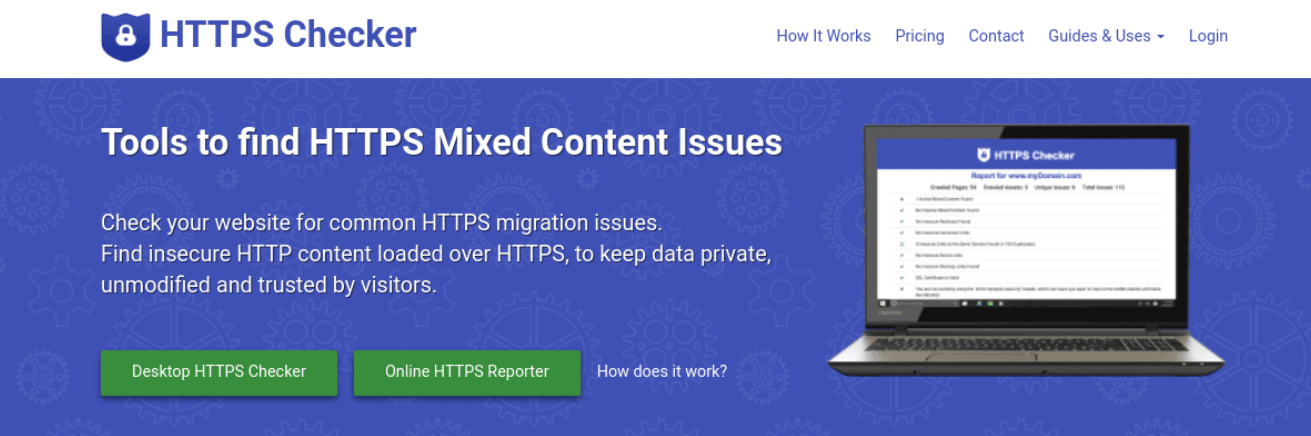
After significant changes, it can help you check for “not secure” warnings and content. It is available on Windows, Mac, and Ubuntu. The free plan allows you to check up to 100 pages.
10. Update Google Search Console Profile
Now that you have your WordPress site up and running on HTTPS (hopefully no warnings), it is time to dive into the marketing side. Some of these are very important, so don’t skip them!
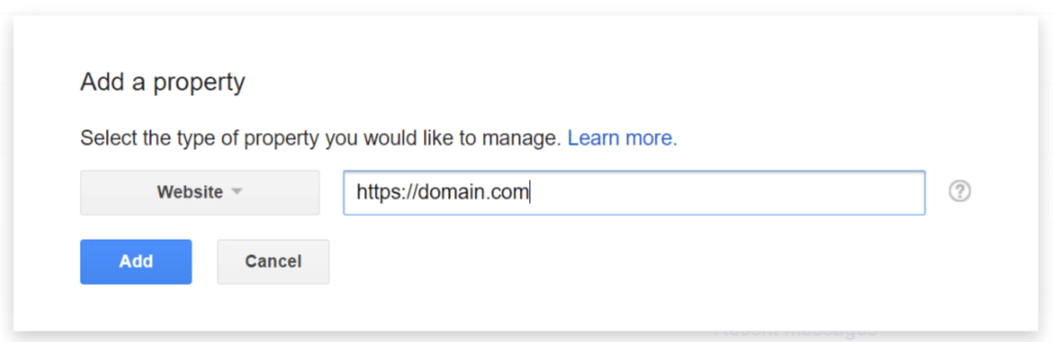
You will first want to create a new Google Search Console profile for the HTTPS version.
After you have created the new HTTPS version, you will want to resubmit your sitemap files. The new HTTPS versions:
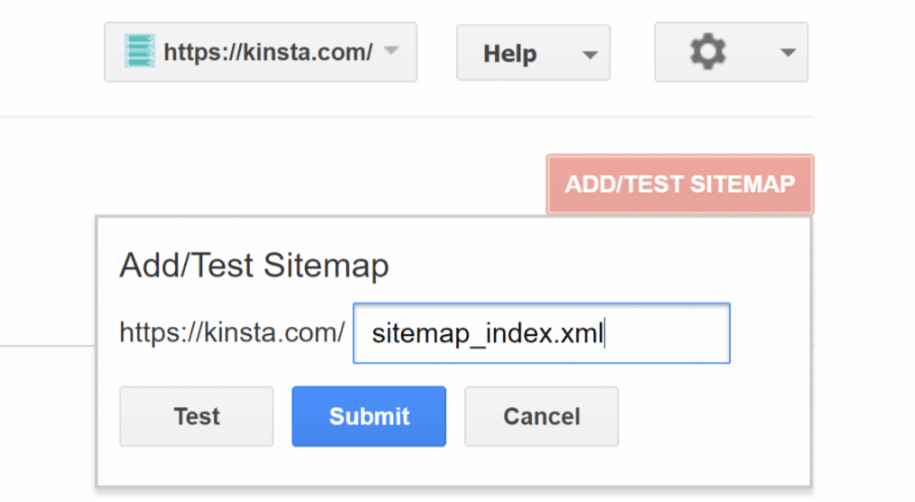
You will need to resubmit this if you have a disavow file from bad backlinks or a penalty. You could permanently harm your site if you don’t do this now.
Go to Google’s Disavow Tool and click on your original HTTP profile. Download the disavow file if it exists. Then return to the tool and submit your disavow file under the HTTPS version.
Note: After doing all this, you can safely delete the HTTP profile in Google Search Console.
11. Bing Webmaster Tools
Bing Webmaster Tools is a little different than Google Search Console:
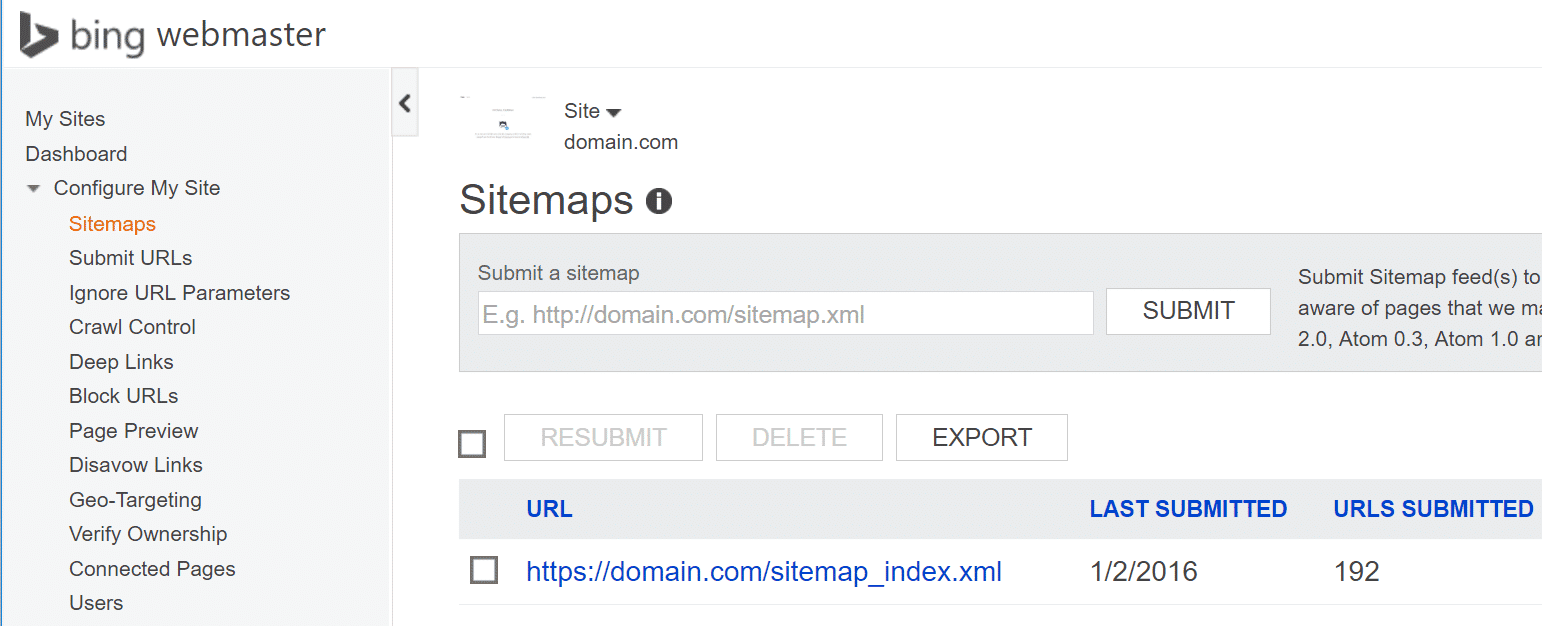
You don’t need to create a new HTTPS profile. Instead, you can just submit your newly created HTTPS sitemap.
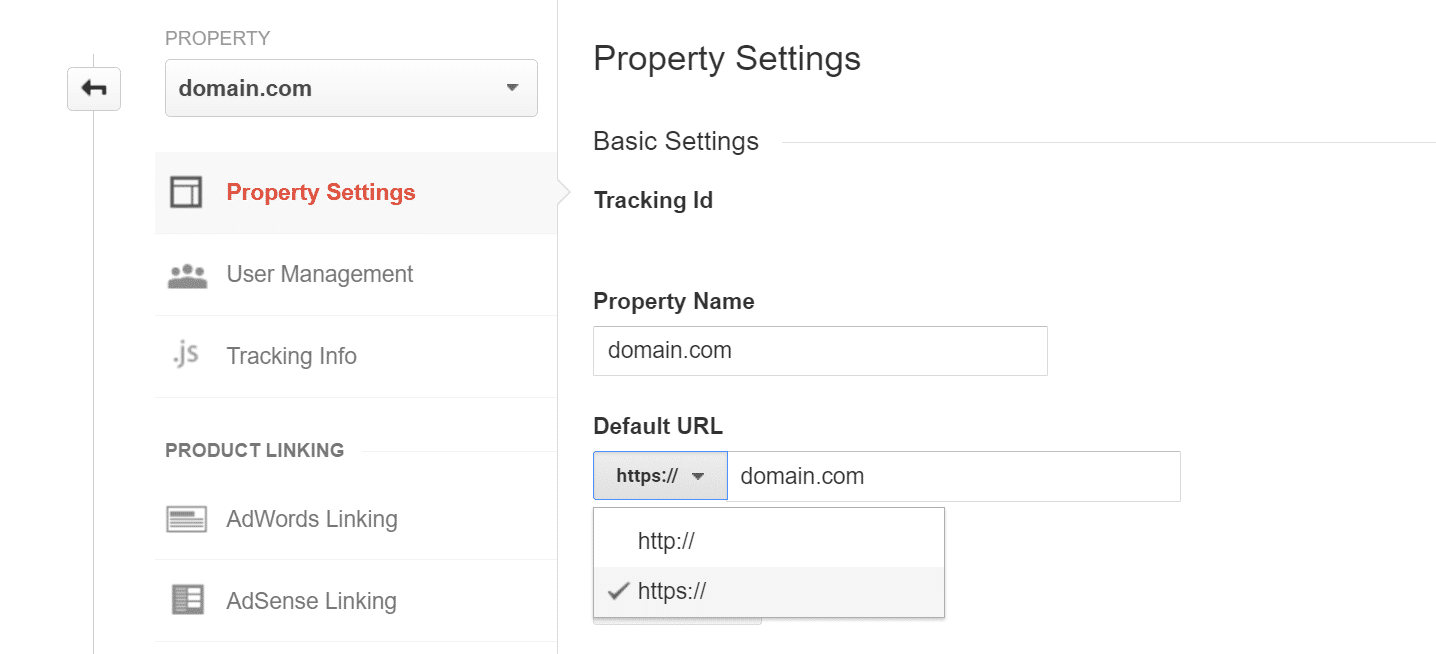
12. Google Analytics
Next, you need to update your Google Analytics property and view. This won’t affect your analytics data: it will simply help when linking your site to Google Search Console, etc.
To update your property, click into your domain property settings and, under the default URL, change it to the HTTPS:// version:
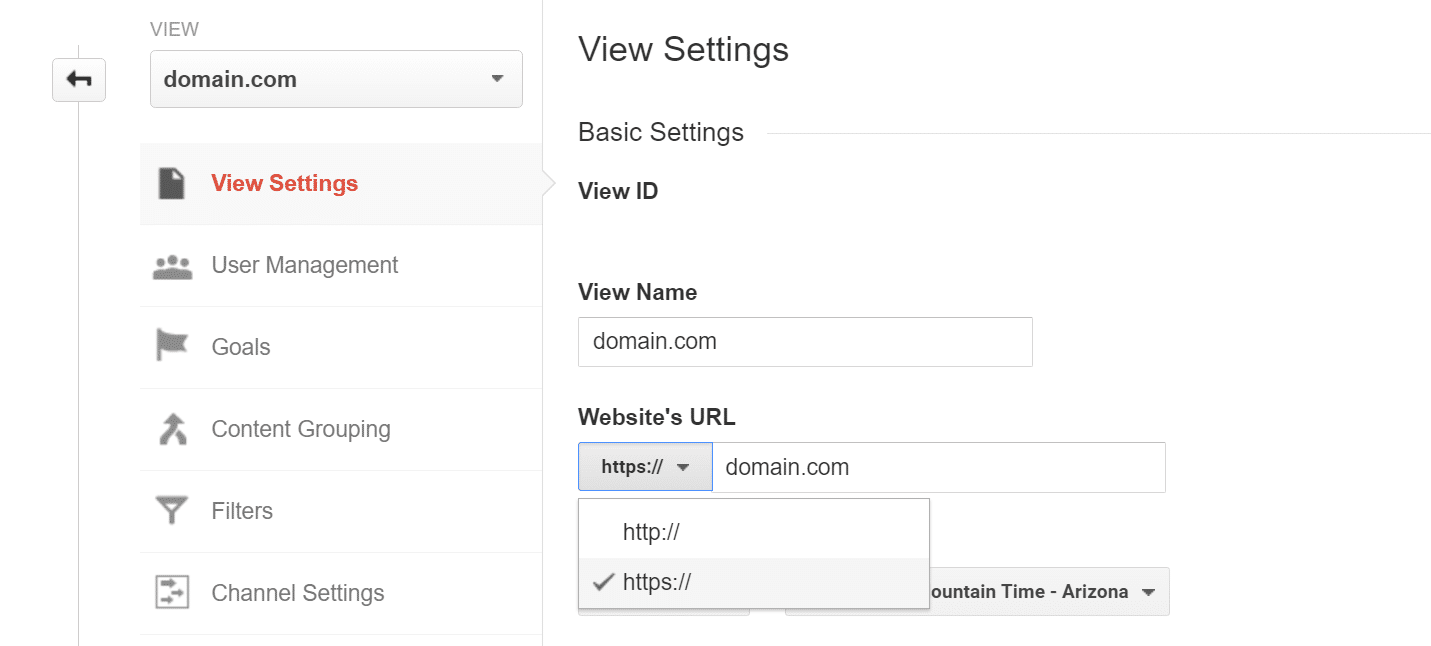
To update your view, click on your domain view settings. Under the Website’s URL, then change it to the HTTPS:// version:
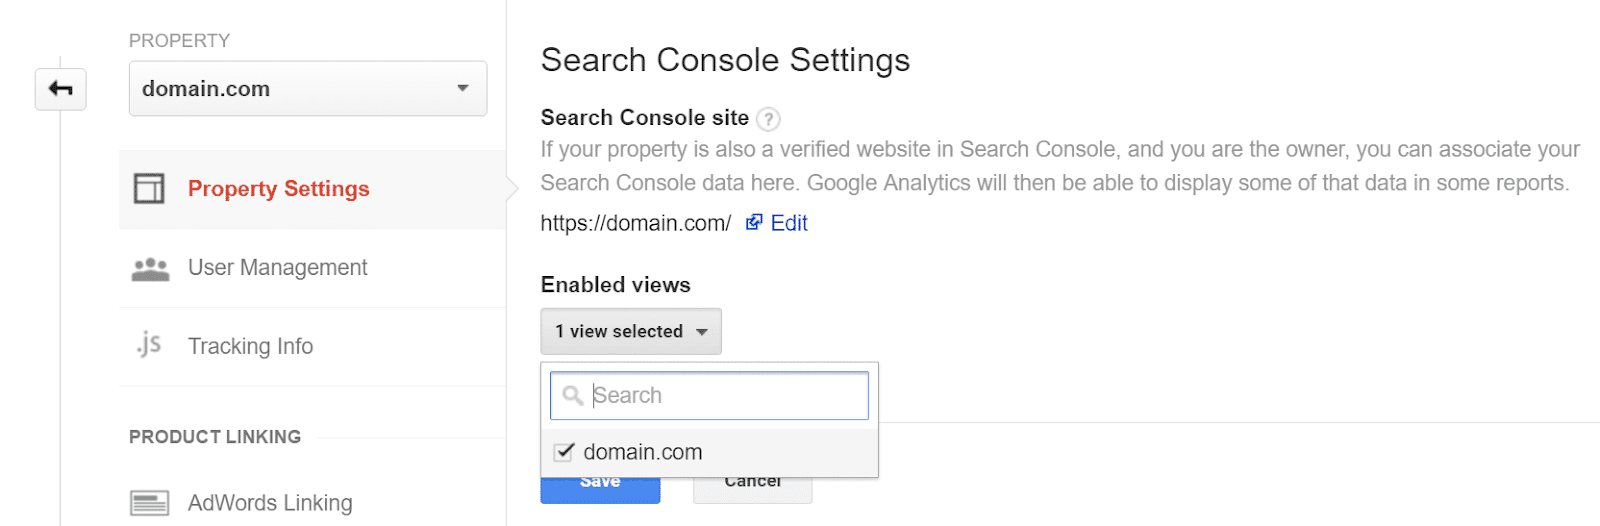
You will also want to re-link your newly created Google Search Console profile that you created in Step 8 with your Google Analytics account. To do this, click into your domain’s property settings, then select Adjust Search Console:
You can then link your new HTTPS GSC profile. Linking these together enables search query data to flow into your Google Analytics account.
13. YouTube Channel
If you have a YouTube channel, you will want to re-associate your website with your new HTTPS version in Google Search Console. Otherwise, you will get errors with annotations and other messages about the HTTPS link being invalid.
In your YouTube dashboard, click on your Channel and then into Advanced. Next, change your domain to the new HTTPS version and click on Add. You might have to remove the old one and then re-add it. You will then have to approve it by going into Google Search Console, navigating into your messages for that site, and selecting Approve.
14. Miscellaneous
That is about it when it comes to your HTTP to HTTPS migration! Here are some more miscellaneous items you will want to update as well. Some of these may or may not apply depending on what you use.
- Make sure to check that your robots.txt is accessible and working.
- Ensure that any canonical tags point to the HTTPS version (this should have already been done if you followed Step 4 above).
- If you run a comment plugin such as Disqus, you must migrate your Disqus comments over from HTTP to HTTPS.
- Update Your URLs in your Email Marketing software
- Update PPC Ad URLs: AdWords, Bing Ads, AdRoll, Facebook Ads, etc.
- Update Social Media Links (Facebook Page, Twitter Bio, Pinterest, Google+, etc.)
Summary
HTTPS is not just a Google ranking factor. It’s a vital security protocol that helps keep your website and visitors safe from attacks.
If you have been procrastinating on switching to HTTPS, hopefully, this post has finally given you some incentive to take the plunge. Are you ready to make a move? If you need any help along the way, our team of experts is more than happy to assist.
Do you have any questions about HTTP to HTTPS migration? Let us know in the comments section below!