
Pinterest helps millions of business owners send more traffic to their websites, but did you know that you can unlock several other tools like advanced analytics, access to Pinterest Ads, and other Pinterest development/marketing tools when you learn how to claim your website on Pinterest?
“Claiming” your website on Pinterest is a simple process of verifying that you are, in fact, the owner of your website and that you’d like to unlock additional business tools for greater exposure.
Benefits of Claiming a Website on Pinterest
If you’re wondering why you should go through the trouble of verifying your website on Pinterest, we’d like to explain some of the major benefits you receive after doing so.
Overall, the Pinterest website claiming process is similar to how you can verify ownership of your website on Google; it’s meant to protect the actual site owner from intruders trying to control their online presence. It also gives you more power over how your business functions online.
Here are the primary advantages of claiming your website on Pinterest:
- Improved web analytics: Along with information about what other users are pinning from your Business account, claiming your website tells those users how to find more of your content, both of which aren’t available without verifying your site.
- Profile picture and Follow buttons (rich pins): By default, your Pinterest profile picture doesn’t appear next to pins that come from your website. Verifying not only adds your profile photo to all of those pins (even if shared dozens of times) but it includes a Follow button and a link to your website.
- A potential verification checkmark: Verified merchants (another verification process for online stores) receive a blue checkmark next to their profiles. Regular verifications (which we’ll show you how to do in this article) receive a red checkmark.
- Potential for improved SEO: From your website link being spread all over Pinterest to the fact that your website will accumulate more backlinks, it’s very possible that verifying a website with Pinterest boosts your overall SEO efforts.
- Multiple websites on one account: Pinterest allows you to claim several websites and put them all under the same Pinterest account.
- Access to new business and developer tools on Pinterest: All verified Business accounts gain sneak peeks into upcoming and new features that may not be available to the public.
- Access to Pinterest Ads: All Verified Business accounts can make ads, run them, and analyze them with powerful statistics.
How To Claim a Website on Pinterest (Step-by-step Instructions)
Before getting started with your site verification on Pinterest, go through the following list to ensure you’re both eligible for verification, and you’re ready for the process.
Things To Do Before You Begin
- Make sure you own a domain: To claim a website on Pinterest, you must own a domain name, subdomain, or sub-path domain. A second-level domain looks like this: example.com; a subdomain like this: blog.example.com; and a sub-path like this: example.com/store.
- Decide on your verification method: We cover 4 methods below. Each method uses either an HTML tag, HTML file, or TXT record. All require minimal technical knowledge and can be done even if you know nothing about HTML, meta tags, or DNS records.
- Upgrade to a Pinterest Business account: This isn’t required but is highly recommended. The whole point of claiming your website is to obtain additional business tools, so if you’re running a business, you can unlock even more features with a true Pinterest Business account.
How To Tell if Your Account is a Business or Personal Account
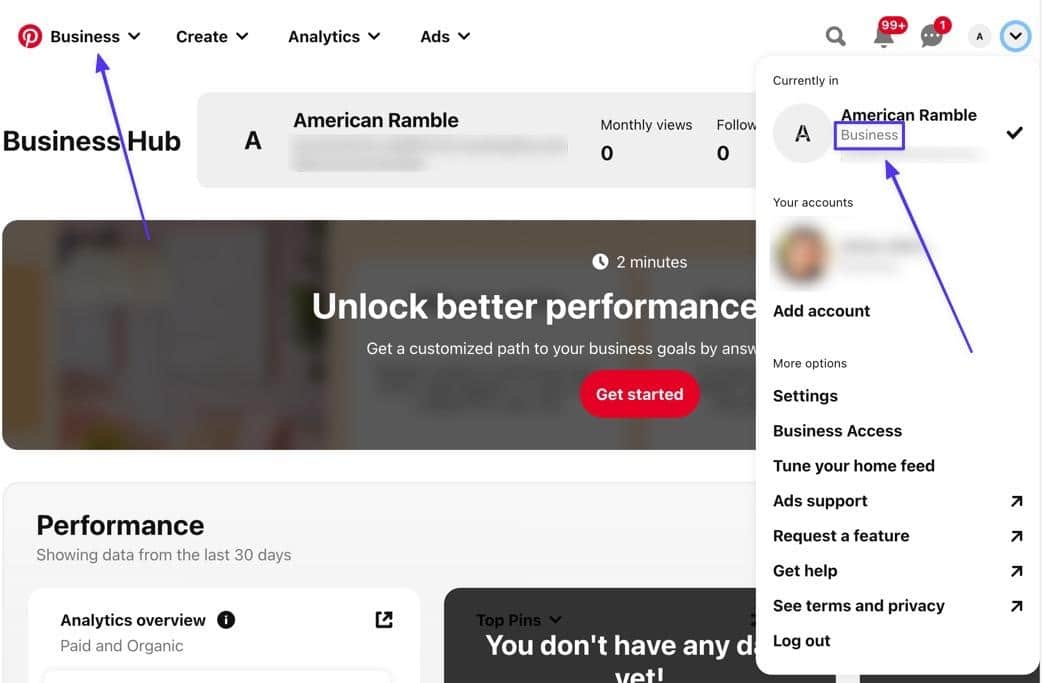
Quickly identify if you have a Personal or Business Pinterest account by opening your profile. The type of account is listed in several obvious areas, including the top left header (next to the Pinterest logo) and by clicking on the Account dropdown menu (downward caret icon) in the upper-right corner. You’ll see “Business” or “Personal” depending on what you have.
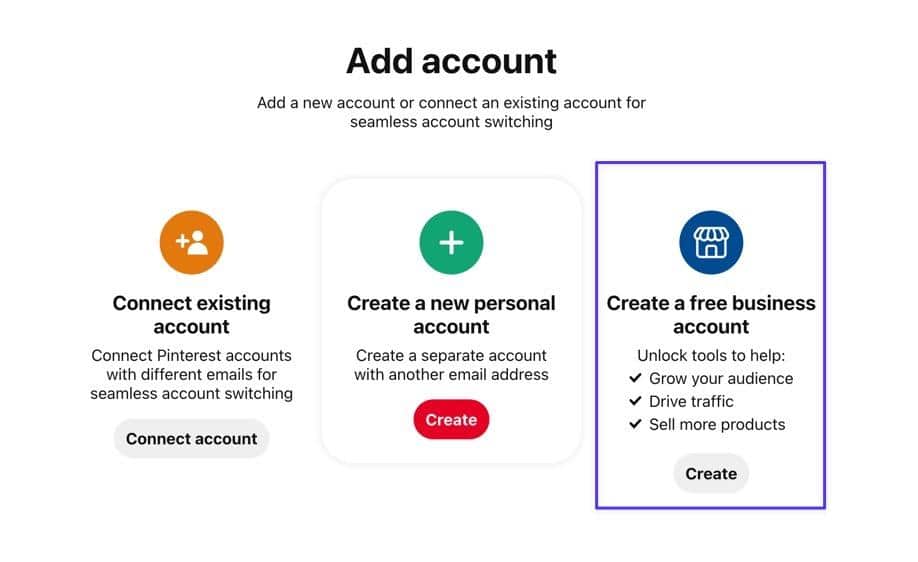
If you have a Personal account and need to convert it to a Business account, go to the Add Account page, then choose to Create a Free Business Account. That allows you to either convert from a Personal to a Business account or link a separate Business account page to a Personal account.
How To Claim Your Website on Pinterest (4 Simple Methods)
Use the following step-by-step tutorials for quickly claiming your website on Pinterest.
Method 1: Add an HTML Meta Tag on WordPress
HTML tags contain data that explains what content is available on a website. One of the ways to show that you own a website is to place an HTML meta tag in one of your site’s files. The tag then reads your website content and sends a notification back to Pinterest that it’s within the code of your site.
The reason this works as a verification option is that only the owner of a website should have access to the source code.
Step 1: Go to Settings
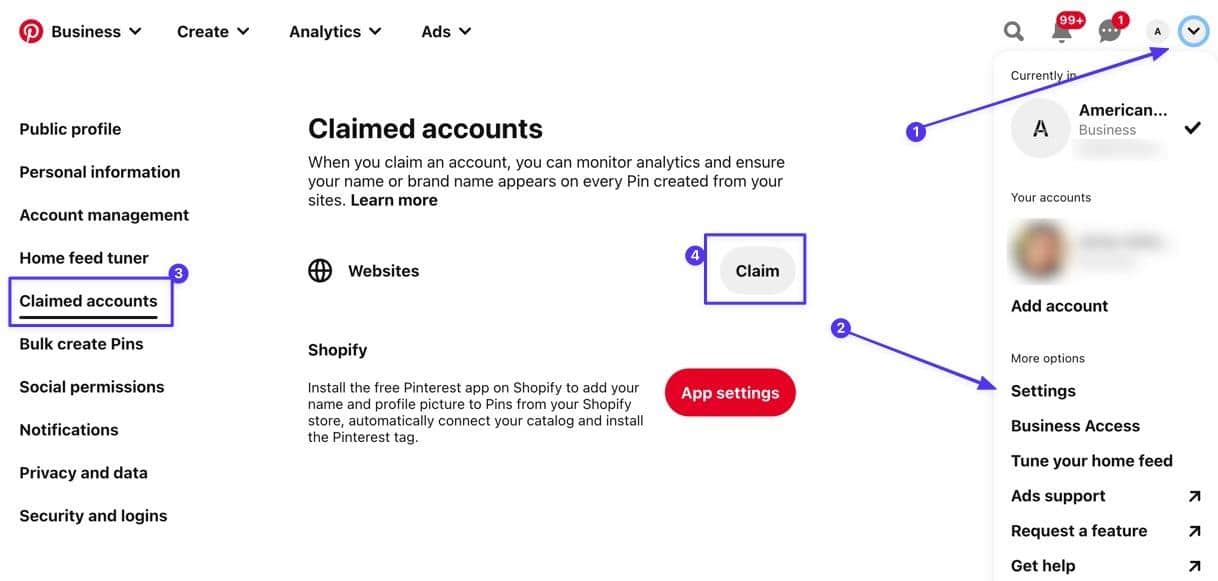
Navigate to the upper-right corner of your Pinterest profile, and click on the Down Caret (v) button to reveal a dropdown menu. Select Settings from that list.
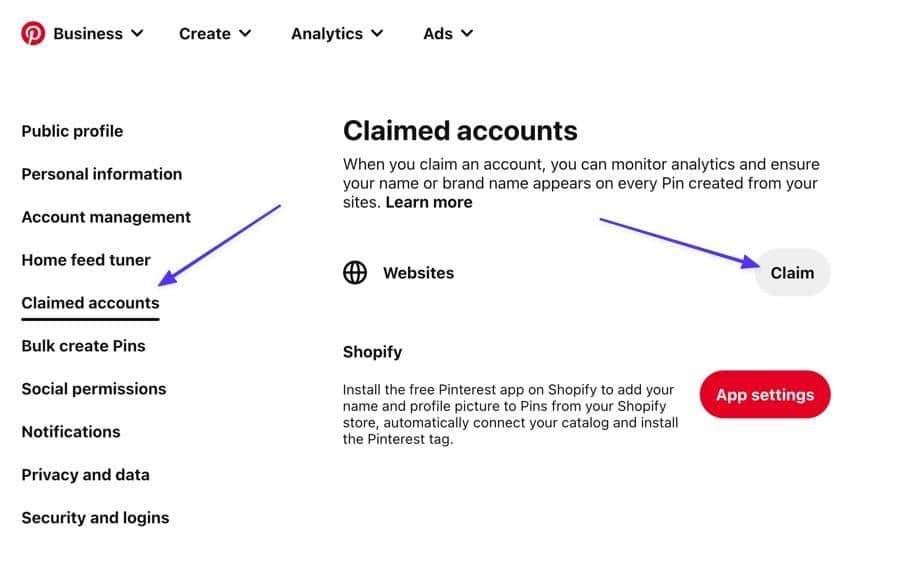
Step 2: Go To the Section to Claim Accounts
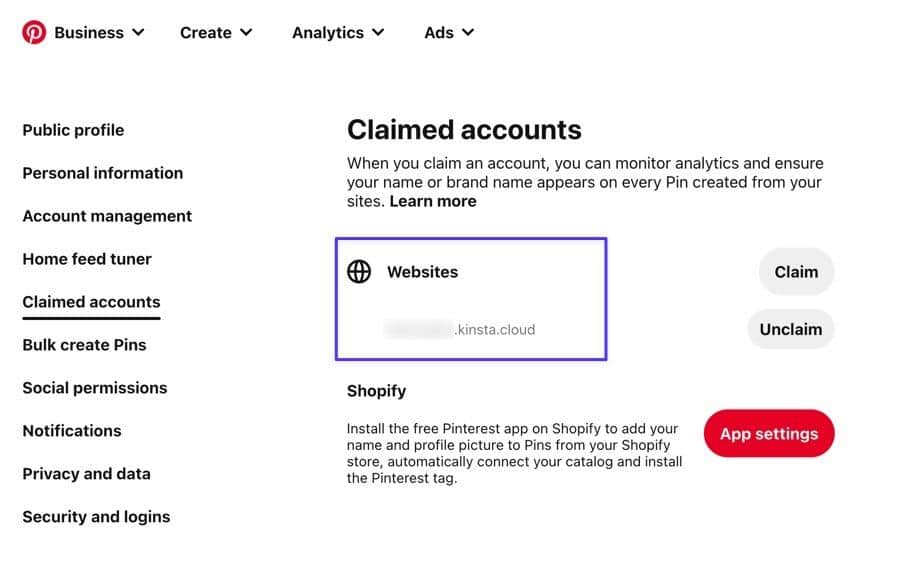
Open the Claimed Accounts tab, then check to see if you already have any websites listed under the Claimed Accounts section. If you do, you may not have to walk through this process. Or you might need to delete old websites.
To move forward with the claiming of your WordPress site, click on the Claim button.
Step 3: Copy the HTML Meta Tag
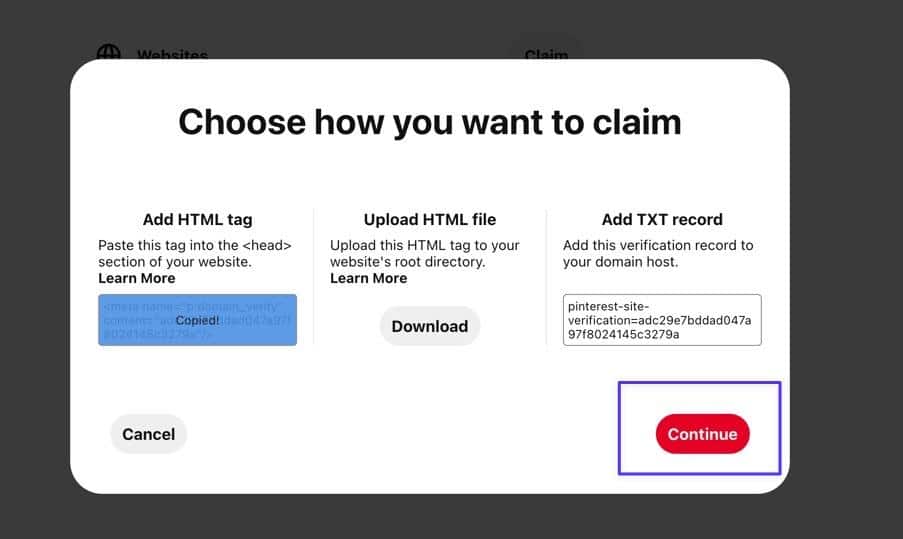
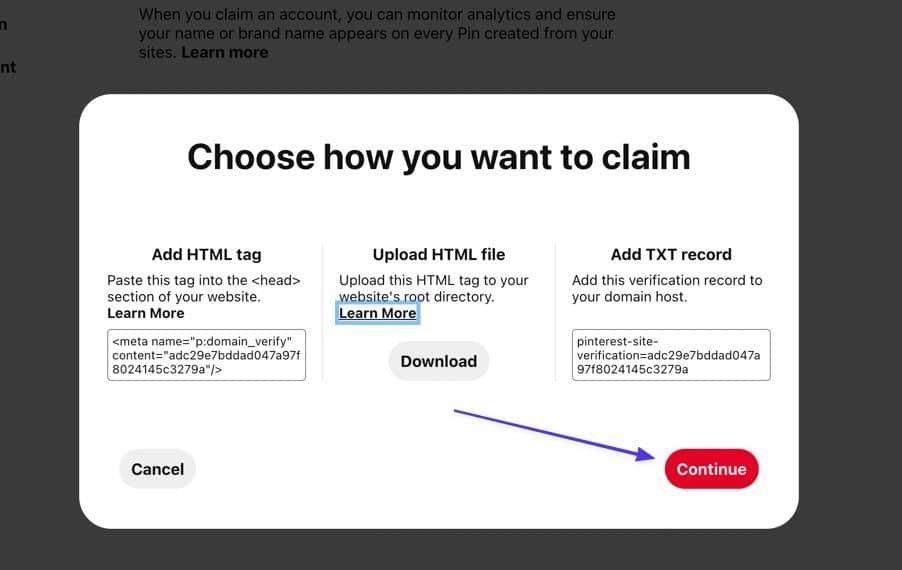
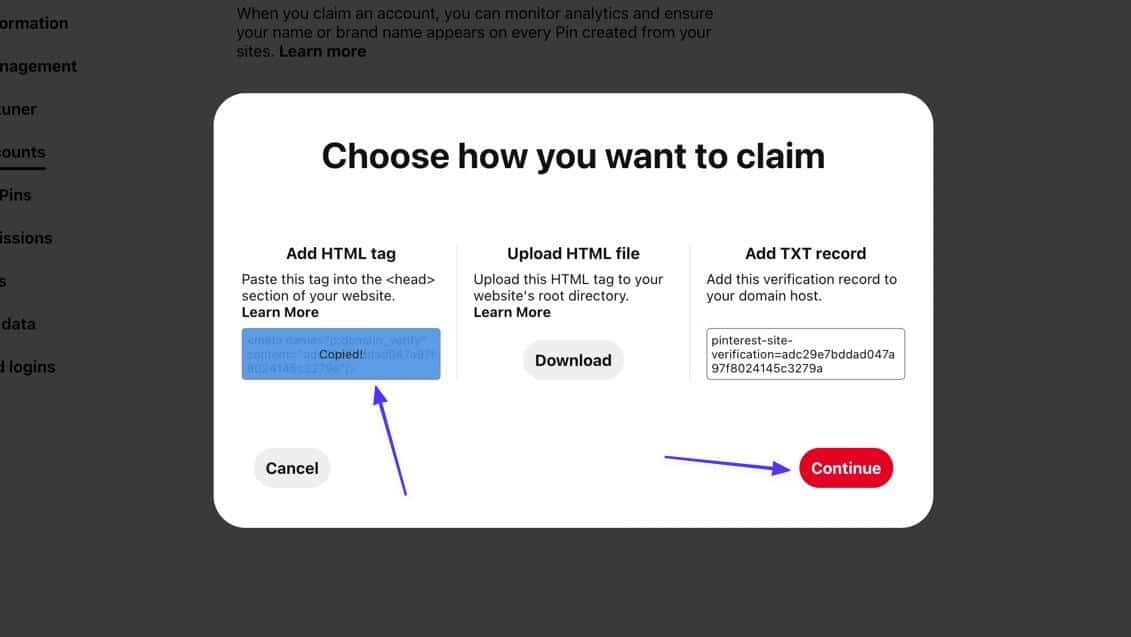
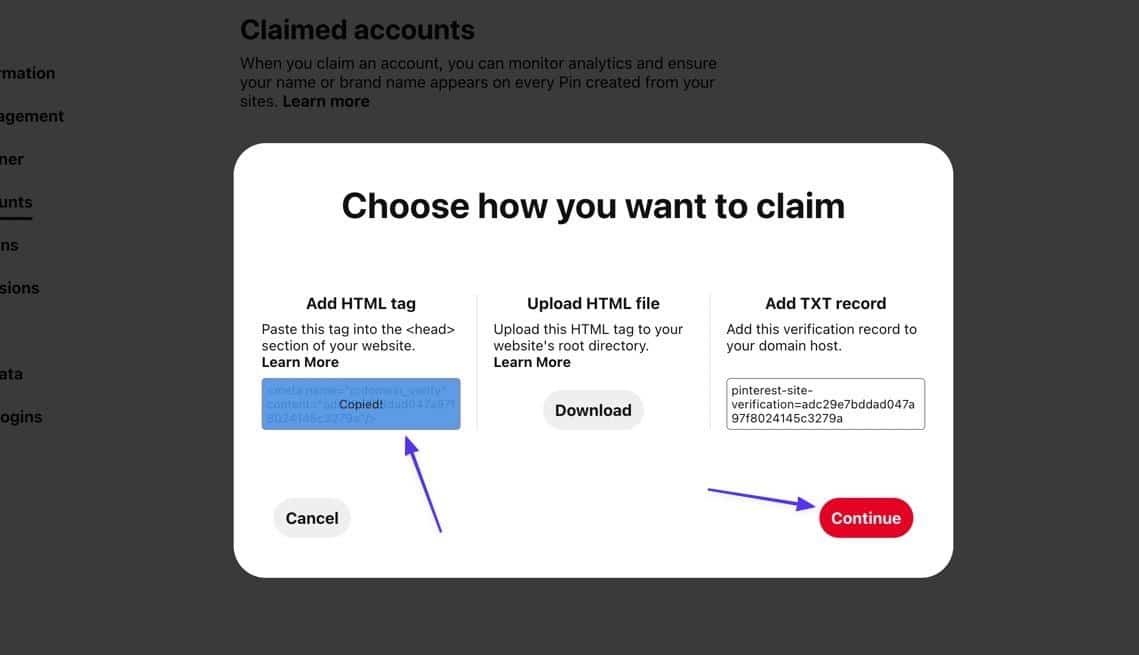
A popup window displays three options for claiming your website, one of which is to Add HTML Tag. That’s the choice to use for this method. Click on the code listed to copy it all to your clipboard.
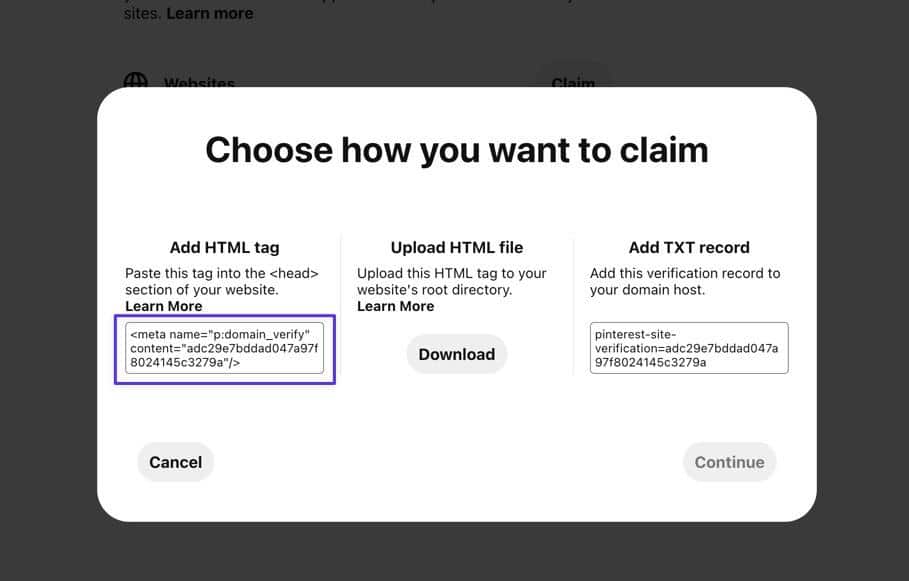
Click the Continue button to proceed.
Step 4: Paste the HTML Tag into Your WordPress Site’s header.php File
Pinterest requests that you paste this bit of code (the HTML tag) into your header.php file. In order to access header.php, you must connect to your WordPress site files using SFTP and an FTP client. We’ll use FileZilla for this tutorial, but there are many reputable FTP clients to choose from.
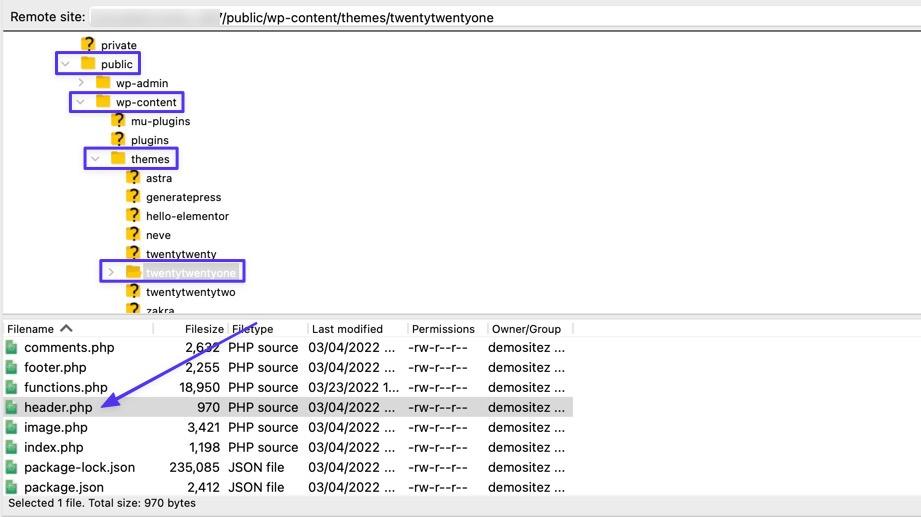
Once linked to your WordPress site files via SFTP, navigate through the file directory by opening your core site file (often /yoursitename or /www), then you can go to /public > /wp-content > /themes.
Finally, open the folder that’s named after your active WordPress theme; for this tutorial, we’re using the Twenty Twenty One theme, so the file is /twentytwentyone.
Locate the header.php file in your theme folder. Pick the View/Edit option that’s available in your FTP Client; for FileZilla, you would right-click on the file and choose View/Edit.
That opens the header.php file in the text editor of your choice. Find the (opening) and (closing) elements. You want to paste the Pinterest HTML tag inside those elements.
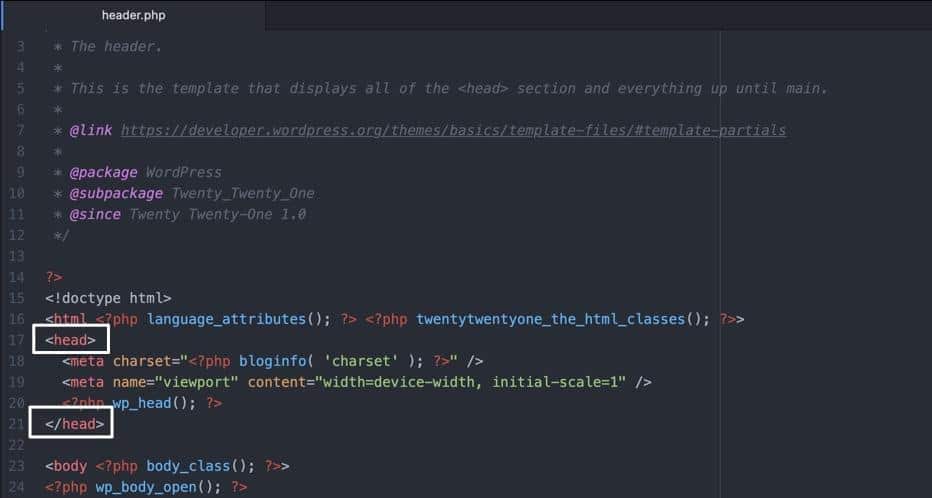
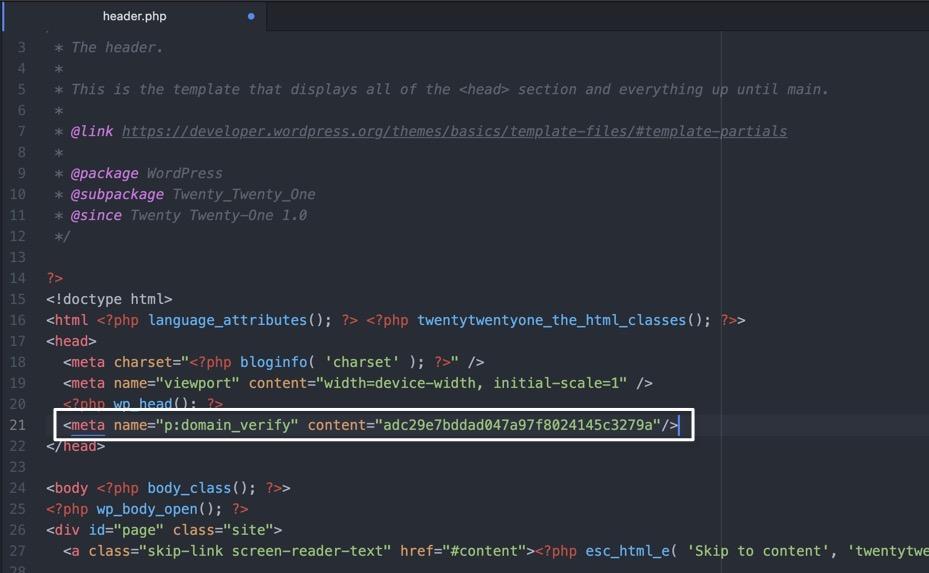
Taking the code that you copied before, paste it into the header.php file. It’s often best to just paste it right before the element, so you don’t mess up any of the other code.
Be sure to save that file and override the previous file in your FTP client. That saves the HTML tag to your website.
Step 5: Verify Your Site Back on Pinterest
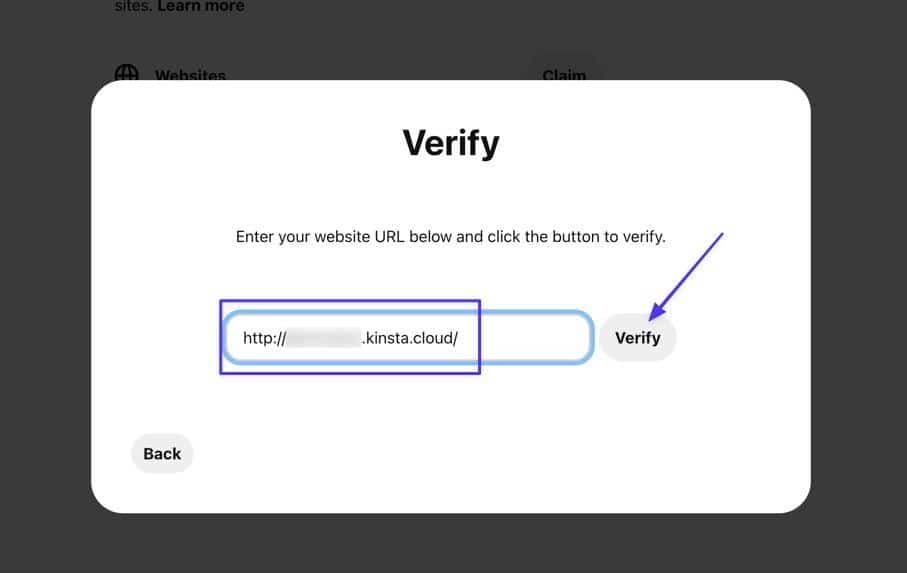
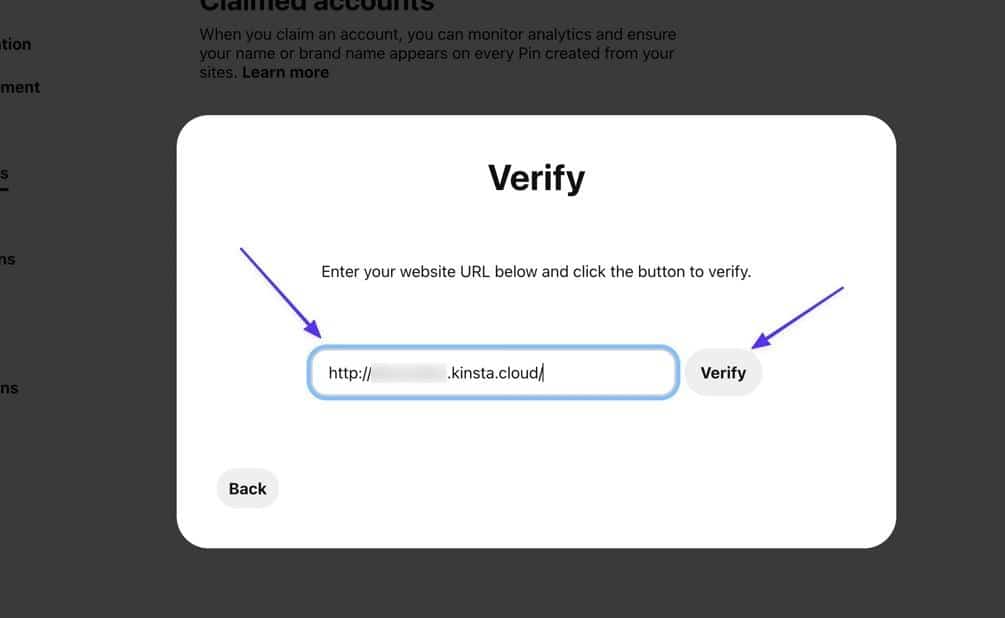
With an active HTML tag on your site, go back to Pinterest. You can now paste in your WordPress URL and click the Verify button.
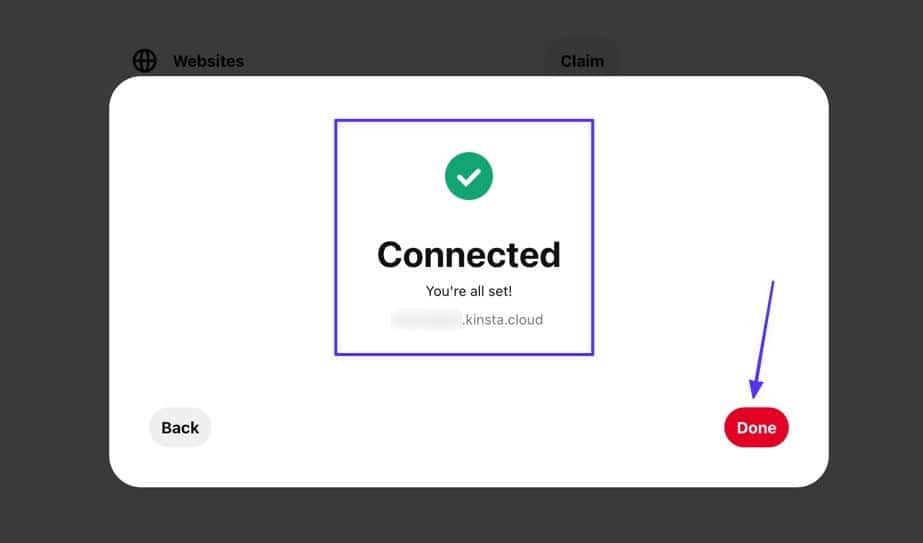
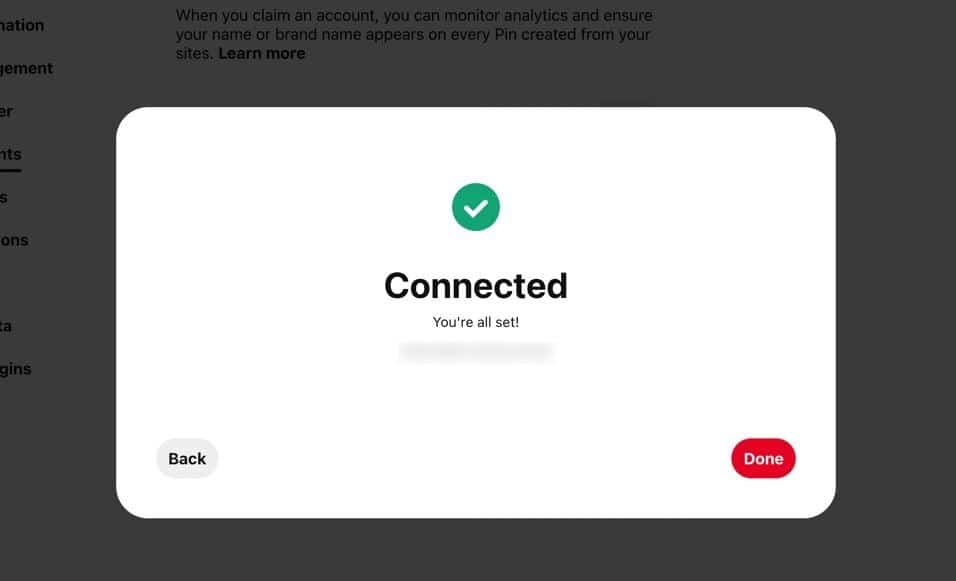
If it all worked out the way it’s supposed to, you should see a “Connected” message with a green checkmark above it. That’s all you have to do! Click the Done button.
Step 6: View Your List of Claimed Websites on Pinterest
All of the benefits we talked about earlier in this article are available now that you’ve claimed the account. You can also see the website listed under the Claimed Accounts section of WordPress.

Method 2: Use an HTML File
The next method uses an HTML file instead of an HTML tag. The difference is that you’ll upload an entire file to your website directory instead of updating a current file with a piece of code.
In fact, the file you’re uploading in this method actually contains an HTML tag like used in the previous method, so it’s the same type of verification but different in the way you add the tag to your site.
Step 1: Go to the Claimed Account Section on Pinterest
To start, go to the Down Caret (v) button and choose Settings. Pick the Claimed Accounts tab, then click the Claim button.

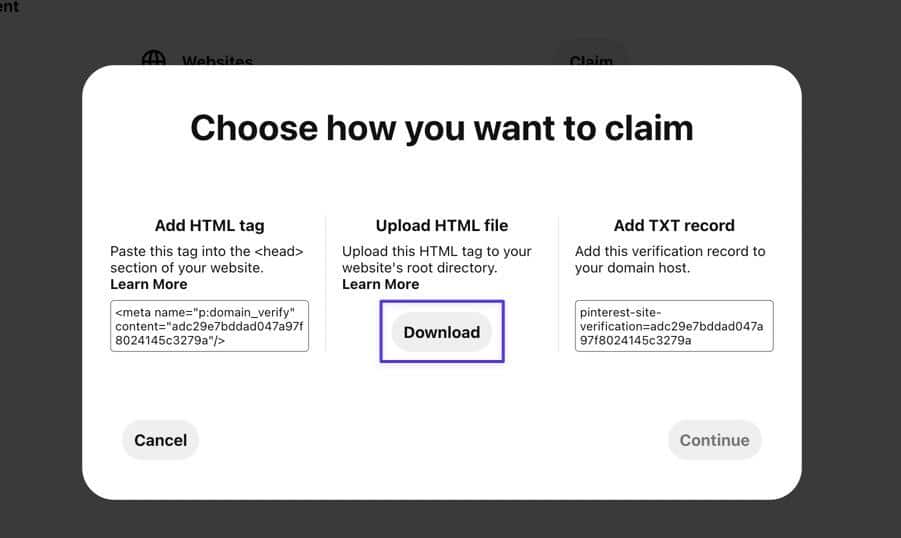
Step 2: Download the HTML File to Your Computer
Look for the second option to Upload HTML File. Click the Download button. This downloads an HTML file wherever you want to place it on your computer. Its name starts with “Pinterest” but you can adjust the name for your own reference.
Step 3: Use an FTP Client to Move the HTML File to the Site’s Server
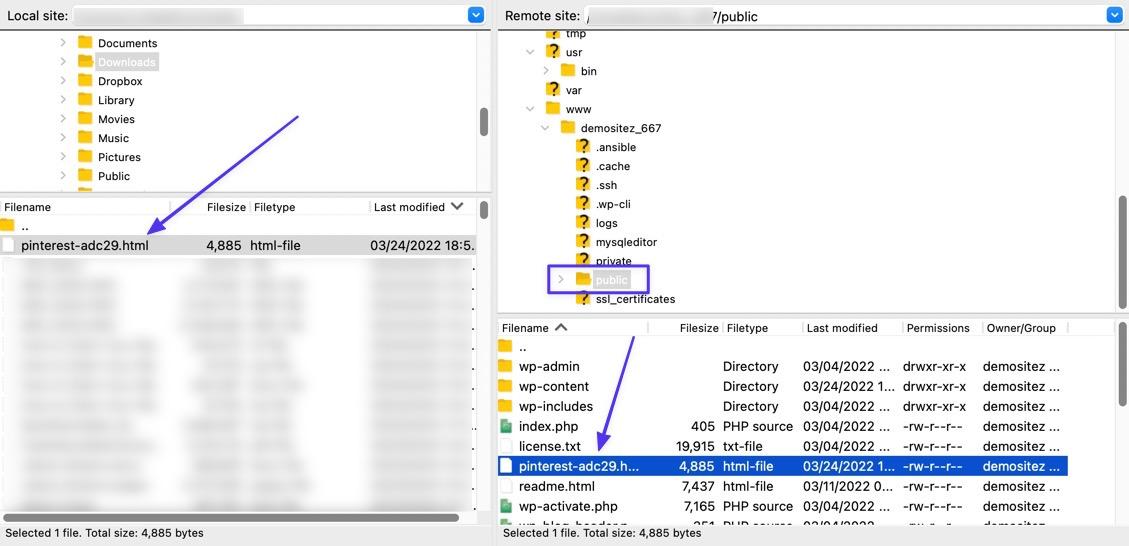
Using the FTP client of your choice (we’re using FileZilla), locate the Pinterest HTML file on your local site and drag it into the root folder of your WordPress site.
The “root” folder varies from platform to platform, but for WordPress, it’s usually the /public folder. After the transfer, the FTP client automatically saves the file to your WordPress files.
Step 4: Verify the HTML File on Pinterest
Go back to Pinterest and click on the Continue button from the previously visited popup.
To complete the verification, paste in your website’s URL. Click the Verify button.

Look for a “Connected” message and a green checkmark to confirm you’ve claimed your Pinterest site!

Method 3: Add a TXT Record to Your Domain Host
This method is unique because it doesn’t use WordPress files but rather your DNS (Domain Name Service) registrar, and you add a TXT record instead of HTML tags or files.
With this process, that means you must log in to your domain provider account (this is often your hosting provider as well, but not always).
If you’re a Kinsta user, and you’ve added a third-party domain to your account with Kinsta’s free DNS service, use the following steps to add the Pinterest TXT record to the DNS section.
Step 1: Navigate to the Claimed Accounts Section in Pinterest
Start the process by clicking on the Down Caret (v) icon in the upper-left corner. Choose Settings. Navigate to the Claimed Accounts tab, and click the Claim button.

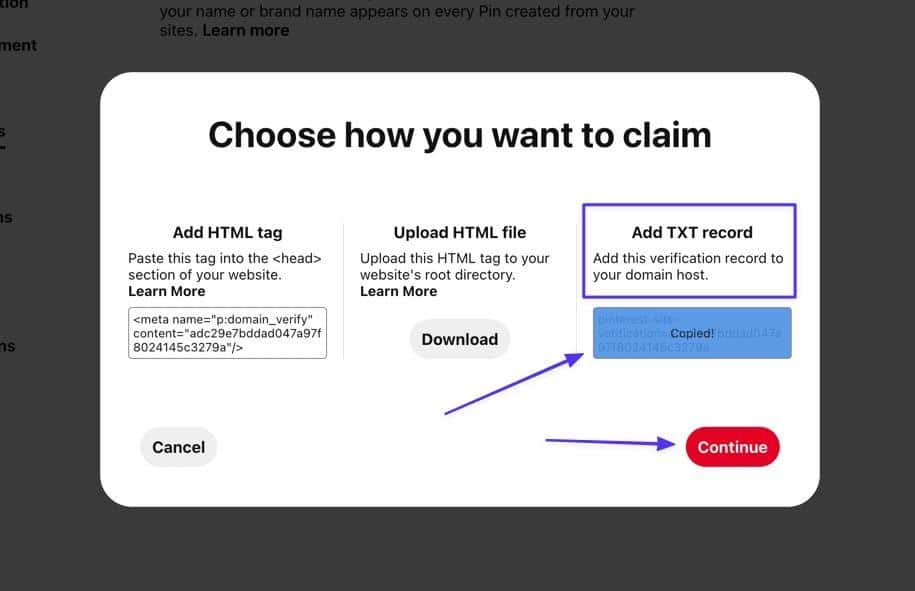
Step 2: Copy the TXT Record
Using the option named “Add TXT Record,” copy the record to your clipboard and click the Continue button.
Step 3: Log into Your DNS Provider Account
Go to your domain name provider’s dashboard and get logged into your dashboard. Add a new DNS TXT record and save it to your account.
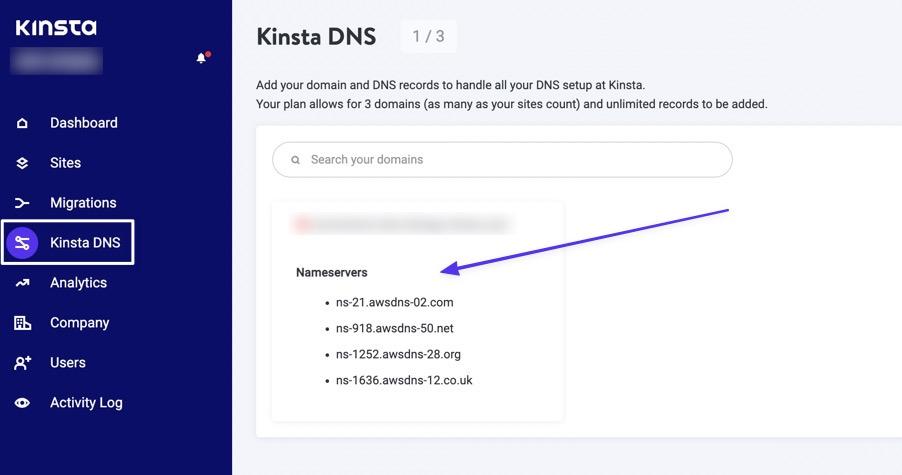
In MyKinsta, you complete this by going to Kinsta DNS and choosing the domain you want to use.
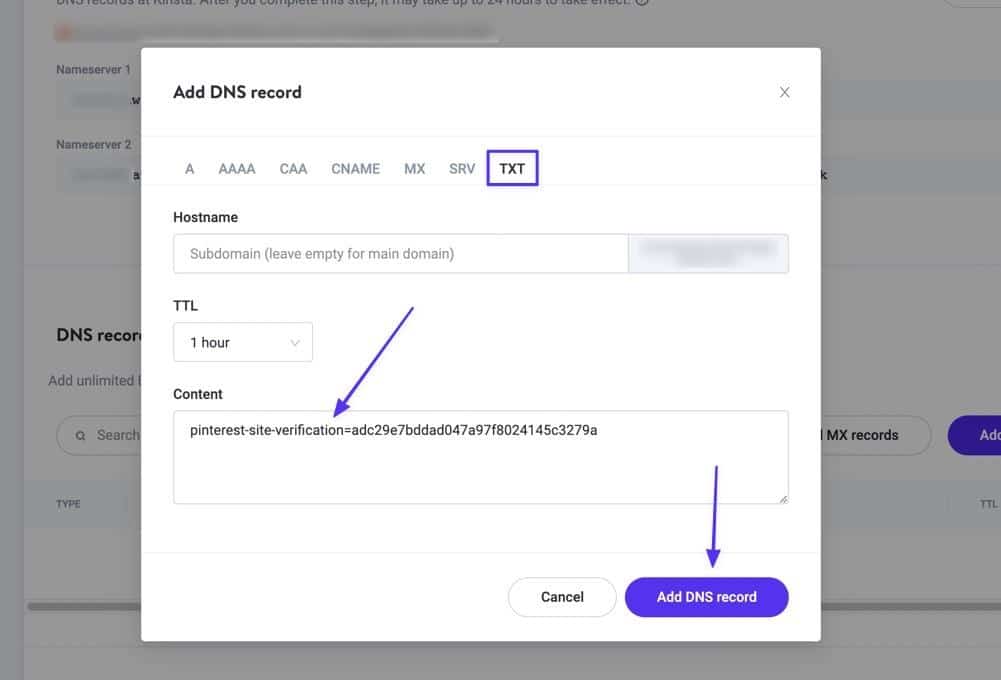
Step 4: Add a New DNS TXT Record
Scroll down to locate the DNS Records section. Click the Add A DNS Record button.
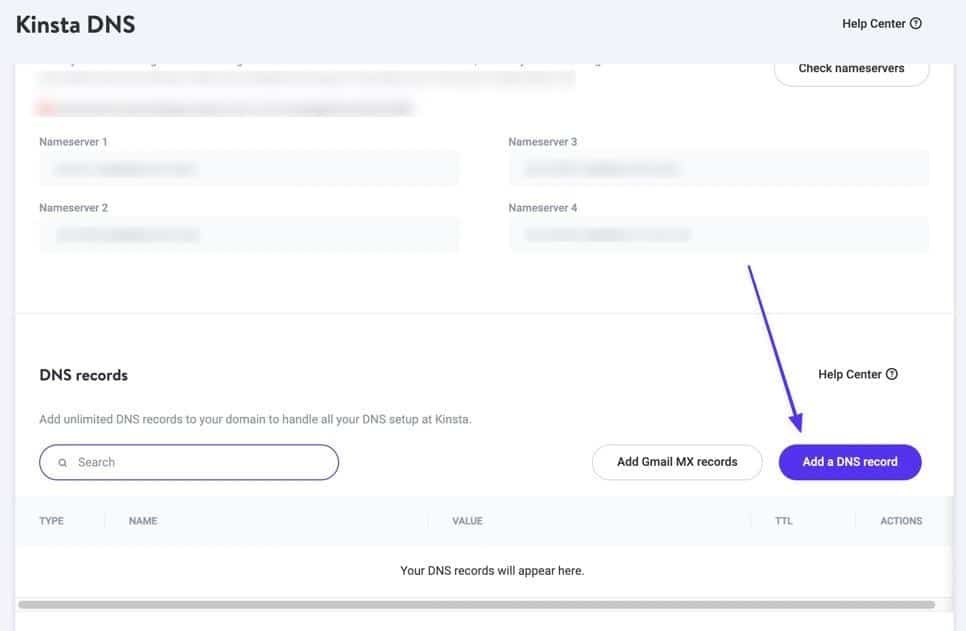
Select the TXT tab. Leave the Hostname and TTL fields as they are. Paste the Pinterest TXT element that you copied before into the Content field. After that, click the Add DNS button.
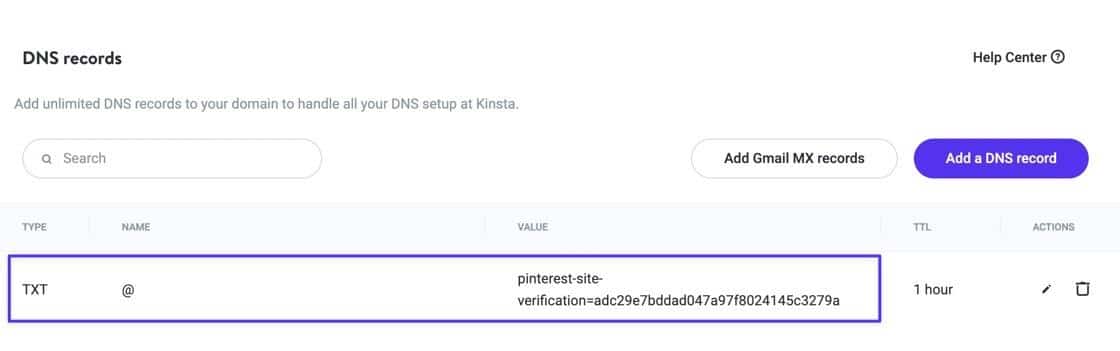
You should now see the TXT record successfully saved to your list of DNS records.
Step 5: Verify The Connection on Pinterest
Navigate back to your Pinterest dashboard and paste your site URL into the Verify field. Click the Verify button to continue.

If it’s successful, you’ll see a “Connected” message with a green checkmark. Click Done and move on to check out all of your new features as a verified Pinterest business!

Method 4: Use a Plugin
Several WordPress plugins have verification features for social sites like Pinterest. These plugins make it significantly easier for beginners who may find the prospect of handling HTML tags, files, and TXT records intimidating.
Having said that, we typically only recommend going with the plugin route if you already have them installed. The good news is that the ones in this tutorial are some of the most commonly used plugins on WordPress.
Verify Your WordPress Website on Pinterest with Yoast SEO
Yoast SEO empowers site owners with search tools to improve search engine results, and one of the ways it does that is by offering a Social Media section to verify your website with those sites and configure the appearance of shared posts/pages.
Step 1: Install Yoast and Find the Pinterest Section
First, make sure you have Yoast SEO installed and active on your website.
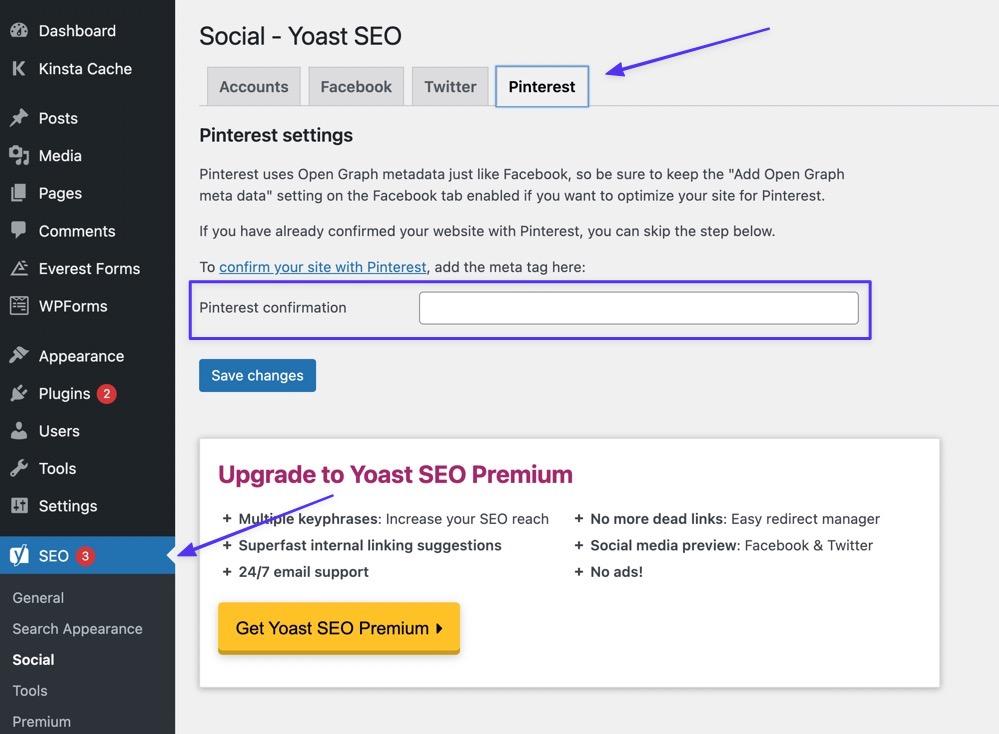
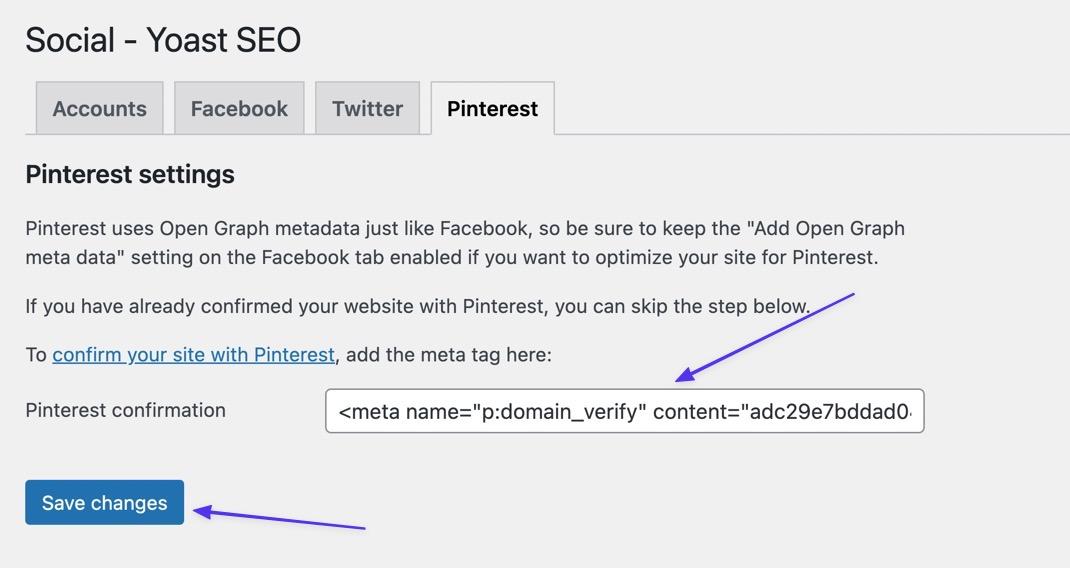
Go to SEO > Social > Pinterest. Here, you’ll find the Pinterest Settings page, which includes a field called Pinterest Confirmation.
Step 2: Grab the HTML Tag from Pinterest
Switch to Pinterest and navigate to Settings > Claimed Accounts. Click on the Claim button.

Copy the HTML tag under the headline “Add HTML Tag.” Click the Continue button to proceed.
Step 3: Paste the HTML Tag into the Yoast SEO Plugin
Switch back to WordPress and paste the HTML tag into the Pinterest Confirmation field. Click Save Changes.
Step 4: Verify That It Worked on Pinterest
Go to Pinterest and paste the main URL of your site into the Verify field. Click Verify.

Look for the “Connected” message and a green checkmark to ensure you’ve successfully claimed your website on Pinterest!

Verify Your WordPress Website for Pinterest Using Jetpack
Jetpack is an all-in-one optimization, security, speed, and backup plugin with tools for improving your SEO and social connections, and it has an area to verify your website ownership with Pinterest.
Step 1: Install Jetpack and Find the Site Verification Section
First, ensure that you’ve installed and activated Jetpack on your site.
After that, go to Jetpack > Settings > Traffic.
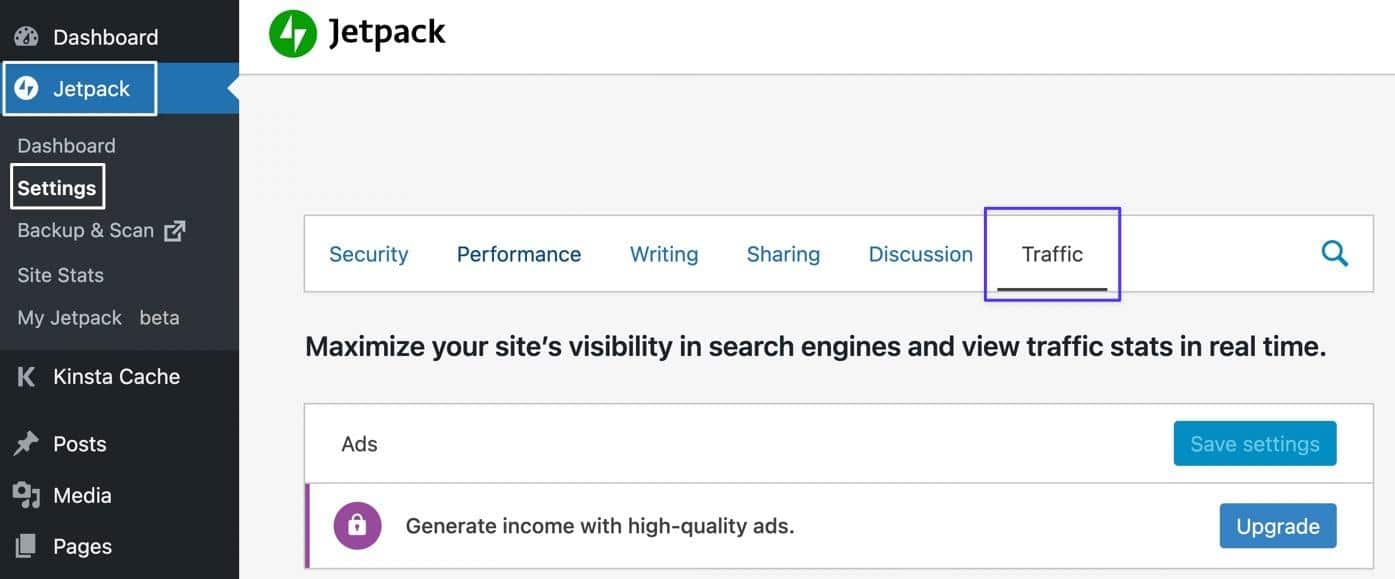
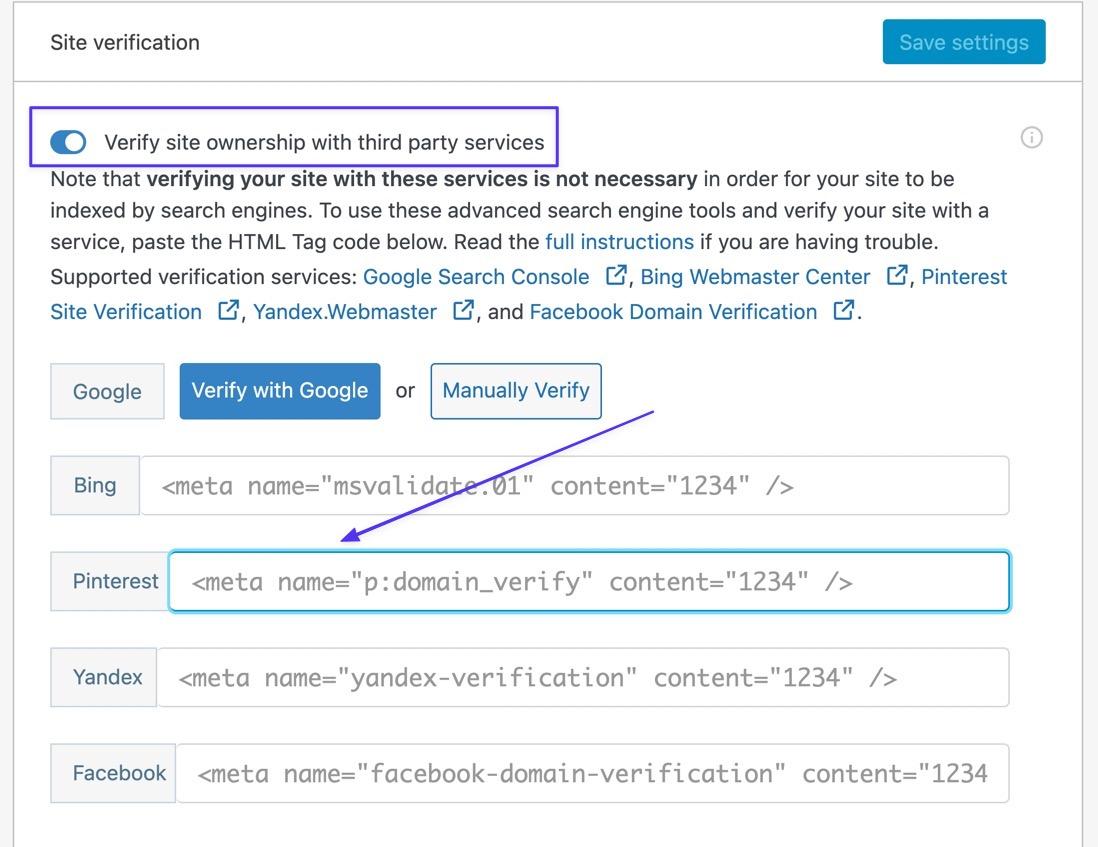
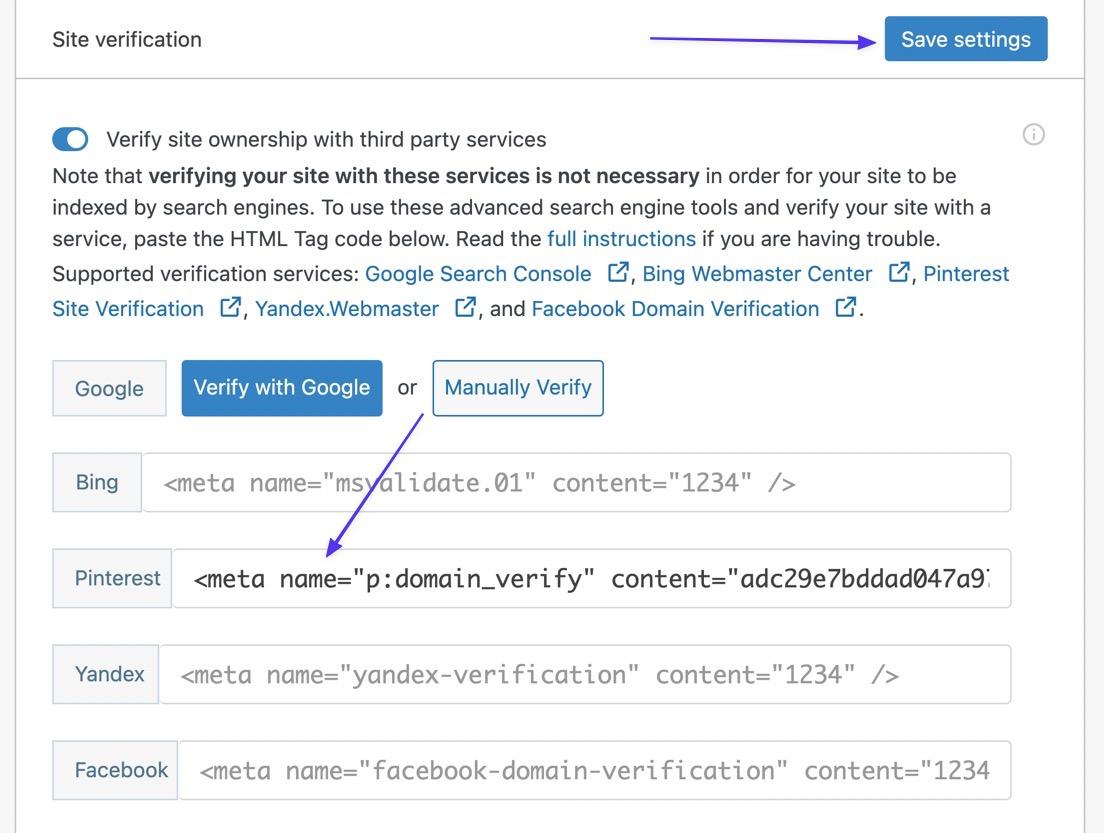
Scroll down to the Site Verification section and turn on the switch that says, “Verify site ownership with third party services.” The Pinterest field is where you’ll paste the HTML tag found in the following steps.
Step 2: Go to the Claimed Accounts Module in Pinterest
Navigate to Pinterest and go to the Down Caret (v) menu in the upper-right corner. Choose Settings > Claimed Accounts. Click on the Claim button.
Step 3: Copy the HTML Tag
Copy the code under the Add HTML Tag section. Click Continue.
Step 4: Paste the HTML Tag into Jetpack
Move back to WordPress and paste that HTML tag into the Pinterest field. Click on the Save Settings button.
Step 5: Confirm That the Process Worked on Pinterest
Back on Pinterest, paste your site URL into the field. Click Verify.
As a result, you should see “Connected” text and a green checkmark to verify that you’ve claimed your website with Pinterest!
Things To Do After Claiming Your Website on Pinterest
The final “Connected” message is usually enough to show that you’ve claimed your website on Pinterest, but there are some additional steps to absolutely ensure it all worked. And in some instances, you may have to wait for a verification email from Pinterest.
1. Check to Ensure Your Website is Actually Verified and Claimed on Pinterest
Did you see the message that you’ve successfully claimed your website on Pinterest? If not, or if you can’t remember if you’ve verified in the past, it’s easy to check your verification status on Pinterest.
Go to Settings > Claimed Accounts, and check under the Websites section. If there’s a domain listed, you’ve claimed that website with the Pinterest Business account.
2. Potentially Wait for a Verification Email
Although most of our tests ended with an immediate verification for Pinterest, that’s not always the case. In fact, we saw a “Verification in progress” message when trying to add the TXT record to our DNS.
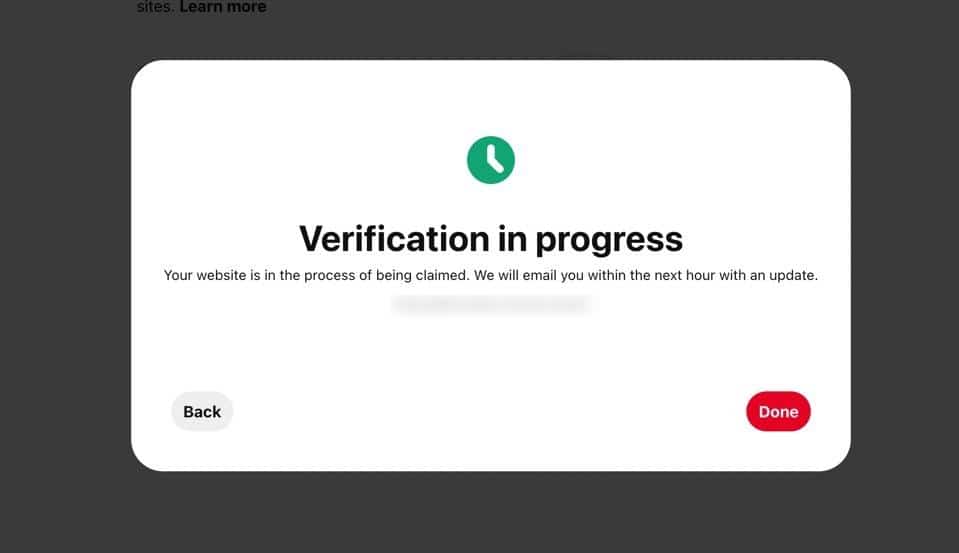
Sometimes this means you didn’t complete the verification properly (like trying to verify with your site host when name servers are pointed somewhere else), but it’s often because Pinterest simply needs a little more time to process your claim.
If you see an “In progress” message, keep an eye out for an email from Pinterest. Verifications typically happen within seconds, but you may not see the email for a few hours or even days.
Summary
To recap, our in-depth tutorial explained:
- The Benefits of Claiming Your Website on Pinterest
- How to Claim a Website on Pinterest (Using 5 Methods with Step-by-step Instructions)
- Things To Do Before You Claim Your Website
- Method 1: Update the Meta Tag on WordPress
- Method 2: Use an HTML File
- Method 3: Add a TXT Record to the Domain Host
- Method 4: Use a WordPress Plugin
- Things to Do After Claiming Your Site on Pinterest
If you have any further questions about how to claim your website on Pinterest, let us know in the comments. If you’re already verified, how do you like the added Pinterest account features?


