
Fonts can make the difference between a dull website and a beautiful one. By learning how to change font in WordPress, you can make your site look modern, professional, and branded.
But what’s the best way to use fonts in your WordPress site, and how do you choose the right fonts for your design?
In this guide, I’ll walk you through you everything you need to know about fonts in WordPress.
Fonts: The Terminology
Let’s start by looking at the terminology around fonts on the web.
- Web fonts (aka HTML fonts) are fonts hosted on a third-party website and linked to in your site.
- Locally hosted fonts are just that (hosted on your website’s servers.)
- Web-safe fonts are a limited range of fonts that are pre-installed on (almost) all computers and that you can be fairly confident all your visitors will have access to.
Let’s have a look at the options for adding fonts to your website.
How to Add Fonts to Your WordPress Site (the Options)
Before leaping into adding fonts to your site, it helps if you understand the options available to you.
Fonts are part of your site’s design, so in most cases, they will be coded via your theme – but not always. In some cases, you might decide to use a plugin to enable a wider range of fonts in your site.
Here are some of the options available to you:
- Using web fonts such as Google Fonts by installing a plugin that gives you access.
- Using web fonts by coding them into your theme and enqueuing them (not as tricky as it sounds).
- Hosting your fonts on your own website and adding those to your theme.
There are two main distinctions – whether you use web fonts, which are hosted outside your site, or whether you choose to host your font files yourself. In this guide, we’ll look at the pros and cons of each.
Let’s start by looking at web fonts: why you might choose to use them and the ways of adding them to your site.
Using Web Fonts in WordPress
Web fonts are the most popular way of adding fonts to your website because they make it easy to add a vast range of fonts.
What Are Web Fonts?
Web fonts are fonts that are hosted on a third-party provider’s website. Instead of copying the files to your own site, you link to the provider’s website and they are pulled in from there.
This means that you have access to a large range of fonts without having to use server space on your own hosting. It also means that if the font files should change over time, you don’t have to update your files and you’ll automatically have access to the new versions of the files from the provider.
Web fonts can be free or you can pay for them, usually via a subscription. Some popular providers are:
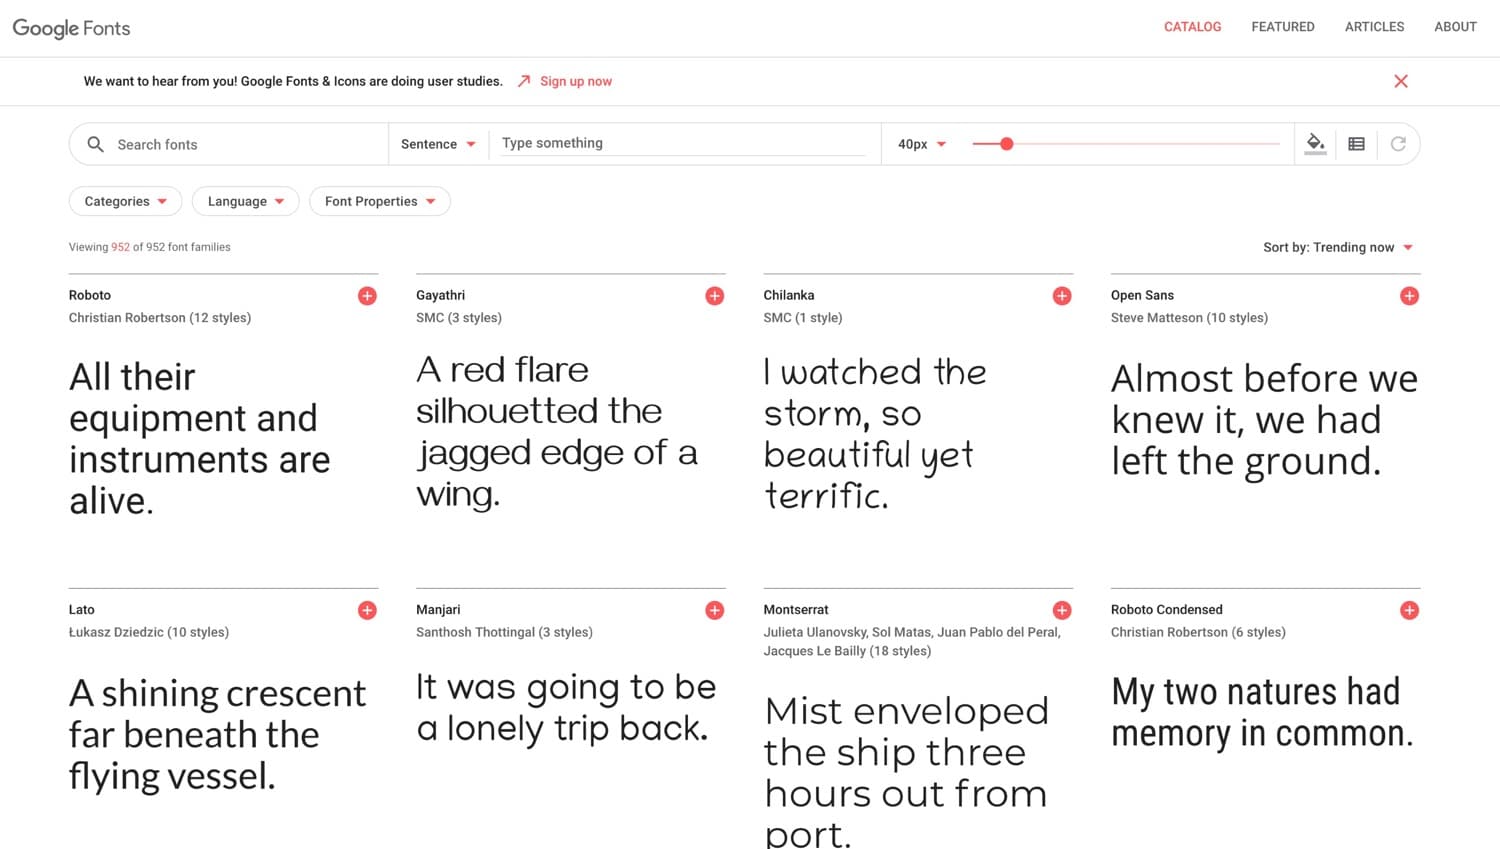
- Google Fonts. The biggest provider of free web fonts. You can also download all of their fonts to your computer, meaning if you want to create offline materials using the same fonts as your website, you can. And it’s all free.
- Adobe Edge Web Fonts. These are also free. While they’re designed to be used with Adobe products, they work well on any website.
- Fonts.com is a premium provider of fonts, which you may need to use if you have to match your web font to a font from your printed material and the font isn’t available via a free provider.
- fontfabric is a font designer providing premium fonts for use as web fonts and online. You’ll need to pay for these but will get something more individual than if you used Google fonts.
All of these providers let you serve the fonts direct from their servers by adding some code to your WordPress site or sometimes by using a plugin that means you don’t have to add any code.
Web fonts are different from web-safe fonts. You can use these as a fallback for web fonts just in case your website visitor can’t connect to the web font for some reason. I’ll show you how to do that later in this post.
Why Use Web Fonts?
So now you know what web fonts are, why would you choose to use them instead of hosting your own fonts?
Here are some of the benefits:
- Ease: adding a few lines of code or installing a plugin is quicker than downloading and uploading the font files and makes it easier to change the fonts if you decide to in the future.
- Range of fonts: there are thousands of fonts available as web fonts and the list is growing all the time.
- Updates: If the font file needs to be updated, maybe to add variable fonts (more of which shortly) or to add extra characters, your site will have access to the new version without you having to do anything.
Most websites use web fonts, with a web-safe font as a backup. And with WordPress, it’s very easy to do.
Finding the Best Web Fonts For Your Site
Having decided you’re going to use web fonts, you now have a tough decision: which fonts to use?
In the good old days when all web developers had access to were those pre-installed web-safe fonts, this was a very easy decision. Did you want to use a serif font or sans-serif? (Serif fonts have a little line or stroke at the end of a larger stroke in each character, sans-serif fonts don’t.) Having made that decision, your choices were very limited.
But now, the world is your oyster.
Here are some tips to help you choose the best font for your site:
- Look at your printed materials. Are there fonts already being used that you can find as web fonts? If not, can you find something similar?
- Look at your competitors’ websites. What kinds of fonts are they using? I don’t recommend you copy them, but there may be certain styles that convey the right sort of image to your website users.
- Think about what kind of mood you want to convey with your fonts. Some fonts look more modern, others more traditional. Some are fun, others more serious.
- Stick to fonts that are easy to read for body text, and use more interesting fonts for headlines if you want.
- Pick from the most popular Google fonts – these will be familiar to website visitors and are easy to read.
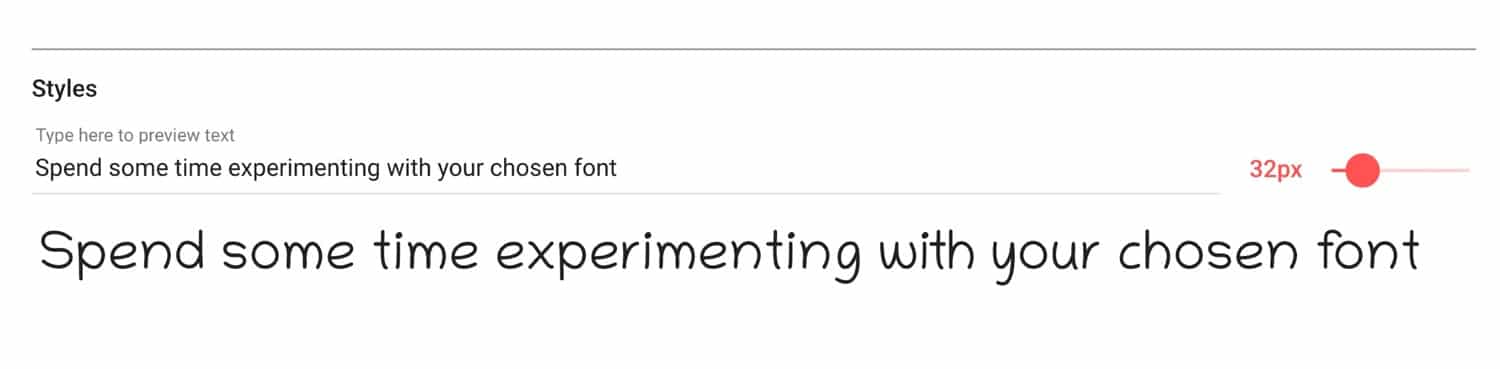
Once you’ve chosen your fonts, spend some time experimenting with them. Font providers like Google Fonts let you type in custom text to see what it looks like in your chosen font. Once you see your own text in the font, it might help you decide if that’s the right font for you.
And remember, using web fonts makes it very easy to change your fonts so you can always switch to another option while you’re developing your theme or setting your site up.
How to Add Web Fonts with a WordPress Plugin
So you’ve picked your chosen font, now it’s time to add it to your site.
If you don’t feel comfortable adding code to your theme files, you can install a plugin that will let you access Google Fonts and use whichever font you want on your site.
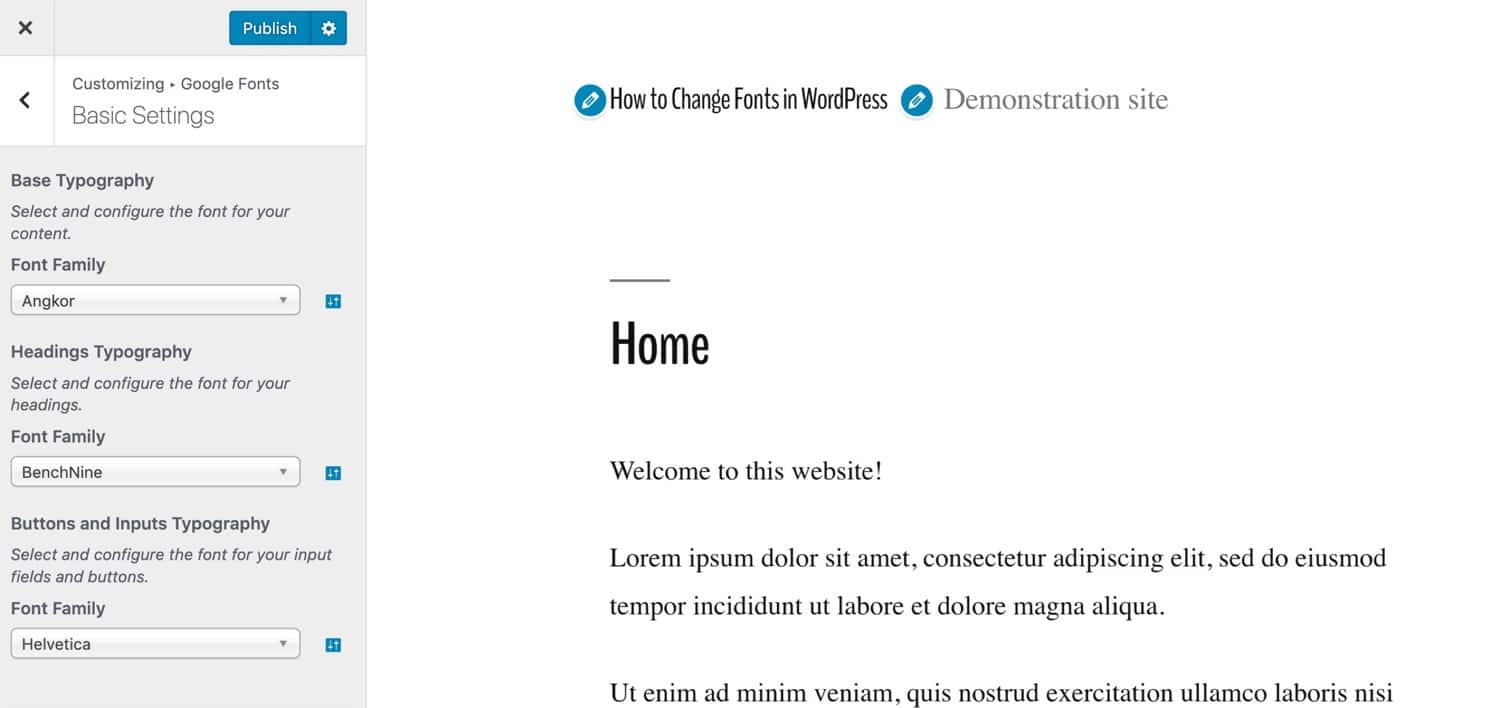
The Google Fonts Typography plugin gives you access to the entire library of Google fonts and lets you review them via the WordPress Customizer.
Install the plugin on your site just as you would any other plugin, and then activate it.
Go to Appearance > Customize to access the Customizer. You’ll see a section for Google Fonts.

Click on that link to access the settings for your fonts. Configure them as follows:
Basic Settings: configure the default font for your body text and your headings, as well as any buttons. In the screenshot below you can see that I’ve added an easy-to-read serif font for the body and a more distinctive font for headings.
Advanced Settings: Here you can configure branding (site title and description), navigation (your menu), content and headings in more detail, your sidebar and footer. You can also load fonts without assigning them to anything, which means you can add them to any custom CSS in the Customizer.
Font Loading: If there are any font weights you don’t need (i.e. bold, italics, that kind of thing), you can uncheck them here so they don’t slow your site down needlessly.
Debugging: Use this to force any fonts to display if they’re not working as they should.
Spend some time working with these settings and testing them in the Customizer to ensure they work the way you want. Then when you’re happy with your settings, click the Publish button. Don’t leave the Customizer without clicking Publish or you will lose your changes.
Editing Font Colors
The free version of the plugin doesn’t let you edit the colors of your fonts. To do that, you’ll have to either buy the premium version or use the Additional CSS option in the Customizer.
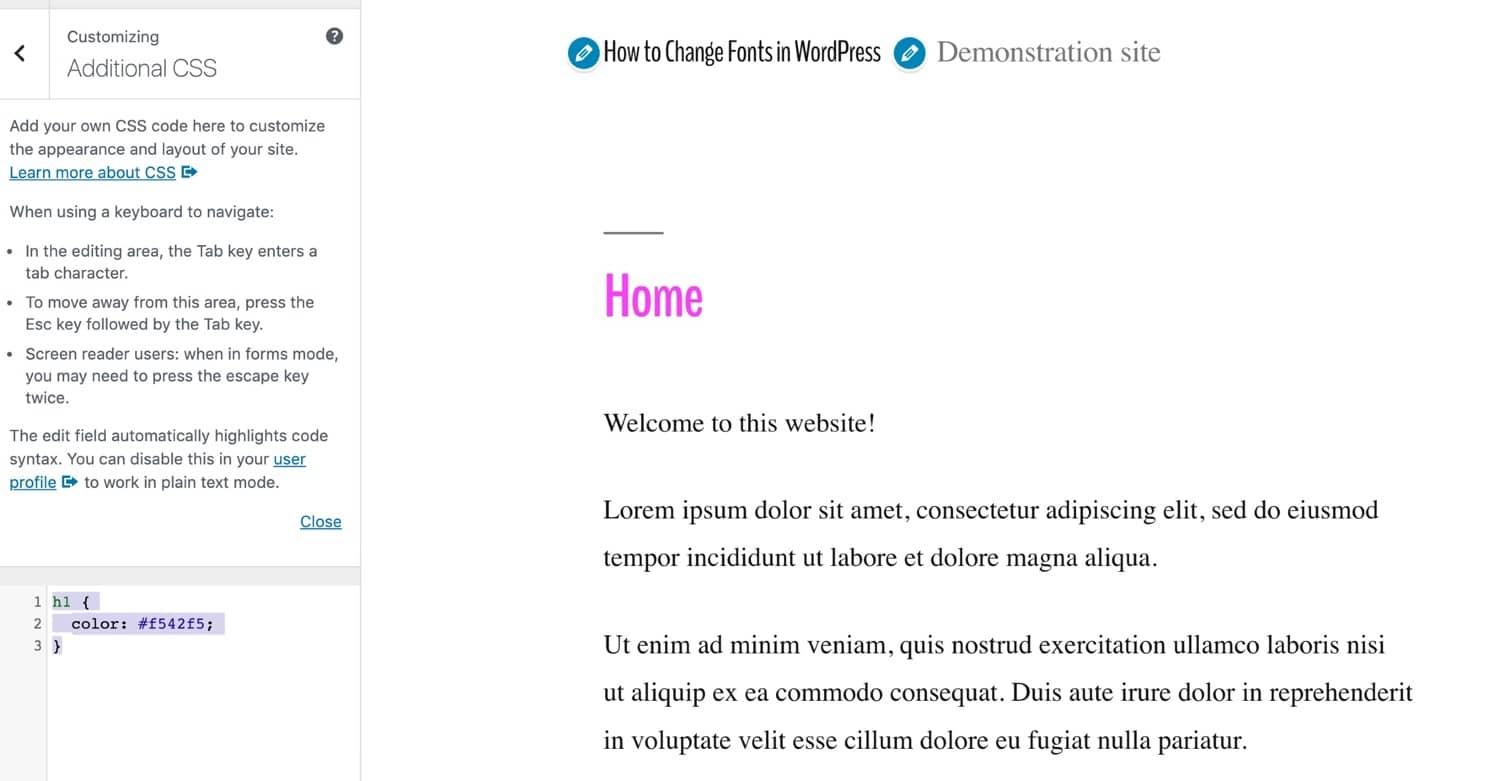
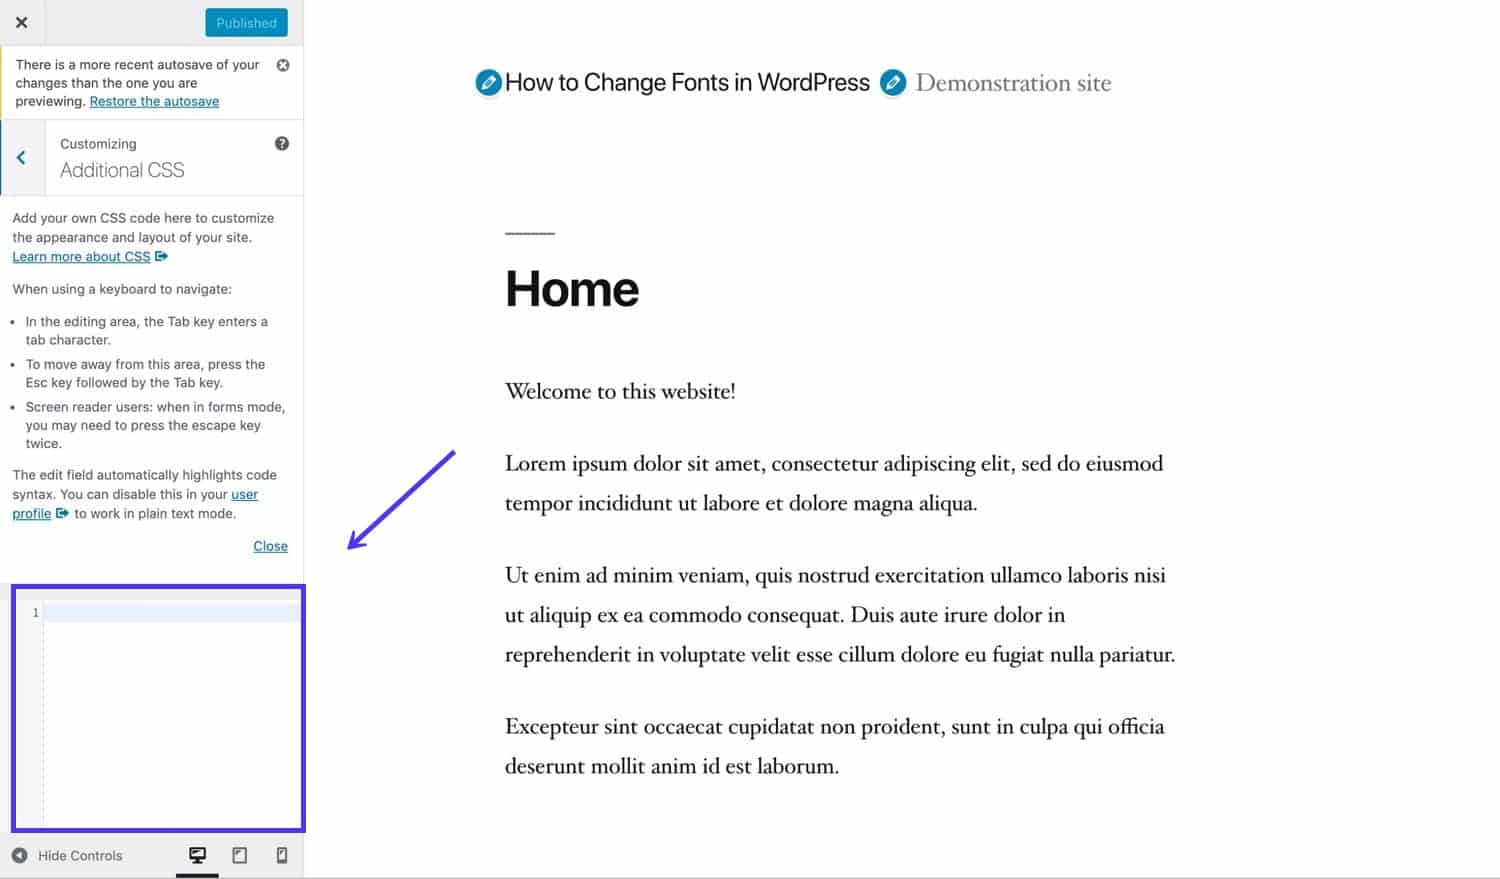
Go back to the home screen of the Customizer and click the Additional CSS tab. You’ll be presented with an empty text area where you can add your own CSS.
To find the element you need to style, select it and use the code inspector in your browser to find out what color styling it already has.
Below I’m using Google Chrome and I’ve targeted an h1 element.
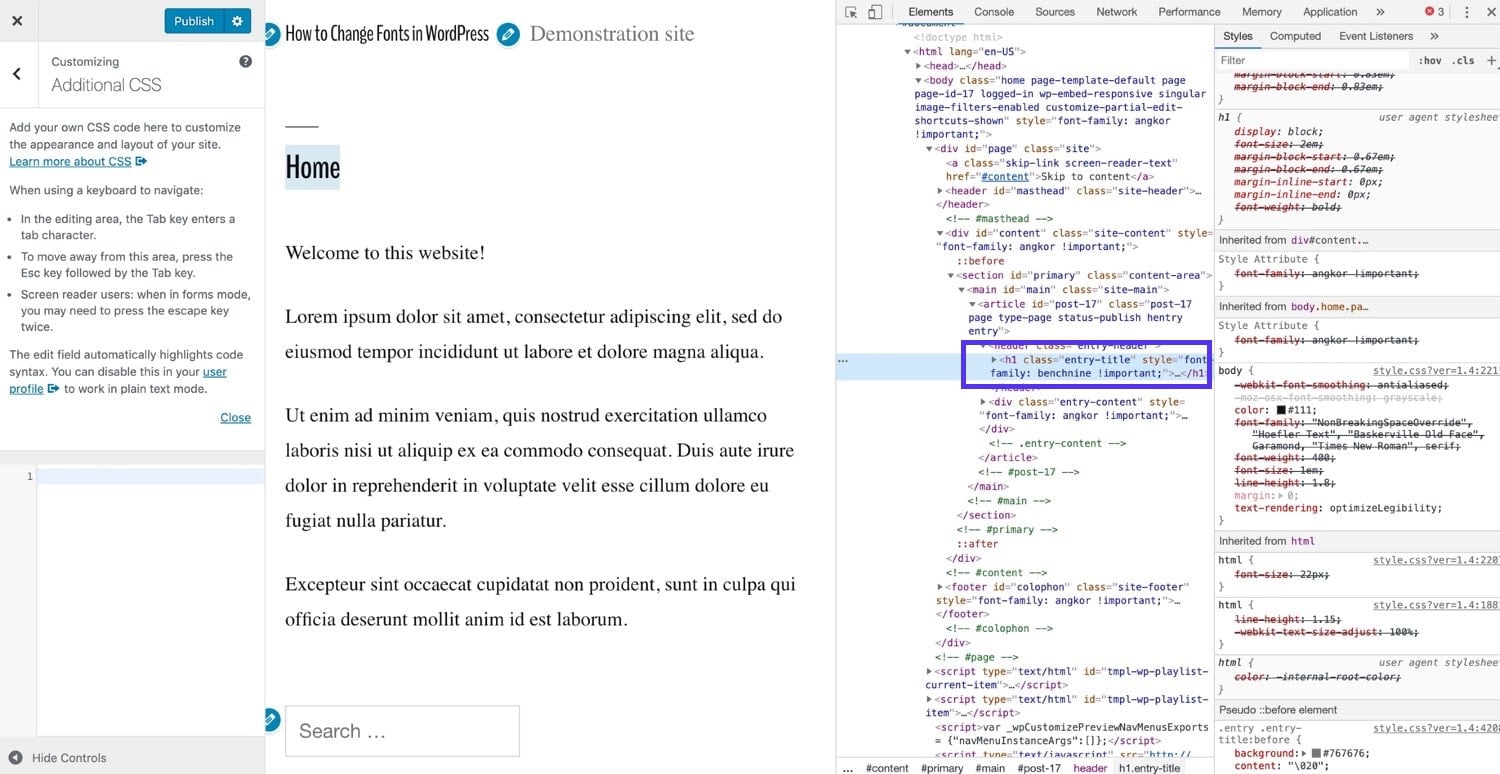
In my WordPress theme, it’s inherited its color from the body element. I want to add something more specific. In the text area for your CSS, type in the CSS for your element and the color you want to use. Mine looks like this:
h1 {
 color: #f542f5;
}
That gives me a bright pink h1 element:
You can repeat this with any text elements you want to add color to, and also to any you want to add custom fonts too that weren’t included in the options in the other screens. If you want to know what CSS to use for fonts, read on to the section of this post on amending your fonts via CSS.
How to Add Web Fonts Manually
If you don’t want to add an extra plugin to your site and have access to the code for your theme, you can install and use web fonts by adding some code to your functions file and your stylesheet.
If your site is using a bespoke theme that you can edit, then you can edit the functions file and stylesheet from your theme. But if you’re using a third party theme that you bought or got from the WordPress theme directory, then you’ll need to create a child theme. You’ll then need to give it two files: functions.php and style.css.
Let’s work through the process of manually adding web fonts to your theme. I’m going to work with Google Fonts for this example, as that’s the most commonly used and it’s free.
Picking a Font and Grabbing the Link
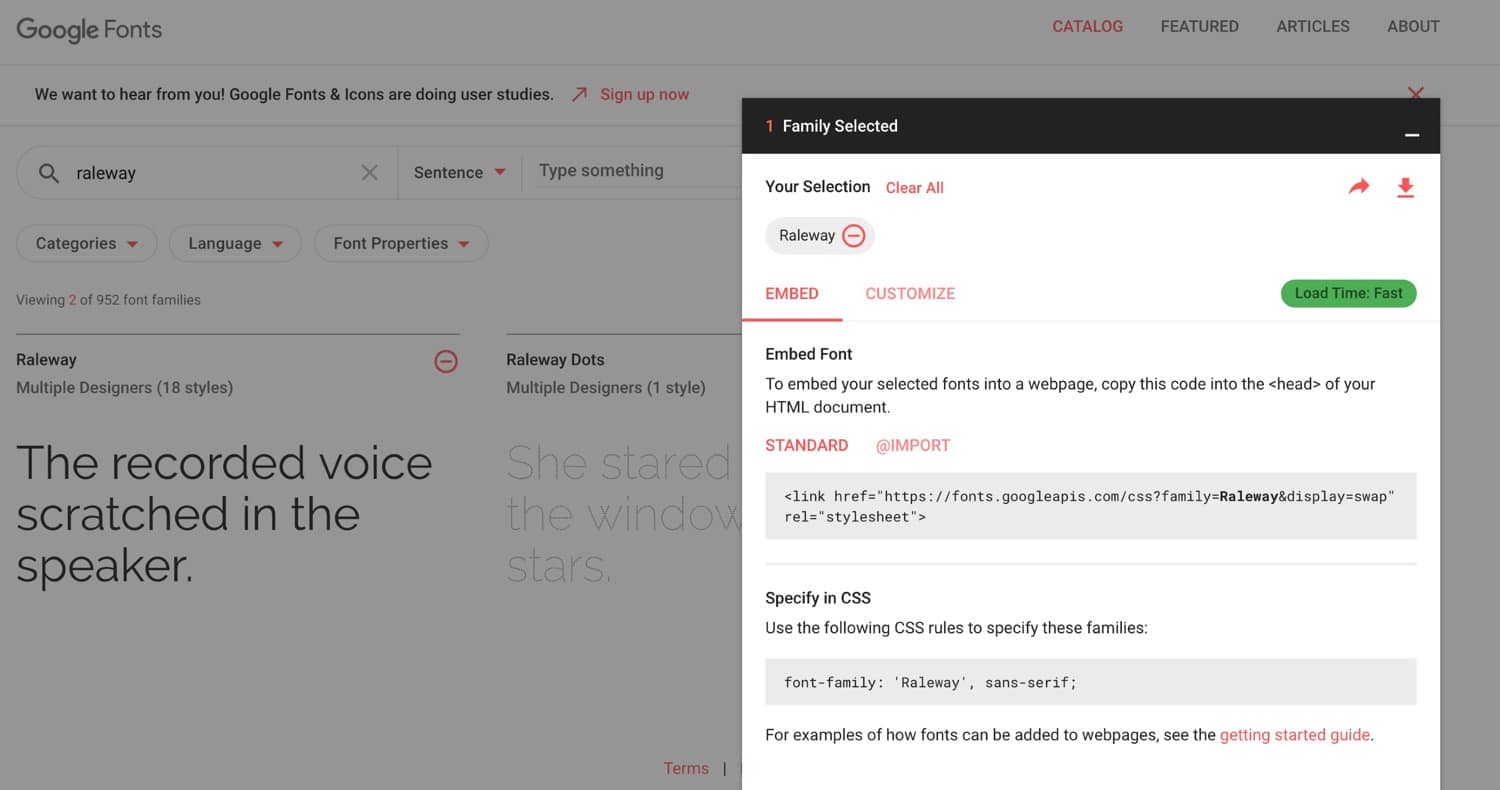
Start by choosing your font from Google Fonts. Add it to your library by clicking the plus icon next to it.
Click on the tab at the bottom of the screen for your library and you’ll see some code for you to add to your site. If you want to add extra font weights and styles, click the Customize tab and select the ones you want. Then go back to the Embed tab.
Don’t copy the code exactly: you’ll be using it, but instead of calling the font in the <head> section of your site’s header, you’ll be enqueuing the fonts. This is the correct way to do it in WordPress.
Instead, from the Embed font section, copy just the link to the font.
So, in my case, Google Fonts is giving me this code:
<link href="https://fonts.googleapis.com/css?family=Raleway" rel="stylesheet">I just need to copy this bit:
https://fonts.googleapis.com/css?family=RalewayEnqueuing the Font(s)
Open your theme’s functions file and add the following, replacing the link for my font with the link Google has given you for yours:
function kinsta_add_google_fonts() {
 wp_register_style( 'googleFonts', 'https://fonts.googleapis.com/css?family=Raleway');
 wp_enqueue_style( 'googleFonts');
}
add_action( 'wp_enqueue_scripts', 'kinsta_add_google_fonts' );
This enqueues the style from the Google Fonts servers. If you need to add more fonts to it in future, you can either add a new line to your function or add it into the same line, like so:
function kinsta_add_google_fonts() {
 wp_register_style( 'googleFonts', 'https://fonts.googleapis.com/css?family=Merriweather|Raleway');
 wp_enqueue_style( 'googleFonts');
}
add_action( 'wp_enqueue_scripts', 'kinsta_add_google_fonts' );
This will enqueue both the Merriweather and Raleway fonts.
Adding the Font(s) to Your Stylesheet
This won’t make the font work in your site yet: you still need to add it to your theme’s stylesheet.
Open the style.css file in your theme and add the code to style individual elements with your web fonts. Make sure you add it after any existing CSS for fonts, or it may get overridden by that.
Which elements you style will be up to you, but it’s common to use a legible font for the body element and something more fancy for the headings.
body {
 font-family: 'Raleway', sans-serif;
}

h1, h2, h3 {
 font-family: 'Merriweather', serif;
}
In the case above, everything on the page will use the Raleway font, except the h1, h2 and h3 elements, which will use Merriweather.
Now, save your stylesheet and check your site to make sure it all works as you expect. If the new fonts aren’t showing, try clearing your browser cache and checking that the fonts aren’t being overridden by any styling for fonts lower down in the stylesheet. This is why it’s a good idea to either add your new styling at the bottom of the stylesheet or to replace the existing font styling with your new styling (even better).
Adding a Backup Font
There may be occasions when someone visits your site and can’t access the web font files for some reason. Maybe they’re on a poor connection or using an old device that won’t render web fonts. Or maybe your web font provider is having technical issues.
For this reason, it’s a good idea to have a backup in place.
The code you’re given by Google fonts already has a backup of simply specifying serifor sans-serif, but we can go a step further than that.
Use one of the web-ready fonts that’ll already be installed on your visitor’s machine, and then include the second fallback of just serifor sans-serif, in case they’re using a mobile device that doesn’t even have the web-ready fonts.
Go back to your stylesheet and edit your CSS so it reads something like this:
body {
 font-family: 'Raleway', Helvetica, sans-serif;
}

h1, h2, h3 {
 font-family: 'Merriweather', Georgia, serif;
}
This means that people visiting your site will see your web fonts if all is well; but if it isn’t, they’ll see Helvetica or Georgia, or failing that, they’ll see whatever serif and sans-serif fonts their browser is able to load.
Hosting Your Own Fonts in WordPress
Some developers prefer not to use web fonts but instead to host fonts on their own servers and you might be one of them.
This could be for one or more of a number of reasons, including security, performance or budget.
If you’re concerned about performance, you can optimize the performance of your web fonts in a number of ways, which are covered later in this post. But if you’ve decided to go down the local route, you’ll need to know how to do it.
Why Host Your Own Fonts?
Using web fonts is often easier and can give you more flexibility as well as taking up less space on your server. But that doesn’t mean there aren’t occasions when locally hosting fonts might not be more appropriate.
Reasons you might want to host fonts locally include:
You might find that you can get around some of these issues
- You might prefer not to pull in resources from third-party providers for security reasons, knowing that your own site’s security is controlled by you.
- You might find that using a third-party service impacts on your site’s performance.
- You might have bought a font file and want to use that. Make sure your license includes website use as well as use in printed materials.
- Your site might be hosted locally, for example on an intranet, and users won’t have access to web fonts when they’re using it.
Where to Find Fonts You Can Host Locally
Many web fonts can also be downloaded for use as locally hosted fonts, but you’ll have to check that this is permitted by the license. In the case of Google Fonts, it is allowed.
You’ll also find that there are fonts not available as web fonts that you can download and host yourself. Any font file that you can download to your computer can also be uploaded to your website and stored there. If you need to use a font that isn’t available as a web font to tie in with your branding, this will be the solution but make sure your license allows it.
How to Add Locally Hosted Fonts to Your WordPress Site
So you know you want to host your fonts locally, how do you go about setting it up?
The process is different from using web fonts. You have to upload the file(s) to your site and you link to them in your stylesheet without having to enqueue them in your functions file.
Download and Convert the Fonts
Start by downloading the fonts you want to use. In Google Fonts, you can do this by clicking on the download icon when viewing the font in your library.
Unzip the font file on your computer and delete any font weights you don’t need to use on your site: there’s no point uploading files you won’t be using.
To use on your website, the files will need to be in the .woff format. If they aren’t (they won’t be if you got them from Google fonts), you can use a service like Convertio to convert them.
Upload the Fonts to Your Theme
Now upload the font file(s) to your theme, in wp-content/themes/themename, where themename is the folder for your theme. It’s a good idea to put any font files in their own folder in the theme, for example, a fonts folder.
If you’re working with a third-party theme, create a child theme for your font files and your stylesheet.
Once you’ve done that, you’ll need to add the font to your stylesheet.
Add the Fonts(s) in CSS
Open your theme’s stylesheet.
Add code like this, replacing the fonts I’ve used with your own:
@font-face {
 font-family: ‘Raleway';
 src: url( “fonts/Raleway-Medium.ttf”) format(‘woff’); /* medium */
 font-weight: normal;
 font-style: normal;
}

@font-face {
 font-family: ‘Raleway';
 src: url( “fonts/Raleway-Bold.ttf”) format(‘woff’); /* medium */
 font-weight: bold;
 font-style: normal;
}

@font-face {
 font-family: ‘Merriweather';
 src: url( “fonts/Merriweather.ttf”) format(‘woff’); /* medium */
 font-weight: normal;
 font-style: normal;
}
Add any more that you need to. Note that if you want to use the bold, italics, etc. variations of your font, you need to declare each one using @fontface and then specify the weight or style for each, as I’ve done above with Raleway for bold and normal weights.
Now add the styling for your elements, as you would when using web fonts:
body {
 font-family: 'Raleway', Helvetica, sans-serif;
 src: url( “/fonts/Raleway-Medium.ttf” );
}

h1, h2, h3 {
 font-family: 'Merriweather', Georgia, serif;
}
Your locally hosted fonts will now work with your theme.
How to Change Fonts in WordPress
Now you know how to install fonts in your WordPress site in one of two ways. How about editing them? What about changing them?
You can edit your fonts in one of three ways: via the Customizer, in the post or page editing screen, or using CSS.
Let’s look at each of those options for changing the font style, color, and size.
How to Change Font Styles in WordPress
Let’s see how we can do that both if you’re using the Block Editor or the Classic Editor.
Changing Font Styles in Block Editor (Gutenberg)
If you’re using a recent version of WordPress with the Gutenberg editor, you can change the style of your text when editing it in your post or page.
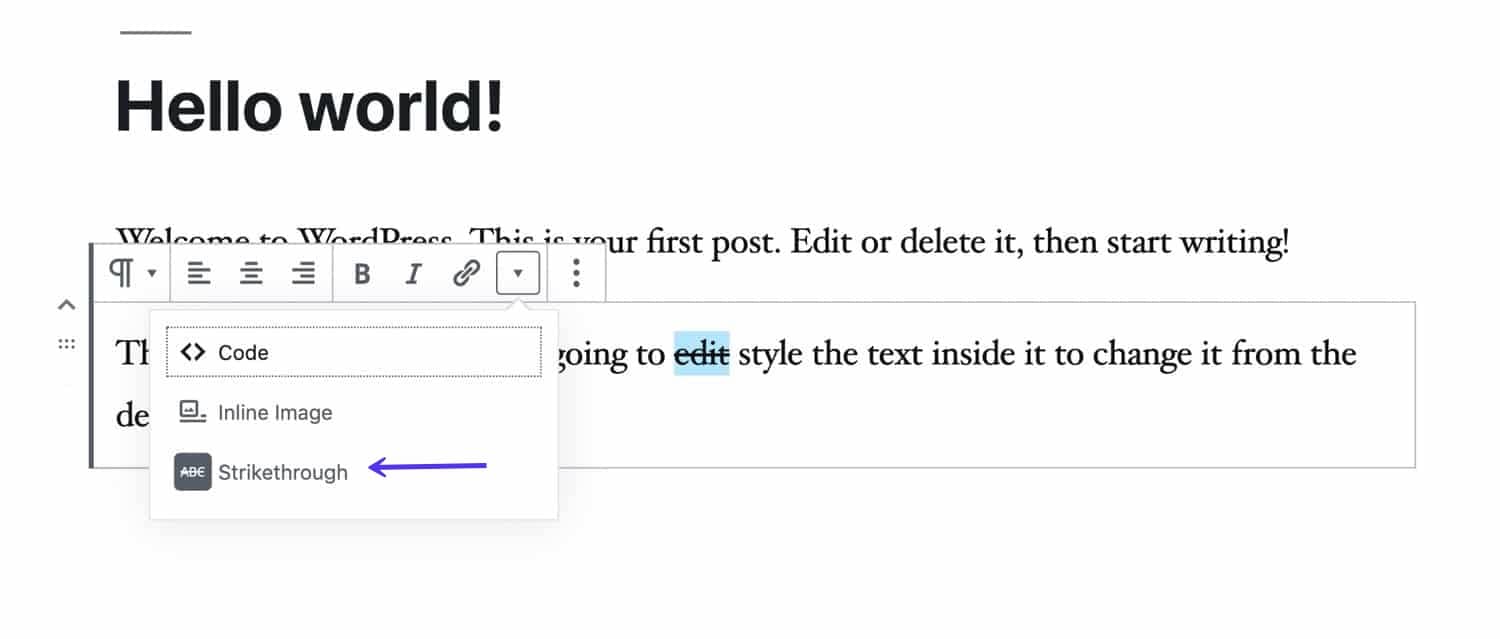
Select the block you want to edit and a styling menu will appear above it.

Select the text you want to edit and then click on the icons to make it bold or italicized. If you click the arrow next to those, you’ll see that you can also select strikethrough.
Changing Font Styles in the Classic Editor
If you’re running an older version of WordPress or you have the Classic Editor plugin installed, you can also edit font styles. (If you don’t want the Gutenberg editor, it’s better to update WordPress and disable Gutenberg.)
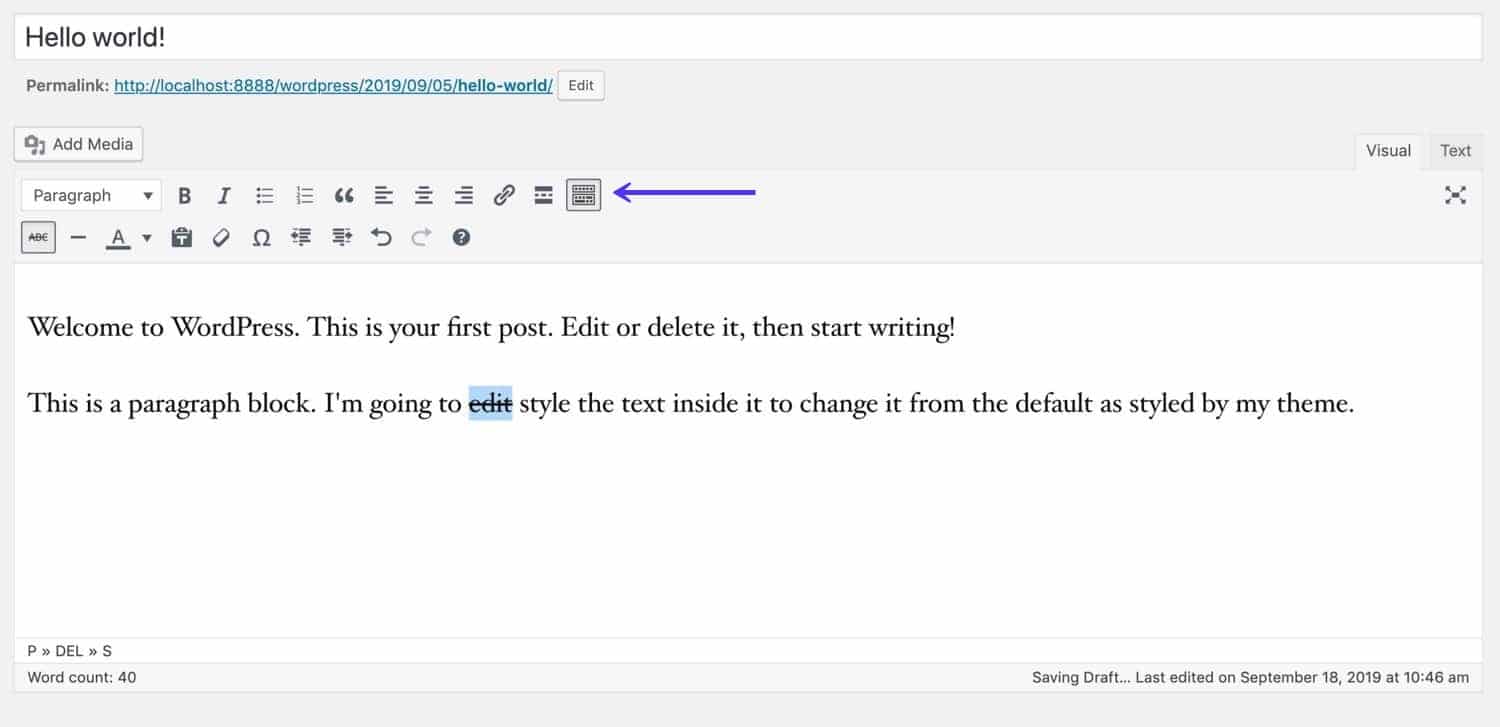
The Classic Editor includes a toolbar above the main editing pane where you can change the styles of your text. If you click on the Toolbar Toggle icon to its right, you can access more options, including strikethrough.
Changing Font Styles in the Customizer
If you want to change the font style for a specific element, you can do this by adding manual CSS to the Customizer.
Open the Customizer and click on Additional CSS. This will open a screen where you can type in CSS.
Now you can type in the CSS for your fonts in the box. So if you wanted to change all h1 and h2 elements to italics, you would add this CSS:
h1, h2 {
 font-style: italics;
}
Changing Font Styles in Your Stylesheet
If you’re comfortable adding code to your stylesheet, this is a better way to do it.
If you’re using a third-party theme, create a child theme for your own styling otherwise any changes you make will be lost when you update the theme. You’ll have to create a stylesheet in the child theme to tell WordPress that it’s a child theme: that’s where you put your new font styling.
If you’re using your own theme, you can edit and amend the CSS in your own stylesheet. The file is style.css and you’ll find it in your theme folder in wp-content/themes.
Add any font styling at the end of your stylesheet so it isn’t canceled out by anything already there. Or even better, remove and overwrite any existing font styling, unless you want to retain it.
Change the weight of an element with font-weight:
span.featured {
 font-weight = bold;
}
Change the style of an element with font-style:
span.featured {
 font-style = italic;
}
Change the alignment with text-alignment:
span.featured {
 text-alignment: center;
}
How to Change Font Colors in WordPress
Another change you might want to make is to change the color of certain text in your site. Beware of going overboard with this: your theme has been designed with colors that work well together and if you add too many colors, it could look garish and unprofessional.
Changing Font Colors in Gutenberg
Gutenberg text blocks let you edit text color and background. To do this, open the block you want to amend and click on the Color Settings tab in the Block section on the right of the screen.
From here you can edit the background color and the text color for text blocks.
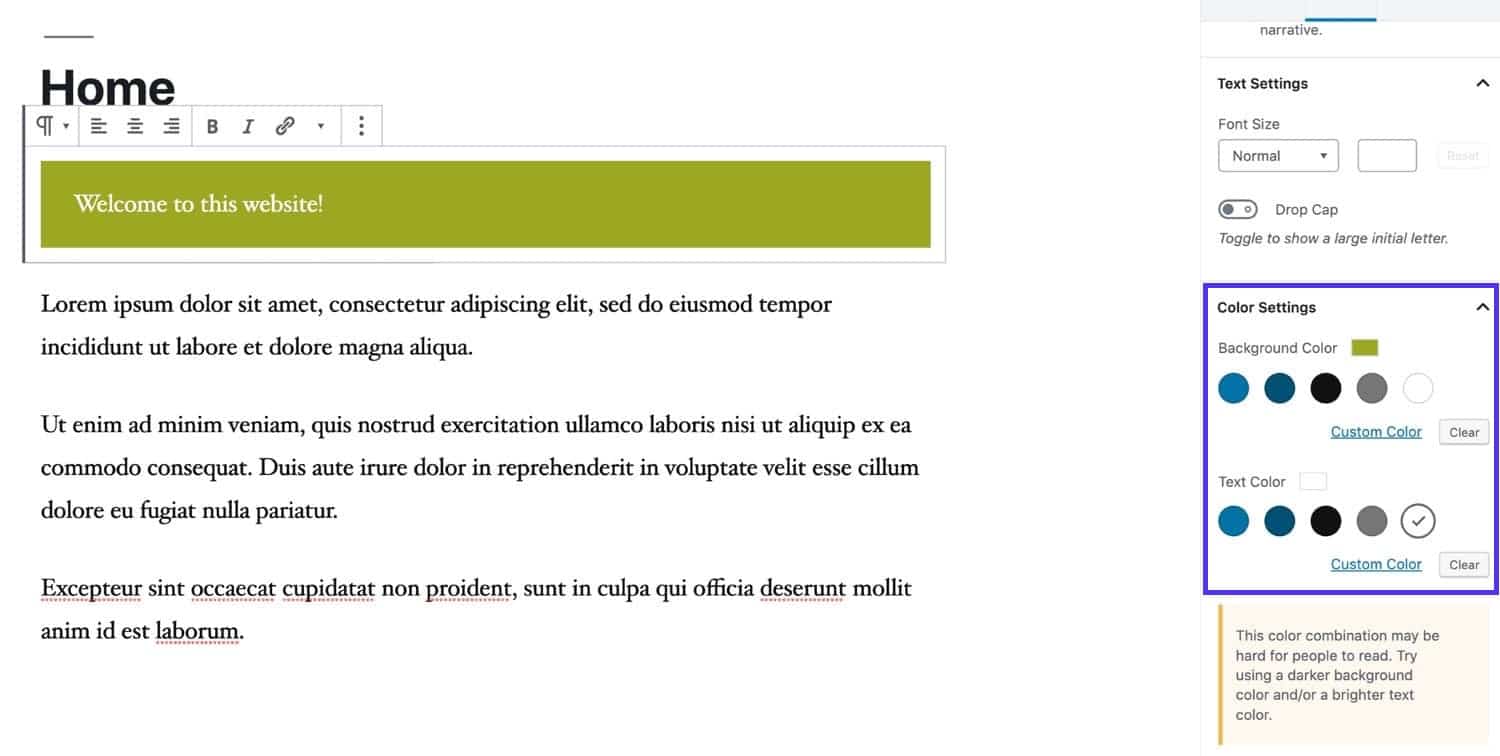
Note that WordPress will warn you if the combination of colors you use will be bad for accessibility, such as in the example I’ve used above. Avoid the temptation to go overboard with your colors – after all you chose your theme because its color design was appropriate for your site, and adding lots more colors could make it look garish.
If you click the Advanced tab below the Color Settings tab, you can also add a class to that block, which you can then style in the Customizer or your stylesheet. So for example if you added a class of .featuredto your block, you could then style it using that class.
Changing Font Colors in the Classic Editor
The classic editor’s toolbar lets you change the color of whatever text you select. So you can select an individual word and change its color. Below I’ve made a sentence red.
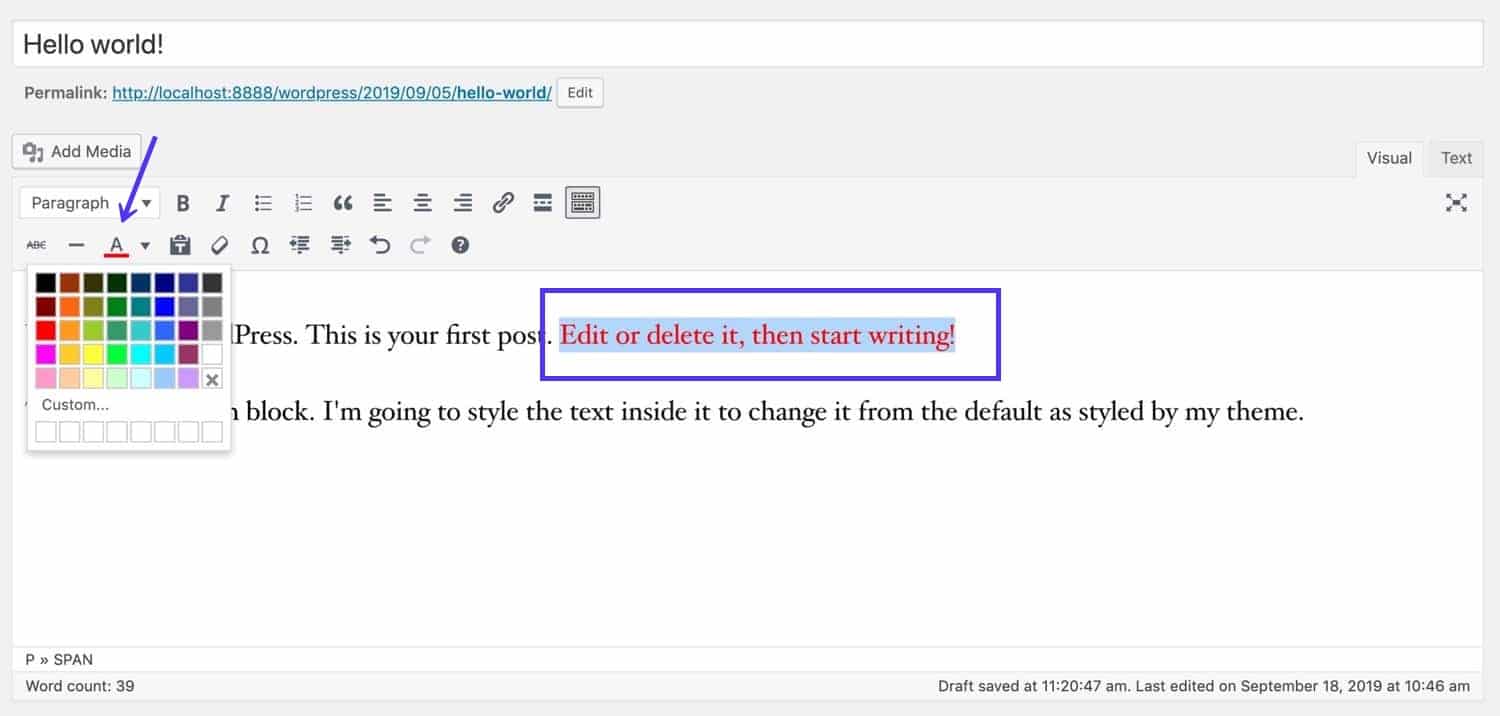
While this does, in theory, give you plenty of flexibility, beware overusing it. If you start adding lots more colors to your text it could result in a site that’s difficult to read and bad for accessibility.
Changing Font Colors in the Customizer
If your theme includes options to change the website color scheme, this is the best place to do it.
For example, in the site below I’m using a theme that lets me choose a new color scheme for the entire theme. This helps ensure the new colors work together well and are coherent.
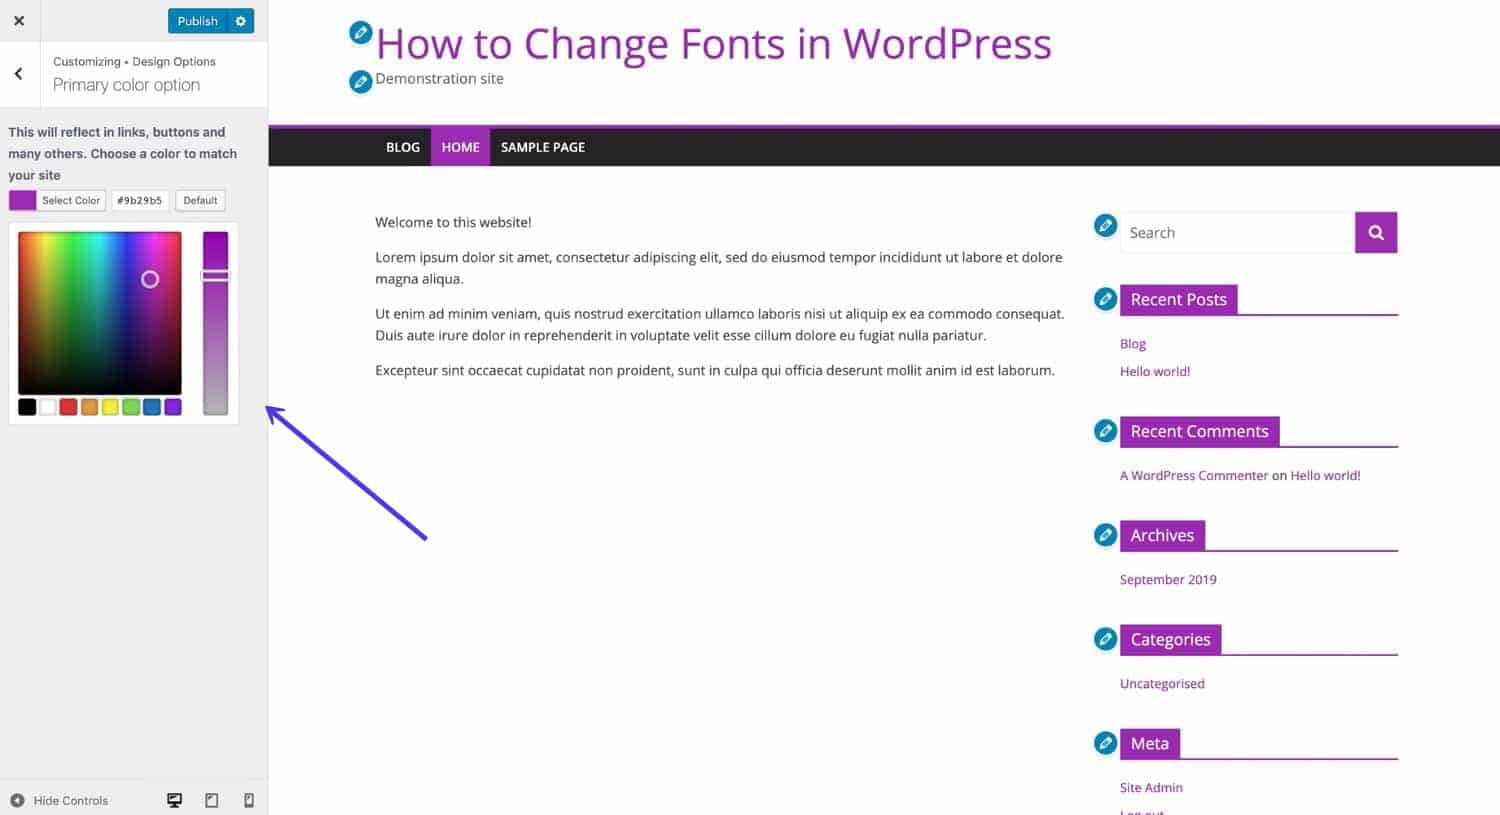
The options for this will vary according to your theme – some themes let you target headings, links and other elements and change their color.
If you want to target specific elements to change their color but this isn’t an option with your theme, you can add CSS in the Customizer to do this.
Select Customize > Additional CSS, and type your CSS in the text box.
For example, if you want to change the color of your h1headings, you type this:
h1 {
 color: #564534;
}
If that doesn’t work, you may need to add more specific CSS. In my theme, the color for the site heading link is coded using the #site-titleID, so I need to add this CSS:
#site-title a {
 color: #564534;
}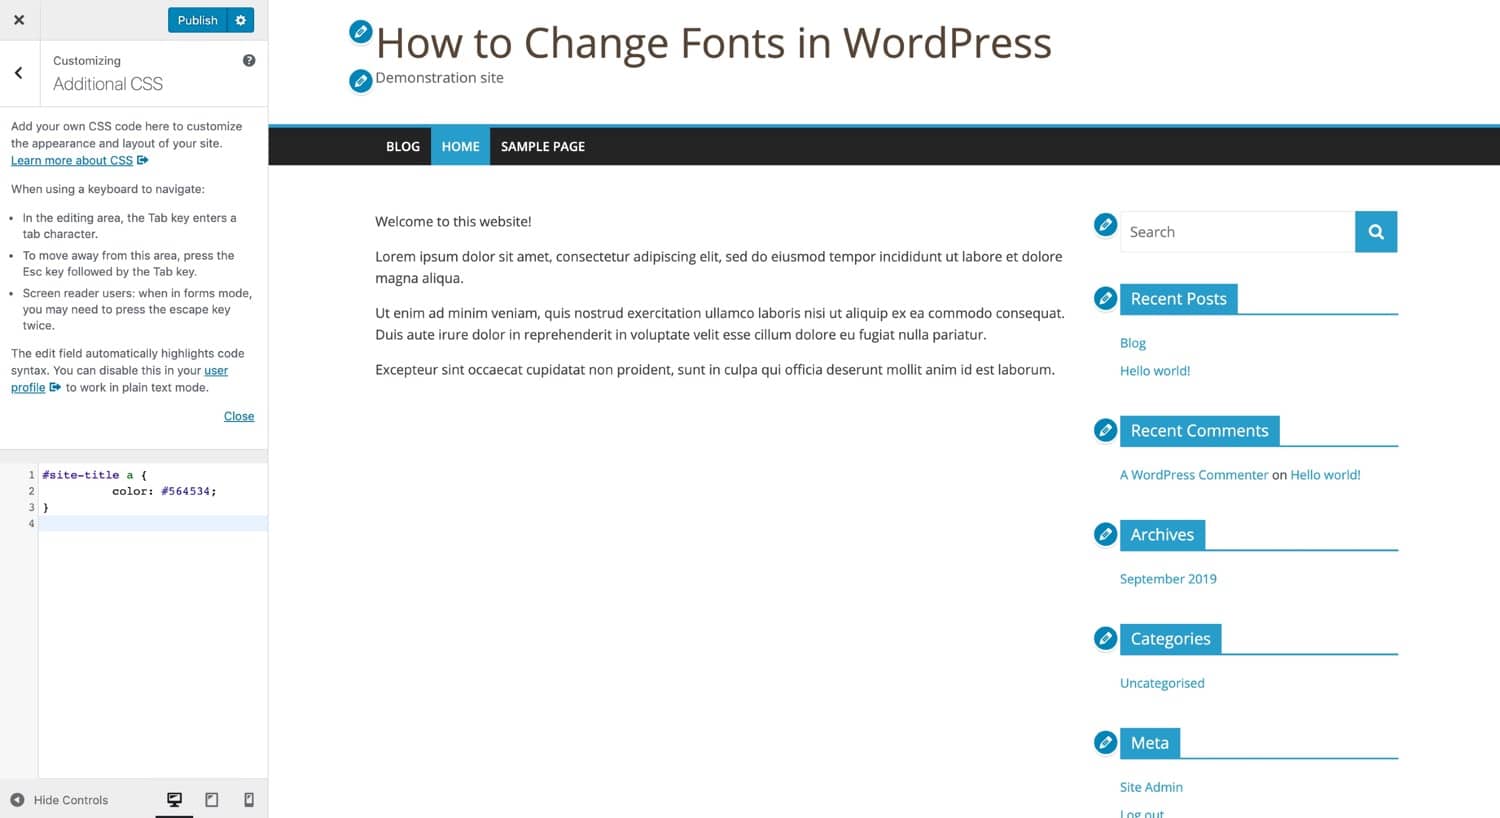
Replace the color I’ve used above with your own color.
When you’re happy with your changes, click the Publish button.
Changing Font Colors in Your Stylesheet
As with font styles, you can also edit your theme’s stylesheet (or create a child theme) to change the font colors.
Change the color with color. Below I’m changing the main color for my site’s text, using the bodyelement:
body {
 color = #222222;
}
Make sure you override any existing styling for the same elements and that you also style any elements that inherit that styling if you want them to have a different color. All text will inherit the color of the body element unless it has its own styling.
Changing Font Sizes in WordPress
For accessibility reasons, you might decide you want your fonts to be bigger than they are by default in your theme. Or you might decide the headings in your widget areas are too small, for example.
Changing Font Size in Gutenberg
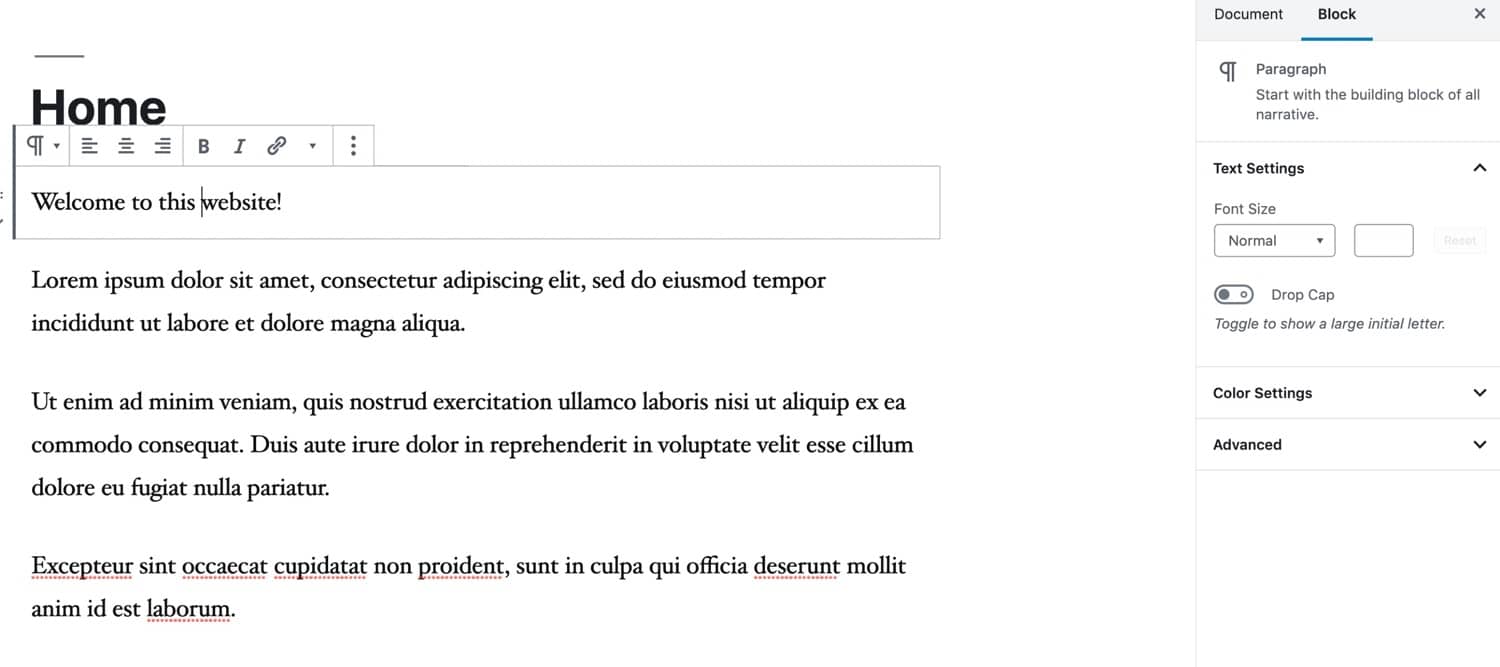
With the Gutenberg editor, you can change the size of the text within each block.
Select the block and then click on the Text Settings tab in the Blocks menu on the right of the screen. You can make the text in the block smaller or larger, as shown below.
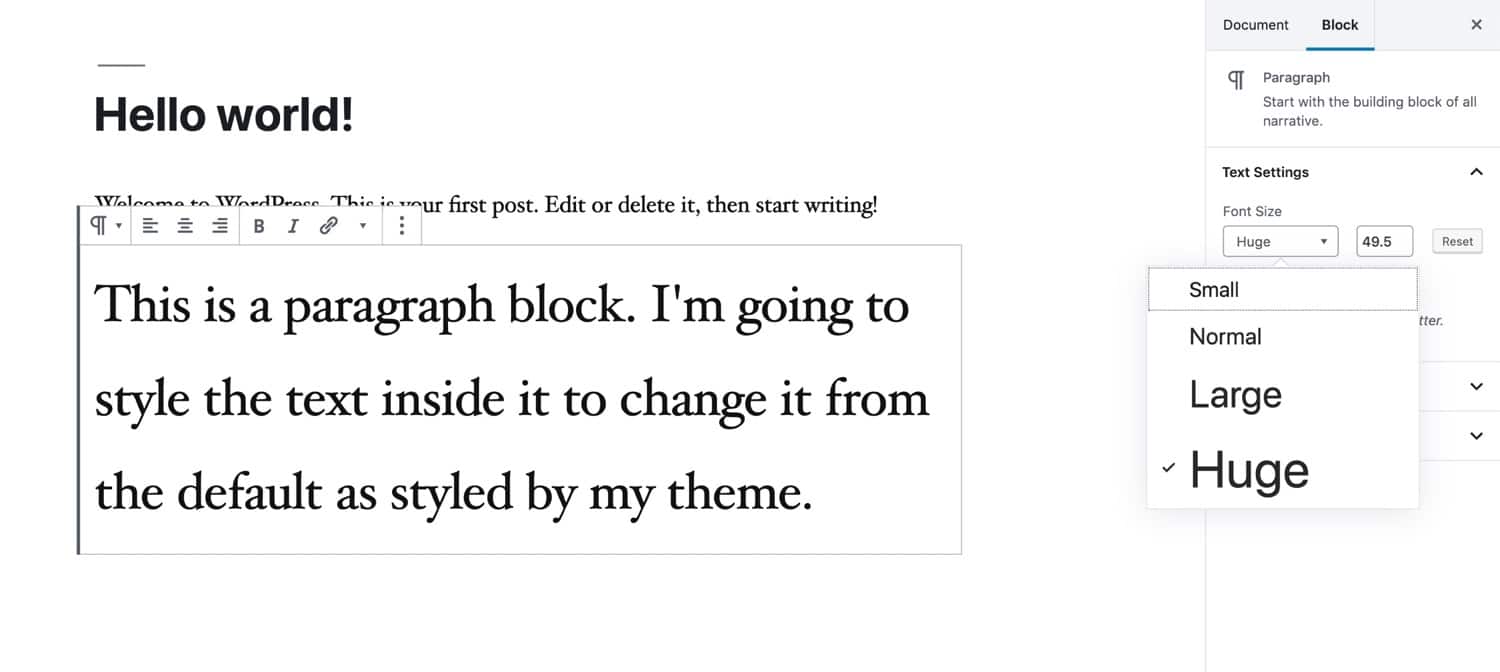
Beware doing this too much: if all the paragraphs on your page are different sizes, it will look disjointed and be difficult to read.
Changing Font Size in the Classic Editor
The classic editor doesn’t give you the option to select specific text and change its size: so if you do need this feature, you’ll need to upgrade to Gutenberg. Sorry!
Changing Font Size in the Customizer
Depending on your theme, you may have an option to change the font sizes in the Customizer, either changing the font size for the whole site or targeting headers and body text.
If your theme doesn’t include a Customizer option to change font sizes, but you can use the Additional CSS option. Go to Customize > Additional CSS and type the CSS in the box.
Below I’m making the headings in the widget areas bigger, with this CSS:
h2.widget-title {
 font-size: 3em;
}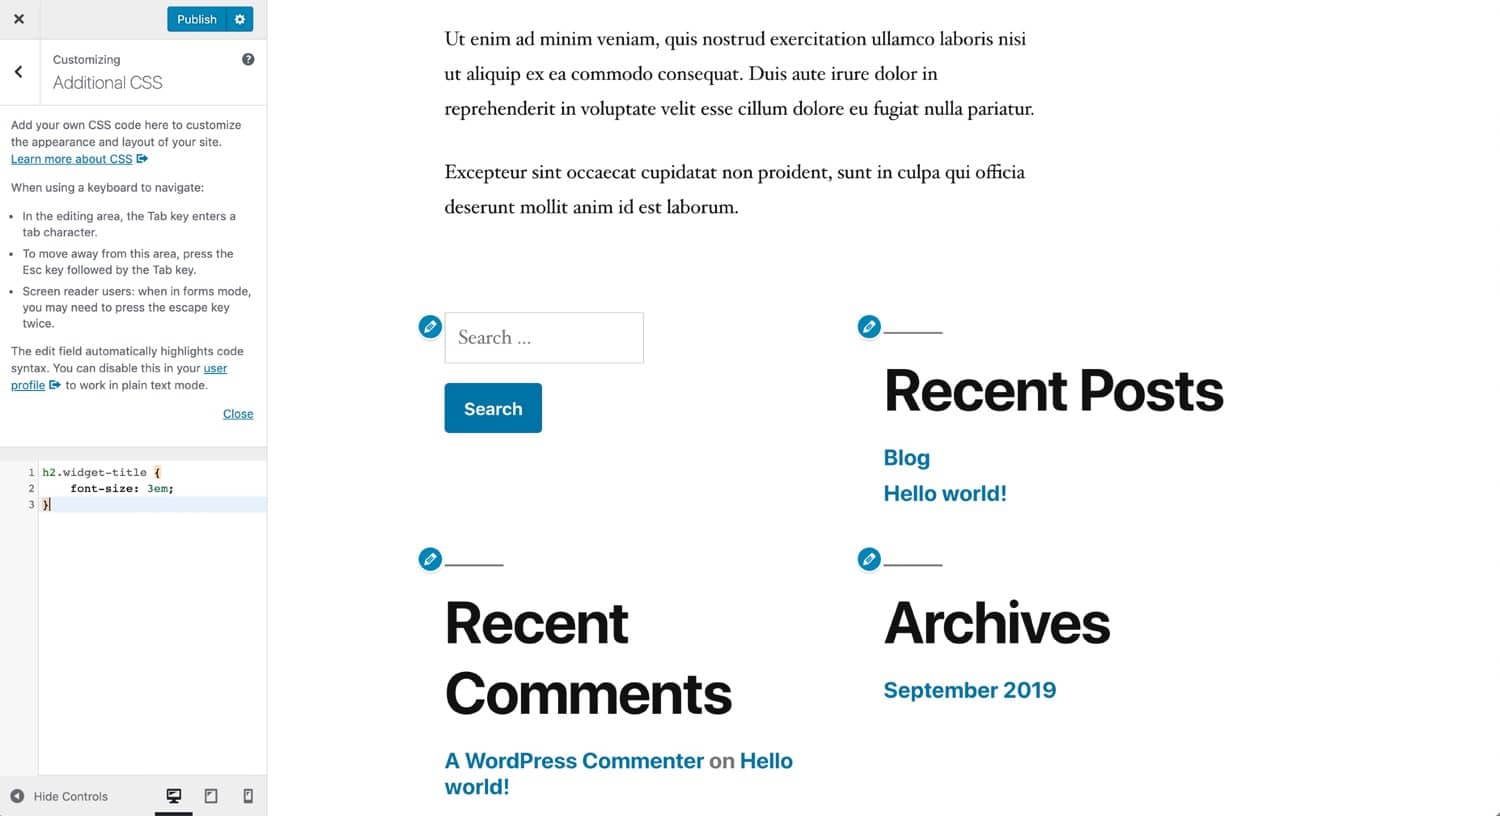
Maybe that’s a bit too big, but it gives you the general idea.
Changing Font Size in Your Stylesheet
Changing the size of fonts in your stylesheet works in a similar way to changing any other styling for your fonts.
If you want to change the size of all the text in your site, you would use the bodyelement:
body {
 font-size: 14px;
}
For the bodyelement you use pixels, but for other elements you use emso the size is relative to the size of the bodyelement.
h1,
#site-title {
 font-size: 2em;
}
Remember if you’re going to make changes to the fonts in your theme stylesheet, test it on a development or staging site first so you don’t run the risk of ruining your live site.
How to Optimize Fonts in WordPress
Whether you’re using web fonts or locally hosted fonts, it makes sense to do everything you can to optimize your fonts.
Here I’ll give you some tips on optimizing your fonts, both for speed and for design.
Optimizing Fonts for Performance
If you’re using web fonts on your site, you’ll want to do everything they can to ensure that they’re delivered to your pages as fast as possible and that the fact they’re hosted elsewhere doesn’t slow things down.
- Use caching to ensure pages don’t need to be rebuilt every time they’re loaded. Kinsta hosting plans come with caching built-in.
- Use a web fonts provider that delivers fonts using a Content Delivery Network or CDN. Google Fonts does this and it speeds up delivery of the fonts.
- Only use those fonts you need. Don’t enqueue variations of fonts (weights, styles) you won’t be using in your stylesheet. If you find you need them at a later date, you can always add them then.
- If using web fonts, make sure you enqueue them properly. Don’t use an @import line in your stylesheet, even if this is what your web font provider tells you to do.
- When adding CSS manually, add it to your theme’s stylesheet and not to the <head> section of your header.php file. This is one reason why it’s better practice to code the CSS manually into your theme rather than using the Customizer or a block, as both of those will add inline CSS to the page instead of adding it to the stylesheet.
- Consider using CSS inlining to shave a few extra milliseconds off page load times. This is a process that uses base64 encoding to add CSS from your stylesheet into the page before loading it, saving the browser having to load extra files. It may seem counterintuitive given the advice above about not writing inline CSS, but it still works from a separate CSS file and doesn’t mean manually coding inline CSS. If you’re loading multiple fonts, inlining can speed up your site a little.
- Use minification to reduce the size of your stylesheet.
- If you’re hosting fonts locally, only upload the files for the fonts and the font weights and styles you need. Only add those variations that you need using the @font-face declaration.
- Consider using a CDN to host your own fonts instead of hosting them on your own server.
- When hosting your own fonts, include additional formats: woff2, woff, ttf, and eot. Browsers can then select the version that’s going to load fastest.
- If you’re using a different font for your site title, enqueue just the characters you need instead of the whole font library.
So if your site title is Kinsta, you could make a small performance improvement by ensuing the stylesheet like this:
function kinsta_add_title_font() {
 wp_register_style( 'googleFonts', ‘https://fonts.googleapis.com/css?family=Raleway&text=“kinsta');
 wp_enqueue_style( 'googleFonts');
}
add_action( 'wp_enqueue_scripts', 'kinsta_add_title_font' );
Optimizing Fonts for Design
As well as optimizing the performance of your fonts, it also makes sense to make sure they’re visually optimized: that they fit well with the design of your site and with your offline materials.
This is particularly the case if you use a plugin or a child theme to add extra fonts on top of the ones already bundled with your theme. There is a risk of your theme looking messy if there are too many fonts in too many colors and styles.
Before you add extra fonts to your site, consider the following:
- Are the new fonts consistent with your existing fonts? Do they convey a similar style or mood?
- If you need to match a font that’s been used for print materials but can’t use the same font as a web font, try finding as close a match as possible on Google Fonts.
- Are the fonts you’ve chosen consistent with your brand? If you’re running a serious business, you don’t want to use Comic Sans (in fact, whatever kind of website you’re running, you don’t want to use Comic Sans).
- If you’re changing the colors of your fonts, try to use colors that are already in the design of your theme or that coordinate with them. Adding too many colors will make your site look garish and unprofessional.
- If you’re trying to pick out a pair of fonts on Google Fonts, try using a service like fontpair to find two that work well together.
The fonts you use in your design will have an impact on the impression visitors get when they reach your site. Make sure you’ve considered this and chosen fonts that will reinforce your brand.
Working with Variable Fonts
Variable fonts are a new kind of fonts that make adding more fonts to your site more efficient.
They allow more information to be stored in one font file, so that if you want variations on your font (bold, italics, etc.), you don’t have to load multiple font files, but can just load the one.
For a font with multiple font weights, styles and slants, this could save a lot of file space and make the process of enqueuing the font or adding it via @fontface easier too.
Variable fonts are supported in the latest versions of Chrome, Edge, Firefox, and Safari, but not by older browsers; so if you do use them, you’ll need a fallback. And there aren’t many variable fonts available just yet. Google Fonts offers many variable fonts, such as Inter, Roboto Flex, and Recursive. They’re stable, efficient, and ready for production use.
Font developers are working on creating more variable fonts and improving their reliability, so it’s worth watching progress so that you can use variable fonts to optimize your fonts once they become more stable.
Summary
Changing fonts on your WordPress site isn’t a straightforward task. You have different possibilities to choose from:
- Using web fonts by installing a plugin.
- Using web fonts by coding them into your theme and enqueuing them.
- Hosting your fonts.
Then, you should focus on how to optimize your fonts for better performance. If you follow the tips in this guide, you should be able not only to change fonts in WordPress but also have more control over them in your theme.
Want to declutter your page or blog layout to make your readers focus on your content? Then, check out this: How to Remove the Sidebar in WordPress (4 Methods).

Rachel McCollin has been helping people build websites with WordPress since 2010. She's a huge fan of self-hosted WordPress and wants to help as many people as possible create an awesome website with it.

