
Does your website suffer from sluggish performance and high network traffic? Where cookies are often the culprit, one effective solution is to use cookie-free domains.
Though cookies are one of the major cornerstones of our online experience, they aren’t always as tasty as their name might suggest. Beyond privacy and security concerns involving third-party cookies, cookies that are automatically attached to your site’s images and other static content can have a severe impact on page performance.
Thankfully, it’s possible to trim the dead weight (in this case, dead cookies) by using cookie-free domains. In this complete guide, we’ll review the basics of cookie-free domains, why they’re so useful, and how you can configure your WordPress site to use them.
But first, let’s reach into the digital cookie jar and take a closer look at how domains use cookies — for better or worse.
What Are Cookie-Free Domains?
Cookie-free domains are parts of a website that don’t send cookies to users’ browsers.
But why not send cookies all the time? After all, wouldn’t it be polite to give users as many cookies as possible?
Not necessarily. When we’re talking about cookie-free domains, we’re of course referring to HTTP cookies. Unlike our favorite baked treats, HTTP cookies are little packets of data that websites send to users’ browsers. While not very tasty, they’re extremely useful for allowing websites to “remember” users the next time they visit.
However, just like actual cookies, you don’t want to serve too many HTTP cookies. As we’ll see shortly, visitors love a few cookies — but any more than what they need will make them feel sluggish and bloated.
What Are HTTP Cookies?
HTTP cookies are everywhere on the web.
Whenever you visit a website, there’s a good chance that the website will ask you to store cookies with your browser. In addition to information about the website itself and the page you’ve visited, cookies include a personal identifier tied to you and your browser. This identifier allows the website to “remember” if you’ve already visited the page.
Let’s take a closer look at how this cookie exchange works (spoiler alert: there aren’t any charming wicker baskets or girl scouts involved).
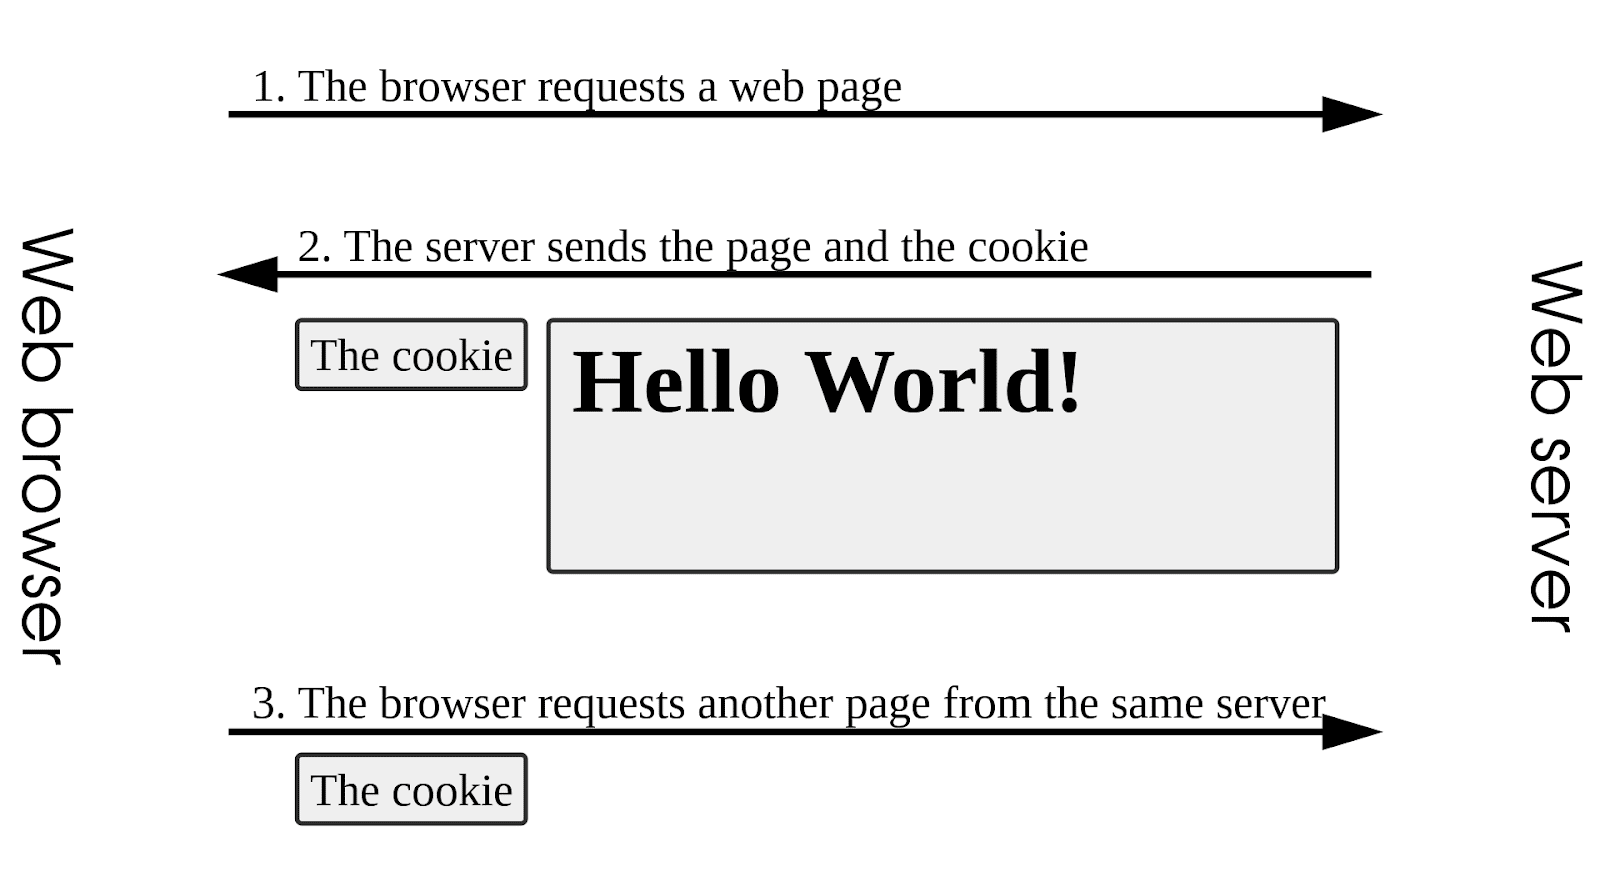
As shown in the image above, the exchange can be broken down into three steps:
- Your browser requests a web page. When you enter an address (e.g., a domain URL such as “kinsta.com”) into your browser’s address bar or click on a web link, your browser generates an HTTP request that tells the website that it wants to view the page. This request is sent to the web server that hosts the website and its pages.
- The web server sends the page and the cookie. Upon receiving your request, the web server sends back the requested page and a cookie containing certain information. As we mentioned earlier, this cookie almost always includes a personal identifier for you and your browser.
- The browser requests another page from the same server. Now let’s say you click on a link to another page on the website, such as “Shop” or “About Us” on an ecommerce site. Here, your browser sends another request to the web server and the cookie it was originally given. When the web server receives this request, it sees the cookie it sent previously and remembers you’ve already visited. With that information, the web server can deliver more personalized experiences, such as maintaining an active login or items in a shopping cart.
There are also different cookies for different purposes. In the example above, the web server engaged in session management maintains your login or shopping cart items — in other words, your individual session on their website. Similarly, cookies can also be used to deliver personalized experiences, such as showing recent orders, viewed items, or even targeted advertisements.
While it might sound nice to be given cookies wherever you go, it’s not everything it’s cracked up to be. As we’ll see in the next section, it’s actually possible for a website to deliver too many cookies — some of which many people would rather not “eat.”
How Domains Use HTTP Cookies
Though personal identifiers are one very important use for HTTP cookies, they aren’t the only ones. In fact, cookies can be used for a wide range of purposes to provide more personalized web experiences, deliver targeted content, and more.
We already covered how websites and browsers exchange HTTP cookies to “remember” you. While that can be helpful for maintaining login sessions and showing shopping cart items, cookies can also be used for more nefarious (or outright annoying) purposes.
Here are some of the most common ways domains use HTTP cookies.
- Session management. You already know this one by now. Session management is often considered the most “benign” use for HTTP cookies, as its sole purpose is to deliver a consistent user experience that helps the user avoid having to repeat certain actions. While seeing previous activity might present privacy concerns for some users, it is relatively harmless. The real privacy issues come when cookies are used for tracking, which we’ll cover shortly.
- Personalization. Session management can also be used to personalize web pages based on user preferences and activity. For example, after selecting their language of choice, users will be able to view the website in that same language on subsequent visits without having to change it every time. Cookies can also allow websites to adapt to the specific requirements of different web browsers.
- Tracking. Cookies also have a controversial side. Since your browser stores the cookies websites give you, those cookies can be used to track you everywhere you go on the web. For example, you might visit a website that gives your browser a tracking cookie letting affiliated advertisers around the web know that you visited their page. When advertisers notice this cookie, they can display targeted ads for the original website or even use it as a vector for cyber attacks. In any case, tracking cookies can make it feel like you’re being “followed” — something that comes with a slew of ethical and privacy concerns.
Thankfully, most HTTP cookies are used for session management and personalization. However, even the most innocent cookies can cause problems.
So far, we’ve explored the idea of one page sending one cookie. In reality, one page usually sends multiple cookies, often one for each page element — HTML, image files, and so on. While some of these cookies are necessary for session management and personalization, many of them aren’t.
As a result, it’s possible to send too many cookies, and this can cause several problems. We’ll discuss those problems in the next section.
Eating Too Many Cookies
Unlike most documents, web pages are a collection of various elements that give them form, structure, and meaning. Each of these elements can have its own cookie.
Whereas regular documents we might view in a .pdf or .docx format might seem like a single “combination” of text and images, web pages are built of many separate, small parts.
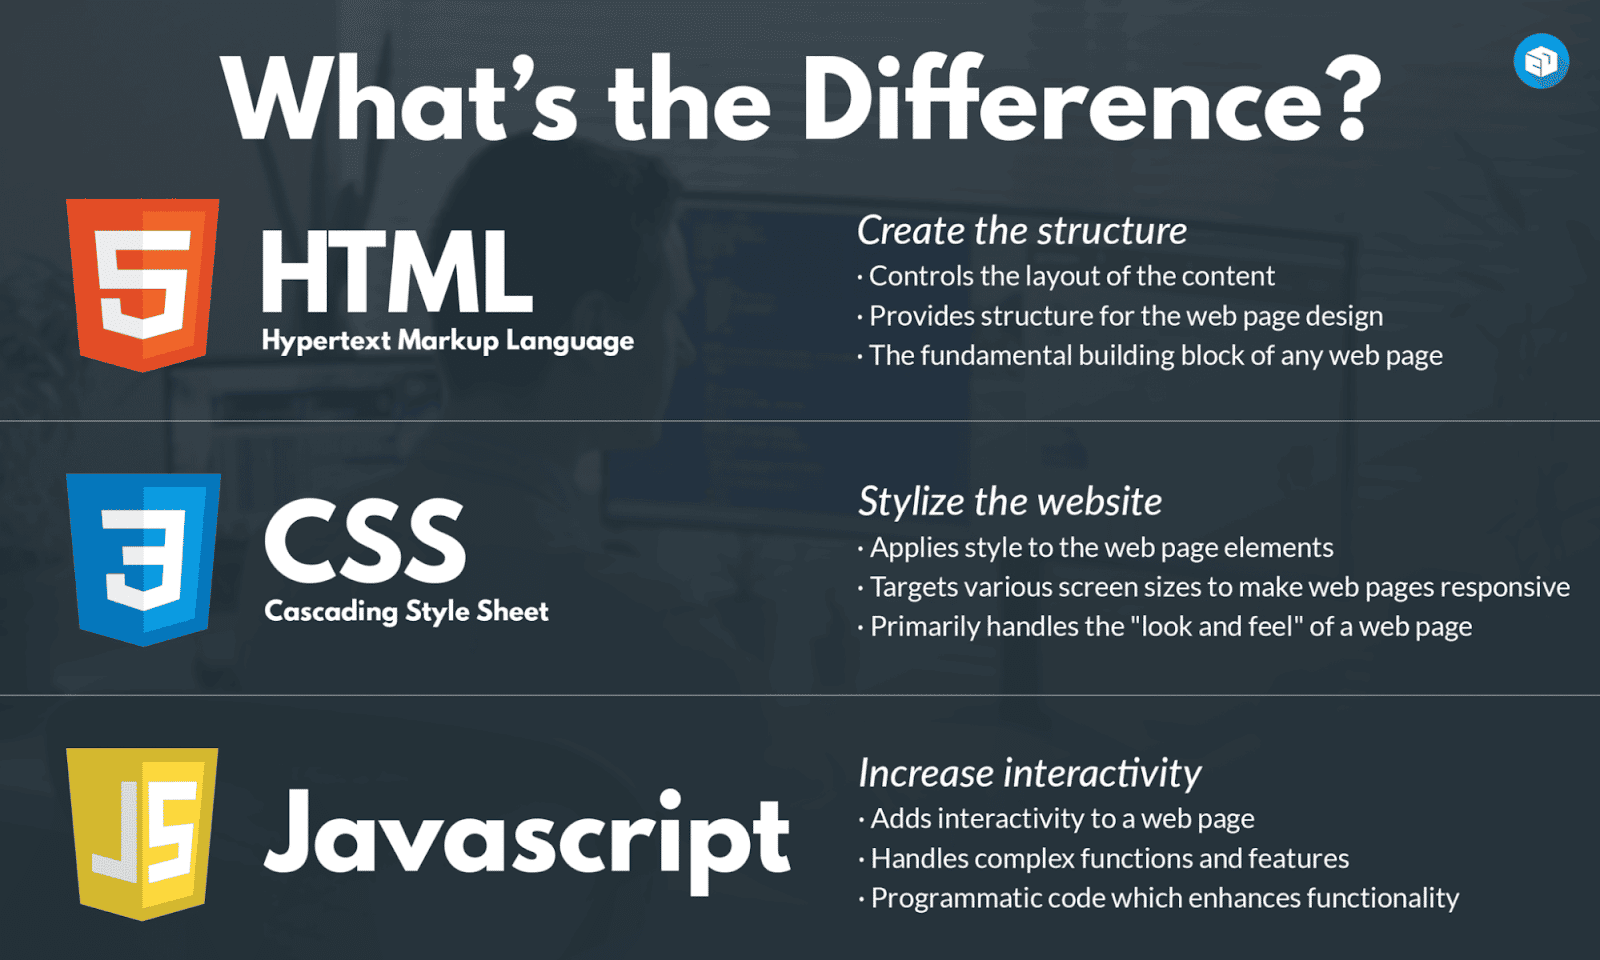
For example, when you request a web page, you’re actually requesting separate page components, such as HTML (structure), CSS (style/formatting), JavaScript (interactivity), and media, such as images. As such, when your browser receives a web page, it’s actually receiving and re-combining these components to display the complete page on your screen.
If the web server is also sending cookies, it may automatically send a cookie with each and every element during this process. That might not mean much for a simple web page with only a few images, but it can quickly get overwhelming if a web page has tens or even hundreds of different components — and is sending a cookie for each one.
Just like eating too many cookies in real life, sending and receiving too many HTTP cookies leads to sluggish performance. Since sending extra data requires extra time and resources, sending cookies along with every element can easily consume a huge amount of network resources.
Domain Diet: Going Cookie-Free
Thankfully, the solution to sending too many cookies uses a real-world analogy: To improve performance, simply eat (read: send) fewer cookies.
But which cookies are we supposed to give up? In most cases, it’s best practice to remove cookies from any static elements on your page.
Static elements are those that you won’t expect to change with user behavior, such as static images or static files, like CSS files. As a result, they don’t need cookies attached to them, making removing them one of the best ways to reduce network load and improve performance.
Of course, removing cookies isn’t as simple as unchecking a “cookies” checkbox.
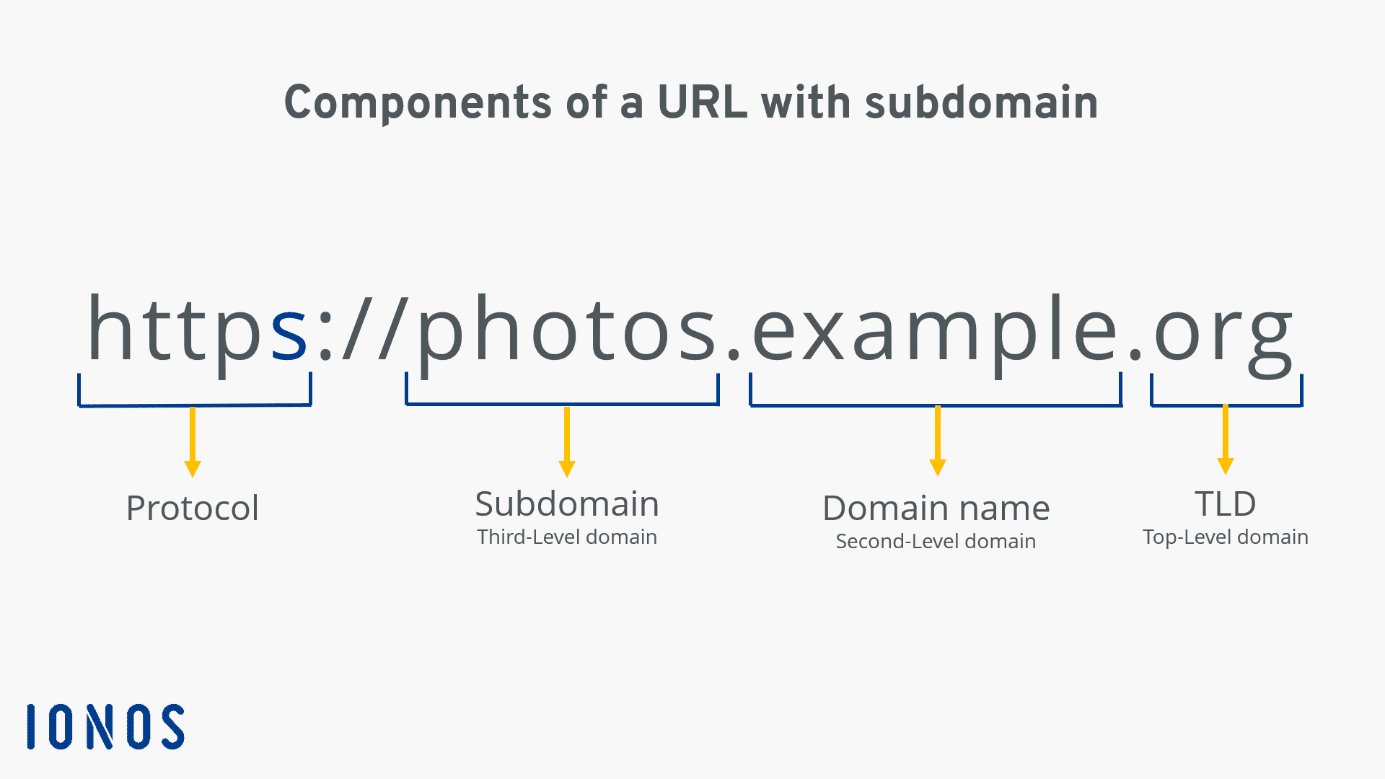
Instead, web servers use cookie-free domains to distribute static content without cookies separately from content with cookies. A cookie-free domain is usually a separate domain (such as a subdomain or FQDN, like “static.kinsta.com” or “kinsta.com”).
Thankfully, it’s not very hard to use cookie-free domains when you’re using the right tools — and setting up a subdomain isn’t the only method of doing so.
But before we get our hands dirty, let’s explore some of the biggest benefits of using cookie-free domains and just how big of an impact this can have on your website (and your budget).
Why Use Cookie-Free Domains?
Removing extra cookies may sound like a small action — and frankly, it is.
However, this small action comes with some pretty big benefits. By only sending the cookies you need, you’ll lighten your network traffic and reap many of the other benefits found below — some of which have nothing to do with performance at all.
Reduces Unnecessary Network Traffic
Most benefits of using cookie-free domains stem from reducing network load from unnecessary cookie traffic.
As we covered earlier, sending page elements to your visitors requires a certain amount of network resources. Beyond the elements themselves, each element (or even multiple parts of the same element) are sent with response headers containing routing information, along with other elements such as cookies.
Even though cookies are relatively small data files, having to send a lot of them with every page request can quickly add up. As a result, users have to wait longer for the page to load as your poor web host gets overwhelmed (and, as a result, goes over budget).
If you use cookie-free domains, however, you’ll eliminate most of the bulk caused by sending unnecessary cookies.
Improves Website Performance
As you might imagine, reducing network load by reducing cookies has a significant impact on loading times and website performance.
Since every page click is a separate request to the web server, users may find themselves waiting for extended periods just to perform basic navigation (Home Page > About Us > Shop, etc.). While page elements and cookies may get cached and reused after the first loads, this can still present a problem if the pages change or the user dives even deeper into your website.
Benefits SEO and User Experience
By reducing unnecessary traffic to improve website performance, your website may also see benefits regarding search engine optimization (SEO) and, of course, customer and user experience.
Customer experience is the most obvious benefit: with a shorter load time, users can access the content they want more quickly. As a result, they’ll be more likely to explore your website (and your products or services) and less likely to click away in frustration.
The same benefit also applies to SEO. While page loading times don’t directly affect SEO, your bounce rate — the percentage of visitors who click off your page — certainly does.
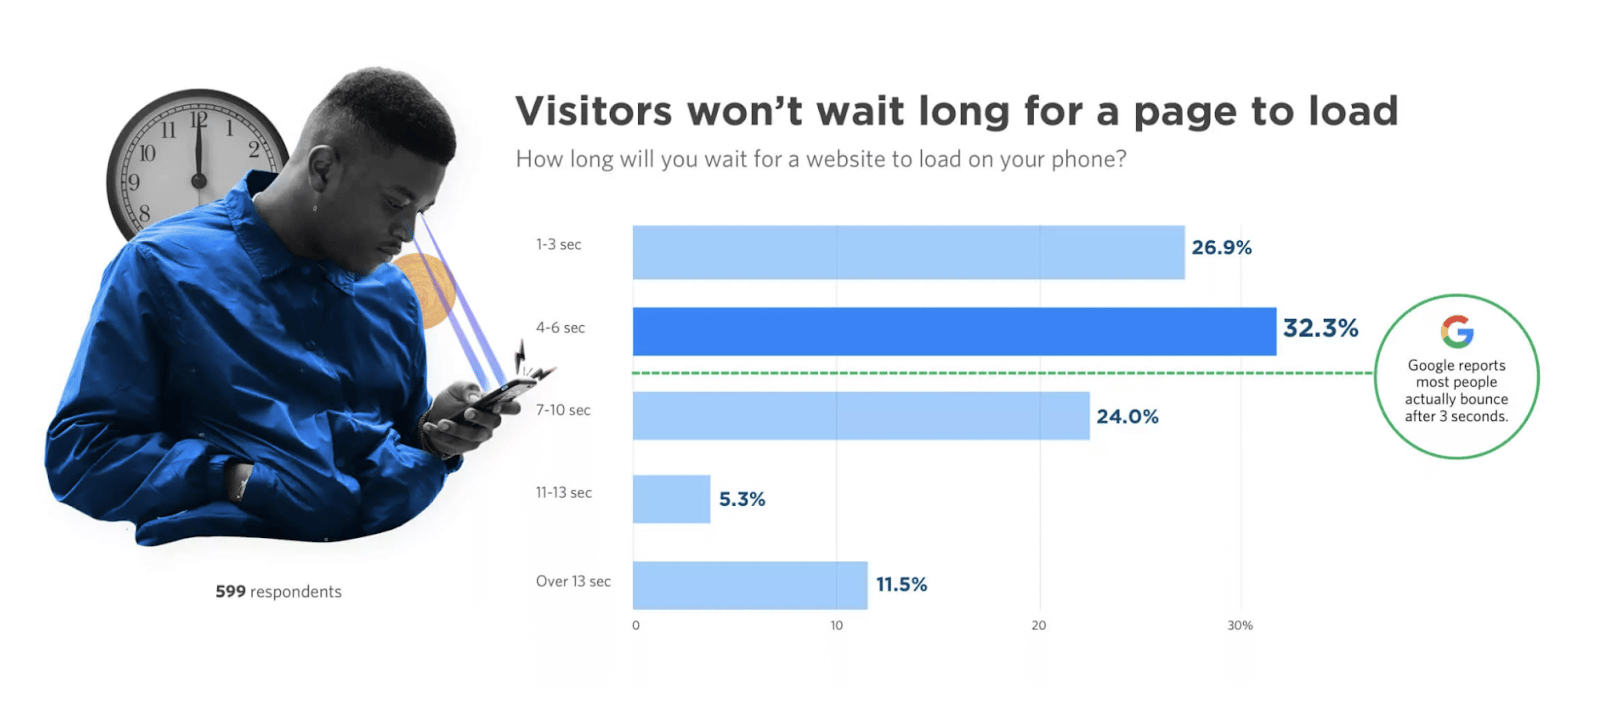
According to a report from Unbounce, three-quarters of shippers will abandon a page if they have to wait four seconds or longer for it to load.
This means that even if removing unnecessary cookies improves your load times by only a second, you’ll still see a massive reduction in bounce and, as a result, a boost in your search ranking.
Lowers Hosting Costs
Network traffic ultimately costs money in web hosting fees.
That means if you’re sending more cookies than you need, you’re also paying way more in web hosting fees. And if cookies are impacting page performance, the damage is doubled: In addition to paying for more traffic, you’ll need to pay for even more to get the same return due to the increased bounce rate caused by slow load times.
Thankfully, managed hosting services like Kinsta can help you fully utilize your page visits. Kinsta offers APM tools and other features to help you make the most of your WordPress website.
Cookieless Future Readiness
Finally, while it may not be a direct benefit now, delivering cookie-free content will help you better prepare for a cookieless future.
With cookie controversy on the rise in light of privacy requirements, such as the GDPR, many major search engines, and technology companies are looking for ways to eliminate cookies altogether. While cookies probably won’t go away for some time, they very well might eventually — and the sooner you’re ready for it, the easier the transition will be.
Methods of Using Cookie-Free Domains
As we covered earlier, the general idea of a cookie-free domain is to deliver static content without delivering cookies. Though creating a separate static domain or subdomain is the most direct way to do this, it’s also possible with CDNs and a couple of WordPress tricks.
Create a Separate, Cookie-Free Domain
With this method, you’ll create a separate domain for hosting your website’s static components, such as images and CSS.
While you can register an entirely separate domain name, it’s usually easier and more cost-effective to create a subdomain of your existing domain name. Most cookie-free domains simply use a static prefix (e.g., “static.yourdomain.com”) as their subdomain.
Note that this will only work if the “www” version of your domain (e.g., “www.yourdomain.com”) is the root domain in your website’s root file.
To make the subdomain cookieless, you’d normally have to find and edit your .htaccess file directly using special code. However, as we’ll see later, it’s much easier to simply reconfigure your WordPress site or use a plugin.
However you configure your cookie-free subdomain, you can upload static components, such as your CSS components, images, text, and JavaScript.
Use a Content Delivery Network (CDN)
Using a content delivery network or CDN is an extremely convenient way to use cookie-free domains.
Here, rather than having to create separate subdomains and edit configuration files, you can simply tell your CDN to ignore and strip cookies from the response headers of your static components. That may sound a bit complicated, but it’s actually a simple feature in many CDNs.
Note that not every CDN provides this functionality. As a result, it’s generally better to change your website’s configuration unless you’re already using a CDN that allows you to disable cookies.
Reconfigure Your WordPress Site
If you’re using WordPress, you’re in luck: All it takes to designate a cookie-free domain is to update a couple of lines in your wp-config.php file. Skip ahead to the next section (Configuring WordPress to Use Cookie-Free Domains) for complete instructions.
Use a WordPress Plugin
Another easy WordPress option is to use a plugin for creating static versions of WordPress websites.
One popular plugin for doing this is WP2Static (literally “WordPress-to-Static”). After installing the plugin, simply open it in your WordPress dashboard and configure the settings to export your website to a static version:

Configuring WordPress to Use Cookie-Free Domains
As mentioned above, WordPress offers an easy way to implement cookie-free domains. The process boils down to a few simple steps:
- Adding an alternate subdomain and associated DNS
- Telling WordPress which domain will serve up static assets
- Updating existing WordPress database records to reflect this new address
Kinsta customers can use the MyKinsta dashboard to accomplish some of these tasks. Many other WordPress users will be able to do the same in cPanel.
We’ll cover both below.
Using MyKinsta To Set up a Cookie-Free Domain
Kinsta customers can associate subdomains (or completely different domains) with a WordPress instance within the MyKinsta dashboard. Many customers will also use MyKinsta’s tools to configure DNS for those domains.
In this example, we’ll create a cookie-free domain at static.example.com for our website already up and running at www.example.com.
Step 1. Create a Subdomain in MyKinsta
If you initially established your WordPress site at Kinsta using the wildcard option with its domain name (like: *.example.com), you are already set to support any subdomain name. If not, you can add the new domain for cookie-free content like this:
- Select WordPress Sites on the left-hand menu.
- Click on the name of your WordPress site.
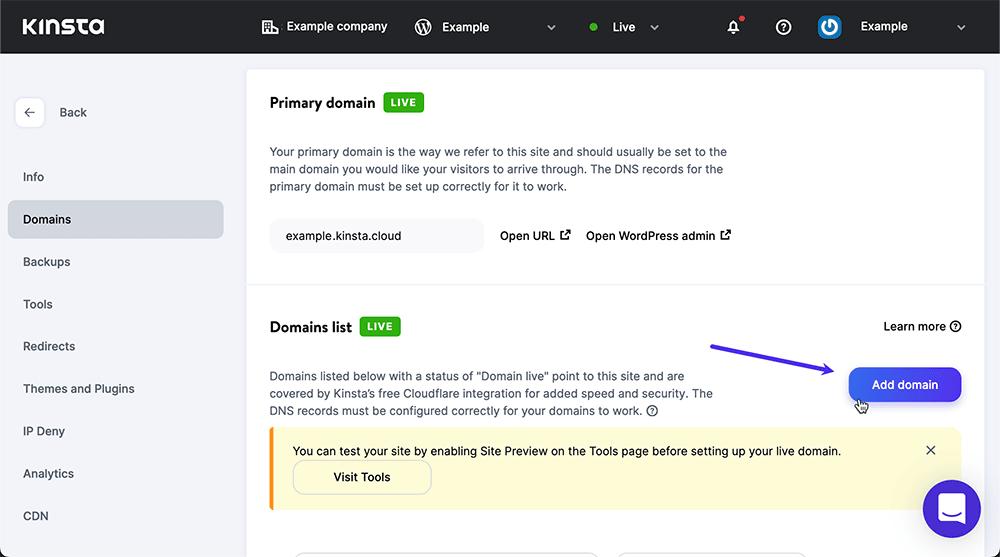
- Select Domains on the left-hand menu.
- Click the Add Domain button.
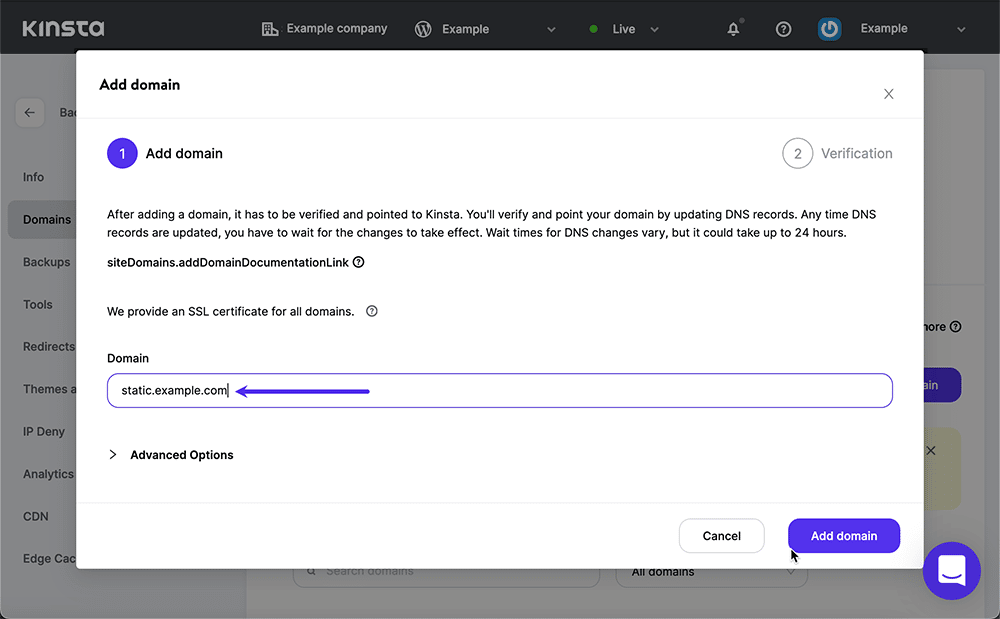
In the following dialog:
- Type the name of your cookie-free domain.
- Click the Add Domain button.
Next, your new static domain will need a DNS record pointing to your existing website. If you manage DNS for your domains through a third-party provider, you will use their tools to do that. If your DNS is provided by us, configure your new domain in MyKinsta like this:
- Select DNS on the left-hand menu of the MyKinsta home page.
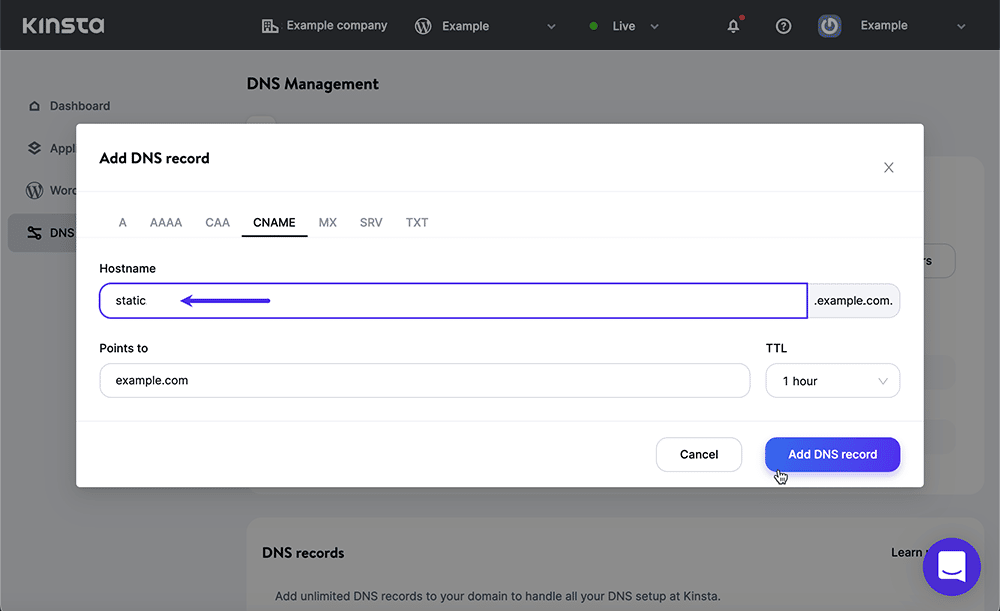
- On the DNS Management page, scroll down to the DNS Records block and click the Add DNS Record button.
We recommend adding your new subdomain to DNS as a CNAME record, allowing you to rely on just the second-level domain name for associations with IP addresses. Below, we are adding a CNAME record for static that points to example.com:
Step 2. Disable Cookies on Your Static Subdomain
Now we’ll edit your WordPress site’s wp-config.php file so that assets within the wp-content folder are served up from the “static” domain and cookies are delivered only via the “www” address.
Most Kinsta customers will use an FTP/SFTP client to login to their WordPress site and download wp-config.php to their desktop for editing:

Use a text editor to add the following lines to the wp-config.php file (replacing the example domains with your own own):
define("WP_CONTENT_URL", "https://static.example.com/wp-content");
define("COOKIE_DOMAIN", "www.example.com");
After saving the file, upload it to your WordPress site, replacing the previous version.
Step 3. Redirect Existing Assets to the Subdomain
The steps above will allow cookies to be handed out when browsers load content like pages and blog posts from the “www” address, but will cause content like media uploads and assets like JavaScript, CSS and fonts within themes to be associated with the “static” domain.
However, your website may already have content that contains links to those assets at the “www” address. You can clean that up with a little search-and-replace in the WordPress database itself.
Always back up your WordPress site before working in the database. After that is done:
- Select WordPress Sites on the left-hand menu of the MyKinsta dashboard.
- Click on the name of your WordPress site.
- Select Domains on the left-hand menu.
- On the Site Information page, scroll down to the Database Access block. (You can copy database username and password information here if needed.)
- Click the Open phpMyAdmin link.
- Login to your WordPress database.
- Click the SQL tab.
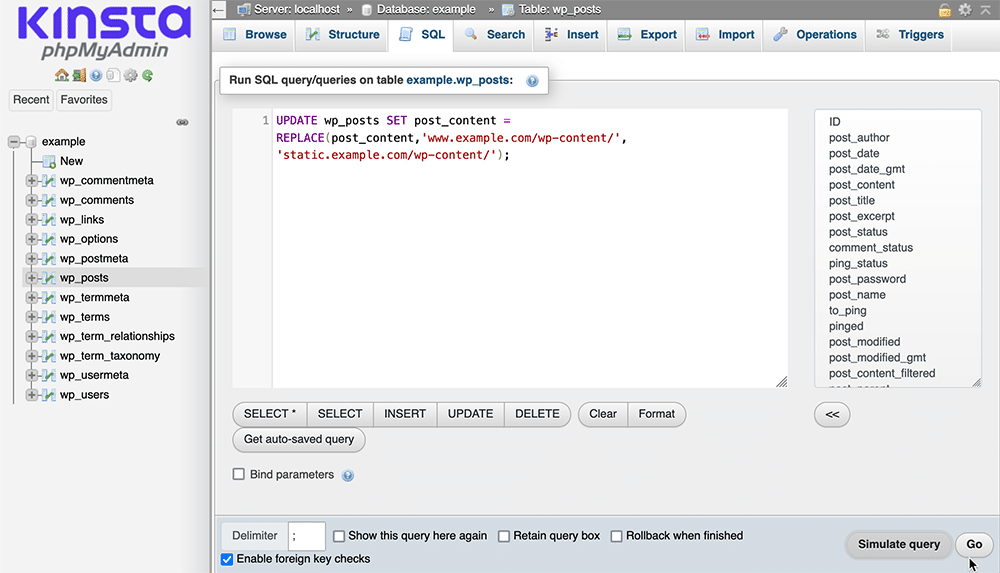
Run the following command to be sure that any asset links within your existing posts are directed to your cookie-free subdomain (again, being sure to replace the domains with your own):
UPDATE wp_posts SET post_content = REPLACE(post_content, 'www.example.com/wp-content/', ' static.example.com/wp-content/')
You’ve now successfully configured a cookie-free domain in WordPress with the help of MyKinsta. Use this domain to host any static content for which you don’t want to send WordPress cookies and use your regular domain for everything else.
Using cPanel To Set up a Cookie-Free Domain
Here are the steps to accomplish what we did above in MyKinsta using cPanel or one of the popular cPanel alternatives.
Step 1. Create a Subdomain in cPanel
Navigate to the Domains section of the cPanel main page. In the Subdomains tool, simply create a subdomain connected to the top-level domain of your current WordPress site.
These settings can be seen below to create the subdomain static.example.com.

Step 2. Configure the Subdomain as Static in cPanel
With your new static subdomain ready to go, it’s time to make it live up to its name by making it serve static content in WordPress.
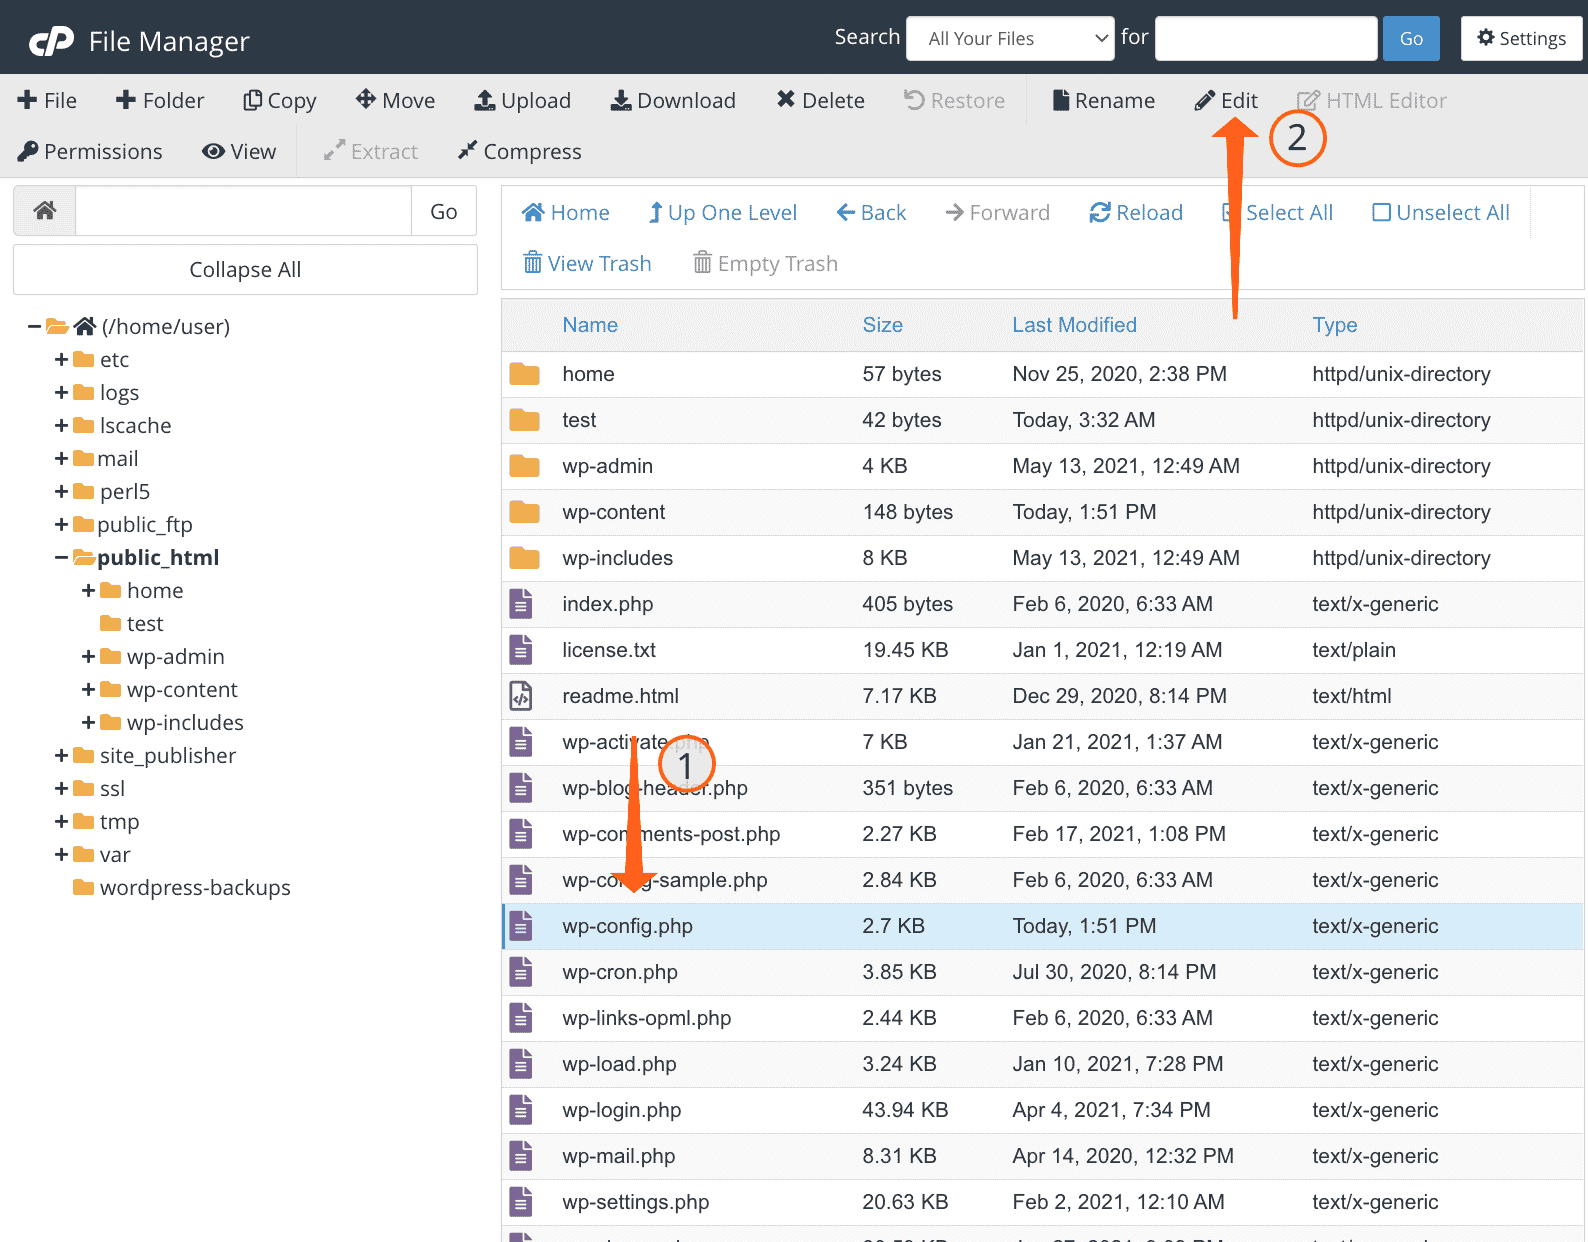
We’ll do this by editing your WordPress site’s wp-config.php file. The easiest way to access this file is in cPanel’s File Manager tool.
In File Manager, navigate to your website’s public_html folder and select wp-config.php (1). Then, select the Edit option (2) to edit the file.
In the wp-config.php file, simply add the following lines (being sure to replace the domains with your own!):
define("WP_CONTENT_URL", "https://static.example.com/wp-content");
define("COOKIE_DOMAIN", "www.example.com");
Click “Save Changes.”
Step 3. Redirect Existing Posts to the Subdomain
Finally, you’ll need to redirect your existing posts to the new static subdomain. But first, be sure to back up your WordPress site just in case it doesn’t function properly after.
In the Database section of cPanel, open the PhpMySQL tool. Select your site’s database and then its _posts table.
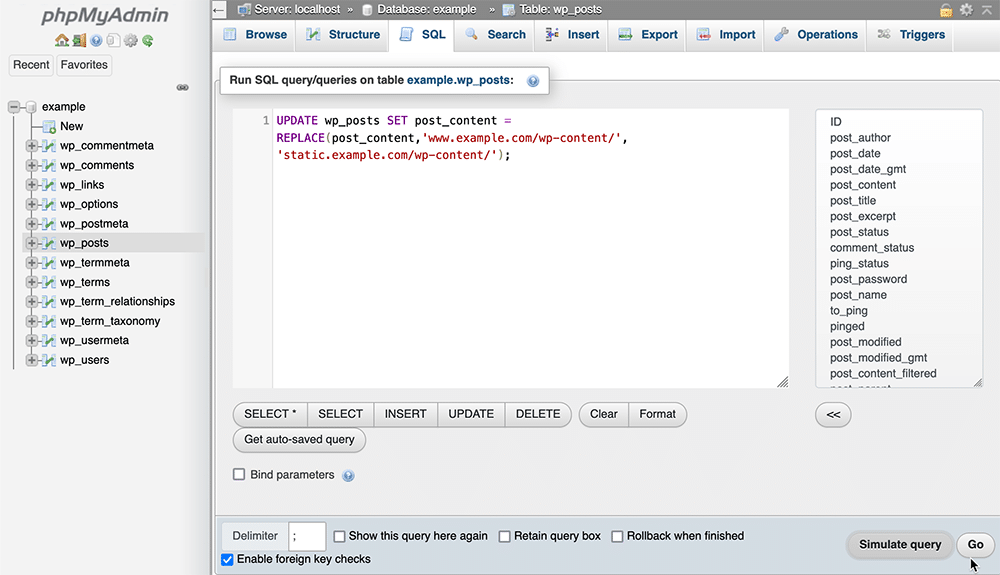
Click the SQL tab of the _posts table. Run the following command to verify that your post URLs are directed to your cookie-free subdomain (again, being sure to replace the domains with your own):
UPDATE wp_posts SET post_content = REPLACE(post_content, 'www.example.com/wp-content/', ' static.example.com/wp-content/')
And that’s it! You’ve now set up a cookie-free domain in WordPress with the help of cPanel. Use the cookie-free domain for static content like images, CSS, JavaScript, and fonts, while allowing cookies on your site’s primary domain.
Summary
Using cookie-free domains is a highly effective way to improve your site performance, reduce hosting costs, and even enhance your customer experience and SEO.
As we’ve seen, setting up cookie-free domains in WordPress is beneficial. However, only a managed WordPress host like Kinsta can take full advantage of these benefits.
With convenient tools for removing set-cookie headers and direct database access to redirect posts to a static subdomain, it’s never been easier to use cookie-free domains. Kinsta’s APM tools and other performance-monitoring features can also help you track the results.
For more information and to see Kinsta for yourself, contact us or schedule a free demo today.


