
A WooCommerce website has different and unique needs compared to other types of websites. For starters, the amount of time the store is online is one of the most important aspects to consider. It almost needs to be an obsession for a savvy store owner.
WooCommerce staging is one tactic to help you keep your ecommerce store live, while still enhancing and updating it.
In a general sense, a staging site is a copy of your live site that isn’t accessible to the public. This is an oversimplification, but if you think of it in this way, you’ll begin to see what it can do for you. With a staging site in place, you can carry out updates, test design choices, and work on your site without impacting the live store.
In this article, we’re going to show you everything you need to know about WooCommerce staging. By the end, you’ll know if it’s right for you, and how to put something in place.
What Is Staging?
Staging is a way to host your live site, without showing it to the public. This seems counter-intuitive until you understand that you’ll make changes to a staging site before pushing them to your live instance. Consider it a copy of your site that you’ll use as a testbed, before you publish the good changes.
It’s this concept that’s important to the whole process. You don’t want to make changes to your live site in most cases. This is because any one of those tweaks could cause an issue, at which point your site either doesn’t work properly or stops working altogether, interrupting your users and sales.
The general process will be to clone your site’s files along with your database. This will go onto another server, your local development environment, or both, depending on your workflow (more on this later). Once you finish your work, you can move back through those stages to progress — so from a local setup to your staging server, or from staging to live.
All the while, your live site remains in its old working state, without suffering from the effects of your changes. Of course, once you push those changes from your staging environment to your live server, this will update your site.
On the whole, staging is a failsafe against issues with your site while you make changes. Once you determine that those changes are good to go, you can send them to your live site.
Do You Need WooCommerce Staging?
We admit that this can seem like a convoluted workflow, especially given that most site owners are new to the concept of local-to-live development. However, WooCommerce staging makes good business sense for one big reason: uptime.

Public use of ecommerce is rising, and it’s going to be near-ubiquitous in the future. What’s more, the most popular ecommerce markets span the globe. This means you’ll need to be prepared to cope with an almost constant flow of traffic.
In other words, you’ll want to maintain your site’s uptime.
WooCommerce staging lets you keep your site live while you safely test out changes. It offers myriad benefits:
- You have plenty of time to work on the aspects of your site you need, without worrying about downtime.
- A staging site will never affect your live server, so you have protection from mistakes.
- You can test out redesigns and User Interface (UI) updates without impacting the end user.
- If you have a development team, there’s a natural division of labor here. They can work on the design and functionality of your site in peace while you concentrate on maximizing your productivity using a proven design.
There are lots more positives to WooCommerce staging, and they will all be unique to your own setup. In any case, if you split your site and development across local, staging, and live sites, you’ll keep your uptime high and your profits rolling in.
When To Use WooCommerce Staging
We’ve touched on some of the use cases for WooCommerce staging already, but it’s worth giving you more detail on some specific situations.
On the surface, simple updates and tweaks to your site don’t seem like the best use for WooCommerce staging. After all, setting this up requires some thought, and it’s often more straightforward to make those changes to your live site. However, we’d argue that basic changes are the best reason to use staging.
This is because a WordPress core, theme, and plugin update can affect a site as much as the White Screen of Death (WSoD) or other error. These types of updates still make changes to your files, and if there’s an incompatibility, you’ll have a site that’s offline.

In the case of core updates that go wrong, the damage might be irreversible. This is obviously more disastrous than a fixable error, but even with the latter, you’ll have some work to do. For example:
- You’ll need to log into your site’s server through Secure File Transfer Protocol (SFTP).
- Next, you’ll want to find the offending theme or plugin, which often involves disabling everything and carrying out individual checks.
- From there, you’ll want to sort out the functionality that the theme or plugin gives you. In the case of the former, your site will look broken in all likelihood, while the latter might cause some essential functionality to disappear.
While it’s one of the simplest issues to fix, a theme or plugin incompatibility still provides a headache. Most important is that it introduces downtime, which will have a knock-on effect to your income and traffic numbers.
You can also extend this to plugin and theme installations. Of course, installs and updates are different actions, but they are both concerned with changing and adding files. As such, it’s not hard to understand how installing a new plugin or theme on a WooCommerce staging site will let you test the new addition for bugs and incompatibilities before you go live.
In fact, when it comes to theme installations, you’ll only really do this if you’re looking to redesign your site. This is a core use case for staging, and we’d argue that redesigns are one of the only situations you might consider utilizing the technique.
As you can see, WooCommerce staging is more than a design sandbox environment.
Using Staging as a Backup
Some users will also assert that if you copy a full live site over to a staging environment, this also constitutes a full backup of your site. The truth here is more complicated.
On the one hand, yes, your entire site is available within a different environment in case the worst happens. However, this “backup” is only a snapshot of your site at a much older point in time.

It would take incredible luck to stage your live site just before it’s hit with an error. What’s more, if you use staging, you won’t always use the most current database because an update is not always necessary for the application. In fact, most staging processes forgo pushing the database from staging to live because the data is always going to be outdated.
This is especially true for WooCommerce sites, where you might experience multiple sales per minute. Imagine a situation where you pull a site to staging and push it live after some time, only to wipe away several hundred orders.
Options for WooCommerce Staging
Lots of savvy web businesses, hosts, and developers recognize that staging in general is important for most site owners. As such, there are plenty of ways to stage your site, and they’re all going to be familiar if you use WordPress:
- Your host might have ways to set up staging, although not all will. This is a good option, because you won’t need to navigate to yet another dashboard and interface.
- WordPress plugins exist, such as WP Stagecoach and WP Staging. Lots of advice suggests plugins such as Duplicator, but this can’t replicate the same functionality as a staging solution can.
- There’s also the option to set up a manual staging site. This is going to be a technical endeavor, and you’ll need a lot of expertise to pull this off. It might not be the best option for most, but it will be the most powerful.
It’s always a good idea to first check what you can already achieve with your current tools and software. As such, your host is the first place you should look.
Why Consider Hosts With Built-In Staging
Despite the benefits of a manual approach — it’s powerful, adaptable to your needs, and under your control, it’s likely not the best solution. We believe that your host offers the right blend of features, functionality, usability, and more to help you set up WooCommerce staging.
There are lots of benefits of using your host:
- You don’t need to worry about hooking up your staging solution with your server, because it’s already part of the ecosystem.
- Your host knows how to set up servers, so they will be the experts in what makes for a good staging server.
- What’s more, you can better replicate your live server using your host’s infrastructure. In many cases, those servers will have the same specifications, software, and optimization.
- There will be no extra dashboard or interface to content with, which is important from a usability standpoint. Lots of hosts offer an easy staging option, with the ability to choose what you pull and push between servers too.
Because we believe so much in the power of staging, Kinsta has its own solution to set this up with the least amount of fuss. In the next section, we’ll take a look at what it offers.
Why Kinsta Is the Perfect Host for WooCommerce Staging
Among the many features Kinsta offers is robust, integrated staging for each WordPress install a prime one — this includes WooCommerce sites. In fact, Kinsta has 52,000 staging sites in use and counting!
You get a full-featured solution here. That includes the ability to set up, refresh, delete, and manage your staging environment. There is a minimal number of clicks between you and a staged site, and it takes only seconds to push and pull data and files between your live and staging environments.
What’s more, you can create a complete workflow if you include DevKinsta as part of your process.

DevKinsta is a free tool that lets you push local sites you develop to a staging environment. This means you can work without wasting any of your server’s resources, then test those changes out on your staging server.
We have plenty of information on how Kinsta’s staging works within our knowledge base. However, we’re going to show you some of the basics across the rest of the article.
Kinsta also allows you to take advantage of their Premium Staging Environments add-on, which allows you to add up to 5 Premium Staging Environments to your WordPress site. A Premium Staging Environment is ideal for resource-intensive site testing or development, like a WooCommerce website.
How To Set Up WooCommerce Staging (Using Kinsta and DevKinsta)
Over the next few sections, we’ll show you how to set up WooCommerce staging using both Kinsta’s functionality and DevKinsta as a local environment.
However, before you fire up the control panels, it’s a good idea to plan out how you’d like your process to flow.
1. Plan Out Your Workflow
This is a subject we touch on elsewhere in the article, but WooCommerce staging isn’t only about hosting on a different server to test out changes. Consider it a whole approach for your site’s development. Because of this, you’ll want to decide on this workflow before you do anything else.
Our opinion is to take a three-pronged approach to your development workflow:
- Local: You’ll work on your site within a sandboxed environment on your own computer, which offers lots of time and no pressure. However, you won’t often get complete parity between your local setup and live server.
- Staging: This will offer an online environment to test the changes you make from your local setup, on a server that better represents your live site.
- Live: This is (of course) your public-facing site, which means it’s the most important to preserve while you carry out design changes and updates.
This workflow lets you work at your own pace, without hitting any hosting resources, then scale the site as you near a production-level design. However, in addition to this, you’ll also want to consider some of the following aspects:
- Database syncing: This is one of the biggest considerations to make with your WooCommerce staging. You will often move a live database to your local and staging environments, but won’t push that database back in its entirety. This is the difference between a good staging solution and a migration tool.
- Syncing files: In a similar way to your database, you’ll want to consider how you sync the files you work on back to your live site. It could be that you don’t push everything, only the changed files. However, there’s nothing wrong with a full sync if it makes sense.
For some developers, Git is an important go-between for the staging process. In fact, Git is fantastic for hosting your theme and site’s files using a “push-to-deploy” approach. This lets you work on a local server, push files to Git, and set up a macro or script to deploy those files to the staging or live server.
If you have the ability to never touch one of your servers, you have less scope for “damage” as you progress through each step of the workflow. This is yet another benefit of staging, in our opinion.
2. Set Up the Staging Environment
We can keep this section short, because enabling staging within Kinsta is so simple! There are three general steps you’ll want to follow here. First, log into your MyKinsta dashboard, and head to the site you want to stage:

Next, change the environment from Live to Staging. You do this from the drop-down menu at the top-right of the screen

Once you click the button to implement staging, Kinsta will work its magic and set things up. You’ll likely have to wait around 15 minutes or so before everything is ready to roll. However, you’ll also find your Secure Sockets Layers (SSL) settings port over, which saves you an extra step.
3. Make Changes To WooCommerce Staging
Kinsta’s staging functionality is fantastic and works with almost every development environment. However, if you opt to use the DevKinsta app, you can access a few extra (and cool) features to make your WooCommerce staging experience easier.
You’ll want to start with the import process to DevKinsta. This is a breeze once you click the Add Site button — you’ll choose Import from Kinsta from the available options:

You know what to do from this point: Develop your site!
Of course, whatever task you choose to undertake while working within DevKinsta is fine by us, but when you’re ready, you’ll want to get those changes back to your staging environment.
4. Push Changes from Staging To Live
Much like importing your site into DevKinsta, pushing those changes back to your server is a snap. If you click into the Site Info panel within DevKinsta, you’ll see the Push to staging button:
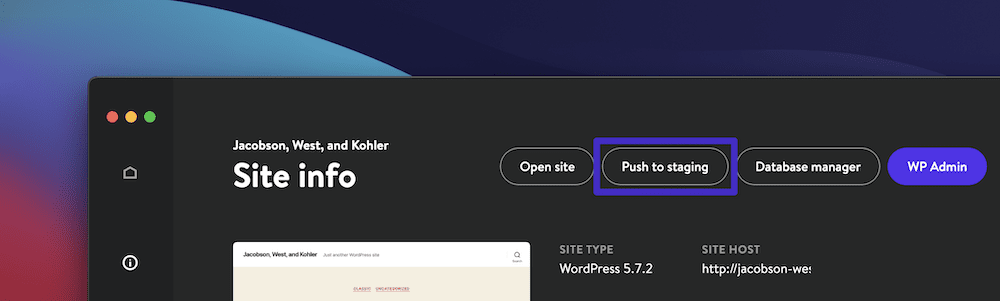
It seems too simple, but this is all you need to do to get your site back to your server again. However, you’ll want to check off a few more tasks before pushing those staging changes live.
First, carry out a thorough test of your site now that it’s on the server. This will catch any incompatibilities that your local environment didn’t highlight.
When you finish that, it’s time to make your changes live.
You’ll do this from the MyKinsta dashboard. With your staging environment on-screen, look to the right-hand side. You’ll see an Environment actions dropdown menu. If you select Push to Live from this menu, the obvious happens:

There’s much more you can do with Kinsta’s excellent staging functionality, and we cover everything you need to know — including our Selective Push feature — over on our knowledge base.
Summary
Site uptime is important — arguably more important for WooCommerce sites than any other feature you’ll consider. As such, you’ll want to find ways to increase that uptime as much as possible in order to maximize the time you have to sell to customers. WooCommerce staging is one of the best ways to find that extra uptime, while also scaling, expanding, redesigning, and optimizing your store.
Over the course of this post, we’ve discussed WooCommerce staging and why you’d want to implement it. While there are a lot of ways to set this up, using your host is arguably the best option. Kinsta offers both standard staging as well as add-on Premium Staging Environments that tie into the local DevKinsta environment. This means you can keep your entire site’s ecosystem within Kinsta-based apps, and benefit from high uptimes to boot.
Do you think WooCommerce staging can benefit your business, and if so, how do you think it will help you? Let us know in the comments section below!


