
Updating your WooCommerce store is a serious thing as you may break some functionality that could negatively affect your bottom line or simply how your site works.
There are four schools of thought amongst store owners when WooCommerce updates roll around:
- The Cowboy: These store owners hit “update” without a second thought. Then their stores come crashing down around them.
- The Couch Potato: Those who simply ignore updates altogether, treating them like they don’t exist.
- The Scaredy-Cat: These store owners have so many outdated plugins and themes because they’re terrified of what will happen if they attempt an update.
- The Maverick: Lastly, these are the store owners who run regular backups, test new releases of WooCommerce on a staging site, and then update their live site without issue.
Ideally, everyone should be a Maverick. Fortunately, it’s not hard to be one! With the right tools in place, a solid testing checklist, and some automation, you can start keeping your WooCommerce site up-to-date and always running smoothly.
In this post, we’re going to run you through how to perform a safe WooCommerce update from start to finish, including what tools to use and a big testing and updating checklist.
And remember, your ultimate goal is to increase your store’s revenue. So be sure to download our free ebook, 10 Ways to Boost Your WooCommerce Product Page Conversions.
Ready to start? Let’s do it, then!
Invest a Little Time Now to Save a Lot of Time (And Anxiety) Later
Before we dive in, best practices tell us that you should never update your site, especially WooCommerce, without thoroughly testing any new releases first. That goes for major, minor, and patch releases—it doesn’t matter.
You have to be willing to spend a little time now to save a lot of time later.
You don’t need to hit that ‘update’ button straight away. Give yourself some time and make sure you understand what changes will be made and, most importantly, how they might impact everything else on your site. Simply reading up on the new features available in the version of WooCommerce you want to update to will help you get your head around what you need to prepare for.
To put things in perspective, and understand how easily things could break, think it from a plugin or theme developer’s point of view for a second: since WooCommerce core, as well as WordPress core, need to be backward compatible. Now, think at the number of plugins you — or your client site — is using. How likely a WooCommerce update is going to break some functionality? Well, I guess you know the answer already: extremely likely.
That’s why, right after a WooCommerce update announcement, it’s always good to review changelogs and the WordPress.org support forums before updating WooCommerce. If there was ever a problem with an update, 99% of the time someone else would come across the issue first, saving you a ton of time and hassle dealing with the issue yourself.
It’s also not uncommon to refrain from pushing the WooCommerce update immediately to your site and wait for plugin/theme authors to release their own updates to WooCommerce-related products before you can update your site too. So being patient and taking the time to check compatibility can really pay off.
Getting Started With Your WooCommerce Update
There are four essential stages when approaching WooCommerce updates, each with its own set steps. We promise that after you’ve run through everything once, it gets quicker and easier every time! We’ll walk you through each of the following four stages of updating WooCommerce:
Updating WooCommerce: Getting the Right Tools
Let’s face it: manually testing WooCommerce is tedious and time-consuming. It’s for these reasons that so many people simply don’t do it or, when they do, they don’t test properly and miss errors on their sites.
Fortunately, there are tools that can help speed up the testing process and make it less of a boring thing to do. After countless times testing WooCommerce updates over the years, these are the tools we recommend. Let’s take a closer look at each one.
Staging Site
This is non-negotiable. You should never update your live site immediately after a new release of WooCommerce.
Staging sites provide a safe testing environment where you are free to break things (usually without repercussions). There, you can run WooCommerce updates, test new versions, and see how your site might react before updating your live site.
If you don’t have a staging site, Kinsta can help you out — we offer a free staging environment with each site, as well as up to five add-on Premium Staging Environments if one isn’t enough.
Visual Comparison Tools
How do you know if your site has changed after a WooCommerce update? If you run a large site with dozens of pages, tracking down small changes in formatting or even widgets that have stopped displaying can take time.
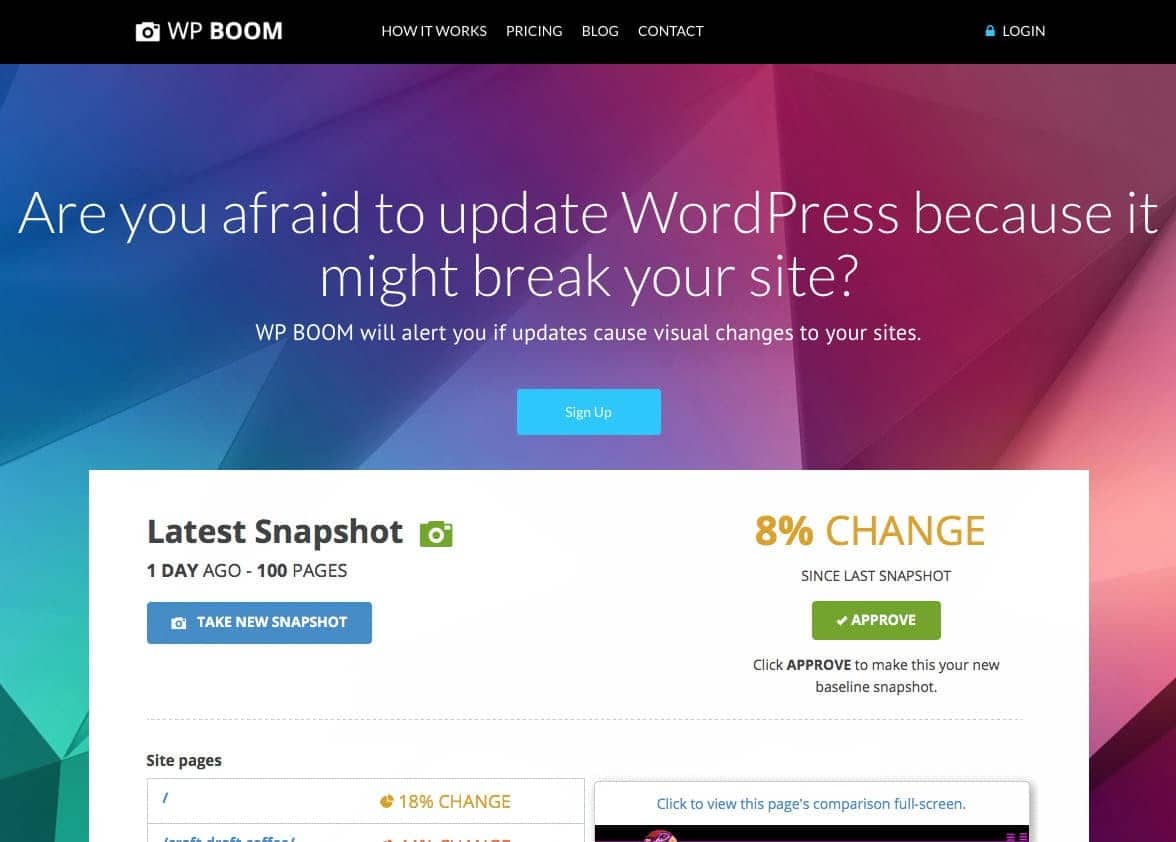
With a visual comparison tool like WP Boom, which we’re going to use for this tutorial, you can take a snapshot of your site, hit “update”, and then take a second snapshot so you can quickly see what’s changed:
It’s important to point out that a visual change doesn’t necessarily mean that some piece of functionality has broken on your site, just that it could be broken.
End-to-End Testing Tools
While visual comparison tools can help you quickly spot changes in the formatting and design of your site, end-to-end testing tools go further. They test the actual functionality of your site and provide more certainty when something isn’t working.
Clicking around your site to complete tests, like adding an item to cart and checking out, takes time. These tasks get old pretty quickly when you’ve tested WooCommerce updates a hundred times before.
With end-to-end testing tools, you can automate this process so it’s done automatically for you.
With Robot Ninja shutting down, we’re going to show you how to use two different tools in this tutorial.
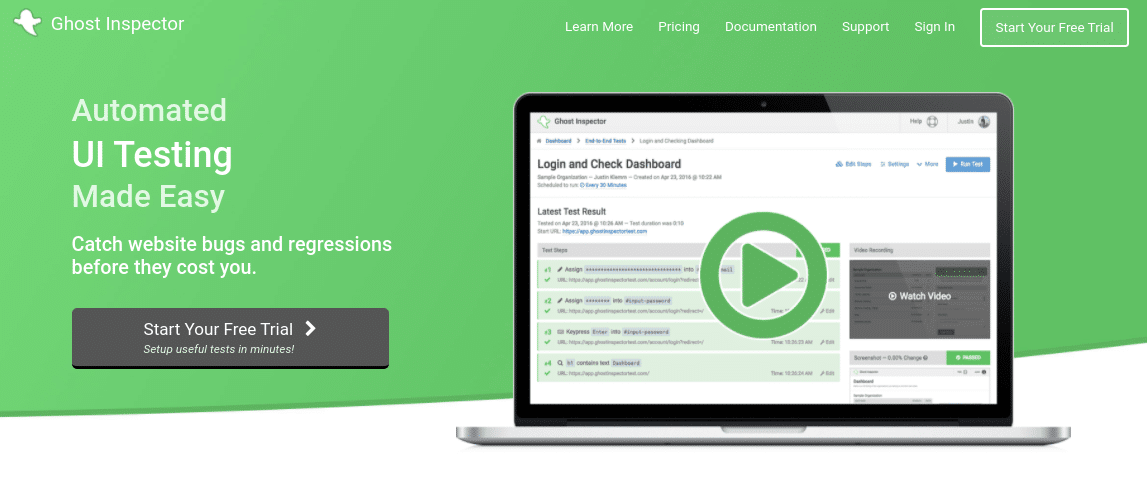
The first is Ghost Inspector:
The second end-to-end testing tool you can try is Usetrace:
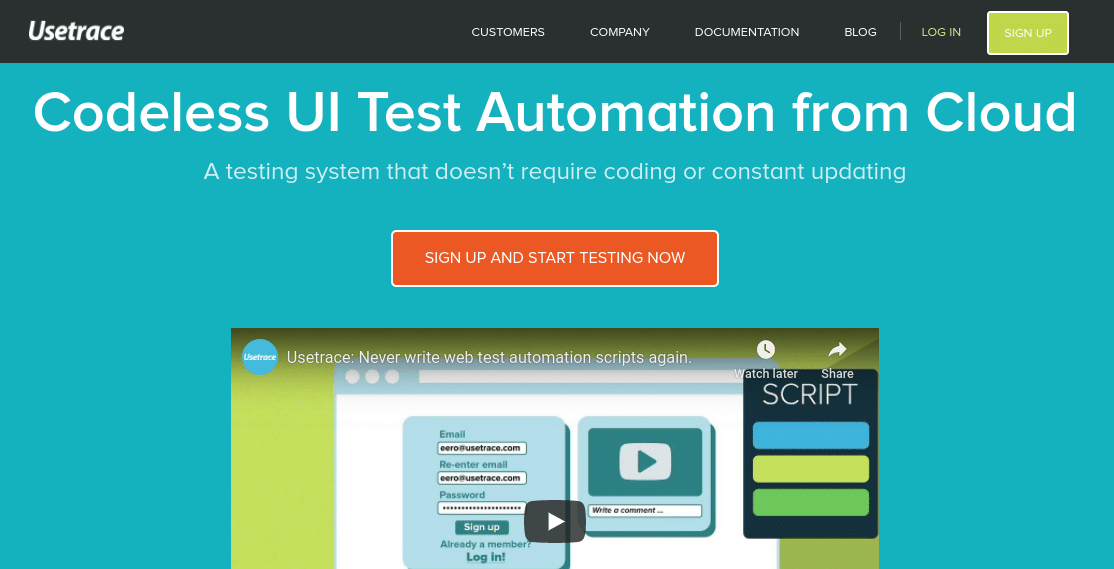
This is another automated end-to-end testing tool for WooCommerce, which you can use on both staging and live sites. We’ll go through how to set up both later in this article. WooCommerce also has some E2E tests you can run through if you are more of a developer.
Backup Tools
You should be running regular backups of your site. If you’re interested in database backups, we’d recommend WP Migrate DB Pro, or simply using WP-CLI to run quick exports.
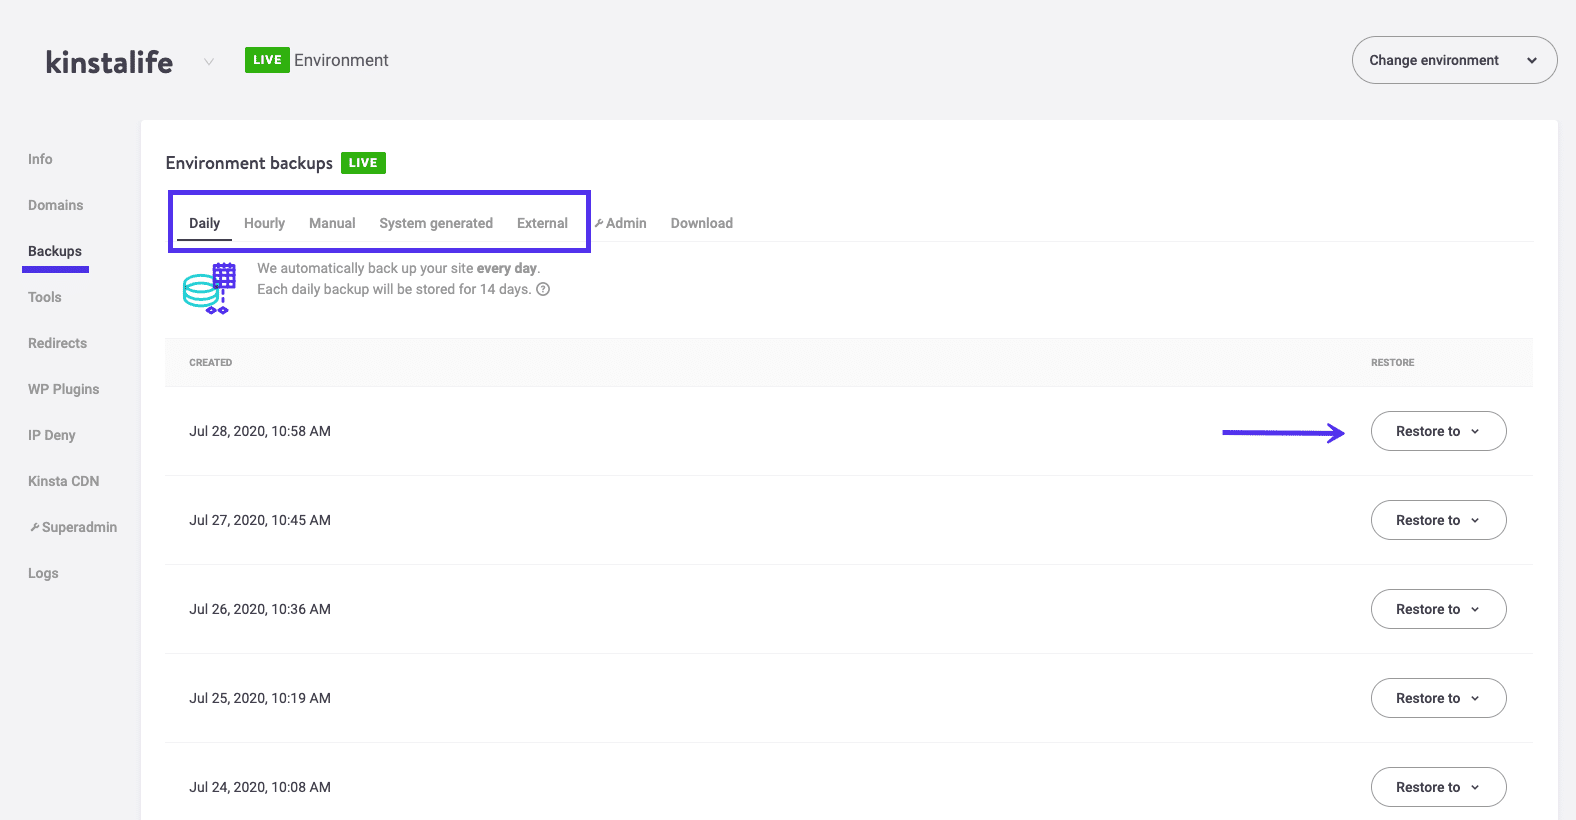
If you’re with Kinsta, we provide automatic daily backups, manual backup points, and backup retention for all of our plans:
Once you’ve got the right tools in place, it’s time to do some prepping.
Updating WooCommerce: Prepping (A 7-Step Checklist)
If you want your WooCommerce update to go smoothly, you need to do some prep. There is a little work involved, but after you’ve prepared once, it’s easier to fill in the blanks and do it quicker next time you update. Below are the seven prepping steps we recommend.
Step 1: Re-Familiarize Yourself With the Site You’re Updating
If you’re not sure how your site is expected to function (i.e. if it’s a new client’s site), take some notes. This will help ease some of the anxiety you might feel if you get confused about how the site works after an update (this happens more often than you might expect).
I also recommend making a list of critical URLs and the functionality of your site (and customers). This should include important pages on your site, such as your home, category and product, ‘my account’, cart, and checkout pages.
Step 2: Verify That Your Backups Are Current
If your backups are not current, now’s the time to run another backup. Re-familiarize yourself with your backup tool. Most importantly, check to see if it’s working properly, and make sure you know how to revert to a previous snapshot of your site.
Step 3: Set Up WP Boom
It only takes a minute to set up this tool. If your memory and note-taking aren’t great (we can all make mistakes), WP Boom can help fill in the gaps with screenshots of your site. Think of them as the ‘before’ photos in weight loss promotions.
You’ll want to start by taking your first site snapshot, so you have a visual baseline record of your staging site pre-update.
It typically won’t be able to take screenshots of the checkout (you need some products in your cart) and protected pages, but that is where one of the next tools can help.
Note: We’ll walk you through how to set up and use WP Boom later in this post.
Step 4: Set Up Your Automated Testing Tool
If you were testing WooCommerce manually, this is the part where you’d make a list of test scenarios: i.e., open your site, add a product to the cart, go to checkout, enter payment information, etc.
Fortunately, both Ghost Inspector and Usetrace can automatically do all of this for you. We’ll explain how to set up both of these tools in a bit.
Step 5: Identify Any Other Parts of Your Site You Want to Test
The next step is to identify any other parts of your site you want to test, based on the list of critical URLs and functionality you created earlier. This could be functionality like contact forms and pop-ups, or elements such as slideshows and galleries.
You can test these things manually, or if you are more technically-minded, you can try your hand at automating this step too.
Step 6: Check Out What’s New in the WooCommerce Version You’re Updating to
It’s also a good idea to see what new updates and features are available in the version of WooCommerce you’re updating to. More specifically, check to see whether your plugins and theme are compatible with it.
Again, it’s better to spend some time now to save yourself some time and anxiety later. We recommend checking out release announcements on WooCommerce.com, change logs, GitHub issues, and the WordPress support forums.
Step 7: Clone Your Live Site to Your Staging Environment
If you’re using any plugins that feature a staging mode, such as WooCommerce Subscriptions, turn them on or simply disable them. Likewise, you’ll want to disable emails.
Then, double-check to ensure that your staging environment mimics your live site as closely as possible. We’d also suggest enabling WordPress debug mode at this point, to help with problem-solving down the road.
Important: After you push your site to staging, you don’t want to lose any orders that might come through. To avoid this, our recommendation would be to put your WooCommerce store into maintenance mode. This will ensure that no orders are placed while you’re performing updates and testing.
Updating WooCommerce: Updating and Testing Your Staging Site (A 7-Step Checklist)
Now that you’re prepped and ready to go, here comes the fun part: updating your staging site. The awesome thing about staging sites is that it doesn’t matter if your site breaks, because it’s just a copy. Let’s take a look at the steps involved in this part of the process.
Step 1: Take a Snapshot of Your Site With WP Boom
The first thing you’ll want to do is take a snapshot of your site with WP Boom. This will give you a visual baseline record of your staging site, pre-update.
Step 2: Run Your Testing Tool and Ensure That Your Tests Are Passing
As we mentioned earlier, you can use an end-to-end testing tool such as Ghost Inspector or Usetrace to automate your tests. Further in this article, we’ll walk you through how you can run a test using both tools, and check to make sure the tests are passing.
Step 3: Update Your Plugins and Theme
In the prepping stage, we mentioned checking to see whether your plugins and theme are compatible with the latest version of WooCommerce you’re updating to. If you noticed your plugins or theme are outdated and no longer compatible with the latest version of WooCommerce, now is the time to update them to a version that is compatible.
Step 4: Update WooCommerce on Your Staging Site
Once you’ve updated your plugins and themes, making sure there won’t be any compatibility issues, you’re ready to update your staging site to the latest version of WooCommerce. Updating your staging site allows you to identify any potential errors to resolve before pushing the WooCommerce update to your live site.
Step 5: Check Your Logs for Errors
After updating your plugins, theme, and WooCommerce, it’s smart to check your logs to look for any errors resulting from these updates. Do a quick scan to ensure that you can still access your home page and admin area.
If you get a white screen of death or are stuck in some other unrecoverable situation, now is a good time to revert to a previous snapshot of your site. You can either do some problem-solving yourself or seek help.
Step 6: Take a Second Snapshot to Compare Changes
If all is going well so far, run WP Boom again and get a second snapshot. Compare your before and after snapshots to see what’s changed.
What’s great about WP Boom is that it will tell you how much your site has changed since your last snapshot.
For example, there might be a 7% visual change between your two sets of snapshots. While this doesn’t necessarily mean your site is broken, it might mean you need to adjust some styles.
Step 7: Run Ghost Inspector or Usetrace Again to Ensure That Everything Works Properly
Next, run another test using either Ghost Inspector or Usetrace (or whichever end-to-end testing tool you’ve chosen) to ensure that your checkout flow is in proper working condition. You can also perform manual or automated checks for any other functionality on your site, such as the contact forms.
If anything is not working as you’d expect, now is the time to report and/or fix it.
If you have custom code running on your site (i.e., code that is not maintained by a third-party plugin/extension developer), you will need to fix it and make sure the fixes are applied to your live site before or after running the update (depending on the issue).
Version control, such as having your site in Git, can help you better manage changes. Where you report bugs will depend on what plugins you are using and your support arrangements. From here, you’ll either have to wait for new releases of your plugins/theme and then try the process again, or work on the fixes yourself and update your code.
The good news is, your live site is not broken, your customers will still be able to make purchases. Plus, you can take the time to repeat the process as much as needed until you are comfortable everything is going to work as expected.
Updating WooCommerce: Updating and Testing Your Live Site (An 8-Step Checklist)
Once you’ve updated your staging site and have it working smoothly, with any broken functionality fixed and all bugs ironed out, you’re ready to update your live site.
Let’s take a look at the steps involved in updating your live WooCommerce site, many of which will be similar to ones you performed during the testing of your staging site.
Step 1: Back Up Your Live Site
The first step is to back up your live site. It’s important to make sure you don’t miss this step. If you’re a Kinsta user, you have a variety of backup options to choose from. However, you can also use a backup plugin.
Step 2: Take Another Snapshot of Your Site
Next, you’ll want to take another snapshot of your site with WP Boom. This provides you with a visual baseline record of your live site, pre-update.
Step 3: Run Ghost Inspector or Usetrace and Ensure That Your Tests Are Passing
Again, you can use either Ghost Inspector or Usetrace for this, depending on whether you wish to use a Chrome extension or online tool to record your tests. This provides another baseline for your site pre-update.
Step 4: Sync and Push Your Changes Live
Next, depending on how your staging and live environments work, you may simply need to sync changes between the staging and live sites. Alternatively, you might have to run through updating your plugins and code again.
If you’re with Kinsta, you can push changes live in one click:
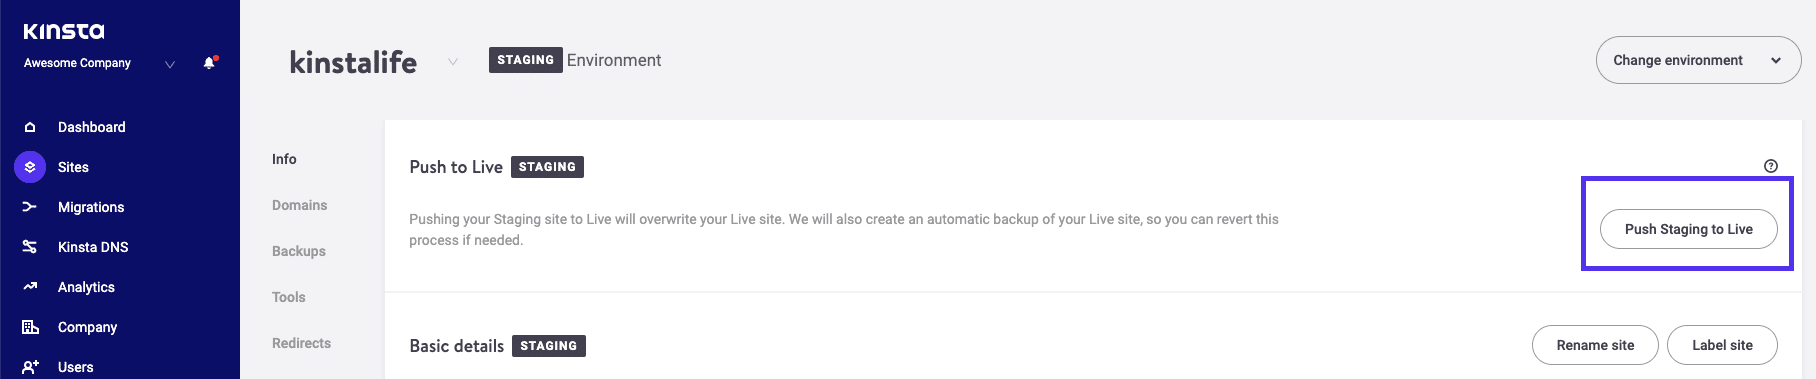
Remember to take your WooCommerce store out of maintenance mode first.
Step 5: Check Your Logs for Errors
Once you’re done syncing the update, check your error logs again for any issues that may have occurred as a result. Verify that you’re still able to access the home page and admin area.
As with the staging site, if you get a white screen of death or encounter another unrecoverable situation, it’s best to revert to a previous snapshot of your site and do some troubleshooting or reach out for help.
Step 6: Take Another Snapshot With WP Boom
Next, run WP Boom again so you’ve got a second set of snapshots. Compare your before and after snapshots to see if anything has changed.
Step 7: Run Ghost Inspector or Usetrace Again to Confirm That the Site Works Properly
Once again, you can use your automated tool to run another test and make sure everything is working as it should. At this point, you can also perform any other manual (or automated) checks for other functionality on your site, such as contact forms.
If you dealt with and fixed any problems earlier while updating your staging site, such as conflicting plugin code and your own custom code, there shouldn’t be too many issues (if any) to fix at this stage.
Step 8: Do a Final Visual Check
You’re almost done. The only thing left to do is double-check your list of critical URLs and functionality to make sure everything’s working.
If all seems well, that’s it! Your WooCommerce updated is now live.
Getting Started with WP Boom
WP Boom is a visual testing and comparison tool built for WordPress. Once it’s set up, you can compare screenshots before and after updating your site, and receive alerts whenever auto-updates cause visual changes to your sites:

To get started with WP Boom, sign up for a free account. After entering your email and password, a modal will pop up asking you to connect a new site:
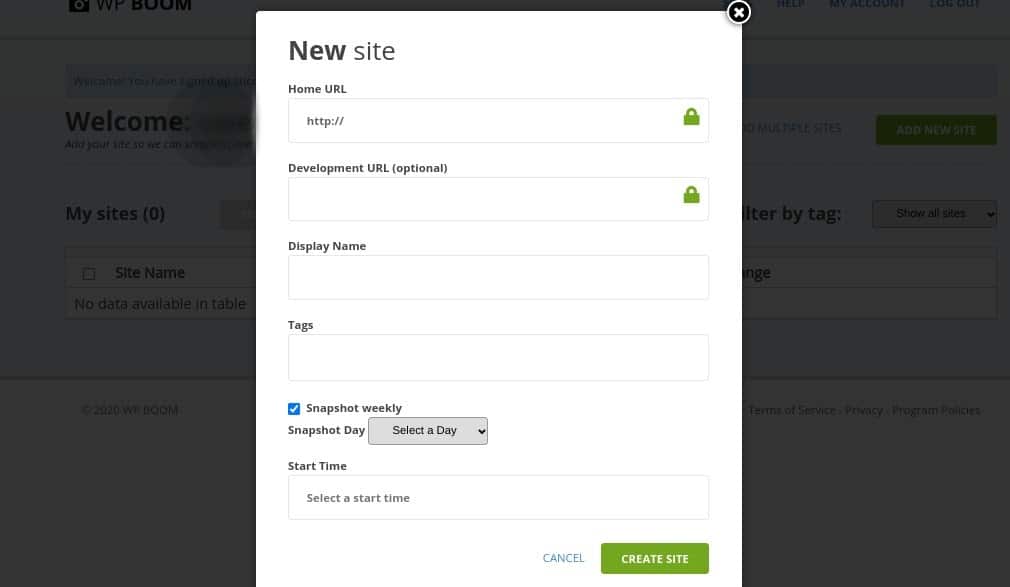
Once you enter the details and click on Create Site, WP Boom will get to work taking your site’s first snapshot. This will take a minute or two, depending on how many pages your site contains:
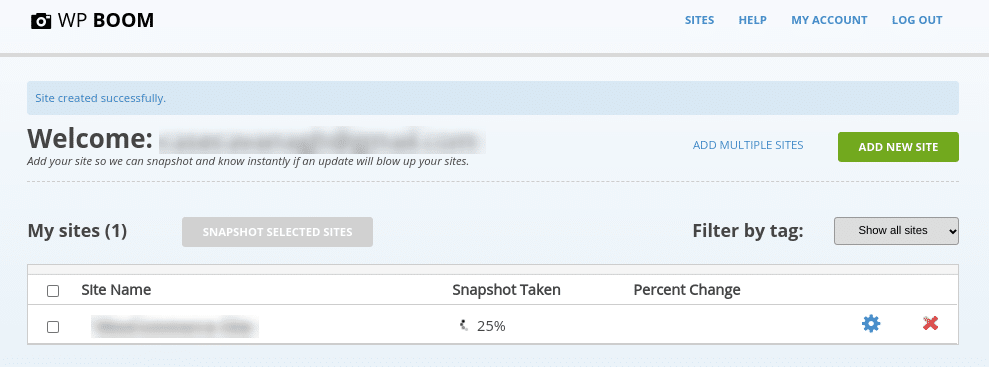
When this process is done, the page will refresh. When you click on the name of your site, you’ll see an overview of your snapshot, including the time it was taken and how many pages were on your site:
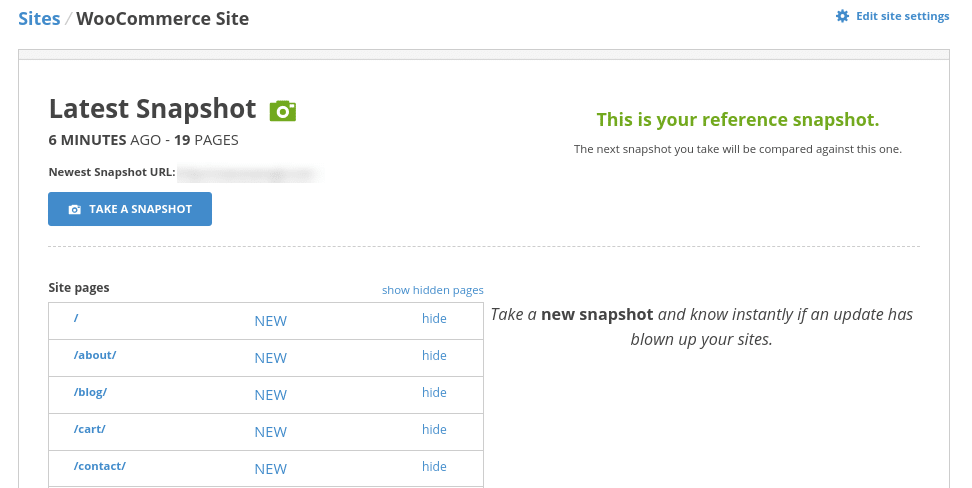
When you’re ready to take a second snapshot, simply return to the WP Boom dashboard, select the site you want to snap, and click on Snapshot Selected Sites.
A few other nice features WP Boom includes are the ability to schedule weekly snapshots and email reports that detail any visual changes on your site. This is useful if you manage a ton of sites and have auto-updates in place.
Automated Testing Tools: Ghost Inspector and Usetrace
It’s important to test and make sure the functionality across your entire WooCommerce site is working properly after making updates, not just your checkout process.
After all, if a customer fills in a contact form or tries to use live chat and those pieces of functionality are broken, how will you know if you haven’t tested them?
It’s easy to run manual tests: simply click through your site, filling in forms and using your live chat window.
To help automate this process, you can first put together a list of critical functionality, as well as instructions for how to manually carry out tests (i.e., “Open site, navigate to contact page, fill in form, etc.”). This will ensure that you don’t miss anything whenever you do a manual test.
If you prefer to automate this process, would like to have more control over your automated tests, or have a highly-customized site or functionality, we’d recommend checking out Ghost Inspector and/or UseTrace.
Both are great options if you aren’t familiar with PHP and don’t want to mess around with scripts and code. These options offer similar features for automating your checkout testing.
Ultimately, which option you go with will depend on whether you want to use a Chrome extension or an online tool to record your tests. Alternatively, if you are a developer and like to get your hands dirty, Codeception is a great choice for developers.
Getting Started With Ghost Inspector
Ghost Inspector is a tool you can use to automate your WooCommerce site testing and ensure that it’s working properly. The best part is that you don’t need any programming or testing experience to use it.
Ghost Inspector works by adding a Chrome or Firefox extension to your browser. Then the extension records your site and automatically runs the tests.
To get started, visit the Ghost Inspector website and click on Start Your Free Trial. Enter your information in the form, and then select Create Account:

This will redirect you to a welcome page. At the bottom, click on the Install Test Recorder button:
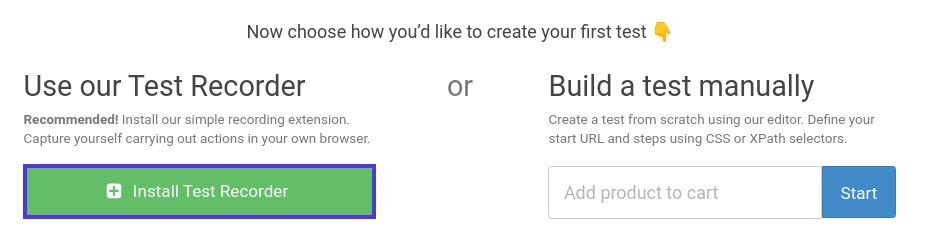
This will open the Chrome Web Store in a new browser tab. Select Add to Chrome:

The Ghost Inspector extension will automatically be added to your browser, appearing in the top-right corner. The first time you click on it, it will ask you to log in using your credentials:
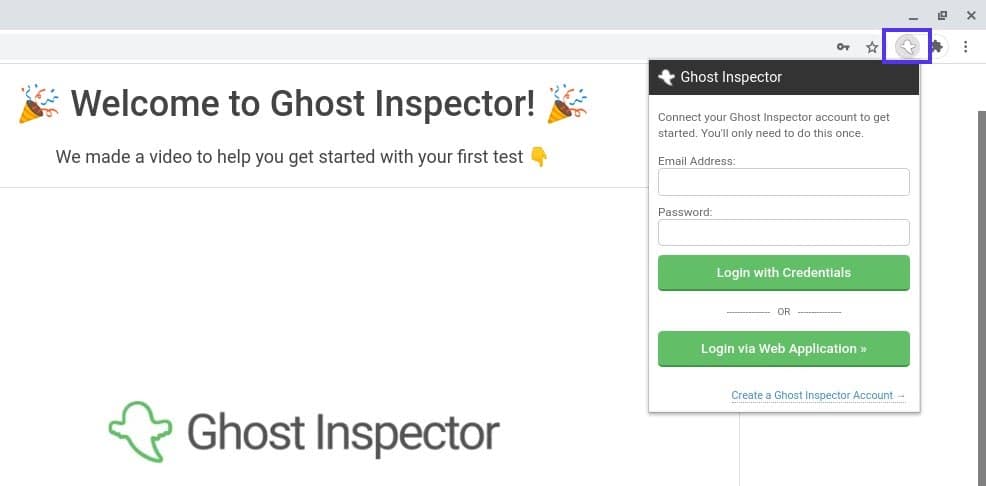
Refresh your browser. When you’re ready to run a test, visit your WooCommerce site (making sure you’re logged out), and then click on the browser extension.
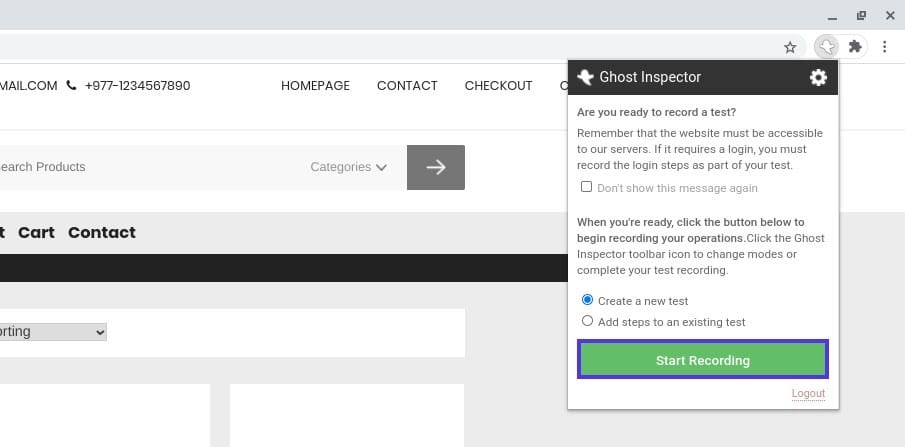
In the dropdown menu, select the option to “Create a new test”, followed by the Start Recording button:
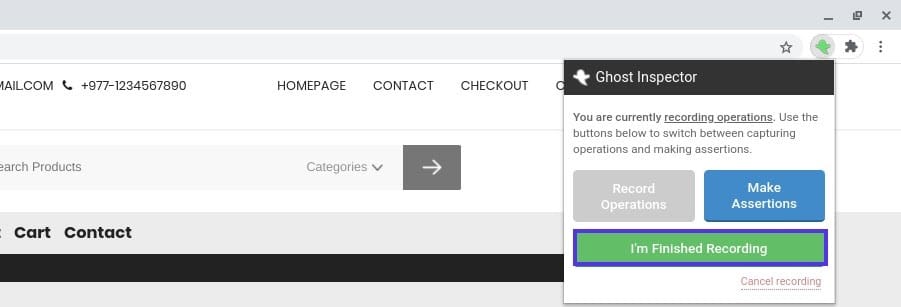
As you run through and test your site, Ghost Inspector will record all of your actions. When you’re done, click on the extension again, followed by I’m Finished Recording:
You can then name and save your test. If you select View My Test, it will bring you to the Ghost Inspector dashboard:
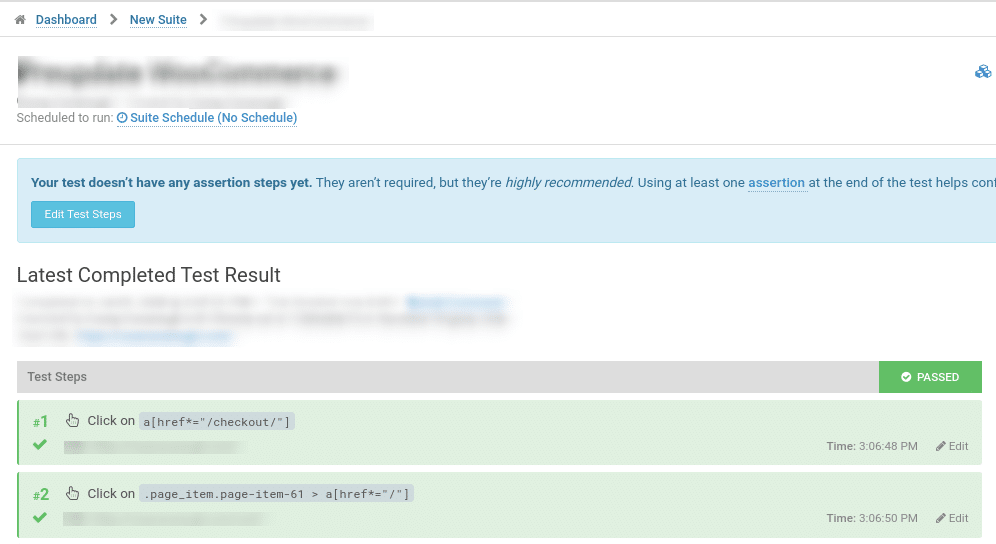
Here you can view all the details of the test. You will see a list of the steps involved and have the option to edit them. It will tell you whether the test passed, and if not, which steps require your attention. For more detailed information, check out the Ghost Inspector documentation.
Getting Started With Usetrace
If you want to use an automated testing tool that isn’t specific to any one browser, you might want to go with Usetrace. With this tool, you create ‘traces’ by recording your workflows through the Usetrace online editor. Then you can use them to automatically test your site.
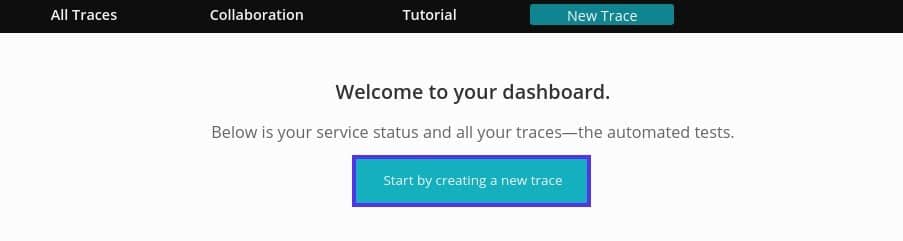
To get started, visit the Usetrace website and click on Sign Up and Start Testing Now. After you create an account, you’ll be redirected to the Usetrace dashboard. Select Start by creating a new trace:
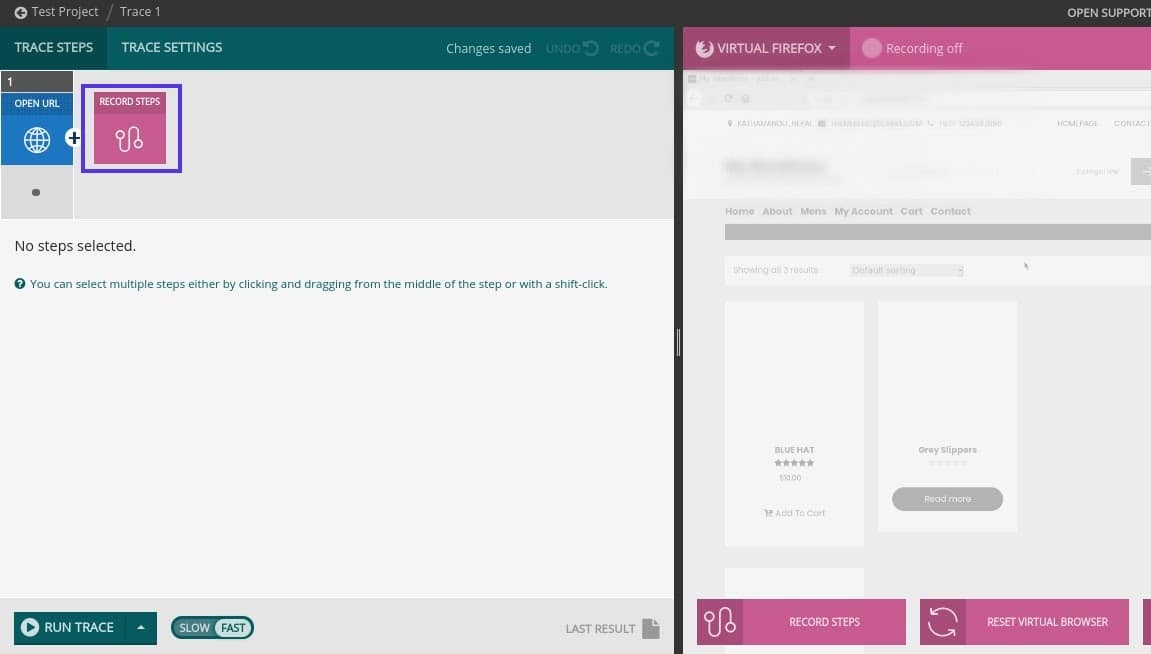
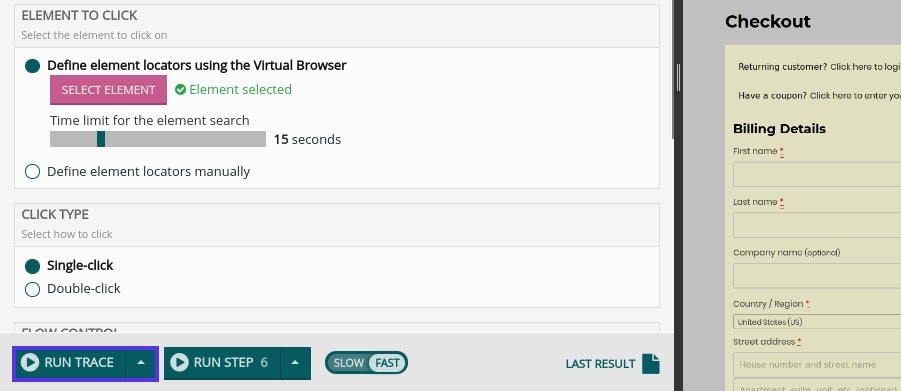
In the window to the left are your trace steps and settings. To the right is the site you’re testing. To start, click on Record Steps:
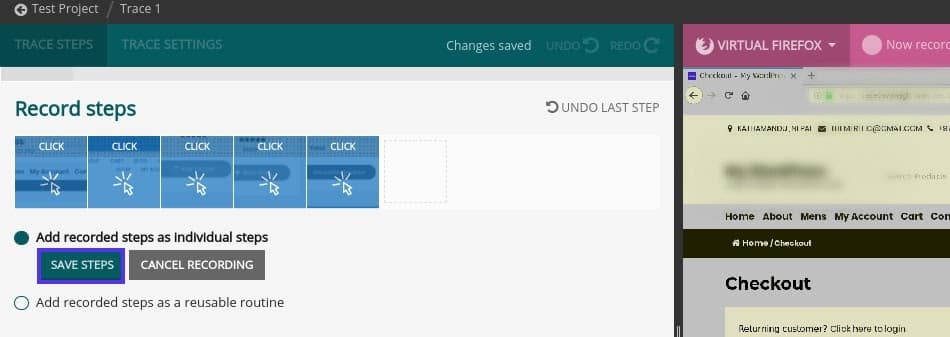
The program will start recording your site interactions. Each time you take an action, such as adding an item to your cart or filling out a contact form, it will add a checkpoint to the trace steps on the left.
When you’re done, click on the Save Steps button:
To run through the entire trace to confirm that everything works, select Run Trace in the bottom-left corner:
After it’s complete, you should see a success message:
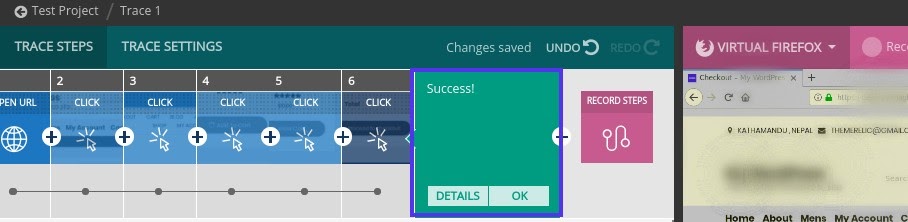
You can click on Details to learn more about each step or select OK if you’re done. For more detailed guidance and instructions, feel free to reference the Usetrace documentation.
Summary
With the right tools, some prep time, and a solid checklist in place, you should have no trouble testing and implementing WooCommerce updates. In order to remove the anxiety around updating WooCommerce, it’s important to demystify the process, which we’ve done here. Hopefully, this guide has provided a solid foundation for keeping your WooCommerce site up-to-date.
We should also highlight it’s important to test your store’s transactional emails as well, but that’s a whole different journey.
Now, back to you: Do you use visualization or screenshot tools when updating WooCommerce and WordPress? What other tools and workflows do you use for updates? Share them with us in the comments below!


