Is there anything more frustrating than realizing you forgot to publish a post on time? You meant to hit publish yesterday, but somehow life got in the way. And now, it’s too late. This is made even worse if the to-be-published article was timely, centered around a holiday, or an announcement of an upcoming event. Yikes!
Thankfully, scheduling your posts in advance can help avoid this problem and keep your blog on track. In this step-by-step guide, we’ll show you how to schedule posts in WordPress using three different methods. So whether you’re a beginner or an expert, you’ll be able to get your posts scheduled in no time.
But first, let’s take a moment to explore why scheduling posts is so important.
Check Out Our Video Guide on How To Schedule Posts in WordPress
Why Schedule Posts in WordPress?
Scheduling posts in WordPress can save you a ton of time and help you stay organized. If you’re running a news site or blog, then it’s especially important to publish your articles at regular intervals. This helps maintain a consistent flow of content and keeps your audience coming back for more.
Additionally, post-scheduling can be a lifesaver if you’re going on vacation or taking a break from your site. Rather than letting your blog go silent, you can schedule a few posts in advance to keep things going while you’re away.
Let’s explore a few more reasons why WordPress scheduled posts are such a good idea. Scheduling your posts ahead of time can help you to:
- Post at the time of day that has the highest traffic. If you want to ensure that your post is seen by as many people as possible, then you need to publish it at the time of day when most of your readers are online. For example, if you’re running a parenting blog, then you’ll want to publish during the daytime when moms are most likely to be online.
- Publish content consistently. If you want to build a loyal readership, then you need to publish content on a regular basis. This can be difficult to do if you have a day job or other commitments that take up most of your time. By scheduling your posts ahead of time, you can make sure that your content goes live even when you’re busy.
- Write a backlog of content and stagger its posting. This can be helpful if you have a lot of content that you want to publish but don’t want to overwhelm your readers. By scheduling your posts, you can control how much content is published at one time.
- Post during the day if you live in another country or sleep during the day. This one is pretty self-explanatory! If you blog during the nighttime hours, then post scheduling can help you to ensure that your content goes live during daytime hours in your readers’ timezones.
- Make sure you post consistently on schedule. This is especially important if you blog about timely topics or events. If you want your readers to know that they can rely on you for timely information, then you need to get your posts published on schedule, every time.
- Write seasonal/holiday content in advance. This can be a great way to get ahead of the game if you write content that’s seasonal or holiday-specific. By writing and scheduling your posts in advance, you can take the stress out of the holiday season and focus on enjoying yourself.
- Keep posting articles while on vacation. Ensure that your blog doesn’t go silent while you’re away. Just write and schedule a few posts before you leave, and you’ll be all set.
- Test different publish times. Trying to figure out the best time to publish your content? Scheduling posts in WordPress lets you test out different times and see which one gets the most traffic. Figure out when your readers are most active and adjust your posting schedule accordingly.
Now that we’ve gone over some of the reasons why scheduling posts is so important let’s take a look at how to actually do it.
How To Set Up WordPress Scheduled Posts
Scheduling posts in WordPress is easy to do and only takes a few minutes. In this section, we’ll walk you through three different methods that you can use to schedule your posts.
Method 1: Scheduling Posts Using the WordPress Block Editor
The first method we’ll cover is scheduling posts using the WordPress block editor. This is the recommended method, as it’s the easiest to do and doesn’t require any additional plugins.
To get started, create a new post or page in WordPress. For this example, we’ll be creating a new post.
Once you’re in the post editor, you’ll notice that in the Publish panel, the timing is set to Publish immediately.
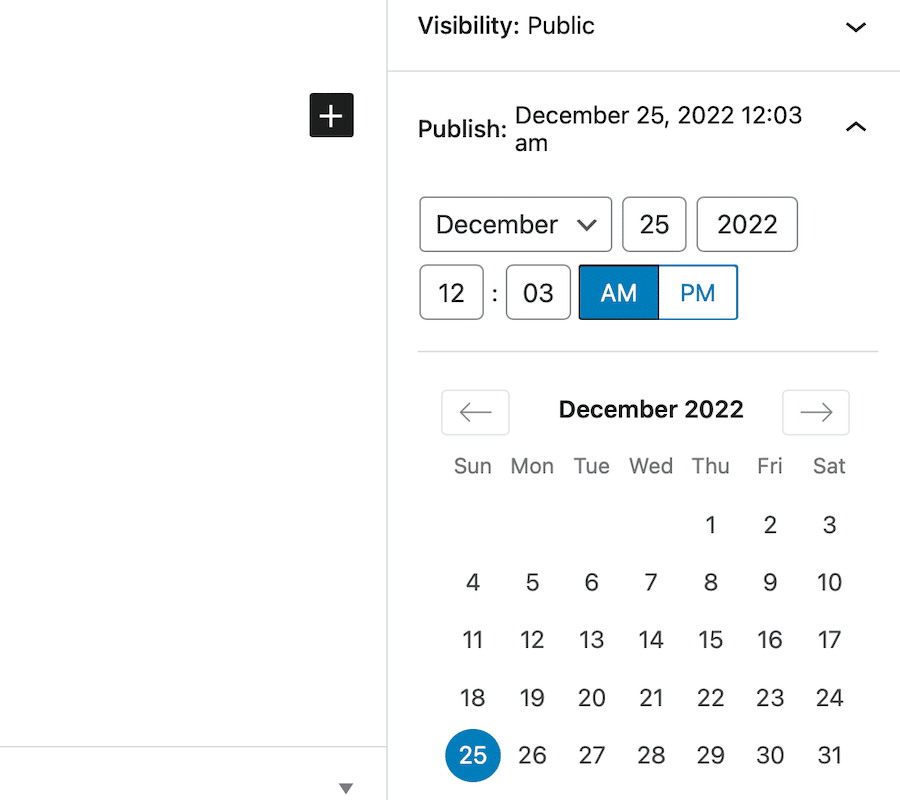
Click Publish immediately to reveal a drop-down, and you’ll be able to select a specific date and time for your post to go live.
For our example, we’re going to schedule this post for December 25th at 8 AM. Once you’ve selected a date and time, simply click on the Schedule button to set your post schedule.

And that’s it! Your post is now scheduled and will go live automatically on the date and time that you selected.
Method 2: Scheduling Posts Using the WordPress Classic Editor
If you’re using the WordPress Classic Editor, then you can schedule posts using a similar method.
To get started, create a new post or page in WordPress. As before, we’ll be creating a new post for this example.
Once you’re in the post editor, look for the Publish panel on the right-hand side of the screen in your WordPress dashboard. By default, this is set to Publish immediately.
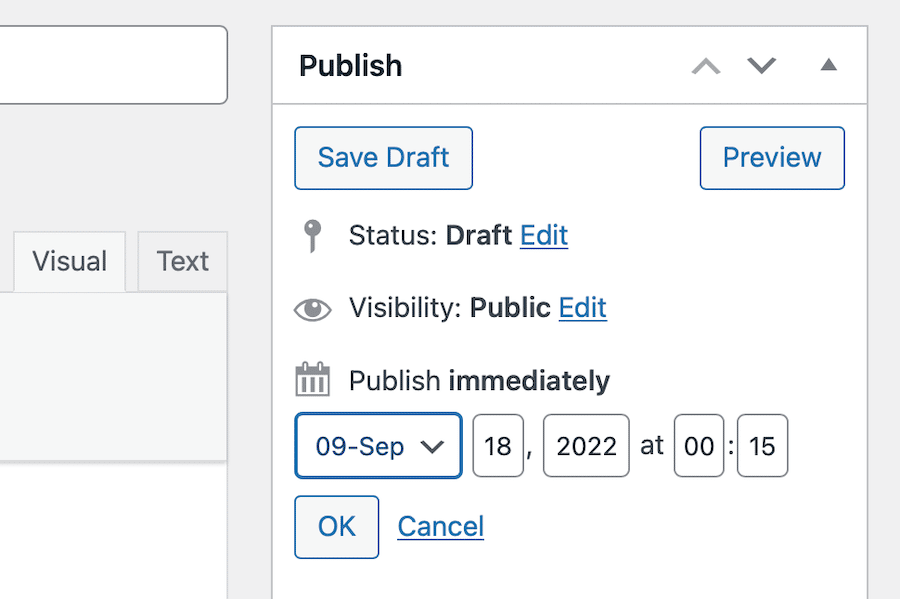
Click on the Edit link next to the Publish immediately option. This will bring up a drop-down menu with a few different scheduling options.
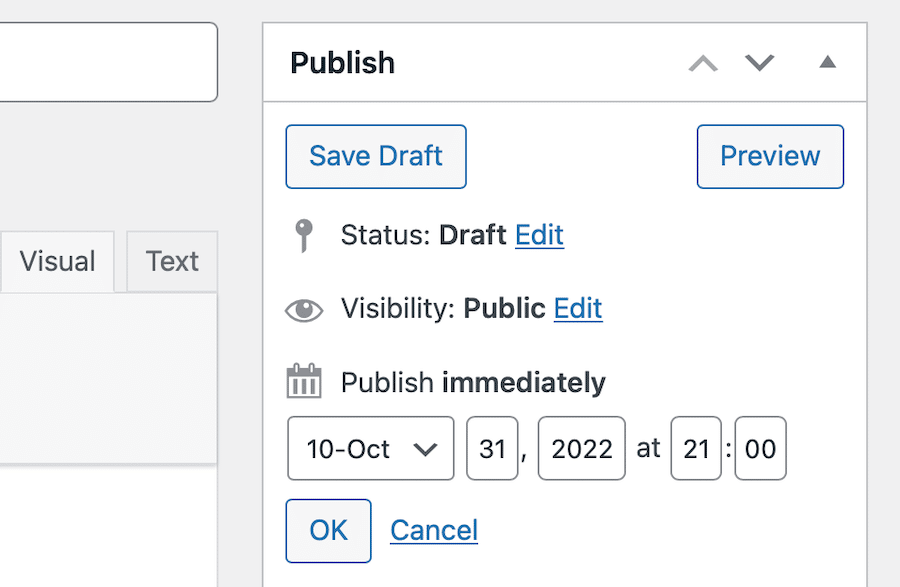
In this instance, we’re going to schedule this post for October 31 at 21:00. Once you’ve selected a date and time, simply click on the OK button to set your post schedule.
Click the blue “Schedule” button to schedule a blog post to publish at a later date in the Classic Editor.
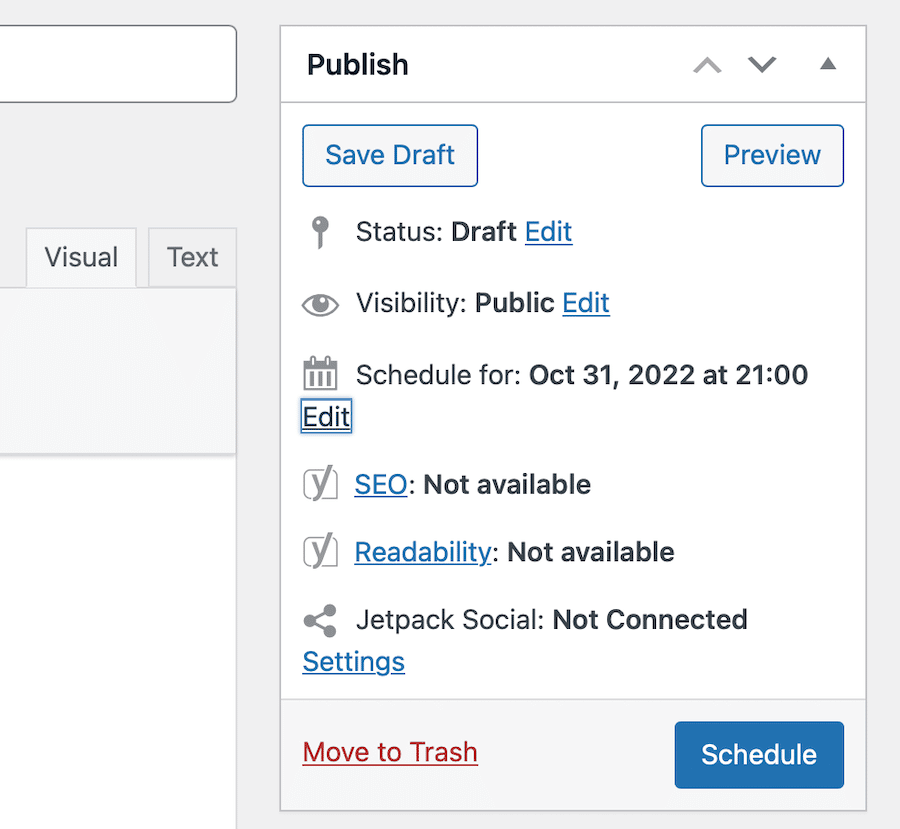
Once again, that’s all there is to it. Your post is now scheduled and will automatically go live on the date and time that you selected.
Method 3: Scheduling Posts Using a Plugin
If you’re not using the WordPress Block Editor, or if you want more control over your post scheduling, then you can use a plugin.
One of the most popular post-scheduling plugins is SchedulePress. This plugin is free to use and lets you schedule your posts in advance.

To get started, install and activate the SchedulePress plugin. Once the plugin is activated, click on Posts > Add New from your WordPress admin panel. This will take you to the post editor screen, where you can write and schedule your post.
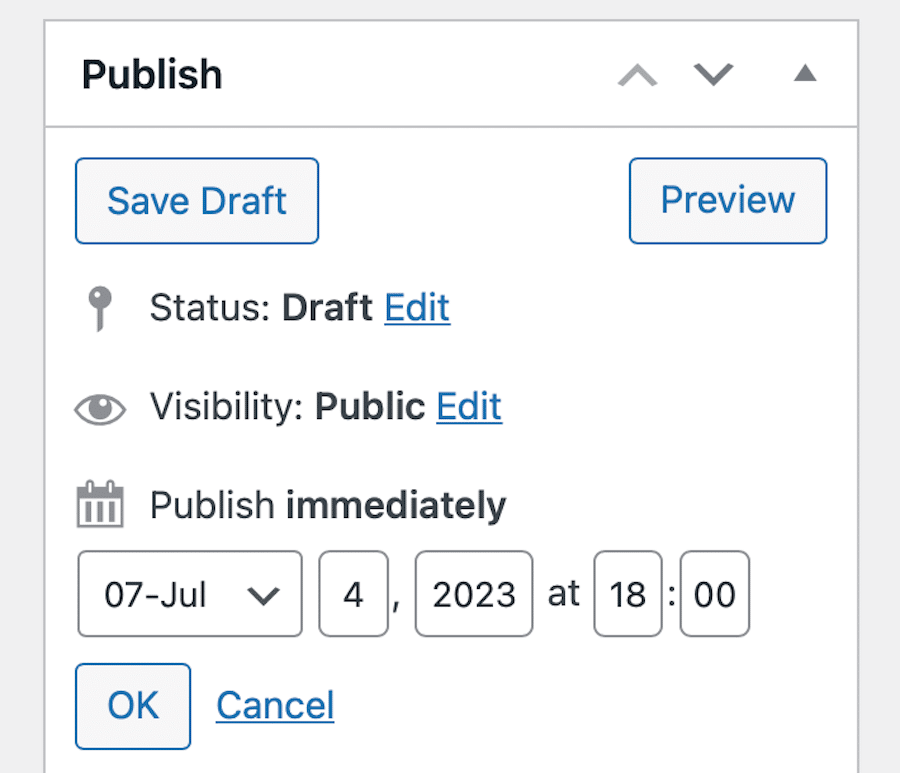
On the right-hand side of the screen, you’ll see the standard Classic Editor Publish box. This is where you can select a date and time for your post to go live.
For our example, we’re going to schedule this post for July 4th at 18:00. Once you’ve selected a date and time, simply click OK and then the blue Schedule button to set your post schedule, like usual.
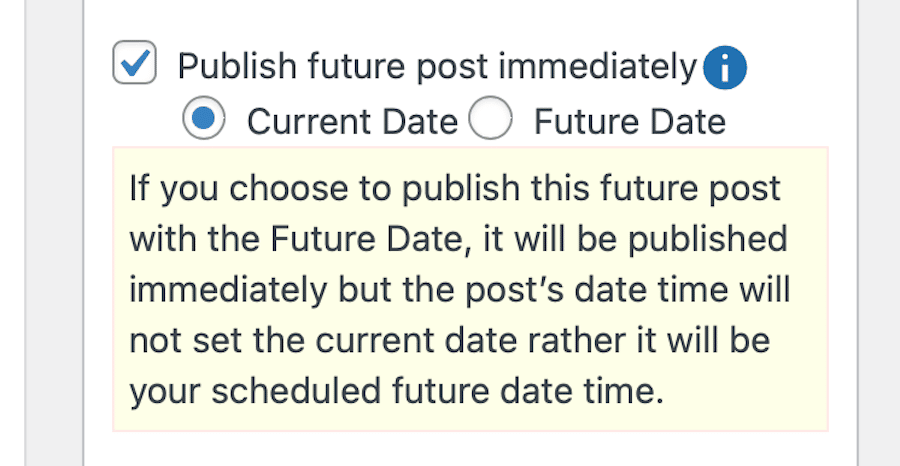
This plugin also adds a nifty feature that lets you publish your schedule post immediately, and it’ll reflect either the current date or the future schedule date – whichever makes the most sense for you.
The Pro version offers a variety of other features as well, including an auto-scheduler, a calendar view, the ability to plan your projects way ahead of time and schedule hundreds of posts at once, and it makes it so you can automatically share your posts once they go live on the top social media platforms.
Tips and Tricks for WordPress Scheduled Posts
So you know how to schedule posts in WordPress now, which is great. But what if your needs fall outside Write. Schedule. Publish? Let’s take a look at a few tips and tricks that you can use to get the most out of this feature.
Setting the Time Zone
If you want your posts to go live at a specific time, then it’s important to make sure that your WordPress site is set to the correct time zone.
By default, WordPress uses UTC time. However, you can change this by going to Settings > General from your WordPress admin panel.

From here, you can set the correct time zone for your location. Once you’ve done that, click on the Save Changes button to store your settings.
Viewing All Scheduled Posts
If you want to see all of the posts that you’ve scheduled for your WordPress site, then you can do so by going to Posts > All Posts.
At the top of the page, several options. Click the link that says Scheduled.

You can use this page to manage your scheduled posts, including editing, deleting, or publishing them early.
Publishing Scheduled Posts Early
If you need to publish a post before its scheduled date and time, then you can do so by going to the All Posts page and selecting the post that you want to publish.
Once you’re on the post editor screen, simply click on the Publish button. This will immediately publish your post, regardless of when it was scheduled to go live.
Managing “Missed Schedule” Posts
If for some reason, your post doesn’t publish at its scheduled time, then WordPress will automatically mark it as a “missed schedule” post.
You can view all of your missed scheduled posts by going to the All Posts page and selecting the post that has Missed Schedule next to it in red.

If you want to try and publish a missed schedule post, then you can do so by simply clicking on the Publish button. However, if you don’t want to publish the post, then you can delete it or reschedule it for a later date and time.
A scheduled post may miss its scheduled publication date and time for a number of reasons. Typically, cron job errors are to blame.
Cron jobs can be best described as “background tasks” that WordPress uses to carry out certain functions. These include things like checking for updates, scheduling posts, and more.
If your WordPress site’s cron jobs aren’t working correctly, then it can cause scheduled posts to fail. You can encounter a cron job error for a number of reasons, including:
- Your WordPress hosting provider is experiencing an issue.
- You’ve recently switched WordPress hosts.
- Your website is down or isn’t working correctly.
- You’ve installed a plugin or theme that’s conflicting with the WordPress cron.
But most often, the issue is caused by a lack of website traffic. Since the crons or schedulers only run when a page is loaded, a lack of traffic at precisely the right (or wrong, if you really think about it) time means the scheduled post won’t publish. The cron job won’t run and you’re left with the missed schedule debacle.
If you think that your site’s cron jobs are the cause of your missed scheduled posts, then you can try to fix the issue by manually running the cron job.
To do this, you’ll need to add a small piece of code to your site. You can do this by adding the following line to your site’s wp-config.php file:
define('DISABLE_WP_CRON', true);Once you’ve added this line of code via FTP access, WordPress will no longer try to run cron jobs automatically. Instead, it will only run them manually.
To set up these manual cron jobs, you’ll need to visit your site’s cPanel and find the Cron Jobs module. Click it and schedule cron jobs that are set to run on intervals.
If this doesn’t fix the problem, or you don’t trust your coding skills, then you can try a WordPress plugin. We recommend Schedule Post Trigger, which is a free plugin that runs missed schedule posts as soon as someone visits your website.

With this plugin, there’s no need to fiddle with code or set up cron jobs manually. Simply install and activate the plugin and it will take care of everything for you.
Opting for a web hosting provider that will schedule cron jobs for you at the server level is a good option, too. Managed WooCommerce hosting from Kinsta will run cron jobs at intervals of 15 minutes.

Kinsta APM may be useful as well for boosting overall site performance and reducing the chances of scheduled posts being missed.
Un-Scheduling a Scheduled Post
If you want to unschedule a post that’s already scheduled, then you can do so by simply editing the post if using the Block Editor.
If using the Classic Editor, click the Edit button next to where it says Scheduled.
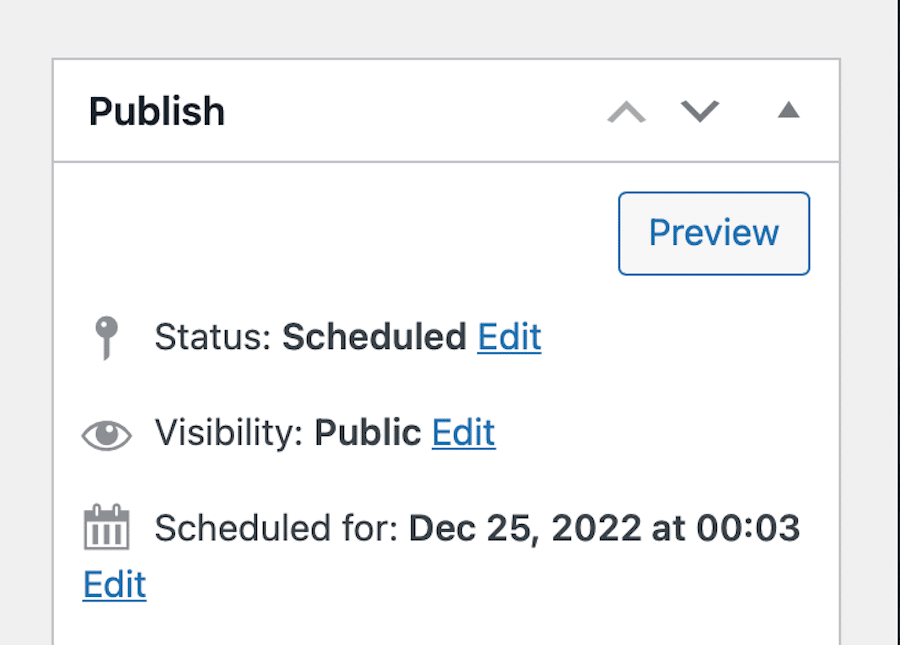
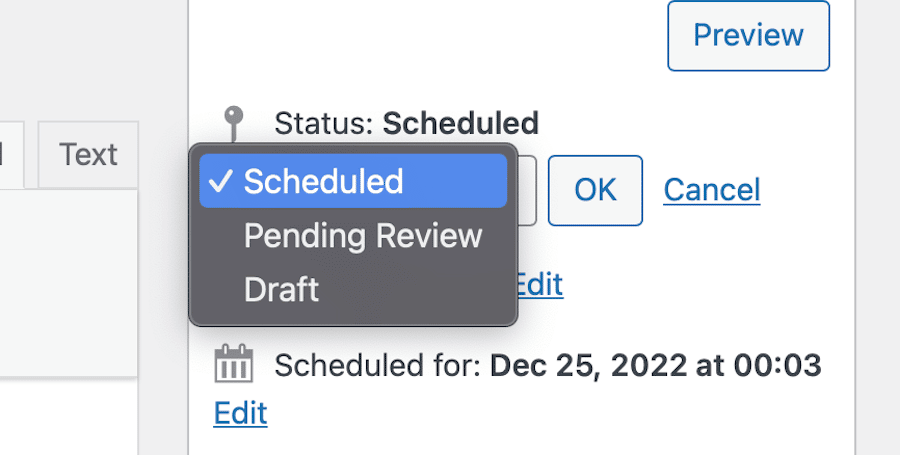
Then click the dropdown menu and set the post back to Draft. Then click OK.
Finally, click Update. This will remove the post from the WordPress queue and it will no longer be scheduled to go live. You can then reschedule it for a different date and time, or you can publish it immediately by clicking on the Publish button as usual.
Scheduling Changes to a Published Post (Using a Plugin)
Although you can’t schedule changes to a published post in WordPress by default, you can do so by using the Revisions feature. This feature keeps track of all the changes that you make to a post and allows you to restore an earlier version if needed.
You can also schedule changes to a published post by using the Advanced Schedule Posts plugin. This plugin allows you to schedule changes to any post, including published posts.

To use this plugin, after installation, simply edit the post that you want to change and then click on the Schedule button in the Publish box.
This will bring up the scheduling options where you can choose when you want the changes to be published. Once you’ve made your selection, click on the Schedule button and the changes will be scheduled.
Schedule Post Expiration (Using a Plugin)
If you want to schedule a post to expire at a certain date and time, then you can use the PublishPress Future plugin. This plugin allows you to schedule posts to expire, and it will then change the post’s status to Pending, Draft, or Private depending on what you prefer.

To use this plugin, simply install and activate it. After that, edit the post that you want to schedule for expiration and then scroll down to the PublishPress box.
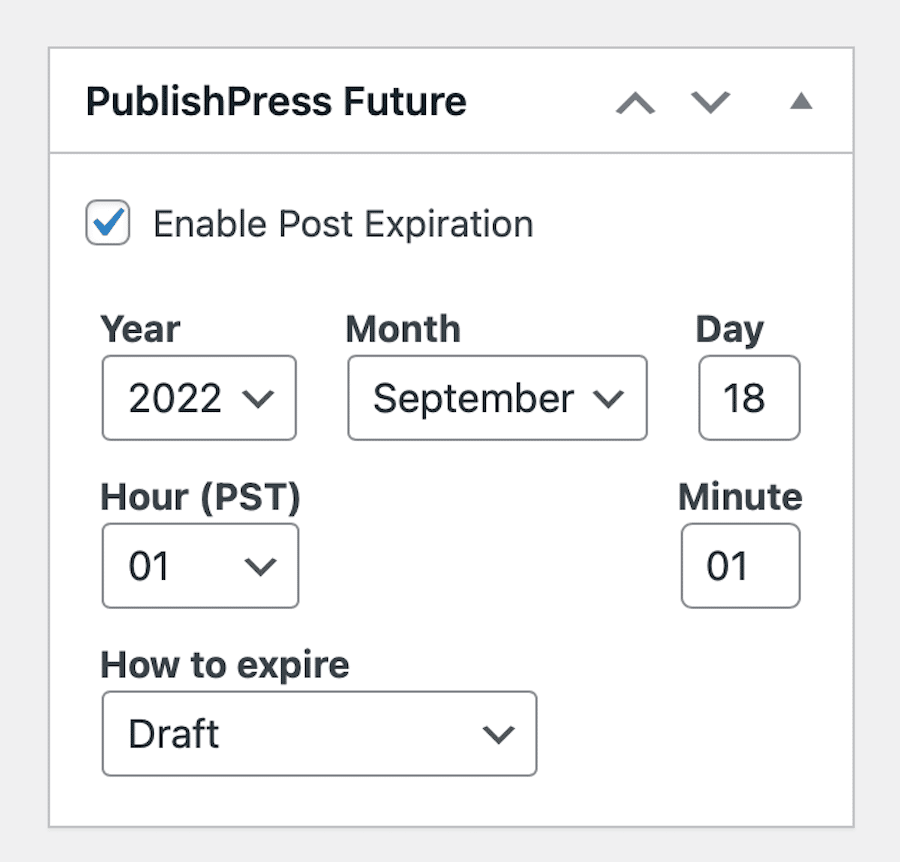
In this box, you’ll see text that reads Enable Post Expiration. Check the box next to it, then choose when you want the post to expire. You can also select what you want to happen to the post after expiration, i.e. set it back to a Draft, make the post Private, Delete it, and so forth. Once you’ve made your selection, scroll back up to the top of the page and click Update.
Summary
In this post, we’ve covered how to schedule posts in WordPress in a variety of ways. We’ve also looked at how to un-schedule a post and how to schedule changes to a published post.
Scheduling posts is a great way to keep your content fresh and ensure that there’s always something new for your readers. It can also help you to free up time so that you can focus on other aspects of your website.
If you have any questions about how to schedule posts in WordPress, then please leave a comment below.
And if you want to use a host that can ensure speedy performance and minimize cron job errors, MyKinsta might just be the ideal option for you. Or, if you run an online store, our managed WooCommerce hosting might be of interest.
Whichever you choose, just know that you’ll be in good hands.


