Ever wonder how to delete categories in WordPress? What about adding and editing categories, or moving posts from one category to another?
In this guide, we explain how to handle every aspect of category management.
Check Out Our Video Guide to Deleting WordPress Categories
But first, what is a WordPress category?
WordPress categories are taxonomy features in the WordPress dashboard that allow users to organize specific types of content — primarily posts. Categories are general labels for groups of posts. They benefit both developers and website visitors since developers can better structure their content and the visitors have more navigational opportunities outside of the main menu.
You can also form hierarchies with categories by adding parent categories that contain multiple regular categories. WordPress stores these category hierarchies in theme and function files.
Any WordPress user can add, edit, or delete categories while placing individual WordPress posts inside those categories.
Here are example categories from a food blog:
- Main Courses
- Snacks
- Appetizers
- Salads
- Desserts
- Breakfast
Categories vary based on the subject of a site, but they typically function as overarching groups for a collection of blog posts. Some plugins also offer their own unique category types, like how you can generate categories for WooCommerce products. WordPress often releases new updates to categories, making them more powerful every time (like with category filters for query loops in WordPress 5.8).
Keep reading to learn how to delete categories in WordPress (and add and edit them, too!)
How To Delete Categories in WordPress
Users can delete WordPress categories in two ways: by deleting them one-by-one or by deleting them in bulk from the list of categories in WordPress.
Learn how to delete categories in WordPress using the two methods below.
How To Delete an Individual Category in WordPress
Assuming you already have some categories enabled in WordPress, the quickest way to delete one or two of them is by going through the basic Categories section of WordPress.
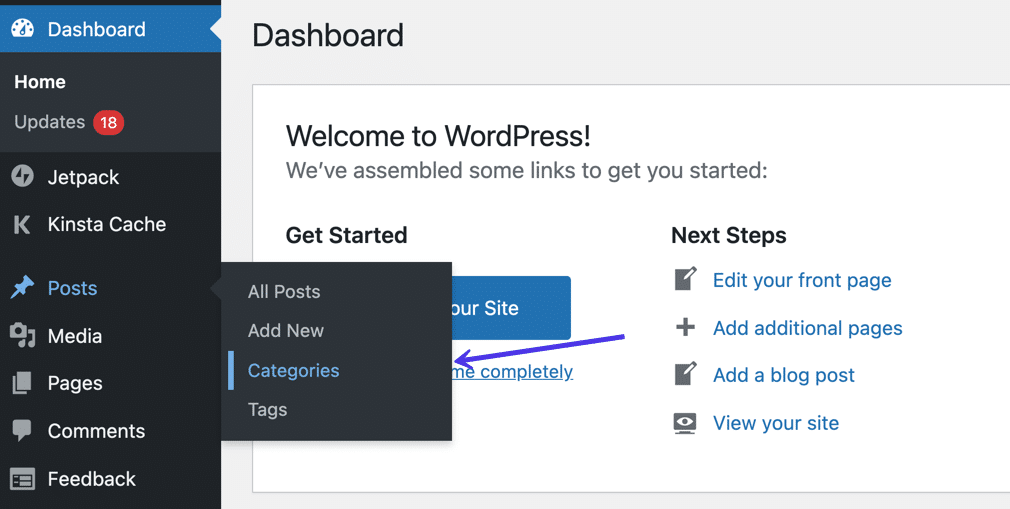
Navigate to Posts > Categories in the WordPress dashboard.
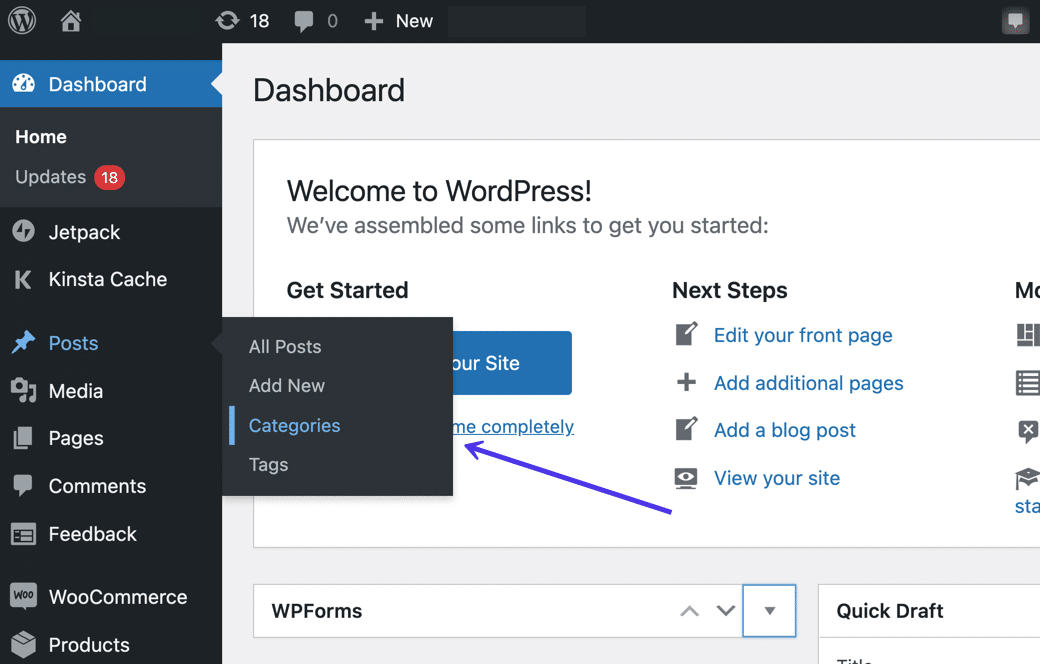
This section of WordPress shows a list of any current categories, along with a section to the left for creating a new category.
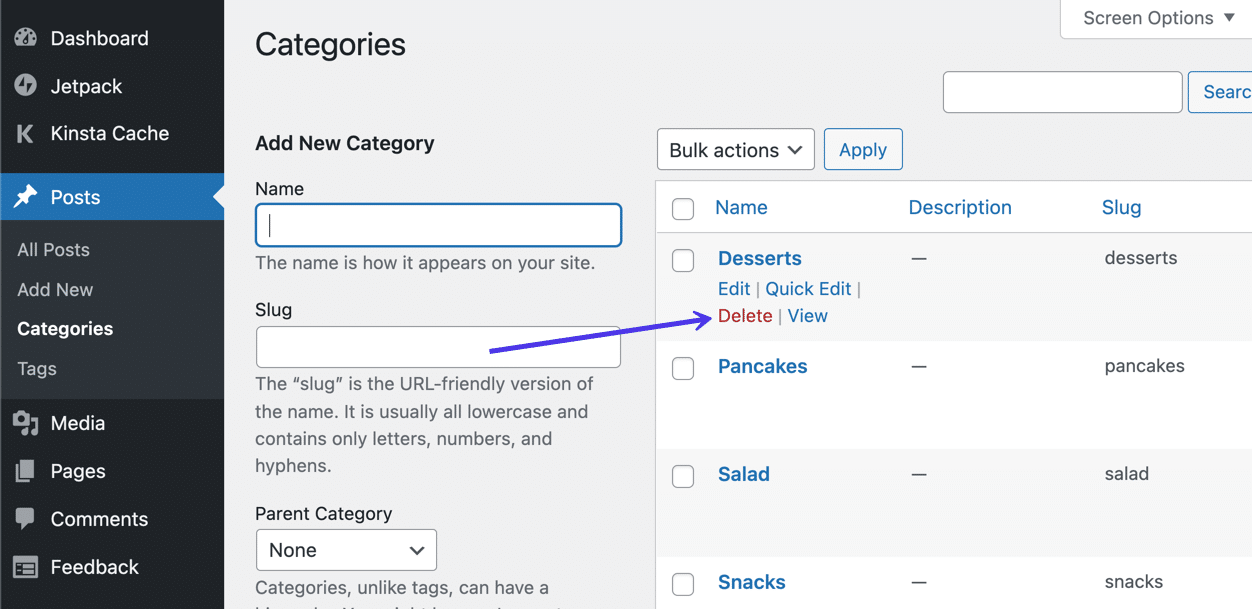
Right now we’re talking about deleting categories, so you’ll only need to use the category list on the right side.
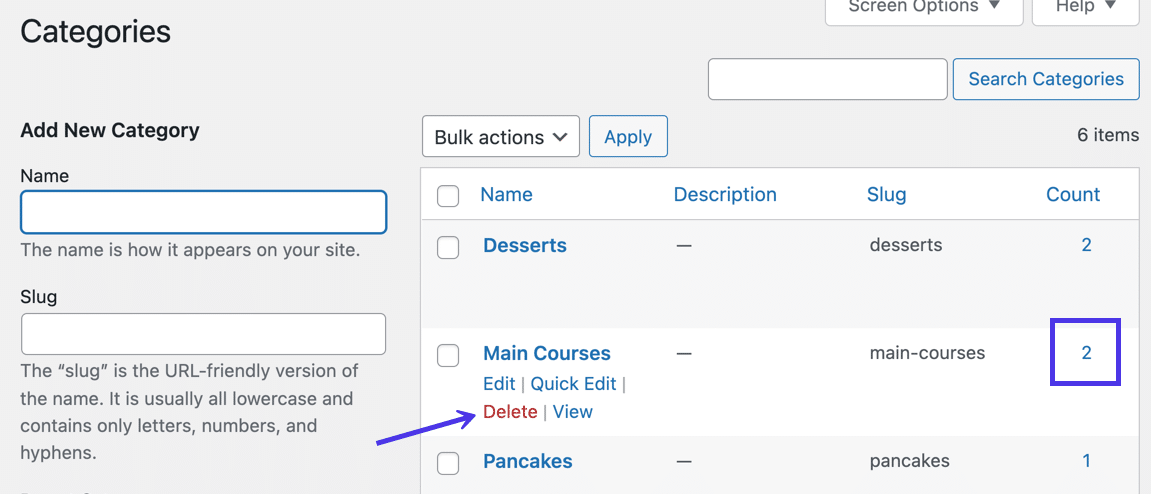
One way to delete an individual category is by scrolling over the category in question and selecting the Delete link that appears. That instantly gets rid of the category after you accept a confirmation prompt.
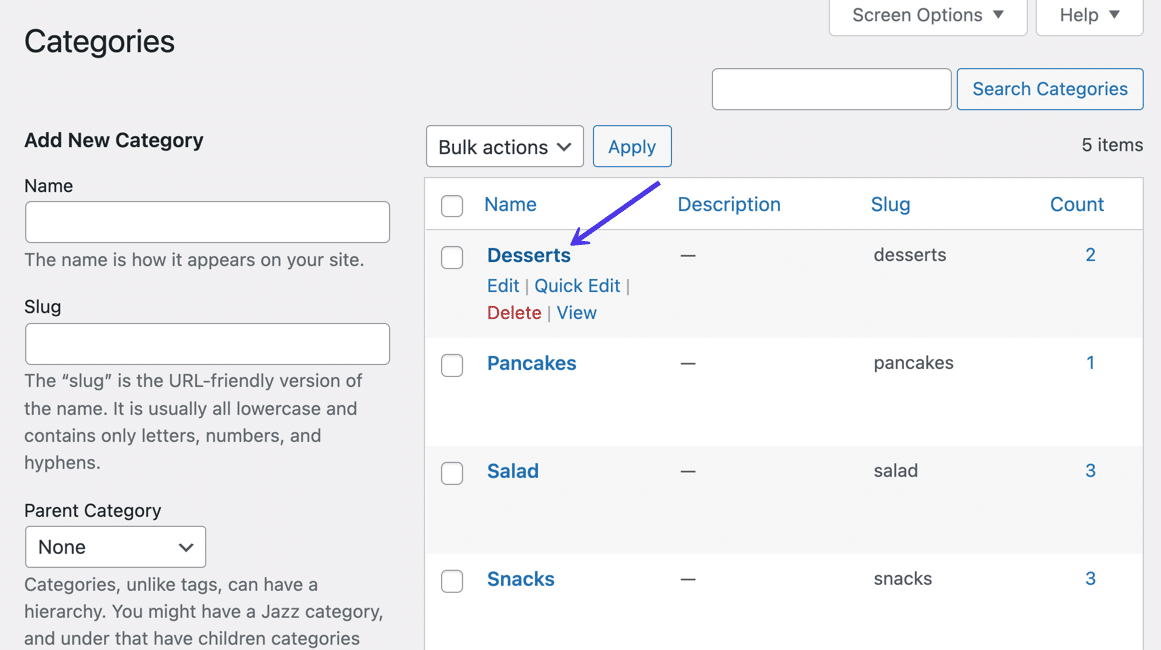
Another way to delete a category is from the same page. This time, you’re trying to open the full Edit Category page. To do so, click on the category name you want to delete.
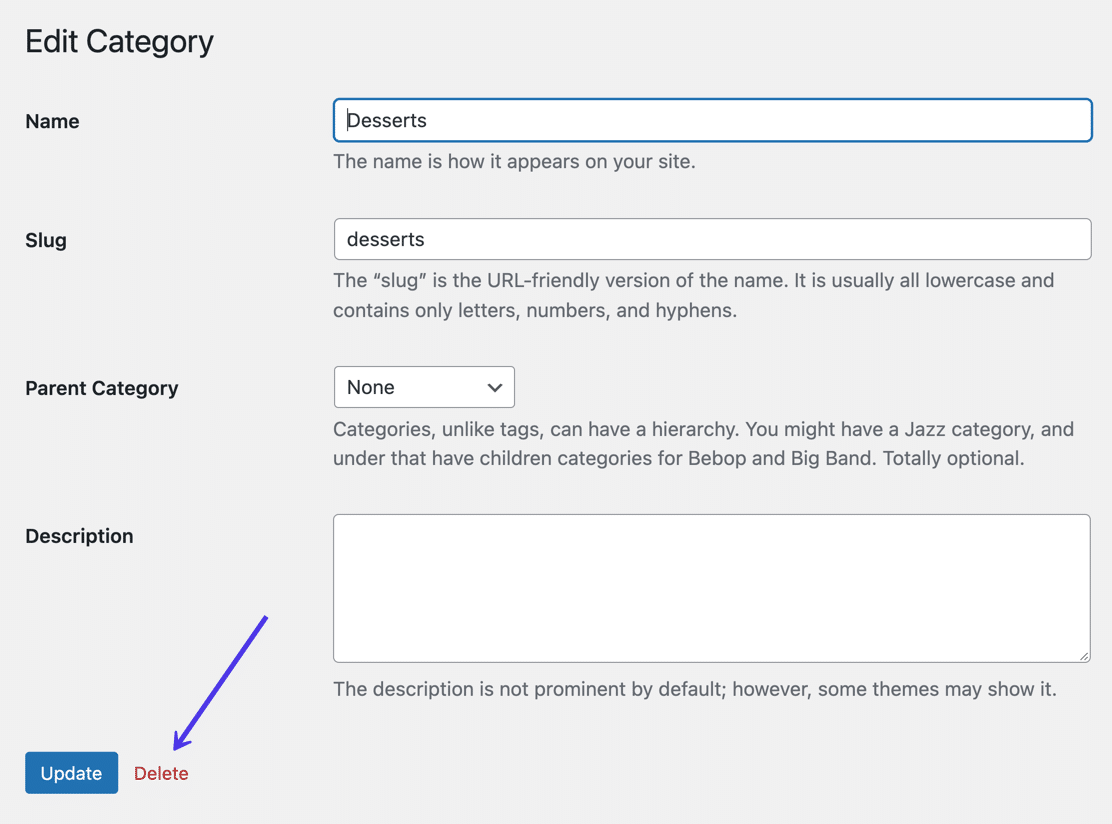
Locate and click the red Delete link at the bottom of the page.
How To Delete Categories in Bulk
It’s also possible to delete WordPress categories in bulk. Similar to the previous one-by-one deletion method, users can bulk delete by going to Posts > Categories.
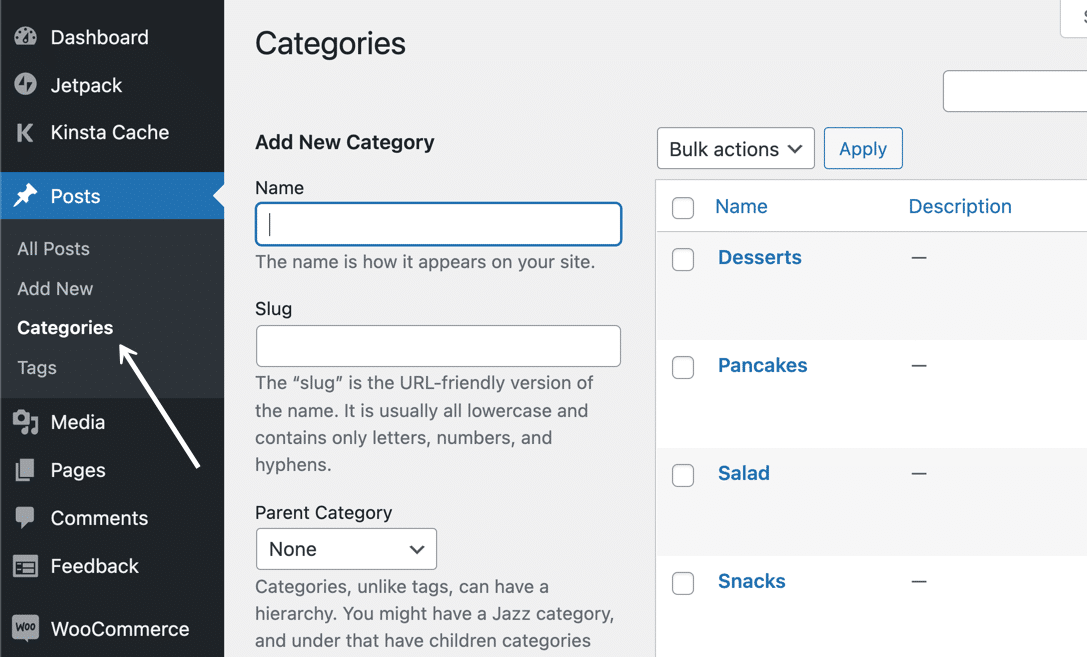
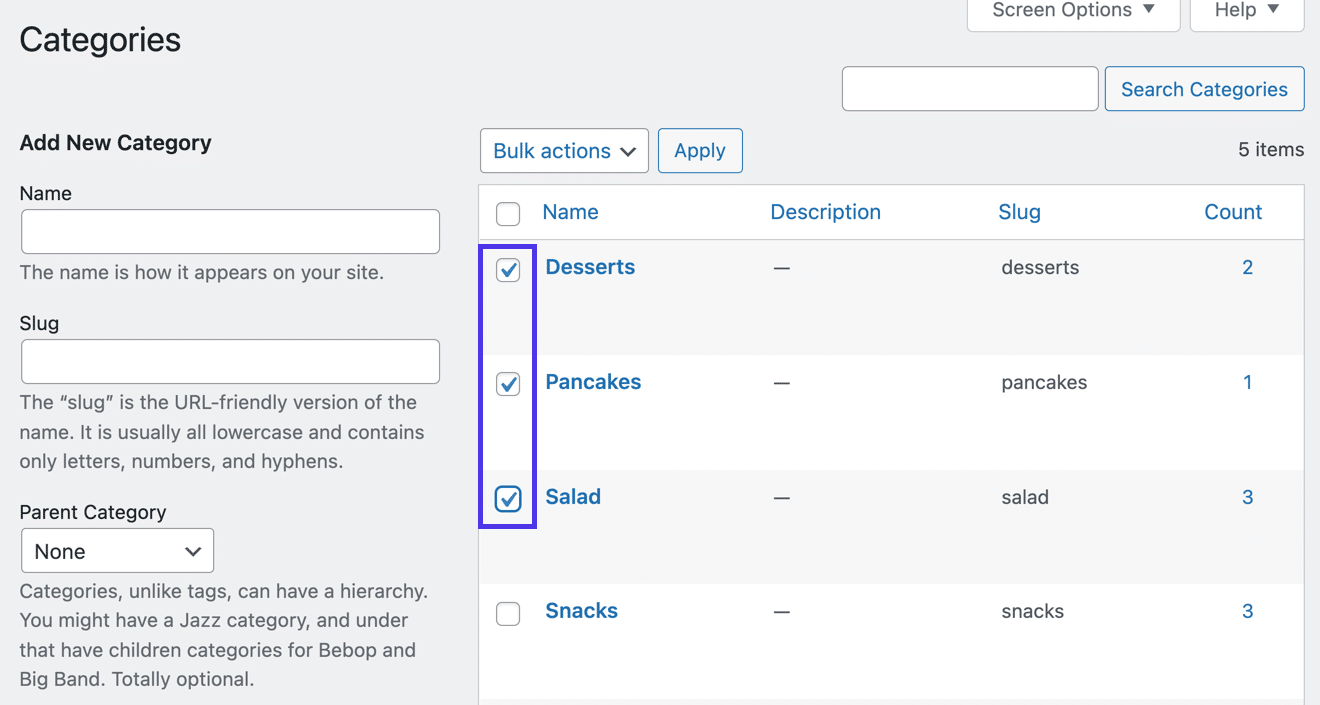
To start a bulk category deletion, start checking boxes next to the categories you wish to remove. Select as many as you like.
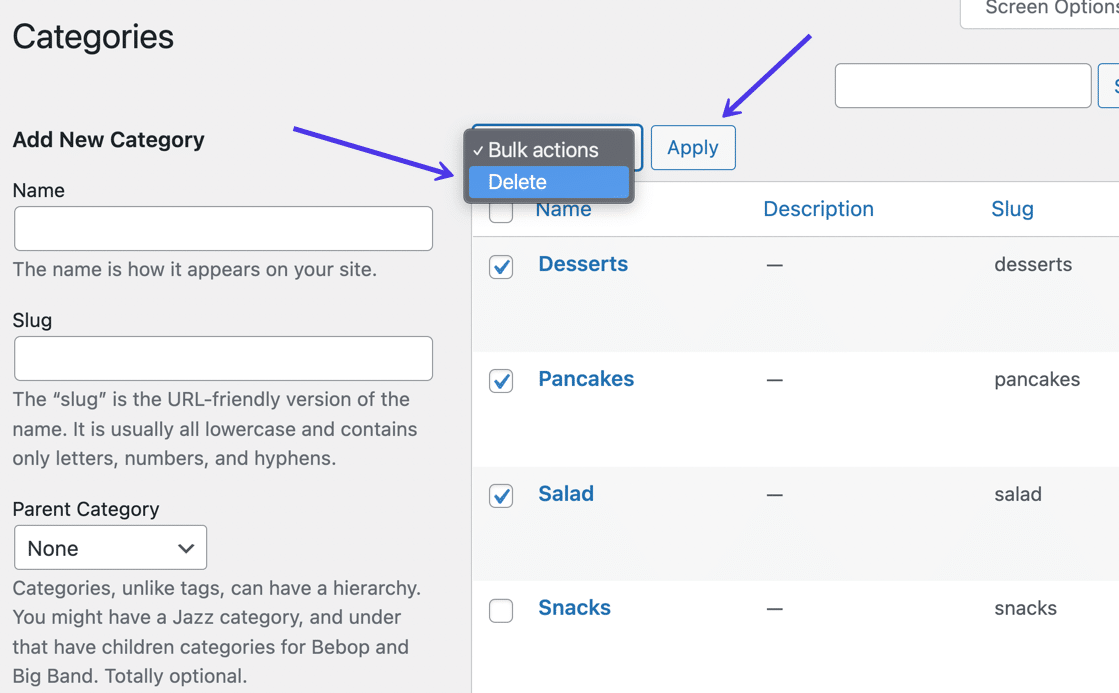
Press the Bulk Actions tab and choose to Delete in the dropdown menu.
After that, click the Apply button to finish the process.
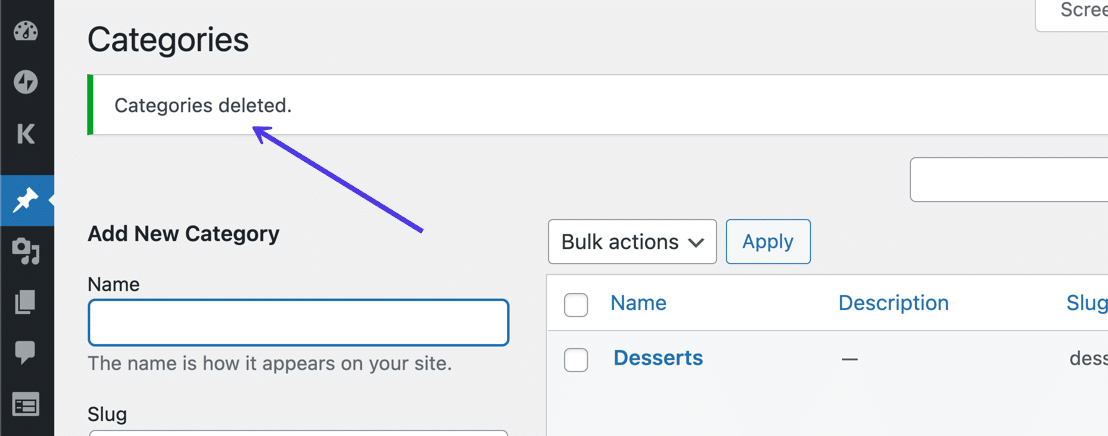
Bulk category deleting also prompts you to confirm this action. After doing so, you’ll see a Categories deleted message at the top of your dashboard.
Can You Un-delete (Restore) a Category?
This is a valid question since WordPress actually offers Trash Posts and Trash Pages sections for restoring those elements.
However, categories lack that same feature.
There’s no way to recover or undelete a category after you’ve deleted it from WordPress. If you accidentally eliminate a category, we recommend creating a new one with the same name; then you can re-add any posts sent to the Uncategorized category because of the deletion.
What Happens to Posts When You Delete Their Assigned Categories?
The main purpose of a category is for attaching posts to the category for improved organization. Yet, that may make you wonder, what happens to a category’s posts once you delete them from WordPress?
Do those blog posts disappear as well?
No. All WordPress posts remain intact after you delete their attached categories.
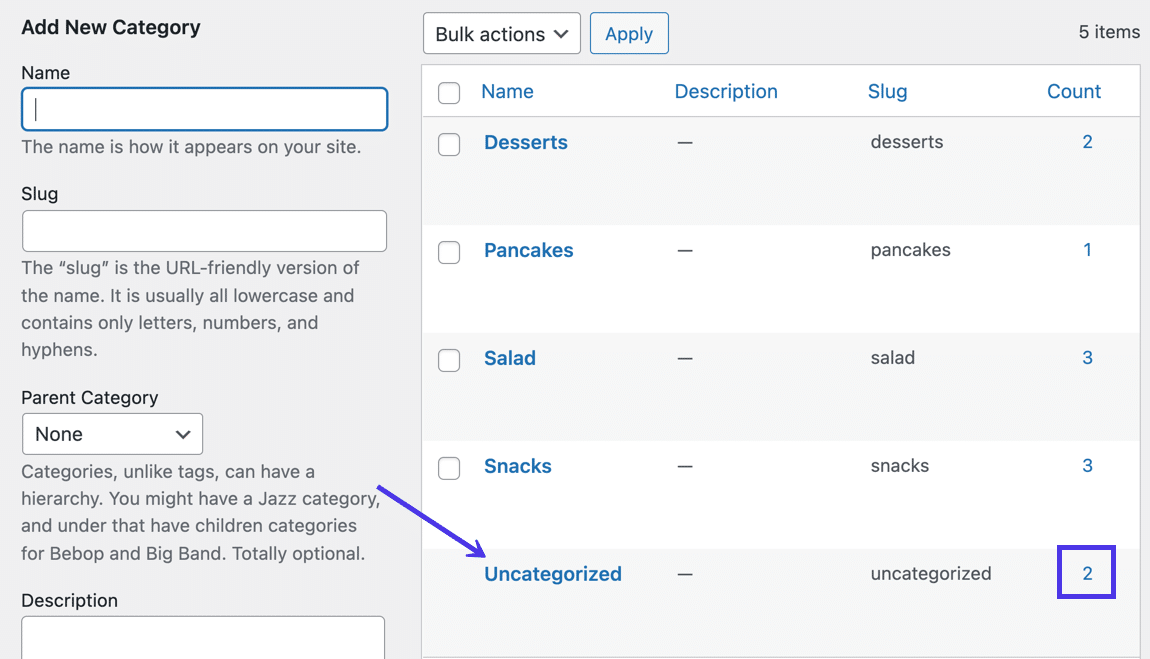
However, they no longer have an assigned category. Those categories get moved to the default Uncategorized category. All WordPress sites start with this as their default post category.
For example, we have two posts in the Main Courses category below. But we’re going to delete that category.
After the deletion, those two posts switch over to the Uncategorized section (this is the default post category).
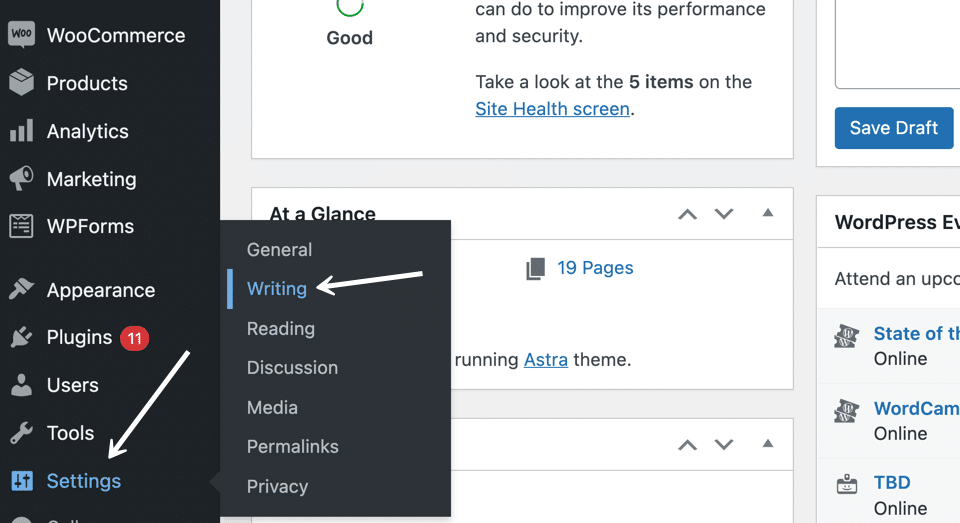
If you’d rather change the default post category to something more specific, go to Settings > Writing.
Find the Default Posts Category field on the Writing Settings page.
Click the dropdown field to choose one of the other categories you’ve made on your site.

How To Edit Categories in WordPress
Sometimes you may only need to edit a category instead of deleting it. In that case, use the methods below to change information for previously created categories in WordPress.
Editing Methods
There are two main options for editing categories in WordPress. Let’s take a look at both.
1. Use the Quick Edit Option
The Quick Edit option is available for all current categories on your WordPress site. It allows you to edit simple parts of a category like the name and slug, but nothing else.
Go to Posts > Categories to get started.
Look at the list of categories to the right. Scroll over the category you want to edit; this should reveal several links, one of which is the Quick Edit option. Click on that to proceed.
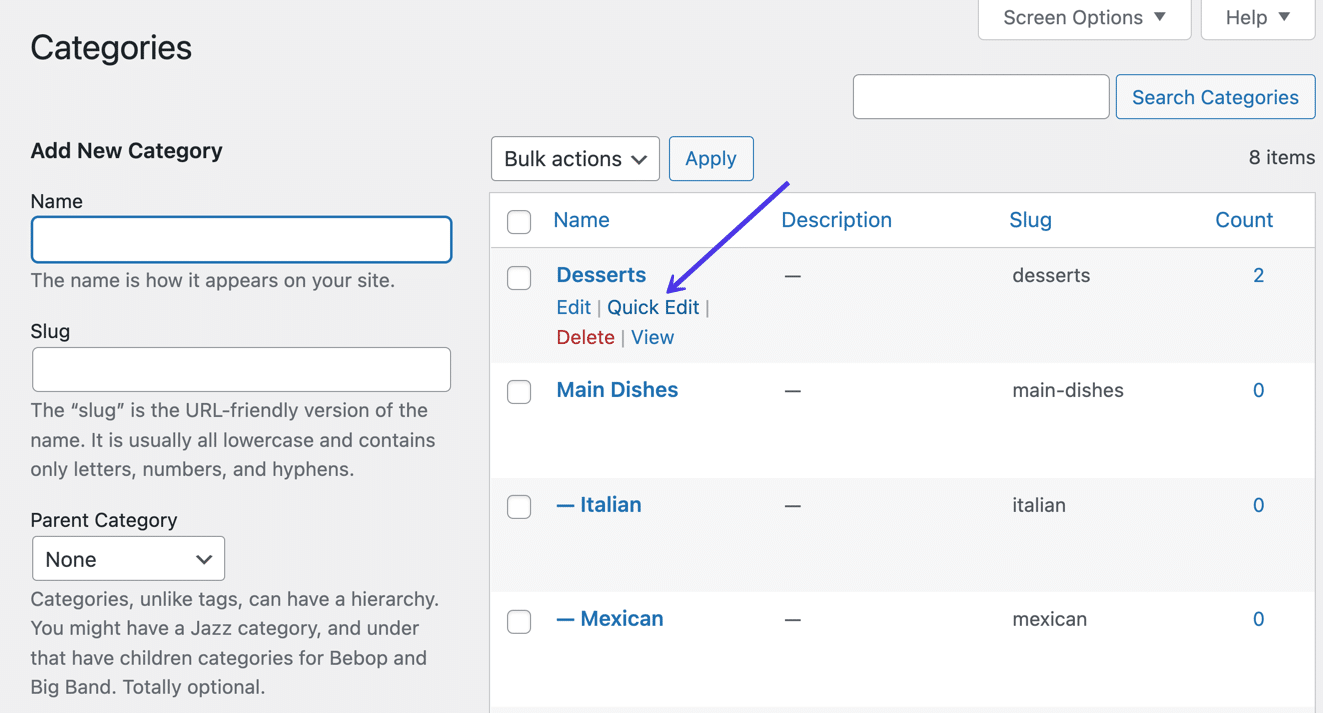
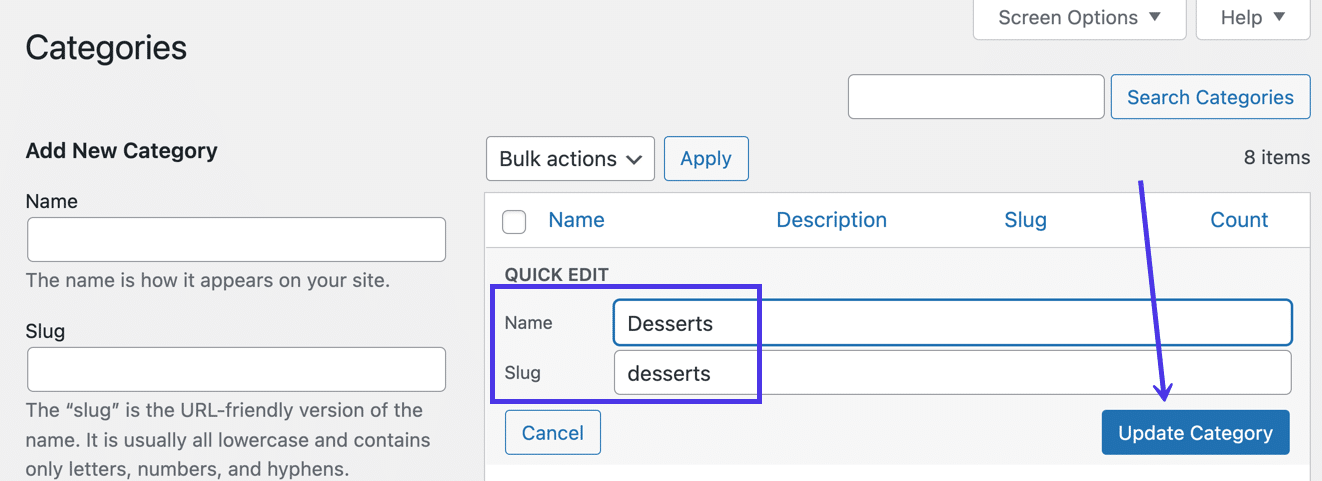
The Quick Edit module doesn’t bring you away from the page but lets you change parts of the category in the same dashboard area. You can edit the Name and Slug fields for the category. Fields like Parent Category and Description aren’t available through the Quick Edit method.
Click the Update Category button to save those edits.
4. Use the Edit Category Page
Each category also has an Edit Category page for making a few more changes besides just the Name and Slug fields.
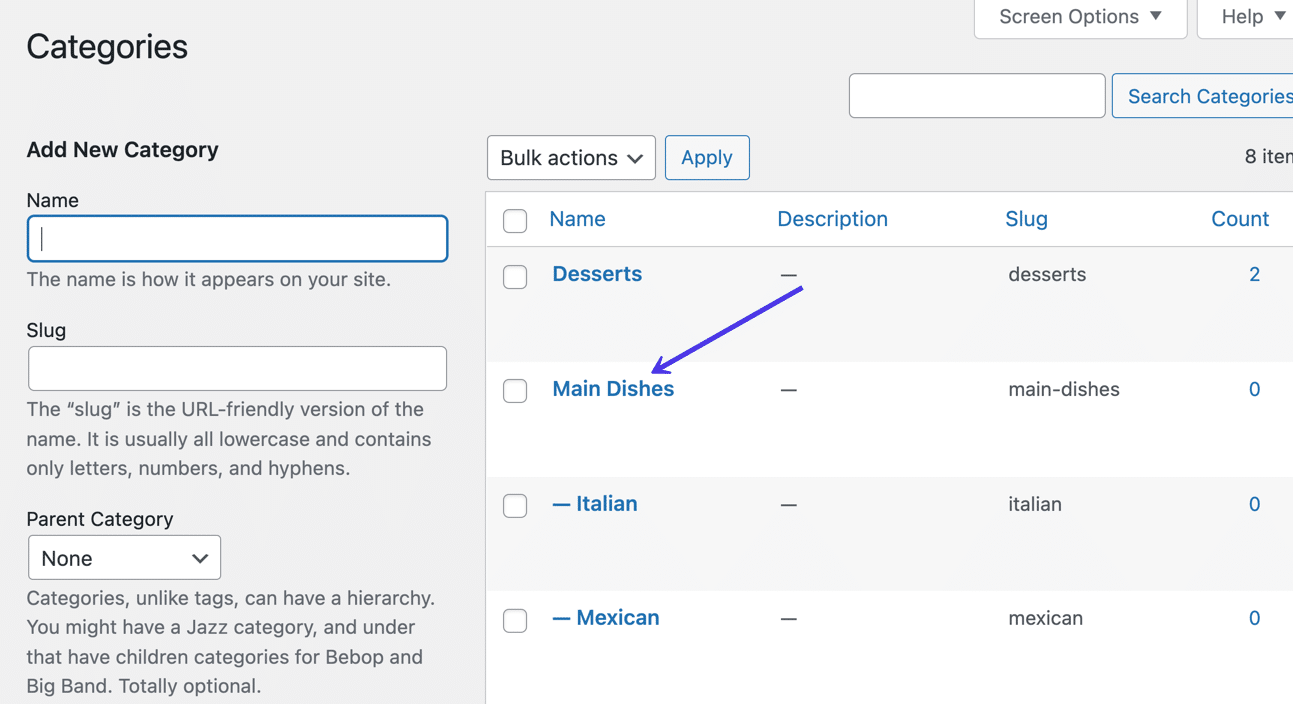
As with the other method, go to Posts > Categories, then click on the name of whichever category you need to edit.
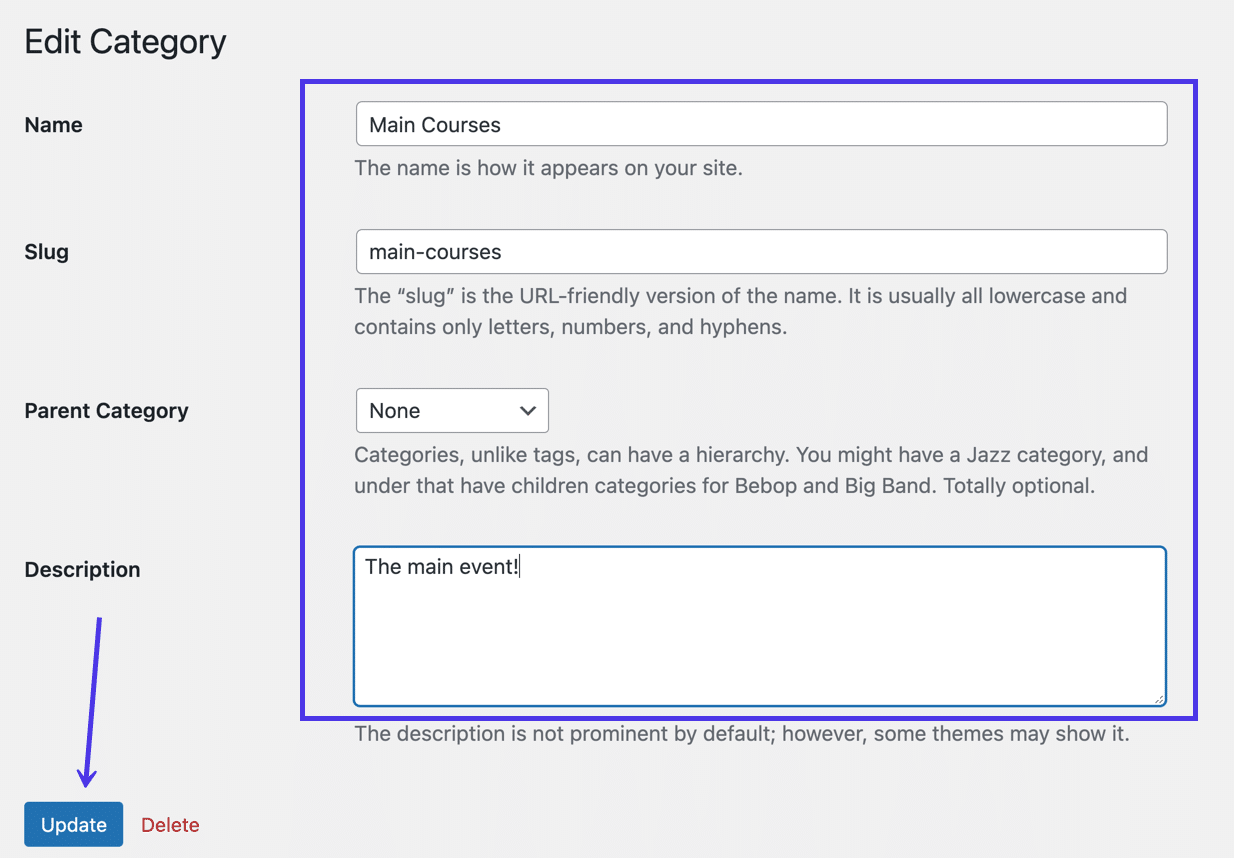
The Edit Category page provides fields for the Name, Slug, Parent Category, and Description. Change any of these as you wish.
- The Name field dictates how your category gets displayed on both the frontend and backend of your site, so website visitors will see this.
- A Slug is the URL-friendly version of the name, which gets placed at the end of the category’s unique URL.
- A Parent Category serves to build a hierarchy with your categories, where you place multiple categories under one overarching parent category.
- The Description doesn’t get shown on the frontend by default, but many themes actually allow you to use it as a frontend explainer for the category page.
After you’ve made edits, click on the Update button to save changes.
How To Edit or Remove the Category Base from a URL
WordPress adds what’s called a “category base” to category URLs. This means that all category URLs not only have the slug at the end of the URL but some extra text to show that it’s a category page.
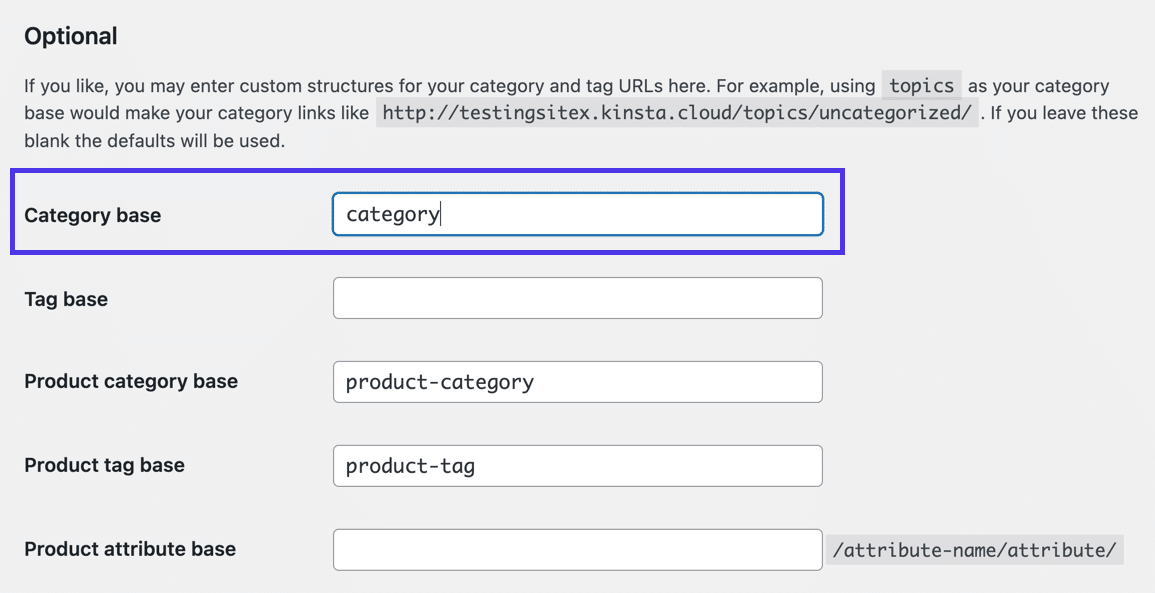
It may look something like this: www.example.com/category/categoryname/ with /category/ being the category base right before the category name. For WooCommerce, they use /product-category/.
However, this may appear to complicate your URLs or not go well with your permalink structure. If that’s the case, consider editing or omitting the category base from your permalink structure.
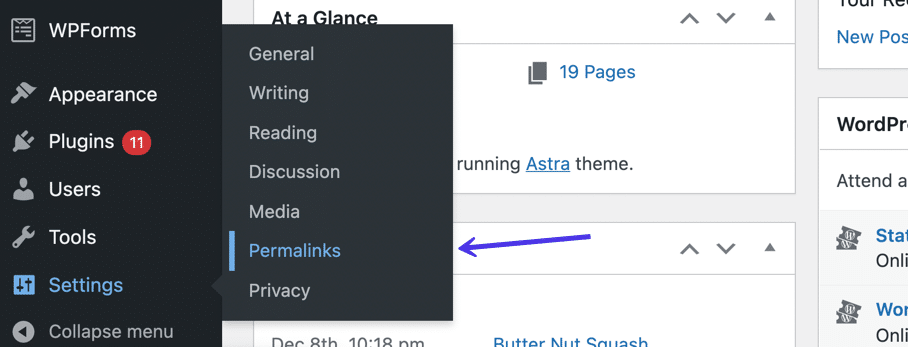
To remove or edit the default category base, go to Settings > Permalinks.
Scroll to the Optional section. This area displays fields to set or change the category base, along with category bases from other plugins you may have installed (like from WooCommerce).
Go to the Category Base field and either remove or edit what’s in the field.
Click on the Save Changes button at the bottom when you’re done.

How To Remove Posts from a Category
You’ve learned how to delete a category from WordPress (therefore removing posts assigned to that category), but what about removing posts from a category in order to either leave the posts uncategorized or switch them to another category?
Have a look at the options below.
Remove Posts From a Category With the Quick Edit Tool
Similar to categories, posts also have Quick Edit buttons for making instant changes without having to open up an entire Edit Post page.
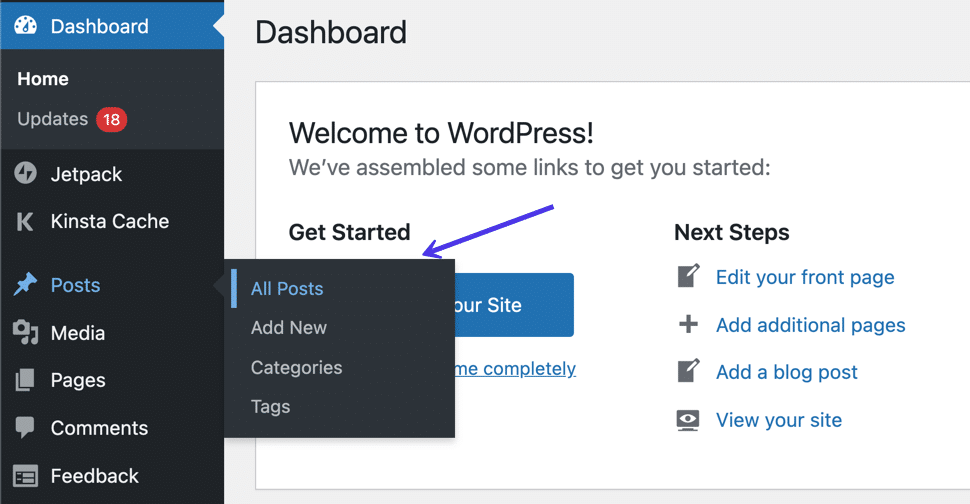
To remove posts from a category using the Quick Edit tool, go to Posts > All Posts.
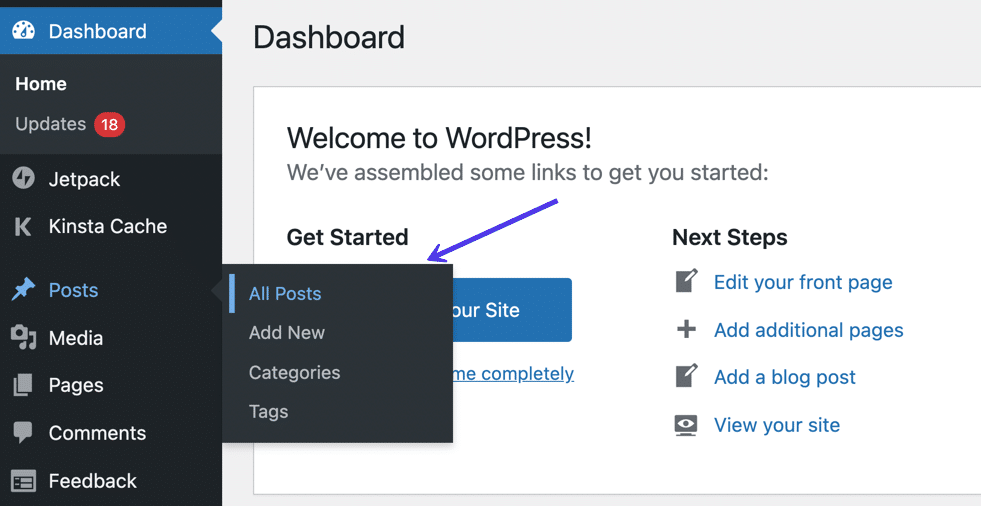
Scroll through the posts list and find the one you’d like to remove from a category.
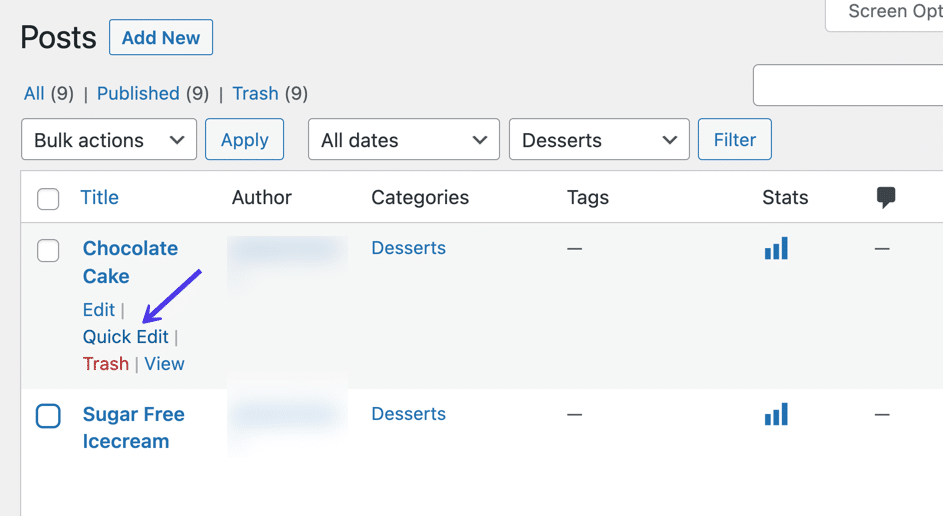
Move your cursor over the post title to reveal several links, including the Quick Edit option. Click on that.
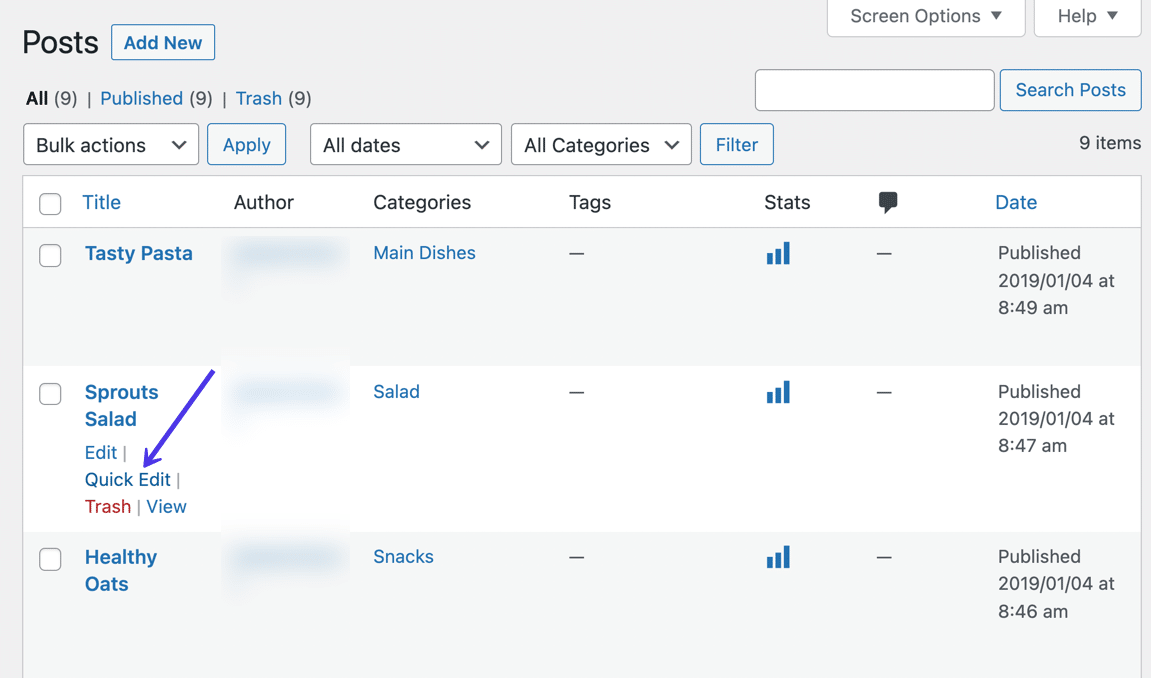
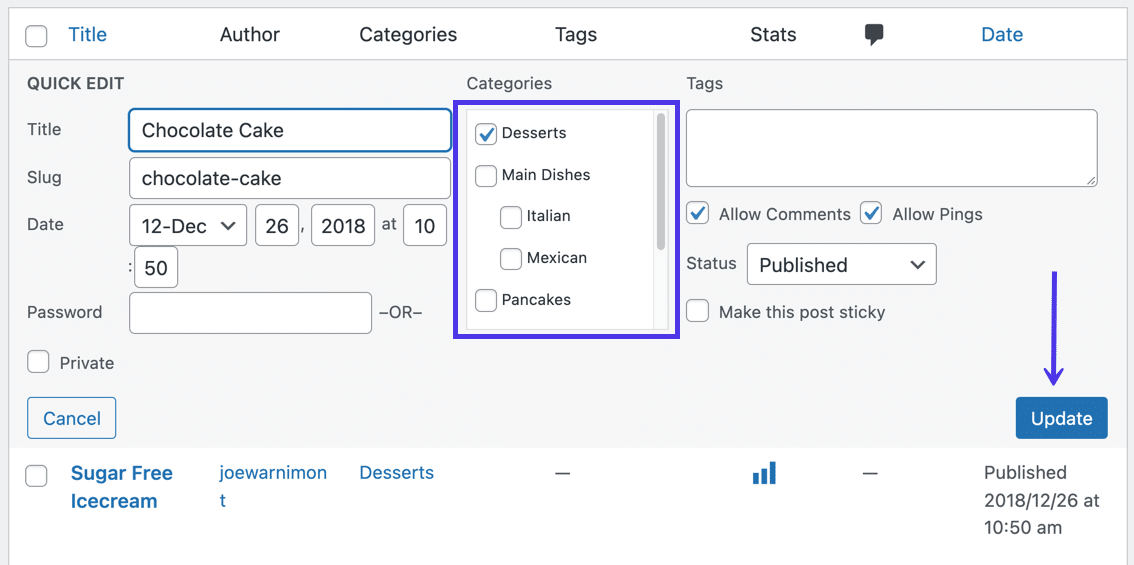
The Quick Edit box appears for that post only. Locate the Categories module and uncheck the box for its current category. You can mark a checkbox for another category or simply leave it to get classified as Uncategorized.
Click on the Update button to finish.
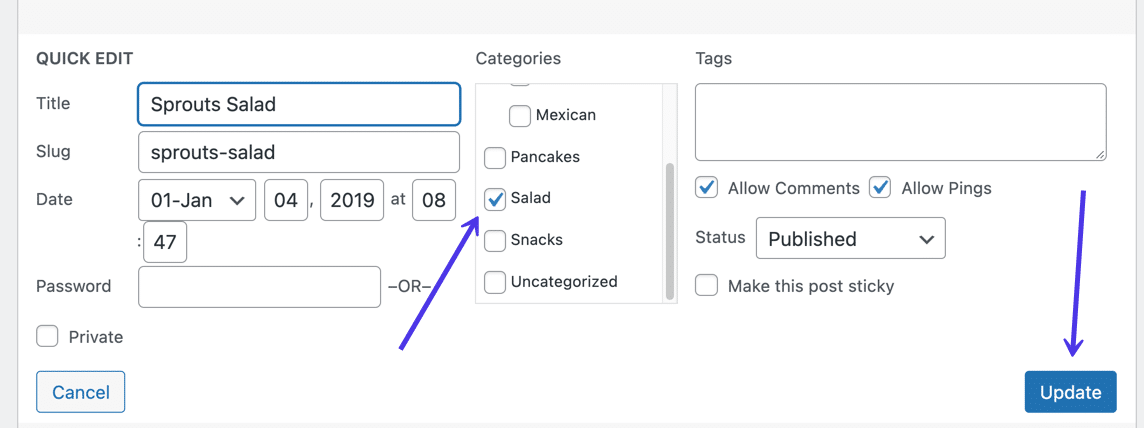
Removing a post from a category changes its label under the Categories column. You’ll either see the new category you selected, or Uncategorized if you didn’t specify a category.
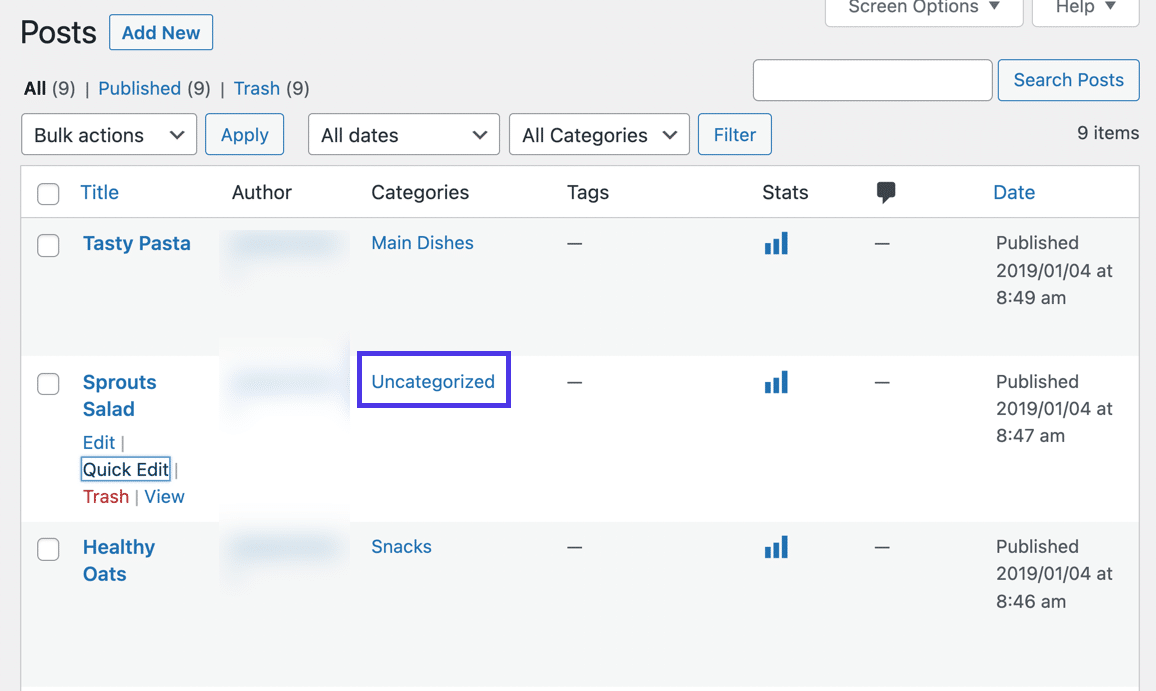
Remove Posts From a Category on a Post’s Edit Page
Removing a post’s category is possible within the post editor — the area in which you create post content, upload photos and publish the post.
To get there, go to Posts > All Posts in the WordPress dashboard.
Click on the post from which you want to remove a category. This opens the post editor.
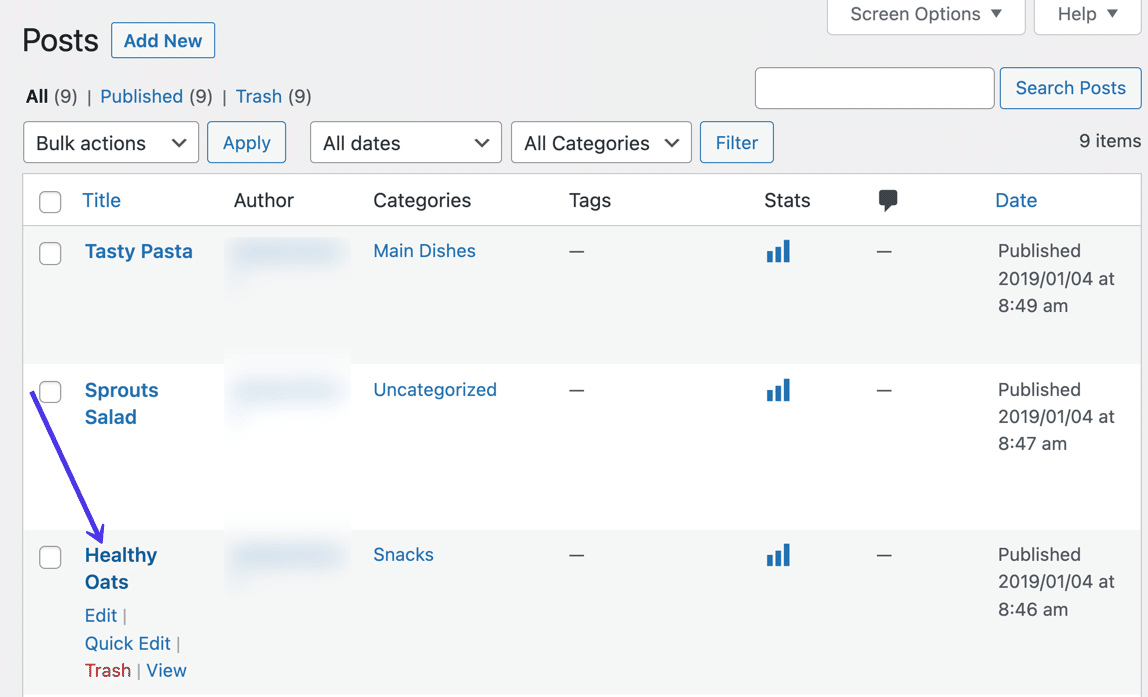
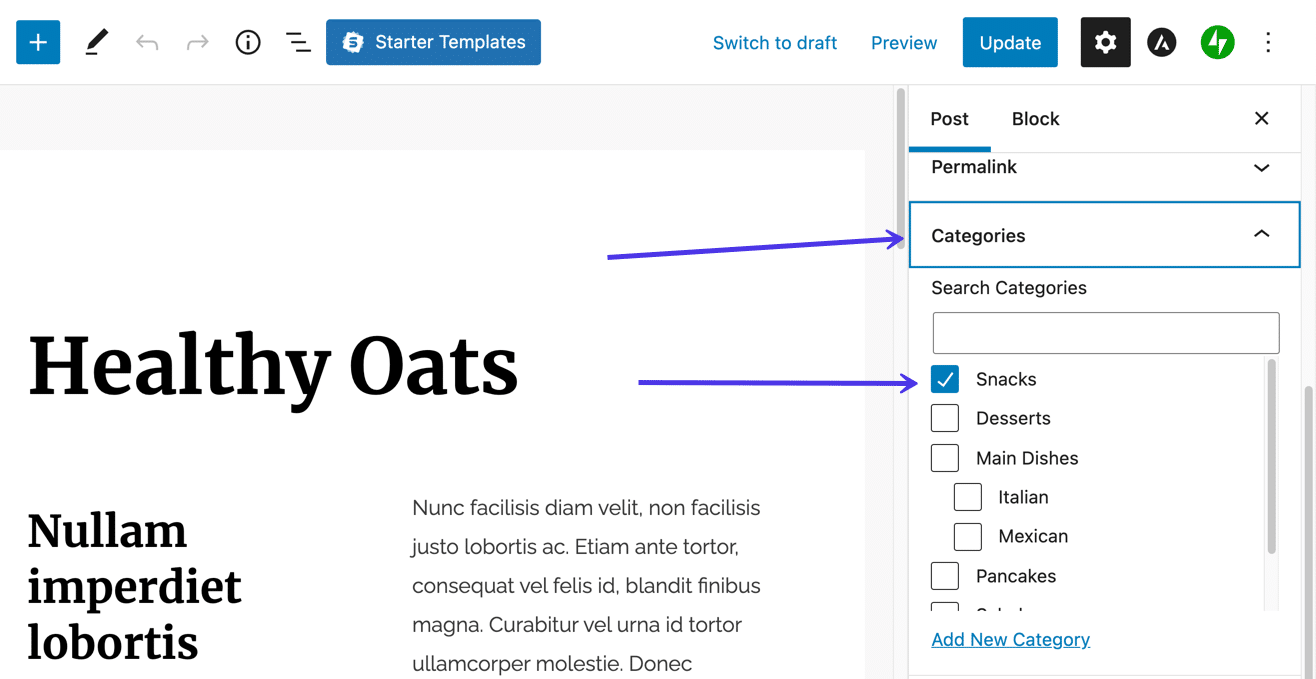
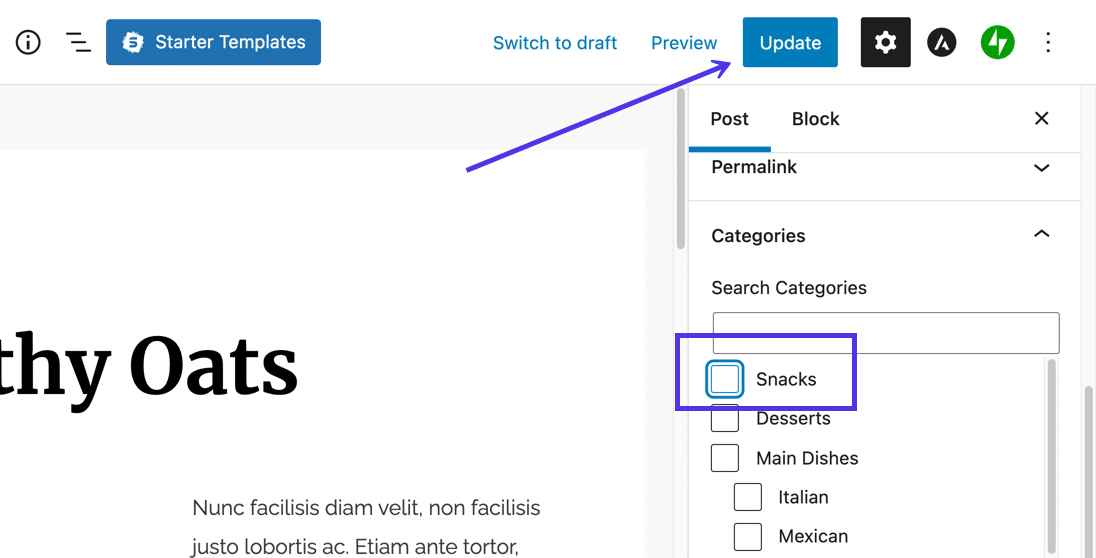
On the right side of the editor, scroll down on the Post tab to find the Categories section. Locate the currently checked category for that post. Uncheck it. As with the previous method for removing a category from a post, you can either select a new category or leave it uncategorized.
Click the Update button whenever you’re done.
Remove Posts by Viewing All Posts in One Category
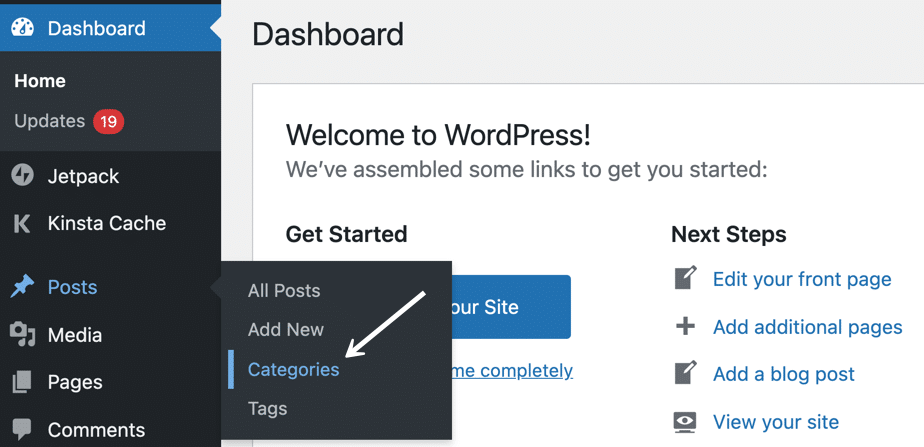
One quick way to view all posts within one category (and remove them from that category in the process) is by going to Posts > Categories.
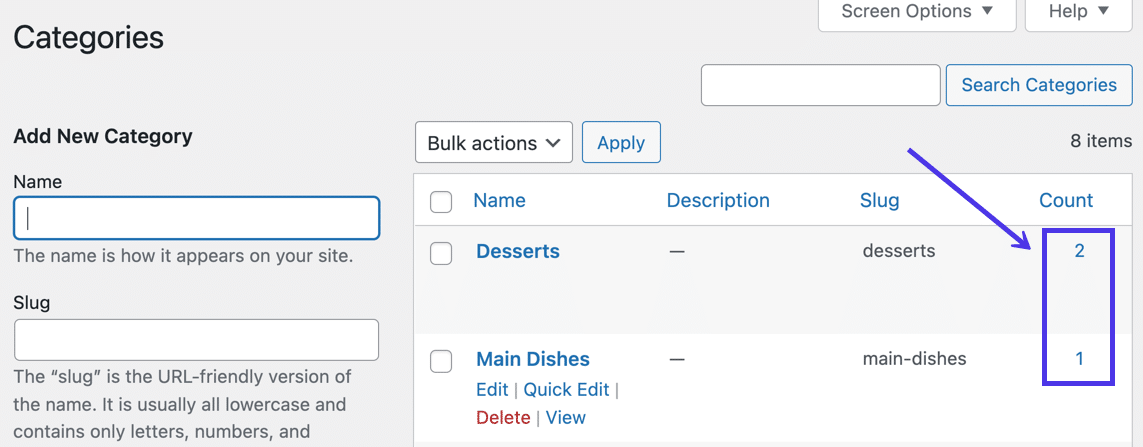
In the list of categories, you’ll see that each category has a Count column that shows the number of posts logged under that category. These are clickable numbers, so you can go to whichever category you want and click the number that’s currently showing.
As a result, WordPress only displays posts labeled under that category. This area also allows you to filter based on the category if you need to switch to a different one.
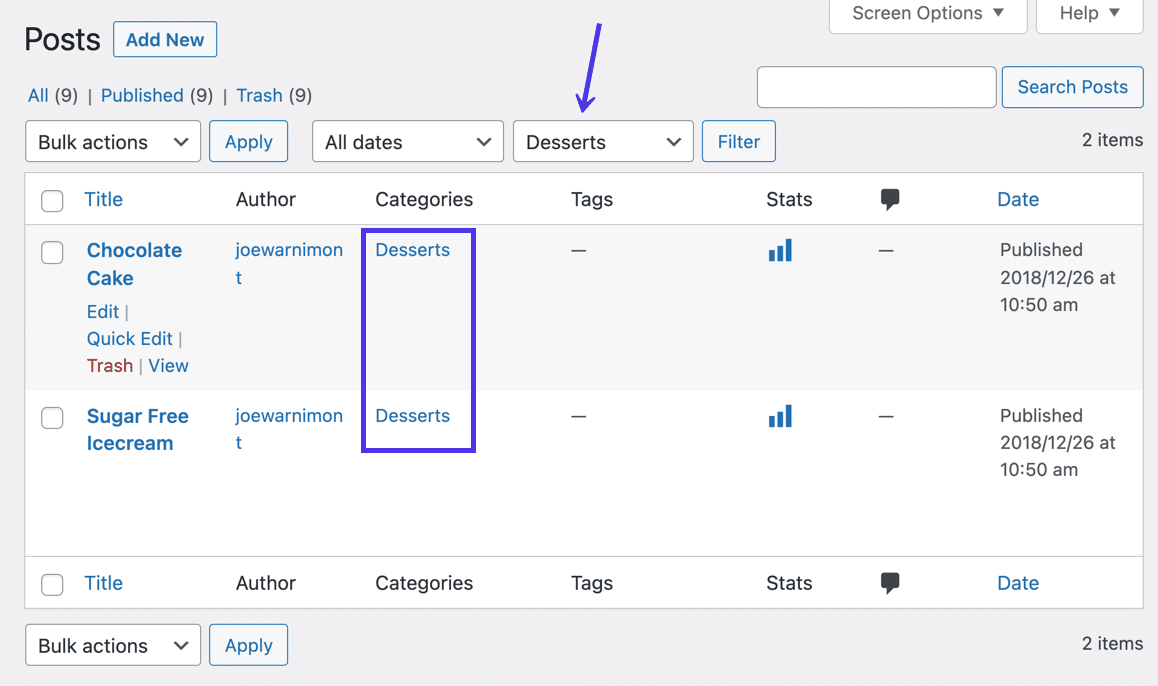
Although there’s no way to remove posts from a category in bulk, this at least merges the view to only show posts within that category. After that, you can click on the Quick Edit buttons for each post.
Uncheck the current category under the Categories field, then click on the Update button to finish.
How To Edit the Display of Categories in WordPress
Categories rarely show up on the frontend of a site unless you actively turn them on in the navigational menu or a widget. Some themes may add categories in those areas, or you may end up inserting them yourself. In this section, you’ll learn how to delete categories in WordPress after you put them on display. We’ll also cover how to edit categories in navigational menus and widgets.
Edit the Display of Categories in the Navigational Menu
To edit or delete (or even add) categories in the navigational menu, go to Appearance > Customize in the dashboard.
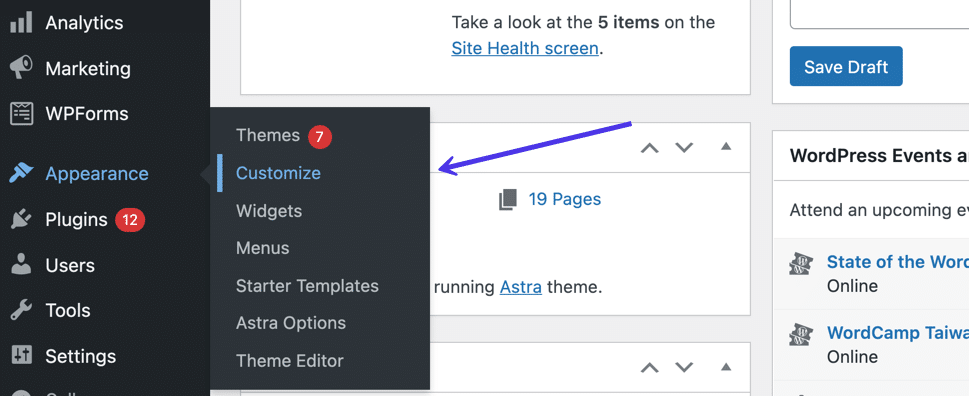
This sends you to the WordPress Customizer for a visual look at the site and several settings listed on the left side.
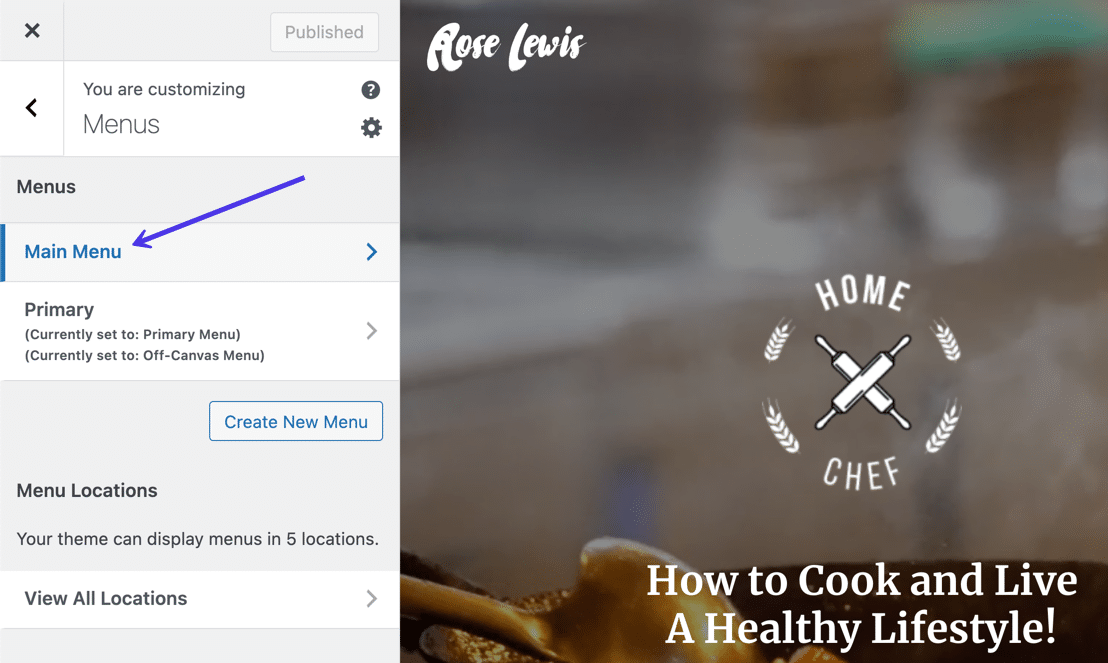
Choose the Menus tab to proceed.

Select the menu that you’d like to edit.
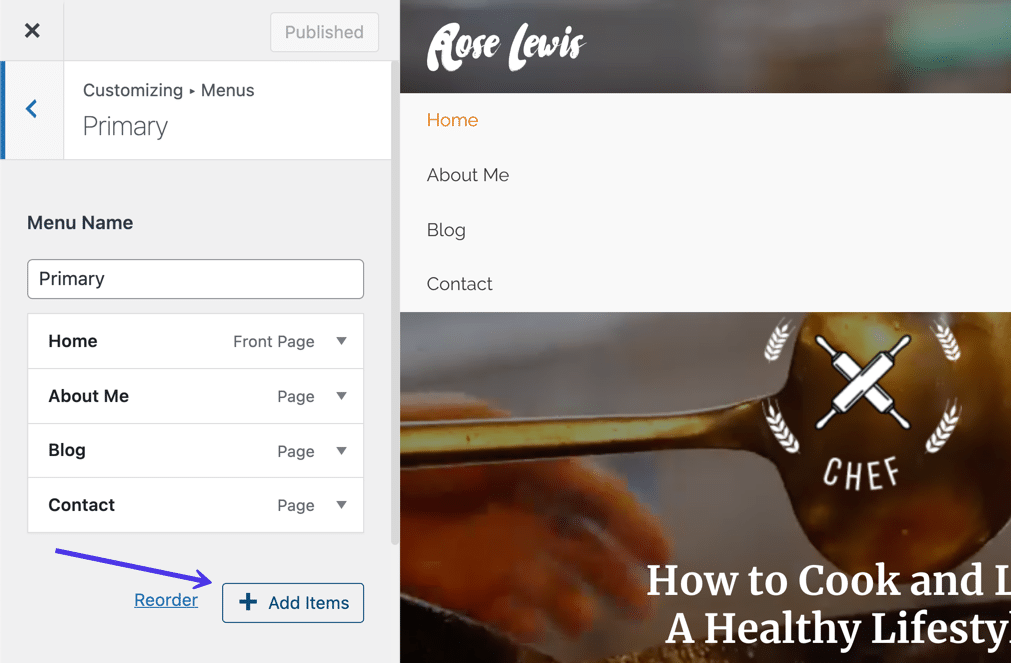
You have the option to add items if you haven’t already placed categories inside the navigational menu.
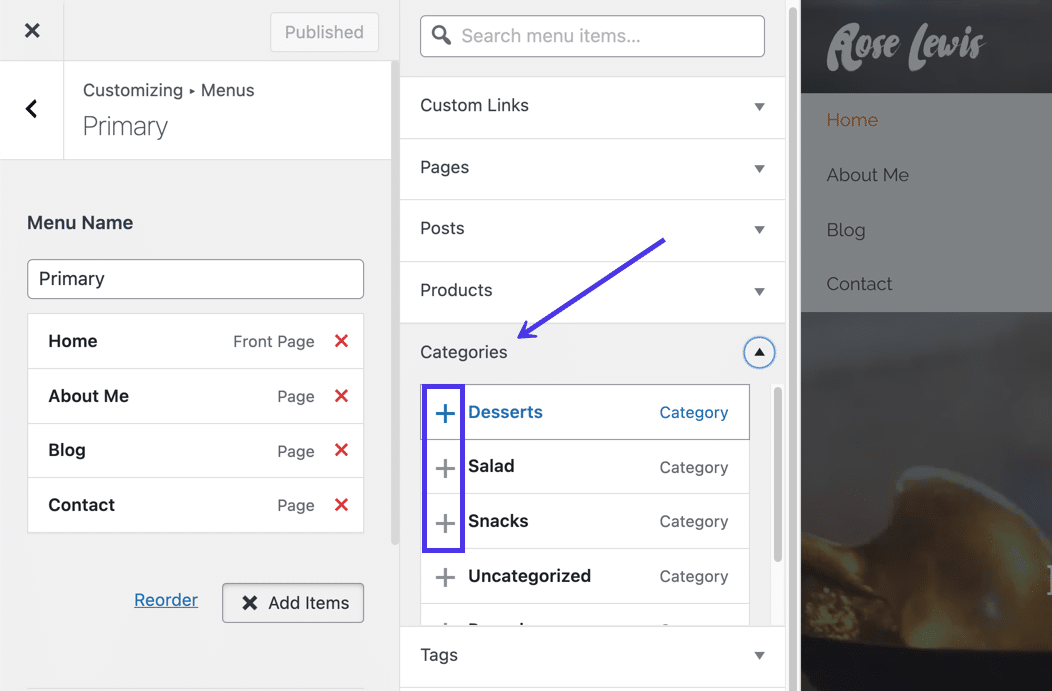
You would then click on the + buttons to either swap out menu items for categories or to add them one by one. These are located under the Categories tab.
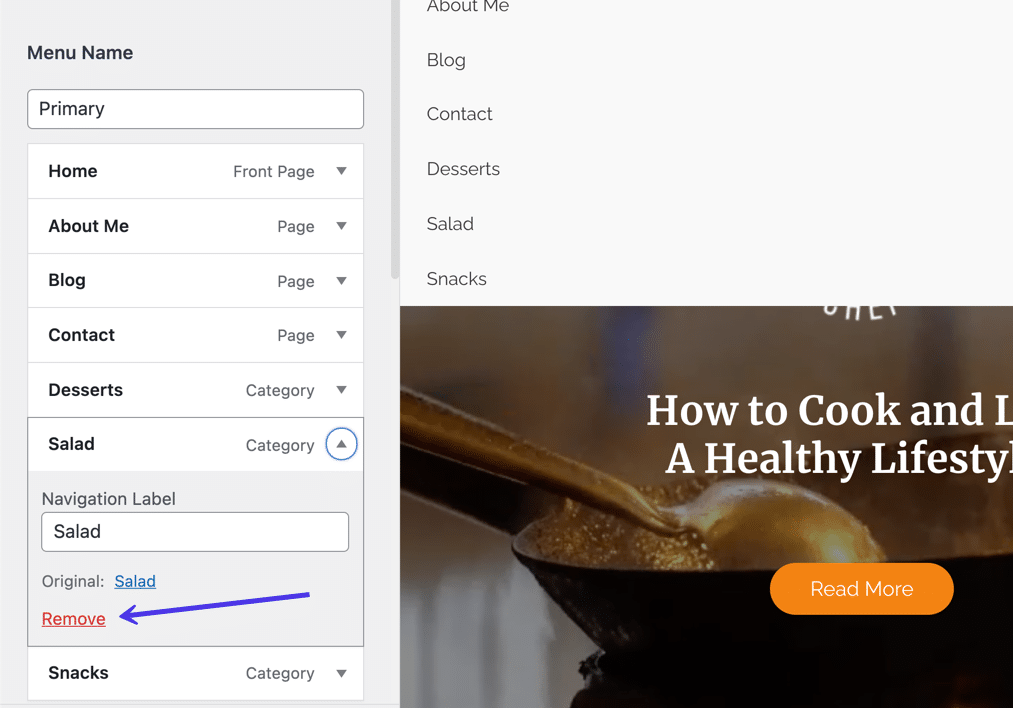
There are several ways to edit and delete a category that’s inside a navigational menu. First, click the category you want to edit by using the dropdown selector. That reveals available fields for editing the category menu item. In fact, there’s only one field for changing the Navigation Label. Change the label if you’d rather it show something other than the standard category name.
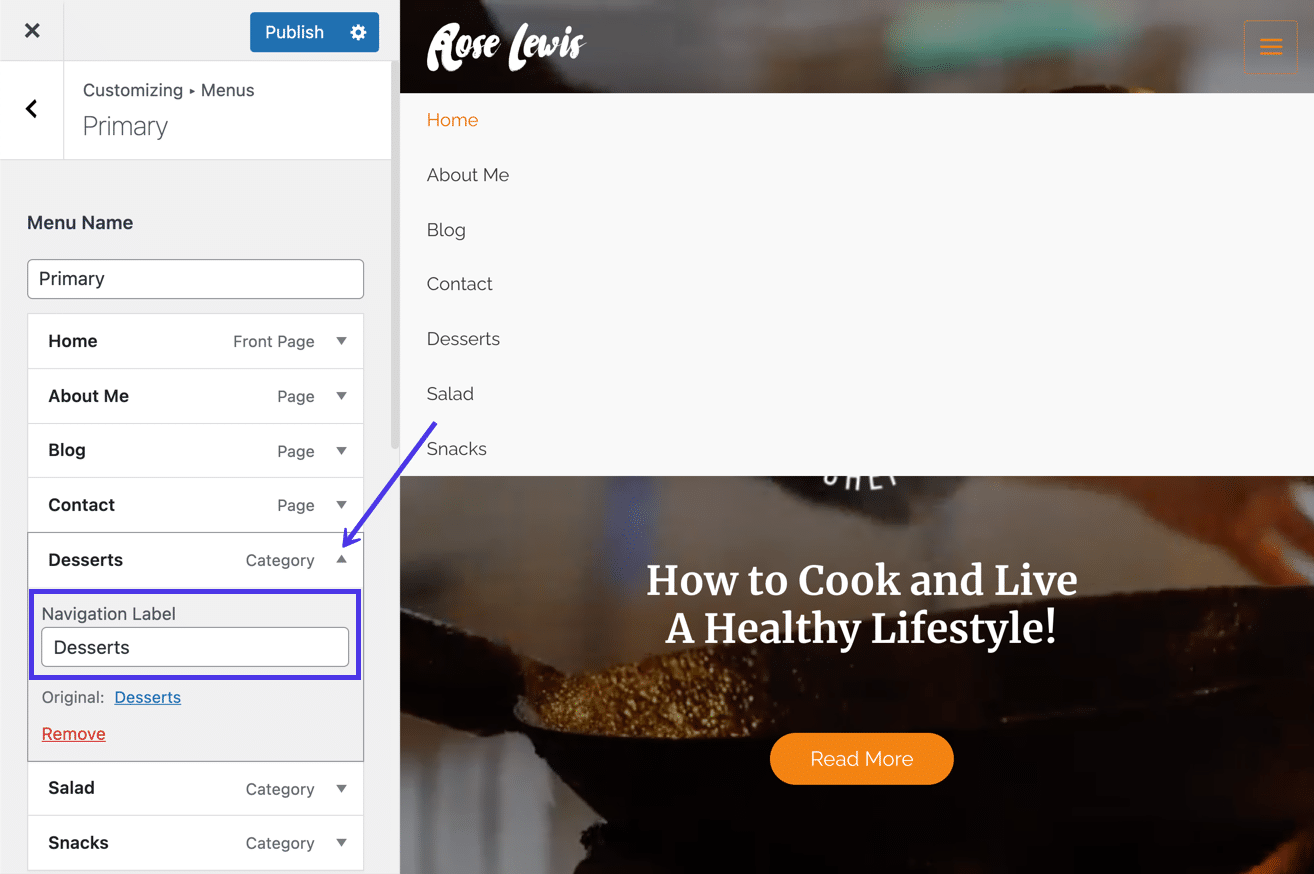
To delete categories in WordPress menus, click on the red Remove link while inside the category menu dropdown.
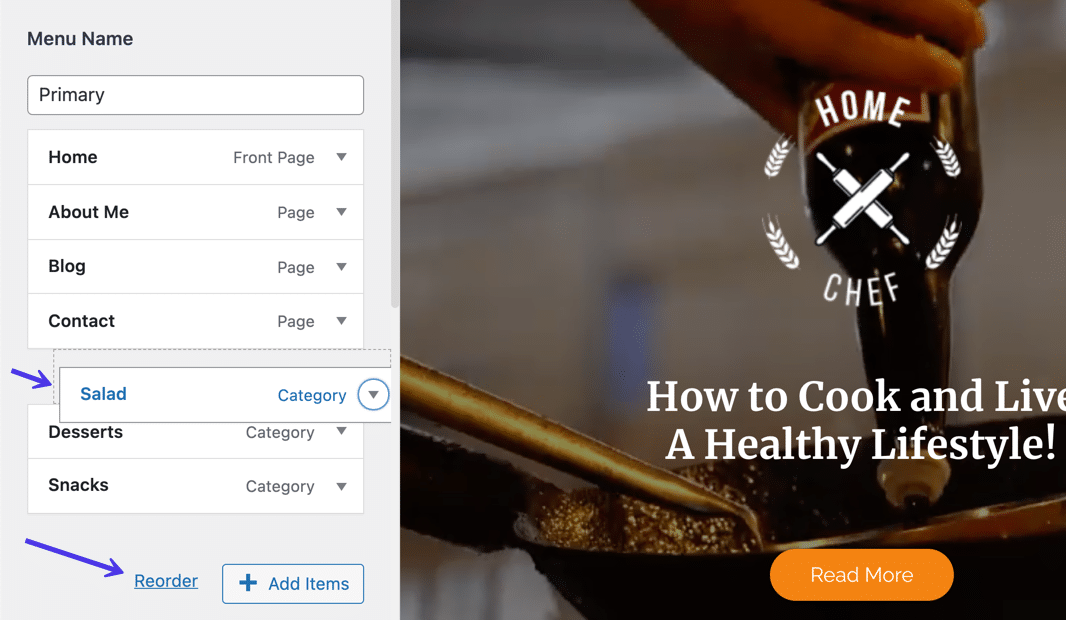
You also have the option to reorder the categories within the menu. Complete this process by either clicking on the Reorder button or simply clicking and dragging whichever category menu item requires moving. You can drag each category up or down and even situate them below other menu items to create a hierarchy.
Edit the Display of Categories in a Widget
WordPress widgets provide many options for displaying content, and one of those options involves displaying category lists inside widgets. It all depends on the theme you have installed, but you might edit and delete categories for widgets in the footers, headers, sidebars, and other supported widget areas.
The best way to find the widgets is by remaining in the WordPress Customizer and clicking the Widgets tab.

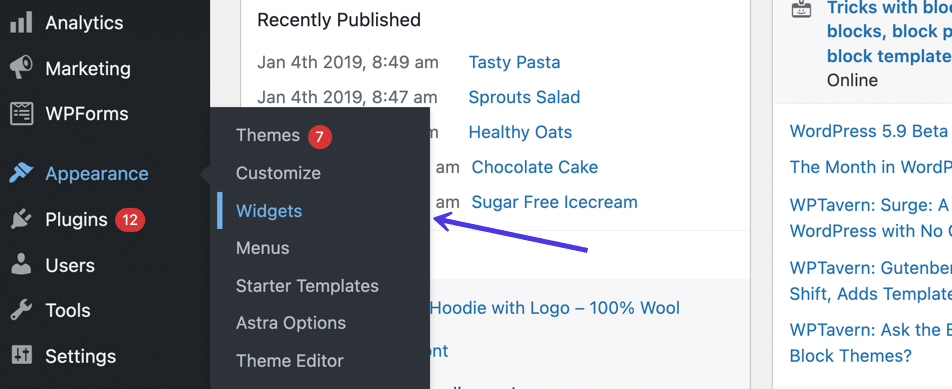
Another way to get there is by clicking on Appearance > Widgets in the dashboard.
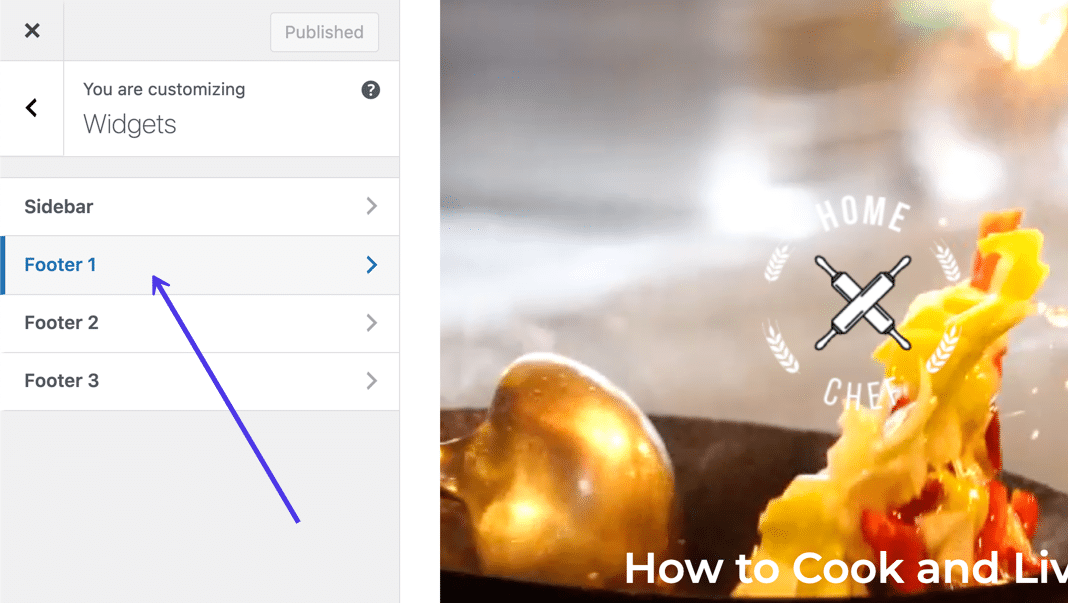
The Customizer then shows all the theme’s supported widget areas. Choose the one you’d like to edit.
It’s possible to add categories or change the categories listed in a widget by selecting the + button and choosing the Categories block.
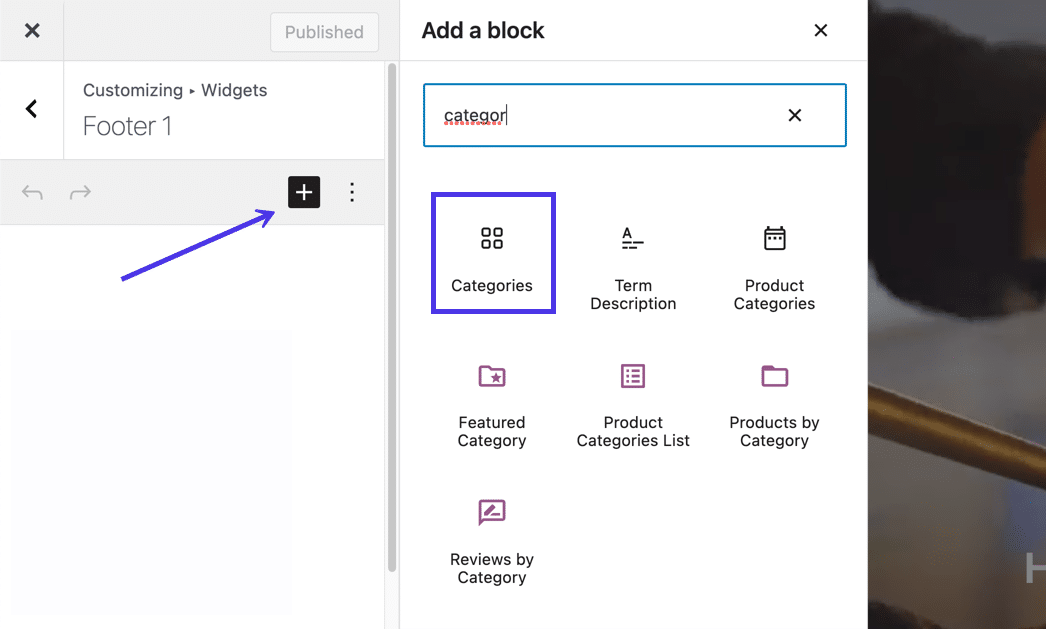
The Categories block automatically displays a list of your WordPress categories in that widget section (like a footer or sidebar).
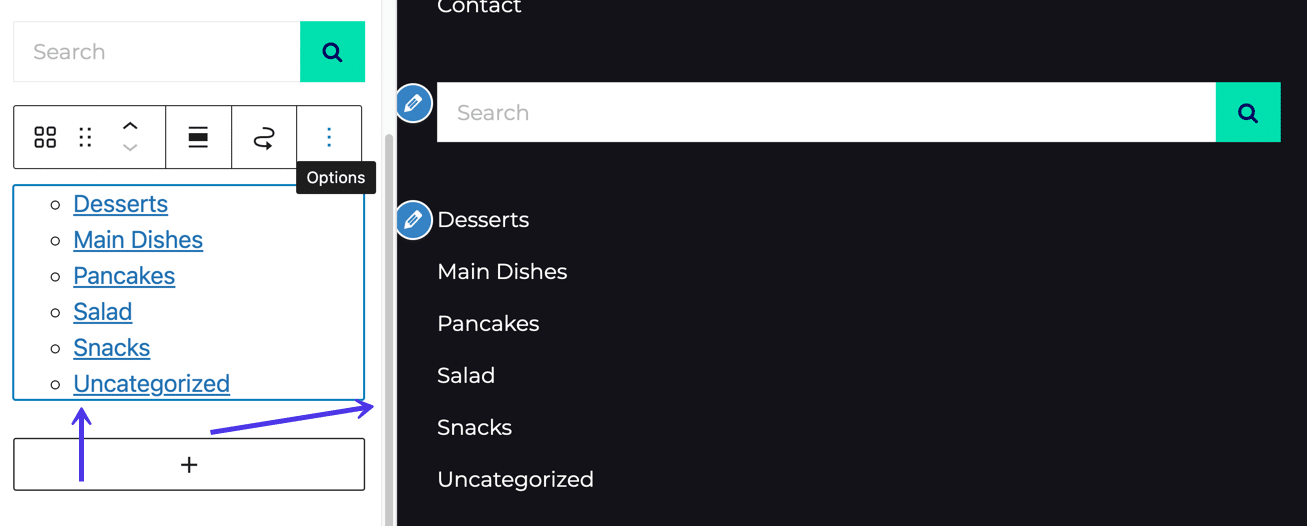
There are several options to edit or delete the categories inside the widget. For instance, you can change the widget’s position, switch it to a different block style, or rearrange the widget order.
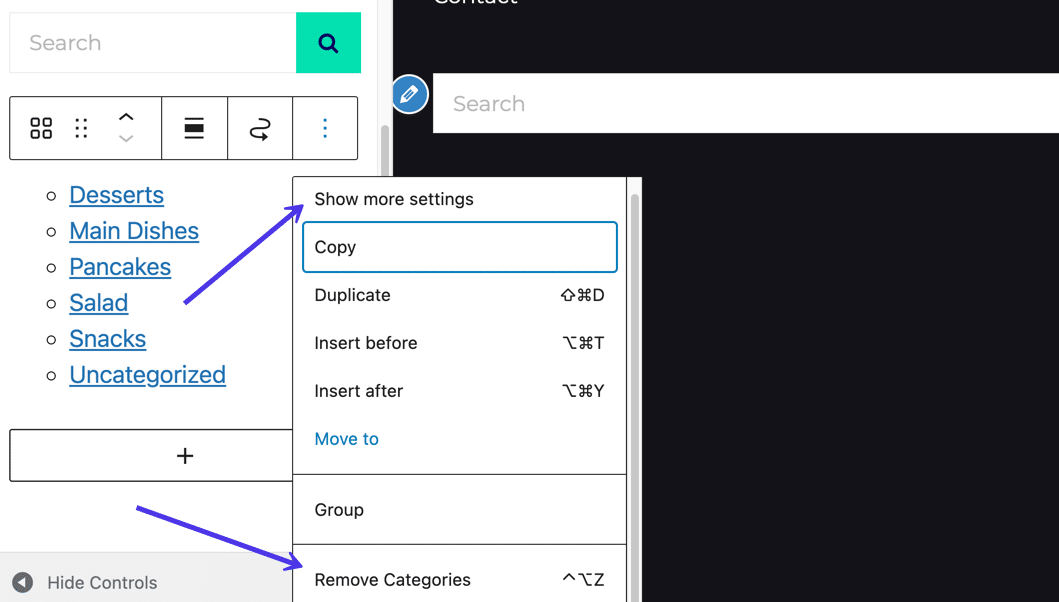
The most important place to go to is the hamburger menu (three vertical dots). After that, you’ll see an option to Remove Categories, which is the best way to delete categories from the widget.
In addition, there’s a tab to Show More Settings. Click on that for more ways to edit the Categories widget.
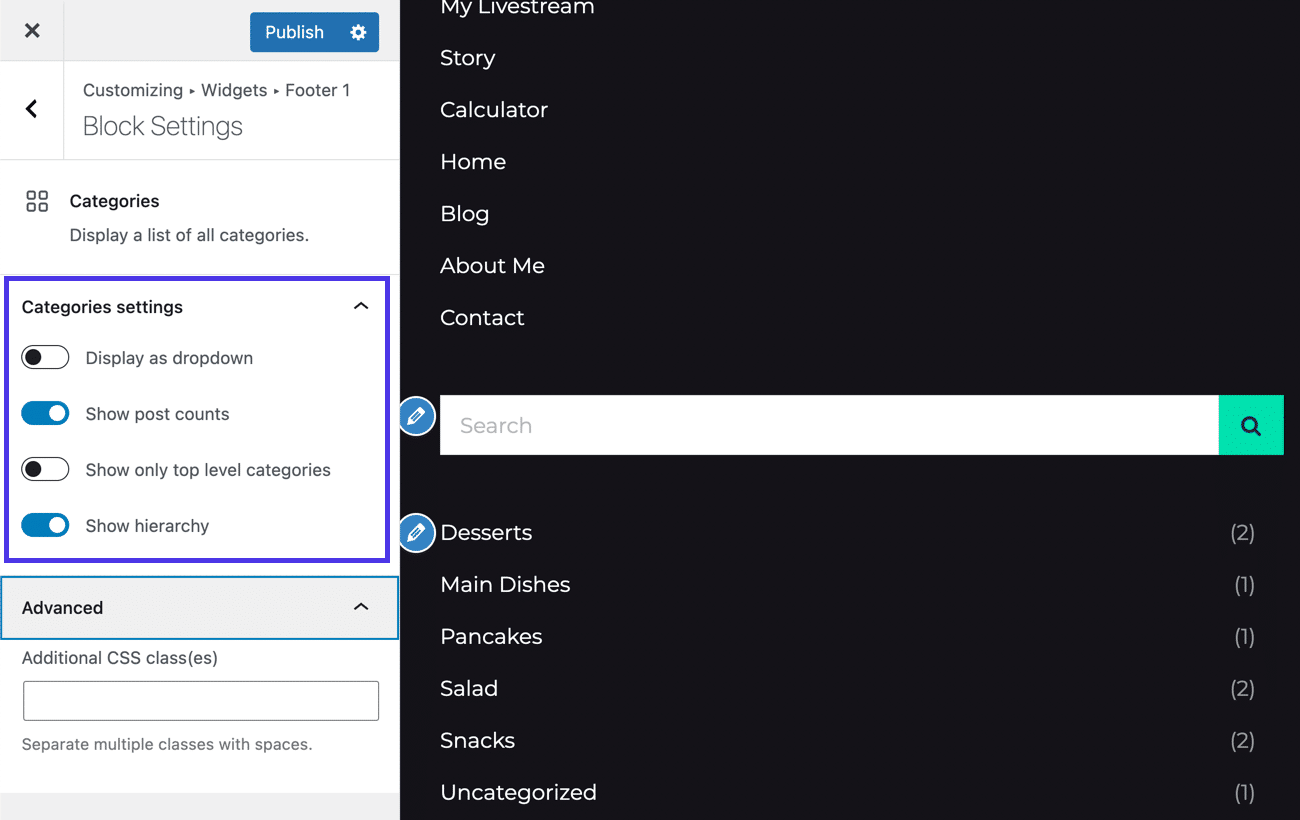
Inside the Edit section, you’re able to display the category list as a dropdown, show post counts, show only top-level categories, or show the entire hierarchy. There’s also a place to insert your own custom CSS classes.
Top WordPress Category Plugins
Learning how to delete categories in WordPress means you must initially work with features built into the WordPress dashboard. However, quite a few plugins are also available for you to improve upon those features and make for some advanced edits to your categories. View the plugins below to make deleting, editing, and managing WordPress categories a little easier.
1. Listing Category Posts

The List Category Posts plugin lets you go to a page or post and make a list of your current categories by using a simple shortcode. There’s also a widget for you to insert a list of categories in any widgetized section like a sidebar or footer. Customization options include CSS styling, HTML tags, and a way to change the number of categories shown in the list.
2. Ultimate Category Excluder

The Ultimate Category Excluder plugin offers an automated way to exclude specific categories from searches, archives, feeds, and your front page. It’s a rather simple plugin where you check off the categories to exclude (along with where to exclude them from) and hit the Save button. It automates everything after that.
3. Create and Assign Categories for Pages

Create and Assign Categories for Pages overrides the WordPress default of not having categories for pages. By default, you can make, delete, or edit categories for posts (and for some plugins) on WordPress, but that’s not the case for pages. Therefore, this plugin gives you the same functionality, except for pages. You can create new categories, assign pages to those categories, and display lists of the categories on your website. What’s great is that all the tutorials within this article work almost the same for page categories as they do for post categories.
4. No Category Base

No Category Base plays into the section where we talked about removing a category base from the category URL. Since WordPress automatically adds a category base that looks like /category/, this plugin gets rid of it completely without you having to manually remove it. To make it work, you install the plugin and let it run; there’s no need to adjust any settings.
5. TaxoPress

TaxoPress is the most powerful plugin to install for categories, seeing as how it allows you to manage your WordPress categories in a variety of advanced ways, adding to the default features that come with WordPress. This is more of a suite of tools for categories, with features to manage category terms and taxonomies, display them in specific ways, change the category terms for specific posts, and show related posts based on similar categories. The plugin also features automated links, category terms, suggested terms, and options to mass edit all the category and tag terms on your dashboard.
6. Category Order and Taxonomy Terms Order

The Category Order and Taxonomy Terms Order plugin sets up categories, and other taxonomies, in a drag-and-drop organizer. With this user-friendly configuration, you’re able to order the categories however you want and set multiple levels within the category hierarchy instead of just sticking to one parent category. The plugin doesn’t let you edit, create, or delete categories from its drag-and-drop organizer, rather you should still complete deletions and other actions as you usually would but then go to this plugin to sort them and create several levels of the hierarchy.
7. Category Posts Widget

Category Posts Widget provides a lightweight widget to only show recent posts from a specific category. The plugin lets you place the widget in any widget-ready area like a footer or sidebar. After that, you can auto-size the layout, use shortcodes, and implement full background images to stylize the widget. The non-premium features are a little limited, but they provide templates to arrange the posts, filtering, and thumbnail images. The Pro version gets more advanced with masonry responsive layouts, complex filters, and custom field support.
8. Categories Images

If you’ve ever wanted to add images to WordPress categories, the Categories Images plugin is there to help. Not all themes support images on category pages, but this plugin allows you to at least upload an image to each category for your reference on the backend of WordPress. If your theme provides support for category page images, the plugin takes advantage by showing the category images on the page. An Image Upload button gets added to the Edit Category page on the WordPress backend. After that, you’re able to exclude certain categories from having uploaded images.
Summary
Learning how to delete categories in WordPress only takes a little understanding that categories are almost entirely managed in one area of WordPress: under Posts > Categories. Besides that, you have several quick tools to edit or delete a category without even opening up an Edit Category page.
Overall, categories are meant to make your life easier as a developer, so it’s essential to learn how to delete categories in an efficient manner, while also completing tasks like changing the default category base, default post category, and more. We also highly recommend using this guide to organize any displayed categories, like in menus and widgets.
Do you have any leftover questions about how to manage categories in WordPress? Let us know in the comments section.


