WordPress background images come in all forms. You can upload a background image for your entire website, place it behind buttons, or set a solid color background for your login page. Regardless of where you want to put them, it’s essential to understand the basics of uploading an image, including a background image.
This article explains what a background image is and how you can edit it for a better outcome. We’ll also cover how to quickly get background images activated on your site and resolve any problems that may occur along the way.
Excited? Let’s begin!
Check out our video guide to adding WordPress background images:
What Is a WordPress Background Image?
A WordPress background image serves as the full background of your website. It’s also called a custom background.

A background can also be a solid color.
Regardless of the option you choose, the functions.php file handles the background image in a WordPress theme. It also gets displayed by the header.php file from WordPress.
As a result, theme developers have greater control over whether or not the custom background feature gets activated for your WordPress theme. You can still turn the functionality On or Off, but your site’s theme typically dictates the default settings.
There are several types of backgrounds you can implement on WordPress. You can either go for a standard full-website background or one that sits behind specific elements like sidebars and articles.
Custom backgrounds are also possible for more specific locations on the WordPress site:
- Behind a WordPress page or post
- On a WordPress category page
- Inside a content block for a page or post
- On the Login page
- Behind the Navigation Menu
- On the Maintenance or Coming Soon pages
Overall, if custom background support is enabled in a theme, the user has the ability to upload an image or choose a color to fill the entirety of the site background.
The settings are located in the WordPress dashboard under Appearance > Customize > Background Image. However, other types of backgrounds are possible through drag-and-drop page builders, plugins, and different options.
Uploading a background image to the dashboard is only part of the process. After that, you need to configure the background image settings. Sometimes you can leave the settings as is, while other times, it’s important to reconfigure the settings to ensure the image looks excellent.
Settings for a WordPress background image include:
- Background colors
- Sizing
- Image position
- Whether or not the image should repeat
- Options to fill the screen or stretch the image
We’ll first cover the best practices when using WordPress background images. Then we’ll go into how to set a WordPress background image in various situations.
The Many Styles of Backgrounds
A real advantage of a WordPress background is that they’re not all static images. You may come across various types of backgrounds, ranging from videos to photo patterns to slideshows.

You’re often able to implement unique backgrounds with the help of custom CSS or plugins (or both). We show you both methods in this article.
Here are some background styles to consider:
- Standard Background Images: These are static images (PNG, JPG, and other image formats) that stretch over most website space and sit behind the primary content. Their benefits include simplicity, options for high-resolution photos, and default support by the WordPress Core. Downsides range from their tendency to mess with foreground elements’ visibility to a large, high-resolution image slowing down your site.
- Solid Color Backgrounds: The solid color background image comes in handy when you want to add some vibrance to your site but don’t have an image that fits your brand or one that looks good as a background. The color background also presents a cleaner, more professional image, and they don’t take long to implement. They’re great for matching your branding without needing custom code or a plugin.
- Gradient Backgrounds: A gradient background transitions from one color to another. It’s more visually appealing than a solid color, doesn’t take much time to add, and you can add one with many plugins. The main downside is that a foreground may show up well on one end of the gradient but not on the other.
- Pattern or Texture Backgrounds: All pattern and texture backgrounds are photos, yet they focus on repetitive items in the image or a close-up texture, like a wooden panel or a patch of grass. The good part about a pattern or texture is that it works wonders as a background, seeing how you can stretch it out, and most people won’t notice if there’s a break in the pattern when the image isn’t quite big enough.
- Image Slideshow Backgrounds: An image slideshow background empowers site owners to share multiple types of designs or photos in the background, boosting efforts to adjust the mood when a customer scrolls through your site. However, slideshows could come off as distracting or slow down your site.
- Video Backgrounds: Video backgrounds are engaging, fun to watch, and easy to portray the nature of your brand. However, they also lead to performance issues if not done correctly and could take your sales funnel’s attention away. Also, background videos must be the perfect dimensions and play at the right times. They can also get expensive to make unless you opt for free stock videos.
Best Practices for Using WordPress Background Images
Setting a custom background image seems like an easy task. Just upload the image in the right spot and watch it appear on the frontend, right?
Most of the time, that’s the case, but other times you’ll find that the background image can be a bit troublesome. That’s why we recommend following the best practices for WordPress background images to eliminate as many problems as possible.
Tips For Using WordPress Background Images
Stick With High-Quality Images
The resolution of your intended background image often makes or breaks its presentation. You may think that an image you took with your smartphone is perfect for a background image, but the chances are that it needs to be of much higher quality.

You can pay for a royalty-free image from a site like Shutterstock. Those sites typically have professional-level images that are prepped and ready to upload as a large background image. You can also find plenty of them on free stock image sites.
The background image may not be shown in its entirety on your website, as much of it is covered by content. Still, the actual image is displayed across the whole screen.
If you don’t use a high-quality image, you run the risk of seeing a stretched background.
Make Sure the Background Images Are Sized Properly
Along with image resolution, the physical size of the image matters a lot.
All screens have varying aspect ratios. And mobile devices make it even more complicated. But the goal is to use an image that looks great for the largest of screens. Otherwise, you run the risk of yet again having the image stretched out or not displayed properly.
In general, a good rule is to stick with a minimum WordPress background image size of 1024 x 768 pixels. However, other experts recommend something more like 1920 x 1080 pixels. Overall, your best course of action is to stay somewhere between 1000 and 3000 pixels for the width, depending on where it’s displayed.

The next factor you need to consider is the aspect ratio. Is the background image covering an entire website, or is it just the top quarter?
Technically, a website has a portrait (longer height than width) aspect ratio. So you can look into those types of pictures. However, sectional backgrounds—like those for headers or banner ads—should remain in landscape formatting (longer width than height).
Also, the most common aspect ratio for desktops today is 16:9. Remaining around that goal helps. A responsive theme or plugin may adjust the background image automatically for mobile viewing.
Ultimately, testing your background images on an actual site and multiple device types should make the final decision much easier.
Optimize Before Making a WordPress Background Image
As with all images uploaded to WordPress, you’re doing yourself a disservice if you don’t optimize them before publishing to the internet. This is particularly important for background images since they often show up on multiple pages throughout your website. Plus, they are large photos and cover a significant amount of space on the screen.
Larger images put a significant amount of strain on your server. Maintain the resolution of your image, but optimize its size so that your website loads quickly.
You have two options for optimizing photos:
- Optimize the background images (and all website images) before uploading them to WordPress. Complete this manual process with the help of tools like Photoshop Express, GIMP, and Pixlr.
- Automate the optimization process by installing a WordPress plugin that resizes and shrinks photos upon upload.
Read our in-depth image optimization guide on how to optimize images for improved web performance.
Check for Background Support Before Installing a Theme
Unfortunately, not all themes support custom background images. That’s often because the background doesn’t fit into the theme’s overall design, so the developer chose to turn it off altogether.
Yet, if you really want a background on your website, it’s prudent to check the list of features when downloading a new theme, especially if you plan on paying for a premium theme. Many theme sales websites offer information about whether or not a theme supports backgrounds.
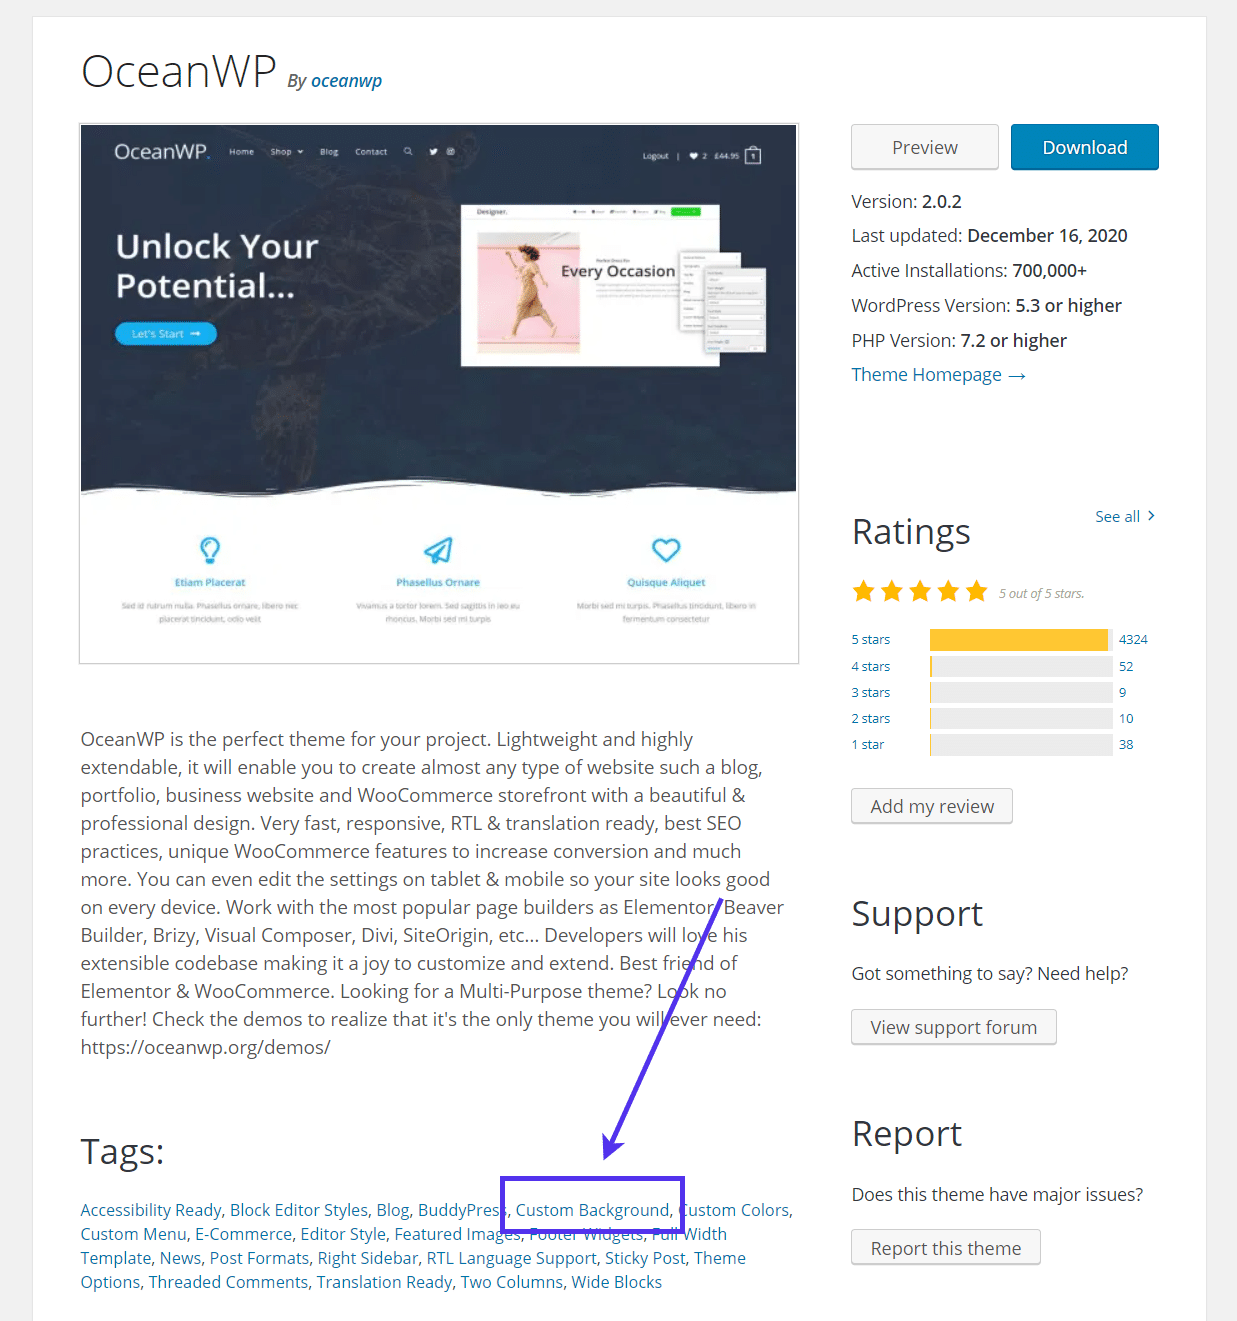
For example, themes listed in the WordPress Theme Library indicate support for custom backgrounds as tags. You may also find a reference to a custom background in the theme description.
Other theme sites typically include similar information about custom background images. If not, reach out to the developer to figure out if it’s possible in any way and if overriding the background image block (covered below) will cause any issues with the theme.
Consider Using a Visual Page Builder to Make Background Images Easier
Page builders like Gutenberg, WPBakery, Divi, and Elementor, offer impressive lists of blocks and modules to insert elements like images and text boxes anywhere on a webpage.

Without a drag-and-drop builder, it becomes a bit more difficult to configure a background image. It’s especially tough trying to resolve any problems you may encounter.
Page builders also tend to replace the default background image functionality provided through WordPress. You can override theme restrictions or any missing elements that help display a background image in the code.
Make Sure Your Background Image is Legal
Legality always comes up when speaking about images, especially those published on the internet. There’s a growing trend on social media where people seem to assume that adding a credit to a photo automatically makes it okay to use that photo.
That’s false.
Whoever takes the photo owns it. Even if that image comes from a quick iPhone snap—they immediately have copyright protection for that photo in the United States and many other countries.
If you want the legal rights to use someone else’s photo, it would require a written statement from the copyright holder permitting you to use their images—a simple email does the trick. Even then, you may have to attribute the photo if the person asks you to.
We have a comprehensive guide on protecting images on your site, but the article also outlines valuable information for those interested in using photos from other sources.
The tough part about background images is that it’s usually not practical to add attribution, seeing how WordPress has no place to incorporate a visible caption for background images. And no, you can’t add attribution on one random blog post or page and expect that to serve as credit for a full website background image.
To protect yourself and to respect those who take the photos, consider one of the following when sourcing a WordPress background image:
- Take the photo yourself. That’s the easiest way to ensure you’re not infringing on anyone else’s copyrighted property.
- Pay for photos on websites like Shutterstock and iStockPhoto. These are sometimes expensive, but for one background image, it may just squeeze into your budget.
- Consider a free image website like Unsplash or Pexels. However, make sure that attribution isn’t required! You can occasionally locate images on these sites where attribution is suggested but not required.
- Contact the photographer or artist and ask if you can use it for free. This may be all you need, especially if you offer something in return.
- Think about skipping the background image, or consider going for a colored background instead of a photo.
How Do I Set a Background Image in WordPress?
There are various ways to set a background image in WordPress. These methods usually change based on the location you want to put the image.
For instance, you may decide that you’d like to have a background image to remain the same throughout your entire website. On the other hand, it’s possible you’d rather find a way to show unique background images for all your pages.
Since so many possibilities exist, we’ll cover how to add a background image or color to the following sections:
- The entire site
- A WordPress page
- A WordPress post
- An individual content block
- The WordPress header
- A category archive page
- The WordPress login page
- The Navigation menu
- A maintenance page
How to Add a Background Image to the WordPress Header & Menus
Before You Start: Activate Custom Background Support on WordPress (If Needed)
Theme developers decide the fate of a site’s background capabilities. WordPress has the functionality built into the core, but a theme developer could turn it off, leaving you with no dashboard setting to turn it on.
If at any point in the following tutorials you find that your theme is the reason you’re lacking a Custom Background option, consider the following steps to make a quick fix of it.
The main custom background support for WordPress gets handled by the functions.php file. Open that file and insert the following code if it’s missing:
$defaults = array(
    'default-color'          => '',
    'default-image'          => '',
    'default-repeat'         => '',
    'default-position-x'     => '',
    'default-attachment'     => '',
    'wp-head-callback'       => '_custom_background_cb',
    'admin-head-callback'    => '',
    'admin-preview-callback' => ''
);
add_theme_support( 'custom-background', $defaults );
Keep in mind that the element actually activating the background support is the add_theme_support() function with everything in it. That code turns the background feature on in the WordPress dashboard, which you can use within many of the following tutorials in this article.
It’s also possible to add a default background image for the entire theme through the functions.php file. Simply go to the area from the previous code with the default-image value and add the image’s URL to the blank space between the ' ' after the =>.
This is a quick and easy way to turn on custom backgrounds within the WordPress dashboard.
Having said that, we recommend changing the theme if it doesn’t have background support in the first place. The removal of the custom background feature could have its own purpose, or maybe the theme developer found it was causing too many problems with the design.
How to Add a Background Image to Your Entire WordPress Site
If your theme offers the capability to add a custom background image (and many do), it makes it much easier for you.
To begin, go to your WordPress dashboard and click on Appearance > Customize.

That brings you to the WordPress Theme Customizer, with customization settings on the left and a website preview on the right.
Here, find and click on the Background tab.
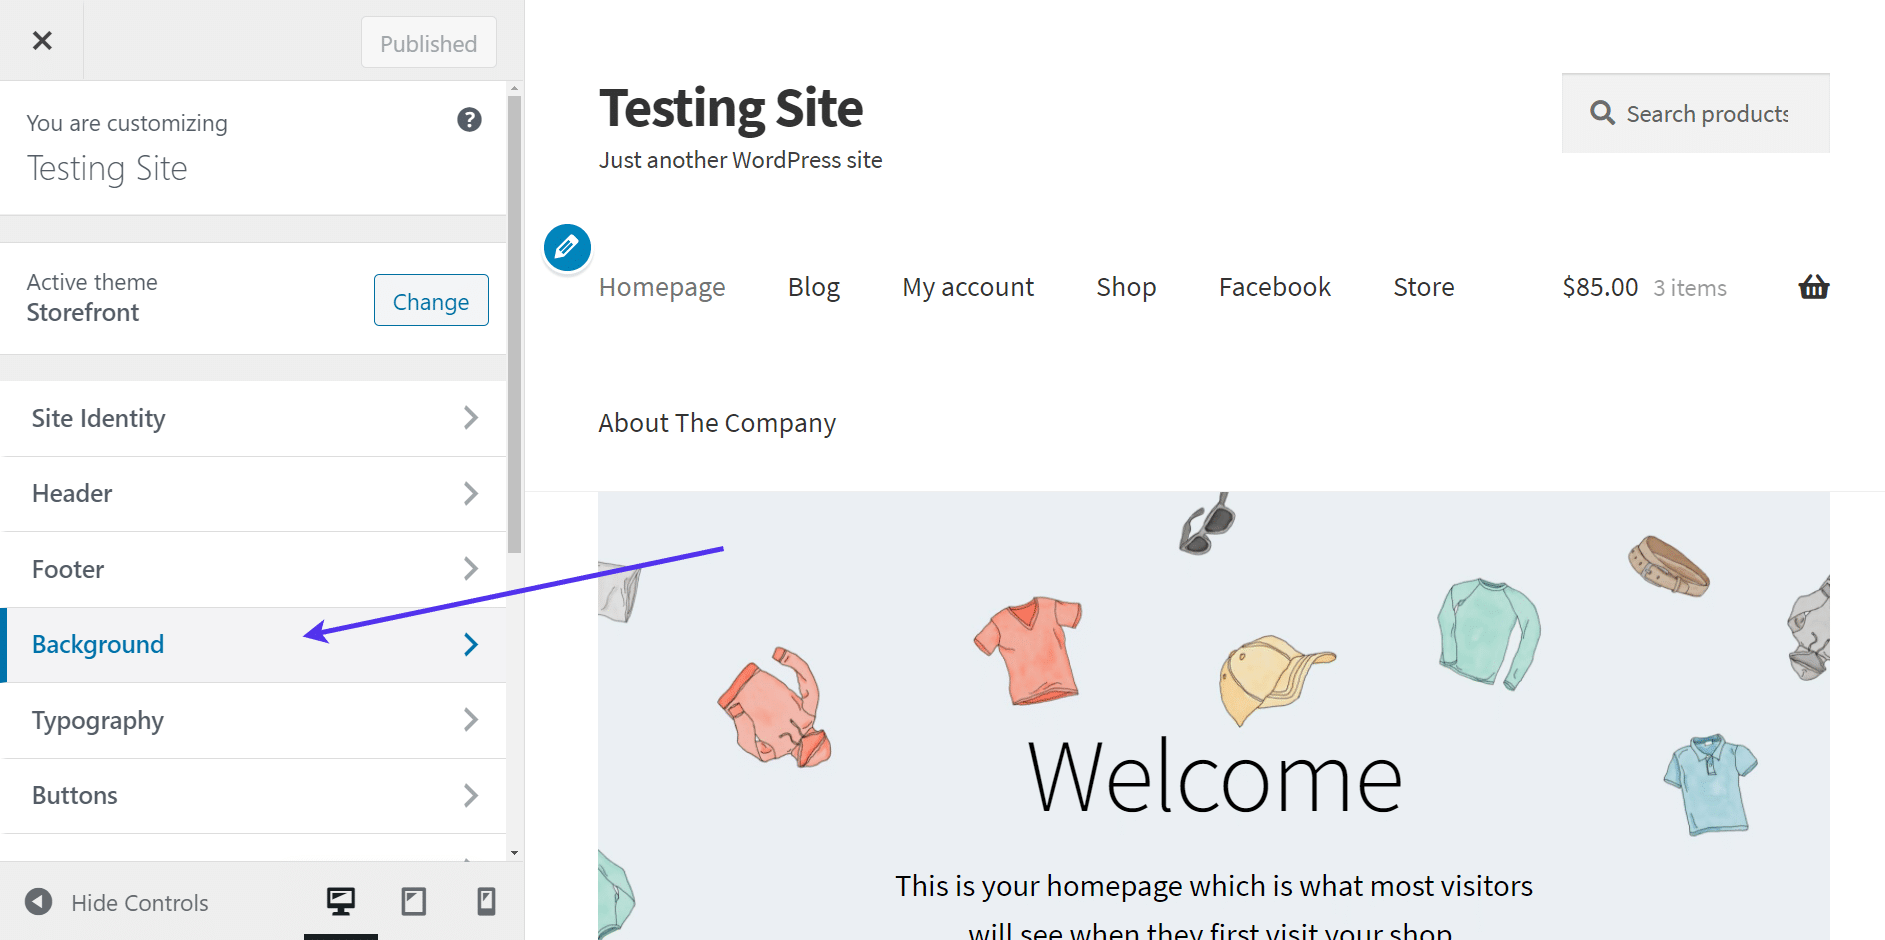
As an alternative, if you can select Appearance > Background, you can use it for a more direct route to this setting.

The Background customization area manages the background elements for your entire website.
Click the Select Image button to proceed.

In the Select Image window, choose an image that will fit well as a background for your brand and website styling. In general, a neutral color pattern with a black, or white, or gray shade usually helps to ensure that most of your text and content still looks good with the background behind it.
Once you select your image, click on the Choose Image button to move on.

The background you implemented now appears in the website preview.
See if your content still stands out and looks presentable with the chosen image. Sometimes you may find that you need to either completely swap out the background or change things like text or link colors.
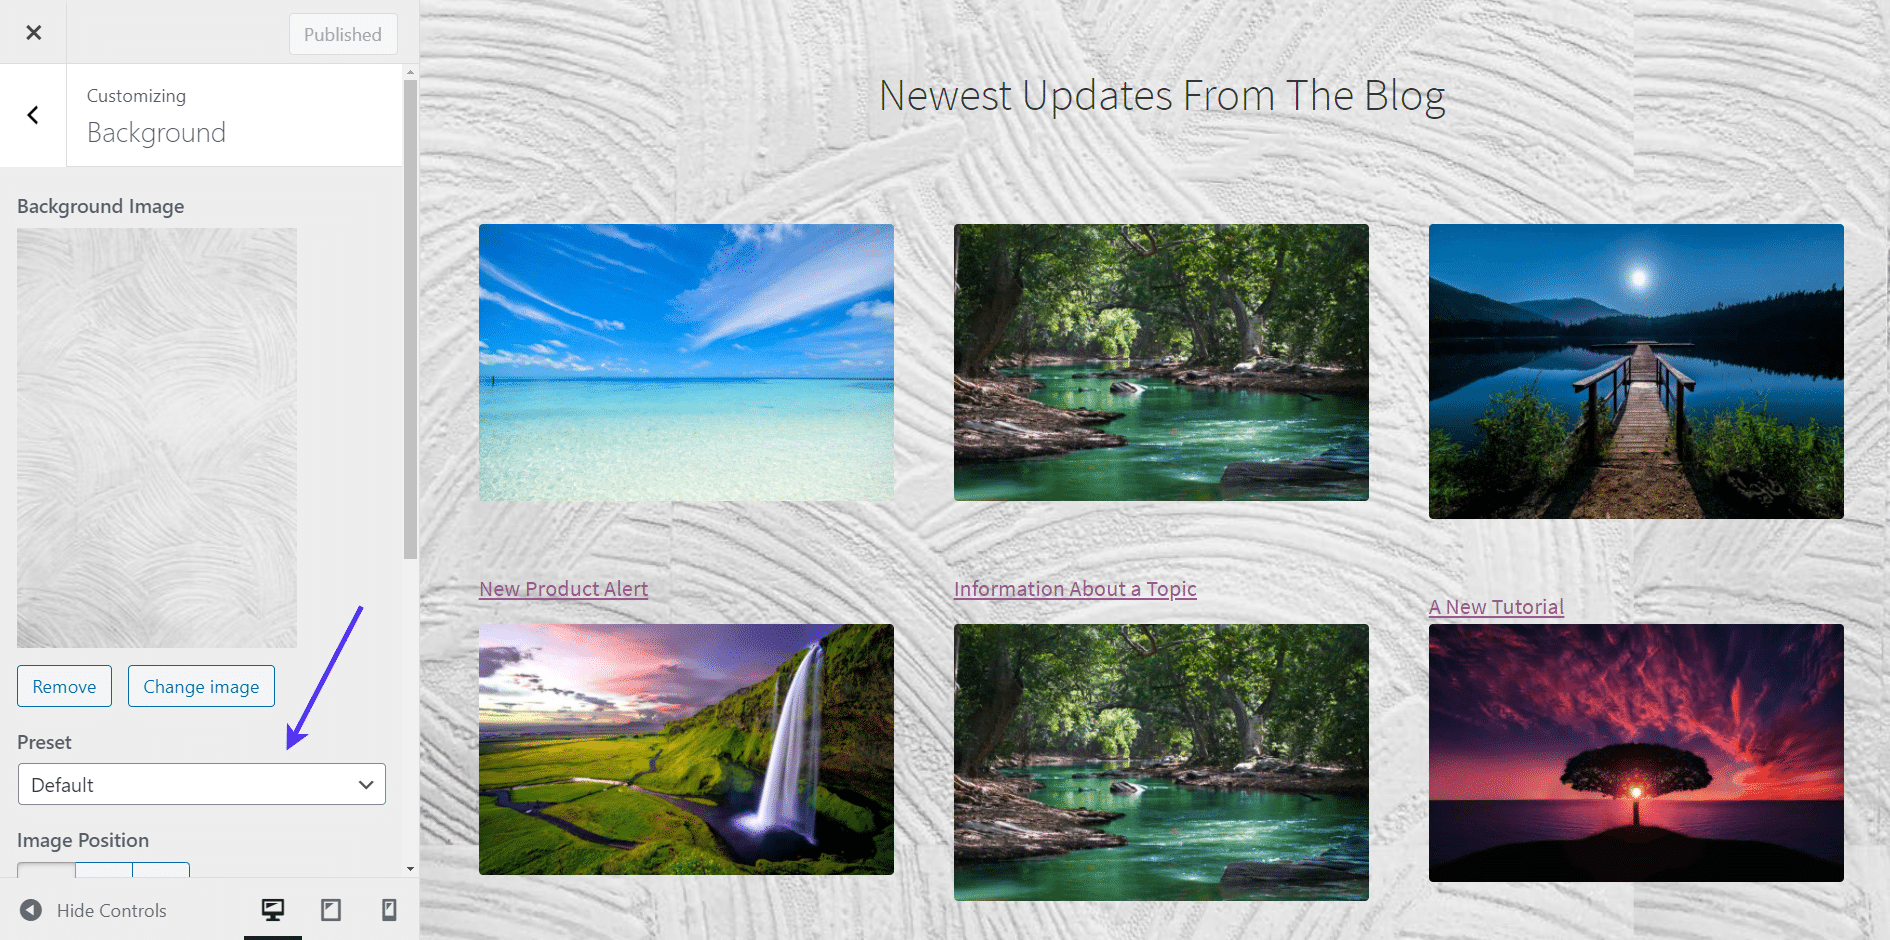
A small thumbnail of the background also shows up in the Settings panel, showing you that the image has been implemented.
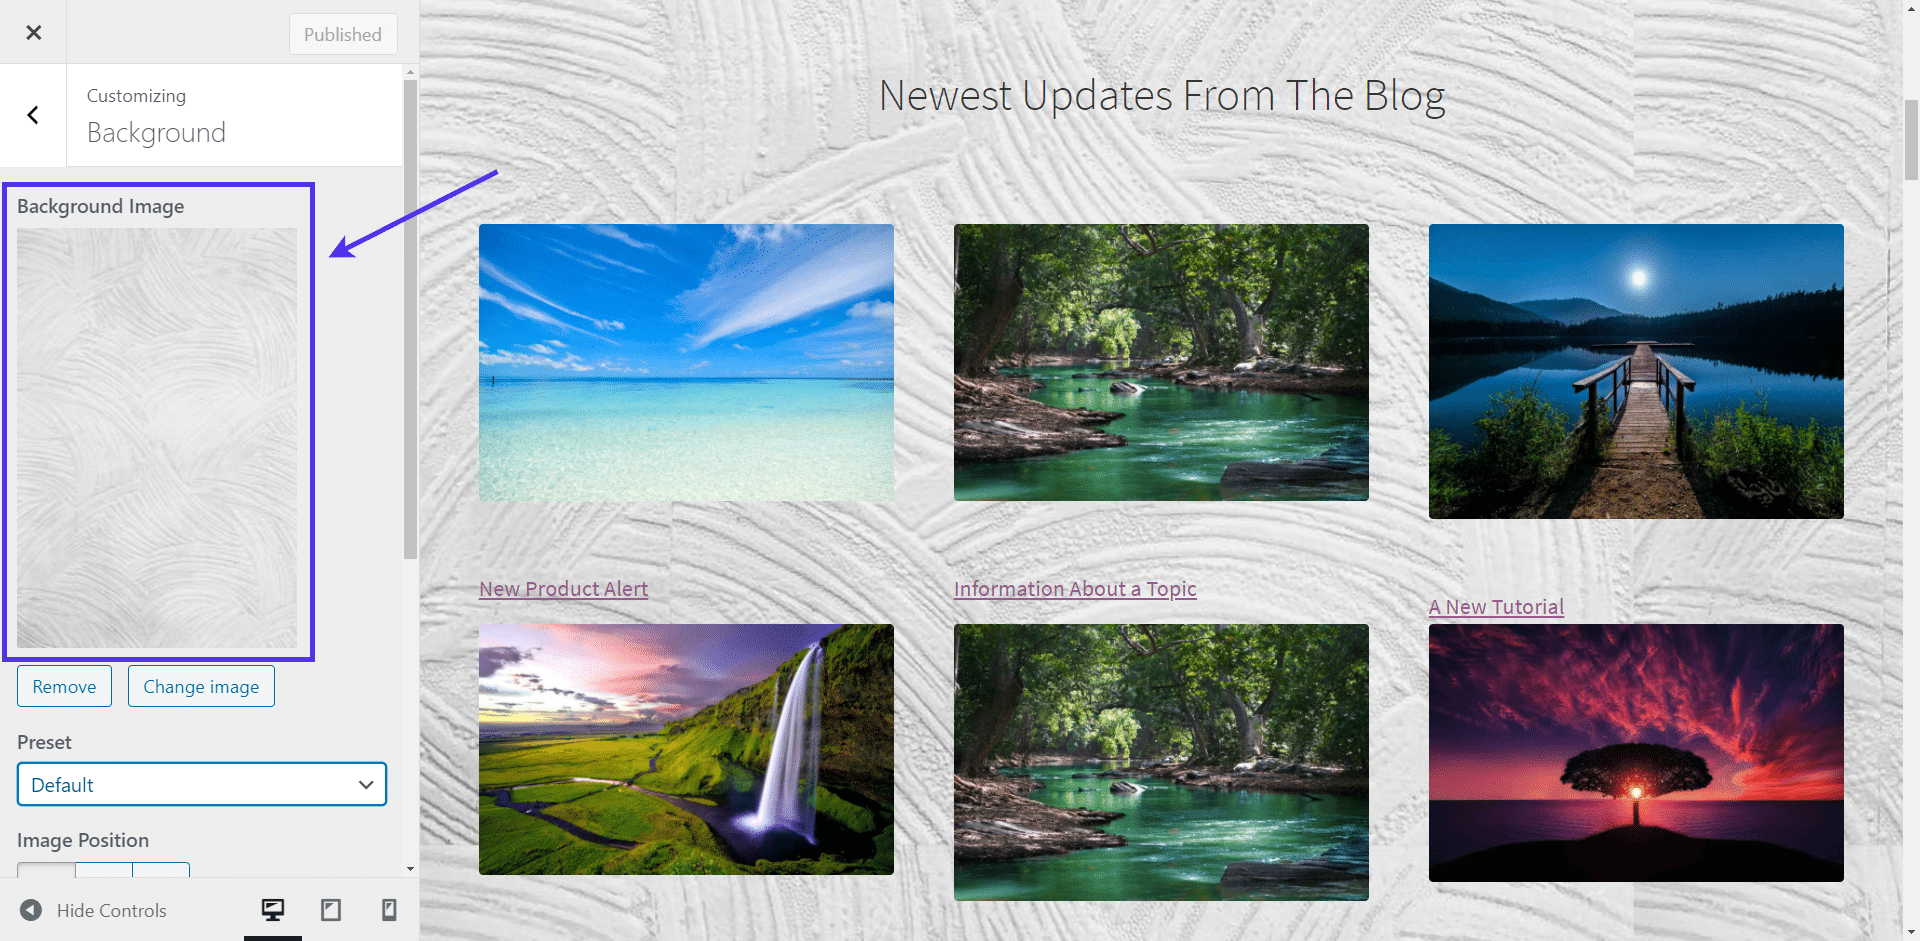
A few additional settings are available for WordPress backgrounds, including the Preset field.
Click on the Preset field to change the formatting of the image using preset designs and alignments.
You can choose from the following presets:
- Default: This is usually the same as Repeat, but it may depend on your theme. The Default setting generally works best, but it depends on the image being used.
- Fill Screen: This setting stretches the image to ensure that all parts of the screen get covered, even if it means cropping the image, so it overflows off the screen. It works well for many high-resolution images but could cause blurring with low-resolution images.
- Fit to Screen: This maintains the original photo’s aspect ratio and attempts to use that ratio to fit the current screen image. It does a good job of keeping the image close to its original state but may not cover all the background area.
- Repeat: This uses parts of the Fill Screen function, expanding and stretching the image, but it also repeats the image when it can’t successfully cover the entire screen. For patterns, this usually looks great. But for some images, it may produce a hard line between the repeated images.
- Custom: This setting gives you the most control over the background, offering several options to customize the WordPress background image size, like how it repeats on the page, stretches, or moves as the user scrolls.
There’s no rule as to which of the Presets work best because images come in different sizes, resolutions, and details. Therefore, you’re best off starting with the Default preset and then testing each of the other presets to see which one looks best for your background image.
If all else fails, go to the Custom setting to get really specific with your choices.

The Fit to Screen preset doesn’t quite do it for this image, mainly because the original image is much longer than it is wide, leaving a significant amount of space to the right. I could change the Image Position to the Center, but it would most likely leave white space on the sides.

The next setting to consider is the Image Position tool. Click the arrows to move your background image around, adjusting the orientation to either place the image’s focus towards the center or filling the screen.
Much like the Presets setting, the Image Position tool requires a process of guessing and checking your work, as the original image and its contents dictate how it looks.

Next up, there’s a checkbox field to make the background image Scroll with Page.
With this box checked, the background image sticks to the foreground content and scrolls along with the user as that person moves up or down on the page.

Unchecking that box tends to change the background image’s general orientation, yet its dominant feature is to tell the background to remain static while the user scrolls down the page.
The foreground content items (like the products in this instance) glide over the background image, creating an attractive effect.

Working with a Custom Preset
When opting for something besides the Custom preset, you don’t get that many additional settings to configure.
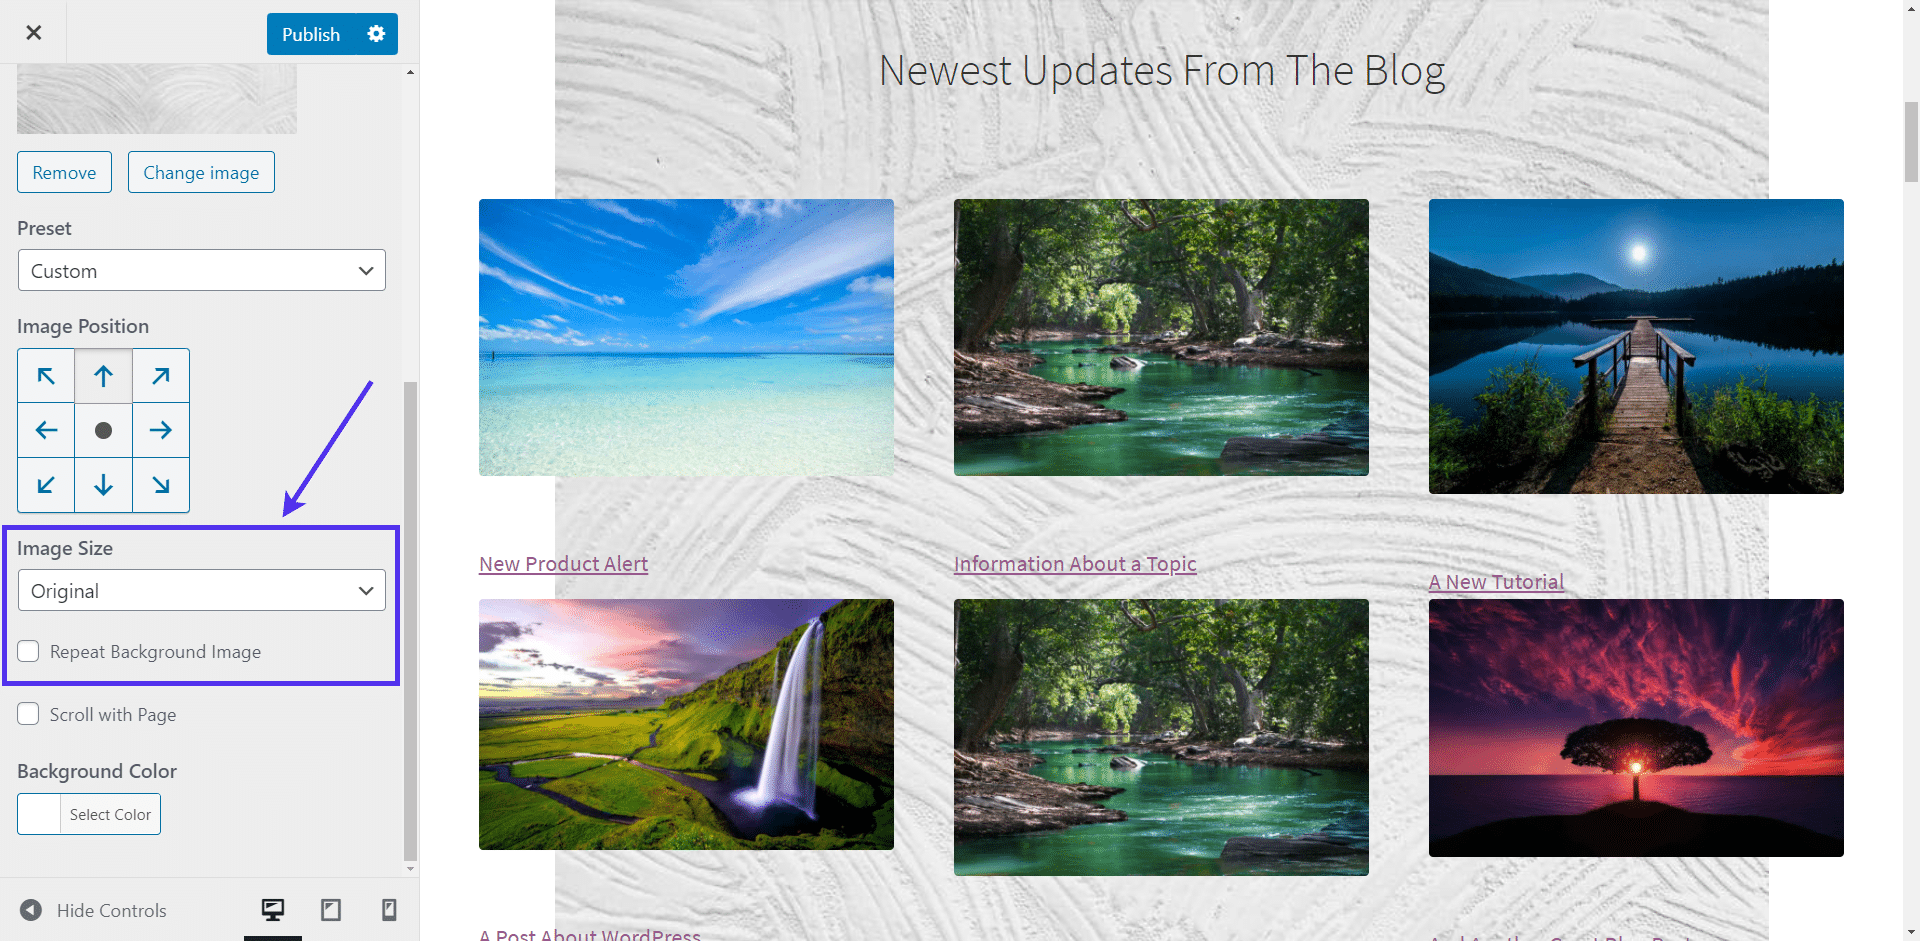
However, choosing the Custom preset opens up several other fields to consider.
For example, you can choose to Fill the Screen or Fit to Screen, and then combine that with a repeated or non-repeated background image, combining the presets’ elements from before. And you still get the Scroll With Page option.

See if using the original image without any edits or settings is possible. Sometimes the original photo is a near-perfect match to be used as a background, so why mess with what’s already ready to go?
However, its size may also be too big for your website, or maybe the aspect ratio isn’t quite the right fit. Regardless, we suggest experimenting with this setting to figure out if it’s right for you.
Once you decide upon your perfect background settings (for this tutorial, the Default option looks nice), click on the Publish button to render the changes on your website.

Go to the frontend of your website to see the background in action.
The homepage is a wonderful place to start. You’ll notice that the header area and welcome image don’t have backgrounds. That’s because the welcome image at the top of the site is already covering the entire horizontal part of the screen as a full-screen hero image.
As for the header and menu, you’ll learn how to configure those backgrounds in some of the following tutorials.

Keep in mind that the general custom WordPress background activates on every page and post of your website. It’s a global feature for those who want a quick way to brand their site and add some flare.
For example, going to the Shop page on this site reveals the background behind the product selection.

How to Set a Background Color Instead of an Image for Your Entire Website
The process of activating a background color on your entire website isn’t much different from when you’re turning on a background image. Start by going to Appearance > Background in the dashboard, then look for the Background Color field.
Click the Select Color button to open more settings to choose and switch out different colors for your background.

The color panel provides multiple options for you to decide on a color. The first is by typing in, or pasting in, a color code. All colors have unique color codes, and you can find these colors and their associated codes with a quick internet search.
The other option is to click around the color panel to find the perfect color for the background. They even have common color swatches towards the bottom of the panel if you’d rather take one of the simpler colors.
To activate a background color, make sure the color is selected and showing in the Select Color preview.

You should see the color background in the WordPress Customizer preview. If not, that most likely means you have an image background installed that’s overriding the color background.
All you have to do to reveal the color background is click the Remove button underneath the Background Image preview.

Now the color appears throughout the entirety of your site, behind the content. Much like you would with an image background, it’s prudent to look through your website to ensure that all text, images, and links are still visible with the new background.

How to Add Background Image to WordPress Page
But what if you want to insert an image on WordPress to show up as a background on a single WordPress page? The previous section outlined the global settings for a site-wide background image.
Check Out Our Video Guide to Adding Background Images to WordPress Single Pages, Posts, & Content Blocks
Many people enjoy adding backgrounds to their pages because you can incorporate a certain theme or feel to a page that applies to the content. For example, an About Us page could have a Los Angeles background if the company is in LA. Or an introduction to an author’s book could include a background that fits the theme of the story.
In this section, we’ll walk through how to add a WordPress background image to a page using one primary method and a few alternatives if you don’t mind spending money on a plugin or opting for a page builder.
Note: It doesn’t matter whether you use the Gutenberg or Classic WordPress Editor.
For page-specific backgrounds, these methods seem to work the best:
- Adding a unique page background with custom CSS.
- Using a plugin that allows for individual page backgrounds.
- Incorporating a custom background on each page with the help of a page builder.
Adding your own custom CSS to a page involves finding the class ID for that page and calling for a background URL, within the Custom CSS module, in the WordPress page settings. Luckily, it’s not that difficult to figure out the class ID of a page, considering we can look it up, or you may already know what it is.
Go to the page on your site where you want a background for that page only.

Right-click anywhere on the page to reveal a dropdown menu on your screen. Select the Inspect tool at the bottom of the dropdown menu.
The Inspect module displays coding from the page itself, along with custom CSS used globally for your website. It’s a useful area for locating information about a page or post on your site.

The Inspect box has lines of code from the page, but we’re only interested in the class tag assigned to this page in particular. To clarify, each WordPress page has a class tag as an identification code.
Use the search function and type in body or class to locate the line of code with the page-id tag.
In this instance, the ID is page-id-352, but yours will differ.
You want to copy the entire part of the code with the page-id-# keyword, including the dashes.

With the page ID saved somewhere for use in the next few steps, go back to your WordPress dashboard and click on Appearance > Customize.

Select the Additional CSS tab in the WordPress Customizer.

This section allows you to type or paste in any custom CSS you want to manipulate items throughout your website. In this case, it comes in handy for overriding the default background image and enabling a background image for one page and not the others.
Paste the following code into the Additional CSS field, but remember to replace the “#” with the actual number you pulled as the page ID from the previous steps. Also, you must put a real image URL in place of the filler text we have in there (http://YOURIMAGEURL.jpeg).
body.page-id-# {
background-image: url("http://YOURIMAGEURL.jpeg");
background-position: center center;
background-size: cover;
background-repeat: no-repeat;
background-attachment: fixed;
}
For this example, the page ID is filled in as 352, and we have a background image URL pasted in from our Media Library.
If necessary, please change the custom background settings if you have trouble fitting the screen’s background image. For example, you may want to modify elements like the WordPress background image size, attachment, or position. If not, leave them all as they are in the example code.

Click on the Publish button when you’re satisfied with the custom CSS.

With that custom CSS, the page specified includes a background image using the code’s sizing and positioning settings. No other page on your site will show the same background unless you repeat the CSS for different page IDs.

As mentioned before, your other options for adding a unique background to a WordPress page include using a page builder or a plugin that allows for background images on individual pages.
However, the cheapest and quickest way to place a background image on an individual page is to use the CSS code method shown above.
How to Add Background Image to WordPress Post
Most background images get inserted behind WordPress pages or every page throughout a website.
The default custom background feature in WordPress has nothing to do with individual posts, besides the fact that this background will show up for the blog posts as well. That’s not ideal for all organizations because different blog posts could have drastically different topics.
Such blogs could benefit from their own unique background images. However, WordPress posts don’t have their own background image setting, making it a little trickier.
Therefore, we have a few options to consider when adding a background image to a post (you’ll notice they’re the same as when working with page-specific background images):
- Insert a background image using custom CSS.
- Use a plugin to implement a background on individual posts.
- Install a visual page builder for post backgrounds.
Like the previous section about unique page backgrounds, you can add a post-specific background using a page builder or a plugin.
Seeing as making a post-specific background isn’t much different from a page-specific one, we’ll only touch briefly on the steps to handle this process for an individual post.
When using custom CSS to implement a post-specific background, you use the same code as you would for the page background, with one difference: you must find the post ID as opposed to the page ID.
Therefore, open up the frontend of a WordPress post where you’d like to insert a background.
Right-click on the post and choose the Inspect option. Complete a search within the code to locate the body class section in the code. Look for the postid-# part—that’s the post ID you need to insert into the custom CSS.
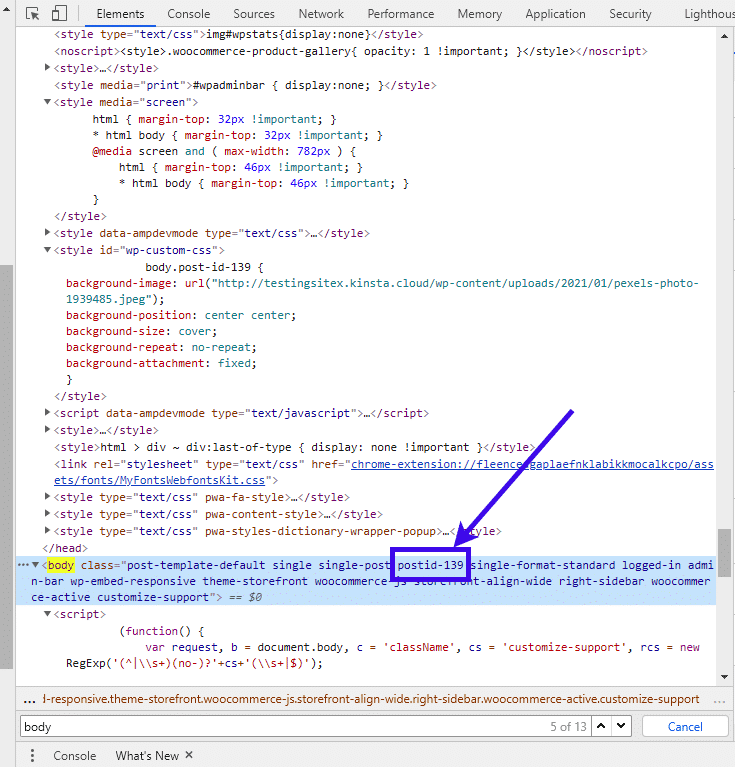
You’ll notice that the formatting for the post ID is slightly different in this example compared to the page ID, where the postid-# tag doesn’t have a dash between “post” and “id” like it has with page-id-#. Also, these aren’t hard rules. You can find varied formats for the tags.
Now, go to your WordPress dashboard and click on Appearance > Customize. Navigate to the Additional CSS tab.

Paste the following code into that custom CSS field:
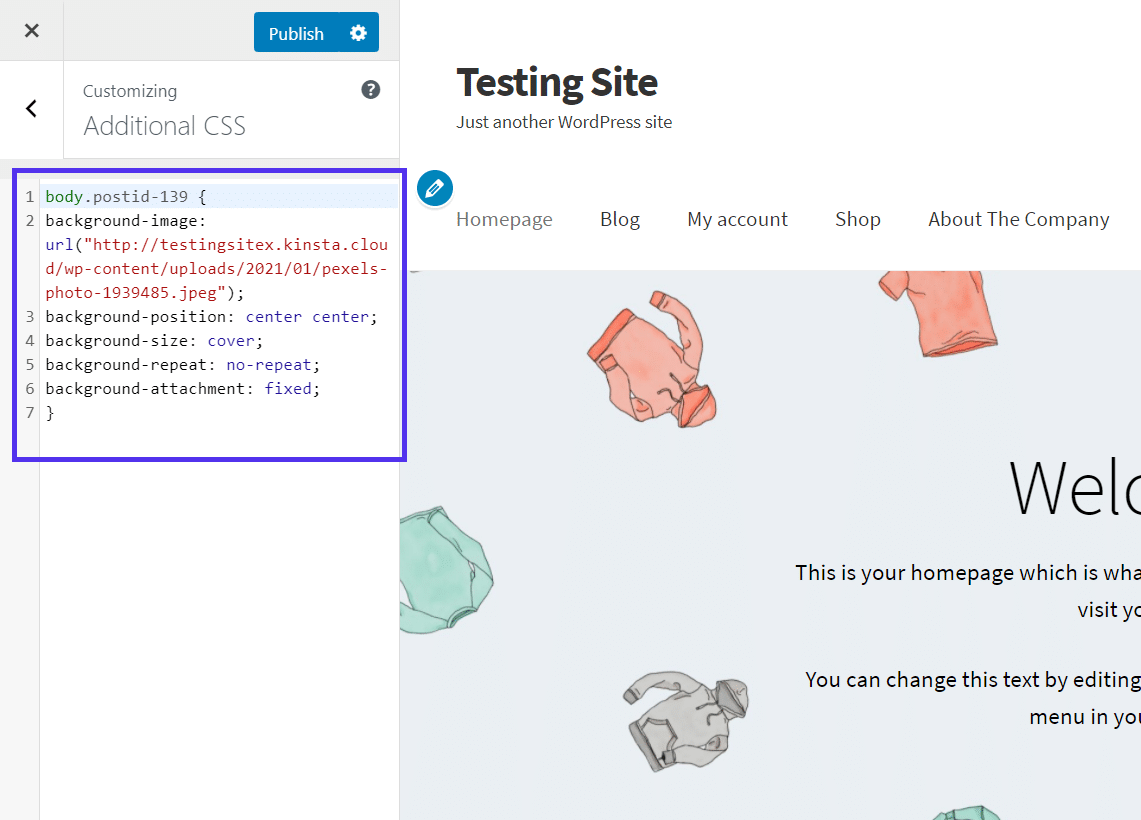
body.postid-# {
background-image: url("http://YOURIMAGEURL.jpeg");
background-position: center center;
background-size: cover;
background-repeat: no-repeat;
background-attachment: fixed;
}
After that, take the post ID number you found from the desired post before. Replace the “#” in the CSS code with the number. Also, change the http://YOURIMAGEURL.jpeg text with the real URL of the background image you’d like to show, keeping the quotation marks around it.
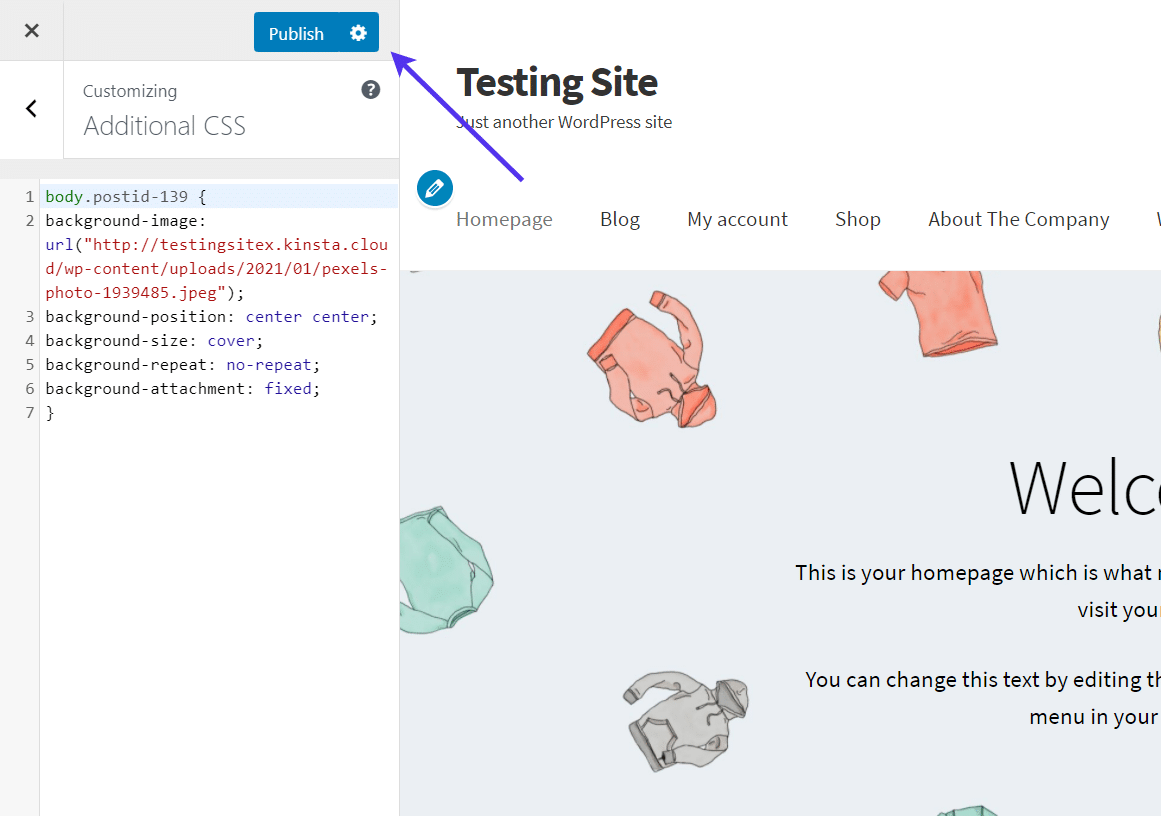
Make sure you hit the Publish button before leaving the Additional CSS tab, as this saves your changes on the website and allows you to view the background on the frontend.
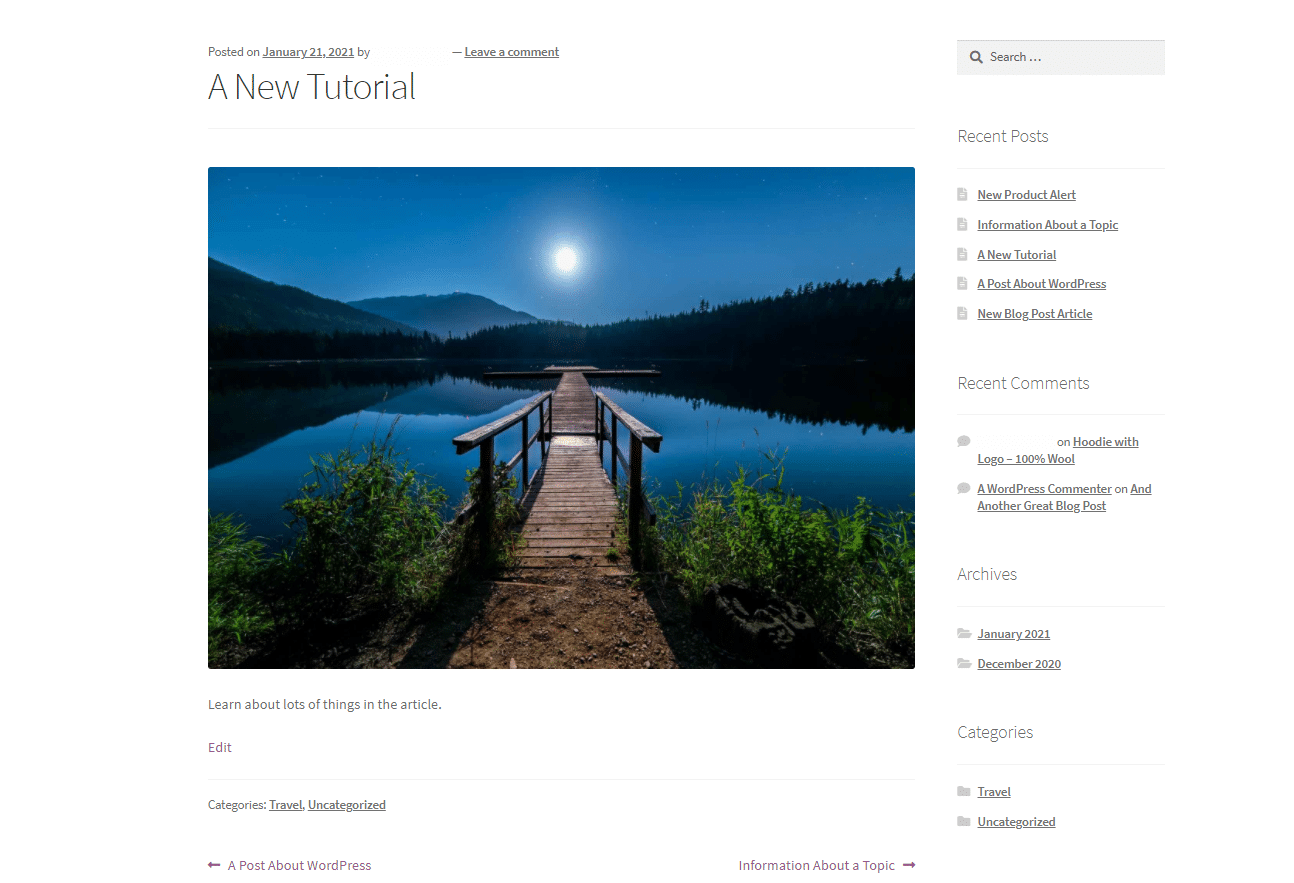
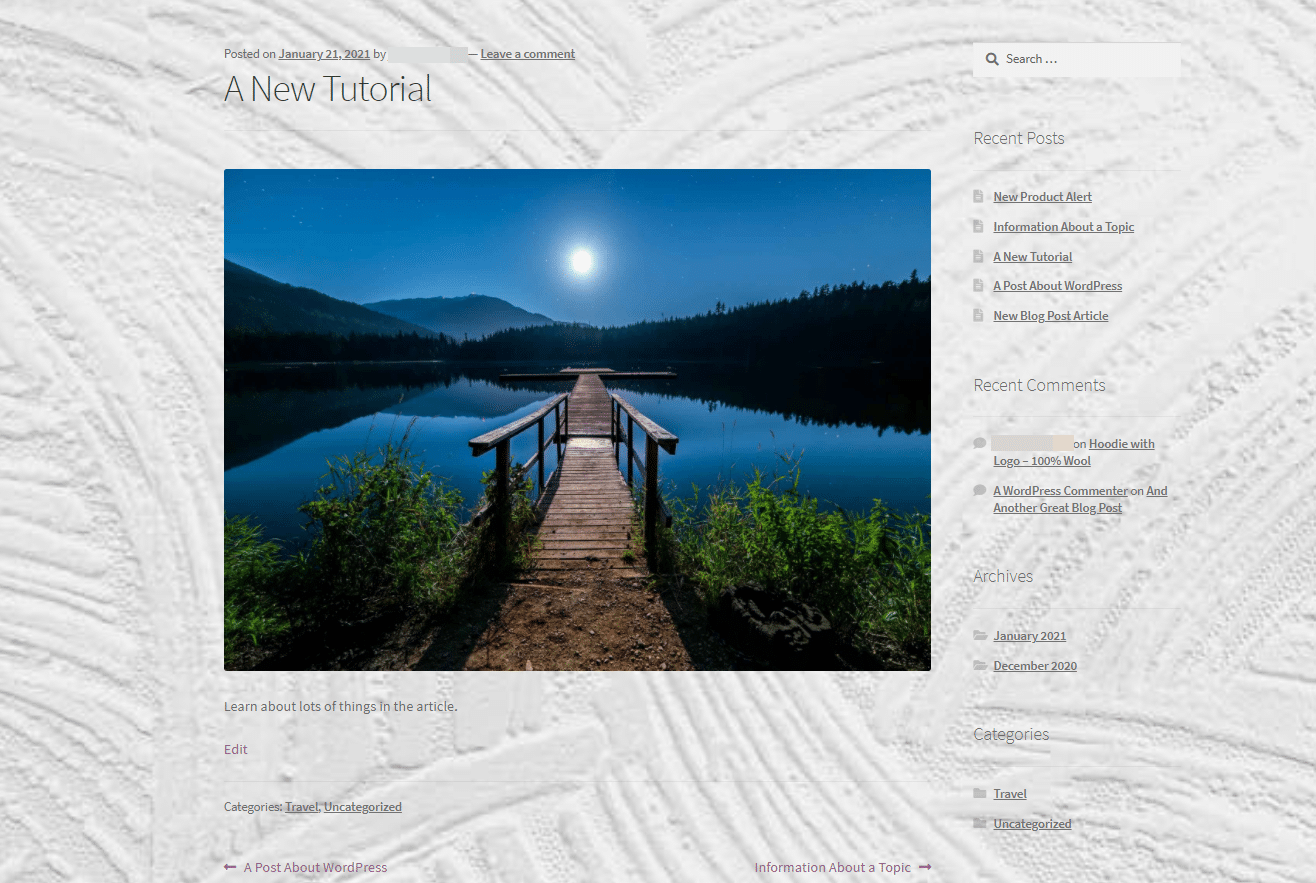
With those CSS changes in place, you can now go back to the frontend of that WordPress blog post to see the new background. Test the other blog posts and pages on your site to see that none of the other ones have a background unless you implement the same code for those post IDs.
How to Add a Background Image to an Individual Content Block
The WordPress Gutenberg block editor’s individual content blocks allow for a wide range of content display options, including text boxes, images, and galleries.
These break up your content into separate sections. So, you can add a background color or image just for that block.
For example, let’s say you’re writing a blog post about the retail clothing industry’s status. You want to end or begin the post with a call-to-action for people to sign up for your next webinar. It would make sense to have this section stand out by using a background color or image.
Unfortunately, the WordPress block editor doesn’t offer an all-encompassing setting where you can add a background to any block. However, some blocks have the option to incorporate a color background.
There’s also one block, called a Cover block, which is the closest thing we can add a background image for one block in a post or page. The cover allows you to overlay text and some media items, making it suitable for our end goal.
Below are the techniques to use for setting an image or color background for an individual WordPress block.
Setting a Color Background for One Block
The simplest way to add some liveliness to a single block is to add a color background. It’s not as fancy as an image background, but the color background is actually the only type of background in the WordPress block editor available for the standard blocks.
Note: Some blocks don’t have any background settings at all. If that’s the case, you’re best off using a Cover block and overlaying other blocks on top of it, as covered further down in this article.
The Paragraph block, for example, has a setting to activate a color background.
To turn this on, select the block, then locate the Color Settings under the Block tab on the right side.

This section reveals Text Color and Background Color fields.
Go to the Background Color area and select a color from the list of available options. You can also choose the Custom Color link to insert your own color code or choose a unique color.
As you can see, once that setting is in place, the Paragraph block’s background turns to a different color—in this case, blue.

Adding a Color Background to Any WordPress Block
As mentioned before, not all WordPress blocks have this built-in background feature. What should you do if you want to make a gallery, or some other block element, that doesn’t offer the background option?
The quickest solution is to use the Group block feature in WordPress.
To do so, select multiple blocks already in your content. For this example, I’ll select both a Paragraph block and a Gallery block simultaneously.
Click the stacked square icon on the menu that appears.

Choose the Group option in the dropdown menu.
This takes whatever blocks you currently have selected and combines them into a group, allowing you to move or edit them all together instead of separate blocks.

This sets the Group as its own block. It means you can go to the Block Settings tab on the right side of the page to find its settings.
Look for the Color Settings tab and click on that.

Much like a standard Paragraph block, the Group block also has a Background Color feature.
Choose the color you like the most for this situation to see that everything within that group should now have that color background.
What’s great about the Group block is that it takes another block that doesn’t have a background feature (like the Gallery block) and allows you to activate a background for it anyway.

Adding an Image Background to One WordPress Block
WordPress blocks are in both pages and posts. Therefore, we can implement this tactic in either one. You can insert just about any content above the grouped block’s background—or only in one WordPress block.
To get started with this process, click the Add Block or “+” icon button and search for the Cover block.
Choose that block to insert it into your post or page.

You must then click on the Upload or Select Media button, which allows you to search for images you can use as the background.

Choose the image you want and click the Select button.

Now you can see that image as the background for the Cover block.
Feel free to click on that block to start typing in paragraph content, as the primary feature is for overlaying text.
What’s great about the Cover block is that it offers several formatting options, allowing you to jump from a heading to a paragraph format in seconds.

To add other blocks on top of that background, click the “+” icon button within the Cover block itself. You may have to hit the Enter key once to reveal the button.

Much like adding a content block in a regular article, the Cover block allows you to scroll through all potential content blocks in WordPress.
That means you can place an Image, Gallery, Columns, or any type of WordPress block within the Cover block, making it the ideal solution for image backgrounds with an individual block.

For this example, I inserted an image and formatted it a bit to make it look acceptable within the Cover block.
Each block you place in front of the background has its own custom settings in the right-side Block tab, so consider editing them as you drop them into the Cover block.

At some point, you may want to edit or customize the background image itself. If that’s the case, choose the Cover block, then go to the Block Settings tab on the right side of the page.
This reveals a myriad of settings to adjust for the background image, including the following:
- Fixed Background
- Repeated Background
- Focal Point Picker
- Dimensions
- Overlay
- Opacity
- Advanced

One of the more important settings to consider is towards the bottom of the Block Settings panel.
Scroll down to find the Overlay section. Open the section to reveal a list of color overlays and options to make those colors solid or gradients.
This is a great option for slightly changing your background color to match your brand or highlight your foreground content. You can also adjust the Opacity to ensure that the color overlay doesn’t overwhelm the background altogether.

As an alternative, consider the Stackable Page Builder Gutenberg Blocks plugin to open up more advanced tools for backgrounds on individual blocks.
How to Put a Background Image Behind the WordPress Header
Up until now, we’ve talked about how to add a background image to your entire WordPress site, along with methods for backgrounds on specific areas like WordPress blocks, posts, and pages. But what about the area that contains your menu and logo?
Sometimes, a background behind your header is all you need.
Setting a background image for the header adds a new vibe to your site, especially if there’s a holiday going on or some big sale that you can highlight.
To start, go to Appearance > Header in the WordPress dashboard.
Note: You can also find the header settings by going to Appearance > Customize > Header section.

You should now see a preview of your homepage on the right side of the screen, along with the Header settings to the left side of that.
The Header module explains the preferred dimensions for any header background image, so you can opt to crop down your image before you upload or wait until you get the image on your WordPress dashboard.
Under the Current header title, click the Add New Image button.

Headers are tricky because you want to ensure that all the links and text elements (not to mention your logo) look crystal clear on top of the background image.
Therefore, we recommend testing out background images and considering images that stick to more solid colors and patterns. They won’t make it as difficult to see your menu items and logo.
Select an image that looks ideal for you, then click on the Select and Crop button to proceed.

We like the built-in crop tool since it automatically provides the right dimensions for the header background image. This should speed up the process compared to editing a photo beforehand in something like Photoshop.
Move the cropping box to the location that makes the most sense for your background image. Feel free to drag one of the corners if you need to cut down the image even more.
Once you have the perfect crop, click on the Crop Image button.

The header background image gets immediately activated in the WordPress Customizer preview, helping you see exactly what your customers will look at with this type of background.
You’ll notice that the header background image doesn’t bleed over into the rest of the page content. Instead, it remains in the header, behind anything that’s currently located there, like a logo, tagline, menu, and search bar.

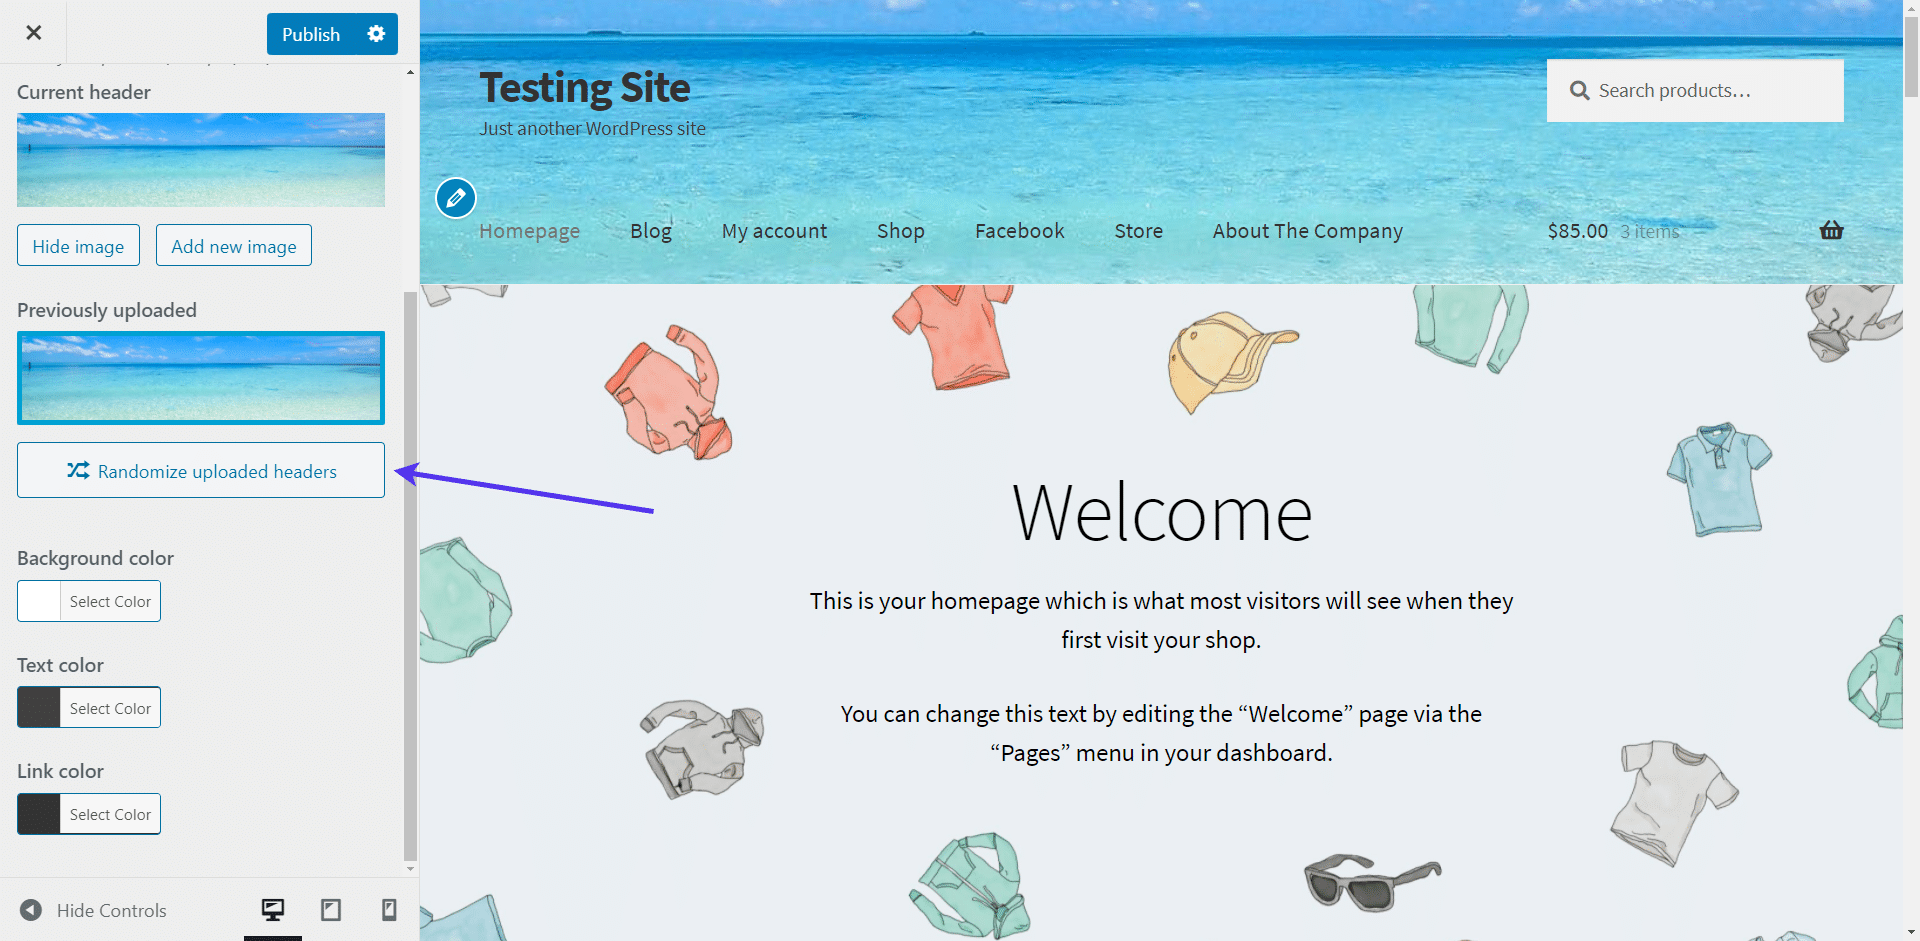
Another option for your header background is to upload several images and have them randomly rotate, adding a bit of flare and surprise to your website whenever a user lands on the homepage.
To make this work, you must first have several images uploaded to the Header settings box. Click on the Add New Image button to complete that process.
Once you have more than one image, click on the Randomize Uploaded Headers button to activate the feature that shows a different header background every time.
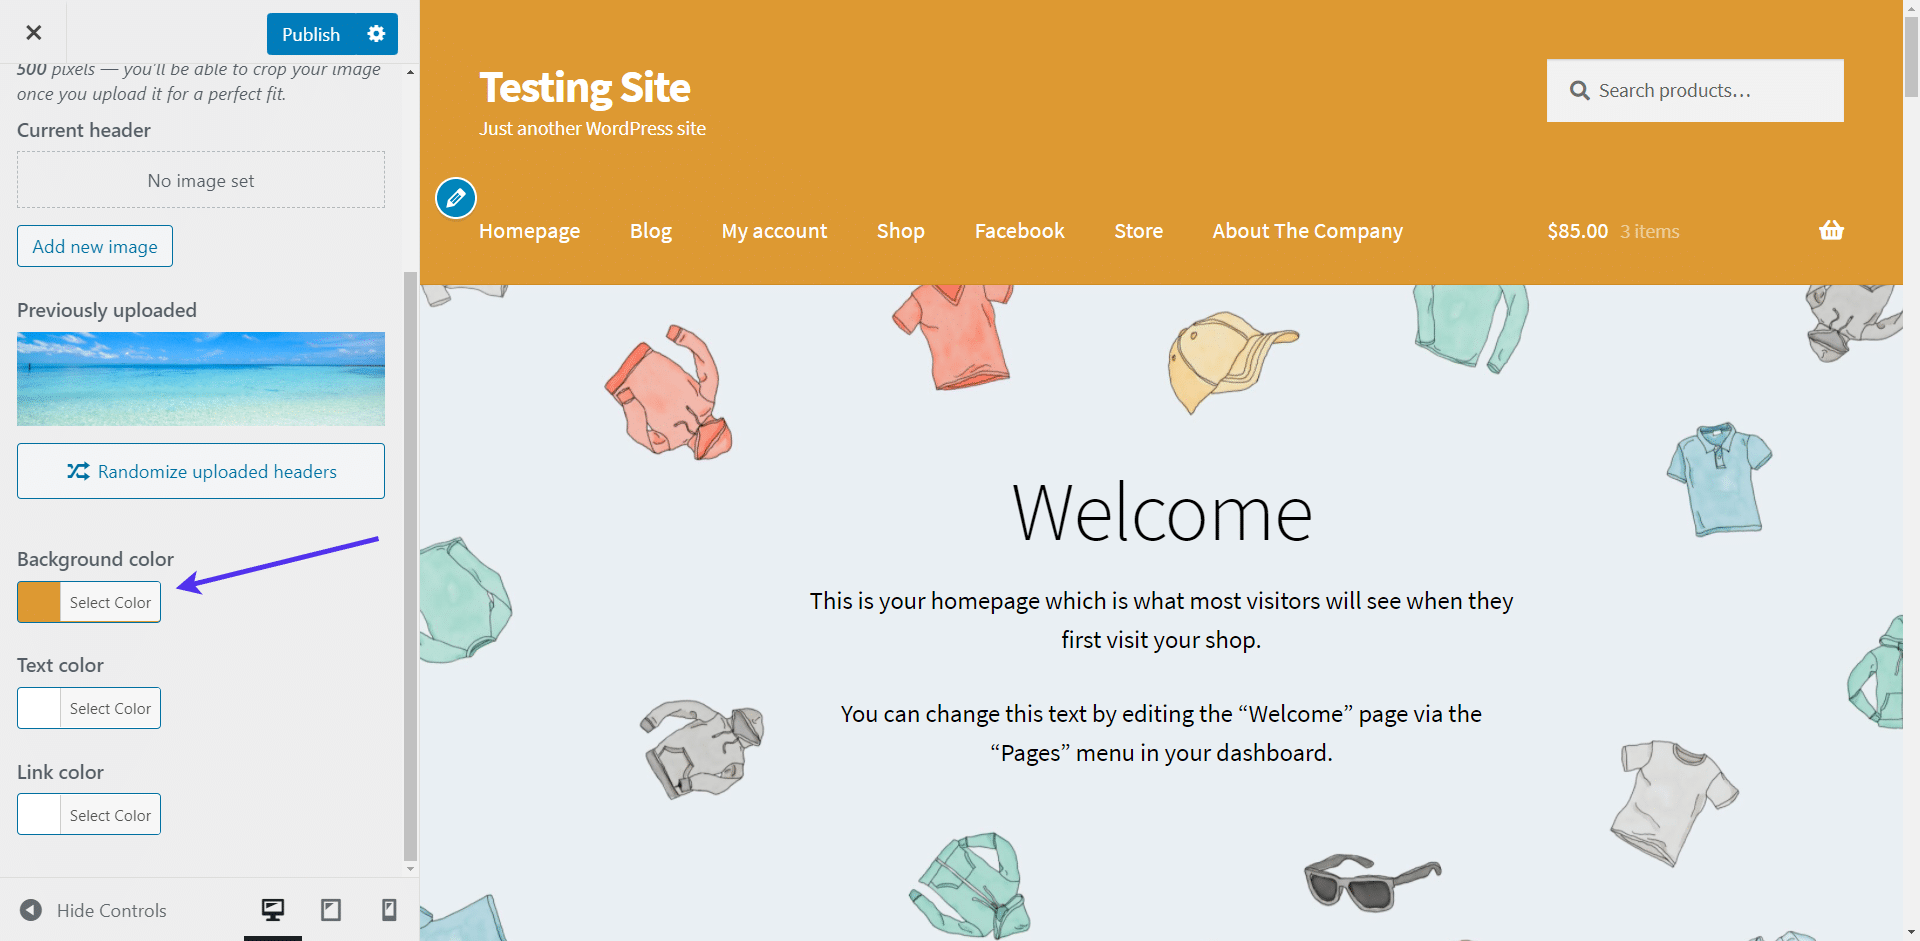
You may notice that adding a background image to the header makes it difficult to see some of the header items, like your menu or a shopping cart.
If that’s the case, we suggest refraining from immediately deleting the header image. Instead, go to the Text Color and Link Color fields to see if any adjustments may help.
The Text Color setting controls any text in the header that’s not hyperlinked to another internal or external page. Many times that only means the tagline, if you have one, but sometimes you may have other items like a shopping cart total or social media icons that also change colors with the text.
The other box is for the Link Color. You’ll most likely see more changes when you adjust this color since it includes all menu items linked to other pages.

Here’s an example of what happens when you pick a new color for both the Text Color and the Link Color. You can see that the tagline and site name changed, the menu changed to white, and so did most of the other header elements like the shopping cart icon.

For those not interested in using a background image for your header, you also have the option to use a solid color background.
For this, find the Background Color field under the same Header Settings area.
Click on the Select Color button and choose from the color panel to see the preview results. You can also change the text colors when using a background color.
After testing what works best for your header, and deciding on the perfect background image for that header, click the Publish button for all to see the changes.
And if you have any problems rendering the changes on the frontend, consider clearing your WordPress cache.

How to Add Background Images to WordPress Category & Login Page
How to Add Background Image to WordPress Category
A WordPress category archive page compiles all posts listed under a certain category. For example, many websites have categories for custom post types like Products. By default, all WordPress websites have categories for posts. Those you don’t categorize get tagged with the Uncategorized category.
Since category archive pages aggregate similar content, it makes sense to include a relevant background image on those pages to showcase the category better. As an example, you might have a tech-oriented background for a Web Design category or a seashell or beach-patterned background for a Travel category.
The custom CSS method (outlined below) is the cheapest option. However, you can also look into the various page builders and plugins to see which of them allow for backgrounds on category pages.
To complete this task with CSS, open your WordPress dashboard and go to Appearance > Customize.
Select the Additional CSS tab to open the module that allows for typing in your own CSS.

Open one of your category archive pages on your WordPress site. Usually, these pages have URLs like this: http://yourwebsitedomain.com/category/travel. You need to change the travel part to whatever category you have on your own site and switch the yourwebsitedoman part to your actual domain name.
Right click anywhere on the category page and click on Inspect. It’ll show the Inspect tool in your browser, with the code for that page presented for you to see.

Search for “body” or “class” to locate the CSS class for category pages, along with the class for this category in particular.
For this situation, our CSS class is “category-travel,” since I have a category named “Travel” on the site.
Save the CSS tag for later.

After that, navigate back to the Additional CSS section in your WordPress Customizer.
Paste the following code into that box, switching out the category-travel class with your own and placing a real image URL in the place that says http://YOURIMAGEURL.jpeg.
body.category-travel {
background-image: url("http://YOURIMAGEURL.jpeg");
background-position: center center;
background-size: cover;
background-repeat: no-repeat;
background-attachment: fixed;
}
Click the Publish button to save the changes.

Finally, go back to the category archive page on the frontend of your WordPress site. It should now show the same page from before, but with the background specified in the CSS code. If you have any trouble with the WordPress background image formatting, switch back to the Additional CSS panel to adjust elements like the background’s position, size, and repeat function.

How to Add a Background Image to Your WordPress Login Page
The WordPress login page has two versions: one for regular users who come to your site and want to register and login to your website, and the other for internal users, like admins and authors.
These login pages are separate from your website’s main workings (most of the files being located in the wp-login.php file). So, the custom background image tool won’t bleed over into the login modules.
There are multiple WordPress login page customizer plugins available. Here, we’ll show you how to change your WordPress default background using LoginPress.

It lets you change each element on the login page directly from your WordPress admin dashboard without writing a single line of code.
To change the default WordPress login background with LoginPress, install and activate it on your site first.
When you’re done, go to the left sidebar of the WordPress admin dashboard and navigate to LoginPress. That’s where the plugin’s main functionality resides inside the Settings, customizer, and Add-Ons sections.

Simply select the Customizer option.
On the next screen, you can see all the customization on the left side and a live preview on the right side of the screen, where you can track your changes side by side, including:
- Themes
- Logo
- Background
- Customize Login Form
- Customize Forget Form
- And more…

Next, you’ll be on the Background customization screen, where you can see 3 options for the background, including:
- Background Color
- Background Image
- Background Video

Background Color
If you’d rather have a Background Color, disable the Background Image first. Then click on the Color Picker tool. It reveals a color panel for you to choose exactly which color makes sense for your business.
The best part is that you can also track changes side by side in the WordPress Customizer preview.

Background Image
A compelling background sets the right tone of aesthetics for your WordPress login page. LoginPress allows you to present your brand identity on your login page dynamically.
LoginPress Background Image feature offers two choices to add an engaging background for your login page, including:
- Background Gallery: Background Gallery offers some built-in background images.
- Background Image: The background Image option lets you choose any desired image from your PC.

Other than this, you can go for additional settings to ensure that the best view of the uploaded image is currently active, such as:
- Background Image Repeat: This feature helps you to repeat your background image, such as x-repeat, y-repeat, and inherit, to name a few examples.
- Select Position: This option lets you customize the position of your selected background image.
- Background Image Size: You can also adjust the background image size, i.e., Auto, Cover, Contain, etc.
Depending on your photo’s size, you can tweak it a bit using these options.
Background Video
You can also add background Video to the default WordPress login page with LoginPress. To do this, simply enable the Background Video option.
Now you can see 2 more options are open to choose, including:
- Media
- YouTube

If you want to select any custom video, click the Select Video option > Upload Files > Select Files > and Choose File. All done!

If you want to select any YouTube video, simply select the YouTube option > Add the ID of the YouTube video.

Remember, whether you choose color, image, or video as your default WordPress login page background, don’t forget to click the Publish button to make the changes live for your audience.

Other than customizing the overall appearance of your WordPress default background image, you can make changes to the general behavior of the default WordPress login page, such as:
- Force Password Reset
- Session Expire
- Auto Remember Me
- Custom Password Fields
- Login Order
- Enable PCI Compliance

WordPress background image using LoginPress for your site offers a visually appealing and personalized touch to the default WordPress login page. It provides you the opportunity to create a user-friendly login interface.
How to Add a Background Image to Your Navigation Menu
You may have noticed some websites with fancy menus that include background images or icons. This is a common practice in the eCommerce world, where the brand may have a mega menu with categories and background images for each category button.
If you’re interested in adding backgrounds to your menu, look at our article on the best WordPress menu plugins. Many of these menu plugins offer options to include image and color backgrounds within your menu.
Seeing as how there are several plugins to add a certain background for navigational menus, we’ll provide tutorials for two, one of which allows for backgrounds behind your submenu. In contrast, the other one adds a background to your mobile menu.
To add a background image to different submenus, install and activate the WP Mega Menu plugin. This plugin allows you to activate and manage a mega-menu with multiple dropdown levels. It’s ideal for large online stores, but it does the trick for smaller menus as well, especially if you want to add a background image or icons.

Begin by finding the WP Mega Menu tab in the WordPress dashboard.
Click on the Themes menu item.

Here, you can see a list of default themes created for your menu by the plugin.
You can click to edit any of the themes or add your own design from scratch.

Each theme has its own settings where you specify elements like the theme title, menu bar options, and the brand logo. Just about every part of your menu is customizable, from the dropdown menu to the submenus.
However, for the menu background, you simply need to know which theme you want to choose.

Go to Appearance > Menus in the dashboard.

You’ll see a new module that links to the Mega Menu Settings.
Click to Enable the mega menu, then choose whichever of them you like the best for your website.
Finally, click the Save button.

Now, shift your attention to the Menu Structure area.
Scrolling over any of your current menu items reveals a WP Mega Menu button. This is where you customize the layout and design for each dropdown section.
Click the WP Mega Menu button for any menu item you want. For this case, we’ll add a dropdown mega-menu to the Shop tab.
Note: We’re assuming you already have a menu configured on your WordPress site. Read our WordPress Dropdown Menu guide if you need help with that.

In the new popup window, flip the switch to turn on the Mega Menu for that particular menu item.
You can then add a dropdown row and drag some of the many widgets from the left side into that row. For instance, we’ll drag a list of products so that they show up when someone scrolls over the Shop menu item.

To add a background to this dropdown area, click the Options button in the lower left-hand corner.

Find the Upload Background Image field.
Click the Upload button to find the right photo in your Media Library to use it as the background.

An image thumbnail appears after you select it from the Media Library.
There are some other settings to consider, so feel free to check on those if you want.

Be sure to click on the Save Changes button at the bottom of the Options panel.

You also need to click on Save Menu back in the Menu Structure area of the WordPress dashboard.

Now, navigate to the frontend of your website to see the menu. If you scroll over the item we just customized, you should see a dropdown section with the background.

Another way to add a background image to a menu is by using a mobile, responsive menu that shows up when someone accesses your website through a mobile device.
You can place a background behind the mobile menu with the help of the WP Mobile Menu plugin.

After installing and activating the WP Mobile Menu plugin, go to Mobile Menu Options in the WordPress dashboard.

The plugin offers several ways to configure your mobile menu. The general requirement is to enable one of the menu formats and indicate which WordPress menu you want to use for that mobile menu.
For example, we can click on the Enable Left Menu switch (turning on a mobile menu that sits on the left side of the screen) and choose the Main Menu option from the Left Menu dropdown. This links our current Main Menu with the mobile menu, so visitors see the same tabs.

It depends on the type of mobile menu you create, but since we’re making a left-side menu, we can click on the Left Menu tab to reveal the appropriate settings to add a background.

Scroll down to the Panel Background Image field and click the “+” sign to open the Media Library.

Select an image from your Media Library and add it to the field.
You should see a thumbnail version of the background image as confirmation.
Select the Save Changes button to activate the background.

Seeing as how the plugin generates mobile menus, the menu may only show up when your browser is set at a narrow width or when you go to your site on a phone or tablet.
The new menu gets consolidated under a hamburger icon (three horizontal lines).
Click that to test the new menu with the background.

As shown in the screenshot, the background gets placed behind the entire mobile menu for everyone to see.

How to Add a WordPress Background Image to a Maintenance Page
All websites occasionally require maintenance, and sometimes that maintenance takes so long that displaying a maintenance page helps.
Background images play a large role when working with maintenance pages. Most maintenance pages consist of a fullscreen background image and maybe some text or links with more resources.
If you already have a maintenance page and it doesn’t include a background image, consider the following steps to generate a beautiful environment for when you may need to shut down your website from the public for a period of time.
You can add a background image to a maintenance page with the help of the Maintenance plugin. Install and activate the plugin on your website.

Once it’s active, find the Maintenance is On/Off button at the top of the dashboard.
Click on the button to go to the Maintenance plugin’s Settings page.

Another way to get to the Settings page is by clicking on the Maintenance menu item in the dashboard’s side menu.

The Maintenance plugin’s Settings page has a decent collection of options to customize, but the main area to consider is the General Settings module. Here, you can write in a Headline and Description, both of which serve as the text that overlays on top of the background we’re about to insert.
The Page Title shows up in the browser tab, so you should consider customizing that as well.
You can use the Maintenance plugin for anything from maintenance pages to coming soon pages, so you might type in something like “Our Site Is Undergoing Maintenance,” or you might show a bit of information about your company and include a form for people to type in their email addresses.

Moving on, the plugin offers an option to upload your logo, which also overlays on top of the background image.
Click on the Upload Logo button and choose your logo to see its thumbnail in the dashboard.
At last, the Background Image field asks for you to click on the Upload Background Image.
Either upload an image from your computer or go through your Media Library to locate a background that’s suitable for the maintenance page.
Note: The best maintenance background images are large, high-resolution, and in landscape orientation. A “Portrait Mode” background alternative is available in the settings below.

Once you choose the background, it appears as a smaller thumbnail preview in the dashboard.

Although a background image with a landscape orientation makes the most sense for desktop computers and wider screens, many people end up on your site using screens with portrait orientations, like with a phone being held vertically.
Therefore, a wider background image won’t look as nice. That’s why the plugin offers a Portrait Mode Background Image that serves as an alternative, getting responsively swapped in whenever a user visits the page using a portrait-oriented screen.
It’s important to include an image in this field, so click the Upload image for portrait device orientation button.

This time, find an image that’s taller than it is wide (portrait mode). You can always crop the original background image to make it into a portrait, or you have the option to upload a completely different image to fill the spot.
Highlight the image you want and click on the Select Image button to insert it into the dashboard.

All these settings mean nothing unless you activate Maintenance Mode.
To make that happen, locate the Maintenance On/Off switch at the top of the Settings page.

Flip the switch so that it reads “On,” then select the Save Changes button.

Go to the frontend of your website to ensure the background image and maintenance page show up properly.
There’s a good chance it doesn’t.
There are two reasons for this: First off, you must log out of the WordPress Admin account to see the Maintenance Mode website. Second, you may need to clear the site cache to update the change in content.

For instance, when I log out of the Admin Account, the maintenance page now shows up when I go to any page.
The background image is there, along with my customizations like the logo and text description.

Besides, changing the browser windows’ size to more of a portrait orientation snaps the portrait mode background into place.
You should also see the portrait mode when visiting the site on a phone or tablet.

Another type of background image with the plugin is called a Preloader Image. This essentially loads a quick image with an animated effect before revealing the actual maintenance page, background, and content.
Like the regular background image, click on the Upload Preloader button to find an image that looks nice and add it to the dashboard.
Again, click on the Save Changes button and clear the cache.

By default, the Preloader Image effect spins around for a moment, and then it disappears to present the maintenance page and background image.
It’s entirely up to you whether you’d like to keep this type of effect or not.

Several other background elements are available for you to experiment in the Maintenance plugin’s Settings panel.
For instance, you may want to add a background color instead of a background image.
If that’s the case, go to the Background Color field and Select a Color that fits your brand.

The background color doesn’t show for the maintenance page unless you disable all other background images.
So, make sure you delete the Background Image.

You also must delete the Portrait Mode background image.

Save changes and clear the cache. Then go to the frontend of your site to see the background color in effect.

Othe settings to consider include items like the font color, font family, and background blur.
We also recommend thinking about whether you need to have a frontend login or not. This provides a way for users to log in to their accounts and gain access to profiles if need be.
Once everything is done, click the Save Changes button.

The Maintenance plugin also offers several pre-made themes with beautiful background images and professionally designed layouts and text.
You can find themes for coming soon page and maintenance layouts, along with pages to collect email addresses and other contact information.
You must purchase the themes to use them.

Depending on your budget, they’re rather inexpensive and look great.

For those not interested in buying a theme, all the settings covered above are at your disposal. You can also go into the Custom CSS module to configure your maintenance page and background image however you want.

Remember, the maintenance page settings rarely go into effect unless you log out of the admin account and click the Clear Cache button.
You can find the Clear Cache button in the upper right-hand corner of the dashboard when using Kinsta. If using a different host, consider one of the many caching plugins on the market.

Once you clear the cache and save your settings, you should see a beautiful background image that complements the maintenance page!

How to Add a WordPress Background with a Third-Party Page Builder
Our article on the best page builders offers a list of options for choosing a page builder with drag-and-drop features. WordPress already includes a page builder in Gutenberg, yet many website owners prefer other solutions.
The following section explains how to implement a background using some popular page builders, including Elementor, Beaver Builder, and Page Builder by SiteOrigin.
Add a WordPress Background with Elementor
Elementor, the popular page builder meant to speed up website production dramatically, offers a free plugin with several background image tools.
Also, Elementor presents visual background flexibility for various parts of your website instead of restricting backgrounds to the entire website. For instance, you can add a background behind just about any building block section and show different backgrounds from page to page.
To begin, install and activate the Elementor plugin.
Elementor scatters its background settings all over the builder, making it easy to select an element and implement a background if needed. Therefore, you can technically go to any page or post with the expectation to have access to a background upload button.
In this case, we’re going to the Homepage of our test site. Visit the page of your choice by selecting from the list at Pages > All Pages. You can also do the same with Posts.
Once on the default WordPress page editor, click the button to Edit With Elementor.

This shifts the view on your screen to the Elementor Editor. Here, the left side has a menu with drag-and-drop modules to construct and edit your page.
The background functionality isn’t available in a section or block but rather in the primary Settings for that page.
Therefore, click on the small Settings icon (it looks like a gear) in the editor’s lower left-hand corner.

This shows a section for general page settings.
Click the Style tab at the top of the Page Settings section.

Under Style, locate the Background Type field and click on the Paint Brush icon to add a standard background.

Next, choose the type of background you want to appear. For instance, the Color field allows you to switch the background to a solid color. There’s also a Gradient option in the Background Type field if that’s more your style.

Click the Choose Image button under the Image field to bring up your Media Library and choose a background image suitable for this page.

As always, test out your background images and stick to the optimal dimensions and best practices (high-resolution and portrait orientation for most), then select the image that works well and click the Insert Media button.

The selected background image now appears in the Elementor website preview to the right. You may need to adjust other parts of your content to ensure items like text and images show up when on top of the background.
Elementor provides image background settings like Position, Attachment, Repeat, and WordPress Background Image Size. Modify the settings to determine if your background may look better as a fixed attachment, or maybe with a top-right orientation or an alternative size.
Push the Update button to save all changes to the page and publish your website’s new background.

Section Backgrounds with Elementor
Elementor offers advanced background functionality for the majority of sections added to your pages.
All you have to do is select a section on an Elementor page and modify the Background settings to limit the background to only that area.
For instance, we can select this Text Editor section to view the Text section settings.

Choose the Advanced tab and find the Background section inside that tab.

The Background settings include Background Type, Color, Image, and more, much like the settings we saw for the general page background settings. The only difference is that it constrains these settings to the selected section.
Choose the Paint Brush icon for Background Type, then click on the Choose Image button under the Image field.

Pick an image from the Media Library and click the Insert Media button.

As you can see, the background image remains within that section’s boundaries while sitting behind the content already created for that section.
Use the Position, Attachment, Repeat, and Size selectors to modify how the background image is presented in the section.
At last, click the Update button to save your changes.

Add a Background Image with Beaver Builder
The Beaver Builder plugin includes a Lite version with some basic background tools. It’s one of the most popular page builders on the market, offering many content modules for items like video, images, paragraphs, and more.
Besides all that, it allows you to implement a background image, color, or video, using visual tools and CSS to place the background element on your entire website, one page, or an individual section on a page.
First, install the Beaver Builder plugin to get started.

Go to any page or post to edit it with Beaver Builder.
You must convert previously created pages to the Beaver Builder format. As an alternative, you have the option to create a page from scratch and choose to edit the page in Beaver Builder.
For converting a current page to Beaver Builder, open that page editor and click on the three-dotted icon to open the View menu in the upper right-hand corner.

Scroll down to find and choose the Convert to Beaver Builder link.
It attempts to compile all the content you have on your page and shift those elements into compatible Beaver Builder modules.

To make a page from scratch, go to Pages > Add New.
Then click the Launch Beaver Builder button.

The Beaver Builder plugin brings you to a fronted view of the webpage. It takes up most of the screen acting as a true frontend editor, where you click on the elements and move around boxes with your mouse.
The first way to add a background through Beaver Builder is by uploading a background to one section block. This could take up most of the page or a fraction of the page, depending on your section block’s size.
Once selected, find the Row Settings button (the ⚙ icon).
Click that icon to reveal the settings for that row. You may also do this with sections and columns, and other types of blocks.

A Settings panel appears on top of your website preview. Click the Style tab, then look for the Background section.
Under Background, click the dropdown menu to show all background types.

You have several Background types to consider, one of which is for a Photo. The others include:
- Color
- Gradient
- Video
- Embedded Code

Feel free to test out the different background types.
For example, you may find that a Gradient background looks better than an image. Each of the background types includes its own settings. The Gradient type, in this instance, asks for two colors for the gradient to move from one to the other.

Opting for the Photo background presents fields to choose from the Media Library or paste in a URL for the image. Click the Select Photo link if using the Media Library Photo Source.

Find your favorite background photo and click on the Select Photo button.

Beaver Builder drops the photo into the background space chosen from before. The Photo Settings section asks how you’d like to format the photo. Choose from options like Size, Repeat, Position, and Attachment.

Global and Full-page Beaver Builder Background Photos
Beaver Builder works with the default WordPress design tools to take advantage of the built-in background features.
Therefore, you can go to the Appearance > Background tab to activate a photo background for your entire website.
As an alternative, open any webpage in Beaver Builder and click the Tools dropdown menu in the upper left corner.
Here, click the Global Settings option.

The Global Settings Panel offers the ability to change your entire website, overriding or modifying built-in WordPress coding. Therefore, we’d like to insert a CSS code block to change the entire website’s background image (globally).
Click the CSS tab in the Global Settings, and paste the following segment of code into the field:
body {
background-image: url("URL to Image");
background-repeat: no-repeat;
background-position: center top;
background-attachment: fixed;
background-size: 100%;
background-color: #0f1066;
}
It makes more sense to use Beaver Builder for custom page backgrounds, as each page has its own image as a backdrop.
On your page editor, open the Tools menu again.
Select the Layout CSS & Javascript option.

Paste the same code into the CSS tab, changing the URL to Image text to the actual URL and adjusting any settings you want:
body {
background-image: url("URL to Image");
background-repeat: no-repeat;
background-position: center top;
background-attachment: fixed;
background-size: 100%;
background-color: #0f1066;
}
Add a Simple Row or Widget Background with Page Builder By SiteOrigin
The Page Builder by SiteOrigin is yet another drag-and-drop visual website-making tool. It’s limited in its ability to insert backgrounds for the entire website (you’d resort back to the standard WordPress Custom Background tool). Still, it provides settings to add background images and colors for rows and widgets used by SiteOrigin.
First, download and activate the Page Builder by SiteOrigin plugin.

Navigate to a new page or consider adding a SiteOrigin row to a current page on the website.
Each SiteOrigin section asks for you to Add Widget or Add Row. You also have the opportunity to browse through the Pre-built Layouts if you’d rather not start a design from scratch.
The good news is that both widgets and rows in SiteOrigin have settings to include background images.
Therefore, click the Add Widget or Add Row button to proceed.

In this example, we’ll look at the Widgets library.
Here, you’re able to choose one of the many widgets provided by SiteOrigin, from Navigation Menus and Pages to Post Content and Product Lists.
We’ll choose the Products widget for this example, but you can go with one of the many other widgets based on your design’s needs. Also, you can group these widgets with a Row, then add a background image to that row so that the background appears behind multiple widgets.

The new widget or row ends up in the SiteOrigin page editor. Most of SiteOrigin remains in the WordPress dashboard, so there’s not as much of a frontend editor as there is with other page builders.
To add a background to any SiteOrigin item, scroll over the element and click on the Edit link.

I chose the Products widget for this example, but each widget has its own settings to configure what it looks like on your website.
The background tools live underneath the Design dropdown menu. Click that to move forward.

Find the Background Image field and click on the Select Image button.
You also have the option to paste in an External URL for the background image.

The Media Library shows you the current images you have uploaded to WordPress. Click on the image that works the best for this background and select the Done button to drop it into the SiteOrigin module.

Now the Background Image field presents a thumbnail version of that photo.
Scroll down through the settings to configure everything from the Background Image Display to the Font Color for the overlaying text.
In general, you should be able to get the desired results by choosing the Cover display. It appears that the SiteOrigin plugin defaults to the Tiled display, so you may have to change that.
Be sure to click the Done button when you’ve completed your custom settings for the background.

The widget (in this case, the Products widget) goes into the SiteOrigin WordPress editor for that page. You can drag this element anywhere you want on the page and add new widgets and rows above and below it.
You must either click the Preview or Update button and then navigate the page’s frontend to see the results.

The current background I added appears within the restraints of the Products widget from before. This background obviously needs some editing to make it look prettier, but it’s a quality start to filing in space with a far more creative-looking background image.

Adding Unique Background Images with Brizy
The final page builder for this demonstration, Brizy, offers stylish templates and a superior frontend interface for adding unusual designs and rapid customizations.
The Brizy Page Builder includes an extensive set of drag-and-drop modules to incorporate into your current website. It also allows you to start from a blank template and construct your entire website with Brizy.
As such, you’ll be happy to hear that Brizy also has a background tool for just about every element you include through the page builder. Not to mention, Brizy features several unique background styles, like adding a looping video to the background or a full map.
To take advantage of these background settings, install and activate the Brizy plugin to get started.

Much of the Brizy design process requires you to start with a blank template. Brizy will attempt to convert your older designs into Brizy modules, but we find that it’s best to start anew.
Go to a Page or Post in your WordPress dashboard and begin building the page with a title and maybe some content.
You should see a button to Edit With Brizy. Click that to get sent to the full Brizy page builder.

The Brizy page builder shows a full preview of your website with buttons, text, and images. If the page is blank, click the Start Building Your Page button.

Look for the Layouts and Blocks tabs in the upper menu bar.
The layouts provide pre-built webpages, filled with demo content and ready to go as long as you customize your own company’s content. The blocks are smaller chunks of webpages, but they’re still pre-built and often easier to use and manipulate than if you were to make a block on your own.
It doesn’t matter which direction you go. Browse through the layouts and blocks and add as many as you want to the page. These are simply the elements you’ll use to form a complete webpage.

After you have a few blocks or layouts on the webpage, go back to the editor screen to look at your work.
You’ll see that every block section has a Settings icon on the block’s upper right side, which usually shows up when you scroll over the section.
Click on this for the block of your choice. We’ll add a background to that block.

The Block Settings panel remains in the upper right-hand corner. Scroll over the menu icons to see what they all do.
One of them is for Colors, and by that, they mean a color background. You can change that up and add a gradient if you’re keener on sticking to a solid or gradient color background view.

The icon button to the left contains the Background settings.
Click that button to open up the quick tools for uploading a background image to this block.

Brizy offers three media background items:
- Images
- Videos
- Maps
First, try the Image type to understand how it works with your current layout.
Click the Image upload area to find a photo in the media library and add it to the background.

We found a wood panel photo for this tutorial and indicated that we’d like to have no parallax effect.
This adds a pleasant effect since the color background serves as an overlay, yet we still see the wood’s texture behind it.
Remember that you can always adjust the Parallax field to make the background image a fixed, animated, or scrolling background.

And that’s how you insert a background image with Brizy!
The best part about Brizy is that you can keep moving through the design and clicking on each section’s Settings button.
One section down, we can insert yet another background image without spending much time on it at all.

And to demonstrate the power of the other background types, we can click on the Map background type, punch in an address, and watch as a map of that location appears right behind the foreground content.
The map gets situated as a full background and has a zoom function if it doesn’t come out quite right with the default settings.

Finally, we recommend checking out the Brizy background video tool, located in the same section as the image background tool. It works by inserting a video URL (YouTube or Vimeo), rendering a full video right behind the foreground content. It even provides a setting to loop the video and choose when it should start as the user scrolls over the section.

The animated gif below gives a brief example of the video in action, even though it could probably use some editing.

Background Image Sizing, Sourcing, and Basic Editing
We mentioned earlier in the article that even though there’s no perfect size for a background image, we recommend beginning at no smaller than 1024 x 768 pixels and sticking to a common aspect ratio like 16:9. The aspect ratio doesn’t matter as much as the image’s actual size and resolution since you can crop the image or let WordPress do it for you.
It’s also essential to find the right places to buy or borrow WordPress background images if you don’t plan on taking your own photos.
Where to Find Suitable Background Images
For your background image search, look at our guide on finding and adding stock photos without leaving WordPress. We also have a list of useful marketplace sources to seek out high-resolution stock photos, many of which are free.
Overall, we recommend trying to take background images yourself. If that’s not possible or you don’t have experience with photography or graphic design, think about using free stock photography resources. You can also opt to pay for a background image from one of the many premium stock image websites, some of which charge a monthly fee to download a bunch of photos.
Some highlights from those links include:
- Unsplash – Free, and no attribution required.
- Visual Hunt – Free photos. Most images don’t require attribution.
- Pexels – Free with no attribution needed.
- Pixabay – Free with most images not requiring attribution.
- iStockphoto – A fairly low-cost premium subscription for royalty-free images.
- Shutterstock – Royalty-free images for a reasonable subscription fee.
How to Change the WordPress Background Image with Custom CSS
As we’ve learned, you can add a WordPress background image with standard built-in WordPress tools or a plugin. It doesn’t matter which route you choose, as long as you get the desired result. There’s also the option to utilize custom CSS to either stylize the background image or add it to your site altogether.
We won’t cover the intricacies of custom CSS, seeing how every background image and theme will have a different process. However, we recommend reading our guide on editing, adding, and customizing CSS in WordPress. The article covers useful tips for adding background images to just about any website section, from menu items to specific page blocks.
Fixing Common Issues With a WordPress Background Image
All WordPress sites come with the ability to add a background. However, that doesn’t mean the core feature works for all websites. For instance, you may find that the theme you’re using doesn’t support custom backgrounds. Or maybe you keep uploading a background, but it doesn’t look quite right (too large or too blurry).
Encountering an issue with WordPress a background is frustrating and, unfortunately, somewhat common. We compiled some of the most common issues with background images below and charted each course of action.
How to Fix the 5 Most Common Issues With Background Images in WordPress
My Theme Doesn’t Support a WordPress Background Image
Theme developers control the Custom Backgrounds feature in WordPress. They can turn it on or off, depending on whether they’d like to enable custom background support. The background gets turned off when it’s either not needed, or maybe it conflicts with the theme’s overall design.
If you find that your theme either doesn’t support a custom background or it limits your abilities when adding a background, consider these solutions:
- Swap the theme out for one that does support custom backgrounds. Look for Custom Backgrounds in the feature lists when buying or downloading themes.
- Use a background plugin to override the custom background default feature being blocked.
Although it’s possible to include your own custom coding or go into the theme files to reactive custom backgrounds, we usually recommend against both options. Your best course of action is to locate a theme that supports backgrounds or add a plugin that allows for backgrounds but doesn’t mess much with the theme’s functionality.
My WordPress Background Image is Too Dark or Has the Wrong Color
A darkened background image could stem from many settings running alongside the background image itself. Most of the time, it has to do with an overlaying filter or poorly colored background.
For most instances where the background is discolored, you must check your theme or plugin that controls the background itself.
Look for a setting near the background field that asks for a filter or overlay. You may also find an opacity feature that should be cleared so that your background shows properly.
If all else fails, the theme may have a background filter hardcoded into the theme files. In that case, contact the theme developer to get an idea of what’s possible to correct the background color.
My WordPress Background Image is Not in the Right Position
The background image showing up in the wrong position tends to jar your website’s overall design. You may find that the background is too far to the left or right, or maybe what’s supposed to be the background’s central focus isn’t appearing on the screen at all.
Luckily, moving around the background only takes a few clicks of the button.
Go to Appearance > Background in the WordPress dashboard. Find the image you currently have uploaded as the background and look for the Position field. This field lets you move the background’s positioning, with options to move it to the left, right, top, bottom, or corners.
We recommend clicking on all of the positioning buttons to see the results they produce. After you find the right position, save the page.
My WordPress Background Image Repeats Over and Over
Textures and solid backgrounds often look better when repeated, seeing how they would overlook the image breaks. However, many images look awful when repeated repeatedly as a background, especially those with lots of detail and varying degrees of color.
A repeated background image layout comes in handy if your source image isn’t large enough to cover the entire background without looking stretched out. Therefore, WordPress sometimes defaults to a repeated layout to maintain the resolution of the image.
The main solution to this problem is located in the Background section by Appearance > Background in WordPress. With a photo uploaded as a background, try presets like Fill Screen, Fit To Screen, or Custom, instead of the Repeat preset option.
However, you might find that trying to get a smaller image to cover a background screen’s entirety causes unpleasant results. In that case, the best solution is to completely replace the background source image and seek out one that’s large, high-resolution, and ready to be published to the web.
My WordPress Background Image is Stretched
A stretched background image means your custom background settings attempt to take a smaller image and cover the entire screen with the image.
You can also see this happen with larger, high-resolution images if they don’t match the required aspect ratio. For stretched background images, think about the source file. Choosing a different image that’s suitable is the best option.
One other problem is that you may have the background settings misconfigured. Check things like the background image position and being stretched over the canvas in the Fill Screen mode. You may only need to stick with the original dimensions or add a Repeat function to make it all work out.
Other Background Troubleshooting Tips
- Theme developers have full power over the custom background feature in WordPress. If you installed a theme and can’t get the background to work, your best bet is to contact the theme developer or install a new theme to see if that fixes the problem.
- Custom background colors and images often override any custom CSS code you implement to control your background image’s sizing, placement, or source. You may have to stick with the theme’s background settings instead of using custom CSS.
- A theme may get sold with a custom background already activated. Usually, all you have to do is replace the background image with a new one. Sometimes, it’s necessary to tap into the theme files or use custom CSS to override the theme settings.
Best WordPress Background Image Plugins
If you want to have further editing capabilities for a background image, are interested in video backgrounds, or tools that allow for page-specific backgrounds, you can consider the following WordPress background image plugins:
Simple Full Screen Background Image

The Simple Full Screen Background Image plugin isn’t much different from the default background image tool in WordPress, except that it adds automated features for things like resizing and scaling for browsers.
Overall, this plugin works best for those who find that their theme blocks the ability to add a background, or maybe they’re having trouble with the built-in WordPress background tool. It overrides what you have on WordPress and adds a special Background button in your WordPress dashboard to instantly upload an image from your computer.
That’s all there is to it!
The plugin also has a Premium version that offers improved scaling, support for an unlimited number of backgrounds, and unique effects, and much more.
Advanced WordPress Backgrounds

The Advanced WordPress Backgrounds plugin takes on a different approach to WordPress backgrounds, enabling you to take advantage of unique effects that spice up your background. An example of this is the parallax background, which can slowly move along with the user as they scroll through your website.
The plugin also offers support for videos. The video backgrounds are pulled from places like YouTube and Vimeo, or you can even self-host them.
It’s also possible to have a solid color or textured background. All of these background types include advanced features you can’t find with the basic WordPress background tool. Some of these include scrolling and scaling effects, opacity effects, and custom speed options.
It supports Gutenberg and can go along with the standard WordPress editor and many other visual page builders. Finally, you can use its custom CSS options to add even more style to your backgrounds.
Perfect Images + Retina

The Perfect Images + Retina plugin comes in handy as a two-in-one solution. It allows you to manage the WordPress background image size and appearance while also regenerating thumbnails and replacing images. The image management is rather impressive, and it’s particularly crucial for high-resolution backgrounds.
The plugin also provides a background feature if you go for its premium version. It generates a retina equivalent for that background image so that the images look the way they’re supposed to, even on high-res displays.
Maintenance

Maintenance is a simple and easy-to-use plugin for designing maintenance and coming soon pages. The Maintenance plugin has both free and premium versions, but the free one is enough to activate a maintenance page and add a background image with overlaying text and fields.
You can even upload your own logo, customize things like fonts and icons, and choose various templates with their own beautiful background images. You can also install its many pre-built templates, but most of them require the plugin’s premium license.
Summary
A basic WordPress background image takes no effort to add and show across your entire website. It’s a functionality built into the WordPress Core, so it’s easy to swap out backgrounds for certain events or holidays. You can also stick with one background for life.
Besides the standard WordPress background, you can use custom CSS code, plugins, and page builders to implement all sorts of backgrounds on your WordPress site. From image backgrounds on specific pages to backgrounds for your menu button, the possibilities are unending.
It’s now time to add that background you’ve always wanted to your WordPress site.
Did we miss anything out? Please leave a comment if you’re having trouble adding or managing WordPress background images.