
Need a way to downgrade WooCommerce without losing your store’s data?
If a new version of WooCommerce introduces problems on your site, you might be looking for a short-term fix to get your store working right away.
Downgrading WooCommerce gives you that option by letting you instantly turn things back to how they were before the update.
In this post, you’ll learn 3 code-free ways to downgrade the WooCommerce version on your store, along with some important tips and considerations to avoid issues while doing so.
Why and When Should You Downgrade WooCommerce?
The main situation in which you might want to downgrade WooCommerce is some type of compatibility issue, either in the core WooCommerce plugin itself or in one of your extensions (i.e. WooCommerce plugins and theme).
While the WooCommerce team thoroughly tests each release, there are so many variables that issues can still arise. Side note – setting up WooCommerce logging is a great way to detect these issues.
For example, WooCommerce 3.0 famously caused issues with product photo galleries, which caused a lot of stores to revert back to the previous version until the fix was released.
However, it’s important to note that downgrading WooCommerce is not a long-term solution.
Using an older version of WooCommerce for long periods of time could eventually cause security or performance issues at your store. The latter of which can show up when you’re debugging performance with a tool like Kinsta APM. You can also use tools like Query Monitor, MyKinsta analytics, or PHP testing tools to monitor issues.
Instead, downgrading WooCommerce is a temporary stop-gap measure that you can use to keep your store working while you or others work out a more permanent fix.
That “permanent fix” could be the WooCommerce team fixing a known bug. Or, it could require some manual effort on your part, such as tweaking custom code that you’ve added or switching to a different WooCommerce extension for certain functionality.
Important Preparation Steps Before You Downgrade WooCommerce Version
Before you downgrade WooCommerce, you should perform some basic preparation to make sure you don’t encounter any issues.
1. Create a Backup
Before making any changes to your store, you should create a full backup of your site. That way, you always have a safe restore point no matter what happens (or as “safe” as can be).
If you’re hosting WooCommerce with Kinsta, Kinsta already backs up your site every day automatically. However, we still recommend taking a manual backup so that you have the latest version, as customer or order data might have changed since that automatic backup.
If you need a helping hand, we have complete guides on how to back up WordPress and how to restore a WordPress backup.
2. Use a Staging Site
A staging site is an identical copy of your WooCommerce store that’s in a safe, private sandbox. It gives you a safe place to test changes to your site without affecting the live version of your store.
Whenever possible, we always recommend that you downgrade WooCommerce on a staging version of your site before doing so on the live version of your site.
This will help you catch any issues, including some database issues that are unique to WooCommerce.
If you host your WordPress site with Kinsta, you can easily set up a WooCommerce staging site from MyKinsta. All Kinsta customers get free access to staging, and Kinsta also offers premium staging environments for people who need more flexibility.
If you’re not hosting with Kinsta yet, here are some other ways to create staging sites.
3. Check For WooCommerce Database Changes
One tricky thing about downgrading WooCommerce versus downgrading other WordPress plugins is that WooCommerce sometimes makes changes to the WordPress database when updating to a new version.
You’ve probably seen this message after updating WooCommerce – it usually says something like “WooCommerce database update required”.
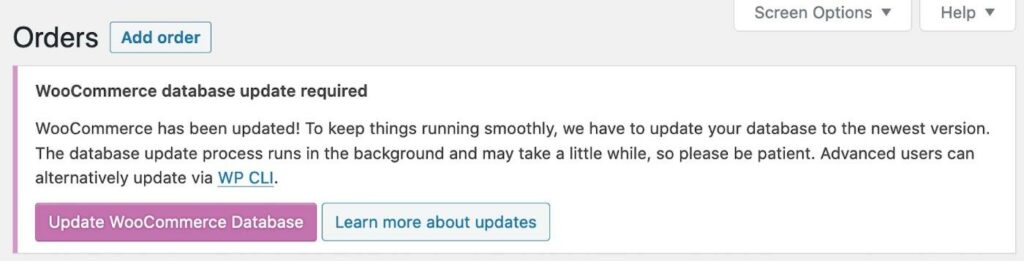
If you’re downgrading WooCommerce immediately after updating and there wasn’t a database upgrade (or you haven’t run the database upgrade yet), you shouldn’t have problems.
However, if you did run the database update and you’re now trying to downgrade to a version that uses the older database version, that might cause issues.
This is why it’s important to have a backup of your site and test things on a staging site before you downgrade the live version of your store.
4. Check for Compatibility Issues in WooCommerce Extensions
Finally, you’ll also want to consider any compatibility issues in other WooCommerce plugins that you’re using, along with your WooCommerce theme.
For example, maybe you’re using a wishlist plugin that’s only compatible with the latest version of WooCommerce. In this case, downgrading WooCommerce might cause issues with that plugin.
Again, using a staging site can be really helpful for detecting these compatibility issues before you make changes to your live store.
How To Downgrade WooCommerce Plugin to a Previous Version: 3 Methods
Now, let’s get into the actual step-by-step guide for how to downgrade your WooCommerce version using 3 different methods.
All of these methods achieve the same thing, so you’re free to pick the one that seems easiest to you. However, we recommend the first method as the best option for most people, which is why we’ve put it first on the list.
But before we get started, here’s one more reminder to create a backup of your store and work on a staging site when using these methods.
Again, they should work fine – but the fact that WooCommerce sometimes does database updates between versions can introduce some variables. That’s why we always recommend you be safe and take precautions!
1. Download and Install an Older WooCommerce Version Via WordPress Dashboard
Thanks to a recent WordPress core update, WordPress now lets you manually reinstall any version of a plugin right from your WordPress dashboard.
This offers the simplest way to downgrade WooCommerce because you’re no longer required to use FTP (though we will cover that method next).
Here’s how it works…
Download the Version of WooCommerce That You Want to Use from WordPress.org
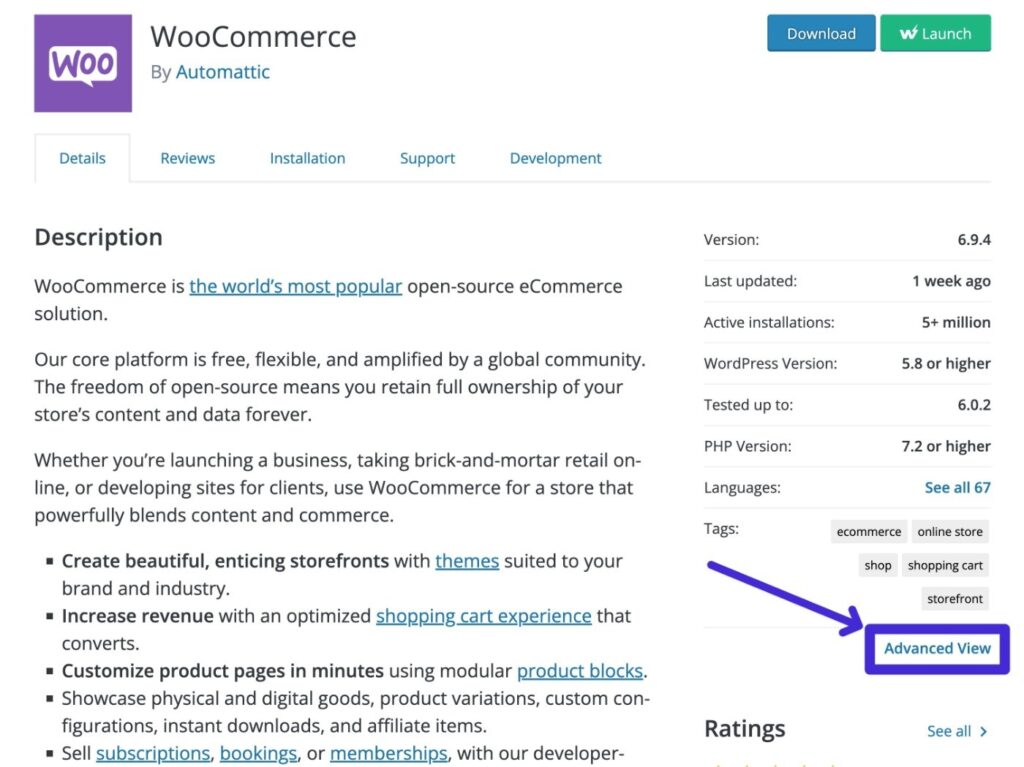
To get started, go to the Advanced view of the WooCommerce plugin listing at WordPress.org.
You can click this link to go straight there or go to the main listing page and click Advanced View.
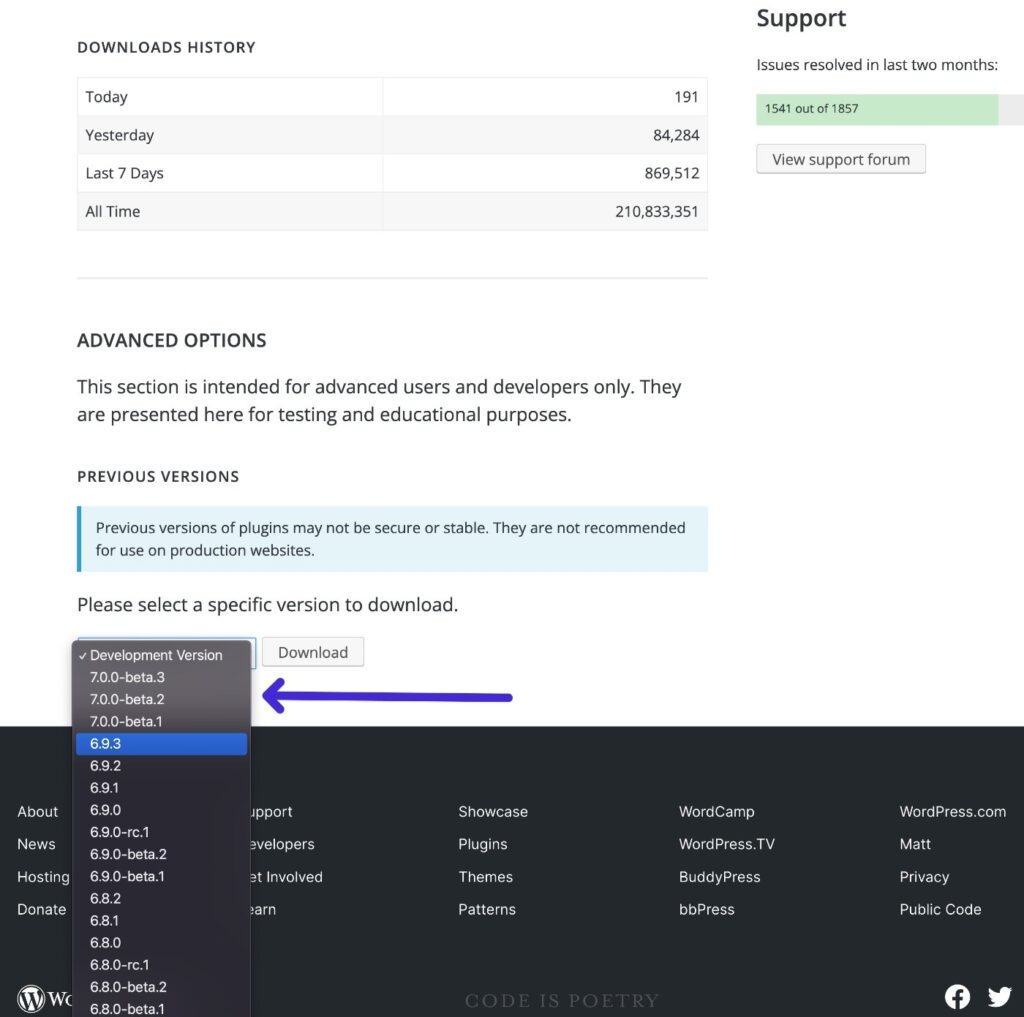
Then, scroll down to Previous Versions under the Advanced Options section.
Use the dropdown to choose the version of WooCommerce that you want to downgrade to and then click Download to download that version’s ZIP file to your computer.
If you need some help here, we have a complete guide on how to download older versions of plugins.
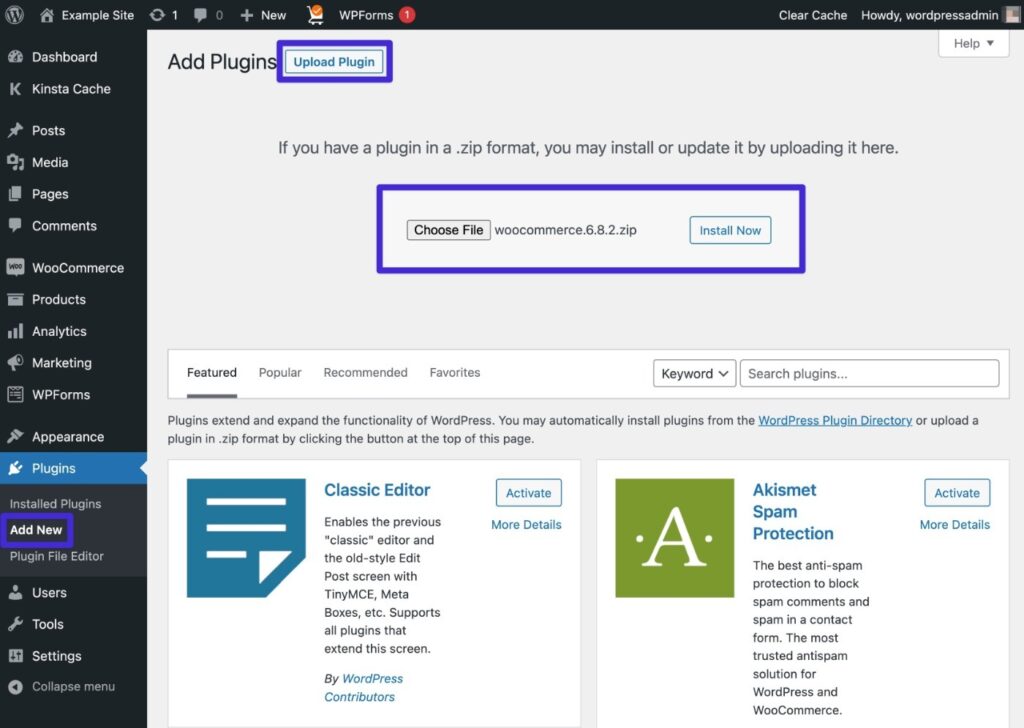
Install the Older Version via Your WordPress Dashboard
Now, you need to install the older version of WooCommerce via your WordPress dashboard, just like you were installing any other plugin with a ZIP file:
- Go to Plugins → Add New in your WordPress dashboard.
- Click the Upload Plugin button.
- Use the file picker to select the ZIP file that contains the older version of WooCommerce (the one that you want to downgrade to).
- Click Install Now.
After that, WordPress should show you a prompt asking you if you want to overwrite your existing version of WooCommerce with the version that you just installed.
Check the version numbers to make sure everything is correct and then click the Replace current with uploaded button to confirm.
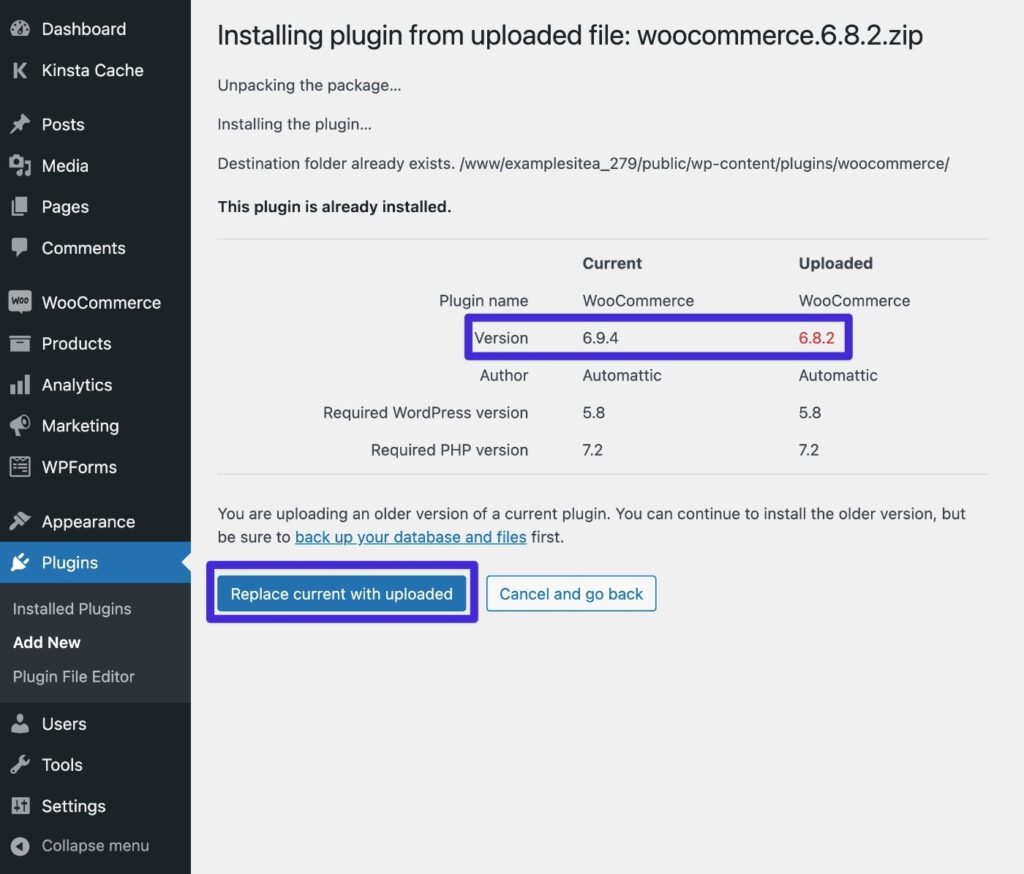
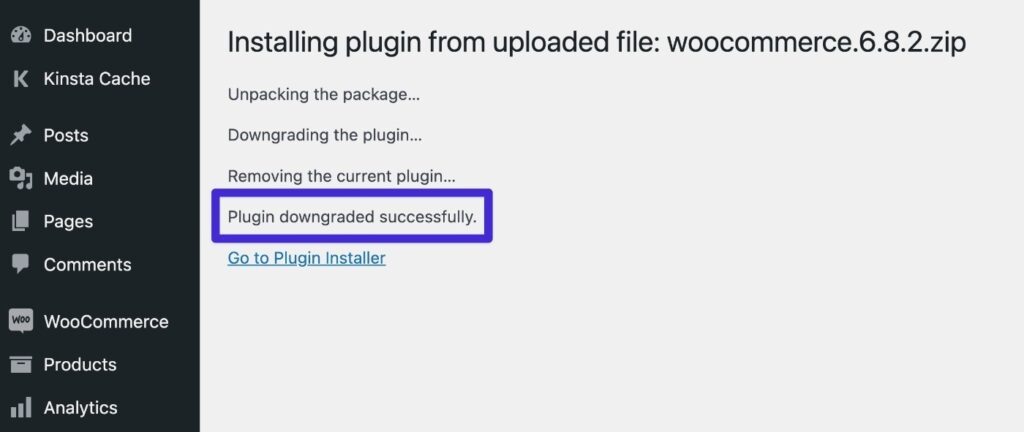
You should then see a success message telling you “Plugin downgraded successfully.” And that’s it! You just officially downgraded WooCommerce and you’re all finished.
2. Use FTP to Upload the Older Version
As another option, you can also downgrade WooCommerce by connecting to your server via FTP.
Before WordPress added the feature to downgrade plugins from the WordPress dashboard, this was the only way to manually downgrade WooCommerce.
However, since that other feature does exist now, there’s really no need to go with the added complexity of FTP.
This method can also cause a few minutes of downtime, so you might want to enable WordPress maintenance mode while you’re performing your work.
If you do prefer this method, here’s how it works…
Download the Version of WooCommerce That You Want to Use from WordPress.org
To begin, go to the Advanced View of the WooCommerce listing at WordPress.org and download the version of WooCommerce that you want to use.
We have more advanced instructions in the previous method if you need a helping hand here.
Connect to Your Server Via FTP
Next, you need to use an FTP client to connect to your WordPress site’s server using FTP. For the example screenshot below, we’re using the free FileZilla FTP client.
If you’re not sure how to do that, you can read our guide on how to use FTP to connect to WordPress.
Rename the Existing WooCommerce Plugin Folder
Once you’re connected via FTP, navigate to wp-content/plugins on your server.
Find the woocommerce folder and rename it to woocommerce-delete. This will disable that version of WooCommerce on your site while still preserving the files on your server in case something goes wrong.
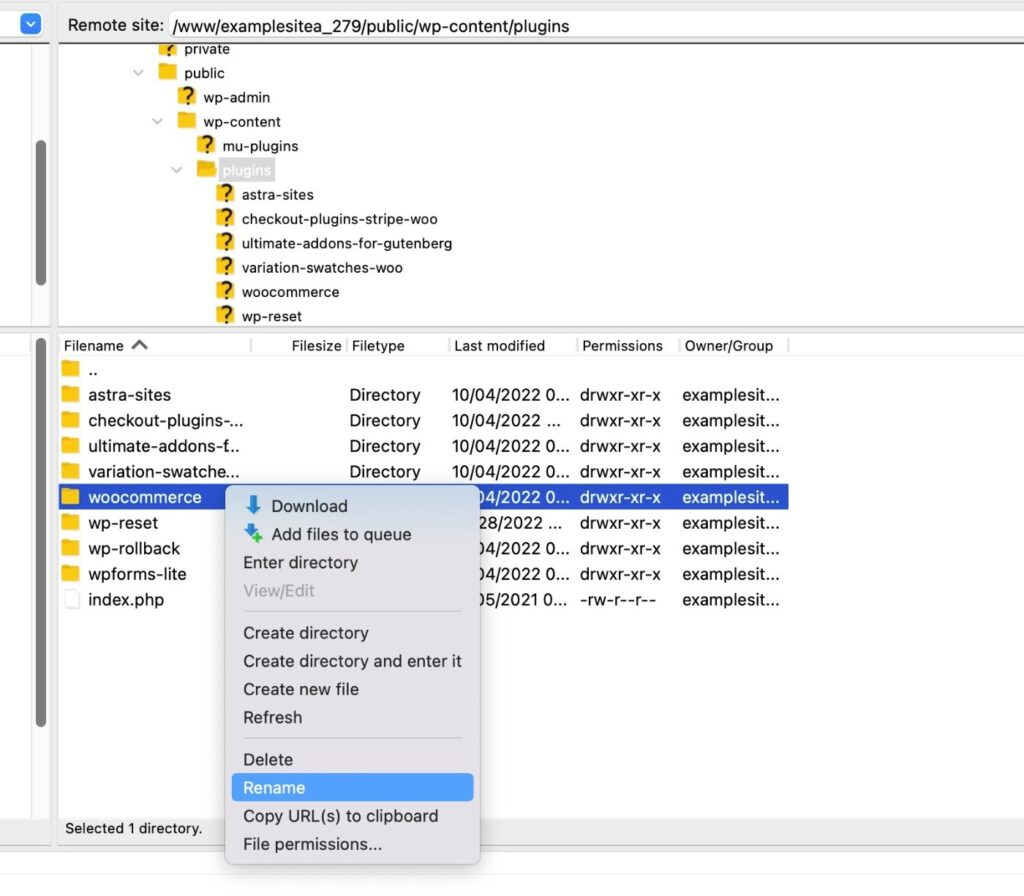
Once you successfully downgrade, you can delete this folder, though.
Be aware that your store will stop working from the time that you rename the plugin folder until the time that the upload from the next section finishes.
Unzip and Upload the Older Version of WooCommerce
To finish things out, you need to upload the older version of WooCommerce that you downloaded from WordPress.org.
Here’s how:
- Use your local computer to unzip the ZIP file that you downloaded from WordPress.org.
- Upload the unzipped woocommerce folder from your local computer to the plugins folder on your WordPress server.
- Wait for the upload to complete (it might take several minutes depending on the speed of your internet connection).
Once the upload finishes, the downgraded version of WooCommerce should be active on your site.
To finish things out, you can delete the woocommerce-delete folder that contains the previous version of WooCommerce once you’ve verified that your store is working.
3. Use the WP Rollback Plugin
If you’re ok with installing a new plugin on your store, the free WP Rollback plugin lets you easily downgrade the WooCommerce version right from your WordPress dashboard.
Here’s how to use it to downgrade WooCommerce:
- Install and activate the free WP Rollback plugin on your WooCommerce site. It’s listed at WordPress.org, so you can install it just like any other free plugin.
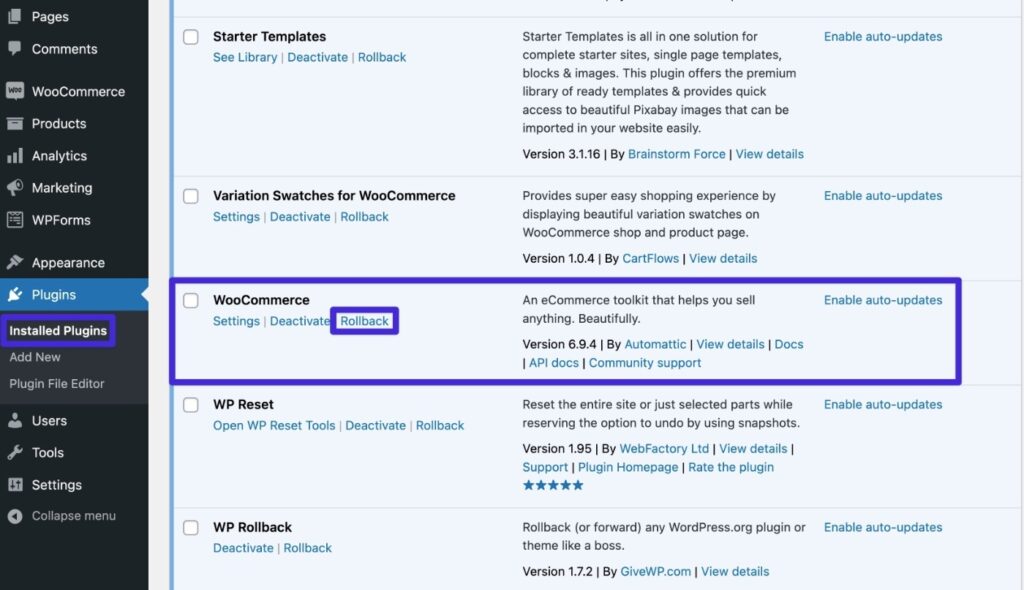
- Go to Plugins → Installed Plugins in your WordPress dashboard.
- Find the WooCommerce plugin in the list.
- Click the Rollback link underneath the WooCommerce plugin’s entry.
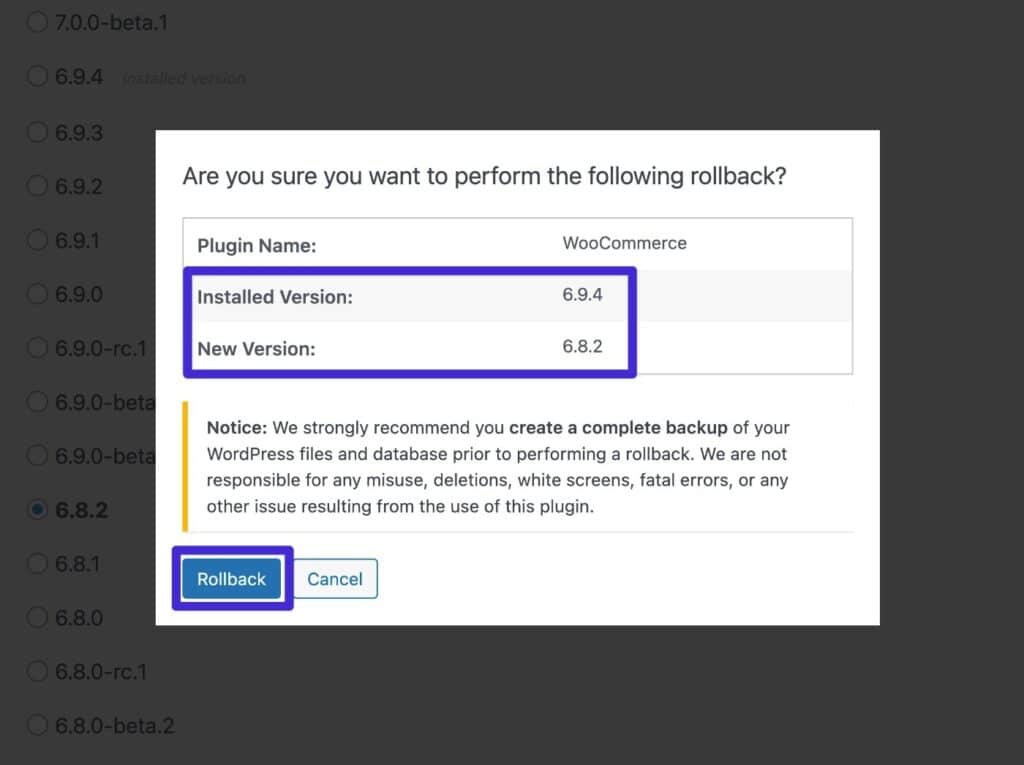
This will open a new interface that lists all of the available versions of WooCommerce that you can downgrade to.
Select the version that you want to use via the relevant radio button. Then, click the Rollback button at the bottom of the screen.

You’ll now see a popup confirming your selected version numbers. If everything looks good, click the Rollback button in the popup to continue.
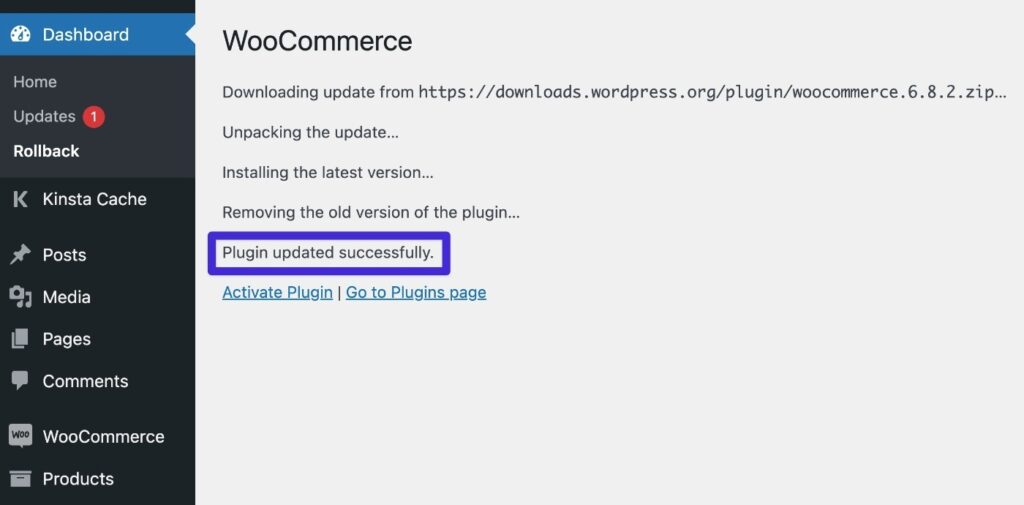
After a short wait, you should see a success message telling you that WooCommerce has successfully been downgraded. Unlike the first method, the message will read “Plugin updated successfully”, but that still means that the version has been downgraded.
Summary
At some point in your time using WooCommerce, you might need to downgrade WooCommerce to preserve important functionality or temporarily fix compatibility issues while waiting for a more permanent fix.
In general, you can downgrade WooCommerce just like any other WordPress plugin.
The simplest option is to just upload an older version of WooCommerce through your WordPress dashboard, but you can also use FTP or the free WP Rollback plugin.
However, be aware that WooCommerce’s database updates can sometimes cause issues when downgrading that you wouldn’t experience with other plugins.
For this reason, it’s essential to take a backup of your store and test things on a staging site before applying them to your live store.
If you’re still having issues, you can also read our full guide on how to downgrade WordPress, which includes methods for the core software, PHP versions, and more.


