WordPress Multisite has many benefits. It lets you create as many websites as you need with just one WordPress installation. It allows for connections between those sites, sharing of data and users, and it gives you a way to make money from your WordPress installation, by selling sites on your network to users.
But sometimes, a single-site WordPress installation might be the best option for your site. Maybe you don’t want to share a database of users with other sites. Maybe your site has become much larger than the other sites in the network and you want to separate it out. Or maybe you want a different hosting environment for that site, or you’re moving out of someone else’s multisite network to your own single installation.
Another possibility is that you’ve been running a small Multisite network but now want to remove all of the sites except one and revert that to a single site installation.
The good news is that you can migratea sub-site from WordPress Multisite to a single site, or convert a network to a single site. The not so good news is that it’s more complicated than simply migrating a single site to another WordPress installation or another domain.
In this post, I’ll show you how to migrate your WordPress site out of WordPress Multisite to a single site, without losing any data.
Why Migrating from WordPress Multisite to a Single Site Is More Complex Than Migrating a Single Site
Let’s take a look at why migrating a site out of a Multisite network is more complicated than migrating between single-site installations.
The reason for this is the way WordPress Multisite stores your data and files, and the fact that some of the data is stored along with data for the other sites in the network.
A Multisite network stores data about each site as follows:
Upload files are stored separately for each site, in WordPress-content/uploads/sites/xx, where xx is the ID of the individual site.
Most data, including posts, post metadata, taxonomies, and more, is stored separately for each site in dedicated database tables that are created each time a new site is added to the network. These are given a prefix including the ID of the site, so wp_12_posts will be the posts table for site 12.
User data is stored in two tables for the entire network. Instead of becoming a user on one site, a user has an account on the network, which stores metadata about which sites they have access to. This means you can’t export the user database tables and migrate them to your new site: you’ll have to migrate users separately.
Theme and plugin files are stored once in the network, regardless of how many sites they’re activated on. This is one of the major benefits of Multisite because it means you only have to keep themes and plugins updated once. But when you’re migrating a site out of the network, it makes things more complicated.
As we go through the process of migrating from WordPress Multisite to a single site in this post, I’ll show you how to deal with each part of the site separately so you can migrate it successfully.
A note on terminology: in this post, I’ll refer to sites within a Multisite network as ‘sub-sites’. I’ll use ‘base site’ to refer to the core site in a network, which is the one that was there before Multisite was activated. And I’ll refer to standalone sites in their own dedicated WordPress installation as ‘single sites’.
How to Migrate a Sub-site from WordPress Multisite to a Single Site
So, assuming you haven’t been scared off by what you’ve learned about the process so far, let’s look at the different methods you have for doing this.
The options are:
- Use free export/import plugins to migrate data, and migrate files manually.
- Use a migration plugin to export all data and files.
- Carry out a manual migration.
Let’s take a look at each of these methods in turn.
1. Using Free Plugins to Migrate a Sub-site Out of a WordPress Multisite Network to a Single Site
The first option uses the free import/export plugin to migrate your content and another free plugin to migrate widget settings.
The benefits of this method are that it’s free and it doesn’t involve any tinkering with the database, so is fairly foolproof. However, it has some drawbacks:
- The only users migrated will be users who’ve created content – you’ll have to migrate all other users manually.
- No settings will be migrated apart from widget settings. If you have complex settings, and plugins like an ecommerce plugin, this method is not recommended as you’ll spend a lot of time manually copying all your settings.
But if your site is simple, with a small number of plugins, not much in the way of customization, and not many users, it might be the simplest way to proceed.
So let’s take a look at how you do it. There are six steps:
- Create the new single-site installation.
- Install the same plugins and themes as in your old site and activate them.
- Migrate content using the Import/export plugin.
- Migrate widget settings using the Widget Import/export plugin.
- Add any additional users who aren’t content authors, using the User Import & Export plugin.
- Manually copy settings from the old site to the new site.
That’s quite a lot of steps, but some of them are quick or automated.
Create the New Single Site Installation
Start by installing WordPress on your new single site. When you create the site, you’ll be given a temporary domain name as you don’t want to use the domain name from your old site just yet – save that for when you’ve got the site working.
Install WordPress using an installer or using manual installation.
Install Plugin and Theme Files
Now you need to install the plugins and theme that you used in the old site in the Multisite network to the new site. It’s important you do this before migrating any content because the plugins and theme might create content types (such as post types) that you’ll need to migrate.
Open each of the plugins and themes screens in the WordPress dashboard from your old site in the Multisite network and check what’s active. If the plugins and themes are from the WordPress plugin and theme directories, you can just install and activate them in your new site in the normal way.
If they’re premium themes and you don’t have a license, you’ll need to buy one. Download the themes/plugins from the provider and install them following their instructions.
Before you continue, make sure all the same plugins are activated on the new site as well as the same theme. Don’t worry about configuring them yet and don’t run through any wizards – we’ll do that after importing the content.
Migrate Content Using the Import/Export Plugin
Now it’s time to export content from your old site and import it to the new site.
In the old site, install the import/export plugin. You’ll need to do this via the network admin screens, or ask the network administrator to do it for you.
Once the plugin’s installed and activated for your site, go to Tools > Export.
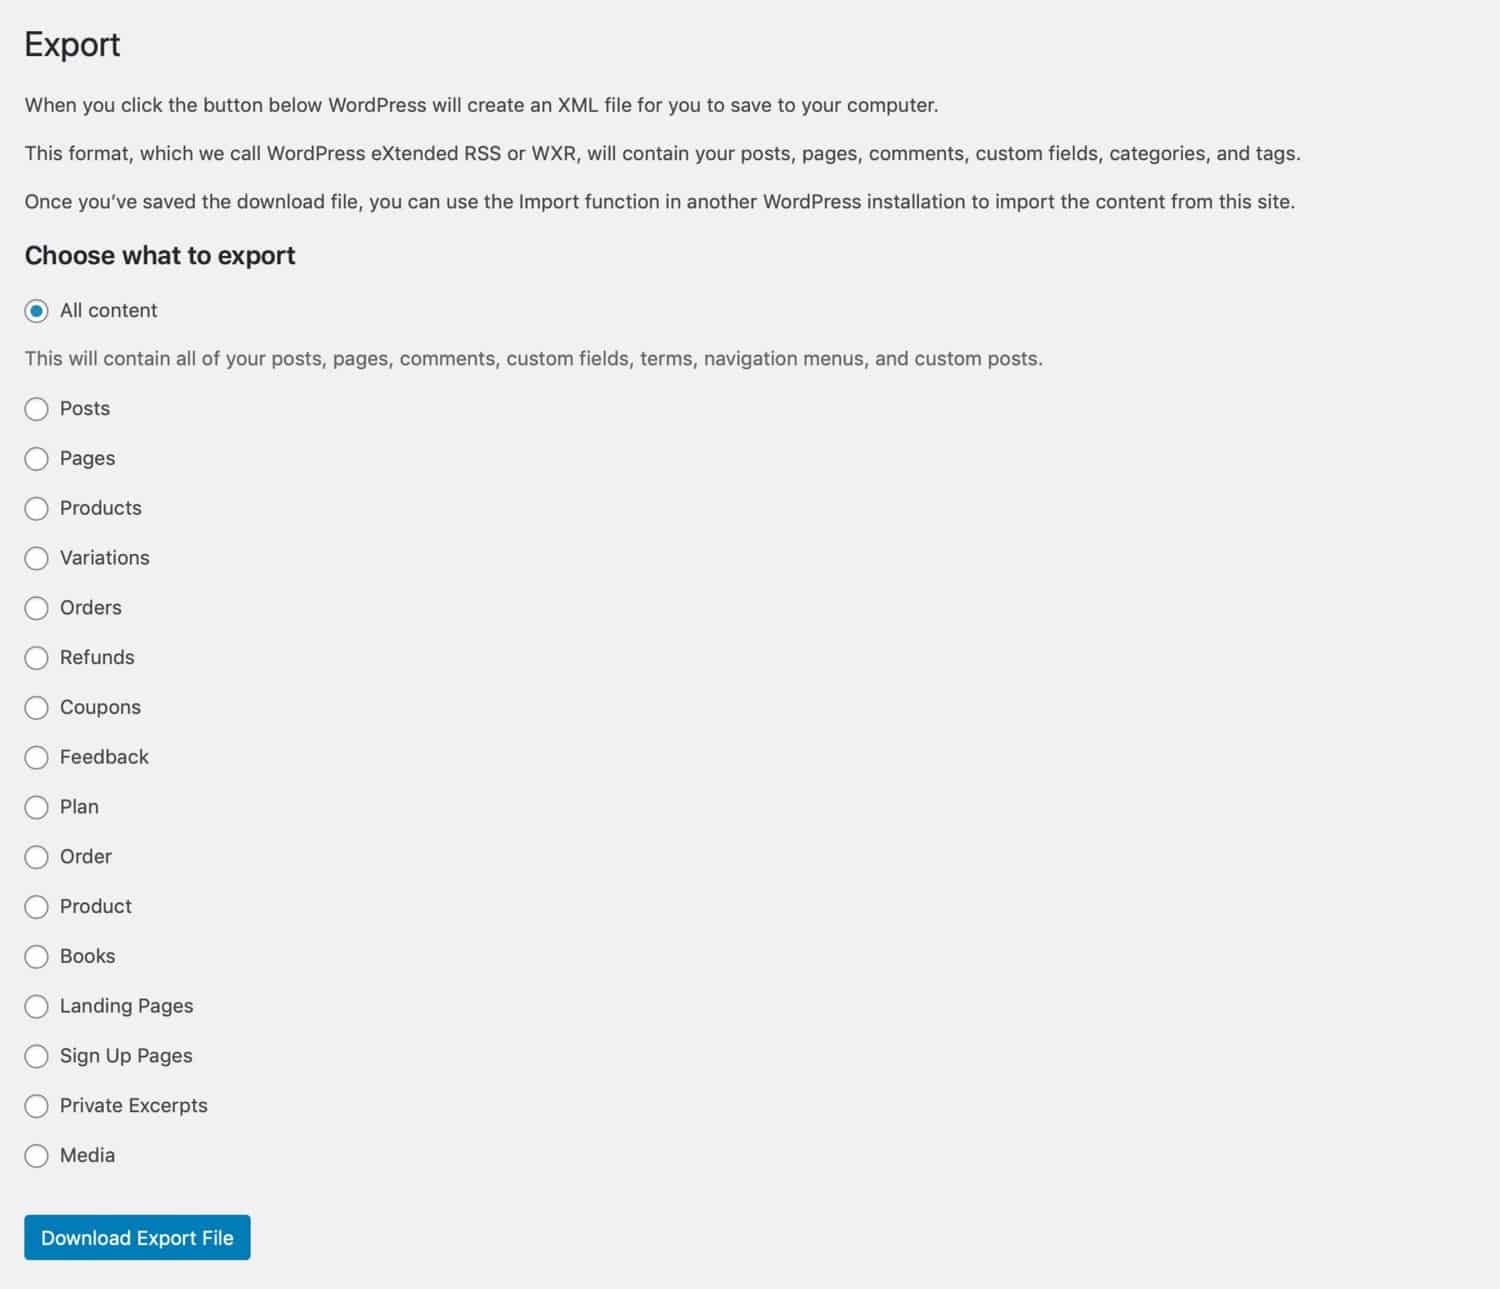
Under Choose what to export, select All content, then click the Download Export File button.
This will download a XML file to your computer, whose name will include the name of your site. Save this somewhere safe – you’ll need it to import to the new site.
Now open your new site and go to Tools > Import.
If the Import plugin isn’t already installed, you’ll need to click on the Install Now link under WordPress.
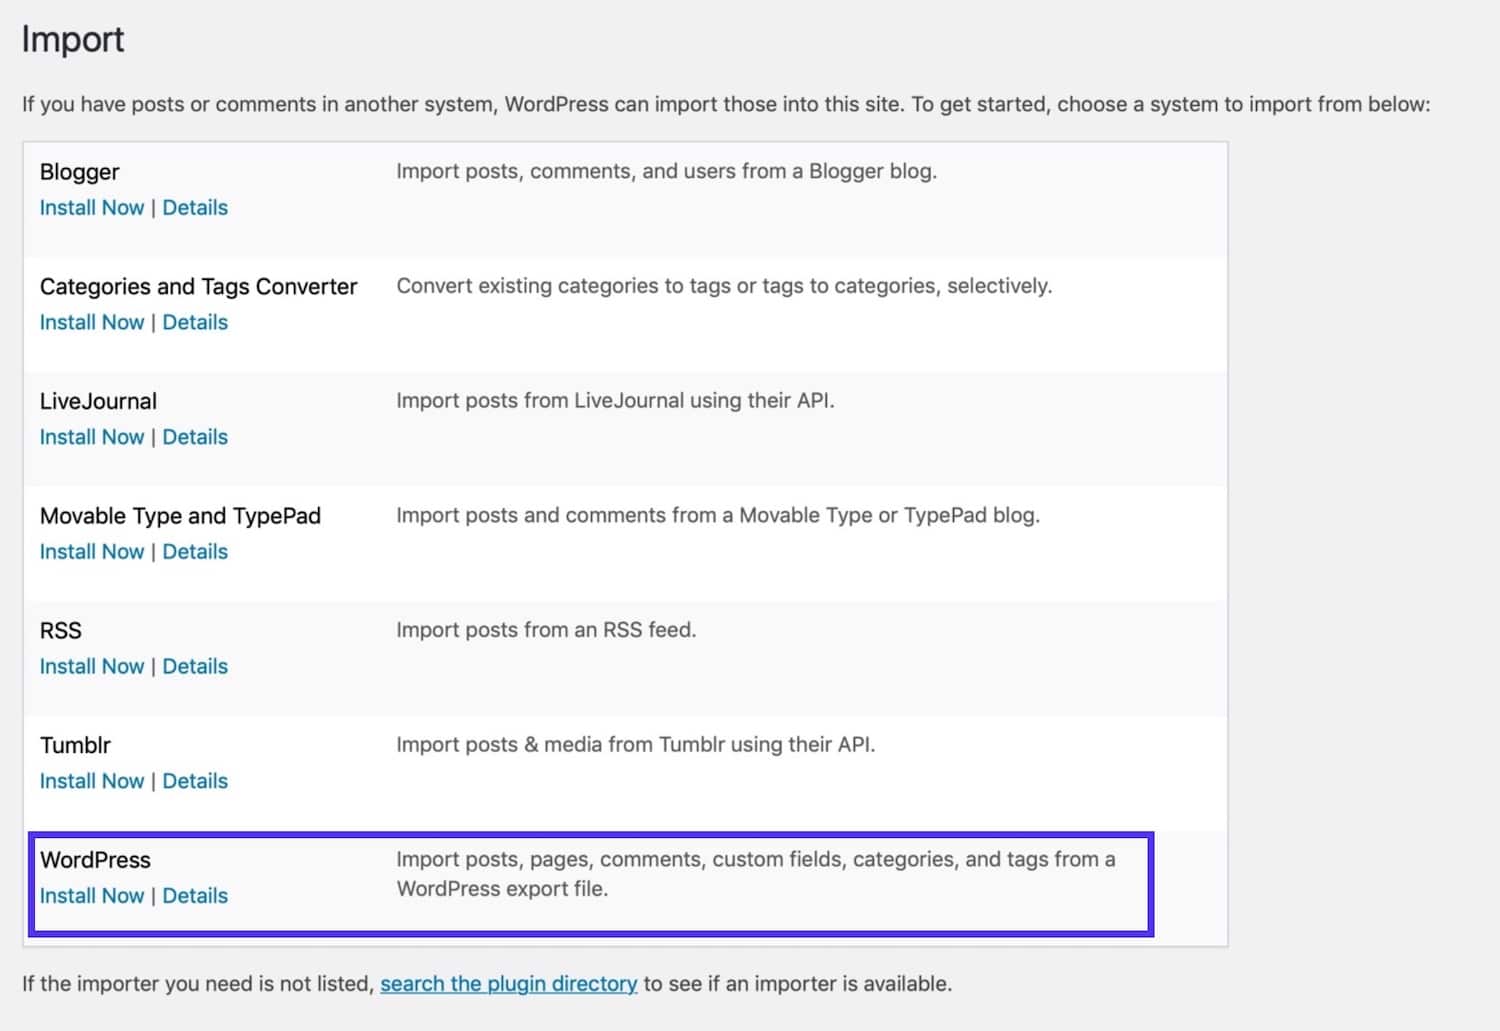
The importer plugin will be installed and activated and a link will appear at the top of the screen for you to run the importer.
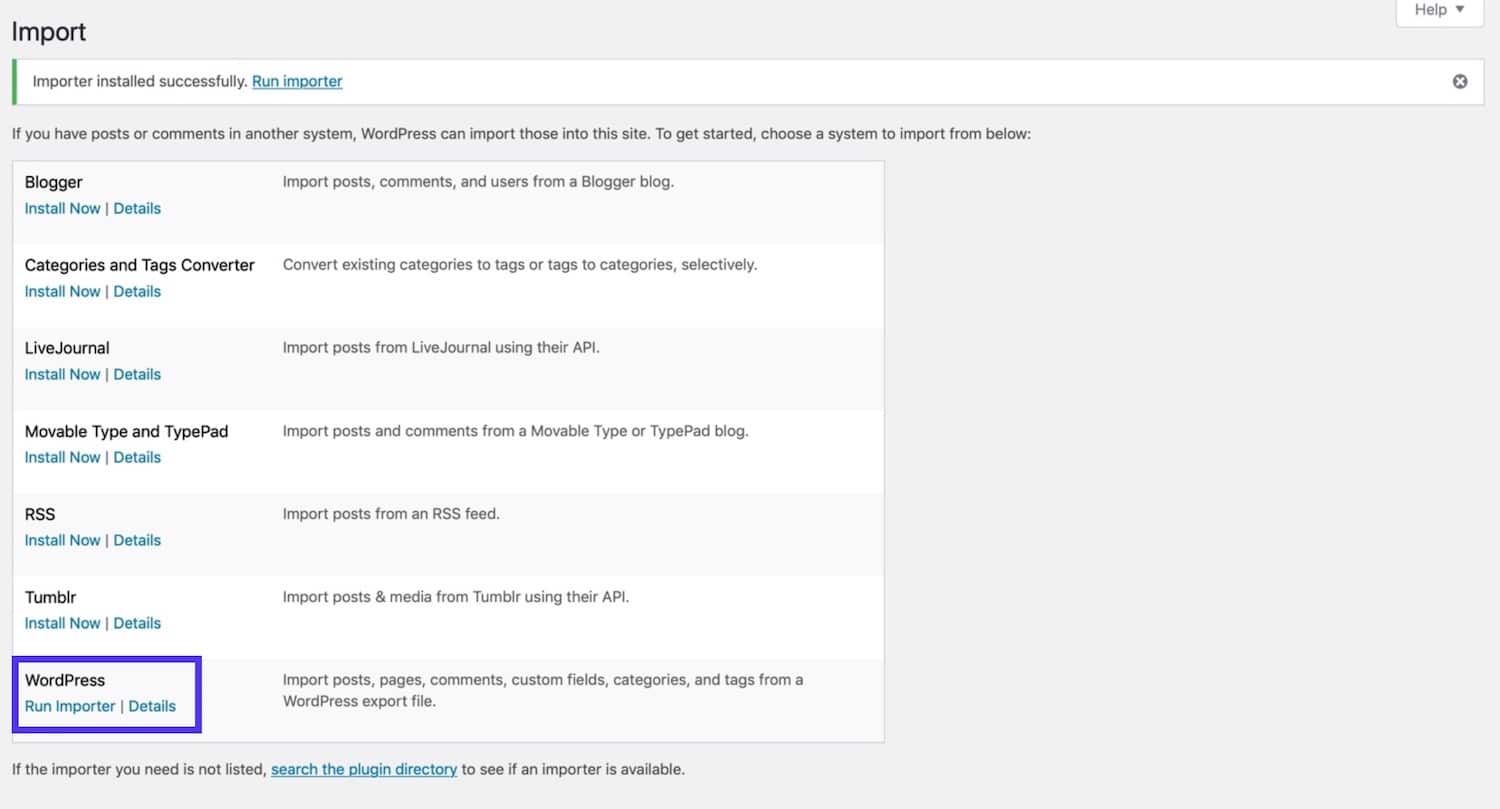
Click on that link and you’ll be taken to a screen where you upload the XML file.

Click the Choose file button, find the XML file on your computer, then click the Upload file and import button.
WordPress will ask you to assign authors and decide if you want to download attachments.
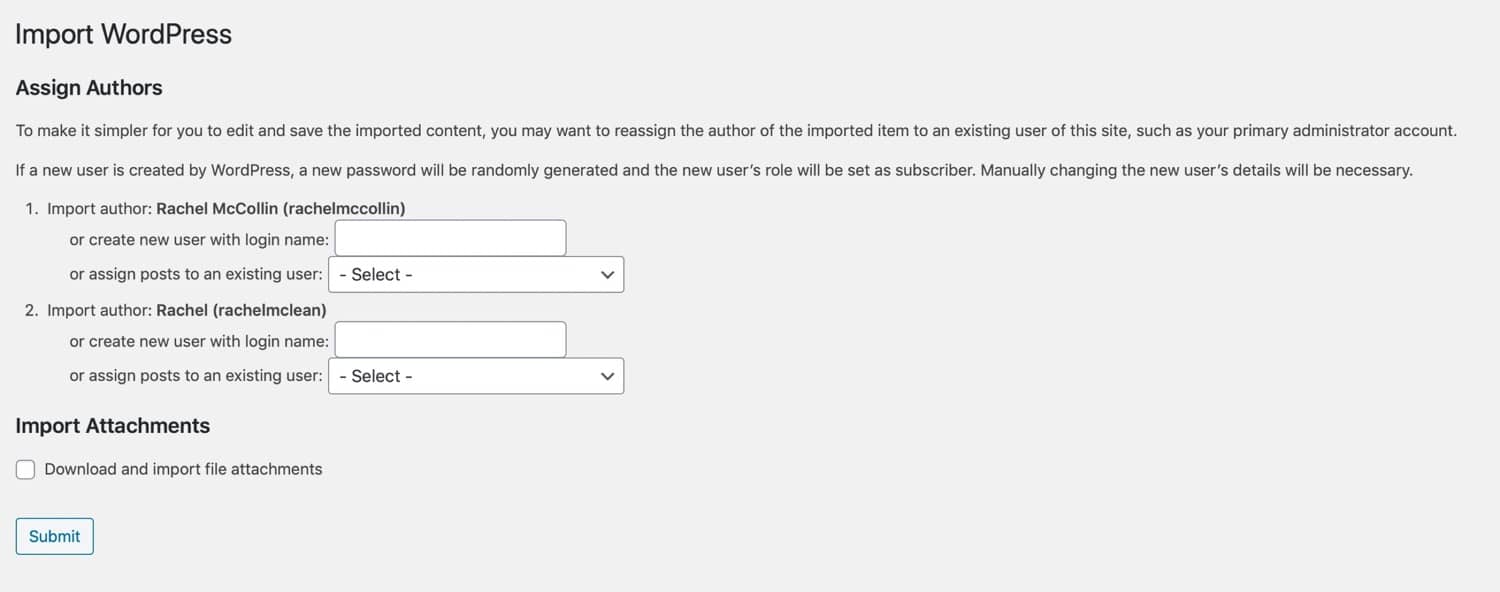
Select the authors in your new site that correspond to authors in your old site, if you’ve already added them to the site. If not, type in the login name and the importer will add new user accounts for you. Then check the Download and import file attachments box.
Click the Submit button and the importer will import the content from the XML file for you. Head on over to your Posts screen and you’ll be able to see them all listed.
Migrate Widget Settings Using the Widget Import/Export Plugin.
So you’ve now got all your posts, pages, etc. imported.
You can’t import most of the settings – but you can import widget settings using the Widget Importer & Exporter plugin.
Install and activate the plugin on both sites – again, you can only do this if you have plugin installation access in the network.
Now in the original site (the one in Multisite), go to Tools > Widget Importer & Exporter.
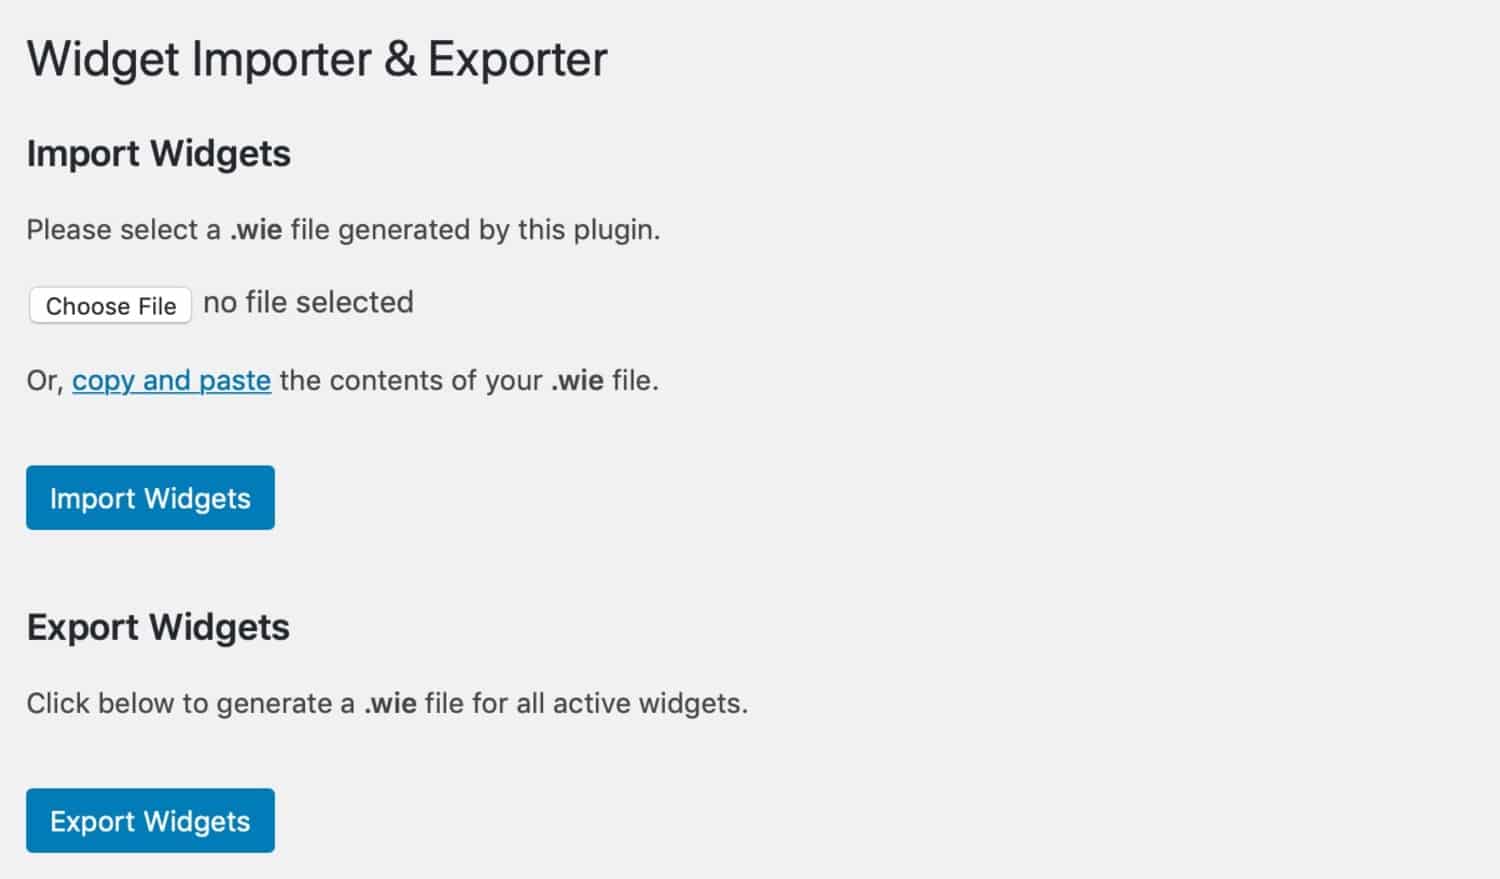
Click the Export Widgets button. This will download a .wie file to your computer – keep it somewhere safe.
Now in the new site, go to Tools > Widget Importer & Exporter. Click the Choose file button and upload the file you just downloaded, then click the Import Widgets button. You’ll be taken to a screen showing you which widgets have imported.
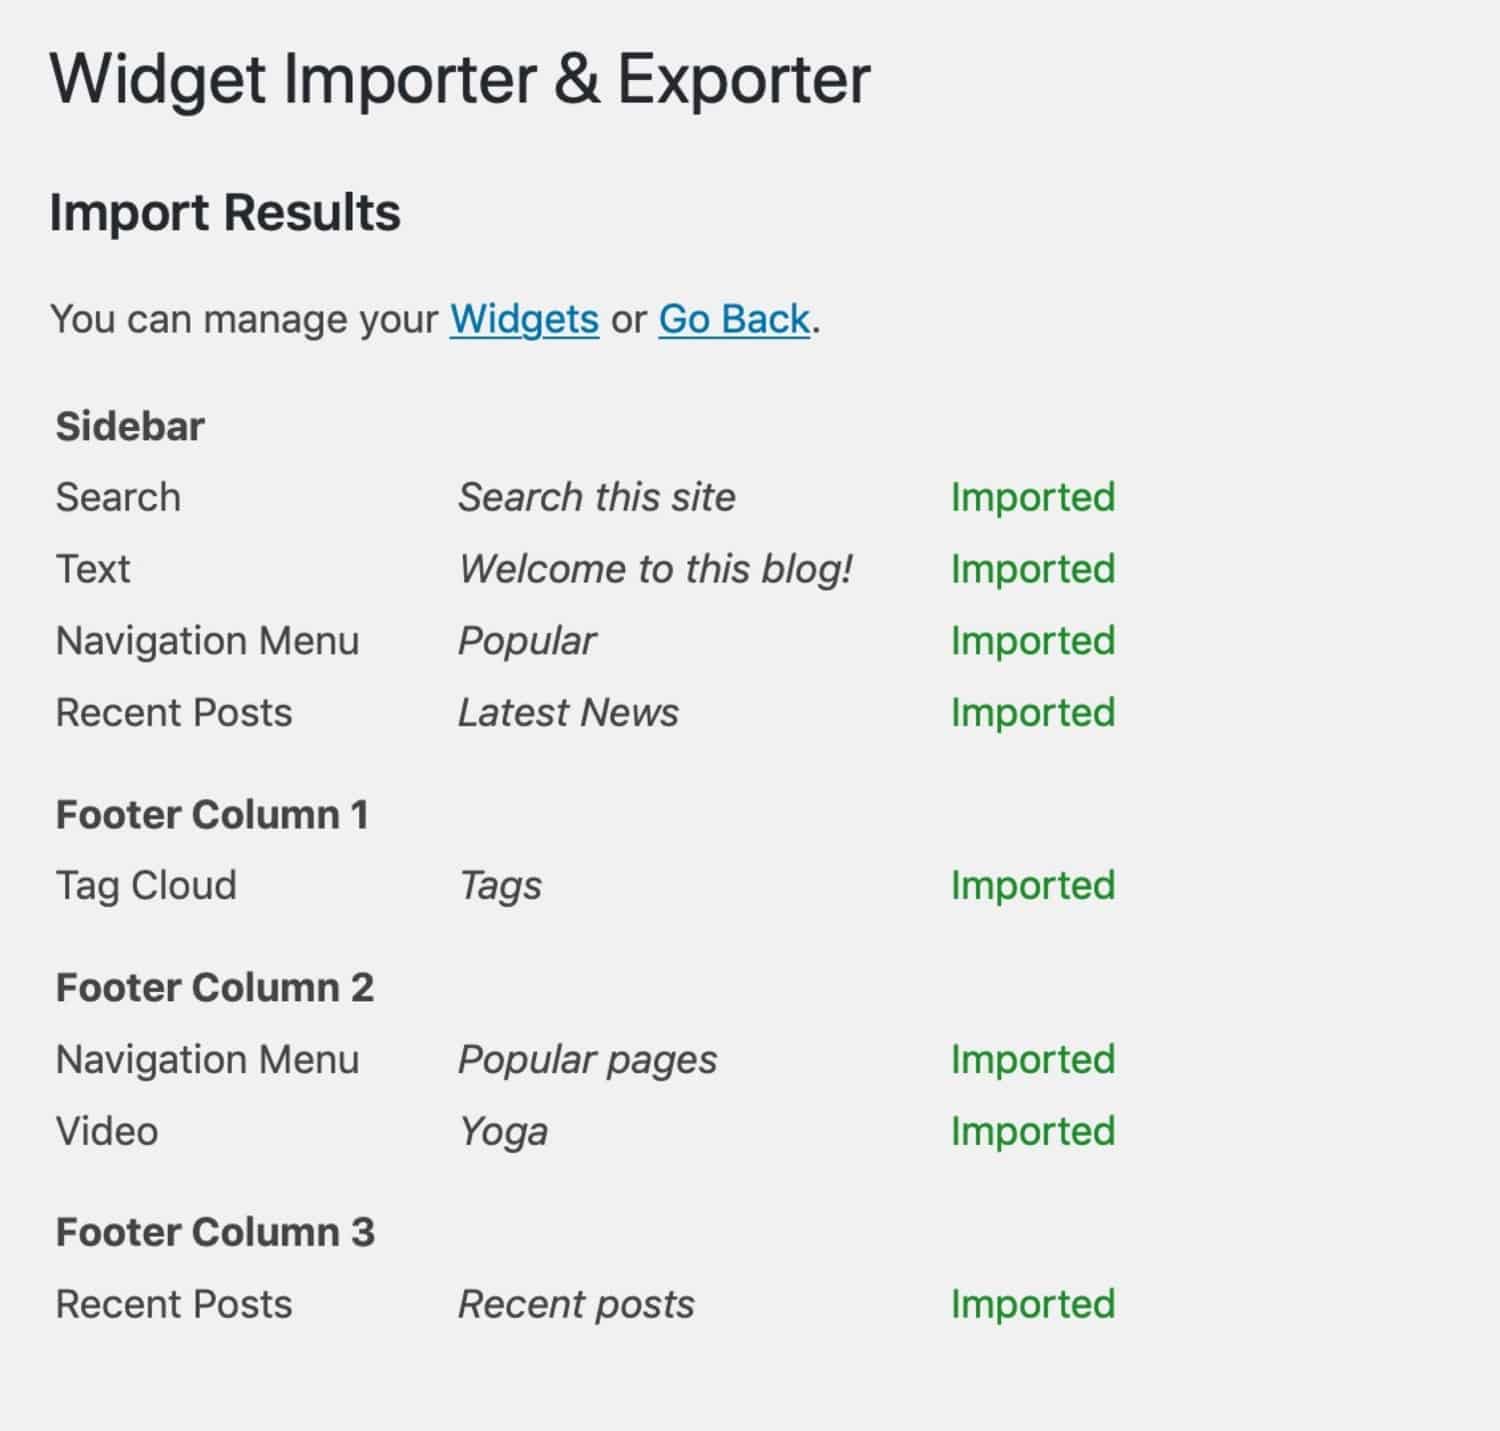
The next step is to import any users who weren’t created when you imported the content. As this is a step you need to take for all methods if migrating your site, it’s covered towards the end of this post – scroll down to the ‘Importing Users’ section.
Finally, you need to update the setting in the new site.
Manually Copy Settings from the Old Sub-site to the New Single Site.
The last step is to update settings in your new site so they mirror those in the old site. This is something you’ll have to do manually, so it can be a laborious process.
Open the old site’s admin screens in one browser window and the new one in another – or even better, use separate browsers so you’re less likely to muddle the two. Work through the settings screens in detail, tweaking settings in the new site so they mirror those in the old site.
Once you’ve done this, your new site will be up and running. The final stage is to update the domain name – which is the same for all methods and is covered below in the section on migrating your domain name.
2. Using a Migration Plugin to Migrate a Sub-site from WordPress Multisite to a Single Site
If you have access to a migration plugin on the multisite network, using this to do the migration will be much easier and more reliable than using the Import/Export plugin. It also means you don’t have to directly access the database so is safer than a manual migration if you aren’t comfortable doing that.
Start by performing the migration out of the old site. You’ll need to use a migration plugin that’s compatible with WordPress Multisite and will migrate just one site and not the whole network.
At Kinsta we recommend the free Migrate Guru plugin for large sites. However, this plugin doesn’t let you migrate a single site out of a Multisite network. There are no free plugins that will do this so you’ll need to use a premium plugin.
Most migration plugins, even the premium ones, don’t support migrating a sub-site out of a network.
Two valuable options are Duplicator Pro and All in One WP Migration plugin to transfer your files and database via their servers.
To run an automated migration, you’ll need to buy and install the Duplicator Pro plugin on both the network and the new site. Work through the plugin documentation to perform the migration: you’ll need to create a package with the migration from your old site and then import that to the new site.
As user data is stored for the whole network, you’ll need to migrate this separately, which I’ll cover later in this post as it affects all methods of migration.
3. Migrating a Sub-site out of WordPress Multisite to a Single Site Manually
The final method for migrating a site out of a WordPress Multisite network to a single site is to migrate it manually. This won’t cost you anything but you should only do it if you feel comfortable accessing phpMyAdmin and editing your database export files.
The site you’re moving out of Multisite will have three components that you need to copy from the Multisite network:
- theme and plugin files—you might copy these across or reinstall them in the new site
- uploads—you’ll find these in the sub-site’s subdirectory in wp‑content/uploads/sites
- database tables—you don’t need all of the database tables but just the ones relating to this site
Note: If your Multisite network was created prior to WordPress 3.5, you won’t have a sites folder. Instead, you’ll have a blogs.dir folder in wp-content with all of the upload files for the sub-sites. This will have a numbered folder for the site you’re migrating, which you copy instead.
Back Up First
Before you do the migration, it’s a good idea to back up your Multisite installation. Use your preferred backup plugin, or create a backup using your hosting interface if your provider lets you – Kinsta performs regular backups and you can also create a manual backup.
You’ll use this backup to copy the relevant files to your new site, and it also gives you some peace of mind in case you have any problems.
Find the ID of Your Sub-site in the Multisite Network
Each site in a network has its own unique ID. This is used to identify its folder in the wp-content/uploads/sites directory and to identify the database tables for that site.
Go to Network Admin > Sites and select the Edit option for the site you’re migrating.
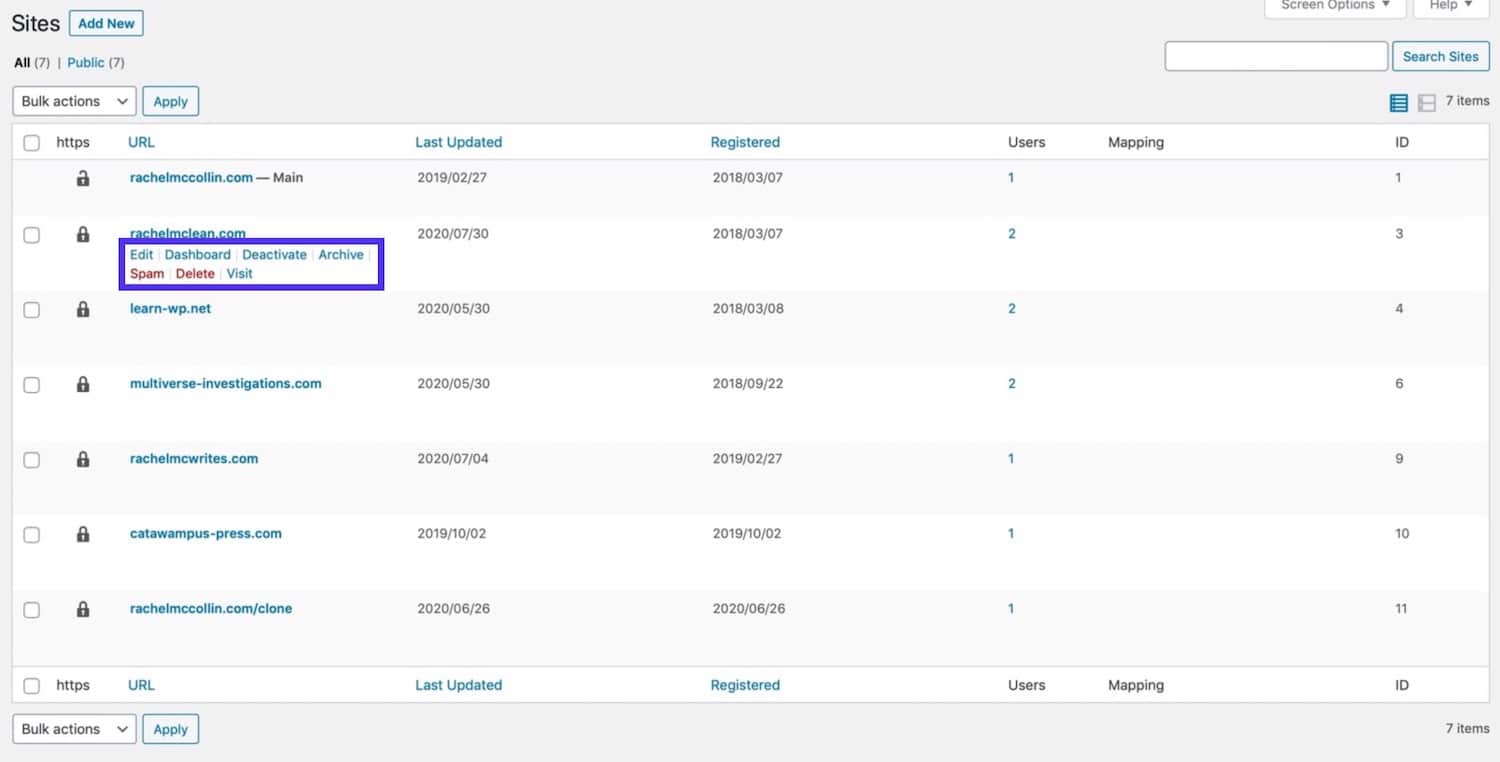
The URL WordPress takes you to will give you the site’s ID. The URL should be in the form http://mynetwork.com/wp-admin/network/site-info.php?id=XX.
XX is the ID of your site and will be the name of the folder containing its files, as well as the prefix for its database table names.
Migrate Theme and Plugin Files from WordPress Multisite to a Single Site
Now identify the plugins used by the sub-site and either install them in your new WordPress site via the Plugins screen or upload them from the backup you took of your old site. Copy them to wp-content/plugins in your new site.
You can find out which plugins are being used by going to the Plugins screen in your sub-site. Include any plugins which are network activated.
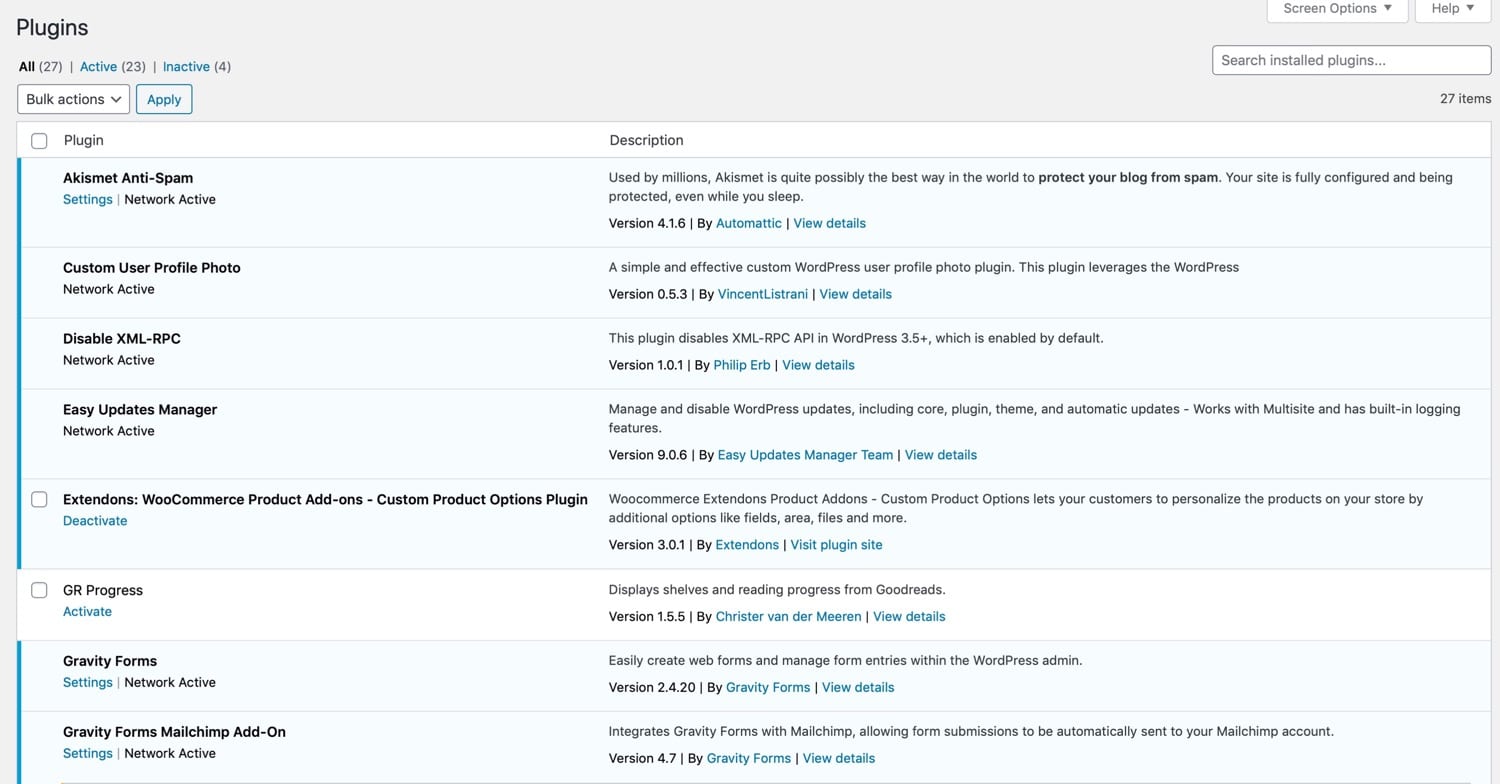
Do the same for your theme – copy it from your backup to the wp-content/themes directory of your new single-site WordPress installation, or just reinstall it.
Migrate Uploads from the WordPress Multisite Sub-site to the Single Site
If the network was created after WordPress 3.5, it will have a sites folder in wp-content/uploads. Find the subfolder with your sub-site’s ID and upload its contents to the wp-content/uploads folder in your new site.
If the network is an older one and has a blogs.dir folder, that will also contain a folder with your site’s ID. In it, you will find a subfolder called “files”. Copy the contents of the files folder to the wp-content/uploads folder in your new site.
Note: you may need to delete any folders WordPress has created in your new uploads folder to avoid any clashes.
You now have all the files installed. You don’t need to activate that as migrating the database across will copy any settings including plugin and theme activation and settings.
Export the Sub-site’s Tables From the Multisite Network
As you’re only moving one child site and not the whole installation, you won’t need the contents of your entire database.
Open phpMyAdmin for your Multisite Network. Click on the Export tab.
A Multisite network has many more tables than a single site – an extra set for each site. Find the tables relating to the site you’re exporting. They will begin with wp_XX_, where XX is the ID of your site.
Select all of the tables relating to your child site and then scroll down to the With selected: box.
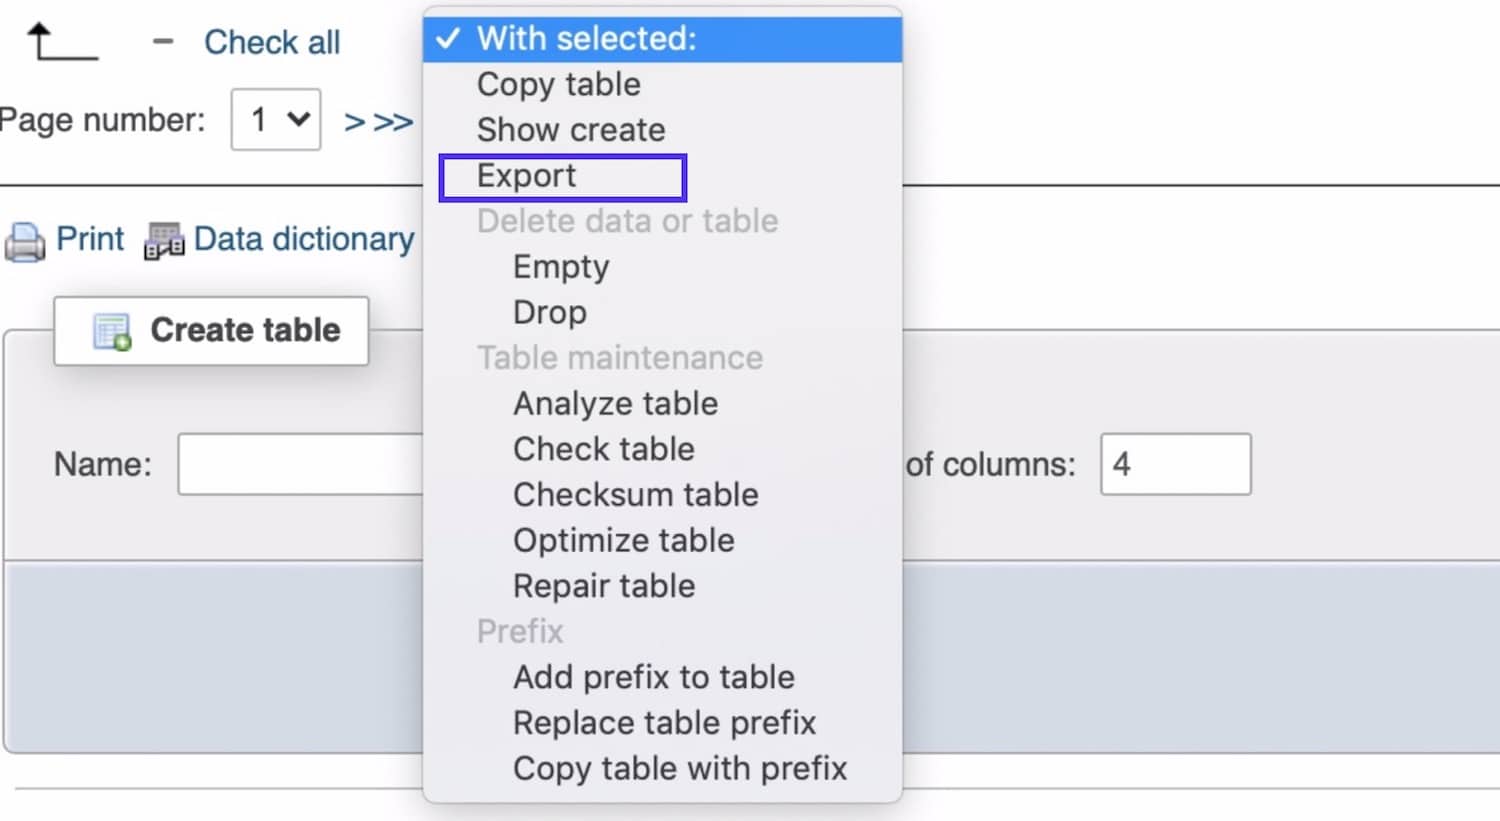
Click on that and select Export.
On the next screen, leave the export method as Quick and click the Go button.
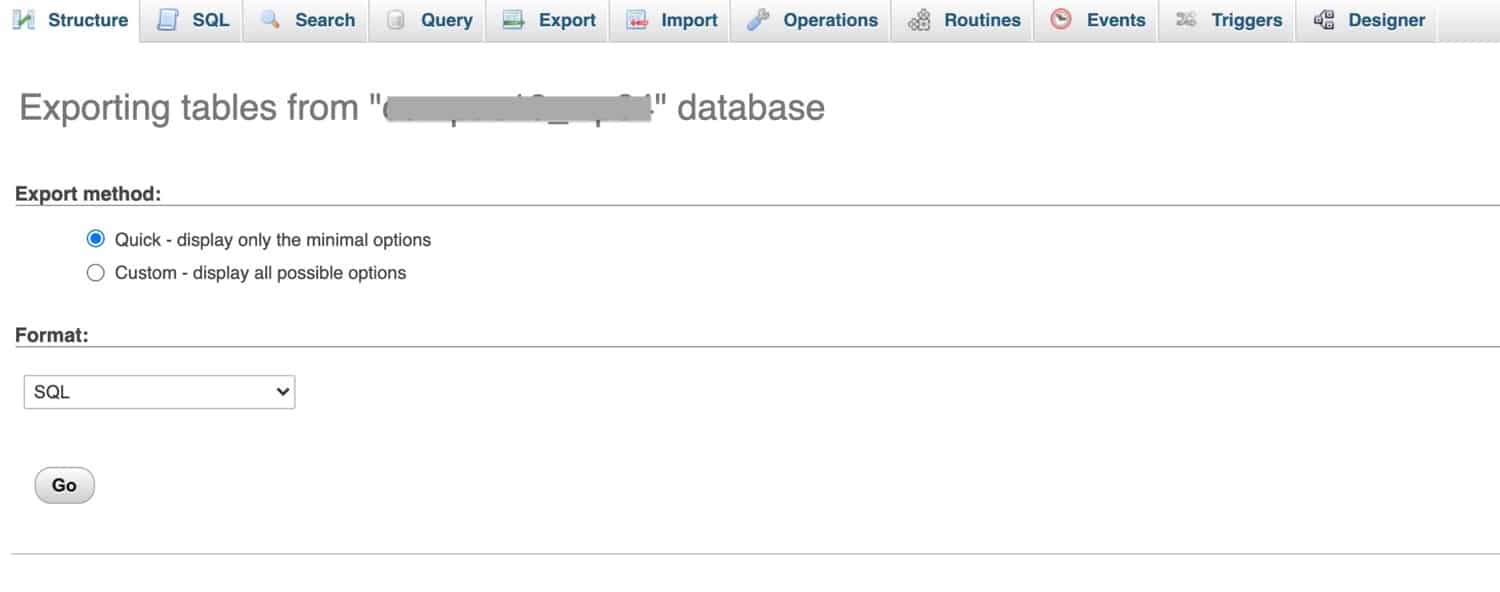
Edit the Database Tables
Make a copy of the SQL file that’s been downloaded to your computer and give it a name that tells you what it is (for example by adding “copy” to its name). Open it in a code editor.
You’ll need to edit two things: links and table references.
Start with links. You’ll need to change all instances of the site’s domain in the Multisite network to its new single site domain (or to a temporary domain if you’re using one while you get the new site working). For example, if your site was at http://network.com/mysite, change it to http://mysite.com.
If your network uses subdomains, you’ll need to change all instances of http://mysite.network.com. If you do this I’d advise also running a check for the subdirectory version just in case. Save your file.
Secondly, the database tables in your new single-site installation won’t have prefixes for the site ID, so you’ll need to remove these. In your SQL file, replace all instances of wp_XX_ with wp_, where XX is your site ID.
Now save the SQL file.
Migrate the Database Tables from a Sub-site in Multisite to a Single Site
Now that you’ve edited your SQL file, you need to import the database tables. Start by dropping all the existing tables in your new WordPress installation.
Open phpMyAdmin for your new site. Select all of the tables from your new site’s database except the wp_users and wp_usermeta tables.
Click on the With selected: dropdown box, and select Drop. When prompted on the next screen, click Go.
Next you need to upload the database you’ve edited:
- Click the Import tab.
- Click the Choose file button.
- Select the SQL file you’ve edited and click Choose or OK.
- Click the Go button.
After a while (depending on the size of your database), you will see a message telling you the upload has successfully finished. This could take a while if your database is large.
Final Steps
You’re not quite done yet. Next, clear your browser’s cache. This avoids any problems you may have if the browser has cached content from the old site.
Now log in to the WordPress admin for the new site. If you moved the user tables across, your login details will be the same as for your old site, but if you didn’t, these will be whatever you specified when you installed WordPress in the new location.
Check that all your links are working correctly and that widgets and plugins are behaving as they should. If not, you can either step back through the process, using your backups where you need to, or simply make any tweaks from within your new site.
Once you’re happy that everything’s working as it should, remove the site from your Multisite installation. I’d recommend leaving this a week or so in case you spot anything that hasn’t moved across. You’ll need to move the domain across in the meantime (which is covered below).
To remove a sub-site from the network, go to Network Admin > Sites. Find the site and click the Delete link below its name.

Phew! It was a long and slightly complicated process, but you’ve done it.
Migrating Users from a WordPress Multisite Sub-site to a Single Site
Migrating users is more complicated than other data from the site in the network because users are stored in one database table for the whole network.
This means that unless your network has only a few users, all of whom are users on that sub-site, you won’t be able to export the wp_users table from the network.
Instead, you’ll need to use a plugin to export users from the network to the new site. The Import/Export WordPress Users plugin is designed to do this and is free.
Install the plugin on both sites and activate it for the sub-site in the Multisite network and on the new site. Now in the sub-site, go to Users > User Import Export.
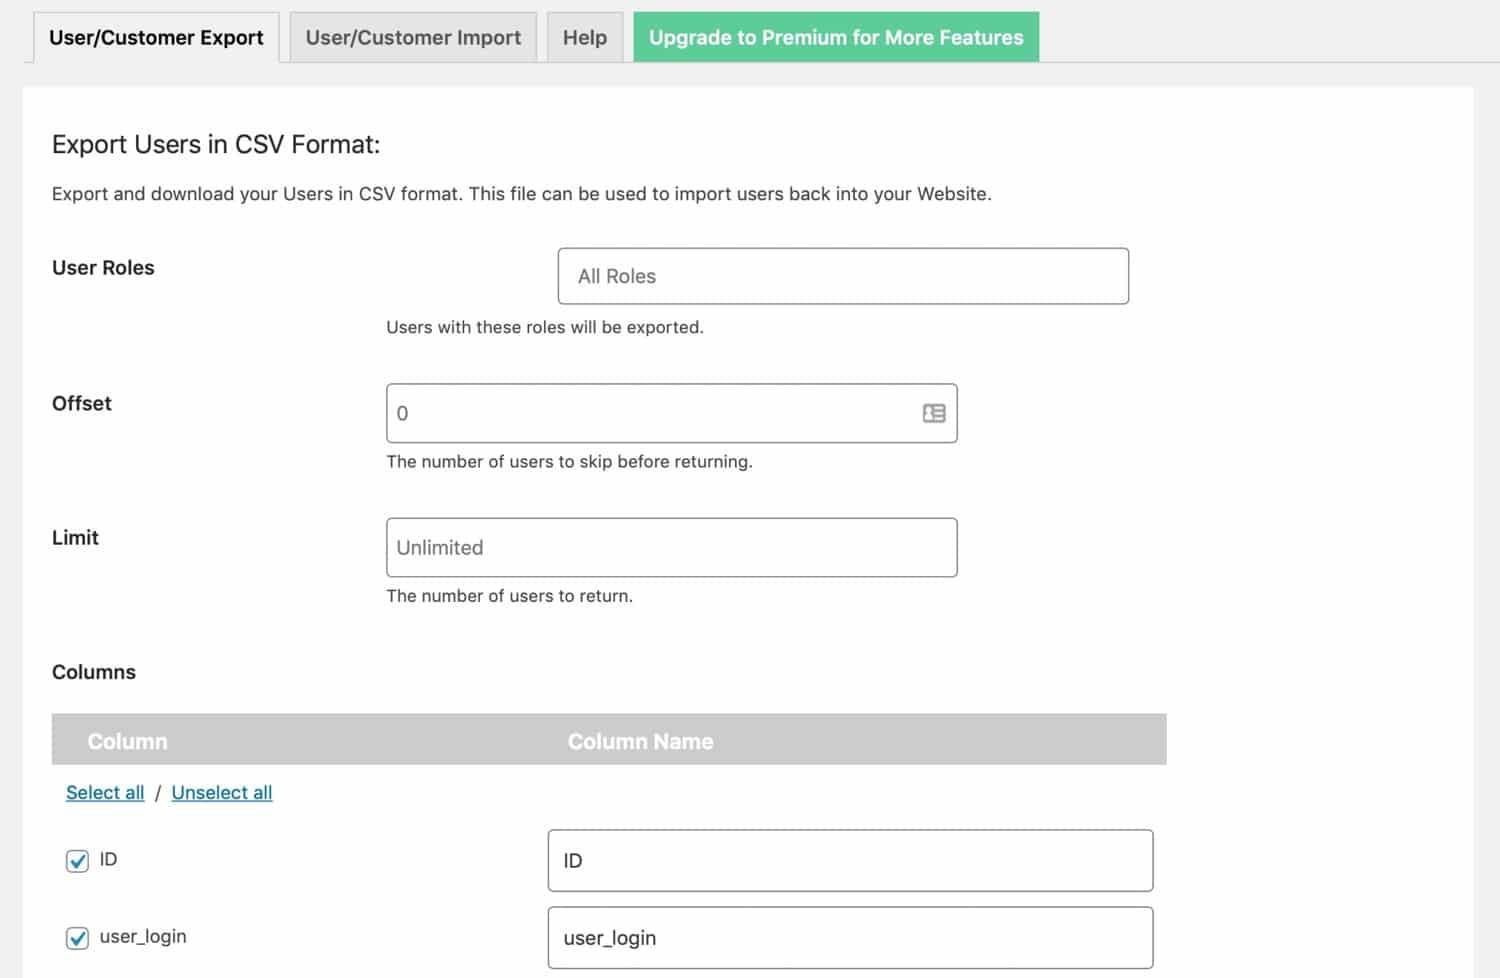
Scroll down and click the Export Users button to download a CSV file with all your user data.
Now in the new site, go to Users > User Import Export again. Click on the User/Customer Import tab.

Click the Choose file button to choose the CSV file you just downloaded, then click the Upload file and import button.
The plugin will upload the file and import all the users from your old site. It will then take you to a screen showing you the details fo those users you imported.
You’ve now imported all aspects of your old site from the Multisite network into your new WordPress installation. You have just one step to go: transferring your domain across.
Migrating Your Domain to Your New Single Site from a Multisite Network
Whether you need to migrate your domain name will depend on how you had things set up in the Multisite network.
If you were using subdomains or subdirectories for your sub-sites, and not mapping domains to them, then you’ll need to register a new domain for your new single site and use that.
But if you want to use the same domain name you were using from the old site, you’ll need to make sure it isn’t pointing to your old site on the network.
If you’ve deleted the sub-site from Multisite (which you should), then the domain name will no longer be in use by that site. But you will still need to ensure it points to your new site.
To do this, you’ll need to get your domain name pointing to your new site using DNS. If you’re with Kinsta, follow our instructions for pointing your domain name at our hosting.
Then update the settings in your new site, in the Settings > General tab.
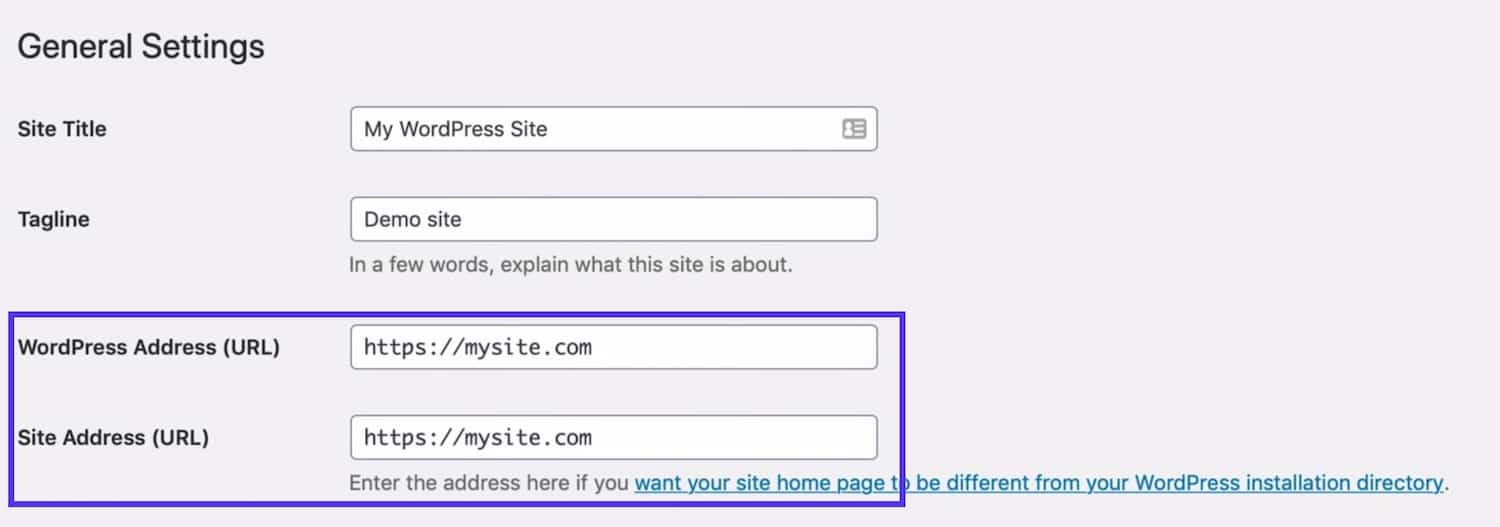
Add the correct domain name to the Site URL and Site Address fields and save your changes.
And you’re done! Your site will now be working as a single WordPress site.
How to Revert an Entire Multisite Network to a Single Site
Sometimes you don’t want to move a single site out of a WordPress Multisite network, but instead, you want to revert the entire network to one site and not run Multisite at all.
This is a drastic step, but might be relevant if your network only contains a very small number of sites or if you’ve had to delete all of the sites except the base site.
You can only do this with the base site, the one that was already there before you activated Multisite. You can’t revert one of the sub-sites to being the only site on the network this way.
To do this, you follow five steps:
Let’s work through the process.
1. Delete or Migrate all of the Sites in the Network
First, you’ll need to remove all of the sub-sites in the network. Simply delete them from the Sites screen, or migrate each of them to their own single site or to another network (although if you want to create another network, it’s difficult to see why you would do this).
Follow the steps above to migrate each of the sub-sites. Once you’ve done that and they’re all working in their new locations, go to Network Admin > Sites.
Select all of the sub-sites then open the Bulk actions dropdown menu and select Delete. Then click the Apply button.
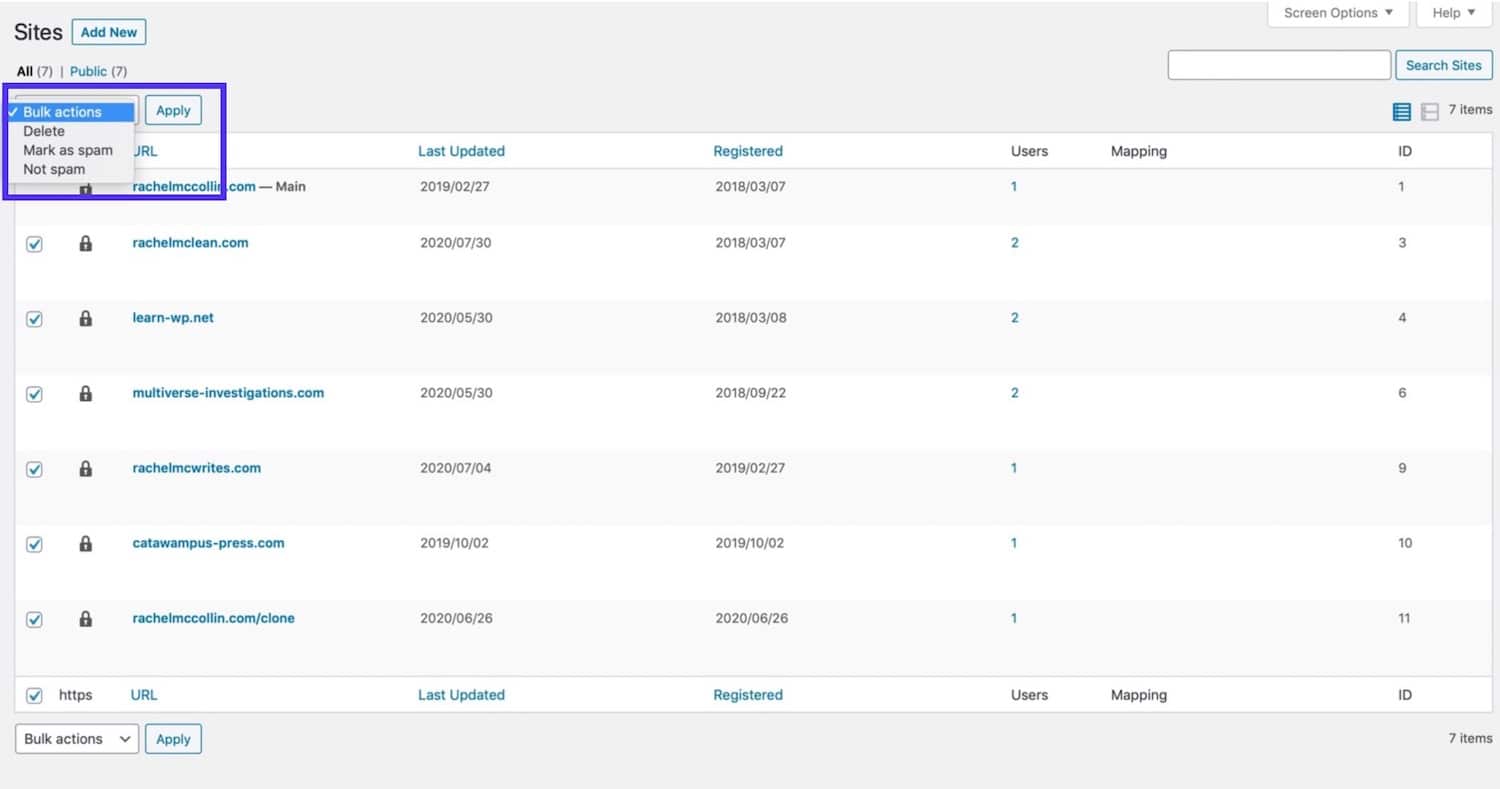
Be very careful before you do this and make sure anything you need is backed up or migrated. There’s no going back from this.
Deleting the sub-sites like this will delete the upload files for each of them as well as the database tables relating to those sites – but it won’t delete all of the Multisite database tables, you’ll do that later.
You now have a network with just one site.
2. Uninstall and Delete Themes and Plugins Not Used by the Base Site
Now go to Network Admin > Plugins. Delete any plugins that aren’t used by the main site. You might want to check by going to the Plugins screen for the main site first.
Repeat this for themes and delete those you don’t need.
3. Remove Users Without Access to the Base Site
Now go to Network Admin > Users and delete any user accounts that don’t have access to the base site.
It can be helpful to install the Multisite Enhancements plugin as this will tell you which users have an account on which site. In the example below, only the Super Admin has access to the base site.
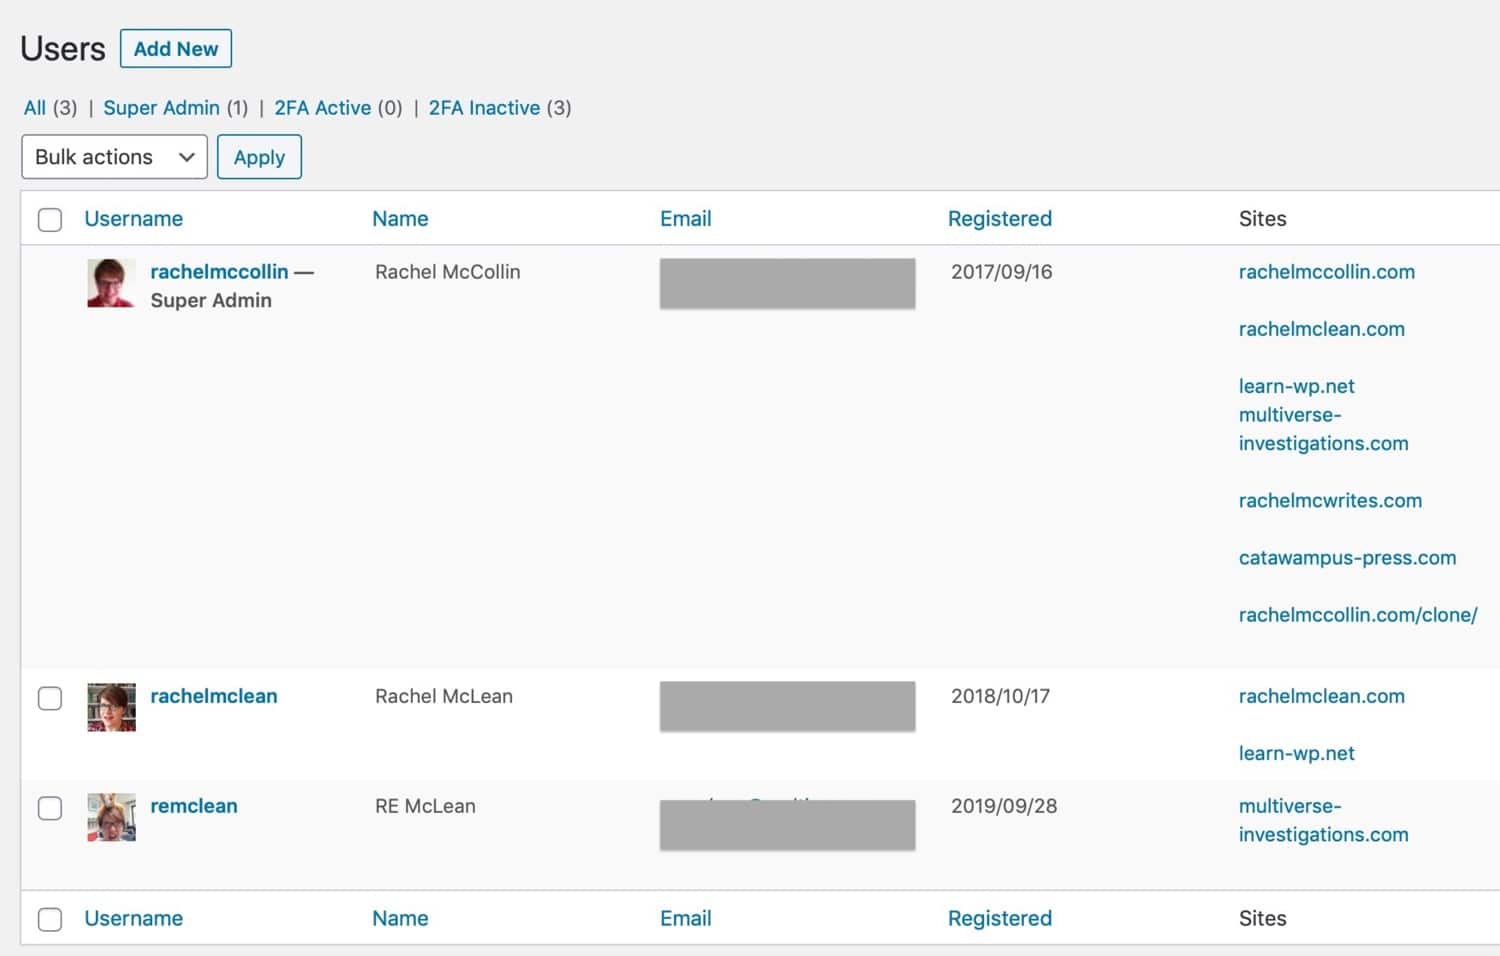
To delete users, select the users you want to delete, click on the Bulk actions dropdown, select Delete and then click the Apply button.
You will now only have users on your network with access to the base site.
Deactivate WordPress Multisite on Your WordPress Installation
The final step is to deactivate WordPress Multisite on your network. Before you do this, take a backup of your site – just in case.
Now open the wp-config.php file and find these lines:
define( 'MULTISITE', true );
define( 'SUBDOMAIN_INSTALL', false );
$base = '/wordpress/';
define( 'DOMAIN_CURRENT_SITE', 'localhost' );
define( 'PATH_CURRENT_SITE', '/wordpress/' );
define( 'SITE_ID_CURRENT_SITE', 1 );
define( 'BLOG_ID_CURRENT_SITE', 1 );
Delete all of those lines.
Find the line that reads:
define('WP_ALLOW_MULTISITE', true);Edit it so it reads:
define('WP_ALLOW_MULTISITE', false);Now save your wp-config.php file.
You also might need to edit your .htaccess file to revert it to the code for a single site.
If you’re a Kinsta customer and your Multisite network was running on sub-domains, you should find that you don’t need to make this edit and your site will work as a single site with just the wp-config.php edits. If your network was running on subdirectories instead, you’ll need to reach out to support asking for the changes to be made.
If you do have access to the .htaccess file, open it in a code editor and find the lines relating to Multisite. Replace them with these lines:
RewriteEngine On
RewriteBase /wordpress/
RewriteRule ^index.php$ - [L]

# uploaded files
RewriteRule ^([_0-9a-zA-Z-]+/)?files/(.+) wp-includes/ms-files.php?file=$2 [L]

# add a trailing slash to /wp-admin
RewriteRule ^([_0-9a-zA-Z-]+/)?wp-admin$ $1wp-admin/ [R=301,L]
RewriteCond %{REQUEST_FILENAME} -f [OR]
RewriteCond %{REQUEST_FILENAME} -d
RewriteRule ^ - [L]
RewriteRule ^([_0-9a-zA-Z-]+/)?(wp-(content|admin|includes).*) $2 [L]
RewriteRule ^([_0-9a-zA-Z-]+/)?(.*.php)$ $2 [L]
RewriteRule . index.php [L]
Save the .htaccess file.
Drop the Database Tables Added by Multisite
WordPress will have added extra database tables to your site when you first activated Multisite.
In phpMyAdmin, find these tables:
- wp_blogs
- wp_blog_versions
- wp_registration_log
- wp_signups
- wp_site
- wp_sitemeta
Select them all, click on the With selected: dropdown and select Drop. Confirm that you want to do this and the tables will be removed from the database.
You now have a single site WordPress installation. You’ll need to log in again but the base site should now work as a single site.
Summary
Moving a site out of a WordPress Multisite network is more complicated than migrating between single sites, but it isn’t impossible. It’s also possible to revert a Multisite network to a single site so that only the base site is still in place.
Follow the steps above and you’ll have a new single site instead of a site within a Multisite network. Do you have any questions about WordPress Multisite and single sites? Let us know in the comments!


