
Struggling with First Contentful Paint (FCP) times on your site?
Whether you’re not even sure what First Contentful Paint is or you’re looking for some specific tips on how to speed up First Contentful Paint times on your site, this post is for you.
We’ll start by explaining what First Contentful Paint is and how you can measure it on your site.
Then, we’ll share a bunch of tactics that you can use to speed up FCP times on your site. And to make this post as accessible as possible, we’ll try to showcase non-technical tools and WordPress plugins to help you implement everything.
Let’s dig in!
What is First Contentful Paint (FCP)?
First Contentful Paint, often shortened to FCP, is a user experience-focused performance metric that measures how long it takes for the first part of the page to be visible on the user’s screen.
FCP is an important metric because it affects perceived performance. When a visitor first visits your site, their browser will display a blank screen, which isn’t a good experience for visitors.
Once content starts loading, the visitor will at least feel like “something” is happening, and the full content of the page will load soon. As such, having a fast FCP time can make the user feel like your website is fast, even if it still takes a little longer for the rest of the content to load.
In contrast, having a slow FCP time is frustrating for users, as it really drives home the point that the page is taking a long time to load. There’s nothing worse than having visitors sit there staring at their blank screens and wondering if your website is even working.
First Contentful Paint vs Largest Contentful Paint
Largest Contentful Paint (LCP) is another popular user experience-focused metric that operates similarly to First Contentful Paint.
Because the metrics are so similar, it can be difficult to understand the differences between First Contentful Paint vs Largest Contentful Paint.
Here’s the basic difference between them:
- FCP — measures how long it takes the first object to appear. It could be anything — as long as some type of content appears on the page.
- LCP — measures how long it takes the page’s main content to appear.
Because of this difference, your page’s FCP time should always be at least a little bit faster than your page’s LCP time. By the definition of the metrics, it’s impossible for your LCP time to be faster than your FCP time. Though they could technically be equal if the “first” element to load is the same as the “main” element, this won’t happen on most pages.
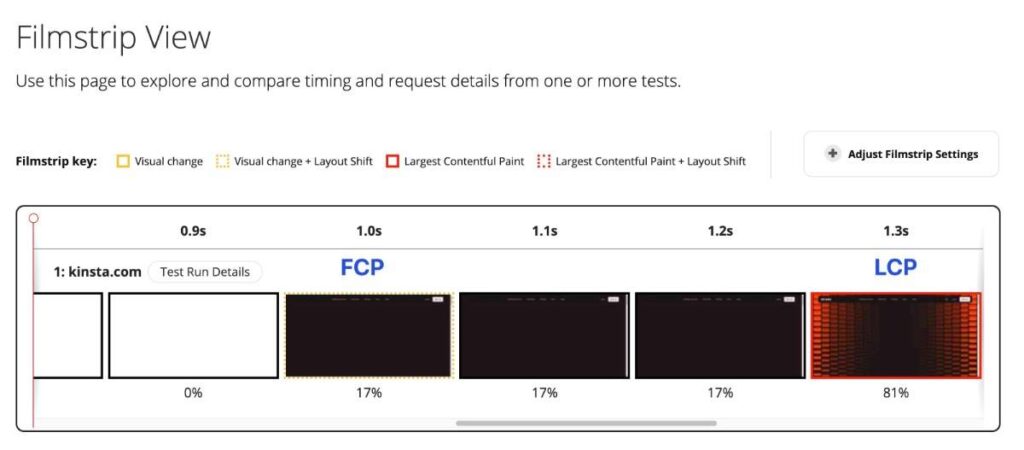
To illustrate this, here’s a visual filmstrip timeline of a WebPageTest analysis that we ran on the Kinsta homepage.
- FCP occurs in the 1.0-second filmstrip (.924 seconds, to be exact). This is the first time that it goes from a blank white page to having some visual content.
- LCP occurs in the 1.3-second filmstrip (1.217 seconds to be exact). This is when the “main” content of the page is visible.
What is a good First Contentful Paint time?
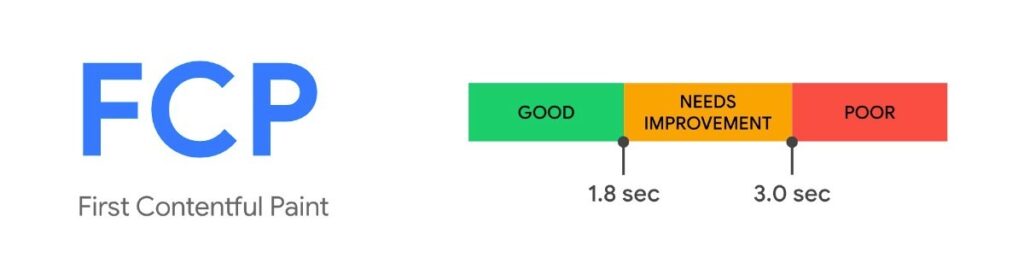
Google recommends that you aim for a First Contentful Paint time of 1.8 seconds or less on your site’s pages.
Google considers FCP times between 1.8 and 3.0 seconds as “Needs Improvement,” while FCP times above 3.0 seconds are “Poor.”
How to measure a page’s First Contentful Paint time
The easiest way to measure the First Contentful Paint time of a page on your site is using Google’s PageSpeed Insights tool, though there are also other tools that you can use.
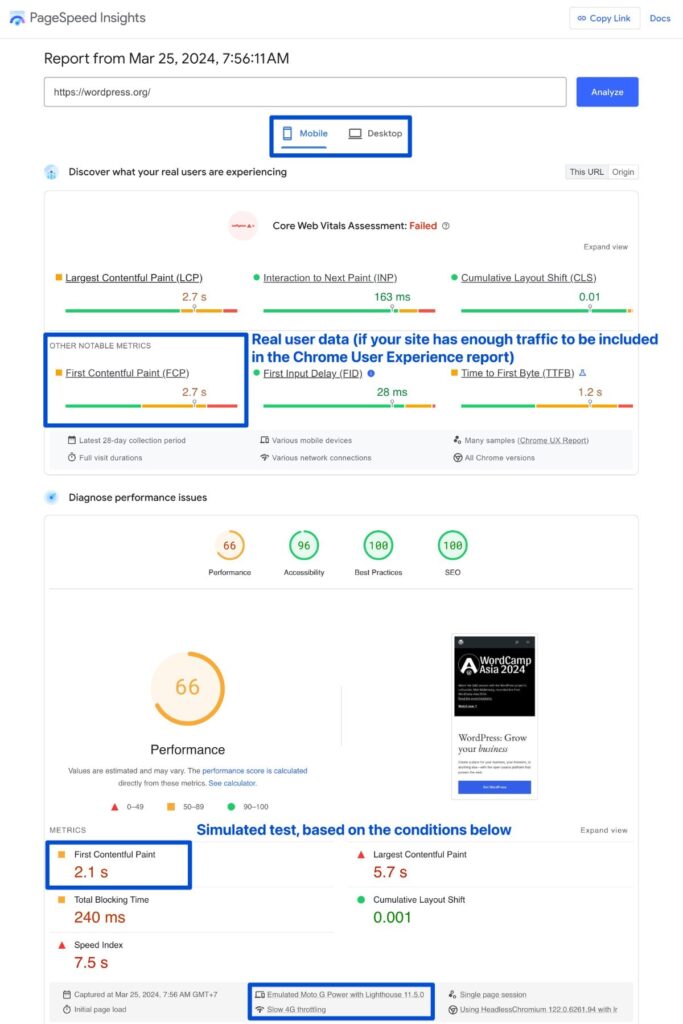
The nice thing about PageSpeed Insights is that it will give you both simulated test results as well as FCP data from real users (if your site has enough traffic to be included in the Chrome User Experience report).
It also covers both desktop and mobile performance, as your page’s FCP time will vary depending on the user’s device and connection speed.
Here’s how to test a page:
- Open the PageSpeed Insights page.
- Enter the URL of the page on your site that you want to test.
- Click the Analyze button.
After a short wait, you should see your results.
If your site has enough traffic to be included in the Chrome User Experience report, you will see 2 different FCP times:
- The time in the “Discover what your real users are experiencing” section is the average FCP time for real human visitors to your site.
- The time in the “Diagnose performance issues” section is based on a simulated test. You can see the conditions for the simulation in the gray box below the numbers.
You can also switch between mobile and desktop results by using the tabs at the top.
To test other pages on your site, you can repeat the same process.
Your FCP times will vary depending on the page, so we recommend testing multiple pages to get a good feel for your site’s performance.
For example, you might test the homepage, the blog listing page, a single blog post, and so on. And again, make sure to look at both mobile and desktop data.
Other ways to measure First Contentful Paint times
While PageSpeed Insights offers one of the simplest ways to see both real and simulated FCP times for your site, there are also other performance testing tools that you can use as a supplement or replacement for PageSpeed Insights.
Here are some good places to start:
- WebPageTest — lets you run simulated tests using different connection speeds, devices, and locations.
- Chrome Developer Tools — lets you run performance tests directly from your browser.
- DebugBear — lets you run simulated tests from both desktop and mobile devices and includes tons of data in addition to FCP.
- GTmetrix — lets you run simulated tests from different locations. You can see the FCP time in the Performance tab — our full guide to GTmetrix testing covers it in more detail.
What can affect your site’s FCP times?
At a high level, there are 2 “buckets” of issues that can slow down FCP:
- Slow server response time — if it takes your server too long to provide your site’s data to users’ browsers, your page will have a slow FCP time. This can include issues such as slow hosting or DNS, not using caching (which requires the server to do more work before it can serve a page), not using a content delivery network (CDN), and so on.
- Poorly optimized website code — even if your server responds quickly, you could still have a slow FCP time if your site’s code is poorly optimized. For example, your page might have tons of JavaScript that is blocking visible content from loading. There could also be problems with CSS, images, or other areas of your site’s code.
Depending on your site, you could be experiencing issues in just one area or in both areas.
How to speed up First Contentful Paint: 10 tips that work
Now that you understand more about what First Contentful Paint is and why it matters let’s get into some actionable tips that you can implement to improve your site’s times.
The nice thing about implementing these tips is that they’ll improve all of your site’s performance metrics, not just FCP.
Here’s a quick summary of the list — we’ll go through them in detail below:
1. Move to faster hosting
There’s one unavoidable fact when it comes to FCP:
If your site’s underlying hosting is slow, your FCP will still be slow even if you have a perfectly optimized site.
Implementing the other tips on this list will make your site’s FCP times better, but your site’s performance will always be bottlenecked by the quality of your hosting.
So — you can go ahead and implement the other tips on this list first. But if you’re still struggling with slow FCP times after doing everything else, you might just need to move to faster hosting.
If you’re not sure where to start, Kinsta’s managed WordPress hosting makes a great choice.
Not only is the underlying infrastructure optimized for performance, but Kinsta can also help you automatically implement a lot of the other strategies on this list, including caching, content delivery network (CDN), optimized DNS, optimized images, and more.
2. Use page caching (ideally at the server level)
If you’ve built your website with WordPress, it will need to dynamically process server-side code for every single visitor (by default).
When a person visits your page, your hosting server will need to execute WordPress’s PHP and query your site’s database in order to generate the finished HTML document to deliver to the user’s browser.
This takes time, especially on low-powered hosting, which can have a big effect on your site’s FCP times.
With page caching, you can “cache” the finished HTML version of each page. Instead of needing to process server-side code for each visit, your server will immediately respond with the finished HTML in its cache.
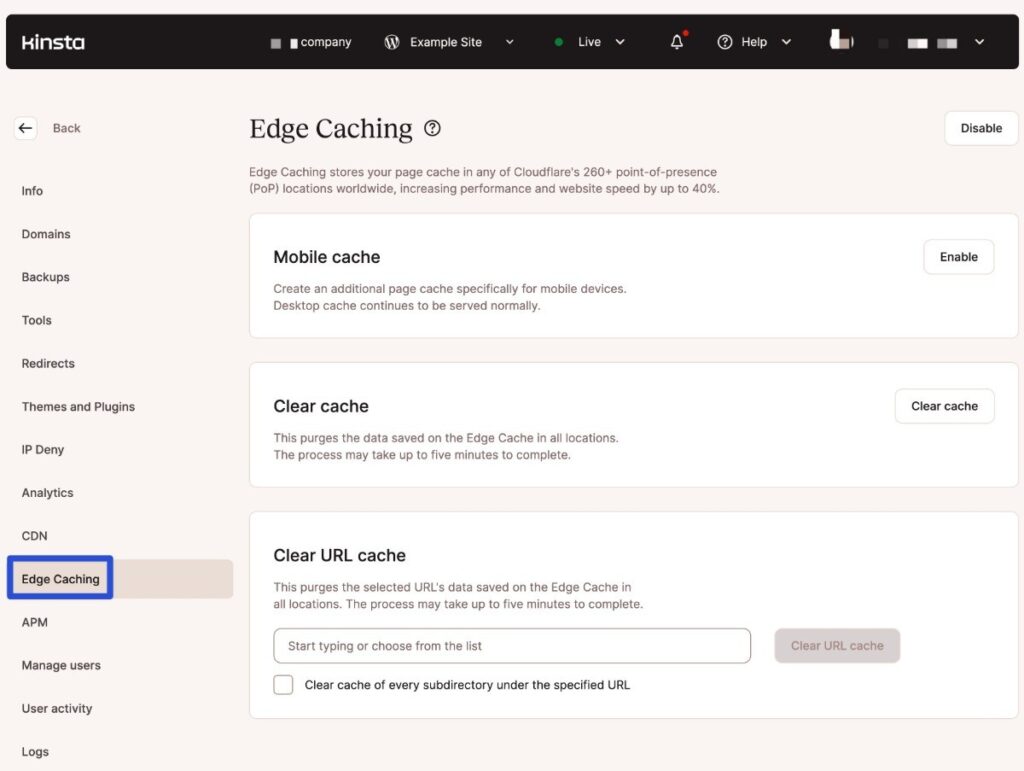
If you use Kinsta hosting, Kinsta will automatically implement page caching for you via its Edge Caching functionality.
The unique thing about Kinsta’s Edge Caching approach is that it can serve the cached pages from Cloudflare’s global network. We’ll discuss what a content delivery network is in the next section, but the high-level advantage is that it lets you achieve very fast global load times.
If you’re hosting elsewhere, you can check to see if your host has a server-level caching feature or use one of the many WordPress caching plugins, such as WP Rocket and FlyingPress.
3. Implement a content delivery network (CDN)
A content delivery network (CDN) is a global network of servers that store a copy of some or all of your site’s content/files.
When a person visits your site, the CDN will automatically serve your site’s files from the location that’s physically closest to the visitor.
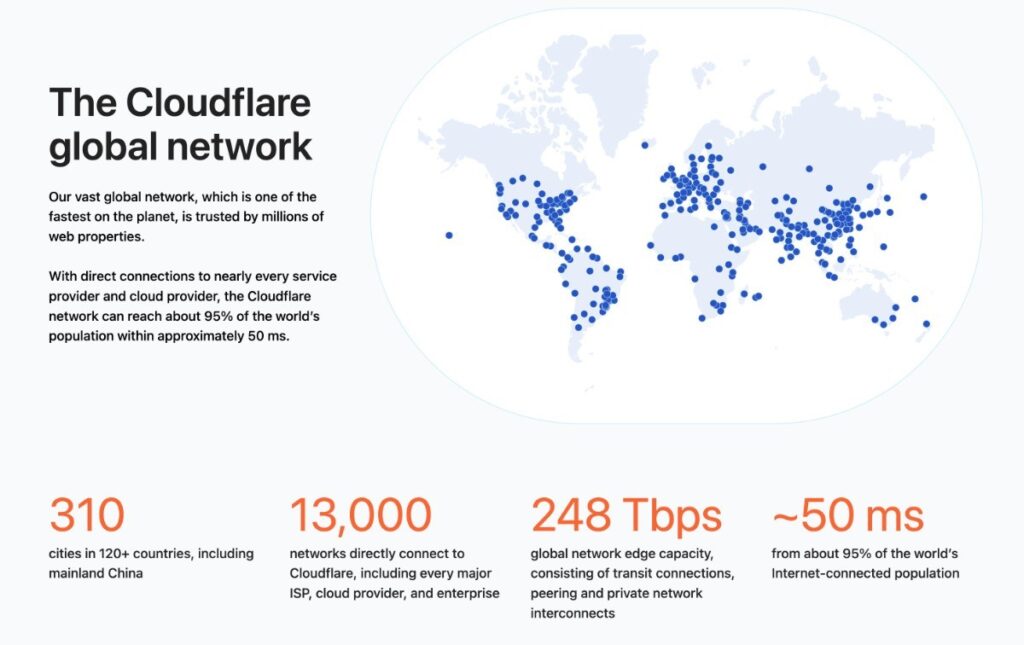
Because physical distance still plays a role in load times (we haven’t beaten the speed of light yet!), the visitor’s browser will receive your site’s files faster, improving your FCP time.
If you use Kinsta hosting, Kinsta automatically implements a free Cloudflare-powered CDN for your site’s entire pages, which offers the fastest global performance.
If you’re hosting elsewhere, you can implement a CDN yourself by using providers like Cloudflare, Amazon CloudFront, Fastly, and others.
4. Use a faster DNS provider
Before a user’s browser can connect to your website’s server, it first needs to use the Domain Name System (DNS) to find the actual web server associated with your site’s domain name.
The DNS provider that you’ve configured your domain name to use will affect how long this process takes, which will consequently affect your site’s FCP.
For example, according to DNSPerf, the difference between the fastest provider and the slowest provider is over 130 ms, which is pretty significant.
If you host with Kinsta, you already get access to premium DNS powered by Amazon Route53 when you use Kinsta’s nameservers.

If you’re hosting elsewhere, Cloudflare offers one of the best free DNS services.
5. Optimize your site’s CSS
Now that you’ve fixed server response time issues, it’s time to move into optimizing your site’s code, starting with its CSS.
CSS controls the design and style of the elements on your page. While it’s an essential part of any website, your CSS could be slowing down your FCP times if it’s loading in an unoptimized way and/or you’re loading unnecessary CSS on pages where it’s not needed.
We have an entire post on how to optimize CSS, but let’s go through the most important tactics for speeding up FCP.
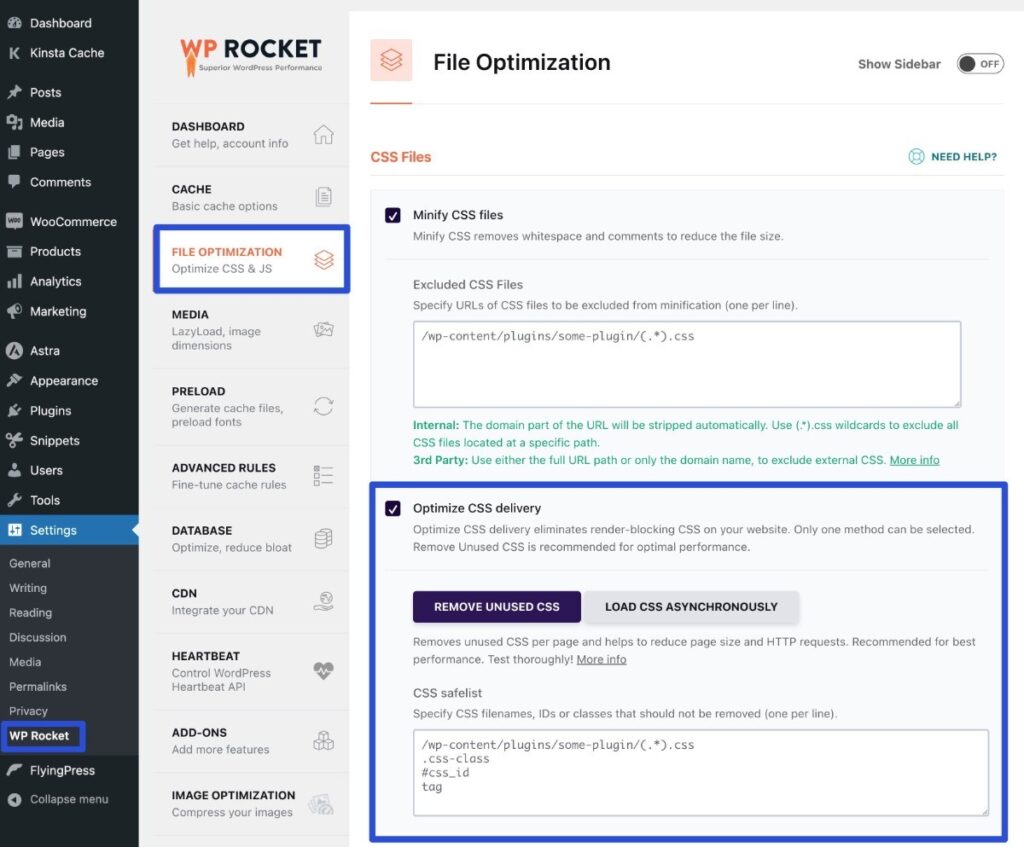
Remove unused CSS
First off, you’ll want to remove any unused CSS from pages where it’s not needed.
One way to do this is the manual method. A tool like PurifyCSS can scan your pages for unused CSS, and then you can manually remove that code. PageSpeed Insights will also flag unused CSS in the “Reduce unused CSS” section of its diagnostics.
However, if you’re using WordPress, there are some helpful plugins that can automate the entire process for you, which is a lot easier (especially for non-developers). Some good options to consider are WP Rocket, FlyingPress, and Perfmatters.
All of these plugins are premium tools. However, we think they can be worth the investment because they can also help you implement a lot of the other tips on this list.
Inline critical CSS and defer non-critical CSS
By default, your site will probably wait until it’s loaded all of the CSS code before it starts rendering the above-the-fold content. However, this isn’t totally optimal from a user experience perspective because you really only need the CSS required for the above-the-fold content — everything else can wait until later.
The CSS for a page’s above-the-fold content is called the critical CSS.
To speed up your page’s FCP and other performance metrics, you can place this critical CSS directly in the page’s <head> section (AKA putting it inline) rather than loading it as part of an external stylesheet.
For more advanced users, you can manually generate a page’s critical CSS using a tool like this one.
But again, on WordPress, you can automate this process for each individual page on your site using FlyingPress or WP Rocket.
Once you’ve inlined the critical CSS on a page, you can safely defer loading the rest of the page’s CSS until later in the page load process (after the above-the-fold content has already been rendered).
Both WP Rocket and FlyingPress will automatically do this for you as part of their critical CSS functionality, which is another reason to consider using them.
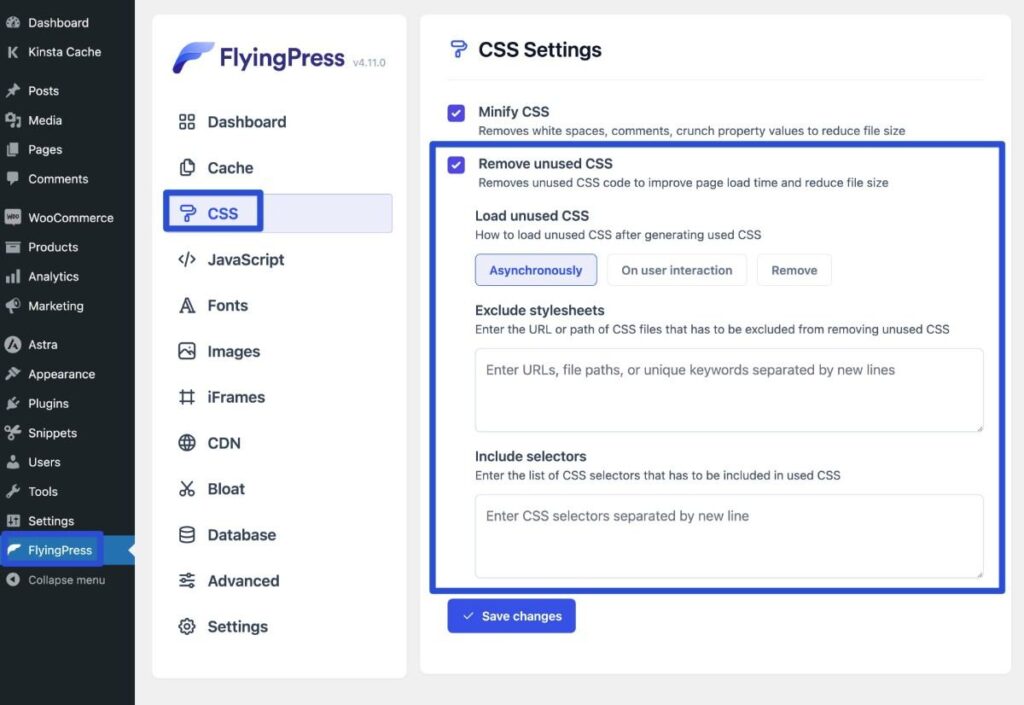
Minify CSS code
Finally, another way to add a tiny bit of performance to your site’s CSS code is to minify it. When you minify the CSS code, you remove unnecessary characters and whitespaces, which can add some more marginal size savings.
Plugins like WP Rocket and FlyingPress can do this for you. You can also find minification-specific plugins like Fast Velocity Minify.
6. Optimize your site’s JavaScript
In addition to CSS, your site’s JavaScript is another area where you’ll want to spend some time optimizing your site’s code.
As with CSS, there are several different strategies that you can implement to reduce the impact of JavaScript on your site’s FCP times.
Don’t use JavaScript-dependent elements above-the-fold
If you rely on JavaScript to power important above-the-fold functionality, such as your site’s navigation menu (this is especially common for the mobile version of a site, as many mobile menus rely on JavaScript), this can slow down your FCP time because users’ browsers need to load the heavy JavaScript before they can start rendering the page.
If you’re using WordPress, choosing a performance-optimized theme should help you avoid this, as good developers will avoid relying on JavaScript for these functions.
You can also try to avoid using sliders and other JavaScript-powered elements in above-the-fold areas.
Remove unnecessary JavaScript
While you’ll want to put a special emphasis on reducing JavaScript usage in above-the-fold elements, it’s also just generally a good idea to remove as much unnecessary JavaScript from each page as possible.
To start, you’ll want to delete any WordPress plugins that don’t make a meaningful improvement to your site, as many WordPress plugins rely on JavaScript for their functionality.
Another option is to use a script manager plugin like Asset CleanUp or Perfmatters to disable JavaScript on a page-by-page basis, which lets you disable scripts on pages where they aren’t needed while still leaving them enabled on other pages.
We also have a more technical guide on how to disable plugins on a page-by-page basis.
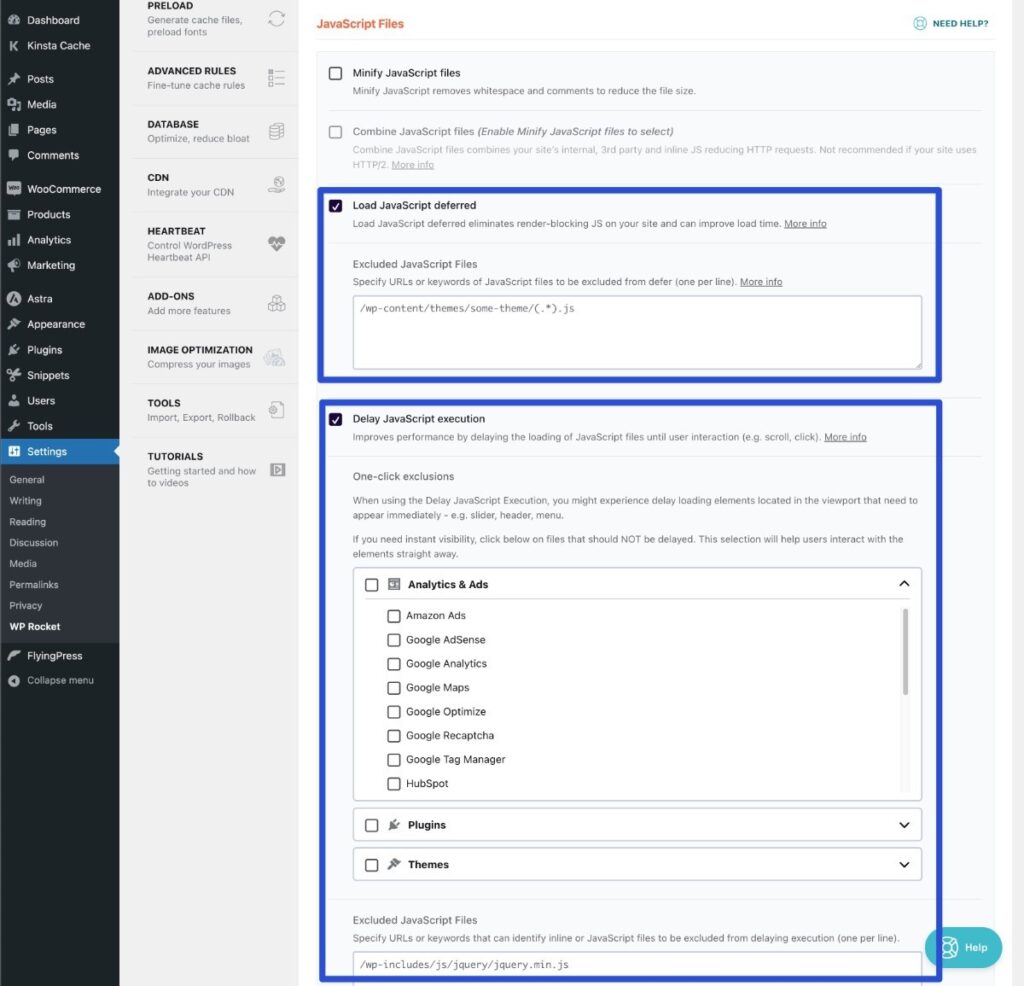
Eliminate render-blocking JavaScript (defer or delay)
No matter what, you’ll probably still need to load at least some JavaScript on your page. To make sure this JavaScript doesn’t interfere with loading above-the-fold content, there are 2 common strategies that you can implement:
- Defer render-blocking JavaScript — you can avoid blocking other content from loading by deferring the loading of JavaScript until later in the page rendering process. You can use defer or async, and there are WordPress plugins to automate this process.
- Delay JavaScript until user interaction—you can completely wait to load some or all of your site’s JavaScript until a user interacts with the page (for example, clicking or scrolling). This offers the best performance improvement, but you might need to manually exclude certain scripts to avoid causing problems.
You can implement either of these tactics on WordPress via plugins like WP Rocket or FlyingPress.
We also have guides on how to defer parsing JavaScript and how to eliminate render-blocking resources.
Minify JavaScript code
Finally, you’ll want to minify your site’s remaining JavaScript to achieve some additional small performance benefits by removing unnecessary characters.
As with minifying CSS, most caching and performance plugins (including WP Rocket and FlyingPress) can do this for you. You can also use a targeted plugin like Fast Velocity Minify.
7. Disable lazy loading for above-the-fold images
With image lazy loading, you can delay loading your site’s images until they’re needed (e.g., a user scrolls down the page).
Normally, this is a good thing for performance if you’re lazy loading images that are below the fold. However, using lazy loading for above-the-fold images can actually negatively affect your site’s FCP and LCP times.
Therefore, you’ll want to make sure that you exclude any above-the-fold images from being lazy loaded.
If you’re using the core lazy loading feature in WordPress, WordPress should do this automatically. But if you’re experiencing issues, you can manually adjust this behavior using the wp_omit_loading_attr_threshold function.
If you’re using a plugin for lazy loading, the plugin should hopefully give you an option to do this. For example, Perfmatters lets you automatically exclude a certain number of leading images and manually exclude specific images if needed.
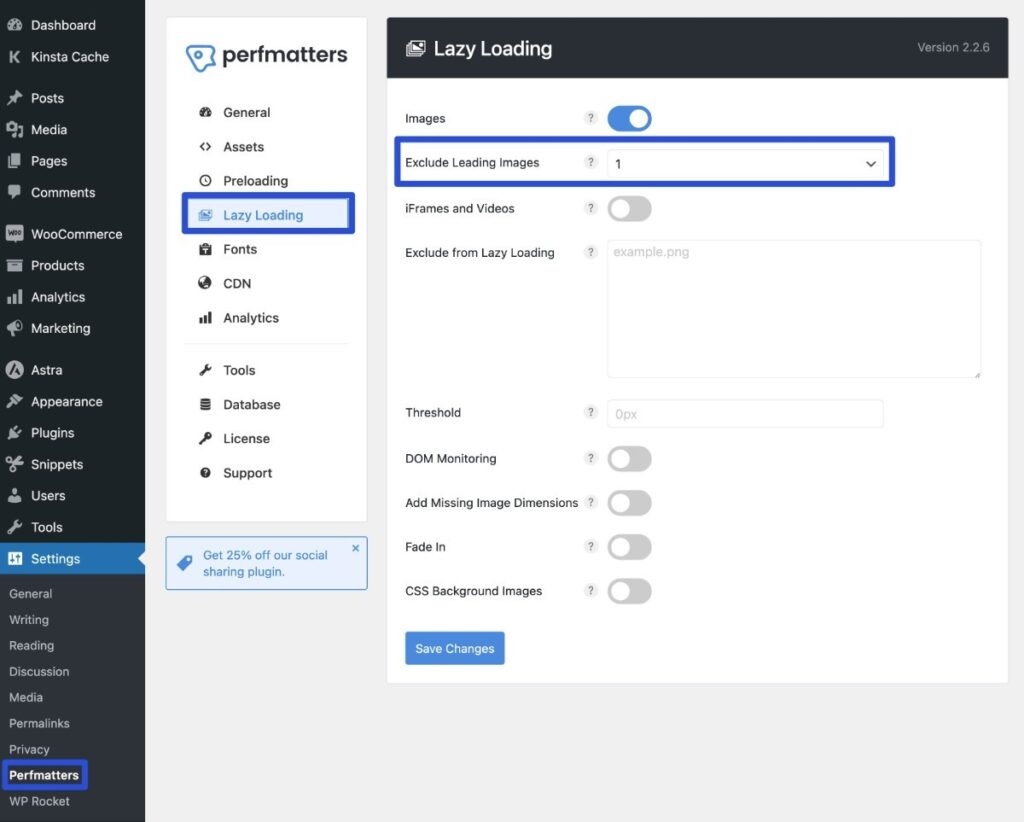
If your plugin doesn’t offer this feature, consider switching to one that does.
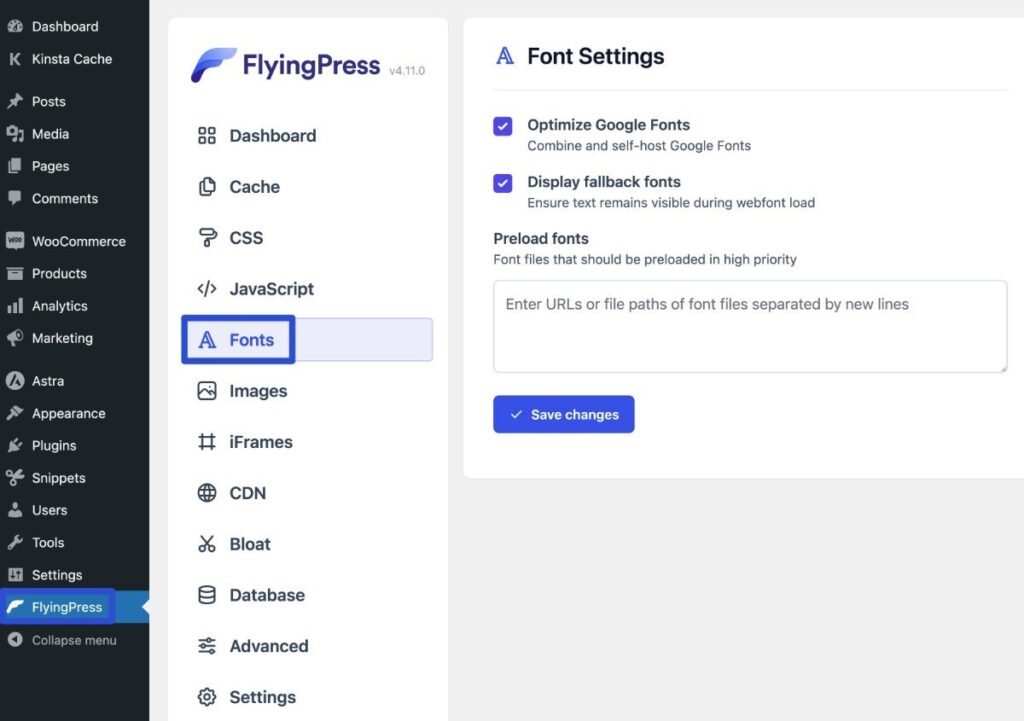
8. Optimize font delivery
To ensure that text content is visible while loading (which can affect your FCP times and user experience), it’s important to also optimize how fonts load if you’re using custom fonts (such as fonts that you found on Google Fonts).
To avoid problems, you can use the Font-Display: Optional or Font-Display: Swap CSS descriptors.
With Font-Display: Optional, you can tell users’ browsers to use a fallback font if the custom font doesn’t load quickly enough.
If you don’t want to add this using your own CSS, there are a number of WordPress plugins that can optimize font loading for you, including WP Rocket, FlyingPress, and Perfmatters.
9. Try to reduce DOM size as much as possible
According to Mozilla, the Document Object Model (DOM) is “the data representation of the objects that comprise the structure and content of a document on the web.”
While human visitors won’t interact with the DOM directly, a page’s DOM is important for helping web browsers understand and display the content on a page.
As a general rule, having a larger and more complex DOM will lead to slower FCP times than a shorter, optimized DOM structure.
Here are some tips to reduce your site’s DOM size:
- Use a performance-optimized WordPress theme — on WordPress, your theme will play a big role in your site’s DOM size. Check out our data-backed posts with the fastest WordPress themes and the fastest WooCommerce themes.
- Use the Page Break block — you can break up a long page using the Page Break block.
- Optimize pagination — you can use pagination in WordPress to break up the pages that list your blog posts (or other custom post types).
- Show excerpts — instead of showing the full text on listing pages, consider showing an excerpt instead.
- Limit or avoid using “heavy” page builders — while visual, drag-and-drop page builders can be really nice from a design perspective, they can also add a lot of bloat to the DOM. From a performance perspective, you’ll be better off sticking with the native editor. You might find that the performance tradeoff of a visual builder is worth it for the added design power, and that’s usually ok as long as you’re implementing the other tips.
10. Avoid redirects (especially multiple redirects)
Redirects let you send traffic from one URL to another URL before the page loads. For example, you might redirect someone who visits the HTTP version of your site to the HTTPS version.
However, because the redirect needs to complete before the user’s browser can load the page, each redirect typically adds hundreds of milliseconds of delay to your site’s FCP time (and other performance metrics).
Here are some tips to avoid unnecessary redirects:
- Update hardcoded URLs if switching from HTTP to HTTPS — if you move your site to HTTPS, you should actually update all of the URLs in your site’s database to use HTTPS instead of relying on redirects.
- Point URLs to correct WWW or non-WWW versions — make sure that all of your URLs use the correct version to avoid redirecting from WWW to non-WWW (or vice versa).
- Fix broken internal links — update any internal links that are broken instead of relying on redirects to send users to the right spot.
- Ask other sites to fix broken external links (if worthwhile) — if you’re receiving lots of traffic to a broken link from a third-party site, you can reach out to the site owner and ask them to fix the link instead of relying on redirects.
To find redirect issues, you can use the free Kinsta redirect checker tool. We also have a post on WordPress redirect best practices.
For example, here you can see that Kinsta’s redirect checker detected multiple redirects when we entered http://www.wordpress.org as the URL:
- One redirect from HTTP to HTTPS.
- A second redirect from WWW to non-WWW.
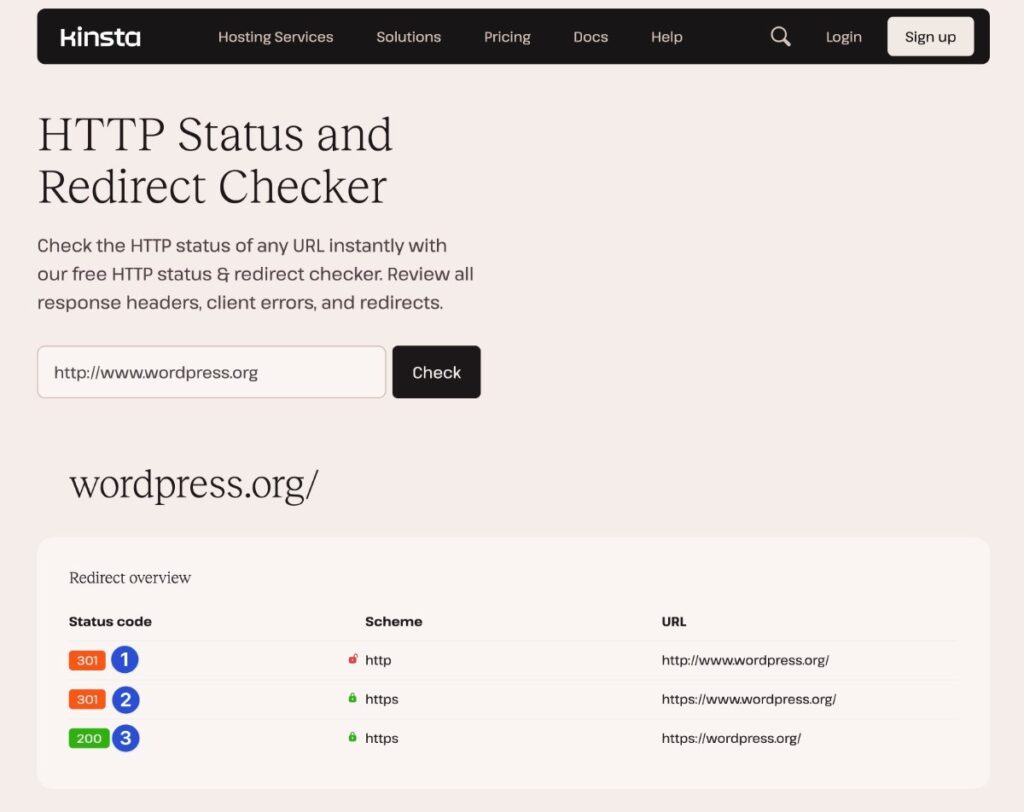
If you see multiple redirects like this, you’ll need to fix them.
Summary
First Contentful Paint is a user experience-focused performance metric that lets you see how long it takes for the first piece of content to become visible on your page. It’s similar to, but slightly different from, Largest Contentful Paint.
If you optimize your site’s First Contentful Paint time, it will have the natural effect of also improving your Largest Contentful Paint times, along with most other performance metrics for your site.
To speed up your times, you’ll want to focus on optimizing both your site’s frontend code and server response time.
If you put a site with optimized code on fast WordPress hosting like Kinsta, you should be able to get your site’s FCP times well under the 1.8-second mark that Google considers “Good.”


