WordPress image sizes are more complex than you might expect. It’s essential to understand how image sizes work in WordPress, what the default image sizes are, and how to define custom image sizes to manage your website effectively.
Having this knowledge under your belt will ensure you have the appropriate type of images in suitable sizes at the right locations so that you can get the most out of your visual content strategy.
These tactics will also improve the share-worthiness of your posts, which will translate into more visibility and traffic. Statistics reveal that readers only remember 10% of the text content they read after three days, but this number shoots up to 65% if you add visually appealing images to your content.
In this extensive guide, you’ll learn everything you need to know about WordPress image sizes.
Excited? Let’s go!
Prefer to watch the video version?
How WordPress Manages the Images You Upload
Uploading images to WordPress is pretty straightforward, but a lot goes on in WordPress backend as it handles them.
The first thing WordPress does when you upload an image is creating three different sizes of your image. It means you end up with four images for every one you upload:
- Thumbnail
- Medium
- Large
- Original Size
WordPress creates all these different sizes to serve your images in the most appropriate size for each visitor. Your website will always show the correct images to your readers based on the device they’re using, speeding and enhancing their experience.
You could always edit your images manually to provide these additional sizes, but to do so accurately in a tool like Photoshop is no small undertaking. It will involve a good deal of tedious work, which is why WordPress saves you the trouble.
WordPress Image Sizes: Essential Things to Keep in Mind
Before we get into the more technical aspects of WordPress image sizes, you should know a few critical notes.
We’ve discussed how WordPress creates three default image sizes for you, but what if you need a different size than WordPress’s defaults? What if you want more sizes overall?
Good news! You can do that easily. WordPress allows you to change the default image sizes and add as many additional sizes as you want. We’ll explain this in more detail in a bit.
But before we get to that, you should know that there are specific requirements for this to work as you want.
One of them is that you should try uploading your images in the largest size you will need. While WordPress will make it smaller for smaller devices, it will use the full-size (original size) where the image needs to be at its largest.
Suppose you upload an image that is smaller than the largest size you’ve defined in WordPress. In that case, WordPress won’t display that particular image in the largest size correctly. Plus, there’ll be a noticeable loss of quality.
That said, you must also make sure that you do not upload images that are larger than what the largest size needs to be. WordPress will never use such images as they’re too large and will eat into unnecessary space on your server.
Thus, you should check the size of the image you’re uploading and make sure it’s the largest size it needs to be before you upload it to WordPress, but not any larger than that.
Where and How WordPress Stores Your Images?
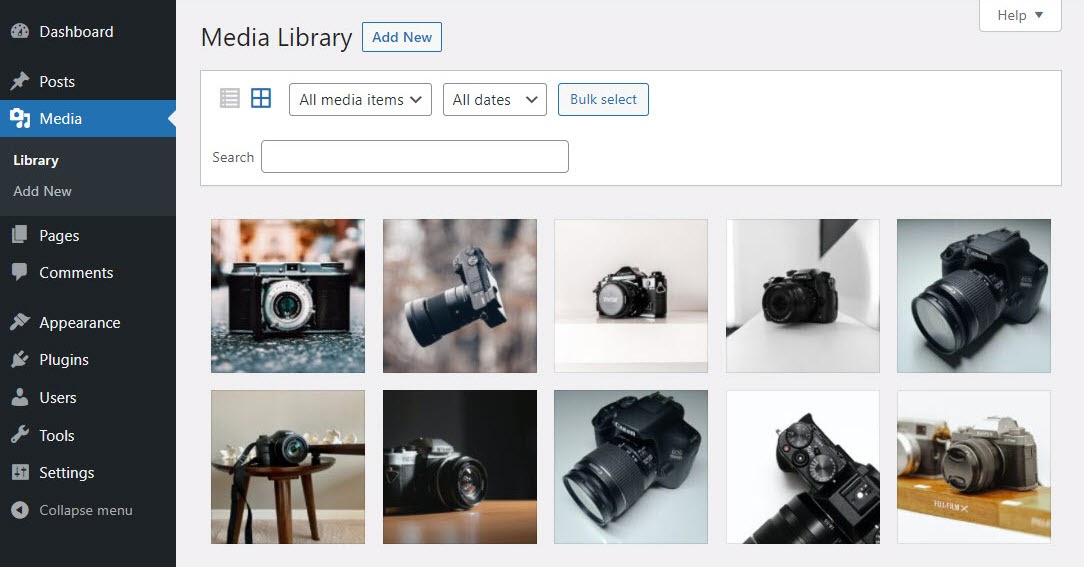
As far as your Admin panel is concerned, WordPress stores your upload images in the Media Library. You can view all your uploaded images by hovering your mouse on the Media option and clicking on Library.
You can sort them by media type (image, video, audio, etc.) and date. However, do note that you’ll only be able to sort the images by date if you haven’t disabled this function in the Settings.
There’s also a search box on the right to help you track down your uploaded image. Just type in a word you used in the title, caption, or description of your image to locate it.
Your images are stored in your site’s uploads folders (wp-content/uploads/). To access this folder, you’ll need to use an FTP/SFTP client. There will be multiple subdirectories within your site’s uploads folder housing your images by upload date (assuming you’ve left the option to sort by date switched on in your Settings).
You can also create custom folders for your media files, but we recommend doing this only if you consider yourself an advanced user.
What Are the Default WordPress Image Sizes?
When it comes to WordPress and image sizes, we’re always looking at four different ones, with your original image file and the three different sizes WordPress creates by default:
- Thumbnail size: 150px (square)
- Medium size: Max width and height of 300px
- Large size: Max width and height of 1024px
- Full size: The original size of your image
Again, as we mentioned earlier, you’ll want to upload your images in 1024px if you plan to use only these default image sizes. That will allow your images to be served correctly even at the largest size, which may not be possible if your image is of a smaller size than the largest size WordPress is using (which is 1024px by default).
What’s the Ideal WordPress Featured Image Size?
WordPress featured images are critical to reader engagement. Much like the cover of a book, the featured image offers a preview of what’s to come in the content.
They most often appear with WordPress posts, but they can also be included with pages and custom post types as well. And since the featured image may end up being displayed by search engines and social media websites, it’s crucial to choose the right size.
While there are differing opinions on the subject, general consensus holds that the ideal WordPress featured image size is approximately 1200 × 630 pixels. An image with these dimensions should fit your site properly, no matter how large or small your reader’s screen size.
It’s also worth noting that in order to make your pages eligible for the Google Discover feed (a great source of additional traffic from Google), Google highlights that your WordPress featured image size must be at least 1,200 pixels wide.
But is this the default WordPress featured image size?
It may come as a surprise, but WordPress doesn’t actually include a featured image size setting out of the box. Instead, featured images will default to their original upload size unless constrained by the site’s design, or unless you select one of WordPress’ other default sizes (like “Medium” or “Large”).
However, many WordPress themes — including WordPress’ default theme, Twenty Twenty-One — set their own custom image sizes for featured images, so be sure to check your theme’s settings first.
What’s the Ideal WordPress Header Image Size?
Similar to featured images, header images can give your readers a sneak peek into the page’s theme and mood. While they aren’t as prone to being shared across search results pages or social media feeds, it’s still important for your site’s speed and integrity that they be the right size.
Because header images are often dependent on a site’s design, they can range widely in their dimensions. There’s no “one size fits all” scenario, so it’s best to take your site’s design and responsiveness into consideration before choosing your WordPress header image size.
That said, theme developers recommend that WordPress header images should stick to a 16:9 ratio, such as:
- 1920 × 1080 pixels
- 1280 × 720 pixels
- 1152 × 648 pixels
As with featured images, WordPress doesn’t set a default size for header images. However, your theme may come with an option to customize the header size through the theme’s settings, under the Appearance menu.
If your chosen theme doesn’t give you an option to change the WordPress header image size, you can still adjust it yourself. We’ll cover how next.
How to Change Default Image Sizes (and When You’d Need To)
While the default WordPress image sizes work well for most users, some users may have different requirements. You may prefer a slightly larger size for your thumbnails or a smaller size for the large images.
Changing the default image sizes in WordPress would make sense when you find yourself editing most of the images you’re uploading because WordPress’s default image sizes aren’t suitable for your use case.
Before adding new custom image sizes on top of the default image sizes, be aware that you would be storing many more image files on your site’s database than you need to. That may lead to performance issues for your site and consuming more space than it needs to.
The same goes for image-based sites that need to stick to specific image sizes. Photographers, designers, and others serving up heavy images like to have consistent sizing everywhere across the site to ensure uniformity.
Similarly, some landing pages also need to display particular image sizes, and the default WordPress image sizes may not be suitable. And an ecommerce store typically needs to use larger thumbnails, which reveal more detail.
There are plenty of other reasons you may want to change the default image sizes, but you get the idea.
WordPress understands that too, which is why it allows you to change these defaults.
Steps to Change the WordPress Default Image Sizes
Here’s the step-by-step process for changing default image sizes in WordPress.
Step 1: Hover your mouse over Settings and click on the Media option that appears:
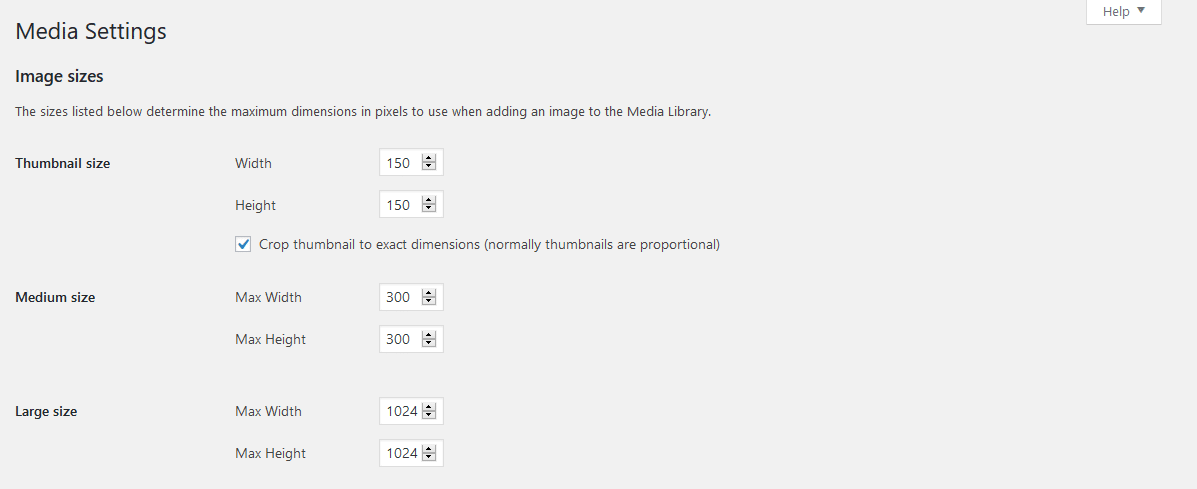
Step 2: Change the sizes to what you want by editing the figures as we did below:
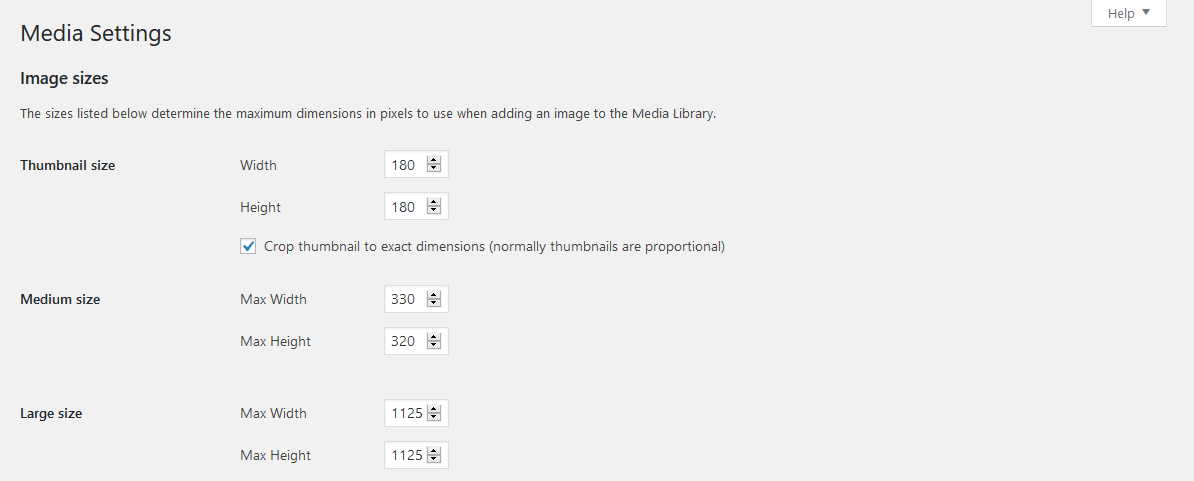
Step 3: Click on the Save Changes button at the bottom.
Now, all the images you upload from this point would be in these new default sizes.
Some tutorials out there will suggest that you input “0” for the default image sizes. However, we recommend against this, even if it may help you save on space.
If you change these values to “0”, then WordPress will use your full-size (original) image in all locations and across all devices, which would lead to a massive spike in bandwidth usage on your site. Further, this would almost certainly slow down page load time for sections that display many of these images.
How to Add Custom Image Sizes to WordPress
If you need to change all your past WordPress images to these new sizes, you can use several great plugins, which we’ll cover in detail below.
For users who tend to use many different types of images, it may be essential to have more image sizes than the three default sizes WordPress offers.
The default image sizes may be enough for the standard types of images, but for something like pop-up graphics, widgets, or slider pictures, you’re probably going to need more image sizes.
Custom image sizes grant you the flexibility to improve the functionality of your WordPress site and save a ton of time resizing your images one by one.
Now that we’ve established that as our baseline, let’s take a closer look at the process involved in adding these custom image sizes to your WordPress site.
You have two options here. The first is to use a plugin that handles everything for you with just a few clicks. The second is the manual way of adding the required code strings to your site’s files.
Let’s get to the plugin method first.
Adding Custom Image Sizes Using Image Regenerate & Select Crop
Image Regenerate & Select Crop plugin goes beyond Regenerate Thumbnails (discussed further below), allowing for more customization and functionality.
On top of letting you change the default image sizes, it also enables you to regenerate any existing images to match your preferred image sizes, set default cropping options for pictures, and regenerate thumbnails.
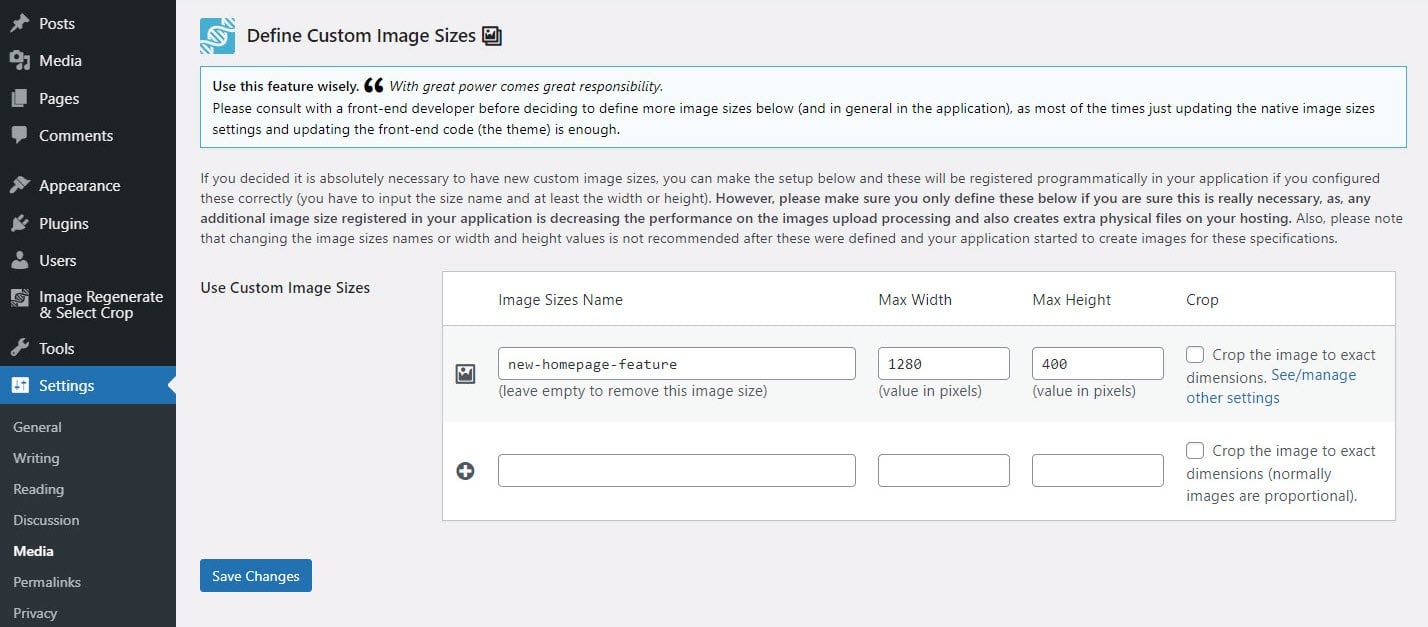
Once installed and active, you can create as many new custom image sizes as you want via the standard WordPress Settings > Media page.
Adding Custom Image Sizes Manually
Although it’s a relatively simple and easy process, the very first thing you should do is create a backup of your website in case something goes wrong while making these adjustments. Once the backup process is completed, head over to the admin dashboard for your WordPress site.
Once there, hover over the Appearance menu option and choose Editor (this may be named Theme Editor in some cases).
Next, find the functions.php file and check whether the following code is already there (use the search function to locate it quickly). If it’s already there, you don’t need to do anything.
If it’s not there, you need to add this string to the file:
add_theme_support( 'post-thumbnails' );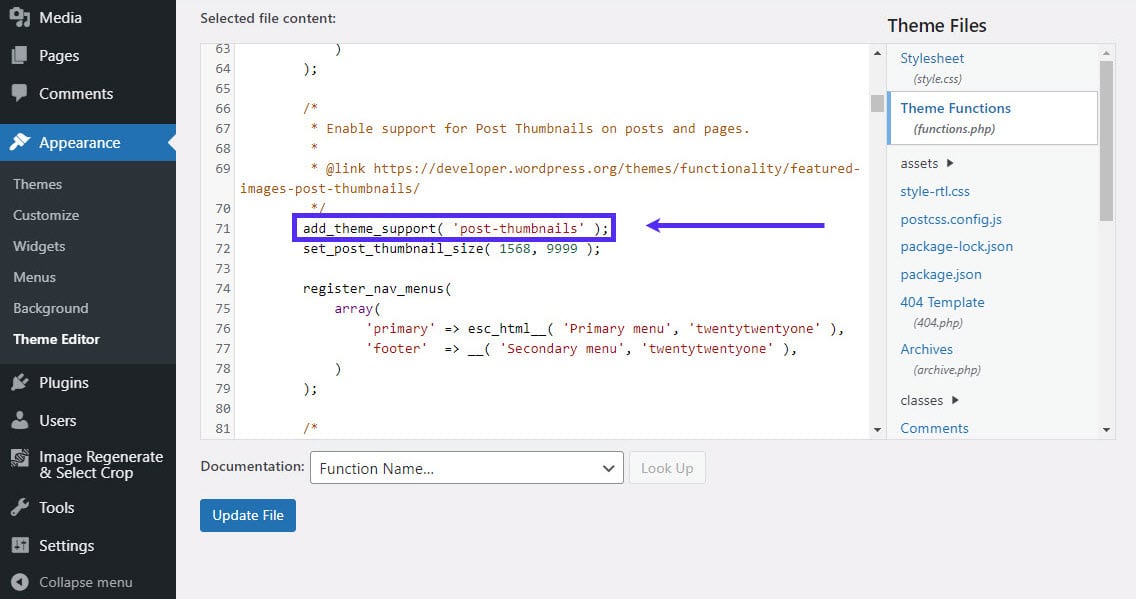
After you add this code, click on the Update File button at the bottom to activate the function that allows you to create custom image sizes.
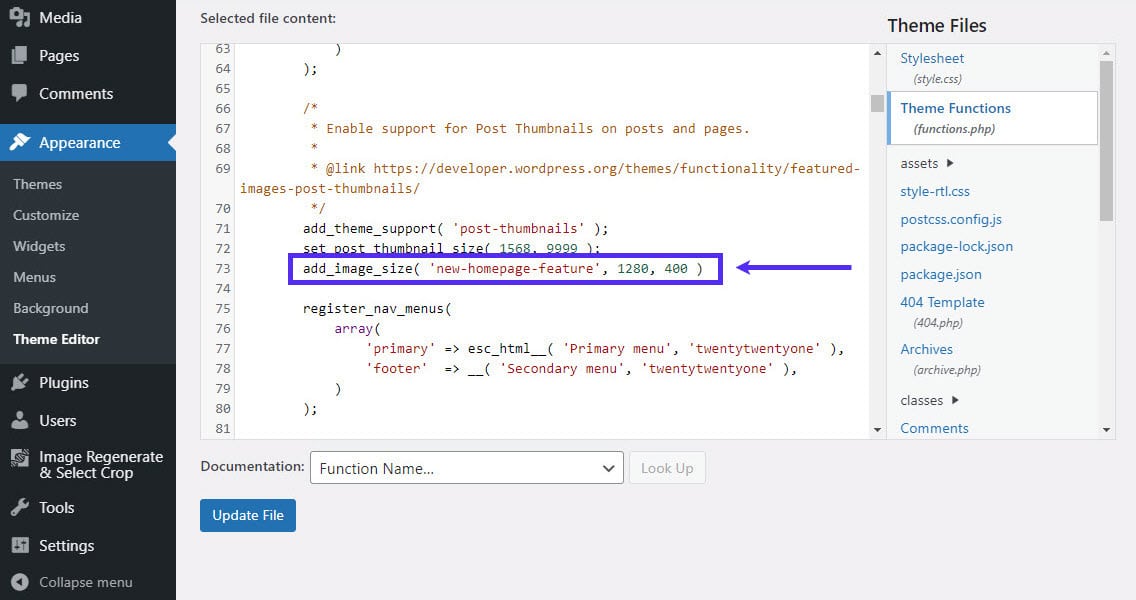
Now it’s time to add the code for the specific custom image sizes you want. Look for the “add_image_size” string in your functions.php file because that’s where you’ll need to do your edits:
add_image_size( 'my-custom-image-size', 800, 640 );Specifically, you should update what’s inside the single quotes with what you want to name your new custom image size. We suggest keeping it simple and descriptive (e.g. “main-post-image”).
After you’ve taken care of the name, you’ll need to declare the image sizes themselves. The first numeral value is the image width, while the second is the image height.
Here’s a screenshot showing our sample code added to the functions.php file:
Understanding Cropping
When an image is made smaller without cropping, it’s just a shrunken-down version of the original. However, when it’s “cropped” or cut, the cropped portion is removed from the finished image.
It’s precisely like physically cutting up a picture. If you take your scissors to a portrait and snip out everything below the person’s shoulders, you’ve “cropped” that picture. It works the same way digitally.
The aim is to reduce an image’s file size, as cropping isn’t the right choice. You’d be removing elements you may want to keep while maintaining a large file size. That said, cropping may make sense for image sizes that have to fit a specific dimension perfectly, like featured images or profile pictures.
The main subjects may get too small for something like featured images. They should still get the exposure they need when resized without cropping. So figure out what works best for the different types of images you use and set the cropping feature accordingly.
When adding custom image sizes, you can make WordPress automatically crop the images based on the size you set and the original size. You need to add “true” at the end of the code.
Again, here’s our above example with the cropping feature enabled.
add_image_size( 'name-for-your-custom-image', 800, 640, true );However, if you don’t want to crop the images, you can either put “false” instead of “true” or leave out both. Not putting either of them will make the code automatically assume the “false” option. That way, WordPress won’t crop your images.
Adding a Custom Image Size to Your Theme
After you’ve created the custom image sizes you need, you also need to update the code in your theme. Doing this will make your theme display these custom image sizes as you desire.
If you’re a complete beginner at editing code, please create a backup of your site again before performing this.
Now, you need to find your theme file in the post loop and add the following code to it:
the_post_thumbnail( 'your-specified-image-size' );To find this file, click on Theme Editor under the Appearance setting. Look for the index.php file here — this is the theme file that houses the post loop you need to edit.
Once you’ve found it, add the code mentioned above, as seen in the below image:
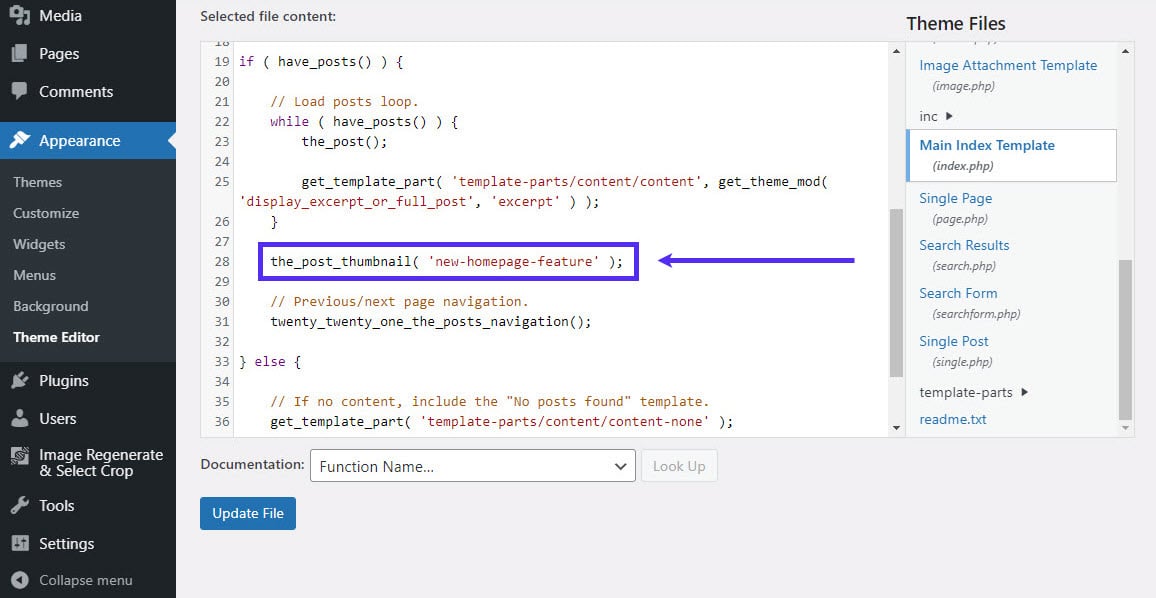
Again, it would be best if you replaced the “new-homepage-feature” portion with the name of the custom image size you’ve created.
Once you’ve added this code and updated the file, you’ll see the custom image size in your media library. Upload a new image to try it out.
Updating Old Thumbnails
While creating and adding custom image sizes feels great, it leaves you with another open task: what about all the old images you’ve already uploaded?
Don’t worry about that — some great WordPress plugins come in very handy for this task! Let’s see how they can help you take care of your old thumbnails.
Regenerate Thumbnails Plugin
Regenerate Thumbnails allows you to automatically re-upload the images in the new sizes, including any custom image sizes you’ve added.
To install it, hover over the Plugins menu option and click Add New. Then type “Regenerate thumbnails” into the search box.
Install the Regenerate Thumbnails plugin by clicking on its Install Now button.

After installation is complete, click on the Activate button to start using it.
Next, hover over the Tools menu on the left and click on Regenerate Thumbnails:
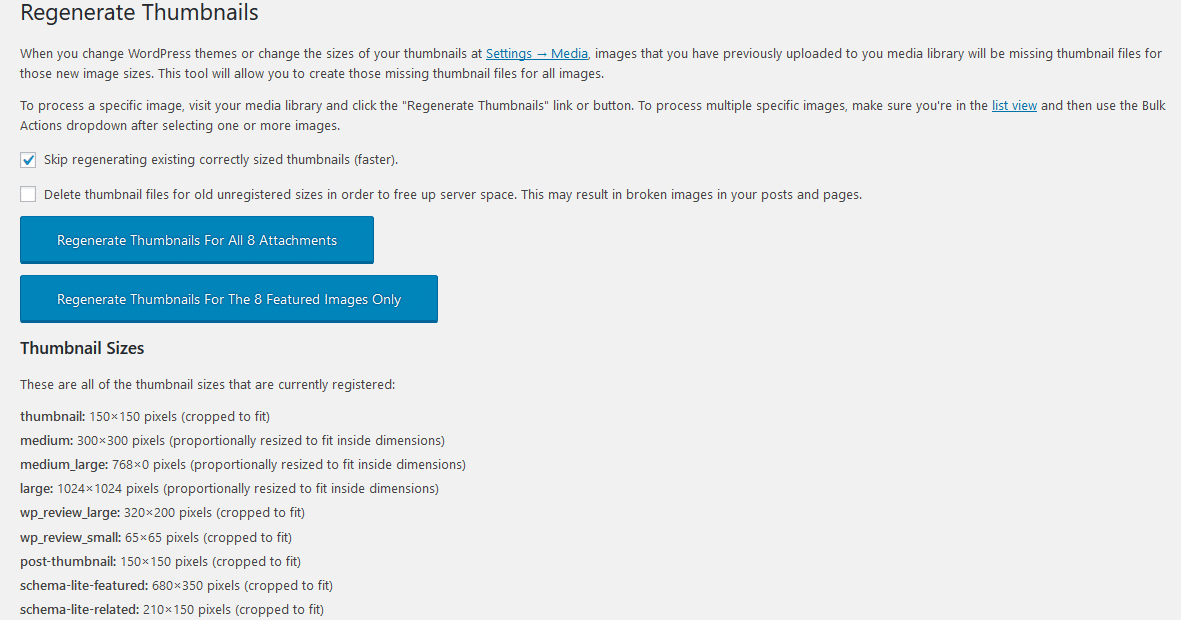
You can click on Regenerate Thumbnails for All [#] Attachments to produce new image sizes for all your old images as well.
As you can see from the image above, Regenerate Thumbnails will also list all the image sizes currently active on your site.
You may find some image sizes you didn’t know. Often, these are created by plugins, especially if they’re for improving the look, design, or functionality of your site.
Using the WordPress Built-In Image Size Editor
As we highlighted before, you should only create custom image sizes you’d be often using. For image sizes you plan on using only on rare occasions, it makes sense to manually edit the image sizes using the WordPress built-in image size editor.
We’ll give you a quick walk-through explaining how you can use the built-in editor to edit image sizes quickly and easily.
First, click on the Media menu to be taken to the Media Library. Next, click the image whose size you want to adjust.
Then click on the Edit Image button right below the image:
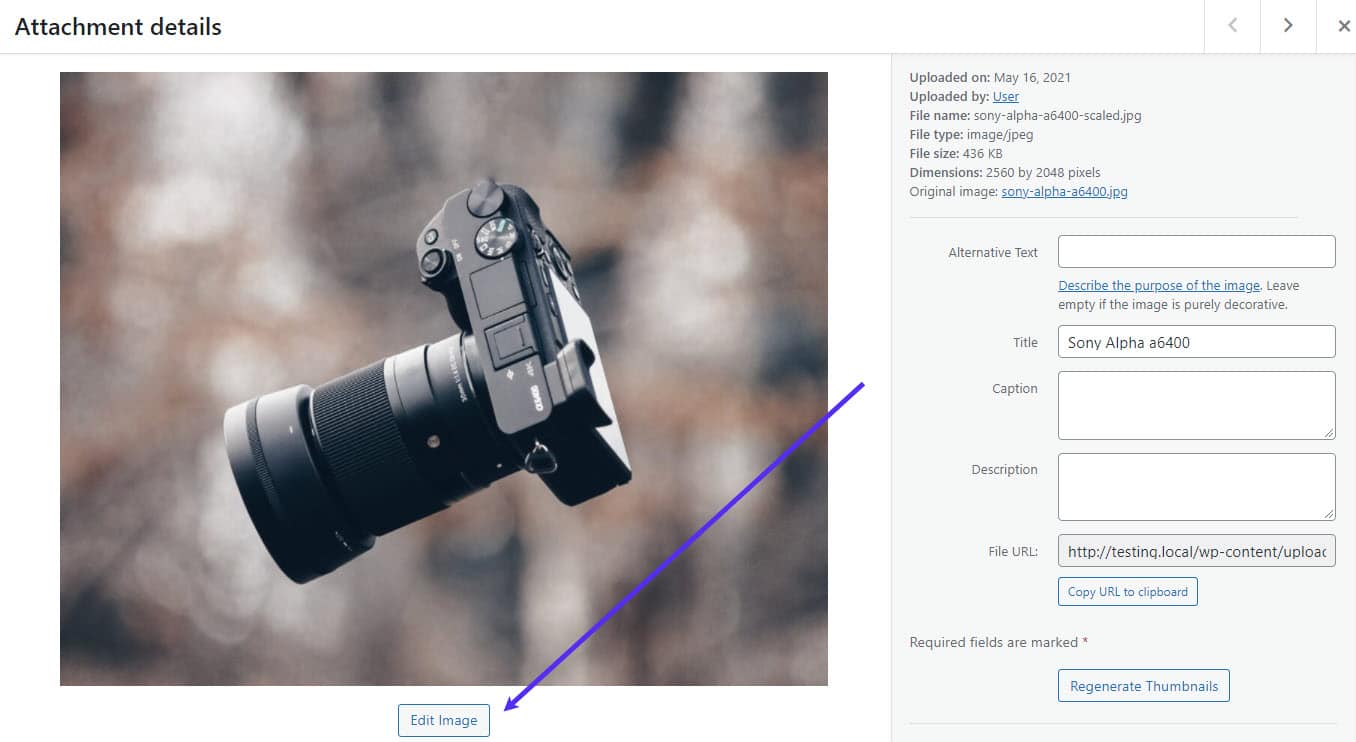
You’ll see the current image size and can adjust it here. Just put in the image size you want and then click on the Scale button, and you’re good to go.
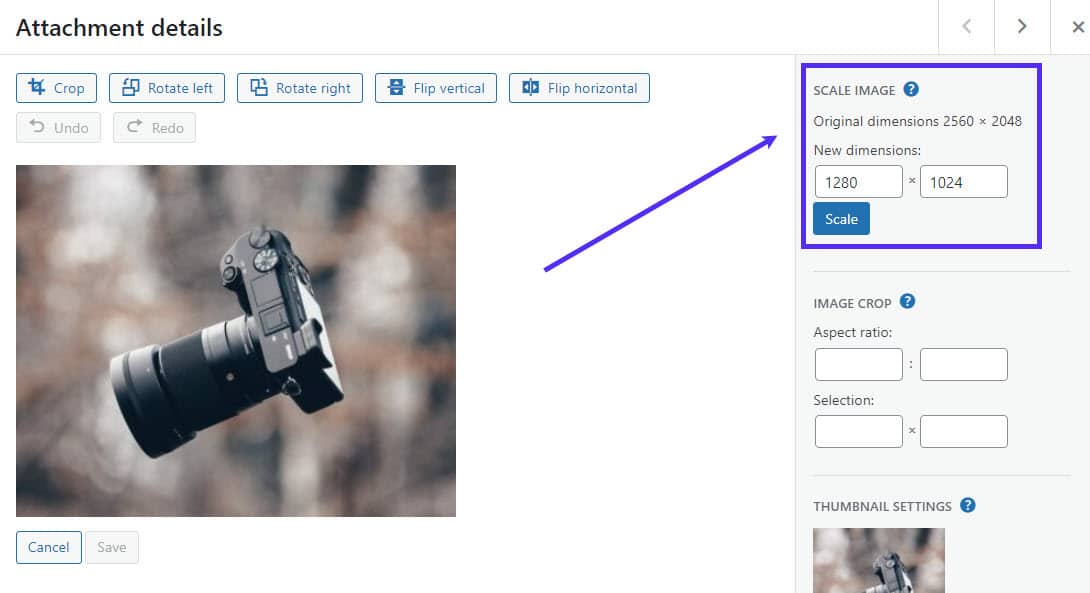
The size adjustment will automatically save as soon as you hit Scale. If you don’t like the new image size for any reason, you can always revert to the original size using the Restore Original Image option (right below the field for image size).
Editing Images in WordPress Gutenberg
If you’re using Gutenberg, you can quickly edit the image size of your images when you add them during the creation of a post.
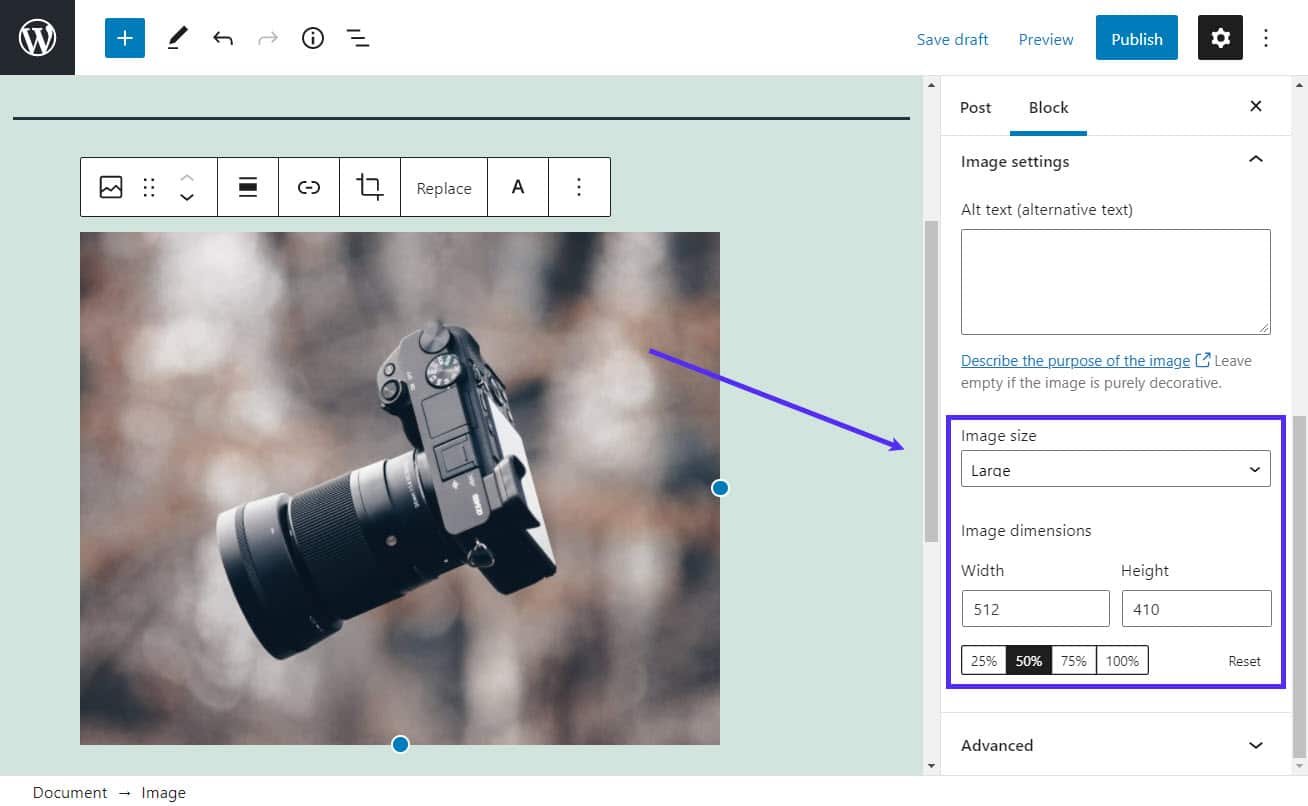
As you can see in the image above, when you upload an image when creating a post in Gutenberg, you can select the existing image sizes or change the image size from right within the post option.
If you’ve added your new custom image sizes to your theme file, you’ll find them all in the Image Size dropdown menu.
You’ll also be able to change the image size using the field right below it. All you need to do is input the desired size in the fields, and the image will automatically resize to your new specifications.
Optimizing Your Images
No image-related guide is ever complete without a mention of image optimization. While we have discussed optimizing images in great detail, mentioning a few quick tips certainly won’t hurt.
After all, when you’re adding custom image sizes, you’ll need to know how to optimize your images to ensure they don’t affect your site’s performance or consume more server resources than they need to.
With that said, here are a few quick tips to help you get started with image optimization.
Decide on the File Type
Simply choosing the right file type for your images can reduce their size significantly. While there are many different types of image files, the vast majority are either JPEG or PNG.
JPEG wins hands down when it comes to colorful images. Also, you can further compress JPEG files to reduce their file size with only a slight reduction in the quality (if you do it right).
On the other hand, PNG usually becomes a better option for drawings, text, most screenshots, and graphics.
Resizing Images
Resizing images is a quick and easy way to reduce the file size of your images. As a rule of thumb, you should make sure all images on your site are only as large as they need to be.
If your website’s maximum width is 1200px, it doesn’t make sense to have a single image on your site with a width larger than that 1200px maximum.
We’ve also mentioned the importance of not creating new custom image sizes unless you need to, so keep that in mind as well.
Take Advantage of Lossy Compression
Lossy compression is a great way to reduce the file size further after you’ve already optimized your images using other methods.
It means getting rid of some image data, removing which wouldn’t make much of a difference to the image quality but can help reduce the file size considerably.
Use Lazy Loading
Lazy loading helps you prioritize the loading of images on your site’s pages. It loads images in time with the visitor’s scrolling of the page. It means the images at the very top will load immediately, but everything below the fold will not load until the user scrolls past the fold.
There’s more to it, but you’ll find it all in our image optimization guide, so let’s instead jump straight to some image optimization plugins you can use.
Image Editing Plugins for WordPress
The beauty of using these plugins is that you can perform advanced image optimization with just a few clicks without having to mess around with any advanced tools or code. Furthermore, most of these plugins are free, especially for optimizing a certain number of images or using some basic optimization features.
- Imagify: Impressively customized level of compression and other image optimization features
- Kraken: Useful lossless compression plugin, but only if you buy the premium version
- TinyPNG: Supports both lossy compression and works with a variety of image types
- Optimole: For CDN and lazy loading, which are highly effective ways of optimizing your images
Summary
You now know everything there is to WordPress image sizes and how to get the most of the features and customization WordPress offers in that department. You should find optimizing your website’s performance and functionality much easier now that you know how to handle your WordPress images inside and out.
You can create custom image sizes and manage them either directly through your theme’s code or using a plugin built for that specific task. Remember to update your old thumbnails anytime you plan to update an image — also an easy task, thanks to the helpful plugins we’ve listed above.
Did we leave anything out? Leave a comment below if you’re having trouble understanding anything about WordPress image sizes!


