
Shopify is an excellent platform for launching your first online store. However, as your shop grows, you’ll likely start to notice the limitations that come with this hosted platform. If you feel that you’ve outgrown it, migrating from Shopify to WooCommerce is easier than you might think.
With WooCommerce, you get complete control over your store. You can configure everything from taxes to adding custom shipping methods. Furthermore, you can publish hundreds or thousands of products, all for free.
This article will discuss what you need to know to migrate Shopify to WooCommerce. We’ll walk you through the preparations and guide you step by step as you move your store. Let’s get right to work!
Check Out Our Video Guide to Migrating From Shopify to WooCommerce
Why You Should Consider Moving From Shopify to WooCommerce
The primary reason to move from Shopify to WooCommerce is that the latter is built on top of open-source software. It uses WordPress, enabling you to create any website you want on any hosting platform of your choice. Unlike Shopify, WooCommerce doesn’t charge you to unlock features. You also won’t need to pay any processing fees to sell products.
You still need to pay for hosting if you’re using WordPress and WooCommerce together. However, you’re not tied to any specific platform. Therefore, you can choose whichever host fits your overall needs.
Considerations Before Migrating From Shopify to WooCommerce
Anytime you plan on migrating a website from one platform to another, you need to consider several factors. For example, you might need to think about hosting, backing up your data, and more. Let’s go through each of those factors one by one.
Finding a WordPress-Friendly Web Host
If you’re already committed to using WordPress and WooCommerce, you’ll likely want to find a web hosting provider tailored to the Content Management System (CMS). Due to the platform’s popularity, you’ll find plenty of hosting options designed for WordPress users.
Kinsta is one such web host. We offer a broad range of hosting plans optimized for WordPress and WooCommerce. Regardless of which Kinsta package you choose, you’ll get access to the advanced features that you need to run and grow your online store.
Our hosting plans include the following features:
- SSD storage
- Optimization for high-traffic websites
- Automatic daily backups
- Around-the-clock support and malware removal
- Staging functionality
- Free SSL certificates
Naturally, we recommend you do your research before you settle on a hosting provider for your store. As long as you opt for a web host with a good reputation, you’ll still get access to all the features that WordPress and WooCommerce offer.
Back Up Your Shopify Store
Anytime you make significant changes to an online store, it’s a great idea to back up all of its data beforehand. One of the downsides of using Shopify is that the platform doesn’t offer backup functionality.
Shopify enables you to export product data in CSV format (which will come in handy during the migration process). However, you can’t back up the rest of your store’s details and design using the platform’s built-in functions.
If you want access to real backup functionality, you’ll need to turn to the Shopify App Store. Here, you’ll find tools that add basic backup functionality to Shopify, such as Rewind Backups:

It’s important to note that even with apps such as Rewind Backups, you might not be able to create complete copies of your Shopify store. You also can’t use Shopify backup apps to migrate your shop.
Migrating from Shopify to WooCommerce is a theoretically risk-free process for your existing store. You won’t lose any of your store’s data, but it’s still a good idea to back up any site’s data in case of issues.
How to Migrate From Shopify to WooCommerce (8 Steps)
Now that you have a web host in place, it’s time to start moving your store from Shopify to WooCommerce. That process involves migrating all of your store’s products and recreating its layout and design in WooCommerce. However, before we can get to that, we need to set up WordPress.
Step 1: Set Up WordPress
WordPress offers several installation methods depending on which type of web host you’re using. For example, managed WordPress hosts often set up the CMS automatically for you when you create a new website:

If your web host doesn’t offer automatic WordPress installation, we recommend that you check out your hosting control panel. Here, you might have access to a software installer such as Softaculous, which will enable you to set up WordPress in a few minutes.
Alternatively, you can also download and set up WordPress manually, which is more straightforward than it might sound. The software is available for download at WordPress.org. It also comes with a famous ‘five-minute’ installer that walks you through the entire process once you upload the files to your server.
Step 2: Install WooCommerce
Once you install WordPress, you’ll gain access to the dashboard. From here, you have complete control over your website’s settings, layout, and the content that you publish:

Since you want to move to an online store, you’ll first need to install WooCommerce. To do so, go to Plugins > Add New and type “WooCommerce” in the search bar at the top of the screen.
WooCommerce should come up as one of the first results that you see:

Click on the Install Now button next to the WooCommerce option. Then, wait for WordPress to download and install the plugin.
This process will happen in the background, so don’t leave the page until the Activate button appears next to WooCommerce. Once it does, click on it:

That’s it! Now WooCommerce is up and ready to go. That means you can start publishing and selling products. However, you already have a full list of products at Shopify, so let’s move your catalog over to WooCommerce.
Step 3: Export Products From Shopify
As we mentioned before, Shopify enables you to export your entire product catalog in CSV format. This file includes titles, slugs, tags, variants, and prices for the products you migrate.
To export your Shopify product data, go to your account and navigate to Product > All Products. This page will show a complete list of all the products in your store. It also includes options to import and export data:

Select the Export button at the top of the screen, and Shopify will ask which products you want to export. Click on All products and select the CSV for Excel, Numbers, or other spreadsheet programs option under Export as:

Once you click on Export products, Shopify will compile a CSV file including all your product data and send it to you via email. That email might take a while to arrive, depending on how large your inventory is:

The Shopify email will include a link to download the CSV file that contains all of your product information. Save that file to your computer because you’ll need it for the next step.
Step 4: Import Your Shopify Products Into WordPress
This step is one of the most important ones. There are two ways that you can import Shopify products into WooCommerce. One method uses the built-in product importer that WooCommerce uses, and the other is through a migration service.
Let’s go over both approaches, starting with the manual option.
Use the WooCommerce Product Importer
WooCommerce comes with a tool that enables you to import product lists in CSV format. You downloaded your entire Shopify catalog in one neat CSV file during the previous step, making this a simple process.
The downside of this approach is that you’re only importing products. All of your store’s data, such as customers, order history, images, and reviews, will remain in Shopify. In essence, you’re starting over using WooCommerce with your existing inventory and a blank store slate.
If that’s not a dealbreaker, let’s go ahead and import that Shopify CSV file in WooCommerce. Access the WordPress dashboard and go to Tools > Import.
Look for the WooCommerce products (CSV) option and click on Run importer:

On the next page, WooCommerce will ask you to choose the file you want to import. There’s also an option for updating existing products using the data from a CSV file. Leave that unchecked as we’re starting with a clean inventory:

Select the CSV file you downloaded during step three and click on Continue. The next screen includes several options for matching product data from the CSV file to WooCommerce fields:

Go through that list of options and decide which data you want to import in WooCommerce and which you’re comfortable leaving out. Some fields, such as SEO Title and SEO Description, don’t have corresponding options in WooCommerce, so that you can exclude those.
Once you’re happy with your choices, click on Run the importer. WooCommerce will take a minute (or more) to import your Shopify product data.
When the process is over, you’ll see a success message that looks like this:

If you click on View products, WordPress will send you to the Products > All Products tab. Here, you’ll see an overview of all the items you just imported:

Remember that WooCommerce won’t import product images, so you must upload those manually. We also recommend checking out each item entry to ensure it’s not missing any critical information.
If product data is missing, you can always rerun the importer and make sure you’re porting the correct fields to WooCommerce. Overall, using the manual importer is simple, but it requires some micromanagement on your end.
Use a Service to Import Shopify Data into WooCommerce
Migrating from Shopify to WooCommerce is common. There are entire plugins and services devoted to simplifying the process. The advantage of using Shopify migration tools is that they automate the whole process and enable you to port data that you can’t with a simple CSV file.
Cart2Cart is one helpful tool. It enables you to connect WooCommerce with Shopify by migrating each data point from one platform to the other:

Cart2Cart offers limited free migrations that enable you to move part of your Shopify inventory over to WooCommerce. However, if you want access to the tool’s complete set of features, you’ll need to pay. Prices vary depending on how many products you want to import and if you wish to include customer and order data and blog posts.
Cart2Cart offers an estimate tool on its site. However, to give you an idea of how much the service costs, migrating a complete Shopify store with 100 products to WooCommerce would run you approximately $120.
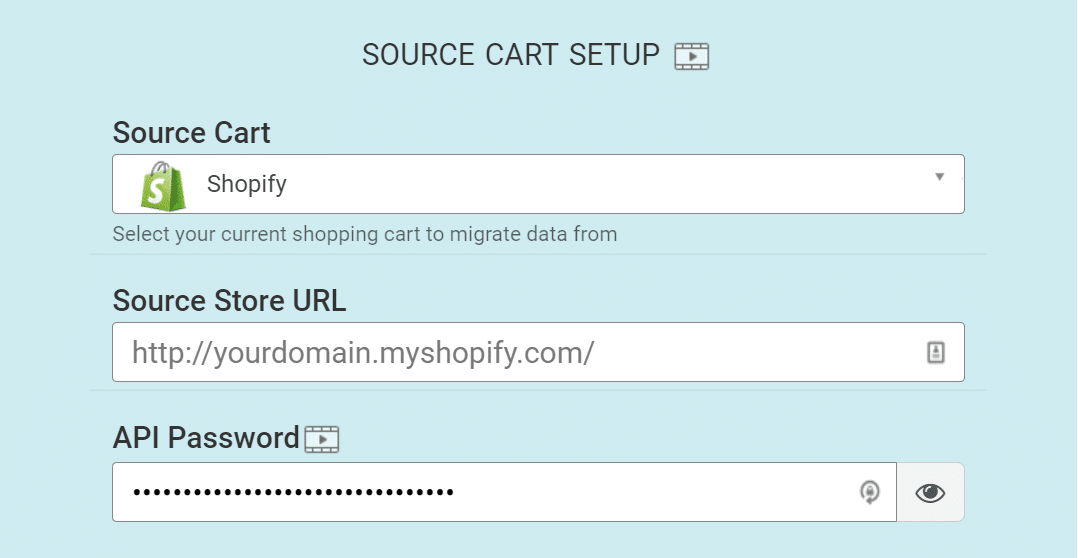
If you want to use Cart2Cart, go ahead and sign up for an account. Once you access your dashboard, the platform will ask you to choose both source and destination carts.
The source, in this case, is Shopify, and WooCommerce is the destination:

For the Cart2Cart importer to work, you’ll need to generate a Shopify API key. Return to the Shopify dashboard and go to the Apps screen. Scroll to the bottom of the page and look for the link that reads Manage private apps:

If you haven’t enabled private app development in Shopify, you’ll see a screen that looks like this. Click on the Enable private app development button:

Shopify will ask you to enable private app development. It will also warn you about sharing your API key with unknown parties.
Confirm your choice, and now you’ll get the option to create a private app:

Creating a private app will generate the API password Cart2Cart needs to access Shopify and export your data.
Firstly, set a name for your app (this can be anything) and enter your email:

Scroll down to the permissions section and give the app access to all the permissions on the list. You’ll be using the Read and write option when available or just Read access if the former doesn’t show up:

Traditionally, you shouldn’t give an app full permission. However, as long as you don’t share the API key and delete the app afterward, you should be fine.
Next, select the latest version of the webhook API:

Click on Save to create the app and confirm your choices on the screen that will pop up. Once the app is up and running, its API password will become available on the app details screen.
Copy and paste the API in the Cart2Cart migration menu and enter your store’s URL alongside it:
Configuring the target cart (your WooCommerce store) is much easier. All you have to do is enter your WordPress login details (for the administrator account), and you’re good to go.
Enter those details and click on CHOOSE ENTITIES:

Cart2Cart will take a moment to prepare the migration process. If the credentials are correct, the program will ask you which data you want to move from Shopify to WooCommerce:

The service will also offer several paid extras for migration, including images, order IDs, and more. Select the options that you want and start the migration. Depending on how much data you need to export/import, the process can take a while.
Afterward, Cart2Cart will show you a success screen and give you an option to send you to your WooCommerce store, where you’ll be able to see the results.
Step 5: Point Your Domain to WooCommerce
At this stage, you should already have a fully working WooCommerce store that includes all of your Shopify products. However, there are still several things left to do, including updating your domain records so that they point toward your new web host.
Currently, your domain is still pointing to your Shopify store. You probably don’t want to register a new domain because that means you’ll need to start building traffic from scratch. As such, you may lose a significant percentage of your customer base.
The process for changing which site a domain points to varies depending on which service you use to manage it. If you use a domain registrar, you’ll need to update your records there. That process differs from registrar to registrar:

If you registered a domain directly through Shopify, you’d need to edit your DNS settings using the platform. Alternatively, some web hosts such as Kinsta enable you to update your domain records from your hosting control panel. MyKinsta, for example, makes it easy to point domains toward your website.
Step 6: Configure Your WordPress Permalinks
WordPress enables you to decide your URL structure, including for WooCommerce products. By default, WordPress URLs look something like this:
yourwoocommercestore.com/?p=534
That type of URL is not user-friendly. It also doesn’t do you favors from a Search Engine Optimization (SEO) perspective.
To change your store’s URL structure, go to Settings > Permalinks > Product permalinks and select the option that you prefer:

In most cases, we recommend that you use the Standard structure. With it, a WooCommerce product URL will look like this:
yourwoocommercestore.com/product/sample-name
This type of URL gives visitors information about what product they’re seeing, forcing you to use descriptive slugs. Once you select a permalink structure, save the changes to your WordPress website.
It’s important to note that you need to choose a permalink structure when starting your WooCommerce store. Changing link structures at a later date can impact your site’s SEO and cause significant errors within your website. The earlier you set a permalink structure, the fewer headaches you’ll face down the road.
Step 7: Recreate Your Shopify Store’s Design (Or Start Over)
If you checked out any of your WooCommerce store’s pages, you probably noticed that they look nothing like their Shopify equivalents. That’s because you’re still using one of the default WordPress themes.
At this stage, you have two options for how to approach your new store’s design:
- Recreating the style of your Shopify store
- Starting over with a new WooCommerce template
Both approaches are valid, and they both involve looking for the perfect WooCommerce theme for your shop. On the one hand, recreating your Shopify store design can make the transition more seamless for existing customers.
On the other hand, WordPress offers significantly more customization options than Shopify. With the CMS, you get access to multiple page builder plugins that work with WooCommerce and enable you to customize your store in any way you see fit.
To customize your store, you can also use the built-in Block Editor with a WooCommerce-friendly theme. Either approach is viable. So, decide what to do with all the features that WordPress and WooCommerce offer you!
Step 8: Configure Your WooCommerce Settings
Importing products into WooCommerce and customizing your store’s style is just the beginning. Before you can start selling products via WooCommerce, you still need to configure a variety of settings, including:
- Payment and shipping options
- Security settings
- Email notification options
- Product settings
- Tax options
If you remember the process of configuring your Shopify store, all of those settings should sound familiar. However, WooCommerce gives you far more control over how you set up your online store:

The official WooCommerce documentation includes a complete guide on how to configure its settings. Once you’re done tweaking your store’s configurations, we recommend checking out some WooCommerce extensions.
Summary
Migrating from Shopify to WooCommerce involves a lot of work. You not only need to import and export products from one store to another, but you also have to re-design your entire website from scratch. Fortunately, WordPress makes it easy to get your new store looking like you want.
With WooCommerce, you get far more control over your store than what Shopify offers. This is thanks to WordPress’ open-source nature and its massive popularity. Therefore, you’ll likely never run out of new features to try in your store.
Do you have any questions about how to migrate Shopify to WooCommerce? Ask away in the comments section below!


