Why do people use website search forms in the first place? It’s because they’re looking for immediate and relevant results they can’t get by browsing a website or using the navigation.
Sometimes those search results provide answers to their questions (like information on a company’s return policy) or a list of matching products or content (like blog posts related to page builder plugins). Regardless of what they’re looking for, though, one thing is for certain:
Visitors expect your WordPress search form to deliver results quickly and accurately.
It makes sense when you look at consumer behavior as a whole. Google has set an almost impossible standard when it comes to online search. According to findings from SparkToro, over half of all searches in Google are zero-click. Basically, Google has made search so efficient that people often don’t need to visit a website to get answers to their questions.
Of course, your website visitors aren’t using internal search expecting or wanting a zero-click result. They’re using search in order to find other parts of your website to explore. But what your WordPress search and Google search do have in common is this: consumers want fast, convenient, and hyper-relevant results from both of them.
There’s just one problem: WordPress’s native search function isn’t great.
That’s why, in this guide, we’re going to explore everything you need to know to optimize the WordPress search experience for your visitors.
How Important Is Internal Search Anyway?
If you design a website the right way, visitors will naturally follow the pathway you’ve laid before them. A well-organized menu helps, too.
That said, internal search has an important role to play in this.
Think of WordPress search like a Fast Pass for your website. When your search function performs the way it should, it can take your visitors from Step 1 to Step 5 in seconds.
This would be especially useful for WordPress websites with a vast amount of content. Here are some examples:
eCommerce
Online stores like Nordic Ware can help visitors go from the home page:

To a narrower list of products just by using the search bar in the top-right corner of the site:

By having the product search form always present, visitors never have to sift through the store’s menu or categories to find something specific they’re shopping for.
Blogs, Podcasts, and News Sites
Websites with large content repositories like Kinsta, which has 39 pages of blog posts (and growing), would benefit from a search bar:

By placing a blog-specific search form at the top of the blog, readers connect with the topics they’re looking for more quickly than they would by scrolling through 39 pages:

Blogs can become difficult to navigate with lots of content. Since you want to keep blog pages short in order to keep loading speeds high, it’s not a good idea to increase the number of posts that appear.
Instead, a search bar will help your visitors more efficiently get around the posts that aren’t relevant to their current interests.
Listings Sites
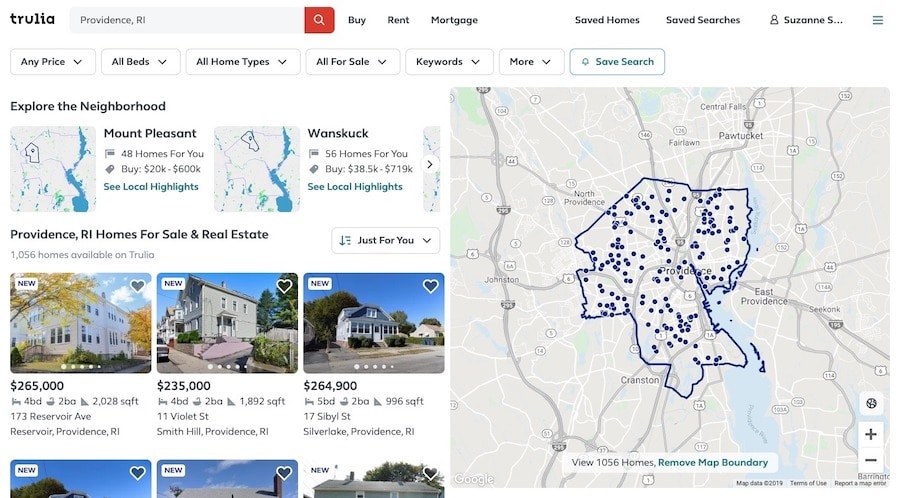
Search is one of the first things visitors do on websites that aggregate listings (e.g. real estate, travel, professional services, etc.), like this example from Trulia:

The search element is always simple enough to start. For instance, specify a location, person’s name, or job title. But the results pages always enable users to filter their results down as much as they want:
Knowledgebases
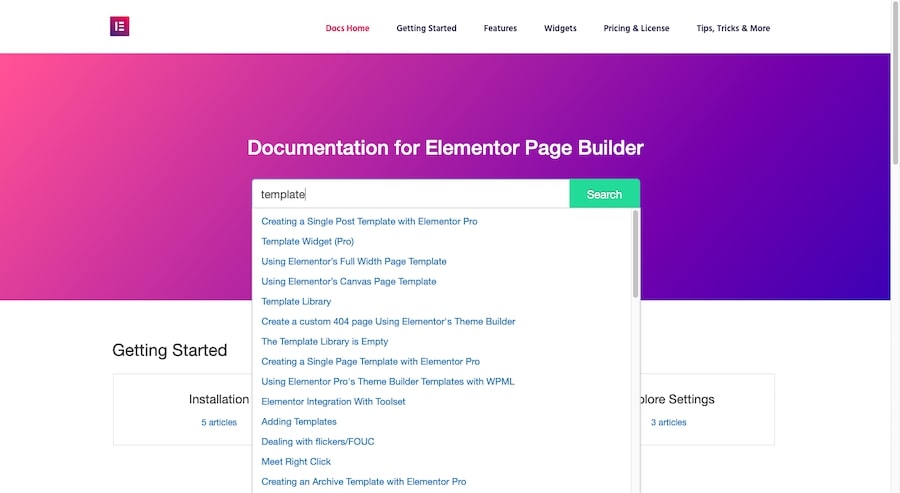
Search is a useful component for help centers and knowledgebases for products like Elementor:
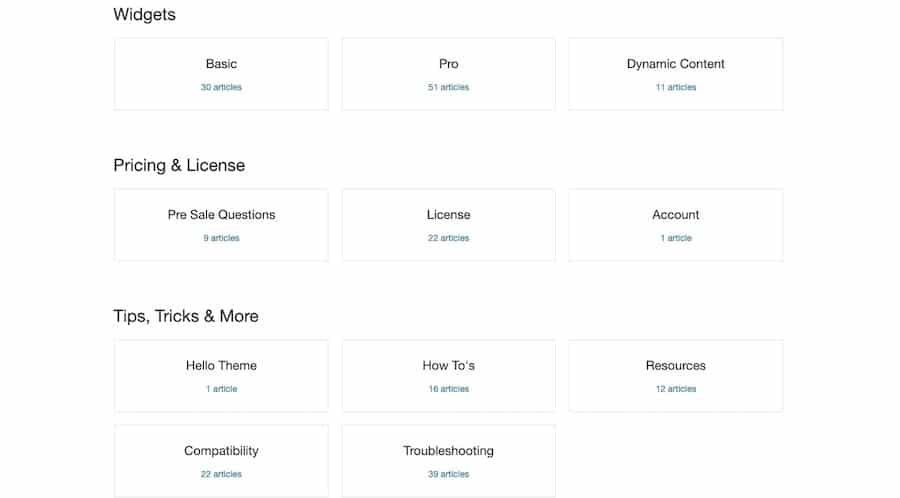
Search helps users find answers to their questions more quickly than they’d be able to with a manual search through the categories:
In many cases, the issues users run into with SaaS products can easily be solved by the users themselves. If you want to keep your live chat and help desk support clear of easy-to-solve questions, make your knowledgebase easy to search.
Bottom Line
If there’s a large quantity of something on your website, don’t assume that the navigation will help visitors work their way through it. Build a Fast Pass-like search experience that will get them exactly where they need and want to go.
How to Add Search to Your WordPress Website
You have a few options for implementing and enabling basic WordPress search for your website:
Add WordPress Search to the Menu with Your Theme
Depending on which WordPress theme you’ve installed, you may be able to add search to your menu with just a few clicks. In this example, I’m using the Astra theme which btw turns out to be very fast!
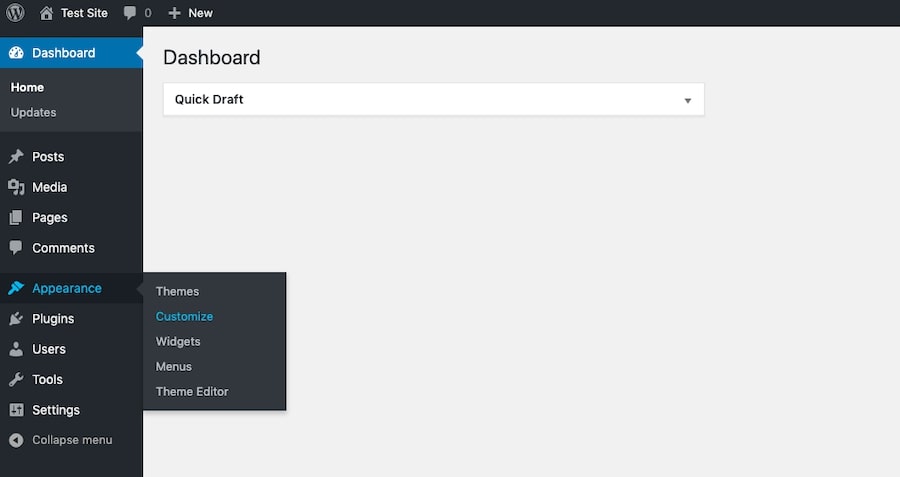
The first thing to do is go to Appearance > Customize:
Next, go to Header > Primary Menu.

Under “Last Item in Menu”, select “Search” from the dropdown.

This will add a search icon and bar as the very last element to your navigation menu.

When using other WordPress themes, this search activation setting might not be in the same spot of your theme customizer. If it’s available, you’ll find it under the “Header” settings. Otherwise, you’ll have to add it manually using one of the options below.
Add Search with a WordPress Widget
WordPress widgets enable you to add content to dedicated blocks in the elements surrounding your content like the sidebar and footer.
One kind of content block you can create with WordPress widgets is a search bar.
Start by locating Widgets under the Appearance menu:

You’ll find all of the widgeted sections available to you here. Depending on the theme or template you use, you might see nothing more than a Sidebar or Footer or you might see a more comprehensive selection like this:
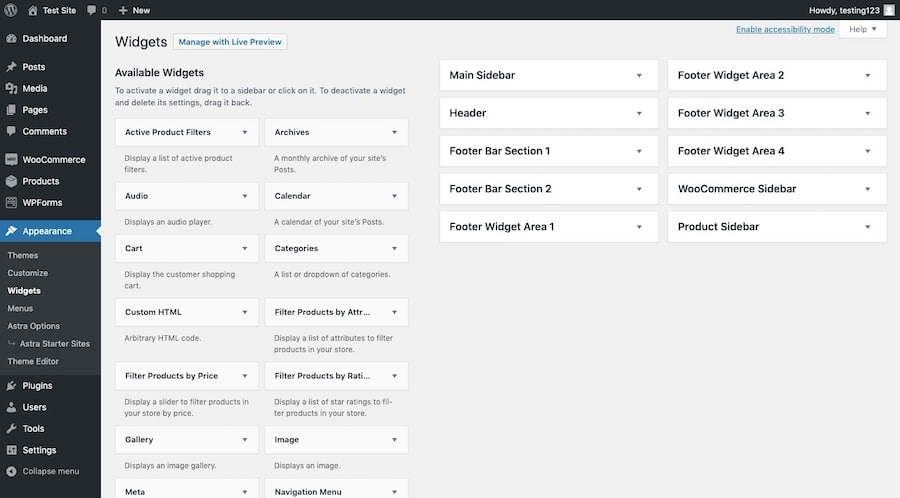
Regardless, what you need to do now is decide where you want your search bar to appear.
Let’s say you plan on publishing new blog content every day and know that the archive is going to grow quickly. So, it would be beneficial to have a search bar present on each blog page.
Scroll to the bottom of your widgets and locate the one called “Search”:

You can add it either by clicking on it and choosing which section to add it to like this:
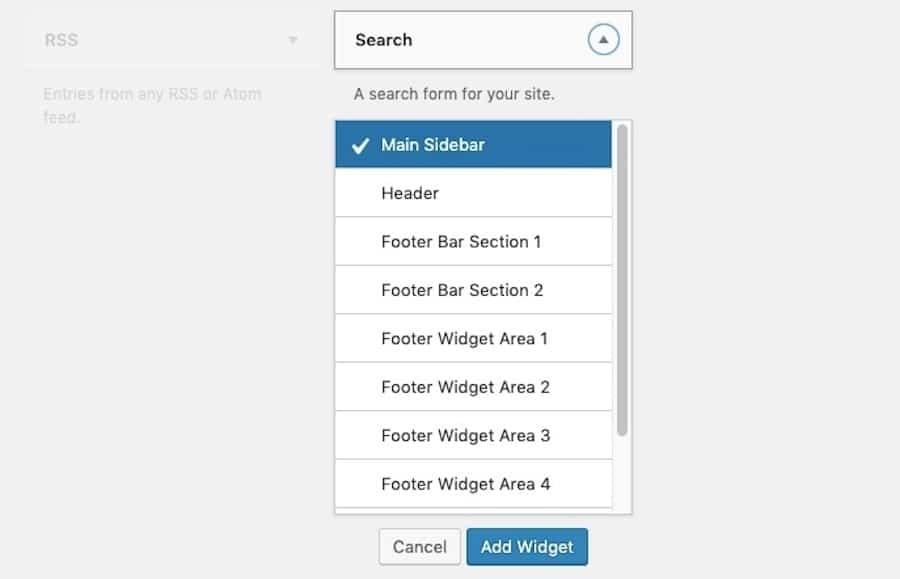
Or you can drag and drop the widget to the section block you want it to appear in:
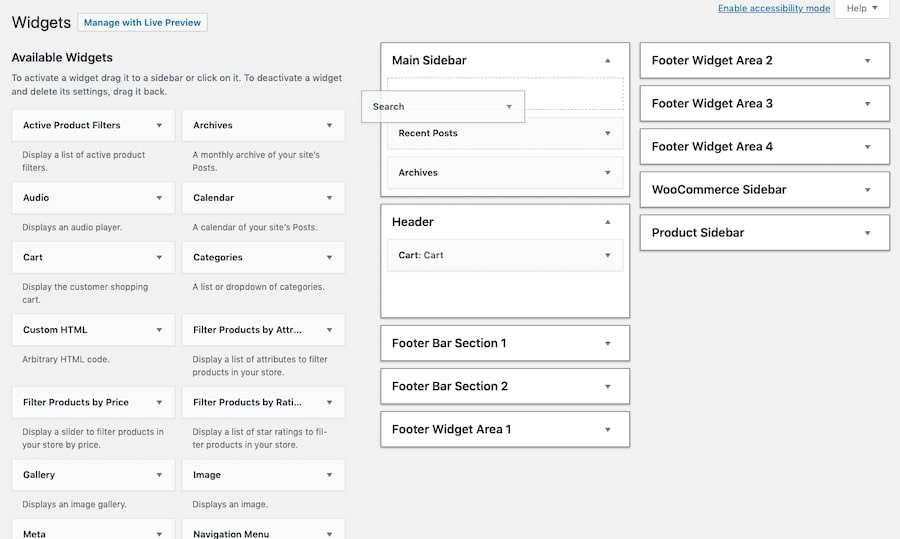
Once you have it where you want it, give it a name:
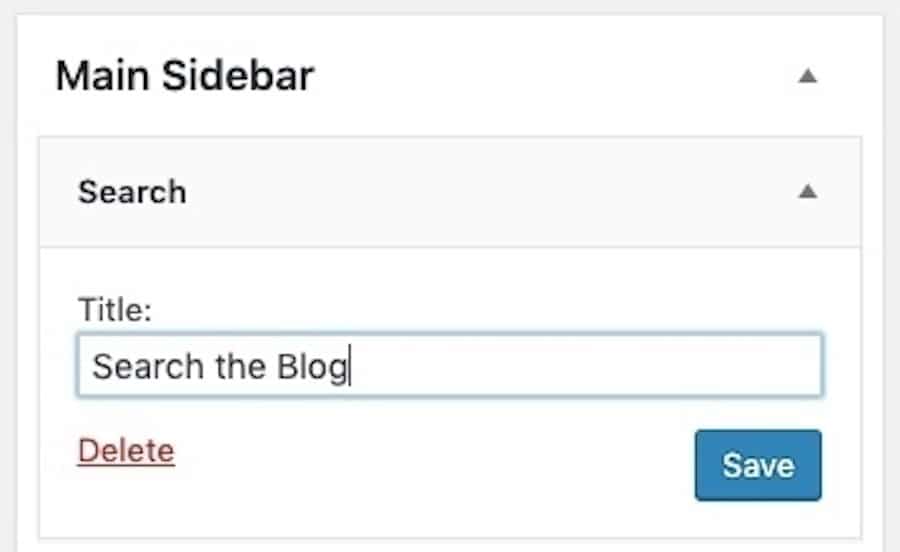
Save your changes and then visit your site to confirm it looks the way you want it to:
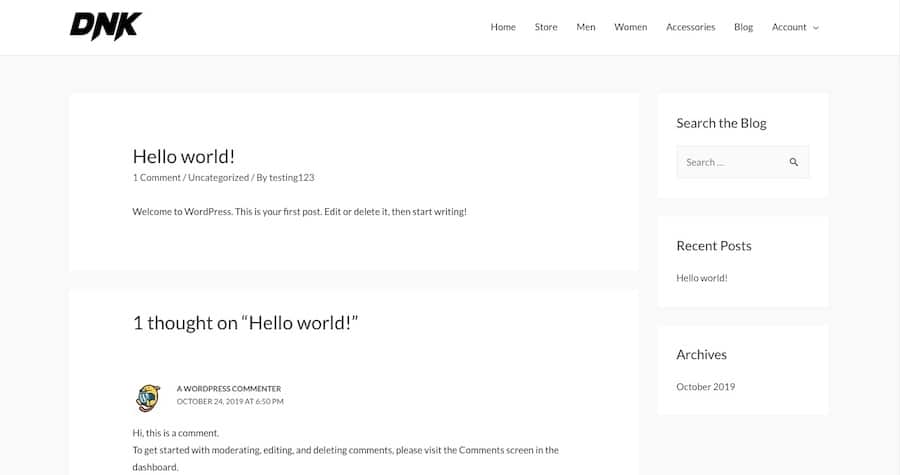
You can see now that the search bar is sitting at the top of the blog sidebar, ready for your readers to use.
Add Search to the Main Content of Your Site with WordPress Tools
While it’s useful to place your search bar in the always-present elements of your website, you may find a reason to include it within the actual content of your pages, too.
There are a few ways to make this happen:
With the WordPress Editor
The Gutenberg editor has certainly made it easier to design more creative page layouts without having to rely on HTML or shortcodes.
One such element you can now add to your pages thanks to the WordPress editor is a search widget:
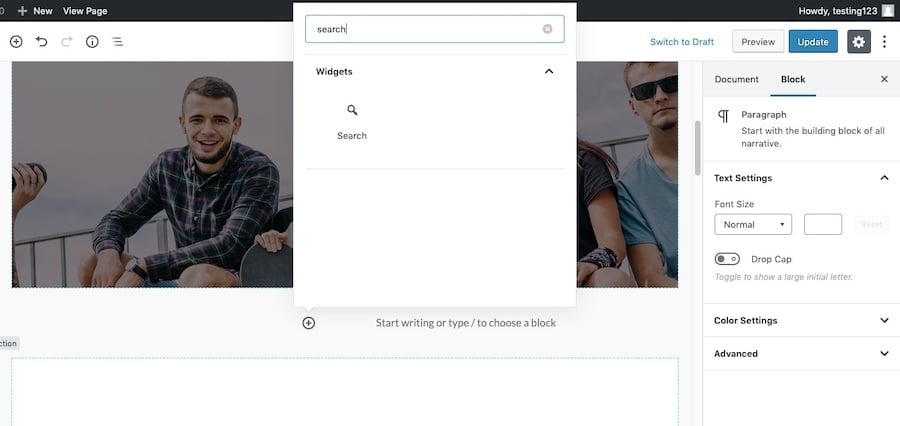
You have more control over how the search bar appears when you use this option. For instance, you can change the title of the search bar, the placeholder text, as well as the button:

You can even change the style of the search block with custom CSS classes.
With a Page Builder Plugin
For those of you who prefer to work with drag-and-drop page builder plugins like Elementor, you can access the search widget with your plugin of choice, too. The process is similar to what you would do with Gutenberg.
With a new page or post open and the Elementor editor activated, do a search for the WordPress search widget from your list of Elements:
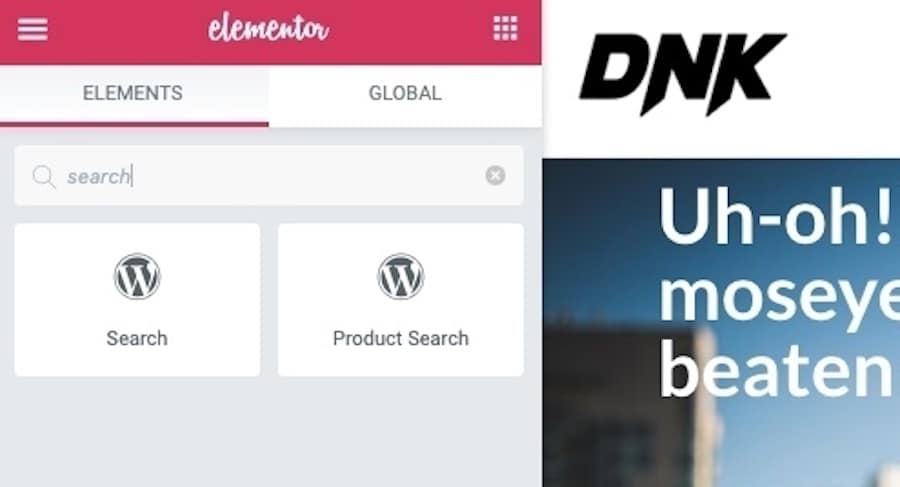
Drag the Search element to where you want it to appear on the page. For example, this is a 404 page that helps users get back on track with a search bar:

As you can see, the page builder plugin gives you more control over where your WordPress search bar appears than Gutenberg does, allowing you to layer it over and within other content.
With a Theme
In some cases, you may find a theme and template that automatically adds search to the content of your website. The kinds of themes that do this, though, tend to be highly specialized, like the Residence Real Estate theme:

Because search can get complicated on listings websites like these, it makes sense that the theme developer would build the functionality into the template.
Booking site themes are another example of ones that come with search functionality already built-in, just like this demo from the Travel Booking theme:

As you can imagine, having search already built into your WordPress theme and template will save a lot of trouble having to build out something this complex yourself. And if the theme is optimized for performance, its search engine solution should be as well (again, one less thing to worry about).
Add WordPress Search with Code
There’s another way to add a basic search form to your website, but it requires you to be comfortable with coding.
To do this, go to Appearance > Theme Editor:

What you’re going to do here is create a shortcode for a search bar using the functions.php theme file:
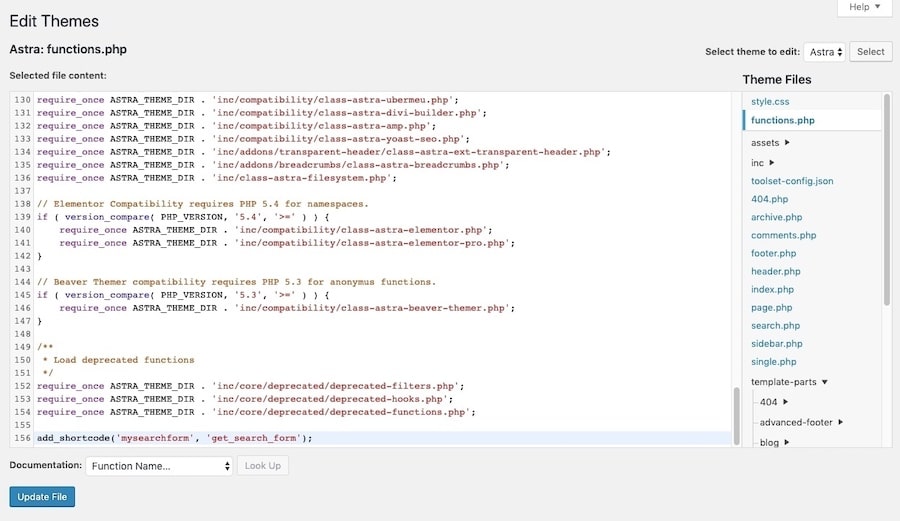
At the bottom of the file, add the following snippet:
add_shortcode( 'shortcodename', 'get_search_form');Replace “shortcodename” with your own name for the search form. Make sure it’s all lowercase with no spaces, numbers, or symbols. Once you update the file, you can start using your shortcode on your website.
Here’s an example:

The shortcode gets added the way any regular text would be added to the site. Just remember to enclose it in brackets [].
While you won’t be able to see the search bar in your editor, have a look at the preview of your page and you’ll see it on the frontend of your site:

Although this is a quick edit, which is good for the purpose of this article, best practices suggest to never edit your theme’s code and to create a WordPress child theme instead.
A Note About WordPress Search Limitations
There are plenty of options you can use to add basic WordPress search functionality to your website. But is that enough?
Unless you have a very small website or you want to restrict search to your blog, it won’t probably won’t be. Let me explain.
WordPress’s native search form looks through the following kinds of content on your web pages and blog posts:
- Page titles
- Paragraph text
- Image titles
- Images captions
- Image alternate text
- File names
As you can imagine, this is incredibly limiting for your users. For starters, if you need to retrieve results from other kinds of pages or content on your website (like WooCommerce products), the basic search form won’t display matching results for them. The same goes for other elements of your website like:
- Widgets
- User comments
- Categories and tags
- Image gallery titles, captions, and alt text
- Custom fields
- And more
WordPress search isn’t just restrictive in terms of results shown either. It’s restrictive by size, too. The larger your website gets, the more difficult it will be for your database to process the results and the longer it will take to serve them to your visitors.
So, what if you need something more powerful and sustainable than what WordPress search allows for?
Let’s look at some ways you can improve it.
How to Improve the Internal WordPress Search Experience
You should read this next part about fixing WordPress search if at least one of the following applies to you:
- You have more than a thousand pages of content or products on your website.
- Your data suggests that internal search is popular, but it’s not leading to any conversions.
- Your search form is getting a lot of action, but your web hosting server is struggling to handle the requests (i.e. it takes more than a couple seconds to load results).
- You want to scale your website without having to worry about search failing you (and your visitors) somewhere along the way.
- Basic search just doesn’t cut it. You need something more advanced and agile to handle the kinds of searches your users do.
Ready to dive in? Here are 6 crucial things you can do to improve WordPress search:
Tip 1: Create a Custom Search Page
Rather than leaving your visitors with a simple search bar to help them zip around your site, why not create a custom search page instead?

It’s not as though your visitors are unfamiliar with using a search, but the experience could be improved with a dedicated search page.
To create your custom page, you’ll need backend access to your website either through FTP or a file manager.
Once you’re inside the WordPress database, you’re going to look for the following file path:
/wp-content/themes/[your theme name]/page.php
page.php is a file that defines the basic structure of your web pages. In other words, it’s a page template. What we want to do now is create a template for your search page.
Duplicate page.php and name the new file searchpage.php. Then, open it for editing.

Most of the code in this file needs to be replaced as what’s here defines a typical web page or blog post. Instead, you need to strip it back so that it only contains what you need on your search page. Here’s an example of how I built out my search page:
<?php
/*
Template Name: Search Page
*/
?>
<?php
get_header(); ?>

<div class="wrap">
	<div id="primary" class="content-area">
		<main id="main" class="site-main" role="main">
<h1>Search Our Shop</h1>
<p>Welcome to the online shop of awesomeness! Here you will find all kinds of products to revolutionize how you work, live, and play.</p>
<p>Use the search form below to get yourself moving in the right direction.</p>

<?php get_search_form(); ?>

		</main><!-- #main -->
	</div><!-- #primary -->
</div><!-- .wrap -->

<?php get_footer(); ?>
The WordPress Codex provides a bit more guidance on what you can and cannot do when creating a custom search page. However, if you like the results of what I’m about to show you, the only thing you might need to change is the content that appears between:
<main id="main" class="site-main" role="main">And:
<?php get_search_form(); ?>Once you’ve saved your searchpage.php template, go back to WordPress. We now need to create a page called “Search”.
Give the page a title and open the “Page Attributes” on the sidebar. You will see a template for the “Search Page” you just created:
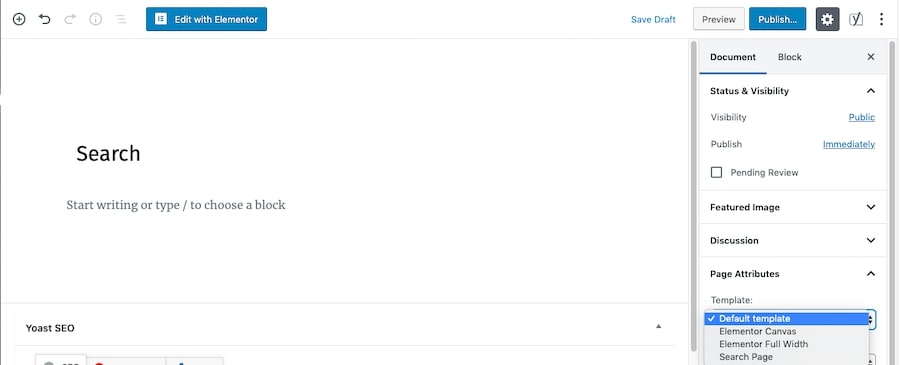
Select the search template and Publish the page. You’ll now see it at the live URL, which should be: https://yourdomainname.com/search/. And, if you used something similar to the code above, it will result in a page that looks something like this:

With this page created and published, it’s yours to do with as you like. You can add it to your menu or link to it elsewhere. Just make sure the link is placed somewhere where your visitors are apt to see it.
Tip 2: Make Your WordPress Search Go Beyond Just Pages and Posts
While the above tip gives you a new place to run WordPress searches from, it doesn’t help with the problem of what kind of content it searches. Luckily for us, there are a number of plugins that will fix this.
Upgrade Basic WordPress Search with WP Extended Search
If all you want is to be able to comb through more content and metadata on your website, a good option is WP Extended Search.
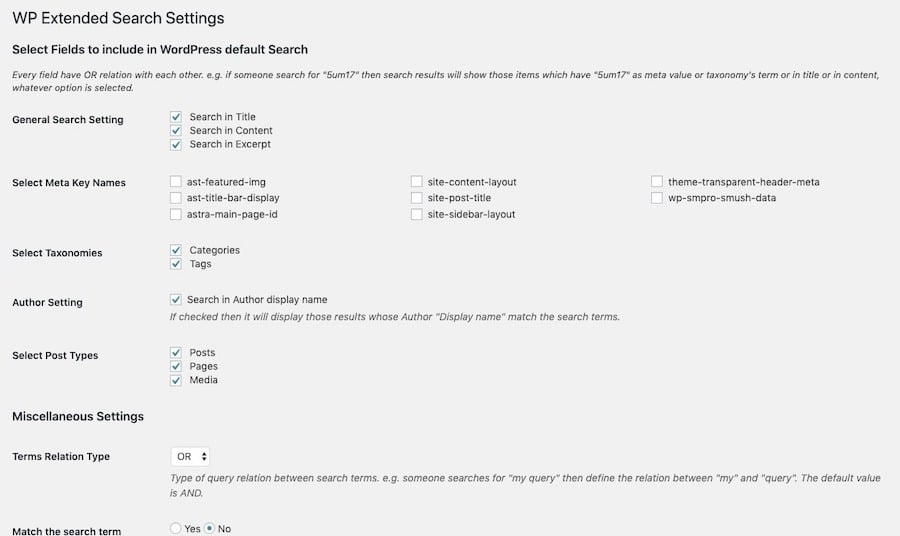
With this plugin, your visitors will be able to retrieve results from:
-
- Posts
- Pages
- Media files
- Categories
- Tags
- Excerpts
- Metadata (like author name)
This is a lightweight and easy-to-configure plugin that improves basic search capabilities for smaller business websites and blogs.
Upgrade WooCommerce Search with Advanced Woo Search
If you have an ecommerce site, you can use the Advanced Woo Search plugin instead.
When enabled, you can place the WooCommerce search form wherever you want on the site. If you want it to replace all of the basic WordPress search forms already there, the plugin has a quick “Seamless integration” option that automatically swaps them out for you.
You can also manually add the form as a widget or shortcode. It’s up to you.
The form is going to resemble the basic WordPress form:

There are two key differences between this form and the one you had before.
The first is that the form searches your WooCommerce product content and metadata, including the title, SKU, excerpt, category, tag, and ID.
This is the second difference:
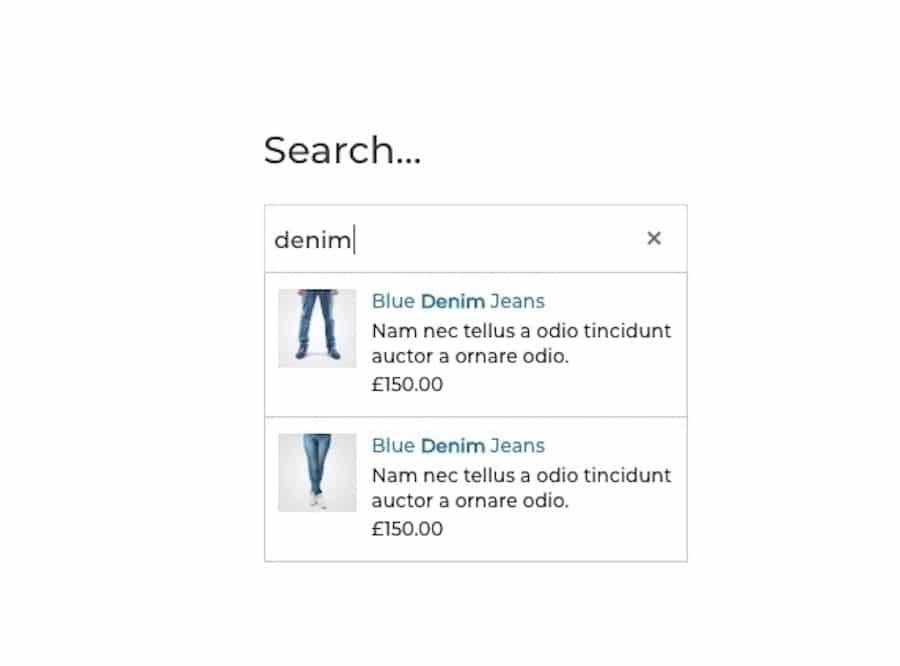
As your visitors begin to type their search queries, matching results appear. This is what’s known as “live” search and, thanks to the plugin’s use of AJAX, it happens instantaneously.
If these options look promising, but you’re looking for more robust or faster upgrades for your WordPress search forms, keep reading.
Tip 3: Improve the Way WordPress Search Results Are Displayed
Next, let’s talk about what kinds of things you can do to improve how search results are shown to your visitors.
Here’s why you can’t afford to skip this tip:

By default, WordPress search displays results similar to this page. The top of the page will say “Search Results for: [keyword]” and is followed by every matching page or post. If there is a featured image (like the jeans above), it will be displayed in full.
It’ll then be followed by an excerpt:

This is just one matching result. Imagine how difficult it would be to get through this search results page if there were a few “denim” matches, let alone dozens or hundreds of them.
To fix this problem, we’re going to look for a WordPress plugin to help.
Improve the Look of Your Form with Ivory Search
Like the plugins mentioned above, Ivory Search enables you to choose which kinds of content and metadata search results are pulled from. With this one, though, you don’t have to make a choice between basic page and post data or ecommerce. You have your pick of the litter here:
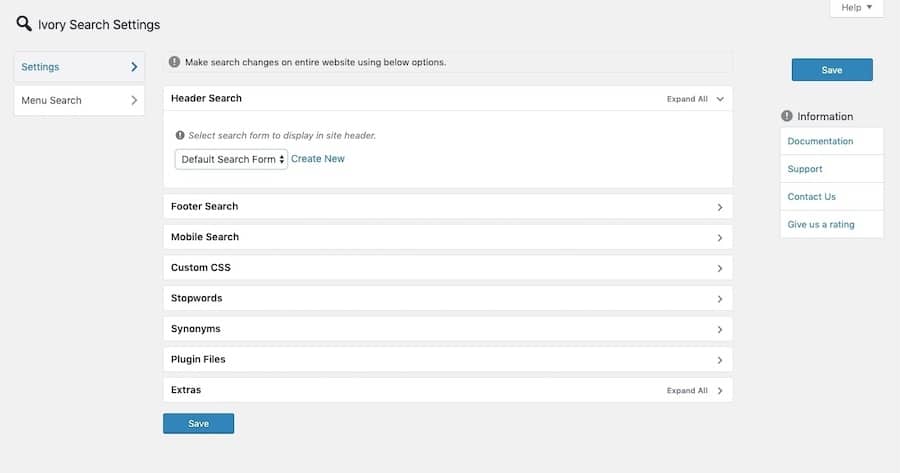
Another noteworthy tip about this plugin is that it lets you customize your search form alongside the rest of your website:

You have control over all aspects of your search form:
-
-
- Colors
- Text
- Style
- Form animation
- Loader image
-
Beyond that, you can also configure things like live AJAX search and give your visitors the benefit of seeing their matches in real-time:

Think of this plugin as the next step up in WordPress search.
Customize How Search Results Appear with Ajax Search
Now, it’s not just how your search form looks that’s going to leave a mark on your visitors. It’s what you do with the results display that impacts their experience, too.
With the Ajax Search Lite and Pro plugins, you’ll really wow them with a smarter and faster search experience.
Here are some examples of what you can do:
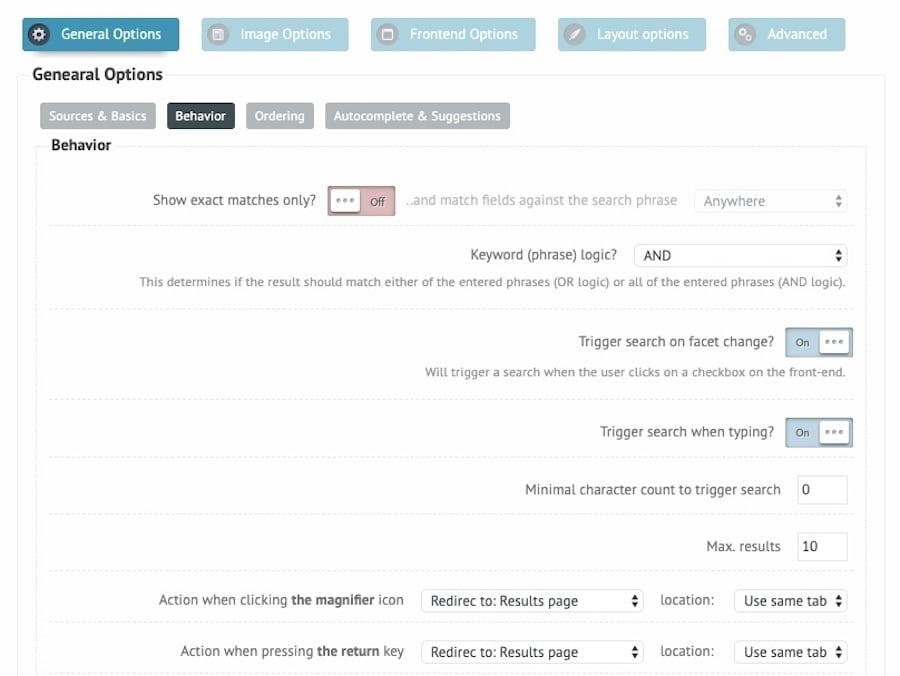
Behaviors make the search experience more efficient for visitors, doing things like immediately opening the search form when they start typing and redirecting them to search results whether they hit the return key or the magnifying glass icon.
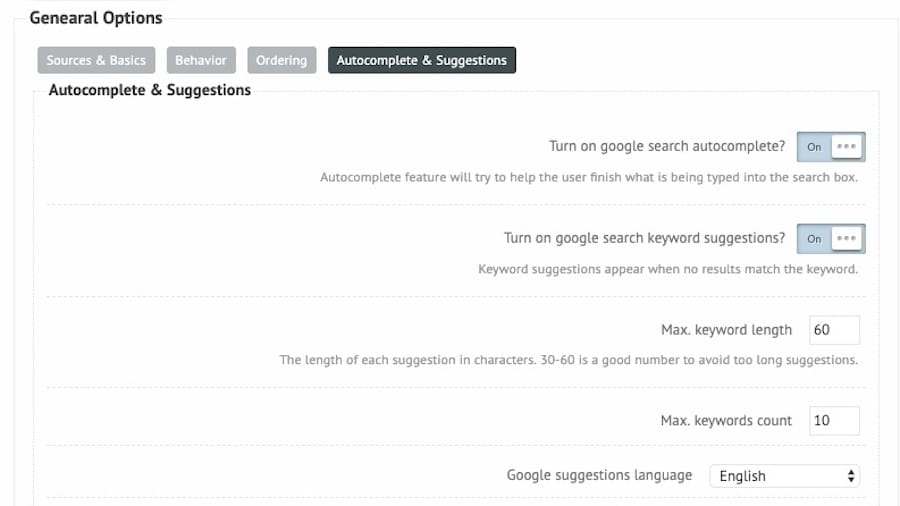
Autocomplete & Suggestions utilize Google search features to speed up your visitors’ searches.
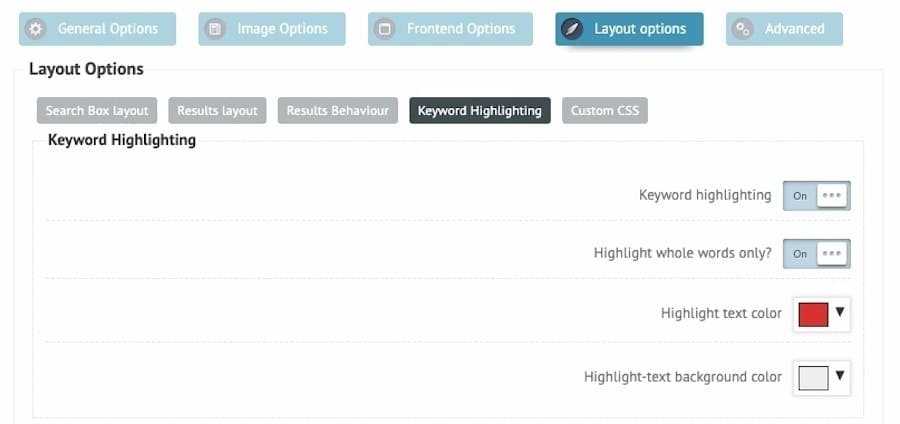
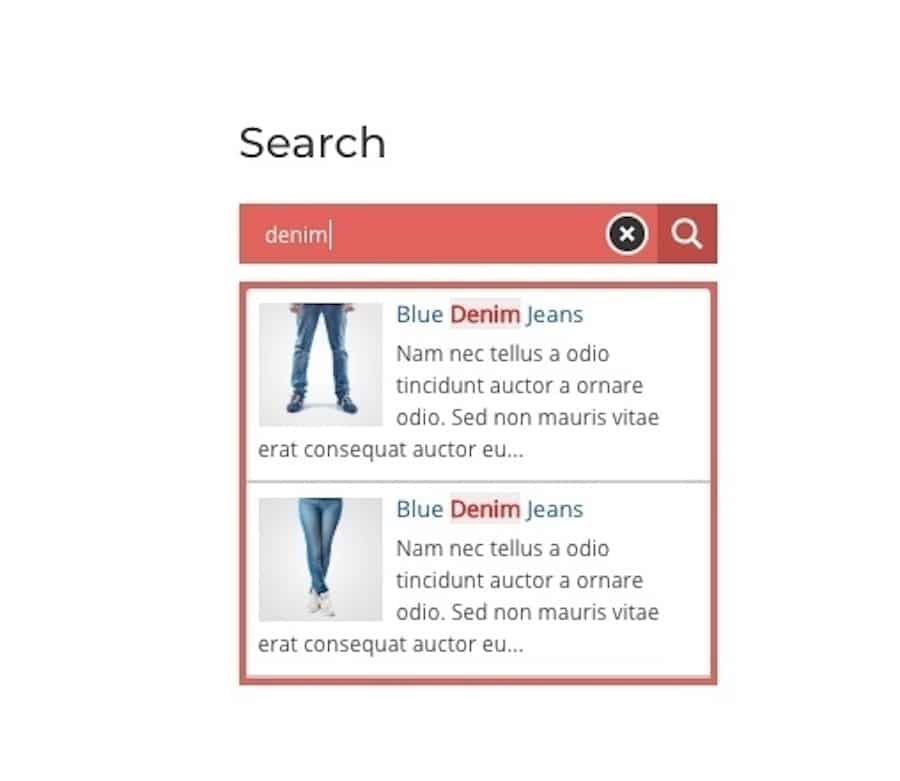
Keyword Highlighting is another useful feature that highlights your users’ keywords in the matching results. This makes it easier to spot more relevant results.
Here’s an example of how that might appear:
This plugin also enables you to dictate how exactly your results should appear: how the results page is to be laid out and which elements should appear (like the featured image + excerpt + author name).
In addition, you can tell the search engine to pull images from a certain place. For instance, if a featured image isn’t available, you can request that the first image on the page be used in search results instead.
You can also decide how each image should be cropped and at what size. This way, you can make your search results pages more manageable in size and appearance — something that becomes extra important as the amount of content on your site grows.
And one more thing: this plugin doesn’t just help you make your search results look better. It speeds up how quickly they get in front of your visitors, too:
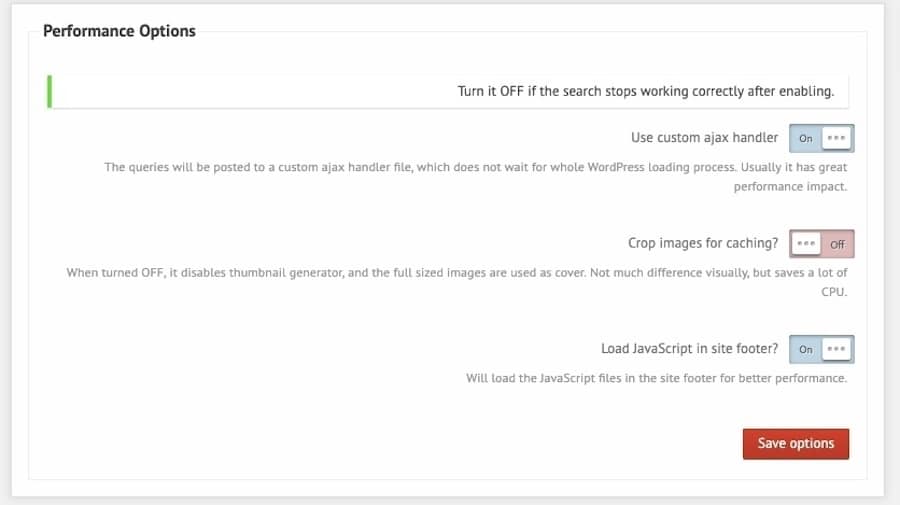
There are three performance optimizations you can make inside this plugin:
-
-
- Apply a custom AJAX handler.
- Disable image cropping.
- Load JavaScript in the footer.
-
With these three settings configured, you can help your web server not be as overwhelmed by continuous search requests.
That said, this is only the tip of the iceberg when it comes to optimizing WordPress search for speed. Keep reading to learn more about Elasticsearch.
Tip 4: Speed Up WordPress Search
While the appearance and search capabilities of your WordPress search form are important, so too is how quickly it all happens.
Get Super Speedy and Complex Search Capabilities with Elasticsearch
At a certain point, WordPress search plugins and your MySQL database just won’t cut it anymore. When your website’s search queries are going through the roof, the only way to ensure an optimum search experience is to use Elasticsearch.
Elasticsearch is an open source search and analytics engine known for its speed, stability, and scalability — it’s just one part of the Elastic stack. When combined with Logstash (for data processing) and Kibana (for data visualization and management), Elasticsearch powers your website’s search engine in ways you’ve never seen before:
-
-
- Query more content types (like PDFs) and metadata
- Fuzzy matching to cut down on “No results”
- Related content suggestions
- Geo-specific content recommendations
- Faceted (multi-filter) search
- Faster query processing
- Real-time access to search query data
-
Although Elasticsearch is open source and free to use, you will need managed Elasticsearch hosting for it (which is not free). There are a number of ways you can obtain this:
1. ElasticPress
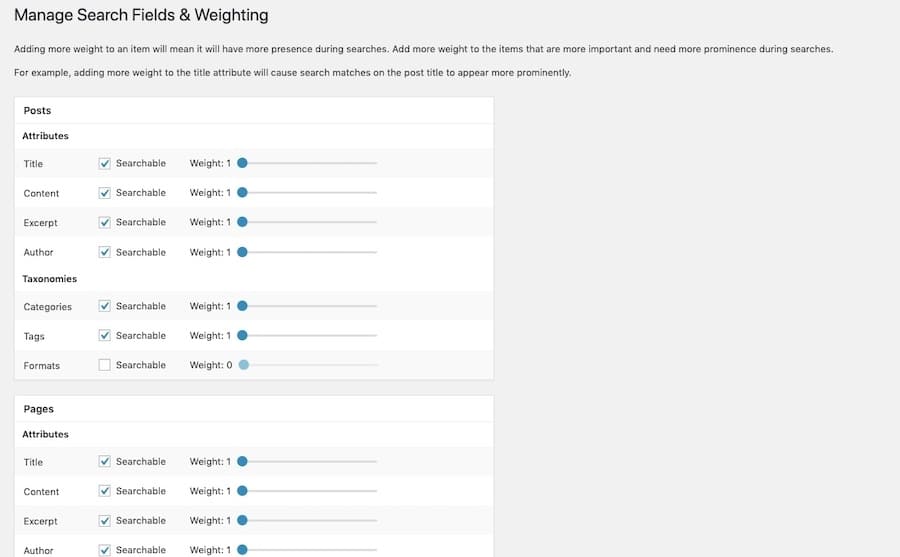
The ElasticPress plugin enables you to seamlessly integrate ElasticPress search capabilities into your WordPress site. This plugin is a popular solution to integrate with WordPress hosts that provide support for Elasticsearch.
2. Elastic
If you want, you can go straight to the source: Elastic. You have a couple of options for deploying your search engine, too.
You can get the full stack and take advantage of its advanced data processing and management tools. This is part of the setup and onboarding process:
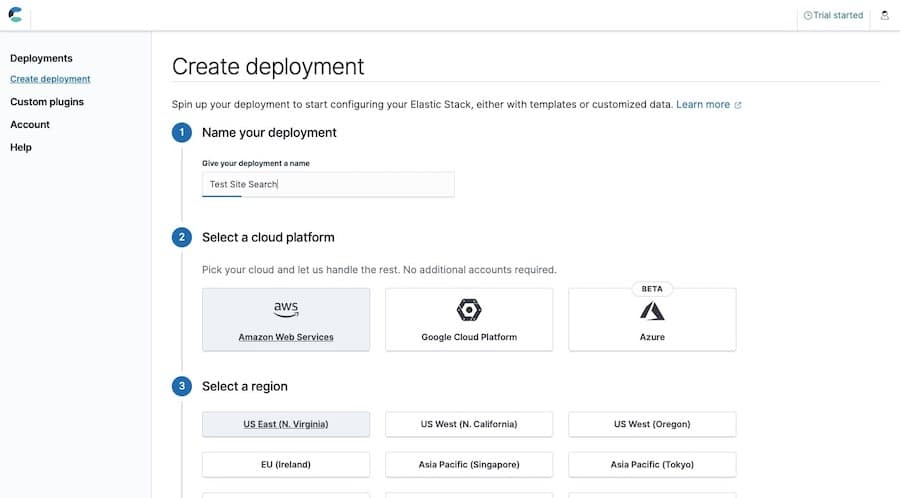
What’s more, you get to control how your Elasticsearch server is to be optimized:

Recommendations are provided based on the kinds of queries your website will be handling, which makes it easy to decide how best to speed up and enhance your search engine.
If you want to simplify setup, use Elastic’s Site Search tool instead:
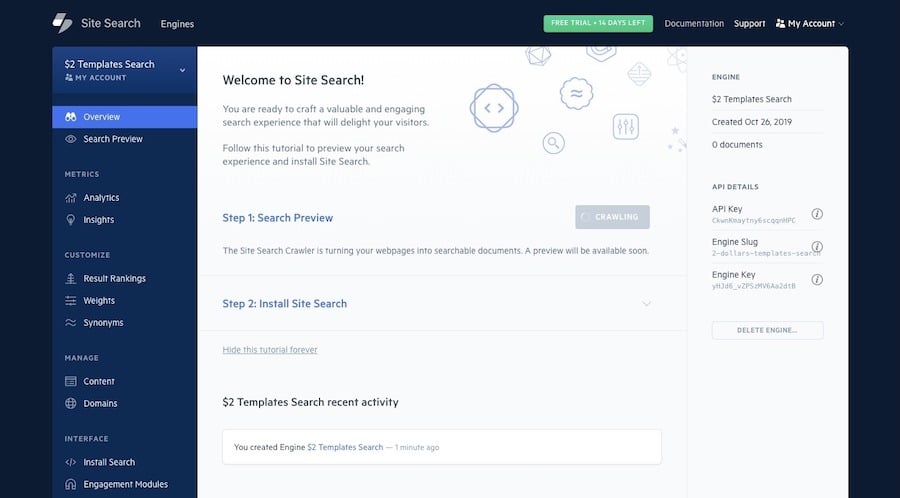
You’re then taken to this dashboard where, once your site is indexed, you can:
-
-
- Install your search engine with a JavaScript snippet.
- Customize how your search engine works with results rankings, weighting, and synonyms.
- Manage the content that’s eligible to appear in search results.
- Set up conversion tracking.
- Configure search recommendations.
- Review your search query data.
-
It’s not as robust of a solution as the Elastic Stack, but this is a great option if you’re simply looking for a high-powered search that’s easy to implement and manage.
3. Amazon Elasticsearch
It should come as no surprise that Amazon has an Elasticsearch service of its own. If you’re already using AWS hosting and deployment services, this would be a great option for you.
Similar to the options above, it’s a managed service that enables you to create a fast search engine with complex querying abilities for your site.
Tip 5: Cache Your Search Results Page
Another way to optimize WordPress search for speed is by caching your search results. By enabling caching, your server won’t have to continually process the same queries over and over again. Instead, it will retrieve and display a static search results page, providing visitors with near-instantaneous results.
One way to enable caching is with a WordPress caching plugin.
One of the top-rated plugins, W3 Total Cache, calls attention to the caching of search results pages, so start there if you’re looking for a caching solution that prioritizes the kinds of performance optimizations you need.
Or you might try WP Rocket. Although it doesn’t cache search results pages by default, it’s created the Cache Search Results helper plugin for that exact purpose.
Another way to enable this is by using the Ajax Search Pro plugin mentioned earlier. I’ve already shown you a few ways that the Lite version of the plugin optimizes search performance. The Pro version adds even more optimizations, including image precaching and search phrase caching.
Tip 6: Activate Search Tracking in Google Analytics
Last but not least, remember to activate search tracking in Google Analytics. You’ll find it under Admin > All Web Site Data > View Settings.

To turn on-site search tracking, switch the toggle to “ON”. This will reveal a new field called “Query parameter”. This is the element in your URL (and database) that defines a search query and result.

The letter “s”, in this case, is what defines the search query on the website. If you’re unsure of what your own search parameter is, run a test search and locate the letter or word following the question mark.
If your search allows visitors to select categories and filters, you can enable site search categories, too. You may need to indicate multiple parameters here.
Once you’re done setting up search in Google Analytics, you’ll be able to find all of your data under Behavior > Site Search.
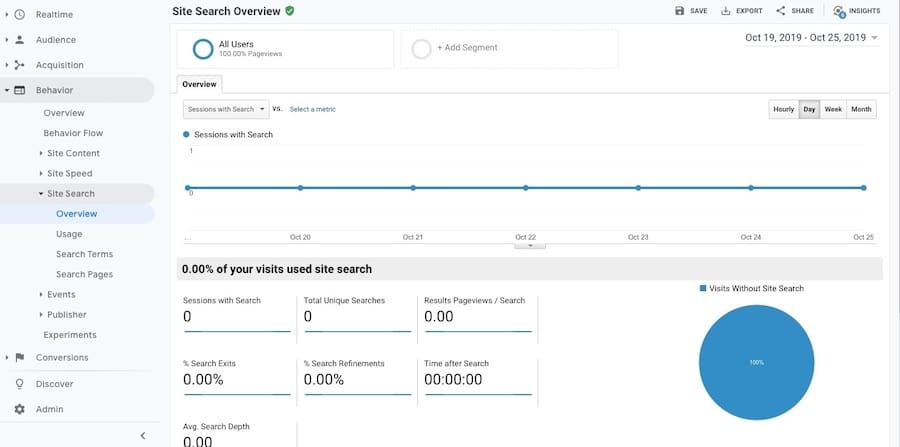
Just like the rest of Google Analytics, this data provides you with a wealth of opportunity to figure out:
-
-
- What’s drawing visitors to your site in the first place.
- Which search terms are queried, but your website has failed to provide an answer or solution for.
- Which content or products get searched the most.
- Which search queries lead to the most conversions.
- Which pages more search queries take place on.
-
Pay close attention to what your visitors are doing with search and you can more effectively shape the rest of the on-site experience for them.
Summary
WordPress search might seem like a simple enough matter — and it is if all you need is a basic search function to help visitors navigate a dozen or so pages.
You can add a simple WordPress search function to a number of areas on your website, like the header, menu, sidebar, footer, and even in-line with your content. There are a number of ways you can add these search elements, too:
-
-
- Your theme’s settings
- A WordPress widget
- A page builder plugin
- A pre-made theme template
- Code
-
Don’t forget: the larger your website is and the more complex your navigation becomes, the more you’re going to need a solution that enhances your WordPress search capabilities to provide a better UX to your visitors. And a better UX, most of the times, results in increased conversions for you.


