WordPress is a powerful Content Management System (CMS) that can lay the foundation for different types of sites and apps. This uses a typical ‘monolithic architecture,’ but as a site grows, this may not be the best fit. This is where a ‘microservices architecture’ can be beneficial.
For this post, we’ll explore how you can build WordPress web apps using a microservices architecture. We’ll also introduce the Create Block Theme plugin and discuss how this exciting solution fits into your development too.
What microservices are
Before building any web app, you should understand microservices and how they differ from monolithic architectures.
With monolithic architecture, there is a tight coupling between all an application’s components. It essentially runs as a single service. It’s a simple way to develop an app, although maintenance and scalability can become a challenge as it gains complexity.
In contrast, microservices help you break down the app into a collection of smaller services. Each service is independent from one another regarding development, deployment, and scaling.
Each service handles a specific task and will communicate with the other services through an application programming interface (API). For example, consider a typical ecommerce site with a cart, checkout, order processing, product page, and more.
In a monolithic architecture, all these features would be part of a single, large application. WordPress is monolithic, and using Woo as your ecommerce platform is an excellent example.
However, implementing a microservices architecture can let you use the right technology for each task. For instance, you could use WordPress’ best-in-class CMS for your content marketing. Adobe Commerce could be your product management system. A checkout solution such as Bolt could fit your needs.

Gluing these together is possible with microservices. Next, let’s talk about why microservices should be a big consideration for your next project in greater detail.
What makes microservices stand out from monolithic architectures
The high-level ‘elevator pitch’ for microservices is how you can combine different technologies and tools to create a whole. However, there are other, deeper characteristics that are worth noting:
- Decoupling. Each service maintains independence. This means you can use the best tech for each job rather than cope with unsuitable frameworks.
- Autonomy. By extension, the services you integrate don’t need to rely on each other for performant running.
- Specialization. Of course, each service will focus on its own job, which again impacts performance.
- Resilience. Part of this inherent and performant asset is that one service failure won’t bring down your entire site.
There are even more advantages when using microservices, over and above these aspects:
- Scalability. You’re able to scale individual services based on individual needs without impacting the rest of your app.
- Flexibility. We’ve already outlined briefly how your services can use the best technology for their job. This even extends to the programming languages you use to create them.
- Faster development. You can develop small and focused services quicker, better understand your service’s functionality, and maintain the system with greater ease.
- Improved fault isolation. With the ‘modular’ setup, you can isolate a service if it fails without affecting your other services.
On the other hand, microservices can introduce complexity for communication, data consistency, and managing distributed systems. As such, you must weigh up your app’s requirements carefully. In short, consider both the benefits and the trade-offs before you decide to use microservices.
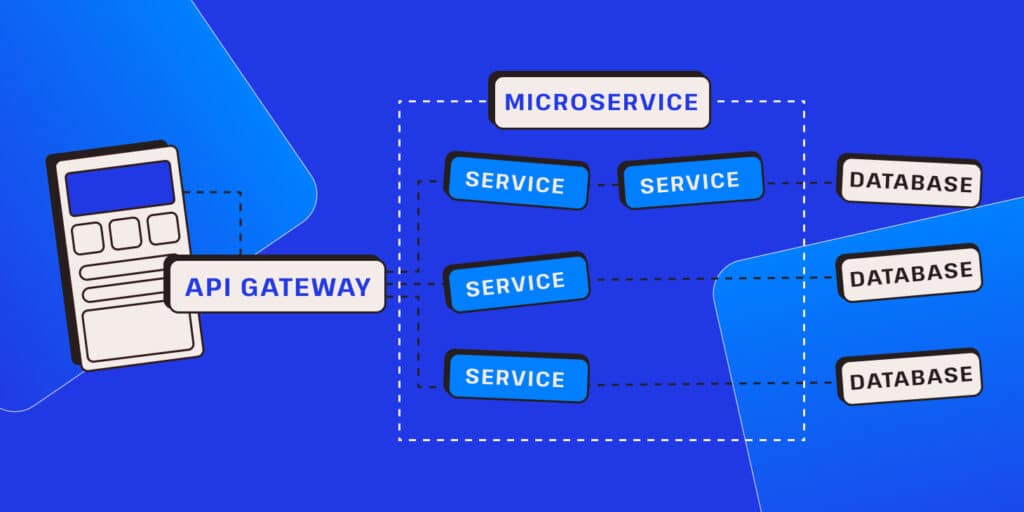
The components of a microservices architecture
As you’d expect, a microservices architecture can consist of several components. These ‘cogs’ work together in the entire ‘wheel’ to provide a scalable and maintainable app.
As such, there are some components that are key to a smooth implementation:
- API gateway: This is the entry point for any client requests. It moves those requests to the appropriate microservices. It can also handle tasks such as rate limiting and authentication.
- Service discovery: You will need to employ a dynamic way to let microservices discover and communicate with each other. Tools such as Consul or Eureka can help here.
- Containerization: It’s common to package and deploy microservices as containers using tools such as Docker. This is how you provide isolation for each service.
- Orchestration: As you add microservices to your app, managing them becomes more complex. A tool such as Kubernetes can help to automate this service management.
- Caching: Caching mechanisms such as Redis or Memcached will often improve performance. This can be crucial, given the greater strain on your backend services and databases.
- Messaging: Of course, your services need to talk to each other too. This is the job of ‘asynchronous’ messaging solutions such as RabbitMQ or Apache Kafka. These ‘message brokers’ enable a loose coupling between your microservices.
Tools are only one aspect of your setup, though. There are other considerations, such as how you’ll design each microservice within the full architecture.
Design patterns for microservices
Your design patterns for microservices matter just as much here as elsewhere in your development workflow. Given the potential complexity across your app, it’s important to consider which patterns will have the greatest impact. There are three we can point out:
- Database-per-service: Each microservice uses its own dedicated database, which helps with data isolation and autonomy.
- API composition: You can compose microservices to create higher-level services or APIs. This flexibility and reusability is a top benefit.
- Event-driven architecture: Here, services will communicate through events. This facilitates a looser coupling and asynchronous processing.
It’s also vital to factor in specific design patterns for the tools you’ll use to build your architecture. For example, Docker and Kubernetes both have typical patterns that you’ll consider alongside the global design your architecture takes.
However, understand that not every component needs to be a microservice. The right idea is to begin with key services and evolve the architecture over time. Later, we’ll discuss this in more detail. First, we should look at how to develop the frontend.
Introducing the Create Block Theme plugin
WordPress will likely feature somewhere in your architecture, given that it’s excellent in many ways. One of those is its ease of use on the frontend. Themes are a core part of the platform, and creating your own is much easier now there are plugins such as Create Block Theme.

This plugin is the spiritual successor to the Underscores starter theme but is completely compatible with full site editing (FSE). You can create a starter theme fast, leverage the editor’s full power, and harness full customization options. It works as a typical WordPress plugin, with the option to export it as an independent theme later.
Using the Create Block Theme plugin alongside a microservices architecture can ‘glue’ everything together. For example, you could use Block Patterns and reusable Blocks across different WordPress sites. While this promotes code reuse and consistency, it can also bring a unified front to all the individual services you use.
We’ll explore the specifics of using Create Block Theme later in this post. For now, let’s discuss headless WordPress and how microservices can impact it.
The intersection between headless WordPress and a microservices architecture
If you want to decouple WordPress’ front and backends, microservices can be a natural forward step. For typical headless WordPress, the platform is for content management only. It could be that it’s used as an API.
By combining headless WordPress with a microservices architecture, you can:
- Leverage the WordPress REST API. WordPress provides a built-in REST API that lets you retrieve and manipulate content programmatically. You can use this API to integrate your microservices with WordPress.
- Have independent scalability of your front and backends. With two independent parts of your site, you can scale both and achieve better performance. Despite the complexities, you actually obtain flexibility.
Next, we want to focus on the REST API a little more. This is how you’ll consume microservices, so it’s a vital part of the whole chain.
Microservices and the WordPress REST API
The WordPress REST API plays a crucial role in enabling the integration between your site and microservices. Its endpoints let you retrieve and manipulate WordPress posts, pages, users, taxonomies, and more using output in JSON.
[
  {
    "id": 1,
    "date": "2020-04-01T10:30:00",
    "date_gmt": "2020-04-01T14:30:00",
    "guid": {
      "rendered": "https://example.com/?p=1"
    },
    "modified": "2020-04-01T10:30:00",
    "modified_gmt": "2020-04-01T14:30:00",
    "slug": "hello-world",
    "status": "publish",
    "type": "post",
    "link": "https://example.com/hello-world/",
    "title": {
      "rendered": "Hello World"
    },
    …
As such, the REST API is the hub for all other services in the architecture. This means you have to choose which current site services to extract as microservices. We’ll look at this in greater detail later in the post.
In a nutshell, the key is to identify the distinct functionalities and responsibilities within your web app. From there, you can split them into independent, focused, and deployable microservices.
Building a web app with Create Block Theme and microservices
The rest of this post will cover the basics of microservices and headless WordPress. It’s going to cover a lot in holistic terms, as the actual process will be specific to your needs.
Even so, let’s dive into the process of building a web app using microservices and the Create Block Theme plugin. The first step is to set up your development environment.
1. Set up a development environment
Every app begins with a space to create it. As such, you need a development environment. There are two locations for your dev space: your local computer and your server.
There are a lot of ways to set up a local development environment, although we (naturally) recommend DevKinsta:
We also recommend a staging environment, as you need a way to test changes before you deploy them. If you choose DevKinsta and you’re a Kinsta customer, you get greater connectivity to your server:
DevKinsta will install Docker for you, which helps to tick another task off of your list. You may want to use Kubernetes for orchestration, so this is the time to install it. Kinsta uses this for database hosting applications and other tasks, and you can download it within Docker Desktop:

From here, you’ll also want to set up any other frameworks you need to develop your theme. However, you won’t be able to do anything without the Create Block Theme plugin, so let’s look at that now.
2. Set up the Create Block Theme plugin
Once you have your development environment set up, you can start working with the Create Block Theme plugin to create your custom block-based theme. You’ll also need the following:
- A WordPress website to work with.
- Whatever coding editor you like to use.
- The Create Block Theme plugin.
You can install the plugin in the typical WordPress way. From there, head to the Appearance > Create Block Theme link within WordPress:
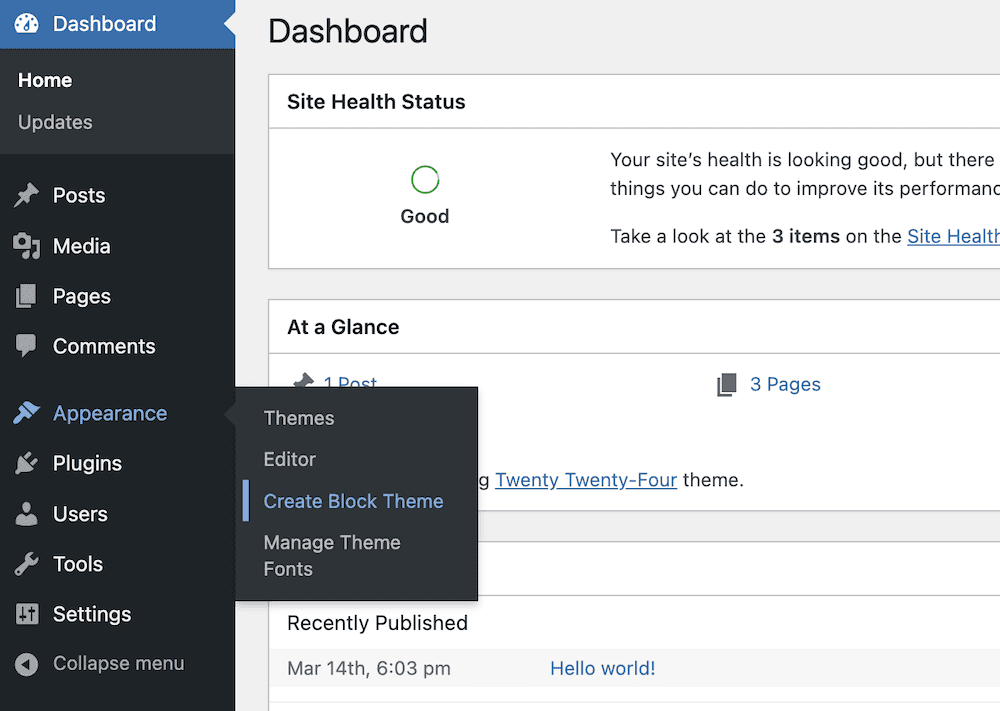
As an aside, if you check out the Appearance tab, you can spot the Manage Theme Fonts option. Create Block Theme also gives access to this option, which is essentially the WordPress 6.5 Fonts Library feature.
Regardless, on the Create Block Theme screen you should see a list of options to generate a new theme. We won’t go through them all here, but we’re going to choose to clone Twenty Twenty-Four. Regardless, this will display a set of options and fields:
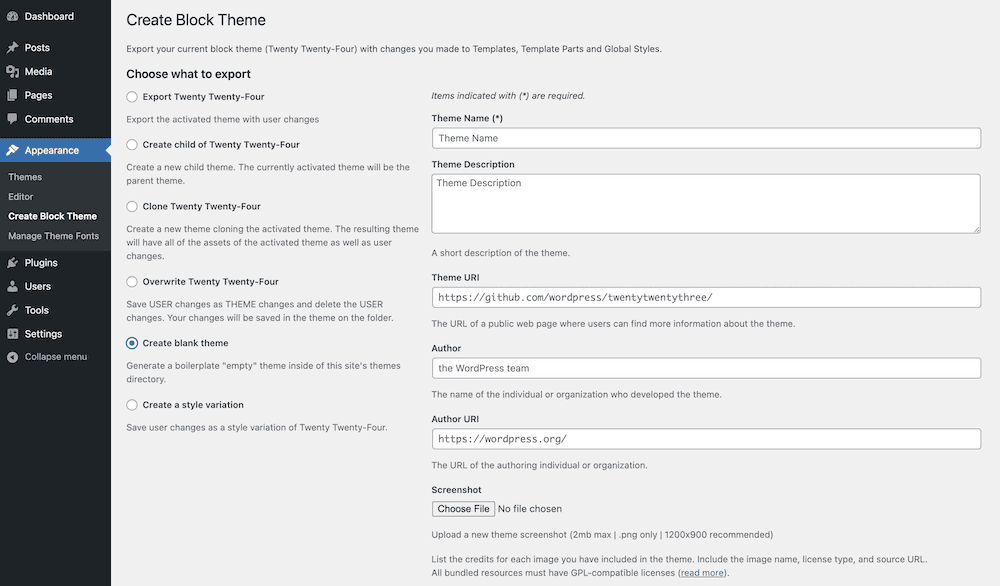
If you notice, these will become the theme identity fields within your style.css file. They’re straightforward, consisting of choosing a name, screenshot, URL, and some tags for the WordPress Theme Directory.
Once you click to confirm, head to the Appearance > Themes screen again and see your new theme ready and waiting:
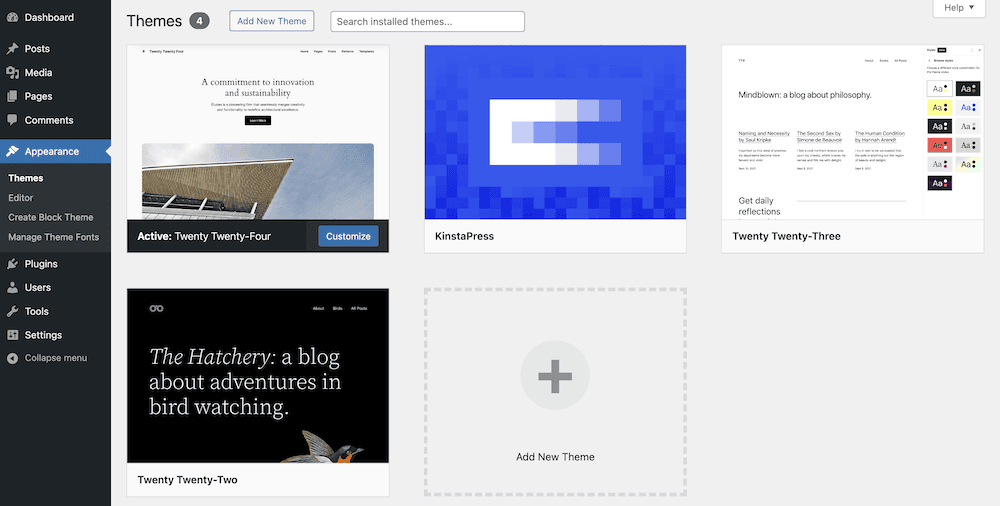
In some cases, you’ll download a ZIP file of your theme, which you should upload back to WordPress. Note that you can export the theme too, but for our use case, we won’t do that right now.
Tips for setting up and using Create Block Theme
We also won’t go too heavily into customizing your new Block theme, as that’s beyond the scope of the post. However, here are some tips for using Create Block Theme:
- Your modifications can happen in two places. You can use either the Global Styles option within the Full Site Editor or by customizing the theme.json file.
- It’s a good idea to create a Block for your chosen microservice. We’ll cover more on this later.
- Create Block Theme lets you generate a child theme based on the current active theme. However, your choice will depend on your goals.
Let’s talk about the last point a little more. If this is a theme to create and distribute, you’ll want to work within the parent theme. For your own use, it could work to customize only the child theme. As a rule of thumb, the less ‘populated’ a theme is initially, the more you should work within the parent theme.
3. Extracting your chosen microservices
Once your Block theme is ready to roll, it’s time to examine your microservices more closely. One key decision you’ll need to make is what services will become ‘micro.’
This can be a complex and subjective question that your own needs will answer. There are a few factors to note, though:
- Your site’s capabilities: Look at any distinct functionality your site offers and consider splitting it into a separate microservice, such as payment functionality.
- Independent scalability: An existing service that relies on independent scaling will be a good candidate for microservices. Caching might be one example here.
- Technology diversity: If you need to move away from WordPress’ PHP architecture, this is again another microservice candidate. This could be the case for specific ecommerce platforms or backend components.
- Data isolation: Services with custom data storage requirements could be microservices. This is also the case if those services don’t need to share data with others.
In our opinion, it’s a solid idea to create microservices that provide specific API functionality. This could be search, payment processing, or authentication. If those services can react with other first and third-party APIs, it makes them more flexible and valuable.
4. Developing and deploying your microservices
To work on and eventually deploy your microservices, you’ll need to rely on other tools. Here are some key considerations and tools you can use:
- Docker will often be the way you containerize your microservices. It packages the microservice and its dependencies together, making it easy to deploy and scale.
- Each microservice will need a Dockerfile, too. It should specify the necessary dependencies, configurations, and runtime environment you need.
- Use Kubernetes for container orchestration and management. Sevalla, Kinsta’s PaaS product, provides a powerful platform with built-in support for Kubernetes.
- Continuous integration and deployment (CI/CD) pipelines can be the way you automate building, testing, and deployment. Tools such as GitLab and Travis CI can help streamline your CI/CD processes.
- Serverless functions don’t need a full-fledged server, so they are great for microservices. Platforms such as AWS Lambda, Google Cloud Functions, or Azure Functions let you run code without provisioning or managing servers.
- API gateways provide a single entry point for your microservices. Tools such as Kong or Amazon API Gateway can help you manage and secure your APIs. Also, they can handle tasks such as authentication, rate limiting, and request routing.
At this point, you’ll have a WordPress website and microservice that are independent of one another. The final step is to integrate them.
5. Integrating microservices with WordPress
Once you develop and deploy your microservices, you need to integrate them with WordPress. To do this, you’ll make API calls from WordPress to the endpoints your microservice exposes. As such, you’ll want to know the REST API inside out.
The typical way to do this in WordPress is with wp_remote_get() or wp_remote_post(). This will let you send HTTP requests and handle the responses. Here’s some example code of how it would all fit together:
// API endpoint URL

$api_url = 'https://api.example.com/endpoint';

// API request parameters

$params = array(
    'param1' => 'value1',
    'param2' => 'value2',
);


// Make the API request using wp_remote_get
$response = wp_remote_get(add_query_arg($params, $api_url));

// Check if the request was successful
if (is_wp_error($response)) {
    // Handle the error
    $error_message = $response->get_error_message();

    // Log or display the error message
} else {
    // Process the API response
    $response_body = wp_remote_retrieve_body($response);

    $data = json_decode($response_body, true);

    // Use the retrieved data as needed

    // ...
}
Microservices often benefit from asynchronous data fetching to avoid blocking the main thread. WordPress can combine two elements to do this. You can use the API Fetch package, along with the support for async and defer introduced in WordPress 6.3. Your code might look like something similar to the following:
import apiFetch from '@wordpress/api-fetch';

// Microservice API endpoint URL
const microserviceUrl = 'https://api.example.com/microservice';
...


// Make the API request to the microservice
apiFetch({
  path: microserviceUrl,
  method: 'GET',
  data: params,
})

  .then((response) => {
    // Process the response
    console.log(response);

    // Use the retrieved data from the microservice

    // ...
  })
...
You might also consider AJAX to carry out dynamic user interface (UI) updates.
Of course, proper authentication and security measures are also crucial. The WordPress REST API includes a few ways to authenticate sessions, such as using cookies, JSON Web Tokens (JWT), or Application Passwords. Given the reliance on external solutions, keeping your microservices and site secure is crucial.
Given that we’re using a custom Block theme, it makes sense to leverage that functionality. Adding your microservice to a Block means you can include it almost anywhere on your site. To go one step further, you may even want to include that functionality in a plugin.
The process has three components: registering the Block, rendering the content, and processing data. JavaScript will be your language of choice here, and the registerBlockType function will handle registration and rendering:
// JavaScript function that builds the Block to enable access within the Block Editor.
( function( blocks, element ) {
    var el = element.createElement;

    blocks.registerBlockType( 'my-micro/stripe-api', {
        title: 'Stripe Payment Gateway',
        icon: 'dashicons-cart',
        category: 'embed',

        edit: function() {
            return el(
                'div',
                {},
                '' // Create the visual elements of the microservice to display within the Block Editor.
            );
        },
…
This is a very basic example of registering a Block, and anything more is beyond the scope of the post. However, you can see that it’s straightforward to combine the Create Block Theme plugin, microservices, and WordPress. If you use the right hosting provider, you have another way to add value to your microservice architecture.
Summary
WordPress is monolithic, but that doesn’t stop it from incorporating microservices. This can have many benefits, such as improved scalability, flexibility, and faster development.
The Create Block Theme plugin lets you create a clean, secure codebase for the rest of your project. Microservices can introduce complexity to your site. Using a custom Block Theme means you can implement those services in the best way for your needs.
Does a microservices architecture seem like a perfect fit alongside the Create Block Theme plugin? Let us know your thoughts and experiences in the comments section below!


