Fastly CDN
While Fastly is a newer CDN compared to some others, it’s a reliable platform that offers a range of services, including DDoS mitigation.
How to install and configure Fastly CDN
In order for Fastly to serve your site over HTTPS (recommended), you’ll need to have a paid plan at Fastly so you can add an SSL certificate.
If you don’t already have a Fastly account, visit their signup page to get started.
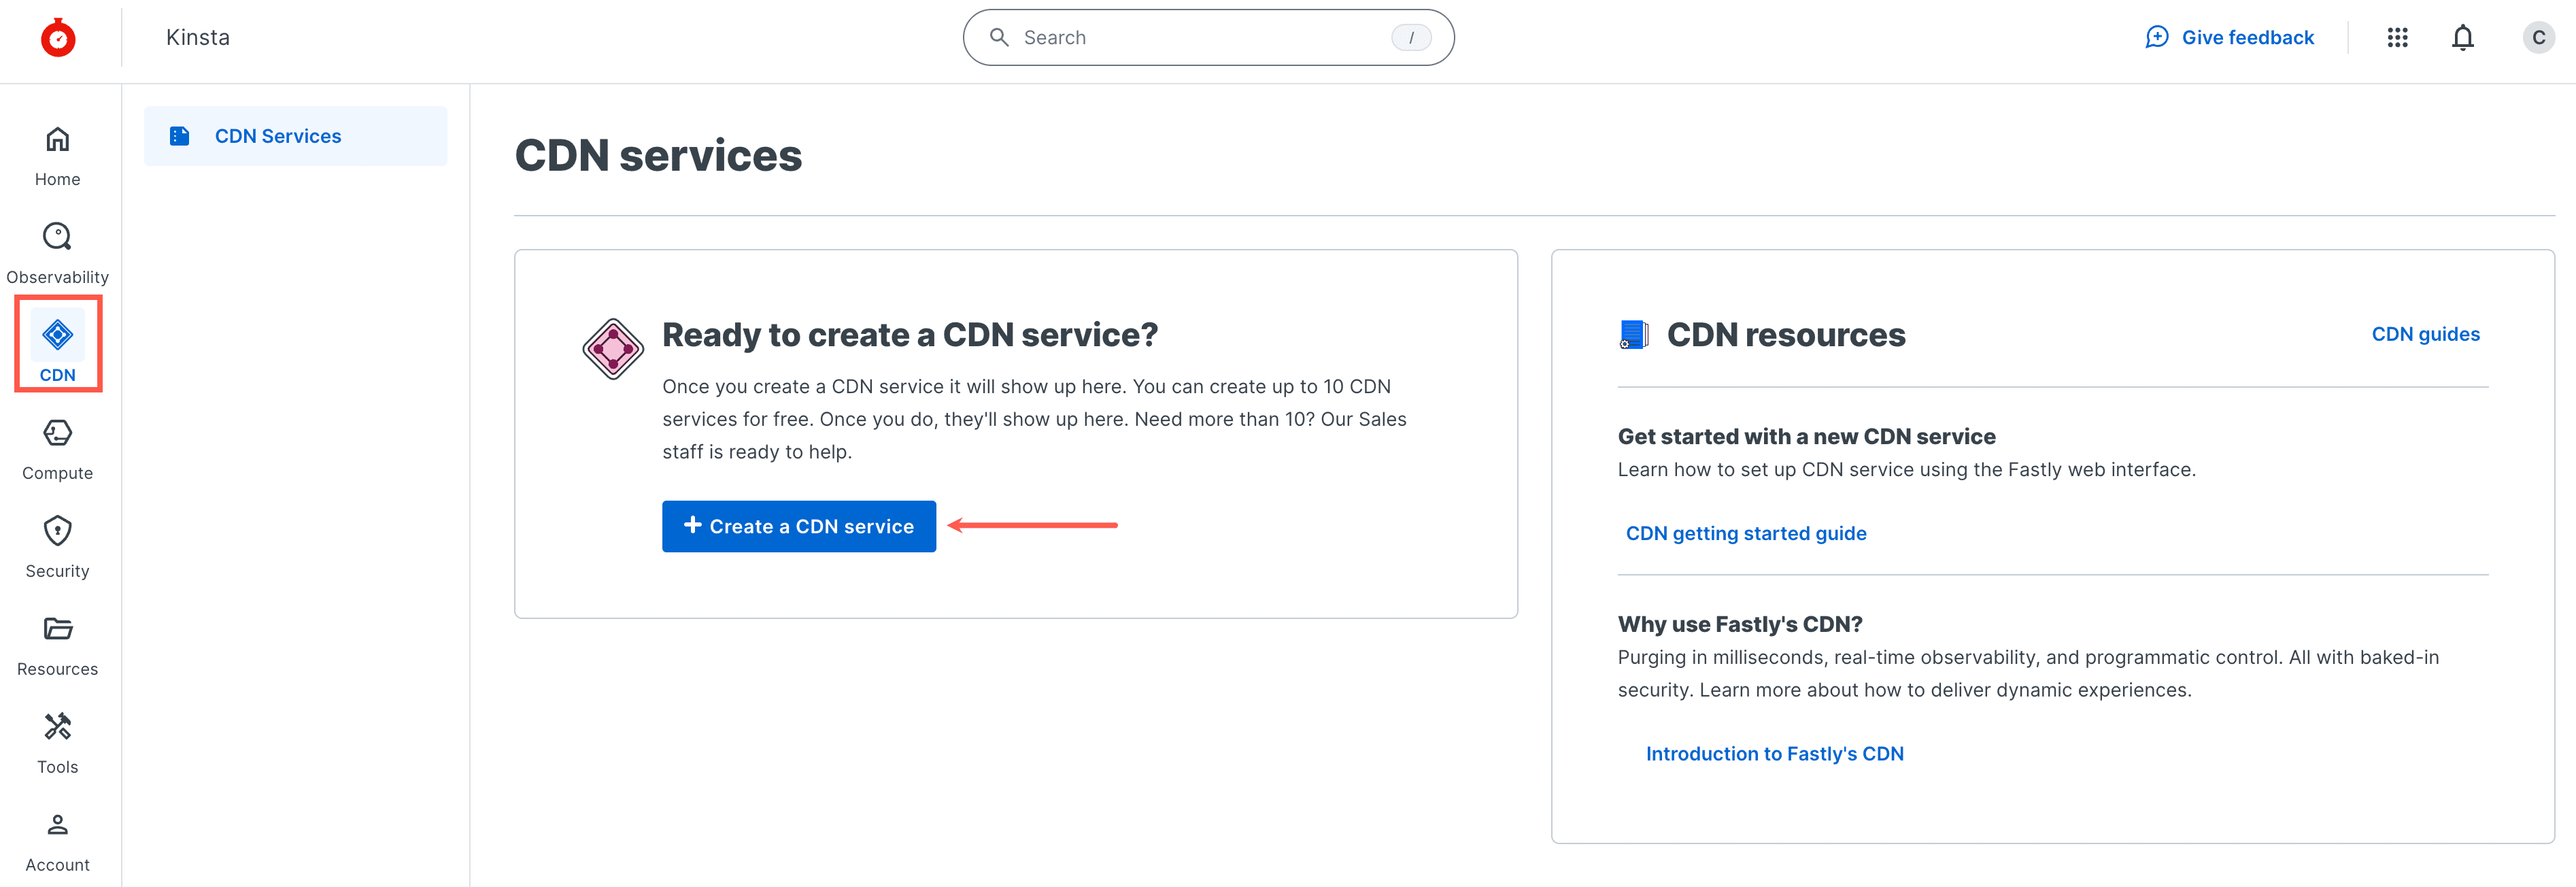
1. Create a CDN service
Log in to your Fastly account and click CDN > Create a CDN service.
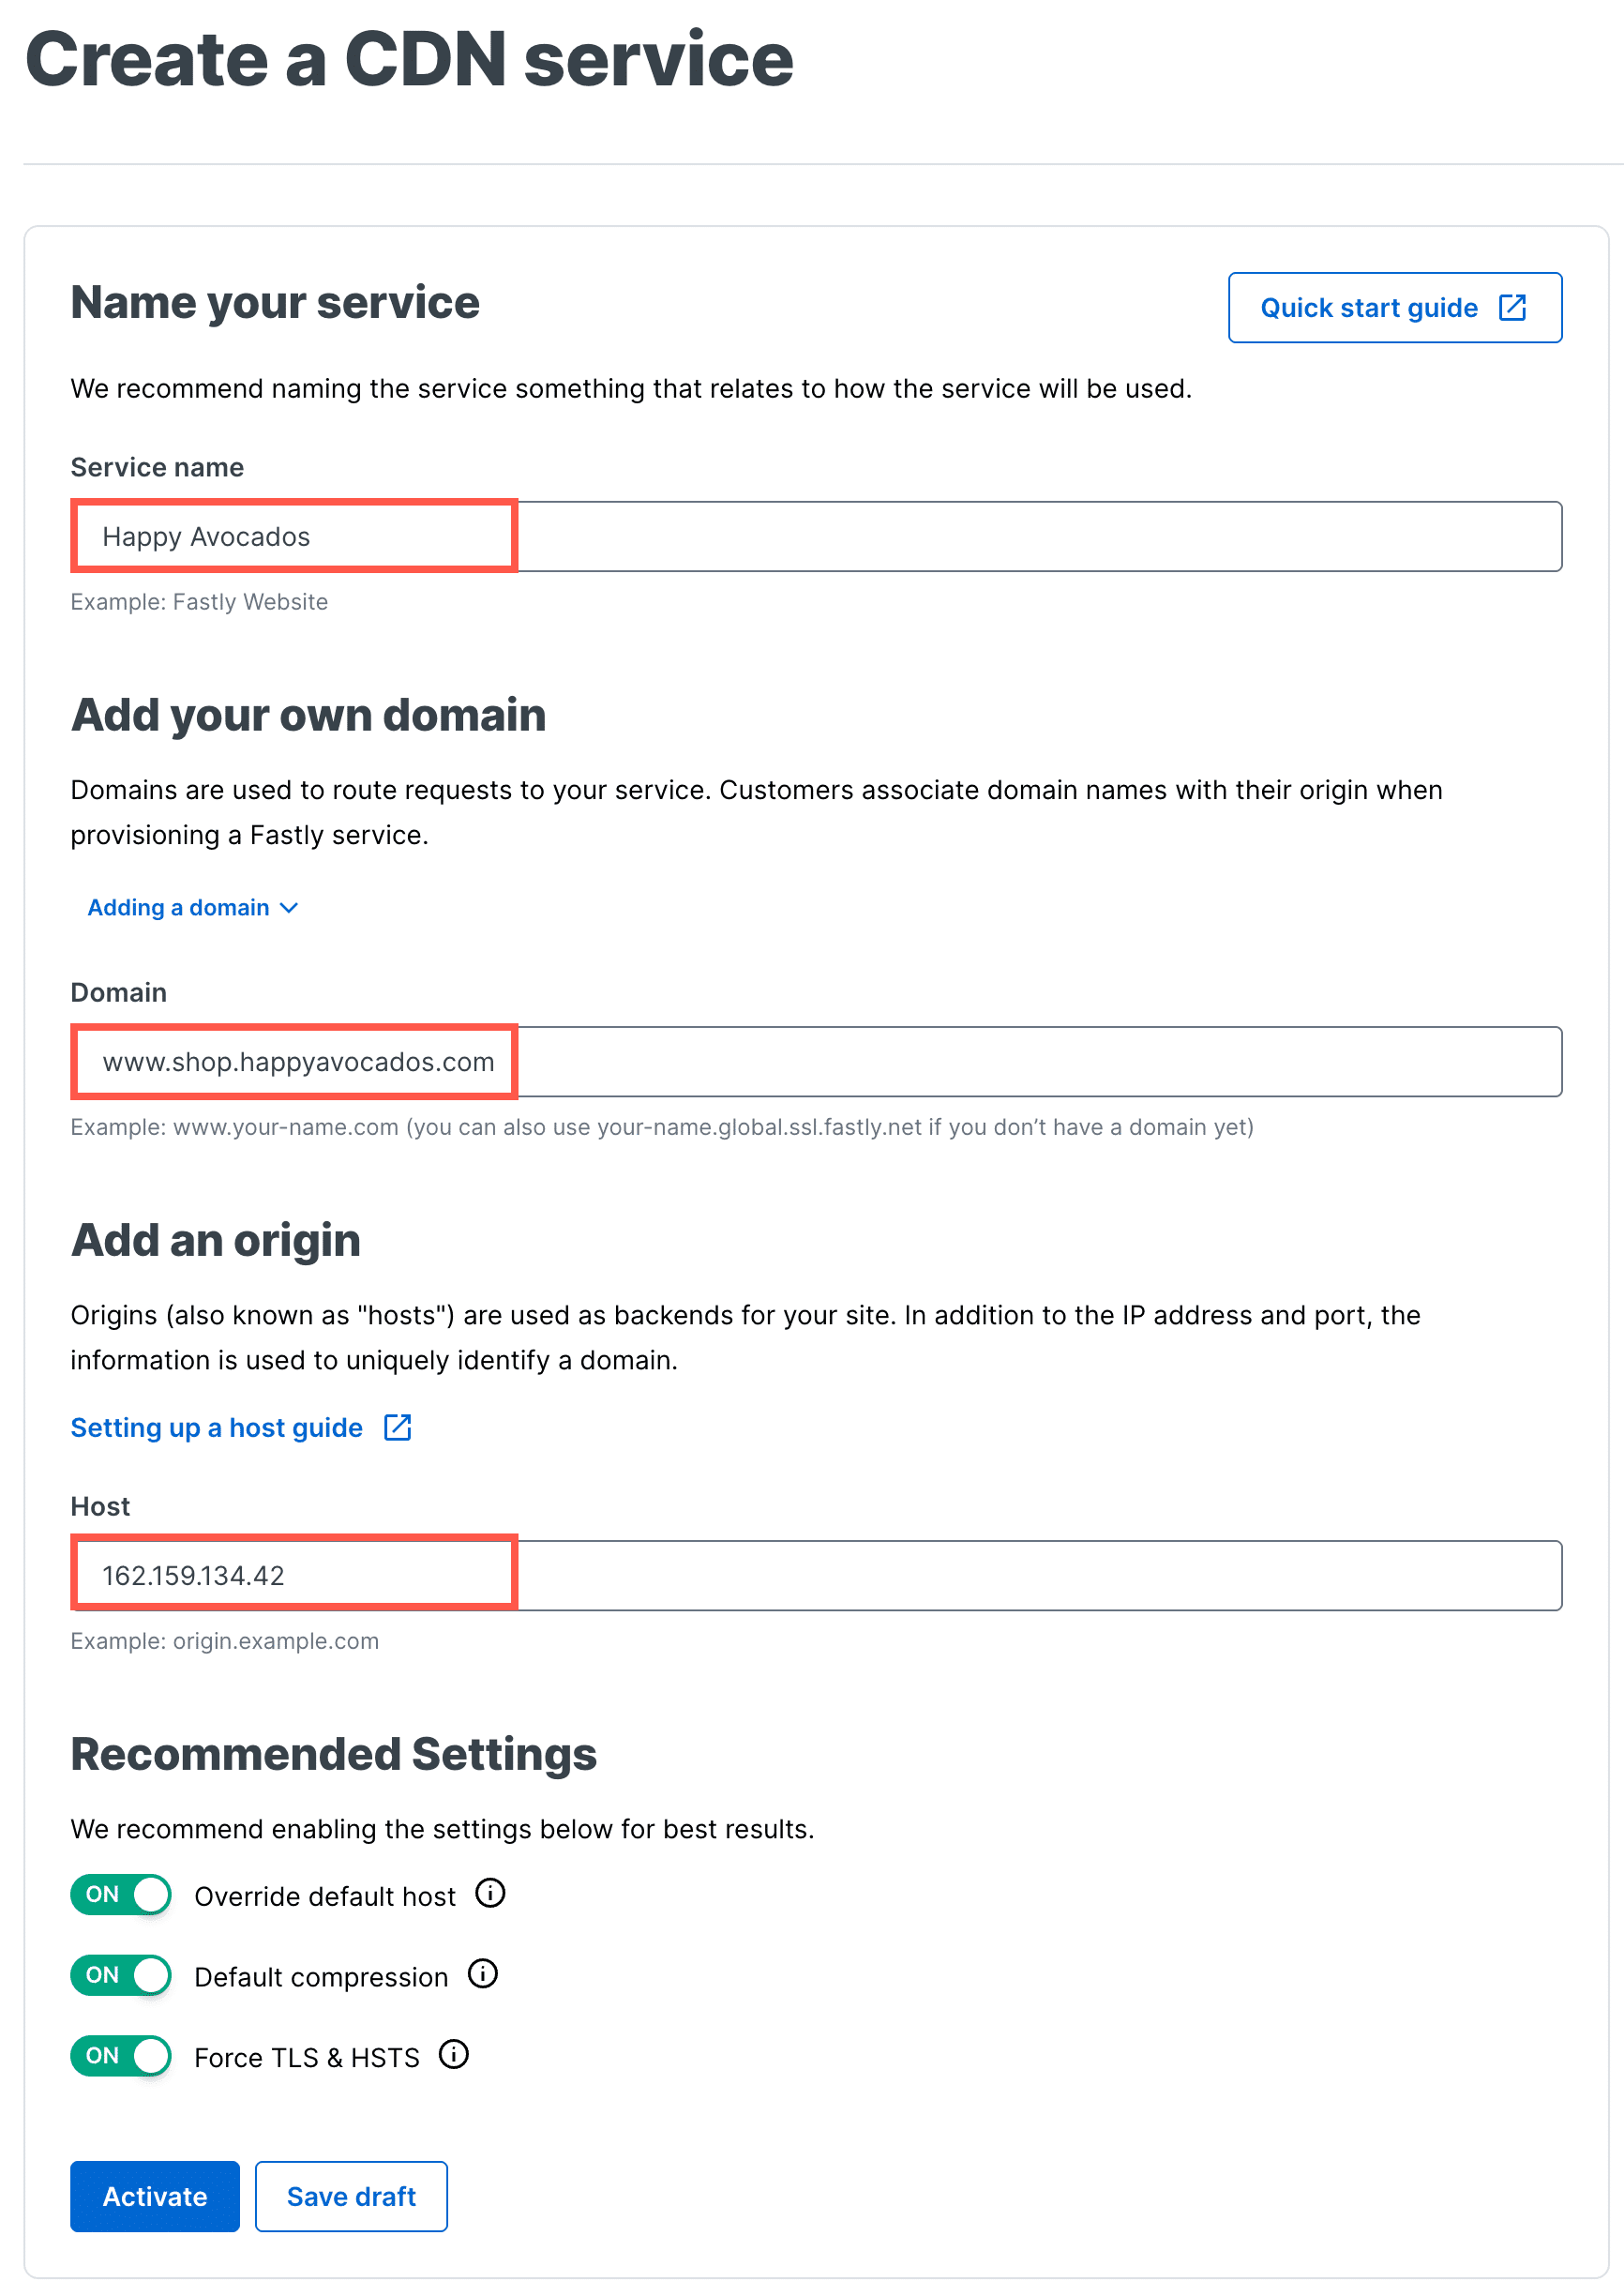
Complete the fields as follows:
- Service name: Enter a name for your service, for example, your site name.
- Domain: Add your domain. Due to DNS constraints, using the www-version of your domain name (e.g. www.example.com) rather than the apex/non-www version of your domain is generally recommended. If you must use an apex domain, check out this guide to Using Fastly with apex domains.
- Host: Your hostname is your Site IP address or hosting.kinsta.cloud. You cannot use the primary domain because it has to be pointed to Fastly to take the service live. While you could technically use the temp domain as your hostname, we recommend using hosting.kinsta.cloud instead because the temp domain can be removed from the site.
Leave the recommended settings as they are and click Save draft. Do not Activate the service yet, once it is active you cannot change the configuration settings. If you do activate the service in error, deactivate the service to continue the configuration.
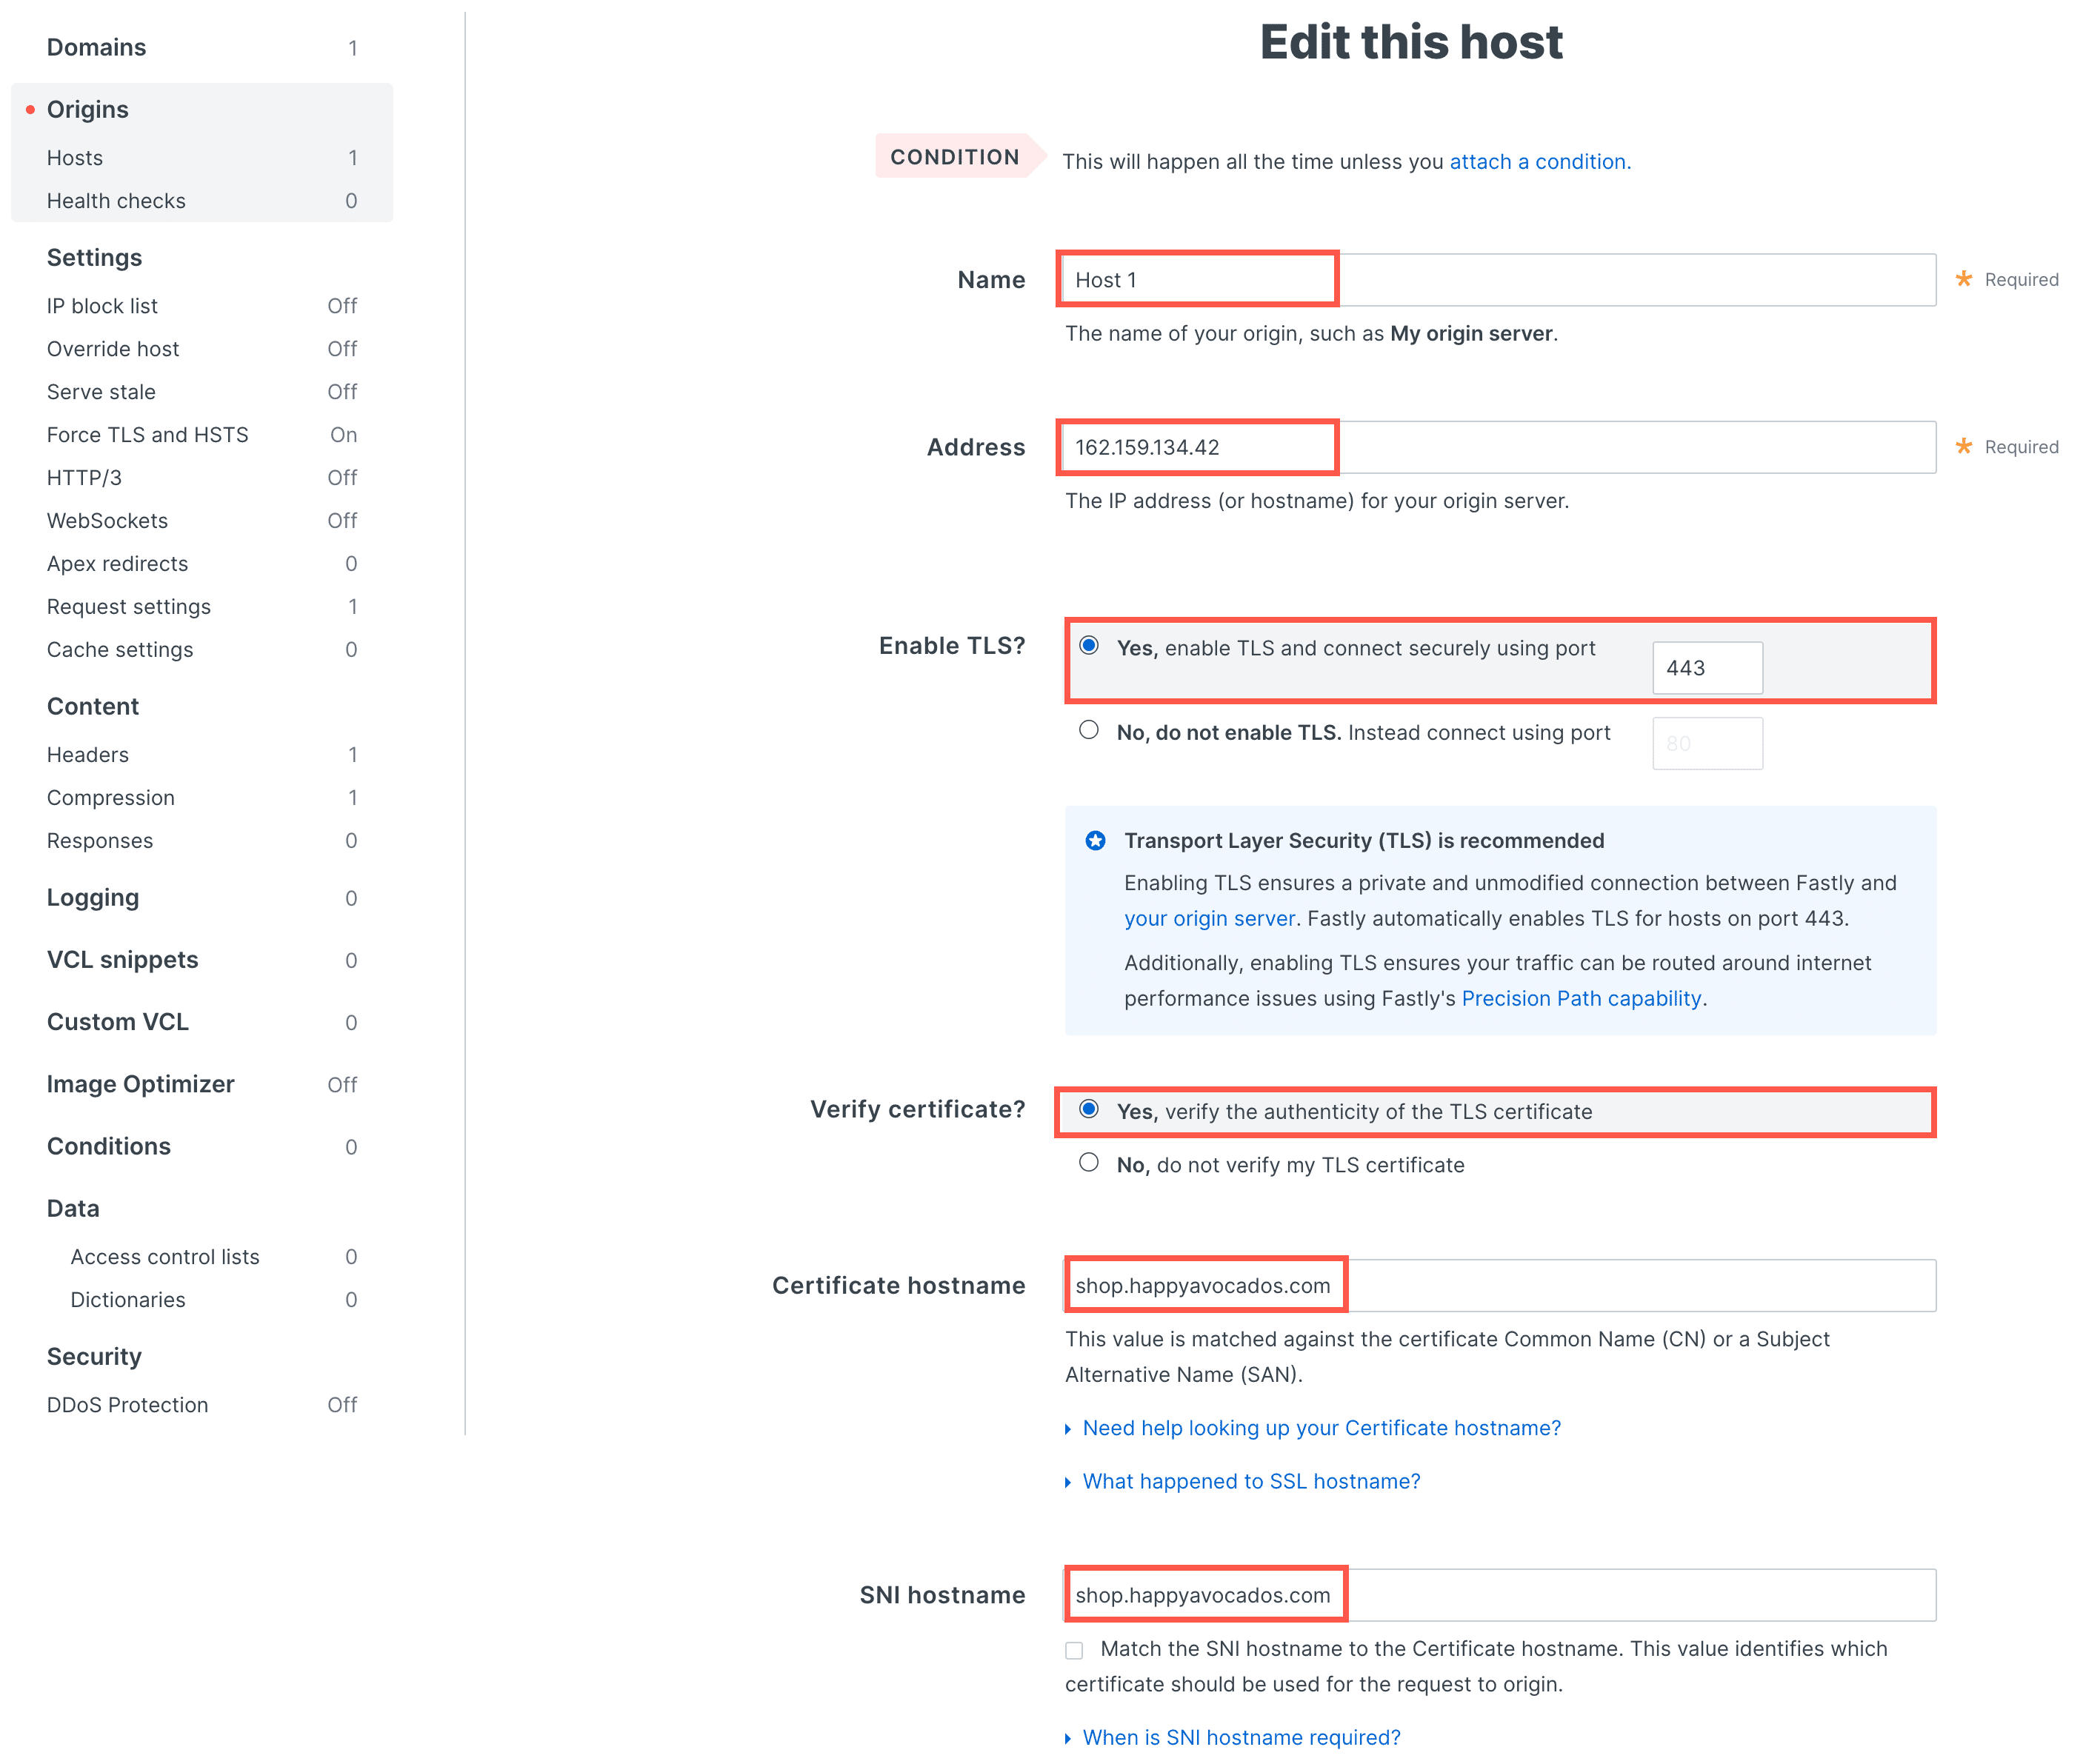
2. Configure your hostname
Click Origins and then click the edit (pencil) icon next to your hostname or IP address and configure the following fields:
- Name: This is a label for the origin, so it can be anything you want. (Default is “Host 1” or similar).
- Address: hosting.kinsta.cloud or Site IP address.
- Enable TLS: Yes.
- Verify certificate? Yes.
- Certificate hostname: Your site’s primary domain at Kinsta.
- SNI hostname: Your site’s primary domain at Kinsta.
Note: If your site at Kinsta has a different primary domain than the domain used at Fastly, please see the additional information for this under When You Should Set Host Override below.
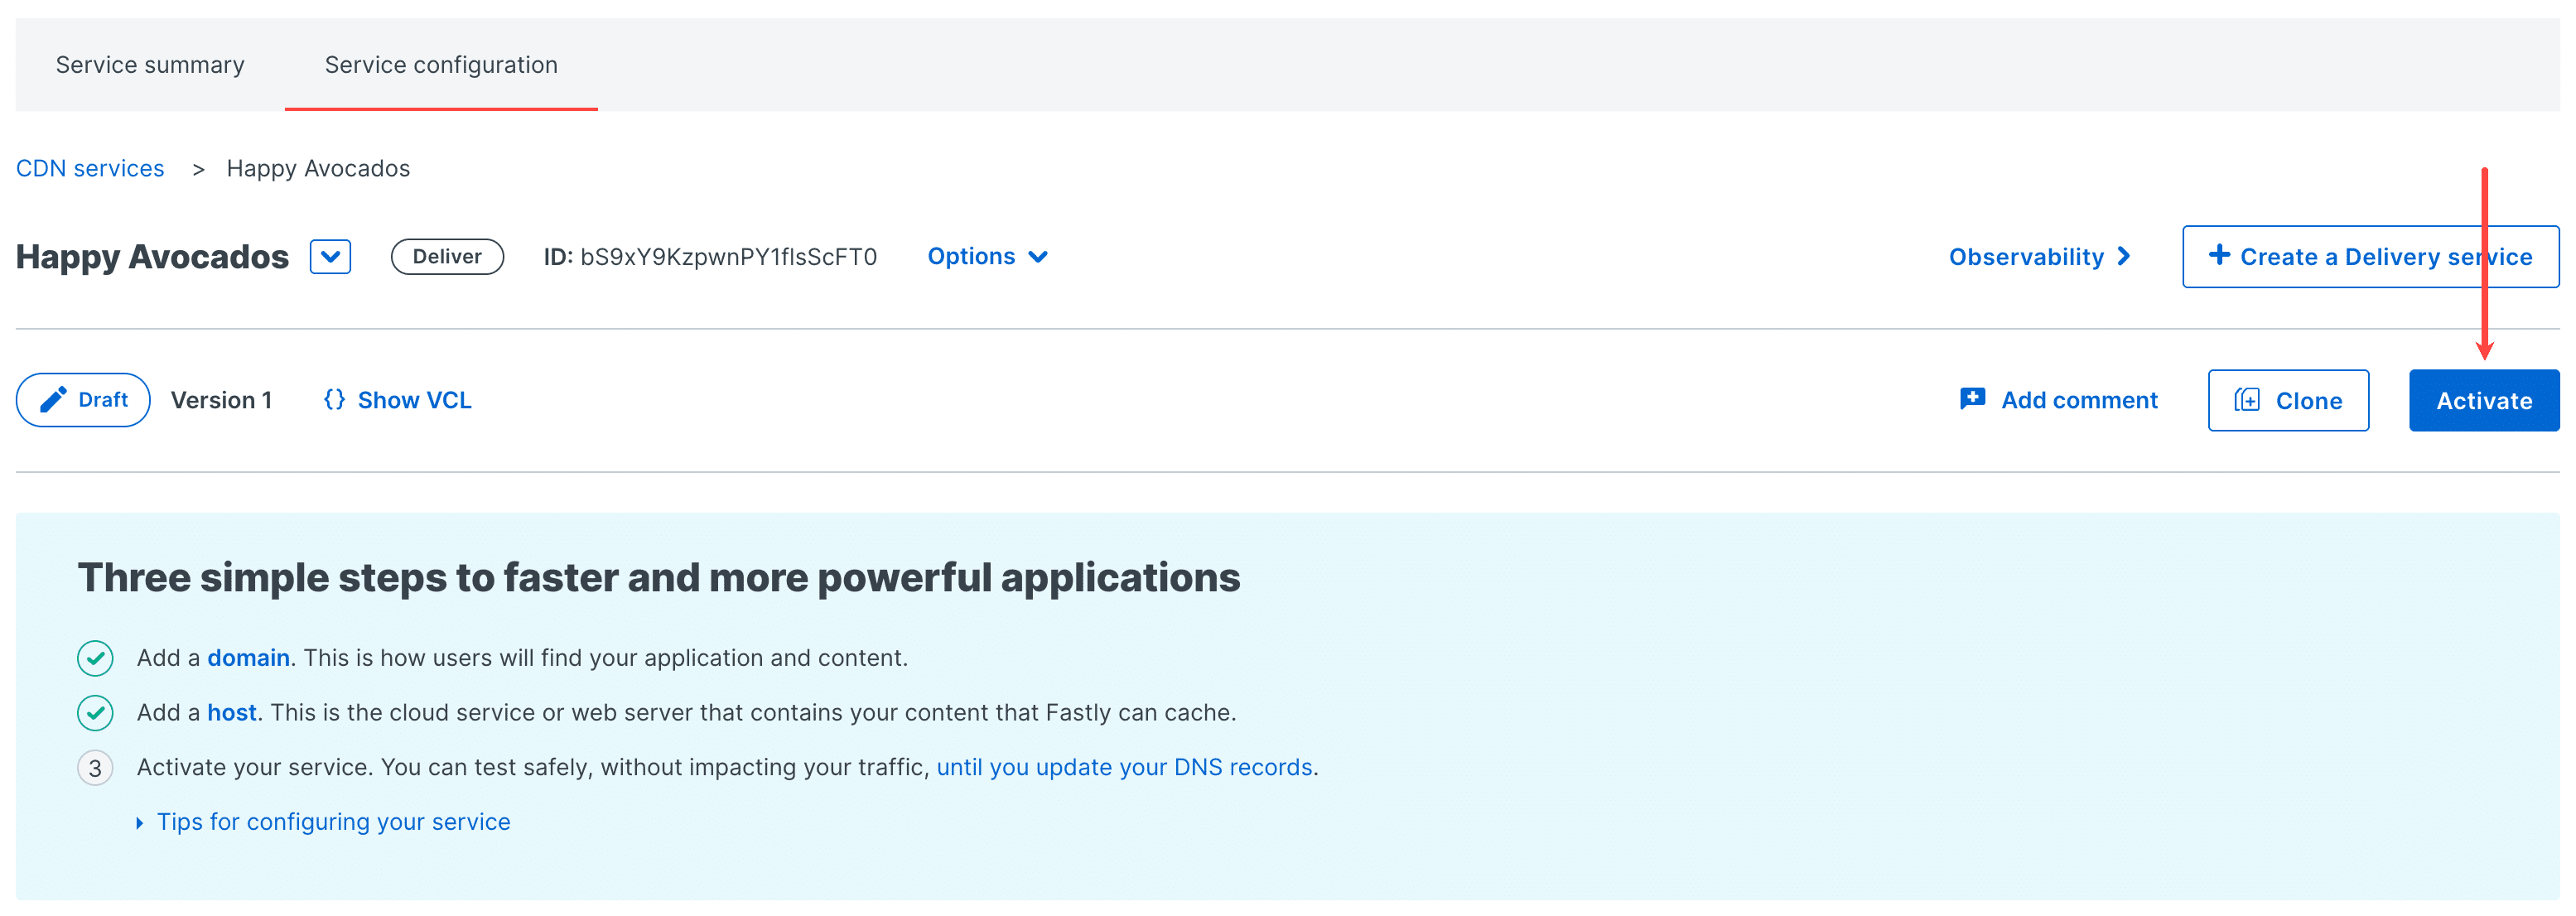
3. Activate Fastly
Now that you have your domain and origin details configured, you’re ready to activate your Fastly service, click Activate.
Activating the service won’t affect your live site just yet; this will just save your origin server and domain details in your Fastly service.
4. Test your service
Now it’s time to test your service to make sure it’s working as expected before you make it live.
This is another step that isn’t technically required but strongly recommended in case any adjustments are needed before making your service live (which will affect your live site).
To test your domain, click Domains > Test domain on your domain name, which will open your test domain in a new tab in your browser.

Your test domain’s URL will look like: http://example.com.global.prod.fastly.net (replace www.example.com with your domain name). You can bookmark or send that to someone else if needed.
5. Add TLS
After confirming your website looks good on the test domain, it’s time to add TLS so your site will be loaded over HTTPS.
Fastly offers a couple of different options for TLS, but we’ll only be covering the Fastly-managed certificates option here.
If you need to upload a third-party certificate at Fastly, that option is available for an additional fee, and you’ll need to follow their guide for using certificates you manage instead of the instructions here.
- Click Security and within TLS Management, click Manage certificates.

Manage TLS certificates within Fastly. - If this is your first time setting up TLS on a domain in Fastly, click Get started. Otherwise, click Secure another domain on the right side of the page. In the dropdown that appears, select Use certificates Fastly obtains for you.
- On the Subscription details page, within Domains, enter your domain name and click Add. Select Let’s Encrypt as the certification authority and if you’re adding a domain, leave TLS configuration on the default of TLS 1.3, click Submit.

Add your TLS subscription details within Fastly. - On the Subscription details page, click the copy (clipboard) icon to copy the target for custom CNAME you’ll need to add to your DNS records for verification.
Note: When you add your domain in MyKinsta it includes a CNAME verification record, you’ll need to remove that record to verify the domain with Fastly. This won’t affect your domain’s functionality in MyKinsta, the verification record is only required during the initial setup and can be safely deleted afterward.
CNAME record details to verify your domain. - To enter your custom CNAME record, log into where you manage your domain’s DNS.
We’ll show you how to create this custom CNAME in Kinsta’s DNS as an example here. If you use a different DNS provider (this may be your registrar or other DNS hosting, depending on where you have pointed your domain’s nameservers), the steps may be a little different.- Within MyKinsta, click DNS management and select the domain you want to add a DNS record to.
- Click Add a DNS record, select CNAME and add your Hostname and Points to values. The Hostname needs to be in the format _acme-challenge.www.DOMAIN_NAME (e.g., _acme-challenge.www.myawesomesite.com) and the Points to value needs to be the target you copied from the Verify domain ownership pop-up at Fastly.
- Click Add DNS record to save your new CNAME record. Note: It may take up to 1 hour for the DNS record to propagate.
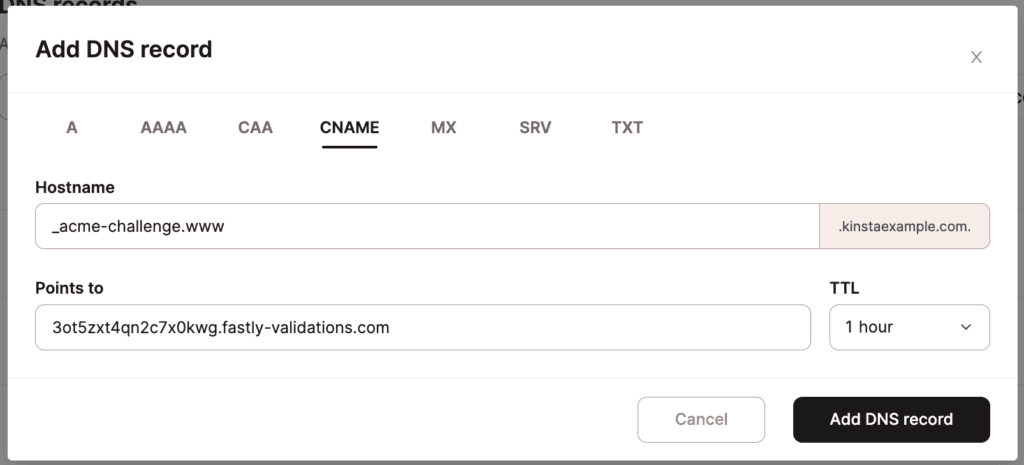
Adding your domain verification CNAME in Kinsta’s DNS.
6. Make it live
Once TLS is set up on your Fastly service, you’re ready to take it live. This is done by pointing your domain’s www CNAME to Fastly. The steps to add a CNAME may vary depending on your provider. We’ll use Kinsta’s DNS as an example again here.
- In MyKinsta, click DNS management and select the domain you want to add a DNS record to.
- If you already have an existing CNAME record for the www hostname, click the Edit (pencil) icon to update it. Otherwise, click the Add a DNS record button.
- Hostname: www
- Points to: j.sni.global.fastly.net
- Click Change DNS record (updating a DNS record) or Add DNS record (adding a new DNS record) to save your DNS record. Note: It may take up to 1 hour for this DNS change to propagate.
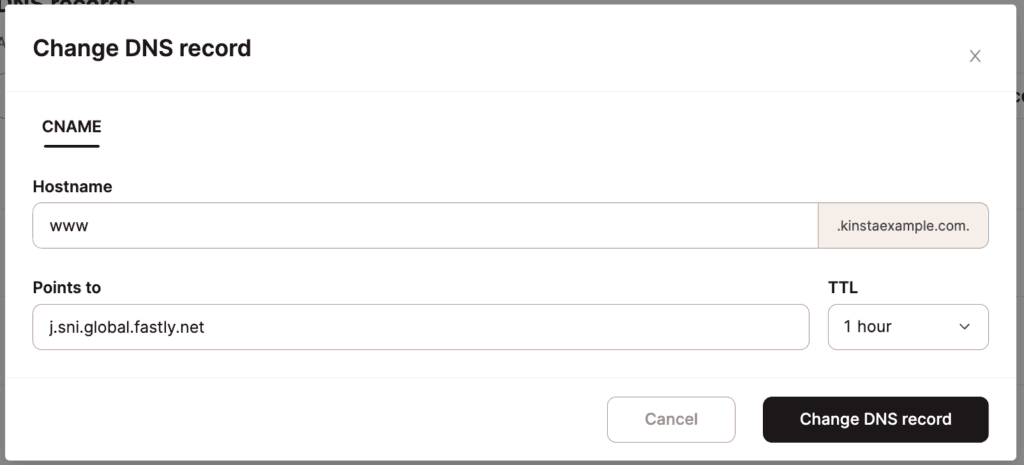
Pointing your domain’s www CNAME to Fastly in Kinsta’s DNS.
That’s it for setup and configuration.
Troubleshooting common issues with Fastly CDN
Even if the setup process went through smoothly, it could be the case that you might experience some issues. Here below, we’ve grouped tips on how to troubleshoot the most common ones, along with some advanced settings.
Changes aren’t showing up on your site
Serving your site through Fastly adds an additional layer of caching that will need to be cleared anytime you need to clear the cache. If you’re having trouble seeing changes on your site or a plugin isn’t behaving as expected after installing or reinstalling, be sure you clear cache at all layers, including:
- Plugins (if applicable)
- Themes (if applicable)
- Site/server cache at Kinsta (from either MyKinsta or the Kinsta MU plugin)
- Caching at Fastly
- Browser cache
IP address blocked by false positive
If you have DDoS mitigation or bot detection enabled at Fastly and you or a site visitor are being incorrectly blocked from viewing your site, this may be due to a false positive. If this happens, you’ll need to work with both Fastly support and our Support team at Kinsta to track down where the block is occurring.
HTTP-HTTPS redirect loops or TLS version errors
If you see a redirect loop or TLS version error on your site, check the following settings:
- Make sure the HTTPS/TLS options from Fastly to the Origin match (Origin > Hosts > Show all details). See step 4 above.
- Make sure the hostname matches your Kinsta domain. See step 3 above.
When you should set host override
By default, the host header at Fastly will be the domain you set at Fastly. For your Kinsta site to recognize the request, the host header needs to match a domain in the site’s domains list.
That means if the domain you’re configuring at Fastly is not in your site’s domains list at Kinsta, you’ll need to set the host override for the origin that requests content from Kinsta. That host override needs to be a domain that is in your site’s domains list at Kinsta.
For example, if you’re configuring example.com at Fastly but only have example.kinsta.cloud in your site’s domains list at Kinsta, you’ll need to set the host override for the origin pulling from Kinsta to be example.kinsta.cloud.
Serverless computing
This can be used for other paths or subdomains that aren’t hosted at Kinsta (e.g. for API calls or other paths outside of your WordPress site).
Fastly WordPress plugin
Fastly offers a plugin that makes managing many of your settings from your WordPress dashboard possible.
Once the plugin is installed and activated, fill in your service ID and API token on the Fastly General settings page in your WordPress dashboard.
Instructions for finding and creating those are linked from that page. Be sure to save those entries before testing the connection.
Summary
If you run into any issues with Fastly, we’re happy to help investigate any issues on the server side, but you’ll need to work with Fastly’s support team or your developer for troubleshooting the Fastly side of things.
Be sure to subscribe to our newsletter to stay up to date with our Cloudflare integration updates (and new content every month).