By acting as a reverse proxy in front of your site, Cloudflare is an all-in-one security and performance product that is used by over 20% of websites around the world. As a WordPress user, adding Cloudflare to your site can help boost site performance and reduce the impact of malicious bots and hackers.
How?
Once configured properly, all requests to your site will hit a Cloudflare server first which will then determine whether the request should be forwarded to the origin server, served from cache, blocked, or processed with custom rules.
In this guide, we’ll dig deeper into the optimal Cloudflare settings for WordPress, highlight the difference between Kinsta DNS and Cloudflare DNS, talk about caching and security setups, and show you how to configure Cloudflare for WordPress Multisite installations.
Note: If you’re a Kinsta customer, as part of our Cloudflare integration, Edge Caching saves your Kinsta site/page cache to any of Cloudflare’s global network of 300+ data centers.
Edge Caching is included free with all Kinsta plans, doesn’t require a separate plugin, and cuts the time needed to serve cached WordPress HTML by an average of more than 50%!
Kinsta DNS vs Cloudflare DNS
Before we dive into Cloudflare settings and how to tweak them properly for your WordPress site, let’s go over the differences between Kinsta DNS and Cloudflare DNS. Kinsta DNS, the premium DNS service included in all of our plans, is powered by Amazon’s Route53. Route53 is an enterprise-grade DNS service that offers fast and reliable resolution.
In terms of performance and uptime, Cloudflare DNS and Kinsta DNS are comparable – both are excellent services. The main difference between the two services is Cloudflare’s additional security and performance features. Kinsta DNS is purely a DNS solution, while Cloudflare offers DNS as well an optional proxy layer that acts as a firewall, CDN, and more.
If you are a Kinsta customer who is looking for a DNS-only service, Kinsta DNS is the perfect option. On the other hand, if you’re looking for an all-in-one proxy-based product, Cloudflare is a good choice.
How to Configure Cloudflare Settings for WordPress
Cloudflare offers a variety of security and performance benefits, but not all of them are fully compatible with WordPress. Let’s take an in-depth look at Cloudflare’s settings to identify the best features for your WordPress site.
SSL
Cloudflare supports four modes of SSL/TLS encryption – Off, Flexible, Full, and Full (Strict).
- Off – No encryption.
- Flexible – Only encrypts the connection between the browser and Cloudflare.
- Full – End-to-end encryption, but allows for a self-signed certificate on the origin server.
- Full (Strict) – End-to-end encryption, and requires a free origin certificate from Cloudflare or a certificate from a trusted CA (certificate authority). We recommend using the Full (Strict) SSL mode for maximum security.
For Kinsta customers who would like to use Cloudflare on their WordPress sites, we recommend generating a free Let’s Encrypt SSL certificate in MyKinsta and using the Full or Full (Strict) option at Cloudflare.
Alternatively, you can also generate a Cloudflare origin certificate to install on your origin server. If your host does not offer free SSL certificates, installing a Cloudflare origin certificate on your server will allow you to use the Full (Strict) SSL mode.
If you are using Kinsta to host a site on a subdomain, while the root domain is utilizing Cloudflare’s Flexible SSL, you can use a Cloudflare page rule to force the Kinsta-hosted subdomain to use Full or Full (Strict) SSL.
This option lets you use Cloudflare’s Flexible SSL while ensuring Cloudflare Full (Strict) SSL for a subdomain hosted on Kinsta.
Always Use HTTPS
We recommend enabling this option to automatically forward all HTTP requests to HTTPS.
HSTS
HSTS stands for “HTTP Strict Transport Security” and is used to force a web browser to use secure HTTPS connections. Enabling HSTS on Cloudflare ensures that HTTP requests will never hit your origin server. If your site is already set up to use HTTPS, we recommend configuring HSTS on your origin server as well.
Minimum TLS Version
TLS (Transport Layer Security) is a cryptographic protocol that allows for the secure transmission of data over a network. By default, Cloudflare sets TLS 1.0 for the protocol version. Some security standards such as PCI DSS 3.2 require more recent versions of the TLS protocol for compliance purposes. If your site requires a certain TLS version, you can change the setting by going to SSL/TLS > Edge Certificates > Minimum TLS Version.
Automatic HTTPS Rewrites
This feature checks HTTP resource URLs in your HTML code to see if they are accessible over HTTPS. If so, they will automatically be rewritten with an HTTPS variation. Automatic HTTPS rewrites are useful for ensuring a secure browsing experience without mixed content errors.
Speed
The majority of Cloudflare settings related to performance, like image optimization, can be found in the “Speed” tab.
Image Resizing (Business Only)
Cloudflare’s image resizing feature is only available for Business plan users. When implemented correctly in your WordPress theme, this feature can be used to offload image thumbnail generation to Cloudflare. This has several benefits over the built-in thumbnail generation feature in WordPress.
For sites that dynamically generate image sizes on the fly, using Cloudflare’s image resizing feature can reduce CPU usage – this allows your site to serve more concurrent users without boosting CPU resources. Cloudflare image resizing also helps reduce disk space usage because thumbnails won’t have to be stored on-server.
Cloudflare image resizing works by prepending an endpoint to your images. Take a look at the example below, which shows how the feature works.
Original Image URL
https://yourdomain.com/wp-content/uploads/2020/01/picture.jpg
Resized Image URL
https://yourdomain.com/cdn-cgi/image/fit=contain,format=auto,metadata=none,onerror=redirect,quality=70,width=720/https://yourdomain.com/wp-content/uploads/2020/01/picture.jpg
The “width” parameter can be adjusted to generate different thumbnail sizes dynamically without any additional resource load on your origin server. If you are looking for a standalone service that is similar to Cloudflare’s image resizing feature, Imgix and Cloudinary are great options.
Don’t forget to check out our in-depth guide on optimizing images for the web.
Polish (Pro Only)
Cloudflare Polish is an image optimization service that automatically compresses JPG, PNG, GIF, and other image files. Images are processed at Cloudflare’s edge, which means there is no performance burden on the server hosting your WordPress site. Polish also supports Google’s WEBP format – this means optimized WEBP images will automatically be served to Chrome, Brave, and other browsers that support the format.
Polish is a useful feature for WordPress sites for a few reasons. If you are using an image optimization plugin like TinyPNG or Imagify, Polish can reduce your server’s CPU usage dramatically – this can result in a more stable browsing experience for visitors. Since Polish-optimized images are stored and cached off-server, you won’t have to worry about using up disk space to store WEBP versions of your images.
Brotli
Brotli is an alternative to GZIP, a compression algorithm that reduces the size of web requests before they are served to visitors. Compared to GZIP, Brotli offers a higher compression ratio, which translates to faster page loads for users. The catch is that not all web browsers support Brotli compression. Regardless, we recommend enabling Cloudflare’s Brotli feature, as requests from unsupported browsers will simply fall back to GZIP compression.
Enhanced HTTP/2 Prioritization (Pro Only)
The introduction of HTTP/2 brought about significant performance increases for websites through parallelization and multiplexing. Cloudflare’s enhanced HTTP/2 prioritization feature takes it one step further by intelligently parsing your website’s HTML to determine what order to load assets for the best possible performance. According to Cloudflare, enhanced HTTP/2 prioritization can decrease page load time by up to 50%.
Mirage (Pro Only)
Mirage is an image optimization feature that targets mobile and low-bandwidth connections. When Mirage is enabled, images are replaced with low-resolution placeholders during the initial page load. After the page has loaded, full-resolution images are lazy-loaded.
Mirage is also able to combine multiple image requests into a single request, which reduces the number of roundtrips required to fully load a page. If your site uses a lot of images and targets a mobile-heavy demographic, Cloudflare Mirage can have a positive impact on performance.
Rocket Loader
Rocket Loader is a feature that speeds up loading times for JavaScript assets by loading them asynchronously. This effectively reduces a page’s render-blocking content, which allows for a faster page load time. We recommend testing your site with Rocket Loader enabled to see if it improves your page speed. If your WordPress site depends on JavaScript assets loading in a specific order, you can bypass Rocket Loader by adding a data-cfasync="false" attribute to the script tag.
Caching
By default, Cloudflare caches static assets like CSS, JS, and image files. Please note that Cloudflare does not cache the generated HTML of your site by default.
Caching Level
We recommend leaving the caching level at “Standard”, which allows for updated versions of assets to be accessed with a unique query string.
Browser Cache Expiration
For sites hosted at Kinsta, we recommend setting the browser cache expiration setting to “Respect Existing Headers”. This will keep static assets in the browser cache for one year. If you’d like to override this with a shorter expiration time, feel free to change this setting.
Firewall
With Cloudflare Enterprise, DDoS mitigation, and three-minute uptime monitoring, Kinsta protects your WordPress sites around the clock. Kinsta customers have access to the IP Deny tool in the MyKinsta dashboard to block specific IP addresses, while more complex firewall rules (like country-level blocks) can be added by our support team.
If your host does not offer a customizable firewall, Cloudflare’s free plan includes a basic firewall that allows for five custom rules. Firewall rules can be configured to block specific IP addresses, user agents, request methods, HTTP referrers, and even countries.
For example, if you notice your WooCommerce store receiving a lot of fake orders from a country outside your target market, you can use Cloudflare’s free firewall to block traffic from the entire country.
Cloudflare’s Pro plan features a more robust web application firewall (WAF). The WAF offers specialized managed rulesets that help protect your site even further. For example, there are rulesets that target WordPress and PHP sites.
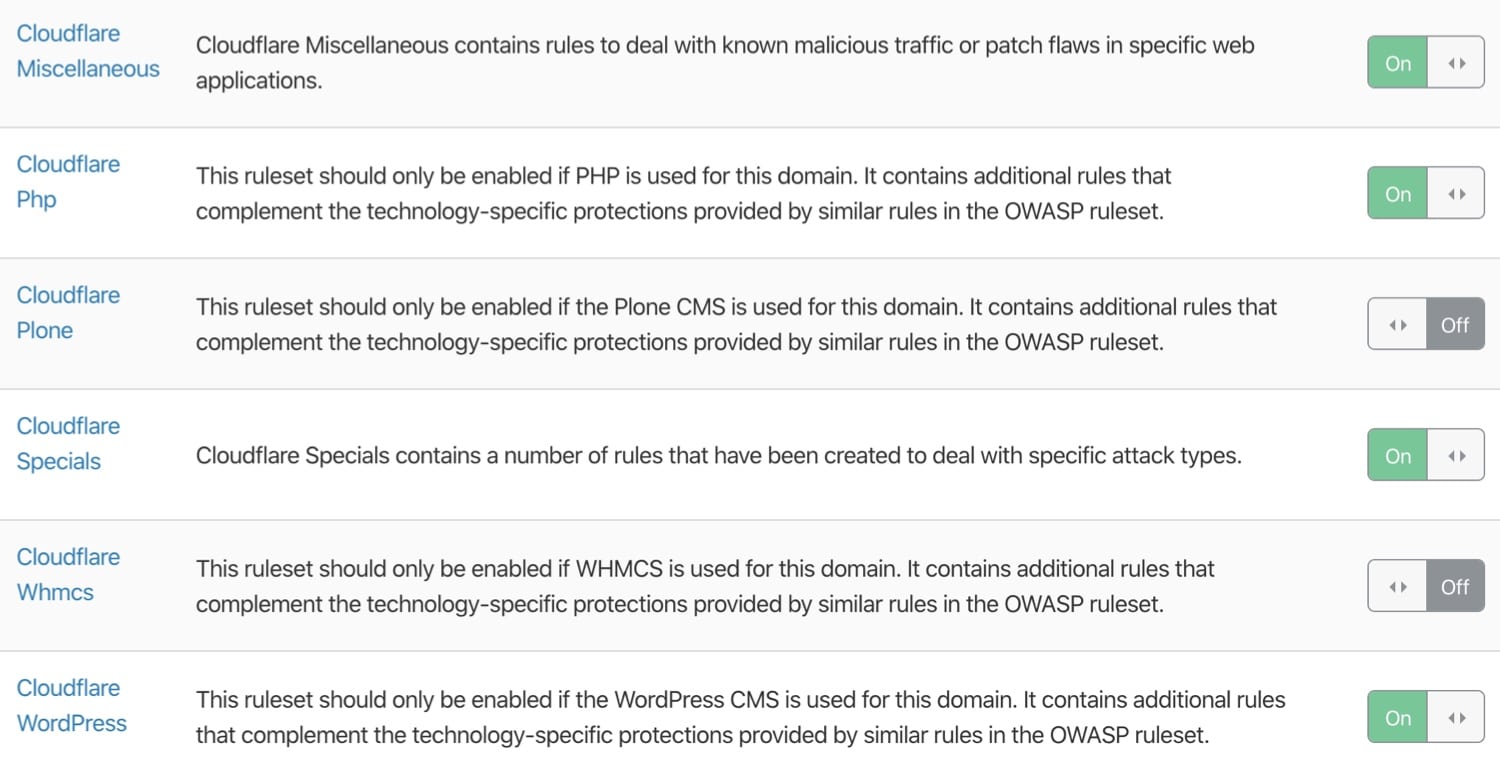
For the majority of WordPress sites, the level of security offered by Cloudflare’s free plan is sufficient. However, if you’re running a mission-critical business site that requires more protection, Cloudflare’s Pro-level WAF and managed rulesets can help secure your site further.
(Suggested reading: Sucuri vs Wordfence)
Network
In Cloudflare’s “Network” settings, we recommend enabling HTTP/2, HTTP/3 (with QUIC), and 0-RTT Connection Resumption.
As we mentioned earlier, HTTP/2 brings several improvements to HTTP/1.1 via parallelization and multiplexing. Similarly, HTTP/3 extends HTTP/2’s performance even further by using a new UDP-based protocol called QUIC instead of the traditional TCP.

Secure HTTP/3 connections also benefit from an optimized handshake routine, which results in faster connection times. When HTTP/3 is enabled in your Cloudflare dashboard, supported clients will be able to use HTTP/3 to connect to Cloudflare servers.
Lastly, Cloudflare’s 0-RTT Connection Resumption feature improves load times for visitors who previously connected to your website.
Page Rules
Cloudflare’s page rules feature allows you to customize settings for specific URLs. Page rules are useful for disabling caching for certain assets, changing the security level for a select page, etc. Cloudflare page rules have two key components – a URL matching pattern and an action to perform on matched URLs. In the screenshot below, you can see a Cloudflare page rule that redirects www URLs to the non-www version.

This rule matches URLs that start with www.brianonwp.com. Notice the inclusion of the asterisk character, which lets you create wildcard matching patterns. Think of the asterisk as “anything here”. Under the URL pattern, you can see this page rule is configured to 301 redirect all matching requests to https://brianonwp.com/$1, where “$1” refers to the “first wildcard” in the matching pattern.
With a page rule like this one, requests to www.brianli.com/specific-page/ will be redirected to brianli.com/specific-page/.
With Cloudflare page rules, you can apply specific settings to any matched URL. Check out the list of settings that can be applied to page rules below. Certain settings can even be combined into a single page rule!
- Always Online – enable or disable Cloudflare’s “Always Online” feature which serves static HTML copies of pages if the origin server is found to be offline.
- Always Use HTTPS – force HTTPS on matching URLs.
- Automatic HTTPS Rewrites – enable rewriting of HTTP URLs in HTML to HTTPS versions.
- Browser Cache TTL – specify the browser cache TTL on matched URLs. For example, you can set different browser cache TTLs for different kinds of files.
- Browser Integrity Check – enable or disable Cloudflare’s “Browser Integrity Check” feature, which inspects HTTP headers to weed out bots and malicious traffic.
- Cache Deception Armor – enable or disable Cloudflare’s “Cache Deception Armor” feature, which protects against web cache deception attacks by ensuring an asset’s file extension matches its “Content-Type”.
- Cache Level – configure the cache level for matching URLs.
- Disable Apps – disable Cloudflare app integrations for matching URLs.
- Disable Performance – disable performance-related features for matching URLs.
- Disable Railgun – disable Railgun for matching URLs.
- Disable Security – disable security features for matching URLs.
- Edge Cache TTL – specify the edge cache TTL (the amount of time an asset is cached on Cloudflare’s edge network).
- Email Obfuscation – enable or disable Cloudflare’s email obfuscation script which reduces successful bot scraping by scrambling email addresses.
- Forwarding URL – create a 301 or 302 redirect to another URL.
- IP Geolocation Header – enable or disable Cloudflare’s IP geolocation HTTP header.
- Opportunistic Encryption – allows clients to access HTTP URLs over a secure TLS channel.
- Origin Cache Control – specify how you want Cloudflare to respond to the origin server’s “Cache-Control” directive.
- Rocket Loader – enable or disable Rocket Loader on matching URLs.
- Security Level – specify the security level for matched URLs.
- Server Side Excludes – enable or disable Cloudflare’s “Server Side Excludes” feature which lets you hide sensitive information from suspicious traffic by wrapping HTML in
<!--sse-->tags. - SSL – specify the SSL level (disabled, flexible, full, or full strict) for matching URLs.
Cloudflare WordPress Plugin
The Cloudflare team maintains an official WordPress plugin. While this plugin isn’t an absolute requirement, it does provide some nice features including WordPress-optimized Cloudflare settings, WordPress-specific security rulesets, automatic cache purging, HTTP/2 server push, and more.
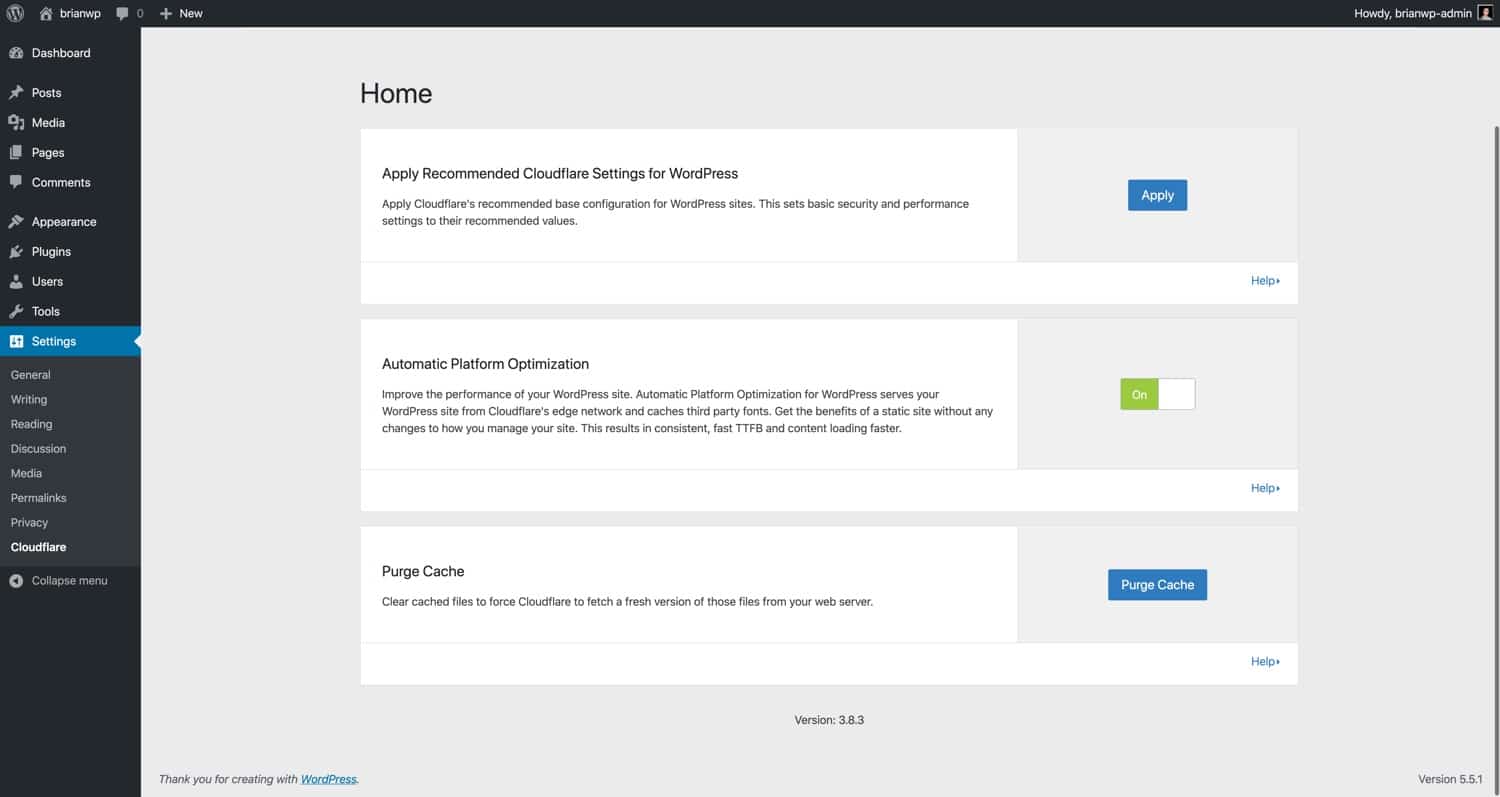
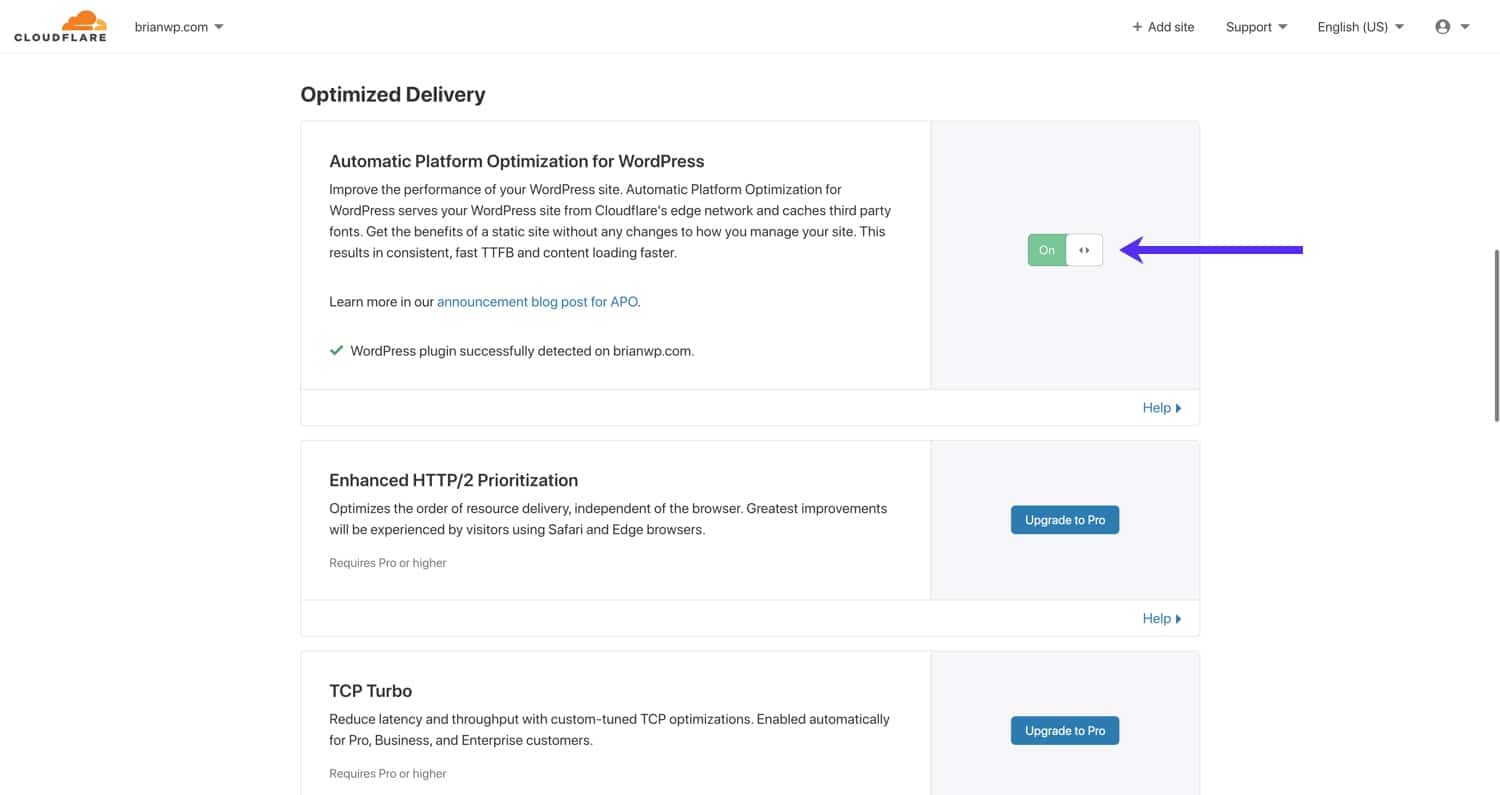
Cloudflare Automatic Platform Optimization for WordPress
Cloudflare’s Automatic Platform Optimization (APO) for WordPress is a dedicated performance optimization service for WordPress sites. Cloudflare APO works by caching your WordPress site’s HTML pages directly on the Cloudflare edge network. This is a big jump beyond the typical caching of static assets (CSS, JS, images, etc.) on CDNs. In our benchmark tests, we found that enabling Cloudflare APO resulted in a 70-300% performance increase depending on the testing location.
Cloudflare APO for WordPress works by storing HTML copies of your pages in Workers KV, a globally-distributed key-value storage service. With APO enabled, requests to your site will be served by Workers KV or Cloudflare’s edge cache instead of your origin server. This is a huge step forward in the world of WordPress performance because, with APO, WordPress sites are no longer bottlenecked by the location of the origin server.
Previously, with traditional CDN setups, HTML pages still had to be served by the origin server. For example, if your site’s origin server is located in the USA, a visitor from London has to wait for the HTML document to be delivered from the USA. With APO, the HTML along with other static assets are served from a Cloudflare data center that’s closer to London.
Cloudflare APO is most compatible with traditional blogs, news sites, landing pages, and other sites that don’t rely on dynamic functionality (WooCommerce stores, discussion forums, etc.). APO automatically bypasses Cloudflare’s HTML cache for logged-in users and on pages containing certain cookies (e.g. WooCommerce). APO is available as a free service for Cloudflare Pro, Business, and Enterprise plans. For free Cloudflare users, APO is a $5/month add-on.
If you’re interested in learning more, check out our in-depth Cloudflare APO guide here.
Cloudflare Argo and Railgun
Cloudflare offers additional performance products that may help boost your WordPress site’s performance even further. These features are subject to additional costs, but they may be worth taking a look at if you want to go the extra mile with your website optimization.
Argo
Argo is a Cloudflare add-on service that provides “smart routing” for your website. With Argo enabled, traffic is routed around congested areas in Cloudflare’s network. In our tests, Argo reduced page load times by 20-30%. If you are a Cloudflare user looking to go the extra mile with your performance optimization, experimenting with Argo could yield positive results.
Railgun
Cloudflare’s Railgun is a WAN product that establishes a secure tunnel between your server and Cloudflare’s servers. Railgun is designed to speed up delivery of uncached content by only delivering the overall difference between requests. For example, if Page A and Page B have identical header and footer structures with different body content, Railgun would be aware of that and only serve the differences via a highly compressed binary data stream.
Railgun is only available on Cloudflare’s business and enterprise plans, and requires your web host to install additional software on your site’s server. For most users, Railgun acceleration is not necessary to maintain fast load times with Cloudflare. However, if you are running a high-traffic WooCommerce store or forum that can’t be cached, Railgun could potentially help improve your site speed.
How to Configure Cloudflare Settings for WordPress Multisite
If you are using Cloudflare with a WordPress multisite, there are a few special considerations you should take into account when it comes to settings.
SSL Setup
To demonstrate a proper Cloudflare SSL setup for a WordPress multisite, we’ve created a test subdomain multisite as you shouldn’t encounter any SSL problems if you are using a subdirectory multisite.
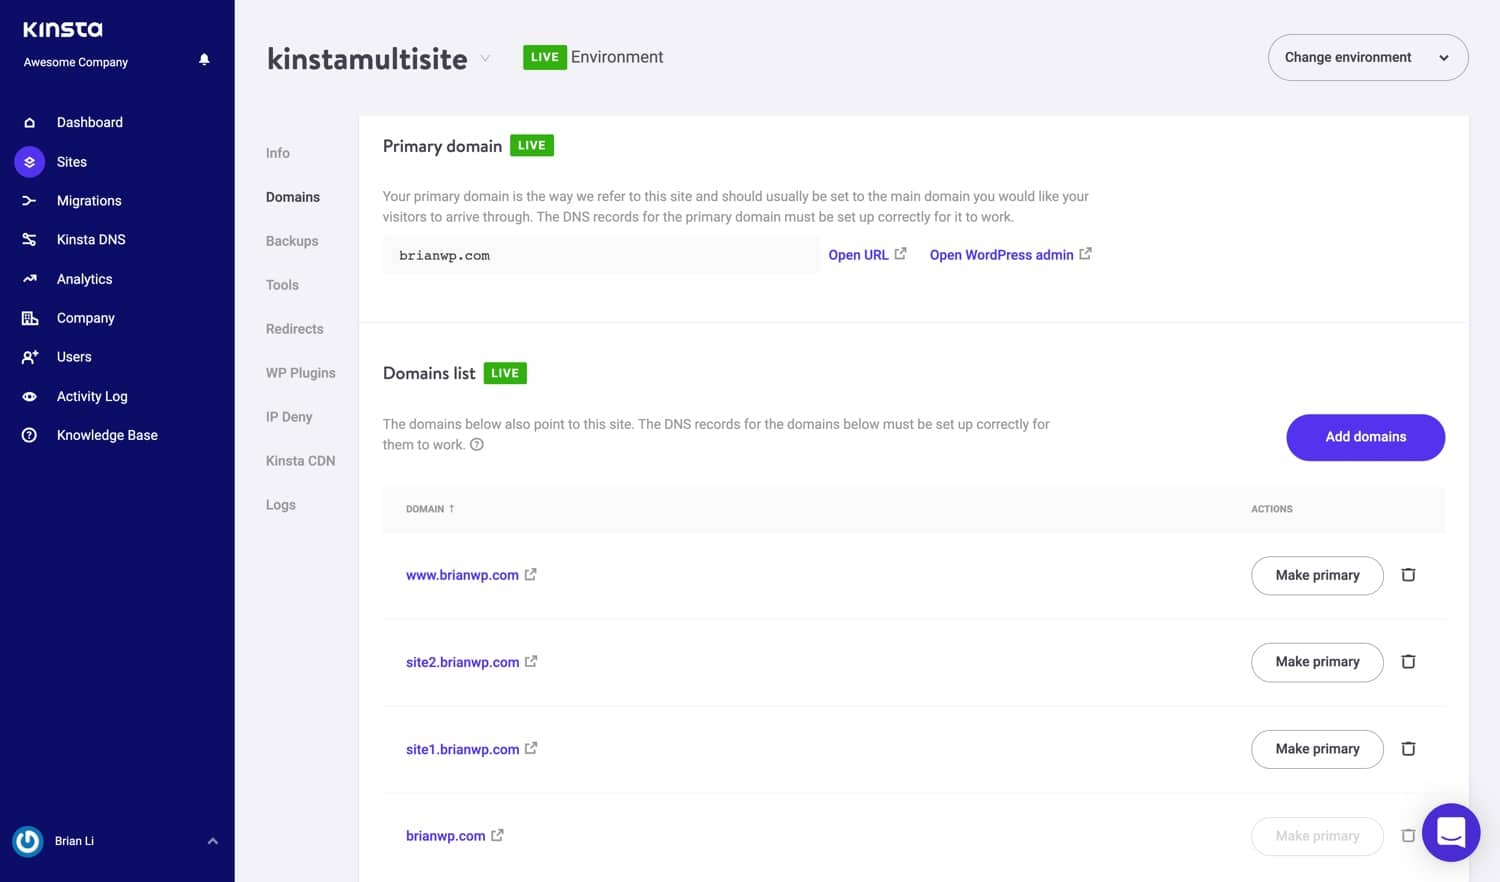
Here’s the structure of our test subdomain WordPress multisite:
- Main Site – brianwp.com and www.brianwp.com
- Subsite 1 – site1.brianwp.com
- Subsite 2 – site2.brianwp.com
In MyKinsta, we have added the domains for the multisite.
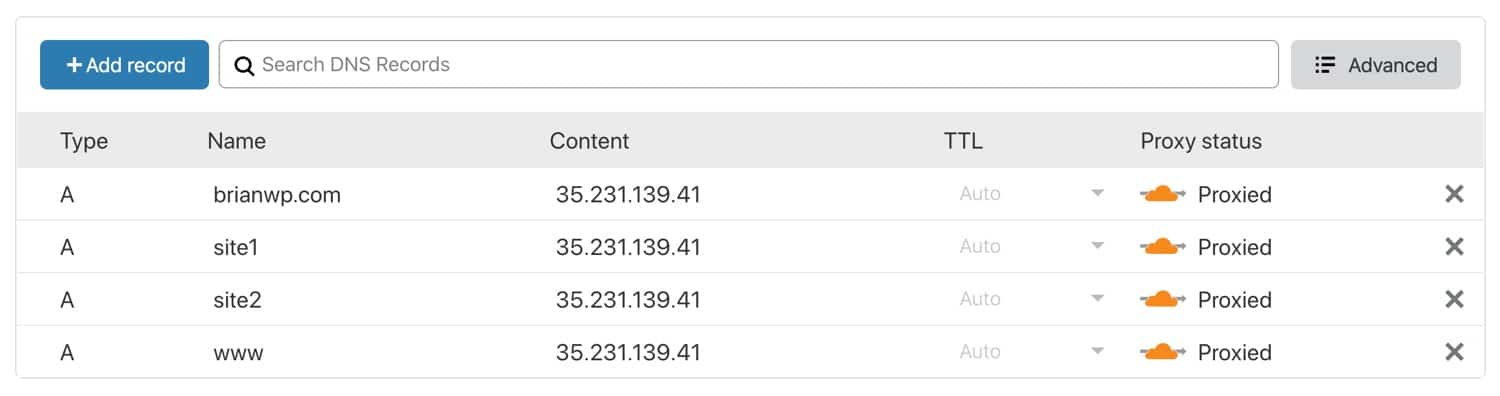
Similarly, the domains have been configured with proper A records in Cloudflare. The Cloudflare proxy has also been enabled, as indicated by the orange cloud icon.
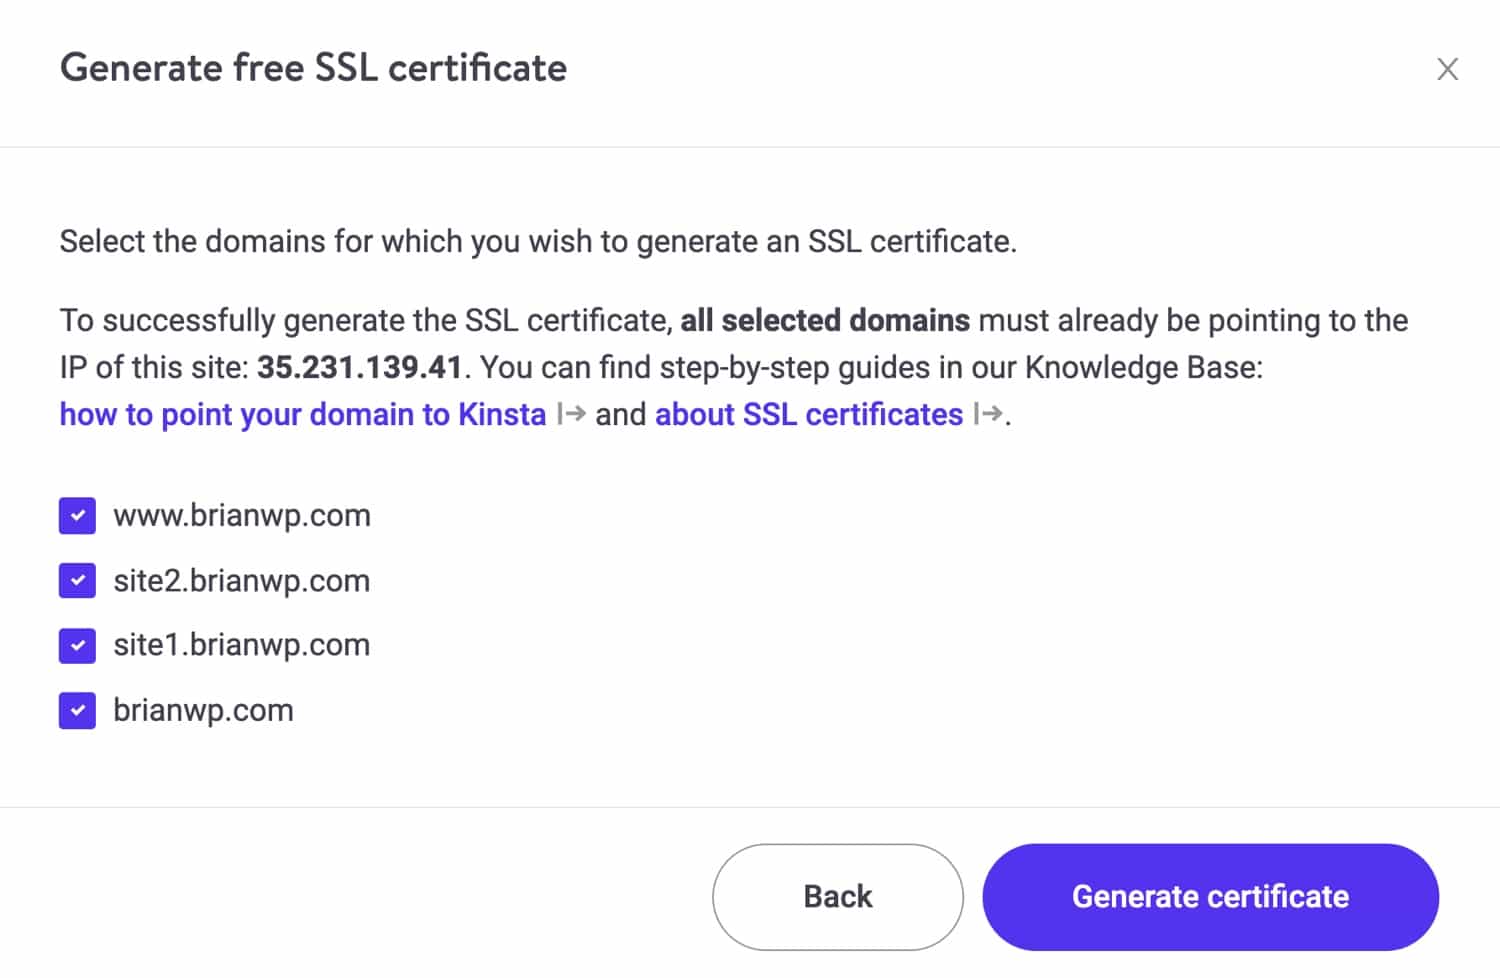
To use Cloudflare in Full (Strict) SSL mode, all associated domains have to be present on the origin server’s SSL certificate. There are two ways to do this.
Let’s Encrypt or Paid SSL
If your host supports free Let’s Encrypt SSL, go ahead and generate an SSL certificate that covers all your multisite domains.
On Kinsta, generating an SSL certificate to cover all your domains is easy with our Let’s Encrypt tool in the MyKinsta dashboard.
Cloudflare Origin SSL Certificate
Alternatively, you can generate a Cloudflare origin SSL certificate that covers your multisite domains. To generate an origin certificate, navigate to SSL/TLS > Origin Server and click on “Create Certificate”.
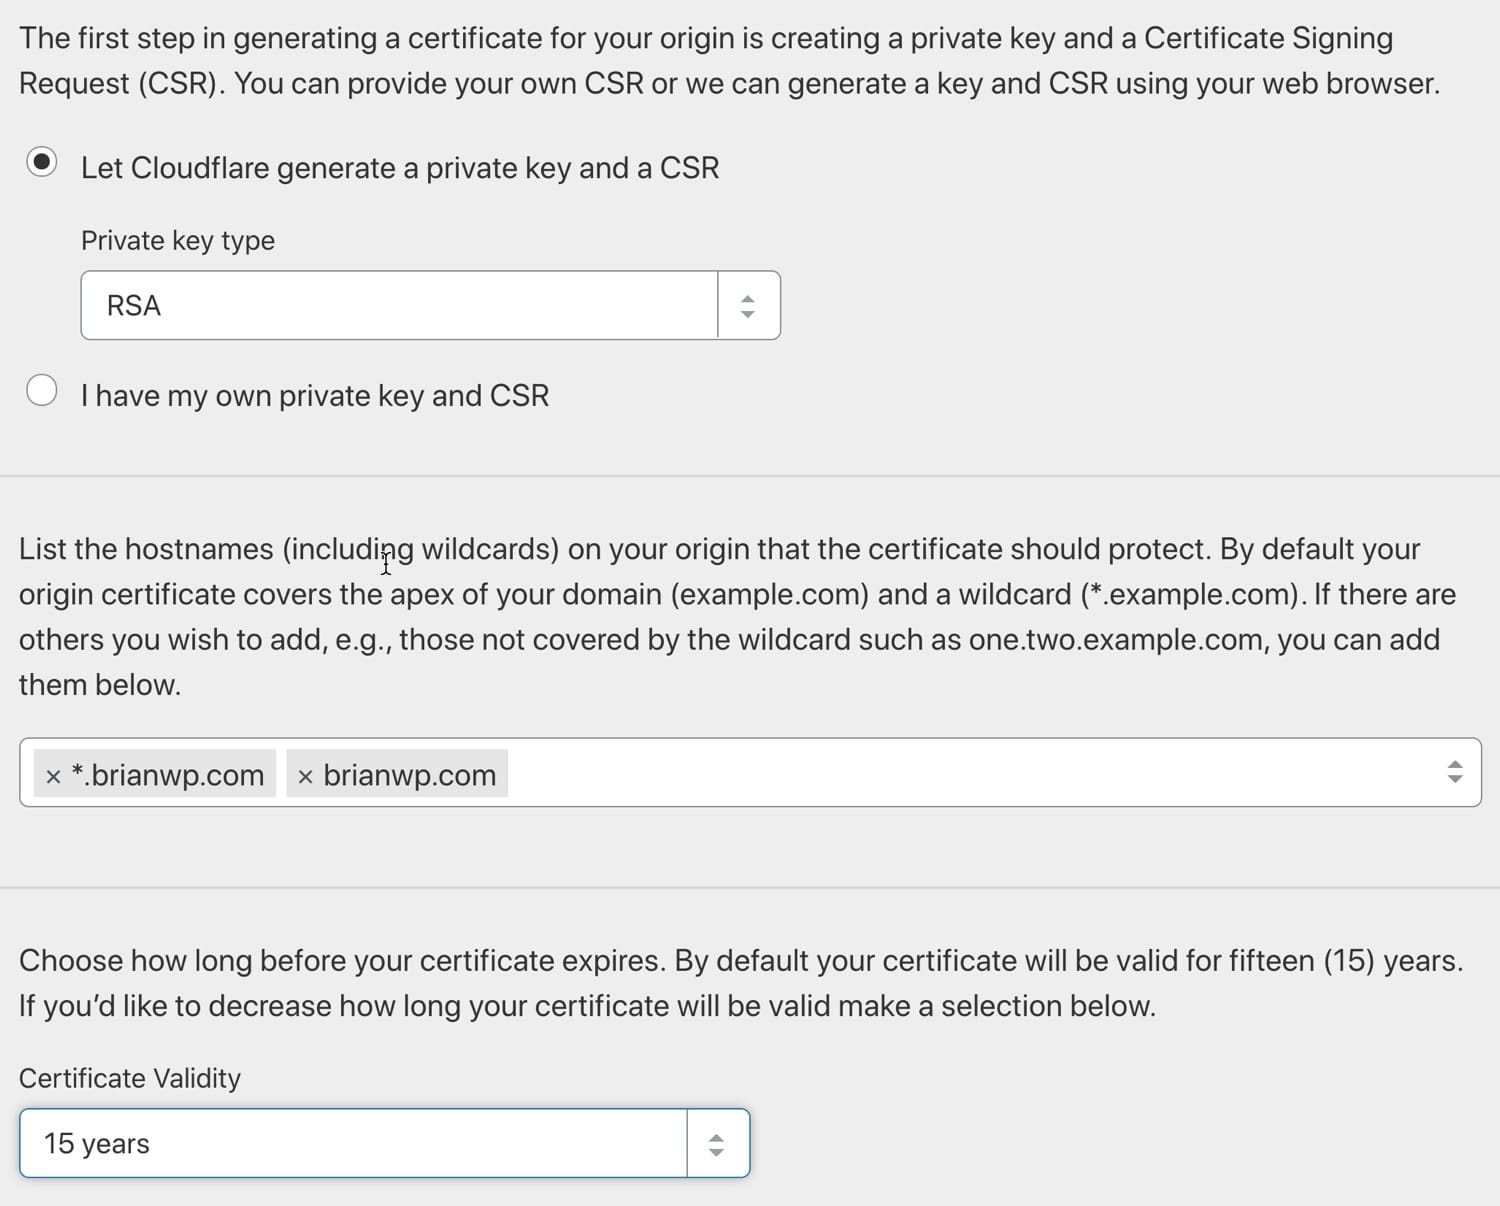
The origin certificate generation menu is split into three sections. In the first section, choose “Let Cloudflare generate a private key and a CSR” unless you have a specific reason to provide your own credentials.
In the second section, type in the domains and subdomains that need to be covered by the SSL certificate. You can only generate certificates for domains that are in your Cloudflare account.
Lastly, in the third section, choose a certificate validity period.
After setting up a proper SSL certificate that includes all your multisite domains, you’ll be able to use Cloudflare in the recommended Full (Strict) SSL mode. If you need to add additional domains or subdomains to your multisite in the future, be sure to generate a new SSL certificate that covers the additional domains.
Page Rules for WordPress Multisites
Cloudflare’s other security and performance features apply globally to all subdomains under your root domain. In other words, if CSS minification is enabled for our main site brianwp.com, it will also be enabled for site1.brianwp.com and site2.wpbrianli.com.
This default behavior can cause issues in certain situations. For example, you may not want to disable HTML, CSS, and JS optimization globally just because it’s incompatible with a single subsite. To get around this issue, you can use custom page rules to selectively disable features for specific subdomains.
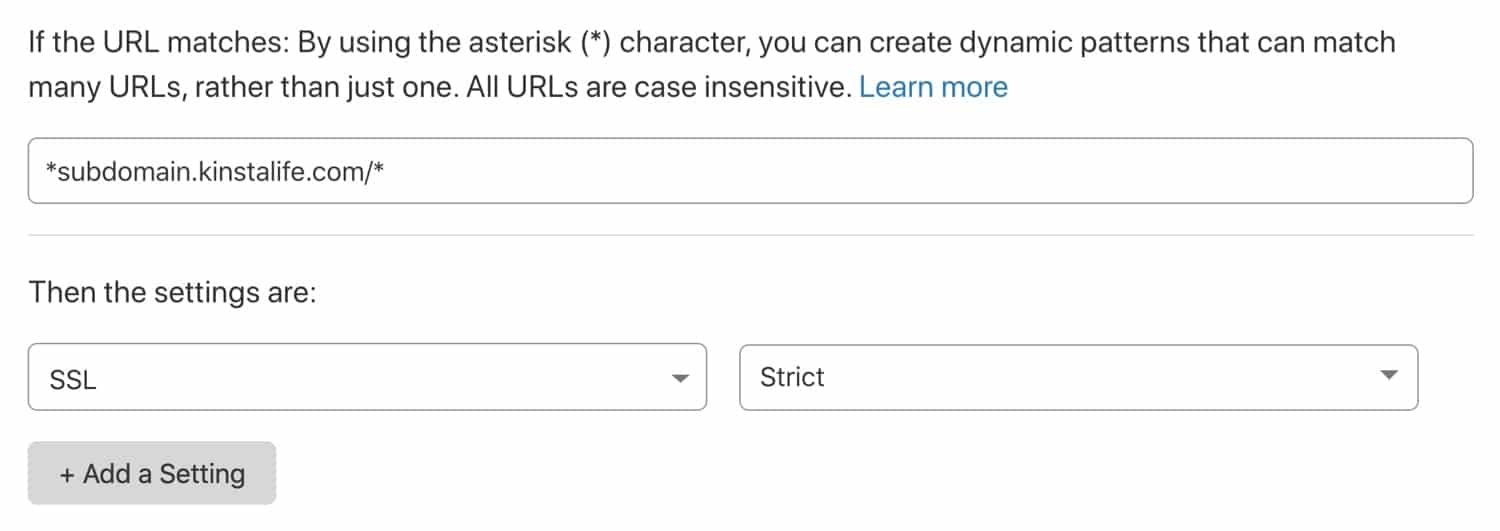
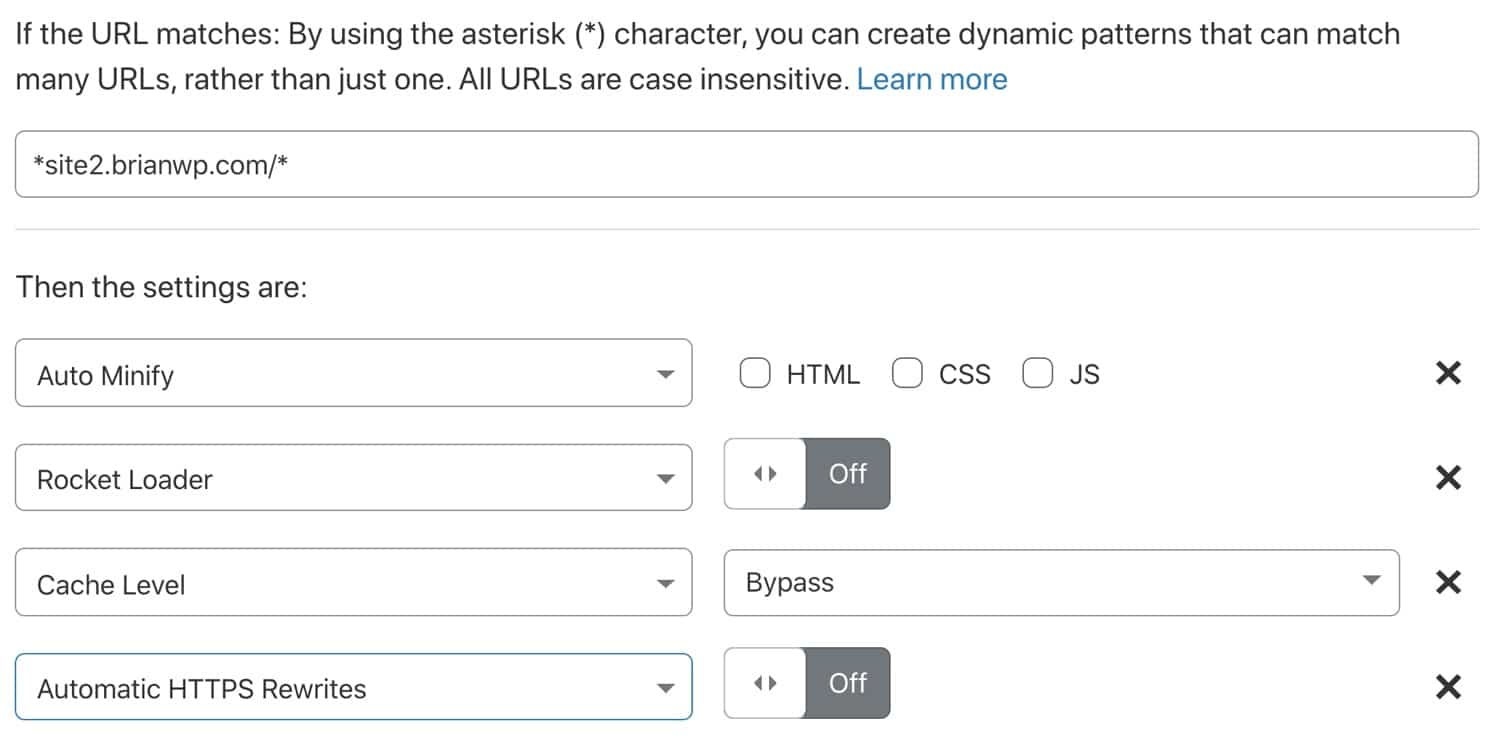
In the example below, we’ve set up a page rule that targets *site2.brianwp.com/*. The * character is used to specify wildcard behavior. You can think of * as “anything here”.
For this page rule, we have disabled auto minification of HTML, CSS, and JS, disabled Rocket Loader, bypassed Cloudflare cache, and turned off automatic HTTPS rewrites.
If you are using Cloudflare’s free plan, be aware that it only comes with three Page Rules. If you need to make selective tweaks on multiple subsites, you’d need to upgrade to the Pro plan or purchase additional page rules.
Summary
Knowing how to configure Cloudflare settings for your WordPress site and how to properly integrate with your hosting stack can positively impact your site speed and security.
Whether you’re a one-man shop or full-service agency with hundreds of clients, Cloudflare is a security and performance service that offers a tremendous amount of value. When paired with WordPress the correct way and a blazingly-fast host, that’s where the fun begins!

Brian has been a WordPress user for over 10 years, and enjoys sharing his knowledge with the community. In his free time, Brian enjoys playing the piano and exploring Tokyo with his camera. Connect with Brian on his website at brianli.com.