Kinsta Migration
When migrating your site to Kinsta, you have a few options to choose from, starting with migrating the site yourself or having our team do the migration for you.
Kinsta migrations are free. You can choose to migrate your site straight away, schedule the migration if your site is continuously updated or has special requirements, or purchase an expedited migration. Our migrations take place Monday through Friday; we do not migrate sites on weekends.
Migration process
When Kinsta migrates your site, we need access credentials to connect to your site and transfer it to our infrastructure. The details we ask for typically include your hostname, username, password, and SFTP connection details.
We create a copy of your existing site and transfer it to our infrastructure. Once the migration is complete, you’ll receive a notification with instructions on how to test your site and confirm everything looks and functions correctly. Your original site will remain live during the migration. However, it’s important that you do not make any changes after the migration has started, as these updates will not be reflected in the migrated version.
After you’ve finished testing and are satisfied that everything is working as expected, you’ll need to update your domain’s DNS records to point to Kinsta. Your site will not go live on Kinsta until these DNS changes are made. We also recommend following our Go Live Checklist after the migration to ensure a smooth transition.
Before you start
Who can request a migration
In order to request a migration, you must be a Company Owner or Company Administrator.
What to prepare
- Check that you have an available site slot. Kinsta creates a new site for your migration. Make sure your plan has an open spot before you begin.
- Gather your hosting credentials. You’ll need your current host’s SFTP/SSH details, username, and password. If your host uses two-factor authentication (Cloudways, GoDaddy, SiteGround, or WP Engine), add [email protected] to your account before submitting your request, as 2FA can block our team’s access.
- If migrating from a backup, make sure it contains both your site files and database, and that it’s ready to upload or accessible via a shareable link (Dropbox preferred).
- If your site is an e-commerce, membership, or community site, plan for maintenance mode. Your site will need to be taken offline during the migration to prevent data loss. Coordinate the timing so you’re available to review and go live quickly afterward.
- Decide on SSL. You’ll need to choose whether to generate a new free SSL certificate through Kinsta’s Cloudflare integration or upload your existing certificate. Have your key and certificate files ready if using the latter.
- Note any special requirements. Bedrock/Trellis setup, reverse proxy rules, custom .htaccess or Nginx rules, WP Engine LargeFS, or a multisite network. You’ll need to include these in the Special Instructions field.
- Do not make changes to your site once the migration starts. Any updates made after that point won’t carry over to Kinsta. If there are any changes or a delay between the migration and going live, a second migration may be needed for any updates.
- Plan for post-migration DNS and service setup. Pointing your domain to Kinsta, configuring third-party services, and setting up email are not included in the migration service; you’ll handle these yourself after the migration is complete. Common tasks include updating your domain’s A records, pointing nameservers to Kinsta’s DNS, setting up a CDN such as Cloudflare or Sucuri, and configuring your email service. For more information, follow our Go Live Checklist after the migration.
Once you have requested the migration, you can check the status of your migration(s) within MyKinsta > Sites > Migrations tab. Our Migrations team will also keep you updated on the status of your migration.
Once your migration is complete, we’ll send you details for testing the site and for pointing your website to Kinsta if everything looks good. Please always wait until we have confirmed that the migration is complete and that you’ve fully tested the migrated site before making it live.
Special cases
eCommerce, membership, and community sites
For frequently updated sites (e.g., eCommerce, membership, or community sites using WooCommerce or Easy Digital Downloads), we strongly recommend enabling maintenance mode during migration to prevent data loss. If that’s not possible, contact our Support Team to discuss alternatives.
While in maintenance mode, visitors see a notice and cannot place orders, register, update profiles, or publish content.
Once enabled, we migrate a copy of your site to Kinsta. After completion, you’ll receive instructions to preview it. The migrated site isn’t in maintenance mode, but it won’t be publicly accessible until you update your DNS to point to Kinsta.
Your live site will remain in maintenance mode until the DNS is updated and fully propagated. After migration, review and test the site, then update the DNS so visitors are routed to Kinsta and normal activity can resume.
Most migrations take 1–3 hours, with another 1–3 hours for review. DNS propagation typically takes around 1 hour, but can vary depending on TTL settings.
Bulk migrations
If you have a large number of WordPress sites you’d like us to migrate, you can contact our support team to perform a bulk migration.
Multisite network
If you want to migrate a WordPress multisite network, you must migrate it as a whole. The Kinsta migrations team cannot migrate a single sub-site of a multisite network into a standalone site; to do this, we recommend working with a developer.
WordPress.com sites
For WordPress.com migrations, we cannot do a traditional migration because WordPress.com does not allow access to the site files or the database. We can only export your WordPress content, such as posts, pages, comments, meta tags, etc., and import the content into a new WordPress installation here at Kinsta.
Because we cannot access the site files, we cannot transfer your WordPress theme, plugins, or any other customizations made to the site. This means your site will not look the same as it does on WordPress.com, and any functionality that depends on a plugin will not work until you reinstall your site’s plugins.
After the migration, you or your web developer will need to reinstall the theme and plugins, and recreate any customizations you made on WordPress.com (if applicable).
Reverse proxy, WP Engine Large FS, or other complex requirements
If your site uses a reverse proxy, WP Engine’s LargeFS feature, or other complex requirements, please let us know in the Special instructions when you request the migration.
How to minimize downtime
You can minimize downtime in a few ways:
- Be ready to review immediately: Schedule your migration for a time when you can start testing as soon as it completes, and keep an eye out for the Migrations team’s completion message.
- Lower DNS TTL in advance: 12–24 hours before migration, reduce your domain’s TTL to 300 seconds (5 minutes) to speed up propagation. After launch, increase it back to around 3600 seconds (1 hour). If you’re using Cloudflare, you don’t need to change TTL.
- Prepare for previewing: Review how to preview your site on Kinsta so you can quickly verify everything post-migration.
- Be ready to update DNS: Familiarize yourself with pointing your domain to Kinsta so you can switch traffic over as soon as the site is confirmed working.
Save and continue your migration request
While working on your migration request, if you need to stop and come back to it later, we’ve got you covered. Your request is automatically saved as a Draft if you leave the form and go to another part of MyKinsta in the same tab, if you close the tab in your browser, or even if you close the browser.
You can view all your migration requests in MyKinsta on the Migrations tab within Sites. If the migration request hasn’t been submitted, it will have a status of Draft. You can click the name to continue entering the required information and submit the request.
If a migration request is pending, you can click the name to view the migration details page, where you can track its progress.

Request a migration
To start a migration in MyKinsta, log in and go to Sites > Add site > Request migration. If you haven’t yet added any sites, you’ll see two buttons instead of a list of sites on the Sites page. Click Request a migration to start your migration request.

Choose your timeframe
You must choose when you would like Kinsta to perform the migration from the following options:
As soon as possible
Migrations are usually completed within one business day. If you select this option, our Migrations team will check all of the information you’ve provided and notify you before the migration starts.
On a specific date
Our Migrations team will start the migration on the date and time you have requested. The timings depend upon receiving the correct information to complete the migration. If we’re unable to access the site or backup for the migration, that may delay the migration, depending on how long it takes to get the necessary information.
Expedited migrations
If you’re concerned about downtime or need to get your site live on Kinsta quickly, we offer expedited migrations for just $49 per site. Agency plans include free expedited migration credits, with the number of credits determined by the number of sites in your plan. To check your available credits, navigate to MyKinsta > Company settings > My Plan > Expedited migrations.
With expedited migrations, our goal is to complete the process within 8 hours, between 9 AM and 11 PM, Monday to Friday (UTC). If we don’t meet this 8-hour target, we’ll refund your migration fee. While we strive to work as quickly as possible, certain factors, such as complex site requirements, slow transfer speeds from your current provider, or sites larger than 10GB, may extend the migration time. If we anticipate that the migration will take longer than 8 hours, we will keep you updated throughout the process.
Choose your migration type
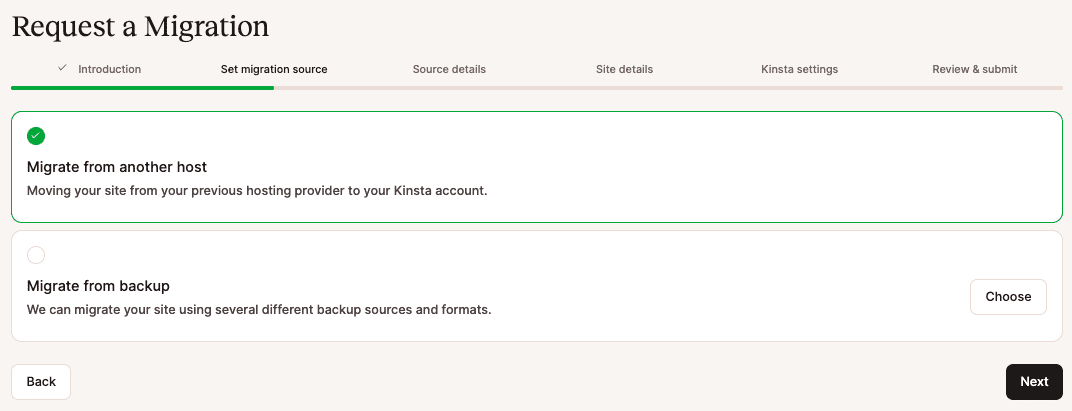
There are two types of migrations to choose from:
- Migrate from another host: Share information about your current hosting provider so the Migration team can access the site to perform the transfer.
- Migrate from a backup: Provide a link to files using cloud storage services such as Drive, Dropbox, etc., or upload a backup file (whether it’s created with Duplicator, ManageWP, or cPanel) to an existing Kinsta website.
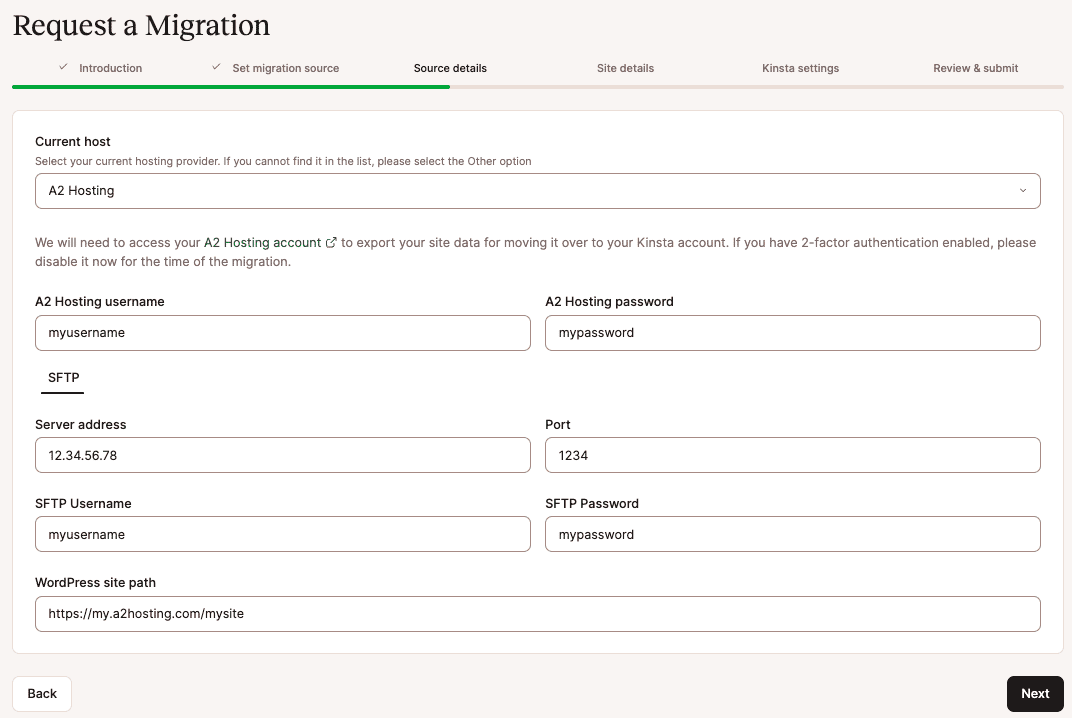
Migrate from another host
On the Source details tab, we’ll ask for your current hosting details. For some managed hosts, this includes your host’s name, username, password, and SFTP connection details. We may also request additional details, like hosting panel credentials. Typically, you can find all of these details on your current hosting provider’s control panel. For more information on how to obtain the details for this tab, refer to Source Details by Hosting Provider, reach out to your current host, or ask the Kinsta Support team.
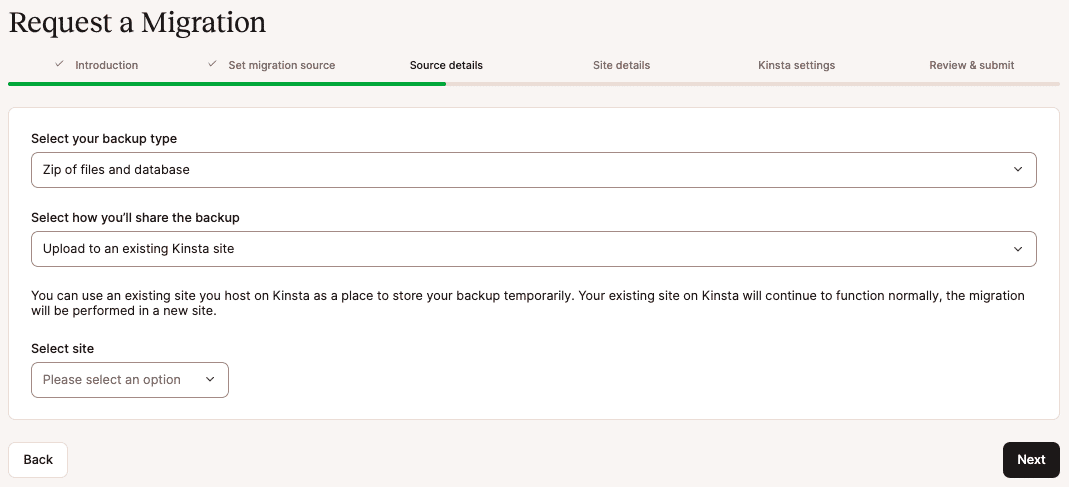
Migrate from a backup
On the Source details tab, we’ll ask for your backup details, including the backup type and how you’ll be sharing the backup with us from the following options:
- Upload to an Existing Site at Kinsta: If you have an existing site at Kinsta to upload and temporarily store the backup in, you can select it in the field provided. Your existing site on Kinsta will not be altered and will continue to function normally. We will perform the migration to a new site. Once you choose the site to upload to, we’ll show you the SFTP credentials for uploading the file. Be sure to upload your backup file to the /private folder to make sure it remains private.
- Link to Files: Choose this option if your backup is stored in a location you can provide a link to. Make sure the link is accessible to anyone who has the URL, or share the backup file with our Migrations team’s email address at [email protected] so they can access the file.
Site details
Next, we’ll ask for your domain, WordPress credentials, and WordPress admin URL, as well as whether your site is a Bedrock/Trellis site, ecommerce, community, or membership site, if it’s a multisite, and if it uses HTTPS.
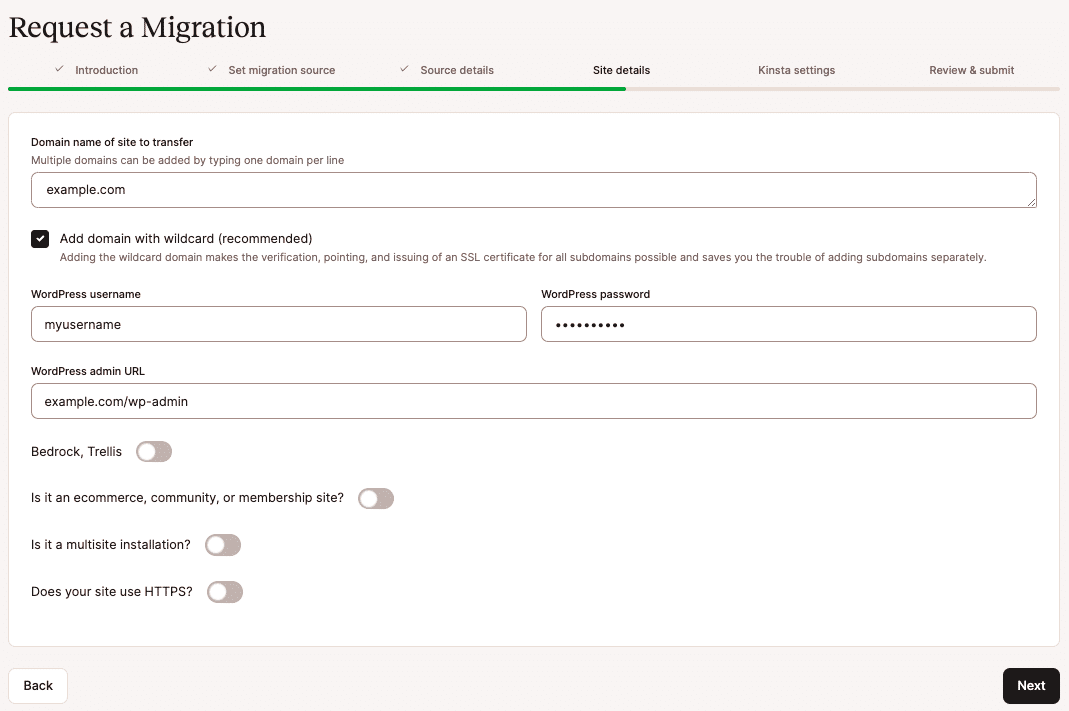
- Domain name of site to transfer: This is the domain you want to use to access your site.
- Add domain with wildcard: A wildcard domain ensures that any requests to a subdomain of
*.domain.comresolve to the same IP address as your main domain. For example, if you have a wildcard DNS record for*.example.compointing to123.123.123.123, any requests tosub.example.comorblog.example.comwill be resolved to123.123.123.123. - WordPress username: Your WordPress username.
- WordPress password: Your WordPress password.
- WordPress admin URL: The URL you use to access WP Admin.
- Bedrock, Trellis: Select this option if your site uses the Bedrock or Trellis configuration and enter the Root path where the WordPress application is installed.
- Is it an ecommerce, community, or membership site?: These sites usually change continuously; therefore, we recommend putting them into maintenance mode to prevent data loss when migrating. If you select this option, you can select the option to Use maintenance mode. Placing a site in maintenance mode means that the site content cannot be updated. While the site is in maintenance mode, a maintenance message is displayed, orders cannot be placed, users cannot register or edit their profiles, and new content cannot be published on the site. For more information about this process, refer to How Kinsta Migrates Dynamic WordPress Sites.
- Is it a multisite installation?: If you have a multisite, select this option and choose if your site is a subdirectory or subdomain. You must migrate the multisite network as a whole. The Kinsta migrations team cannot migrate a single sub-site of a multisite network into a standalone site.
- Does your site use HTTPS?: If you select this option, you can choose to generate a new SSL certificate in MyKinsta (using our free Cloudflare integration) or upload an existing certificate (if you have the key and certificate file).
After entering your site details, click Next to continue.
Kinsta settings
You now need to complete the details for your site’s new home at Kinsta. Enter a unique name and choose your site’s data center from the 27 data center locations available. If you have a dedicated server, you can choose this in the Data center location.
Let us know if there’s any special information or instructions we should know about for your site, such as forcing HTTPS or any special .htaccess or Nginx rules that you may need. You should also let us know if your site is a WordPress.com site, if it uses WP Engine’s Large FS feature, if it requires a reverse proxy, or if it has any other complex requirements.
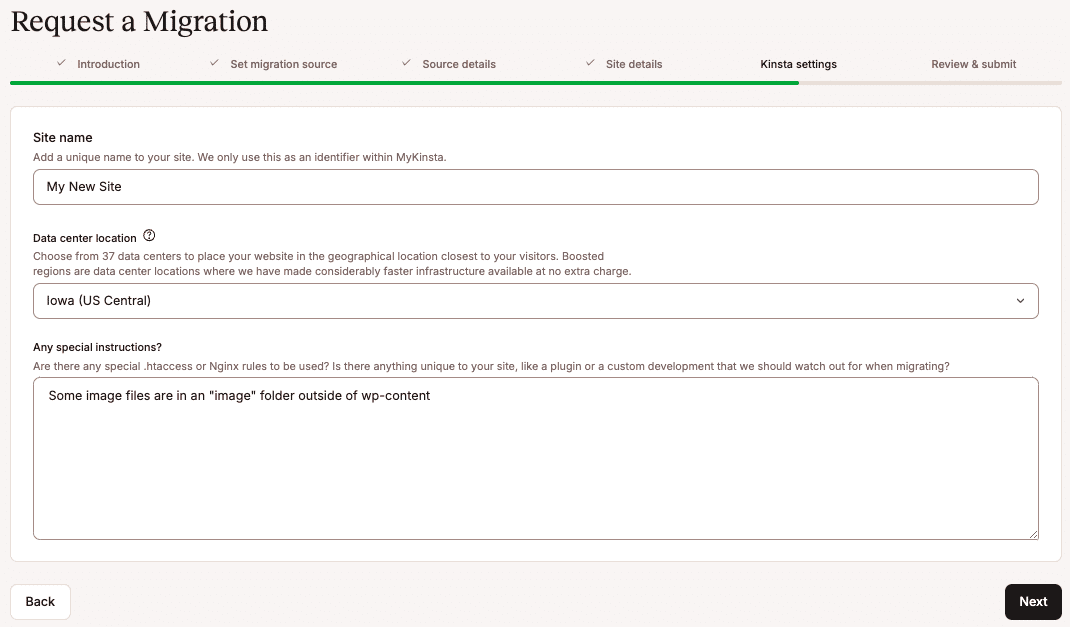
Once you’ve completed your Kinsta settings, click Next to review your migration details.
Review and submit
Carefully review the details of your request for any typos or errors. If you have requested an expedited migration, ensure the correct payment method is selected. If you need to change anything in the request, click the Back button to return to the previous page and update the information.
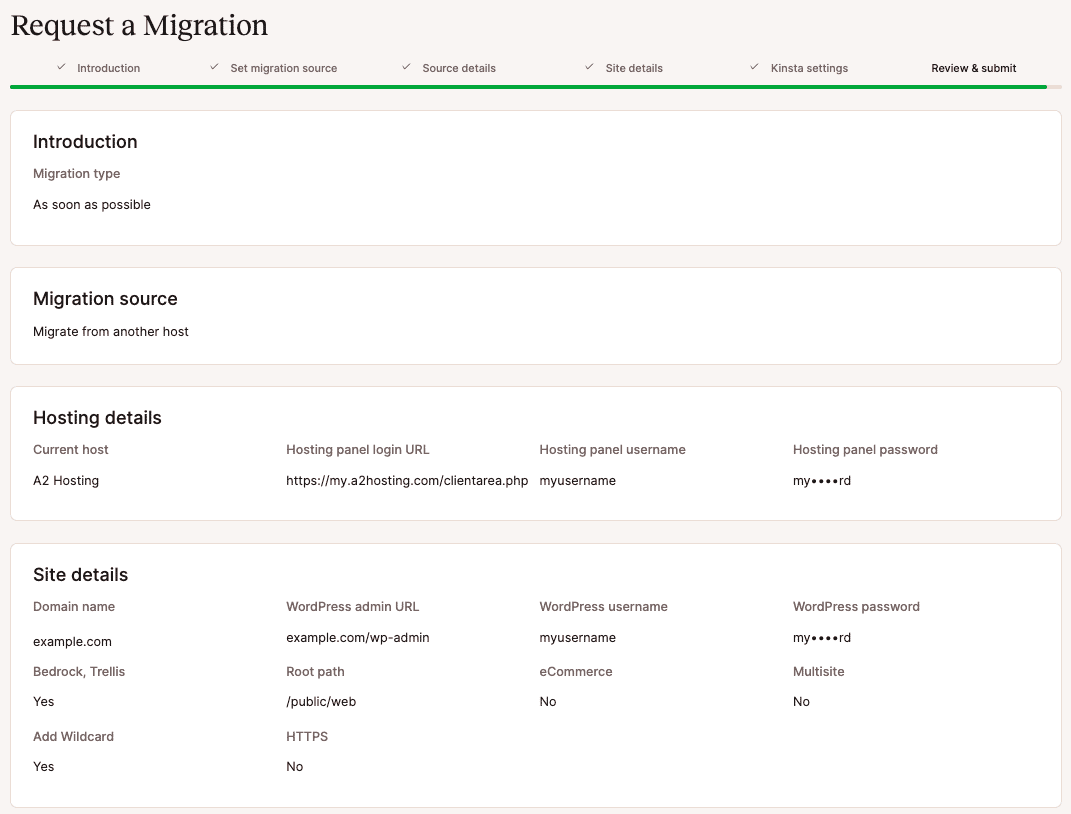
When you’re ready, click Finish to submit your request.
After you submit
Your pending migrations will show up in the Migrations tab under Sites in MyKinsta, and you can check the status anytime. Our Migrations team will also keep you updated on the status.
Do not make changes to your site once the migration starts. Your original site will remain live during the migration. However, it’s important that you do not make any changes after the migration has started, as these updates will not be reflected in the migrated version. If there are any changes or a delay between the migration and going live, a second migration may be needed for any updates.
If you have any additional migrations to submit, click Request new migration to begin a new migration request.

What to do when the migration is complete
Once your migration is complete, you’ll receive a notification with steps to preview and test your site on Kinsta before it goes live.
To test and preview your site using the Site Preview tool:
- Log in to MyKinsta, and go to WordPress sites > sitename > Tools.
- On Site Preview, click Enable, enter your live domain, and select how long you’d like the preview enabled (1, 4, 8, or 24 hours).
You’ll then be able to access and test the site as if it were live.
Take time to verify your content, functionality, and any eCommerce or membership features (for example, stores using WooCommerce). Don’t update your DNS until you’ve fully tested everything.
Once you’re confident the site is working correctly, update your domain’s DNS records to point to Kinsta. Follow the Go Live Checklist to help ensure nothing is missed.
After DNS propagation is complete, visitors will be routed to your site on Kinsta. Only cancel your previous hosting once you’ve confirmed the site is loading correctly from Kinsta.