Sucuri
Offering an array of products and services, Sucuri is a popular CDN and security platform. Once you’ve launched your site at Kinsta, if you would like to use Sucuri’s CDN instead of Kinsta’s CDN, this guide shows you how.
Sucuri can help fend off ongoing attacks and guard your site against additional security threats.
We use a .top domain in the examples below, but Kinsta and Sucuri will work with any top-level domain (TLD).
How to install and configure Sucuri
If you haven’t already signed up for Sucuri, head on over to the Sucuri signup page to get started.
Add your site to Sucuri
To connect your site with Sucuri, you have two options, each of which is explained below. The first few steps are the same for either method, so we’ll go through those first before showing the different steps for each option.
1. Add site
Log in to your Sucuri dashboard and click on the Add Site link near the upper right corner (or Add Site button in the center of the page if this is your first site).
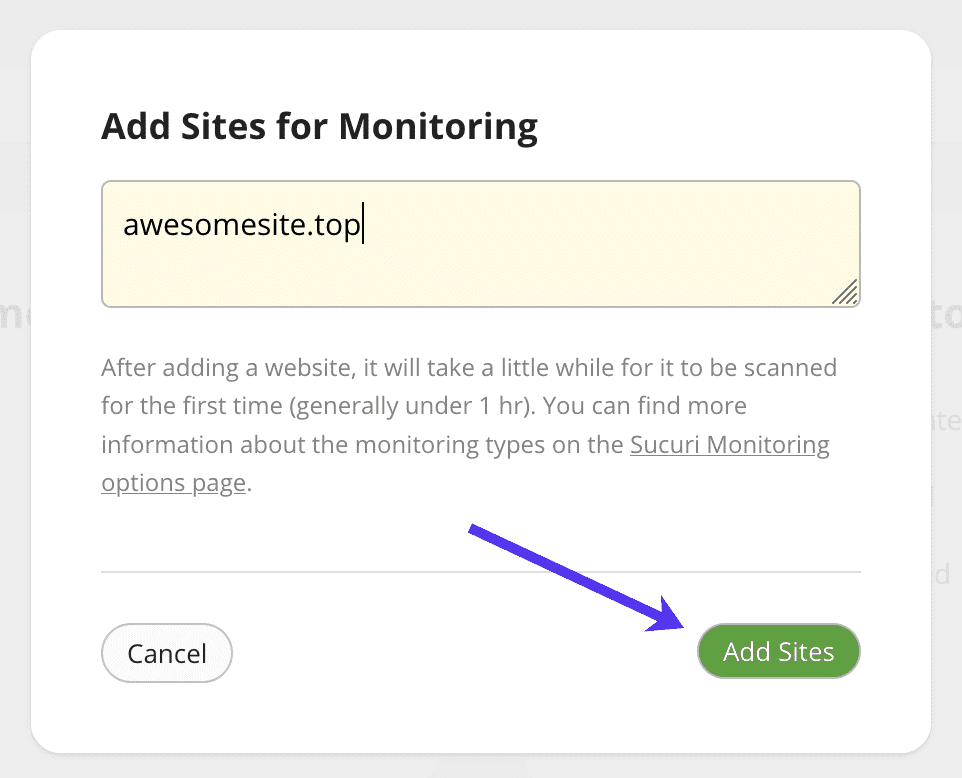
2. Enter your domain
In the modal/pop-up that appears, enter your domain name and click the Add Sites button.
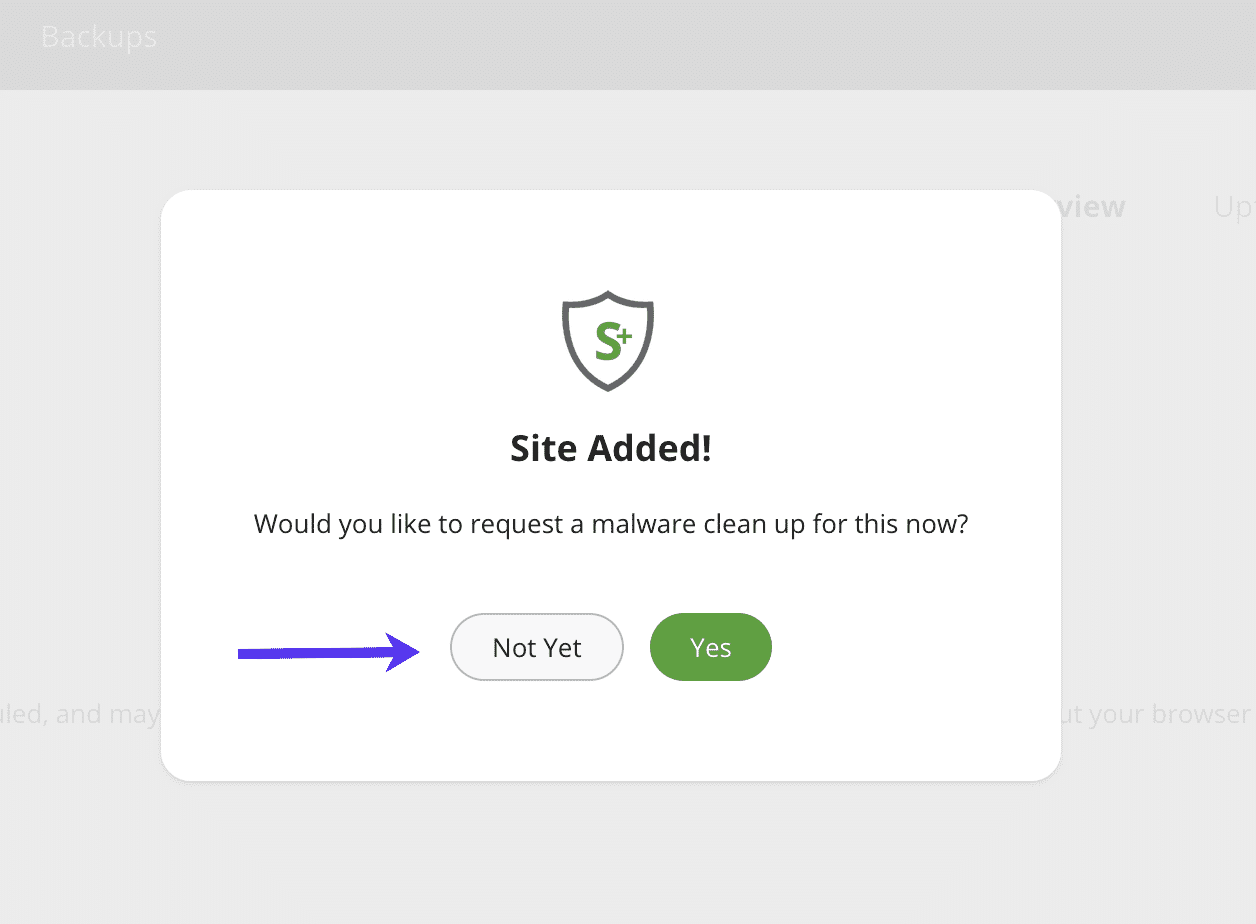
3. Malware cleanup
A notification appears that your site has been added and asks you if you would like to request a malware cleanup. Unless you need that, you can click the Not Yet button.
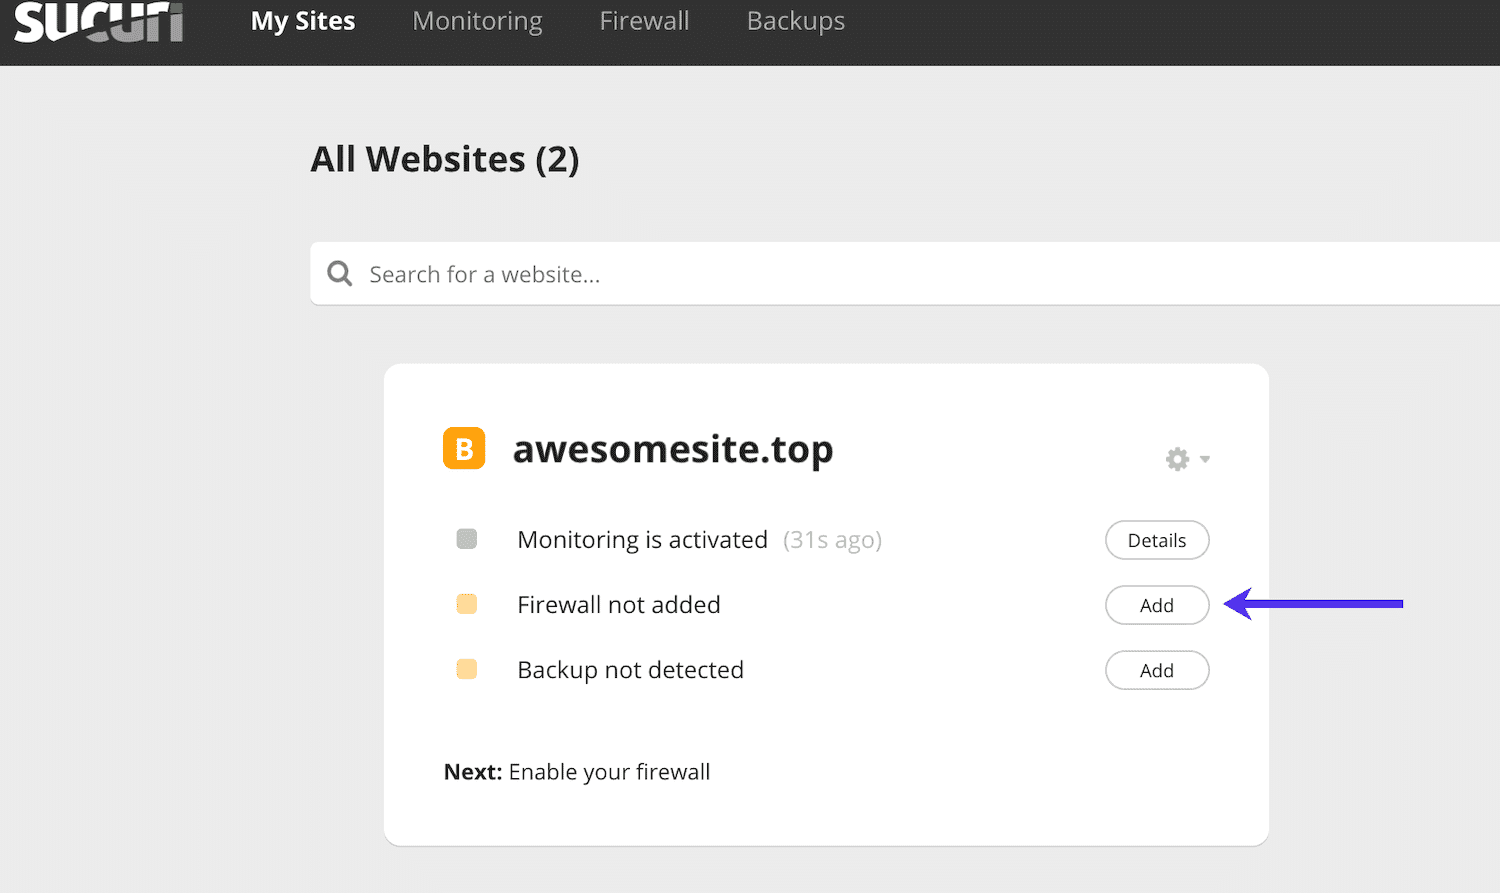
4. Add Sucuri Firewall
To add Sucuri Firewall to your site, back on the My Sites page, under your domain name, click the Add button next to Firewall not added.
5. Add site IP address
On the Firewall page of your Sucuri dashboard, navigate to Settings > General > Hosting IP Address. If it hasn’t already been added automatically, add the Site IP address of your site from MyKinsta.

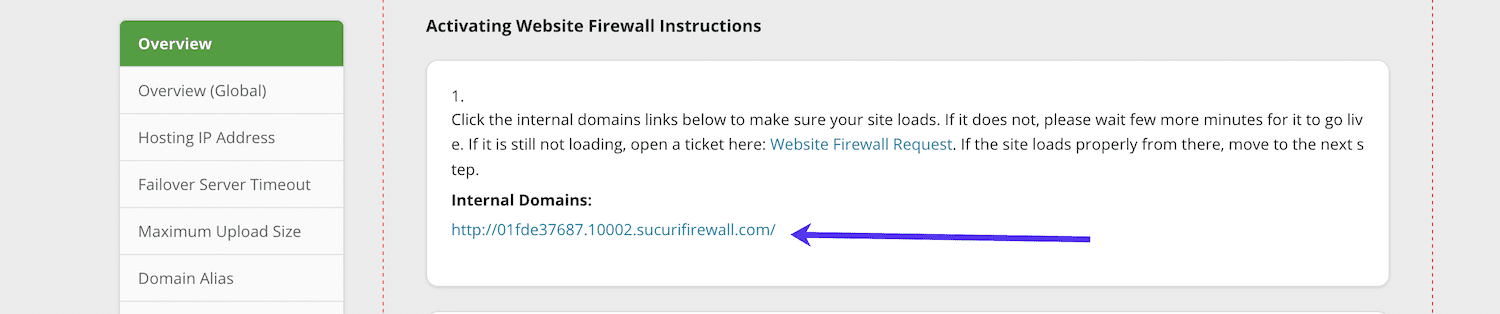
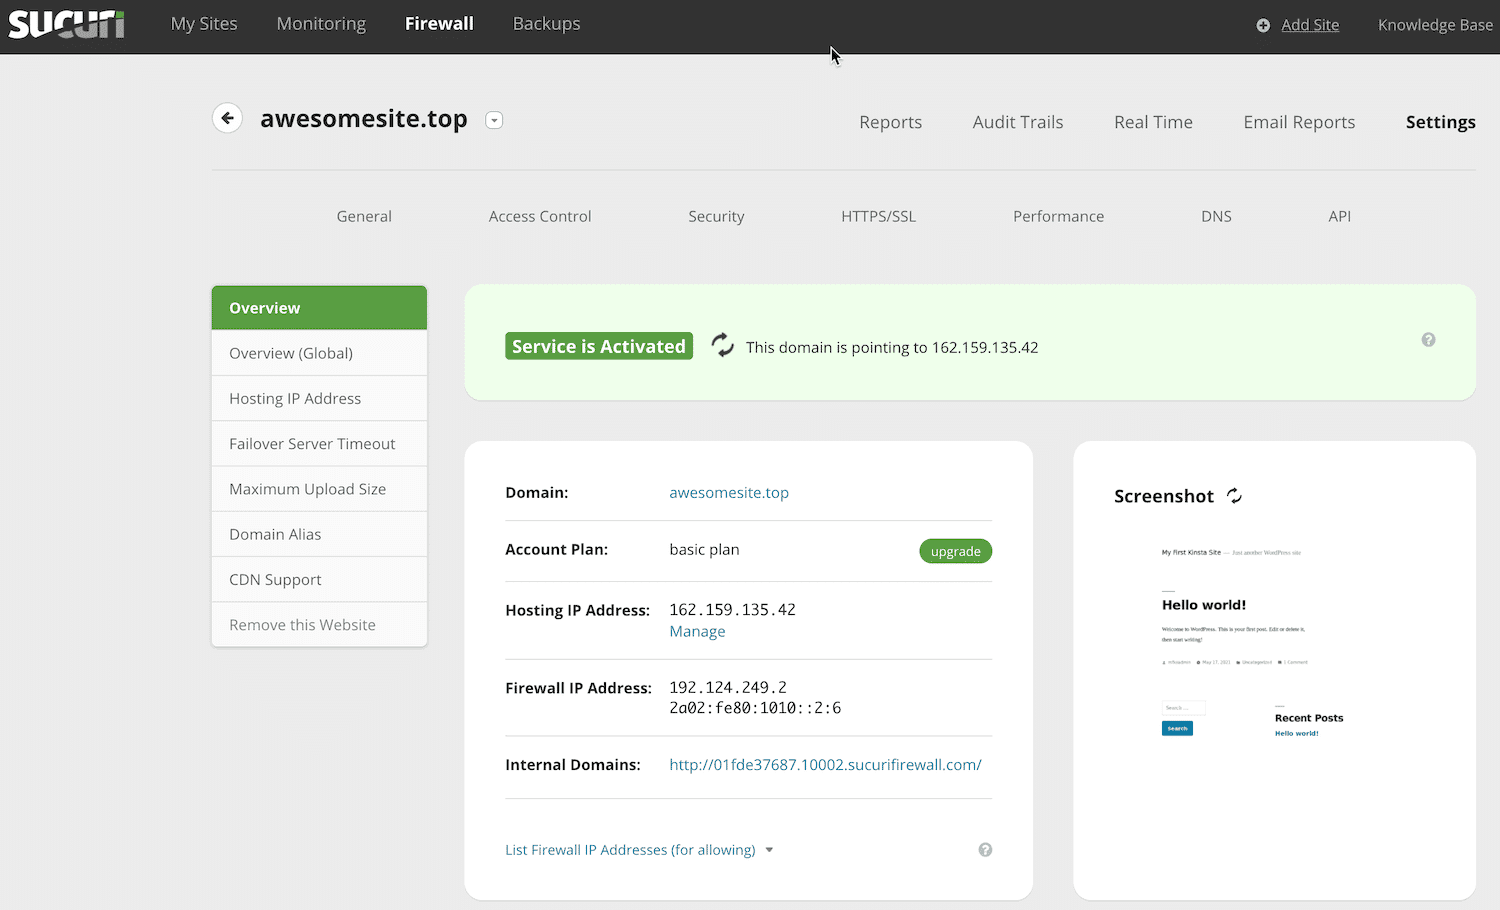
6. Activate Firewall instructions
Click Overview in the left sidebar navigation and scroll down to the Activating Website Firewall Instructions.
7. Check site loads
Click the internal domains link provided and make sure your site loads.
The next steps needed are to connect your site to Sucuri. You can do this with either third-party DNS (pointing your domain’s A record) or Sucuri DNS (pointing your domain to Sucuri’s name servers and managing DNS at Sucuri). Continue with whichever method you prefer, as outlined in the following steps.
Method 1: Connect your site to Sucuri with third-party DNS
For this method, you’ll be changing your DNS records where you manage your domain’s DNS.
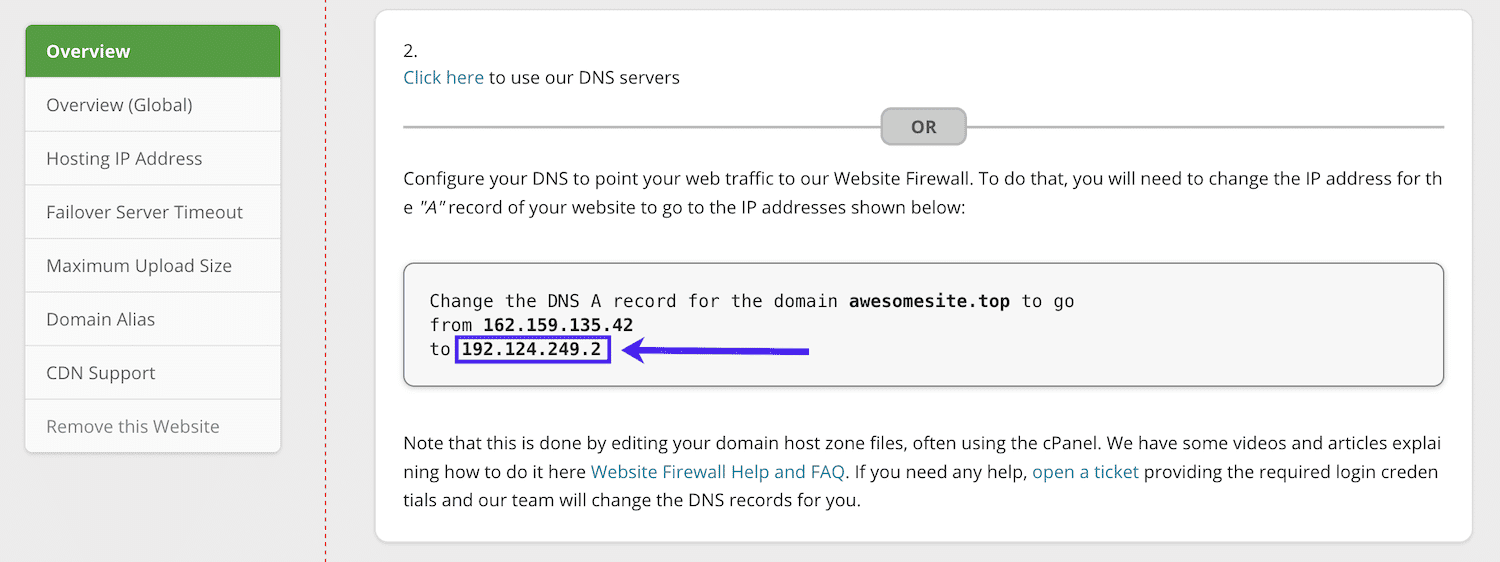
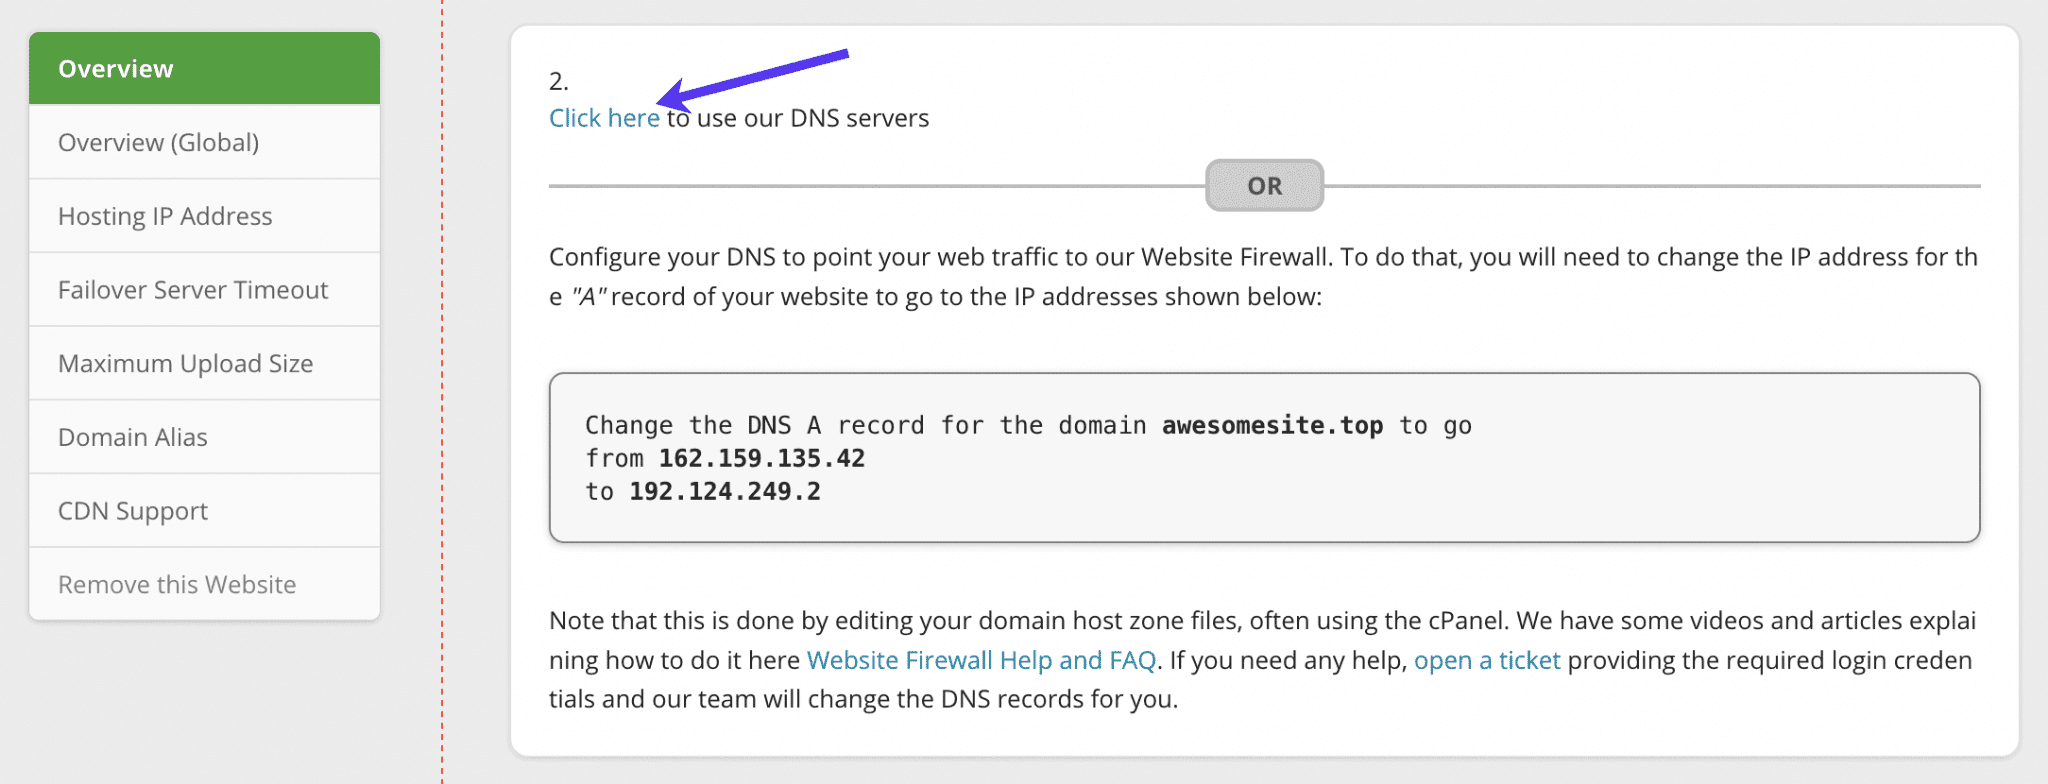
1. Copy A record
Skip the “Click here to use our DNS servers” link and copy the A record that you need to point your domain to.
2. Add DNS records
The steps to add or edit your domain’s DNS records may vary depending on your DNS provider. We’ll use Kinsta’s DNS as an example here.
- Log in to MyKinsta and click DNS management.
- Click on the domain you want to add a DNS record to.
- If you already have an existing A record for your domain, click the Edit (pencil) icon to update this to the first IP address shown at Sucuri. Otherwise, click the Add a DNS record button.
- Leave the Hostname blank unless you’re adding the A record to a subdomain (add the subdomain as Hostname in that case)
- IPv4 Address: The IP address you copied from Sucuri.
- Click the Change DNS record button (updating a DNS record) or Add DNS record button (adding a new DNS record) to save your DNS record.
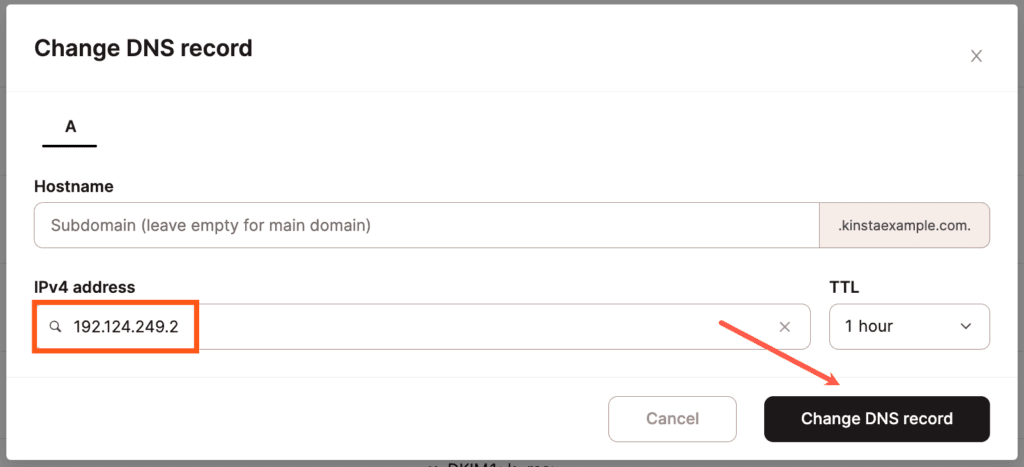
Updating your domain’s A record in Kinsta’s DNS 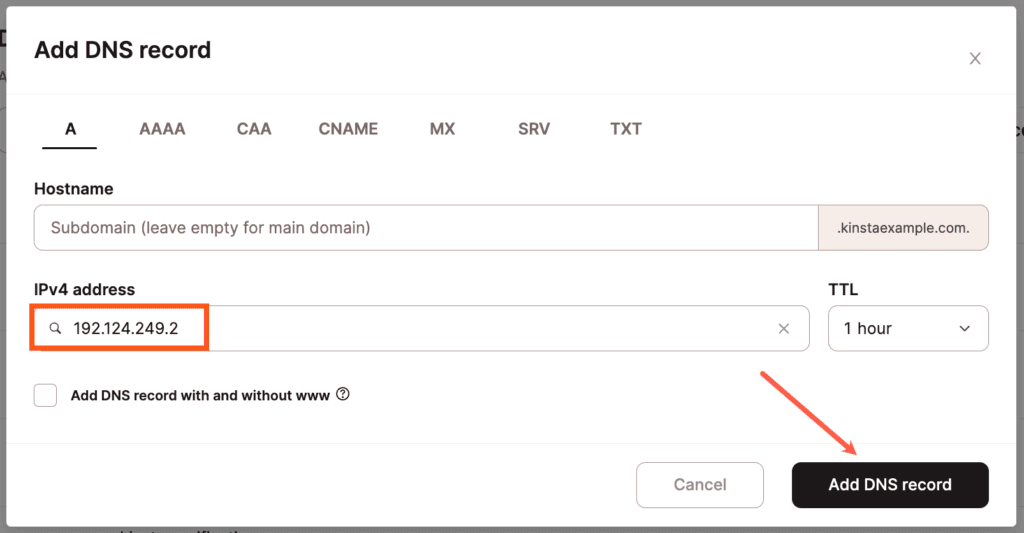
Adding an A record to your domain in Kinsta’s DNS.
- If you already have an existing CNAME record for the www hostname that’s pointed to your root/apex domain, you don’t have to make any changes to that and can skip this part. If your www CNAME is pointed somewhere else, but you want it to point to your root/apex domain, click the Edit (pencil) icon to update it. If you don’t have a www CNAME click the Add a DNS record button and select the CNAME tab.
- Hostname: www
- Points to: Your root domain (e.g. awesomesite.top) or “@” (if your DNS provider allows).
- Click the Change DNS record button (updating a DNS record) or Add DNS record button (adding a new DNS record) to save your DNS record.

Changing your domain’s www CNAME in Kinsta’s DNS. 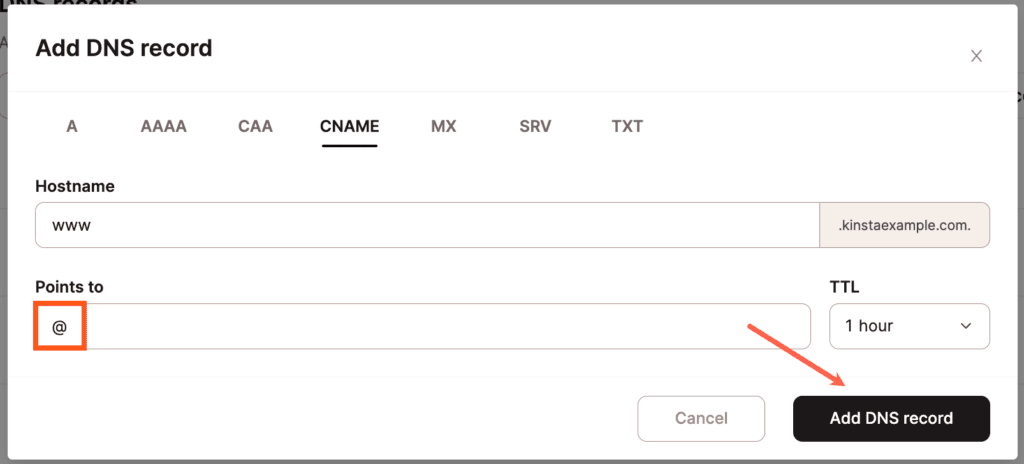
Adding a www CNAME to your domain in Kinsta’s DNS.
Note: It may take up to 1 hour for your DNS records to propagate.
Back in the Sucuri dashboard, you’ll see a status message showing the service is activated once DNS has finished propagating.
Now that your site is connected to Sucuri, head down to the Configure HTTPS Options section of this article to get that configured, so your site doesn’t end up in a redirect loop or show an SSL error.
Method 2: Connect your site to Sucuri with Sucuri DNS
With this method, you’ll be changing your domain’s name servers to point to Sucuri. After this change, you will manage your DNS records at Sucuri. Note: Once this is turned on, if you need to switch your DNS back to a third-party DNS manager, you’ll need to contact Sucuri support to turn off the DNS manager at Sucuri.
1. Use Sucuri’s DNS servers
Click the “Click here to use our DNS servers” link.
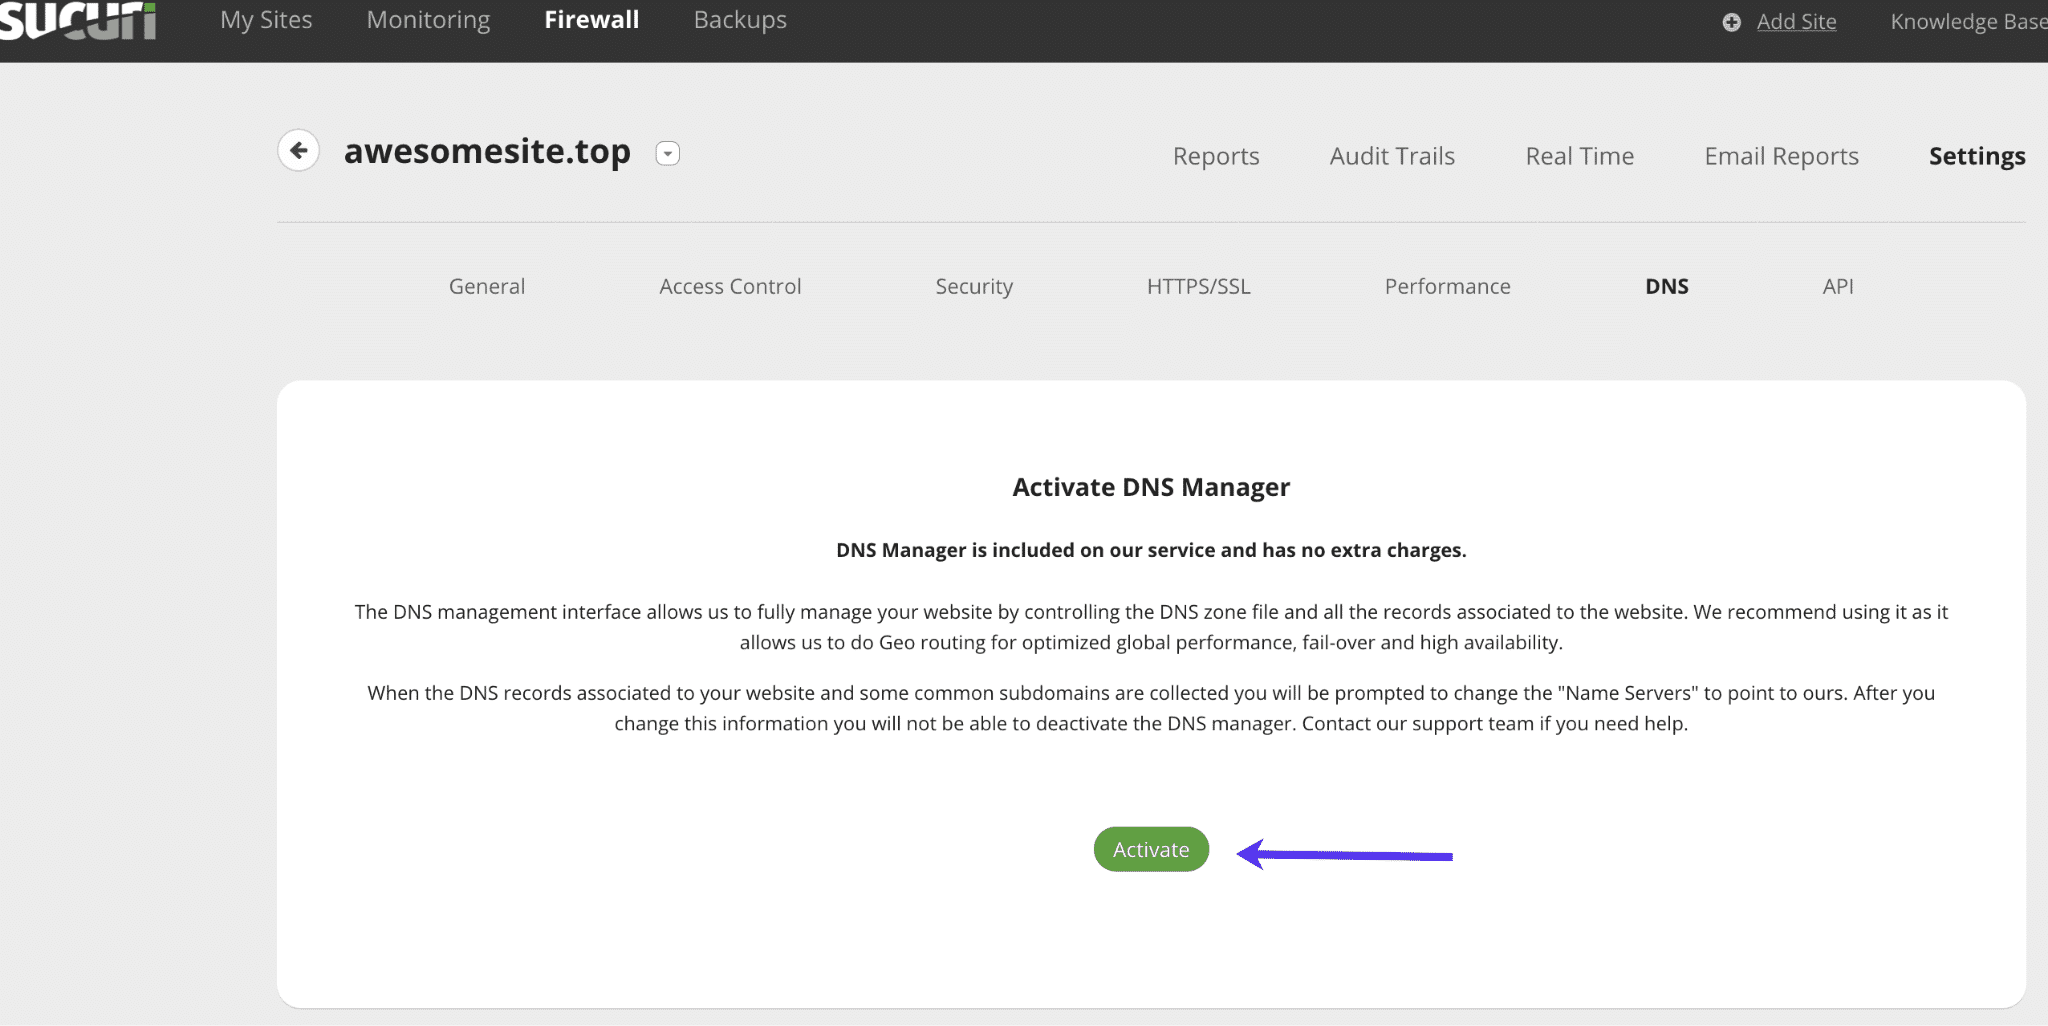
2. Activate Sucuri DNS
This will take you to the DNS Manager page in Sucuri. Click on the Activate button to turn it on, and Sucuri will begin collecting your DNS records.
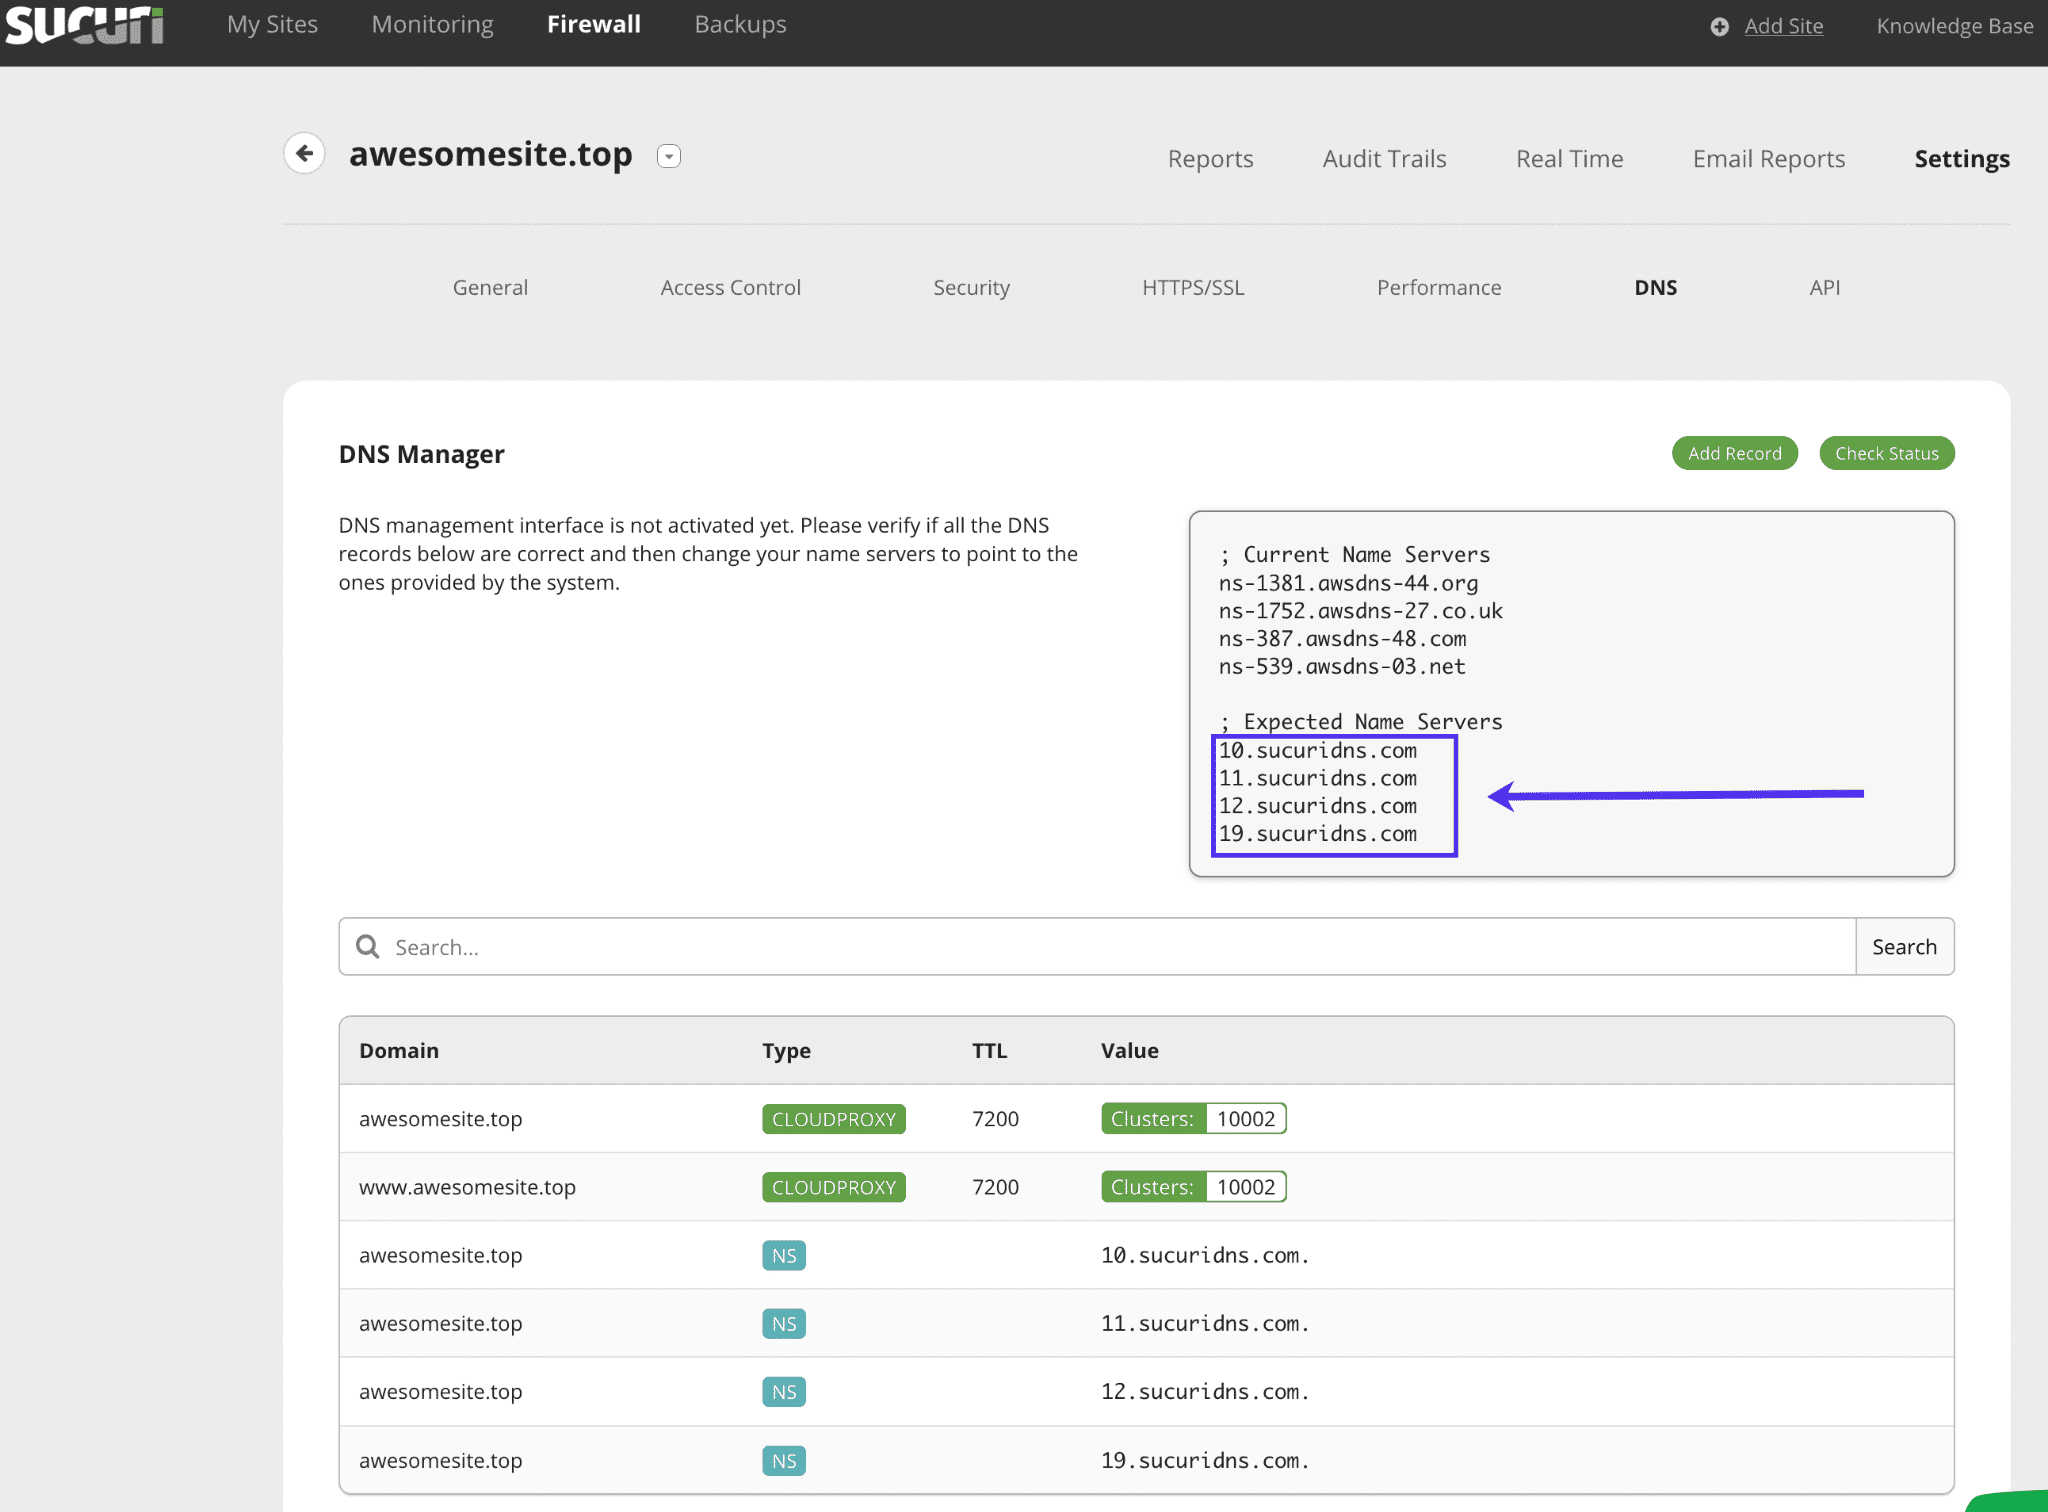
It’s important to check your DNS records before changing your domain’s name servers at your domain registrar. If any DNS records are missing, manually add those to Sucuri.
3. Log in to your domain registrar
In a new browser tab, log in to your domain registrar. If you’re not sure how to do that at your registrar, check their support documentation or contact their support team to help you with that.
4. Copy name servers
Copy each of the name servers from Sucuri and paste them in at your registrar. Be sure to either overwrite the existing name servers or delete them and add the new ones.
5. Propagate DNS
Allow for DNS to propagate the name server change. This usually happens within 24 hours, but in some cases may take 48–72 hours.
Back in the Sucuri dashboard, you’ll see a status message showing the service is activated once DNS has finished propagating.
Now that your site is connected to Sucuri, follow the steps in the next section to Configure HTTPS Options, so your site doesn’t end up in a redirect loop or show an SSL error.
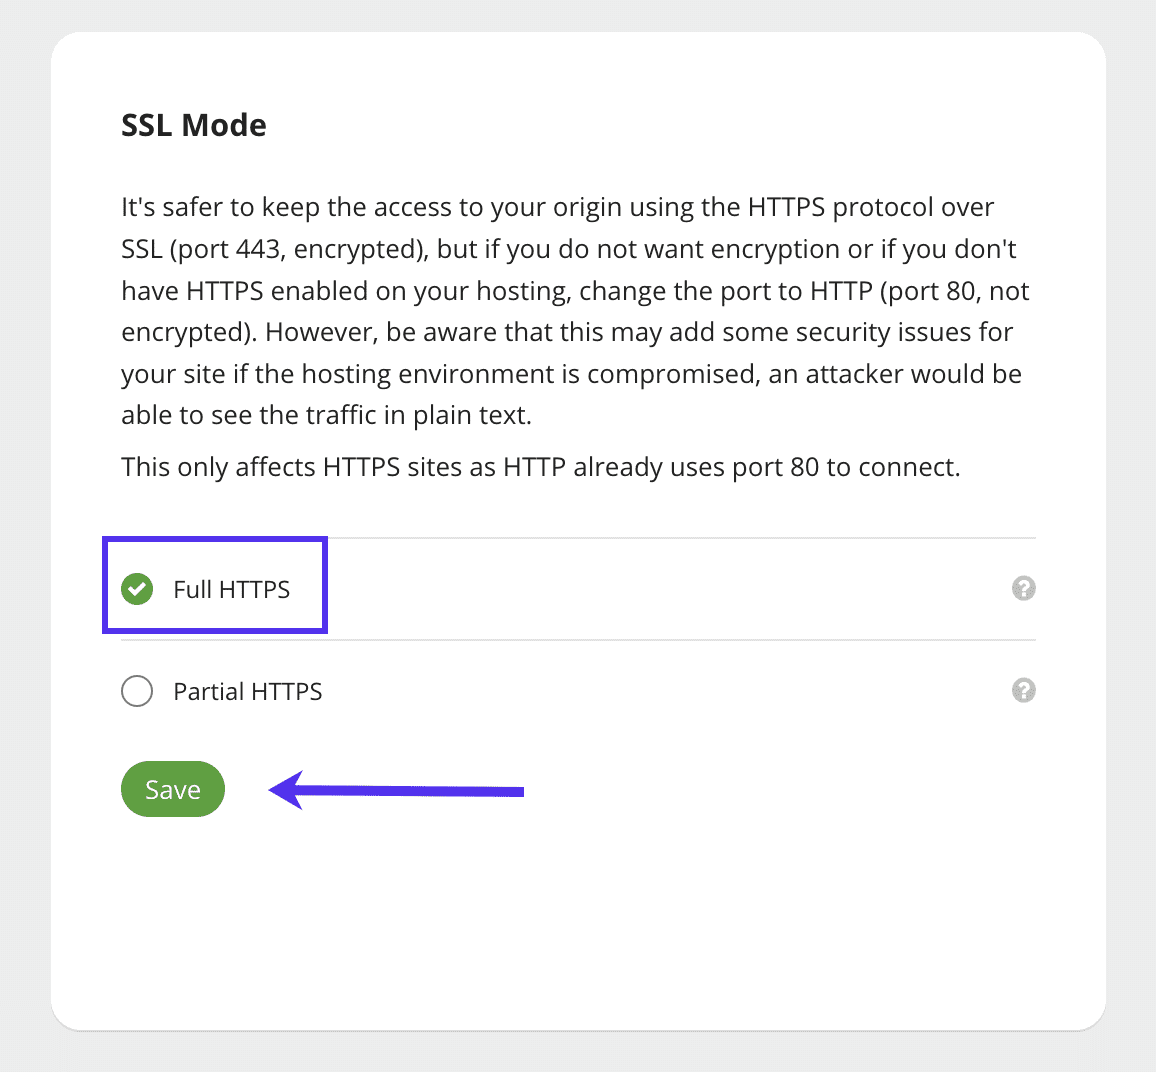
Configure HTTPS options
On the Firewall page, click on the HTTPS/SSL tab and scroll down to the HTTPS Options. Select Full HTTPS and click the Save button. This is important for preventing redirect loops or other SSL errors.
Your site is now connected and configured with Sucuri.
Troubleshooting common Sucuri issues
As with any CDN or proxy, when an additional layer is introduced, you may at times see something isn’t working properly. Below are some of the most common issues you may run into when your site uses both Sucuri and Kinsta’s Cloudflare integration.
Changes aren’t showing up on your site
If you need to clear cache, this will need to be done at Sucuri and Kinsta
- Plugins (if applicable)
- Themes (if applicable)
- Site/server cache at Kinsta (from either MyKinsta or the Kinsta MU plugin)
- Cache at Sucuri
- Browser cache
IP address blocked by false positive
With DDoS protection and/or Bot mitigation enabled at Sucuri, false positives may occur and block an IP address you don’t want to be blocked. If this happens, you’ll need to check with both Sucuri and Kinsta Support to see where the block is occurring.
SSL errors or redirect loops
If any HTTP to HTTPS redirect loops or TLS version errors occur, double-check and make sure the HTTPS Option is set to Full HTTPS at Sucuri.
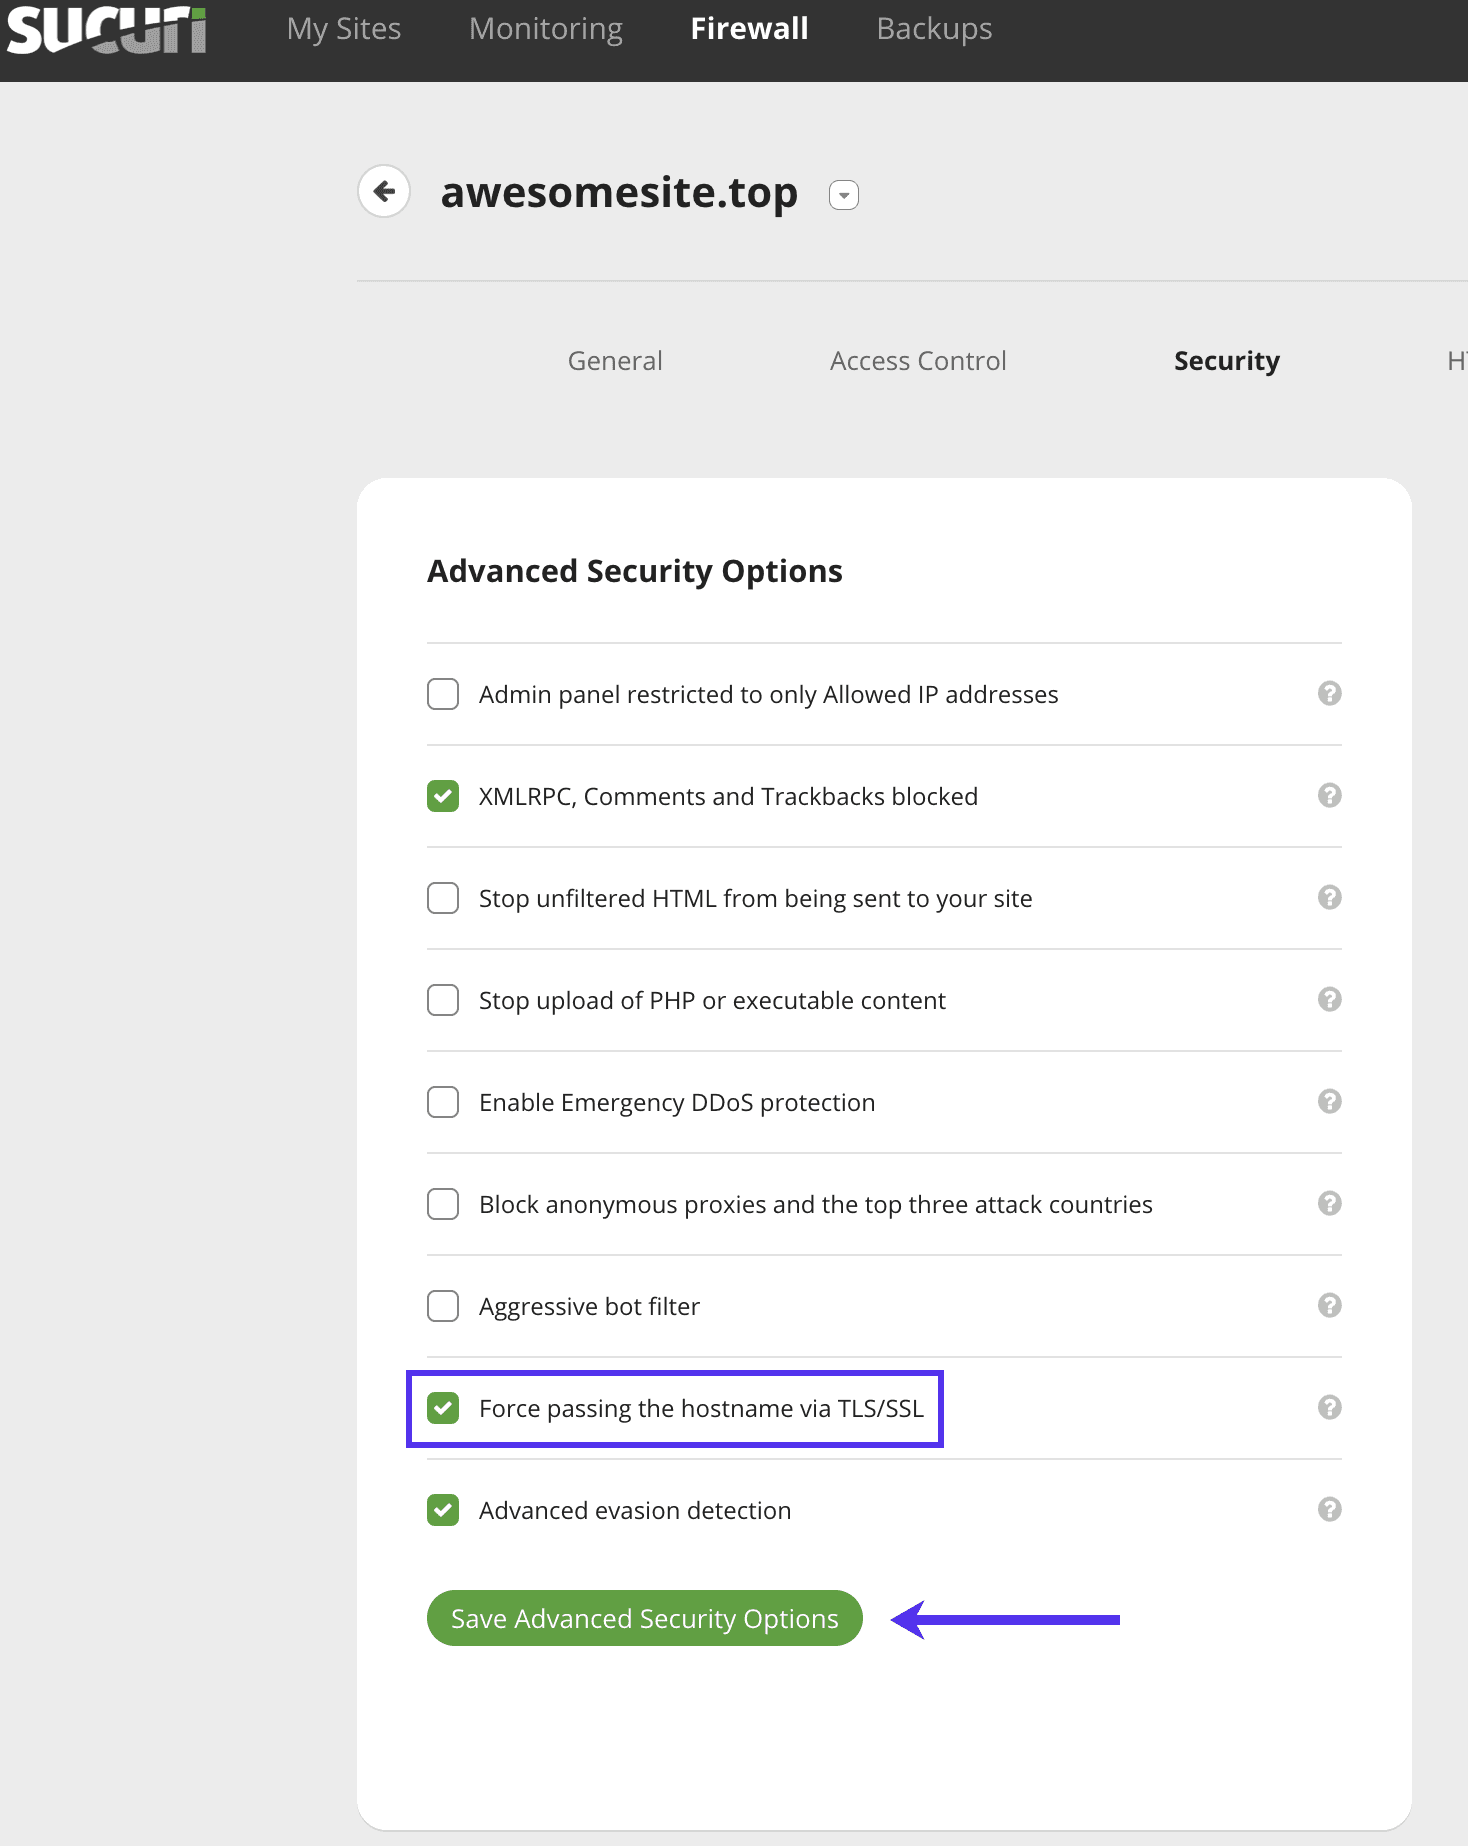
Cloudflare 403 page
If Cloudflare returns a 403 page on the front end or the login page, try Sucuri’s Force passing the hostname via TLS/SSL option in Security Options. This error usually indicates no host header or incorrect host header is being passed, and that setting should fix that.
If enabling Force passing the hostname via TLS/SSL doesn’t resolve the 403 error, disable Sucuri to see if that resolves the error and contact Sucuri support with the details.
Sucuri WordPress plugin
The Sucuri plugin isn’t required but can make managing Sucuri a bit easier. With it installed on your site, you can see and manage your Sucuri service in your WordPress dashboard.
Once you’ve installed the plugin and activated it, generate your API key in the Sucuri Security page in your WordPress dashboard to connect the plugin with your Sucuri account.
There are quite a few settings in the plugin, so be sure to make note of any you change in case you need to change those back to the original settings if any issues arise.
Summary
Your site is now configured and connected to Sucuri. If you’re experiencing any server-side issues, feel free to reach out to our Support team, and we’ll be happy to help. If you have any questions or issues about Sucuri, be sure to check with their support team.