Redis Caching
Redis is an open-source, in-memory data structure store. In the context of WordPress, Redis can be used to store the values generated by WordPress’ native object cache in a persistent manner so that cached objects can be reused between page loads.
Many managed Redis solutions run your cache on a totally separate network from your website, often located thousands of miles away. In contrast, Kinsta’s Redis add-on installs a dedicated 2GB Redis instance within the same container as your WordPress site. This architecture ensures that Redis, your PHP engine, and the database all operate on the same physical machine, enabling:
- Extremely low latency.
- Request round-trips in microseconds, not milliseconds.
- Minimal data transit and no external bottlenecks.
- Faster cache performance.
By eliminating external network calls, this local integration is especially beneficial for resource-intensive applications such as WooCommerce stores, membership sites, or high-traffic WordPress installations.
Using a persistent object cache such as Redis cache allows for the reuse of cached objects rather than requiring the MySQL database to be queried a second time for the same object. The result is that Redis can reduce the load on a website’s MySQL database, simultaneously decreasing the response time of the site and increasing the site’s ability to scale and handle additional traffic.
Sites that will benefit most from Redis cache
At Kinsta, page caching is built in for all sites on our platform. However, there are some sites that don’t make great use of page caching: some ecommerce sites, membership sites, forums and discussion boards, blogs with extremely active comment sections, and other types of highly dynamic websites.
These highly dynamic websites that cannot make good use of page caching are potential candidates for a persistent object caching option such as Redis.
Redis will generally not help the load time of static blogs, informational business websites, and news websites unless the sites make very poor use of our page caching.
Adding Redis to a site at Kinsta
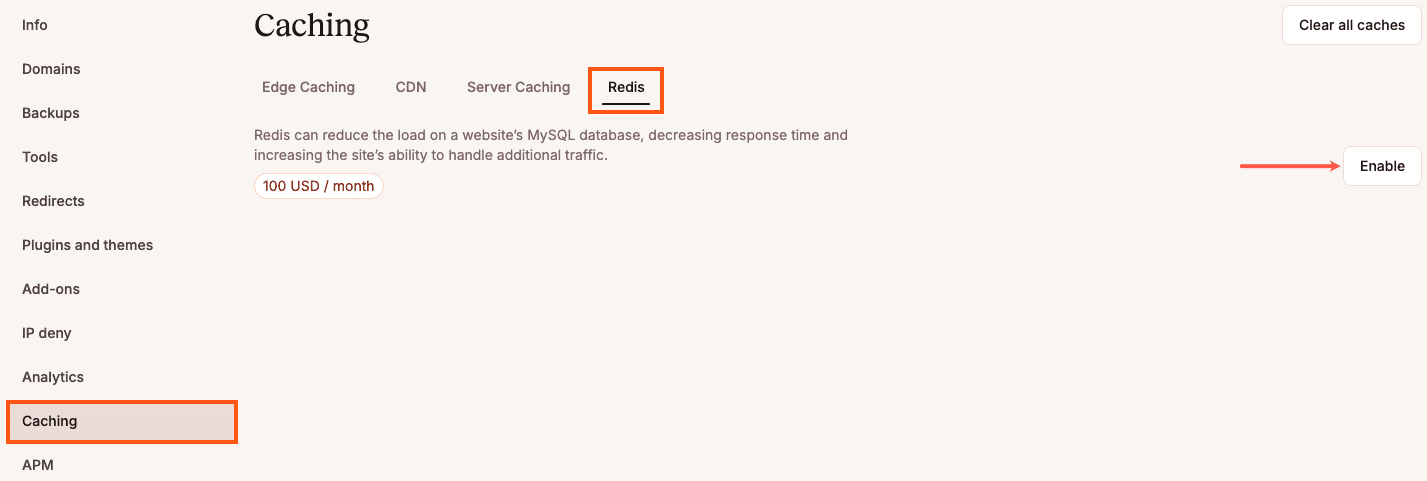
The Redis caching add-on is $100 a month per site. If you would like to add Redis to your site hosted at Kinsta, navigate to Sites > sitename > Caching > Redis > Enable.
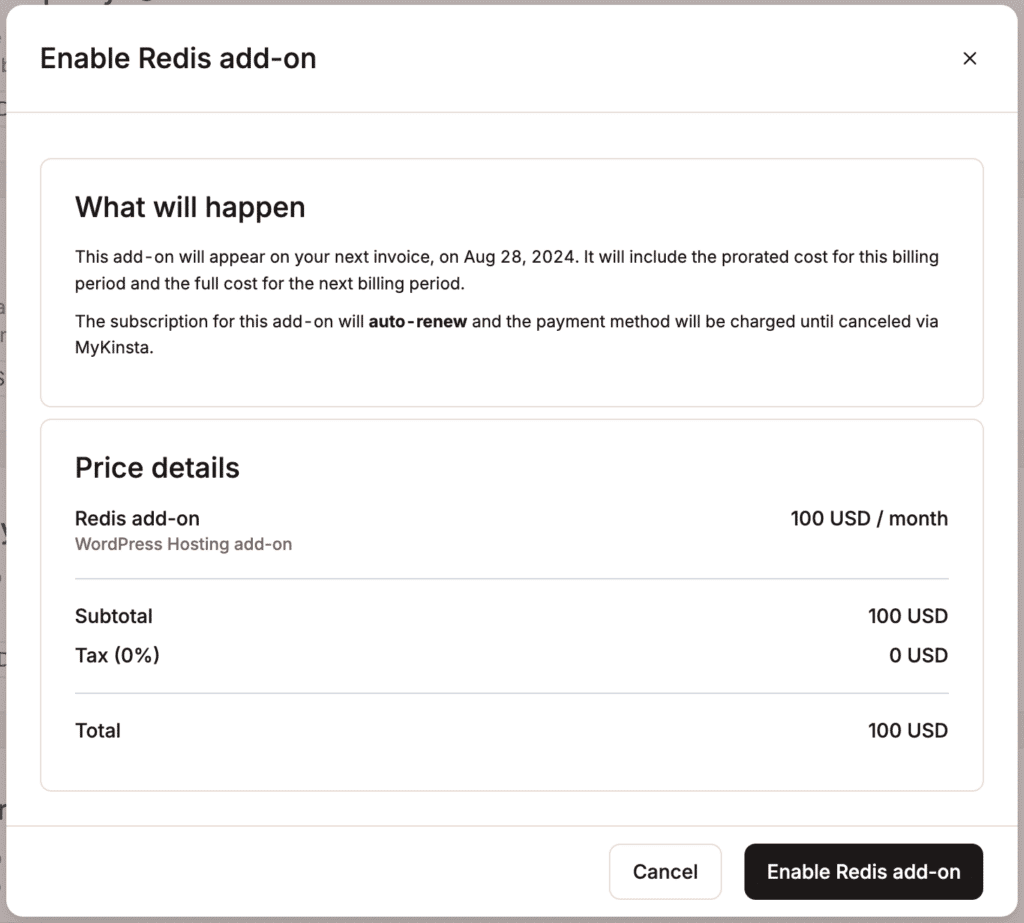
This opens a new window that shows the pricing information for the add-on, click Enable Redis add-on. This installs the Redis Object Cache plugin.
Please note that only users with billing permissions (Company owners, Company admins, Company billing) are able to enable the add-on.
Redis plugin
The Redis caching add-on installs the Redis Object Cache plugin by default. This is an open-source plugin that is available on WordPress.org. Redis also offer Object Cache Pro which includes debugging tools, memory optimization, and premium support.
If you already use a different plugin to integrate with Redis, such as WP-Redis, or want to use a different plugin on your site to integrate Redis with WordPress object caching, you must disable the Redis Object Cache plugin from the Plugins section of your WordPress WP Admin panel. You can then use or install a Redis plugin of your choosing from the plugin repository; this will cause a warning to appear within Caching > Redis, which you can ignore. We do not recommend switching to the Redis Object Cache plugin if you currently have a different Redis plugin working on your site. Redis may not function properly if a suitable plugin is not installed.
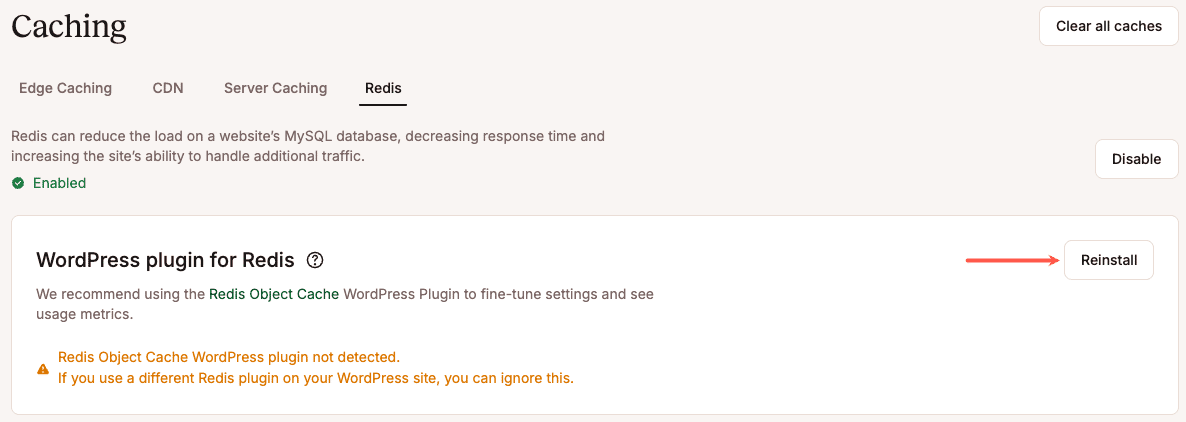
If the Redis Object Cache plugin does not install when you enable the add-on or if it has been removed, you can reinstall the add-on within Caching > Redis > Reinstall.
If you see an error that WordPress is not available, you should reinstall WordPress and try again; this is usually due to a Bedrock or other non-Standard WordPress installation with a custom public web root (document root). Start a new chat with our Support team, and they can add a new wp-cli.yml file to the ~/public directory, with the path pointing to the site’s WordPress installation.
Important notes
- If your site has both a staging and a live environment and your staging site is no longer needed, please delete it. It can then be recreated following the installation of Redis on the live site. If your staging site cannot be deleted, it will be necessary to add Redis (and the Redis plugin) to the staging site container. If this is not done, the next time staging is pushed live, the Redis installation in the LIVE environment will be overwritten and removed.
- Redis cache details may not be reported correctly in the Kinsta’s APM tool if you use a plugin other than WP Redis or Redis Object Cache. This doesn’t mean that Redis isn’t working. This happens because we may not be able to collect and show Redis data from other plugins in the APM tool.
- If you create an empty WordPress or staging environment and enable the Redis caching add-on, it won’t automatically be active on the new empty environment. To enable Redis caching, you’ll first need to install WordPress on the empty environment, disable the add-on on the site, and then re-enable it.
Using Redis with a WordPress website
- Once Redis has been installed and integrated with your site with a plugin, it will run silently in the background.
- It is critical that you test your site thoroughly after enabling object caching, being careful to review all critical processes on your website with multiple user profiles to ensure that cached objects aren’t being reused incorrectly.
- If you find that cached objects are being used incorrectly, it may be possible to exclude specific groups of objects from object caching with the wp_cache_add_non_persistent_groups function. Manipulating object cache performance is outside the scope of Kinsta’s support for Redis and will require the involvement of a qualified WordPress developer.
Connect your database to RedisInsight
RedisInsight allows you to visualize your database and perform GUI- and CLI-based interactions in Redis.
- Download, install, and launch RedisInsight.
- Click Add Redis database > Connection Settings > Security.
- To connect to RedisInsight, you’ll need the following pieces of information from the Primary SFTP/SSH user section of each site’s Info tab within MyKinsta:
- host/server address (IP address)
- port (we take security seriously here at Kinsta, each site uses a different port)
- username (SFTP Username, not your email address)
- password
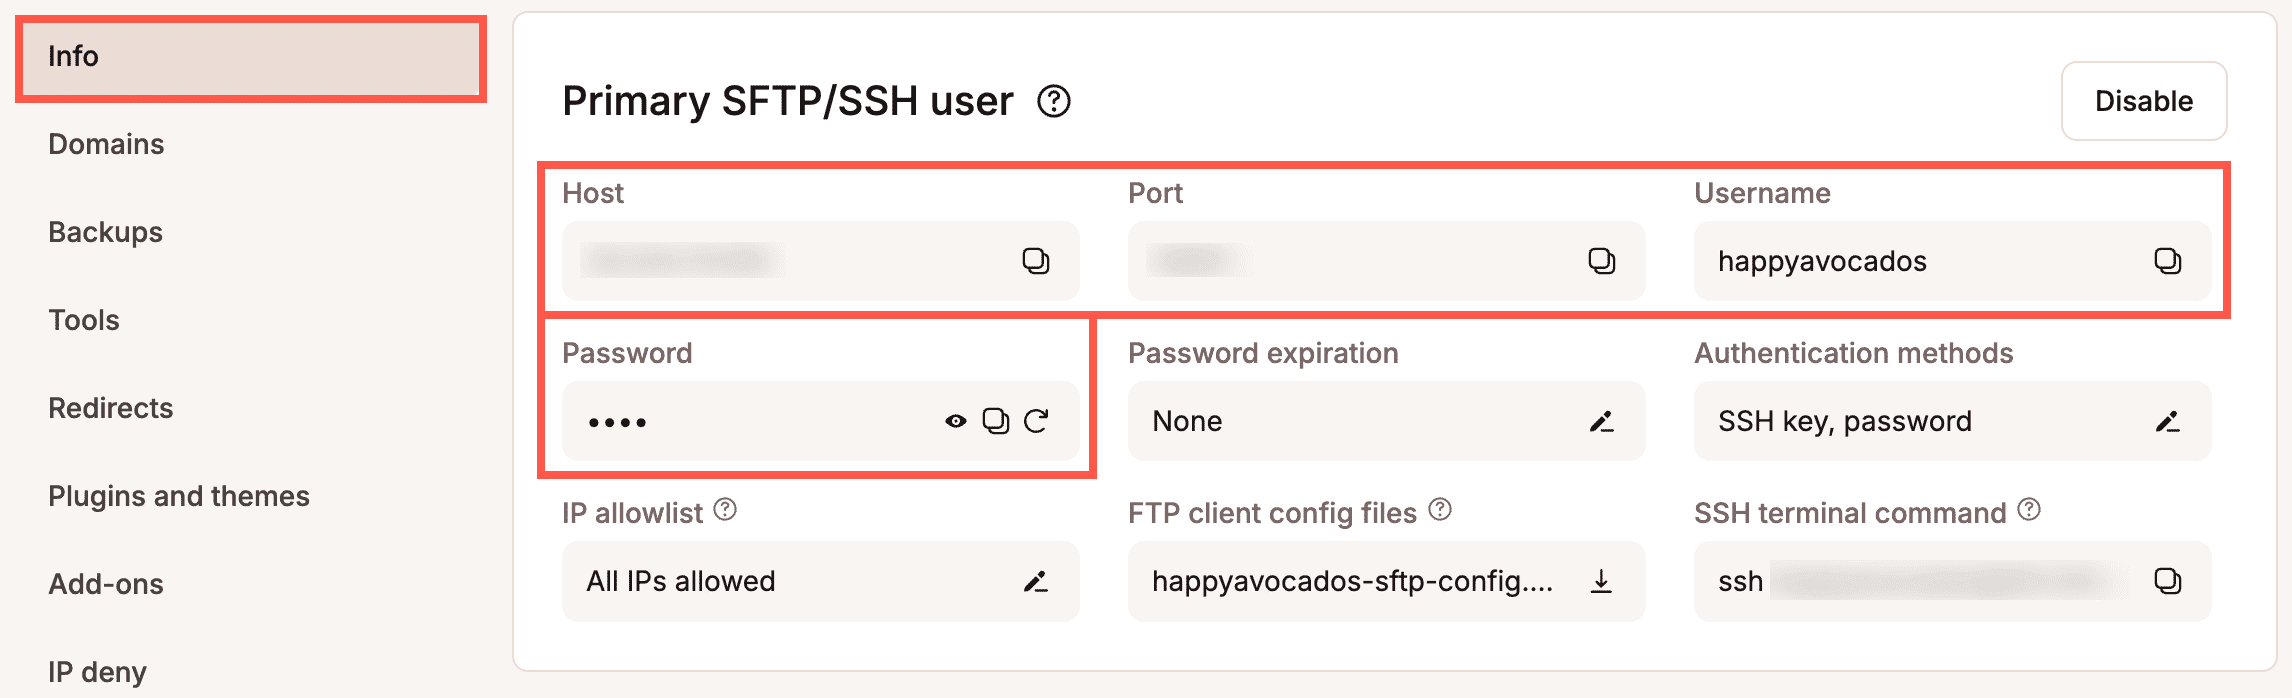
SFTP/SSH credentials.
- In RedisInsight, select Use SSH Tunnel. In the section below, enter your Host, Port, Username, and Password from MyKinsta, and click Add Redis Database.

Enter your MyKinsta SSH credentials to connect to RedisInsight.
Clearing Redis cache
You can clear the cache in MyKinsta, in your WordPress dashboard, with WP-CLI, or with SSH.
Clear cache in your WordPress Dashboard
With the Kinsta MU plugin (installed by default on all Kinsta-hosted sites), you can purge object cache (and other types of cache) in your WordPress dashboard. Log in to your WordPress dashboard and do one of the following:
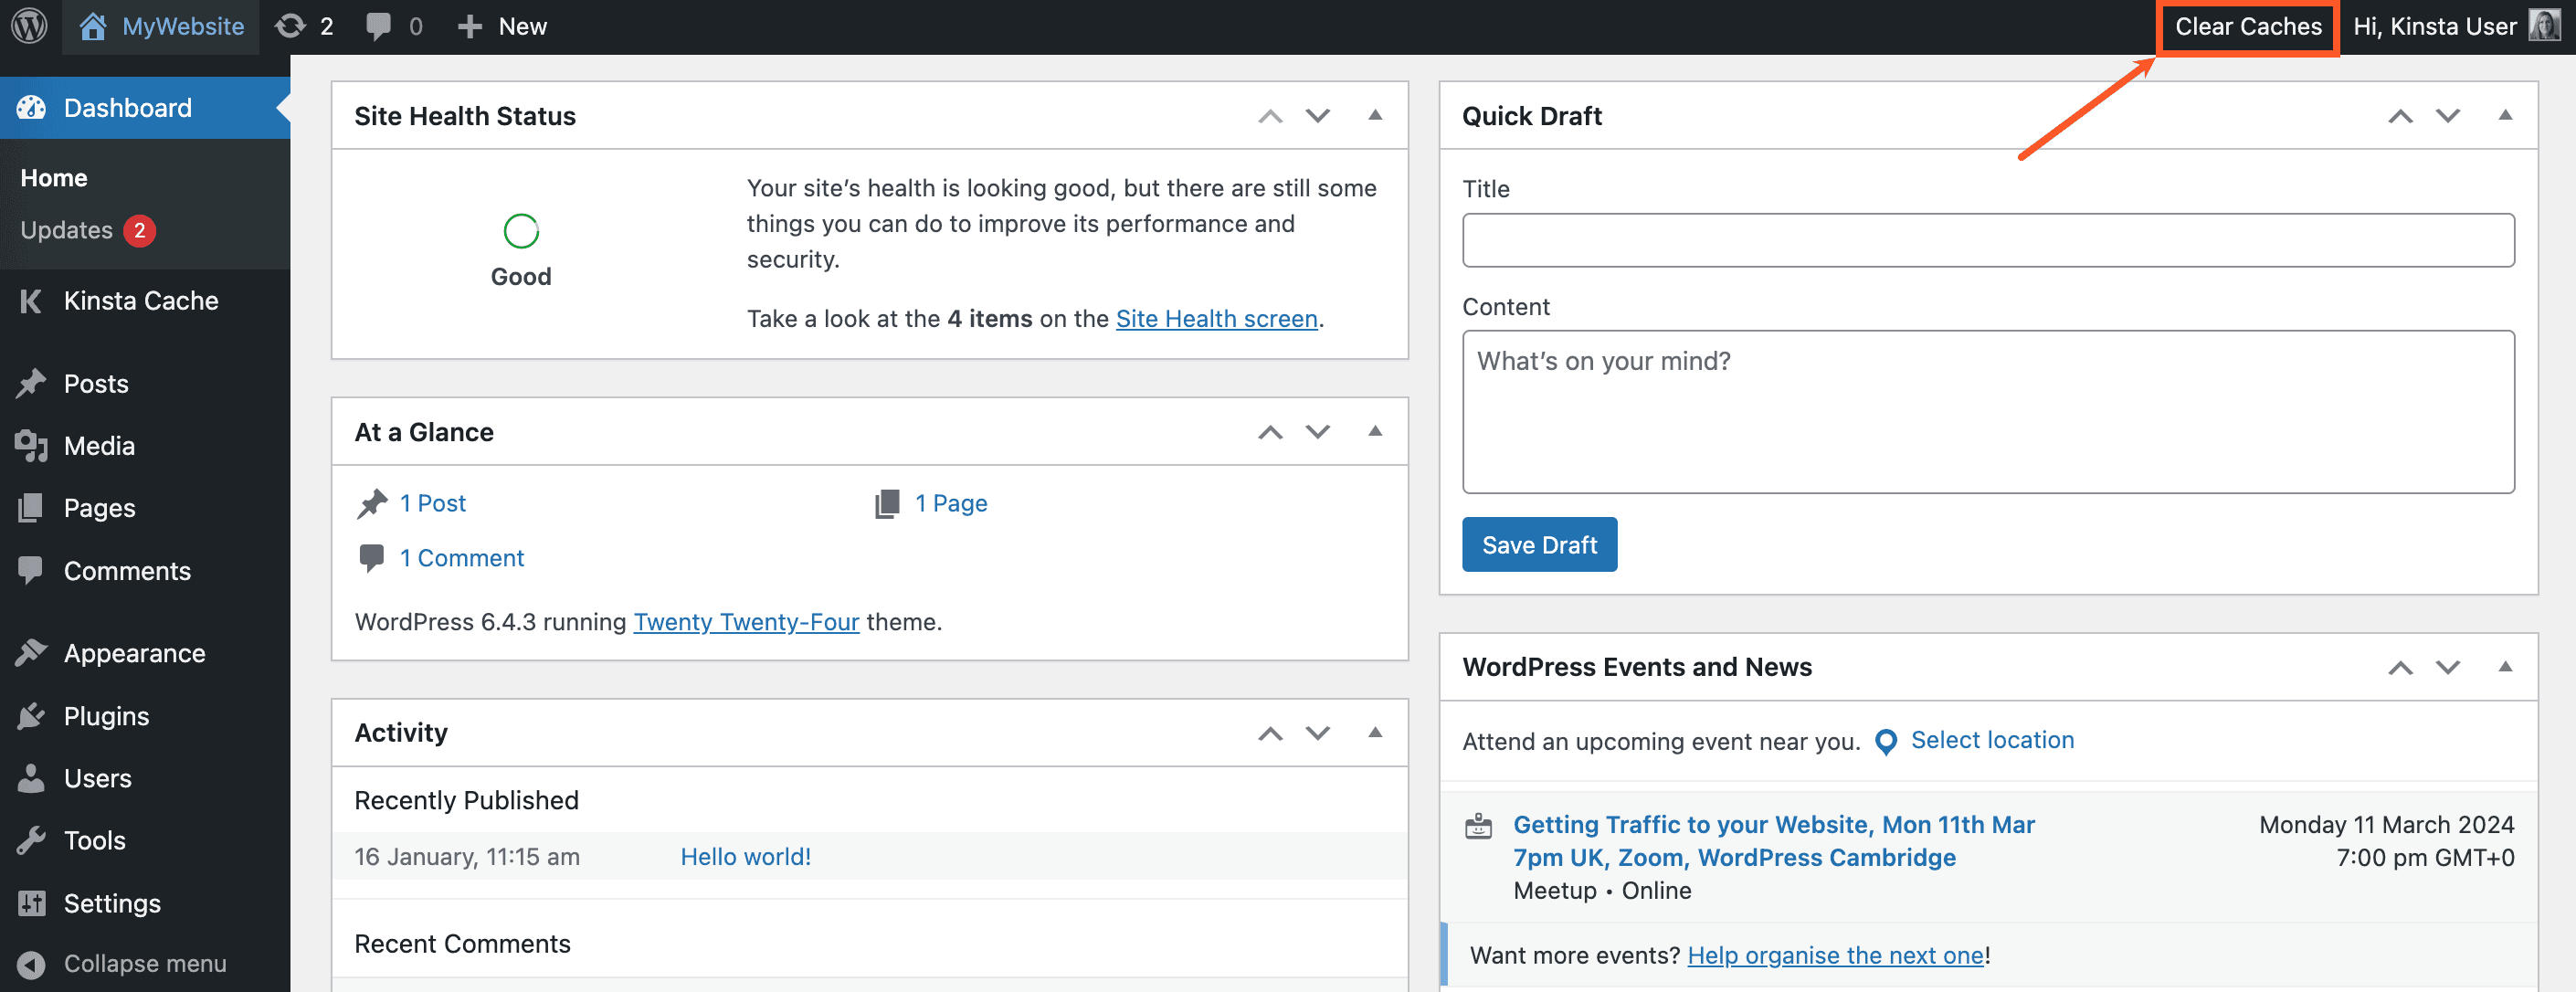
- Click the Clear All Caches button on the Kinsta Cache plugin page in your WordPress dashboard.
- Click the Clear Caches link on the WordPress admin toolbar.
Either of these methods will clear object caching and site cache (aka full-page cache).
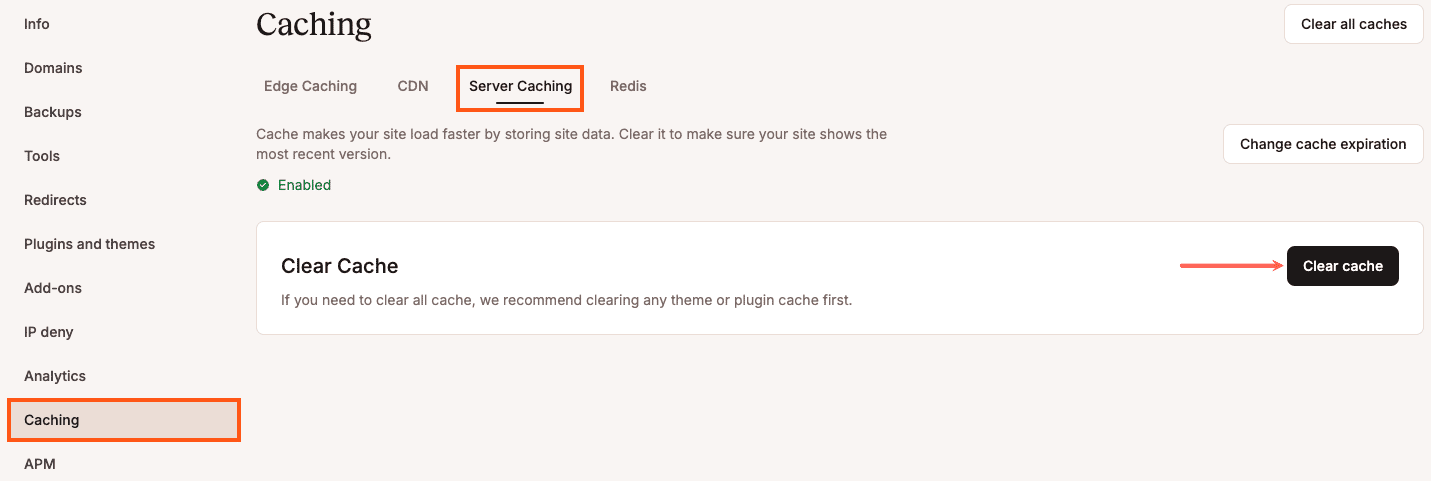
Clear cache in MyKinsta
Log in to MyKinsta and go to Sites > sitename > Caching > Server Caching.
Click the Clear cache button to clear the site cache.
- Clearing the site cache in MyKinsta also clears the Redis object cache.
- When Edge Caching is enabled, clearing the site cache in MyKinsta also clears the Edge Cache.
Clear cache with WP-CLI
Connect to your server with SSH and navigate to your site’s document root:
cd publicIf the Kinsta Must Use (MU) Plugin is installed on the site, you can clear the Redis object cache with this command:
wp kinsta cache purge --objectTo clear all cache, add the --all flag:
wp kinsta cache purge --allExit SSH with the following command:
quitClear cache with SSH
Connect to your server with SSH and flush the Redis cache with the following command:
redis-cli flushall asyncExit SSH with the following command:
quitLimits to Kinsta’s support for Redis
Kinsta’s support for Redis is limited to installing Redis and any required dependencies in the site container and ensuring that Redis is available for use by WordPress. Integrating Redis with your website and excluding specific groups of objects from the cache is the responsibility of each website owner. If you need assistance with the proper integration of Redis with your website, you will need to retain the services of a qualified WordPress developer.
Disable the Redis caching add-on
To remove this add-on, within the Add-ons page, under Redis caching, click Disable > Disable Redis add-on. You can also remove the add-on within Caching > Redis > Disable.
If you remove the Redis caching add-on and you’re in the first 30 days of your WordPress Hosting plan, a prorated fee for the add-on will be added to your next invoice for the time period it was enabled. If your WordPress Hosting plan has been active for more than 30 days, you will receive a prorated credit for the add-on fees to your Account Balance for the remaining days of the current billing period. The credit is automatically used to offset money owed to Kinsta on your next invoice. For more information, refer to our WordPress Hosting Money-Back Guarantee.