Automatic Updates
With Kinsta, you can enable automatic updates for your plugins and themes using either WordPress auto-updates or Kinsta automatic updates.
WordPress auto-updates
WordPress can automatically install plugin and theme updates twice daily. However, it does not perform any testing, so it cannot detect if an update introduces issues on your site.
Kinsta Automatic Updates
Kinsta provides automatic daily updates for plugins and themes, which is free for the first month for all plans, then $3 per environment per month. If your hosting plan also includes a free period, these run separately. For example, if you enable Automatic Updates partway through your plan, you’ll still receive a full month of free updates.
All plugins and themes are updated, including inactive ones, and any newly installed plugin or theme is seamlessly added to Kinsta’s Automatic Updates, ensuring you stay protected against vulnerabilities without any extra effort.
Built-in safety checks
Kinsta Automatic Updates includes features to help prevent issues caused by updates:
- Visual regression testing: Before and after each update, Kinsta compares screenshots of your site to detect significant visual changes. By default, this includes your homepage and four randomly selected pages from your sitemap; however, you can choose specific URLs to test instead. If you choose specific URLs, only those pages will be tested, even if fewer than five are provided.
- Backups: A backup is created before each update and stored for three days under Backups > System-generated, with a note indicating which plugin was updated.
- Automatic rollback: If a change is detected, Kinsta automatically restores a backup taken before the update, helping keep your site stable.
Screenshot comparison
Kinsta uses ScreenshotOne to capture and compare screenshots before and after updates. These images, along with highlighted differences, are securely stored for 60 days.
Password protection on your WordPress site prevents ScreenshotOne from accessing your site to take the screenshots required for automatic updates. You can temporarily disable password protection during the update window to allow updates to take place.
If your site has strict security rules that block requests from unknown origins, you may need to configure an allowlist to enable these screenshots by:
- Allowing requests with the
User-Agent:kinsta-botheader, or - Allowlisting ScreenshotOne IP address ranges.
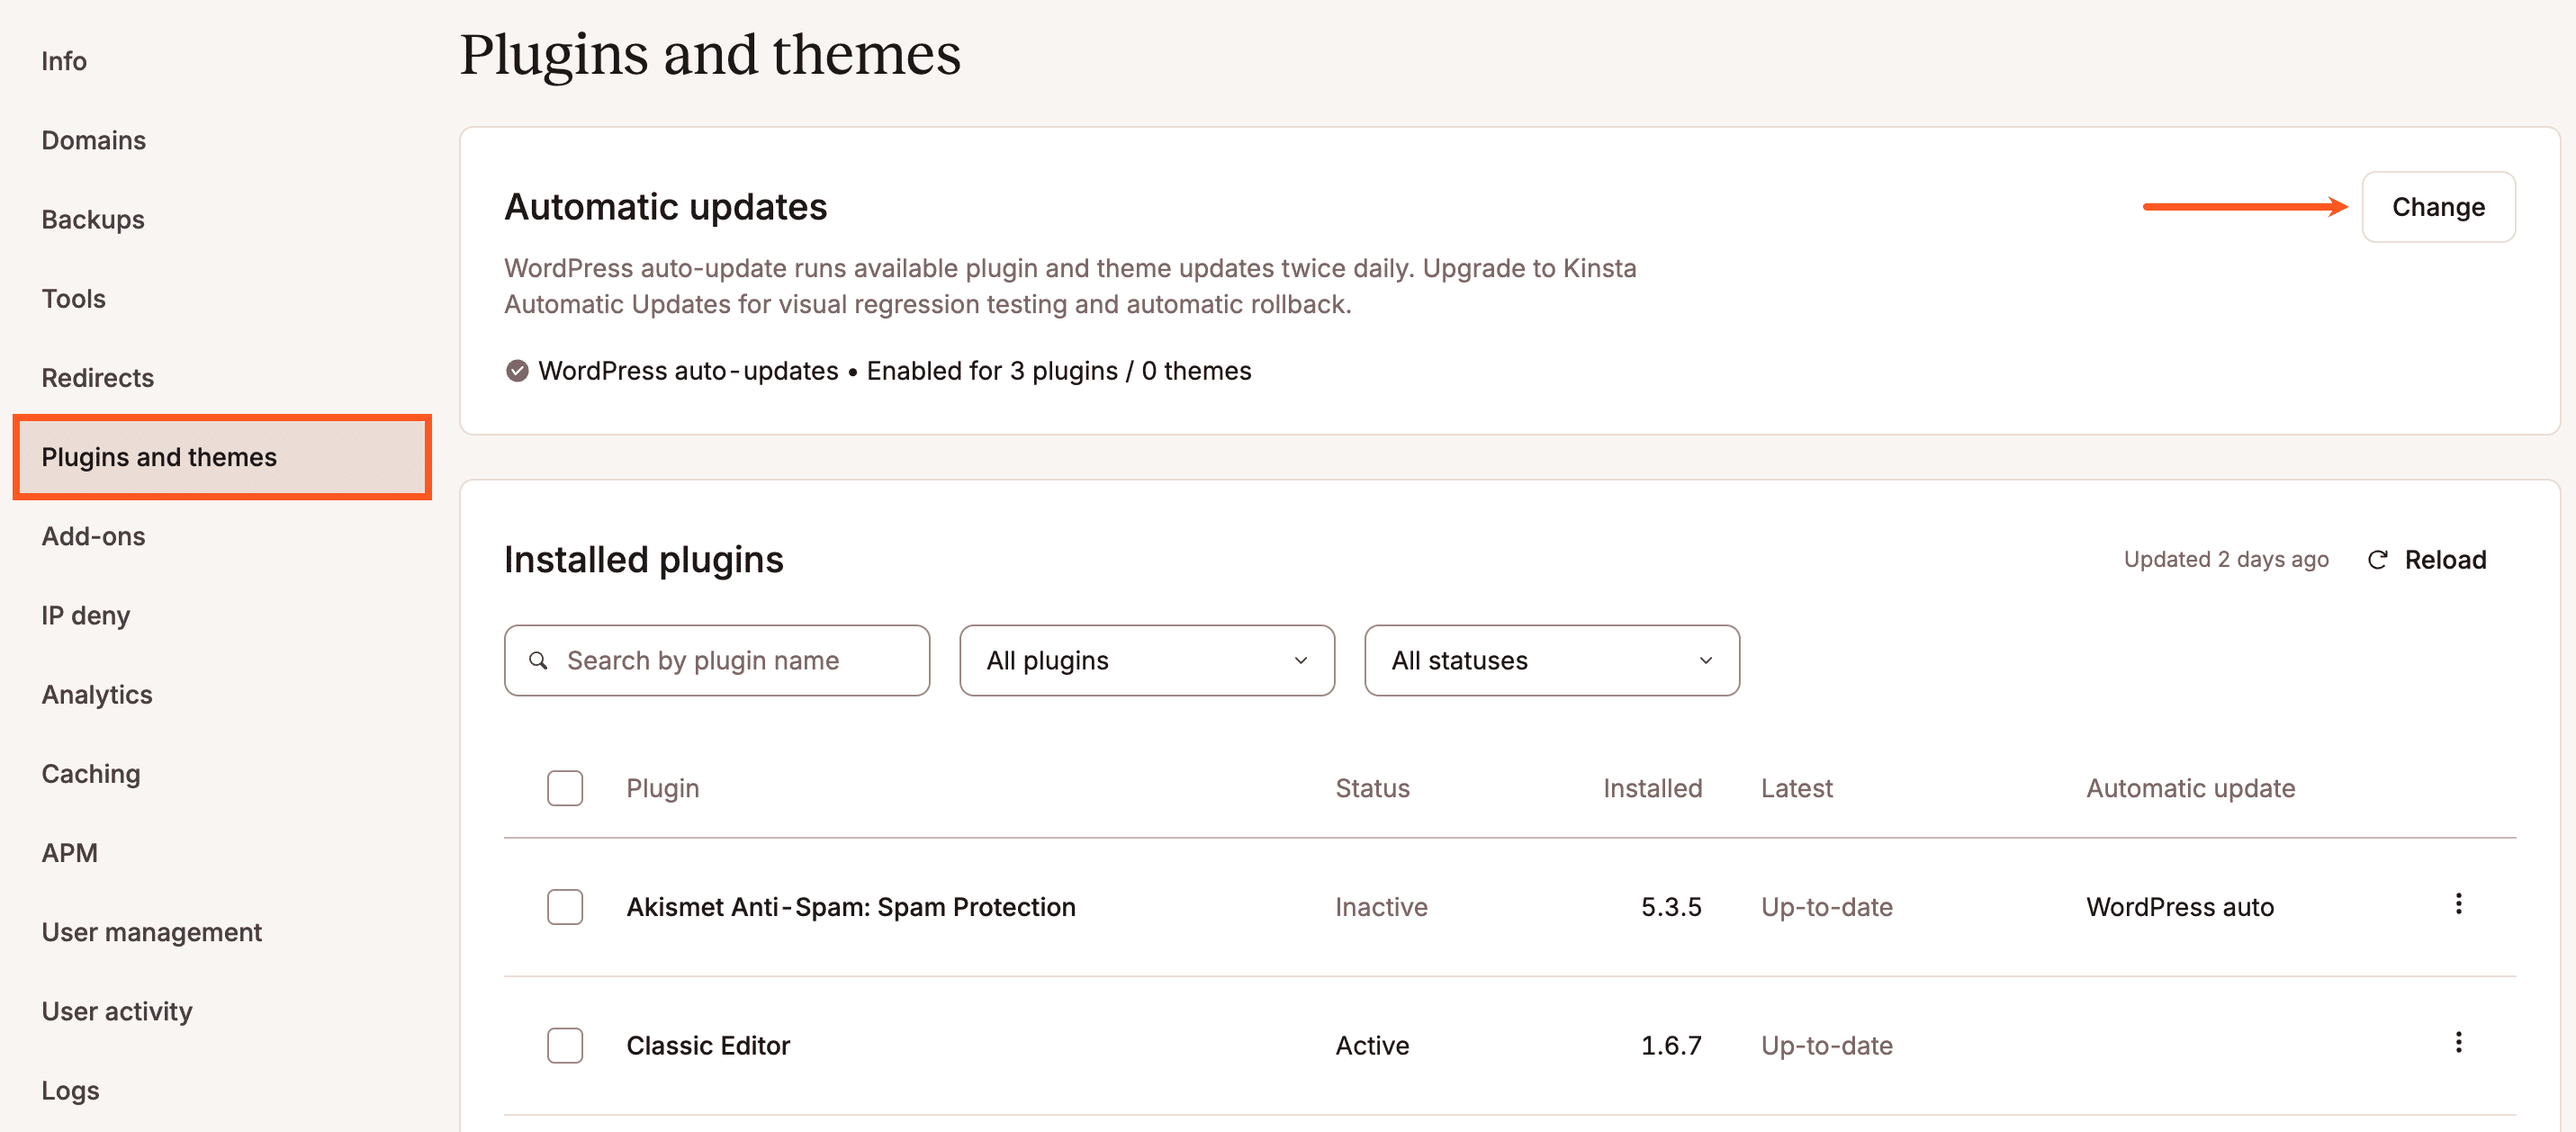
Enable automatic updates
You can enable auto-updates within Sites > sitename > Plugins and themes > Automatic updates > Change.
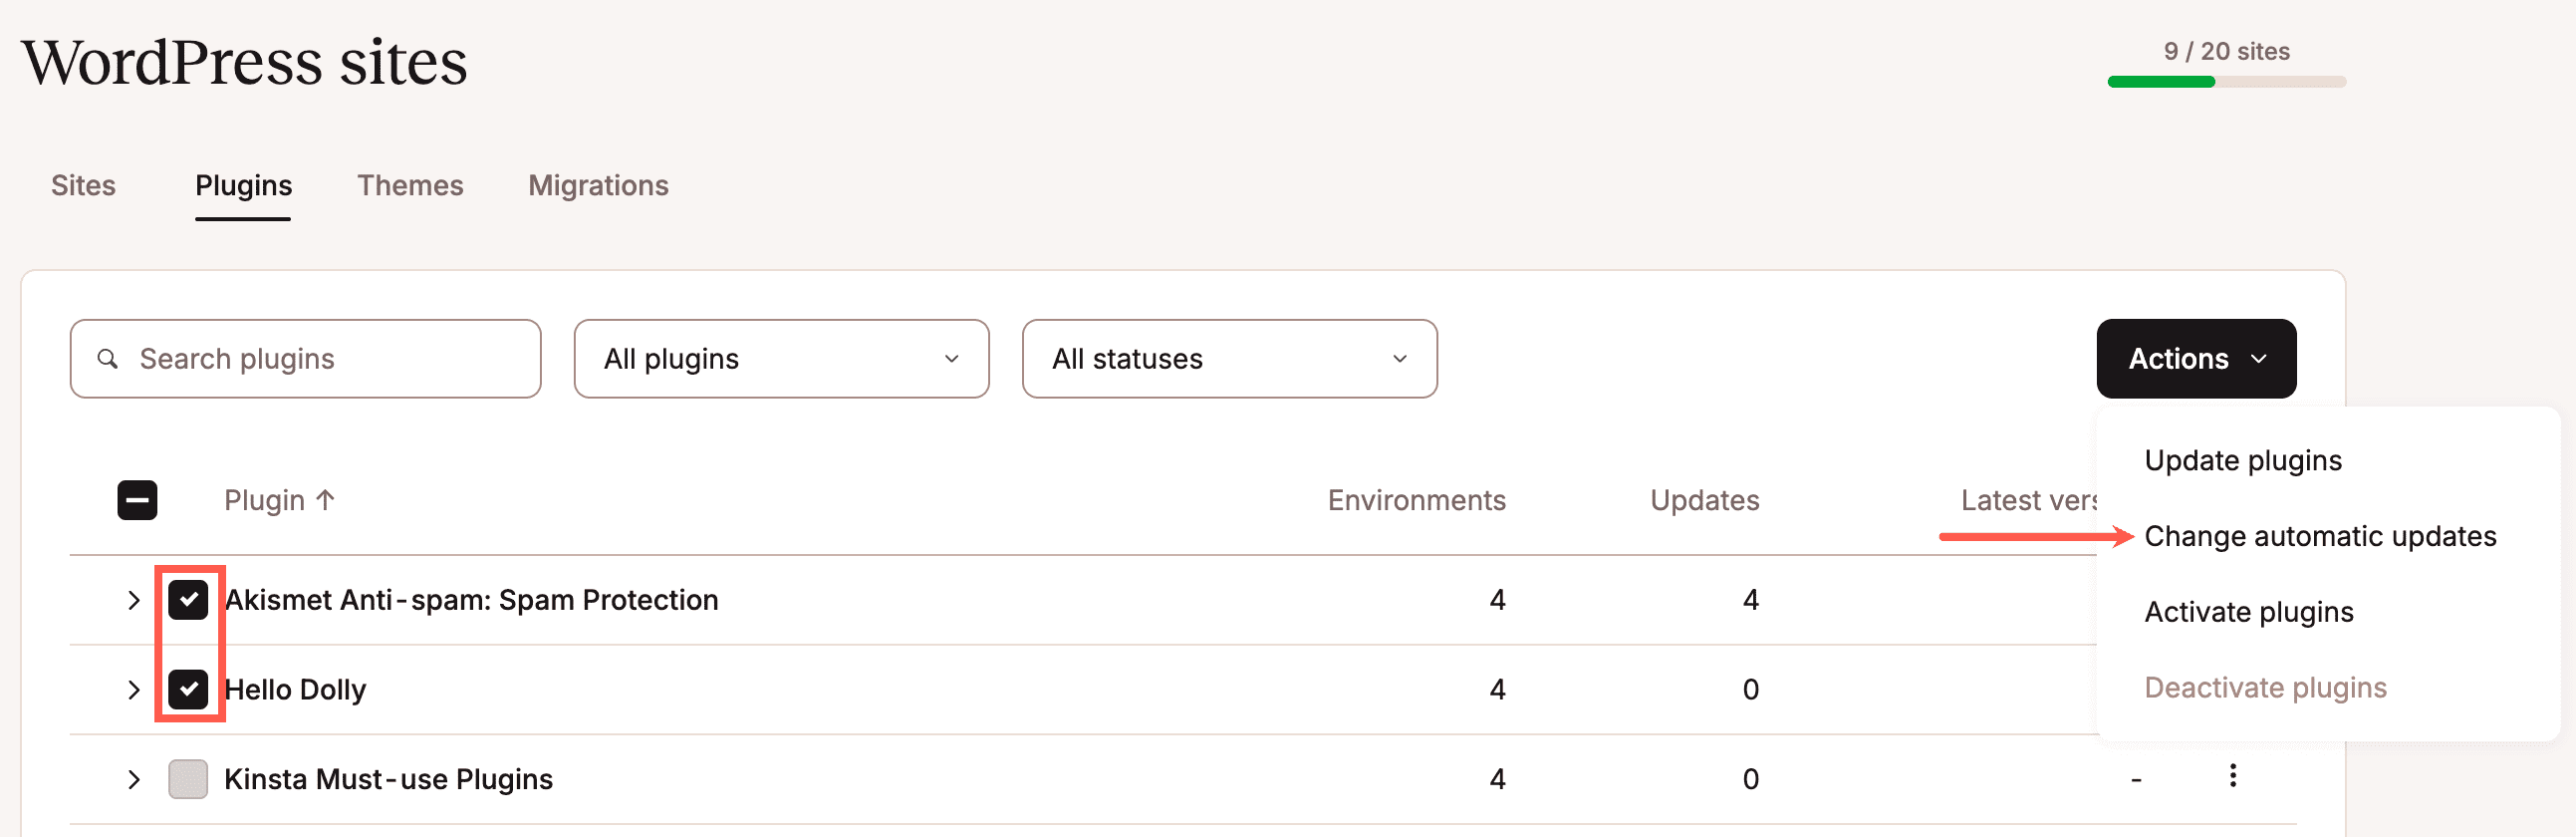
You can enable automatic updates for your plugins and themes for multiple sites, including staging sites, simultaneously from the Sites page. Select the checkboxes next to the sites you want to enable auto-updates for, click Actions, and choose Change automatic updates.

You can also enable automatic updates for multiple plugins and themes across multiple sites within Sites > Plugins or Themes > select the required plugins, themes, or sites > Actions > Change automatic updates.
Note: You cannot add Test URLs or Hide selectors when enabling automatic updates for multiple sites; this must be done at the site level within Automatic updates settings.
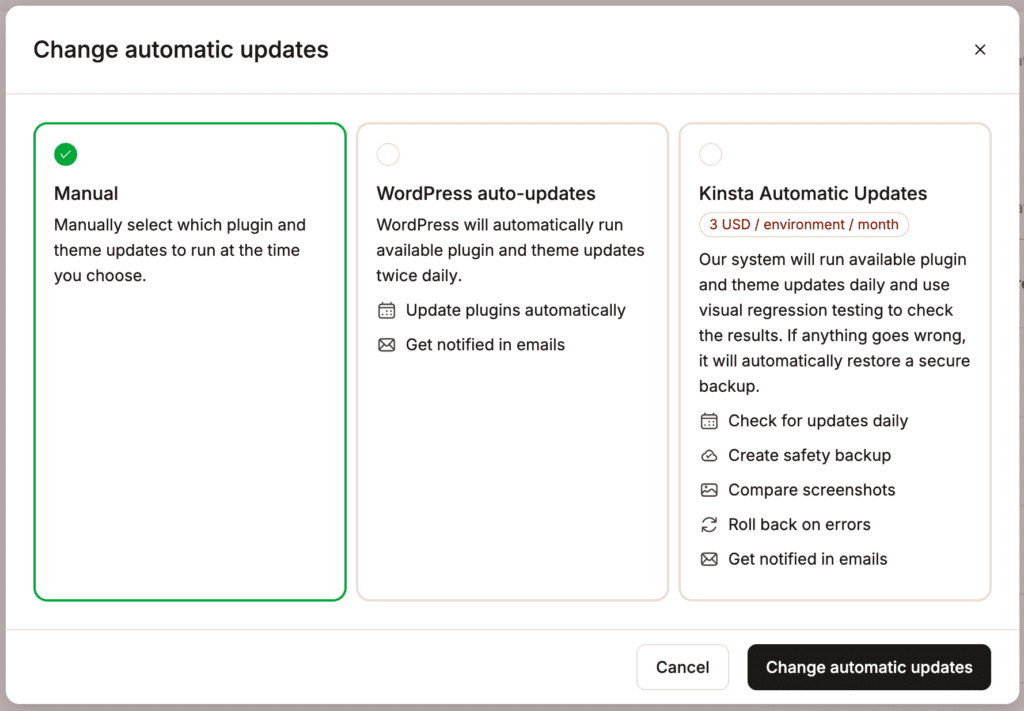
Select WordPress auto-updates and click Change automatic updates, or select Kinsta Automatic Updates and click Continue.
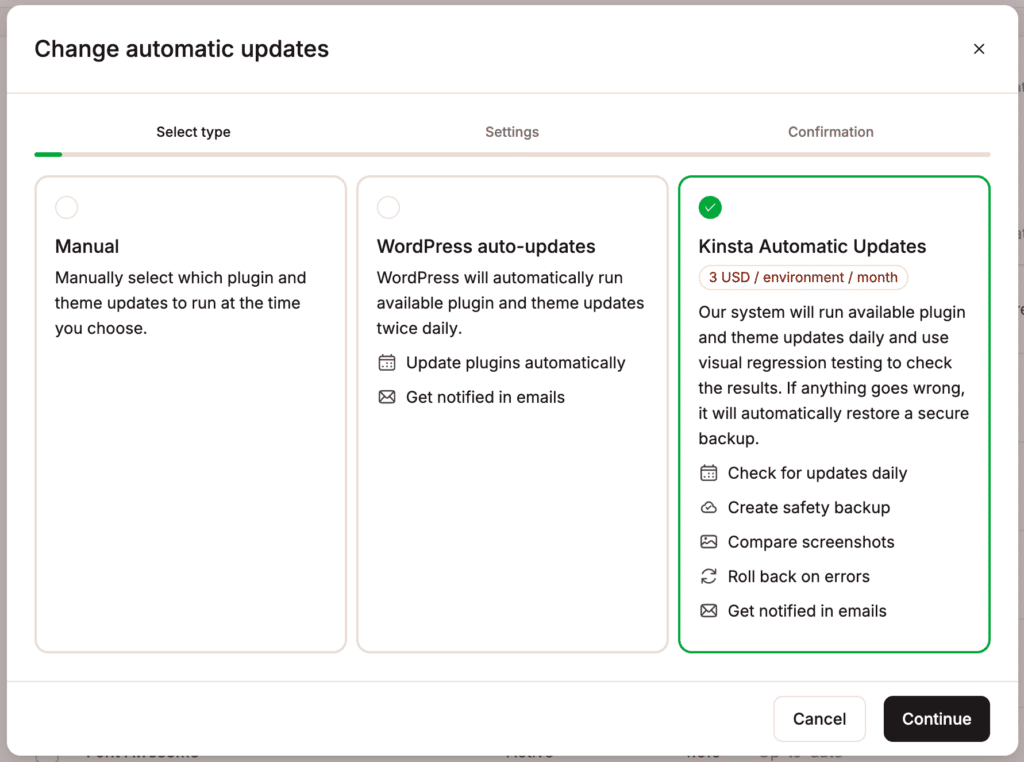
If you select Kinsta Automatic Updates, you can define the automatic update settings. You can change any of these options at any time within Settings.
Settings
If you want to change any of the settings for Kinsta’s automatic updates after enabling them, click Settings within Sites > sitename > Plugins and themes > Automatic updates > Settings.

Testing frequency
Select the days you want the updates to occur on your site. For example, if you only want updates to occur on weekends, select Saturday and Sunday only.
Testing time window
This is when you want the updates to occur on your site.
Test URLs
Kinsta’s automatic updates feature compares your homepage and four randomly selected pages from your sitemap by default. If you’d prefer to test specific pages instead, you can define up to five custom URLs in the Test URLs field. Enter each URL on a new line. Only the URLs you specify will be tested, even if you provide fewer than five.
During the update process, Kinsta will compare images of each specified page before and after the update. The Sensitivity setting controls how strictly changes are detected.
If no URLs are specified, Kinsta will default to testing your homepage and four randomly selected sitemap pages.
Enable WordPress maintenance mode
Select this option to display a maintenance page when the updates are running. The maintenance page only appears while the updates are running and not for the entire duration of the Time window.
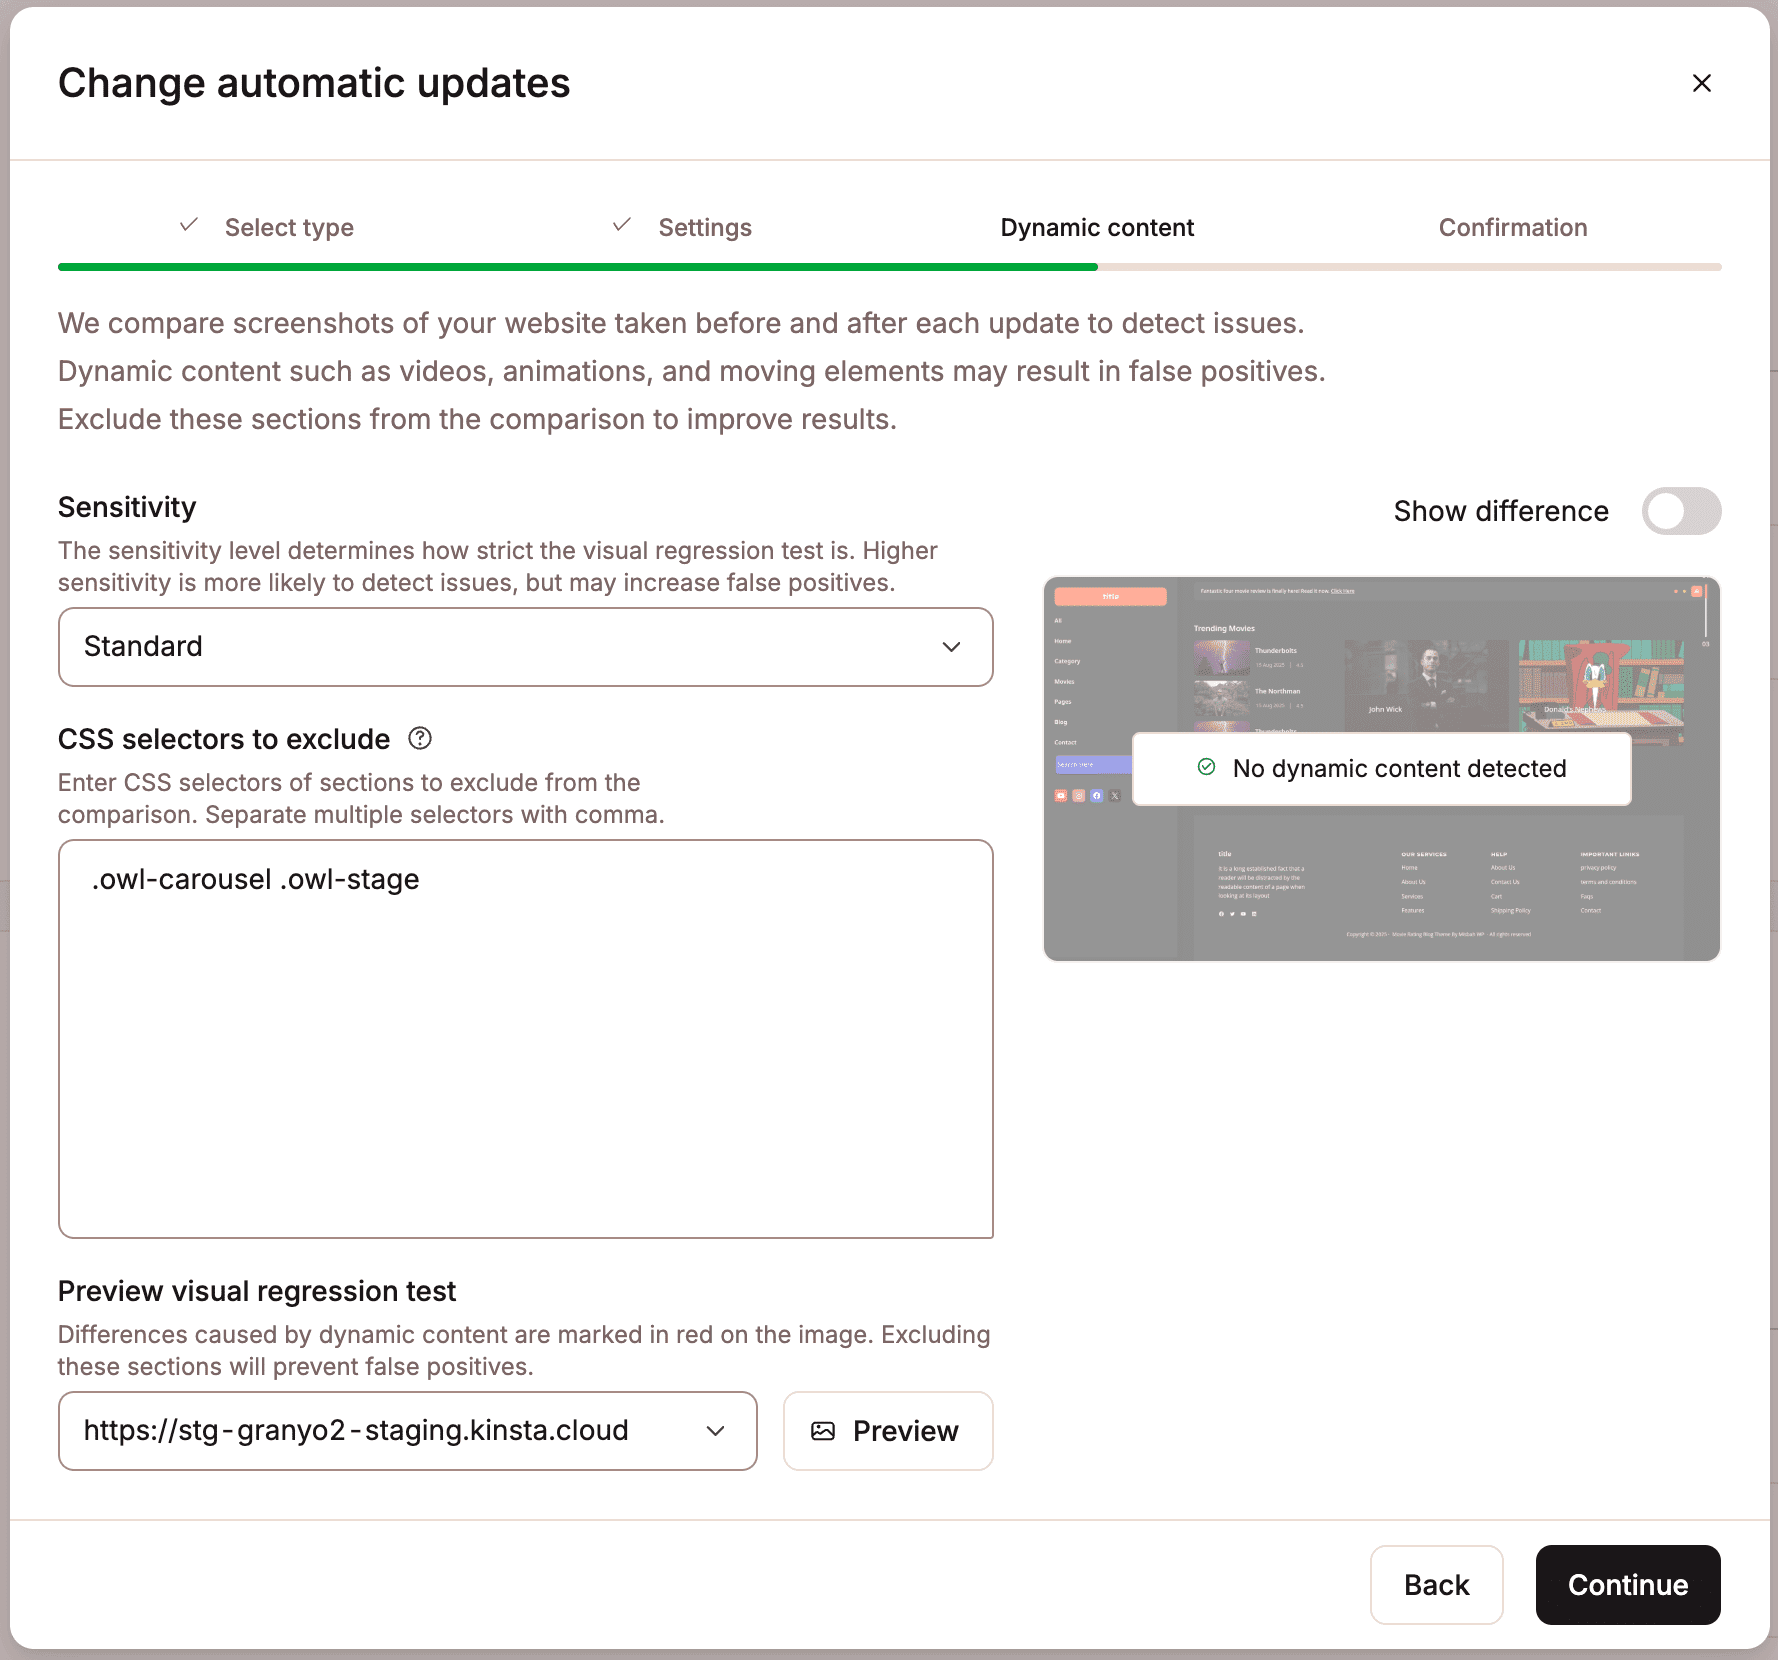
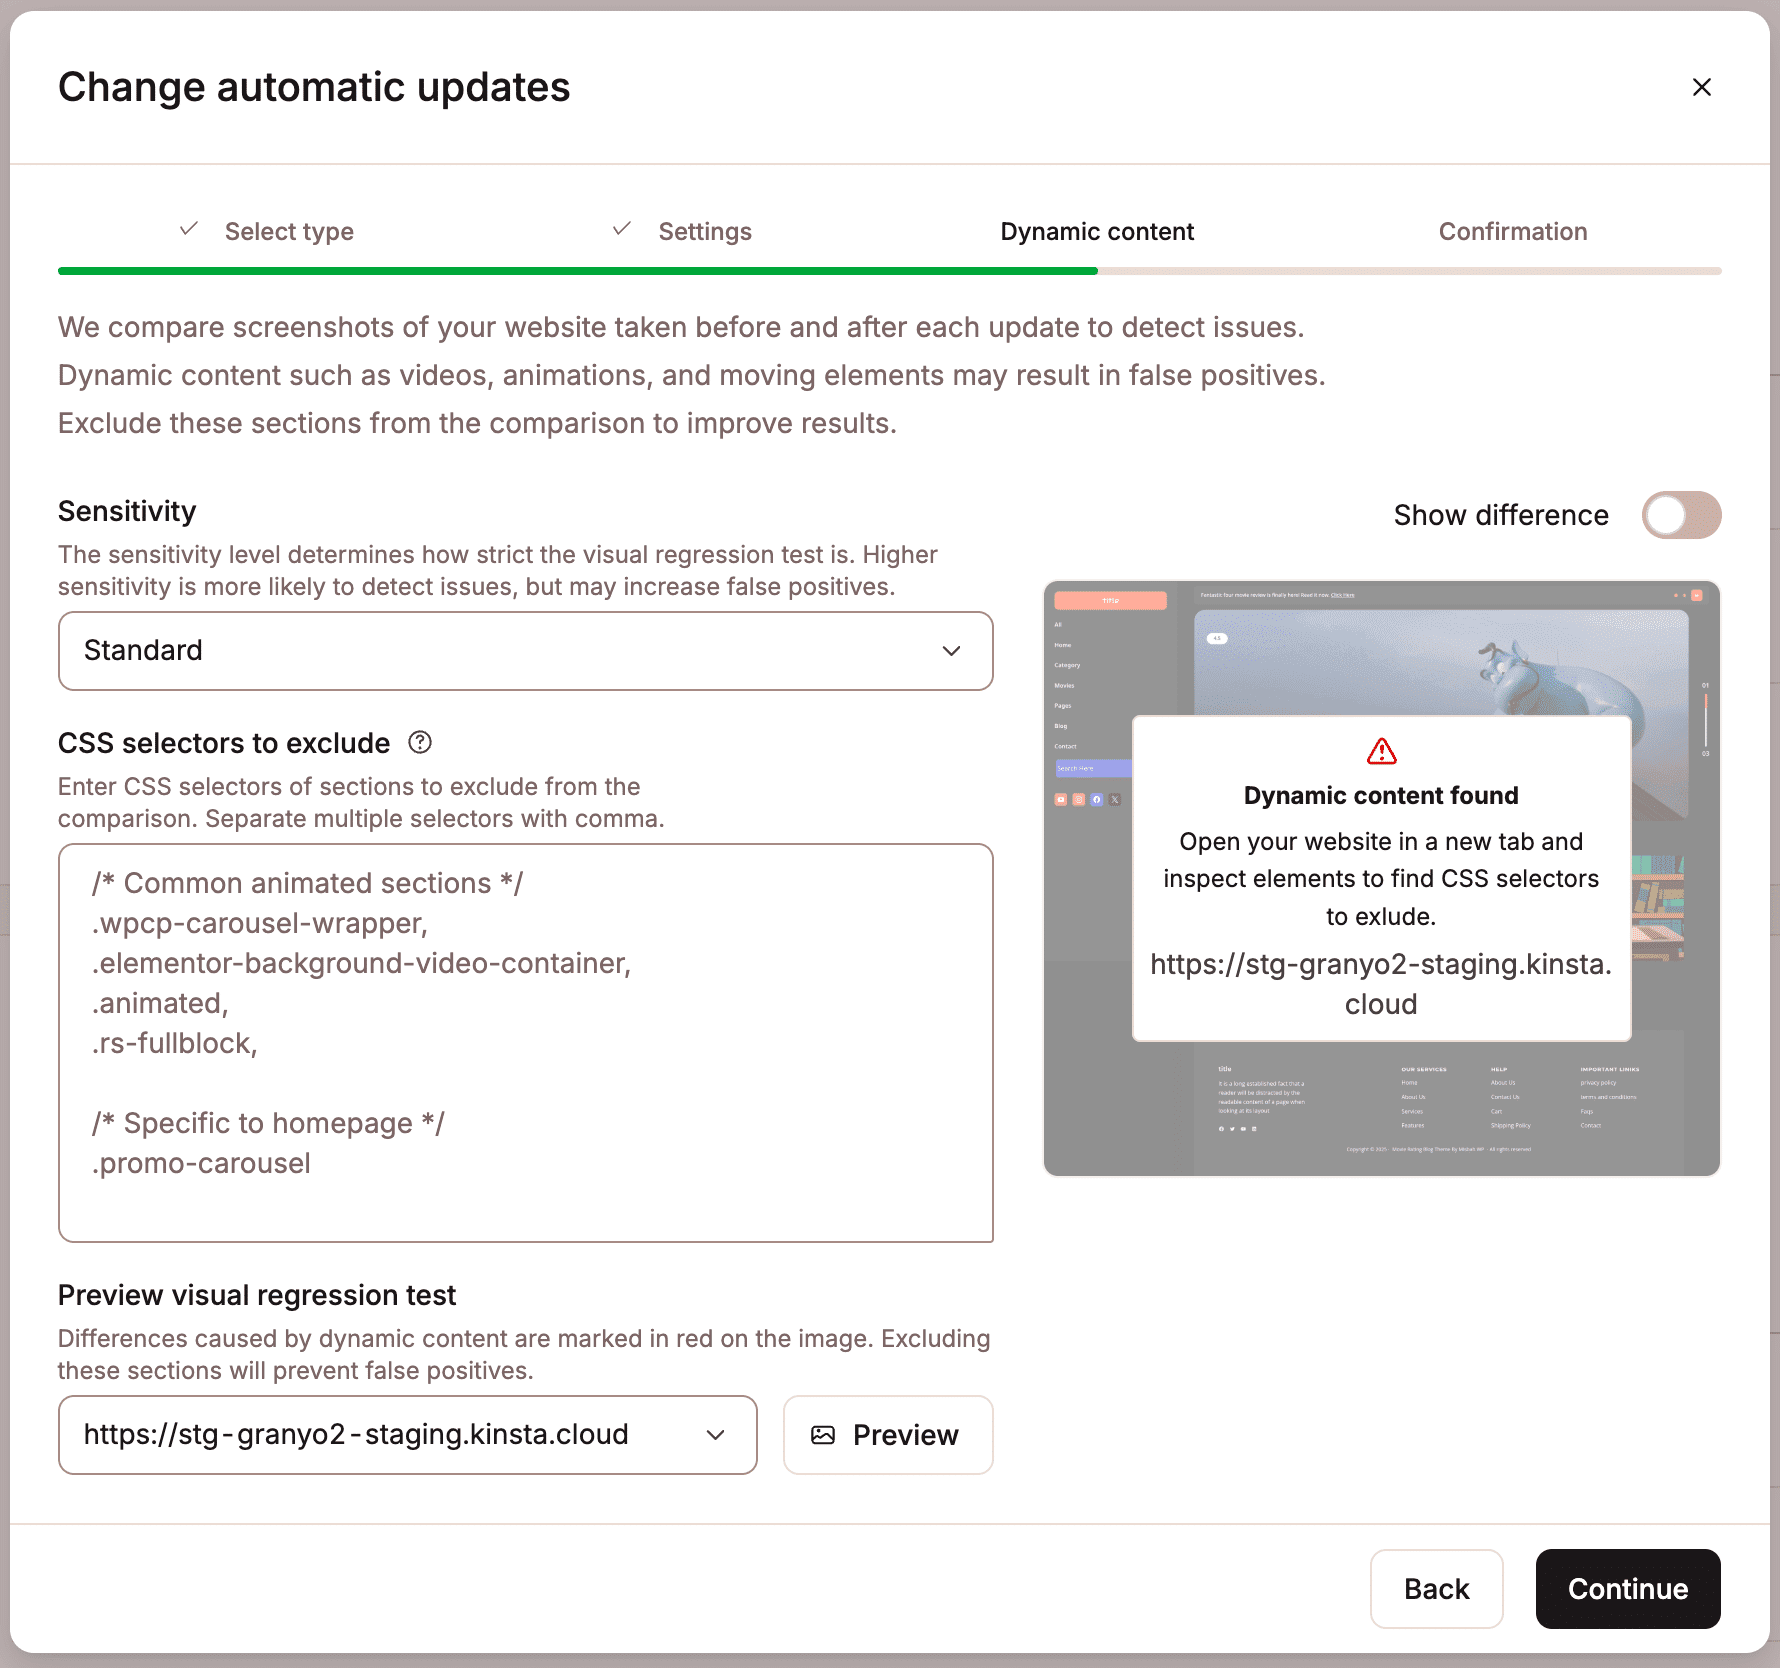
Dynamic content
If you want to change any of these settings after enabling Kinsta automatic updates, click Settings.
Some websites include dynamic content, which changes automatically or depending on who’s visiting the site. This could be things like:
- A rotating banner or slider
- A “Welcome back!” message
- A live feed or chat widget
When MyKinsta runs automatic plugin or theme updates, it performs a visual comparison of your site before and after the update to detect any unexpected changes. However, if your site includes dynamic content (such as rotating banners, time-sensitive data, or user-generated elements), these visual differences may appear even when nothing is actually broken. In such cases, the update may be incorrectly marked as failed.
This tab scans the page selected in the Preview visual regression test to detect any dynamic content. The pages available for preview are those you previously defined under Test URLs.
We recommend reviewing each page before continuing with the automatic updates setup:
- If no dynamic content is found, you can proceed safely.
- If dynamic content is detected, click Show difference to locate where it appears on the page.
You can then:
- Identify the CSS selectors for the dynamic elements.
- Add these selectors to the CSS selectors to exclude to hide those areas from the visual regression test.
- Optionally, adjust the Sensitivity level.
After making your adjustments, re-run the Preview visual regression test to confirm no dynamic content remains. Once the test passes, you can continue setting up automatic updates.
Sensitivity
This controls how strict the visual regression test is. This test compares each pixel in two images based on color and brightness, with the sensitivity setting determining the threshold for acceptable differences. It uses images of the homepage plus four random pages or images from the Test URLs if defined.
Lower sensitivity allows minor differences to be ignored, while higher sensitivity is more likely to detect even subtle changes but may also increase the chances of false positives.
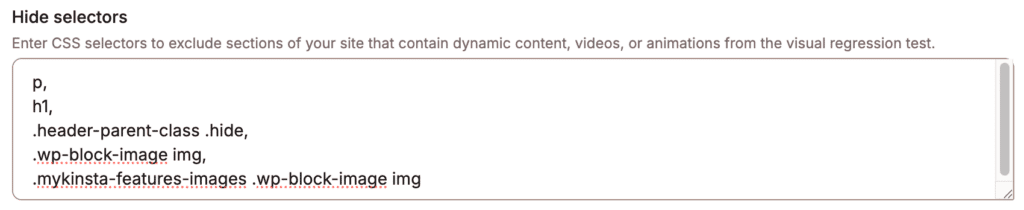
CSS selectors to exclude
CSS selectors are used in stylesheets to target and apply styles to specific elements within your web pages. By defining the CSS selectors in CSS selectors to exclude, you are simply pointing to specific parts of your website (like a banner or a widget) that you want the automatic updates to ignore.
For example, if your homepage features a banner that changes images regularly, you may want to exclude it from checks. A CSS selector for that banner might be .banner-slider, or a specific ID, such as #daily-message. If you enter this within CSS selectors to exclude, the automatic updates will ignore anything inside the element with the class banner-slider or the ID daily-message. You can use the Preview visual regression test to automatically identify any dynamic content on your pages.
How to find a CSS selector
- Open your site in Google Chrome (or any browser with developer tools).
- Right-click the part of the page you want to ignore and click Inspect.
- In the panel that opens, look for a class (starts with .) or ID (starts with #) for that element.
- Copy that class or ID and paste it into the Hide selectors field in MyKinsta.
Each selector should be on a new line and separated with a comma, for example:
Preview visual regression test
This option helps you identify whether any of your site’s pages contain dynamic content that has not already been excluded. You can check the pages for the URLs you’ve previously defined under Test URLs. We recommend reviewing each page individually to check for dynamic elements. To do this, select the page you want to inspect and click Preview.
If dynamic content is identified on the selected page, a Dynamic content found warning appears as follows:
Select Show difference to display a heat map that shows which parts of the page are dynamic as follows:
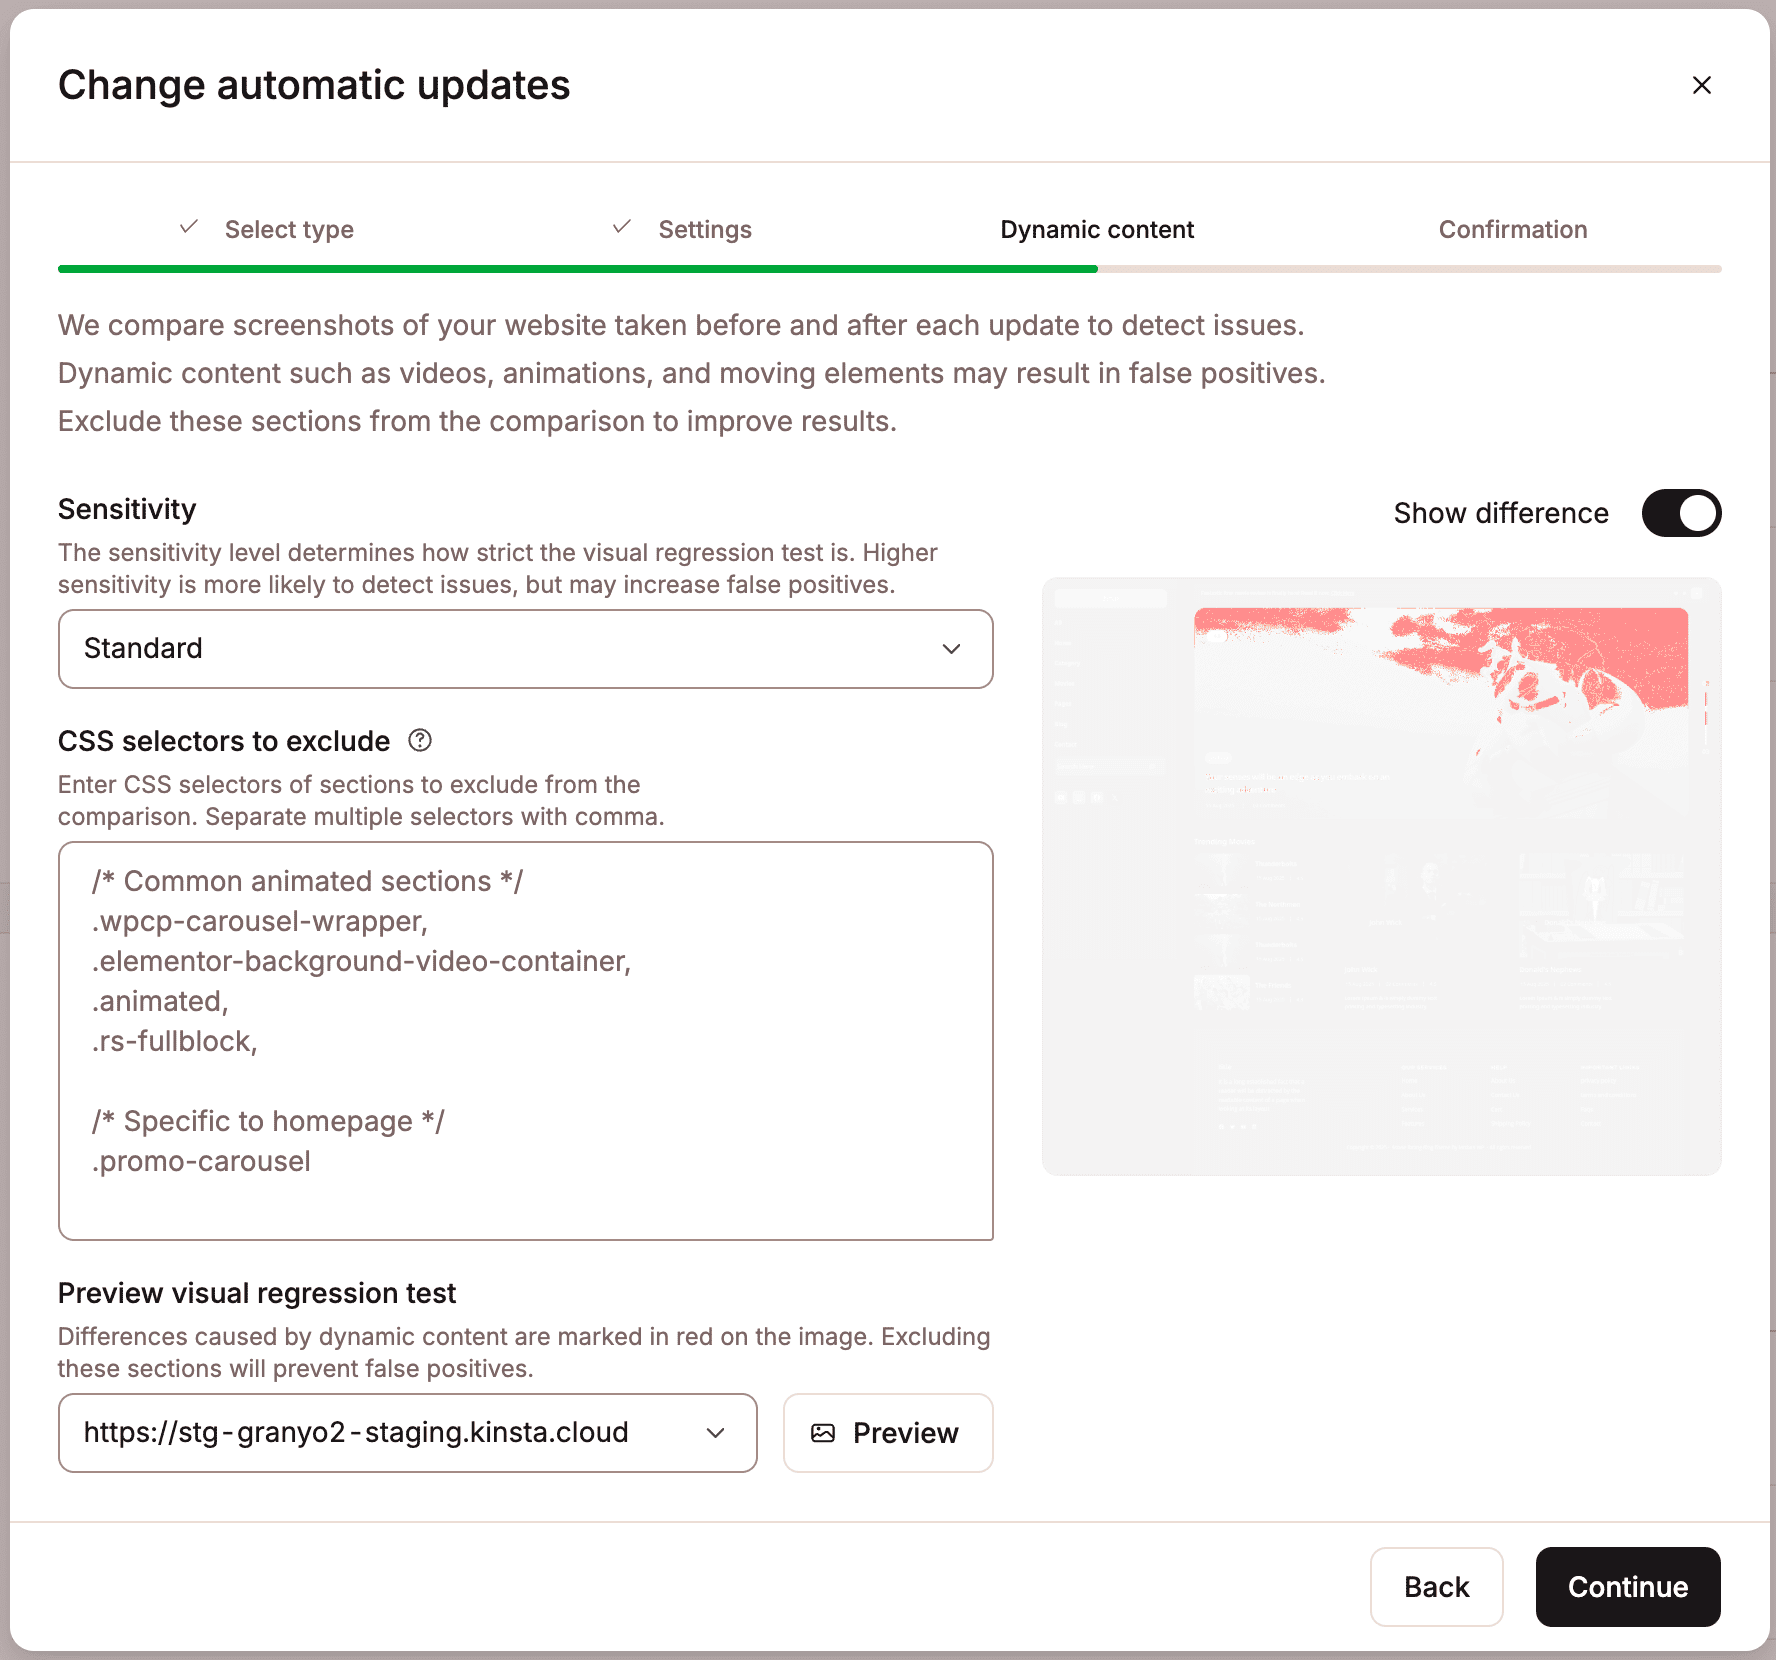
You can then use your browser’s developer tools to inspect that part of the page and locate the CSS selectors for the dynamic content, and you can then add these to the CSS selectors to exclude. For steps on how to do this, refer to How to find a CSS selector. Once you’ve added the selectors, click Preview again to check that all dynamic content has been excluded. If you have excluded all of the dynamic content, a No dynamic content detected message appears, as follows:
You can then click Continue to complete the setup of automatic updates.
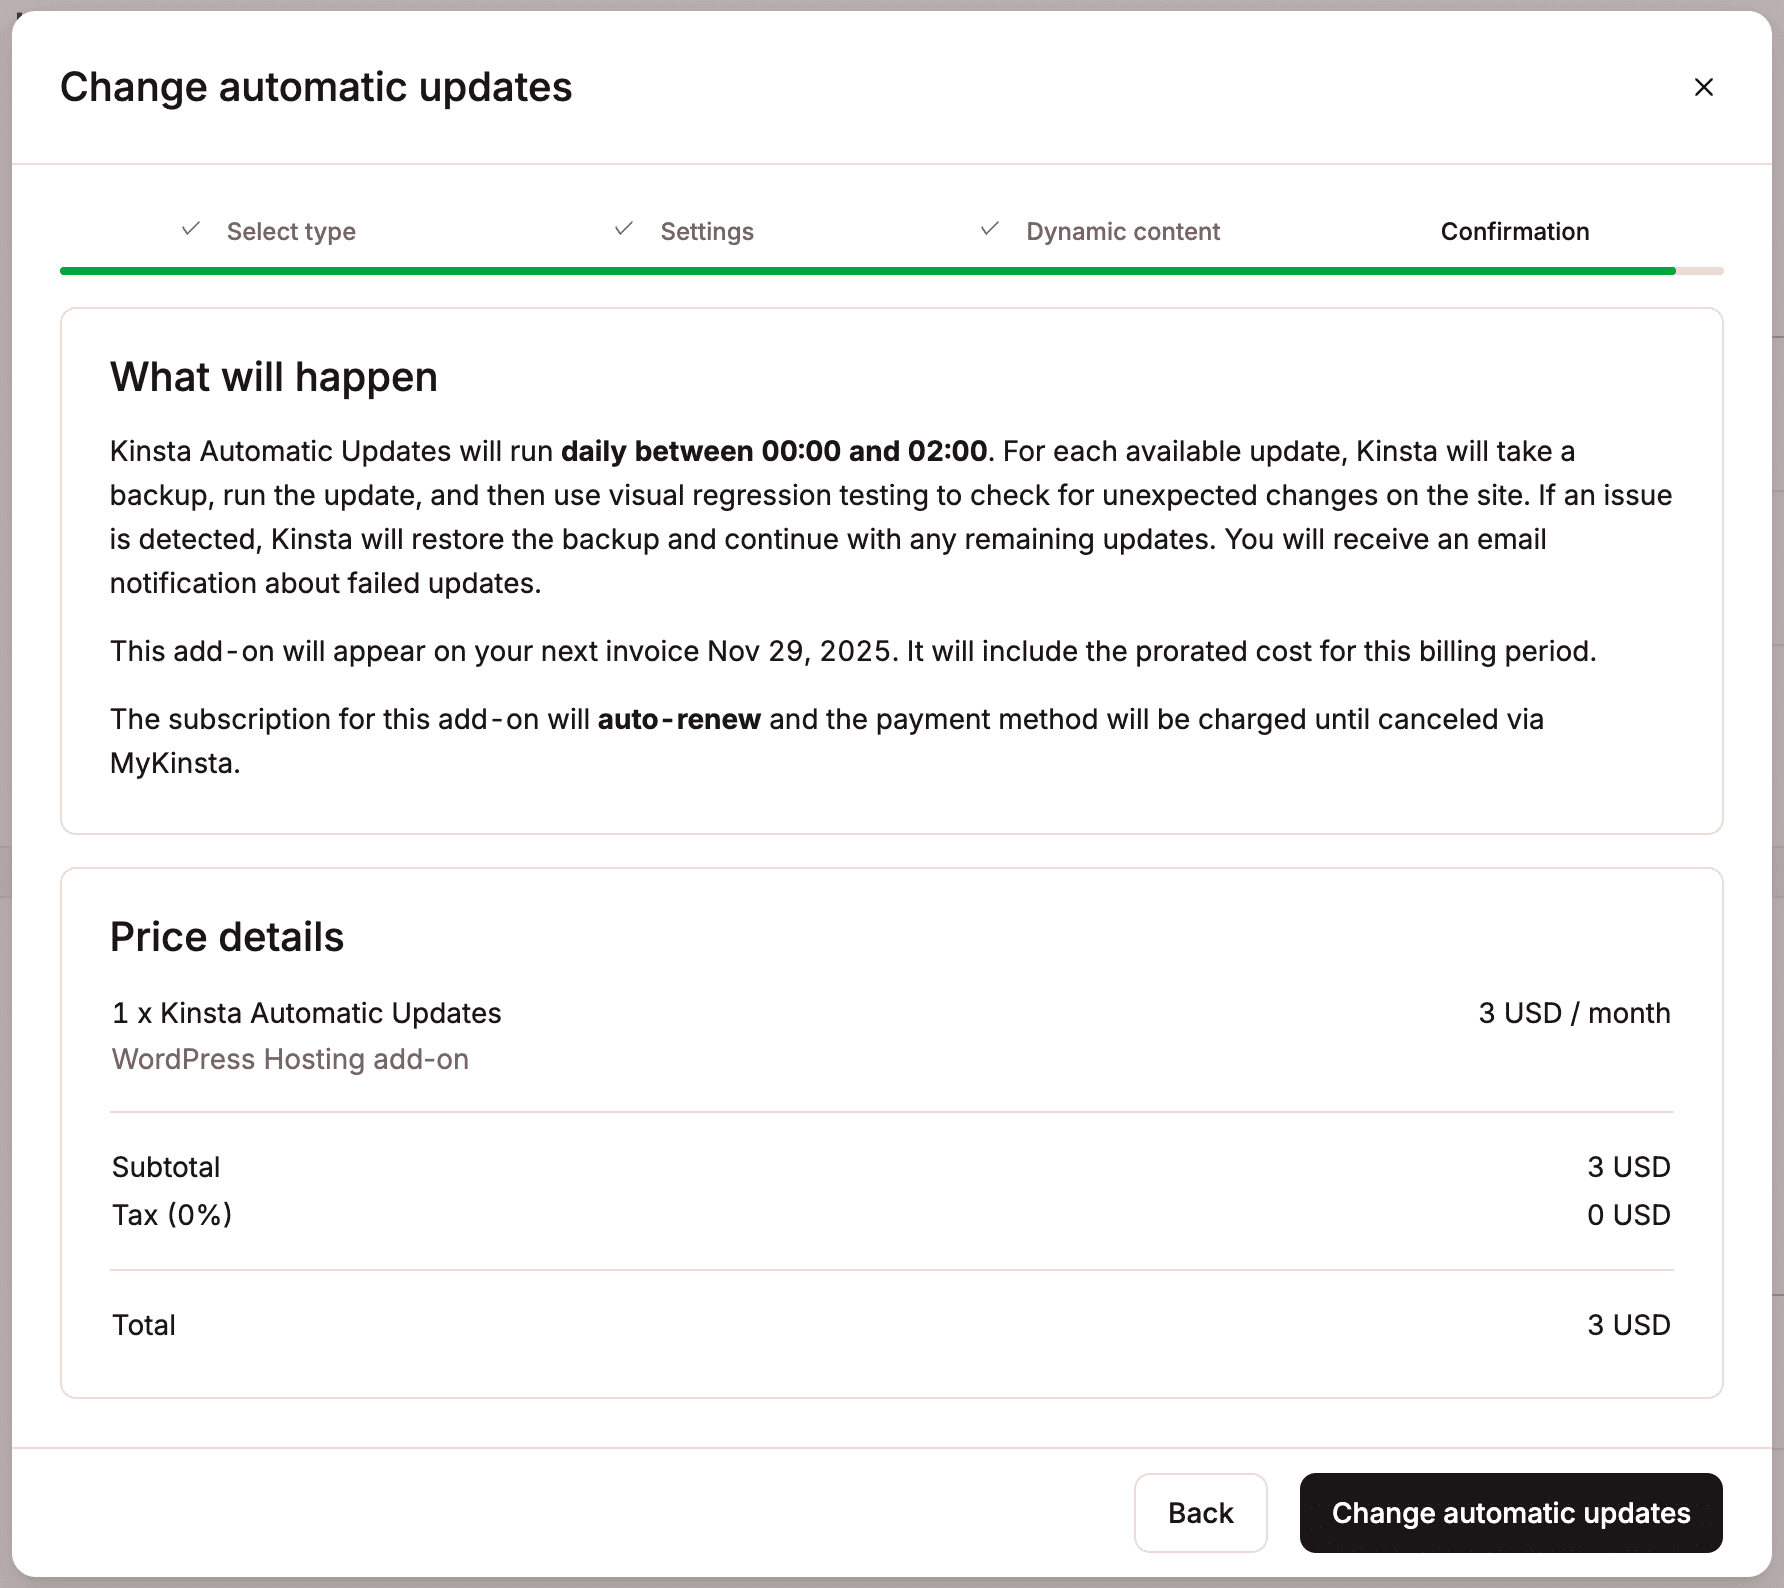
Confirmation
The confirmation page shows the price details. To confirm the add-on, click Change automatic updates. The subscription will appear on your next billing cycle and is automatically prorated for your current billing period.
View installed updates
On the Company Dashboard, you can view a summary of plugin and theme updates for all sites, including the number of available updates, any vulnerable plugins, and details of the most recent updates.
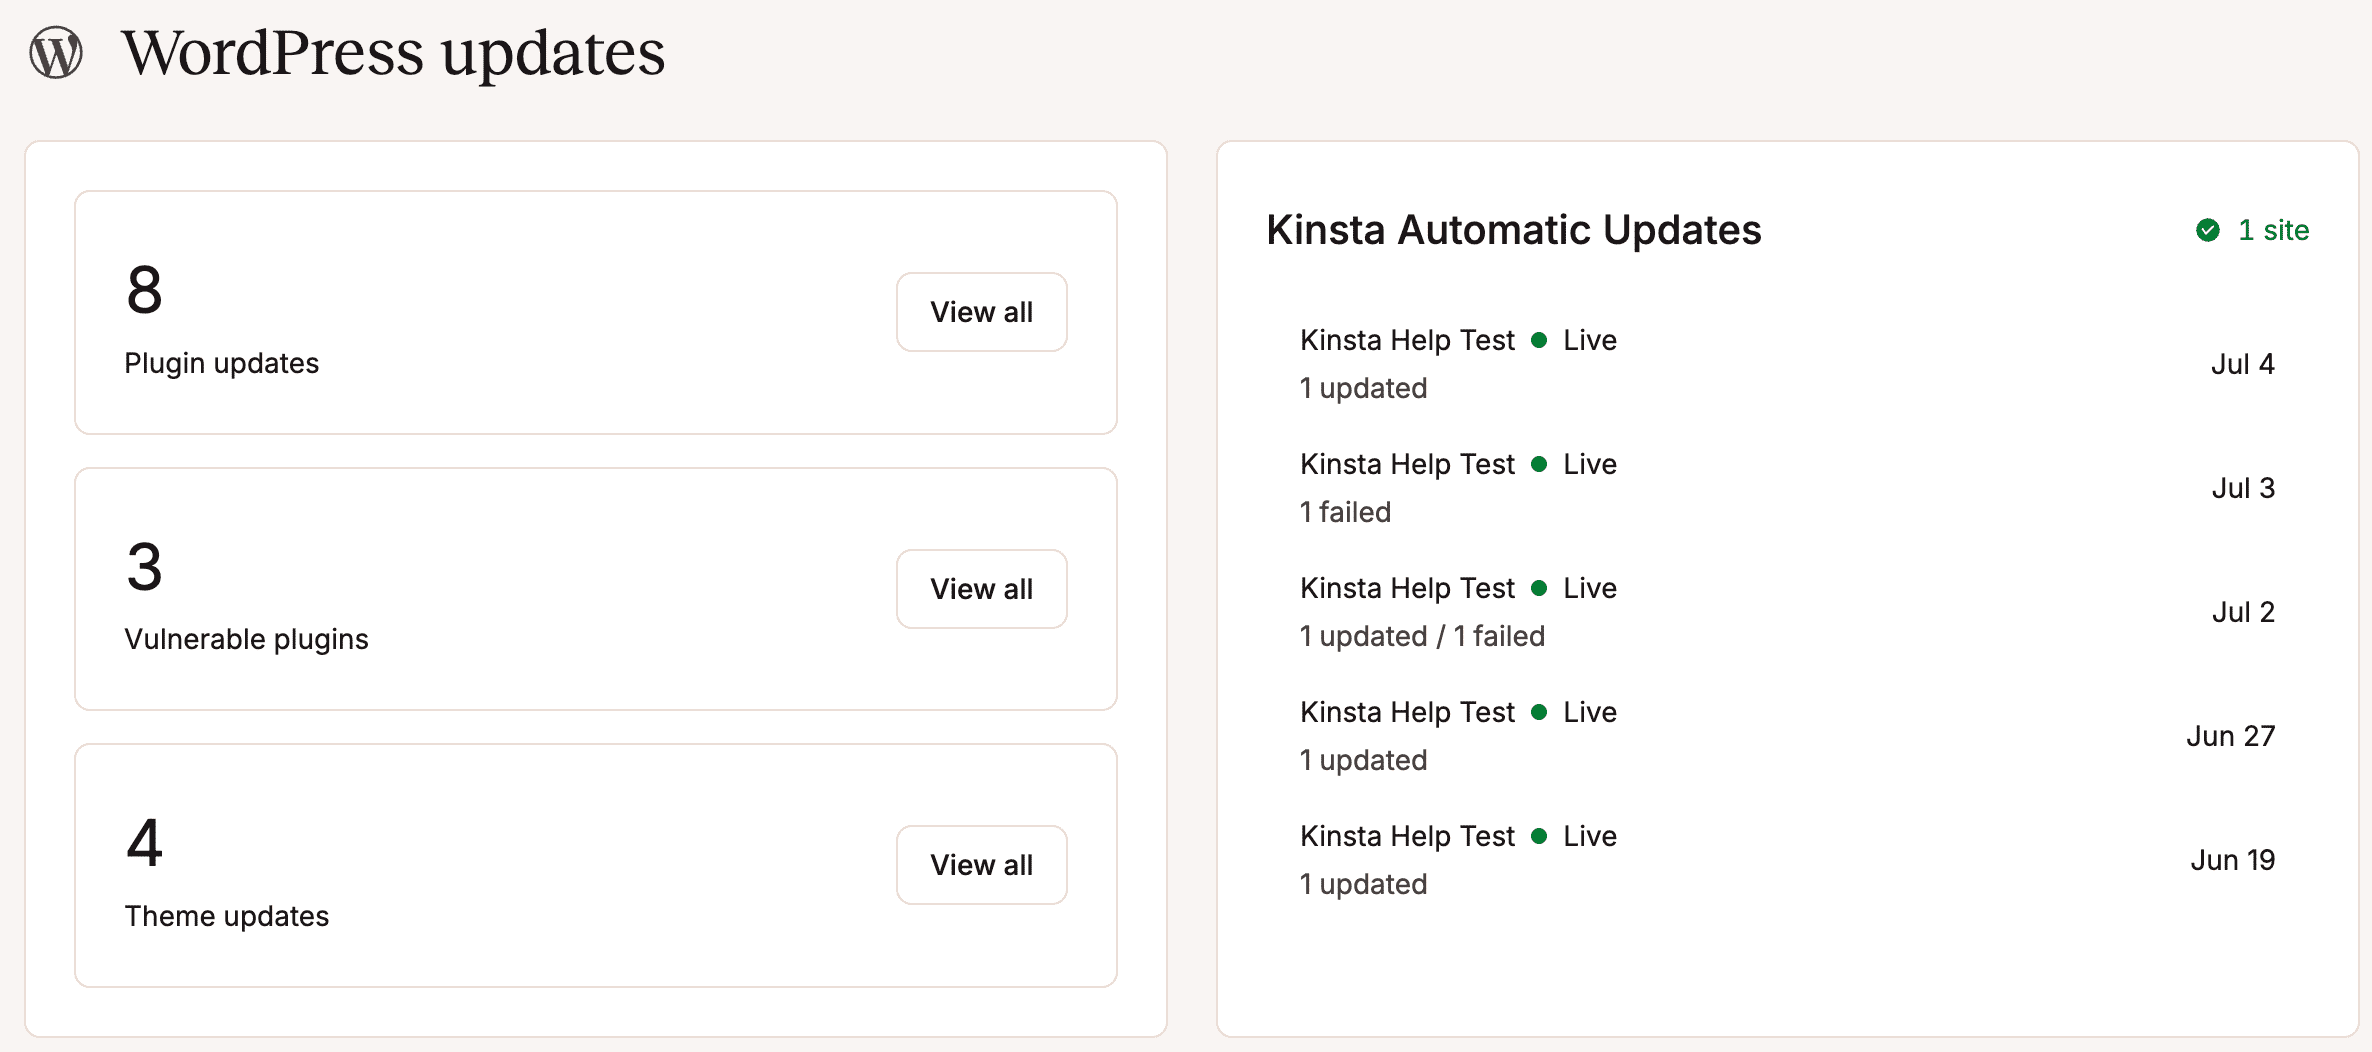
If you’re using Kinsta’s automatic updates, when an update is identified and installed, it appears within Plugins and themes > Kinsta Automatic Updates.
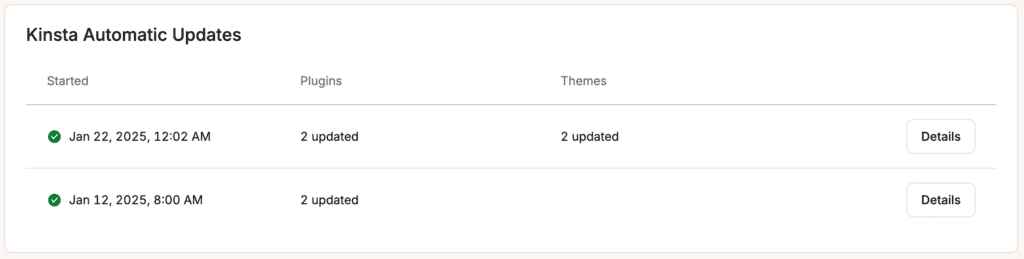
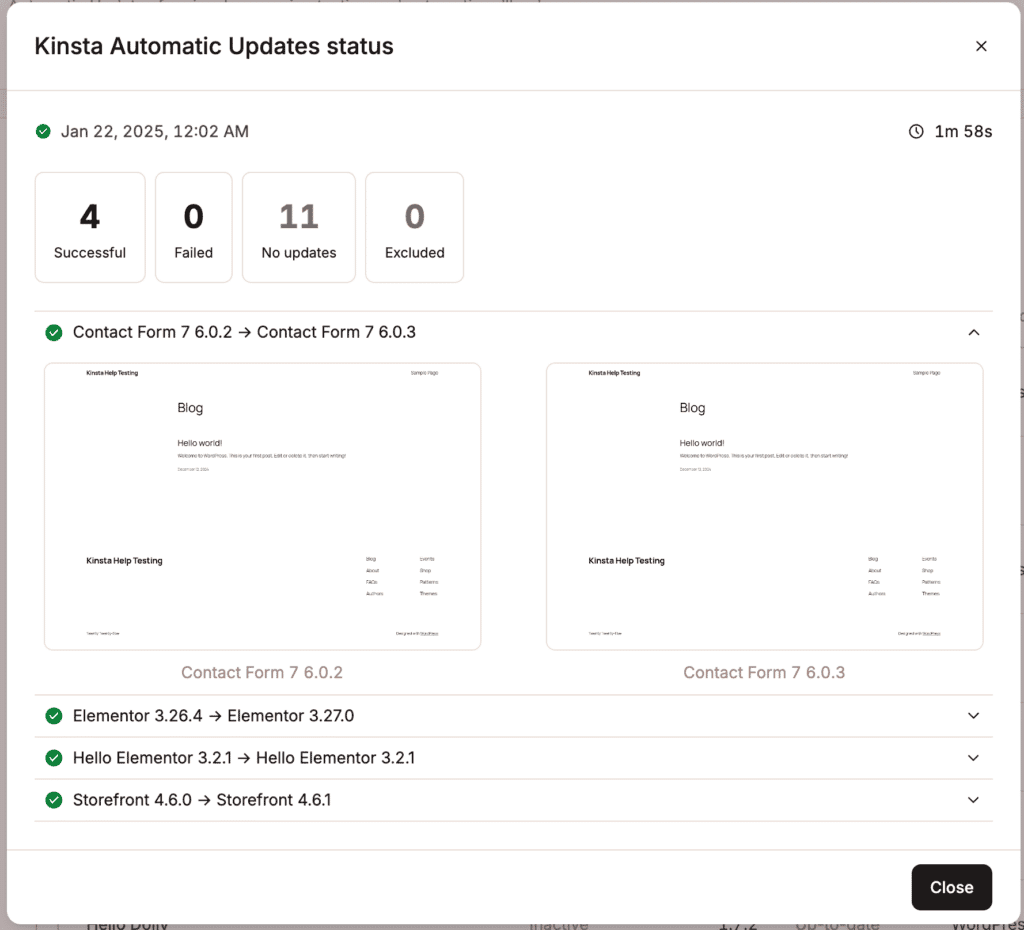
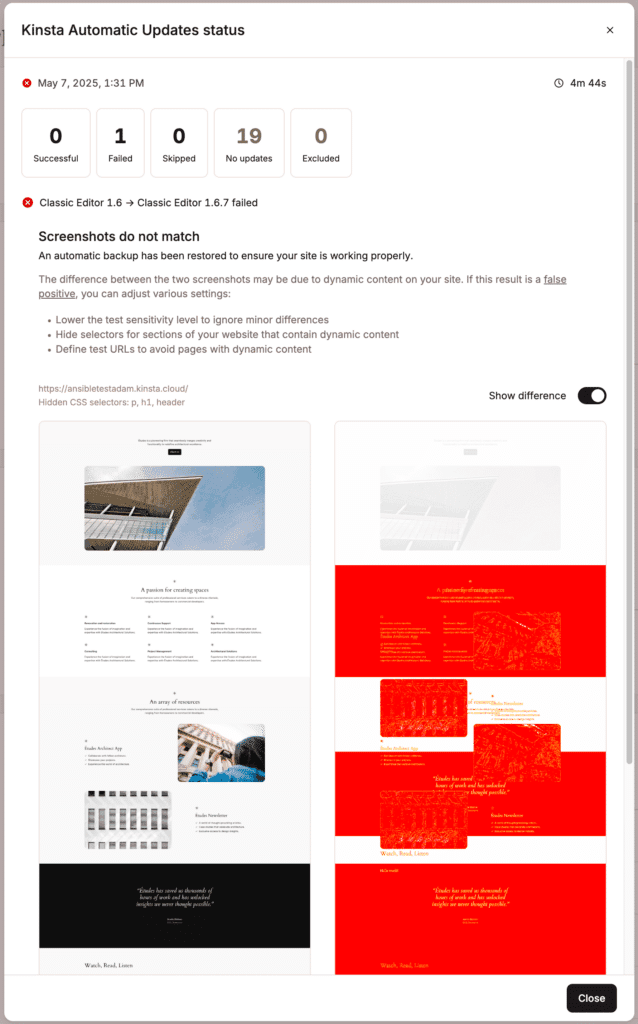
Click Details to view the information about which plugin and theme updates were successful or failed, and how many did not have an update or were excluded. For any successful or failed updates, you can click on the plugin or theme name to show:
- The screenshots taken before and after the update. These screenshots are stored for 60 days.
- Any images highlighting differences.
- The error that caused the update to fail.
Failed Kinsta automatic updates
If an update fails three times, automatic updates for that plugin are paused on the affected environment and retried with increasing delays:
- Retry after 1 day (4th attempt)
- Retry after 2 days (5th attempt)
- Retry after 4 days (6th attempt)
- Retry after 8 days (7th attempt)
- Retry after 16 days (8th attempt)
- Then every 30 days until the update succeeds.
When a plugin update fails, one of the following errors appears:
Domain error
This error occurs when a domain is unavailable during the update process. In this case, MyKinsta is unable to take or compare screenshots.

Screenshot difference
This indicates a minor visual change on the website. The differences are highlighted in the screenshots taken before and after the update. To resolve this, refer to Troubleshooting screenshot differences.
Screenshot height difference
This suggests a significant portion of the page is missing or failed to render following an update. The differences are highlighted in the screenshots taken before and after the update. To resolve this, refer to Troubleshooting screenshot differences.

WP-CLI error
This error may have multiple causes and requires further investigation. While the error log can help identify the issue, we recommend contacting our Support Team to investigate further.

Troubleshooting screenshot differences for Kinsta automatic updates
Kinsta Automatic Updates includes a visual regression test after each plugin or theme update. This test compares each pixel in two images based on color and brightness, with the sensitivity setting determining the threshold for acceptable differences. It analyzes the homepage and four random pages or specific Test URLs if defined.
- Lower sensitivity ignores minor differences.
- Higher sensitivity detects subtle changes but may increase false positives.
If your site contains dynamic content, videos, or carousels, the test may fail because screenshots taken before and after the update will differ. To prevent this, consider the following:
Hide dynamic CSS selectors
Identify which CSS selectors contain dynamic content and hide these within Hide selectors when you enable automatic updates or within the automatic update settings. To find a CSS selector, use your browser’s inspector. Right-click the content you want to hide, select Inspect, then in the Styles panel, right-click the selector and choose Copy selector.
Specify the pages to test
By default, the visual regression test analyzes your homepage and four random URLs from your site. If these pages contain dynamic content, it may lead to more false positives. To reduce this risk, you can specify Test URLs that do not contain dynamic elements when you enable automatic updates or within the automatic update settings.
Adjust the sensitivity level
A higher sensitivity level is more likely to result in false positives, as it is more likely to detect even subtle changes. You can lower the sensitivity level so that the test ignores minor differences when you enable automatic updates or within the automatic update settings.
Exclude or change automatic updates for a single plugin or theme
To exclude or change automatic updates for a single plugin or theme, click the kebab (three-dot menu) on that item and click Change automatic updates.
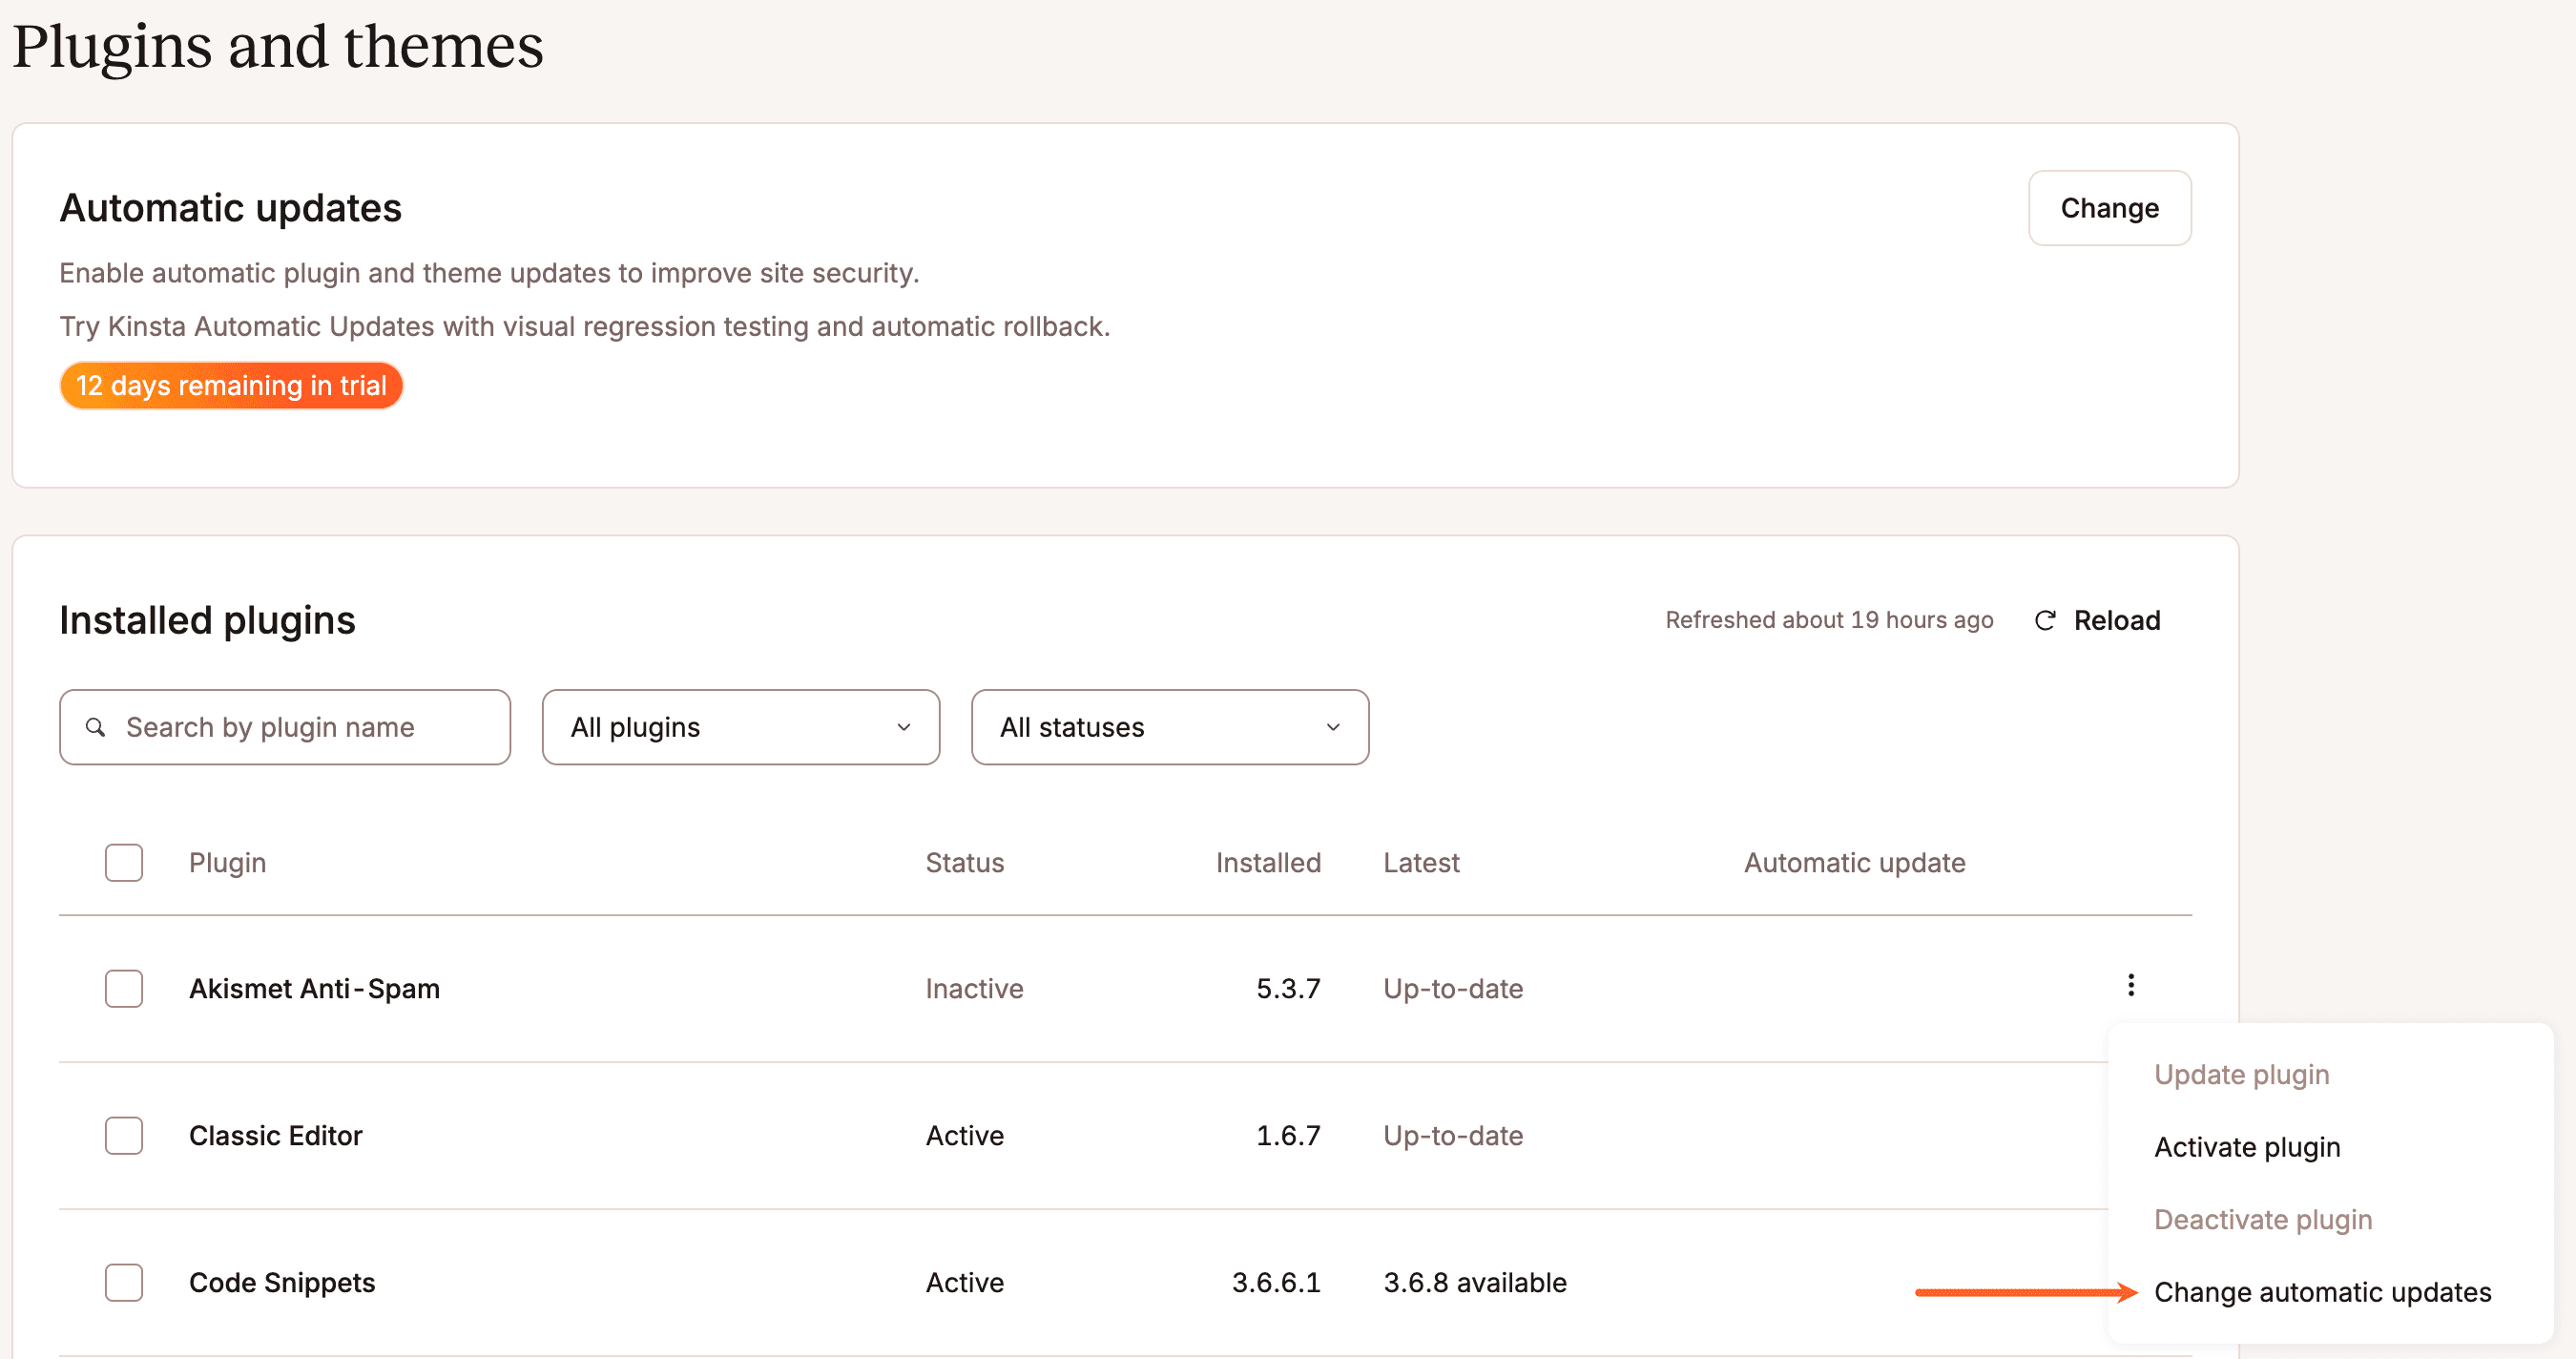
Select the required option and click Change automatic updates.
Kinsta automatic update notifications
You can set up email notifications for weekly updates, successful updates, and failed updates within your username > User settings > Notifications.

Disable automatic updates
You can disable automatic updates within Sites > sitename > Plugins and themes > Automatic updates > Change. Select Manual and click Change automatic updates.
You can also disable auto-updates for your plugins and themes for multiple sites, including staging sites, simultaneously from the Sites page. Select the checkboxes next to the sites you want to enable auto-updates for, click Actions, and choose Change automatic updates.
If you have disabled Kinsta Automatic Updates, this removes the add-on. The first month is completely free, so if you cancel within that time, you won’t incur any charges for the add-on. After the free month, if you cancel, you’ll receive a prorated credit for the unused days of the current billing period. This credit will be automatically applied to your account balance and used toward your next Kinsta invoice. For more information, refer to our WordPress Hosting Money-Back Guarantee.