Redirects
You can add redirect rules from right within MyKinsta. Redirect rules allow you to seamlessly direct traffic from one location to another. This is particularly useful for preventing 404 errors, ensuring proper SEO when you make changes, and routing visitors to the correct locations on your site.
Using free WordPress plugins to implement redirects can sometimes cause performance issues as most of them utilize the wp_redirect function, which requires additional code execution and resources. Some of them also add autoloaded data to your wp_options table, which increases database bloat. Adding them in MyKinsta means the rules are implemented at the server level, which is a much more optimal way.
We recommend clearing your cache after adding or removing redirects.
How to add a redirect rule
To add a redirect, in MyKinsta go to Sites > sitename > Redirects. Then click the Add redirect rule button.

You can then choose the type of redirect rule you want. Check out this article on redirection to learn more about which type of rule you should use. Our tool uses and supports regular expressions (regex).
- 301 redirect: Used for URLs and or content that is “moved permanently.” Typically, this is the one you’ll want to use for SEO purposes.
- 302 redirect: Used for URLs and or content that is “found” or “moved temporarily.”
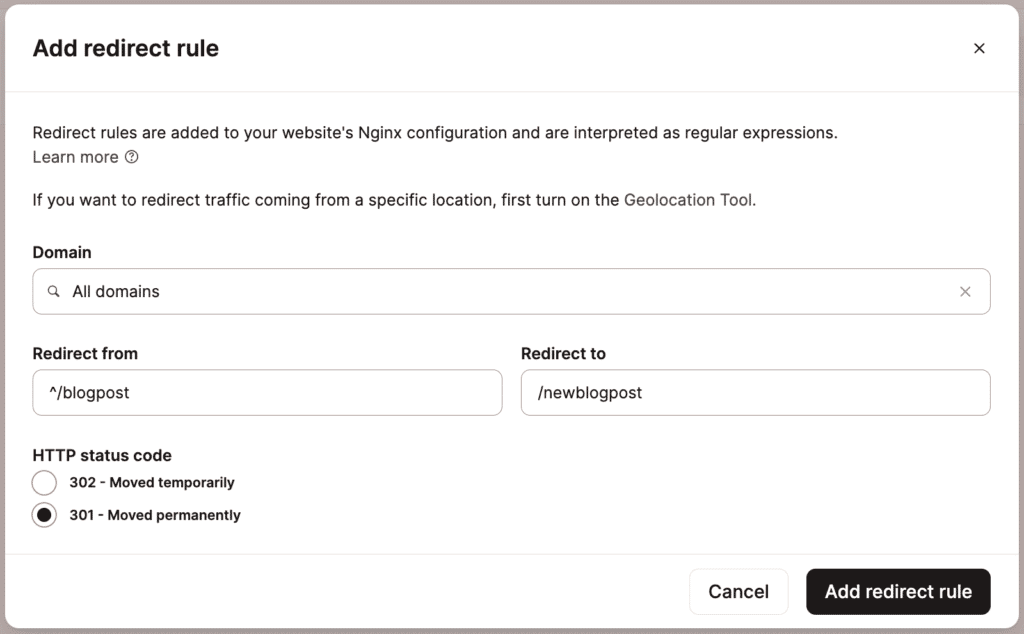
In the example below, we add a 301 redirect for a blog post URL (/blogpost) that was changed and updated to something else (/newblogpost). This ensures that all traffic, backlinks, and “link juice” from Google is now sent to the new URL. 301 redirects pass between 90-99% of “link juice.” You can select which domain prefix you want it to be added for. In this case, we want both www and non-www traffic to redirect.
Note: This will automatically redirect UTM parameters or anything on the end of the URL. For example, if the old URL is shared on social media using a tool like Buffer, it might appear as the following:
https://wpdev.ink/blogpost/?utm_content=buffer
This will automatically be directed to:https://wpdev.ink/newblogpost/?utm_content=buffer
You’ll also notice we added ^ to the beginning of the Redirect from path above. This is because Kinsta’s redirect tool uses regex automatically. Therefore, you should add ^ at the beginning of every “from” path unless you want it to match at places other than the beginning of the path. For example, using /blogpost by itself could create a redirect loop on other URLs, such as /category/blogpost.
It’s also important to check your current backlinks in a tool such as Ahrefs. You may have backlinks on 3rd party sites that point to two different versions of your URL:
https://wpdev.ink/blogposthttps://wpdev.ink/blogpost/
Note that the second one has a forward slash on the end of it. If you don’t consider this, it could break the redirect. If you aren’t sure which version third-party sites may link to, you can use the wildcard regex quantifier ?, preceded with a forward slash / to ensure that both work:
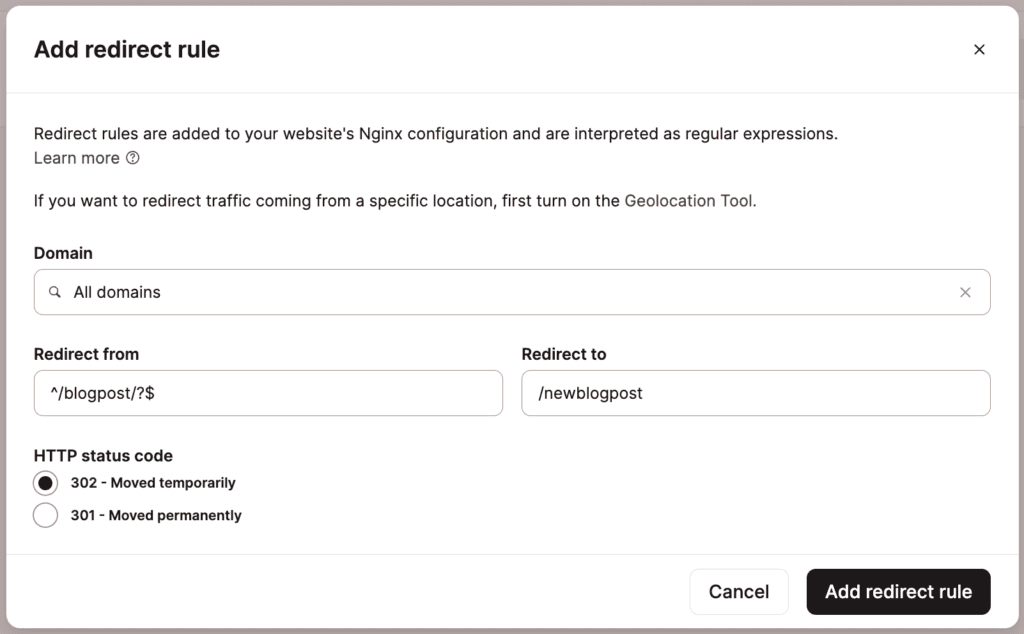
In the above example, all links to both /blogpost and /blogpost/ (with the forward-slash) would get redirected to /newblogpost.
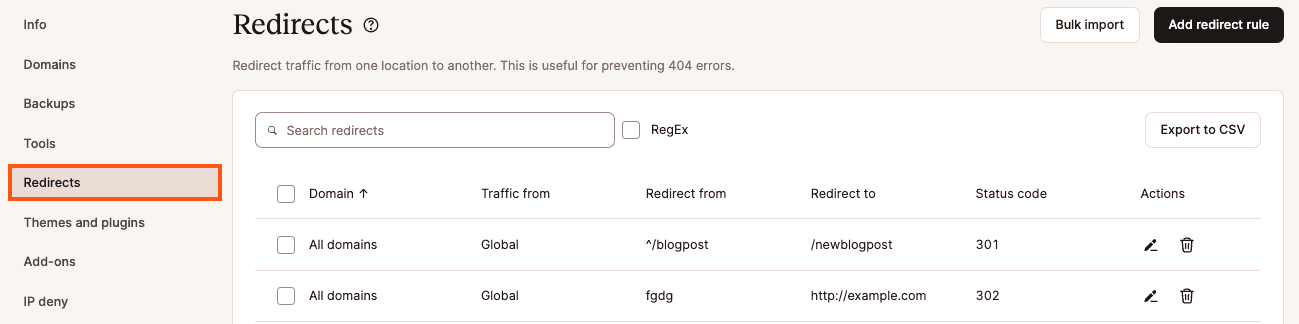
After adding redirects in MyKinsta, you can then manage all of your redirect rules there.
Using regular expressions (regex)
A regular expression is a sequence of characters that define a search pattern. Below are some additional examples that can be used with the MyKinsta redirect tool. The Redirect from field supports regular expressions, and the Redirect to field allows capture group references and some variables (e.g. $host, $scheme). Here are a few important things to note:
- Redirects are checked in the order you add them. Best practice is to have the more specific ones before the general redirects.
- By default, our redirect tool is case-sensitive (see below to use case-insensitive redirection).
- Restricted characters: #, space, “, and linebreak characters.
- You can’t redirect by arguments.
Here’s some common regex syntax:
| ^ | Match only if the following is at the beginning of the line |
| $ | Match only if the previous is at the end of the line |
| ? | Match the previous 0 or 1 times (makes it optional) |
| . | Match any single character |
| * | Match the previous 0 or more times |
| \ | Escape special characters |
| (?i) | Case-insensitive |
| .* | Wildcard to match anything (any character, any time, which will match any string) |
| (.*) | Capturing group that contains a wildcard match for any string in the given place |
The following regex examples can be used with the MyKinsta redirect tool:
Include your https://domain.com/store page
^/storeInclude your https://domain.com/store page (with case-insensitive redirection)
(?i)^/storeInclude a single file, such as https://domain.com/store.php
^/store.phpInclude all files of the same type, such as all of the PHP files
^/store/.*.phpInclude everything that contains a certain phrase, such as https://domain.com/*store*
It is recommended to specify the redirection string / to decrease the chance of redirecting something unwanted.
Note: Since our tool automatically applies regex, the .* wildcard to match anything is automatically applied and isn’t needed in this case.
/store or /store/Include both of the following URLs: https://mydomain.com/fast-racing and https://mydomain.com/fast-car-racing
^/fast(-car)?-racingRedirect all blog posts containing /amp/ to their original non-AMP URL
This is an example from our post on Disabling Google AMP. We needed to redirect all blog posts containing /amp/ to their original non-AMP URL to ensure they got re-indexed to their original URLs. In other words, we catch everything before /amp/ in the URI and append that in place of “$1”.
/(.*)\/amp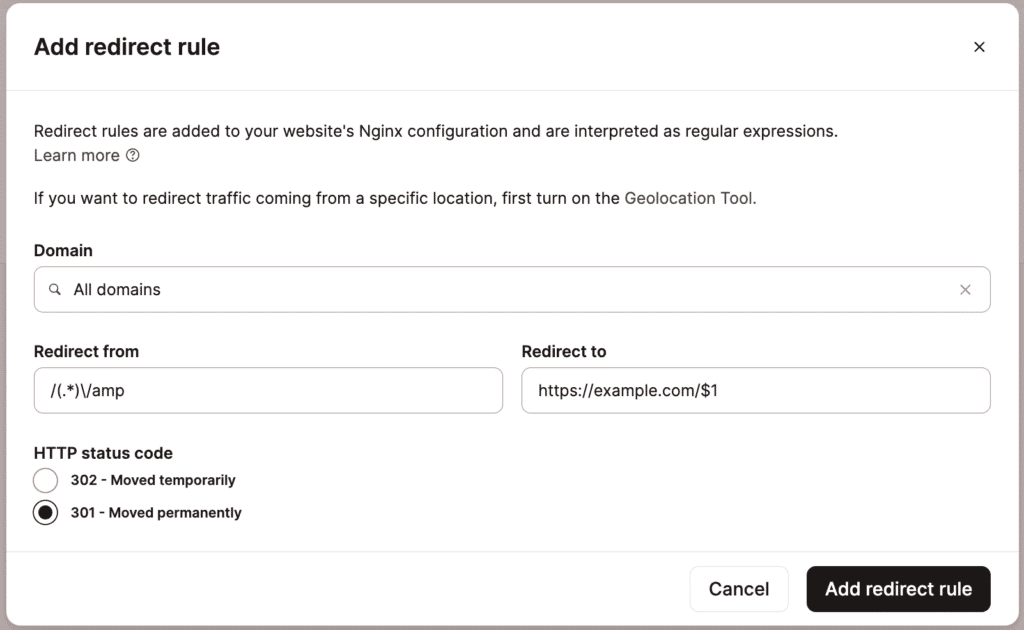
Add a 301 redirect to redirect all www traffic to non-www
Domain: www.example.com
Redirect from: ^(.*)$
^: Matches the start of the URL path.(.*): Captures any sequence of characters (zero or more) after the domain. This part of the regex captures the entire URL path.$: This signifies the end of the string.
Redirect to: https://example.com$1
$1: Refers to the content captured by the(.*)in the original URL (from the^(.*)$pattern). The$1is a backreference to the captured content, essentially appending the captured URL path to the redirect destination.
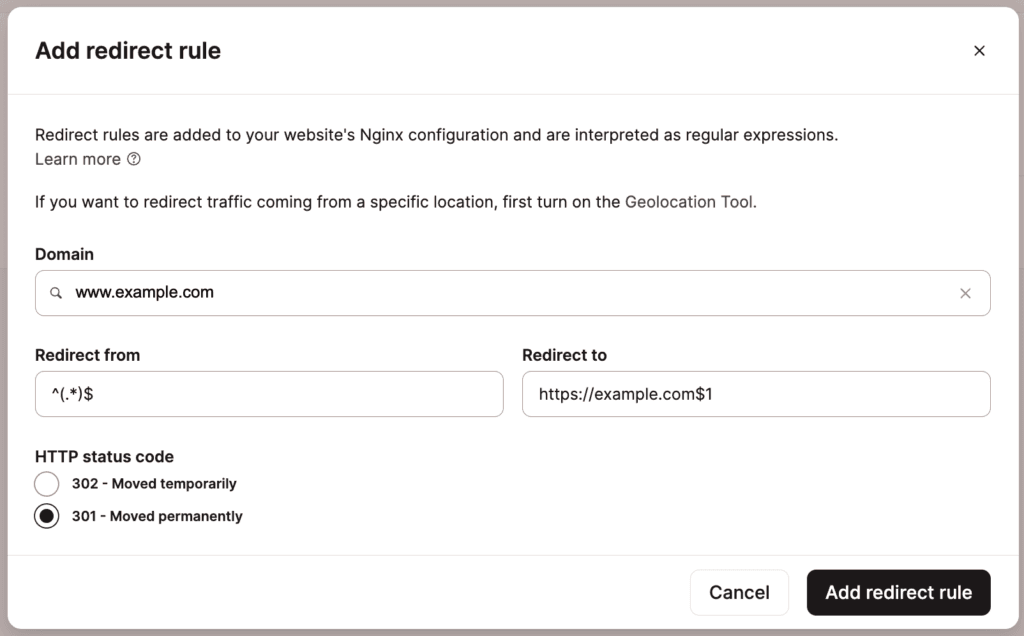
This rule redirects any URL path (including the root /) on the www.example.com domain to the same path on the https://example.com domain. For instance:
http://www.example.com/some-pageis redirected tohttps://example.com/some-page.http://www.example.com/is redirected tohttps://example.com/.- Any URL on
www.example.comis redirected to the equivalent URL onhttps://example.com.
Add a 301 redirect to redirect all non-www traffic to www
Domain: example.com
Redirect from: ^(.*)$
^: Matches the start of the URL path.(.*): Captures any sequence of characters (zero or more) after the domain. This part of the regex captures the entire URL path.$: This signifies the end of the string.
Redirect to: https://www.example.com$1
$1: Refers to the content captured by the(.*)in the original URL (from the^(.*)$pattern). The$1is a backreference to the captured content, essentially appending the captured URL path to the redirect destination.

This rule redirects any URL path (including the root /) on the example.com domain to the same path on the https://www.example.com domain. For instance:
http://example.com/some-pageis redirected tohttps://www.example.com/some-page.http://example.com/is redirected tohttps://www.example.com/.- Any URL on
example.comis redirected to the equivalent URL onhttps://www.example.com.
Add a 301 redirect to redirect all traffic from one domain to another, preserving paths
Add a 301 redirect to redirect all traffic from one domain (kinstaexample.com) to another domain (newkinstaexample.com), keeping the same paths/page slug. This is recommended when changing the domain of your site but keeping the same page slug: redirecting https://kinstaexample.com/contact to https://newkinstaexample.com/contact.
Domain: kinstaexample.com
Redirect from: ^(.*)$
^: Matches the start of the URL path.(.*): Captures any sequence of characters (zero or more) after the domain. This part of the regex captures the entire URL path.$: This signifies the end of the string.
Redirect to: https://newkinstaexample.com$1
$1: Refers to the content captured by the(.*)in the original URL (from the^(.*)$pattern). The$1is a backreference to the captured content, essentially appending the captured URL path to the redirect destination.
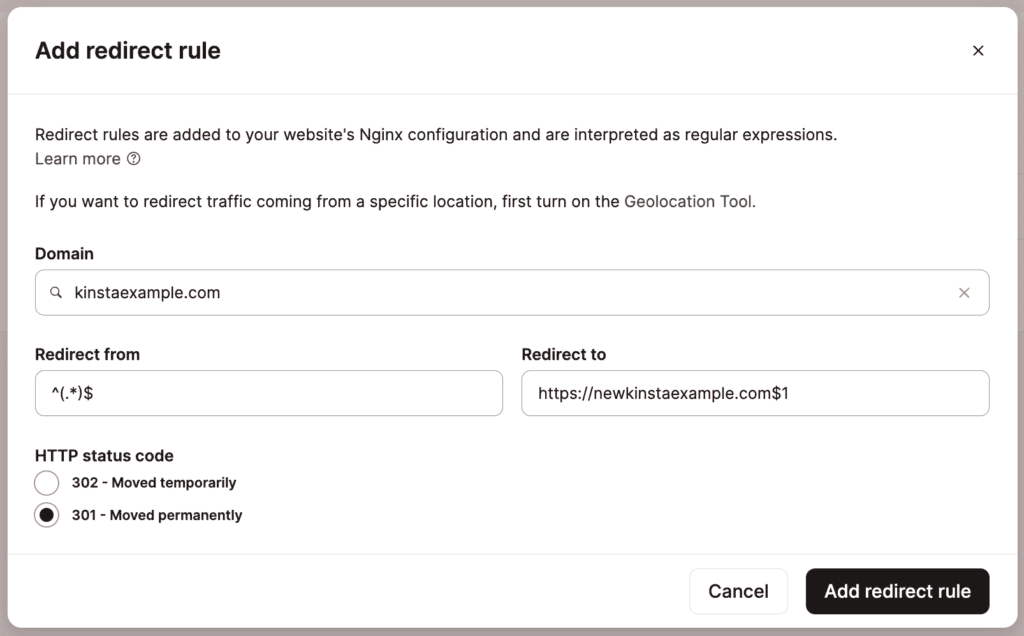
This rule redirects any URL path (including the root /) on the kinstaexample.com domain to the equivalent URL path on the https://newkinstaexample.com domain.
For example:
http://kinstaexample.com/some-pageis redirected tohttps://newkinstaexample.com/some-page.http://kinstaexample.com/is redirected tohttps://newkinstaexample.com/.- Any URL on
kinstaexample.comis redirected to the corresponding URL onhttps://newkinstaexample.com.
Add a 301 redirect to redirect a link to a file
Link to file: www.kinstaexample.com/uploads/oldfile.pdf
Redirect from: ^/uploads/oldfile\.pdf$
^: Matches the start of the URL path.uploads/oldfile: This is a literal match for the directory and the file being matched in the URL path.\.pdf: The\.escapes the dot (.) character, making it a literal dot. Without the backslash, a dot in regex represents any character, but here we want to match the literal.in.pdf.$: This signifies the end of the string.
Redirect to: https://www.kinstaexample.com/uploads/newfile.pdf
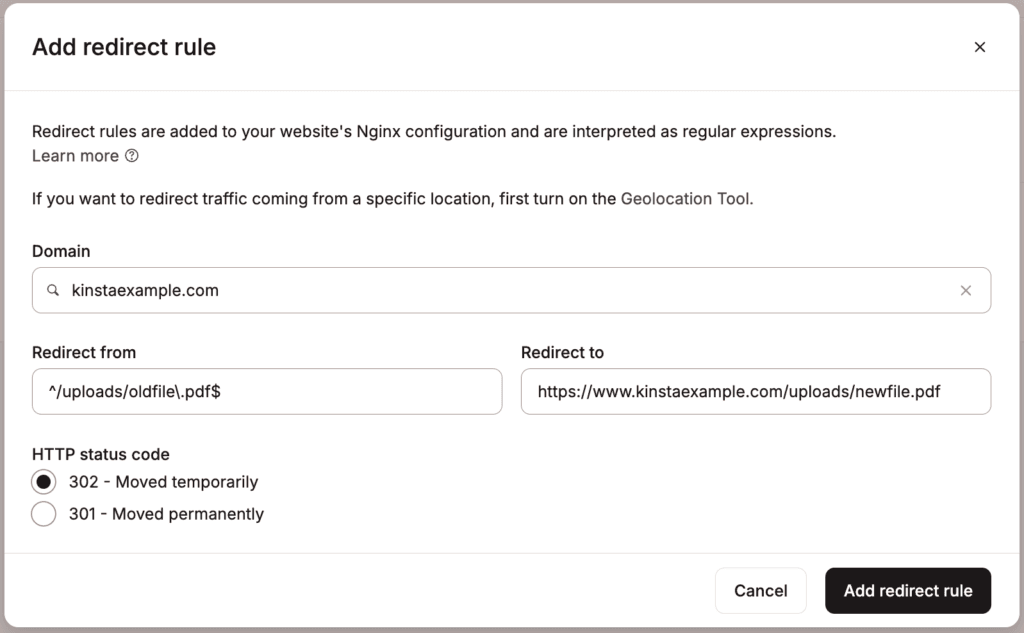
When a user tries to access www.kinstaexample.com/uploads/oldfile.pdf, they will be redirected to https://www.kinstaexample.com/uploads/newfile.pdf. The rule is strictly for that one specific file (oldfile.pdf), and no other files in the /uploads/ folder will be affected.
Too many redirects
If you set up your redirects incorrectly, it may cause an infinite redirect loop, in which case you might see an error like ERR_TOO_MANY_REDIRECTS. If this happens, you’ll want to go back through your redirect rules and double-check them. This commonly happens when the location URL is included in both the Redirect from and Redirect to fields.
For example, the following would cause a redirect loop:
Redirect from: ^/blog/about
Redirect to: https://domain.com/blog/about-me
Why? Because once the process reaches ^/blog/about, the remaining part -me won’t matter, and it will cause an infinite loop. You have to specify the end of the string and the starter point. Here is what you would do to fix it:
Redirect from: ^/blog/about$
Redirect to: https://domain.com/blog/about-me
The $ character will tell Nginx to stop and match the request only if the string is there exactly, but nothing after it.
Further regex reading
Here are some helpful links for further reading about what you can do with regex and understanding the basics:
Check out our video to learn the WordPress Redirect Best Practices to Maximize SEO and Page Speed:
How to bulk import redirect rules
Perhaps you have a more complex setup or want to remove your 301 redirect plugin from your WordPress site. We also offer the option to bulk import redirect rules from a CSV file.
Bulk import notes
- When bulk importing redirect rules in MyKinsta, the rules are organized by Domain. Rules that apply to all domains are listed at the top, followed by specific domains in alphabetical order. The fields, such as Traffic From and Redirect From, will maintain the order in which they were added, but they will be grouped under their corresponding domains.
- Importing adds to the list of redirects; it doesn’t overwrite or change any existing redirects.
- If you have nearly 5,000 redirects within MyKinsta, a Redirect rule limit almost reached warning appears, recommending the use of the bulk import function. You can import 5000 redirects at a time; if you have more, you should import the redirects in batches. There is no limit to the number of redirects you can add.
- The maximum file size you can import is 100KB, if your file exceeds this limit, you’ll need to split it into smaller parts and import each one separately.
- If you need to clear out a large number of rules (e.g., before importing an updated list of redirects), check the checkbox next to Domain to select all domains, or select the checkbox next to each rule you want to delete and click the Delete redirects button that appears near the upper right corner. If you have more than one page of redirects, selecting all only selects the redirects on the current page. You must repeat this process for each page of redirects.
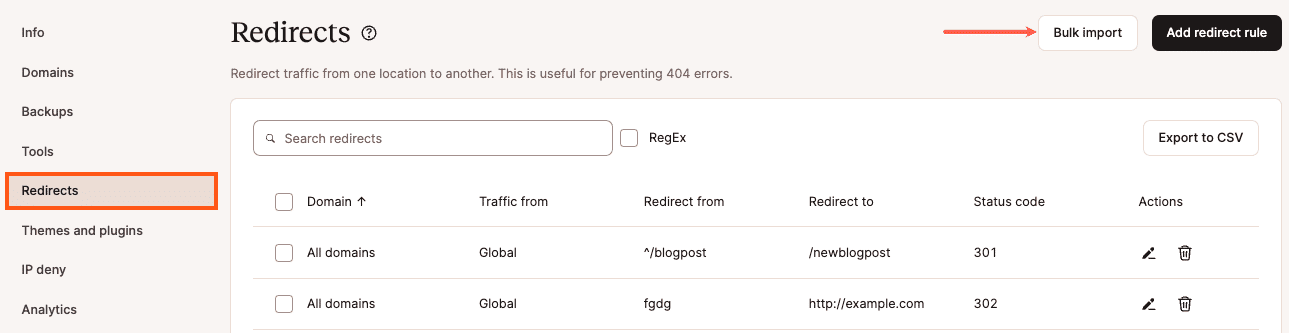
1. Select Bulk import
To add bulk import redirect rules, click on your site in MyKinsta, go to Redirects, and click on the Bulk import button.
2. Import redirect rules
Paste the contents of your CSV file in the field provided. The CSV should contain information separated by commas in this order: status code, domain (use all to cover all domains), redirect from path, redirect to URL, country (optional), and city (optional). Place each redirect rule on a new line. www subdomains should also be added as separate lines. Click the Import redirect rules button.
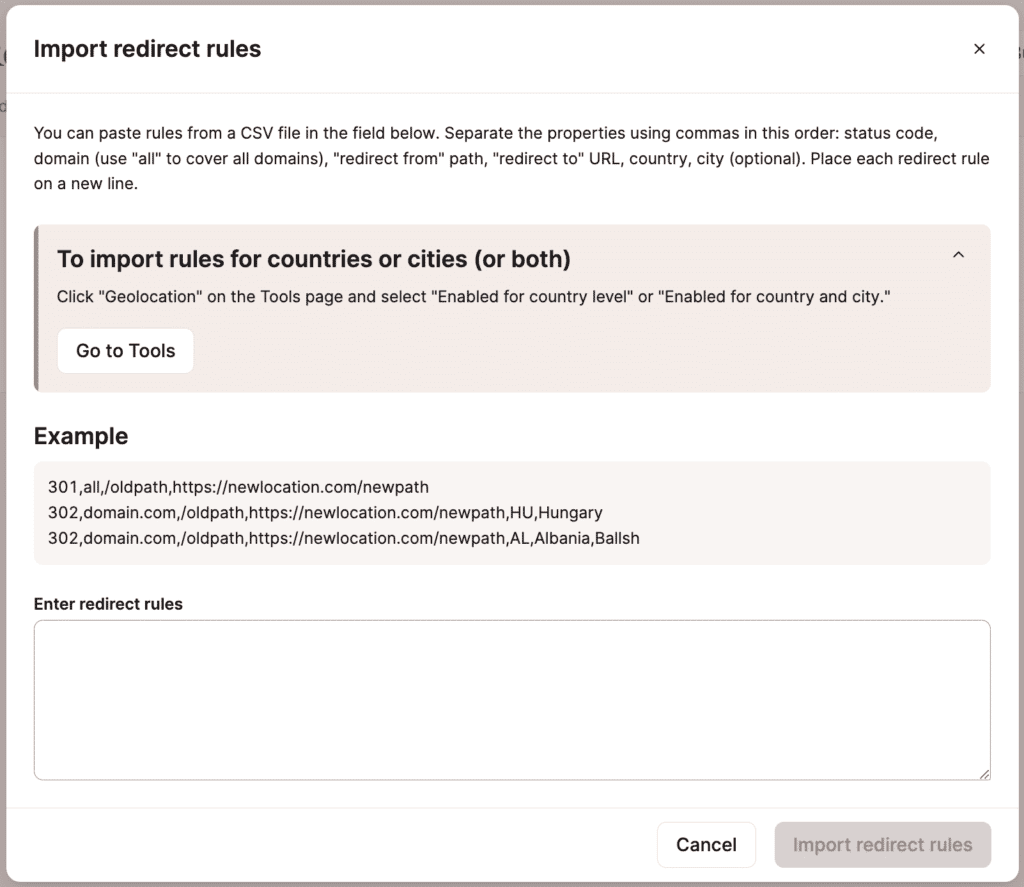
Bulk import also supports regular expressions (regex). Examples:
301,all,^/oldpath/?$,https://newlocation.com/newpath
301,www.domain.com,^/oldpath/?$,https://newlocation.com/newpath
302,domain.com,^/oldpath/?$,https://newlocation.com/newpath,HU,Hungary
302,domain.com,^/oldpath/?$,https://newlocation.com/newpath,AL,Albania,Ballsh
How to export redirects
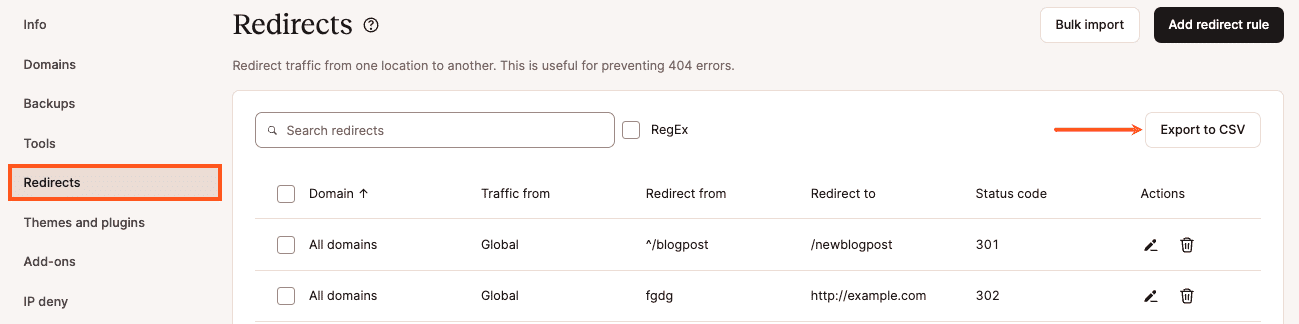
We realize that some of you have hundreds or even thousands of redirects. Having the ability to export them allows for easier editing offline and re-importing, and the ability to easily transfer your redirects to another tool or service as needed. This is where the Export to CSV option comes in handy.
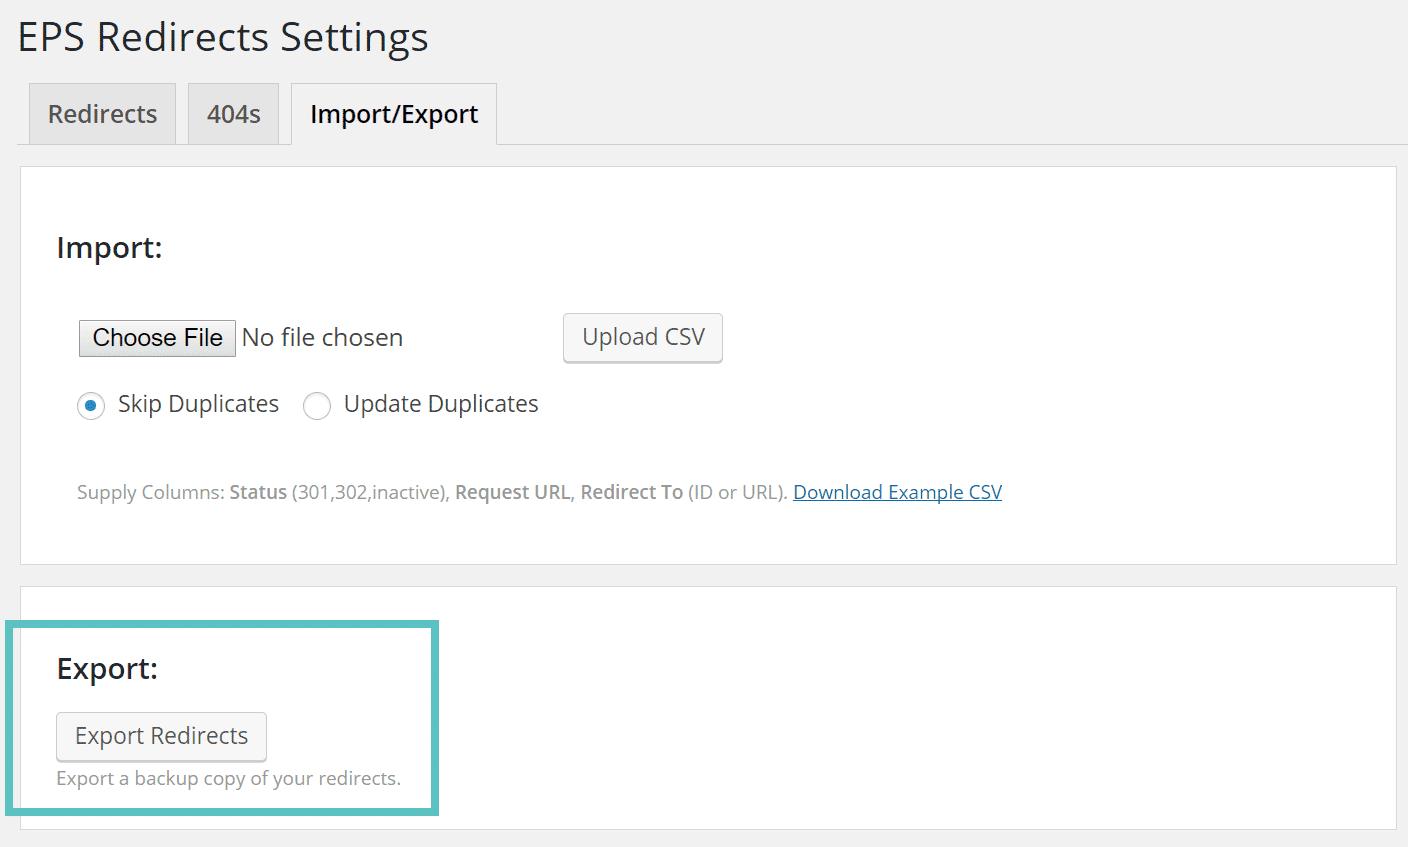
Exporting redirects from WordPress
If you want to migrate your current redirects from a WordPress plugin to MyKinsta, many of them have export options available in their settings (export option example below from the EPS redirects plugin). Just ensure they are properly formatted before bulk importing.
If you’re using the Simple 301 Redirects plugin, you can use this Export Simple 301 Redirects to CSV plugin to export your redirects.
Notes
Our team is happy to help set up simple redirects. Since we don’t run Apache, you can’t use .htaccess. Instead, we run Nginx, which has its own rewrite rule syntax. Whatever you can do with .htaccess files, you can “translate” to Nginx’s syntax, and we’ll add them to your site’s Nginx config file. If your site’s .htaccess file includes a lot of complex rules, you will need to work with a developer to convert these into Nginx format and then supply the converted rules to our team.
Test redirects
When adding or updating redirects, testing those changes is recommended. Check the HTTP status and redirect chain of any URL with our free HTTP status and redirect checker. You can use this tool to review response headers, client-side errors, and test your redirects to make sure they are working the way you want them to.