Transfer Ownership
In MyKinsta, we’ve made it as easy as possible to transfer company ownership from one user to another within Users and to move a site from your company account to another company with our site transfer tool.
Transfer company ownership
With our multi-user feature, you can create and manage a team, giving them access to various aspects of your WordPress sites. As mentioned in our how user roles work article, there is a special role: the Company Owner.
This role is exactly the same as a Company Administrator in all but one respect; only Company Owners can close down an account or transfer company ownership (to a Company Administrator in the same account). Each company can have only one owner, but it is possible to transfer ownership between users.
Important notes
- Only the Company Owner can initiate a company transfer. You must be logged into MyKinsta as the Company Owner to transfer a company.
- The recipient must be a Company Administrator. The user you’re transferring the company to must have the Company Administrator role in their MyKinsta account.
- All site data and settings will be retained. When you transfer a company, you are changing the owner, not the sites; therefore, all of the sites and data within MyKinsta will remain as they are.
Transfer ownership
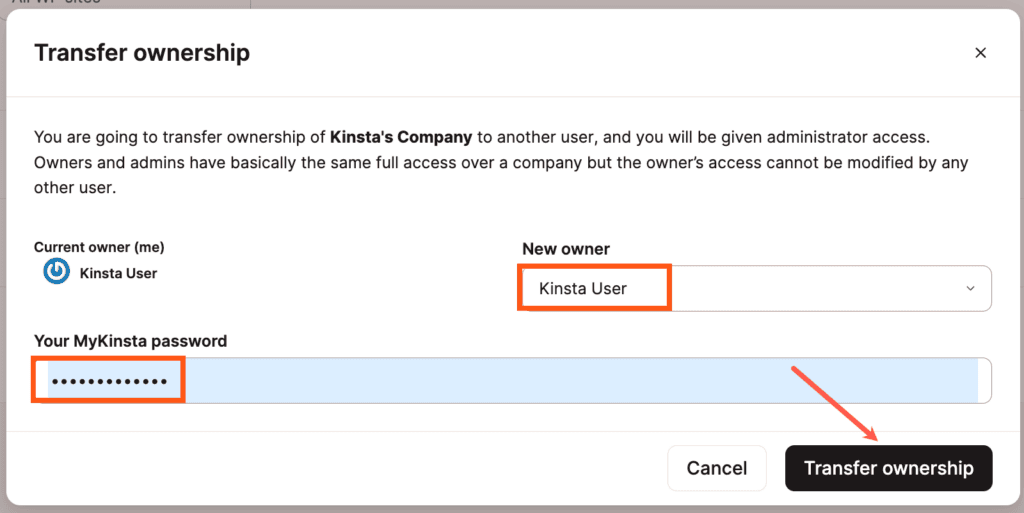
Log in to MyKinsta, then from the Dashboard, click Company settings, then Users. Click Transfer ownership on the right-hand side of your user’s row.
In the modal/pop-up that appears, select an available Company Administrator in the New Owner dropdown. Enter your password and click Confirm to transfer ownership.
Transfer a site to another company
There are several reasons why you may need to transfer a site to another company:
- You’re a WordPress agency that needs to hand off a site to a client’s personal Kinsta account.
- You’re a business owner who wants to transfer a site to a WordPress management company for routine maintenance.
- You’re moving on to another project and want to transfer your site to a third party.
To transfer any sites under your company in MyKinsta to another company’s account, follow the steps below.
Important notes
- Company Owners and Company Administrators can initiate a site transfer. You must be logged into MyKinsta as the Company Owner or Company Administrator to transfer a site.
- The recipient must be a Company Owner or Company Administrator. The user you’re transferring the site to must have the Company Owner or Company Administrator role in their MyKinsta account.
- All site data and settings will be transferred. This includes:
- SSH/SFTP settings
- Caching configuration
- Enabled features
- SSL certificates
- Domain settings
- DNS records managed in MyKinsta will also be transferred. If your DNS is managed through MyKinsta, those records will move with the site.
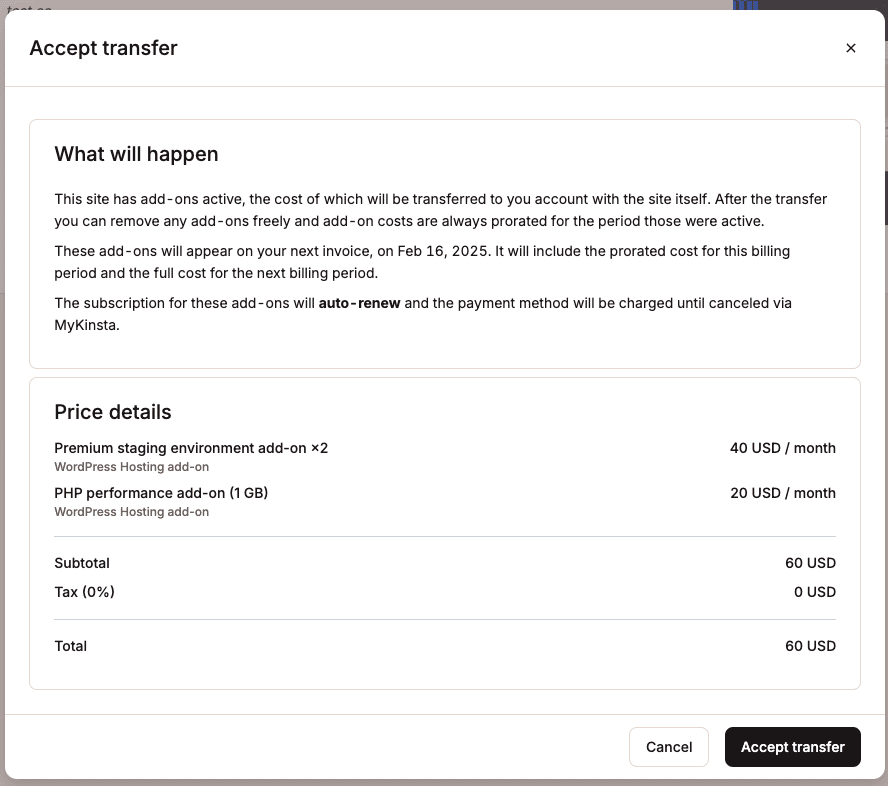
- PHP, Redis, and Premium staging add-ons are transferred with the site. Any active PHP, Redis, or Premium staging add-ons will automatically move to the new company along with the site. All other add-ons are disabled when the site is transferred.
- PHP performance is preserved during transfer. If the current site has a higher PHP memory pool than what’s included in the destination company’s plan, MyKinsta will automatically apply a PHP performance add-on to match the existing performance. For example, if your site currently uses a 2.5GB PHP memory pool and the new company’s plan includes only 1.5GB, a 1GB PHP memory add-on will be added automatically to preserve the original performance level.
1. Find the company ID or email address of the destination company
If you’re transferring the site to someone who already has an account and a Kinsta company, find the company ID or email address of the destination company’s owner or administrator. The company ID can be found in MyKinsta under Company settings > Billing details > Company ID. The email addresses of company users can be found under Users in MyKinsta.

If you do not have MyKinsta access to the destination company or do not know the email address of a company owner or company administrator, you’ll need to get in touch with the company directly to get the company ID or email address.
If you’re transferring the site to someone who doesn’t already have an account with Kinsta, get in touch with them to get the email address they want to use at Kinsta. As part of the transfer, they’ll need to set up an account and company at Kinsta.
2. Initiate the site transfer as the source company
The next step is to initiate the site transfer (both live and staging site environments) from the source company, which is your company.
To do this, navigate to Sites in MyKinsta, click the kebab (three-dot) menu for the site you wish to transfer, then select the Transfer site option in the dropdown menu that appears.

In the modal/pop-up that appears, enter the email address or company ID. You can also optionally choose a recommended plan for the site you’re transferring and enter your Affiliate ID (if applicable).
If you’re using Kinsta’s DNS for a domain assigned to the site being transferred, we recommend moving that as well. Under Transfer domain, select the relevant domain(s) and click the Next button to proceed to the confirmation step.
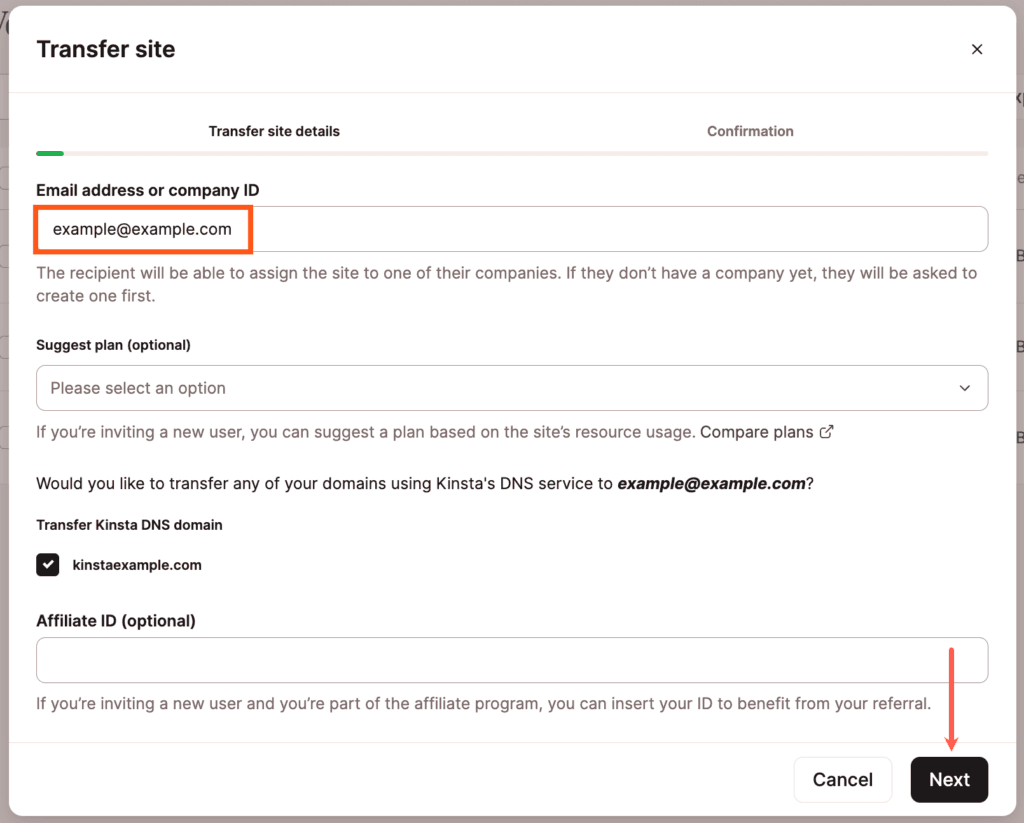
To confirm the site transfer, accept the following prompts:
- The site will be transferred from this company account.
- Transferring this site does not cancel the WordPress Hosting plan. This prompt only appears if the site you are transferring is the only WordPress site on your plan.
Enter the site name and click Transfer site. Once the site is transferred, you’ll have an open spot in your plan for a new site. If you also want to cancel your WordPress Plan, you can do this from within Company settings > My Plan > Cancel plan; refer to Cancel WordPress Plan.

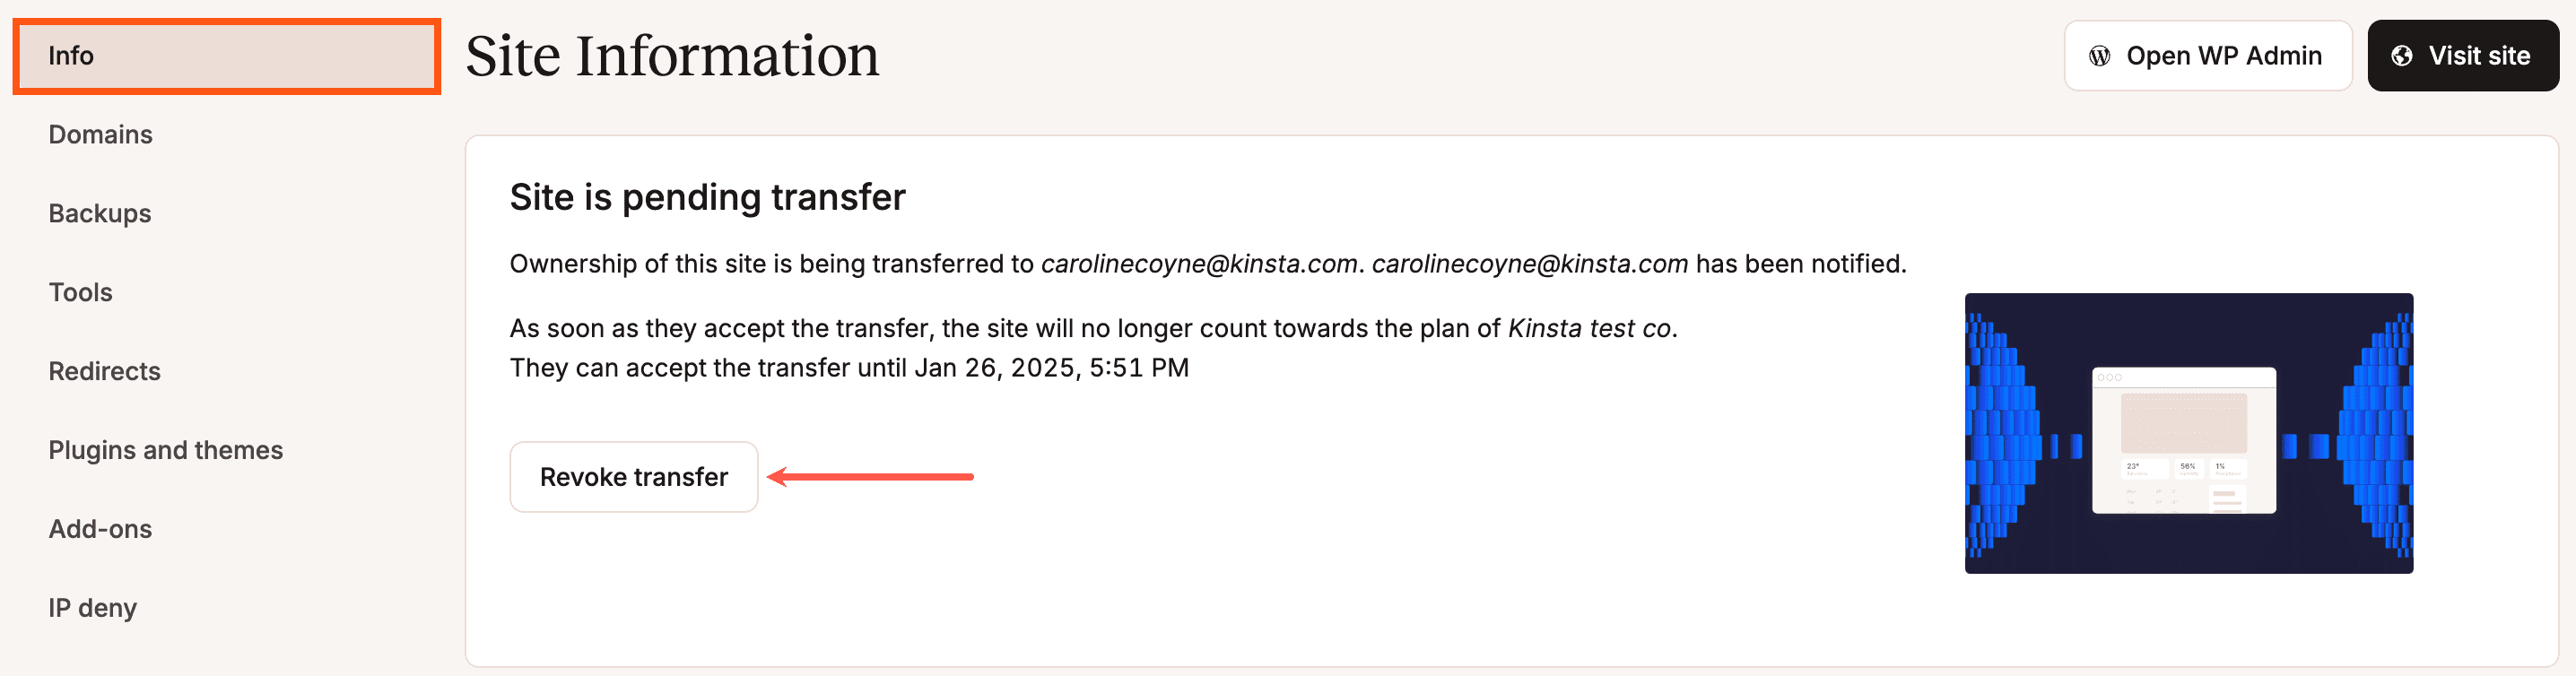
Next, the destination company will have to confirm the site transfer. In your MyKinsta account (the source company), the site will appear as Pending transfer for the company owner and company administrator(s).

Note: Until the destination company accepts the site transfer, you can revoke the transfer in Sites > sitename > Info.
3. Finalize the site transfer with the destination company
After you’ve initiated the site transfer, the company owner and company administrator(s) of the destination company will receive a notification email.
Here’s how things look on their end, depending on a few factors:
- If you recommended a plan.
- If the recipient already has a Kinsta account.
- If the recipient has more than one company.
No Kinsta account, no plan recommended
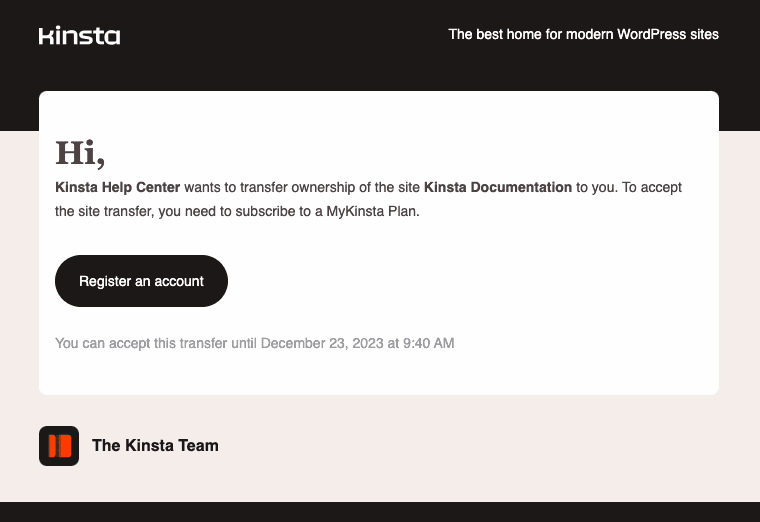
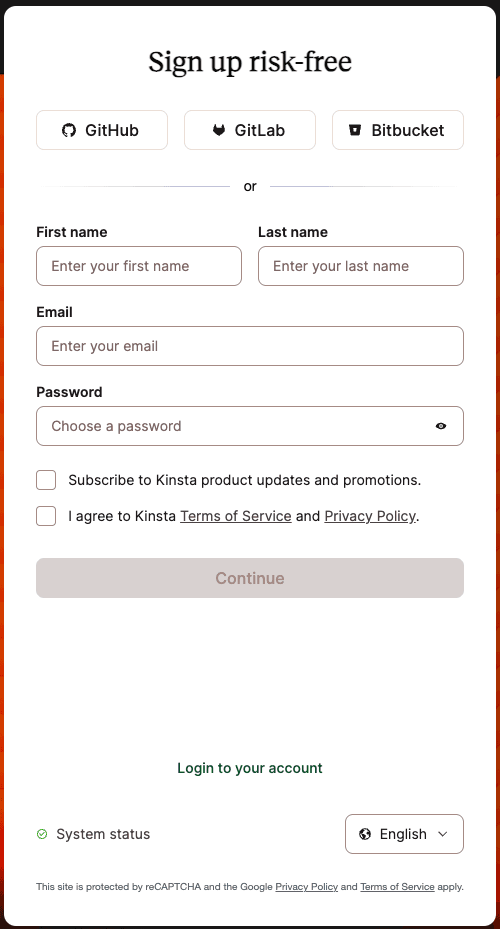
If no plan is recommended, clicking on the Register an account button will take them to the Kinsta plans page, where they can select their plan and then begin the signup process.

No Kinsta account, plan recommended
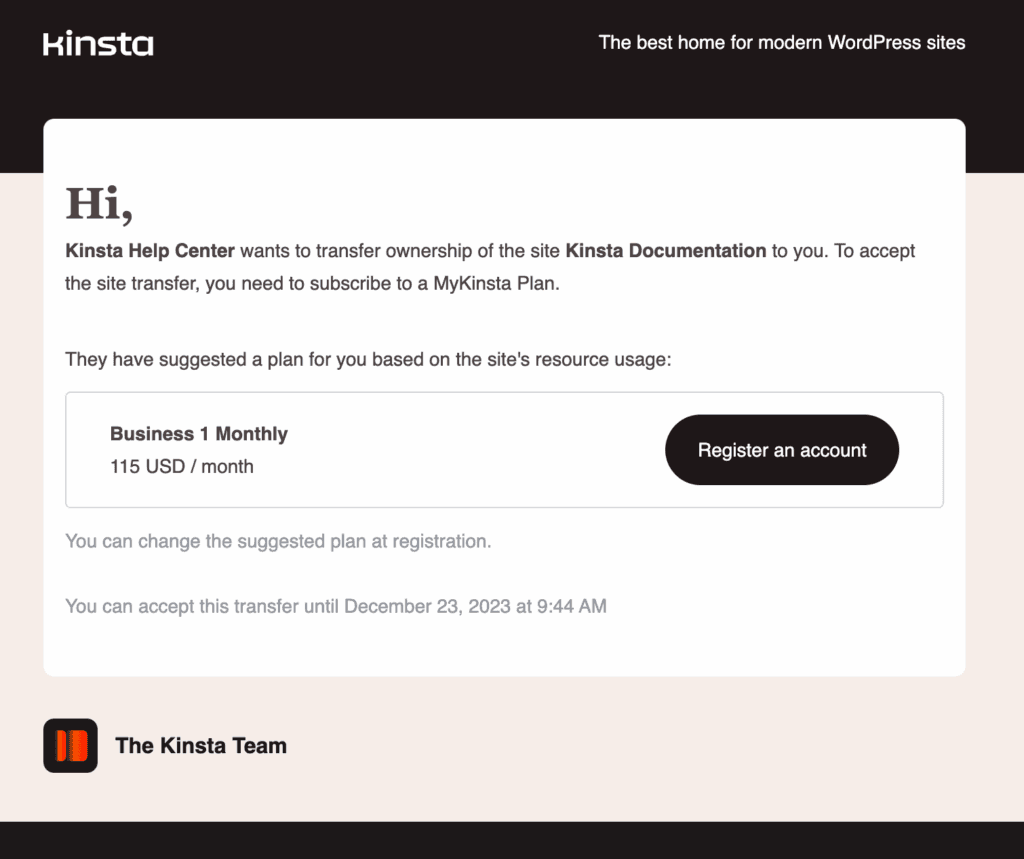
If a plan is recommended, clicking on the Register button will take them to the signup page where they can set up their Kinsta account.
Kinsta account with multiple companies
If the accepting user already has a Kinsta account, they have the option to transfer the site to any of their companies or transfer the site to a new company.
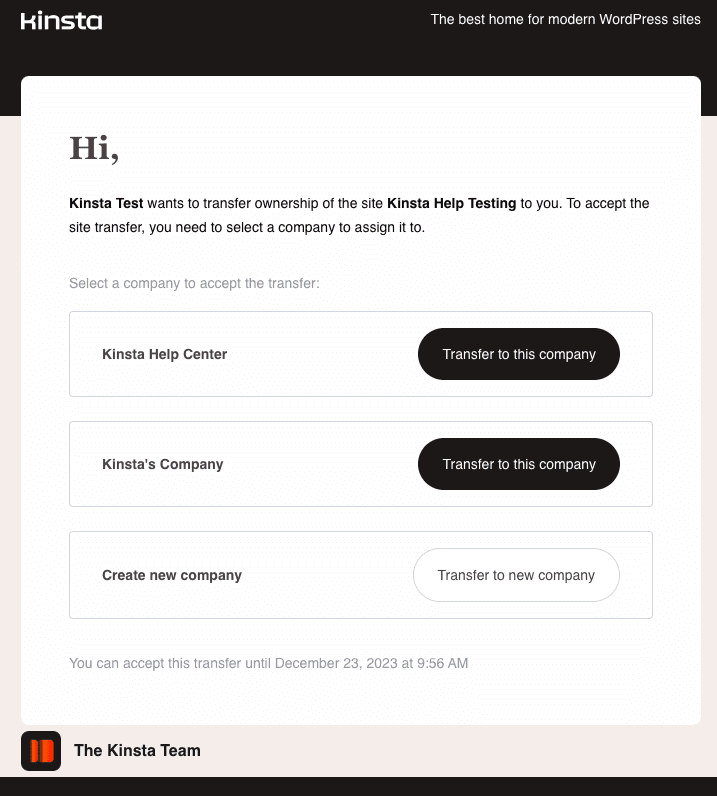
Clicking the Transfer to this company button will take them to the company’s WordPress Sites list in MyKinsta.
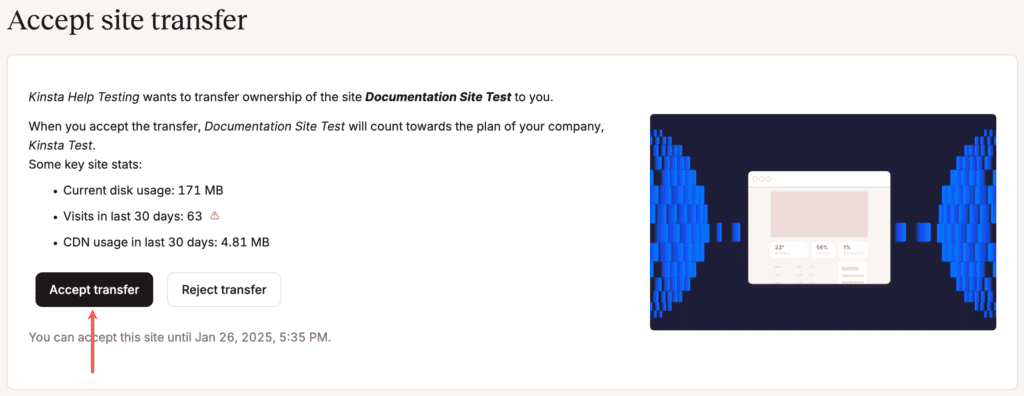
Accepting the transfer in MyKinsta
The site being transferred will appear as an Incoming transfer. Clicking on the site name will give them the option to accept or reject the transfer.

To commit the site transfer they should click on Commit transfer in MyKinsta. If they do not want to accept your request, they can dismiss it by clicking on Reject transfer instead.
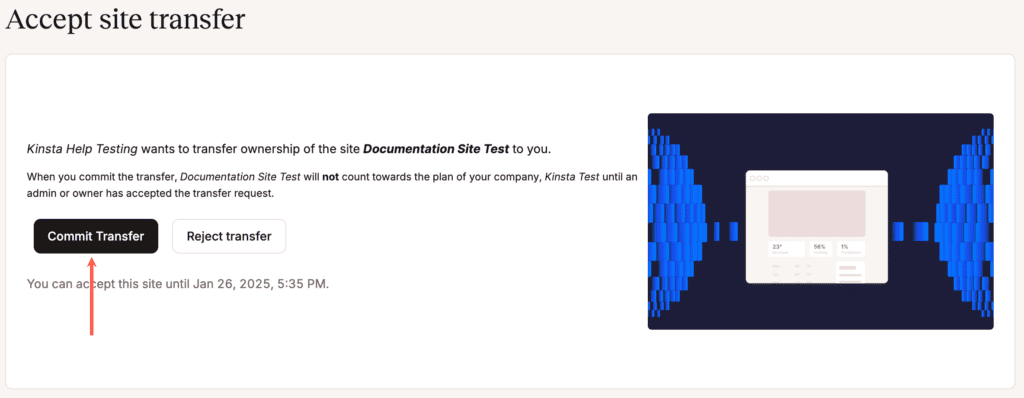
To accept the transfer after committing to it, they should click Accept transfer.
If the site being transferred includes active add-ons, the receiving company will see which add-ons are active. They must accept the transfer with the add-ons. If the add-ons are no longer needed, they can cancel them after the transfer is complete.
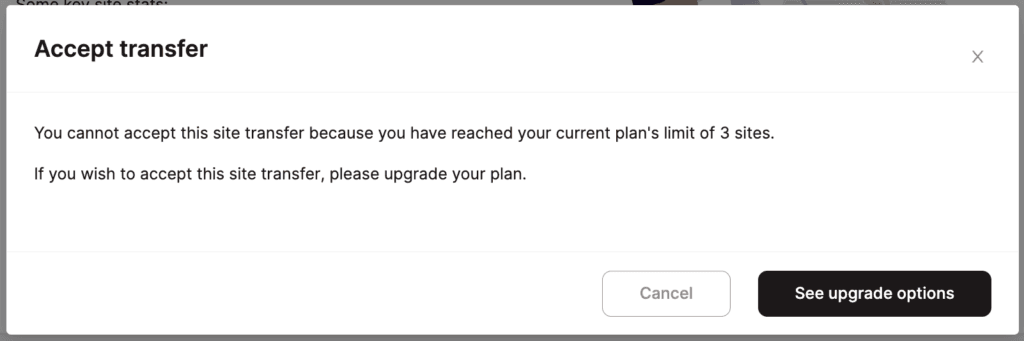
If the destination company’s plan does not have enough sites or KinstaDNS slots to receive the incoming site, they’ll be prompted to upgrade their plan after accepting the transfer.
If they click Cancel without rejecting the transfer, they’ll still be able to accept it within 72 hours.
After the site transfer is accepted, you (the source company’s owner) and any company administrator(s) — will receive a notification email.