SSL Certificates
If you are running an ecommerce site, accepting credit cards, or passing information that needs to be encrypted, you’ll need an SSL certificate for your WordPress site. Having an SSL certificate will allow you to enable HTTPS, which ensures that no information is passed in plain text. In fact, we recommend all sites utilize HTTPS, as it has a lot of additional benefits beyond security.
At Kinsta, you have two options for your site’s SSL: a free Cloudflare SSL or a custom SSL that you purchase yourself.
Option One — Free Cloudflare SSL
All verified domains at Kinsta are automatically protected by our Cloudflare integration, which includes free SSL certificates. After you’ve added your domain, your site is automatically secured by this certificate. For our Managed WordPress Hosting plans, the free SSL certificates also include wildcard support. Kinsta currently enables TLS 1.3 on all SSL certificates, which is secure and supported by all major browsers. For more information about TLS, refer to TLS vs SSL: What’s the Difference? Which One Should You Use?
Unless you have a specific reason to add a custom SSL, you can take advantage of our easy one-click solution, and you won’t have to worry about manually configuring and updating the SSL certificate on Kinsta.
Renew free Cloudflare SSL certificate
If you’re using our free Cloudflare SSL certificate, Kinsta automatically handles the renewal process. When you add and verify your domain in MyKinsta, you need to add a CNAME record for _acme-challenge. Kinsta uses this DNS entry to update the domain with the necessary tokens for each renewal. As long as the _acme-challenge CNAME record exists in your DNS, you won’t need to manually renew your SSL certificate; Kinsta manages it for you. This SSL certificate includes wildcard support, covering an unlimited number of subdomains for that domain.
Wildcard SSL certificates add an asterisk (*) before your domain name as a placeholder, which can be interpreted as any string of characters. This certificate covers both the ‘www’ and non-’www’ variations of a domain. For example, if your primary domain is yourwebsite.com, our wildcard certificate would also work with the following domains:
- www.yourwebsite.com
- news.yourwebsite.com
- blog.yourwebsite.com
- shop.yourwebsite.com
If you haven’t added the CNAME DNS record for _acme-challenge or have removed it, you need to re-add this CNAME record to your domain for the SSL renewal process to work. You’ll receive an email message and a notification in MyKinsta 30 days before your SSL expires to let you know your SSL certificate is expiring soon. Go to the site’s Domains list and click Renew SSL next to the domain.

This shows the CNAME record you need to add to your domain’s DNS. Log in to your DNS provider’s management panel and add the CNAME record to your domain. Your DNS provider is where your domain’s name servers are pointed. This may be your domain’s registrar, but it could be another DNS provider. If needed, you can refer to your provider’s documentation for more information on adding DNS records.
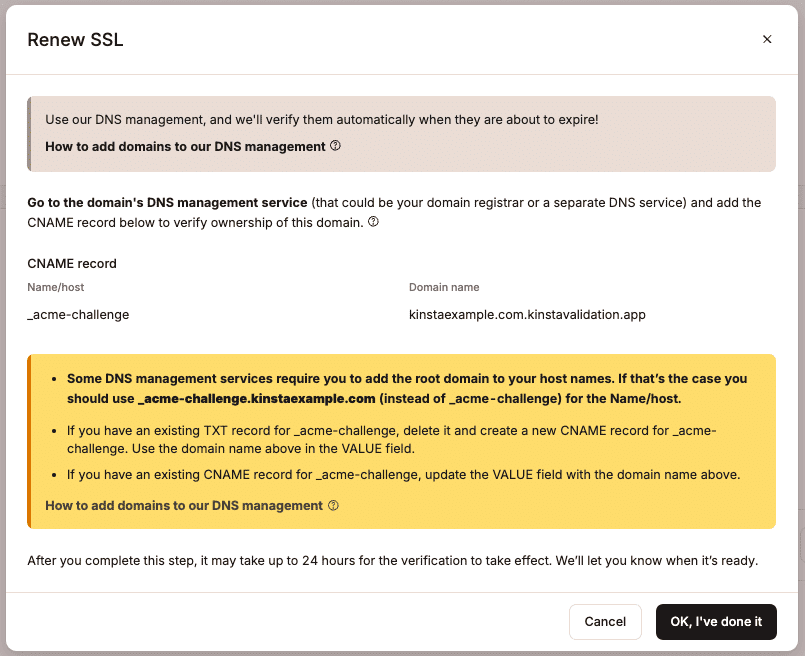
Depending on your DNS provider, the CNAME records may take up to 24 hours to propagate. After a successful domain verification, you’ll receive an email message and notification in MyKinsta, letting you know your SSL certificate has been renewed.
Renewing an expired certificate
If you’re unable to add the CNAME record to your domain before your SSL certificate expires, you’ll receive another email message and notification letting you know your certificate has expired and you need to renew it. The steps to renew an expired certificate are the same as adding a CNAME record for renewal above.
Troubleshooting the Fix domain error
During the SSL renewal process, if a Fix domain error button appears next to the domain, this means a CAA record conflict is occurring.
A CAA record is an optional DNS record that lets you specify which certificate authorities (CAs) are allowed to issue SSL certificates for your domain. If a domain has no CAA records, any CA can generate an SSL certificate for it if requested. If a domain has a CAA record, only the CA(s) specified in the CA record can generate an SSL certificate for the domain.
To resolve this error, click the Fix domain error button and update the CAA record as indicated in the modal/pop-up. Alternatively, if you do not need a CAA record on your domain, you can remove the CAA record.
Option Two — Custom SSL certificate
For users who prefer to go the custom SSL route, Kinsta also supports custom SSL certificates.
1. Obtain custom SSL certificate
There are three ways to obtain your custom SSL certificate:
- If you have a custom SSL certificate and have access to the certificate and key, you can transfer the SSL certificate from your previous server.
- If you have a custom SSL certificate but do not have access to the certificate and key, you can have the SSL certificate regenerated by your SSL provider.
- If you do not yet have a custom SSL certificate but want to install one on your site, you can purchase a new SSL one from any vendor you like, such as Comodo, DigiCert, GeoTrust, Thawte, or Trustwave.
Transfer an SSL certificate from another server
To transfer an SSL certificate you installed on another server, you’ll need to get a copy of your SSL certificate and the certificate’s private key. This private key is created when you generate your CSR and is installed on the server.
If your site is coming from a host that uses cPanel, these can typically be extracted from cPanel directly or from the file manager. If your previous host doesn’t use cPanel, their support team may be able to assist you with getting a copy of your SSL certificate.
Regenerate a custom SSL certificate
If you’ve misplaced or do not have access to your certificate’s private key, you’ll need to generate a new CSR and private key (as explained below for purchasing a new certificate). Then, contact your SSL provider to have the SSL certificate regenerated with the new CSR.
Upload only your CSR with your SSL provider to generate your SSL certificate (.cert file). Once you receive your SSL certificate from your provider (usually a .crt or .cer file and a .ca-bundle file), you can install it in MyKinsta.
Purchase a new SSL certificate
When you purchase your new SSL certificate, you’ll be asked to provide the server type. Our web server type is Nginx. If that option is not available, then “Apache” or “Other” will also work.
The SSL provider will need a CSR (Certificate Signing Request) to create/sign the certificate file. For generating a CSR and RSA key (together known as a key pair), please complete this form: Online CSR and Key Generator.
We recommend filling out every field, but at a minimum, you should fill in the following, as seen in the example below:
- Common name (domain name)
- Email Address
- Organization
- City / Locality
- State / County / Region
- Country
Note: For the common name field, if you’re generating a wildcard certificate, you’ll need to input your domain name like *.domain.com.
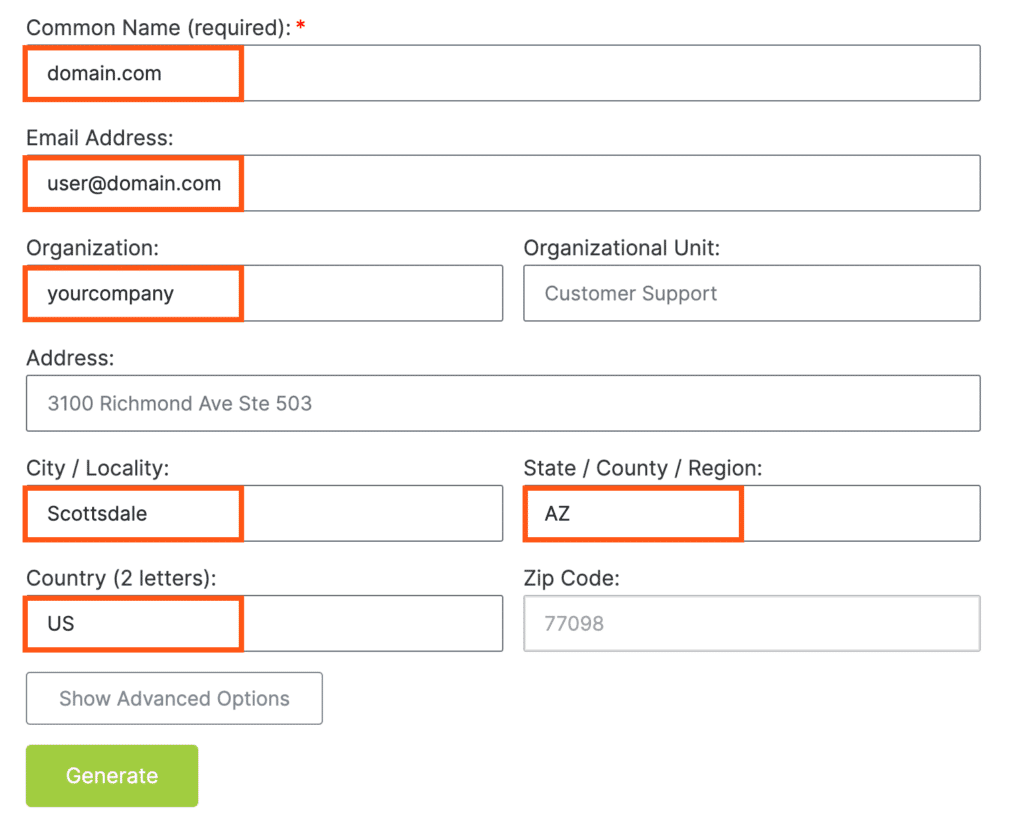
The form will generate the Private Key file and the CSR. Save both of those, as the certificate will be unusable without them.

Upload only your CSR with your SSL provider to generate your SSL certificate (.cert file). Once you receive your SSL certificate from your provider (usually a .crt or .cer file and a .ca-bundle file), you can install it in MyKinsta.
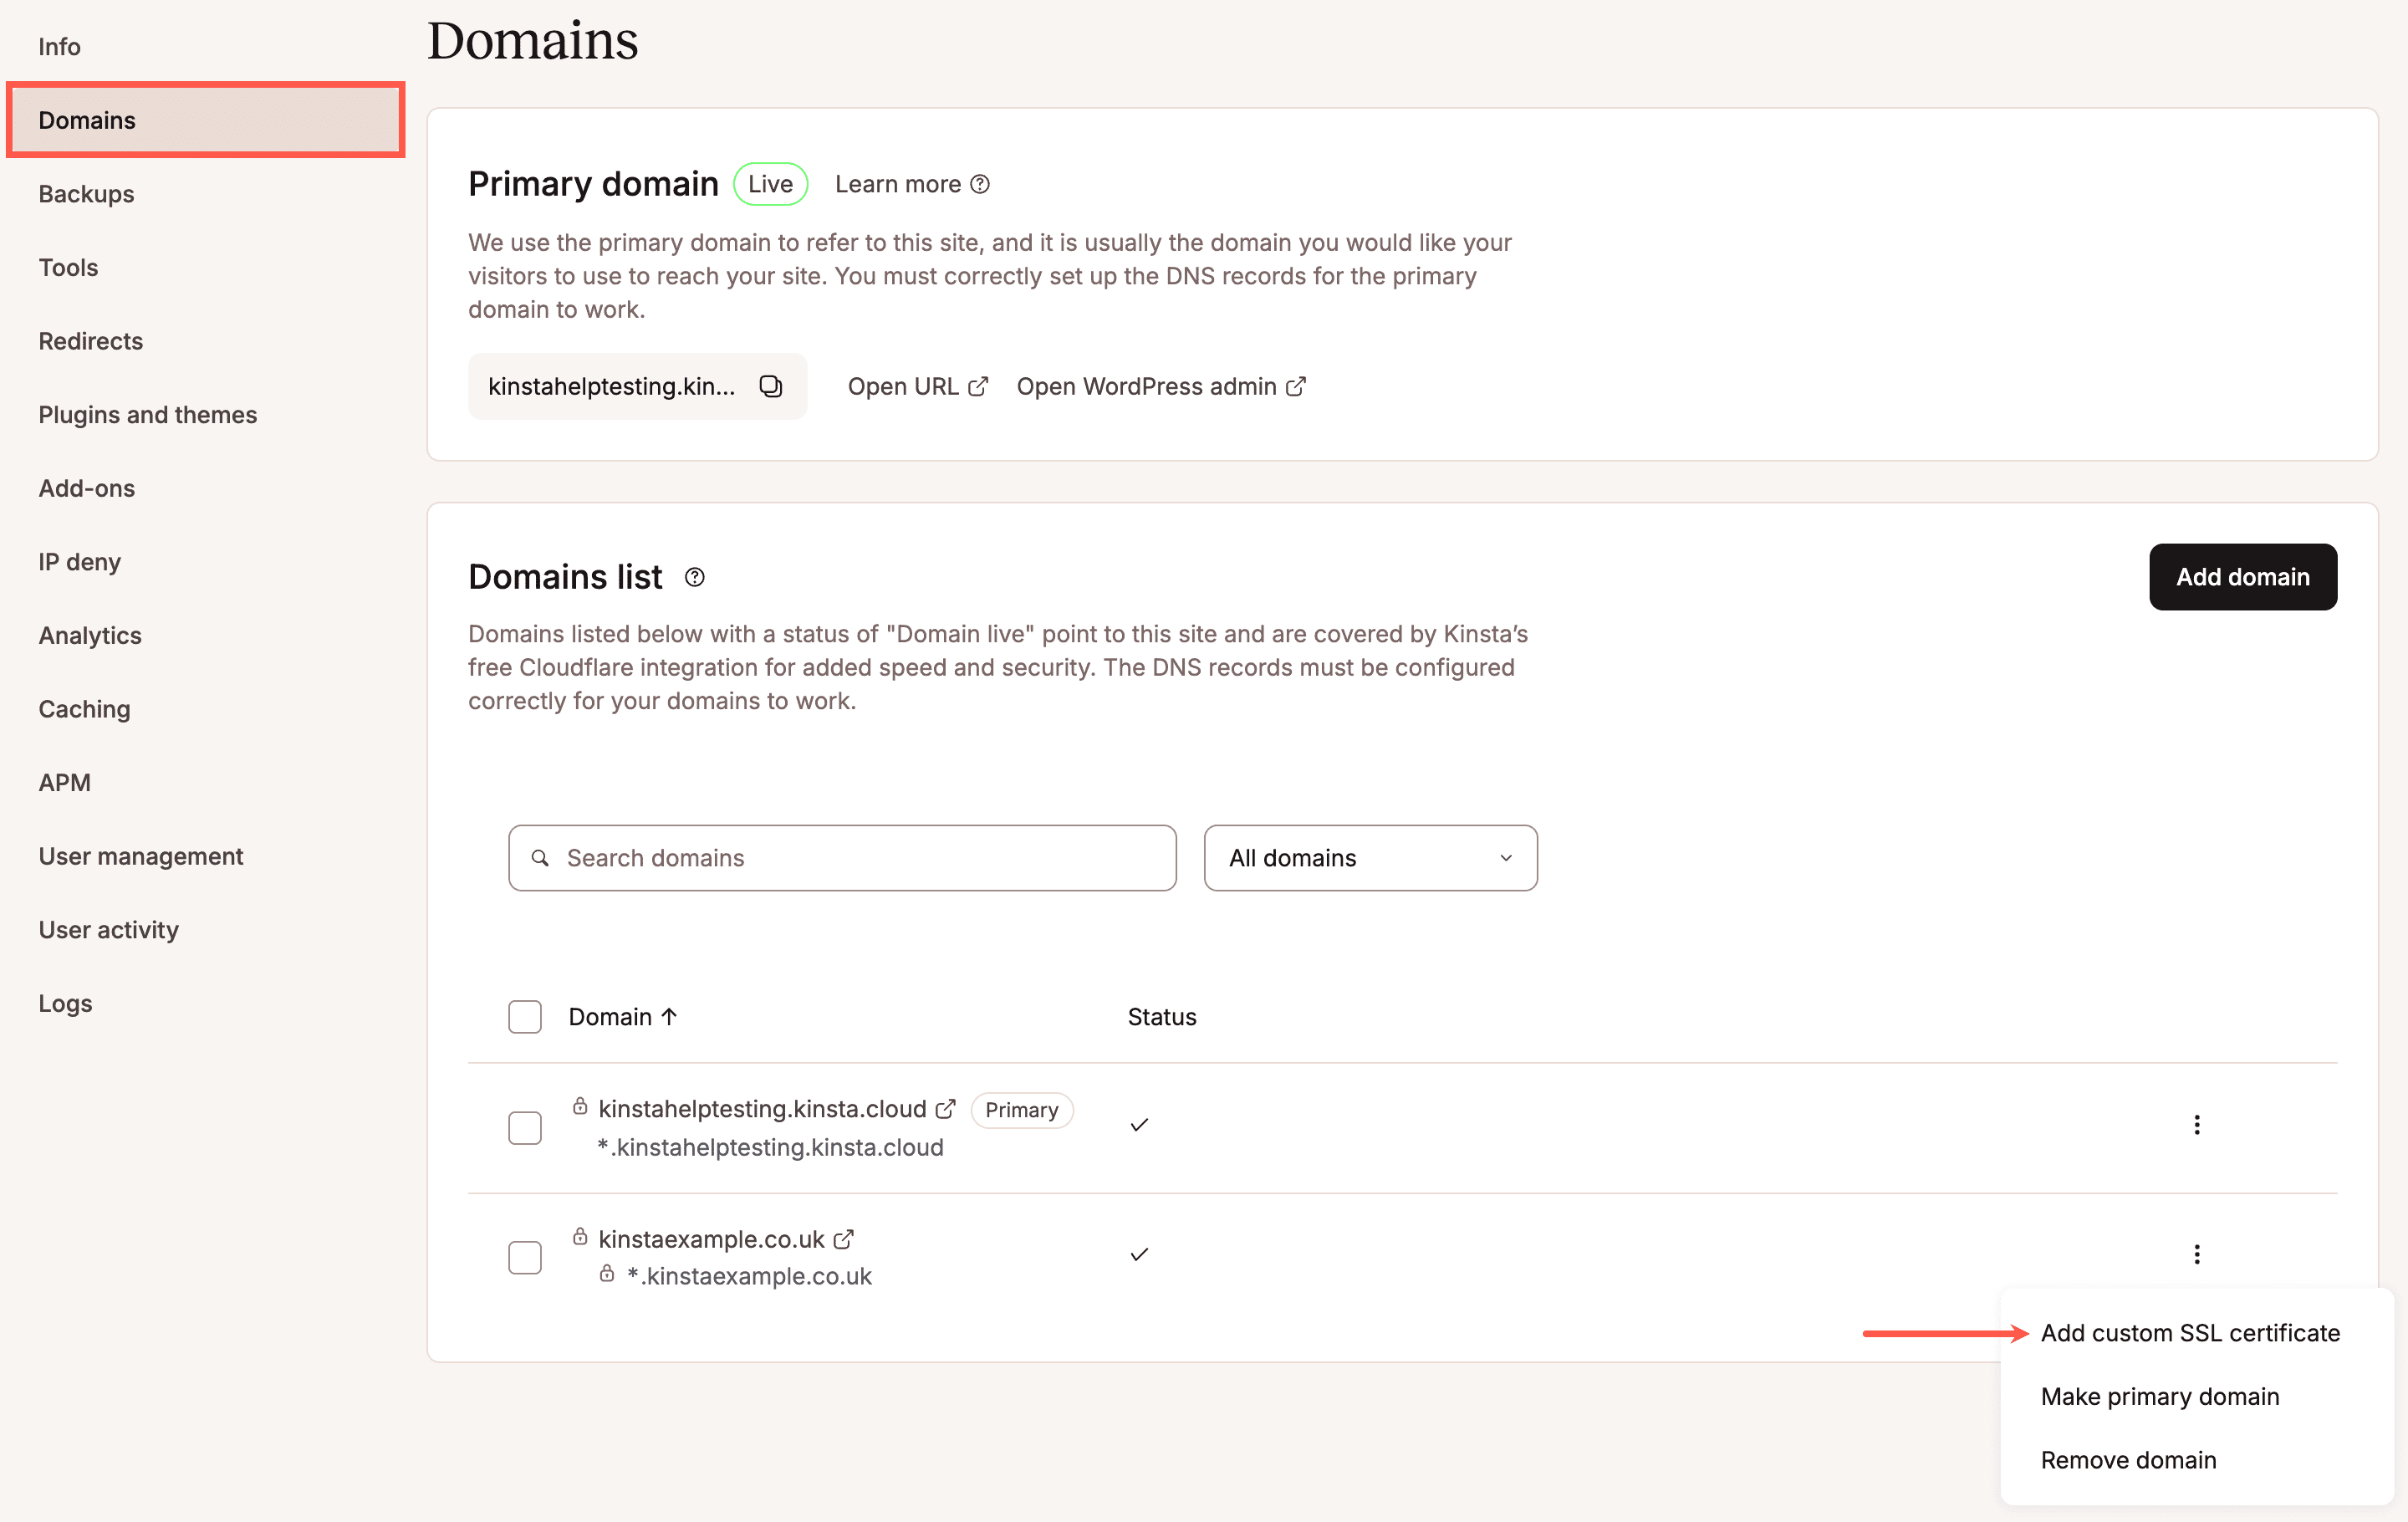
2. Install custom SSL certificate
Navigate to Sites > sitename > Domains. Click the kebab (three-dot) menu for the domain you want to add a custom SSL certificate to and select Add custom SSL certificate from the dropdown menu.
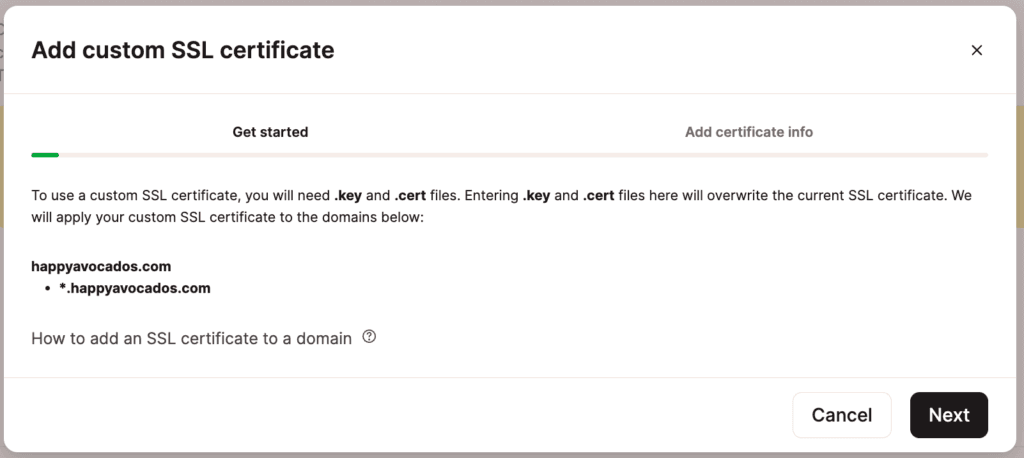
Confirm domains covered by the SSL
Next, you’ll see a confirmation modal showing the domains that the custom SSL will cover. Click the Next button to proceed to the next step.
Add SSL and private key
You will then be able to add your private key (.key) and certificate (.cert, .cer., or .crt file).
Most SSL providers will email you a .crt or .cer file and a .ca-bundle file; however, you may receive a different file, such as .pem. You can use a text editor like Notepad++ or TextMate to open the certificate and bundle files. Whichever file you receive, the private key is the string within -----BEGIN PRIVATE KEY----- and -----END PRIVATE KEY----- and the certificate is the string within -----BEGIN CERTIFICATE----- and -----END CERTIFICATE-----.
Paste the contents of your certificate file in the .cert file contents field first and then the contents of the .ca-bundle file below that in the same field.
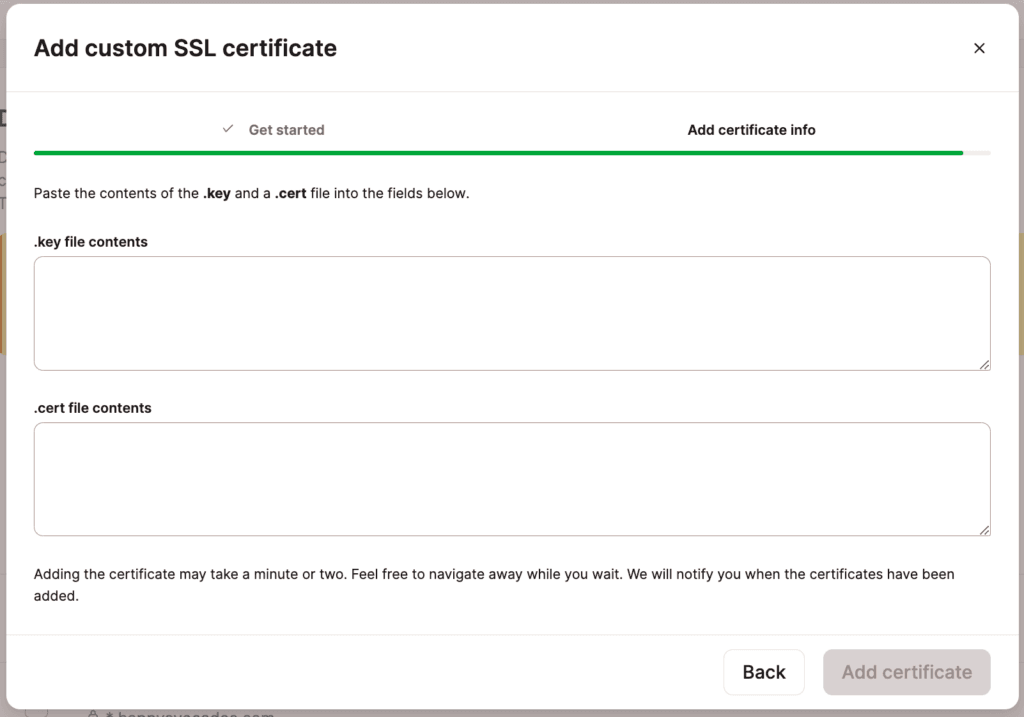
Click the Add certificate button to finalize the configuration process.
Check your SSL certificate
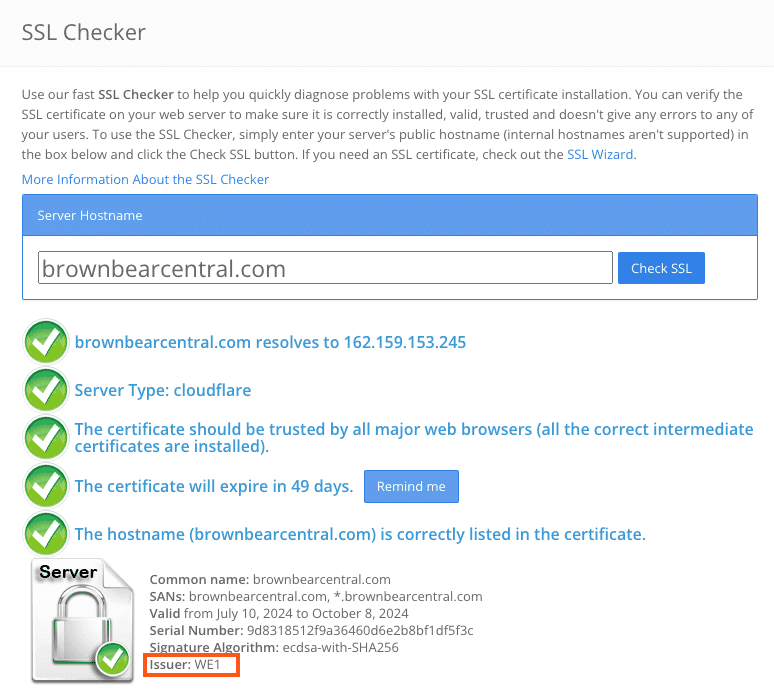
After you have installed your SSL certificate, we recommend running an SSL check to verify that everything is set up correctly. An invalid SSL certificate can cause your visitors to be faced with the “your connection is not private” error.
Renew custom SSL certificate
An SSL certificate doesn’t last forever, so it will need to be renewed before it expires. If you’re using Kinsta’s free SSL certifications you’ll receive an email message and a notification in MyKinsta 30 days before your SSL expires. However, if you’re using a custom SSL certificate, we do not send expiration notifications. You should check with your SSL provider for expiration details.
If you’re not sure if your site is using our free Cloudflare SSL certificate or a custom SSL certificate, there are a couple of ways you can check to see who the issuer is. If the issuer’s name is anything other than Cloudflare, your site is using a custom SSL certificate.
To check the issuer name, view the certificate in your browser and look for the Organization in the Issuer Name section, or use a tool like SSLShopper’s SSL Checker and view the Issuer information.
If you have a custom SSL certificate, you’ll need to renew it with the SSL provider from which it was purchased.
Once your SSL is renewed and you receive the updated files from your SSL provider, you must remove the current SSL certificate and add the new one. When you remove the custom SSL certificate, your site is still secure, as Kinsta’s Cloudflare integration includes free SSL certificates and is automatically secured by this certificate when no custom SSL is in place.
To remove your current SSL certificate, in MyKinsta, click Sites > sitename > Domains. Click the kebab (three-dot) menu for the domain you want to remove the custom SSL certificate from and select Remove custom SSL Certificate from the dropdown menu.
To add your new SSL certificate, within Sites > sitename > Domains. Click the kebab (three-dot) menu for the domain you want to add a custom SSL certificate to and select Add custom SSL certificate from the dropdown menu. Click Next, add your private key (.key) and certificate (.cert, .cer., or .crt file), and click Add certificate.
Redirect HTTP to HTTPS in MyKinsta
We’ve made redirecting all of your HTTP traffic to HTTPS as easy as possible in MyKinsta.
- Log in to MyKinsta, select your site, and click on Tools.
- Under Force HTTPS, click the Enable button.

Enable Force HTTPS in MyKinsta. - In the Enable Force HTTPS modal/pop-up that appears, you can choose to force HTTPS on all live domains or force HTTPS and redirect all traffic to your primary domain. Click Force HTTPS to confirm the change.

Choose how you would like to handle HTTP visits and confirm enabling Force HTTPS. - This step is optional since forcing HTTPS will handle redirecting to HTTPS, but if you want to make sure all URLs in your database are using HTTPS, you can use the Search and replace tool in MyKinsta to update those.
- Lastly, another optional step is to check your URL’s HTTP status and redirect chain with our free HTTP status and redirect checker.