A WordPress featured image functions as a visual welcome card, a cue to visitors to come on in and enjoy what’s behind a link. It often presents useful information in the form of a photograph or graphic image, granting the user a sneak peek into the information behind that link.
Furthermore, an engaging story isn’t complete without the introduction, and that’s exactly the purpose of a featured image. It greatly benefits the website by turning what could very well be a dull website into something beautiful. It also helps break up the monotony of text and adds life to your content.
This article shows you how you can fix WordPress featured images not showing properly on your website. There are many ways to go about it, and we’ll cover them all.
Let’s begin!
Check Out Our Video Guide to Fixing the Missing WordPress Featured Image
What Is a WordPress Featured Image?
By default, WordPress offers a featured image for all posts and pages.
This means you can upload an image that acts as the post or page’s cover media, similar to a book or magazine cover. You can upload a featured image to every post and page. It is then presented as the primary image for that website item whenever the article gets shared on social media and other sites.
Finally, the featured image shows up automatically when you create a feed or gallery of your blog posts or other webpages. This way, you’re able to present somewhat of a media portfolio for your posts instead of a bunch of links with only text.
You don’t have to upload a second version of that same image every time you share—it’s already pulled from the original content.
What if the Featured Image Doesn’t Work?
Featured images are wonderful, but you may find that you’re unable to see a featured image for a post or page for one reason or another. Sometimes there’s a problem with your theme, and other times you’ll find that a plugin is causing the issue.
It’s also common to see varying degrees of featured image problems. For instance, you may notice that the featured image appears nicely on your own website, but it has trouble rendering when a post is shared to a social site like Facebook.
Regardless, a WordPress featured image not showing up is both frustrating and concerning.
Featured images often carry the weight of your website’s visual appeal. Without automated featured images, you’re left with blocks of text and links to webpages. It can also prevent people from sharing your work, considering it’s not all that appealing to share a blog post on Facebook that doesn’t have a featured image.
There are several steps you can take to mitigate the problems:
- Note the exact issue, like if the image isn’t uploading. Or if the featured image fails to show up on social media, but it’s working fine on your website.
- Consider any WordPress issues that may be causing the problem with your featured image, like conflicts between plugins or a coding error.
- Think about installing a plugin that resolves problems for featured images without you having to do much work.
That’s a simple three-step process, but there’s much more detail behind fixing your featured images. Featured images break for various reasons, and it’s often on a case-by-case basis.
Below we’ll cover every problem we know of when it comes to featured images and outline the steps you can take to fix them.
Why Is My WordPress Featured Image Not Showing?
You’ve noticed something wrong with one, or all, of your featured images. Where do you go from here?
We’ve outlined both common and uncommon problems with featured images. Let’s start with the simplest of solutions, making sure you’re uploading your featured images properly. Then we’ll go deeper into other errors.
Make Sure You Know How To Upload a Featured Image in WordPress
It may sound silly to some, but many WordPress beginners don’t know how to upload a featured image in the first place. But that’s fine, as we all start learning somewhere.
We recommend you follow these steps to ensure you’re doing it the right way.
Note: You can upload WordPress featured images to posts and pages, but that basic rule expands once you start adding things like WooCommerce product pages and custom post types. For simplicity, we’ll stick to uploading featured images to regular WordPress posts and pages – but if you’re interested in learning more, here’s a complete WooCommerce SEO guide that covers this & everything else, including Schema Markup up for your products and more.
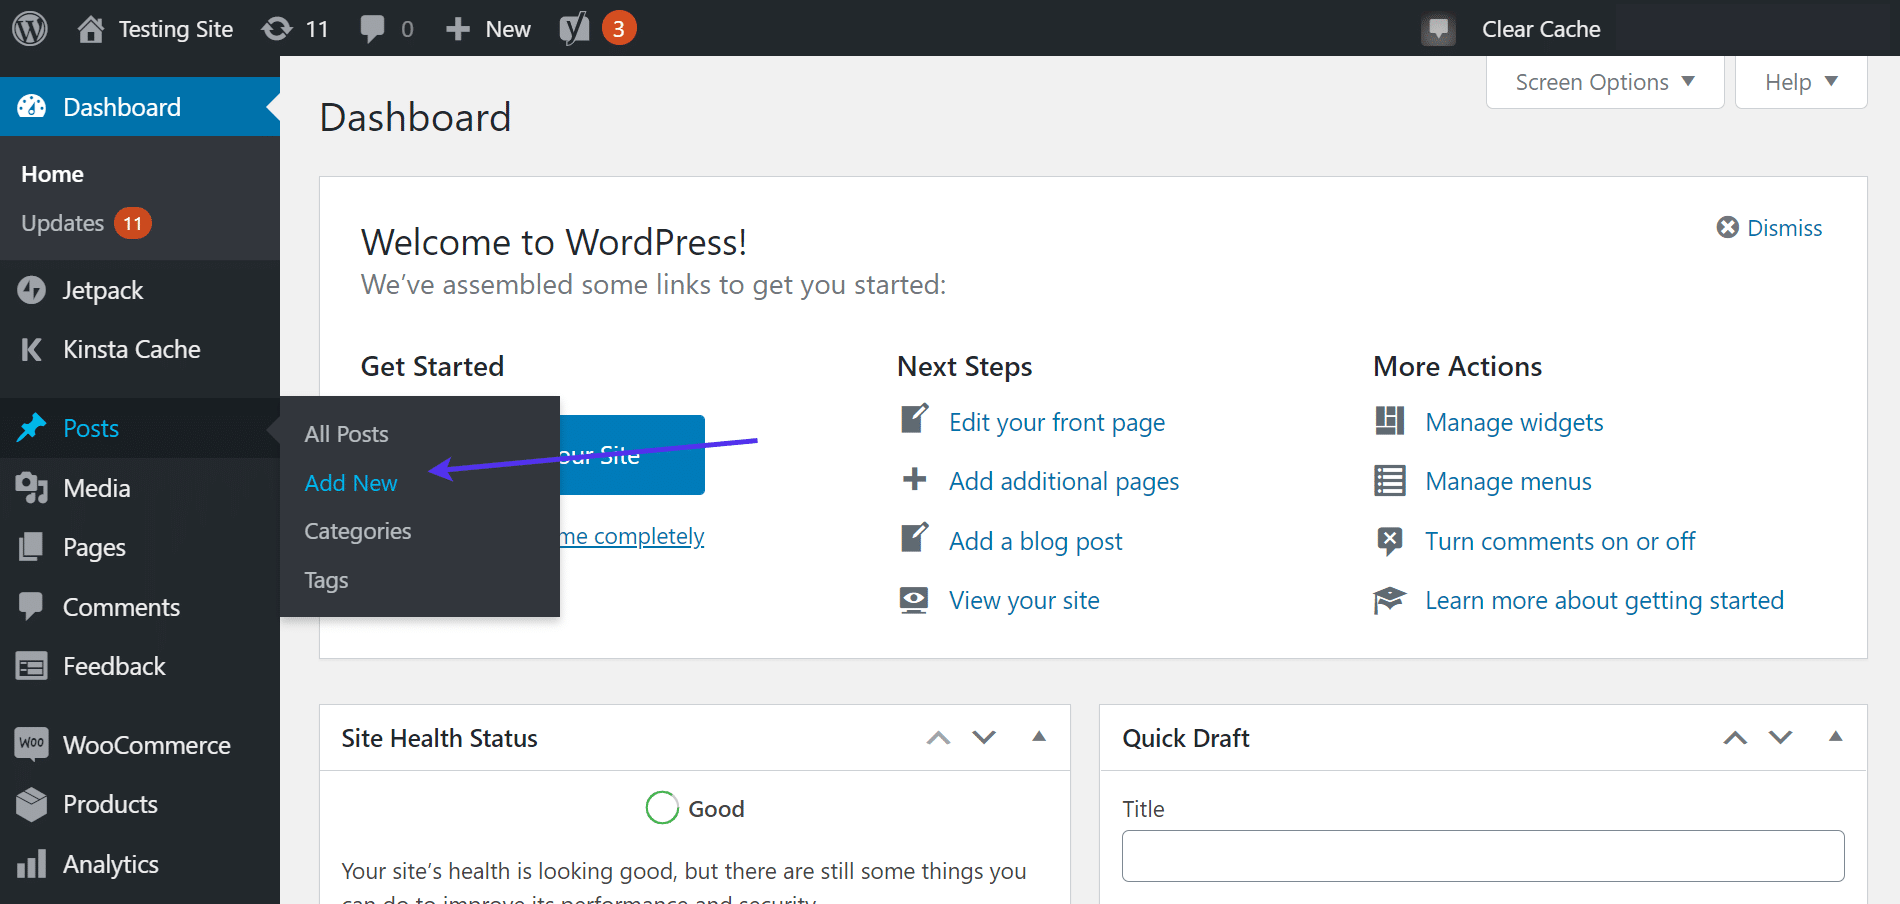
To begin, go to your WordPress dashboard. Go to Posts > Add New to create a new blog post. You can also do this with pages or click on the All Posts option if you’re interested in adding a featured image to a previously generated post.
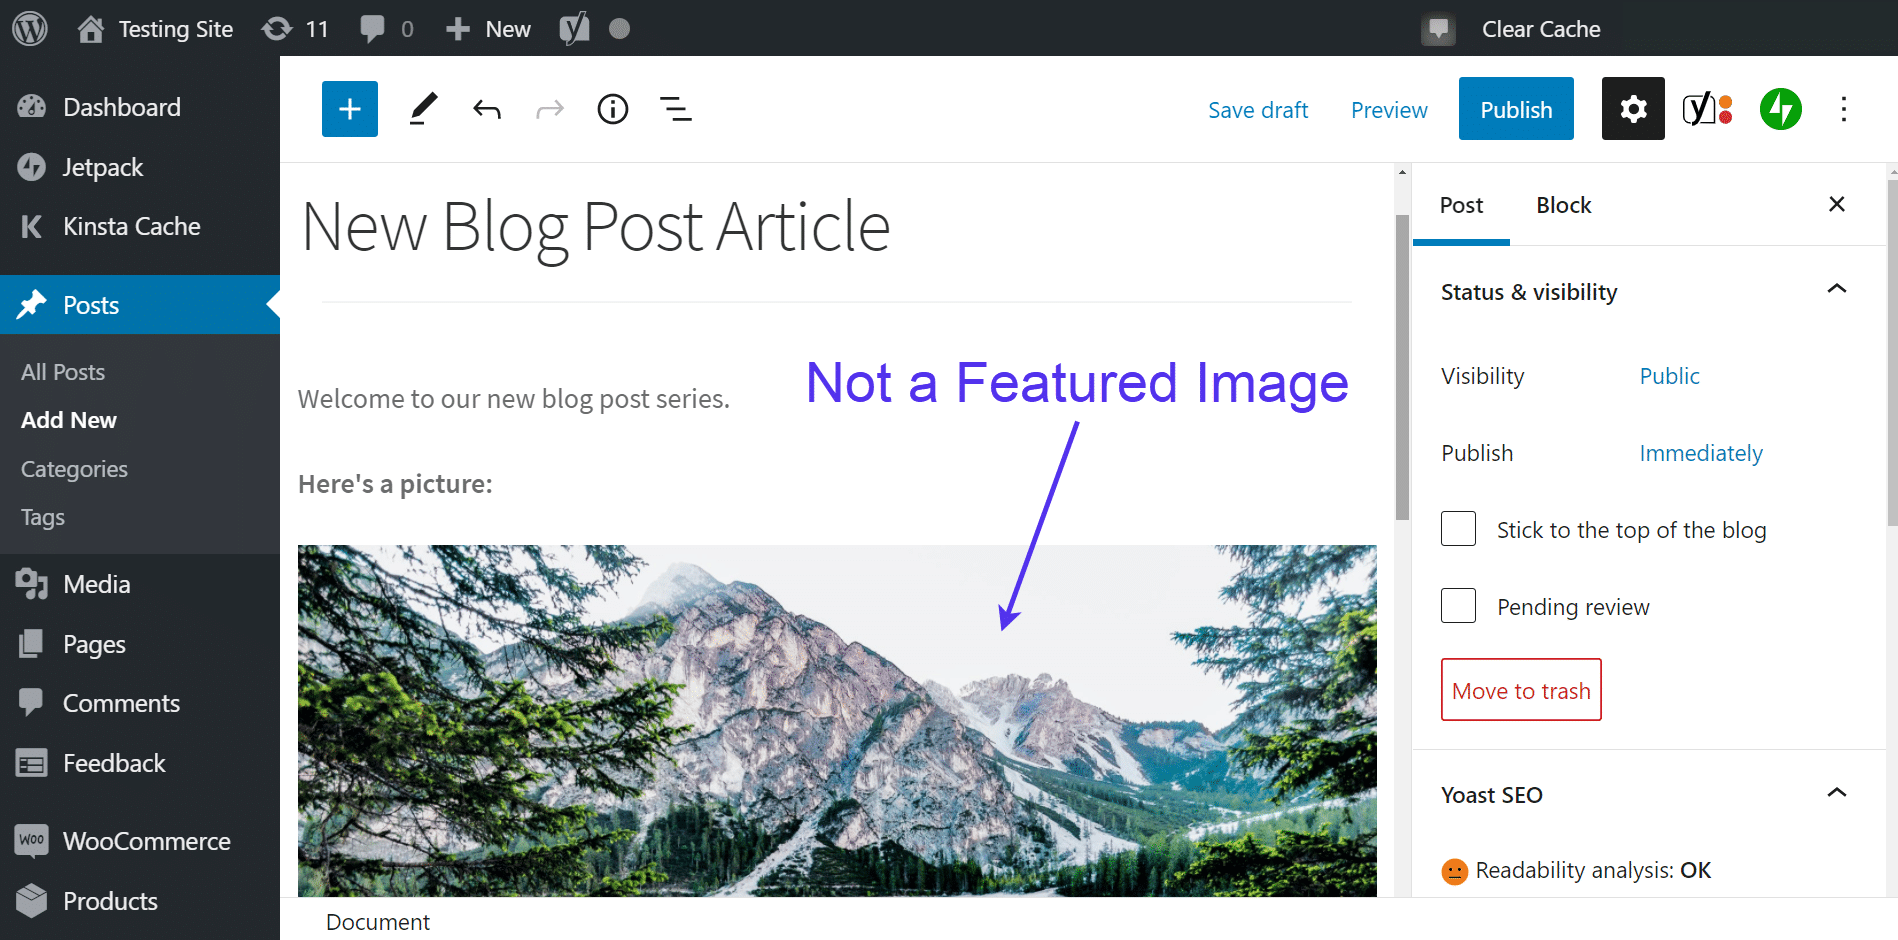
Insert any content you want for the blog post. Fill in the title, write paragraphs, and upload images to the article.
However, keep in mind that an image uploaded to your blog post’s content area doesn’t have anything to do with the featured image, even if it’s the first photo you upload to that article.
There’s a completely different section that handles the featured image.
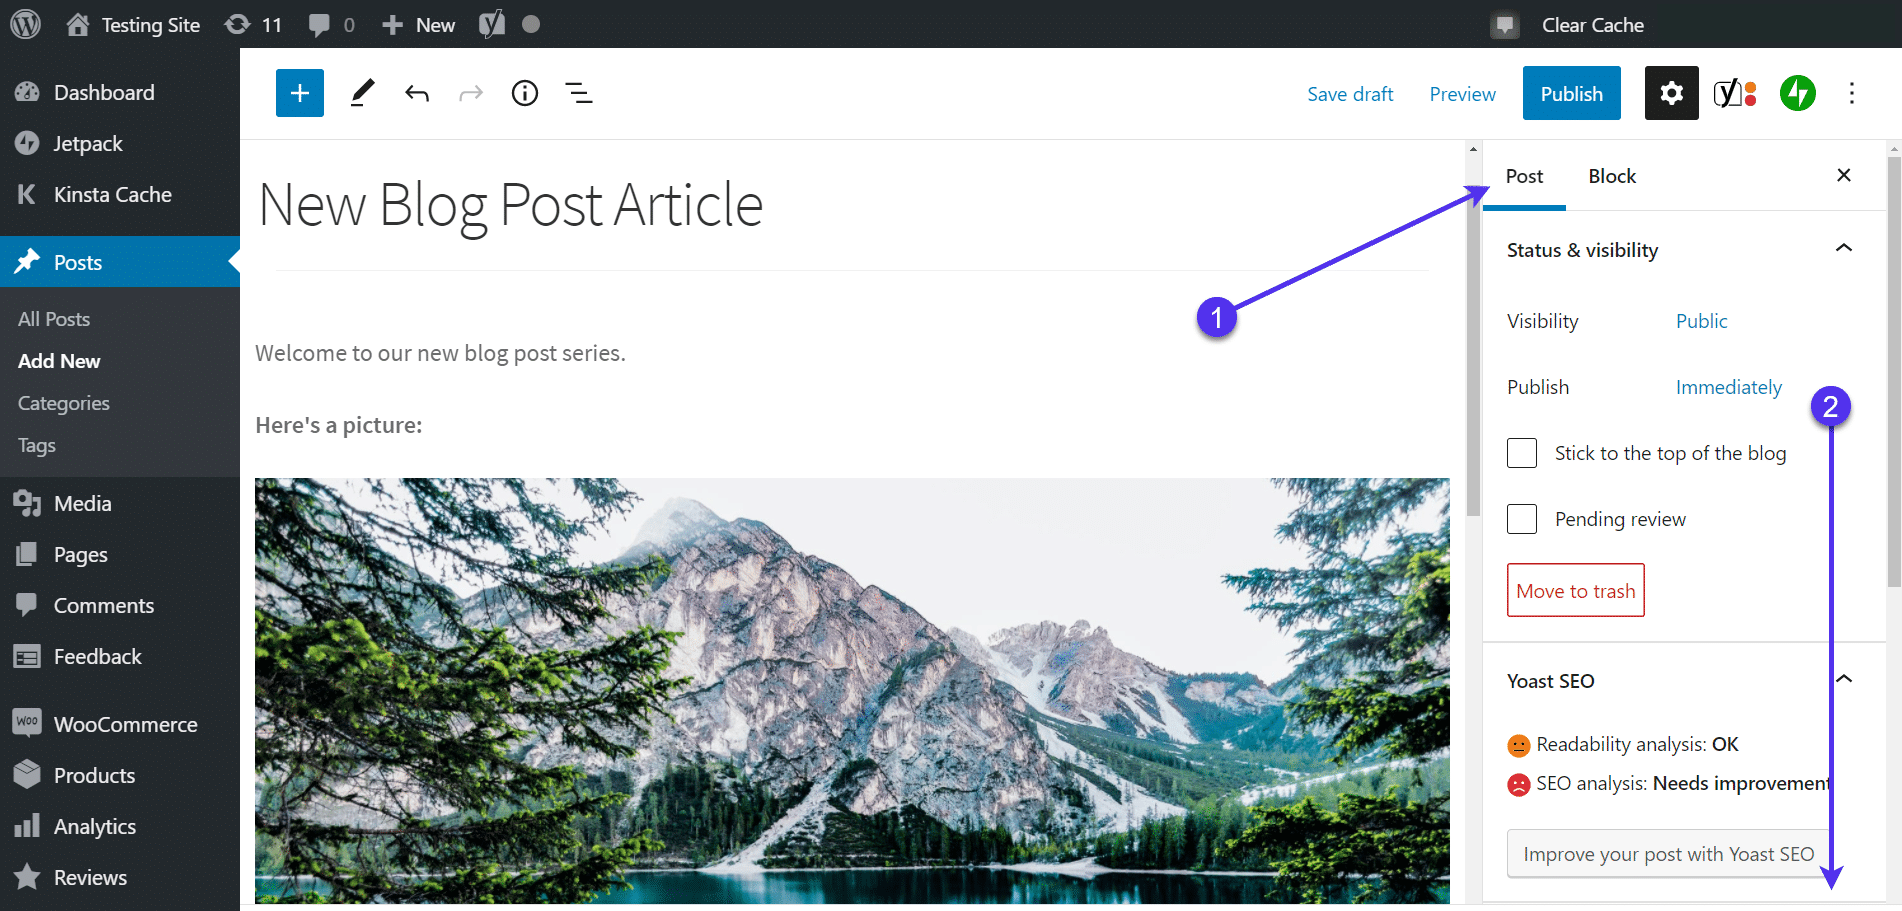
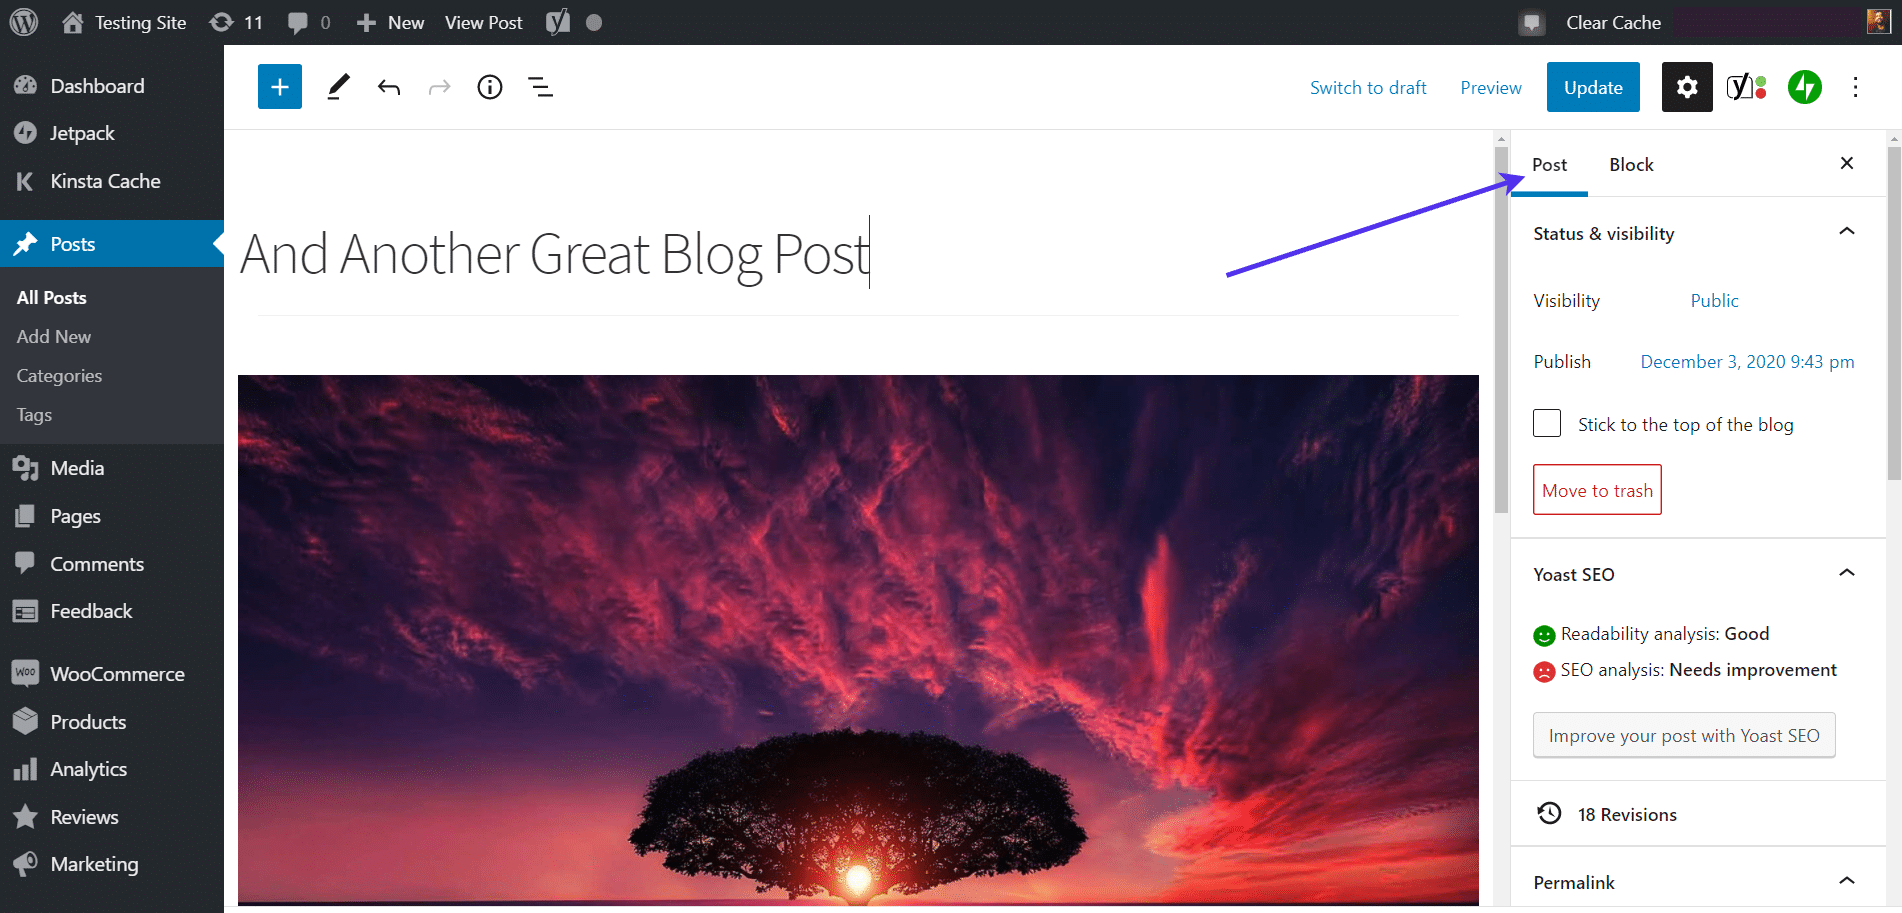
To find and upload a featured image, move your attention to the post Settings panel on the right-hand side. This lists various settings for the entire post and can also reveal Block-specific settings if you have a WordPress Gutenberg block currently selected.
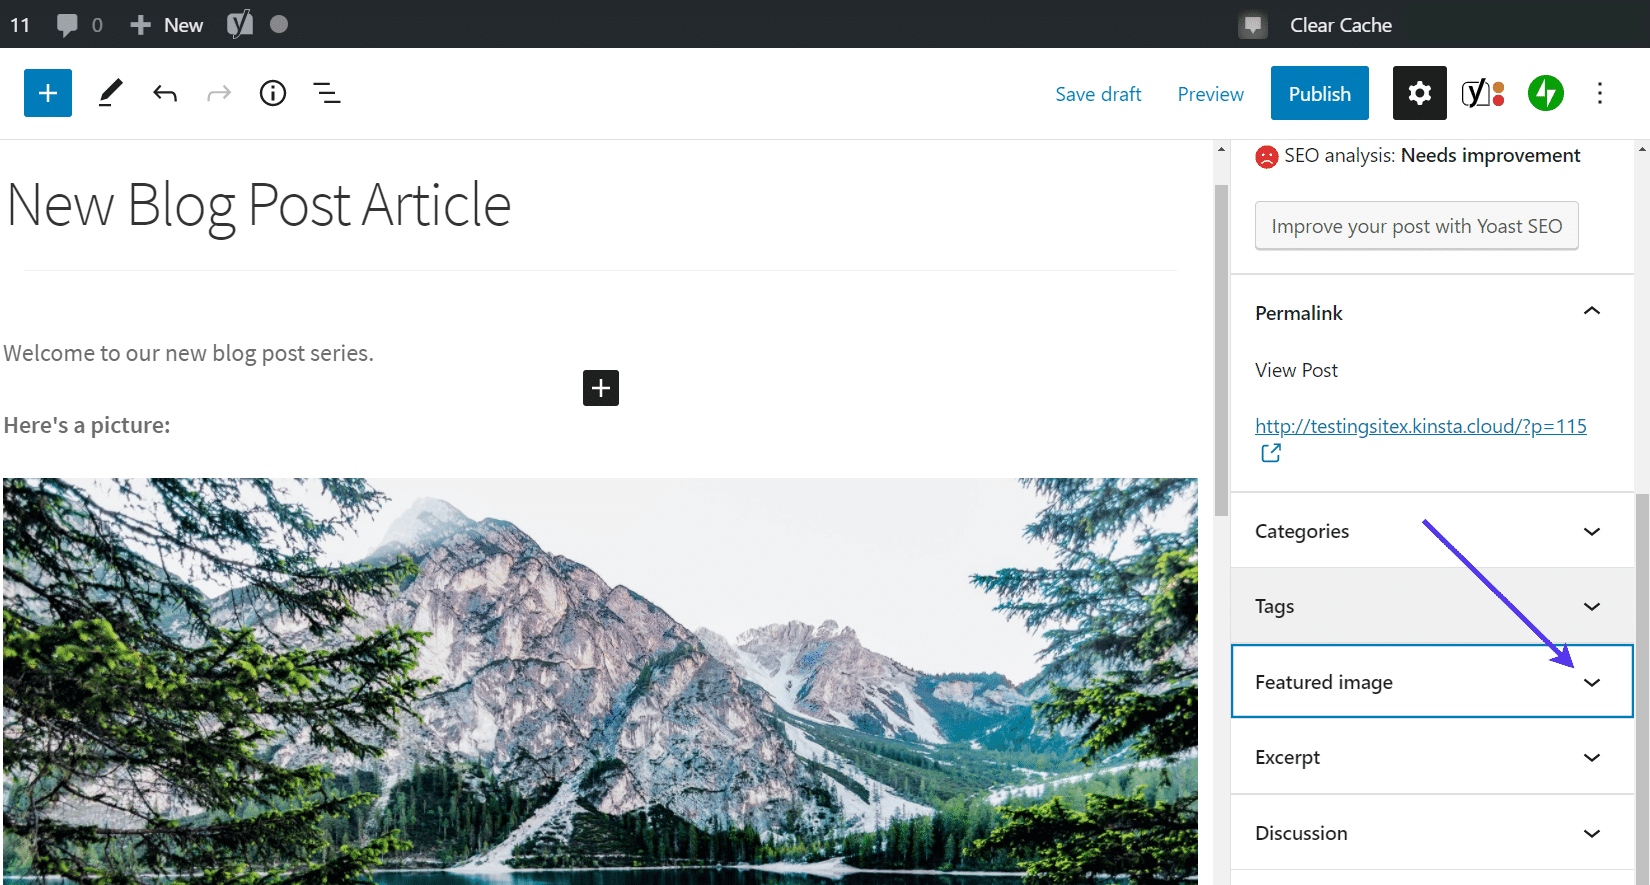
Make sure the Post tab is selected.
Then scroll down through the settings. The Featured Image Settings are towards the bottom.
Click on the Featured Image panel to open its settings.
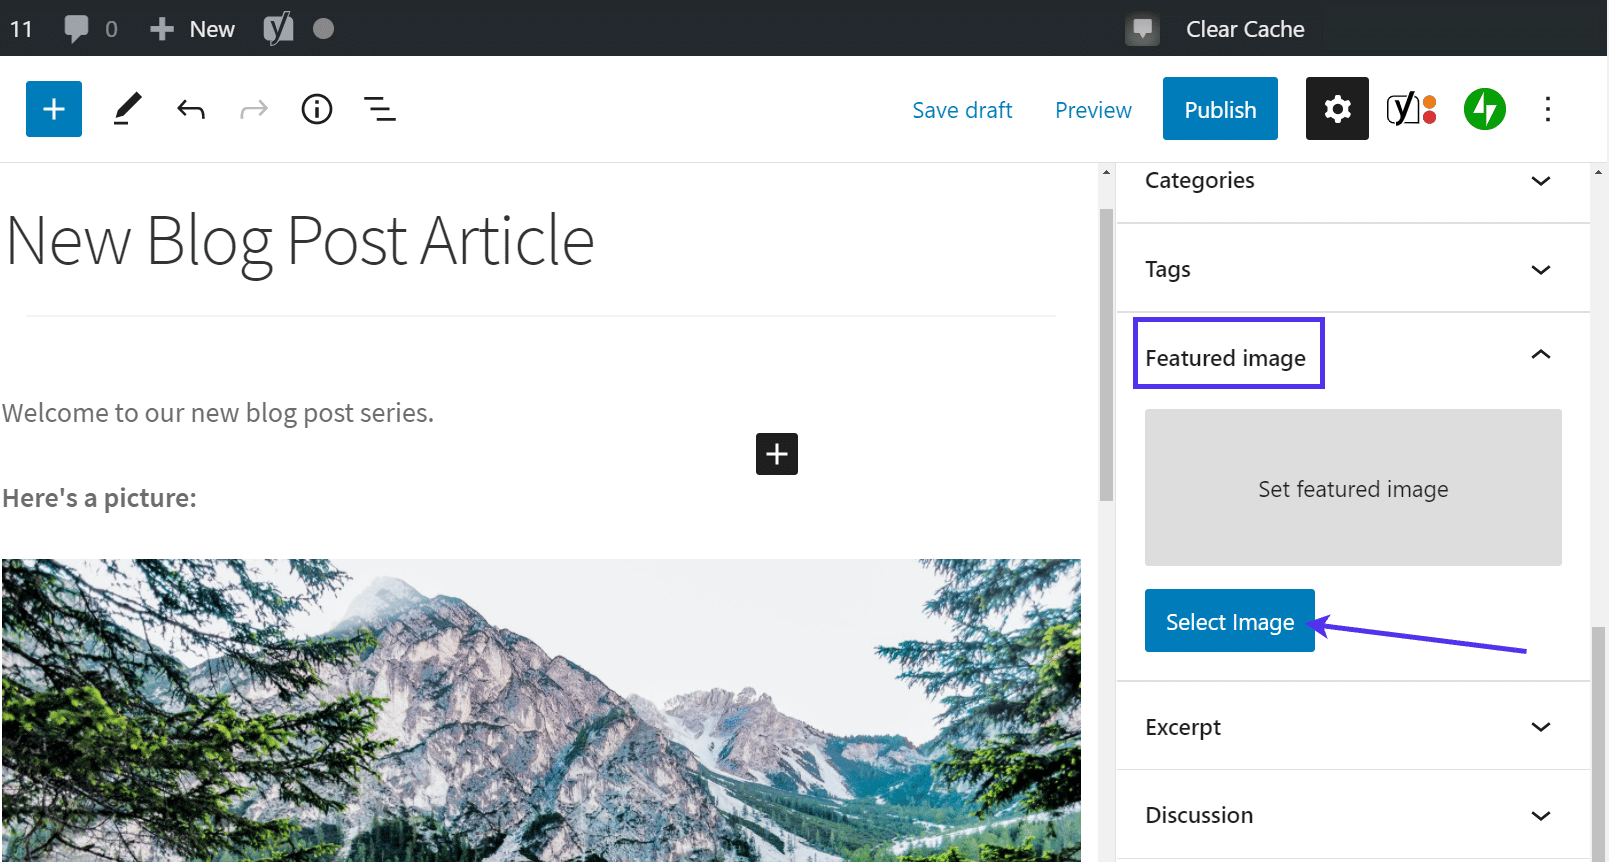
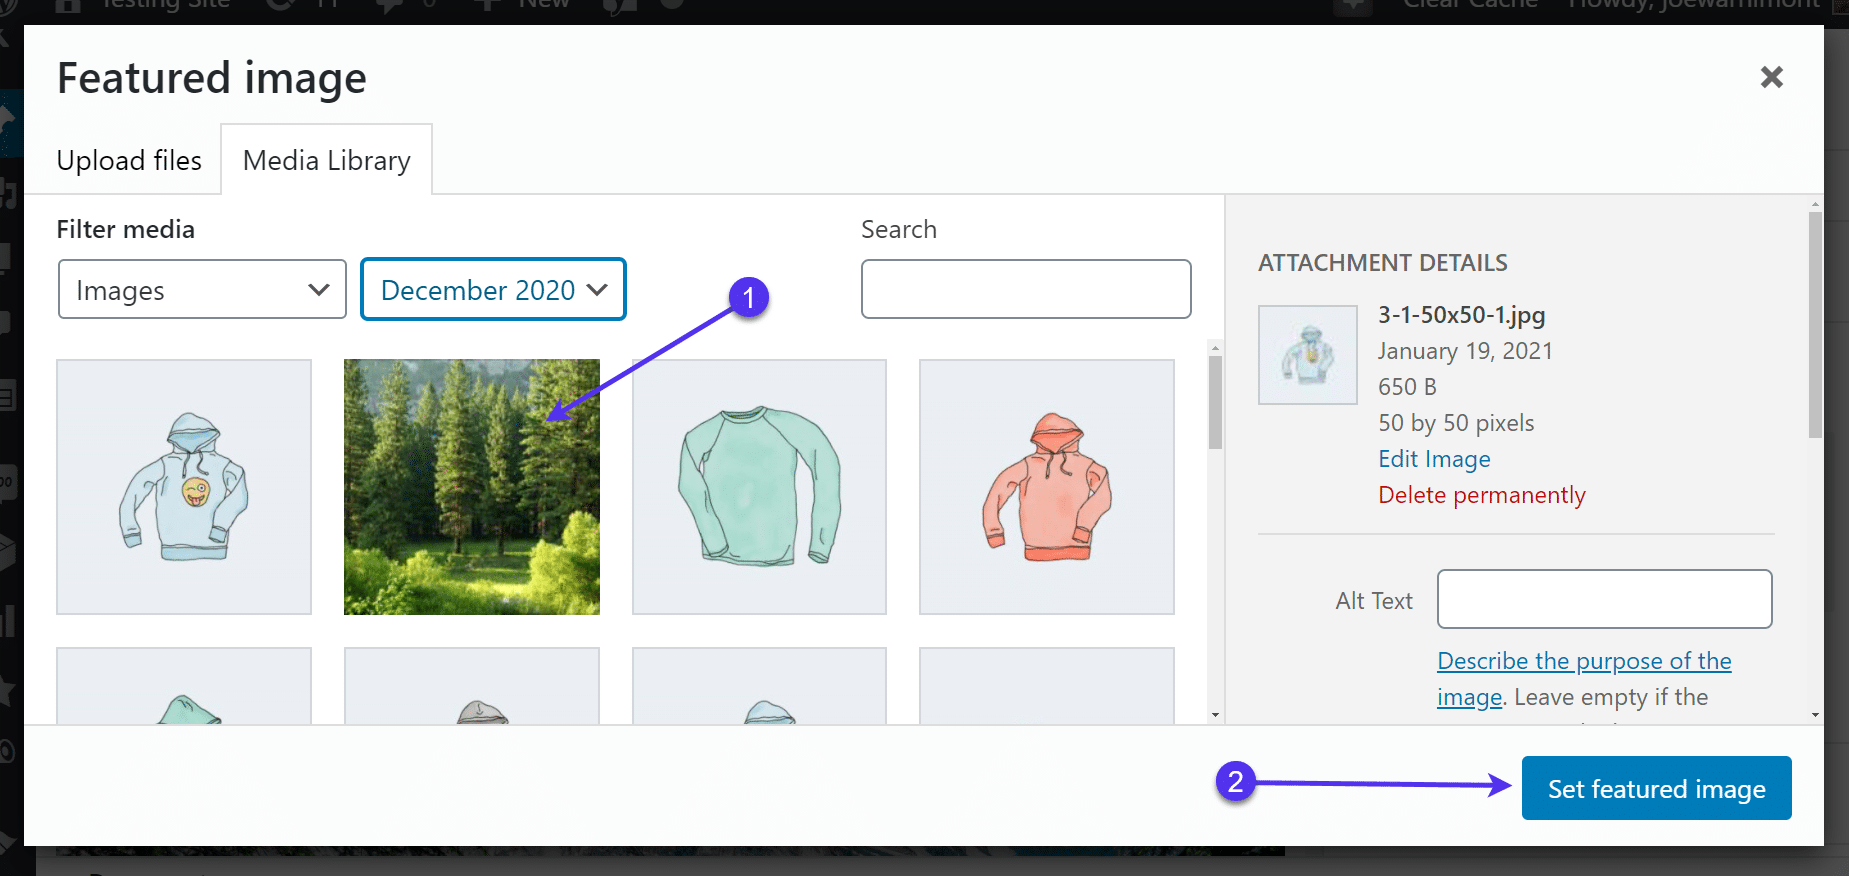
Here, you’ll see a button to Set Featured Image. Clicking on that brings you directly to the WordPress Media Library.
However, we usually recommend clicking the Select Image button, as that provides a few extra choices for deciding on a source for the featured image.
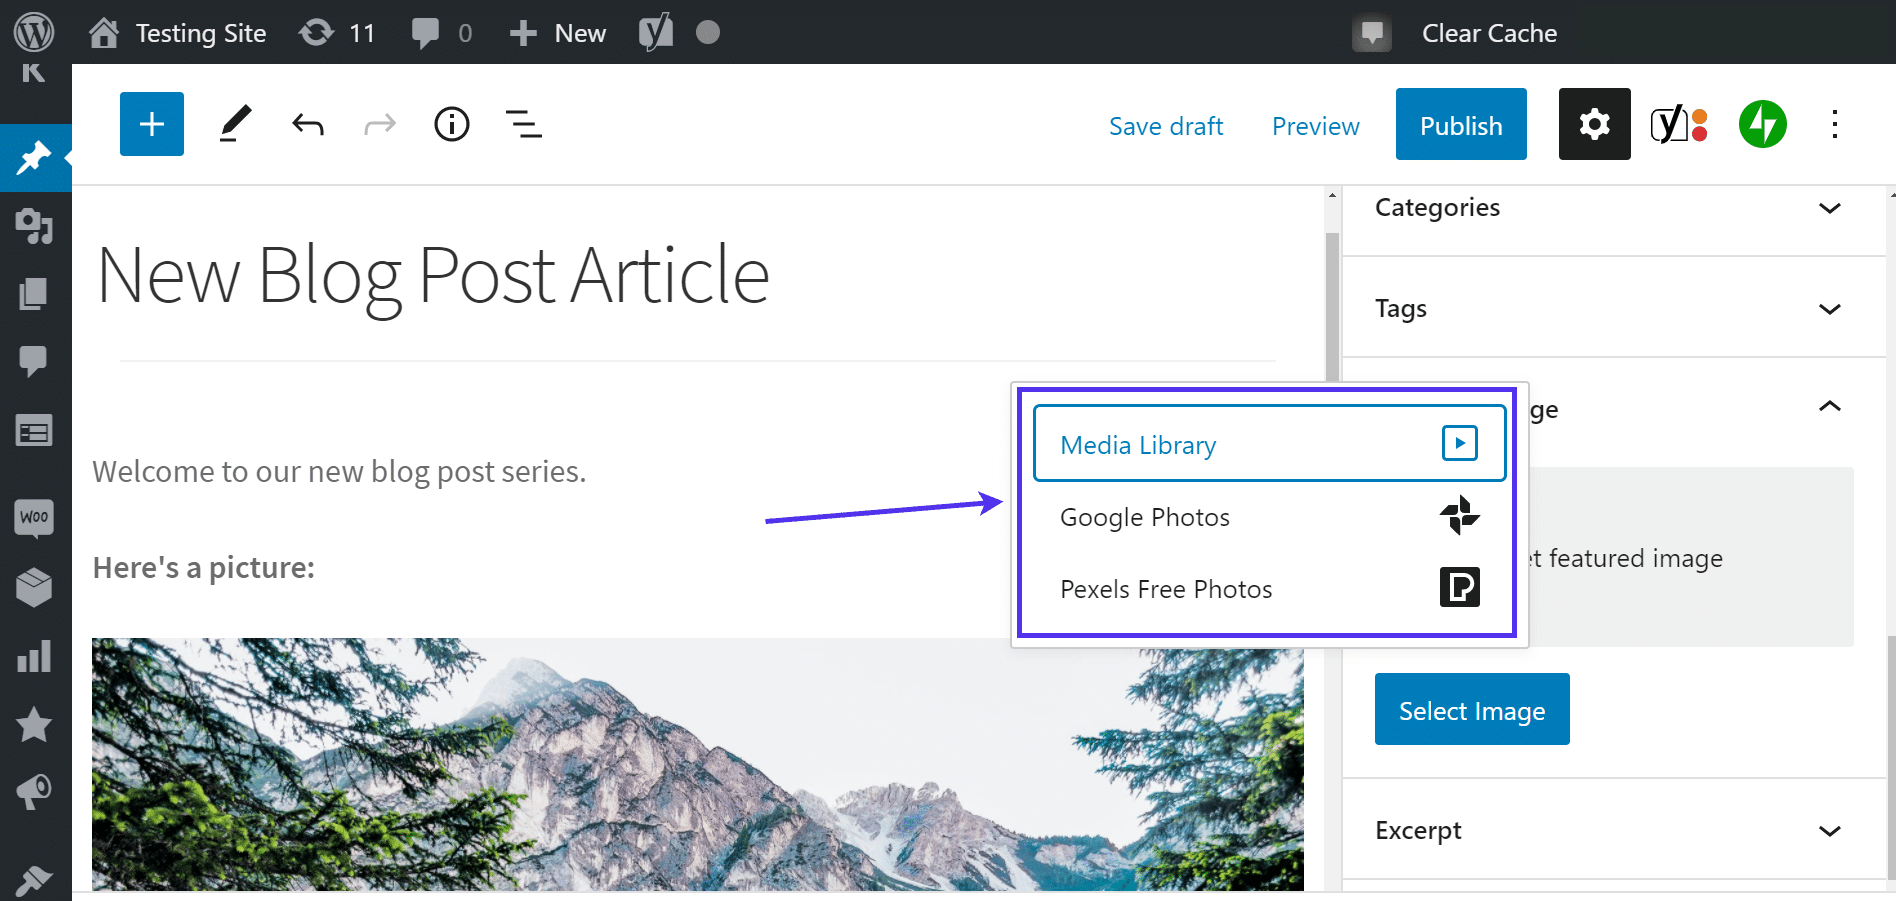
As promised, three choices appear when uploading an image through a Kinsta-hosted website:
- Media Library: Your WordPress media collection, allowing you to upload images to your server, edit those photos, and store them for later use or to place them in your posts and pages right now.
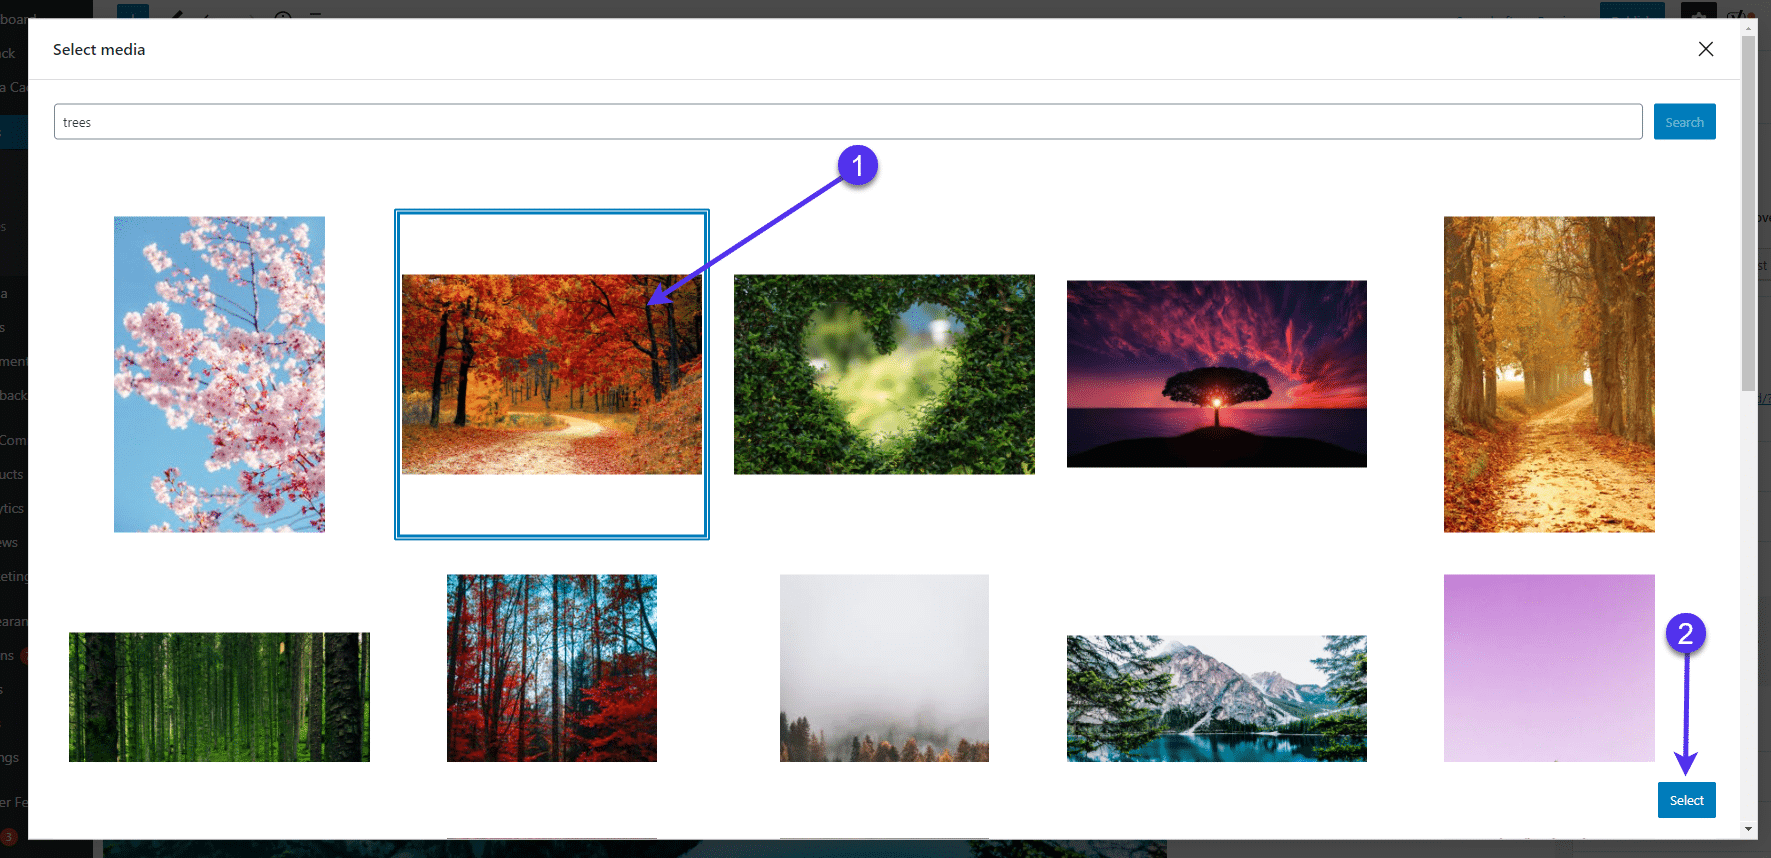
- Google Photos: A cloud library for your own personal photos. You must log in and link to Google Photos to upload from there to WordPress.
- Pexels Free Photos: A free collection of professional photos you can search through and include on your website. Occasionally, you need to provide image attribution (this is provided when you upload a Pexels photo on WordPress).
Choose one based on whether or not you have your own photos and where they’re stored.
Going with the Media Library reveals whatever images you’ve already uploaded to WordPress. You have the option to choose one and click the Set Featured Image button.
As an alternative, the Media Library also has a tab to Upload Files, where you select from the files on your computer and upload them to your WordPress Media Library.
The Pexels collection isn’t much different from your Media Library, except you have the luxury of finding beautiful photos without having to take them yourself. You can search for specific keywords and set them as your featured images. Again, the images from Pexels are free, but you must give a linked credit to the photographer, which is automatically inserted when using Pexels through WordPress.
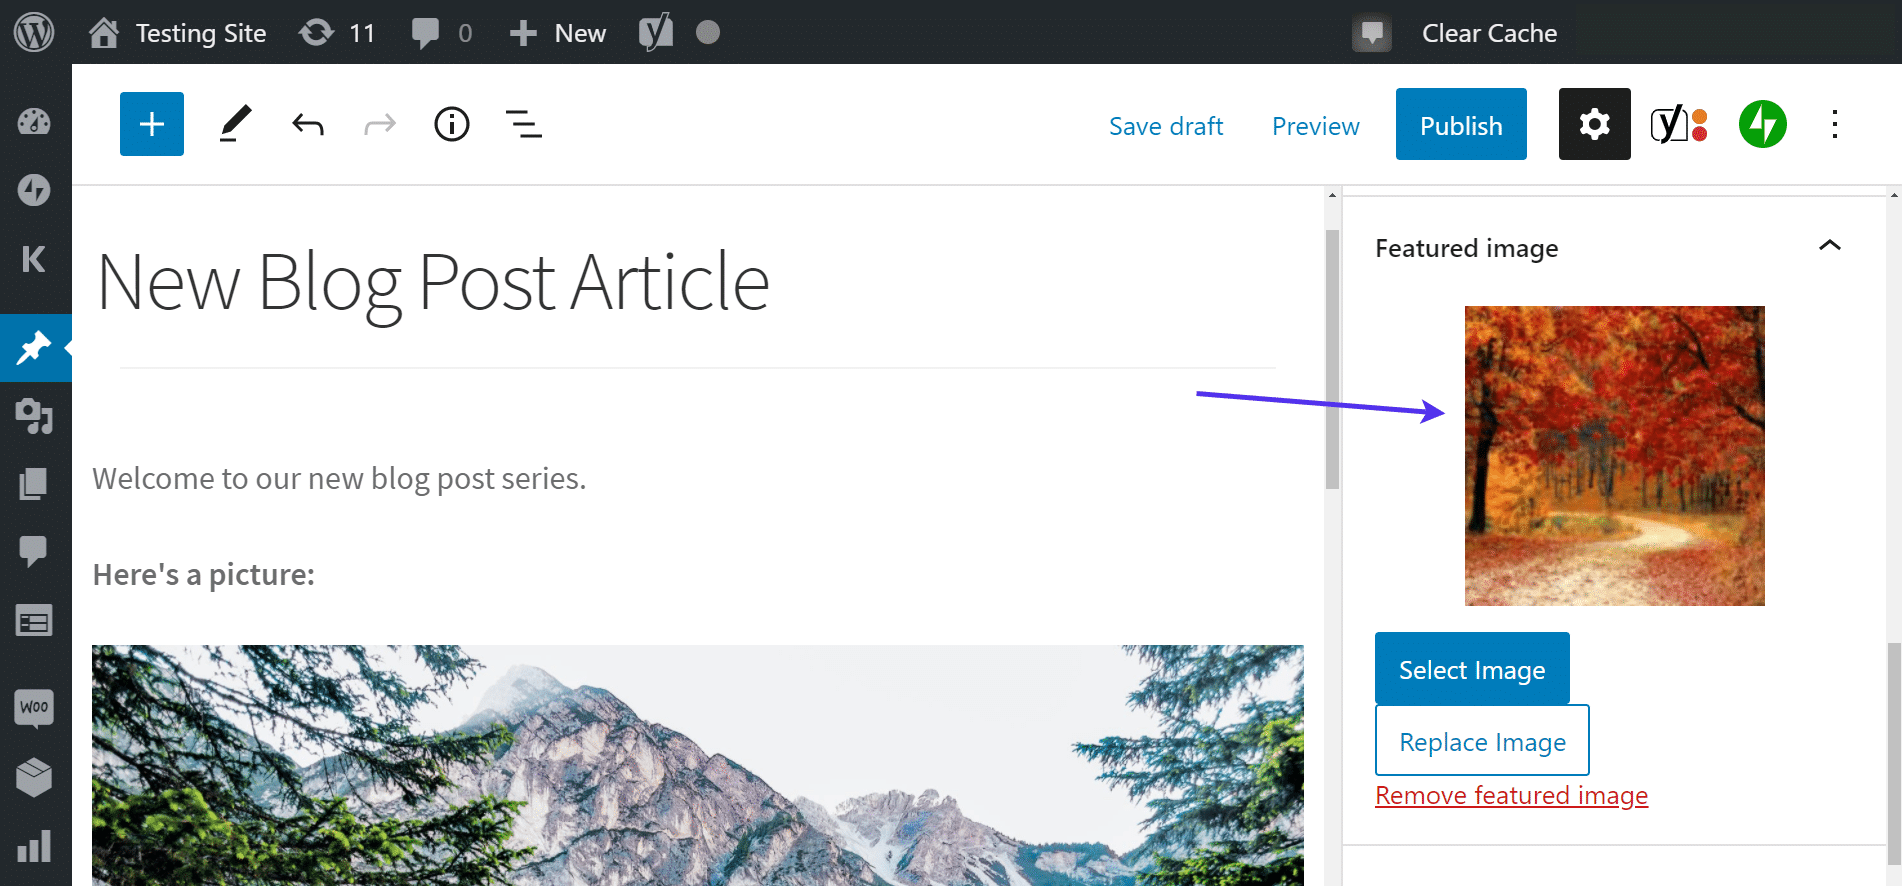
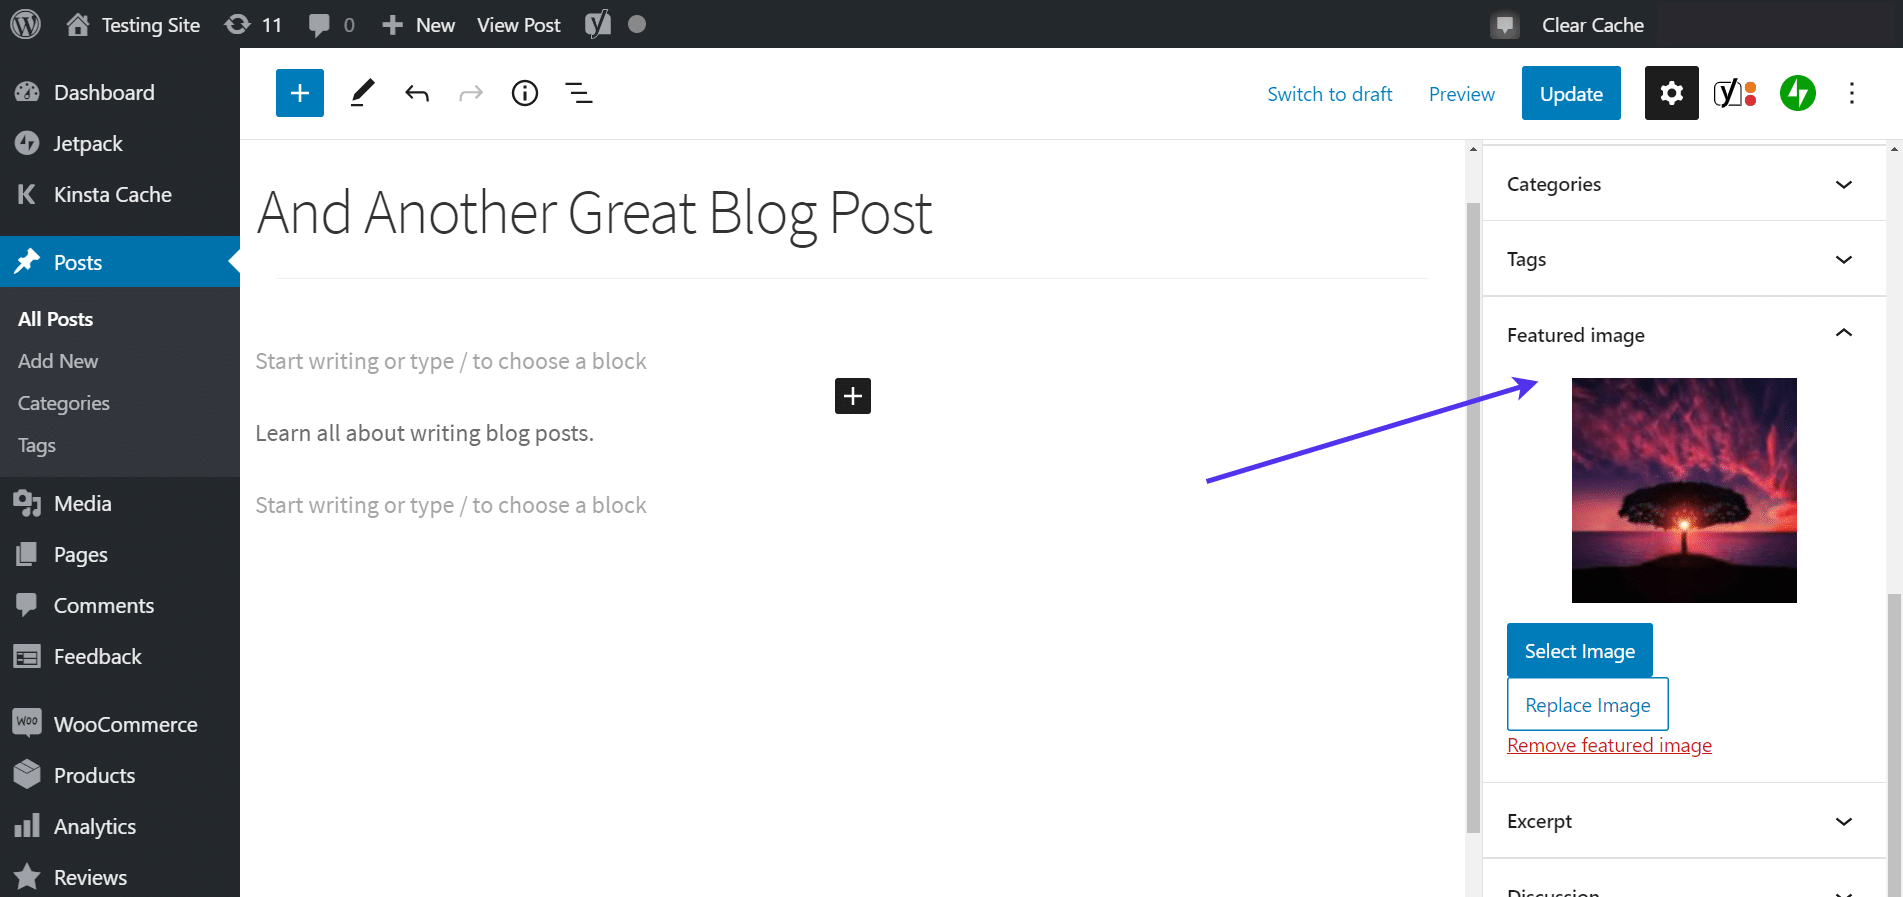
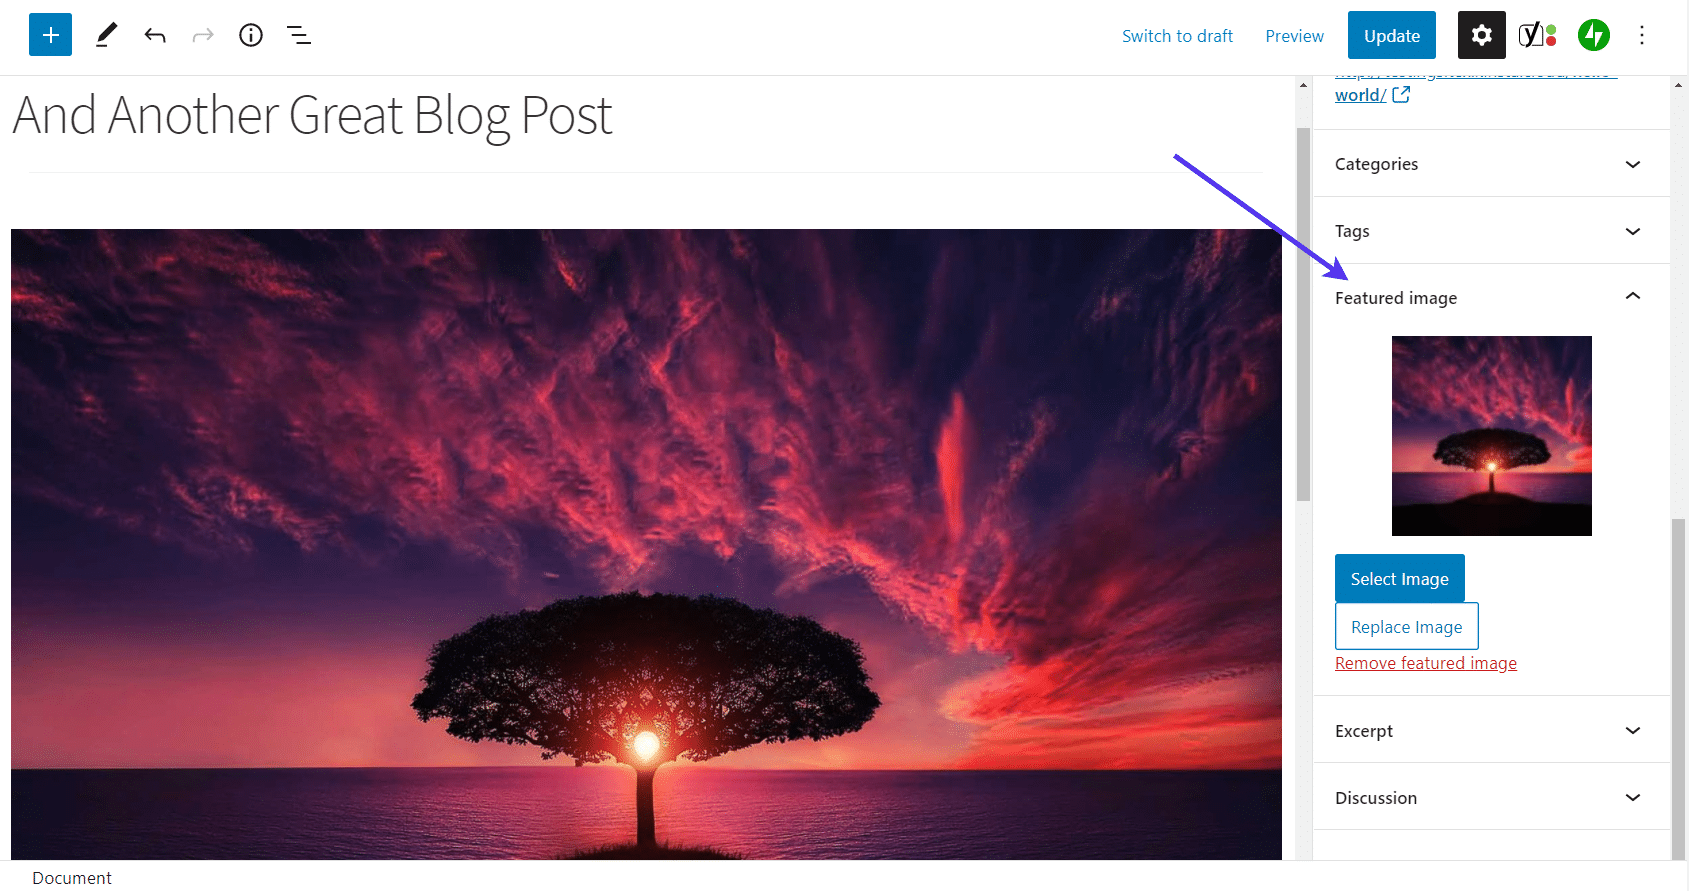
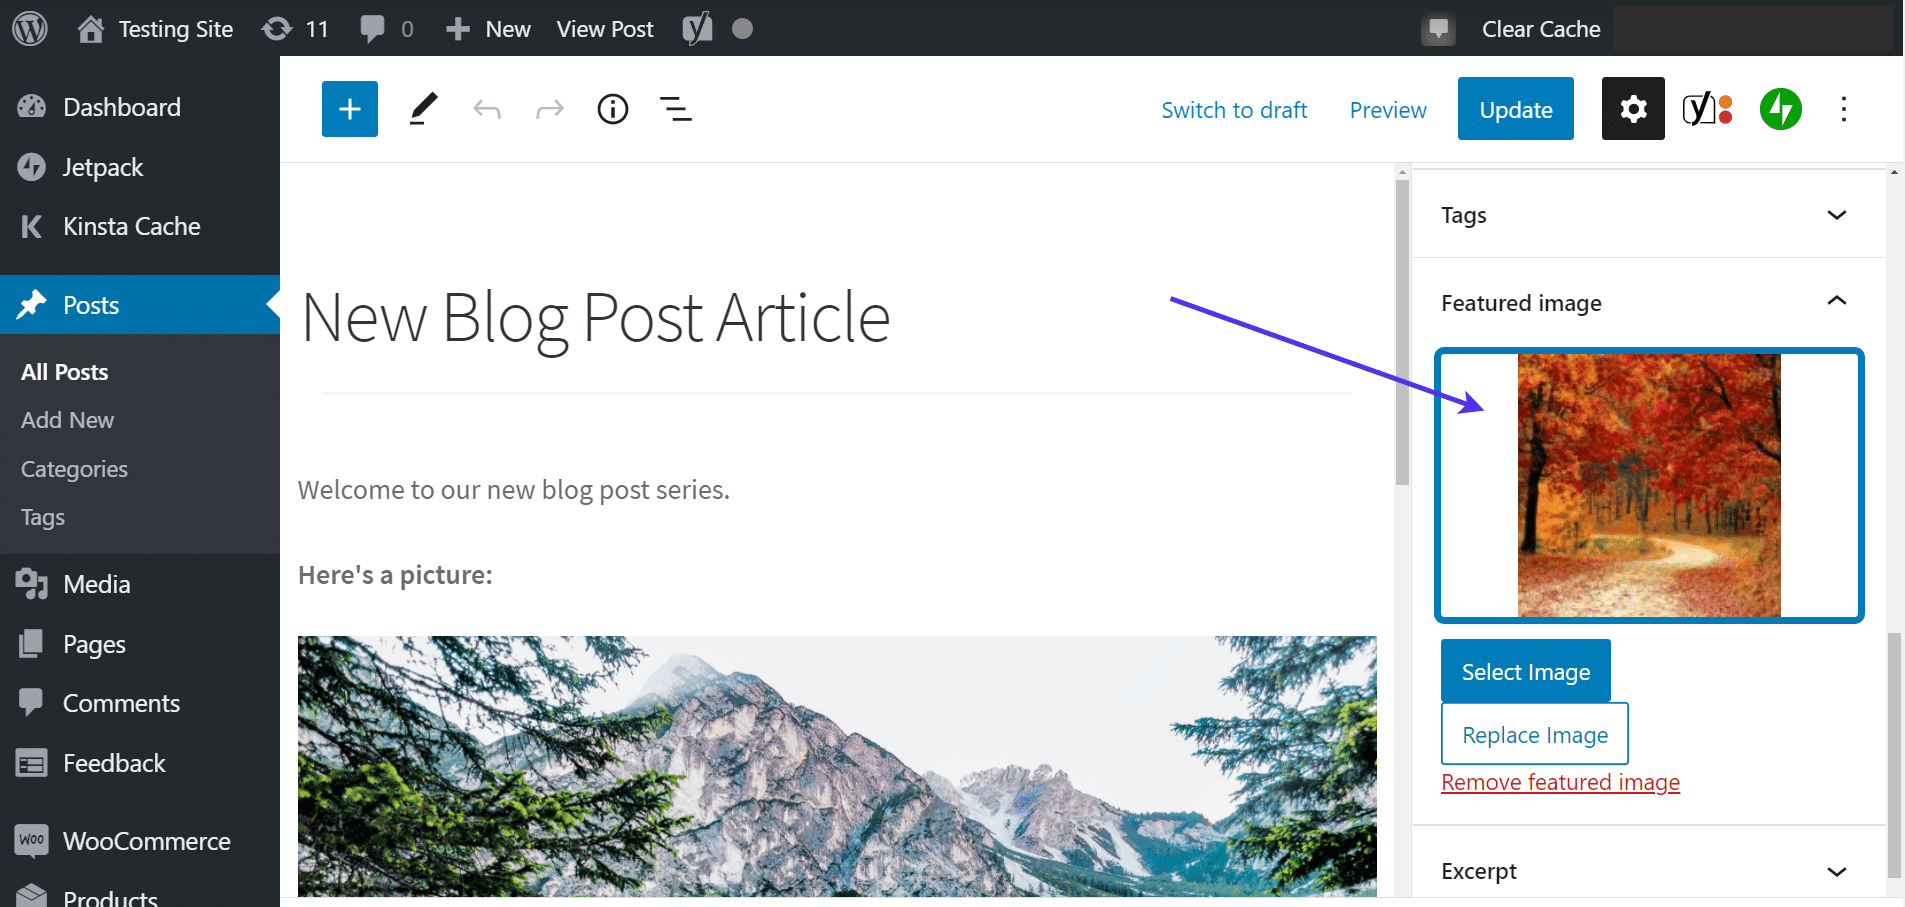
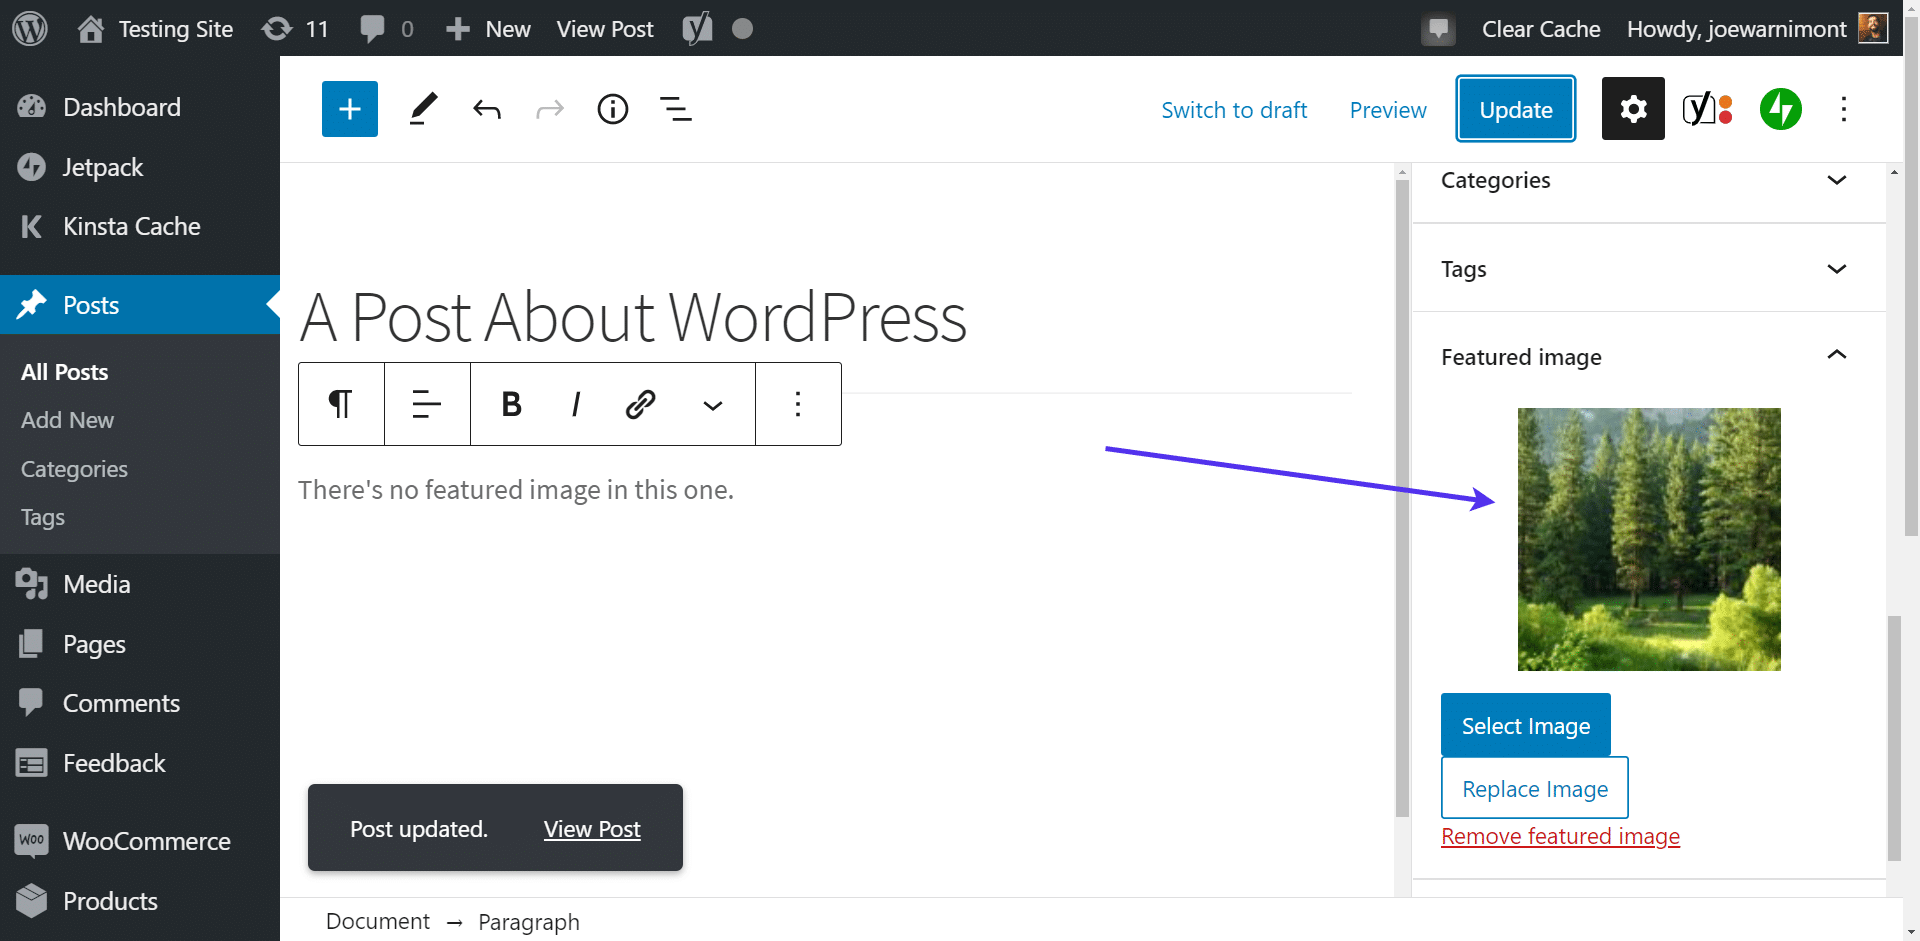
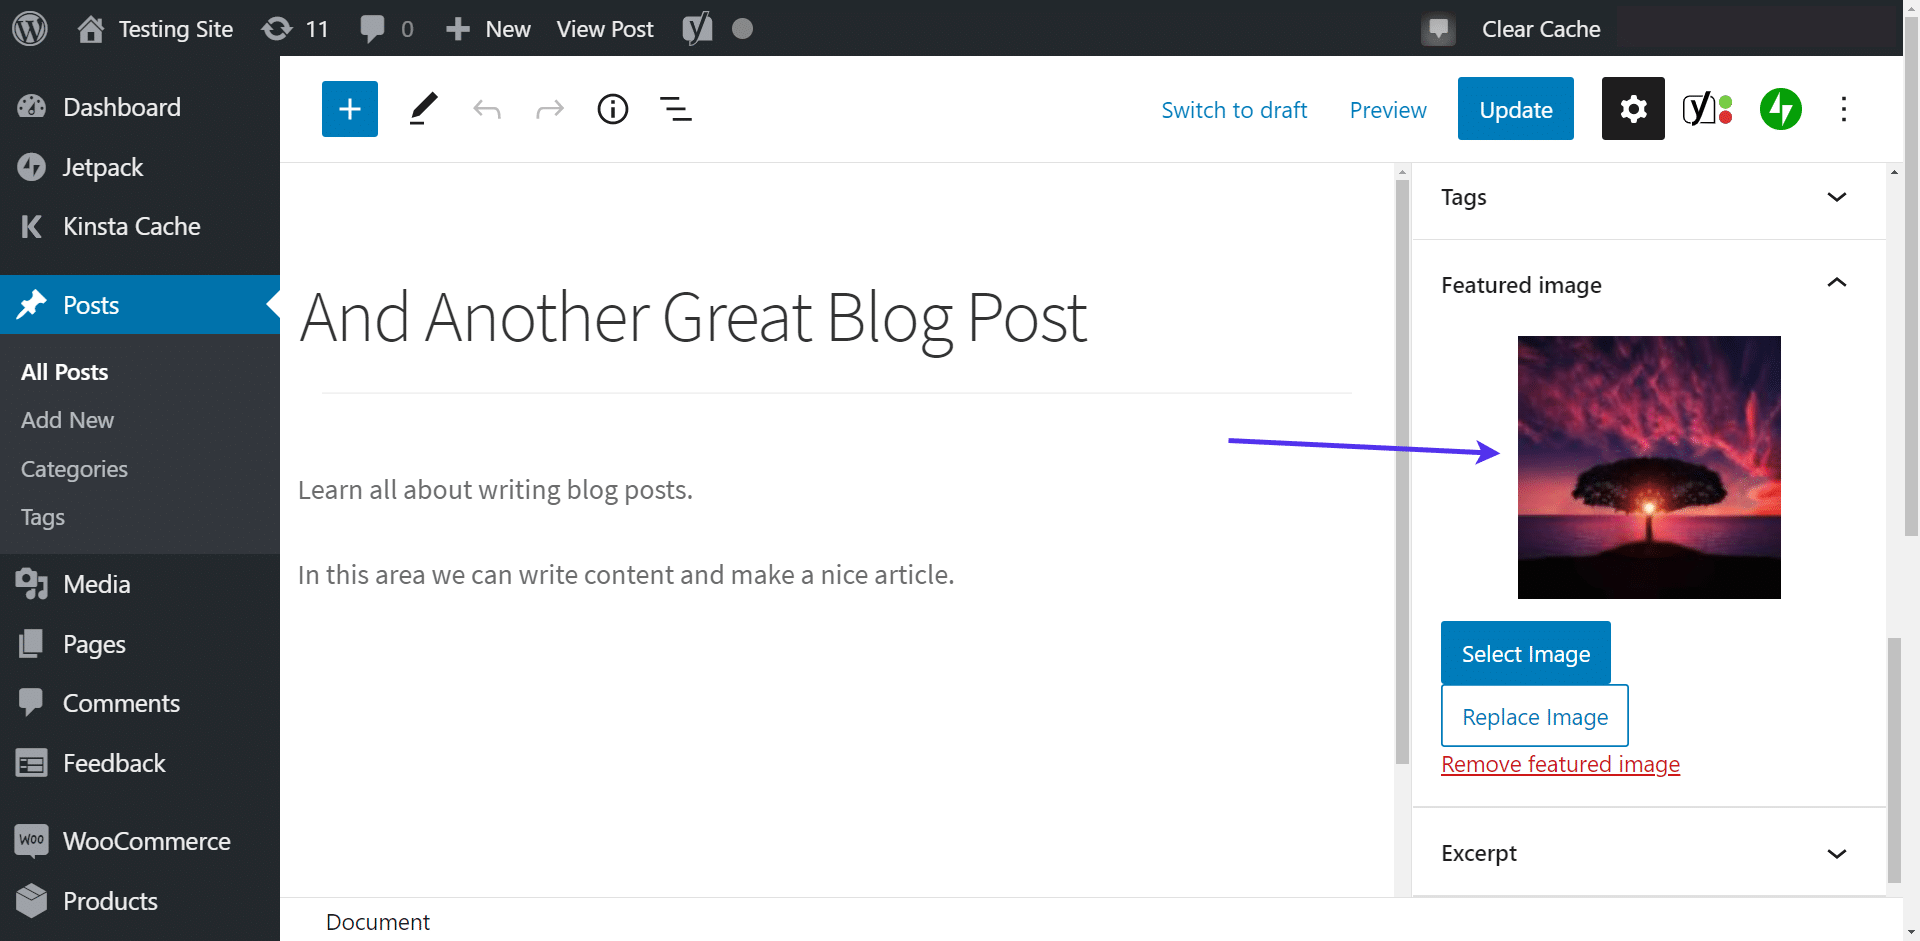
A thumbnail of the image you go with shows up under the Featured Image panel in your Post Settings.
This means that as long as you click Save Draft or Publish, the image remains active on that post until you remove it.
Some other buttons that appear include the Select Image, Replace Image, and Remove Featured Image. All of them allow you to adjust or get rid of the current featured image.
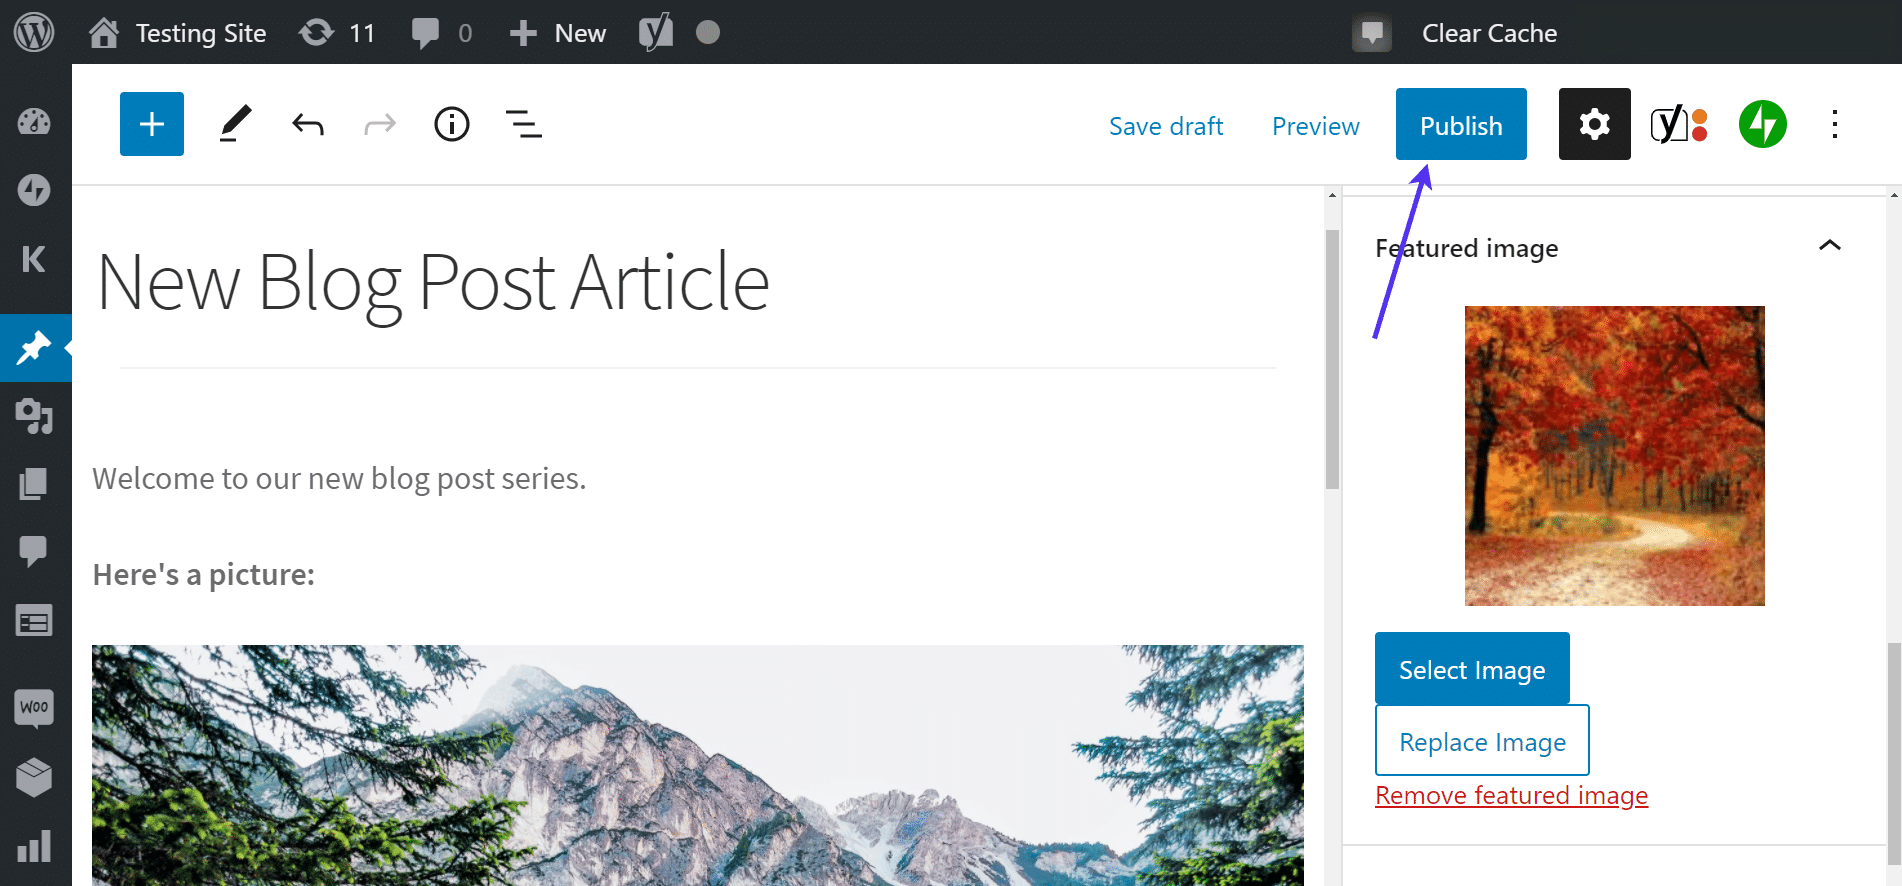
To move forward and see the featured image in action, click the Publish button.
The Preview button also does the trick for testing a featured image, but the public can’t see it until you hit Publish.
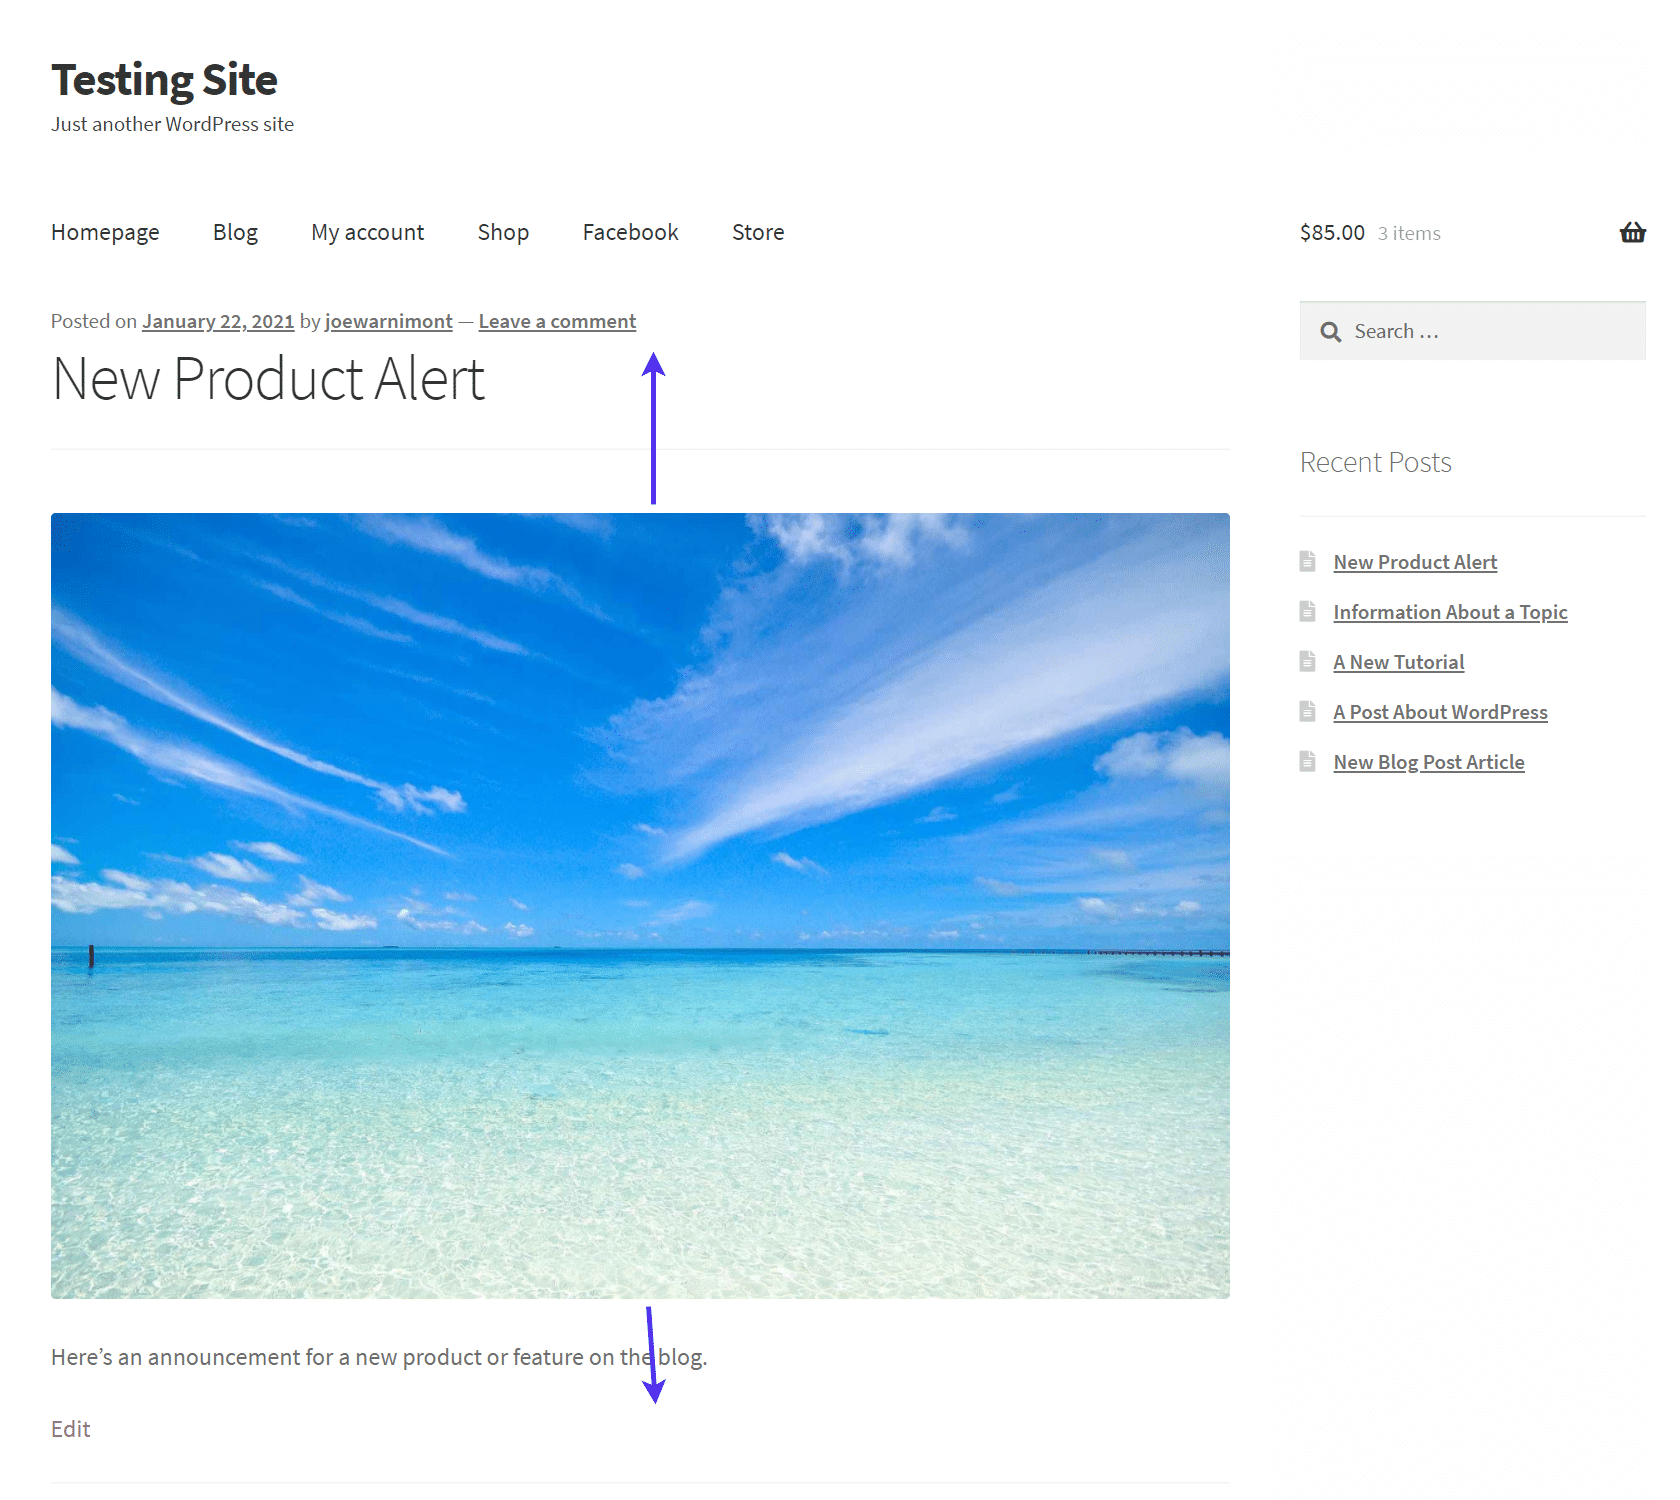
Depending on your theme settings and various other factors, like certain plugins that change image settings, the featured image should appear first in your published blog post.
As you can see, the image we inserted into the post content is shown second since the featured image gets prioritized.

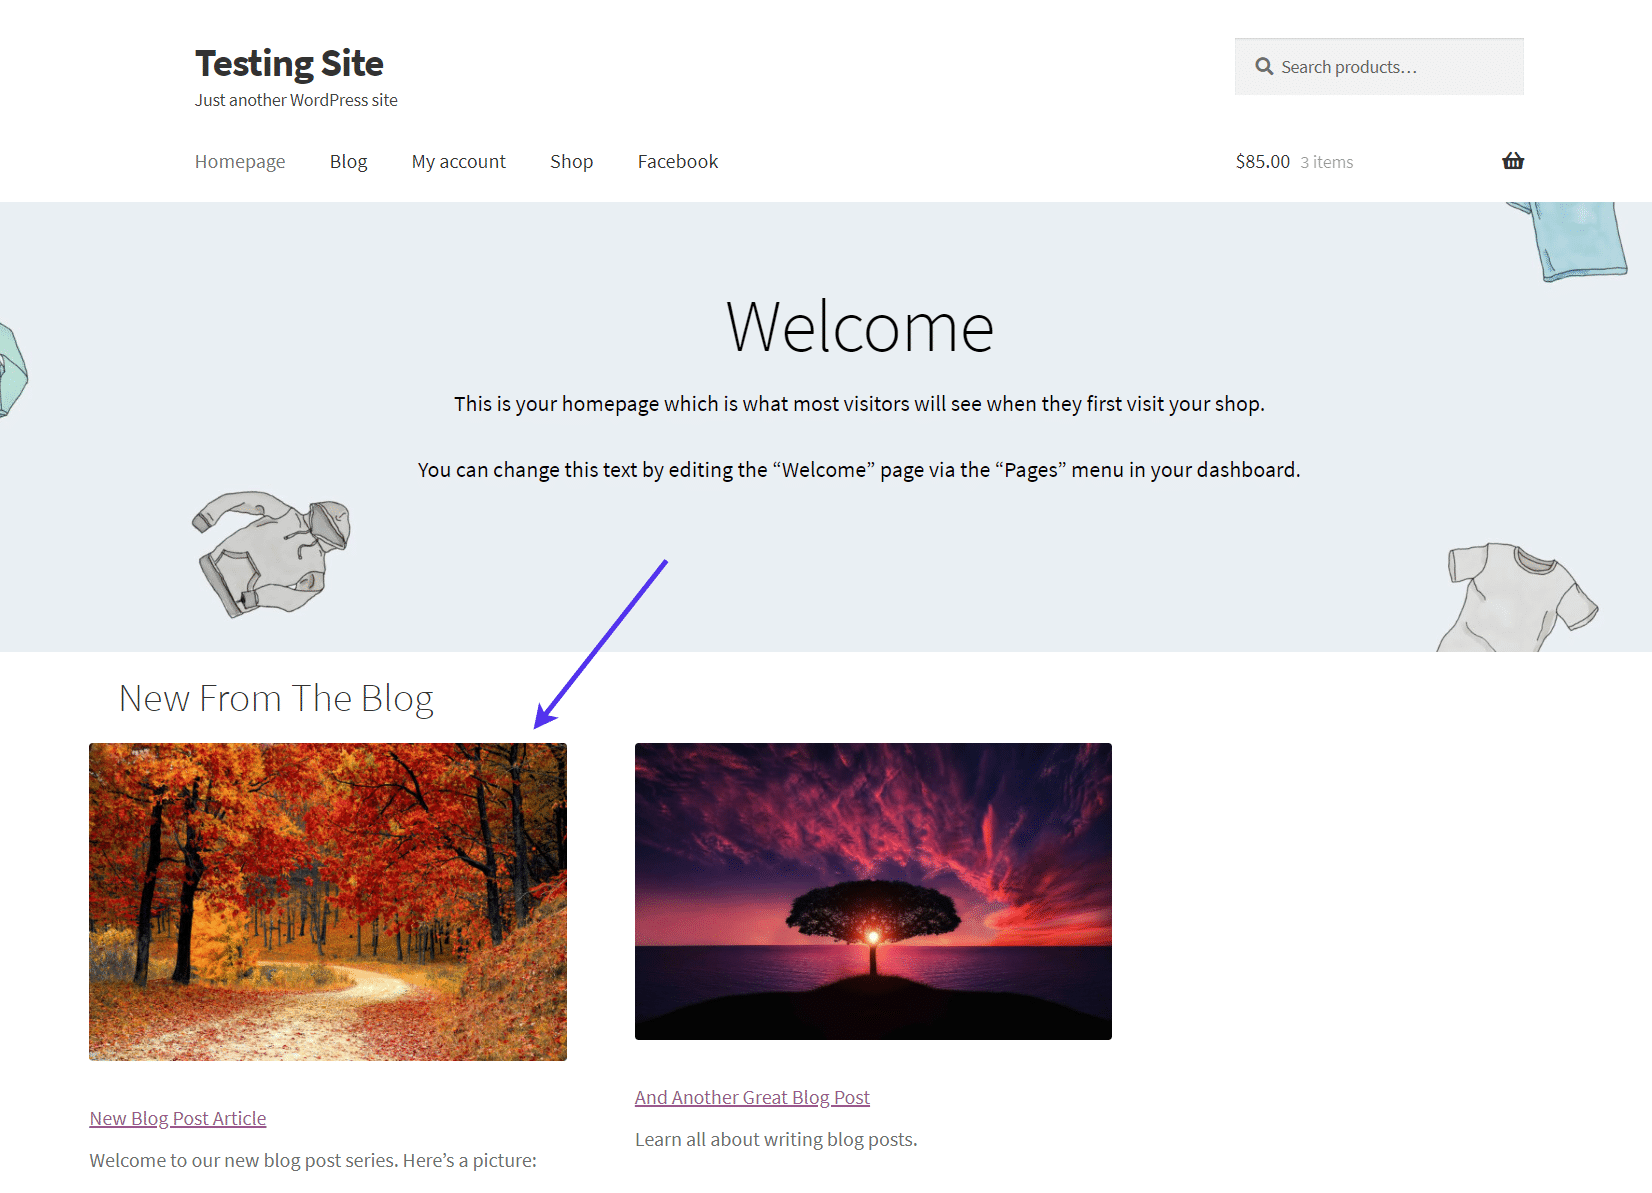
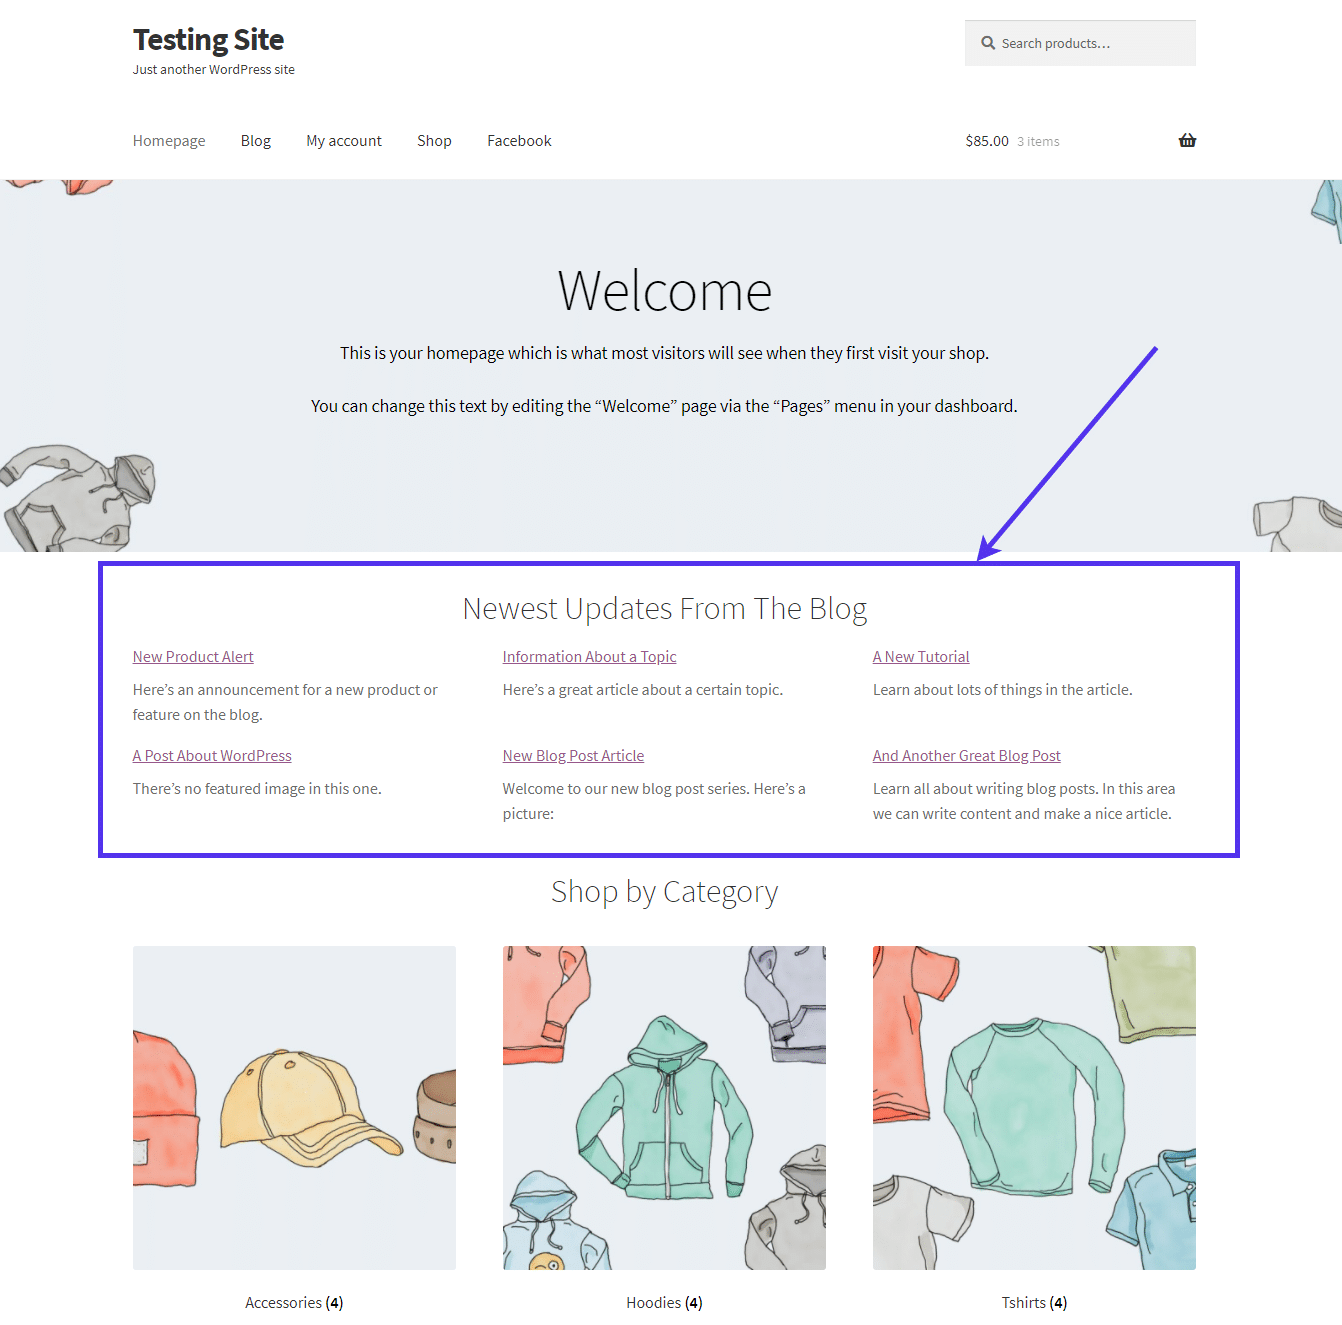
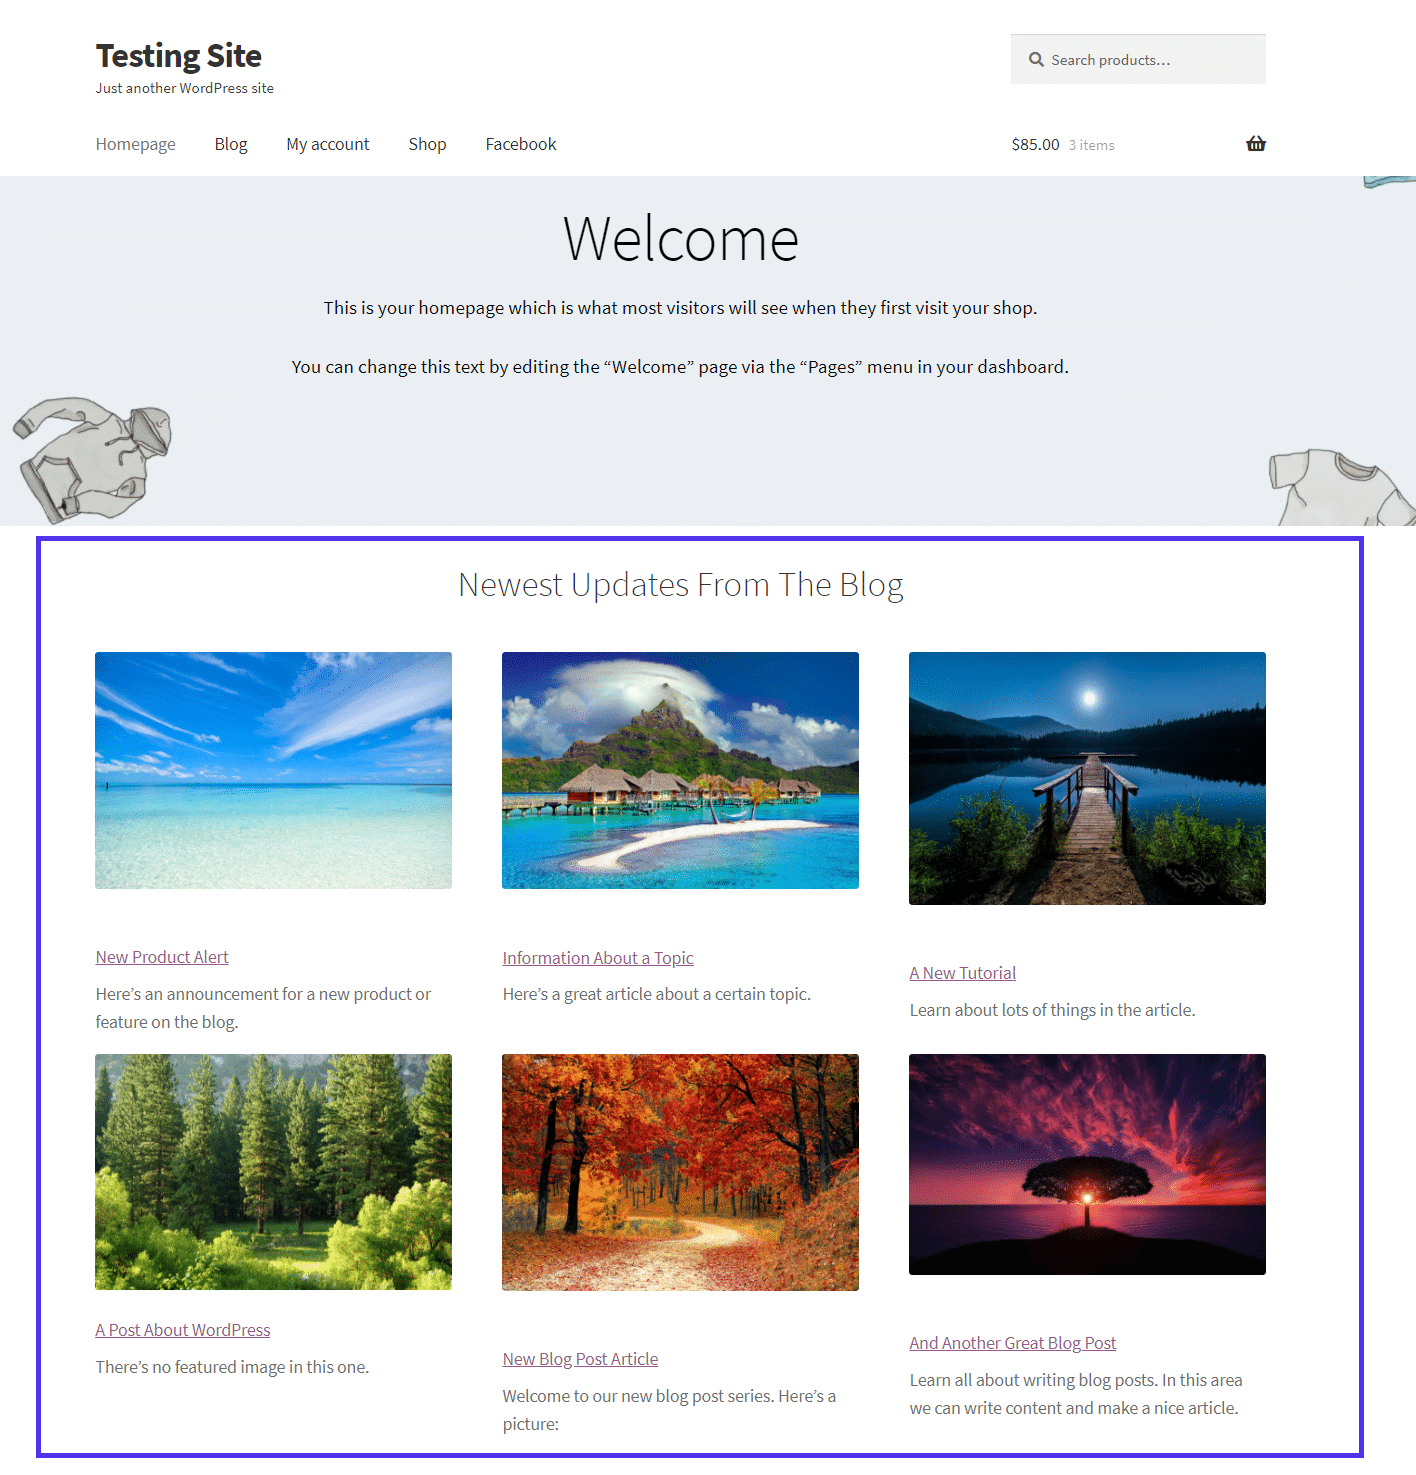
Another way to see your featured image is to create Recent Post galleries or feeds to your blog, usually elsewhere on your website.
For instance, we added a Recent Posts feed on the homepage of our test site. The featured images for all blog posts in that feed appear as smaller thumbnails, providing a more visual experience for those looking for content.
If your featured image problems don’t stem from a misunderstanding of the upload process, continue reading.
Accidentally Choosing a Cover Image vs Featured Image in WordPress
Another simple yet common mistake made by WordPress users is to implement a cover image for a post or page and assume it works like a featured image.
Both cover and featured images function in similar ways, providing large photos at the top of posts and pages, yet they have some differences. WordPress added the Cover block to its Gutenberg editor only recently. Hence, this issue is exclusive to those using it.
The Difference Between a Cover Image and Featured Image
A cover image provides a wide or full-width image section to add anywhere on the site. It’s used to show the start of a new section or an article. You can insert a Cover block anywhere in a post or page, not just at the beginning. Because of this, a cover image is part of the post or page itself, and not separated like a featured image.
A featured image serves as the primary post or page image representing the entirety of that article when it gets shared or distributed elsewhere on your website or online. The featured image has its own section for uploading, away from the content editor. It’s usually located at the top of the post or page.
Your theme’s coding often structures the featured image location and formatting. Therefore, you may have to use custom code to customize the featured image’s appearance.
Finally, a cover image allows for its own unique customization options, like the ability to place overlaying text on top of the image or including a filter. In general, a cover image is far more customizable directly from the WordPress dashboard than a featured image.
Seeing a Cover Image in Action (And How it Differs from a Featured Image)
Let’s take a look at the basic differences between cover and featured images. Both can be accessed and implemented by going to the Posts or Pages menus and creating a new item or visiting an old page or post.
You can find the Featured Image in the right-side Settings panel for all posts and pages. It’s separate from the main content.
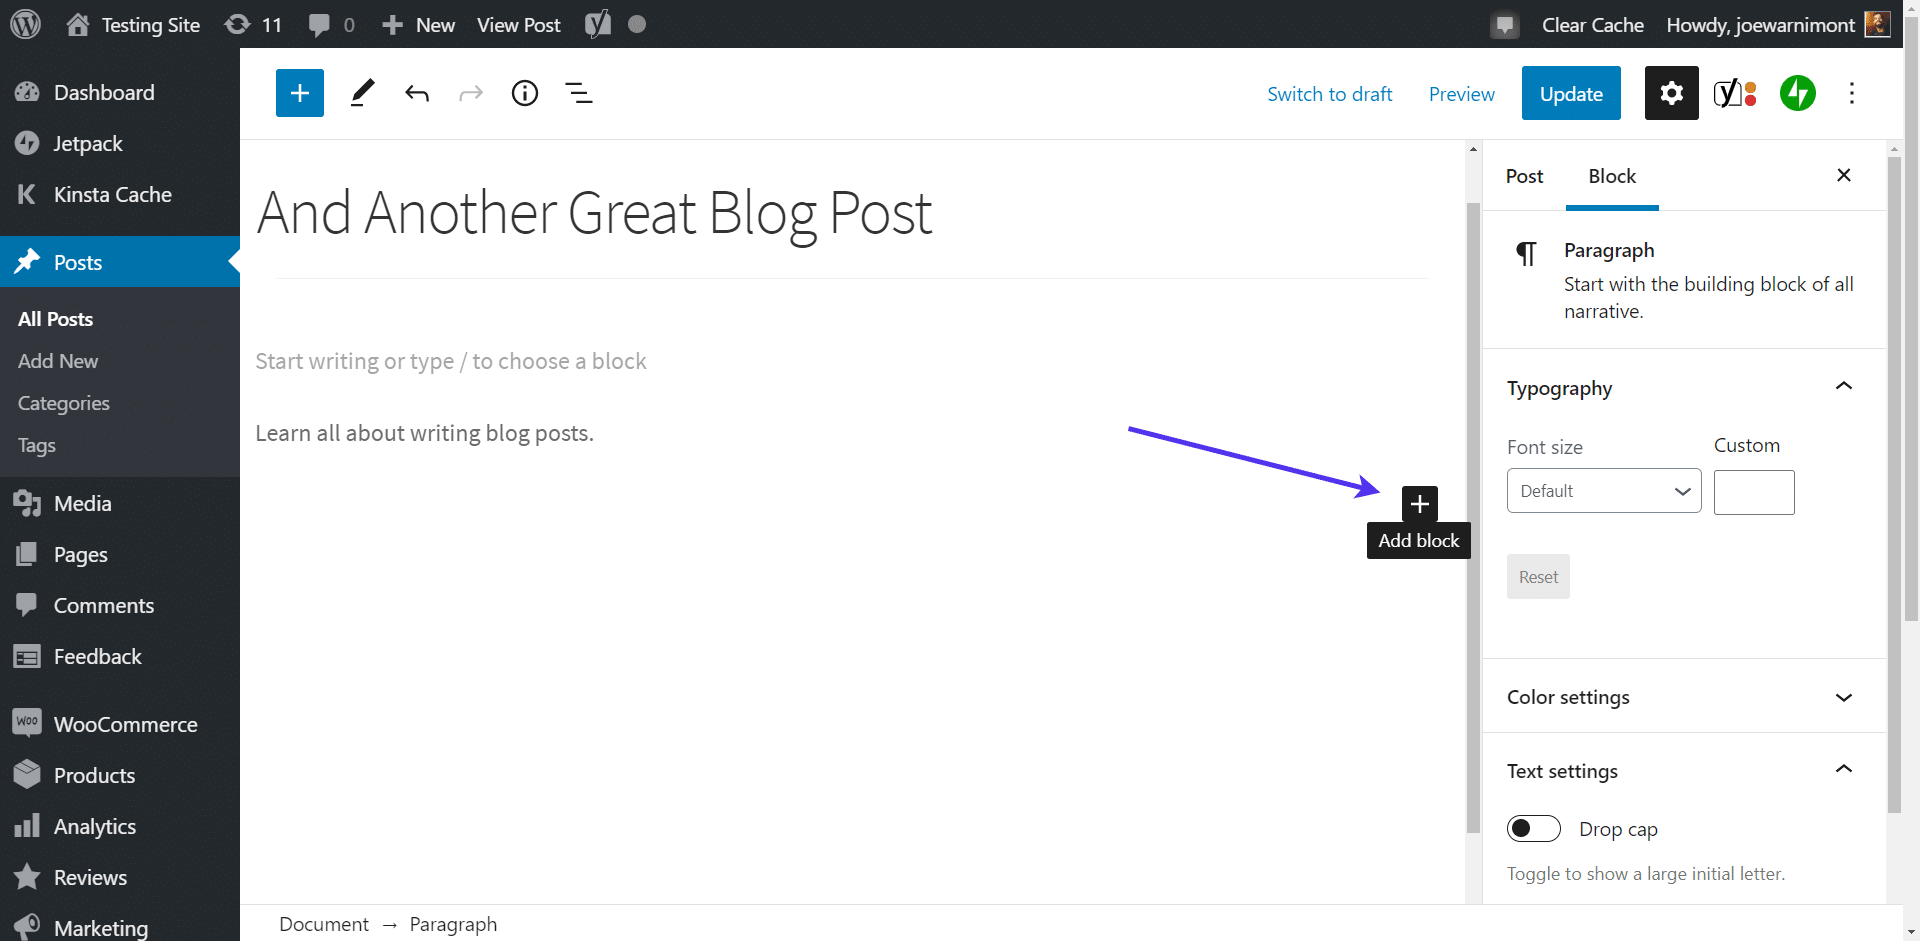
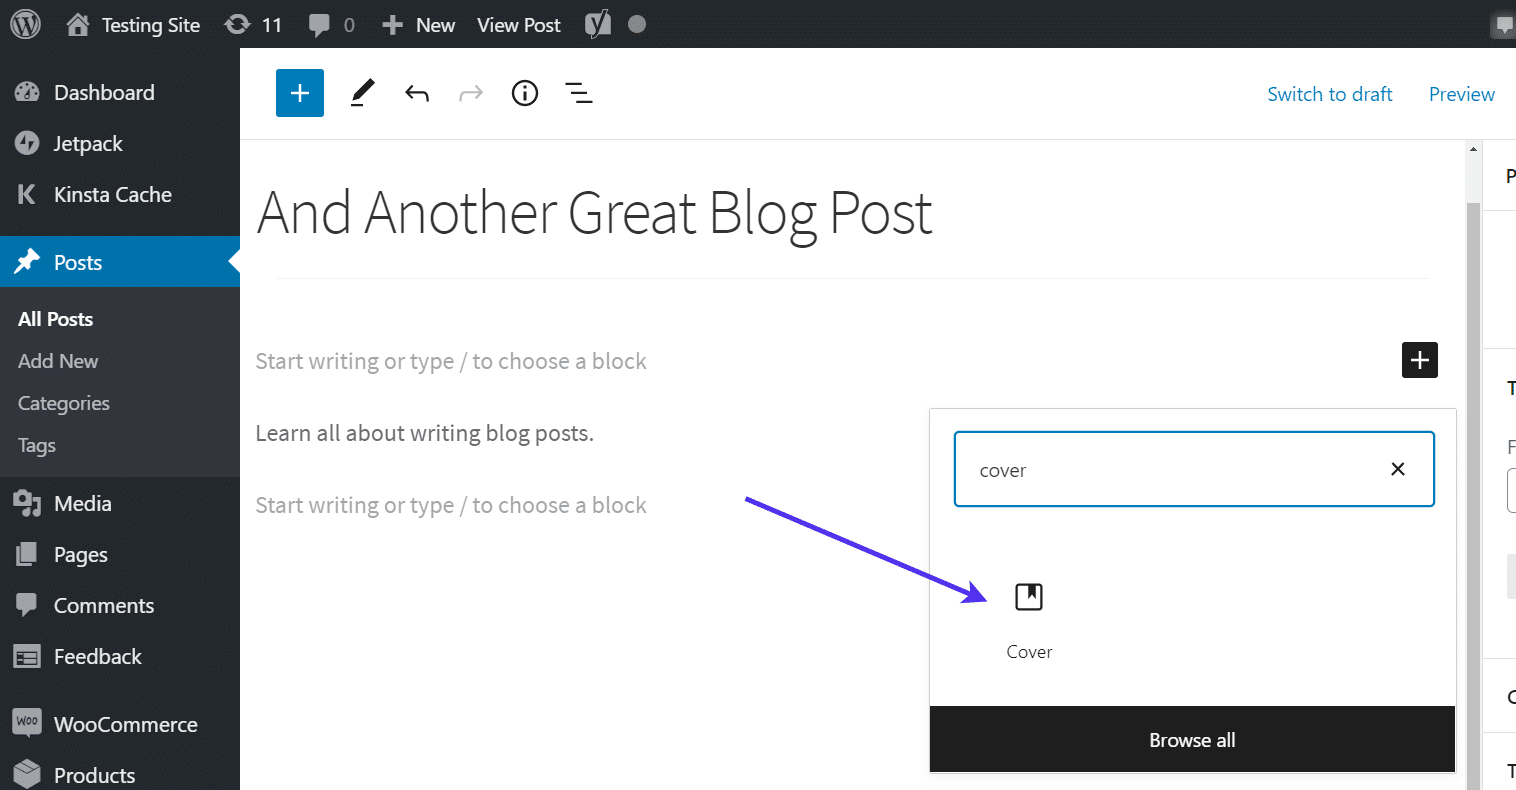
A Cover block, in contrast, is housed in the Gutenberg Block Library, which is accessible by clicking on an Add Block button in the editor. The Add Block button looks like a “+” sign.
You can search for the Cover block or scroll through the library to find it.
Click on the Cover block to insert it into your post or page.
The Cover block gets placed into the content editor, far away from the area in which we saw the featured image.
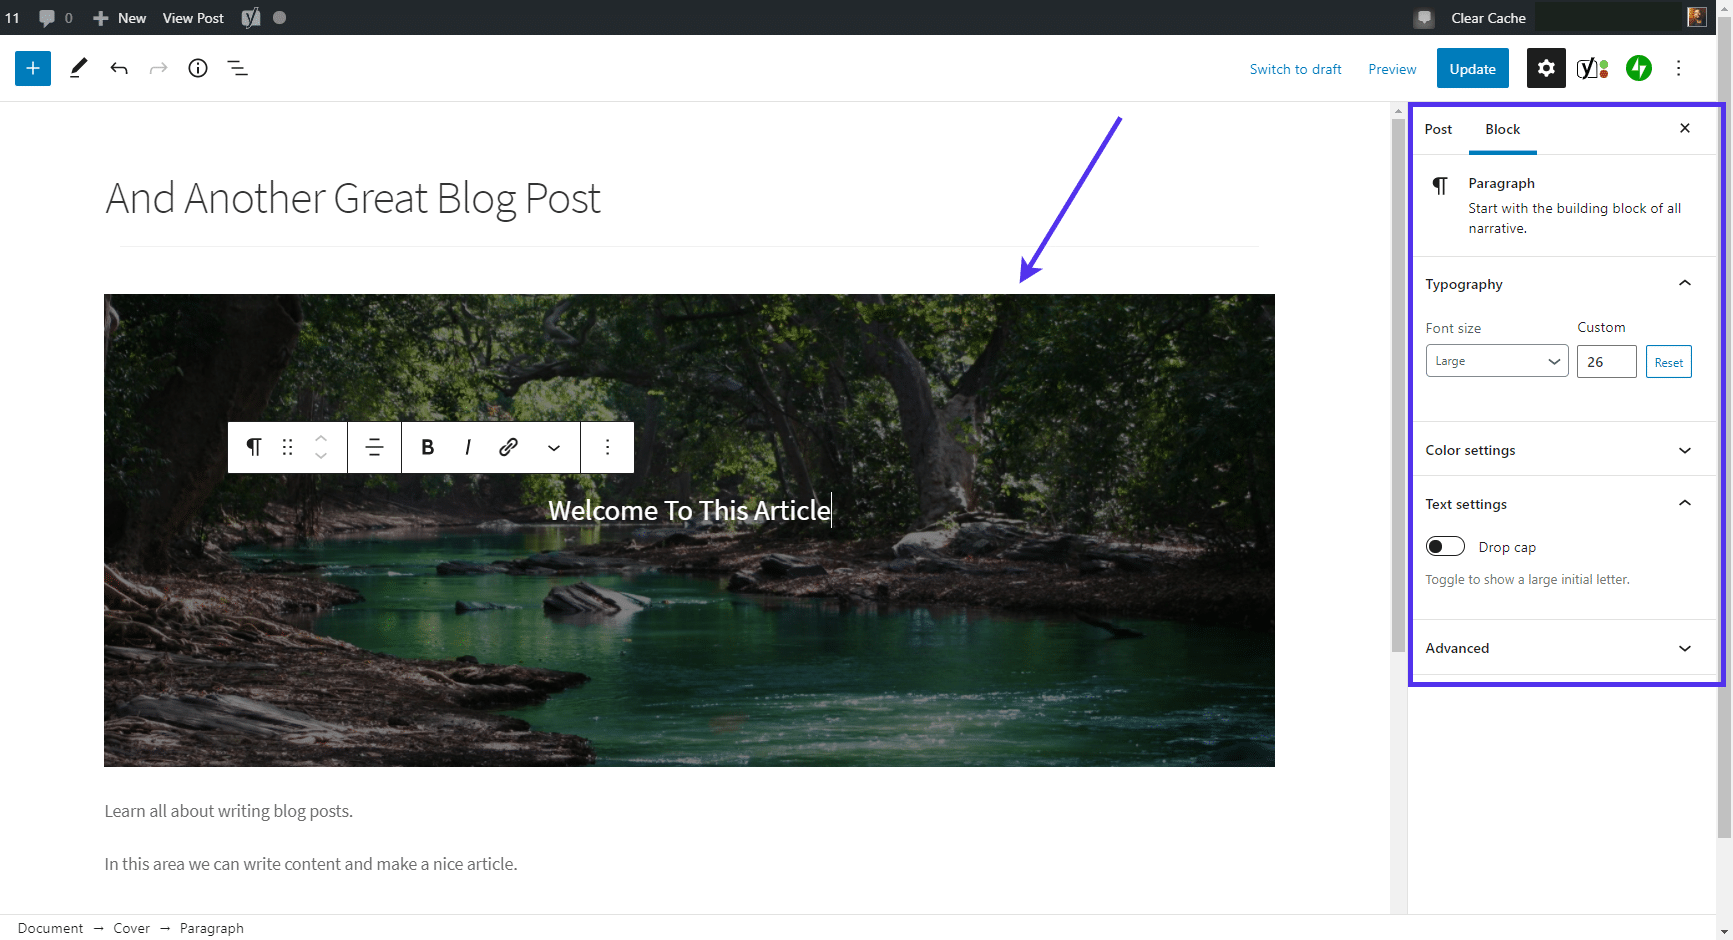
You can upload an image to be your cover by clicking on the Select Media or Upload buttons.
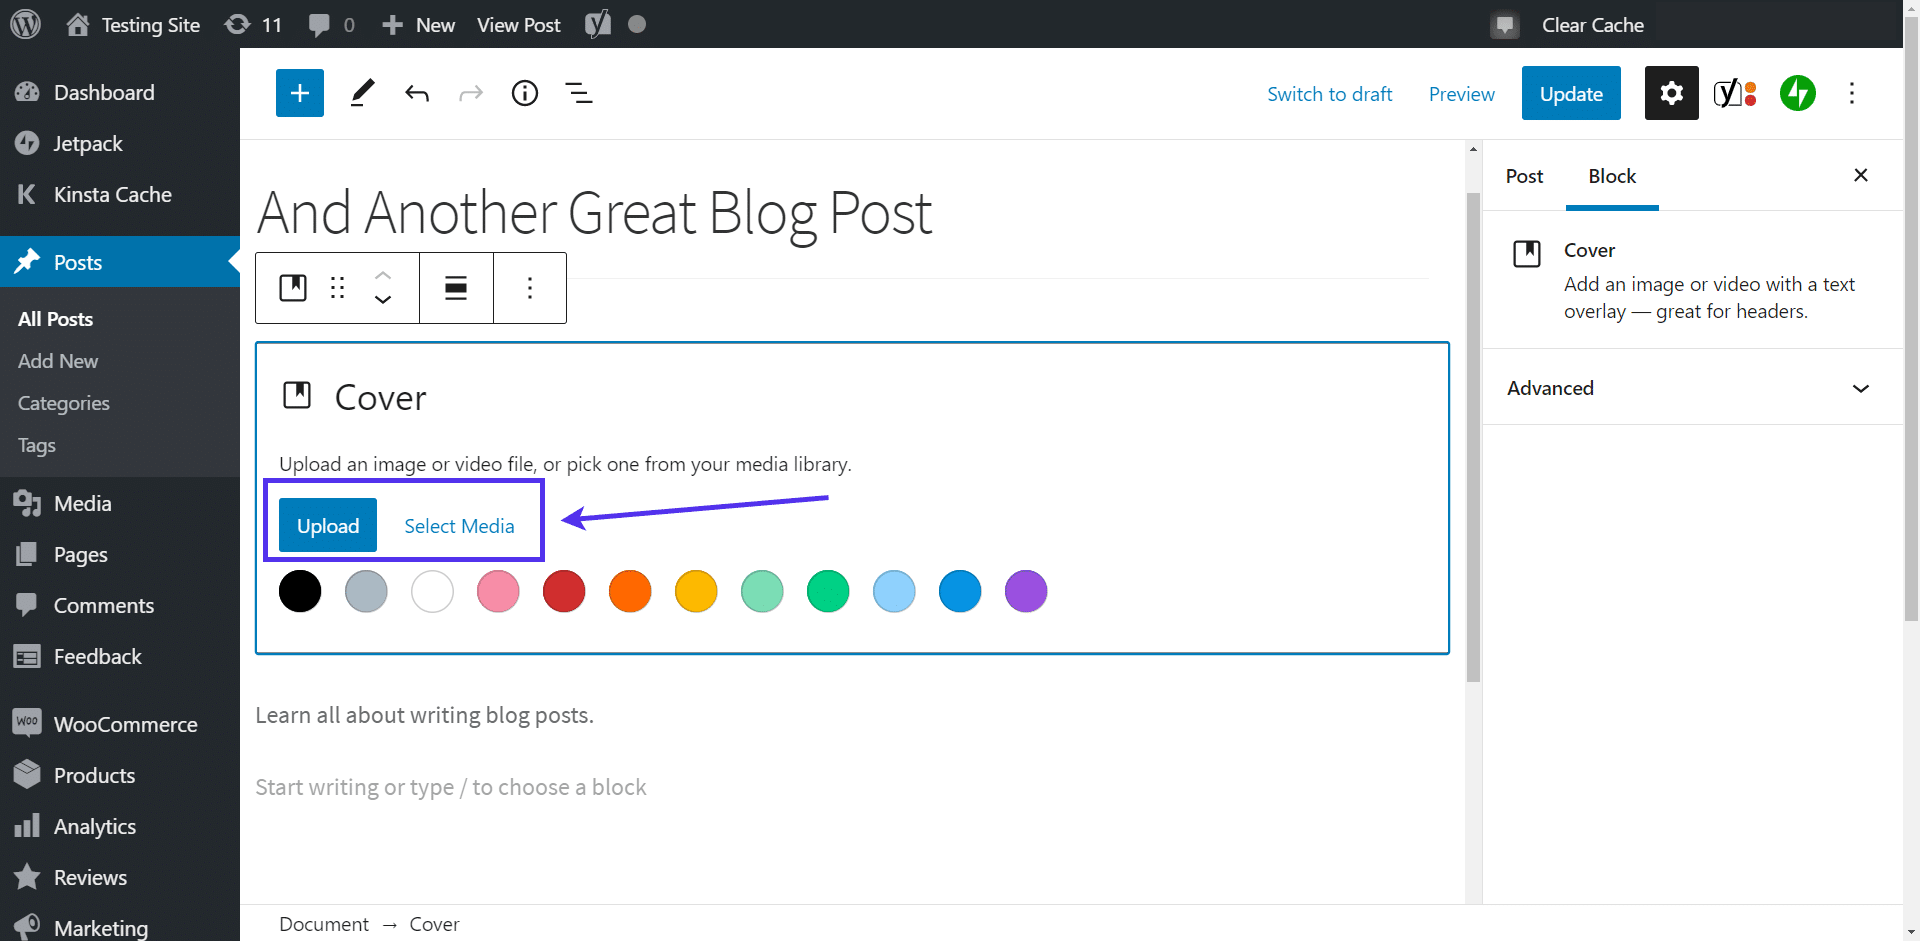
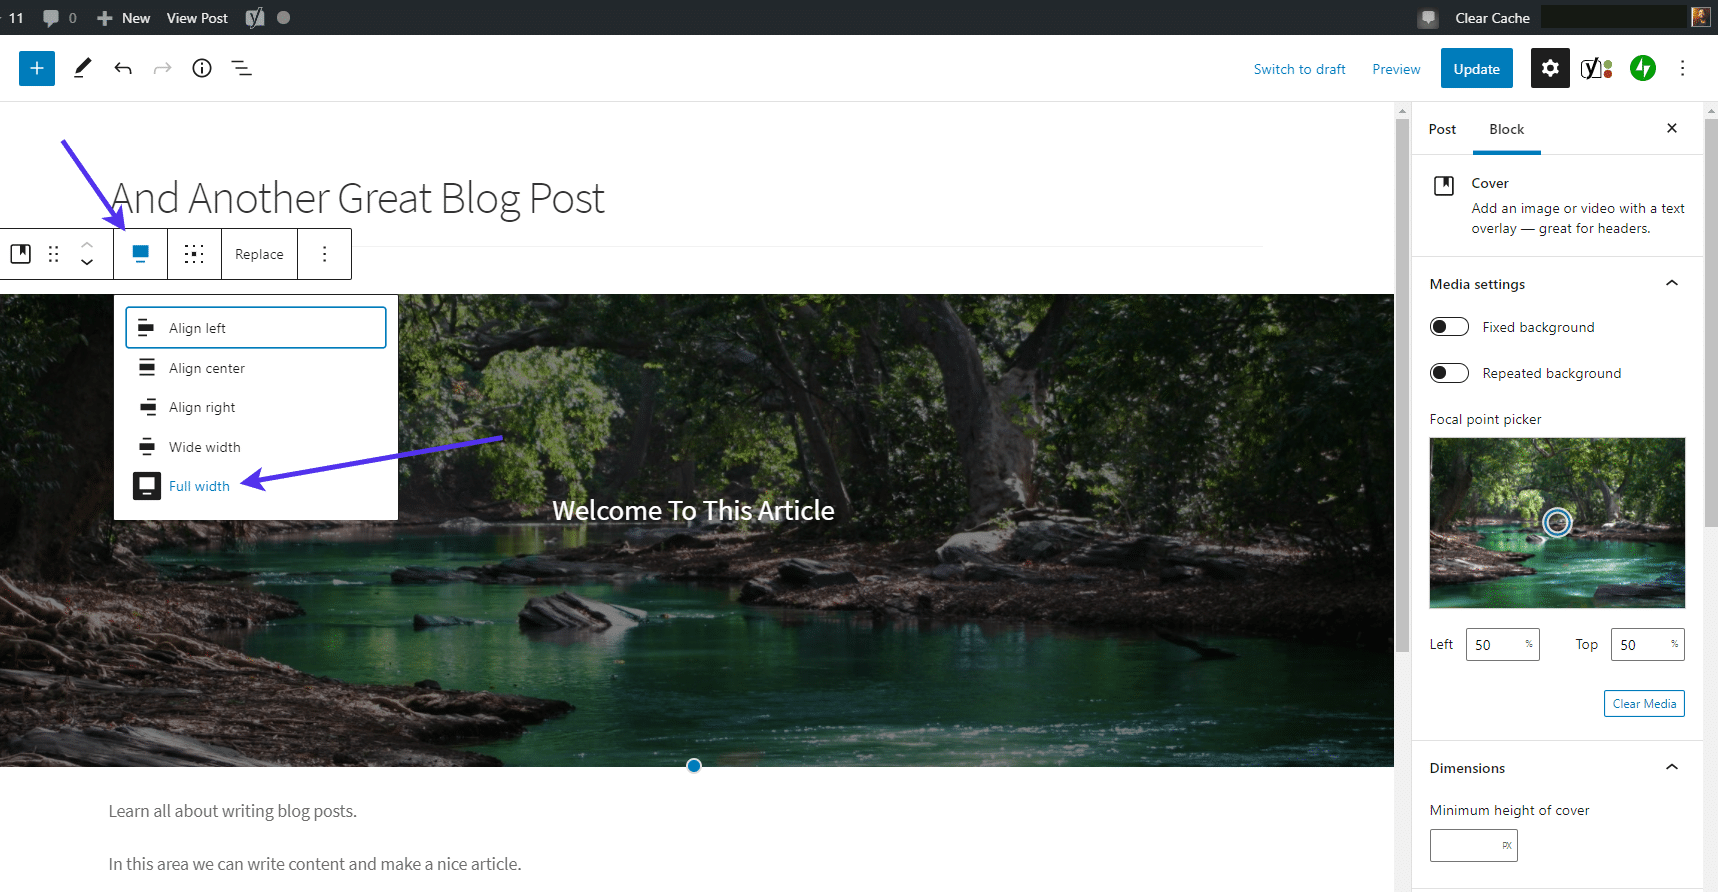
The new cover shows up in the editor preview, and you can also edit the block’s settings on the right-hand panel.
It’s also rather common to adjust the cover to fill the page’s full width, making it even more effective to introduce an article or a separator between sections.
Overall, if you’re editing an image, like a cover or a standard media item, you’re not using a featured image in the WordPress post or page editors.
This might be the root of your featured image problems. A cover image, or any image placed in an article’s content area, won’t show up elsewhere (like in a Recent Posts list) as the featured image.
What if There’s a Duplicate Featured Image?
Some WordPress users complete all the right steps to upload a featured image but realize that a duplicate of the featured image appears. You’ll typically see this happens on post lists or at the top of a page or post, resulting in two of the same photos stacked on top of each other.
It’s most likely because you’ve uploaded a featured image while also including the same image in your content as a cover or regular image. It results in an image duplication issue like this:
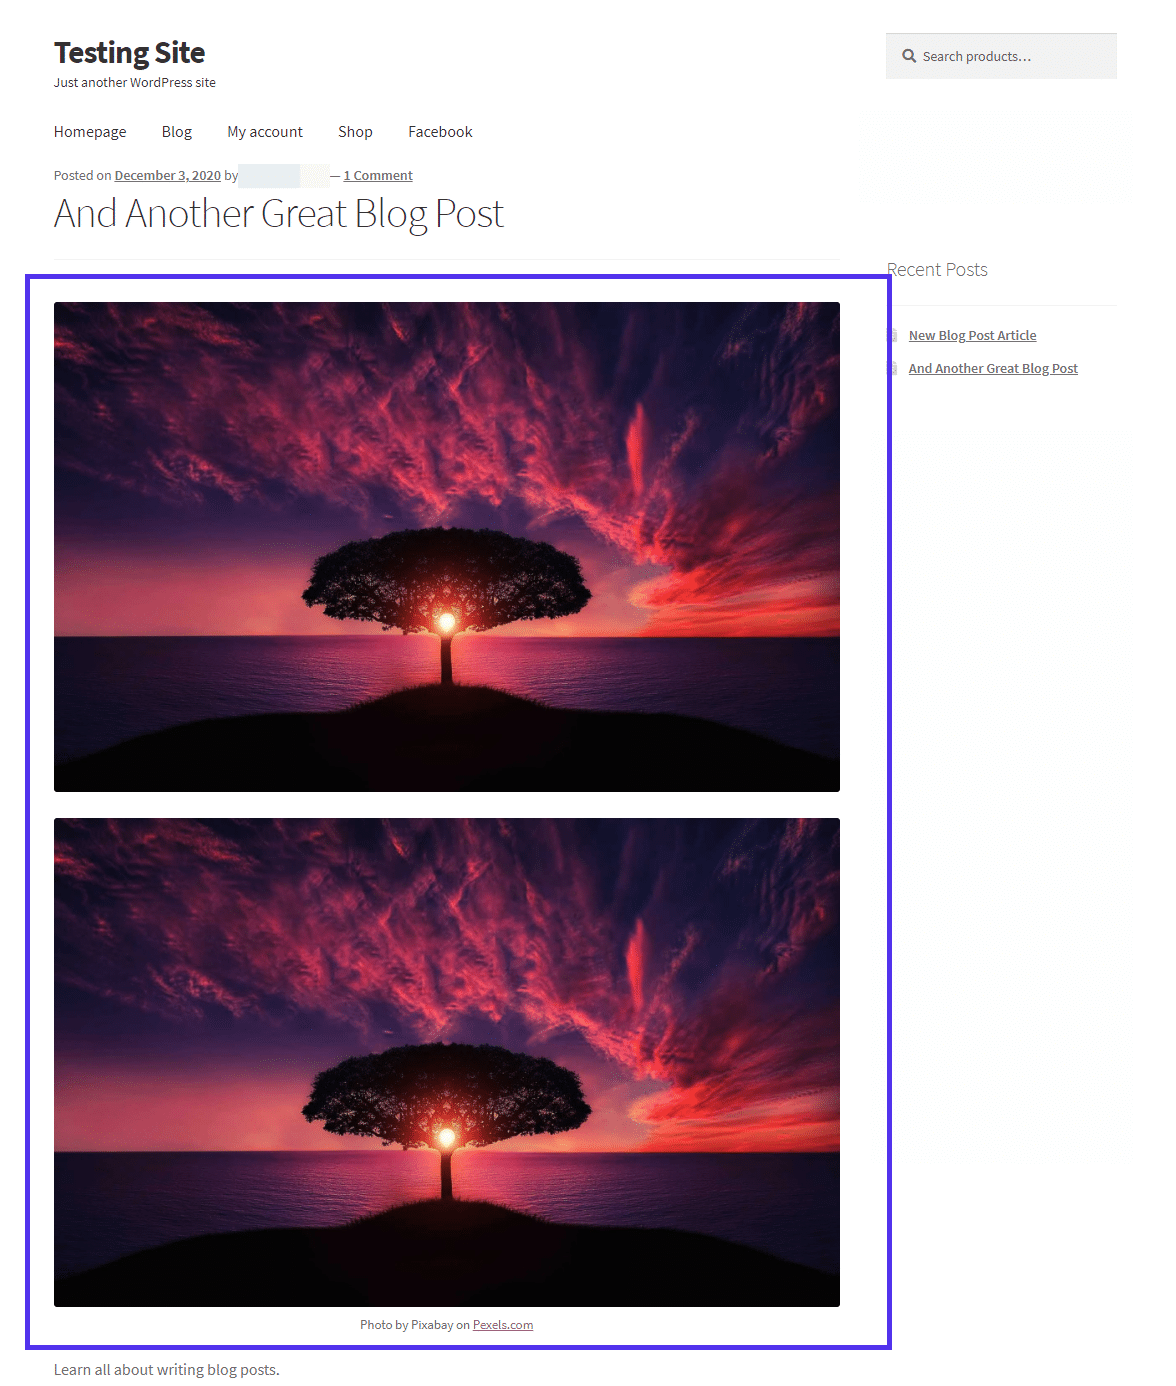
Obviously, you don’t want this. Usually, duplicate featured images aren’t two featured images, but one featured image and a separate photo in the article’s content area.
To check, go to the WordPress post or page editor in question. Locate the Settings panel towards the right side of the page. Then, select the Post (or Page if editing a page) tab to reveal the post’s settings.
Scroll down on that panel and open the Featured Image dropdown item.
If you see the same photo under the Featured Image tab and in your content, that’s causing the problem!
There are two solutions to this. First, you have to decide what you’re trying to achieve. If the goal is to have no featured image, you can remove it altogether.
We often encounter people who want that featured image and simply thought that the content editor was the place to put it. In that case, you should keep the photo under the Featured Image area and delete the one in the article’s content editor.

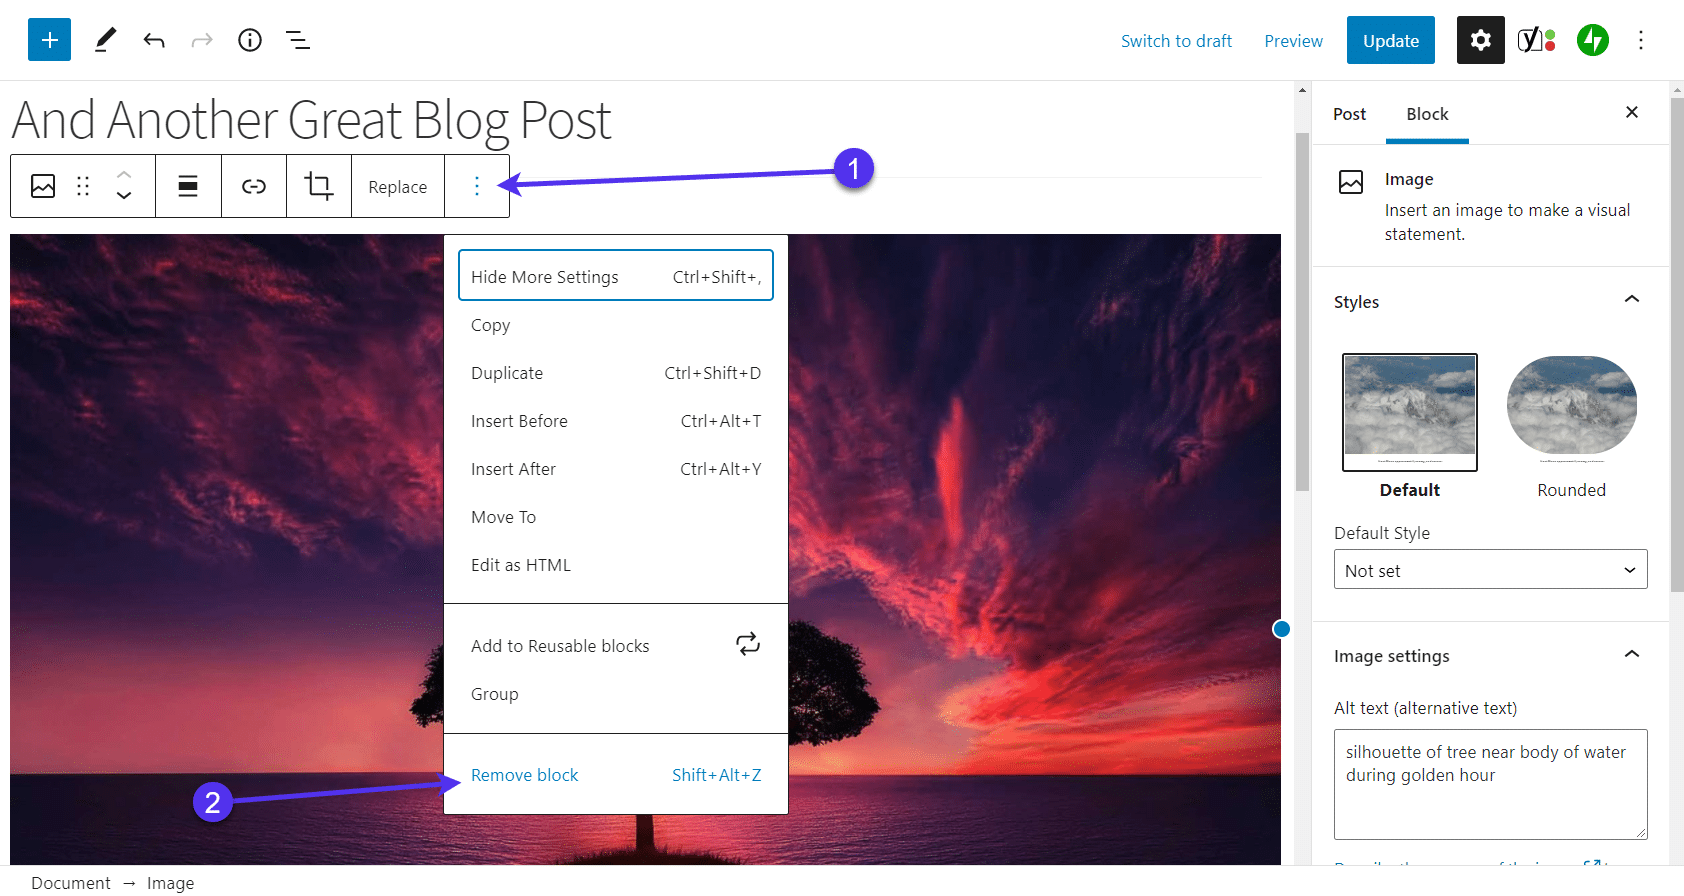
To remove that image block, click on the three-dot icon after selecting the image block.
Click the Remove Block option at the very end of the list.
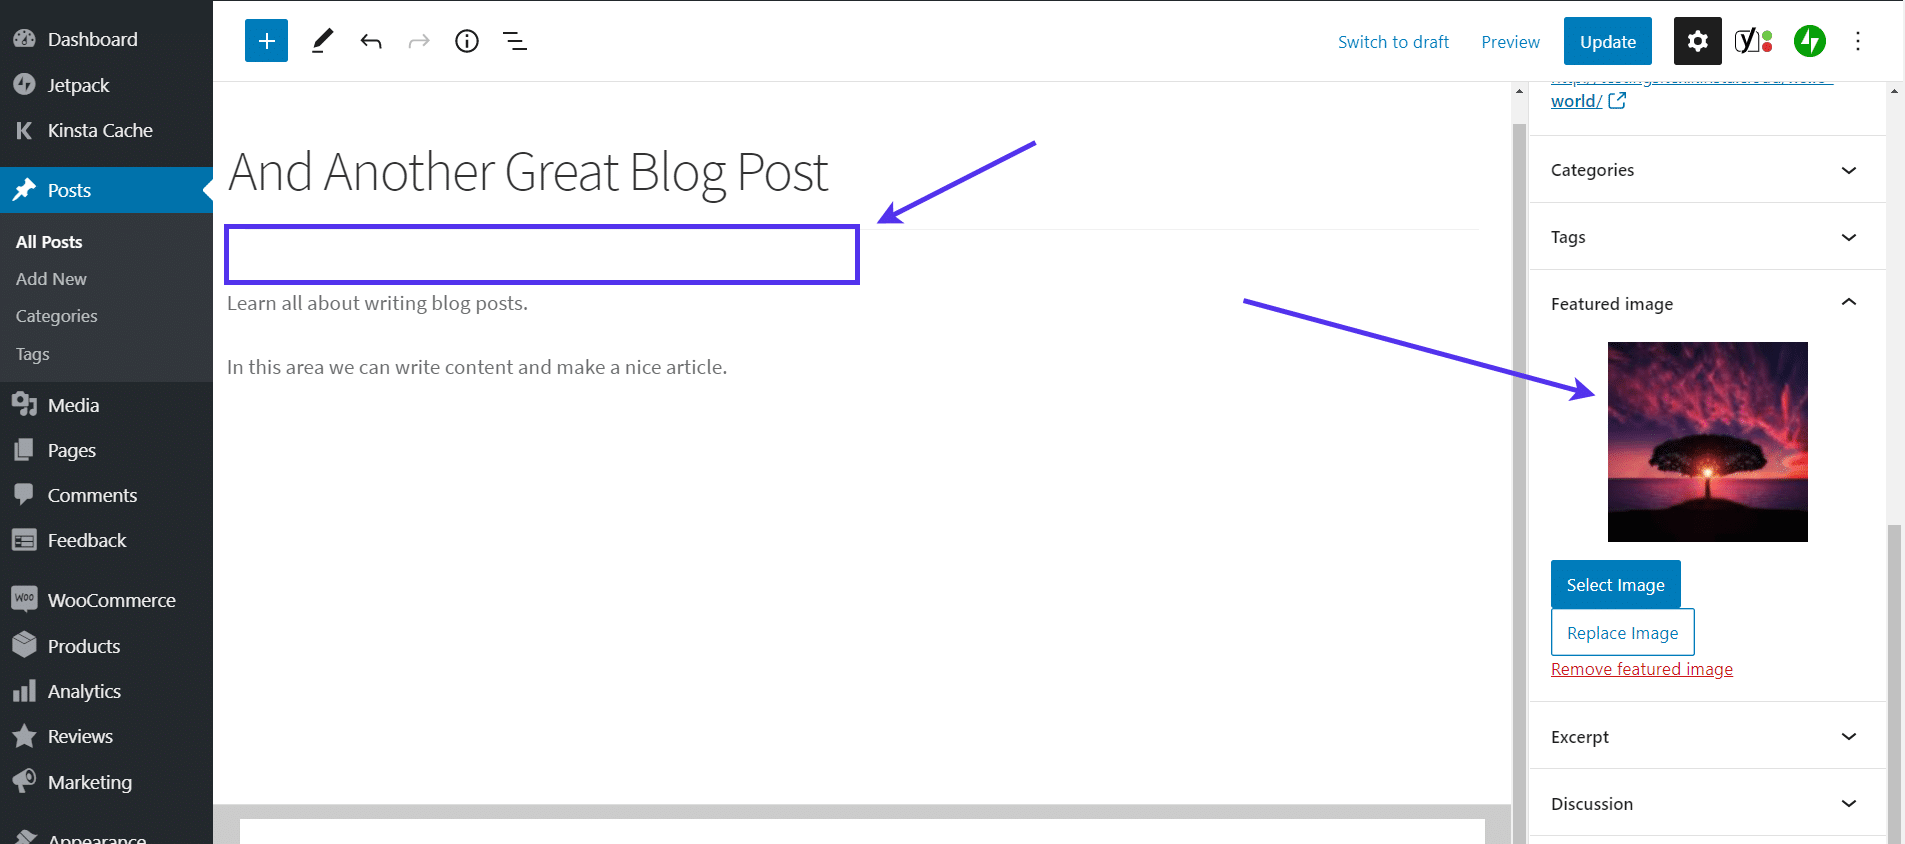
There should be no image at the beginning of the post now—just an image thumbnail preview in the Featured Image module.
That’s how it should be if you want the functionality of a featured image with no duplication!
What if the Featured Image Doesn’t Look Right?
You’ve figured out how to upload a featured image and completed your post content. The only thing to do next is to review and publish the post.
Unfortunately, you discover that the featured image doesn’t look quite as nice as you had hoped it would.
Maybe you encounter one of the following:
- The featured image is too small or too large.
- It’s stretched out or blurry.
- The thumbnail images aren’t showing up as the right sizes.
Luckily, WordPress already includes a wide range of photo editing tools for you to ensure the featured image looks professional. It’s also prudent to understand what types of photos work well as featured images, seeing how it may be the original photos causing the issues to begin with.
Understanding Which Photos Work Well as Featured Images
It’s a good practice to know which photos look good on WordPress. Not only that, but it’s essential to realize that featured images display differently when compared to a regular photo uploaded to a post or page.
Starting with dimensions, all websites, or more specifically, the website themes, have varying dimensions for featured images in posts. Figuring out the optimal dimensions before uploading the images allows you to minimize instances where the featured image gets stretched out or cropped strangely.
Though there’s no recommended size for a WordPress featured image, we suggest starting with 1200 x 628 pixels.
That means you can’t simply take any photo and expect it to look great as a featured image. You’re better off editing a photo to meet those suggested dimensions before uploading it to WordPress.
However, the 1200 x 628 pixels suggestion is just a starting off point. You may discover that your theme does well with slightly wider or shorter featured images.
Here are some general rules to follow before uploading your featured image:
- Stick with landscape sizes over portrait photos. Featured images look much better when the width is longer than the height—often around a 2:1 ratio.
- Upload multiple photo sizes on a test post and mark down the dimensions of each one. This should get you closer to the optimal featured image size for your theme.
- Avoid images that are way too large or small. Larger images get compressed and lose quality, while smaller images get stretched out and end up looking terribly blurred.
- Think about using the built-in image editing tools in WordPress for featured images that are already uploaded but could use some changes.
Another tactic for finding and setting the perfect featured image size is to visit the Media section of your WordPress dashboard.
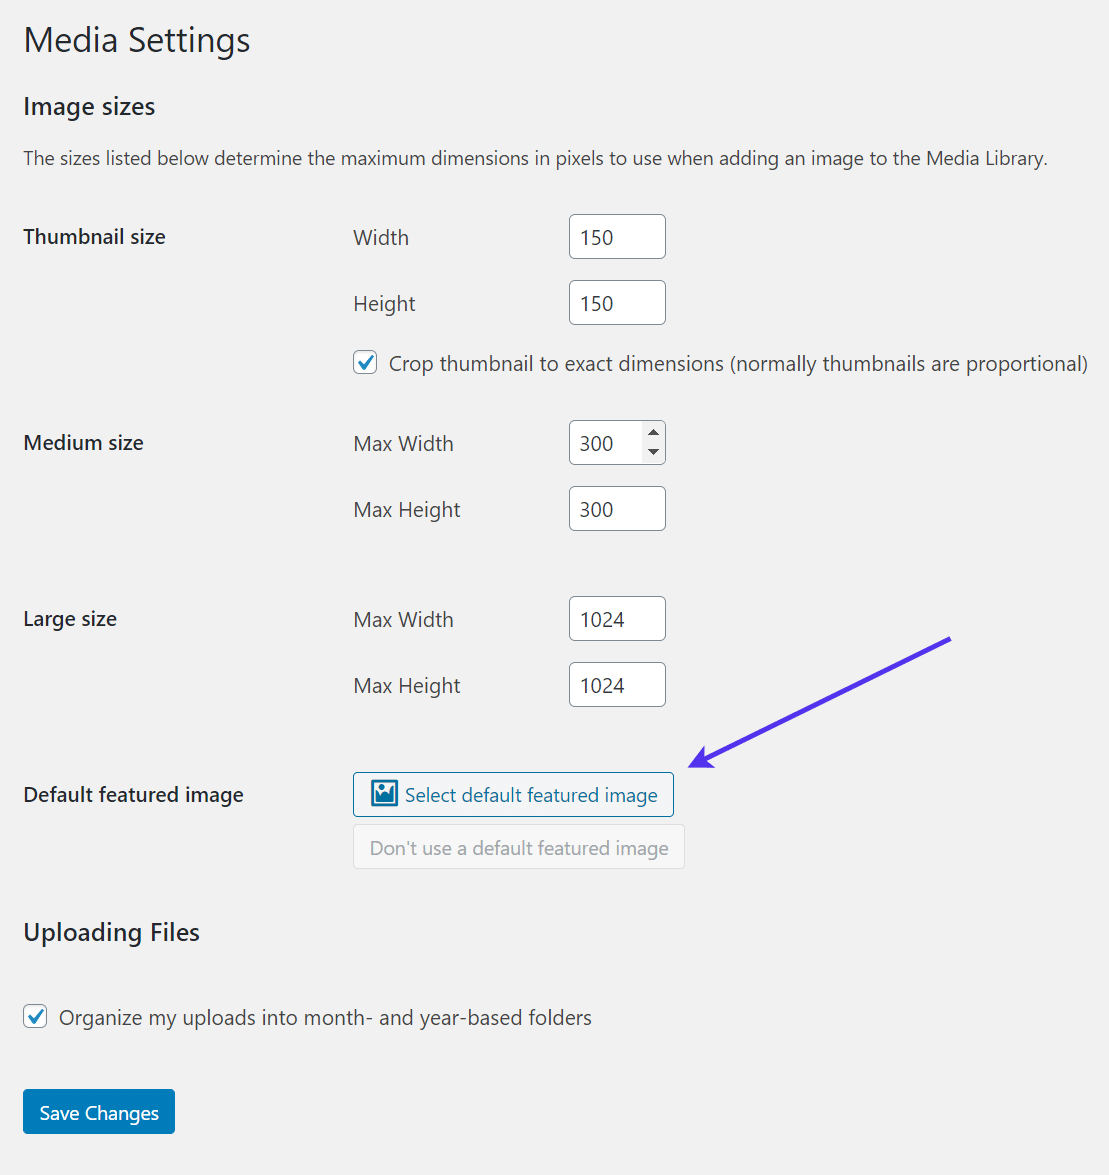
Go to Settings > Media.
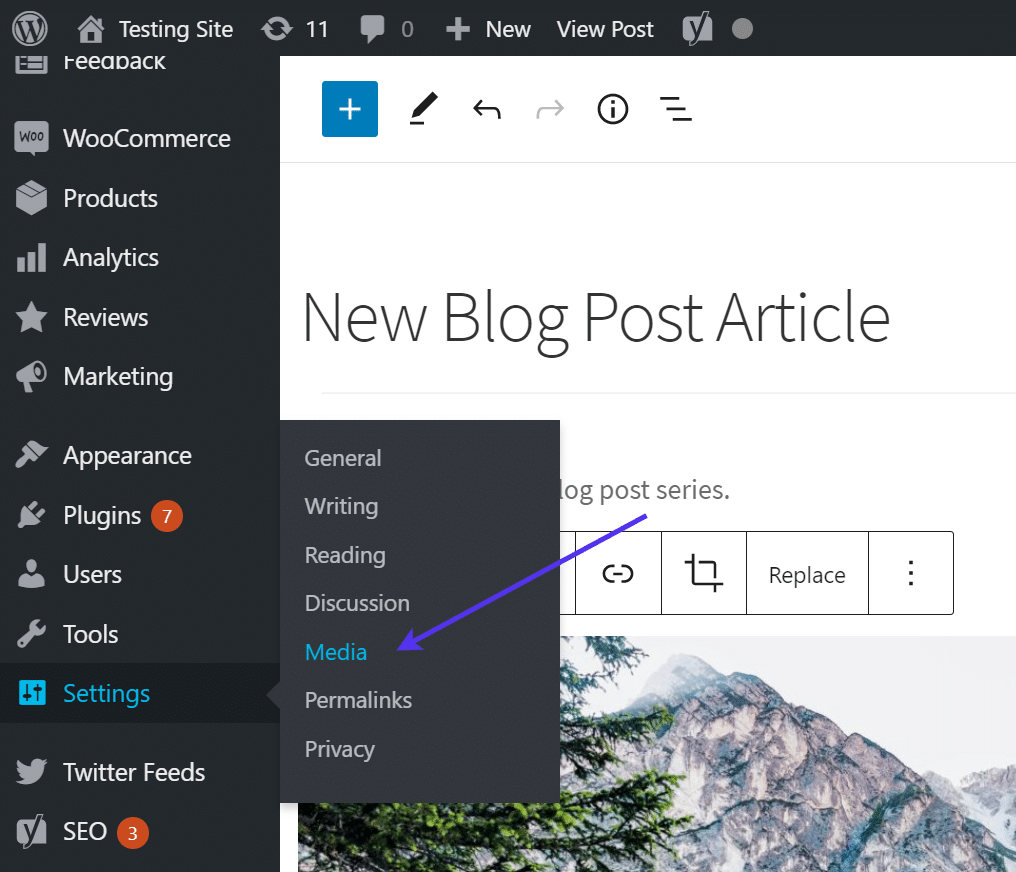
These are the general Media settings for your entire WordPress website. The set dimensions dictate the maximum dimensions you’ll see on your website for the given image sizes.
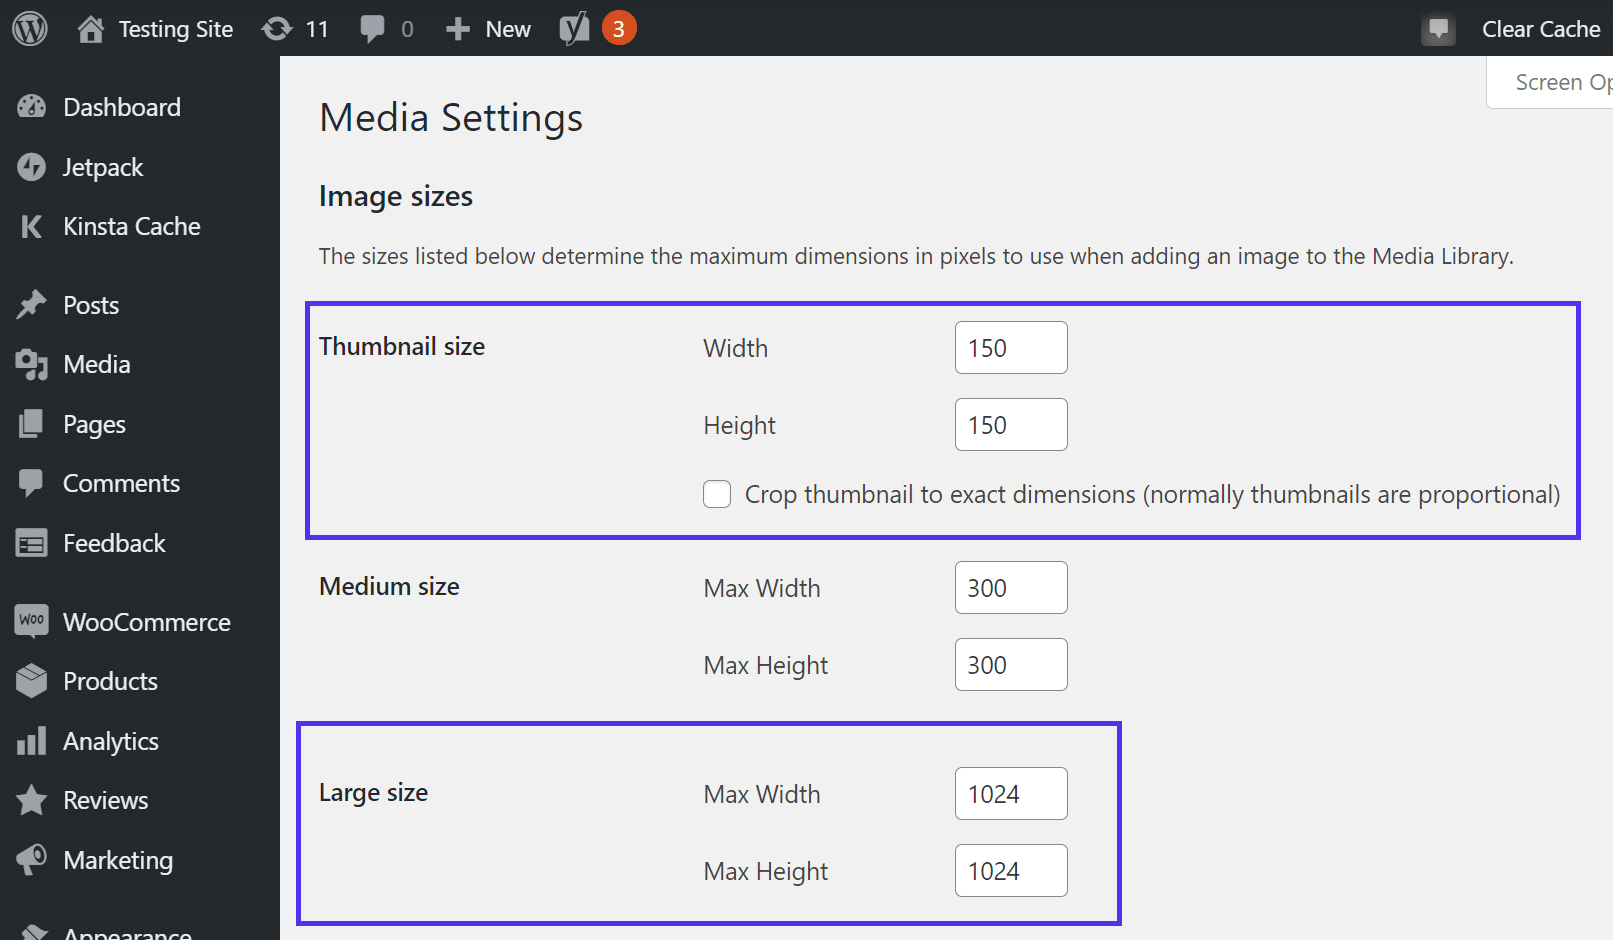
Three image sizes often get configured on WordPress: Thumbnail, Medium, and Large.
The Thumbnail size is the featured image shown in other parts of your website, outside of the post itself. For instance, you may see the featured image appear on a list of Recent Posts or a blog feed on your homepage.
You have the option to crop the featured image thumbnail to the exact dimensions. As an alternative, it’s often a better idea to leave the Crop Thumbnail box unchecked, so the Thumbnail dimensions are used as more of a guideline. This way, the thumbnails remain proportional, and you don’t see any unexpected cropping effects.
The Large Size often dictates the featured image dimensions when shown at the top of a post or page. Sometimes other settings override this, but it’s not a bad idea to mark down the dimensions to ensure you at least know the optimal width for a featured image.
The max height shouldn’t matter as much since your featured images shouldn’t be that tall.
How to Edit Featured Images Inside WordPress
Editing a featured image in WordPress is often the easiest and quickest way to resolve an issue with a featured image that’s too large or needs some cropping done.
We usually recommend editing an image before uploading it as a featured image (third-party editing tools have more advanced features). Still, WordPress provides simple editing features which may prove easier for some users, or for those who want to edit featured images that have already been uploaded to WordPress.
To edit featured images in WordPress, open a post and scroll to the Featured Images section in the Post Settings panel.
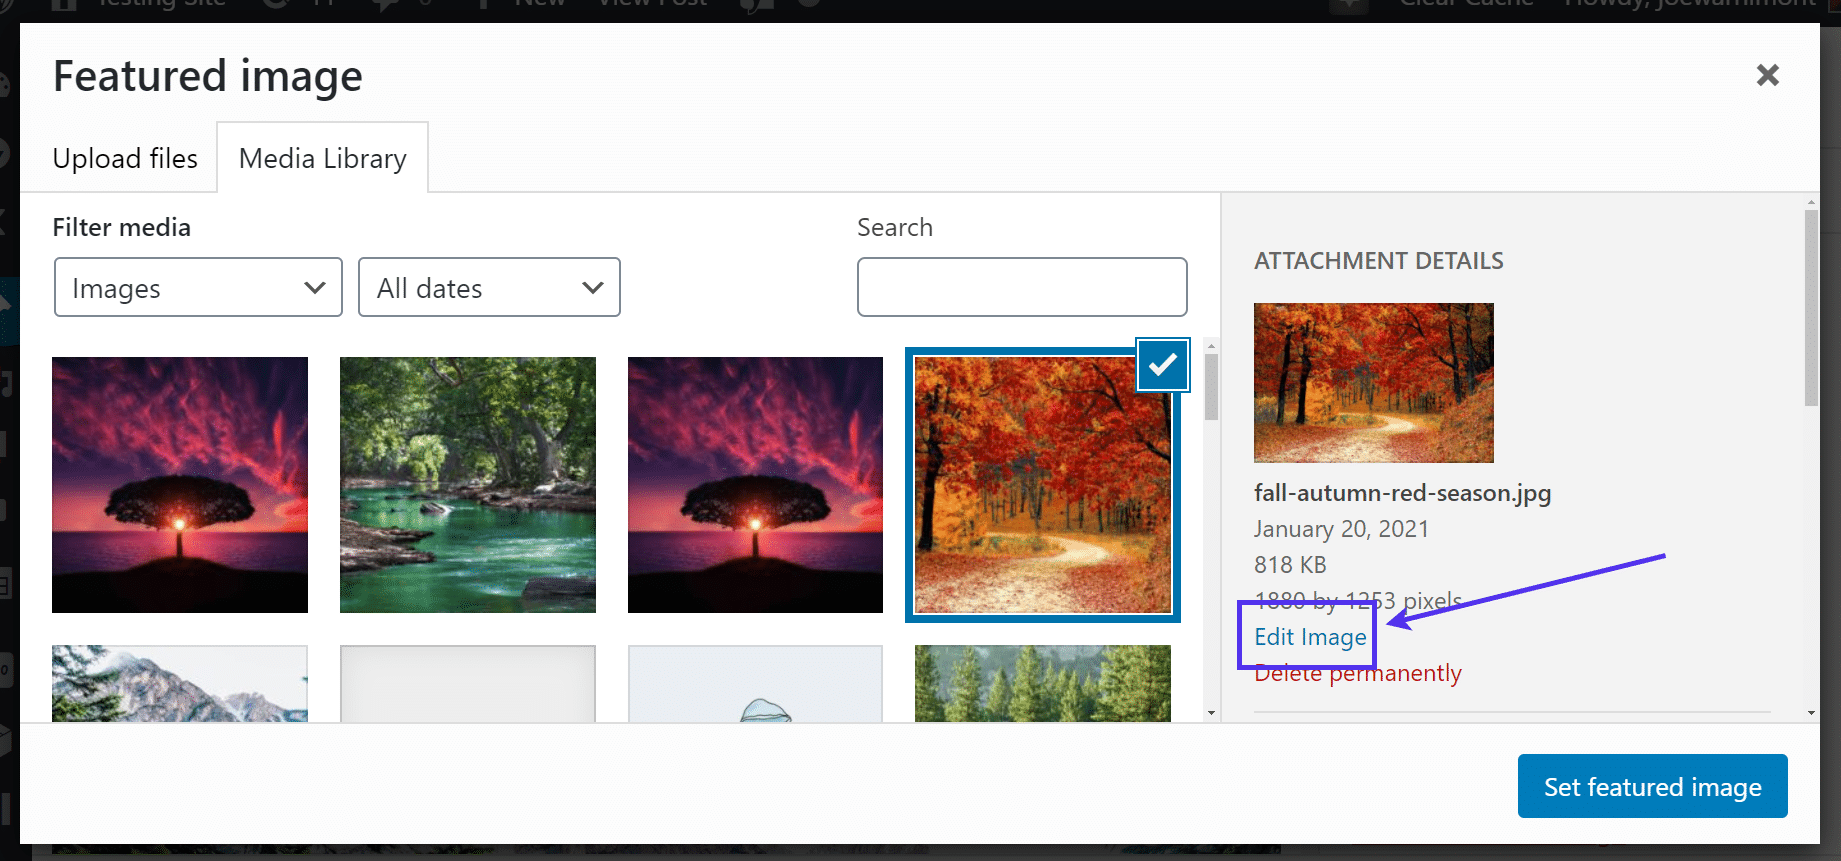
Click the featured image thumbnail to access its various settings. It’s also possible to locate all images on your WordPress site by going to the Media Library.
Make sure the right featured image is selected in the Media Library.
Click the Edit Image link to proceed with the edit.
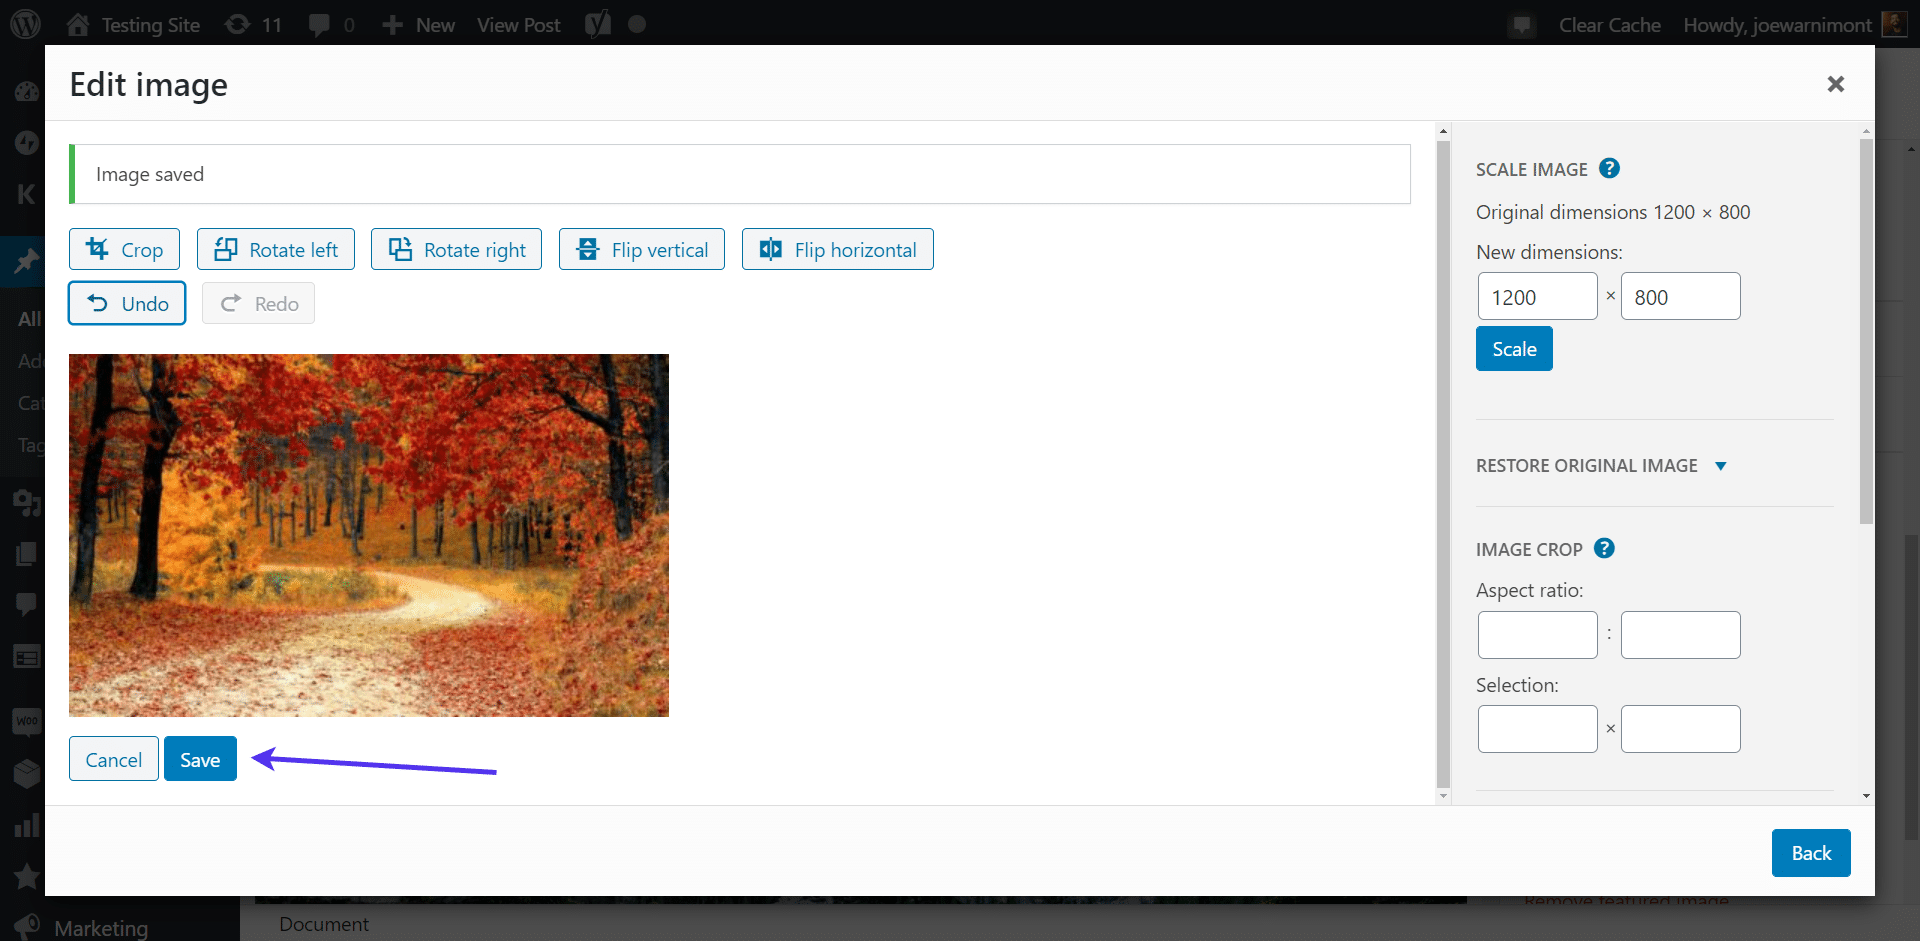
Several tools are available in the Edit Image pop-up, but the most trusty of them is listed on the right side, and it’s titled New Dimensions.
This allows you to type in new dimensions, both the width and height, so that the already uploaded featured image shrinks. We don’t recommend trying to enlarge an image as it’ll only make it blurry.
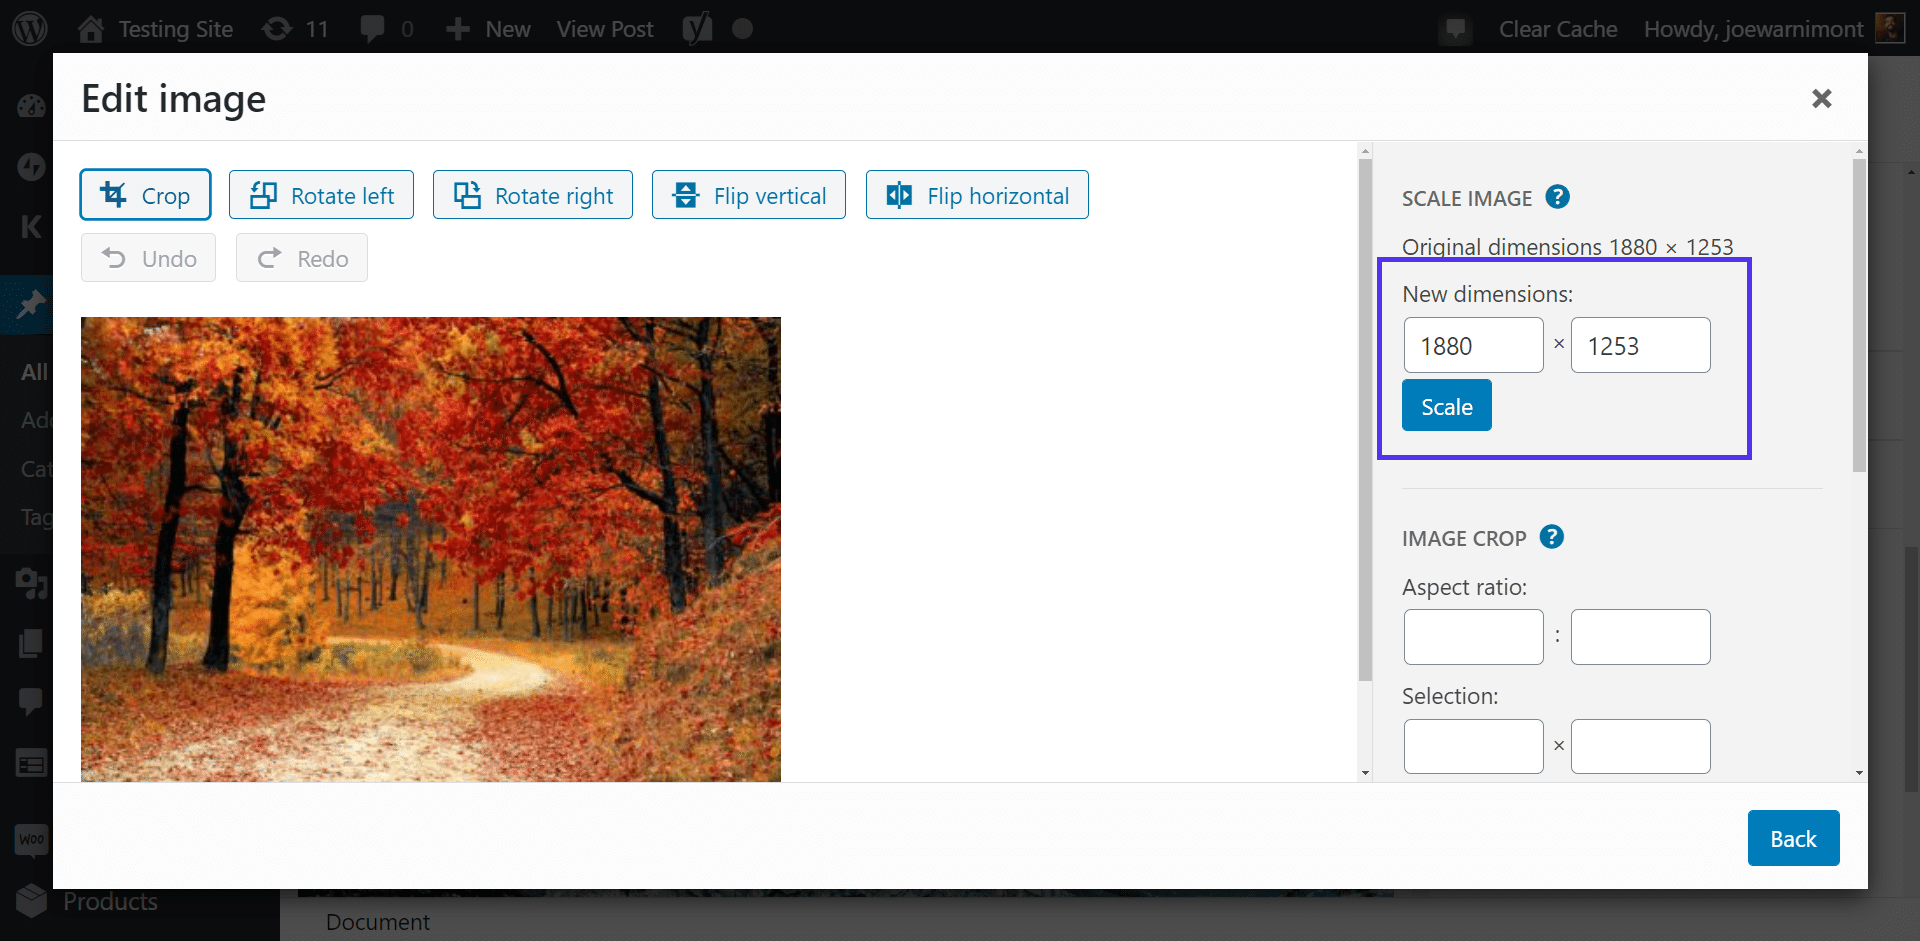
Type in the new dimensions and click the Scale button.
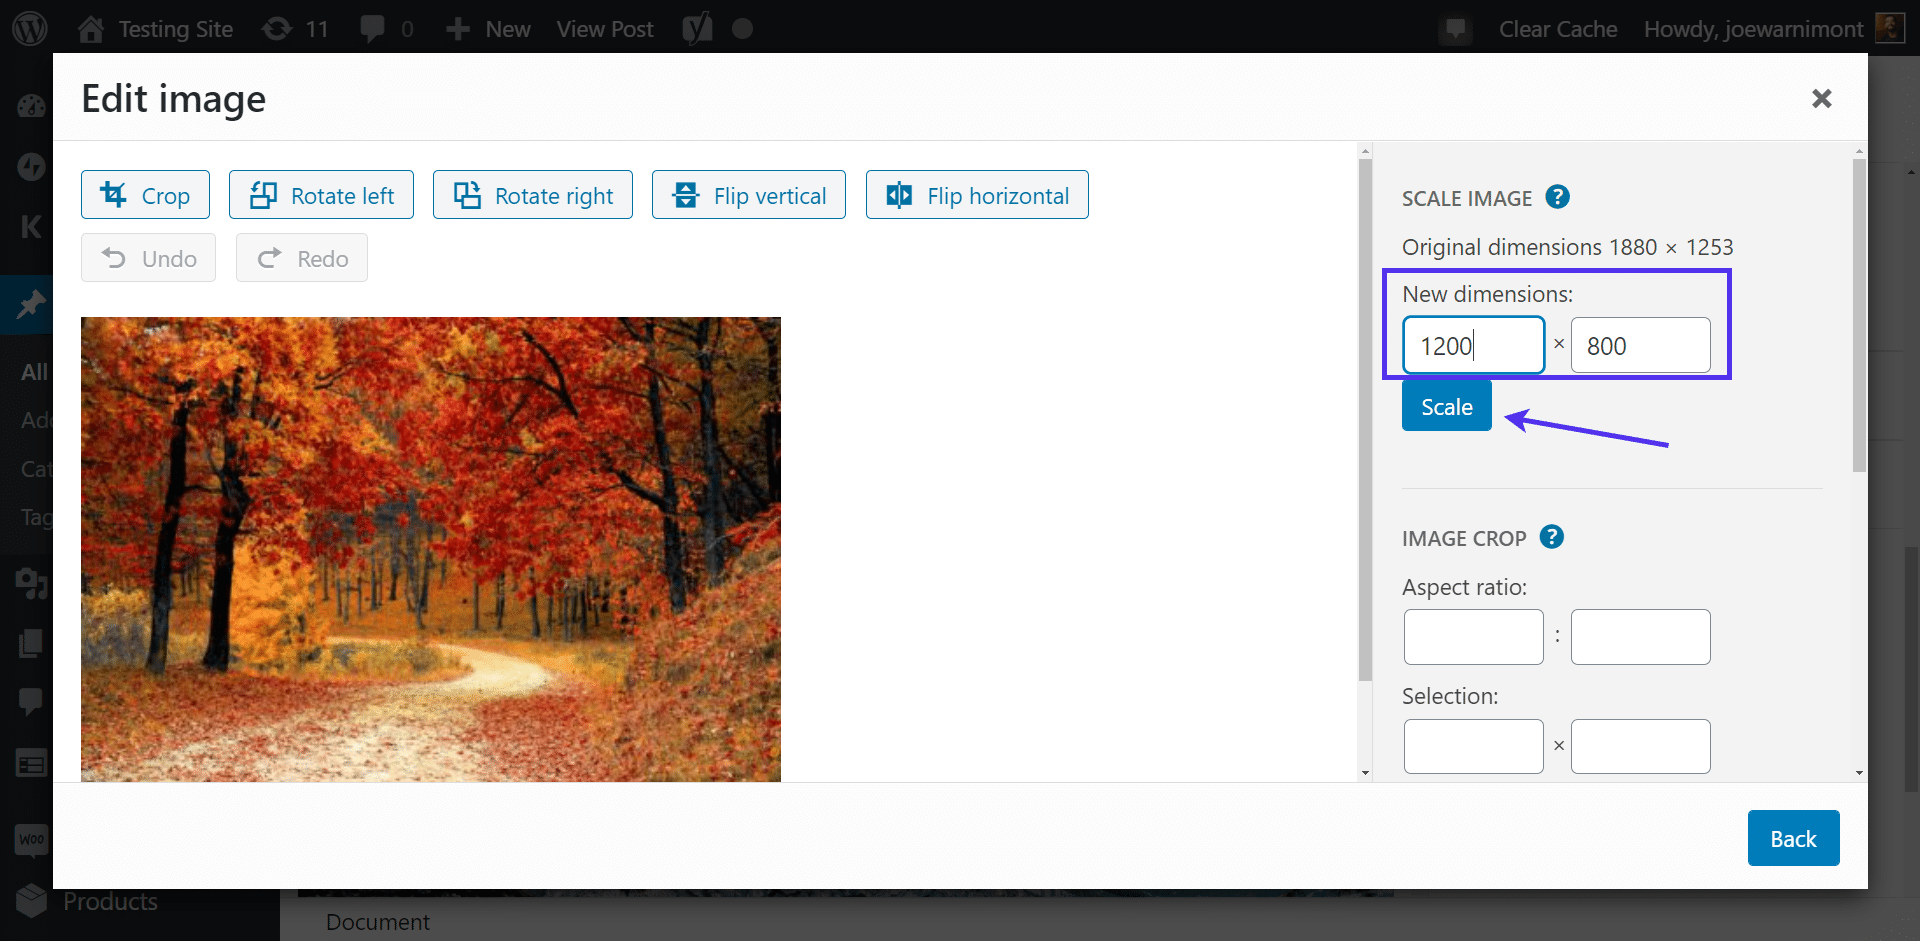
The preview image should look a bit smaller than before unless the change is so minuscule that you don’t notice it.
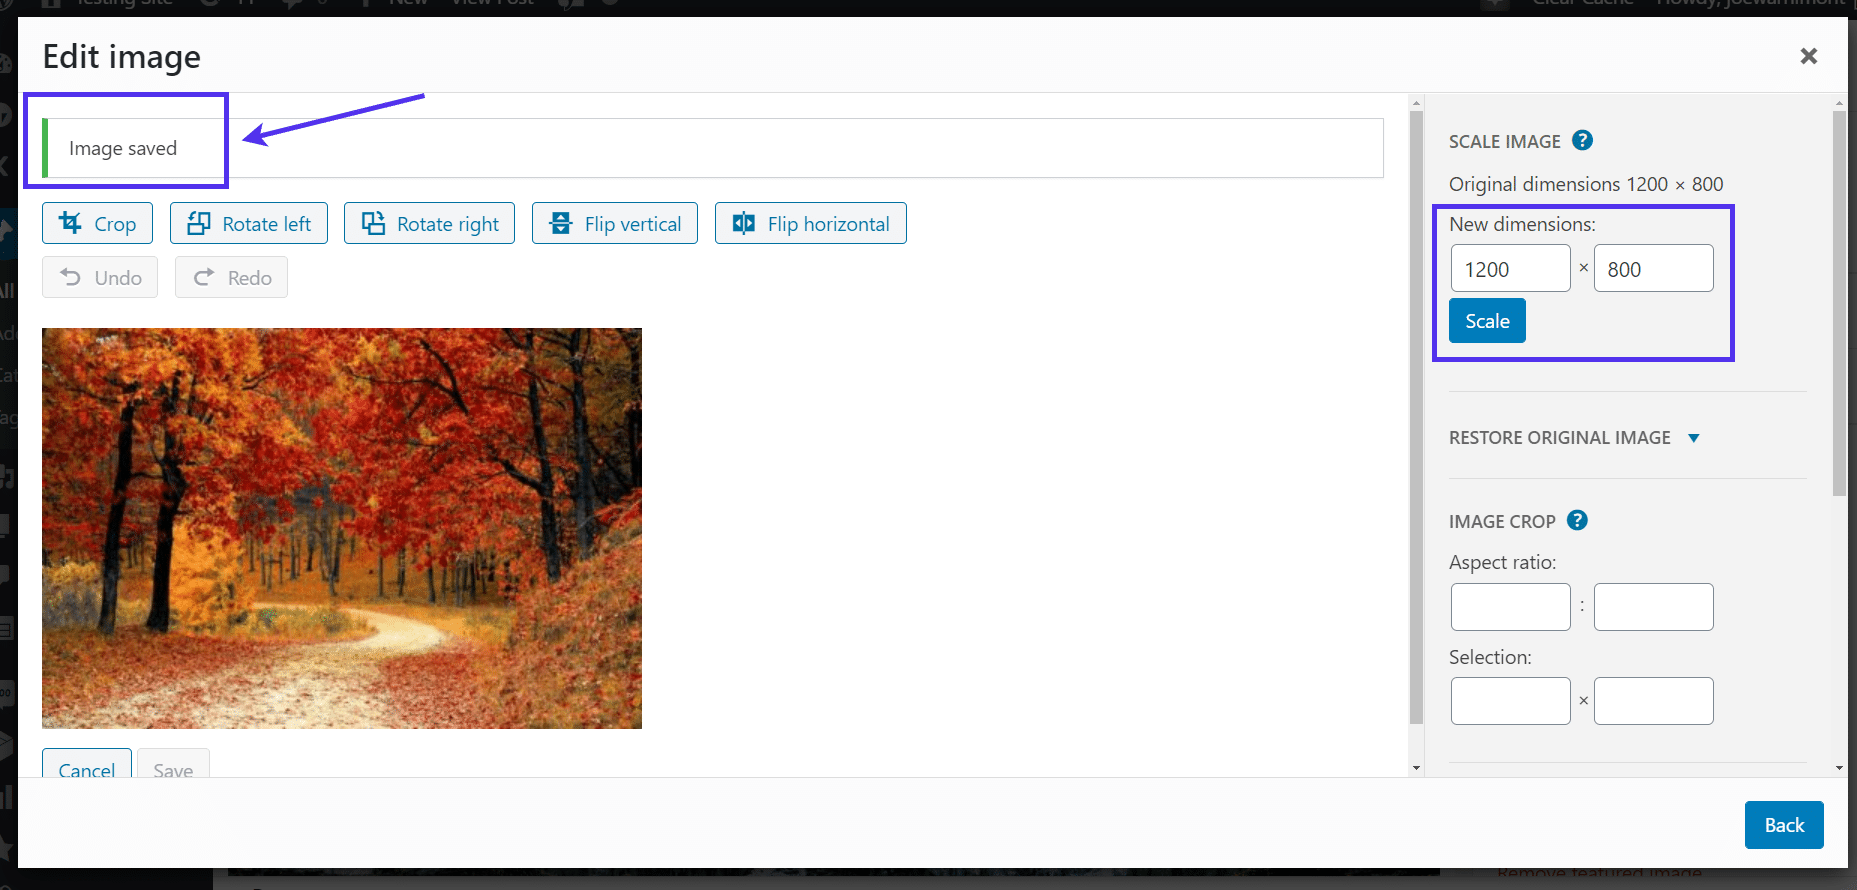
You’ll see a message that tells you the Image Saved. The new dimensions are also listed on the right side of the pop-up window.
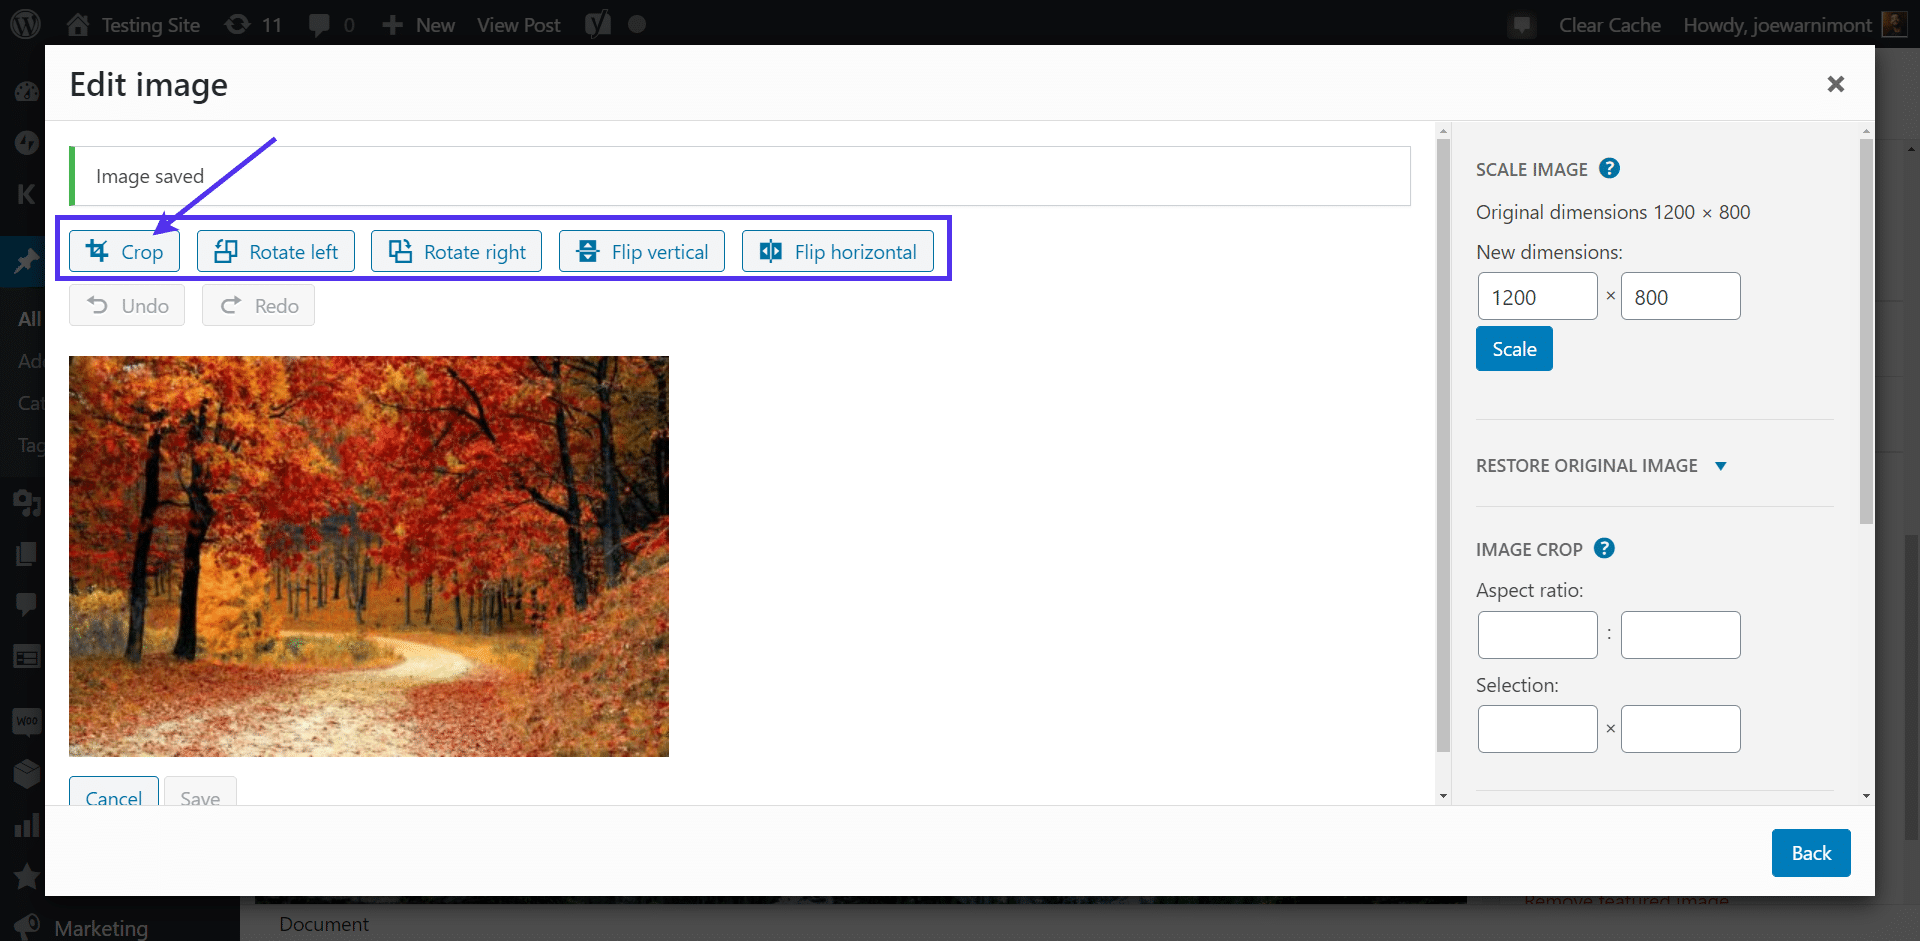
All other image editing tools are located above the featured image preview.
Some of WordPress’ built-in image editing features include:
- Crop
- Rotate Left
- Rotate Right
- Flip Vertical
- Flip Horizontal
The Crop tool is usually the most important, so click on that to activate the edit module.
The Crop tool reveals a square within the preview thumbnail, asking you to click and drag the crop box so that it gets to the exact dimensions you desire.

Hit the Enter key to activate the crop and see the result in the preview. You also have the option to Save the crop, even though it’s done for you.
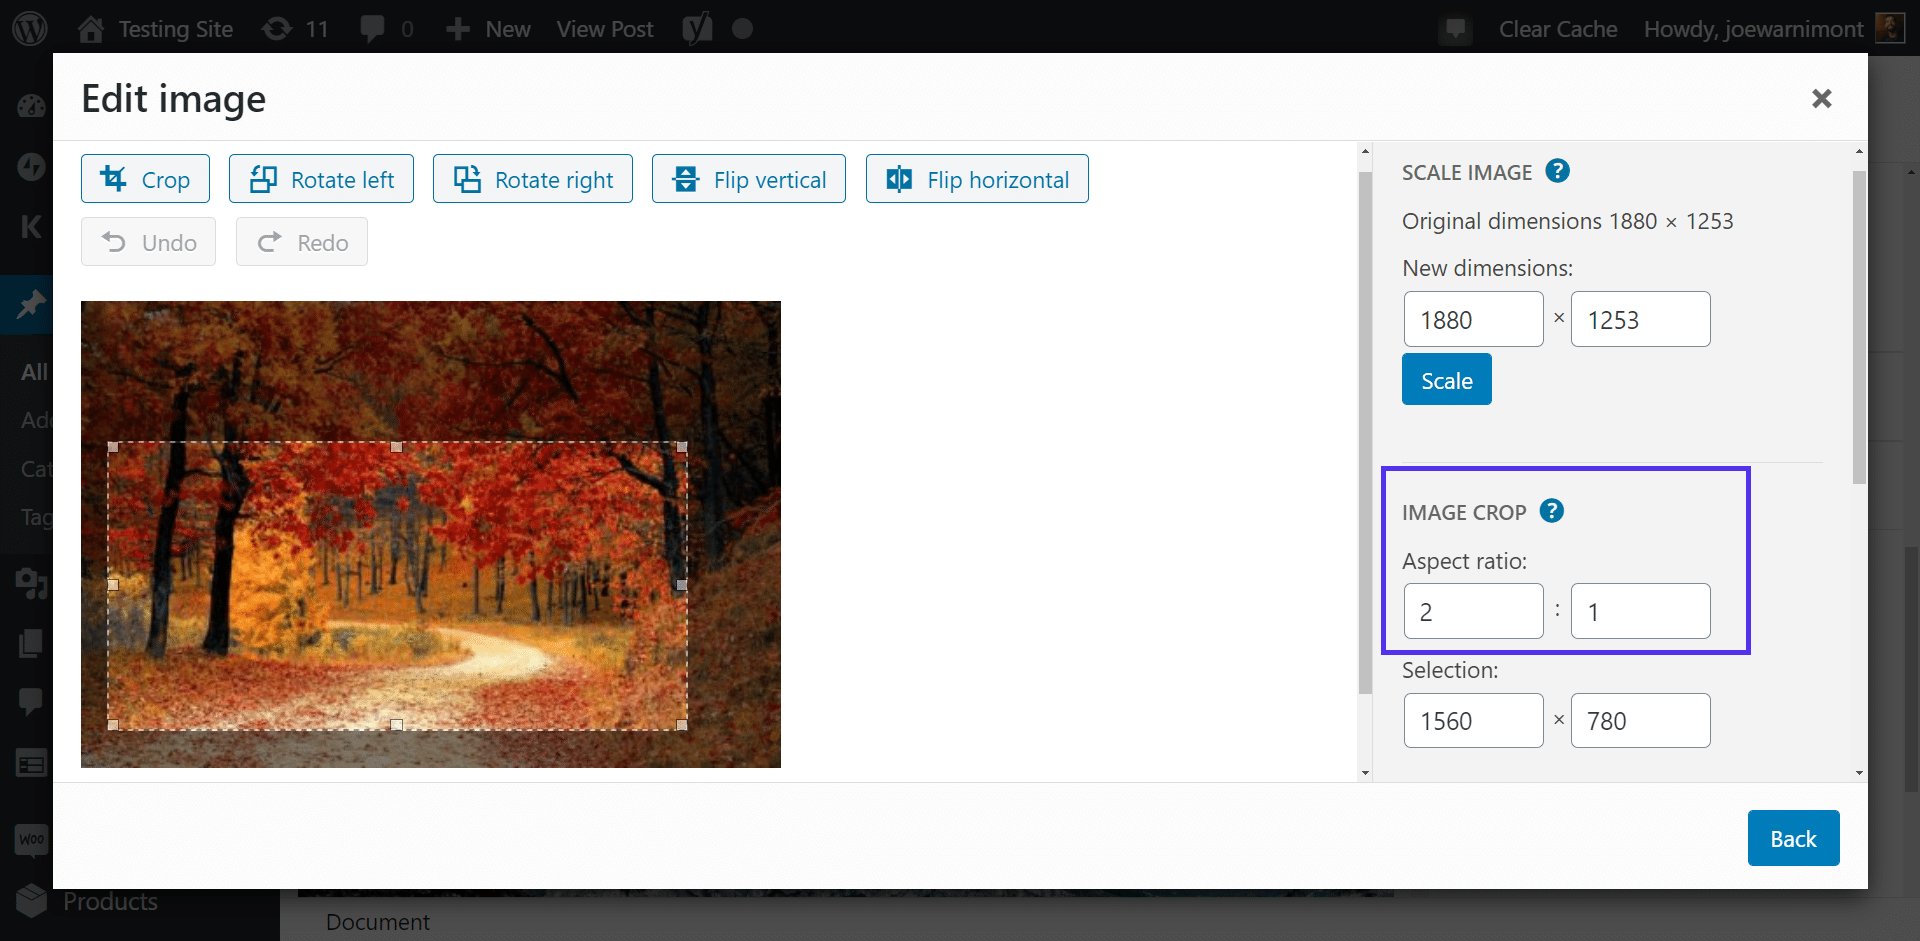
The last way to edit featured images in WordPress involves cropping the image but maintaining a certain aspect ratio. This means that as you move the crop box, and it sticks to the aspect ratio.
For instance, you could type in a 2 x 1 aspect ratio. After that, every time you drag the crop box, it will always keep to the 2 x 1 ratio, giving you less freedom to crop and ensuring your ratio remains consistent when creating featured images.
Whenever you’re done editing an image, you can click Enter to active the edit, and then Save the image. After that, you’re able to insert the new version of that image into a post, page, as a featured image, or wherever you want it to show on your site.
Furthermore, there’s an option in the Edit Image panel that lets you revert to the original dimensions whenever you want.
Fixing WordPress Featured Image Not Showing on Pages and Posts
If you’ve uploaded your post’s or page’s featured image correctly and it still doesn’t appear, then there can be several reasons. Though, it varies depending on your WordPress site’s configuration, theme, and plugins. Here are some common reasons that lead to issues with featured images in the first place:
- Getting an HTTP error when trying to upload an image, which could mean problems with the upload limit or image formats.
- Search engines may block featured images that contain suspicious coding or malware.
- Permissions are blocked for your user type to access that page required to upload or see a featured image.
- Your theme, or a plugin, has an error or is causing a conflict with your featured images’ working.
- The theme doesn’t allow for featured images, or you have to turn them on through the theme settings.
- You may be having trouble uploading the featured image the right way.
- You may find that the theme coding doesn’t support a featured image.
- A lazy loading plugin may be preventing the featured image from showing up or loading quickly.
- The featured image may not be in the right place inside the page or post template.
- Your dashboard settings could have the featured image fields completely turned off.
How to Fix an HTTP Error with Featured Images
A few errors are more common than others when uploading images to the Media Library in WordPress.
Luckily, as WordPress has evolved, the errors have become a little less ambiguous, making it somewhat easier to determine their cause.
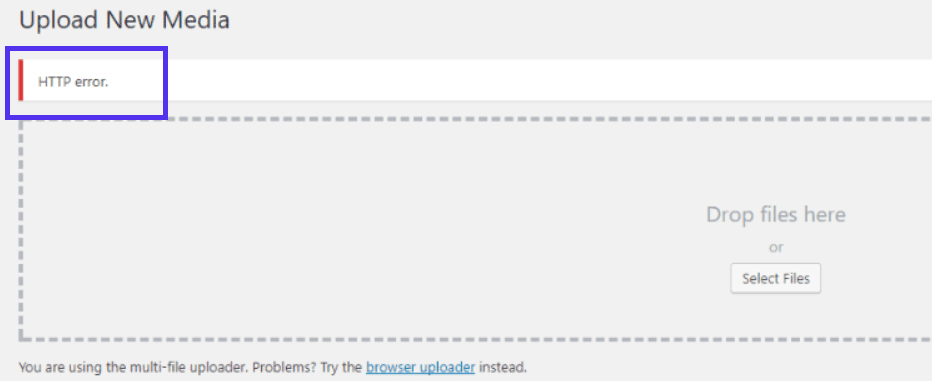
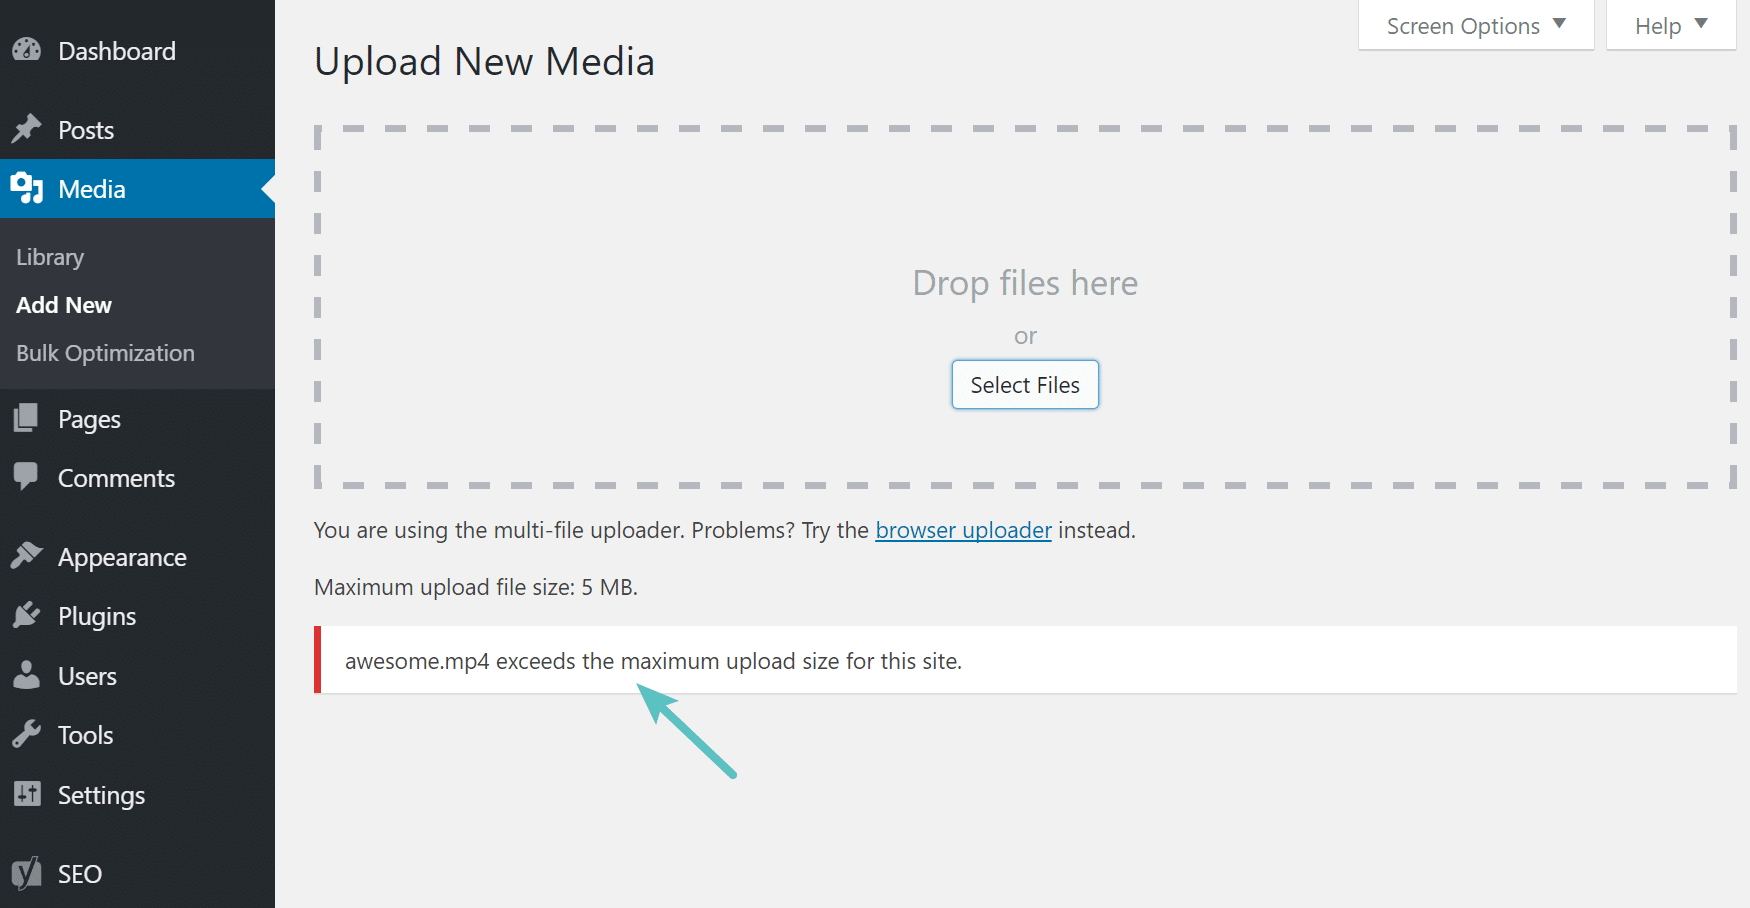
However, you still may see a vague error, as the following “HTTP error.” message. This usually means that there’s something wrong with the image itself, or you need to allow larger uploads to your WordPress site.
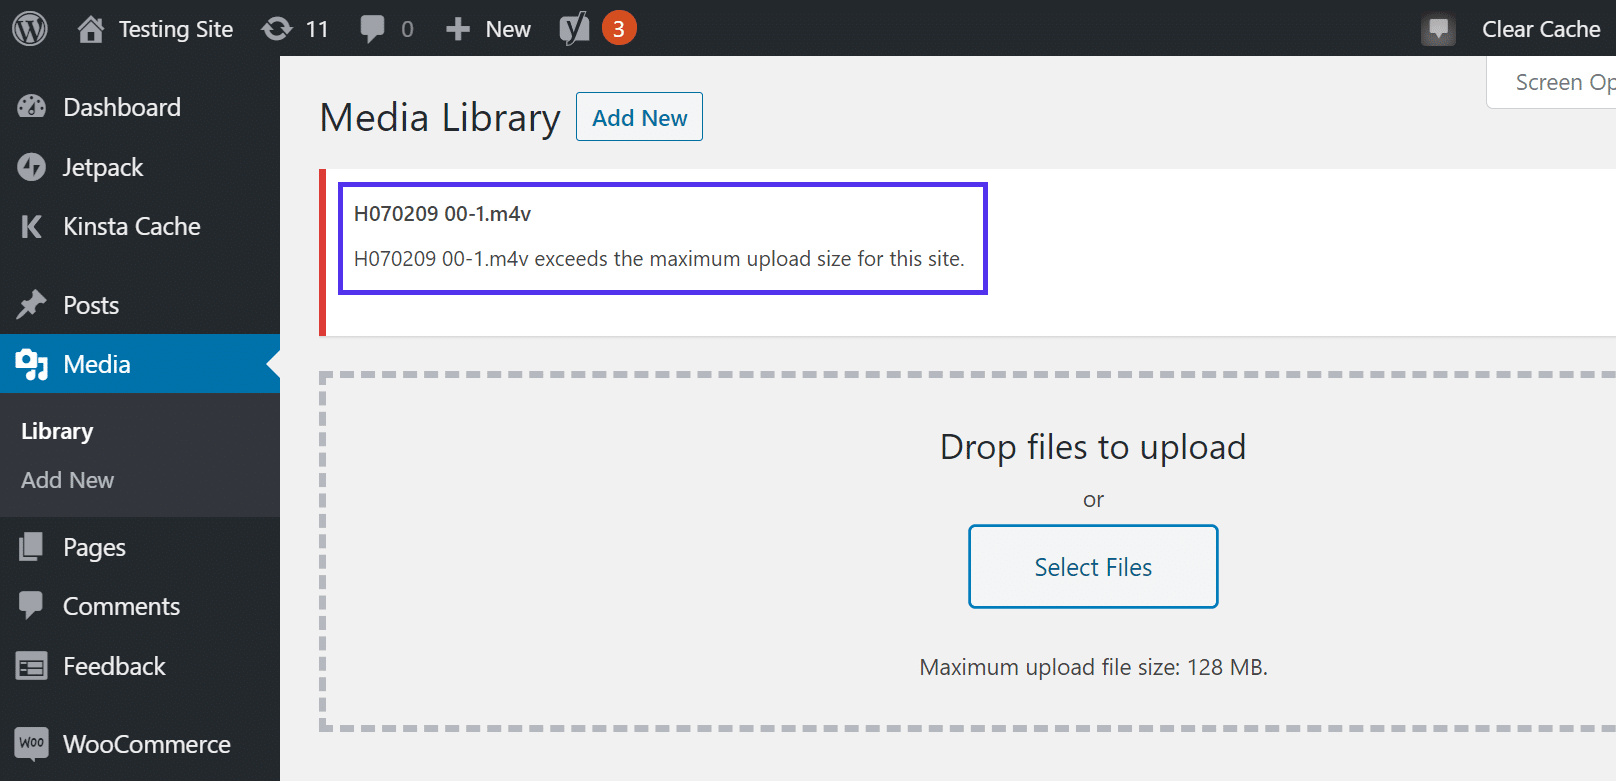
It’s more common to see something with specifics, like a message that tells you an image or video “Exceeds the Maximum Upload Size For This Site.”
Regardless, all of these errors are frustrating and confusing for users. Even if they tell you that the image is too big, how do you move on from there?
In general, the following solutions tend to help with error codes telling you that an image is either too large or not currently supported for uploading:
Increase Your WordPress Memory Limit
Your hosting provider often sets the WordPress memory limitations. You can reach out to your current hosting provider and ask them to expand the PHP limit.

If allowed, you can also change the PHP memory limit on your own by editing your site’s wp-config.php file. In some cases, you will have to upgrade to a bigger hosting plan that offers more resources for your site.
We recommend taking a look at his guide to walk you through those steps in detail.
Decrease the Image File Size
Uploading massive files to your WordPress site causes performance issues and could put too much of a load on your hosting servers. Hence, many hosts, and WordPress itself, define a maximum upload file size.
Besides, any image you use on your site, including featured images, shouldn’t be that large, to begin with. You can still maintain the quality of an image after compression, cropping, or resizing. As long as you’re not making the image too small, you should still be able to offer a beautiful featured image.
Therefore, we recommend using tools for cropping, compressing, and resizing before opting to increase your PHP memory limit.
Some non-WordPress image editing tools you can use are GIMP, Photoshop Express, and Paint.NET.
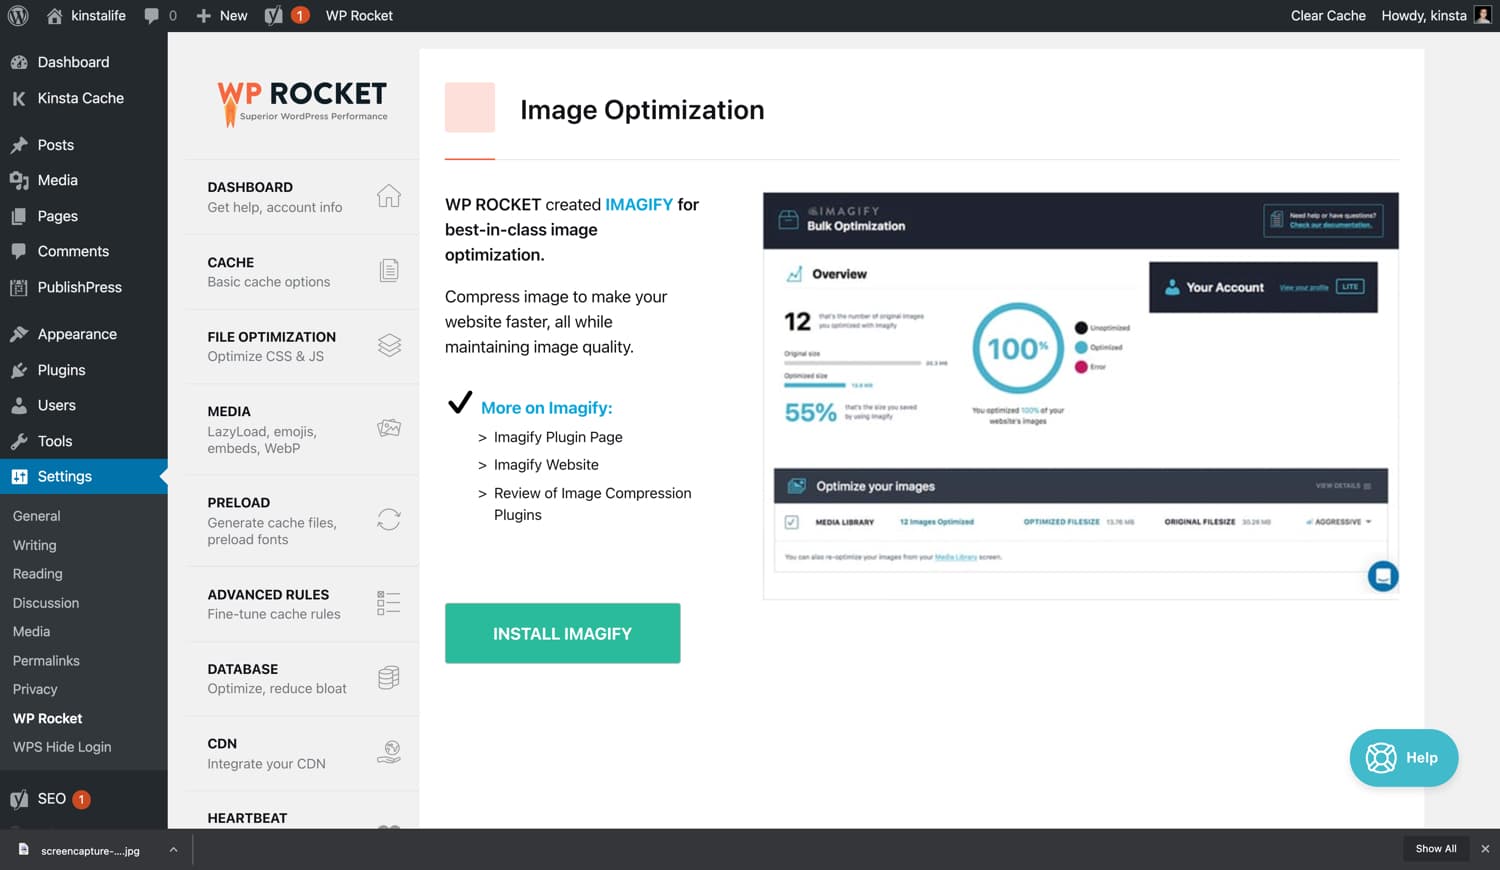
Editing inside WordPress is also an option, but that doesn’t typically resolve to get the WordPress image to begin with. If you’re going with this route, we recommend an image compression plugin that automatically shrinks and optimizes all images uploaded to WordPress, such as Optimole or Imagify. This way, you’re not limiting your site’s resources with too many large photos.
How to Fix Images With Suspicious Coding
Unfortunately, an image with malware or a virus is already compromised. The good news is that WordPress blocking an image because of this reason means that WordPress has done its job!
Although there are limited simple solutions to remove suspicious coding, your best bet is to stick with photos you either purchase legally or take your own photos instead of pulling directly from Google (which is technically illegal anyway) or finding images from sketchy websites.
We also recommend you host your site with a company that takes malware seriously and provides a malware security pledge.
How to Change Permissions to Allow for Featured Image Viewing
WordPress permissions decide who can read, write, or edit website files. On the other hand, user roles dictate which areas of the WordPress dashboard and the frontend website are accessible to certain people.
It’s possible that your current user role doesn’t allow you to upload or view featured images. Another concern is that a certain page or post in your WordPress files isn’t accessible because of user permissions.
The key to fixing this issue is ensuring your user roles and permissions are all set properly.
We recommend reading our guide on WordPress user roles to ensure everyone on your team can access and view featured images at all times.
How to Fix a Conflict or Problem with a Theme or Plugin
Themes and plugins are some of the more common reasons featured images fail or get blocked.
Not all themes have the same featured image settings. Sometimes, featured images for pages are completely blocked. Other times, you may notice that a theme presents a featured image in a different spot than what’s expected.
Also, you may have to configure a specific theme setting so that featured images are populating for all posts.
Unfortunately, we can’t walk you through the solutions to these issues as it requires you to either look into the theme settings or contact the theme developer.
However, plugin conflicts are a different story. Plugins, although rather useful for building a WordPress website, occasionally have questionable coding. Or they simply aren’t updated, leading to all sorts of conflicts.
This isn’t a rule, but it’s also common to see issues with featured images when some plugins have access to your media library or alter all images’ functionality.
Regardless, the best course of action is to follow these steps:
- Update all the plugins installed on your website.
- Check to see if you can now upload and see your featured images.
- If the problem is solved, then it was an error stemming from an outdated plugin.
- If the problem isn’t fixed, proceed to deactivate all plugins.
- Again, check to see if the featured images are showing up after all plugins are deactivated. If not, reactivate the plugins and move onto a different cause of the problem.
- If the featured images now work, one of your plugins was the issue.
- Reactivate each plugin one-by-one. After each reinstallation, you should check to see if the featured images are still functioning and showing up properly.
- If the featured image fails, you know which plugin is causing the problem.
- Uninstall that plugin and look for an alternative.
Resolving a Theme’s Support of a Featured Image
An interesting thing about featured images is that some WordPress themes may not support them. This is due to a wide variety of reasons. The theme is not coded well, or the developer has removed the default featured image functionality on purpose—mainly because they have other settings to control the featured image.
No matter the reason, you may find that your WordPress theme doesn’t offer support for standard featured images. The solution often involves going to the theme settings and locating the featured images’ custom area.
However, you may find that the theme has removed featured images in the coding, and it doesn’t have any additional tools to override the lack of featured images.
Therefore, we recommend checking your theme’s support for featured images. You can do this by simply asking the theme developer, reading the documentation, or going to the functions.php file.
The following block of code is what you can insert (or look for) in the functions.php file:
add_theme_support( 'post-thumbnails');Fixing a Featured Image Problem Because of Lazy Loading
Lazy Loading serves as one of the many methods used for optimizing images to improve site performance. It does this by halting the loading of images on a page until they come into view on the screen. For instance, the last image in a long article doesn’t necessarily have to load until the user scrolls down to the bottom of the page and gets to that image.
However, Lazy Loading often causes problems with featured images since some Lazy Loading plugins treat featured images as regular images. Such plugins may not be the best solution if they block the featured image from being shown on a Latest Posts list, or if they make the featured image load slowly—the featured image should load immediately for optimal user experience.
Many image optimization plugins offer lazy loading functionality as an add-on. Therefore, you have to check each plugin to see if they have this feature enabled on your site.
After you’ve located the potential culprit, turn off lazy loading, clear your site cache, and check if that resolves any issues you may have with your featured images.
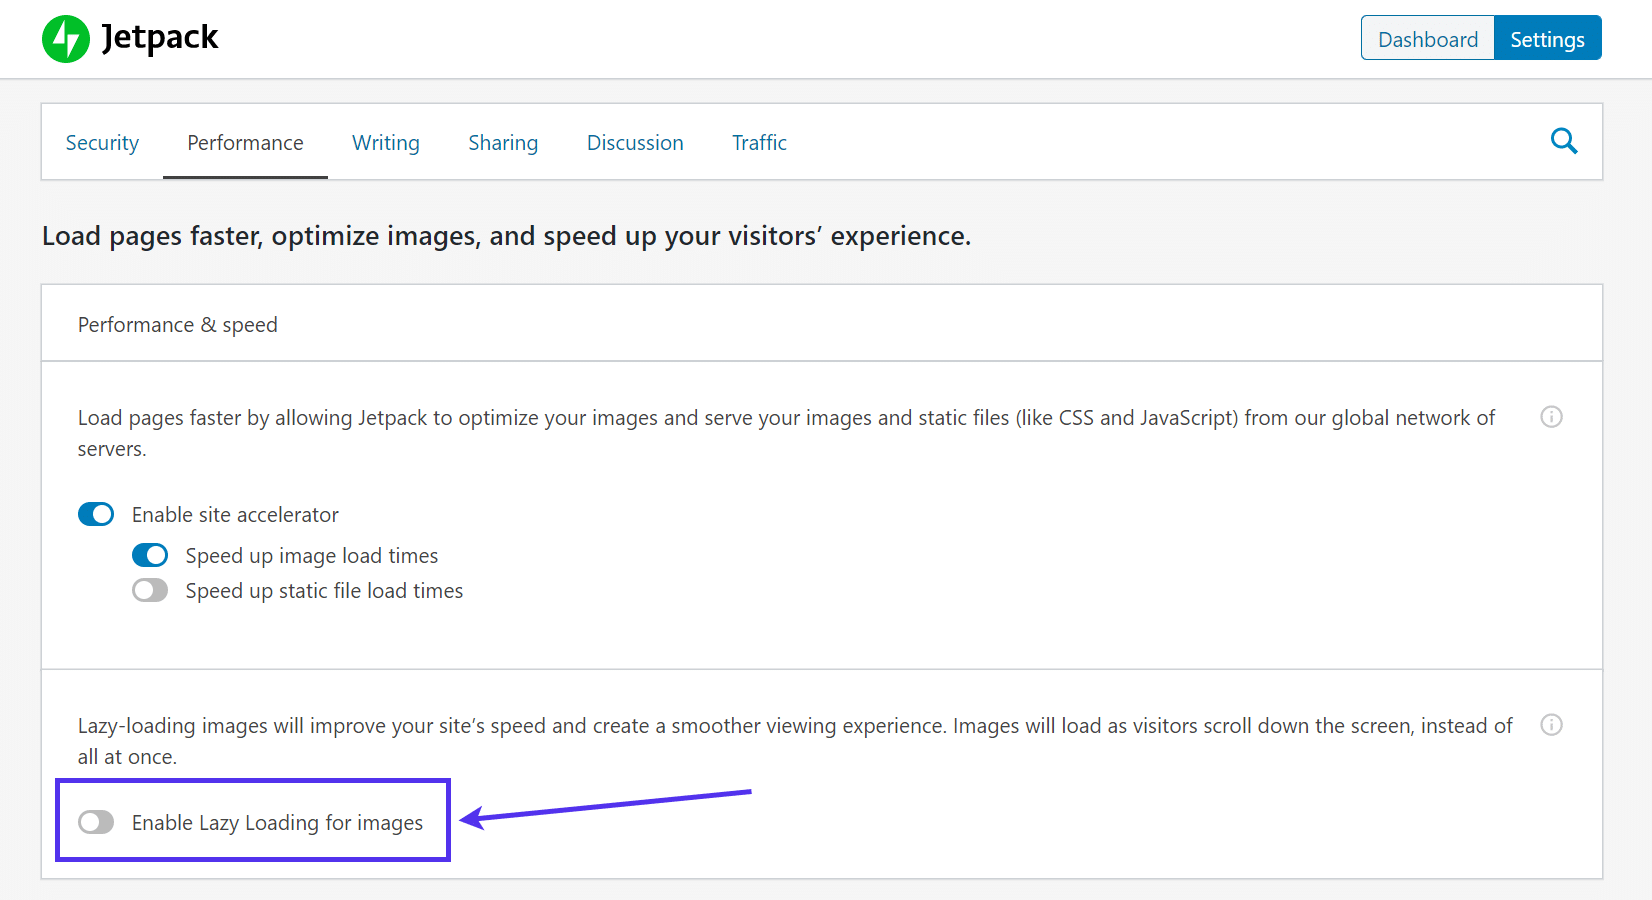
Here are some plugins that tend to include lazy loading features:
- Image optimization tools like ShortPixel and Optimole.
- Direct lazy loading plugins such as Lazy Load by WP Rocket.
- Database and site optimization tools such as Autoptimize.
- All-encompassing suite plugins such as Jetpack.
- Caching plugins like W3 Total Cache.
The WordPress Featured Image Not Showing in the Right Position
Each WordPress page and post template specifies a featured image’s location. A theme or plugin usually defines it.
You would usually find the featured image right below the title and above the first line. It’s possible a theme changed this. You may want to move the featured image to another location, like below the first bit of content or above the byline with the author’s name.
To adjust the location of a featured image, go to the page or post template being used.
Search for this bit of code in the file:
the_post_thumbnail();This code snippet is a reference to your featured image. Post thumbnails are what featured images used to be called in WordPress from its early days. It tells WordPress to display the featured image in the template’s exact location. The the_post_thumbnail(); function may lie before the page title or after the content—that depends on your page and theme configuration.
To change the featured image’s location, cut this piece of code and paste it somewhere else in the page/post template. Giving it a new position within the template will also tell WordPress that it should render somewhere else on the frontend.
As always, we recommend backing up your WordPress site before making edits to the code. It’s also a good idea to make adjustments to child themes instead of the core WordPress files.
The WordPress Featured Image Not Showing Due to Dashboard Settings
One of the more frustrating problems with WordPress featured images not showing involves the dashboard settings.
This is a frustrating one because it’s a simple setting in the dashboard that tells WordPress to either show the Featured Image section or not.
This situation comes in two forms:
- Featured images don’t show up as thumbnails in your lists of posts and pages on the dashboard.
- The featured image field is missing when you’re trying to edit or create a page or post.
Here’s how to fix both.
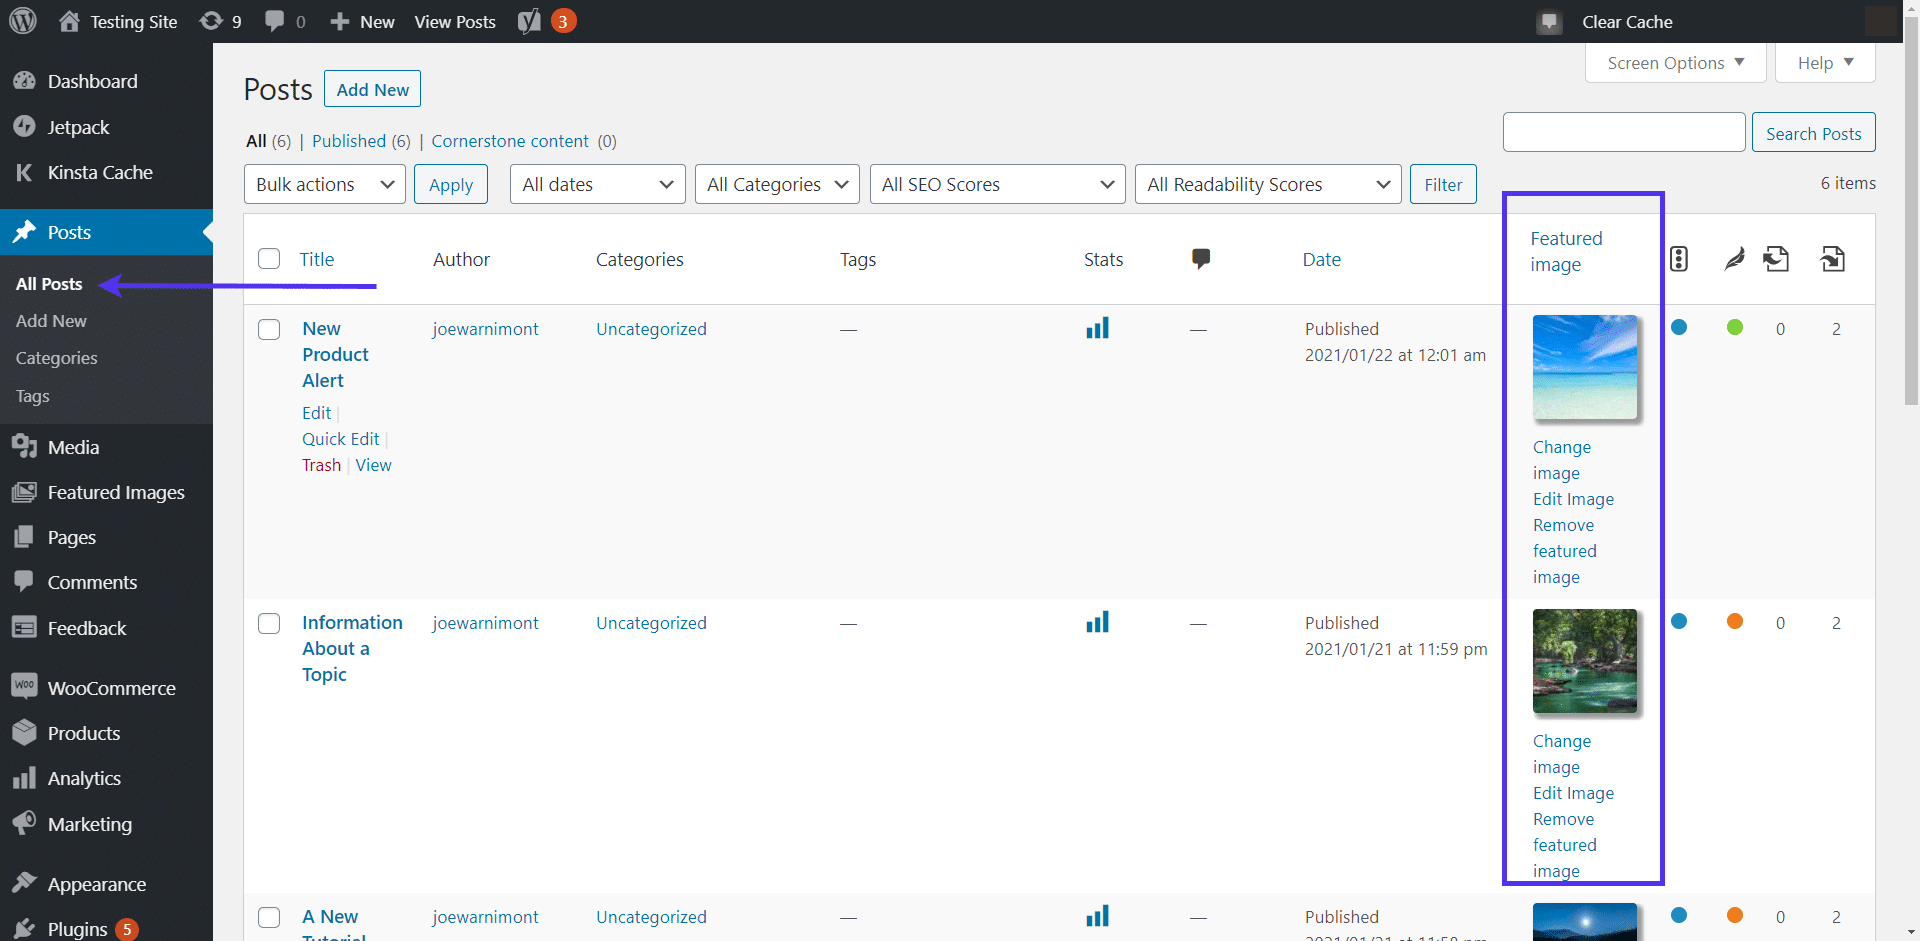
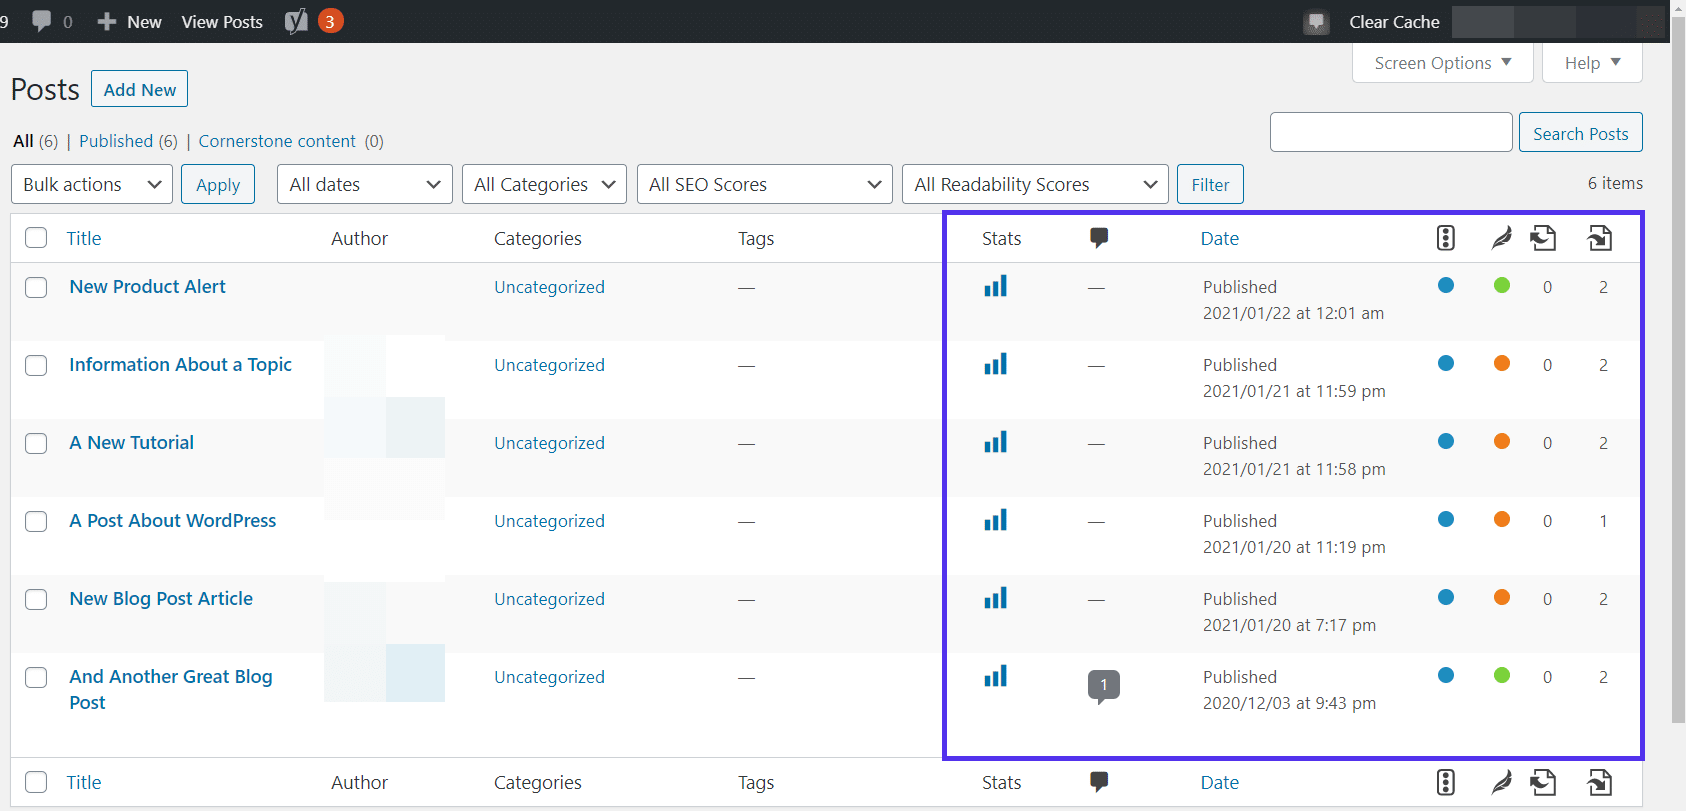
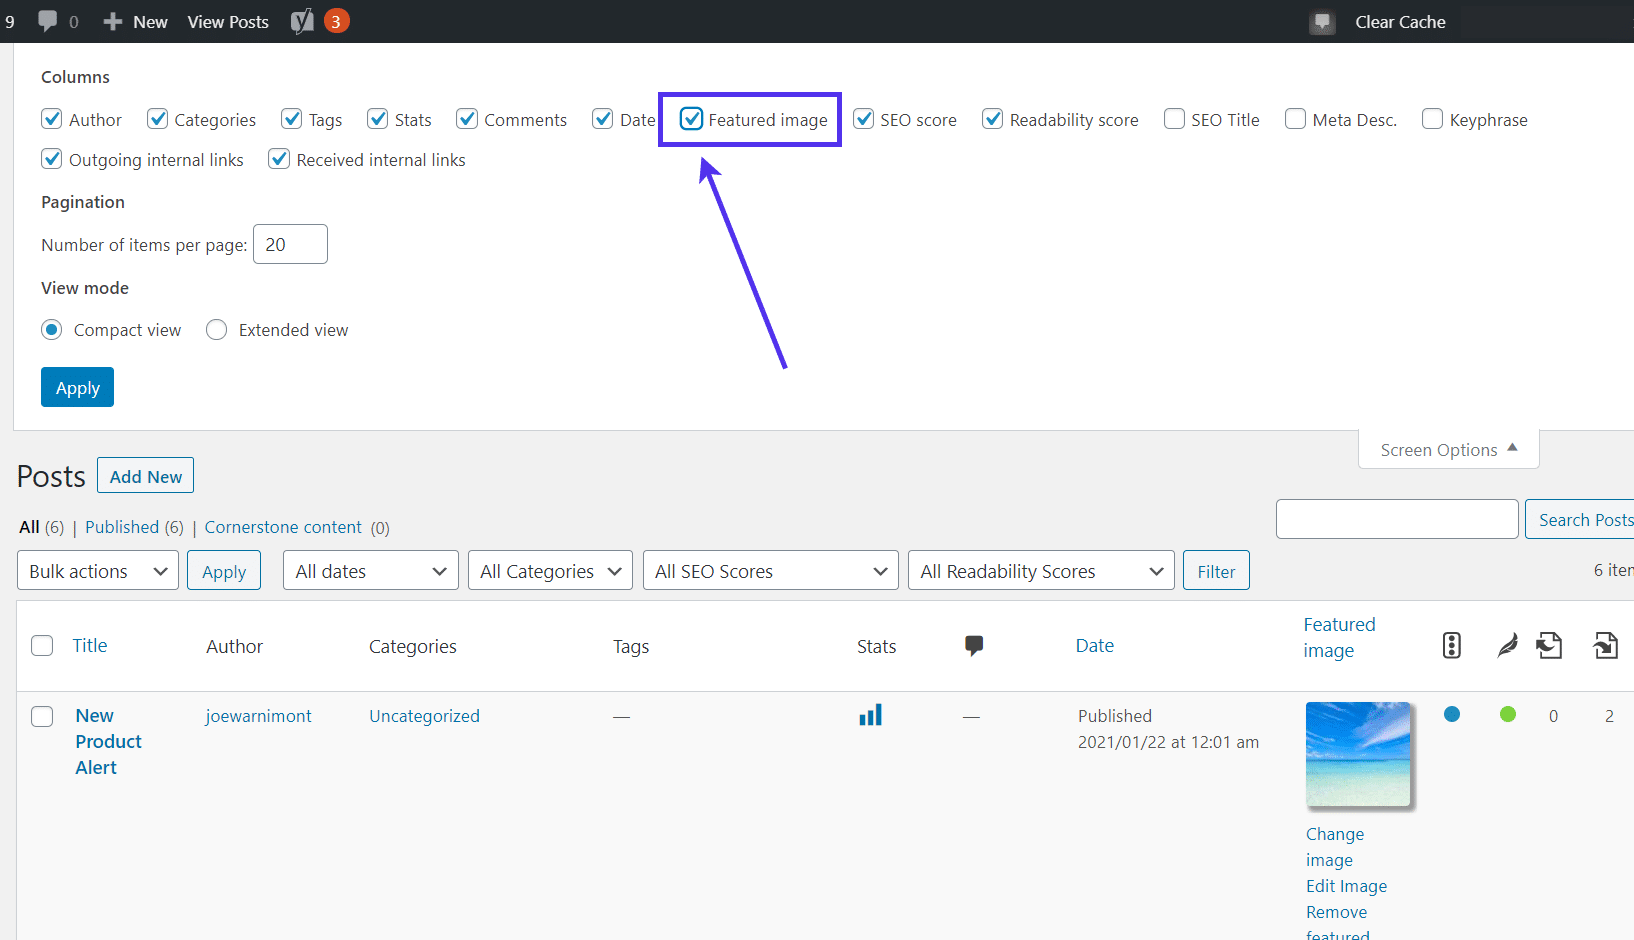
The first problem arises when you can’t see the featured image thumbnails in your list of pages or posts. You can go to Post > All Posts to review your list of articles. A column called Featured Image is supposed to appear after the Post Date. This column reveals the thumbnail version of that featured post to give you a quick idea of what will appear on the frontend of your site.
But what if those thumbnail images are nowhere to be found?
This means that you’ve turned off a setting on your dashboard to reveal the Featured Images column.
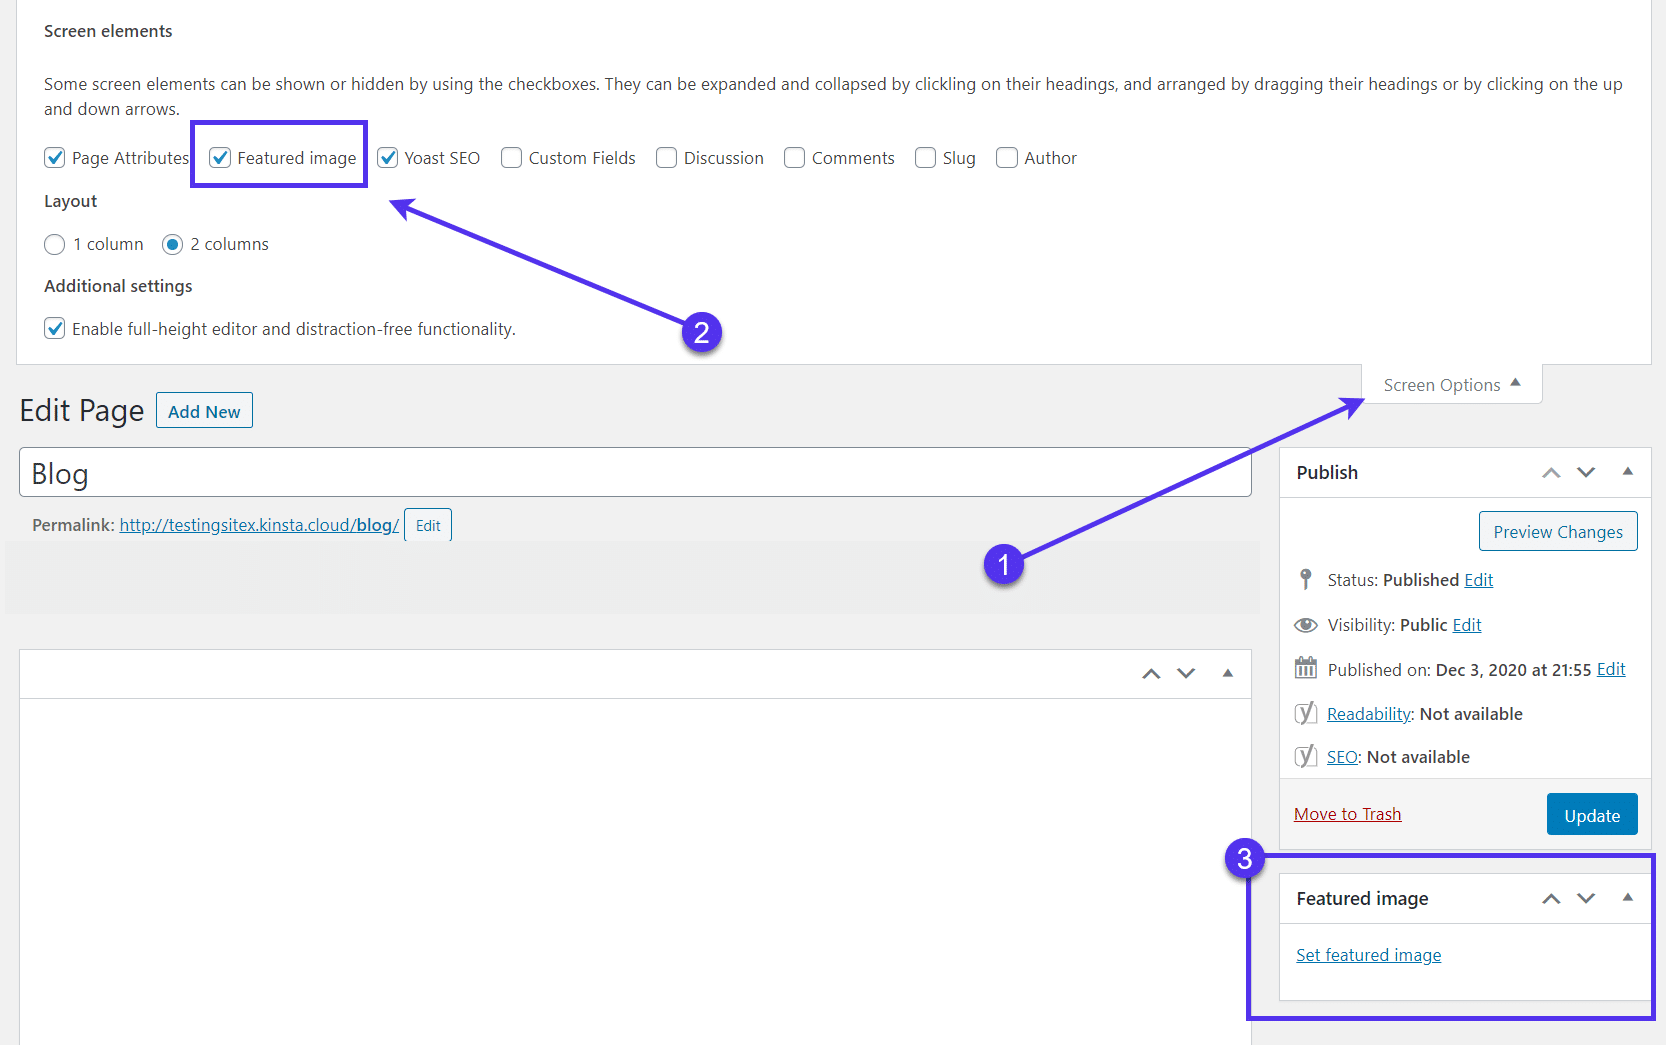
To fix the situation, find and click on the Screen Options tab in the dashboard’s upper right-hand corner.
You have to be on the Posts or Pages panel for the right Screen Options panel to appear.
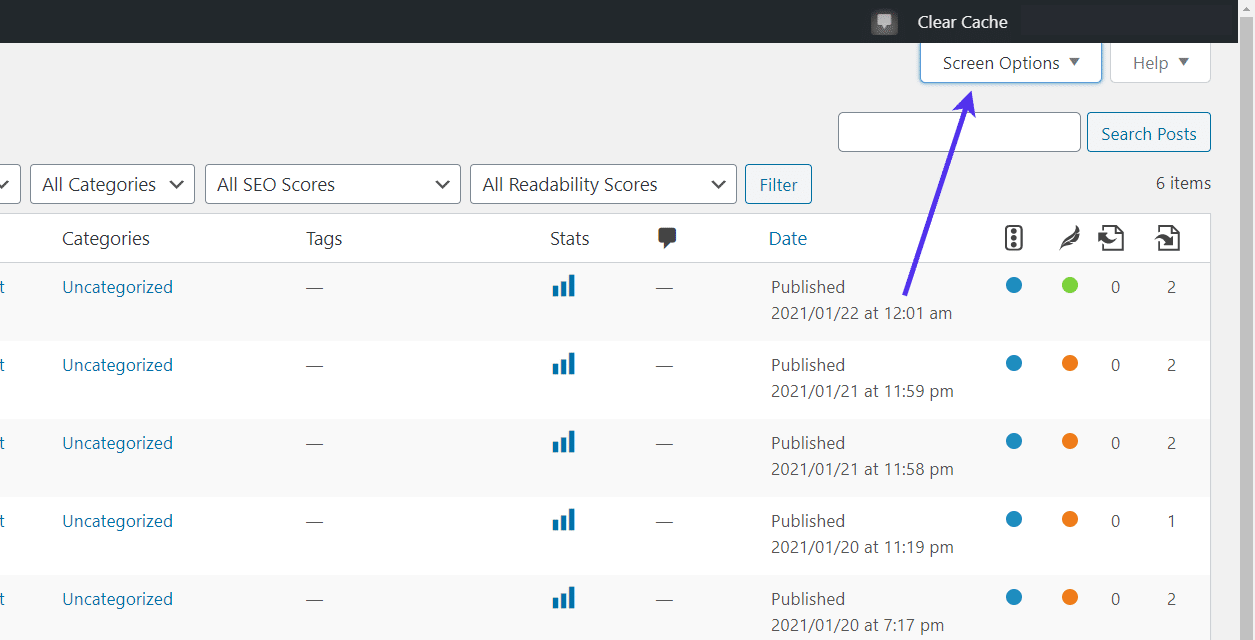
The Screen Options section has a long list of fields to check off and sets what you want in your WordPress dashboard.
For instance, you could add or remove items like tags, categories, and the author.
Here, we want to make sure the checkbox for the Featured Image is checked.
The Featured Image column should now appear in your list of posts or pages.
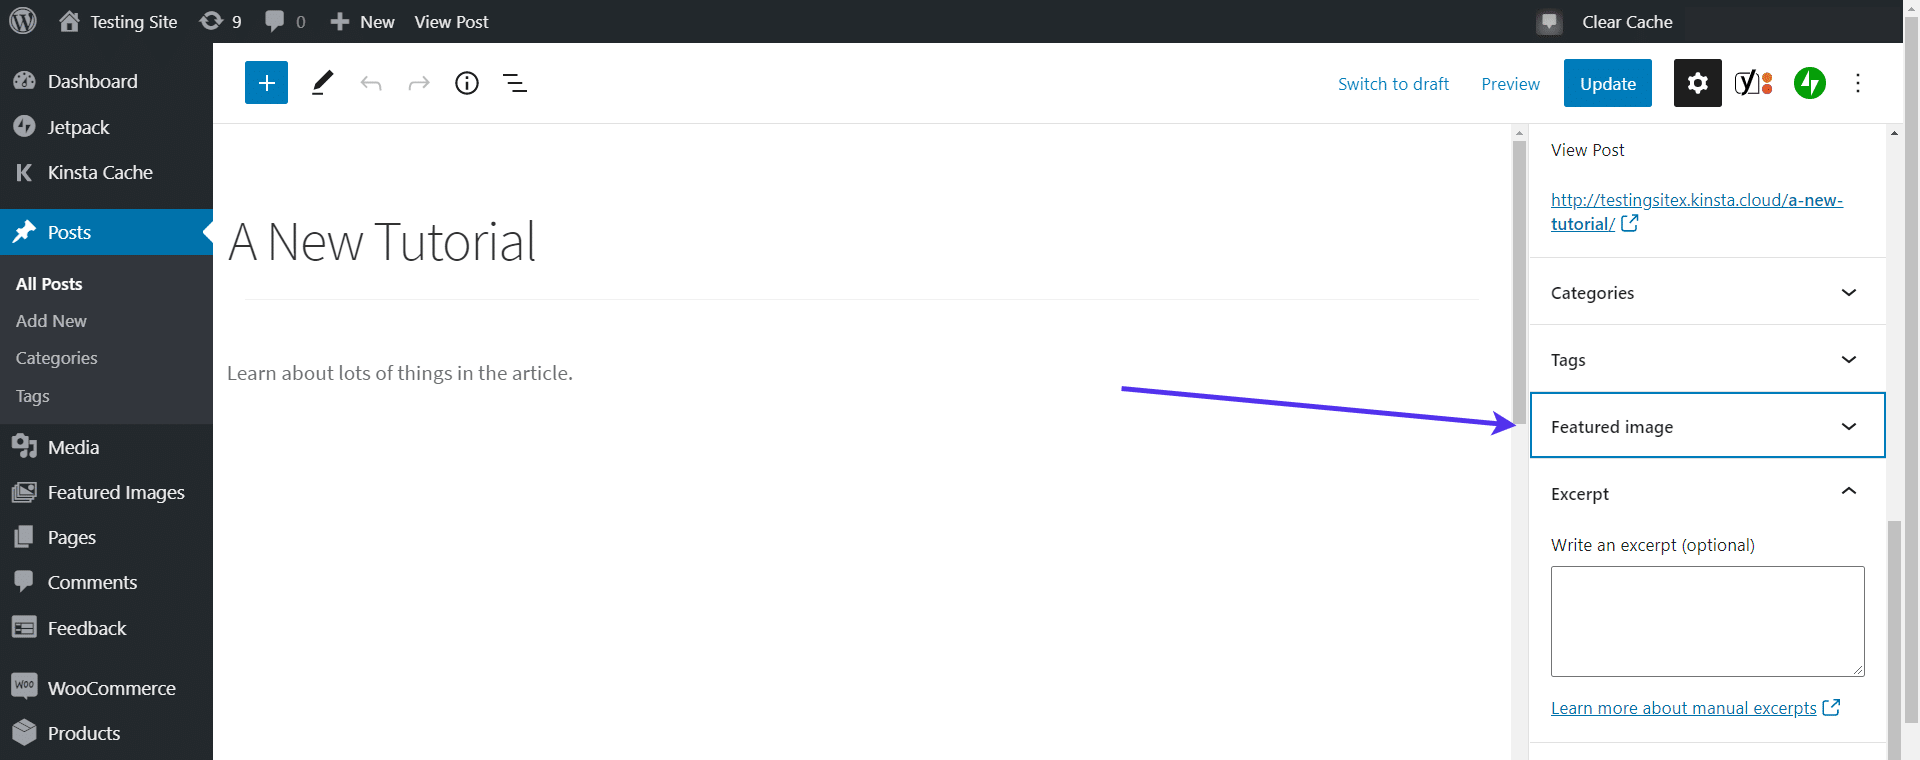
Another Screen Options dilemma comes into play when you do not see the actual field to upload and insert a Featured Image. This field is available on all WordPress posts and pages by going to the Post Settings panel on the right side of the article or page.
If you find that it’s missing, follow the next few steps to activate it.
Find and select the triple-dot icon (⋮) in the far right corner of the dashboard. Scroll down the list of settings to locate the Preferences option.
Click on Preferences to reveal a new pop-up window.
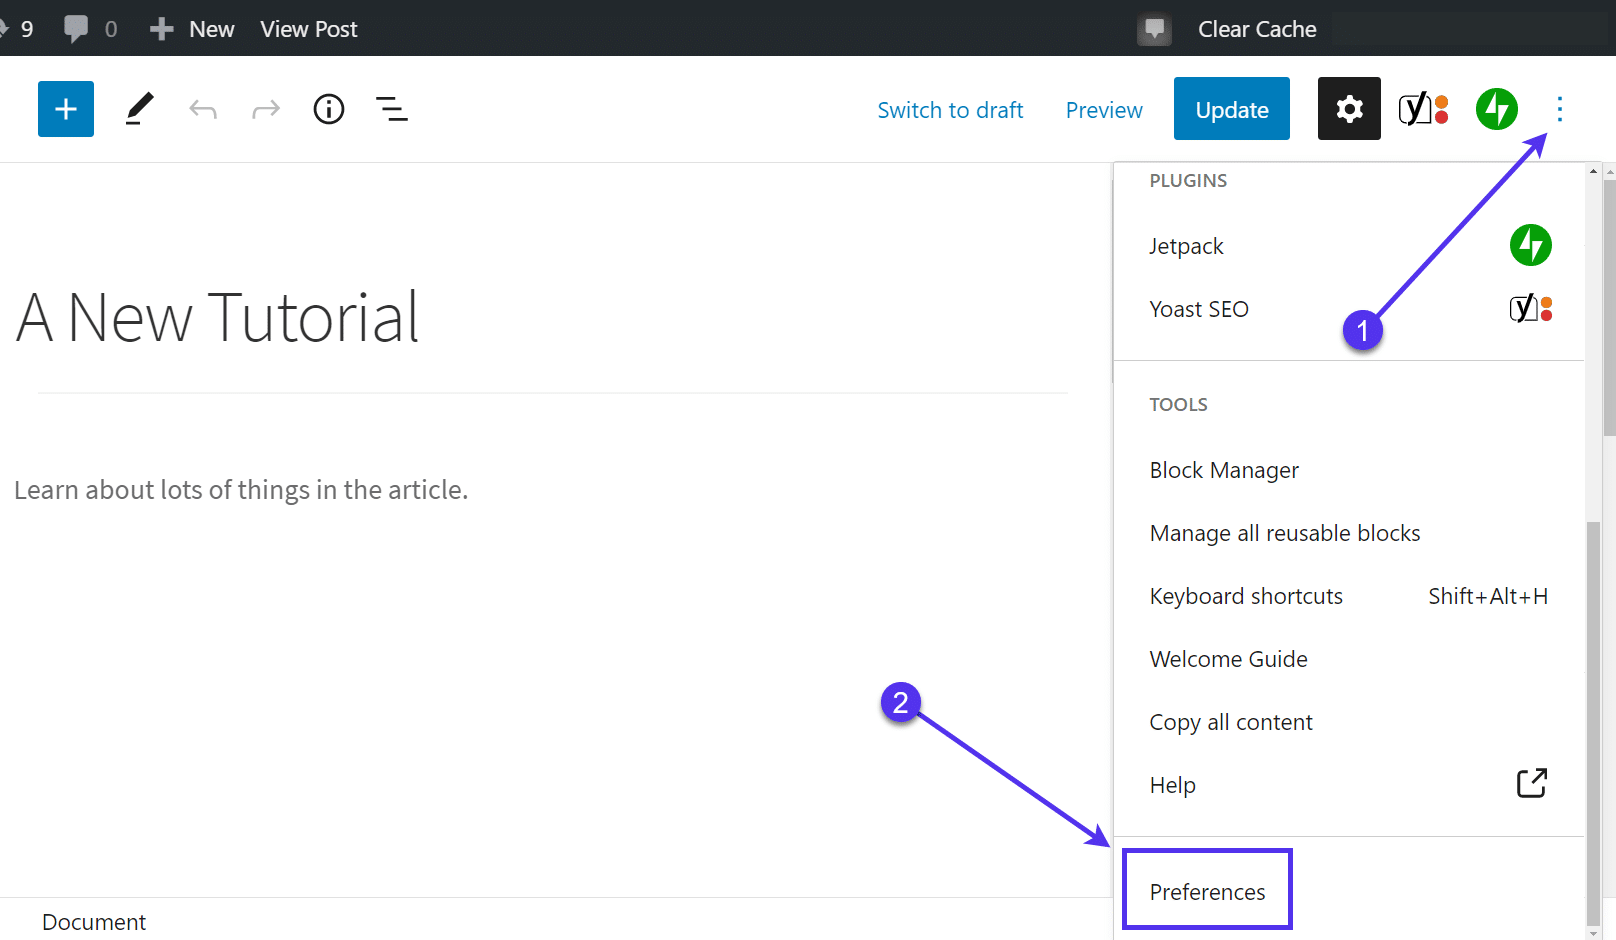
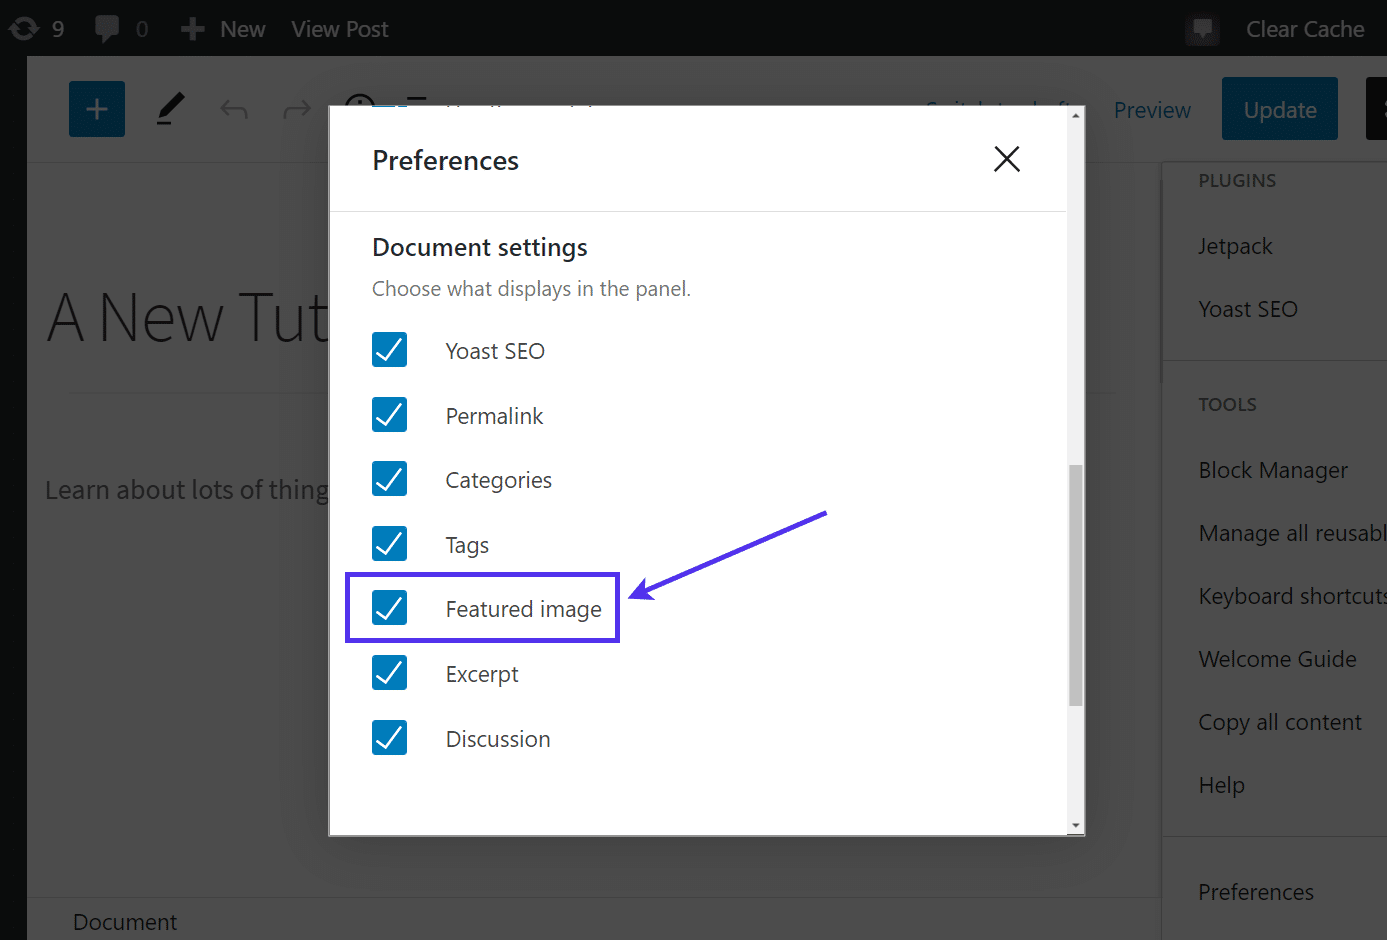
The Preferences module includes a wide range of options for a document. Scroll down to the section called Document Settings.
Under there, you’ll find a field called Featured Image. Make sure that’s checked off to reveal the Featured Image option in your posts and pages.
Alternatively, you may find yourself in the older version of the WordPress editor. This is still common for many pages, or you may have rolled back the Gutenberg editor to use the old editor instead.
If either is the case, open the page or post in question and look for the Featured Image block towards the page’s right side.
If it’s not there, click the Screen Options tab and mark the Featured Image checkbox to reveal it in the editor.
The WordPress Featured Image Not Showing on Blog Post Gallery Page
Another way to use featured images is by listing a feed of your blog posts on your site’s homepage (or any other page).
But what if the featured images aren’t showing on the blog page?
It’s not uncommon for brands to share a list of the most recent posts, yet a gallery or feed with just links may not attract as much attention.
WordPress offers several ways to list your blog posts elsewhere on a website, yet sometimes you have to configure the right settings to ensure they show up properly.
Note: Many website owners use third-party gallery or post listing plugins to make this happen. If that’s the case for you, you’ll have to consult with the plugin’s developer. We’ll only cover how to fix your featured images with built-in WordPress tools for this tutorial.
Showing a gallery or list of your recent blog posts is done by adding a Gutenberg block element to the page designated as the WordPress Homepage.
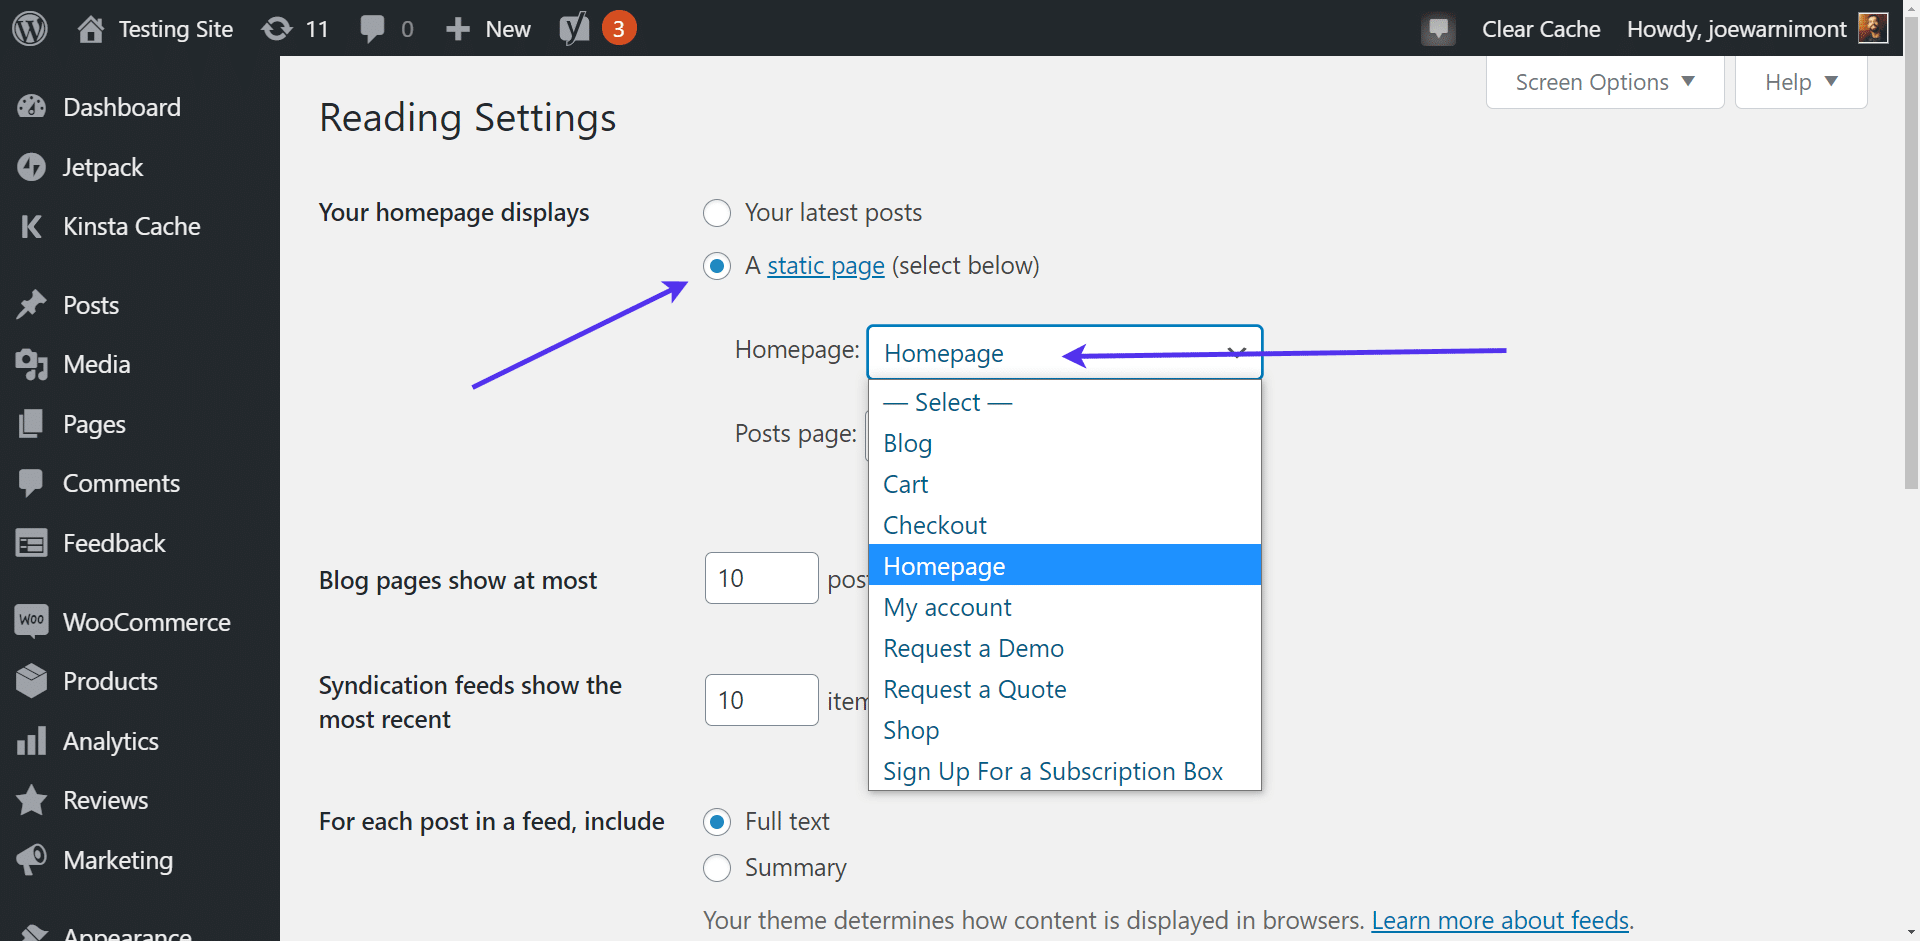
This means you must make a page and assign it as the Homepage in the WordPress Reading settings.
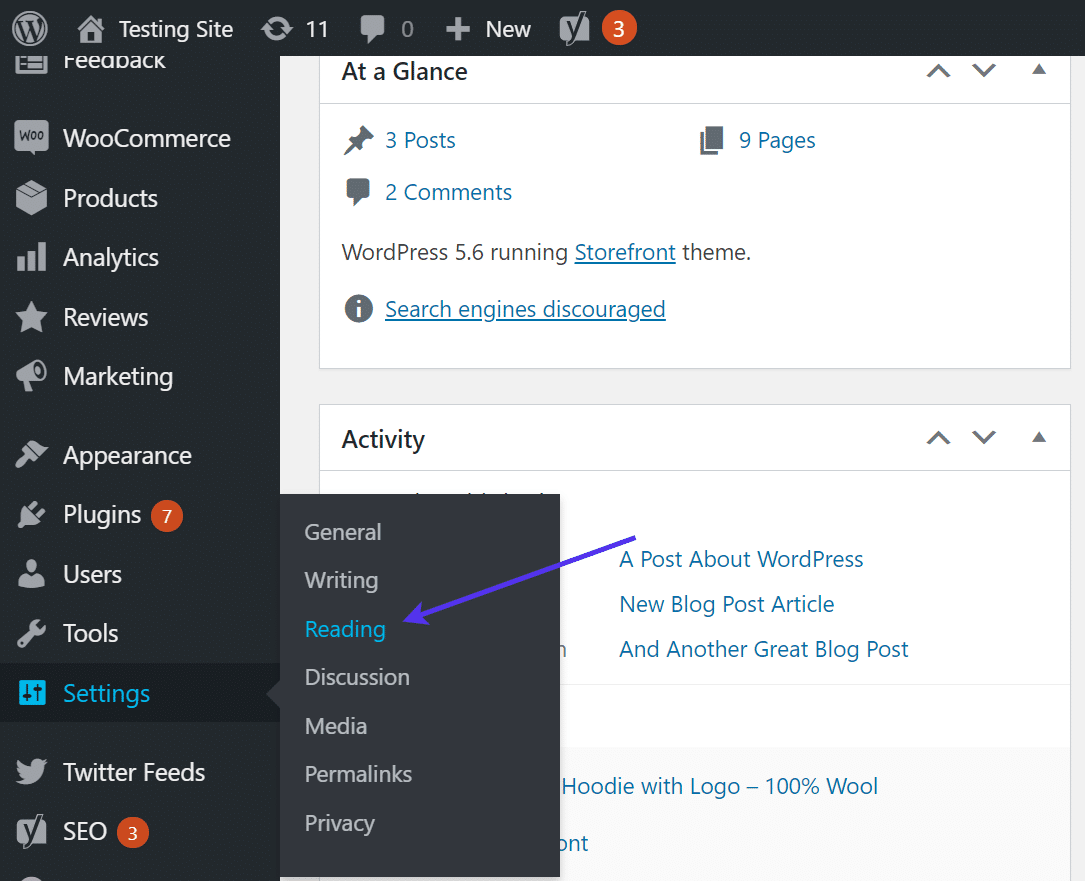
As a quick reminder, you can turn any WordPress page into the homepage by going to Settings > Reading in the dashboard.
Make sure the area that says Your homepage displays is set to A Static page. This shows that you’d like to have a customizable homepage with the ability to add and remove block elements through page builders like Gutenberg. It’s the opposite of only showing a list of your Latest Posts.
Click the Homepage dropdown field to reveal the list of pages you currently have active on your website. In this tutorial, we have a page called “Homepage.” Yours may have a different name depending on what you’ve named it.
Note: You’re always able to come in here and change the static homepage. For instance, you may want to revamp your homepage completely, and it’s easier to just make an entirely new page instead of editing the current one.
Now it’s time to look at the content within that page to ensure the featured images show up the way they should.
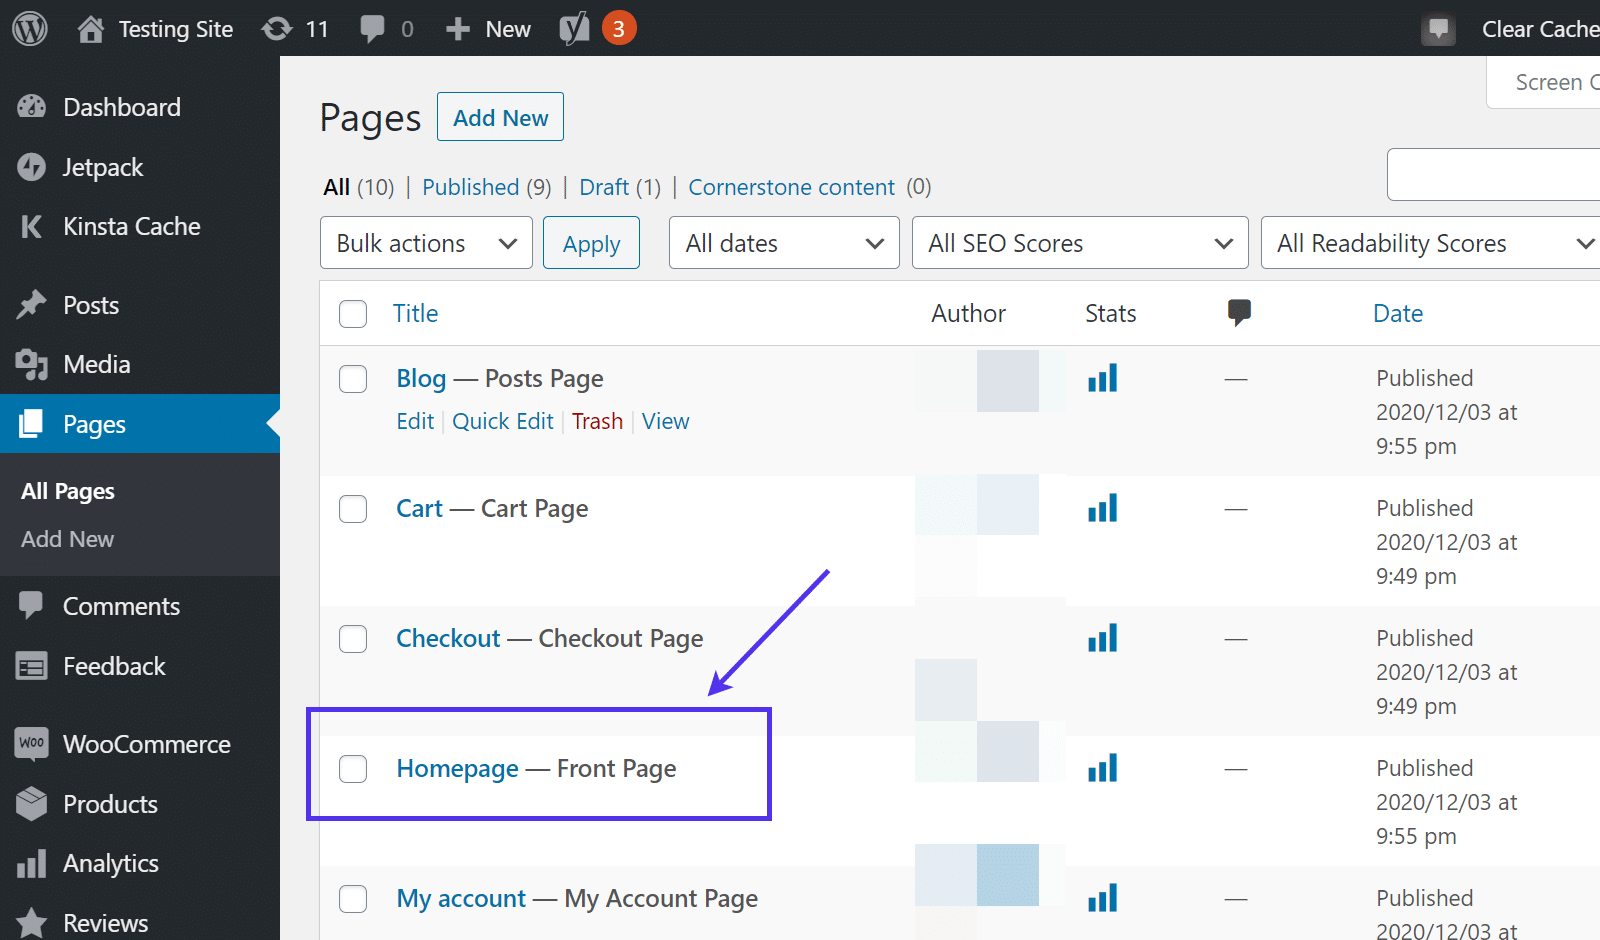
To add content to your homepage, and to adjust the settings for the blog feed on that page, go to Pages > All Pages in the dashboard.

Scroll through the list of pages to locate the one you assigned as the Homepage. It should have a Front Page label next to it. Again, in this tutorial, we named the page “Homepage,” but you may have something different.
Click on the page specified as the Front Page.
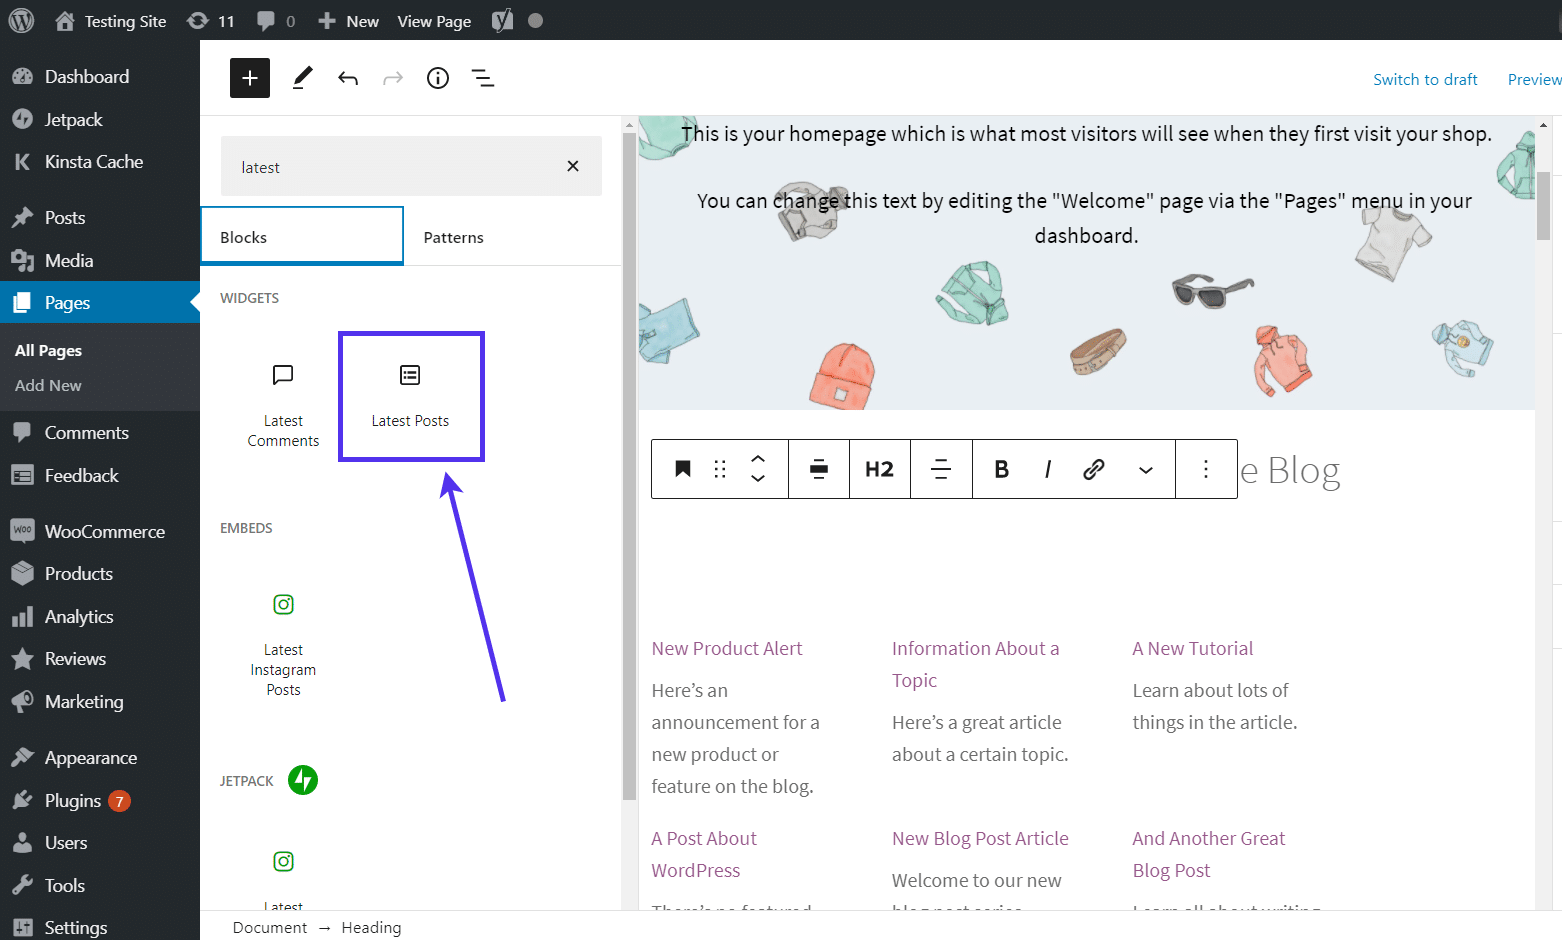
Adding Latest Posts
You may already have the Latest Posts block activated on your homepage, but if not, you can find it by searching in the Gutenberg block library. The block is called Latest Posts. All you have to do is click on the icon to insert it somewhere on the homepage.
After that, feel free to drag it up or down on the homepage so that it’s located in the proper position.
Getting back to the featured images, it’s not set by default to show featured images from blog posts when you put the Latest Posts block into a page. You may see a simple list of links, along with descriptions from those posts.
To add the featured images, click on the Latest Posts block. This selects the entire block and reveals settings for that block in the right-side panel.
Make sure it’s on the Block settings tab. You may have to switch it from Page to Block.
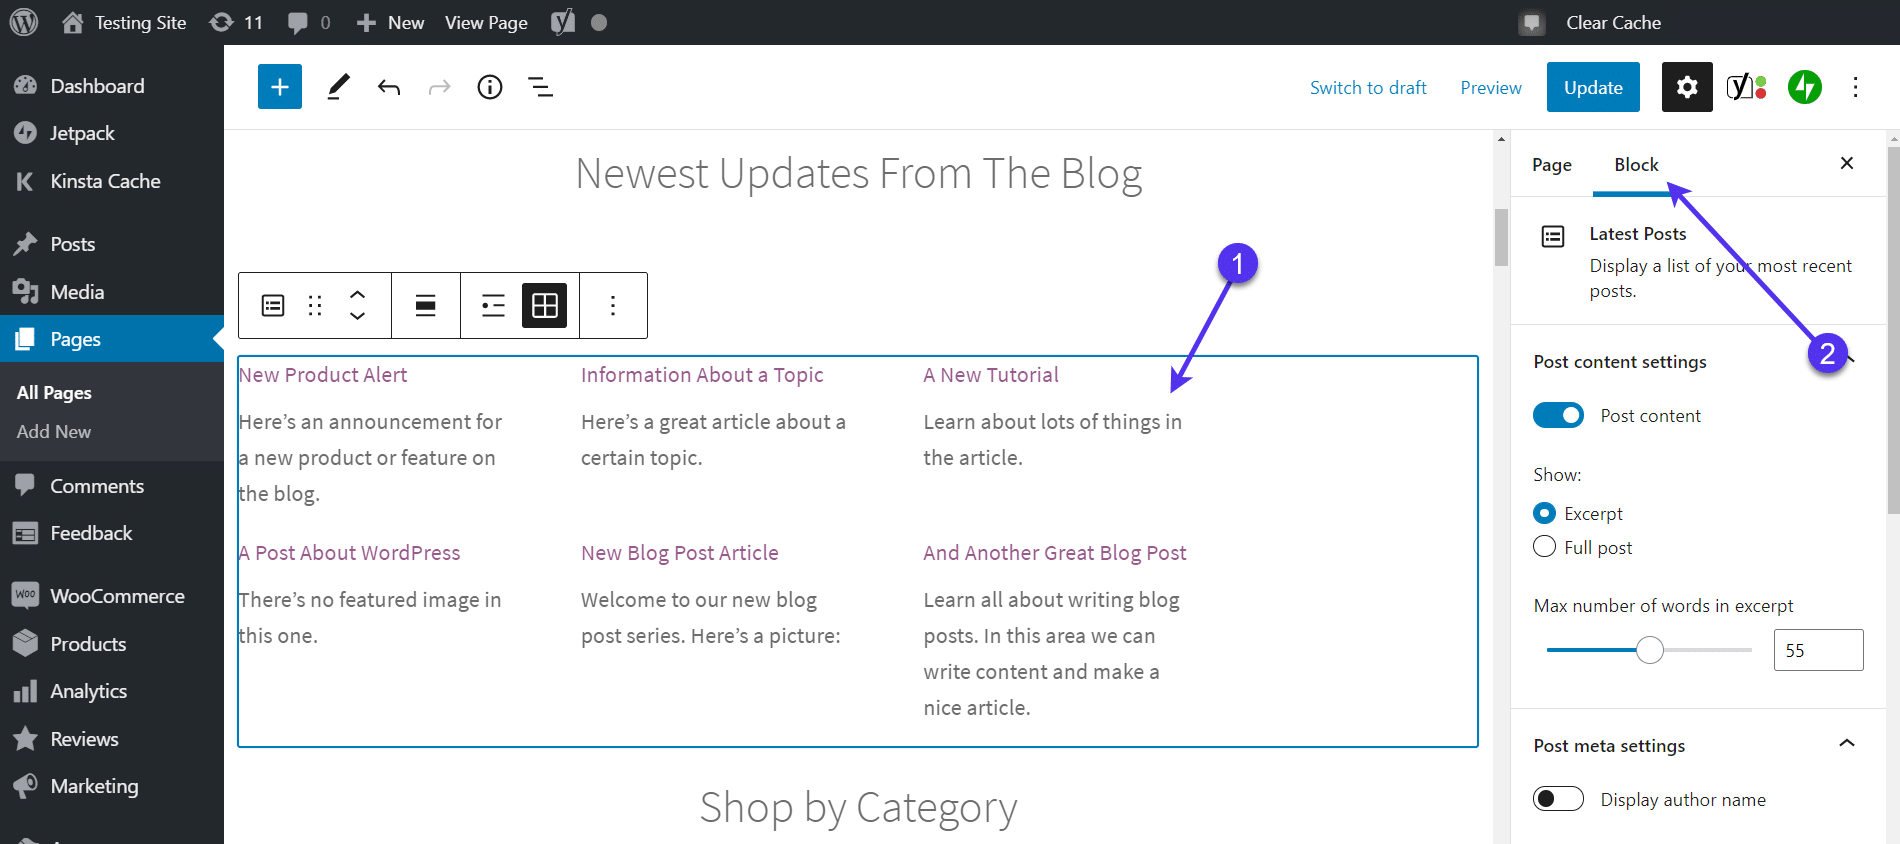
Scroll down in the Block settings tab to view the options available. The first few settings don’t have anything to do with the featured image, but they can affect how the posts show up in the block and make your featured images look strange.
We recommend experimenting with the content settings, like showing Post Content, Display Author Name, or Display Post Date. All of these come into play when highlighting your recent posts and ensuring they look presentable while also displaying your featured images.
The next part is the most important element since it activates the featured images in the Latest Posts block.
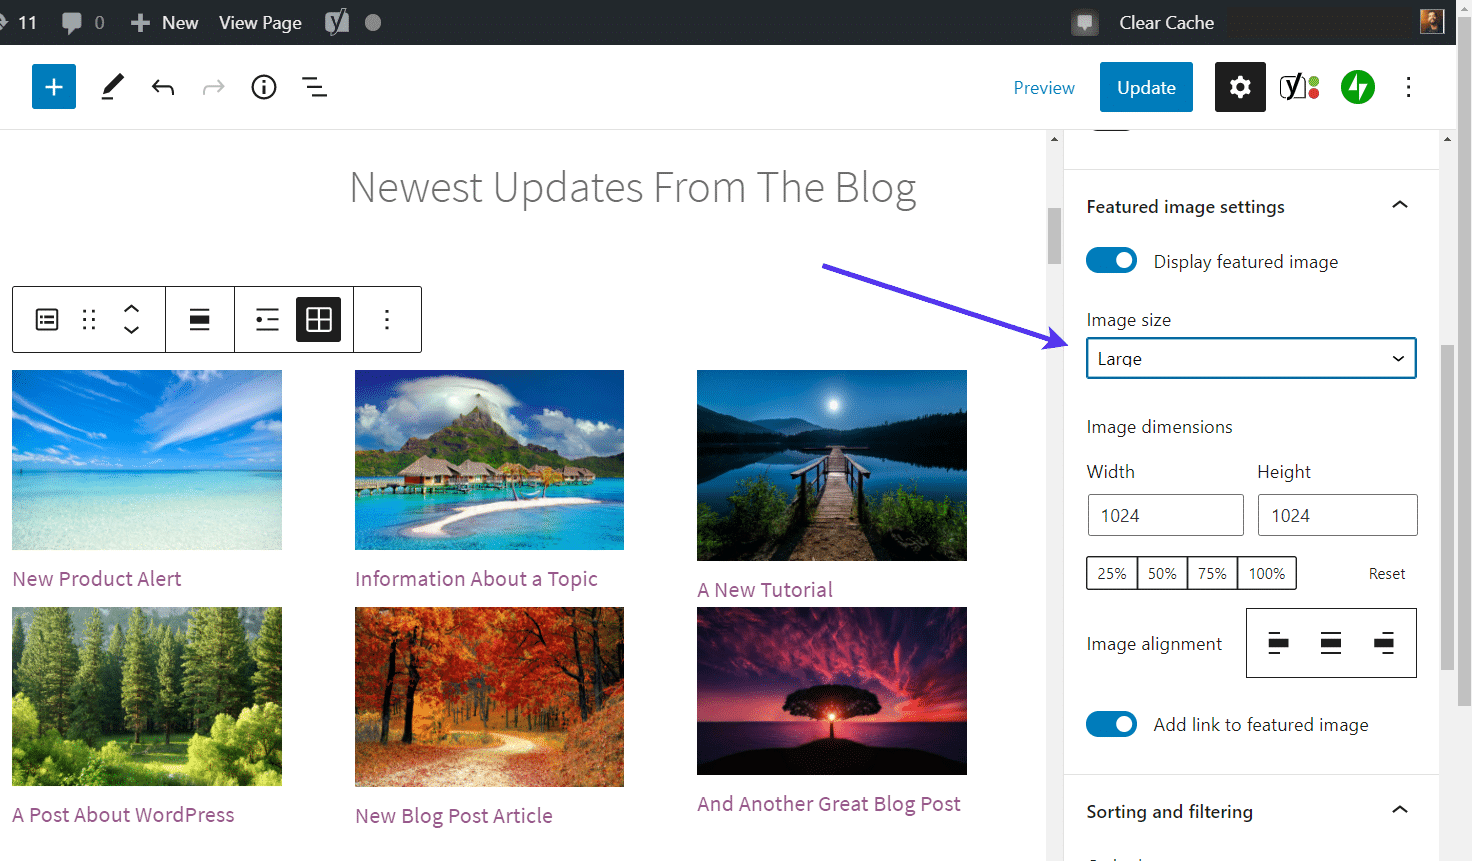
Find the section called Featured image settings.
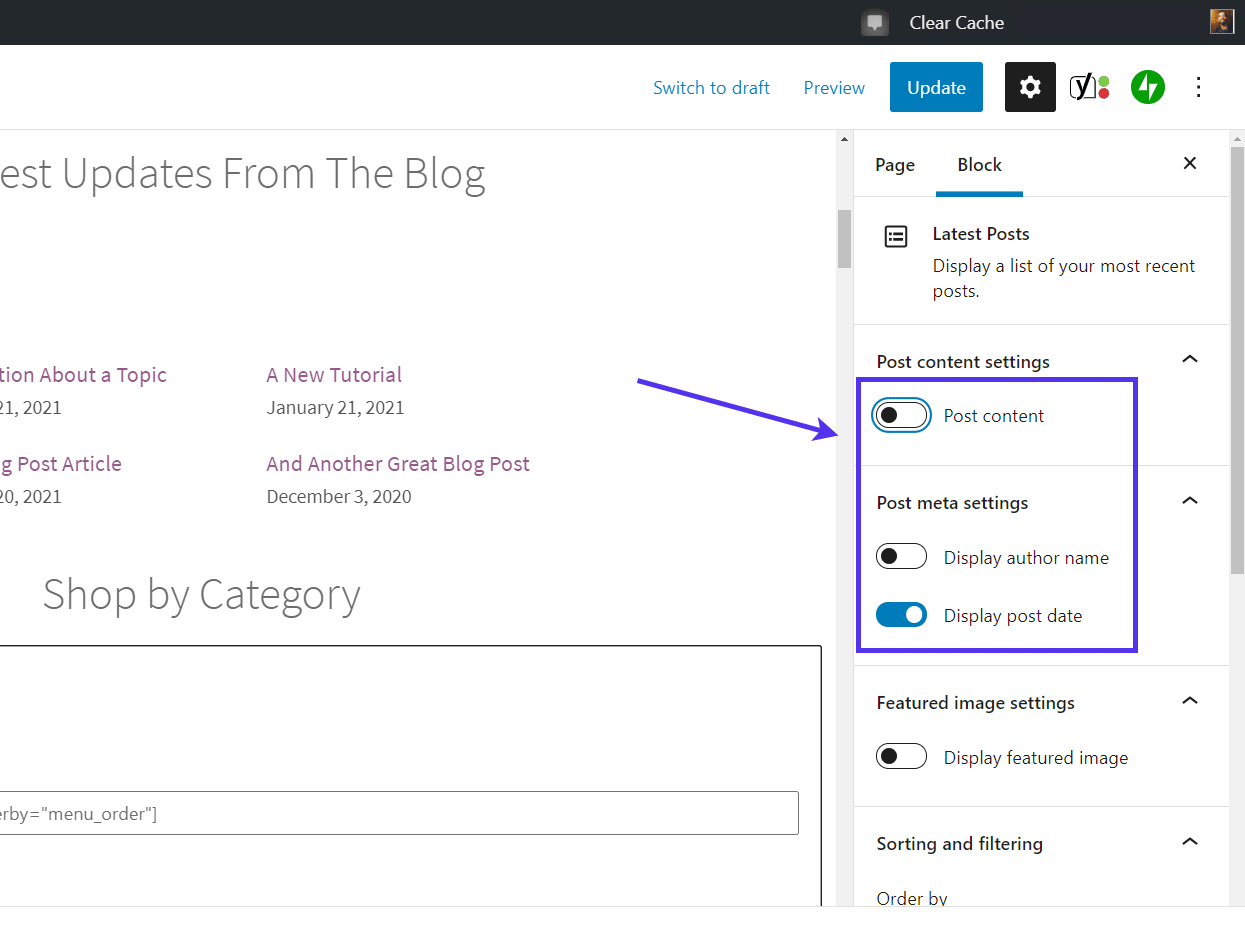
Here, enable the Display featured image option. This turns on the featured images for all the latest posts being pulled. If a featured image isn’t assigned to a post, it will show a blank space in its block instead.
What’s more, several settings are now available to make the featured images look professional. This is particularly important if you’re highlighting your recent posts on the homepage.
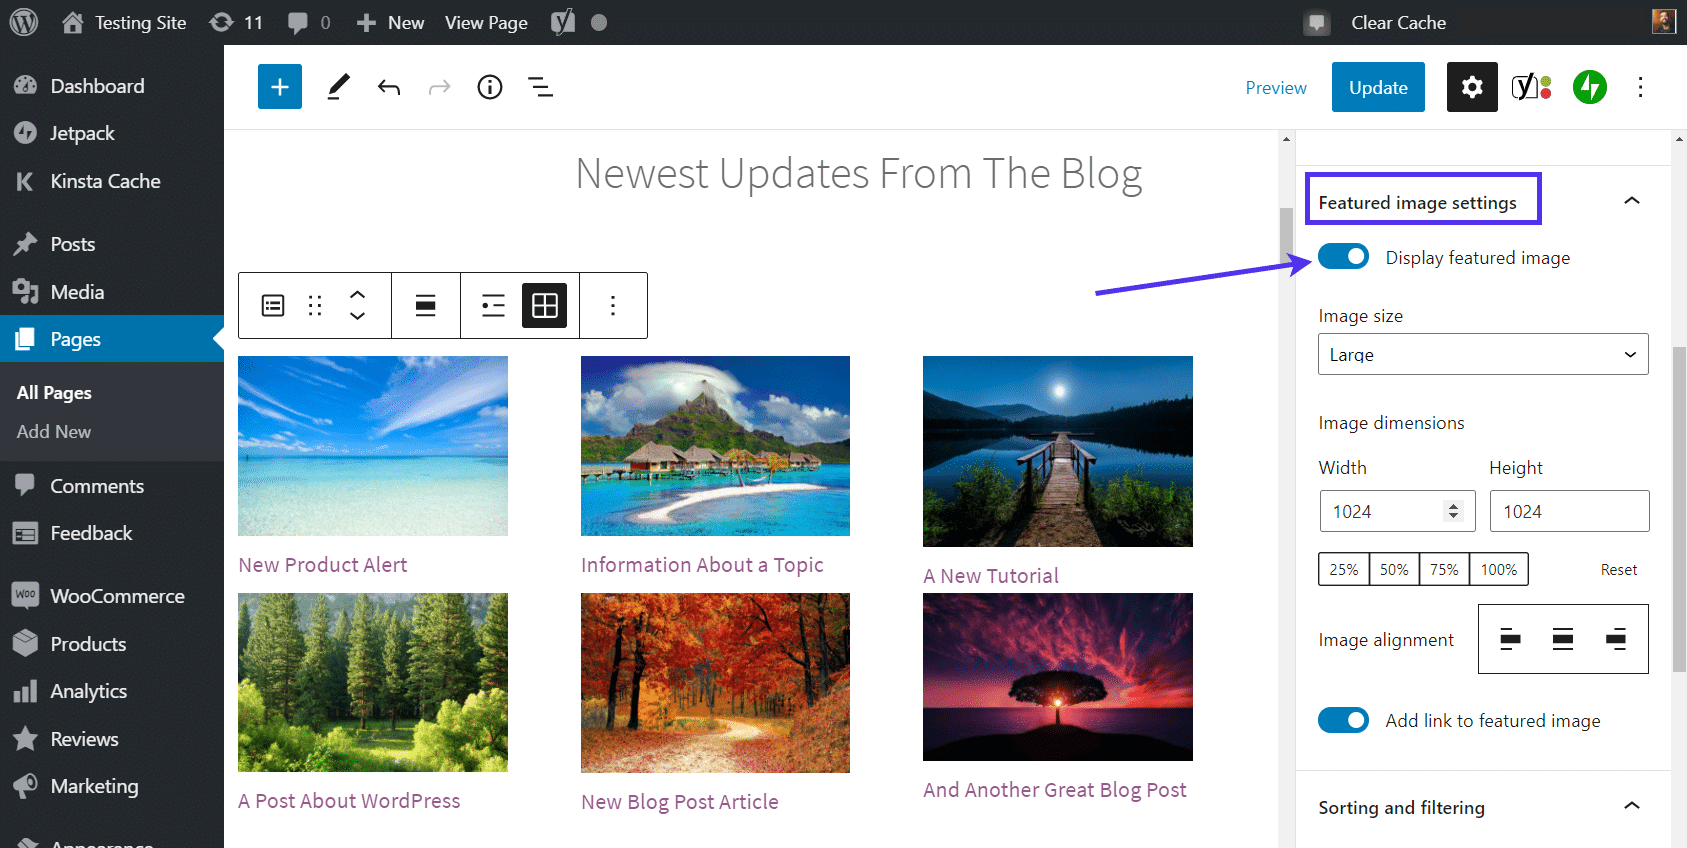
For instance, the Image Size field tells your website how large to make those featured images in the list or gallery. If you switch it to the Thumbnail option, those images shrink slightly and usually become perfect squares.
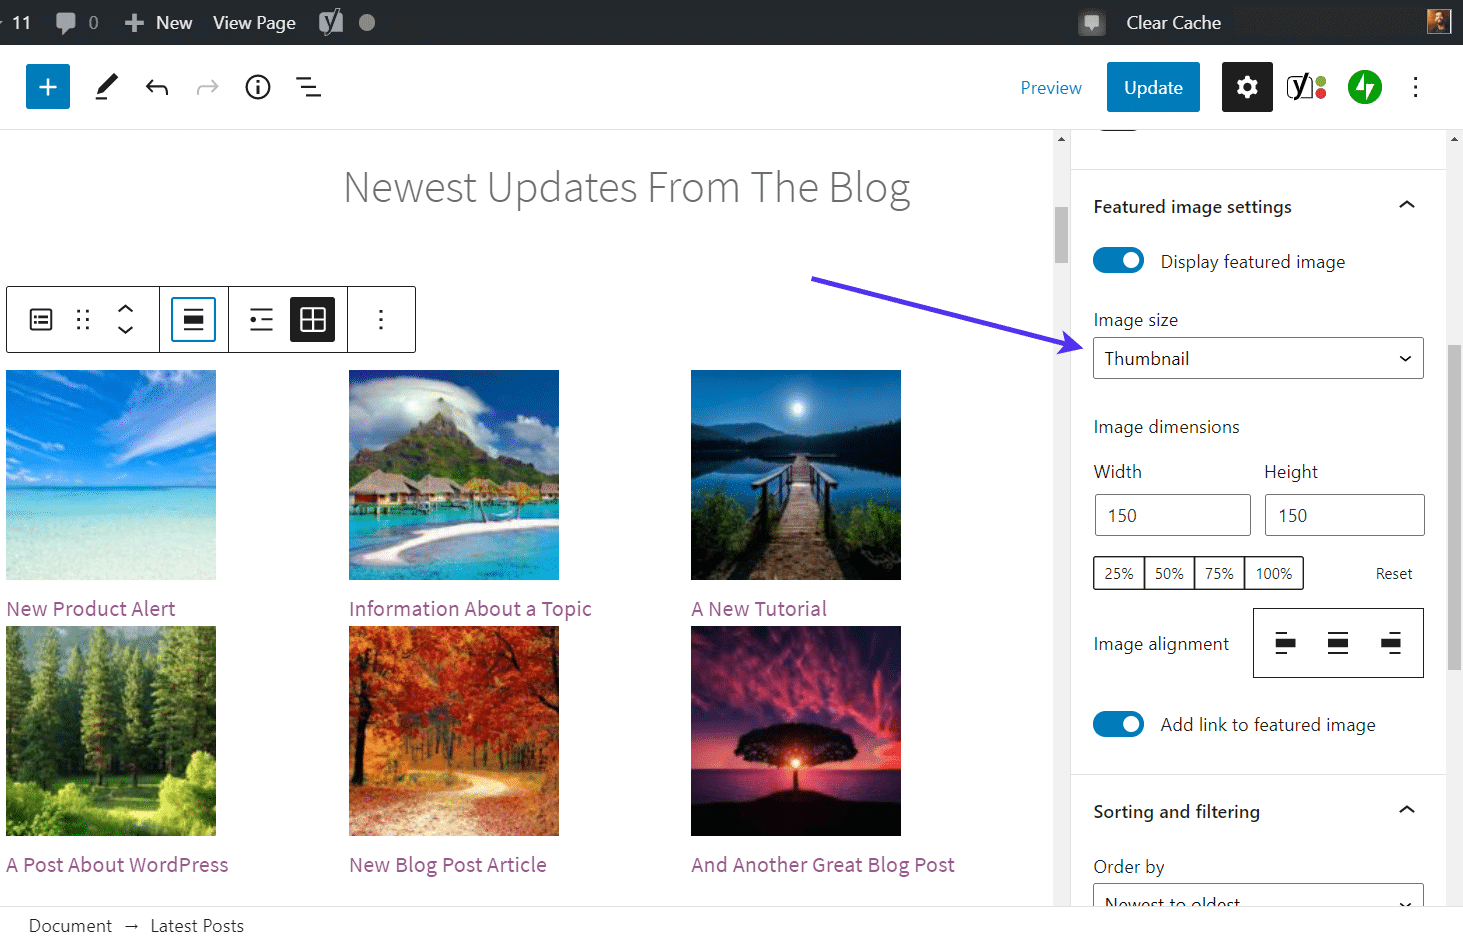
Switching it to Large or Medium adjusts the sizing of all featured images in the block and adds more of a landscape view depending on your featured images’ dimensions.
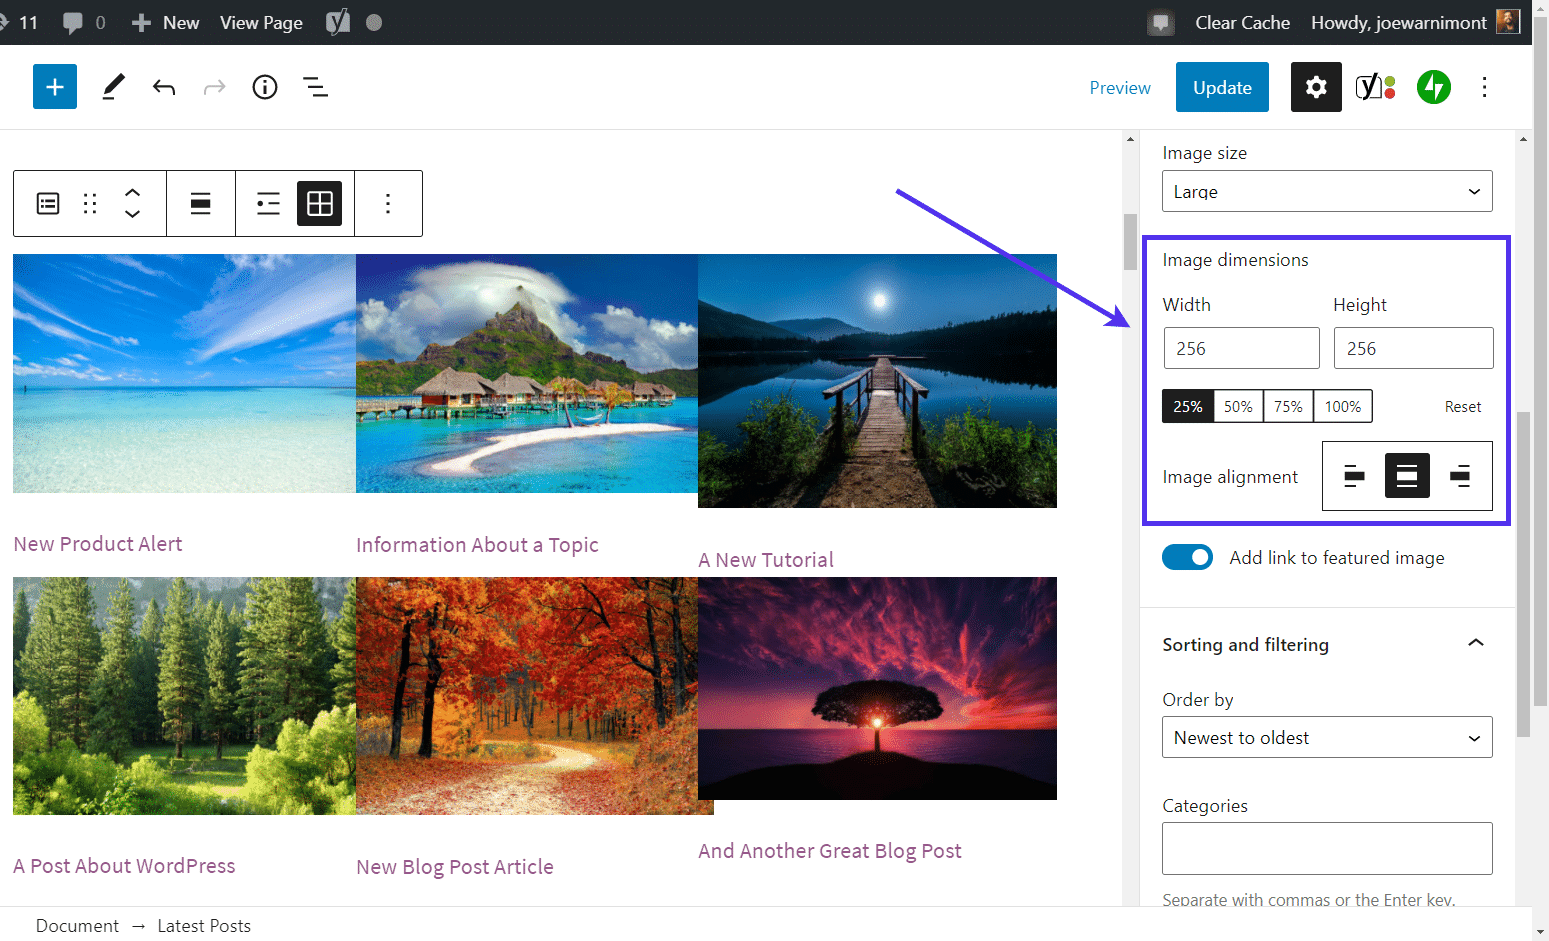
We also recommend looking at the Image Dimensions. This setting controls the sizing of all featured images shown in the Latest Posts block. You can type in custom width and height, or decide on a percentage, so that the tool automatically changes the size of all featured images based on the percentage given. For instance, you could cut down each featured image to 25% of its original size.
There’s also an Image Alignment setting to indicate if the images should slide to the right, center, or left.
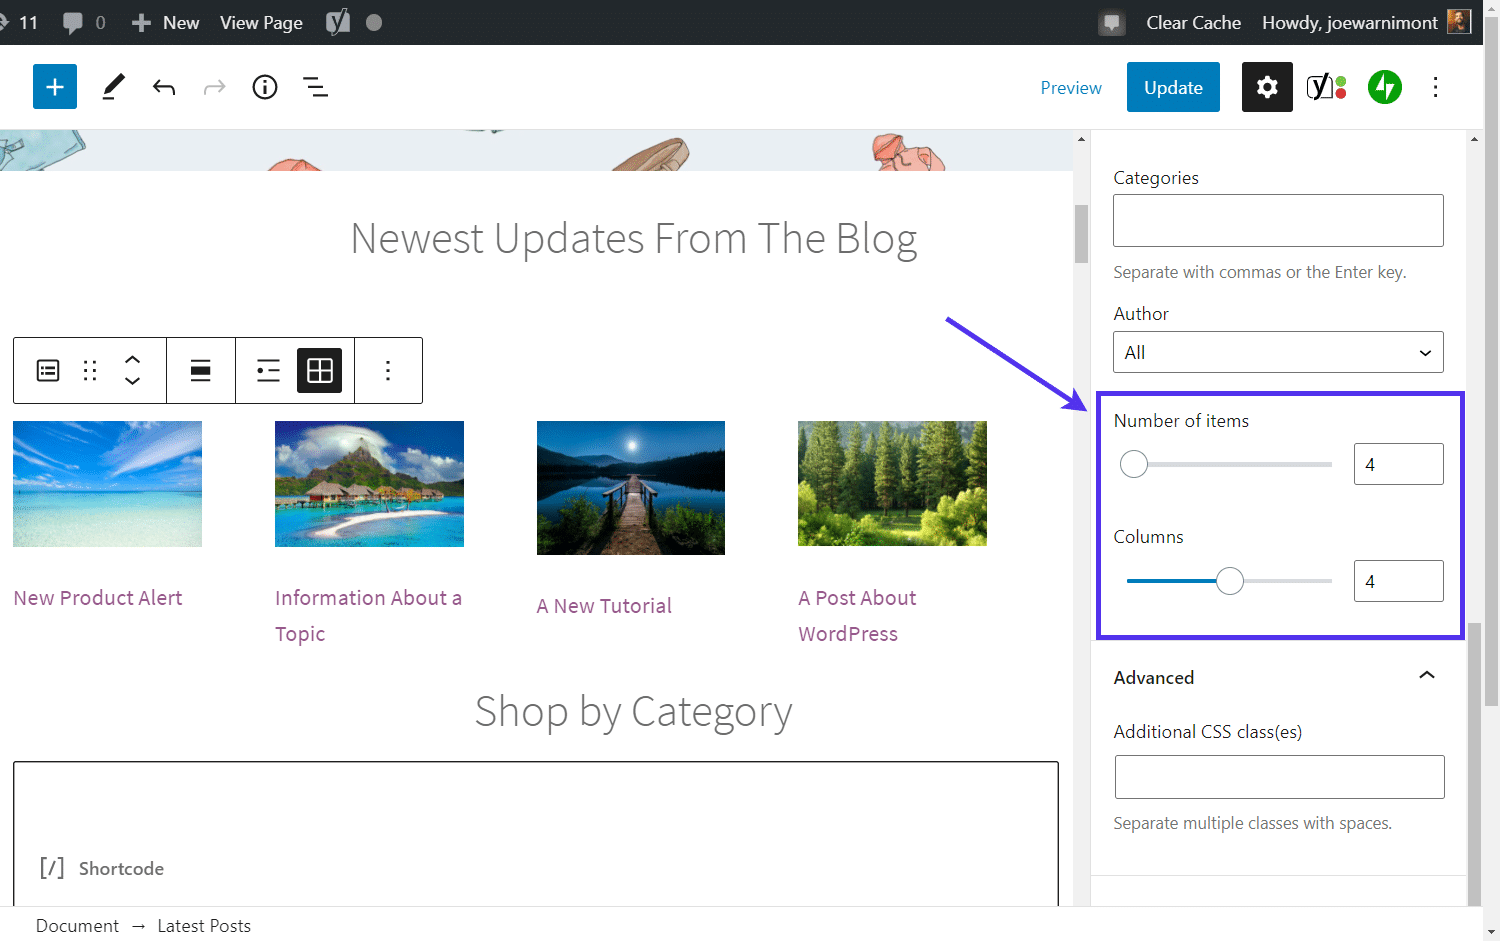
One of the last areas to consider for the Featured Image section (in the Latest Posts block) is the number of items you show in the block and how many columns make up the block.
As with most WordPress settings, these also tend to modify the way your featured images appear. That’s because having four columns will require having much more space (and smaller images) than a block with two or three columns.
Test out the fields for the Number of Items and Columns to ensure your featured images are both presentable and appealing when they get published on the homepage.
Once everything is configured, hit the Publish button. Your latest posts should appear wherever you placed the block on your homepage. Besides, the featured images for each post should be shown above the post title and link.
WordPress Featured Image Not Showing on Facebook
The featured image also appears in the embeds when a post or page is shared on social media sites.
Each social network has its own display for shared content, but Facebook is a solid starting point considering it’s the most popular one. If the featured image is showing on Facebook, then there’s a good chance it also appears on other social sites.
The big question is whether or not the featured image for a post gets rendered properly when you share a link on Facebook. If not, how do you go about fixing that problem? After all, a post shared on Facebook with no image won’t gain much traction.
In terms of featured images on Facebook, we often see the following problems:
- The wrong featured image is showing up on Facebook.
- No featured image complements the posts when sharing on Facebook.
- Several images are pulled from the post, but you must choose which one you want to use.
All the concerns listed above stem from similar problems. They’re all telling you that Facebook is either having trouble accessing the Open Graph data from your website, or there’s no Open Graph data, to begin with.
How to Test if Your Featured Image Shows Up Properly on Facebook
There’s no reason to go into troubleshooting mode if your featured images and post content all come up fine on Facebook when the post gets shared.
We suggest running a test to see if the featured images actually show on Facebook or not.
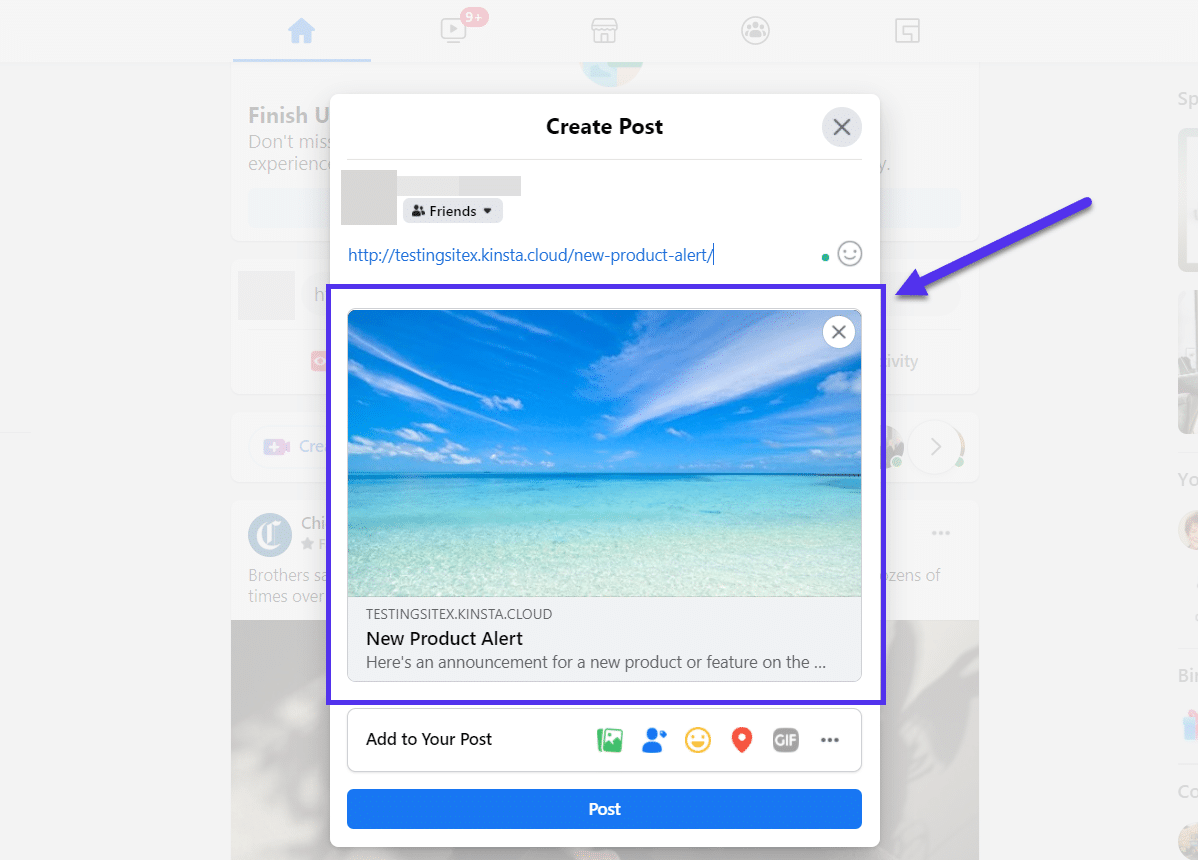
One way to complete this task is by opening up your Facebook account and pretending you’re about to share a status update.
All you have to do is paste the post link into the Facebook status field (you can also do this on personal or business pages) and wait to see if the post content gets rendered, along with the featured image.
The following screenshot shows a post working well on Facebook since it includes a summary of the post content, with a link, the title, and the featured image.
Note: Featured images get pulled from WordPress and populated on social media sites with the use of something called Open Graph. Kinsta Hosting already offers Open Graph support, along with the possibility to control this using Yoast SEO. Therefore, Kinsta bans the majority of Open Graph plugins as they can cause conflicts. However, we’ll recommend a few Open Graph plugins to resolve issues if any of your websites are running on another web host.

Another way to see if this works is if you have any social sharing buttons on your website. Go to the post in question, click on the Share to Facebook link, and see if the featured image appears in the pop-up window.
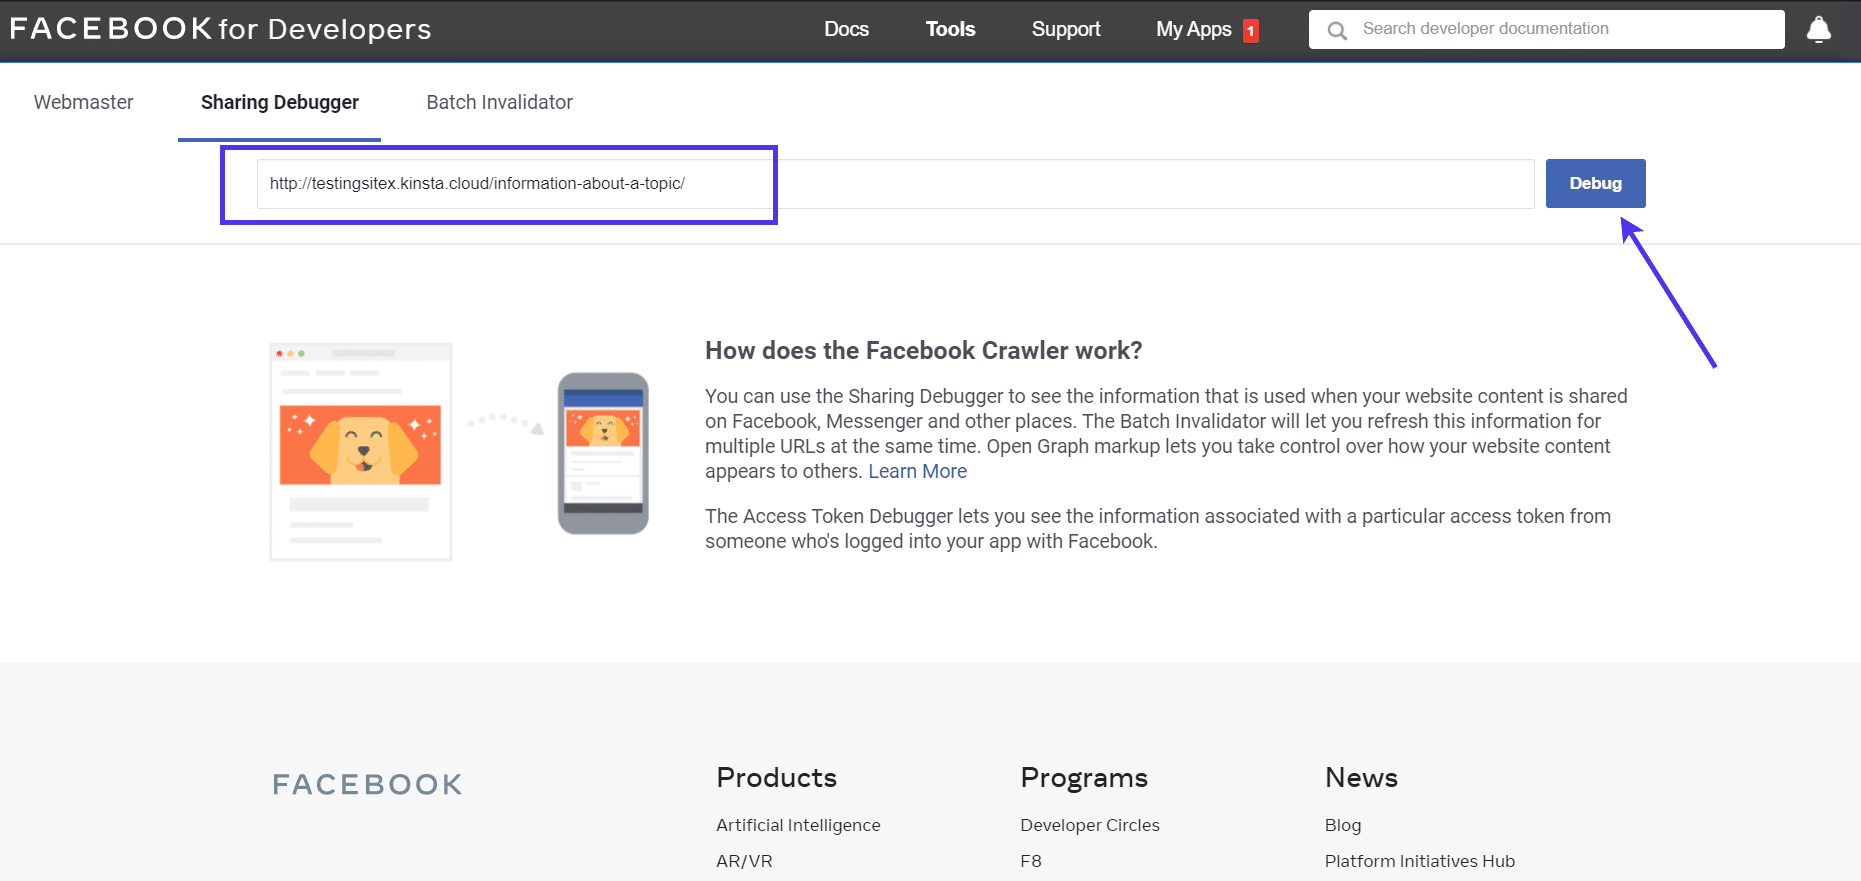
Finally, you also have the option to visit the Developers Debug Tool on Facebook. This tool scrapes any URL you want and tells you whether any errors occur with Facebook accessing the information. It also provides a clean preview of what you can expect to see if you were to paste or share that URL on Facebook.
Once on the Developers Debug Tool page, find the Sharing Debugger tab, and paste the URL in question.
Click the Debug button to proceed.
Check out our guide here to learn more about the Facebook Debug Tool.
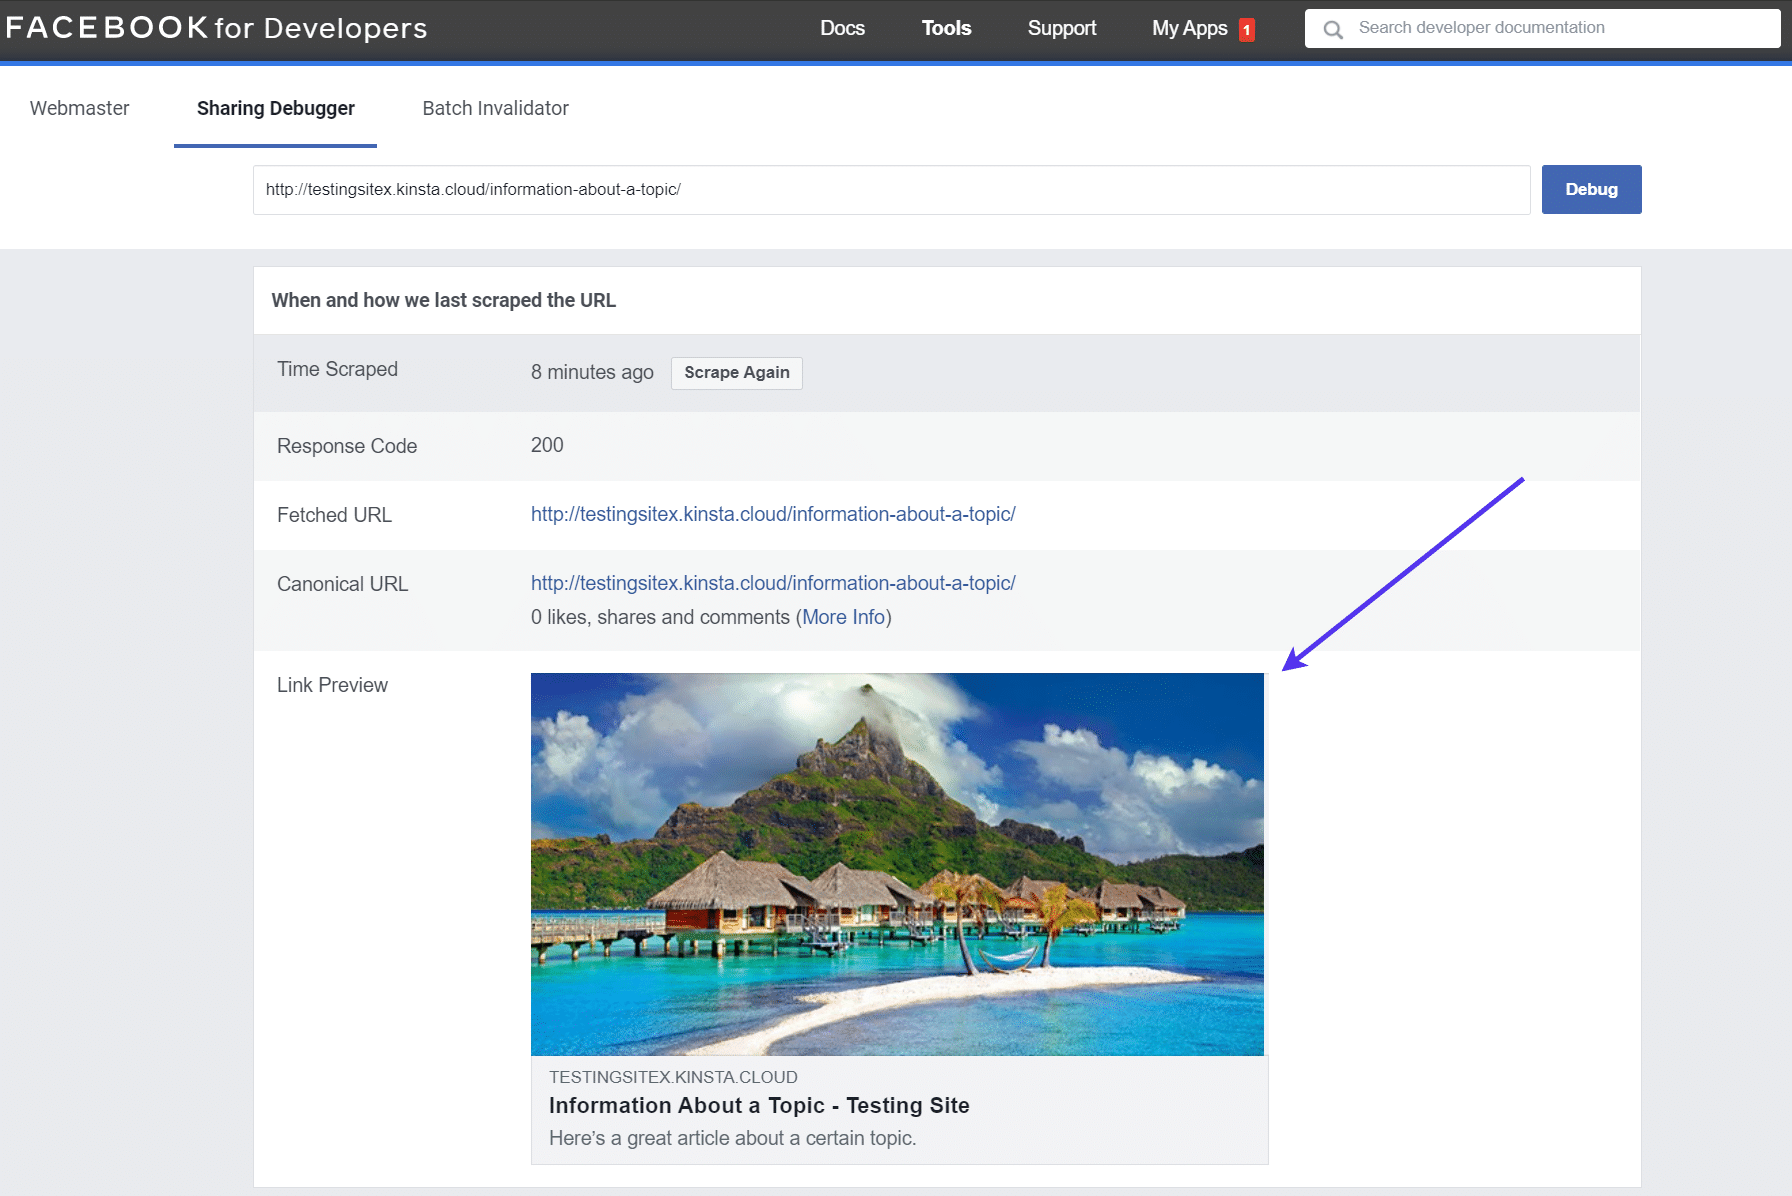
There’s quite a bit of information about how your URL interacts with Facebook, but all you need to look at is the preview. The Link Preview area shows you exactly what your post will look like if you, or someone else, shares it on Facebook.
The screenshot below tells us that our featured image is showing up just fine. But what if that’s not the case? What if the featured image isn’t the right one, or you do not see an image at all?
That’s a problem, so follow the steps below to ensure your featured image is always ready to go for social sharing.
Note: Sometimes newer websites have trouble with Facebook and other social sites because Facebook hasn’t crawled the site already. Because of this, pasting and Debugging the URL in the Sharing Debugger Tool from Facebook could actually solve your problems altogether.
An easy way to see if the Open Graph code is activated on your site is by utilizing an SEO plugin. Many of them provide tools for seeing previews of what shows up on Facebook and other social networks.
Also, you can typically enable the Open Graph markup directly from an SEO plugin’s settings.
For this section, we’ll show you how to activate the Open Graph markup with two of the most popular SEO plugins: AIO (All In One) SEO and Yoast SEO.
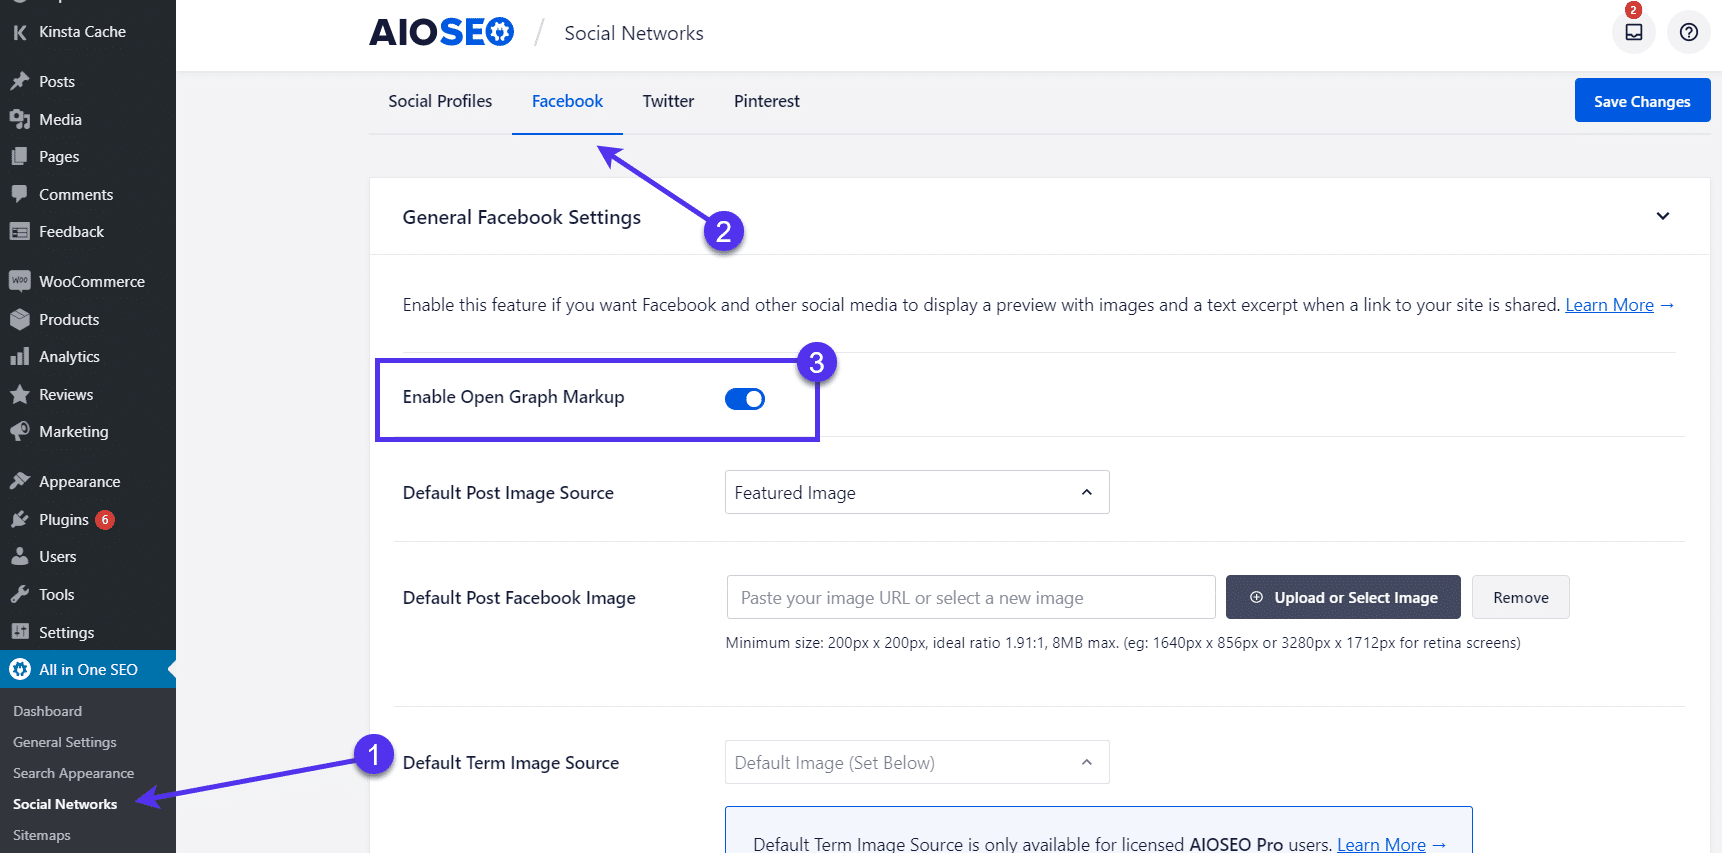
For the AIOSEO plugin, navigate to the All in One SEO menu and click on the Social Networks tab.
Choose the Facebook option and scroll down to locate the field to Enable Open Graph Markup. By default, this featured should be enabled, but it’s possible you turned it off at some point.
You can also configure settings to have a default Post Image Source, like pulling the first image from a post or going with the Featured Image.
After that, click on the Save Changes button and test to see if Facebook sharing allows the featured image to appear.
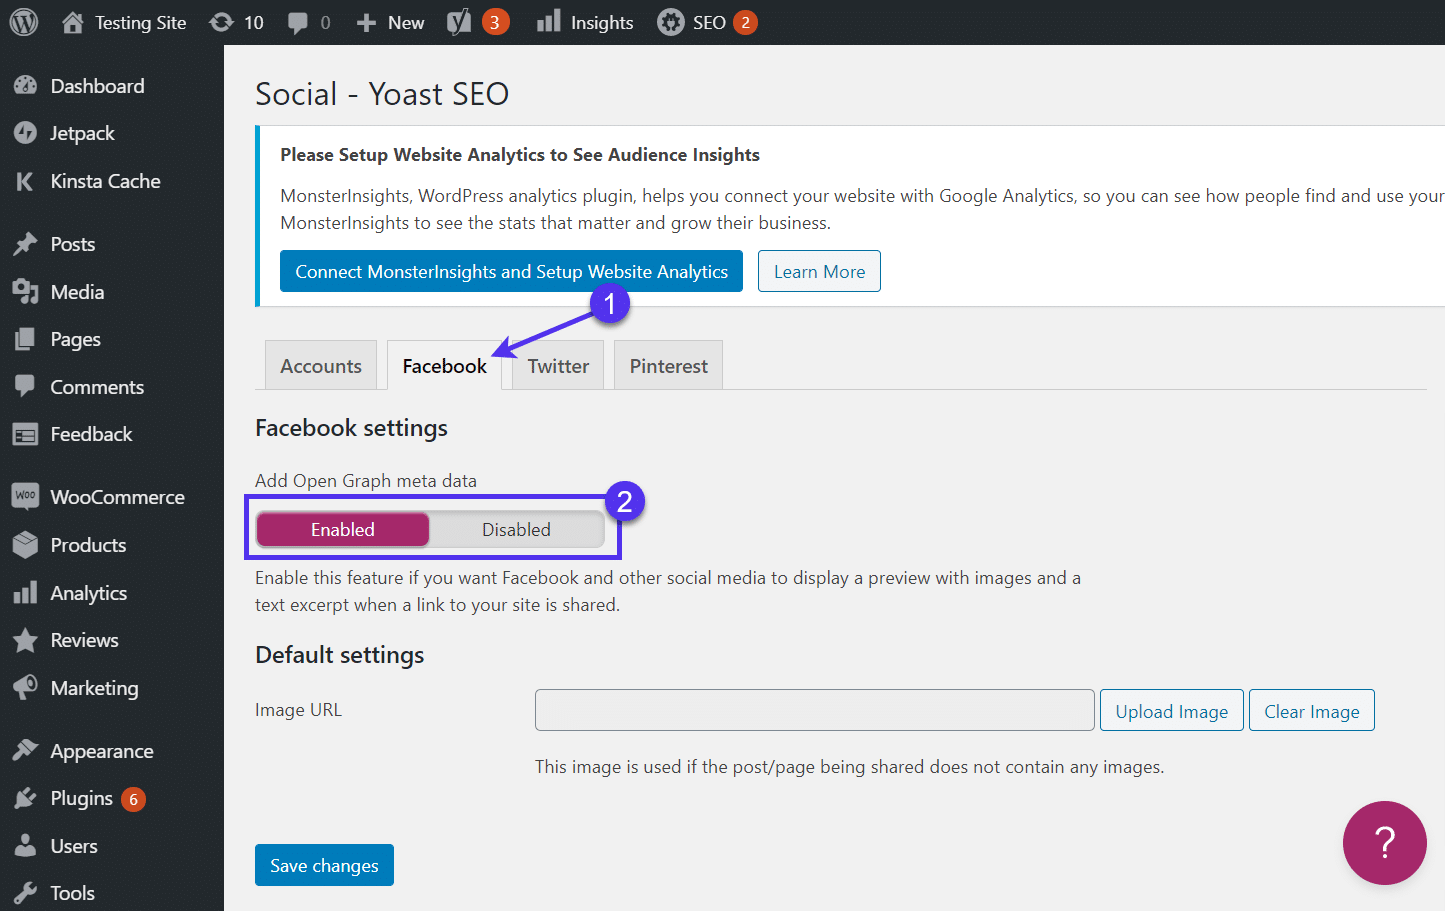
Yoast SEO is another SEO plugin that includes social sharing features and options to enable/disable the Open Graph functionality.
What’s great about Yoast SEO is that simply installing the plugin may do the trick for activating the Open Graph protocol for social sharing.
If you’re still having problems, go to SEO > Social in the WordPress dashboard.
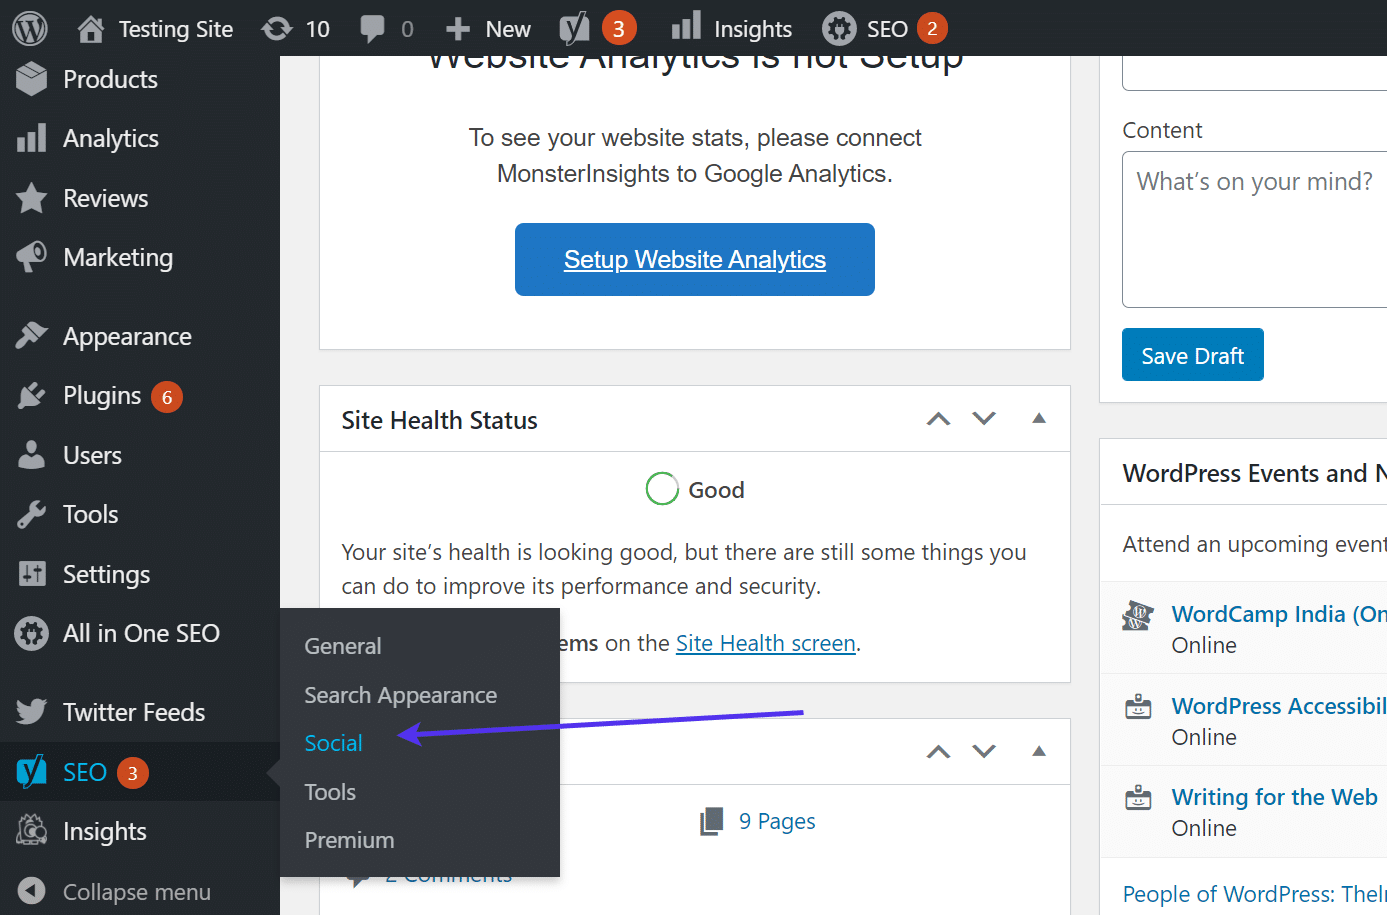
Here, select the Facebook tab. You can also test this out for the other social networks like Twitter and Pinterest.
Find the Add Open Graph Meta Data switch and make sure it’s set to Enabled.
You may also want to set a Default Image URL to appear if a post doesn’t have a featured image assigned to it.
Be sure to Save Changes and try sharing another post to see if it now allows for featured images in the shared posts.
Whenever you make a change, it’s good to go back to the Facebook Sharing Debugger Tool to promote Facebook to search for more data on the post.
You can click on the Scrape Again button or simply refresh the page and paste your post URL in the field once more.
Debugging Multiple URLs at Once on Facebook
You may have a lot of old posts that don’t generate featured images when shared on Facebook. That’s a tremendous problem.
If you find yourself in this situation, we recommend returning to the Facebook Sharing Debugger Tool and clicking on the Batch Invalidator option.
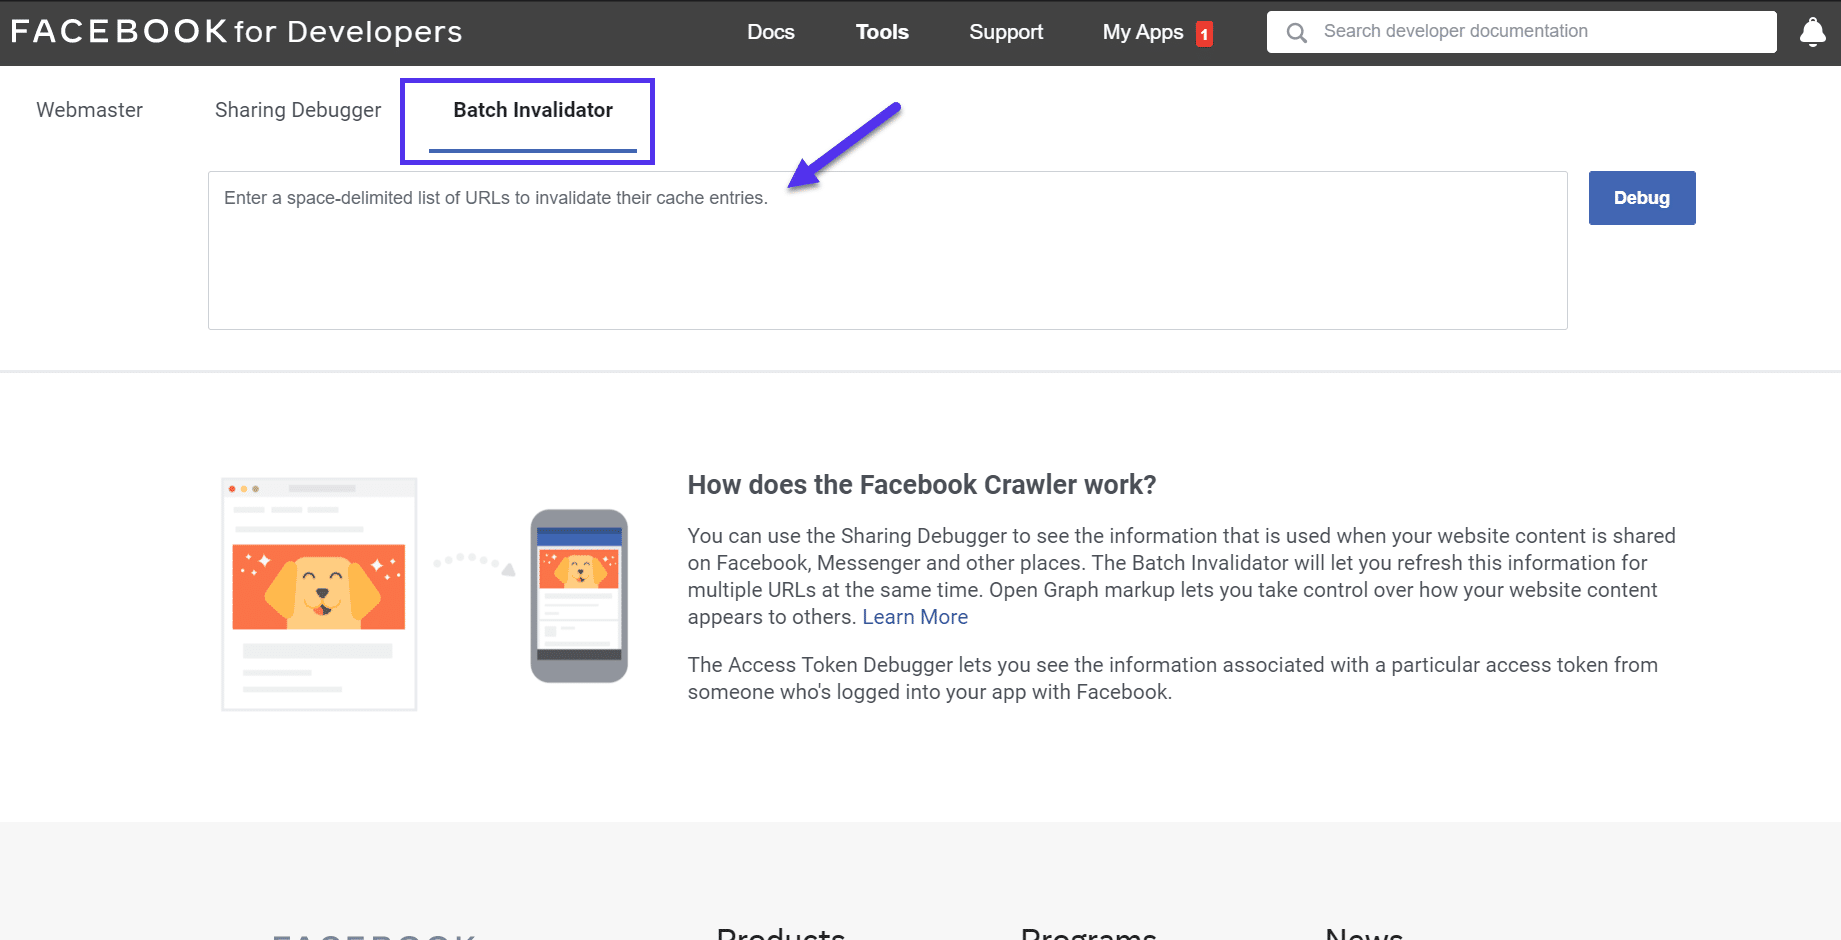
This allows you to paste in up to 50 URLs and run the tool so that Facebook scraps their metadata properly again.
You have two options for grabbing URLs from your site. The first is going about it manually, clicking on each post and page on your site and collecting the URLs into a document.
An alternative is to install and activate a plugin like Export All URLs. It takes every URL on your site and exports them into a simple document. This way, you’re able to copy and paste them easily into the Facebook Sharing Debugger Tool.
Once that’s all said and done, click on the Debug button to process all URLs in the list and make it so that the featured images, and all other relevant post data, appear when shared on Facebook.
Additional Options to Show the WordPress Featured Image on Social Media
Activating Open Graph on your WordPress site is pivotal in showing your featured images on platforms like Facebook.
If you’re having problems with the SEO plugins discussed above, or you simply don’t plan on using an SEO plugin (and therefore, don’t have access to a quick Open Graph activation button), there are a few other options to activate Open Graph.
The OG Plugin
The first is OG, which comes in handy for adding the Open Graph protocol to turn any webpage into rich objects for social media. The plugin is lightweight and doesn’t offer any other features, making it ideal for those not interested in anything besides fixing the Open Graph issue.
To begin, install and activate the OG plugin on your WordPress site.
The true advantage of a plugin like OG is that it doesn’t require any configuration after the installation. That means there’re no settings to look at or change before it working its magic.
The Open Graph protocol is automatically activated for all WordPress posts and pages.
Now, go to your Facebook page (personal or business) and paste a link with a featured image into the Status field.
With the OG plugin activated, you should now see the post information and the featured image in the preview.
If you’re still not having success with that, consider going to the Facebook Sharing Debugger to ensure Facebook knows how to crawl your website, as that’s usually the problem if you already have the Open Graph protocol activated.
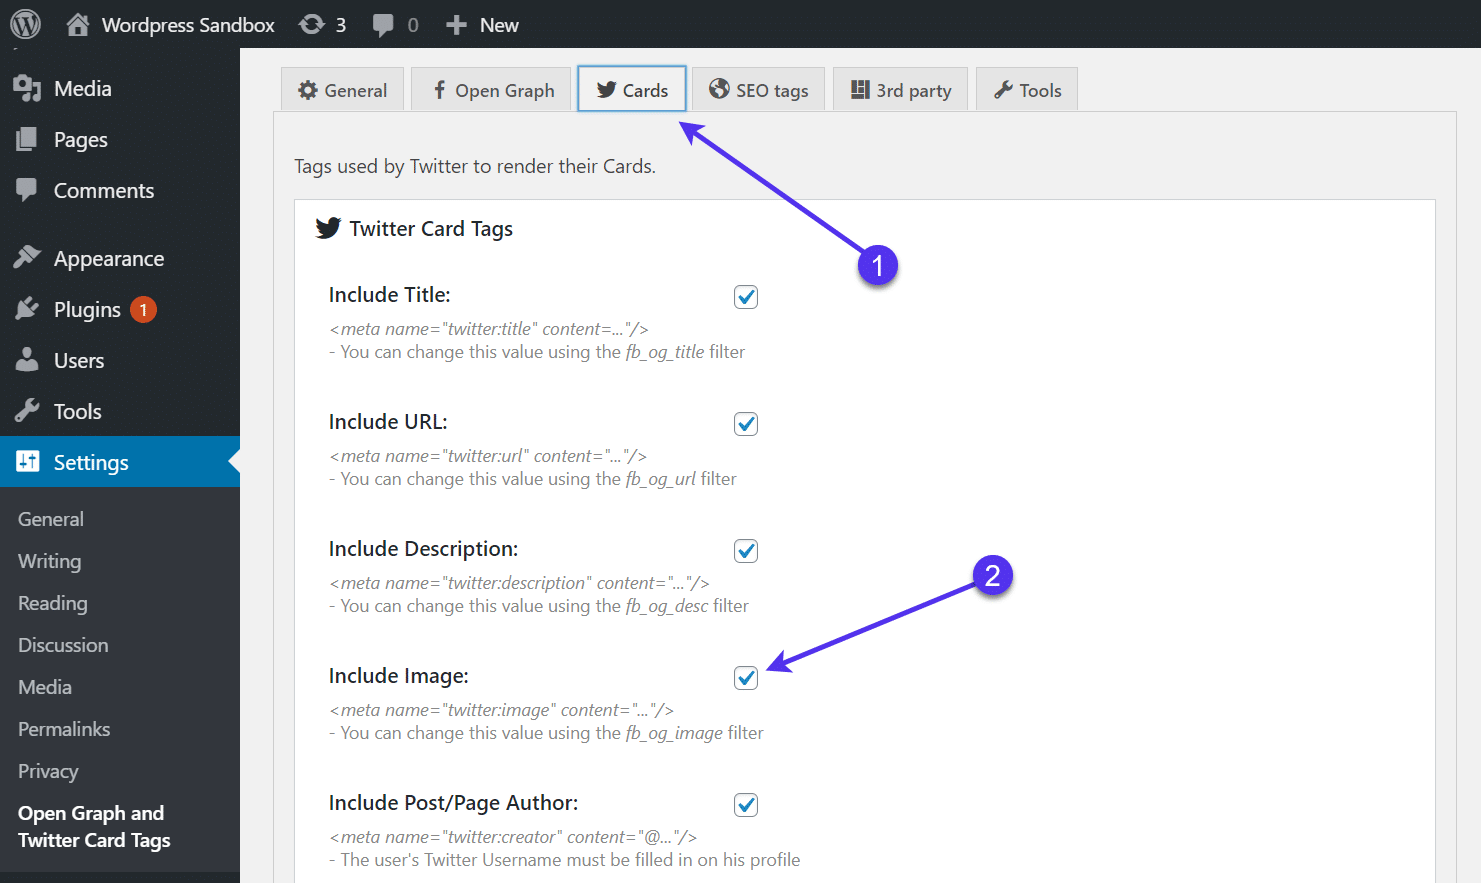
The Open Graph and Twitter Card Tags Plugin
Our last option for turning on the Open Graph protocol to reveal featured images is called the Open Graph and Twitter Card Tags plugin. Along with activating the Open Graph for all social networking sites, this plugin has the added advantage of including Twitter tags to improve your Twitter sharing results.
Again, Kinsta bans many Open Graph plugins, including this one. That’s because there’s no need to activate an Open Graph plugin with Kinsta. However, if you use any other hosting provider, it may prove useful.
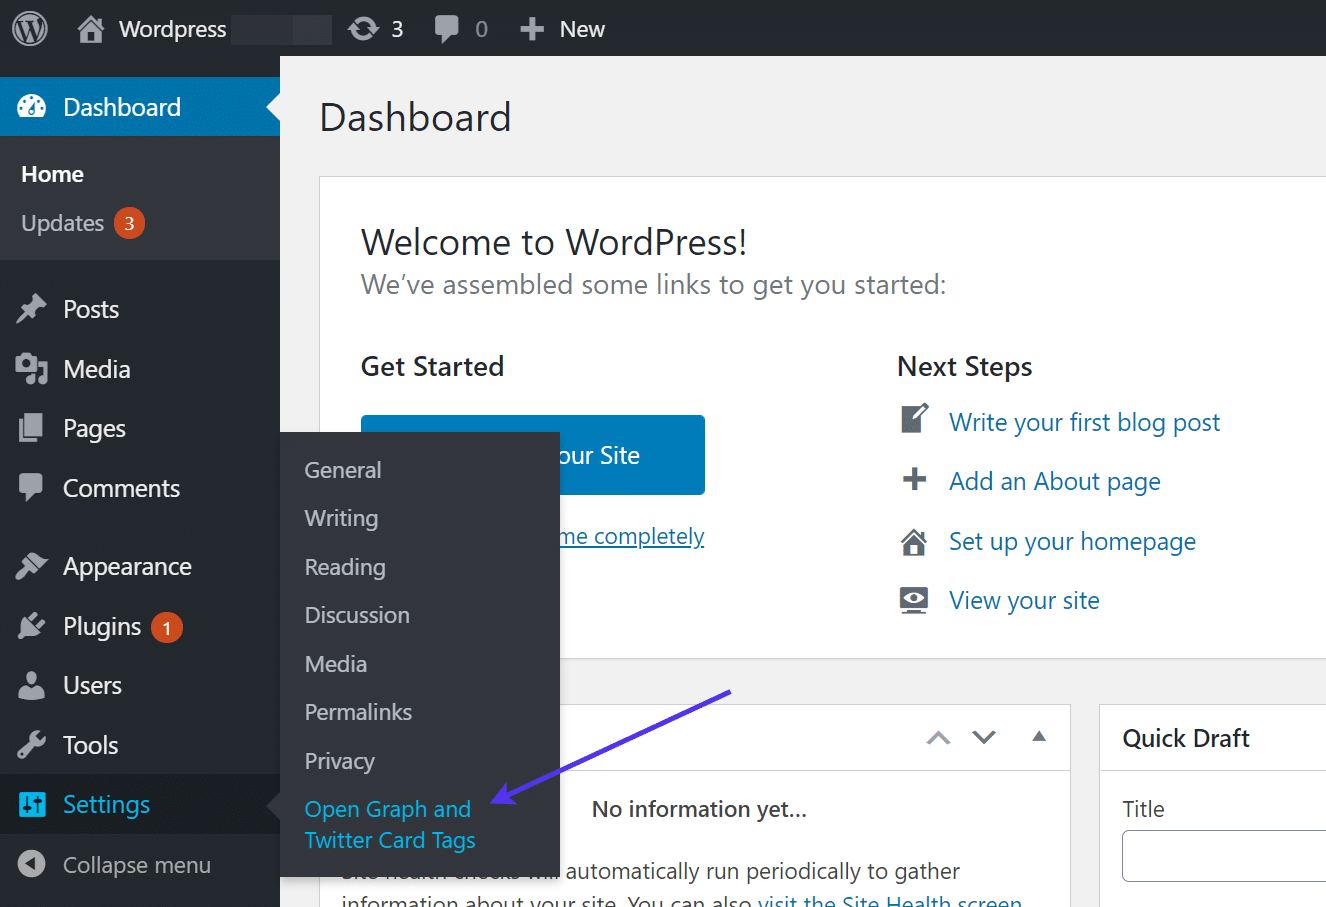
To start, install and activate the Open Graph and Twitter Card Tags plugin on your WordPress site.

Now, go to Settings > Open Graph and Twitter Card Tags. This brings you to the settings required to activate the Open Graph protocol and calibrate which content elements you’d like to see when your posts and pages get shared to social media sites.
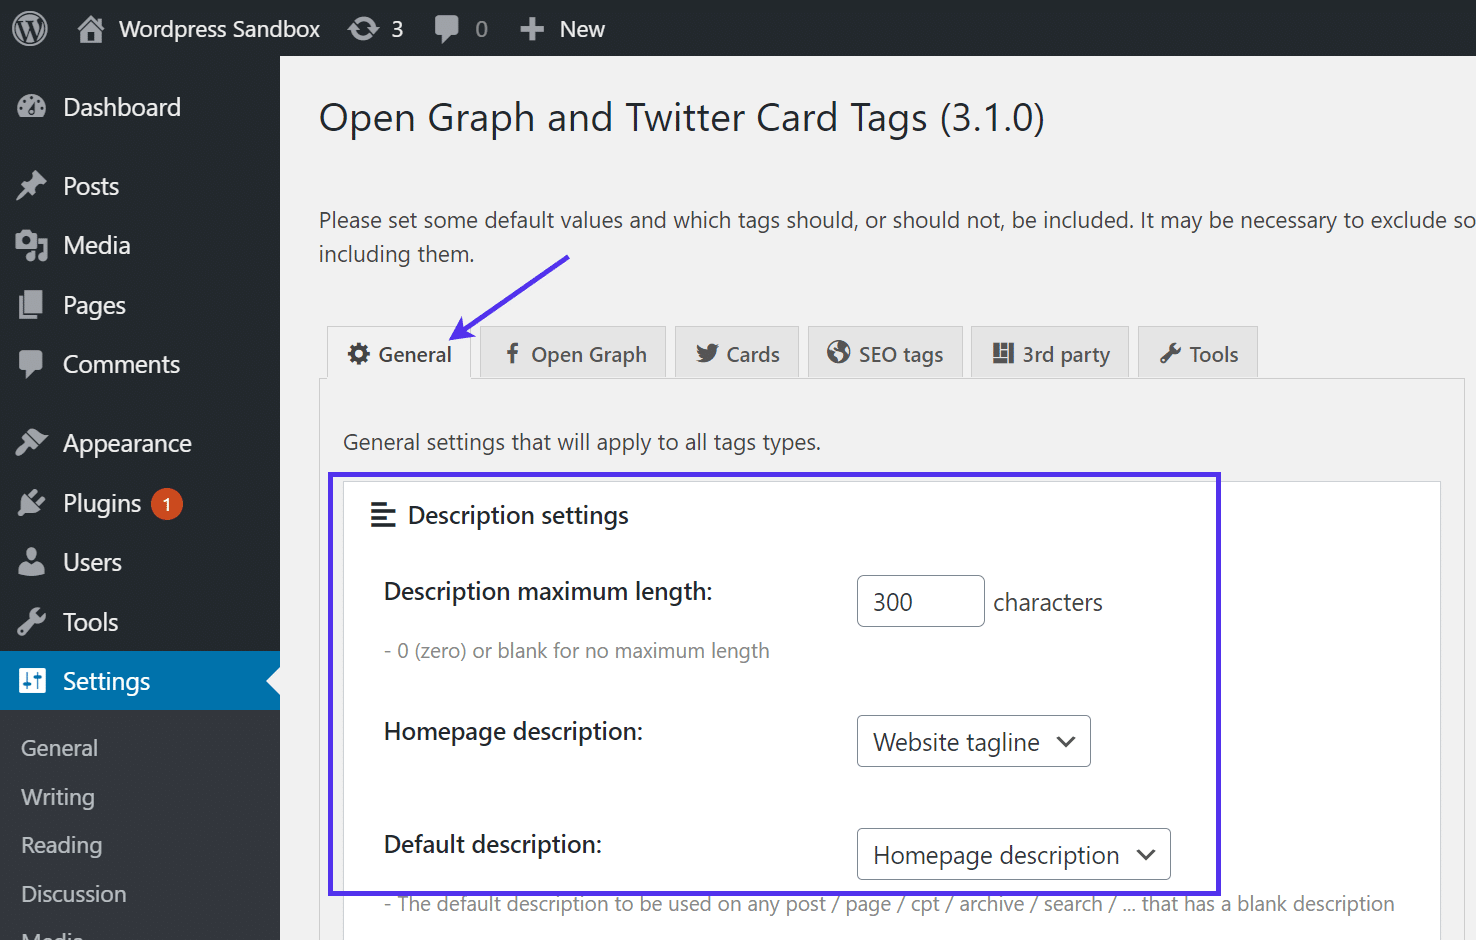
Select the General tab and locate the Description Settings section. Here, you need to fill in fields like the Description Length, Homepage Description, and Default Description. These don’t control your featured image, but they show up right below the featured image, so it’s important for displaying the content.
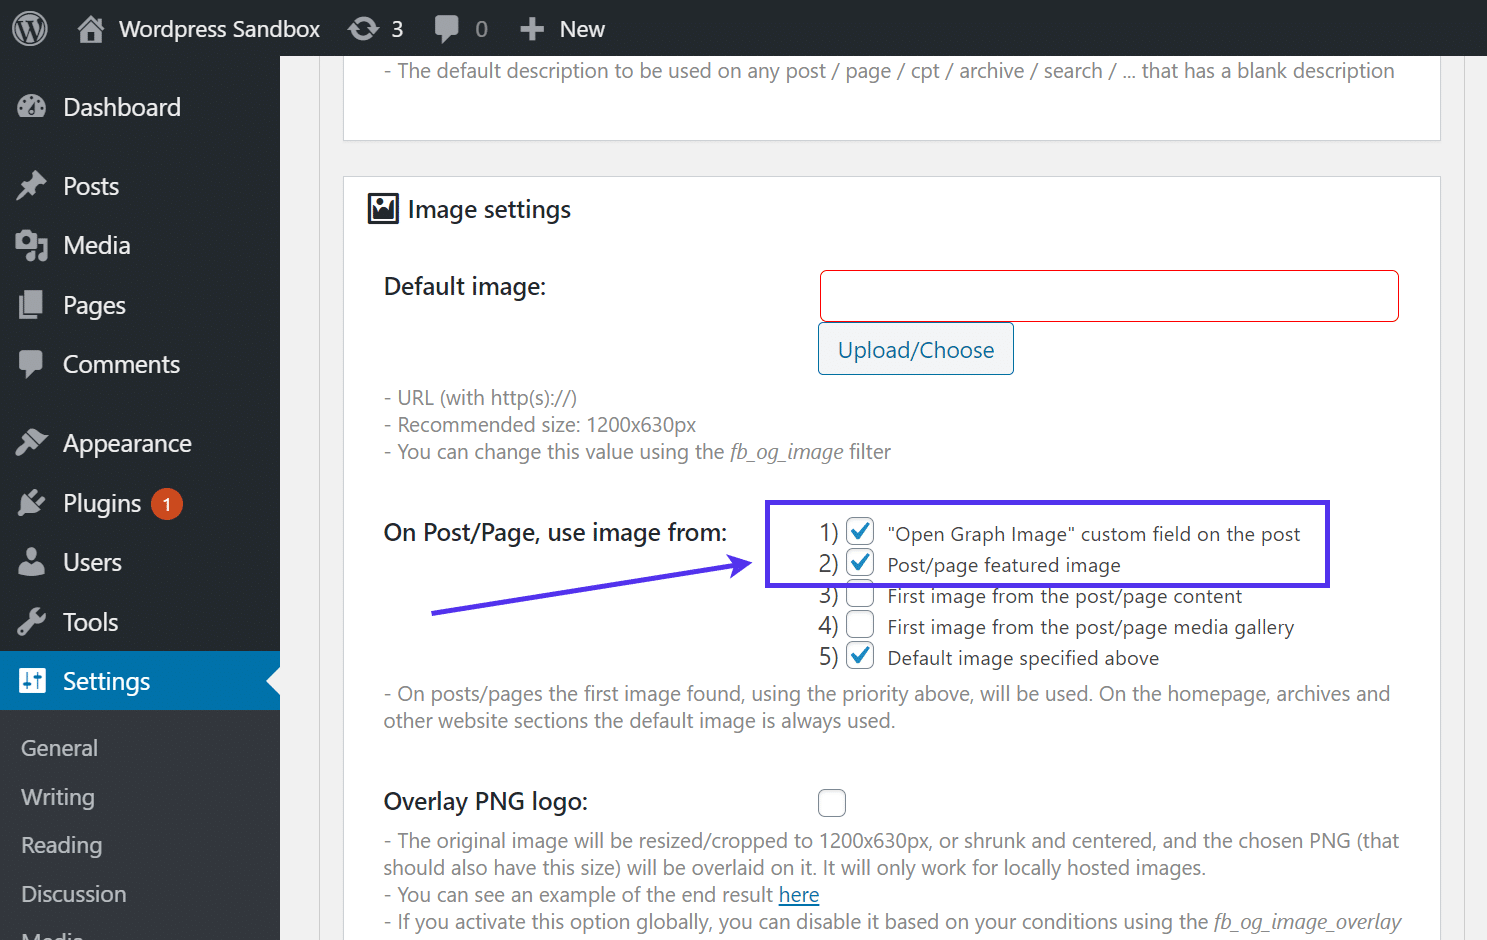
Scroll down to the area called Image Settings. There’s a field for choosing where the image should come from when sharing a post or page to social media.
Select the first two checkboxes to grab the Open Graph image, while the other is for using the page or post featured image.
These are the general settings for all social media sharing, making sure Facebook and Twitter don’t randomly select photos from your article or other places on your website.
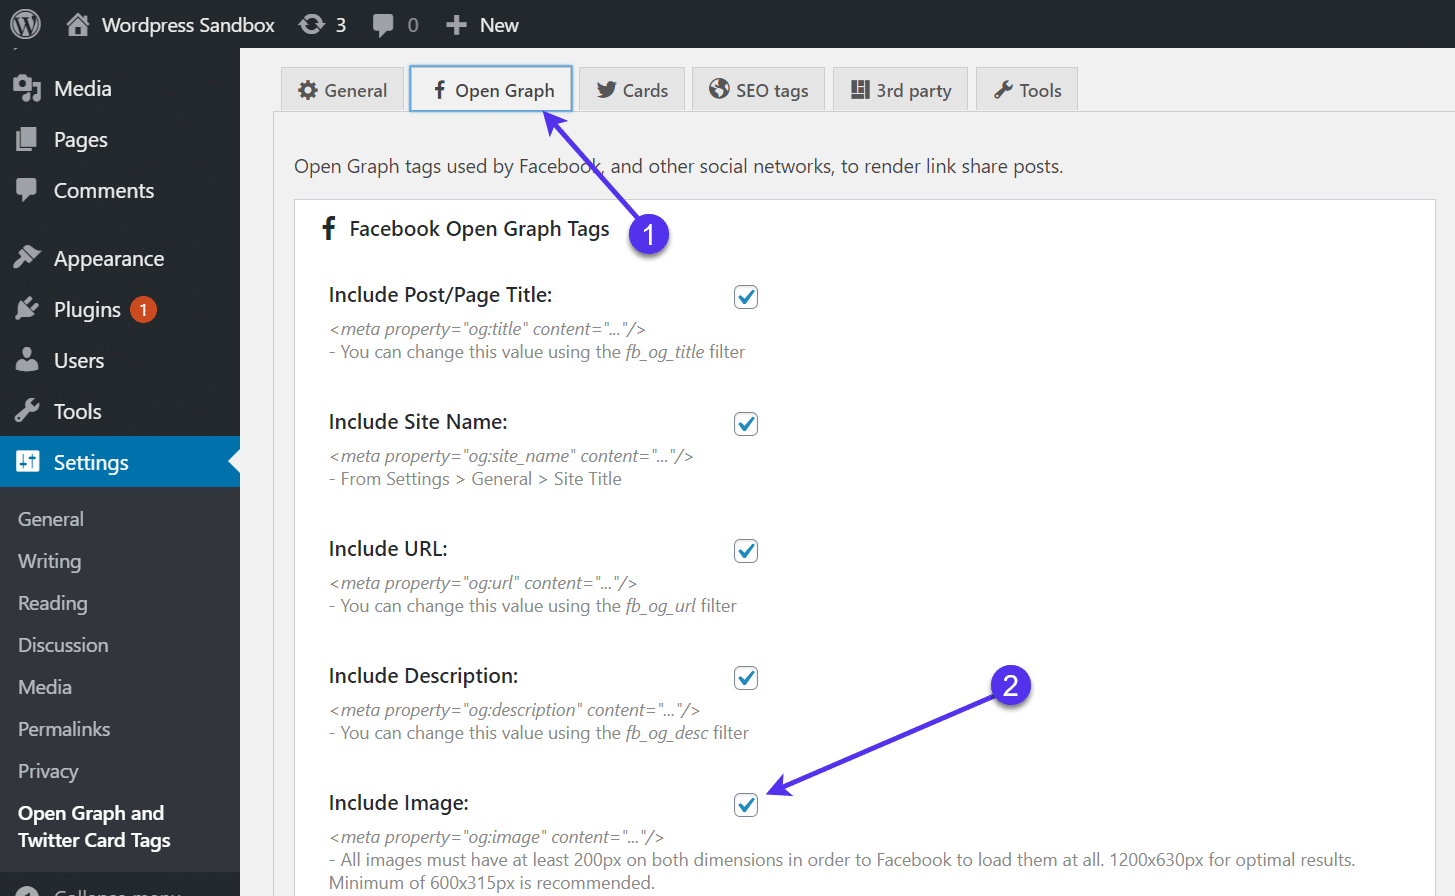
Next up, click on the Facebook Open Graph tab. Here, you can set everything for the Open Graph sharing protocol, yet specific unique traits for Facebook only.
For instance, you might consider including things like the Site Name and Post Title but not having the URL. There’s a long list of settings to mess around with, so it’s entirely up to you.
The most important option right now is the Include Image field. Check this box so that the featured image from a WordPress post or page gets populated upon sharing to Facebook.
Another specific Open Graph module from this plugin is for Twitter. Select the Twitter Cards tab to show the settings to configure your Twitter Card Tags.
Twitter Cards are a little different than Facebook sharing modules, so you can go through these settings to make sure everything looks good. We recommend checking boxes for the Title, URL, and Description.
Finally, you should check the box to Include Image, as this is the only way Twitter grabs your featured image from a post or page.
Be sure to Save the settings after you’re done.
Overall, the best way to activate the Open Graph protocol for properly sharing content and featured images on social media is by installing a plugin like Yoast SEO or OG. The next best method is using a managed host like Kinsta, which already has Open Graph configured for you.
Ensuring Featured Images Always Show in Posts and Pages
The featured image is prone to human error, considering the page or post author must manually upload a featured image whenever creating a new webpage.
Although automating the process isn’t for everyone, there are tricks to ensure that a WordPress featured image is always shown for posts and pages, minimizing the chance that an author forgets to upload one.
How to Configure Default Featured Images for All of WordPress
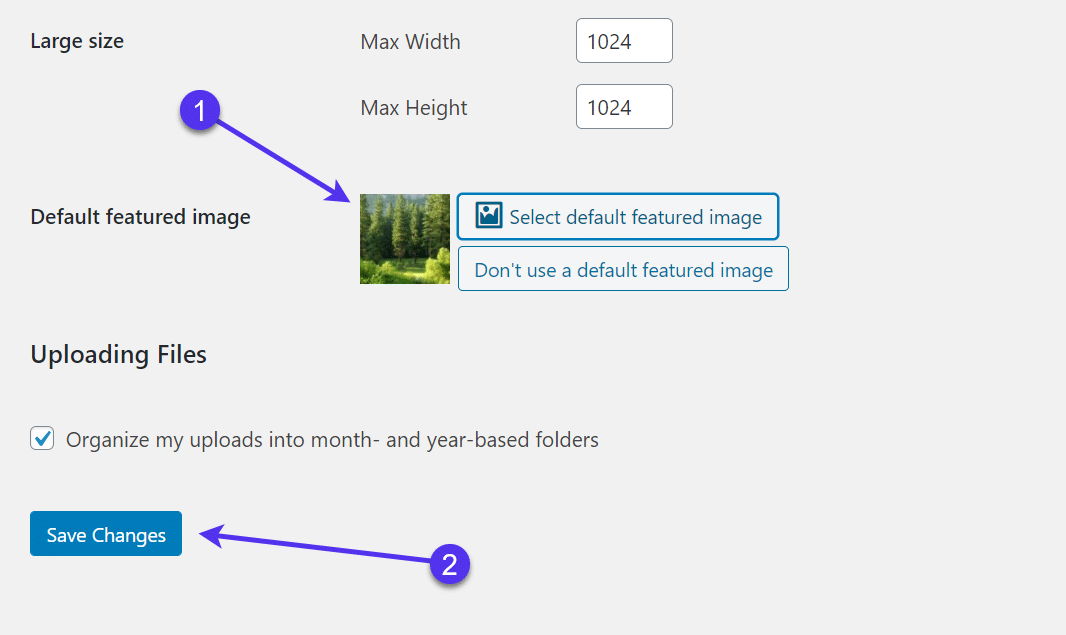
One way to ensure your featured image field is never empty is to set a default featured image for all posts.
The great part about this plugin is that it doesn’t replace the featured images you already have on your posts. Instead, it detects the posts that lack featured images and sets a default featured image for them.
Begin by installing and activating the Default Featured Image plugin.
Now, go to Settings > Media in your WordPress dashboard.
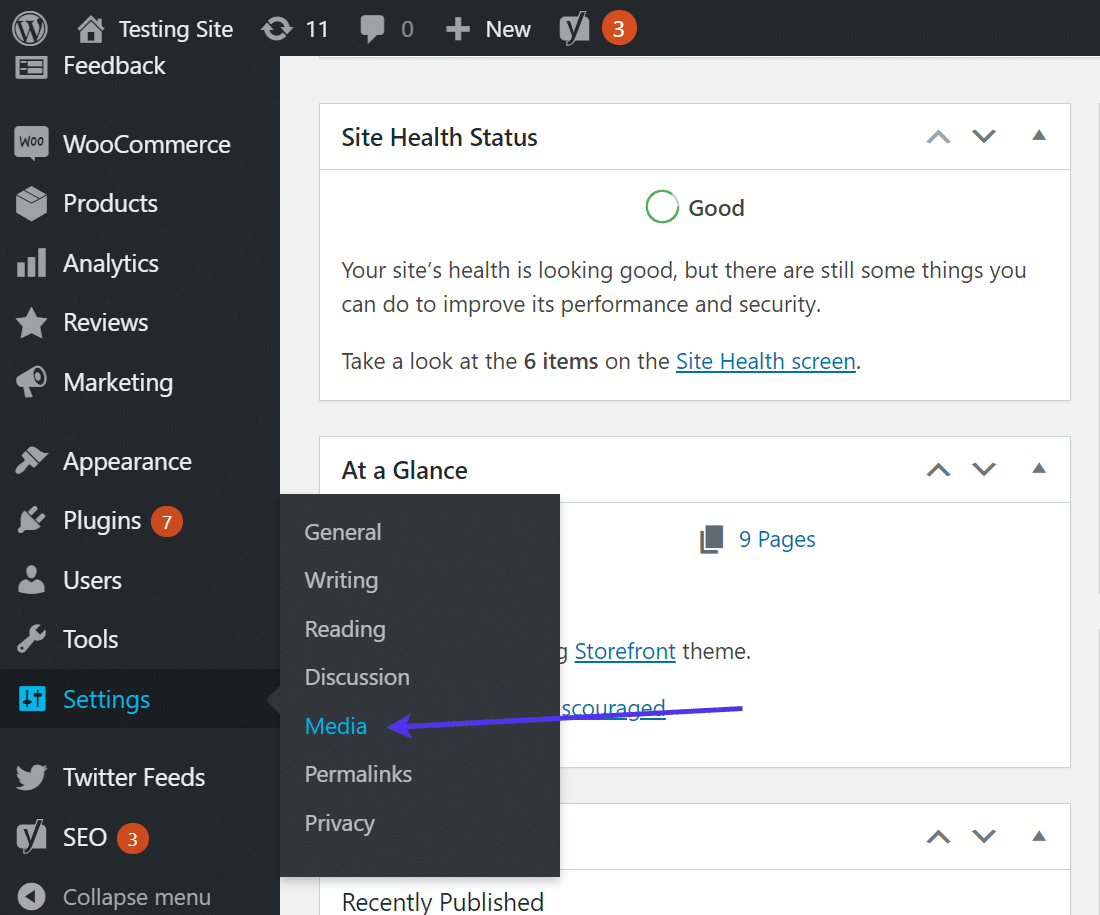
This is the only section of the dashboard that gets changed by the Default Featured Image plugin.
Scroll down to find a new field called Default Featured Image.
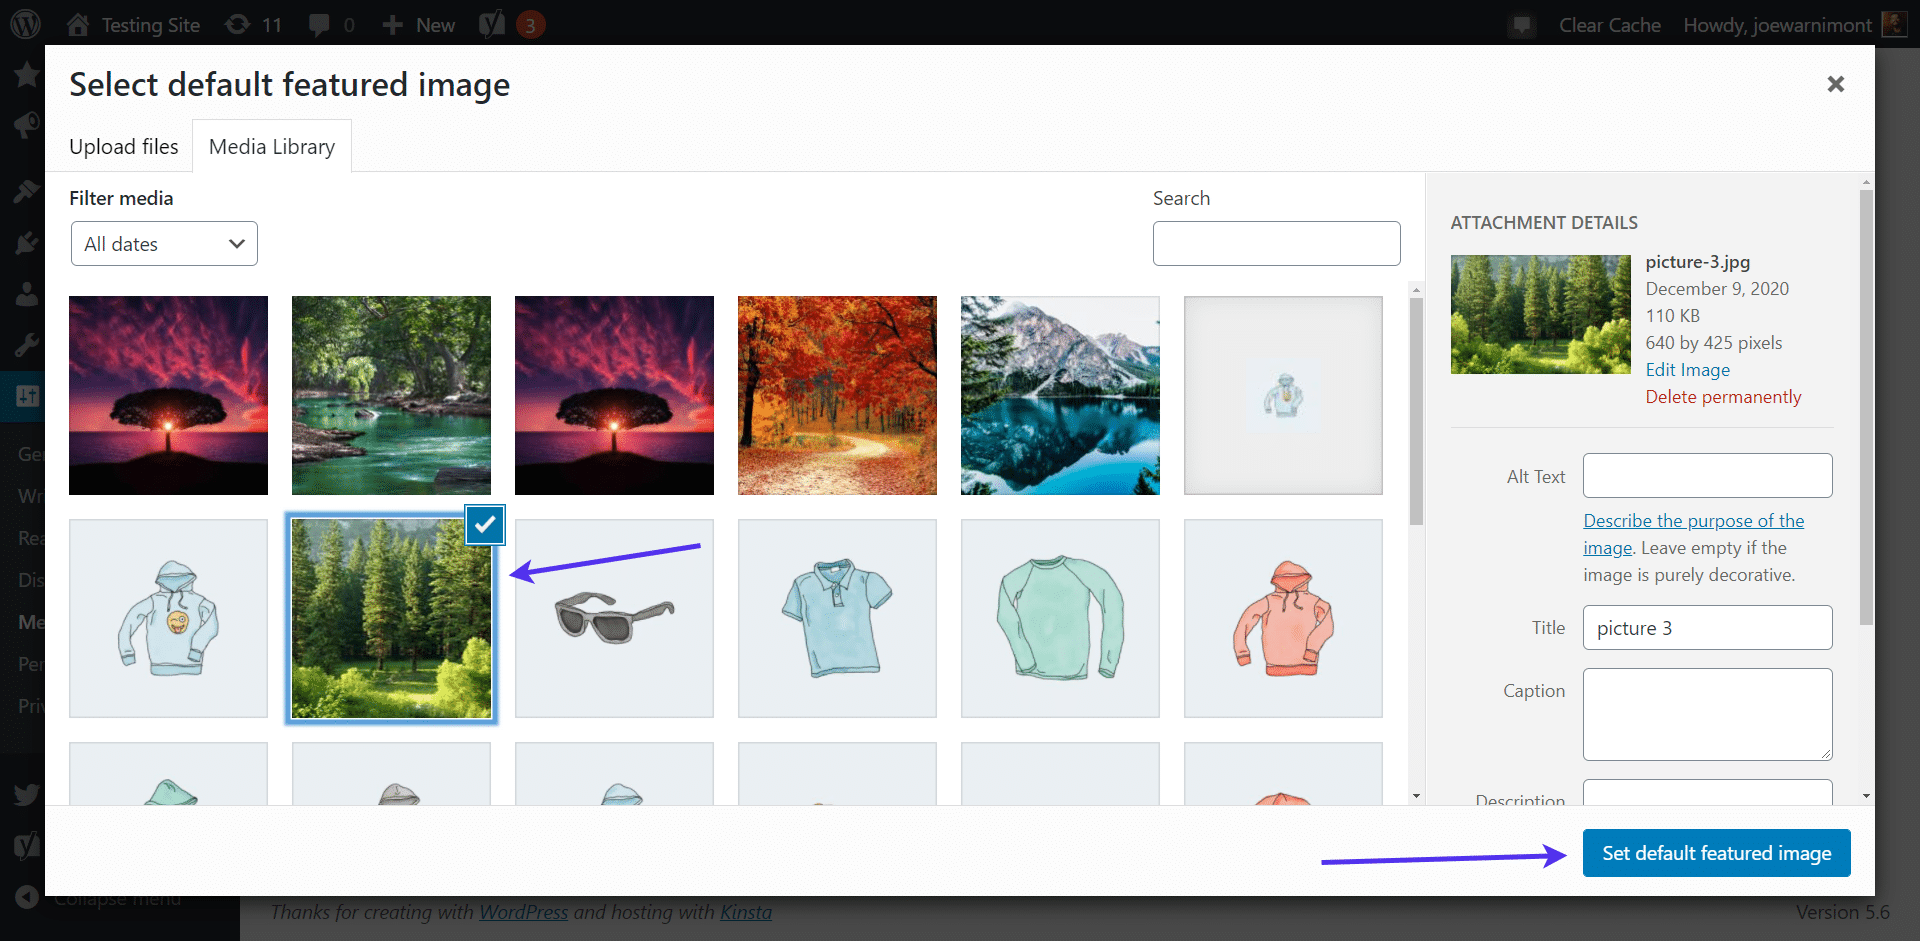
Click on the Select Default Featured Image button.
This brings up the Media Library, from where you can choose an image to serve as your Default Featured Image.
After you select an image, click the Set Default Featured Image button.
You should now see a thumbnail of that image for all posts that don’t have featured images already uploaded.
Be sure to click the Save Changes button to activate the default featured image on your site.
It’s important to test out how the Default Featured Image works on your site.
To do so, go to Posts > All Posts.
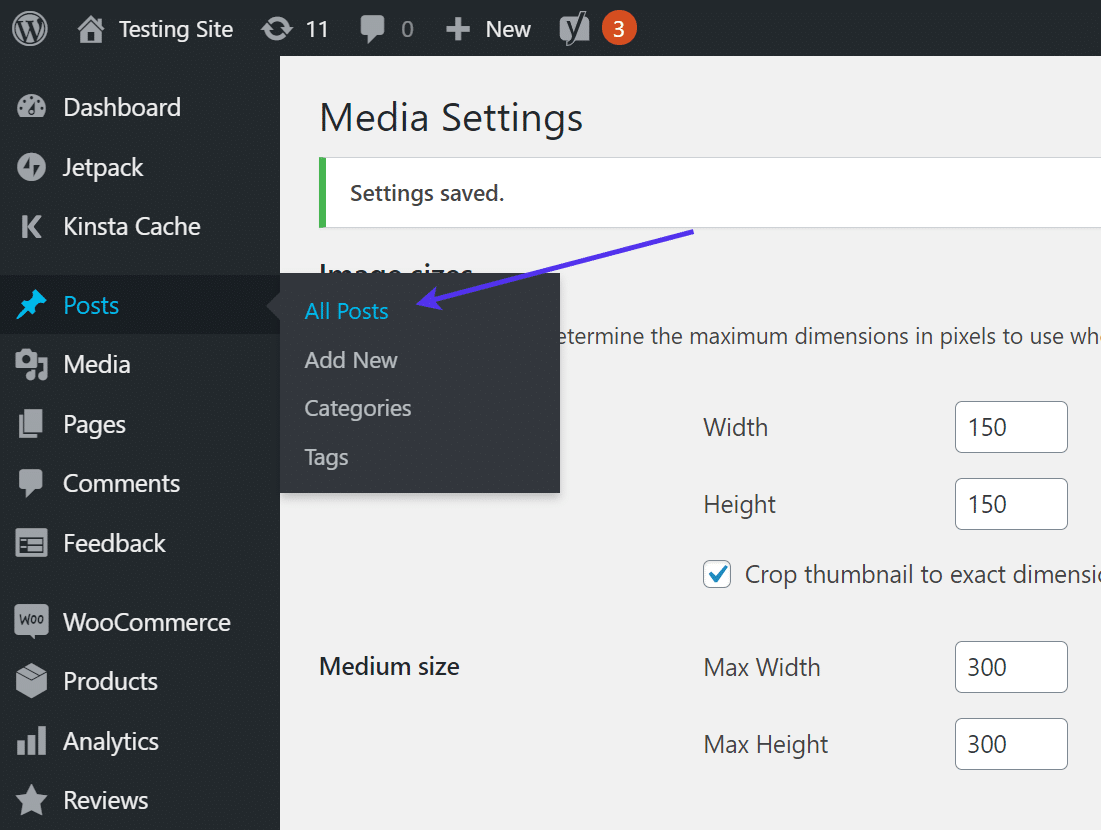
Select one of your blog posts that don’t already have a featured image.
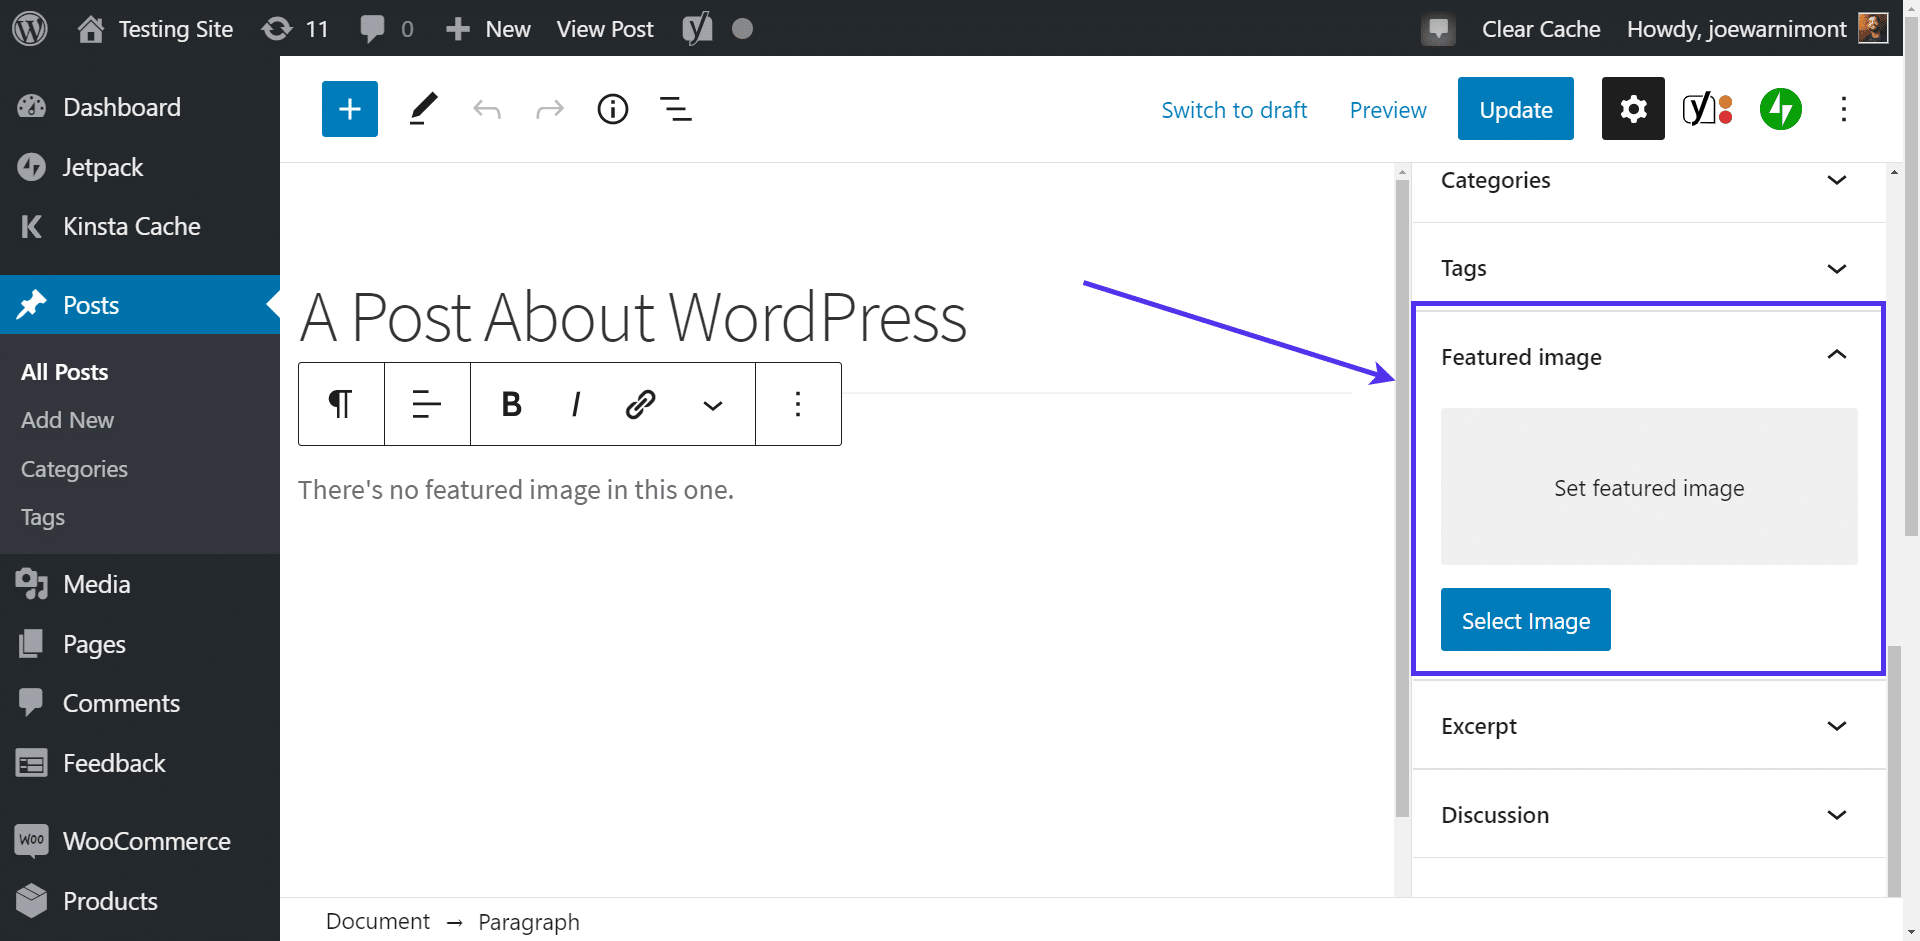
Go to its Post Settings panel and open the Featured Image section.
This should be empty, asking you to upload a featured image.
However, with the Default Featured Image plugin active, all you have to do is click on the post’s Update button.
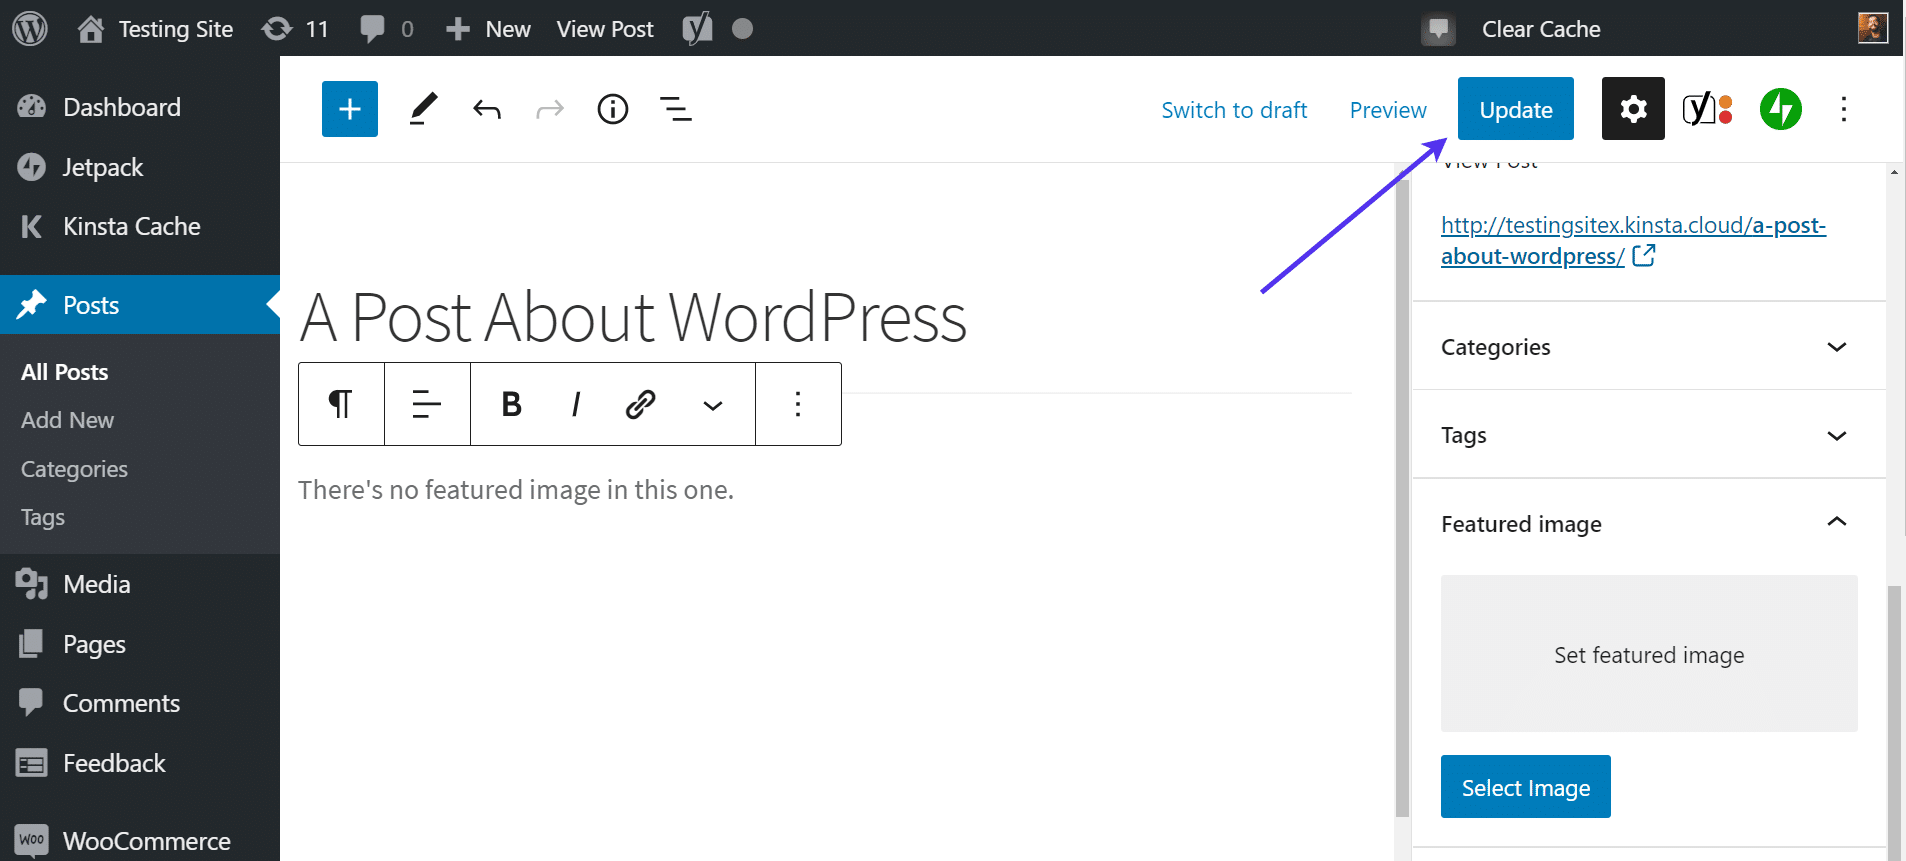
The default featured image then populates inside the post’s Featured Image module.
The good news is that all future posts without featured images will automatically add the default photo. However, you may have to update previously published posts for the default featured image to show up on those.
As a test, let’s visit a post that already has a featured image included with the article.
As you can see, a different image appears in the Featured Image section. This tells us the plugin is doing its job by adding the default featured image to the right posts and leaving out the ones that already have featured images.
How to Bulk Upload and Edit All Featured Images on Your Site
At some point, you may realize that several old posts could use new featured images. It’s also possible that you would like to replace a certain category of post or page to all have the same featured image, whether that’s a professionally designed image that indicates the article is for a tutorial or maybe for putting your logo a relevant image on all webpages.
Regardless, you must bulk edit these featured images so that you’re not spending hours editing each and every one of them. Some websites already have hundreds or even thousands of featured images, so a bulk editing tool is required.
The Quick Featured Images plugin handles bulk editing for featured images along with a myriad of other functionalities, like adding a default featured image for all posts or setting presets for default featured images.

We’re most interested in the bulk editing tool for this tutorial. It allows you to swap out several previously listed uploaded featured images, making all of them the same image.
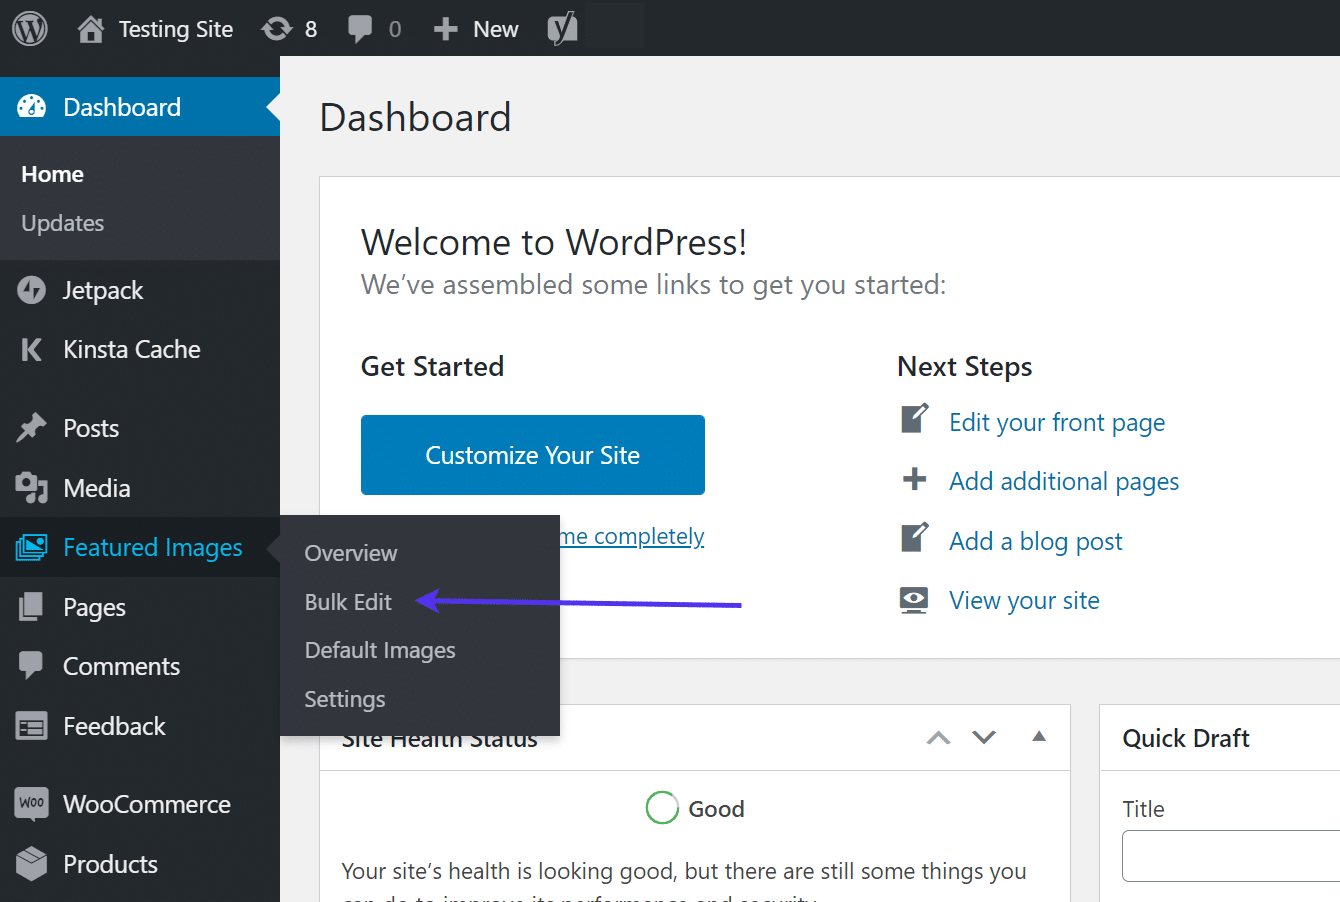
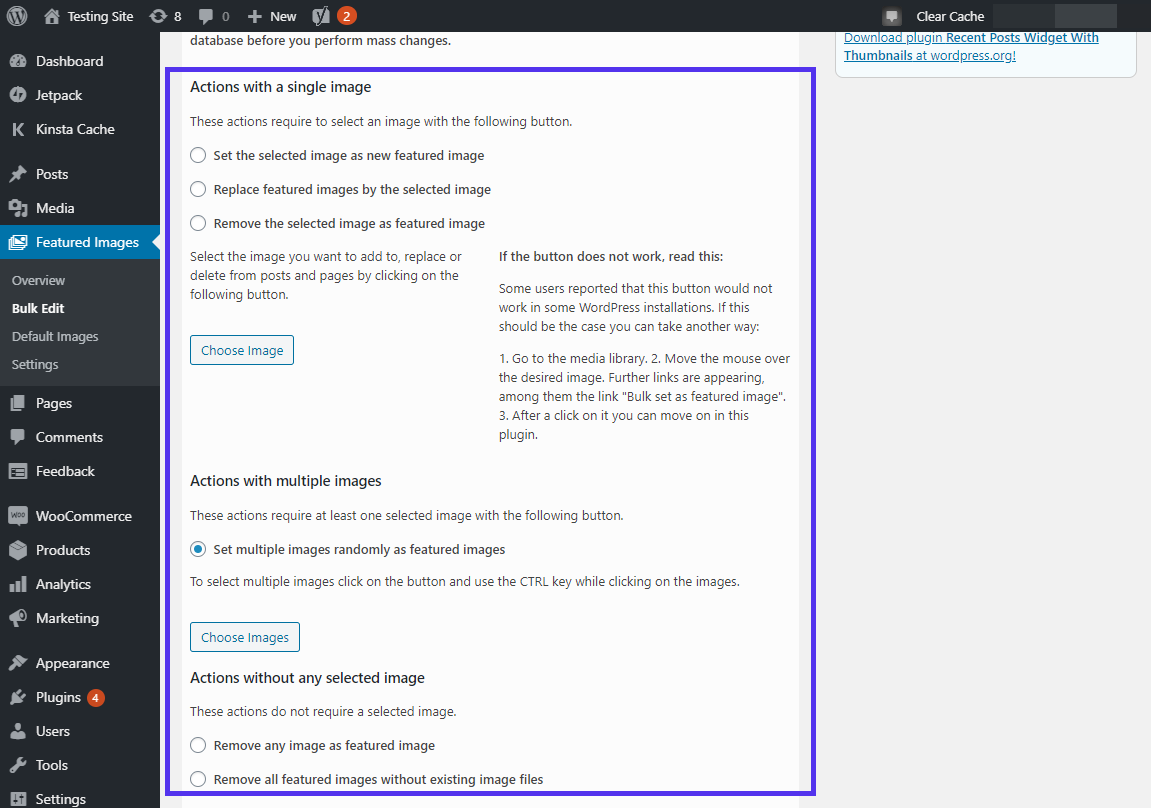
After the plugin is installed and activated, go to Featured Images > Bulk Edit.
Here, you’ll see a Progress Bar at the top of the page. The Progress Bar indicates exactly where you are in the process of bulk editing the featured images.
This is important because the bulk edit is permanent, so you want to be sure of your actions at each step.
To begin the process of bulk editing featured images, scroll down on the page.
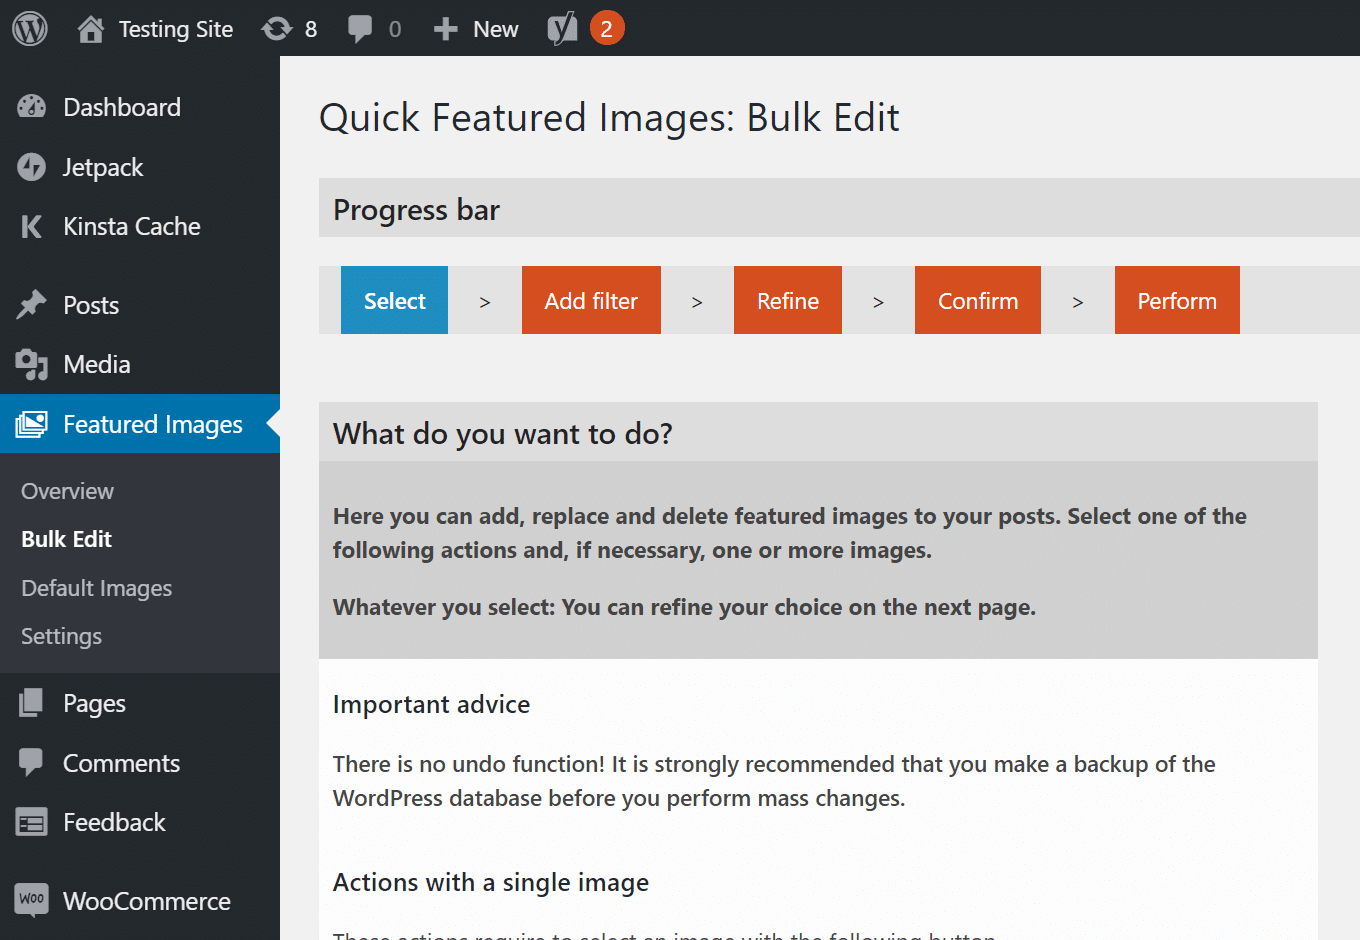
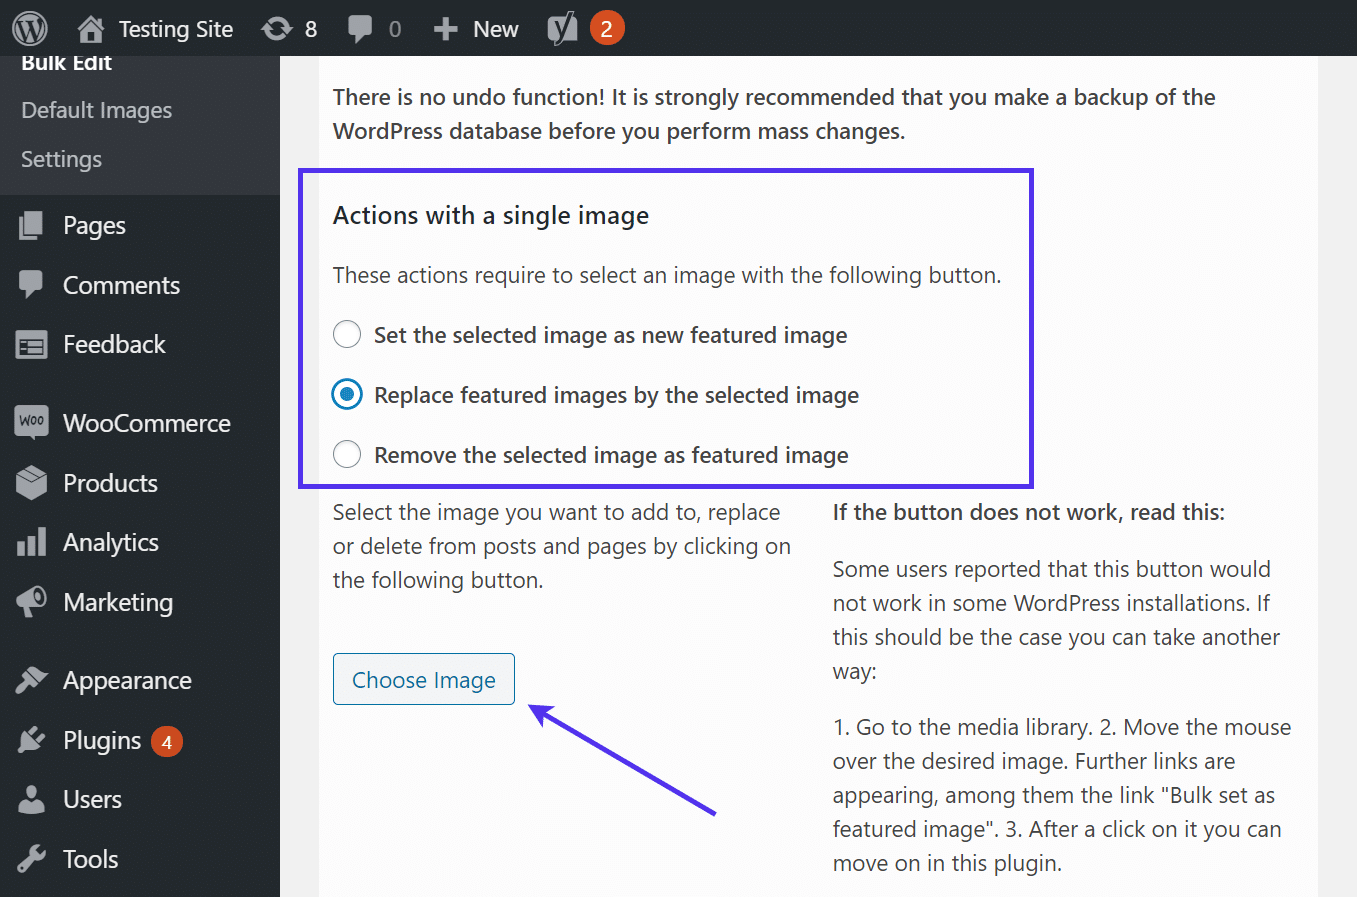
Locate the section titled Actions with a single image. Three options are available for you to bulk edit the featured images:
- Set the selected image as the new featured image.
- Replace featured images with the selected image.
- Remove the selected image as the featured image.
Choose the right option depending on what you’re trying to achieve. For instance, you may simply want to remove all the old featured images or make sure that all new featured images are set as one specific image. In those cases, you may go with the first or third options.
However, you’re usually going to opt for the one titled “Replace featured images by the selected image.” This allows you to upload an image that will replace as many current featured images as you want. You would select those images later and swap every single one of them out in place of the new one.
Click the Choose Image button to proceed.
This step involves choosing the image you’d like to have shown as the new featured image for a few of your current posts or pages.
Select the image you like, then click on the Choose Image button.
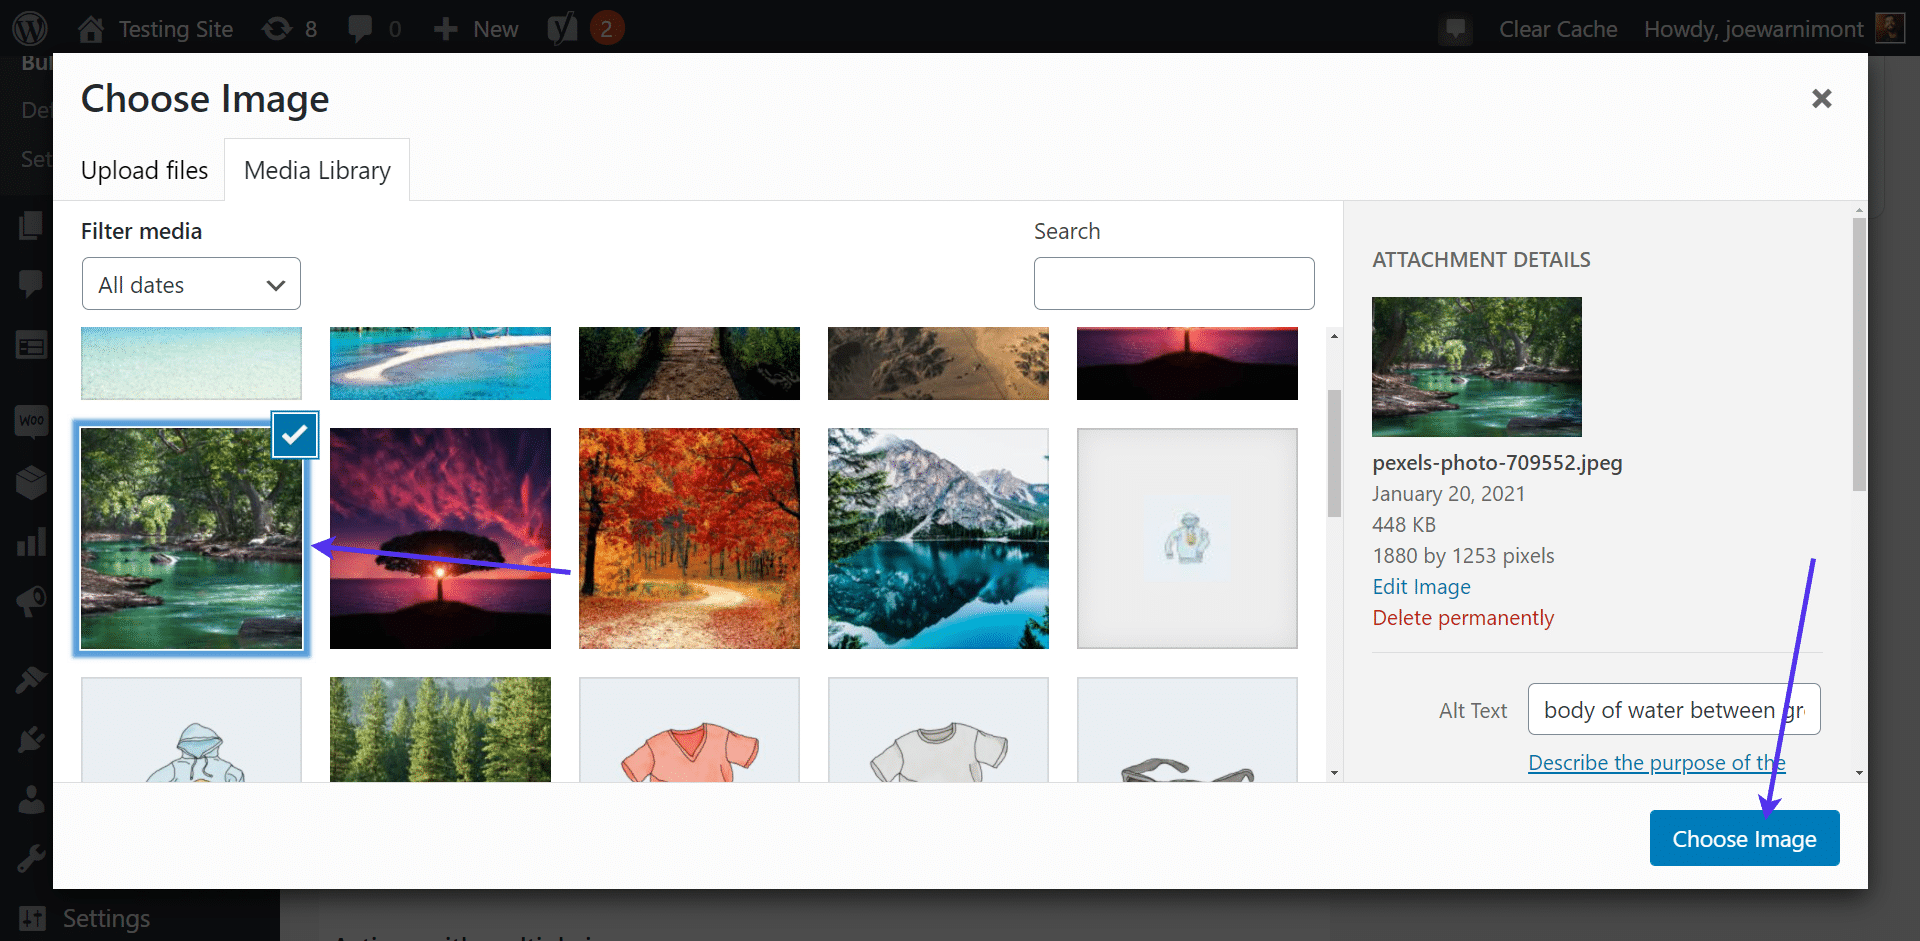
You’ll see this image get populated in the dashboard. Just make sure it’s the right image and that the plugin is recognizing it.
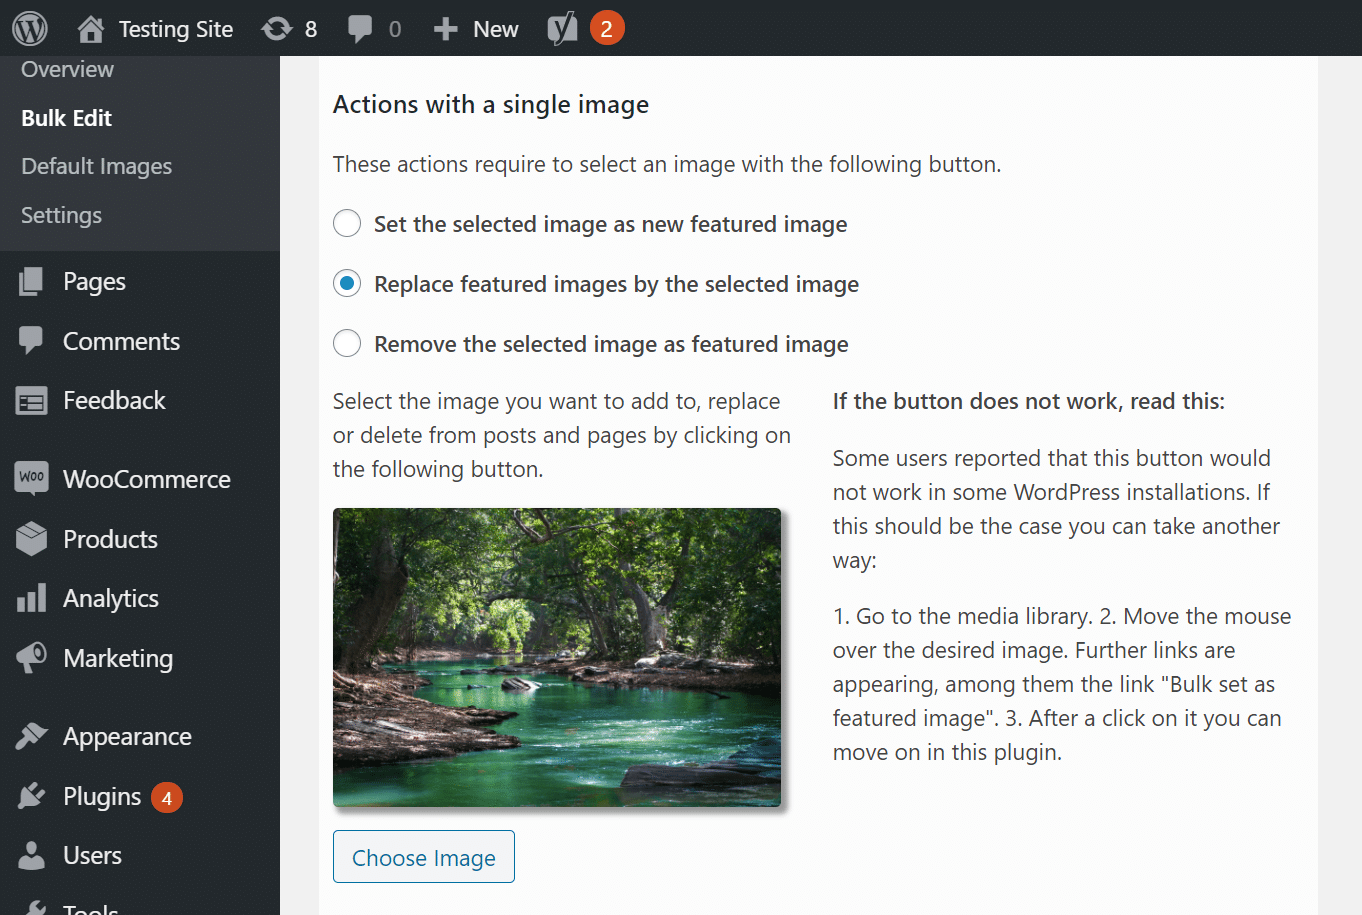
Scroll to the bottom of the page to click on the Next button.
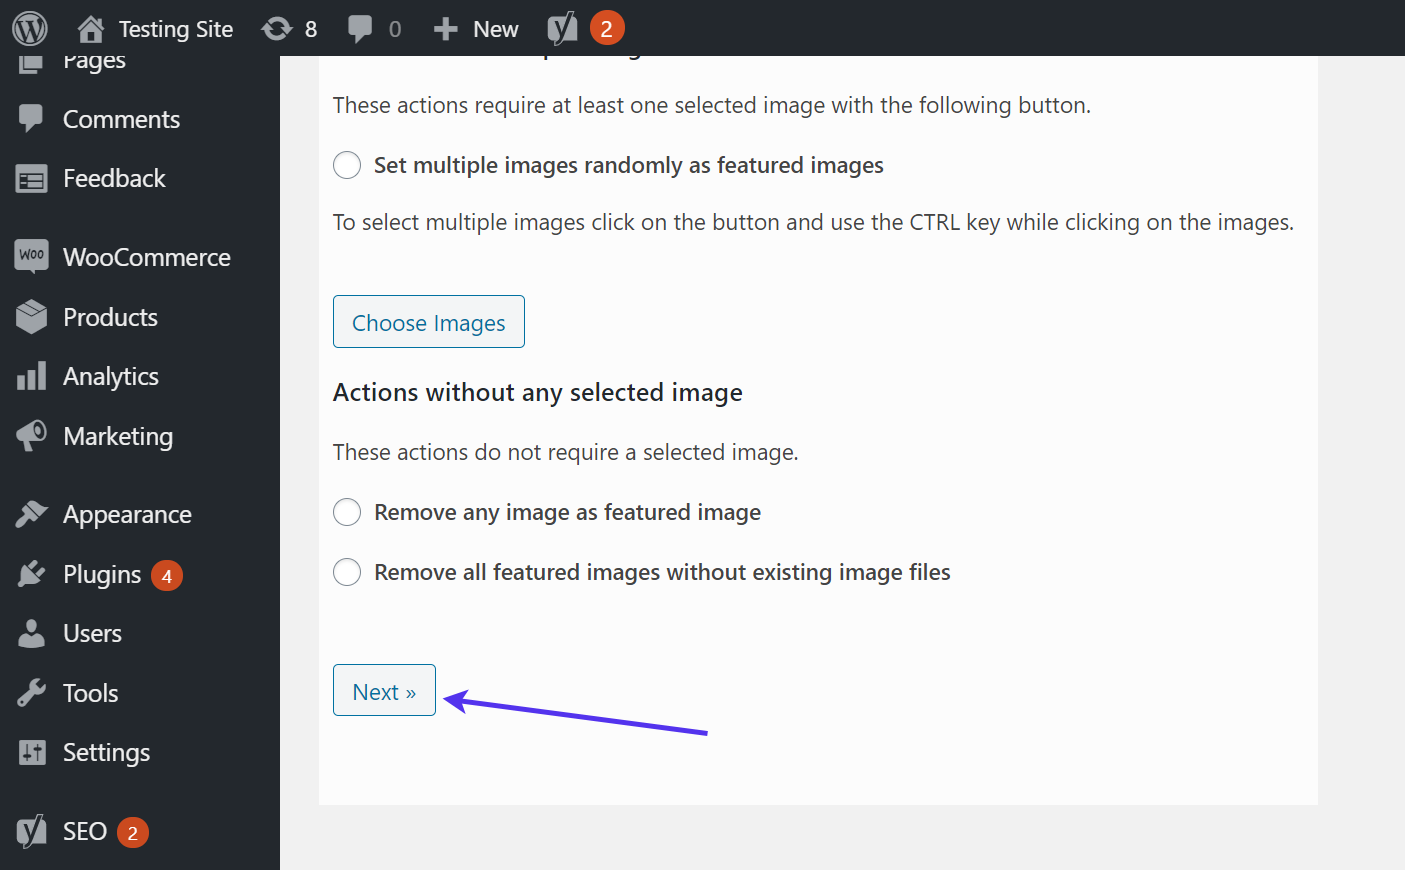
The next step is to Add a Filter, which essentially asks you to choose the images you want to replace. Therefore, click on the Choose Images button under the section titled “Select the featured images you want to replace by the selected image.”
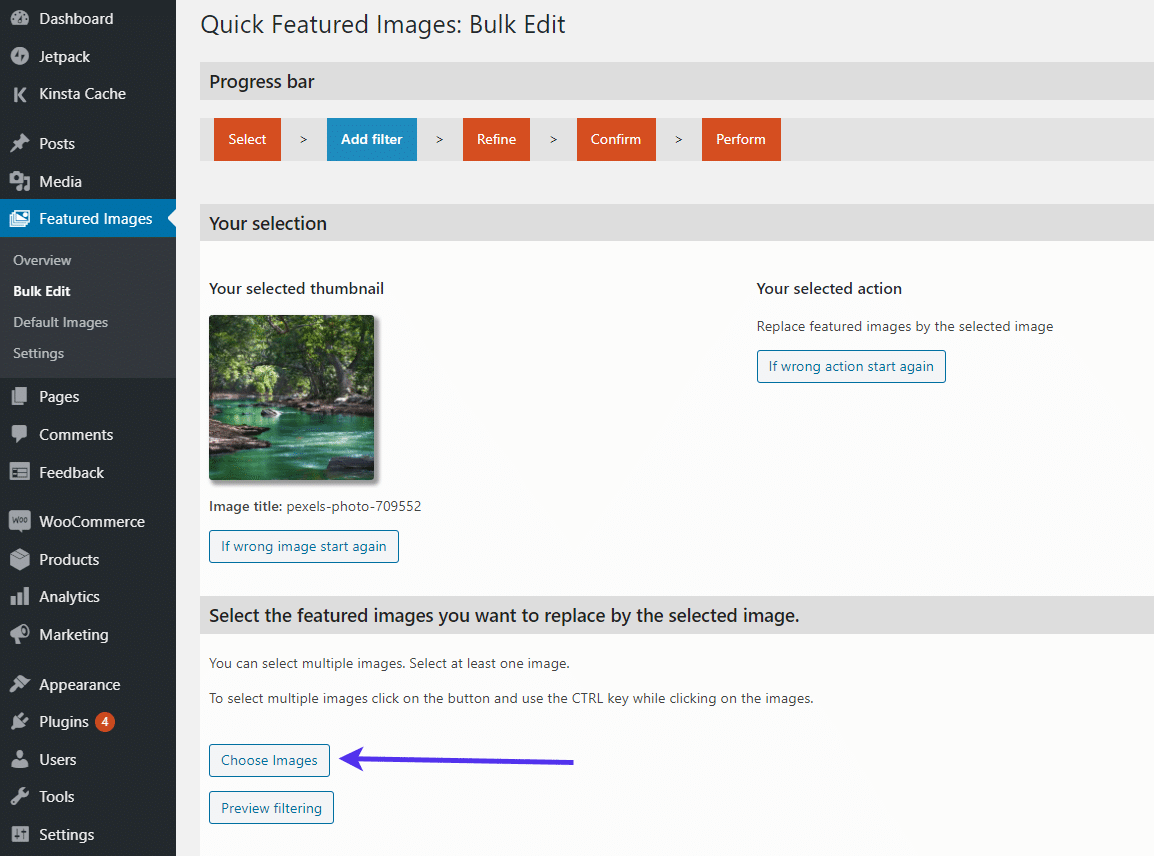
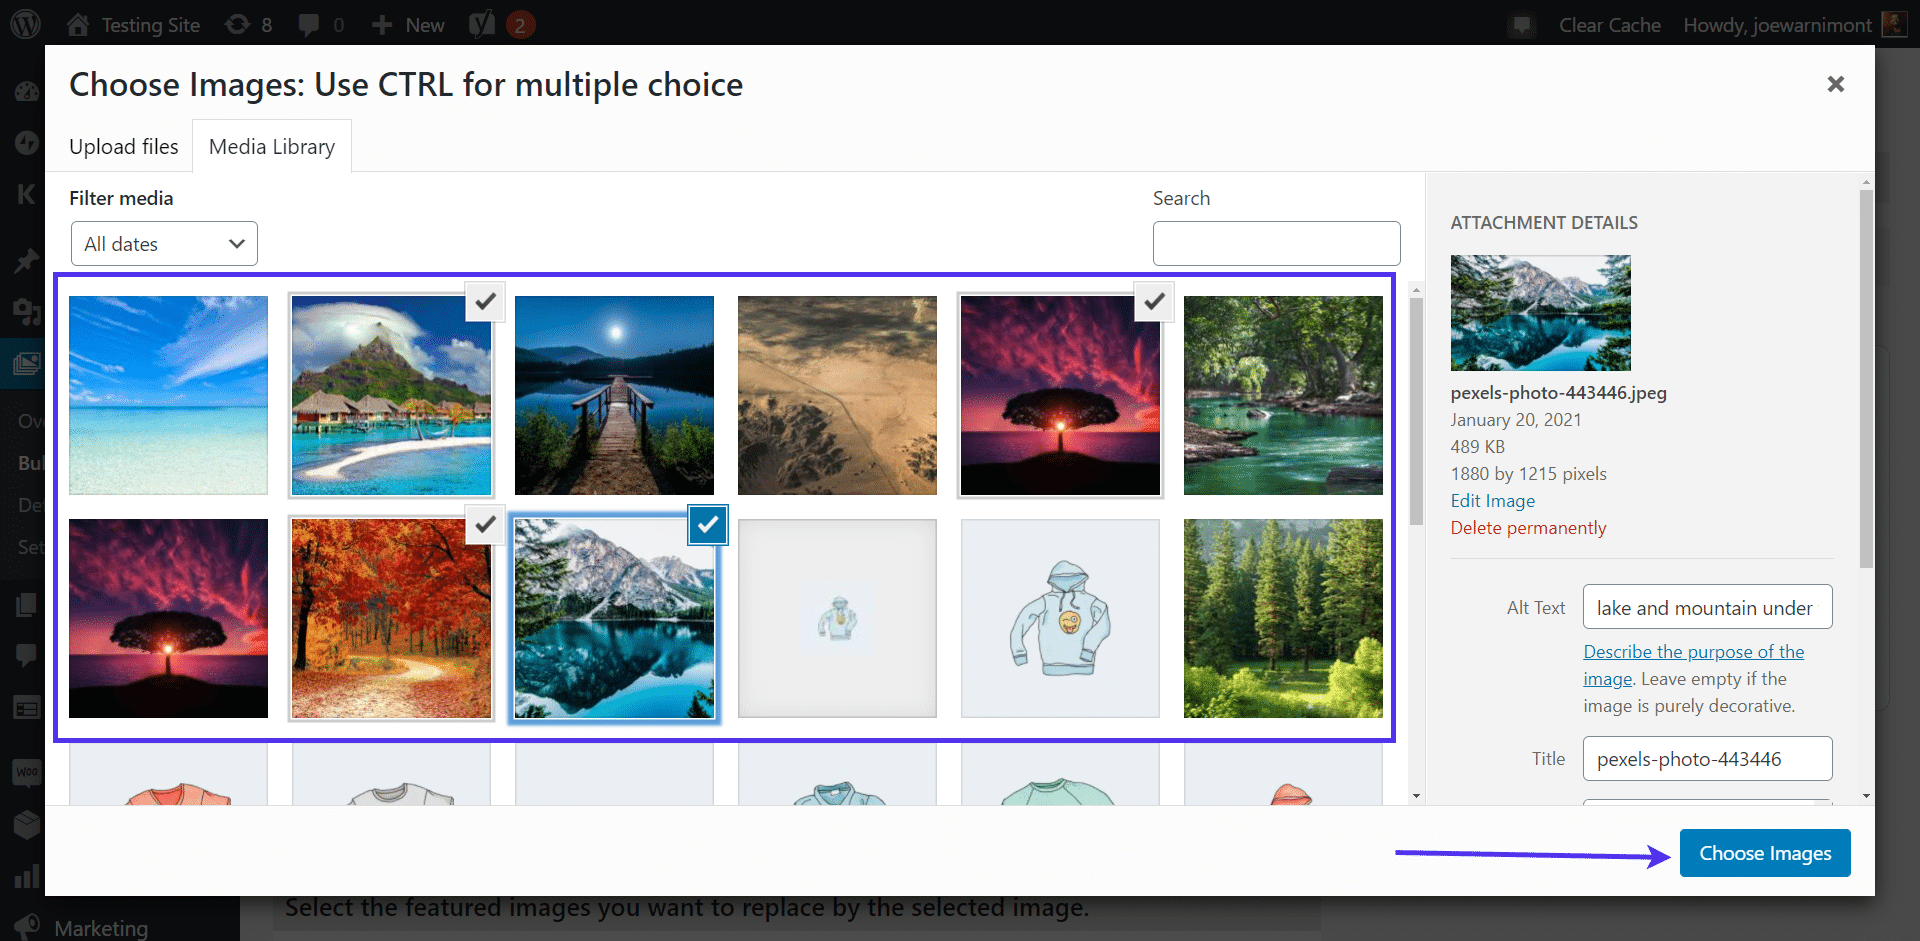
In this module, you can select multiple images from your Media Library. The only problem is that it doesn’t tell you which of your Media Library images have been previously uploaded as featured images.
Regardless, select an image, or multiple images, by holding down the Shift key while choosing the images, and click the Choose Images button to proceed.
All selected images appear as thumbnail previews in the plugin’s dashboard. Feel free to go back and choose more images if you missed any.
Click the Preview Filtering button to see which bulk replacements will occur.
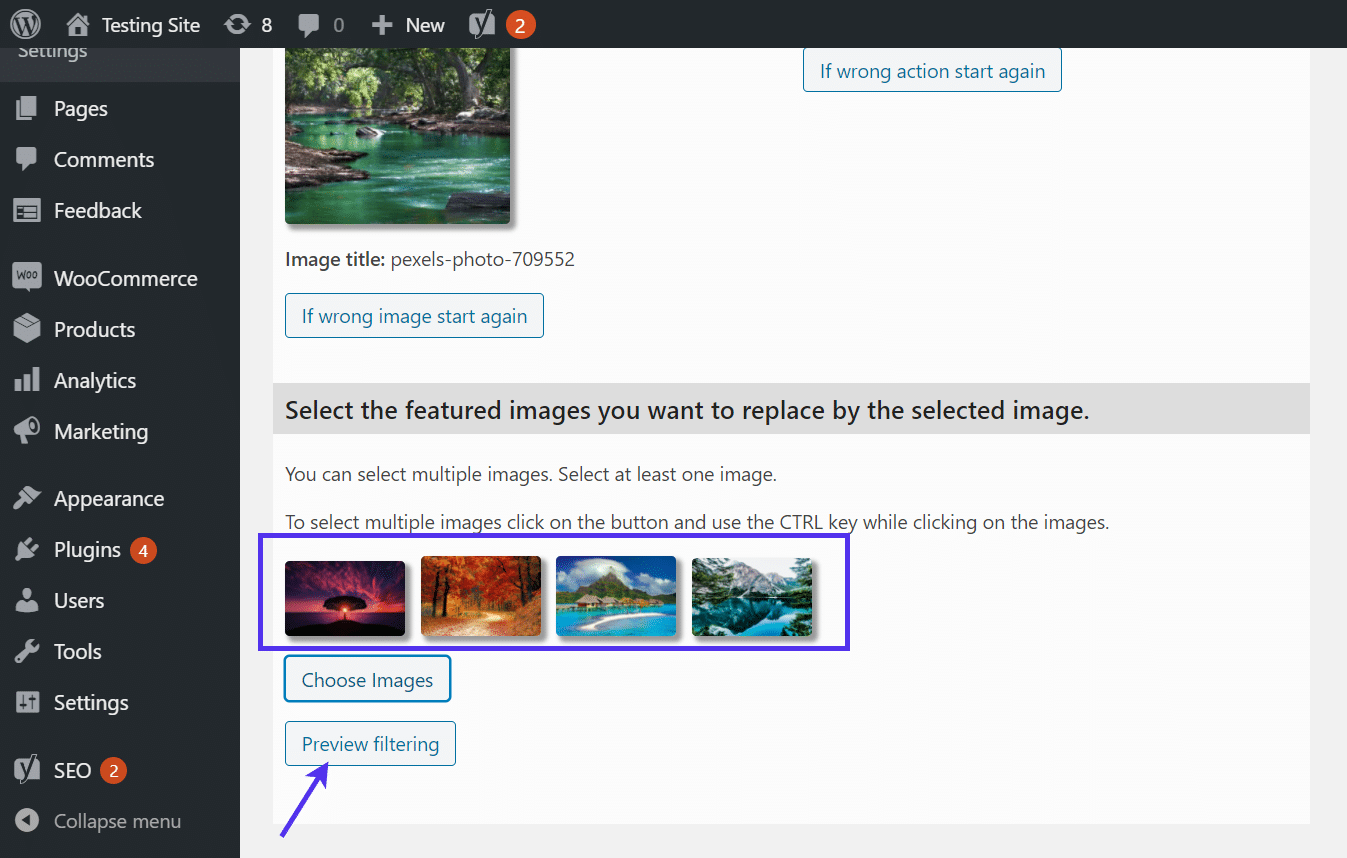
The following page explains which current featured images will be replaced by the future featured image you specified from before. It looks like only two of the images selected are actually stored as featured images in our posts. That means only those images will get replaced by the new image.
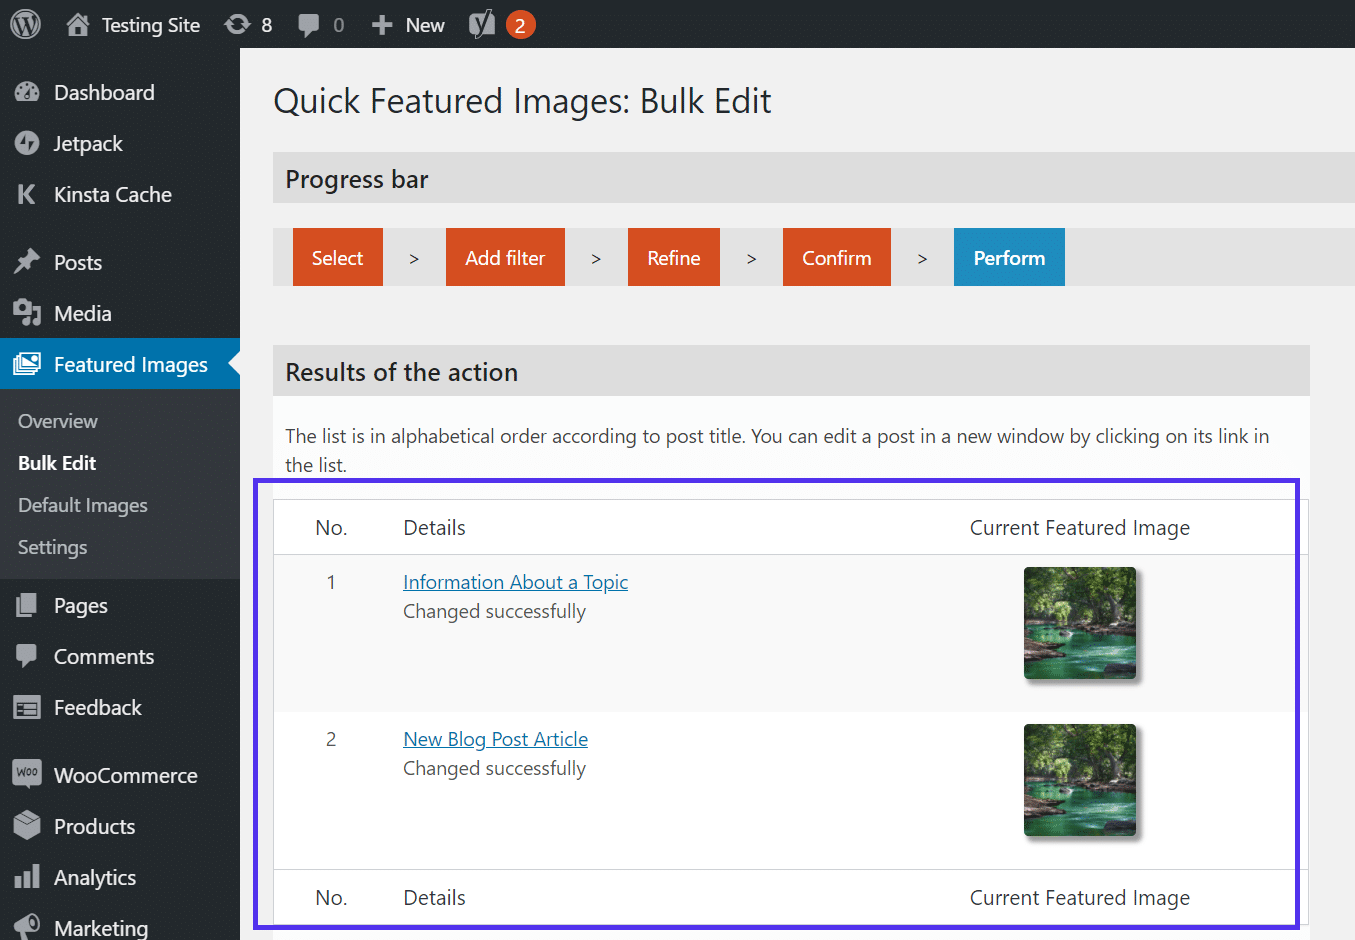
Once everything looks good and you’ve decided that those old featured images are ready to be replaced, click the Apply button to finish the bulk edit.

The last page presents the bulk edit results, with details about the posts that now have new featured images. You can see that two of my posts now have a new featured image, and they’re the same images. That’s what we were trying to accomplish.
You can now go to Posts > All Posts in your dashboard to view the posts in a list and make sure the featured images truly got replaced in the posts.
As you can see, the two posts shown from before had their featured images swapped out by the one I had wanted.

Keep in mind that the initial Select page in the Quick Featured Images plugin offers a wide range of actions to take with your featured images. These are excellent tools for replacing poorly designed featured images or fixing problems when certain featured images don’t show up in the first place.
For example, you might complete an action with multiple pages. In this situation, you would randomly set multiple featured images for your posts based on photos you choose from the Media Library.
Another option is to take action with no selected image, like removing a featured image that repeats several times on multiple posts, or if you need to remove all featured images without existing image files.
The opportunities are plentiful with the Quick Featured Images plugin, so we suggest testing out the tools and seeing how you can bulk edit some of your older or non-functioning featured images to clean up the overall visual appeal of your website.
Plugins to Fix WordPress Featured Image Issues
Problems with featured images stem from various problems. Sometimes the best solution is to install a plugin and hope that it provides the features needed to fix everything.
After all, a theme or plugin could be causing the problem. You’re better off using a plugin that can override the conflict than swapping out your entire theme and redesigning your website just to fix featured images.
Although not all featured image correction plugins complete the same tasks, there are a few that we recommend looking into before trying any drastic changes with your website.
Featured Image from URL (FIFU)
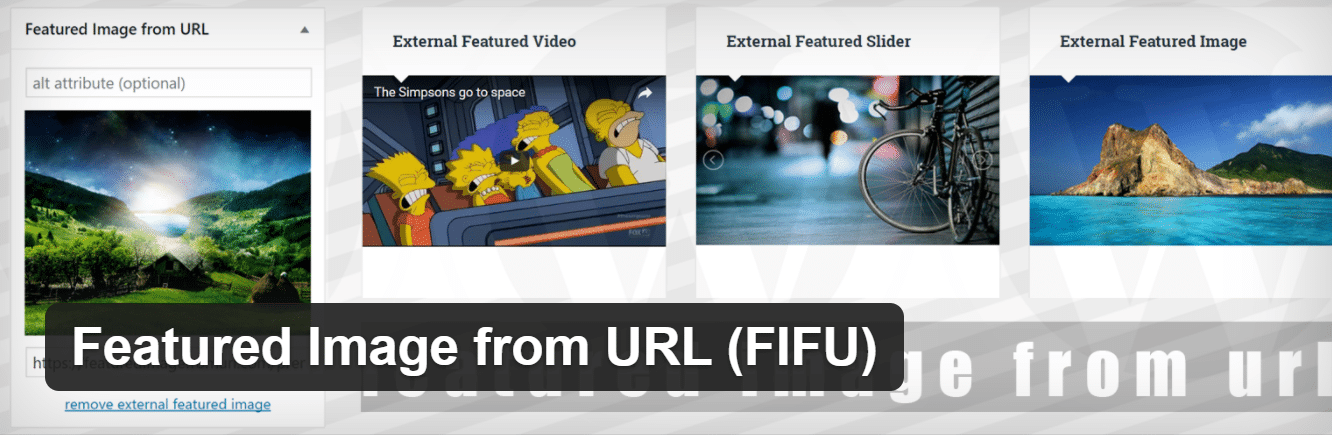
The Featured Image from URL, or FIFU, plugin allows you to take an external image and use it as a featured image for a post or page. This gets around the idea of uploading an image to your WordPress Media Library and activating that image as a featured image.
Therefore, it could help with issues you may see with upload size restrictions or even if your permissions aren’t set properly. Overall, the plugin has a field to paste in a URL from an image and insert that image into the featured image slot.
You must host the image in a third-party location and ensure that it will be hosted there for the future. We recommend only using a media hosting platform, or maybe another website host that you own yourself. It would be troubling and potentially illegal to simply search for an image online, take its URL, and use the image for your featured image, as you do not know where the image URL is hosted.
The FIFU plugin also includes features to auto-set featured images from images and videos by using iframe tags and other elements. You can also set featured images from more unique sources, like a book API or an ISBN, or even from a post title or search engine.
Quick Featured Images
We covered the Quick Featured Images plugin above in this article. It is primarily used for replacing featured images in bulk. That’s the main reason you would take advantage of this plugin. It eliminates a significant amount of manual upload work that could be waiting for you.
We particularly like its ability to set rules for your past and future featured images. For instance, you may want to pull the first image in your content and make it your featured image for a post. It’s also possible to generate featured images based on post authors, tags, and post types.
Whether you’re overriding existing featured images or trying to fix ones that weren’t existent in the first place, the Quick Featured Images plugin does the trick for all of that.
Default Featured Image
The Default Featured Image plugin offers a simple way to override all instances where a featured image is not set for a page or post. It helps with cleaning out those posts where you forgot to add a featured image or, at some point, removed it due to the original featured image not holding up to your standards. Overall, the Default Featured Image plugin has some simple tools for adding a default featured image with a button’s click.
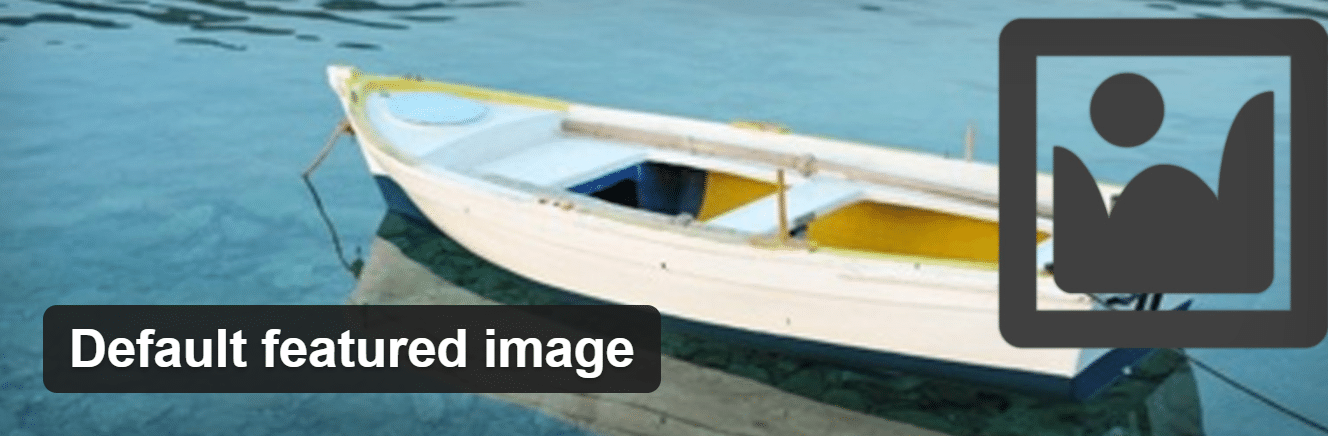
This plugin seeks out all empty featured image fields and fills them in with the default option. Although it may be a temporary fix, this can also prove useful for setting permanent featured images on pages and general blog posts. You may only need a basic photo that’s relevant to your website on those pages.
Its settings are located in the WordPress Media Settings, but you have only one field you to fill out. Upload the image here and click the Save button.
Auto Featured Image
The Auto Featured Image plugin provides a unique option for fixing featured image problems. It promises to make the featured image upload process a little easier for website owners.
The plugin generates a featured image from the first image in a post, but only if the featured image is not already configured. Therefore, it serves as a backup to the real featured image field, just in case you forget to upload the featured image but still want something to show up.
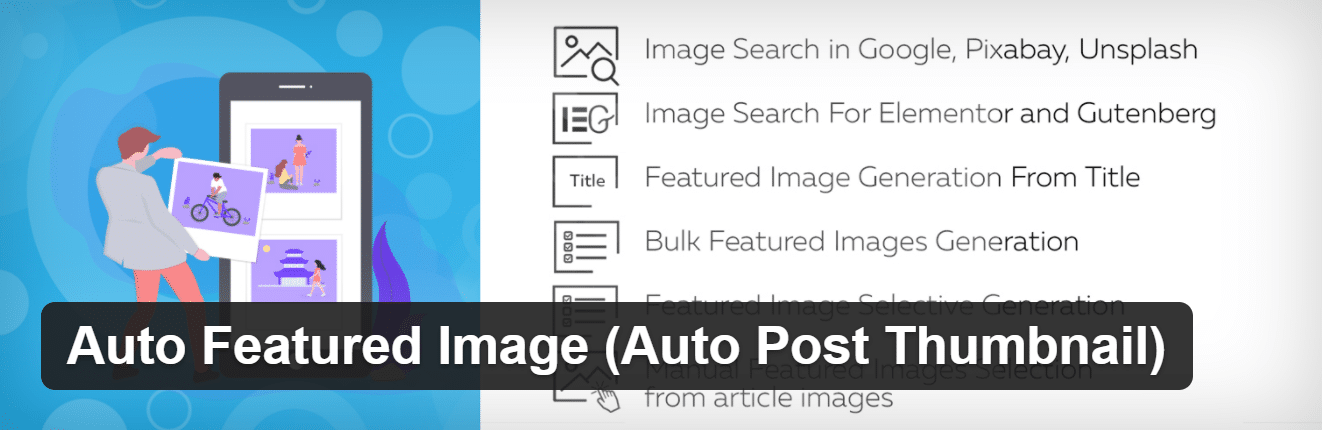
The advantage of using a method like this is that there’s no relying on a default featured image that may not apply to the post. We would assume the first image in a post is relevant to the topic, so there’s no need to worry about a default featured image getting pulled from a file and duplicating the same image on several posts.
The plugin also has a wonderful native search engine that pulls from places like Google, Pixabay, and Unsplash. It also works well with page builders like Gutenberg and Elementor. Auto Featured Image even has a bulk featured image generation tool.
Multiple Featured Images
The Multiple Featured Images plugin boasts several features that come in handy when troubleshooting and resolving your featured images’ problems. First, the plugin opens up the default limit that WordPress sets of having one featured image per post. This means you can upload several featured images and choose which one of them gets shown on different parts of your website.
It uses a widget and shortcode, both of which ask which of the featured images you’d like to display whenever implementing one of the tools. For example, you may rather have one featured image appear in the sidebar, but a different one shows up when the post is in a list on your homepage.
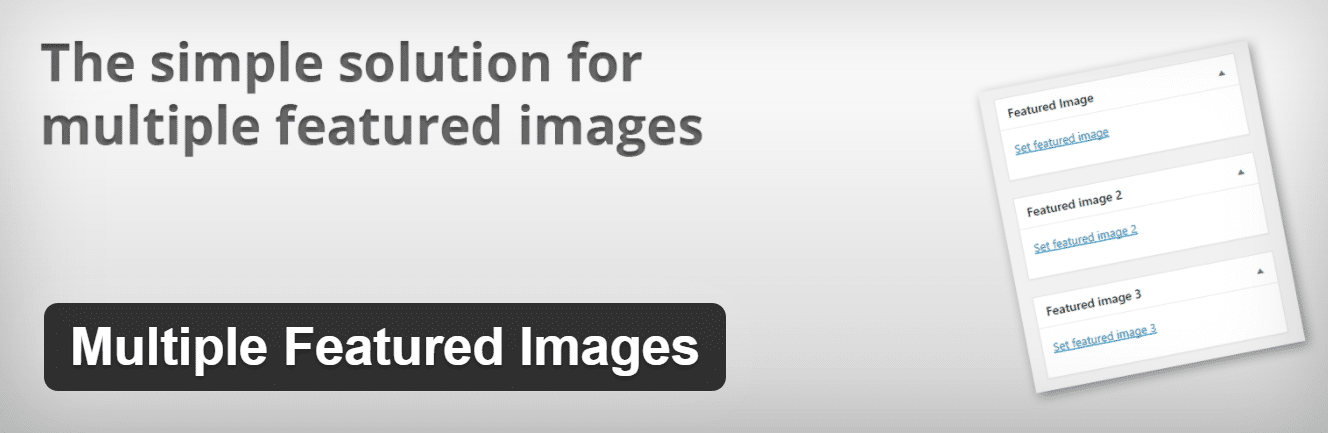
The plugin works with posts and pages, including custom posts and WooCommerce products. You can upload as many images as you’d like while also choosing which featured image should display in certain areas and how big those images should be.
Essentially, this plugin suits those struggling to decide which featured image to use, or when one featured image makes sense at the beginning of the article, but another one looks better in a sidebar.
Best Practices for Featured Images
A big part of making sure featured images look right is to understand the best practices before uploading them to your WordPress site. You can troubleshoot a featured image not showing up or edit each featured image manually.
Still, it’s far easier to know the core approaches to featured images to minimize problems in the first place. These best practices cover everything from design recommendations to uploading tactics, enabling you to feel confident about all featured images while also cutting down on the amount of time you spend with featured images.
Make Featured Images Relevant
The downside of setting a default featured image is that there’s a chance you end up with several featured images that aren’t relevant to the post. The whole point of a featured image is to serve as a visual introduction to the article, much like a title, and the first paragraph of an article provides previews to the reader of what they can expect to read.
For instance, if your article has tips on using Instagram, the featured image better have elements that reference Instagram (legal ones, of course), along with creative items that make the article look appealing.
Relevance also comes into play when you manually insert an image for each featured image in an article. It’s easy to grab a quick image that relates to the article just to save time. Yet, we should all take our time when deciding on a featured image, seeing as how it’s the “book cover” of the post that’ll get people to pick it up and read.
Obtain Legal Rights Before Posting Featured Images
One way to get in serious trouble with your images is by using photos and graphics you randomly find online. This could lead to a photo owner reaching out and asking you to remove many of your featured images, or worse, threatening legal action.
As a good rule of thumb: If you didn’t take the photo yourself or pay for rights, you might not be able to use it.
There are exceptions to this rule!
The only time you’ll find that it’s okay to share an image on your website for free is when you pull from a website like Pexels or Unsplash.
Yet, even with those websites, you’re usually asked to provide attribution for all photos (which is tough as featured images often don’t allow captions).
Follow these rules to ensure your featured images are legal:
- Take a photo with your own camera. That’s a sure-fire way to eliminating legal problems.
- Look at photo websites with Creative Commons licensing. These include options like Unsplash and Pexels.
- Since WordPress featured images usually block captions, state the attribution for that featured image somewhere in your article.
- Pay for photos on sites like Shutterstock and iStockPhoto.
- Make your own graphics with free design tools like Canva or Adobe Spark.
- If you find a photo that you really love, reach out to the photographer or artist and ask if you can use their work on your website. For free, a fee, or with attribution. Make sure to get this agreement in writing (email works too).
Keep the Featured Image Theme Consistent
It’s one thing to ensure all featured images are relevant to the posts they’re attached to.
However, you also want to stick to a consistent theme. This helps speed up your featured image creation process while also helping your brand.
For instance, all of your featured images could have a black and white filter. Or maybe they include colorful animations while still representing what’s in the posts.
Use High-Resolution Images That Scale Down
A featured image does not differ from other photos on your website. It’s getting placed on a digital medium where the photo’s resolution doesn’t necessarily have to be print-worthy to look good.
Overall, photos on your website take up a significant amount of server space, potentially slowing down your site loading times. However, you also want to use photos that actually look good, so you should still shoot for high-resolution photos as much as possible.
When seeking out a featured image, always consider starting with a larger, high-resolution photo. That way, you can scale it down for a digital interface while still maintaining much of its resolution.
Scaling a photo up is a big no-no. Yet, leaving your larger, high-resolution photos in their original formats will surely cause loading problems.
Use a Rapid Image Resizing and Optimization Tool
Considering you should be uploading high-resolution images as featured images, it makes sense to automate optimization. After all, it’s difficult to shrink, resize, and crop every image manually you plan to upload.
An image optimization plugin does much of the work for you, ensuring that your featured images actually show up and don’t slow down your website.
We have an excellent guide on optimizing your WordPress images. Overall, it’s best to opt for a plugin that optimizes your images on a third-party server. It’ll avoid causing problems with your own server. We recommend solutions like Optimole and Imagify.
Optimize Featured Images for SEO
Another element of image optimization involves how those images will show up in the search engines. They’re vital to help your post or page move up the rankings. Every hosted image, including featured images, has metadata crawled by the search engines to figure out what your post or page is all about.
If you’re targeting a keyword, this metadata is a great opportunity to show search engines that the image is relevant. You should avoid stuffing keywords just because you want to. Rather, quickly explain what’s in the picture and potentially add the keyword to boost your rankings.
The most important piece of image metadata is its Alt Text, which can be found by opening your featured image in the Media Library.
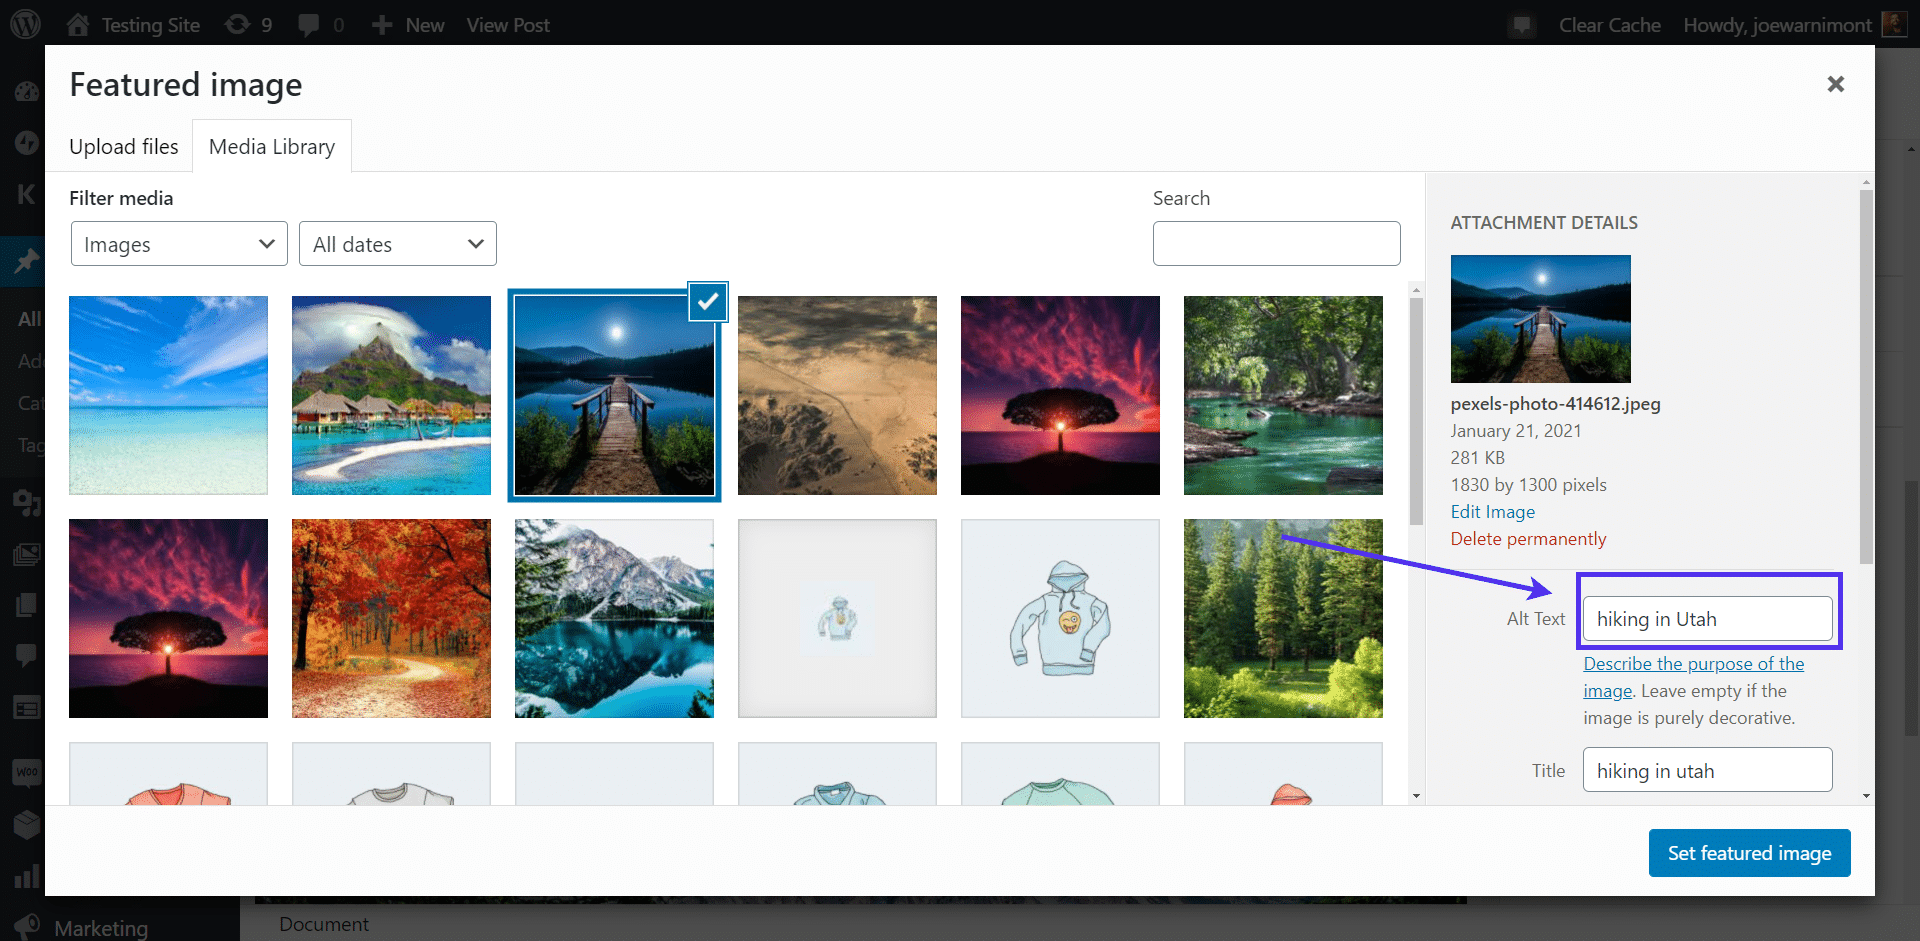
Regardless of whether setting a proper alt text for images helps with SEO, you should do it anyway for accessibility reasons.

Many blind people are using the internet through screen readers. Make your site accessible to them.
Ensure Open Graph Is Active for Sharing
We covered the Open Graph essentials in the section above. But this is a reminder to ensure that your hosting provider either provides the tools needed to render featured images or find a plugin that activates the Open Graph protocol.
The featured image should quickly appear whenever someone wants to share one of your posts or pages on a social network. Otherwise, you run the risk of someone deciding not to share the post at all, or your brand looking unprofessional when users do share any of your site’s links.
Consider a Plugin That Replaces Empty Featured Image Fields
We covered this solution already in the previous section, yet it fits well in the best practices, too. You never know when a human error may result in a featured image not being uploaded to your website.
Think about using a default featured image plugin to fill in the blanks and list temporary or permanent featured images when you forget to do so. It also helps when your older posts don’t have appropriate featured images.
Summary
Creating a website with stunning content to find that featured images don’t show is both frustrating and potentially harmful to your brand. We hope this guide helped you troubleshoot the common problems with featured images not showing on WordPress. Just make sure to test your featured images are uploaded and set properly before embarking on more advanced solutions.
On the way, you also learned tips to improve your image editing skills and workflows. For more such image optimization tips and tricks, read our in-depth image optimization guide. It’s a must-read to speed up your WordPress site.
Now that you have the featured images ready, get sharing!
Did we miss anything important? Please leave a comment below if you have any questions about featured images or problems with WordPress featured images.