Backups
We provide daily automatic WordPress backups, as well as system-generated backups for all sites on your account. These backups, along with your manual backups, are available as restore points in MyKinsta. Follow the steps below on how to create a WordPress backup in MyKinsta and how to restore one if needed.
WordPress backups
Each backup is stored on the same host machine as your site and is a complete snapshot of a site environment’s files, database, redirects, Nginx configuration, and MyKinsta settings at the time the backup was created. This includes the site’s Domains (Sites > sitename > Domains). Note that the timestamps for backups you see in MyKinsta are based on your local system time, not the timezone of the region your site is hosted in.
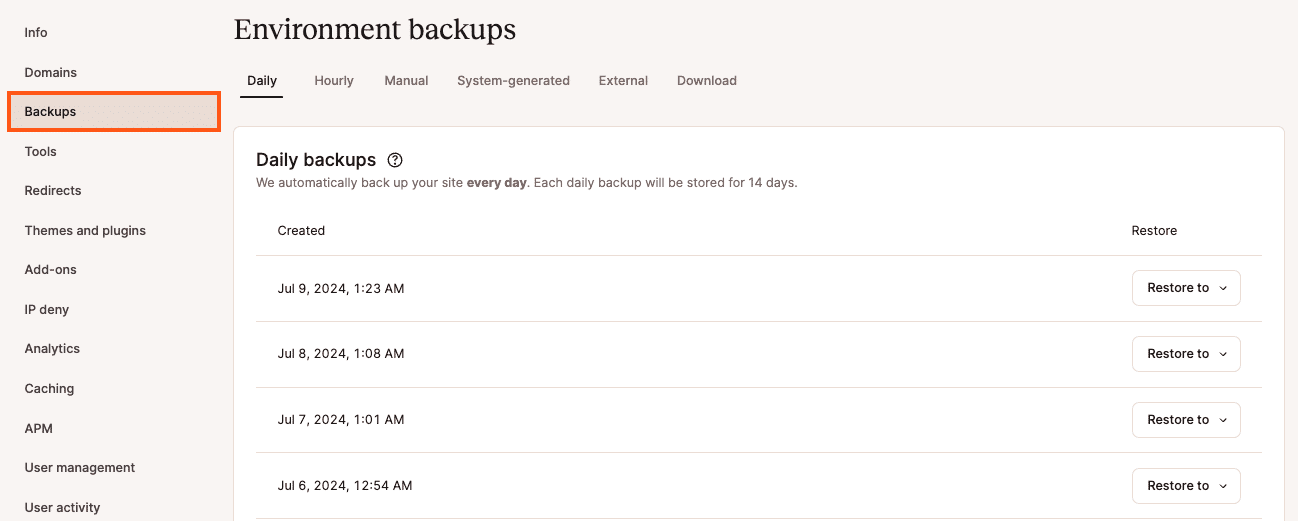
WordPress backups can be found on the backup tab of each of your sites (Sites > sitename > Backups) and are divided into six different sections:
- Daily: We create a backup automatically every day.
- Hourly: We offer an hourly backup add-on for users who need more frequent backups.
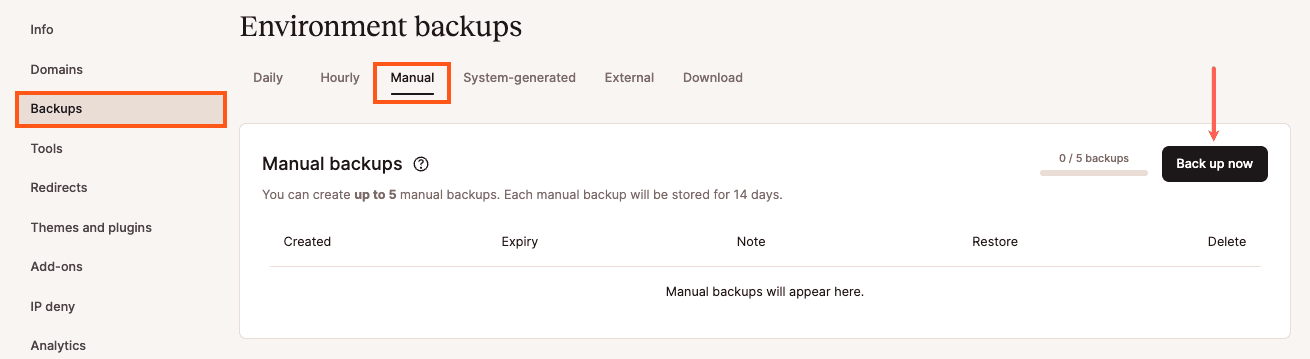
- Manual: You can create up to 5 manual backups, which are stored for a minimum of 14 days (but can vary depending on your plan). These are recommended when you’re rolling out a change on your live site, which perhaps couldn’t be tested on staging.
- System generated: We create an automatic system backup when you perform any of the following events:
- Restore a backup
- Push a staging environment to live
- Search and replace
- Update a theme or plugin manually or automatically – If you use Kinsta Automatic Updates, the backups taken prior to an update are retained for three days.
- Reset a site
- External: With our external backups add-on, you can make weekly or monthly backups to Amazon S3 or Google Cloud Storage.
- Download: You can create a downloadable backup once per week. Unlike the snapshot-based backups above, the downloadable backup will create a downloadable ZIP file containing only your WordPress database and files.
Create a manual WordPress backup
- In MyKinsta, go to your site and click on the Backups tab. Next, click on the Manual tab and click the Back up now button to create an additional backup manually.
Manually create a WordPress backup in MyKinsta. - You can add a short identifier note to your backup. Then click on Create backup.
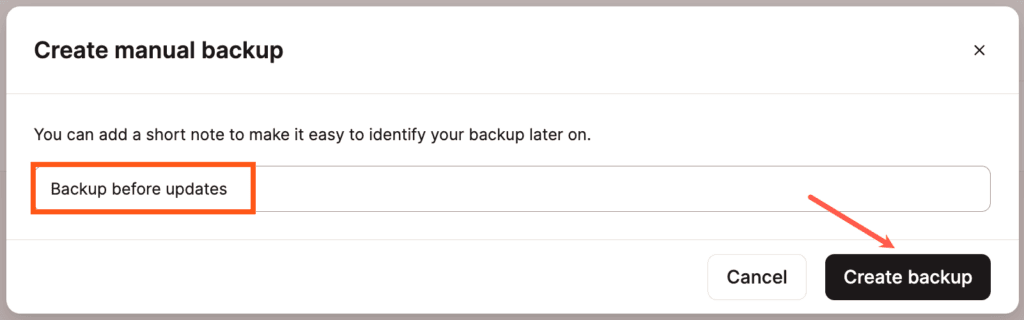
Add a name or short note to your manual WordPress backup.
If you need to make more than 5 manual backups in 14 days, you’ll need to delete one of the manual backups to make room for a new one.
Downloadable backups
You can download an archive file (.zip) containing your entire WordPress site. The archive file contains your website’s files and the SQL file with the contents of your database.
- You can create a downloadable backup once per week.
- The downloadable backup will be available for you to download for 48 hours.
A backup won’t contain any MyKinsta settings or custom server-side configurations, such as:
- Redirects
- Custom Nginx rules
- Blocked addresses in IP deny
- Changes in PHP or MySQL configuration
- Add-ons
Downloadable backups are available at Sites > sitename > Backups > Download in MyKinsta.

Click Create backup now. Creating the backup may take several minutes, depending on the size of your site. Once it’s ready, you will get a message in MyKinsta and an email with a download link.

When your backup is ready, click on the “Download the backup now!” link in the email or the Download button in MyKinsta. Save this to your local computer, where you can unpack it and view the files.

The backup is a .zip file that contains all of your website’s files (inside the public directory) and a database file (sitename.sql).
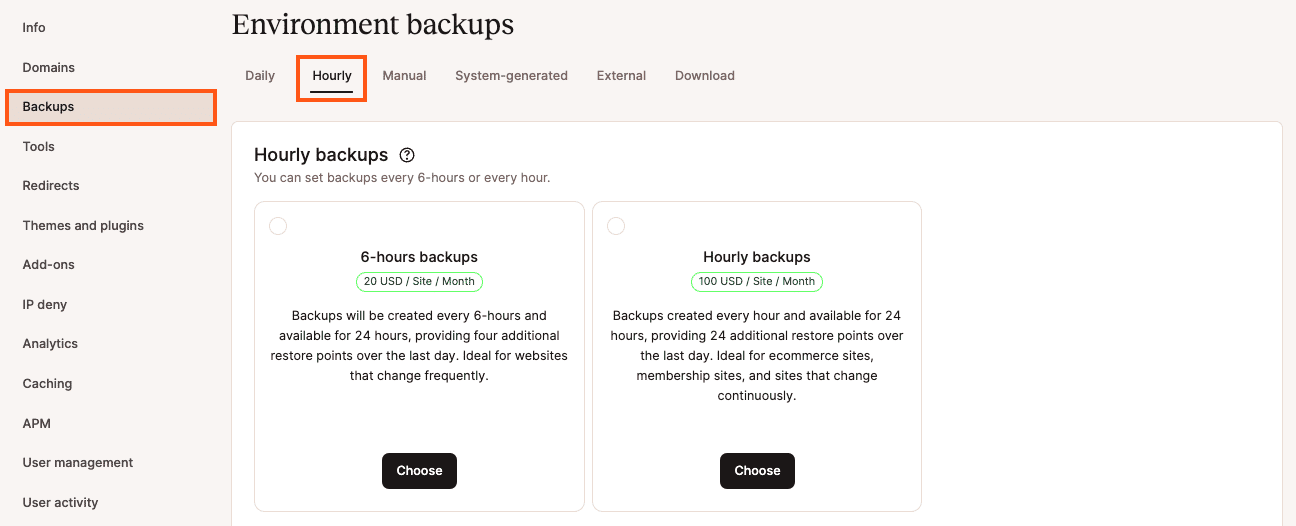
Hourly backups add-on
We have an hourly backups add-on available if you need additional restore points. You can find this under Sites > sitename > Backups > Hourly.
Hourly backups add-on cost
Within hourly backups, you have two options:
6-Hour Backups
- $20/site per month
- Backups will be created every 6 hours and are available for 24 hours. Ideal for websites that change frequently.
Hourly Backups
- $100/site per month
- Backups will be created every hour and are available for 24 hours — ideal for e-commerce sites, membership sites, and sites that change continuously.
Enable hourly backups
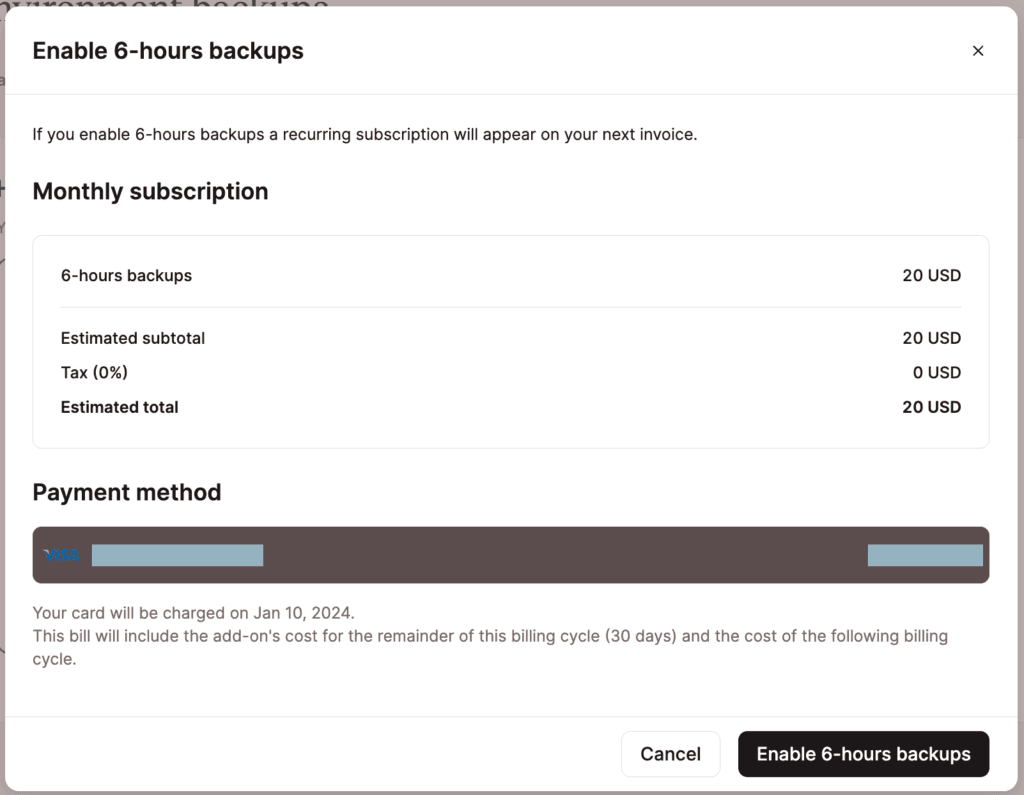
To enable hourly backups, click the Choose button on either 6-hours backups or Hourly backups, review the details, and click the Enable backups button. You will not be billed immediately. You will be billed for the add-on at the beginning of your next billing cycle. That bill will include the add-on’s cost for the remainder of your billing cycle and the cost of the following billing cycle.
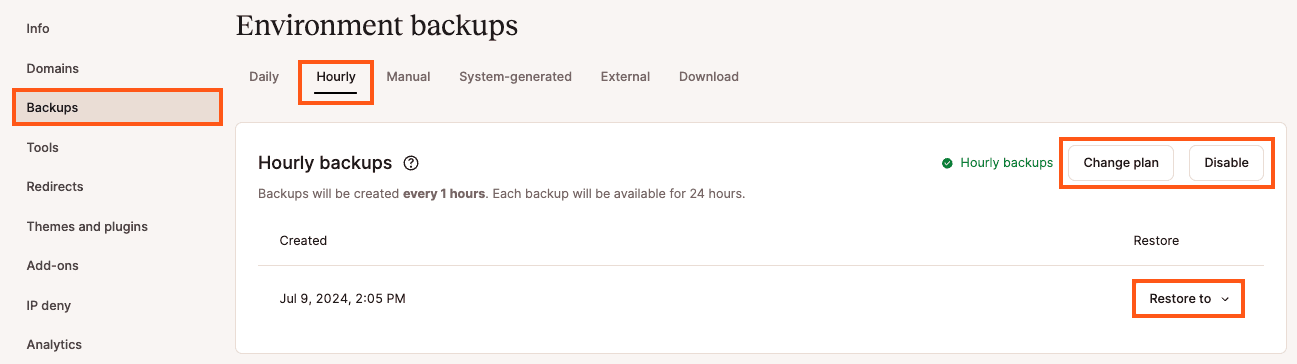
You can view and restore your hourly backups at any time from Backups > Hourly. These are additional restore points. Automatic daily backups are still taken and available to restore when 6-Hour or Hourly backups are enabled.
Change or remove hourly backups
You can upgrade or downgrade the frequency of the backups or cancel the add-on within Sites > sitename > Backups > Hourly. To change the frequency, click Change plan, or to cancel the add-on, click Disable.
If you remove the hourly backups add-on and you’re in the first 30 days of your WordPress Hosting plan, a prorated fee for the add-on will be added to your next invoice for the time period it was enabled. If your WordPress Hosting plan has been active for more than 30 days, you will receive a prorated credit for the add-on fees to your Account Balance for the remaining days of the current billing period. The credit is automatically used to offset money owed to Kinsta on your next invoice. For more information, refer to our WordPress Hosting Money-Back Guarantee.
External backups add-on
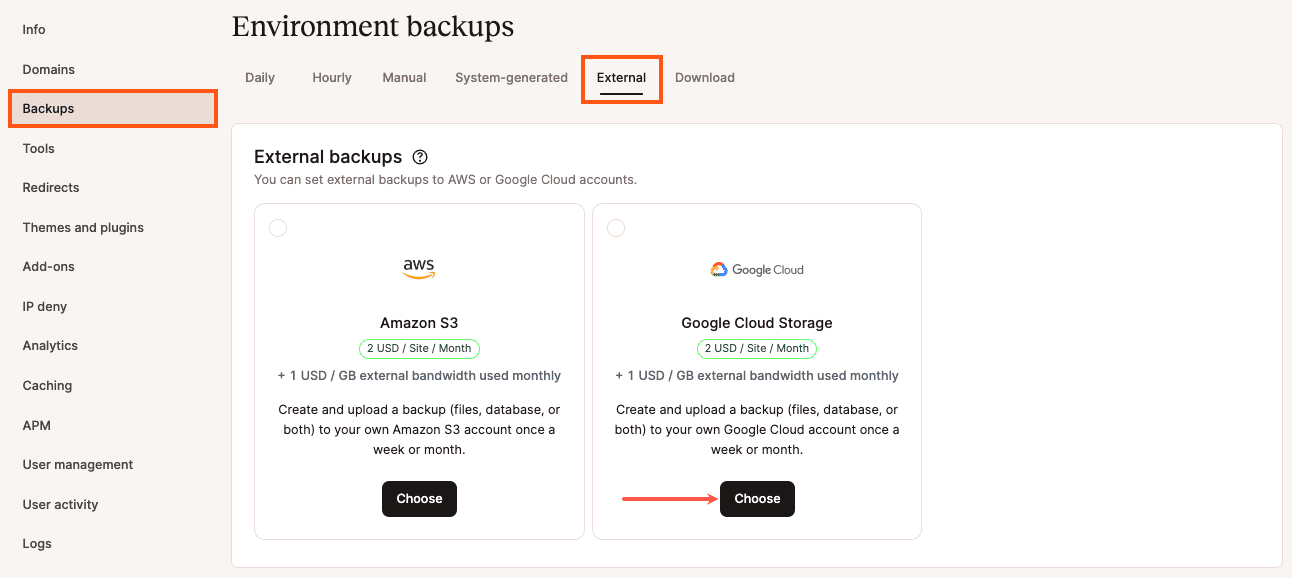
With Kinsta’s external backups add-on, you can back up your WordPress site to Google Cloud Storage or Amazon S3. External backups can be configured for either weekly or monthly frequency, and you also have a choice between backing up your files, WordPress database, or both.
Kinsta’s external backups add-on is a great option if you’re looking for an easy way to handle offsite backups. It lets you build off-site backups into your disaster recovery strategy without configuring complex WordPress plugins to connect to an external storage provider.
External backups add-on cost
The external backups add-on costs $2/month for each site backup plus $1/GB per month for bandwidth. The sample calculations below show how the pricing model works for three sites using external backups.
- Site A uses 5 GB of external bandwidth: $2 + $5
- Site B uses 8 GB of external bandwidth: $2 + $8
- Site C uses 20 GB of external bandwidth: $2 + $20
- The total cost per month for external backups is $39
Keep in mind this example does not include storage costs, which are billed separately and directly by Google Cloud Platform or AWS.
External backups add-on with Google Cloud Storage
To use Google Cloud Storage (GCS) for your external backups, you’ll need to:
- Create a Google Cloud Storage bucket.
- Create a service account.
- Create a service account key pair.
- Configure the External Backups Add-on In MyKinsta.
If you need more details on the steps to follow in Google Cloud Platform, see our guide on Creating and Configuring a Google Cloud Storage Bucket.
Configuring the external backups add-on in MyKinsta
To configure the external backups add-on in MyKinsta, you’ll need three pieces of information from Google Cloud to link your storage bucket to Kinsta’s external backups tool.
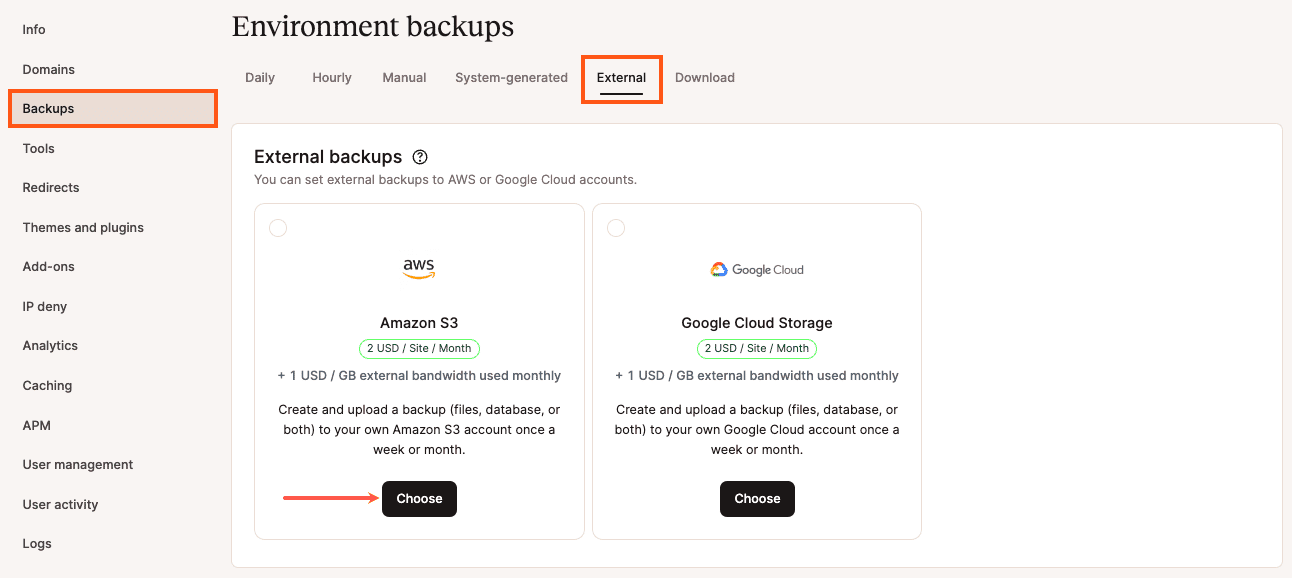
Once you have these details and you’re ready to add the external backups add-on to your plan, log in to MyKinsta, click on Sites > sitename > Backups > External, and click Choose under the Google Cloud Storage option.
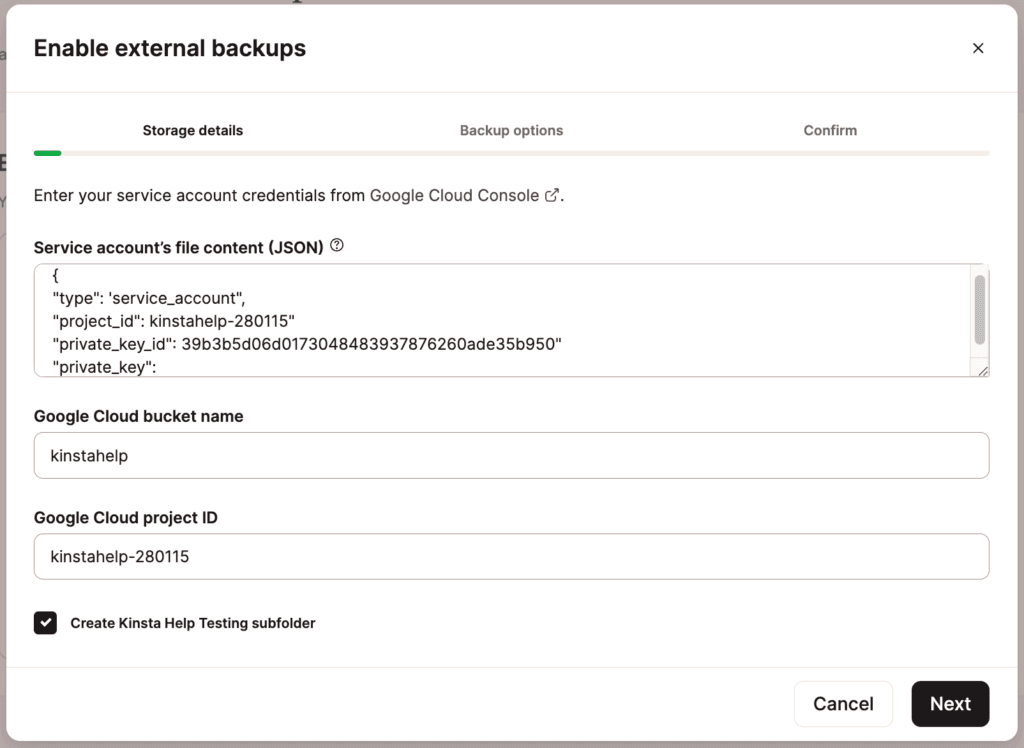
Fill in the storage details form with your Google Cloud Storage bucket and service account information:
- In the Service account’s file content (JSON) field, paste the contents of your JSON file (private key).
- In the Google Cloud bucket name field, paste your bucket name.
- In the Google Cloud project ID field, paste your project ID.
- If you want to back up your site to a unique site-specific folder, check the Create sitename subfolder box. Click Next to proceed to the next step.
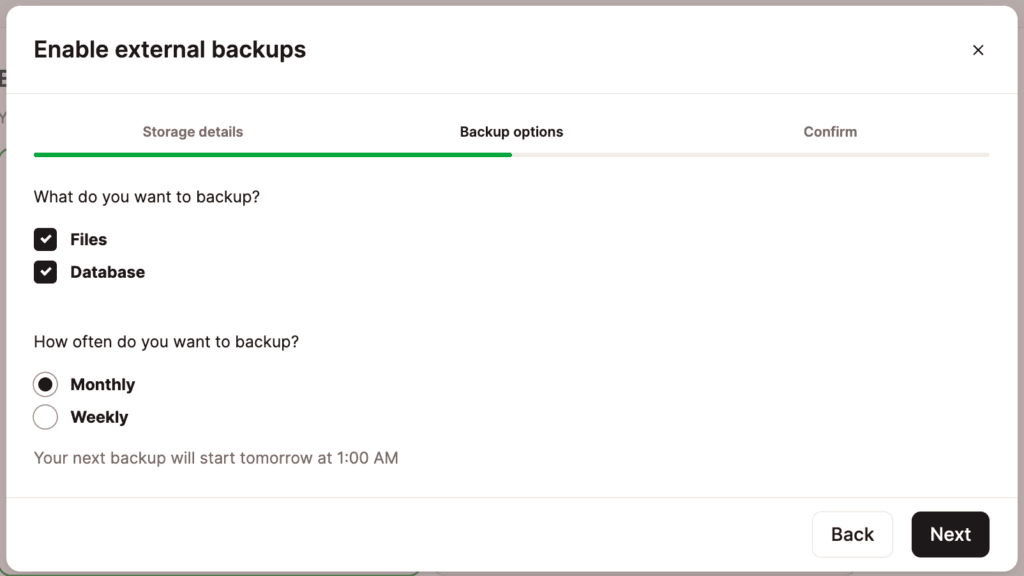
Next, choose whether you want to back up your site’s files, database, or both. You can choose between monthly and weekly backups.
After you’ve made your selections, press Next to continue.
Finally, review the external backup subscription details and your choice of settings. If you need to make any changes to the backup options, press the Back button. If everything looks good, press the Enable external backups to complete the setup process.
You should now see the add-on in the External section of your backups page.
External backups add-on with Amazon S3
To use Amazon S3 for your external backups, you’ll need to:
- Create an Amazon S3 Bucket.
- Create an AWS User.
- Configure the External Backups Add-on In MyKinsta.
If you need more details on the steps to follow in Amazon Web Services (AWS), see our guide on Creating and Configuring an Amazon S3 Bucket.
Configuring the external backups add-on in MyKinsta
To configure the external backups add-on in MyKinsta, you’ll need three pieces of information from Amazon S3 to link your storage bucket to Kinsta’s external backups tool:
- AWS S3 bucket name
- AWS access key ID
- AWS secret access key
Once you have these details and you’re ready to add the external backups add-on to your plan, log in to MyKinsta, click on Sites > sitename > Backups > External, then click Choose under the Amazon S3 option.
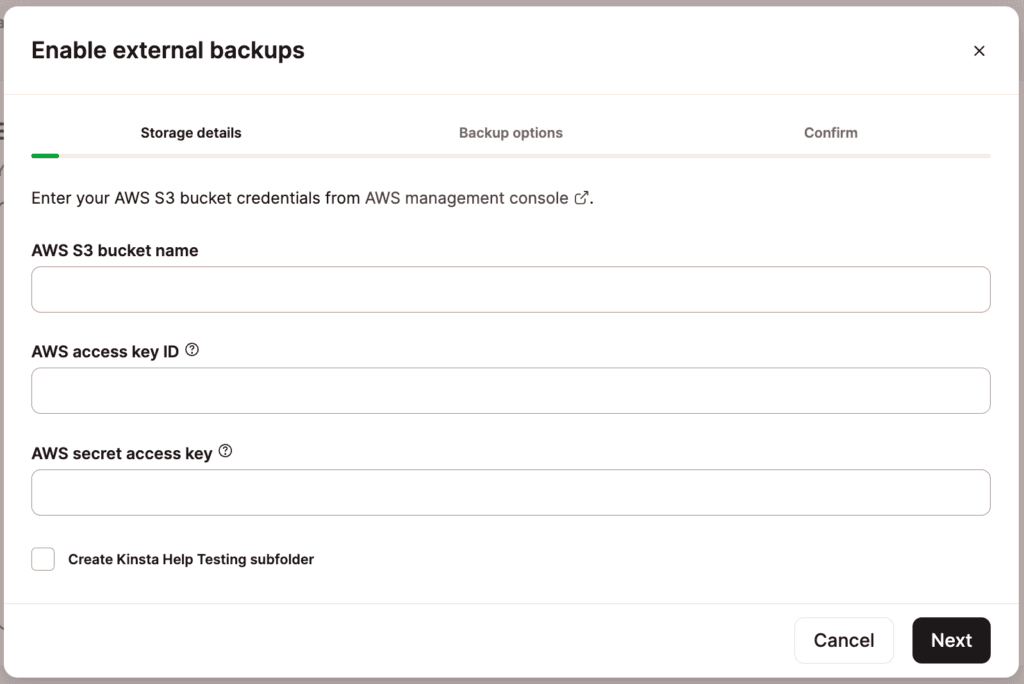
Fill in the storage details form with your S3 and IAM user information:
- In the AWS S3 bucket name field, paste the name of your S3 bucket.
- In the AWS access key ID field, paste your IAM user’s access key ID.
- In the AWS secret access key, paste your IAM user’s secret access key.
- If you want to back up your site to a unique site-specific folder, check the Create sitename subfolder box. Click Next to proceed to the next step.
Next, choose whether you want to back up your site’s files, database, or both. You can also choose between monthly and weekly backups. After you’ve made your selections, press Next to continue.
Finally, review the external backup subscription details and your choice of settings. If you need to make any changes to the backup options, press the Back button. If everything looks good, press Enable external backups to complete the setup.
You should now see the add-on in the External section of your backups page.
How to remove the external backups add-on
To remove (and stop) the external backups add-on, go to Sites > sitename > Backups > External, and click the Disable button. To confirm the removal of the external backups add-on, click Remove backups.
This removes access to the backups from MyKinsta; it does not remove the backups from your Google Cloud or Amazon S3 storage.
If you remove the external backups add-on and you’re in the first 30 days of your WordPress Hosting plan, a prorated fee for the add-on will be added to your next invoice for the time period it was enabled. If your WordPress Hosting plan has been active for more than 30 days, you will receive a prorated credit for the add-on fees to your Account Balance for the remaining days of the current billing period. The credit is automatically used to offset money owed to Kinsta on your next invoice. For more information, refer to our WordPress Hosting Money-Back Guarantee.
Restore WordPress backups
You can restore automatic, manual, and system-generated backups in MyKinsta. If you use the external backups add-on, these cannot be restored directly in MyKinsta; you must follow the steps for Restoring downloadable backups.
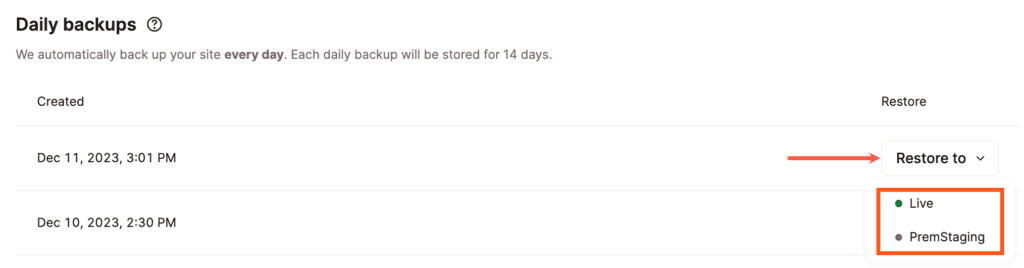
To restore your WordPress site from a MyKinsta backup, click the Restore to button next to the backup you want to restore, and select the environment you want to restore the backup to in the dropdown menu.
Depending on how large your site is, this may take a couple of minutes. While the restoration is in progress, you will not be able to access your site in MyKinsta, and we’ll show you a friendly reminder of the restoration process.
Once the restore process is complete, MyKinsta will refresh automatically, and you’ll have access to the site again.
Whenever you restore a backup, a new backup is generated, which will reflect the state of your website just before you restored it. This is handy if you’d like to undo the restore.
Restoring WordPress backups to staging
You can restore a WordPress site from a backup to a staging site right within MyKinsta. This could make your life easier in several ways, such as:
- A smoother and more flexible development experience.
- See how your site worked previously without having to touch your live site.
- Recover and retrieve information from a previous backup without modifying your live site.
When restoring a backup to staging, you have a few options, depending on which environment the backup is coming from:
- A backup of your Live environment can be restored to any environment.
- A backup of a Premium Staging Environment can be restored to any Premium or Standard Staging Environment.
- A backup of a Standard Staging Environment can only be restored to the same Standard Staging Environment.
Restore WordPress backup to staging
Log in to MyKinsta and go to Sites > sitename. If you do not have a staging site to which you want to restore the backup to, you’ll need to create that staging environment (Standard or Premium) first.
Once you have the staging site created, go to the Backups tab. You’ll see a list of your available backups, which are available to restore to your WordPress staging environment.
Next to the backup you want to restore, click the Restore to button, and in the dropdown menu, select the Staging environment you want to restore the backup to.
Depending on the size of your site, this may take several minutes. You can then access your Standard Staging Environment or Premium Staging Environment, which is separate from your live production site.
Note: When restoring a live backup to staging, all staging backups will remain intact, and any custom domains added to the staging environment are retained as well.
Restoring downloadable backups
Restoring a MyKinsta downloadable backup requires a few additional steps. Let’s go through how to restore a downloadable backup to an existing Kinsta site. The same steps can also be applied to a newly created site.
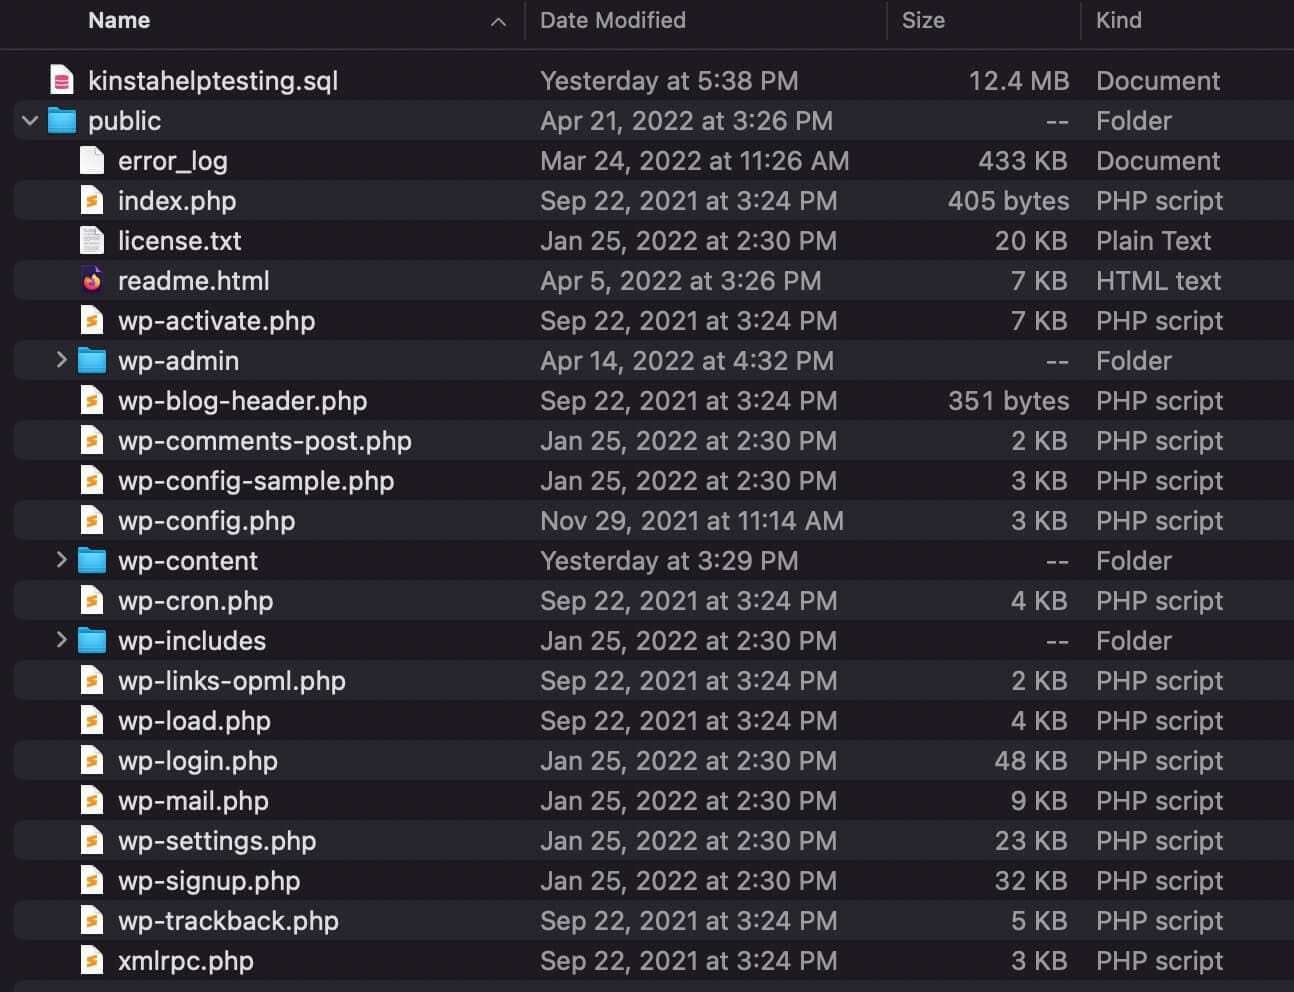
First, unzip your downloaded backup. You should see a folder structure like the screenshot below. This folder contains your site’s files as well as a copy of your WordPress database.
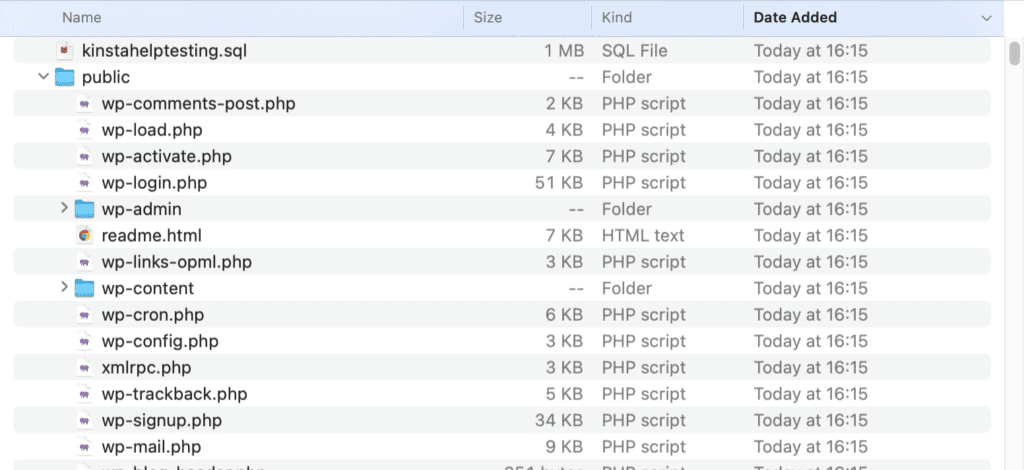
Next, connect to your Kinsta server with your favorite SFTP client and navigate to the ~/public folder. If there are existing files in this folder, go ahead and delete them. Once the folder is empty, transfer your site files (excluding the sitename.sql file) from the downloaded backup to the ~/public folder.
After the files have been transferred, open the wp-config.php file and verify the DB_NAME, DB_USER, and DB_PASSWORD match the credentials under Database Access on your site’s Info tab in MyKinsta.

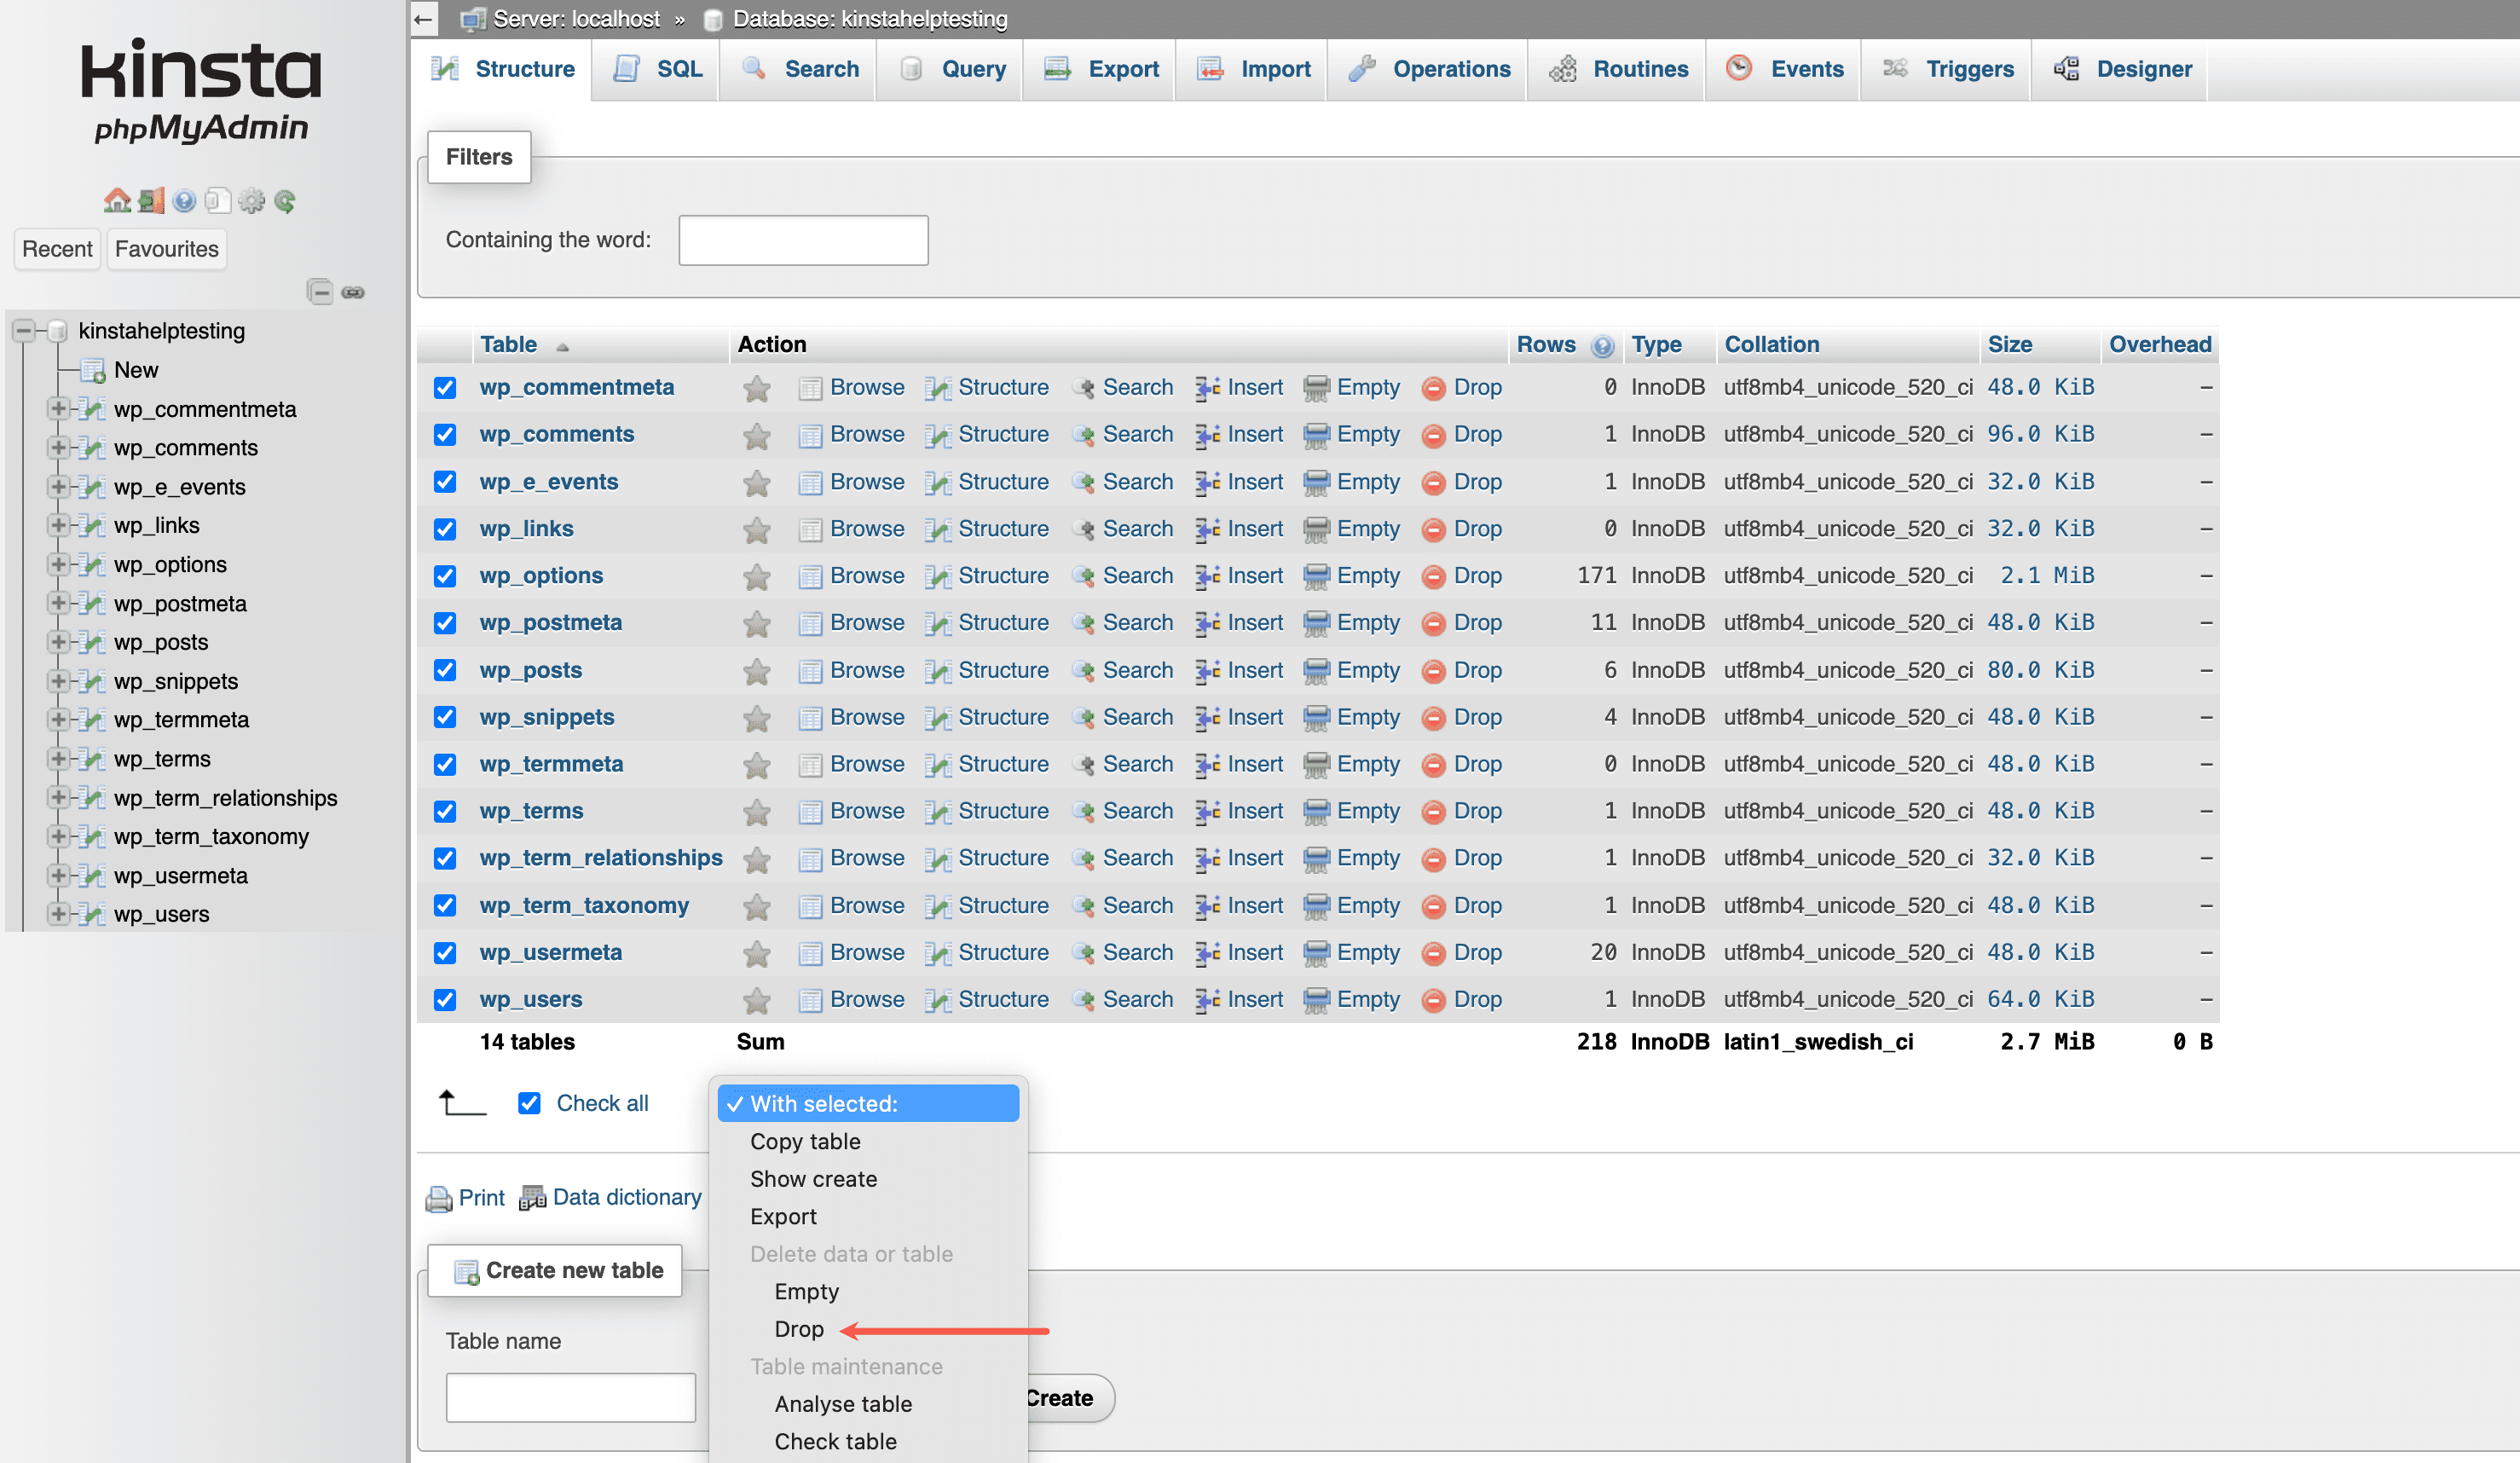
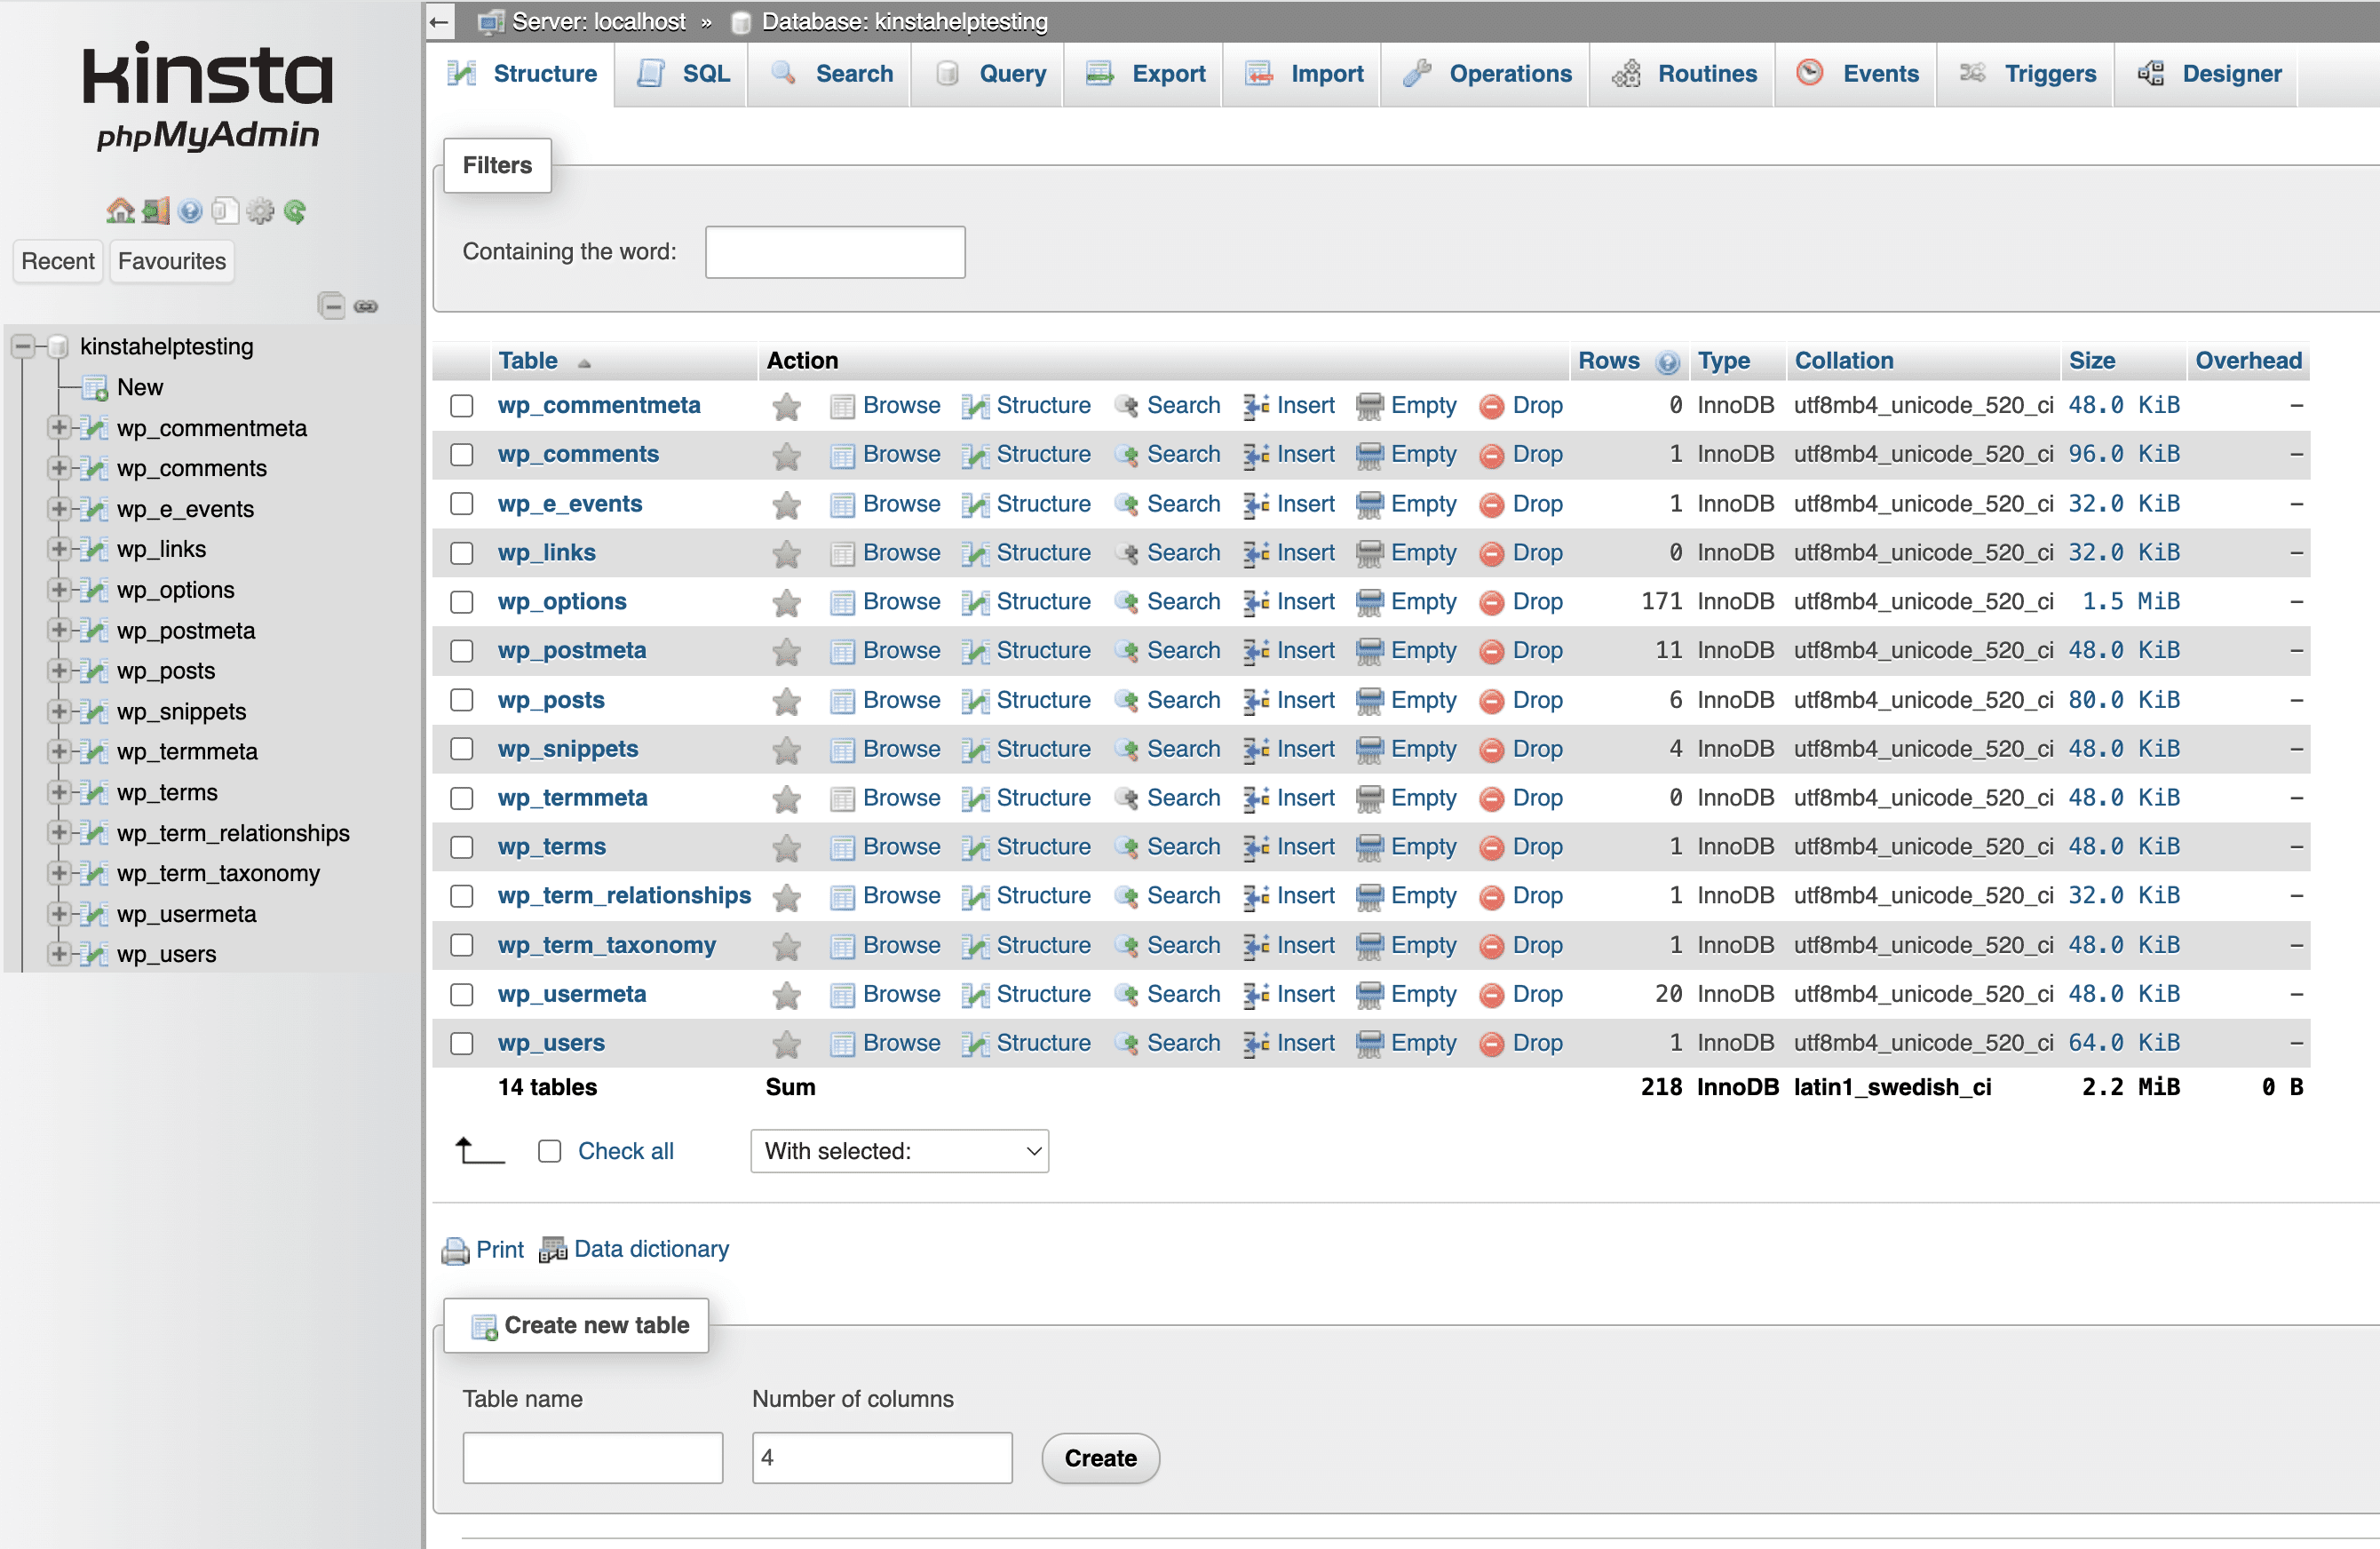
Next, you’ll need to delete the existing database tables and upload the database file from your downloaded backup. To start, open your site’s phpMyAdmin, and scroll down to the bottom of the page. Click on the checkbox next to Check All and use the dropdown to choose the Drop option. You will then be prompted to confirm the database query. Select Yes to complete the deletion process.
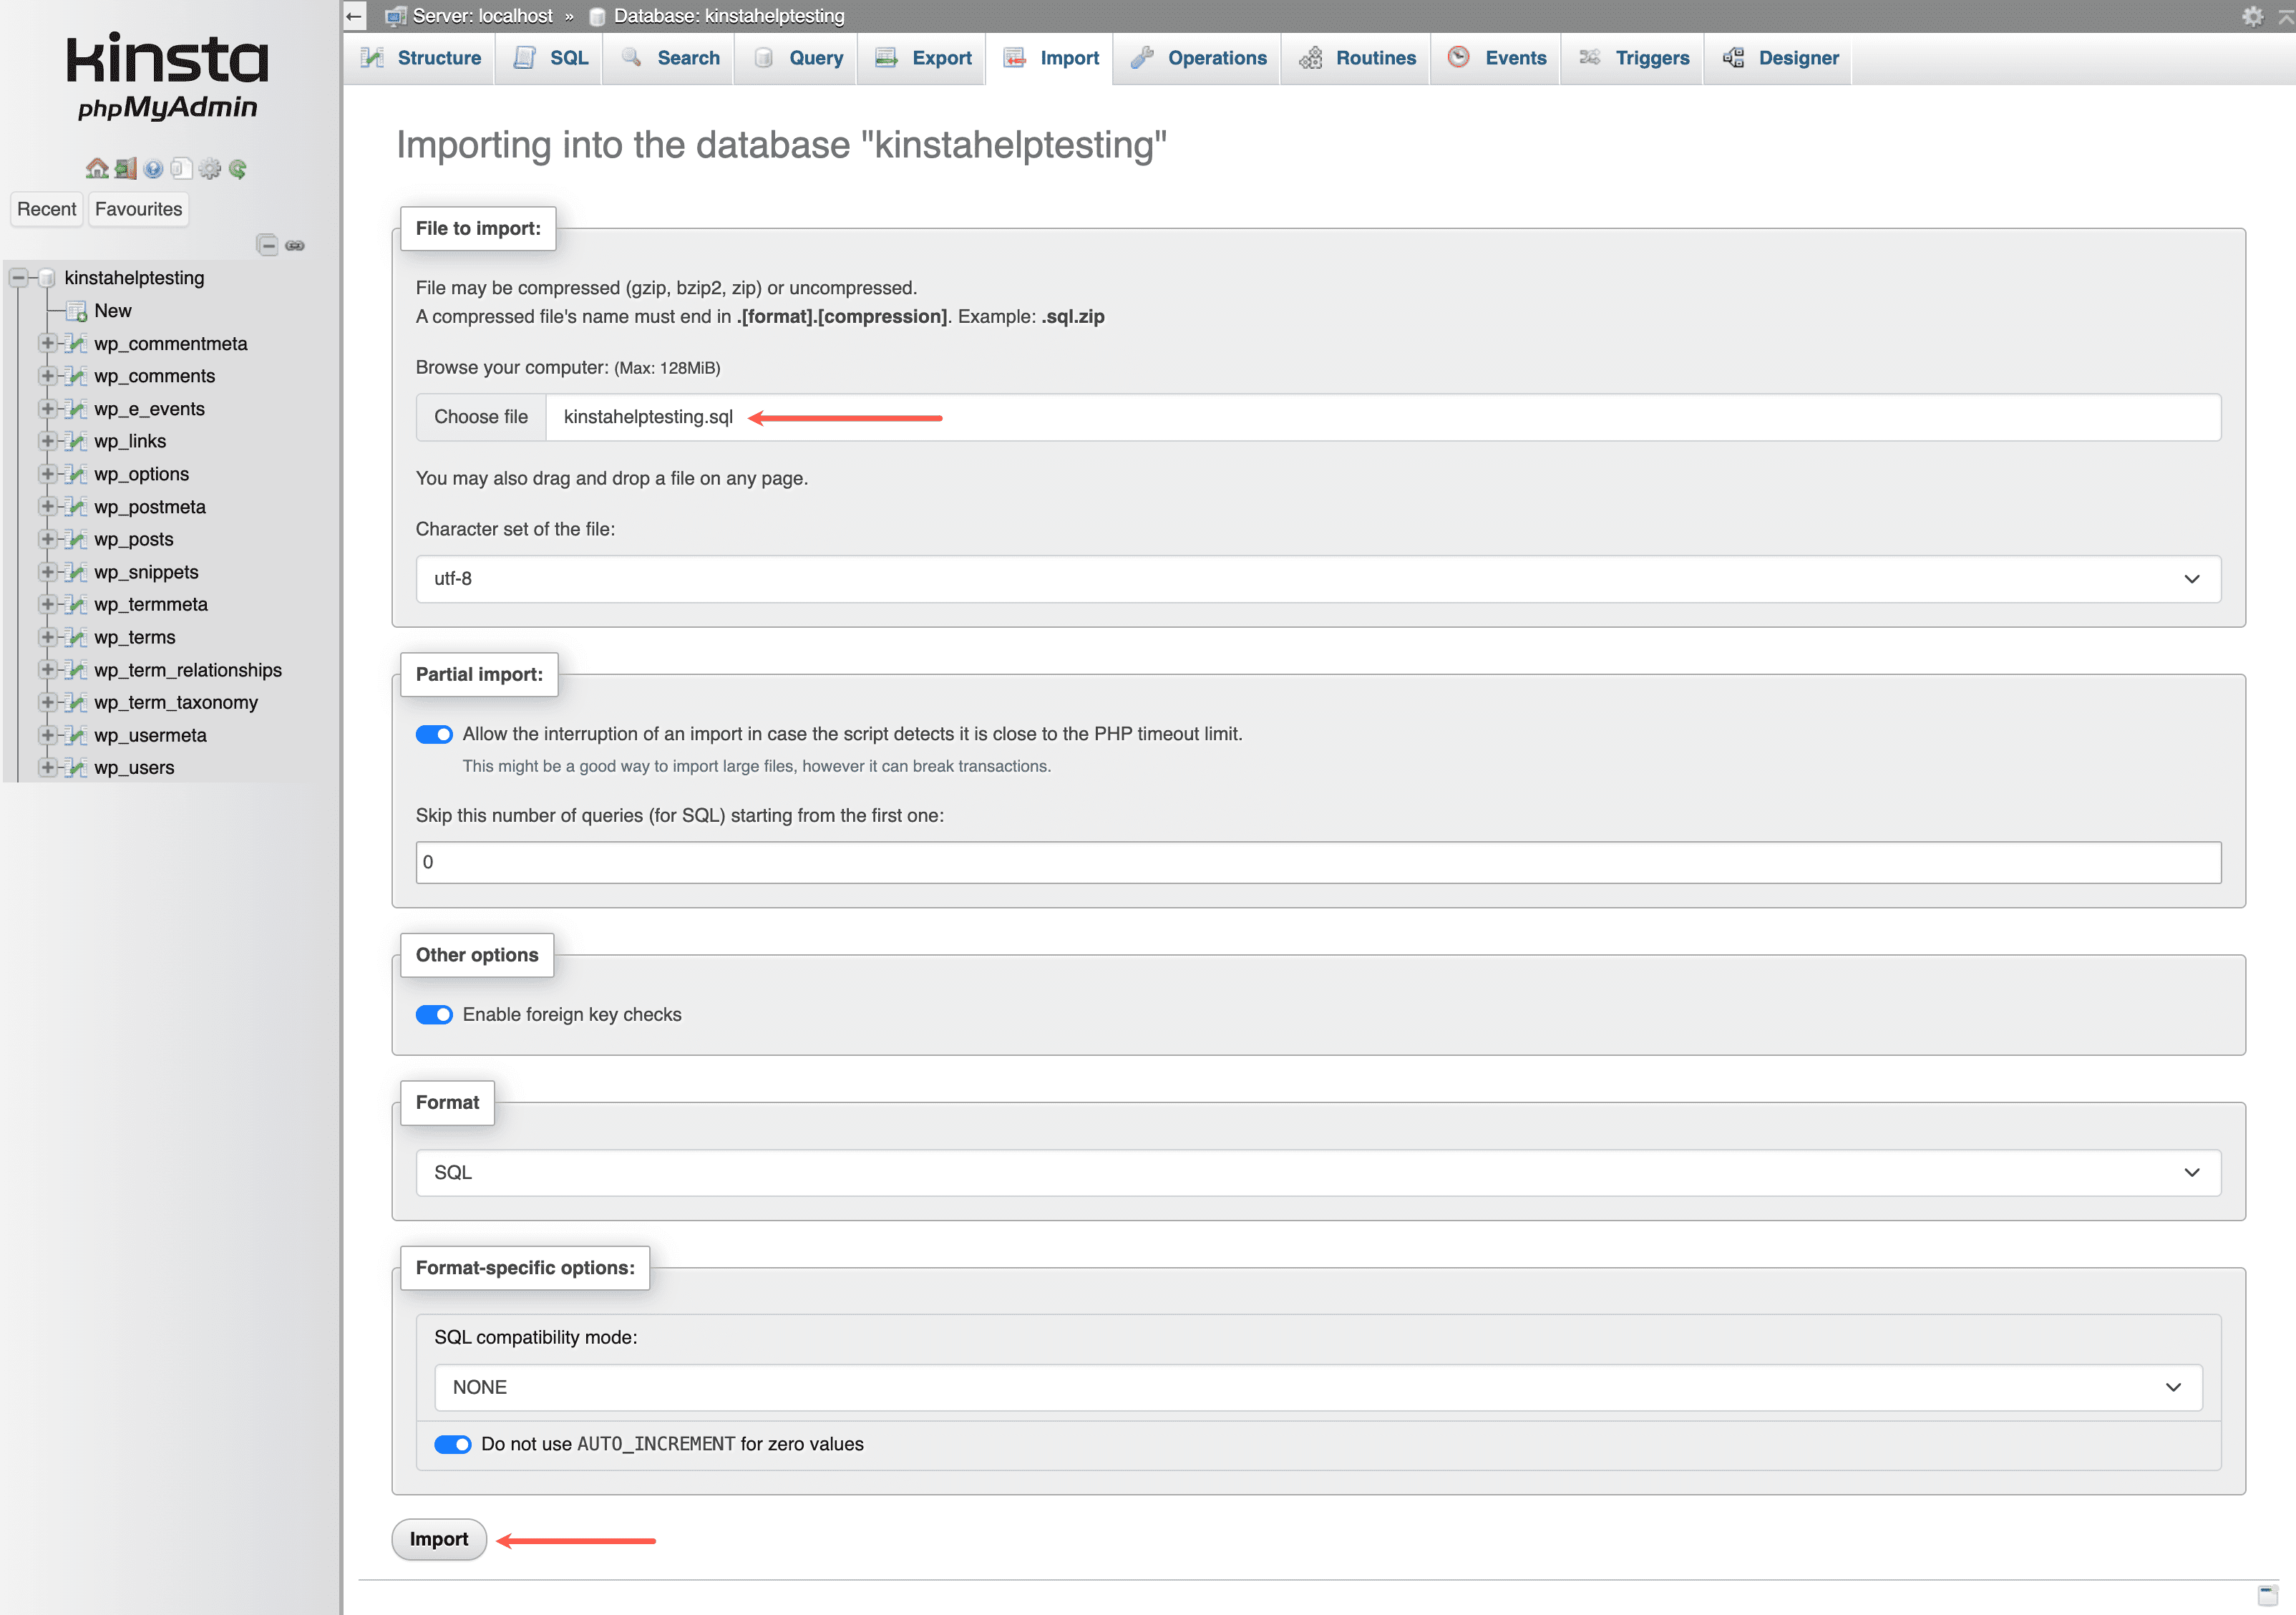
Next, click on the Import tab in phpMyAdmin. Under Files to import, click Choose file and select the sitename.sql file from your downloaded backup. You can leave the other options in their default setting. To finish the database import, scroll down and click the Import button.
After the database import, you’ll be able to see the database tables from your downloaded backup. If you run into a timeout issue during the database import, your database file may be too large for phpMyAdmin’s web uploader. If that is the case, you can try uploading the database file to your site’s ~/private folder and importing it via the command line. If you are uncertain about how to do that, please upload your SQL file to your ~/private folder and open a new chat with our Support team for further assistance.
Important notes regarding backups
Here are a few additional things to be aware of regarding backups at Kinsta.
Backup retention
Depending upon the plan you’re on, the retention period of backups may vary, with the exception of plugin and theme update backups. Manual plugin and theme updates are stored for two hours. If you use Kinsta Automatic Updates, these backups are stored for three days.
| Plan | Backup retention |
|---|---|
| Single 35k, 65k, 125k, and 315k visits Single 20GB, 40GB, 65GB, and 125GB bandwidth WP 2, 5, and 10 | Include 14 days of backups |
| Single 500k and 750k visits Single 250GB and 500GB bandwidth WP 20 and 40 | Include 30 days of backups |
| Single 1.25M, 1.9M, 2.5M, and 3.15M visits Single 750GB, 1125GB, 1500GB, and 1875GB bandwidth WP 60, 80, 120, and 150 Agency plans | Include 30 days of backups |
Disk space is excluded from your plan’s total
Backups are excluded from our reporting when calculating your total disk space usage to give you as much space as possible. Your usage consists of only your live site’s files and database.