Kinsta’s DNS
When you host your WordPress website with Kinsta, you can also use Kinsta’s DNS service to manage your DNS records, including SPF and DKIM records for MailChannels’ service, which we use for transactional email. To take advantage of Kinsta’s DNS service, you must have access to update the name servers on your domain’s registrar. We recommend contacting your DNS provider if you don’t have access to the domain registrar.
This is optional (you can manage your DNS records anywhere you like), but if you’d like to take advantage of our premium DNS service and manage your DNS with Kinsta, follow the instructions below.
The basics of how DNS works
When someone types in your domain (yourwebsite.com) in their browser, their computer uses the DNS system to look up which name servers it should contact to get DNS information. It will return something like the following:
- ns-155.awsdns-22.com
- ns-326-awsdns-15.net
- ns-1352-awsdns-29.org
- ns-1536-awsdns-08.co-uk
The visitor’s computer then contacts one of those name servers to look up the IP address for the domain by checking for the DNS A record, which contains the IP address of the server where it’s hosted. In this case, your domain’s A record is pointed to Kinsta’s IP. The visitor’s computer then connects to Kinsta’s IP to load yourwebsite.com.
What is Kinsta’s DNS?
All Managed WordPress Hosting plans come with Kinsta’s DNS, a premium Anycast DNS service powered by Amazon Route53. Route53 consistently ranks among the fastest DNS services in the world, and it even supports latency and geolocation-based routing to ensure quick response times.
Unlike other WordPress hosts that charge extra for premium DNS, all Kinsta customers with a Managed WordPress plan can take advantage of Kinsta’s DNS at no additional cost. The number of domains you can add to Kinsta’s DNS is equal to the number of sites your plan allows.
Configure domain to use Kinsta’s DNS
1. Add your first domain
The first step is to add your domain to Kinsta’s DNS in MyKinsta. Click on DNS in the left sidebar, then click Add Your First Domain. If you already have a domain in Kinsta’s DNS, click Add Domain in the top right corner of the page instead.

2. Add your domain names
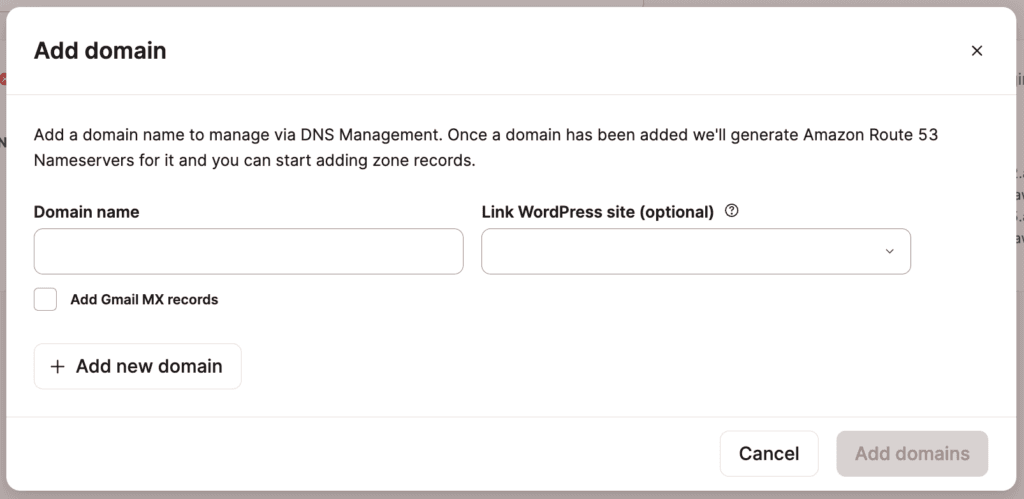
In the Add domain modal/pop-up, enter your Domain name. If you want to link a WordPress site, select the site to link. When you link a WordPress site to a DNS zone, it shows the DNS zone on the Domains page so you can easily access it and gives Site Administrators access to manage the DNS records for the site within DNS.
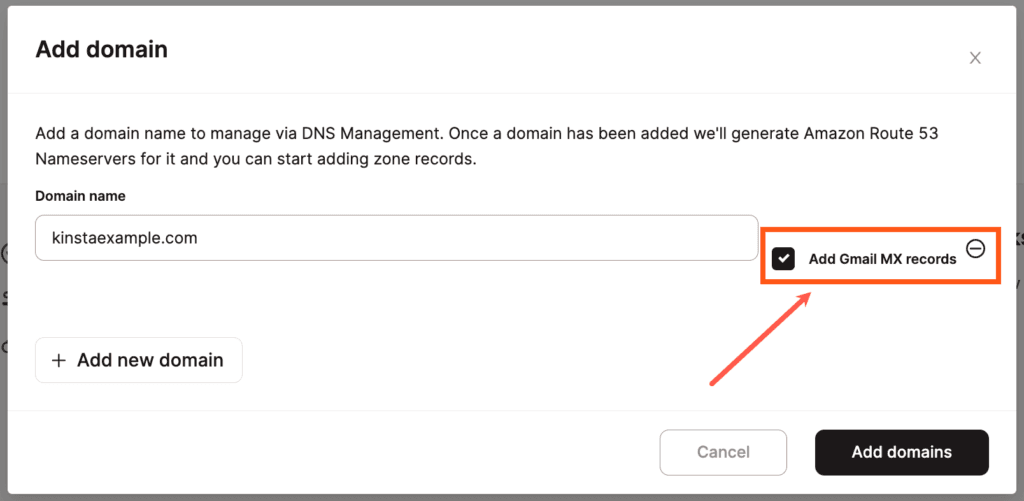
If you’re using Google Workspace for email, you can check the Add Gmail MX Records option to add the required MX records automatically. Note: This only adds the MX records, and you may still need to add additional CNAME and TXT verification records for Google Workspace later on.
If you have more than one domain to add, click Add new domain again and enter your next domain name.
After entering your domain(s), click Add domains to proceed to the next step.
3. View name servers
On the next screen, the four name servers you need to point your domain to will be shown, similar to the ones below:
- ns-332.awsdns-41.com
- ns-1255.awsdns-28.org
- ns-618.awsdns-13.net
- ns-1650.awsdns-14.co.uk
4. Copy existing DNS records
Before changing your domain’s name servers, you’ll first want to copy over any existing DNS records you have set up for your domain.
Log in to your DNS provider, where your domain’s name servers are pointed to. This may be your domain’s registrar but could be another DNS provider.
Copy each of your site’s DNS records from your current DNS provider to Kinsta’s DNS. This will need to be done manually, as Kinsta’s DNS doesn’t automatically copy your DNS records.
5. Log in to your domain registrar
Log in to your domain registrar’s management panel. Note: This may or may not be the same place you currently manage your DNS. Your DNS is managed where your name servers are currently pointed. The name servers your domain points to are managed at your domain registrar. Since you need to change the name servers your domain points to, you’ll need to log in to where your domain registration is managed.
The process of updating name servers is specific to each registrar, so be sure to consult your registrar’s documentation or support team if you are unsure about how to update your name servers.
6. Locate your name servers
Navigate to where your name servers are managed at your registrar. This is usually found under DNS, Manage Zones, Modify DNS Servers, Custom DNS, or something similar. If you have trouble locating that, consult your registrar’s documentation or support team for help locating and updating your name servers.
7. Add MyKinsta name servers
Depending on your registrar and current name server configuration, you may need to delete existing name servers first. Then you can add the name servers shown in MyKinsta. Make sure all 4 name servers are added and make sure they are the only name servers.
After updating the name servers at your domain registrar, it may take 24-48 hours for the changes to propagate across the Internet. While you wait for that to happen, if you haven’t already, you can begin adding any DNS records needed, as explained in the next section.
Add linked WordPress site
Once you’ve set up your DNS zone, you can link a WordPress site to it. This gives Site Administrators access to manage the DNS records for the site. Within Linked WordPress site, click Add site, choose the WordPress site you want to link to, and click Add linked site.

Click Change to change which site the DNS zone is linked to. Click Remove to remove the site from the DNS zone.
How to add DNS records
Kinsta’s DNS supports various DNS record types, including A records, CNAME records, MX records, TXT records, and more. In this section, we’ll walk you through all the supported DNS records and show you how to configure them in Kinsta’s DNS.
On the DNS page, click on the domain you want to manage to begin adding or editing DNS records. Click Add DNS record or Change DNS record after adding or editing a record to save your changes.
A record
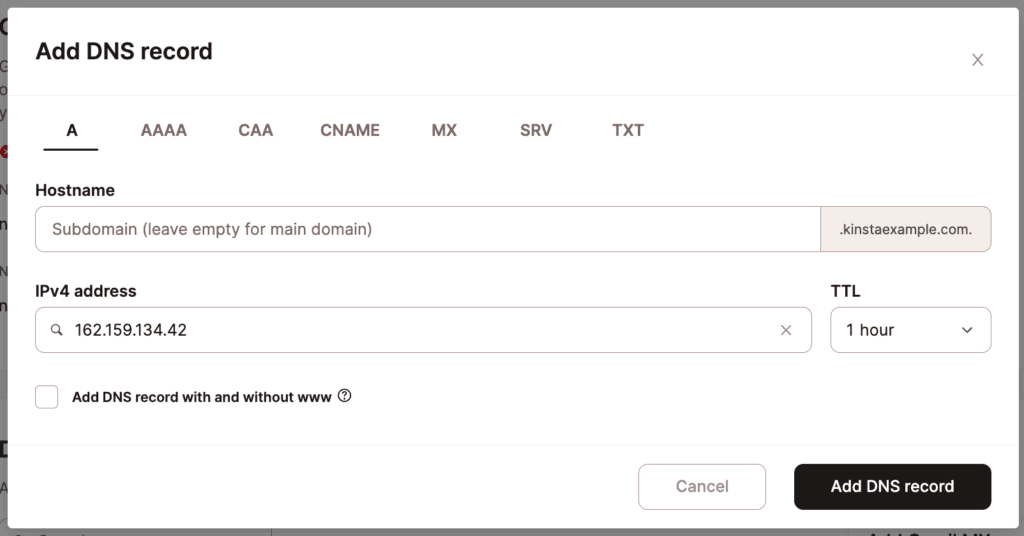
An A record maps a domain name to the IPV4 address of a server and is required for a website to be served via a domain name. For specific information on adding and pointing your domain to Kinsta, please refer to our in-depth guide on Domains and DNS.
- Hostname: Specify a subdomain if you’re configuring a subdomain. If you are setting up an A record for your root domain, leave the Hostname field empty.
- IPV4 Address: Enter your Site IP Address (IPv4).
- TTL (Time to Live): We recommend using the default setting of 1 hour.
- Add DNS record with and without www: Check this box if you want to automatically add the CNAME record for your www domain at the same time.
AAAA record
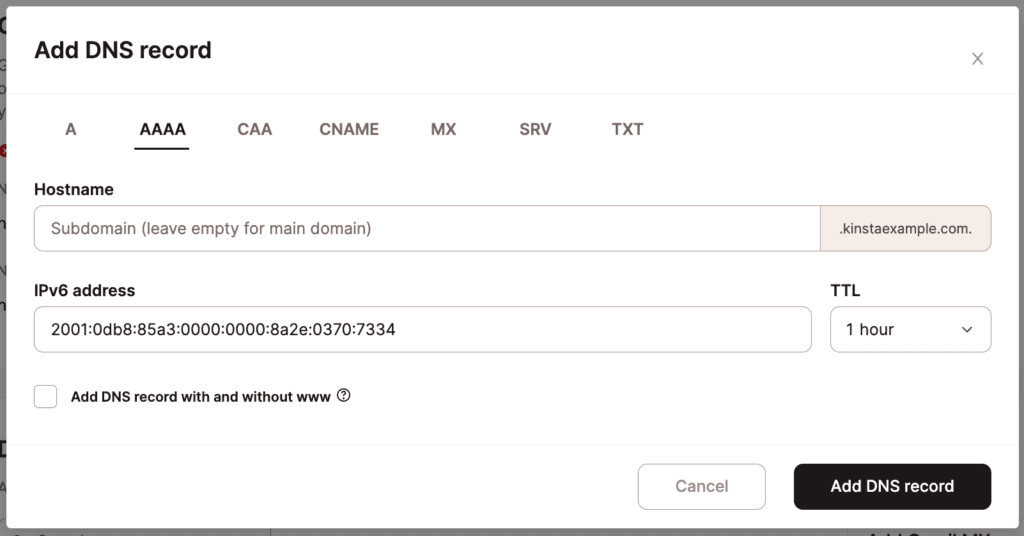
An AAAA record maps a domain name to the IPV6 address of a server that supports an IPV6 address.
There may be a couple of situations where you may want to add an AAAA record in Kinsta’s DNS:
- If you have a subdomain you’d like to point to another server that does support IPV6.
- If you’re using Kinsta’s DNS to manage your main domain’s DNS, but you’re pointing the main domain to another server that supports IPV6.
You won’t be able to use this for your site hosted at Kinsta, as we only support IPV4 addresses.
- Hostname: Specify the subdomain you’re configuring. If you are setting up an AAAA record for your root domain, leave the Hostname field empty.
- IPV6 Address: Specify the IPV6 address of the server.
- TTL (Time to Live): We recommend using the default setting of 1 hour.
- Add DNS record with and without www: Only check this box if you’re creating the AAAA record for your root domain and want to automatically add the CNAME record for your www domain at the same time.
CNAME record
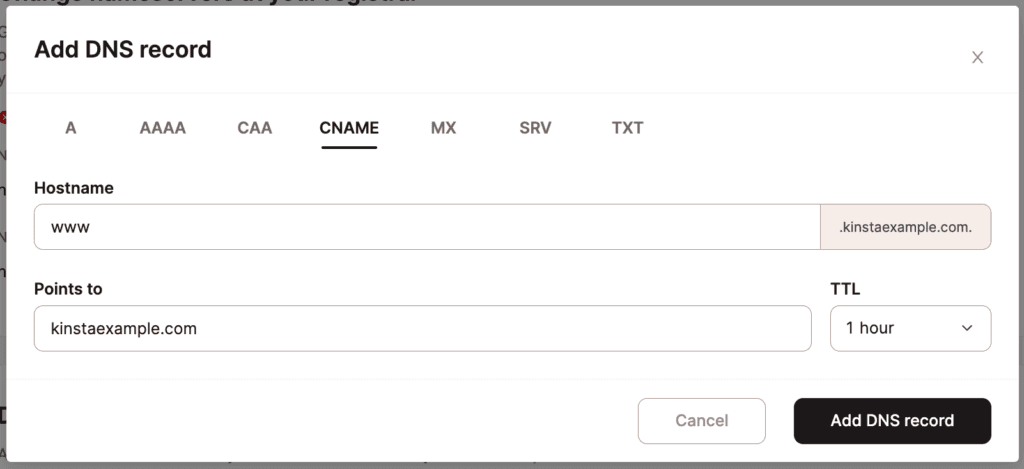
A CNAME record handles the mapping of a domain name to another hostname. CNAMEs are commonly used to map a www domain to a non-www domain (e.g. www.kinstalife.com to kinstalife.com). If you selected the Add DNS record with and without www box when adding an A or AAAA record, the CNAME for your www domain has already been added. For specific information on adding and pointing your domain to Kinsta, please refer to our in-depth guide on Domains and DNS.
- Hostname: Specify the hostname of your subdomain.
- Points To: Specify the hostname you’d like the CNAME to resolve to.
- TTL (Time to Live): We recommend using the default setting of 1 hour.
CAA record
A CAA record is an optional DNS record that lets you specify which certificate authorities (CAs) are allowed to issue SSL certificates for your domain. If a domain has no CAA records, any CA can generate an SSL certificate for it if requested. Setting up a CAA record provides you with an additional layer of security to prevent untrusted CAs from issuing SSL certificates for your domain. The CAA record follows the format below:
your-domain.com CAA <flags> <tag> <value>Let’s take a closer look at each element of the CAA record.
CAA flag
A CAA flag specifies whether a CA is allowed to use the information specified in a CAA record. The flag has two values – 0 or 1
- If the CAA flag is set to
0, a CA can use the information within the CAA record even if it doesn’t recognize the CAA tag. - If the CAA flag is set to
1, a CA is not allowed to use the CAA record unless it recognizes the CAA tag.
CAA tag
A CAA tag specifies that allowed behavior for authorized CAs when issuing SSL certificates. The tag is generally one of three values — issue, issuewild, iodef — but custom values specific to certain CAs are supported as well.
- The
issuetag allows a CA to generate a non-wildcard SSL certificate. - The
issuewildtag allows a CA to generate a wildcard SSL certificate. - The
iodeftag allows you to receive email alerts if an invalid SSL certificate request is made.
CAA value
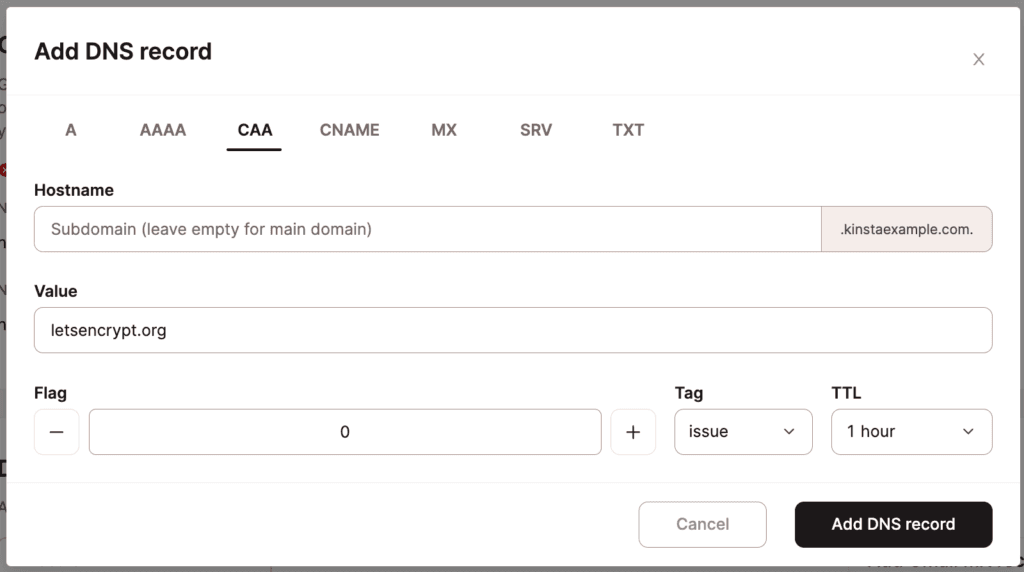
A CAA value specifies the domain name of a certificate authority (CA). For example, the CAA value for Let’s Encrypt (a popular CA) would be letsencrypt.org. If the CAA value is set to ;, no CA is allowed to issue an SSL certificate for the domain. To add a CAA record in Kinsta’s DNS, you’ll need the hostname, CAA value (the domain name of the CA), CAA flag, and CAA tag. In this example, let’s add the CAA record below.
kinstalife.com. CAA 0 issue “letsencrypt.org”We can add this CAA record in Kinsta’s DNS like so:
Google CAA records
If you use Google Cloud or Google-managed SSL certificates, you must add the following CAA records to your DNS entries to allow Google Trust Services (pki.goog) to issue both standard and wildcard SSL/TLS certificates for your domain, replacing example.com with your domain:
example.com. IN CAA 0 issue "pki.goog"
example.com. IN CAA 0 issuewild "pki.goog"
MX record
MX Records are used for email routing, and the specific records will vary based on what your email provider gives you.
- Hostname: Specify the hostname of your email address.
- Points To: Specify the hostname for your email provider.
- Priority: Specify the priority number for the MX record.
- TTL (Time to Live): We recommend using the default setting of 1 hour.
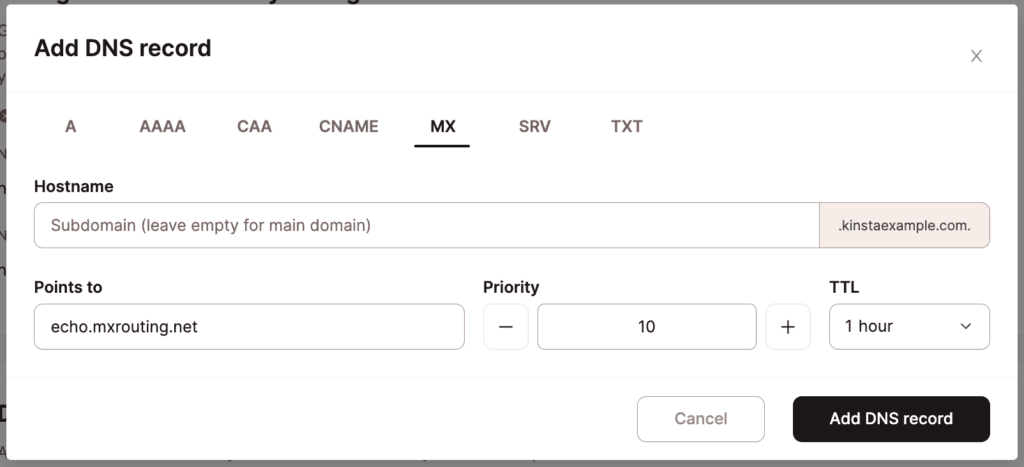
For this example, let’s configure MX records for MX Route, a popular email hosting service. Below are the MX records provided by MX Route:
- echo.mxrouting.net (Priority 10)
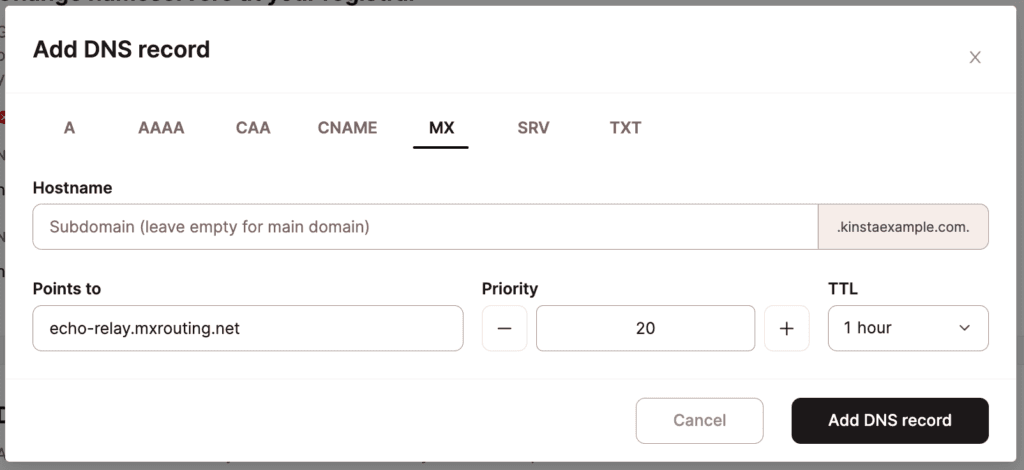
- echo-relay.mxrouting.net (Priority 20)
Add the first MX record like this:
Next, the second MX record can be added like so (notice the different Points To hostname and Priority):
Add Gmail MX records on a new domain
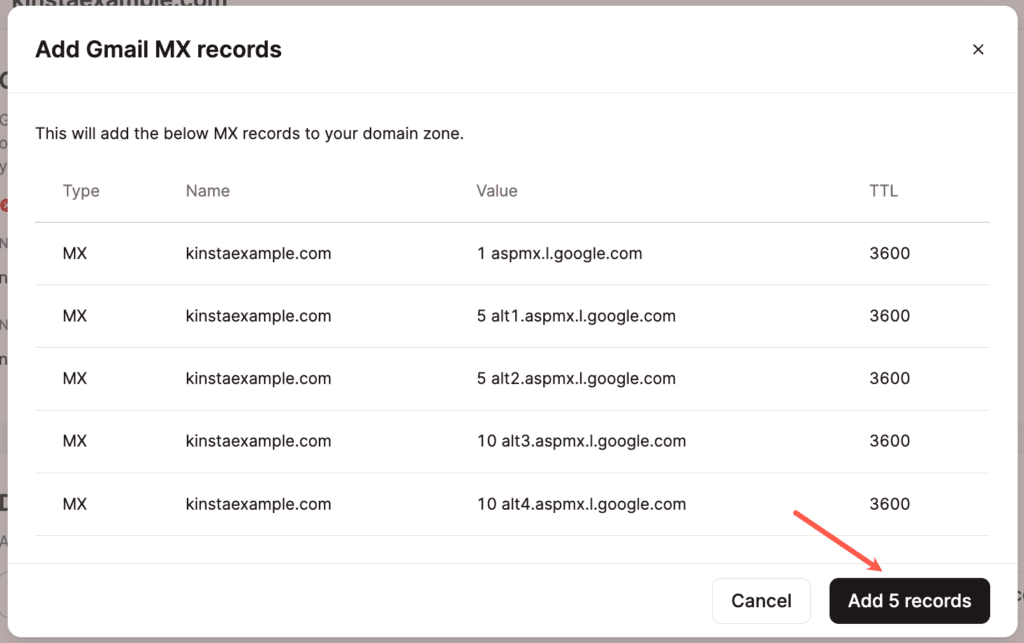
If you’re using Google Workspace for your email service, we make it super easy to add the required MX records. When you’re adding a domain in Kinsta’s DNS, check the Add Gmail MX Records box, and the necessary MX records will automatically be added.
Add Gmail MX records on an existing domain
Already have a domain added and set up in Kinsta’s DNS? No problem. Click Add Gmail MX records.

Next, click Add 5 Records, and you’re all set!
TXT record
TXT records are used for a variety of things. Typically they are used for verification. For example, you can verify your domain name with Google Workspace using a TXT record.
- Hostname: Specify the hostname for your TXT record.
- TTL (Time to Live): We recommend using the default setting of 1 hour.
- Content: The body of the TXT record.
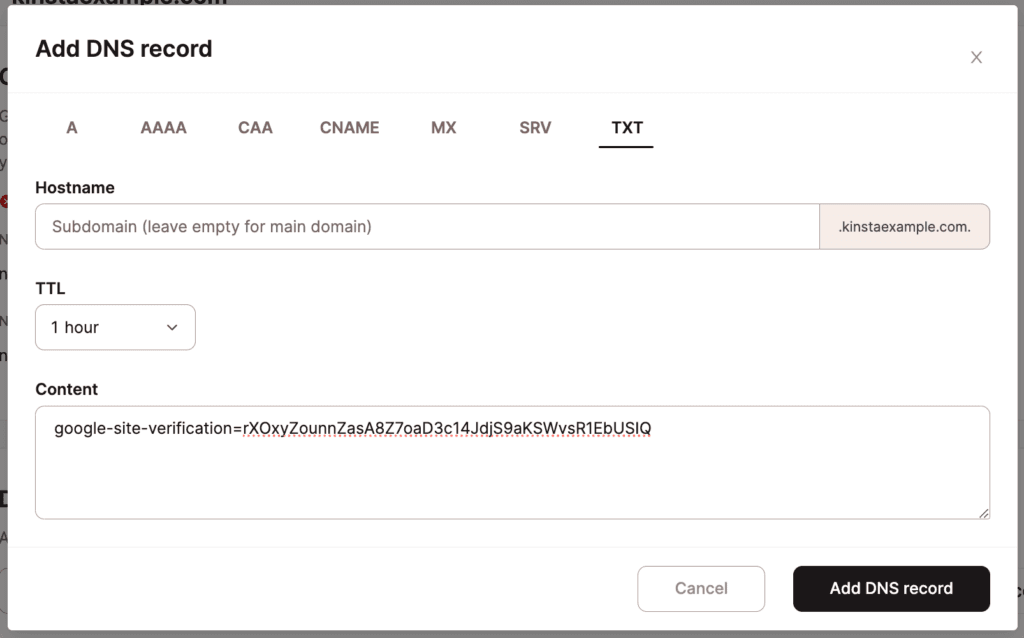
Let’s say we need to add the TXT record below to verify the domain kinstalife.com with Google Workspace.
google-site-verification=rXOxyZounnZasA8Z7oaD3c14JdjS9aKSWvsR1EbUSIQHere’s what that TXT record would look like in Kinsta’s DNS:
SPF record
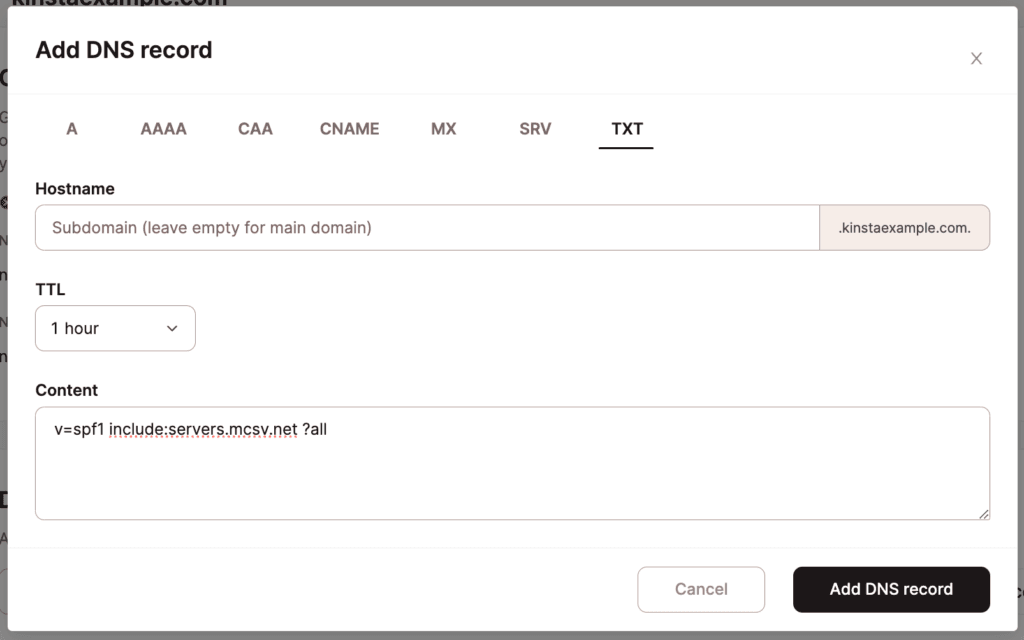
SPF records are used by internet service providers (ISPs) to check the sender’s IP address, as well as the IPs of the website. If they match up, then you’re good to go. Here’s an example of what an SPF record looks like:
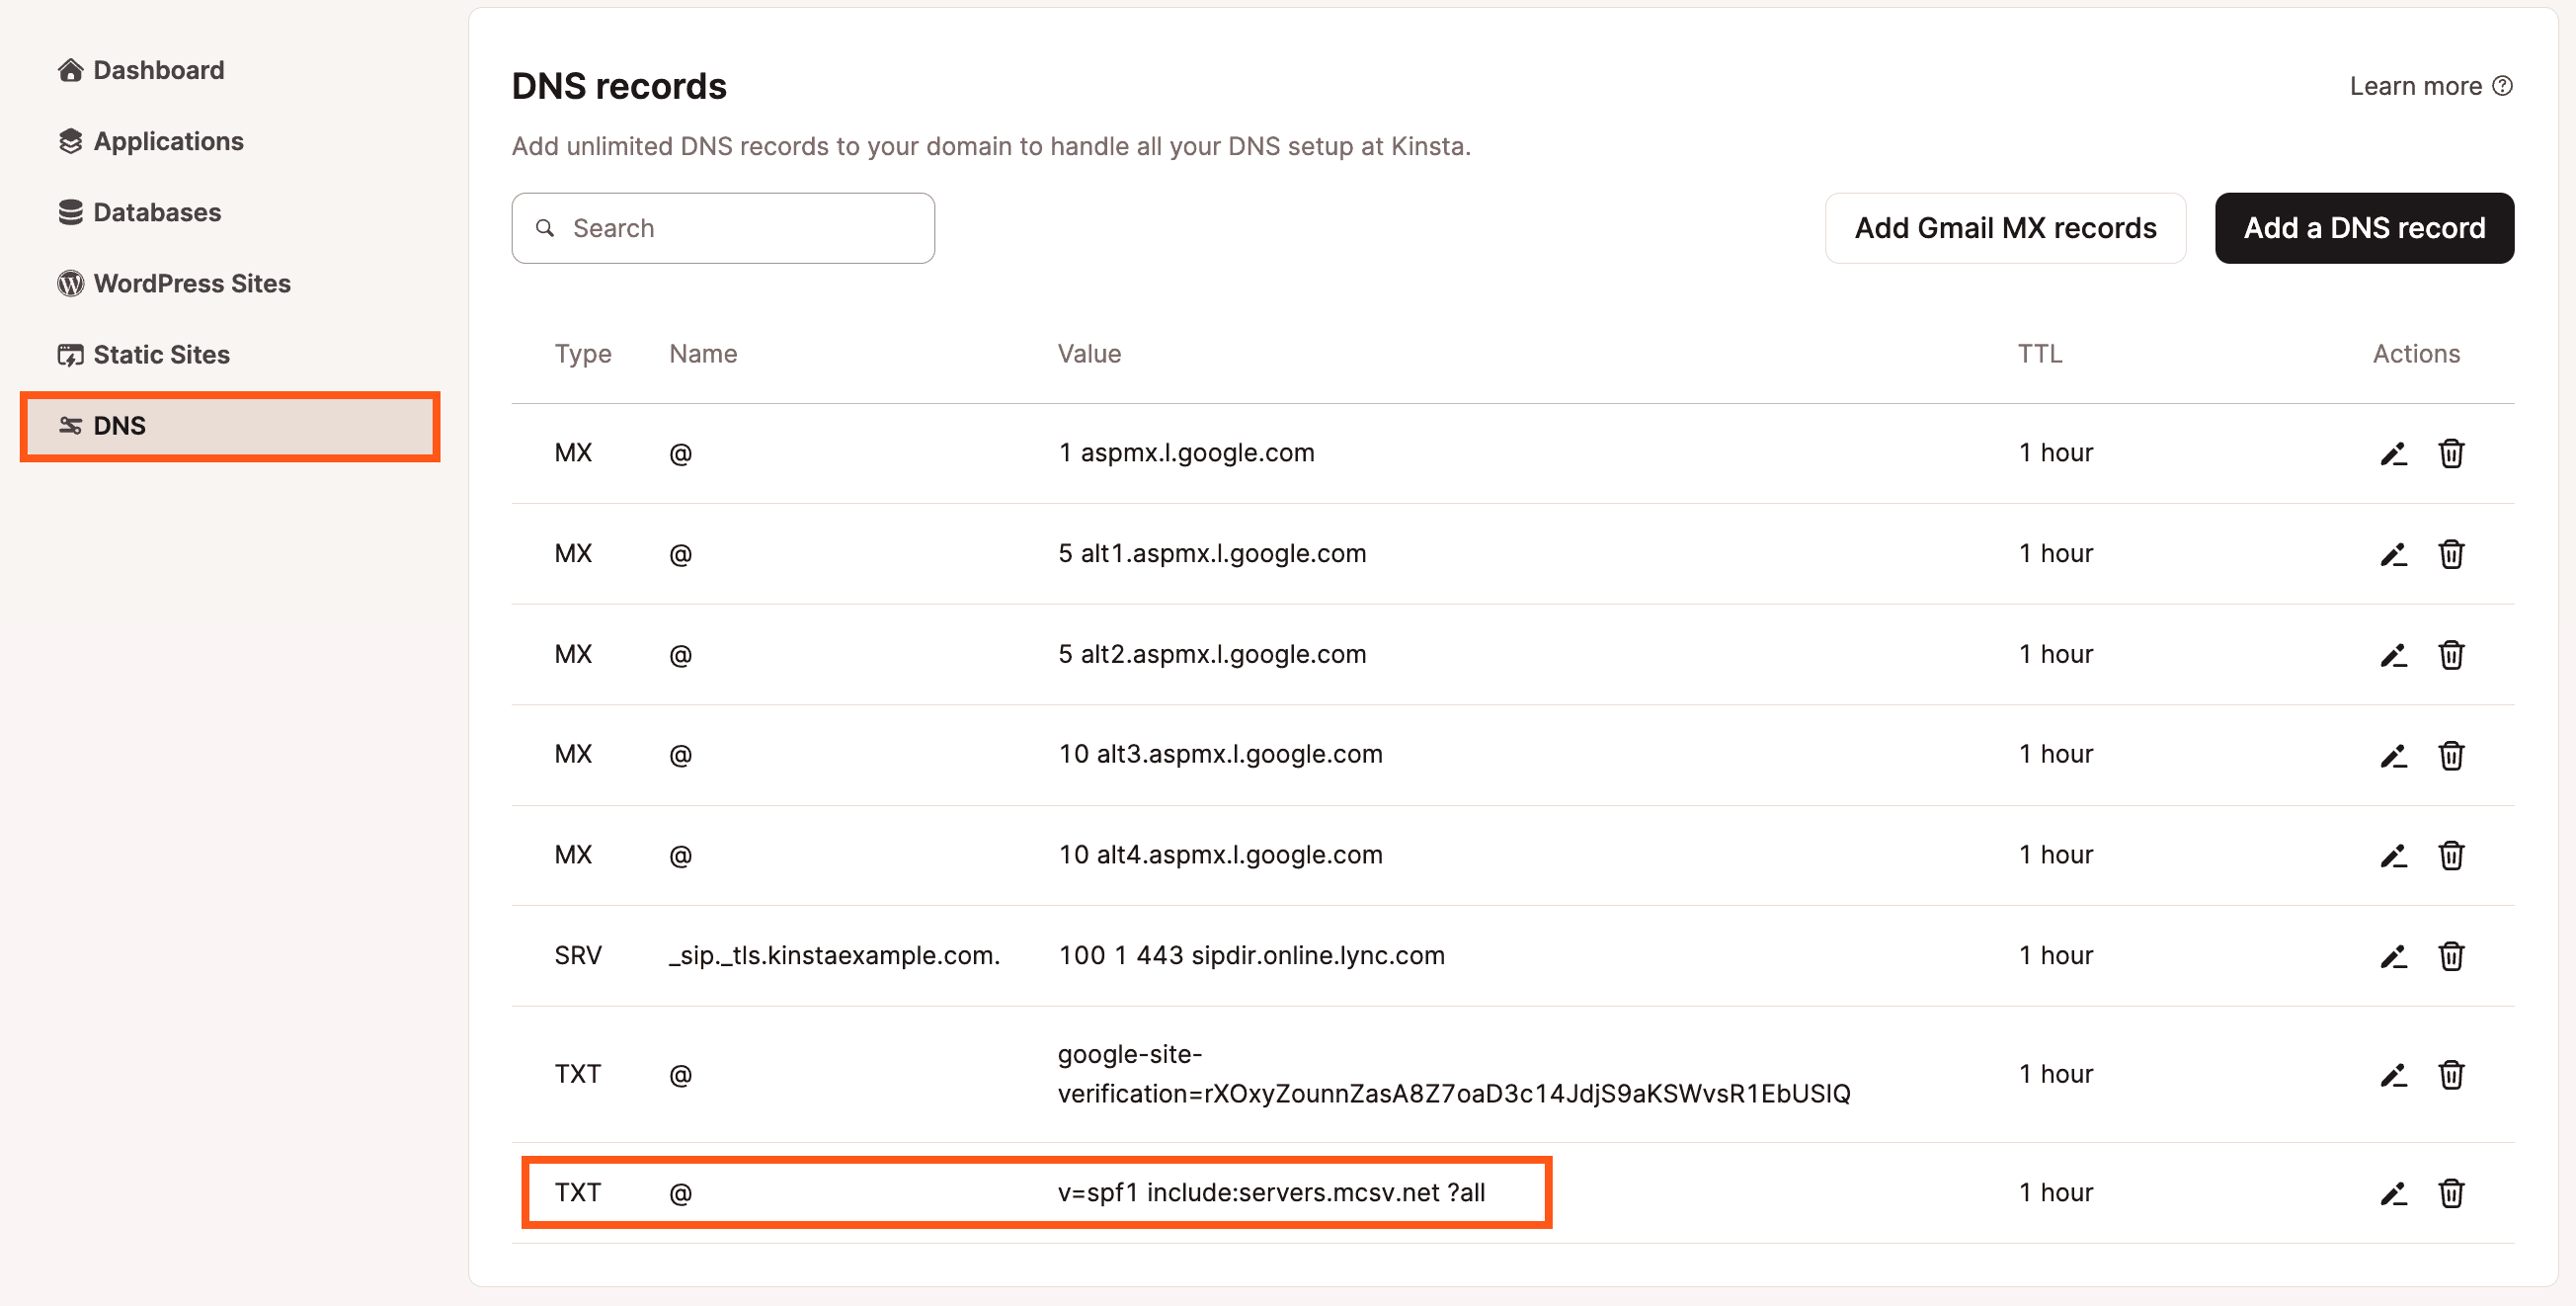
v=spf1 include:servers.mcsv.net ?allThird-party email providers and transaction email services might have you set up an SPF record for email authentication purposes. However, SPF records are now obsolete (RFC 7208) and can be entered as TXT records instead.
- Hostname: Specify the hostname for the SPF record.
- TTL (Time to Live): We recommend using the default setting of 1 hour.
- Content: The body of the SPF record (begins with v=spf1).
If you want more details on how to add an SPF record for MailChannels (the service used here at Kinsta to send transactional emails), see the email authentication steps below.
DKIM record
DKIM stands for DomainKeys Identified Mail. This is an extra layer of email authentication typically used by email marketing software and transactional email providers. If you’re using Kinsta’s Transactional Email service to send emails from your WordPress site, there’s no need to configure a DKIM DNS record as it already includes DKIM support. Thanks to Kinsta’s MailChannels integration, the DKIM DNS record is generated automatically on the server, removing the need to add it manually.
In Kinsta’s DNS, there is no separate option for DKIM, as these are typically entered as either a CNAME record or TXT record, depending on the service. In the example below, we are adding a DKIM record for Mailgun.
TXT records have a limit of 255 characters. This limit is not on our end but rather imposed by the DNS protocol itself. If you need to add a DKIM record that is longer than 255 characters, you’ll need to split the value/content of the record into multiple strings. This is done by encapsulating each string in double quotes.
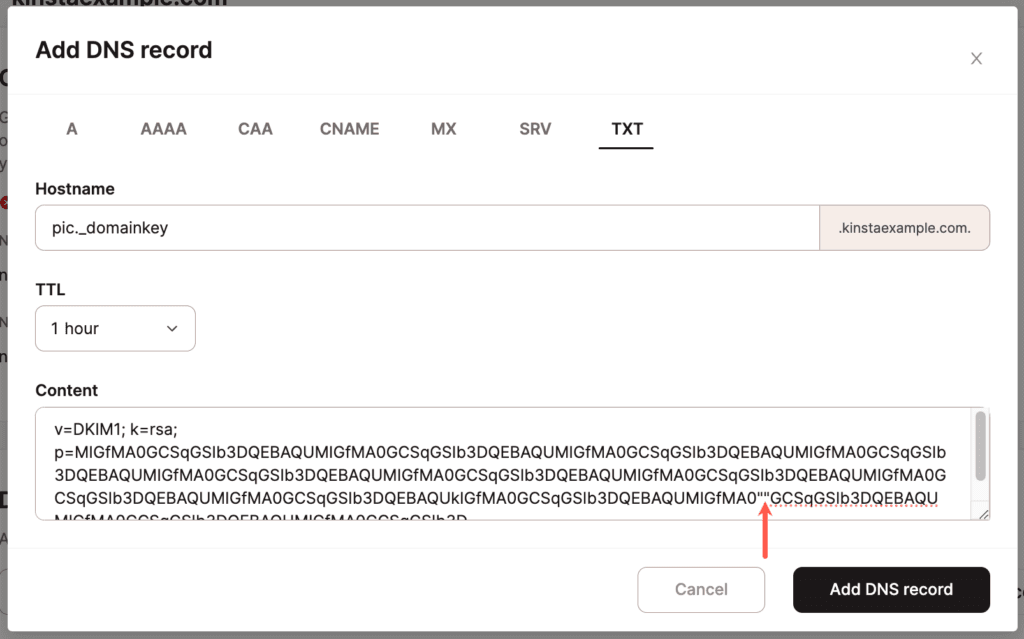
Depending on the method or tool used (the dig command or a lookup tool), checking DNS may show the record as a single entry:
"v=DKIM1; k=rsa; p=MIGfMA0GCSqGSIb3DQEBAQUMIGfMA0GCSqGSIb3DQEBAQUMIGfMA0GCSqGSIb3DQEBAQUMIGfMA0GCSqGSIb3DQEBAQUMIGfMA0GCSqGSIb3DQEBAQUMIGfMA0GCSqGSIb3DQEBAQUMIGfMA0GCSqGSIb3DQEBAQUMIGfMA0GCSqGSIb3DQEBAQUMIGfMA0GCSqGSIb3DQEBAQUkIGfMA0GCSqGSIb3DQEBAQUMIGfMA0GCSqGSIb3DQEBAQUMIGfMA0GCSqGSIb3DQEBAQUMIGfMA0GCSqGSIb3D"or it may show the record with the double quotes between the strings:
"v=DKIM1; k=rsa; p=MIGfMA0GCSqGSIb3DQEBAQUMIGfMA0GCSqGSIb3DQEBAQUMIGfMA0GCSqGSIb3DQEBAQUMIGfMA0GCSqGSIb3DQEBAQUMIGfMA0GCSqGSIb3DQEBAQUMIGfMA0GCSqGSIb3DQEBAQUMIGfMA0GCSqGSIb3DQEBAQUMIGfMA0GCSqGSIb3DQEBAQUMIGfMA0GCSqGSIb3DQEBAQUkIGfMA0GCSqGSIb3DQEBAQUMIGfMA0" "GCSqGSIb3DQEBAQUMIGfMA0GCSqGSIb3DQEBAQUMIGfMA0GCSqGSIb3D"SRV record
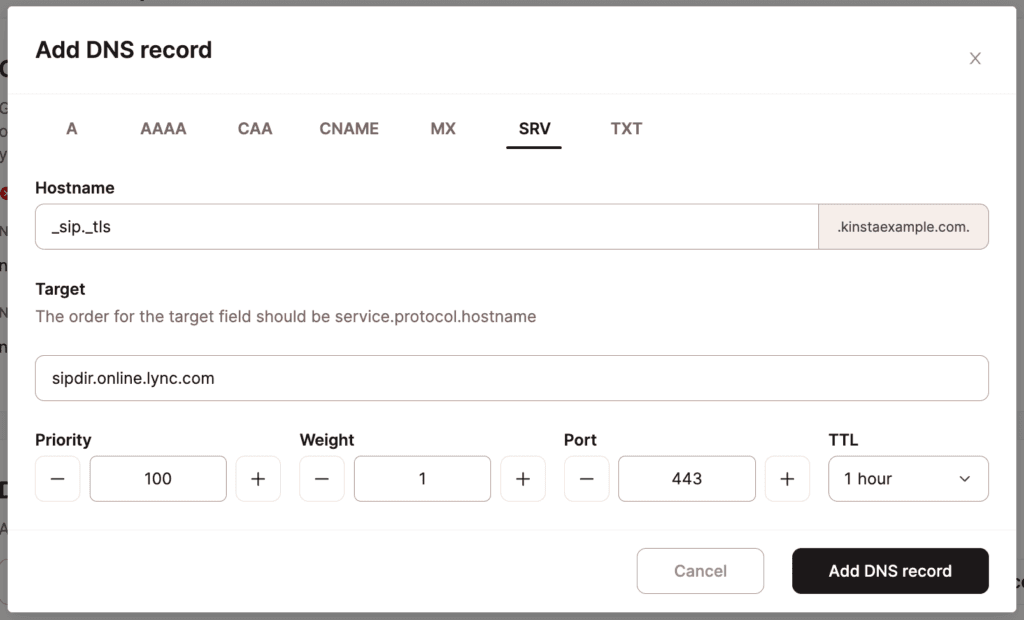
An SRV record (service record) is used when a service needs additional information, such as a port number. These are most commonly used with SIP configurations, VOIP, and IM.
- Hostname: Prepend the hostname for the SRV record in this format:
_service._protocol
(the hostname is automatically entered, so you only need to add the service and protocol) - Target: The target server for the SRV record.
- Priority: The priority level of the target host.
- Weight: The weight relative to other SRV records with the same priority number.
- Port: The network port for the service.
- TTL (Time to Live): We recommend using the default setting of 1 hour.
In this example, we’ll add the SRV record below for Office 365 Skype for Business to Kinsta’s DNS.
- Service: _sip
- Protocol: _tls
- Target: sipdir.online.lync.com
- Priority: 100
- Weight: 1
- Port: 443
- TTL: 1 hour
Email authentication
To help prevent email spoofing or your legitimate email messages being sent to a Spam/Junk folder, setting up email authentication for your domain is recommended. The most common forms of email authentication DNS records are SPF and DKIM, and can be added to DNS in MyKinsta.
At Kinsta, we utilize MailChannels for transactional email delivery. This means outgoing emails from your WordPress site are sent through MailChannels’ service. There are two different from addresses when you send emails:
- Header from: This is used for identifying the sender to the recipient. It is visible to the recipient and appears in the “From” field of the email message. The header from address is derived from WordPress or a WordPress plugin; by default, it is the site administration email within WordPress Admin > Settings > General > Email Address.
- Envelope from: This is used for routing and handling delivery errors. With Kinsta’s transactional email provided by MailChannels, this is set to [email protected] and cannot be changed. It is part of the email’s metadata, and typically, it is not visible to the email recipient; however, some mail software may show both the header from and envelope from addresses.
If you’re using an SPF TXT record to authorize hostnames for email services on your domain, you’ll need to include MailChannels to ensure reliable email deliverability. To do this, merge MailChannels into your existing SPF record. If no SPF record exists, simply add it to your DNS records.
How to check if you are using an SPF TXT record
If you’re using Kinsta’s DNS, log in to MyKinsta, click on DNS in the left sidebar menu, and select your site’s domain name. In the TYPE column, look for a TXT record. If the value of the TXT record starts with v=spf1, it is an SPF TXT record. If you’re not using Kinsta’s DNS, refer to where you manage your domain’s DNS records.
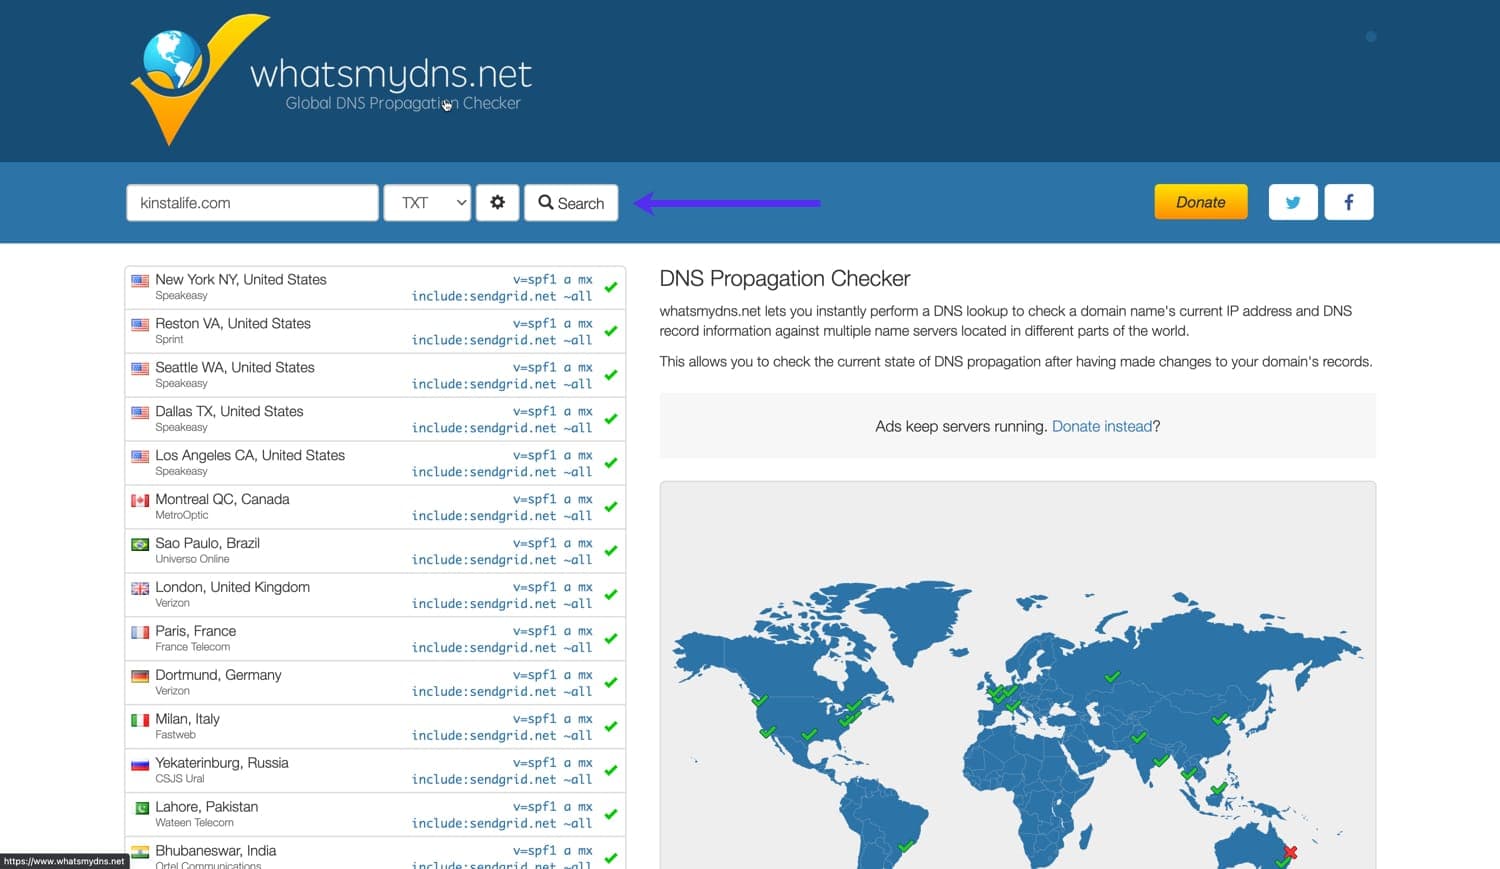
Alternatively, you can use a service like whatsmydns.net to check if your domain has SPF TXT records. To do this, input your domain name, select the TXT option, and click Search to get a list of TXT records for your domain.
You can only have one SPF record for a domain. If an SPF record already exists, you’ll need to merge it to include MailChannels. If no SPF record exists, you’ll need to create one specifically for MailChannels.
How to add an SPF record for MailChannels
To configure an SPF record for MailChannels, add the TXT record below at your DNS provider:
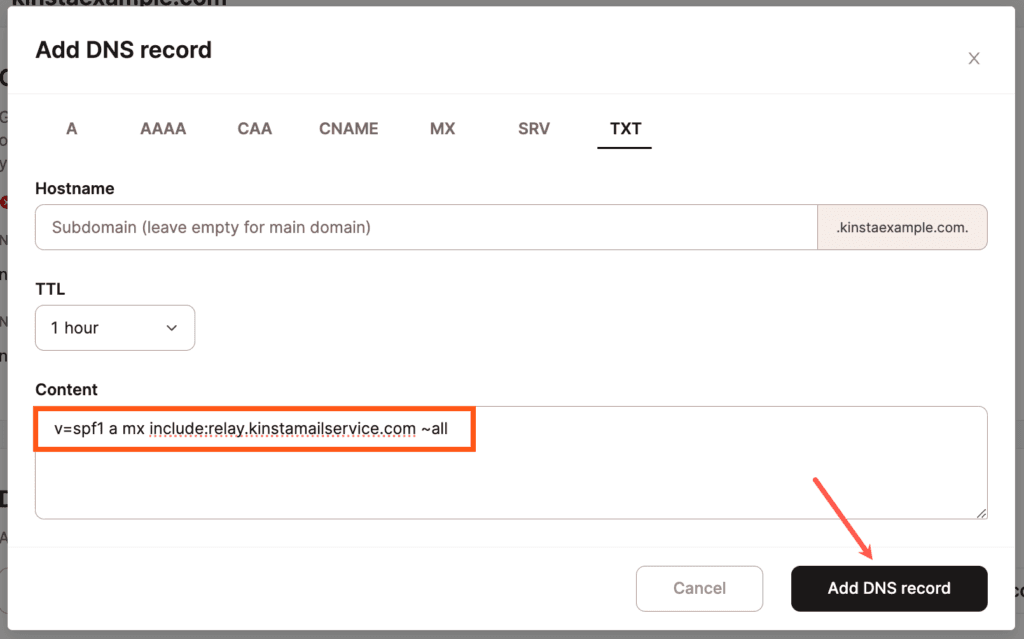
v=spf1 a mx include:relay.kinstamailservice.com ~allIf you’re using Kinsta’s DNS, go to your domain’s DNS settings and click Add a DNS Record.

Select the TXT record option and paste v=spf1 a mx include:relay.kinstamailservice.com ~all into the Content area. If you’re using a subdomain, be sure to add your subdomain in the Hostname field. Click Add DNS Record to save the SPF record.
If you’re not using Kinsta’s DNS, you can update the SPF TXT record where you manage your domain’s DNS. If you’re unsure about how to edit DNS records there, we recommend contacting your DNS provider.
How to merge an SPF record
A domain can only have one SPF record, so if you have an existing record, you’ll need to merge the MailChannels record to use Kinsta’s transactional email. To merge an SPF DNS record, you combine the rules from multiple SPF configurations into a single valid SPF record, ensuring no mechanisms are repeated.
For example, if your existing SPF record is v=spf1 include:example.com ~all. Kinsta’s SPF record should be configured as v=spf1 a mx include:relay.kinstamailservice.com ~all. To merge these records, you need to add a mx include:relay.kinstamailservice.com. The merged SPF record is therefore v=spf1 include:example.com a mx include:relay.kinstamailservice.com ~all.
Your SPF record may already include a mx, for example, v=spf1 a mx include:example.com ~all in this case, all you need to add is include:relay.kinstamailservice.com. The merged SPF record is therefore v=spf1 a mx include:example.com include:relay.kinstamailservice.com ~all.
How to add a DMARC record for MailChannels
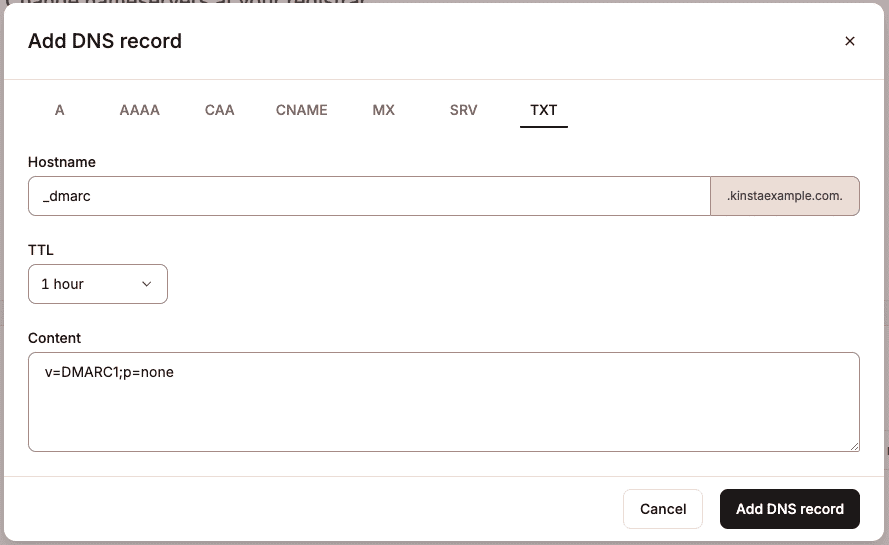
To configure a DMARC record for MailChannels, add the TXT record below at your DNS provider:
v=DMARC1;p=noneIf you’re using Kinsta’s DNS, go to your domain’s DNS settings and click Add a DNS Record.

Select the TXT record option, in the Hostname, enter _dmarc, and paste v=DMARC1;p=none into the Content area. If you’re using a subdomain, be sure to add your subdomain in the Hostname field. Click Add DNS Record to save the DMARC record.
If you’re not using Kinsta’s DNS, you can update the DMARC TXT record where you manage your domain’s DNS. If you’re unsure about how to edit DNS records there, we recommend contacting your DNS provider.