Cloudflare
While our free Cloudflare integration will work great for most customers, if you want a little more fine-grained control or need to implement something at Cloudflare not offered by our integration, you can switch your site to use your own Cloudflare account along with Kinsta’s Cloudflare integration.
Use your Cloudflare account with Kinsta’s Cloudflare integration
Notes:
- This tutorial assumes that you’ve already added, verified, and pointed your site’s domain to Kinsta.
- These instructions are for switching your existing domain to use your own Cloudflare account in addition to Kinsta’s Cloudflare integration (a “Cloudflare domain“).
- In order to use your own Cloudflare account, you’ll need to point your domain’s name servers to Cloudflare. This means if you’re currently using Kinsta’s DNS, you’ll no longer be able to use that, and your domain’s DNS will be managed at Cloudflare.
Install and configure Cloudflare
If you don’t already have a Cloudflare account, visit their signup page to get started.
1. Add your domain
When you log in to your Cloudflare account, enter the domain you want to transfer to Cloudflare select Quick scan for DNS records, and click Continue.
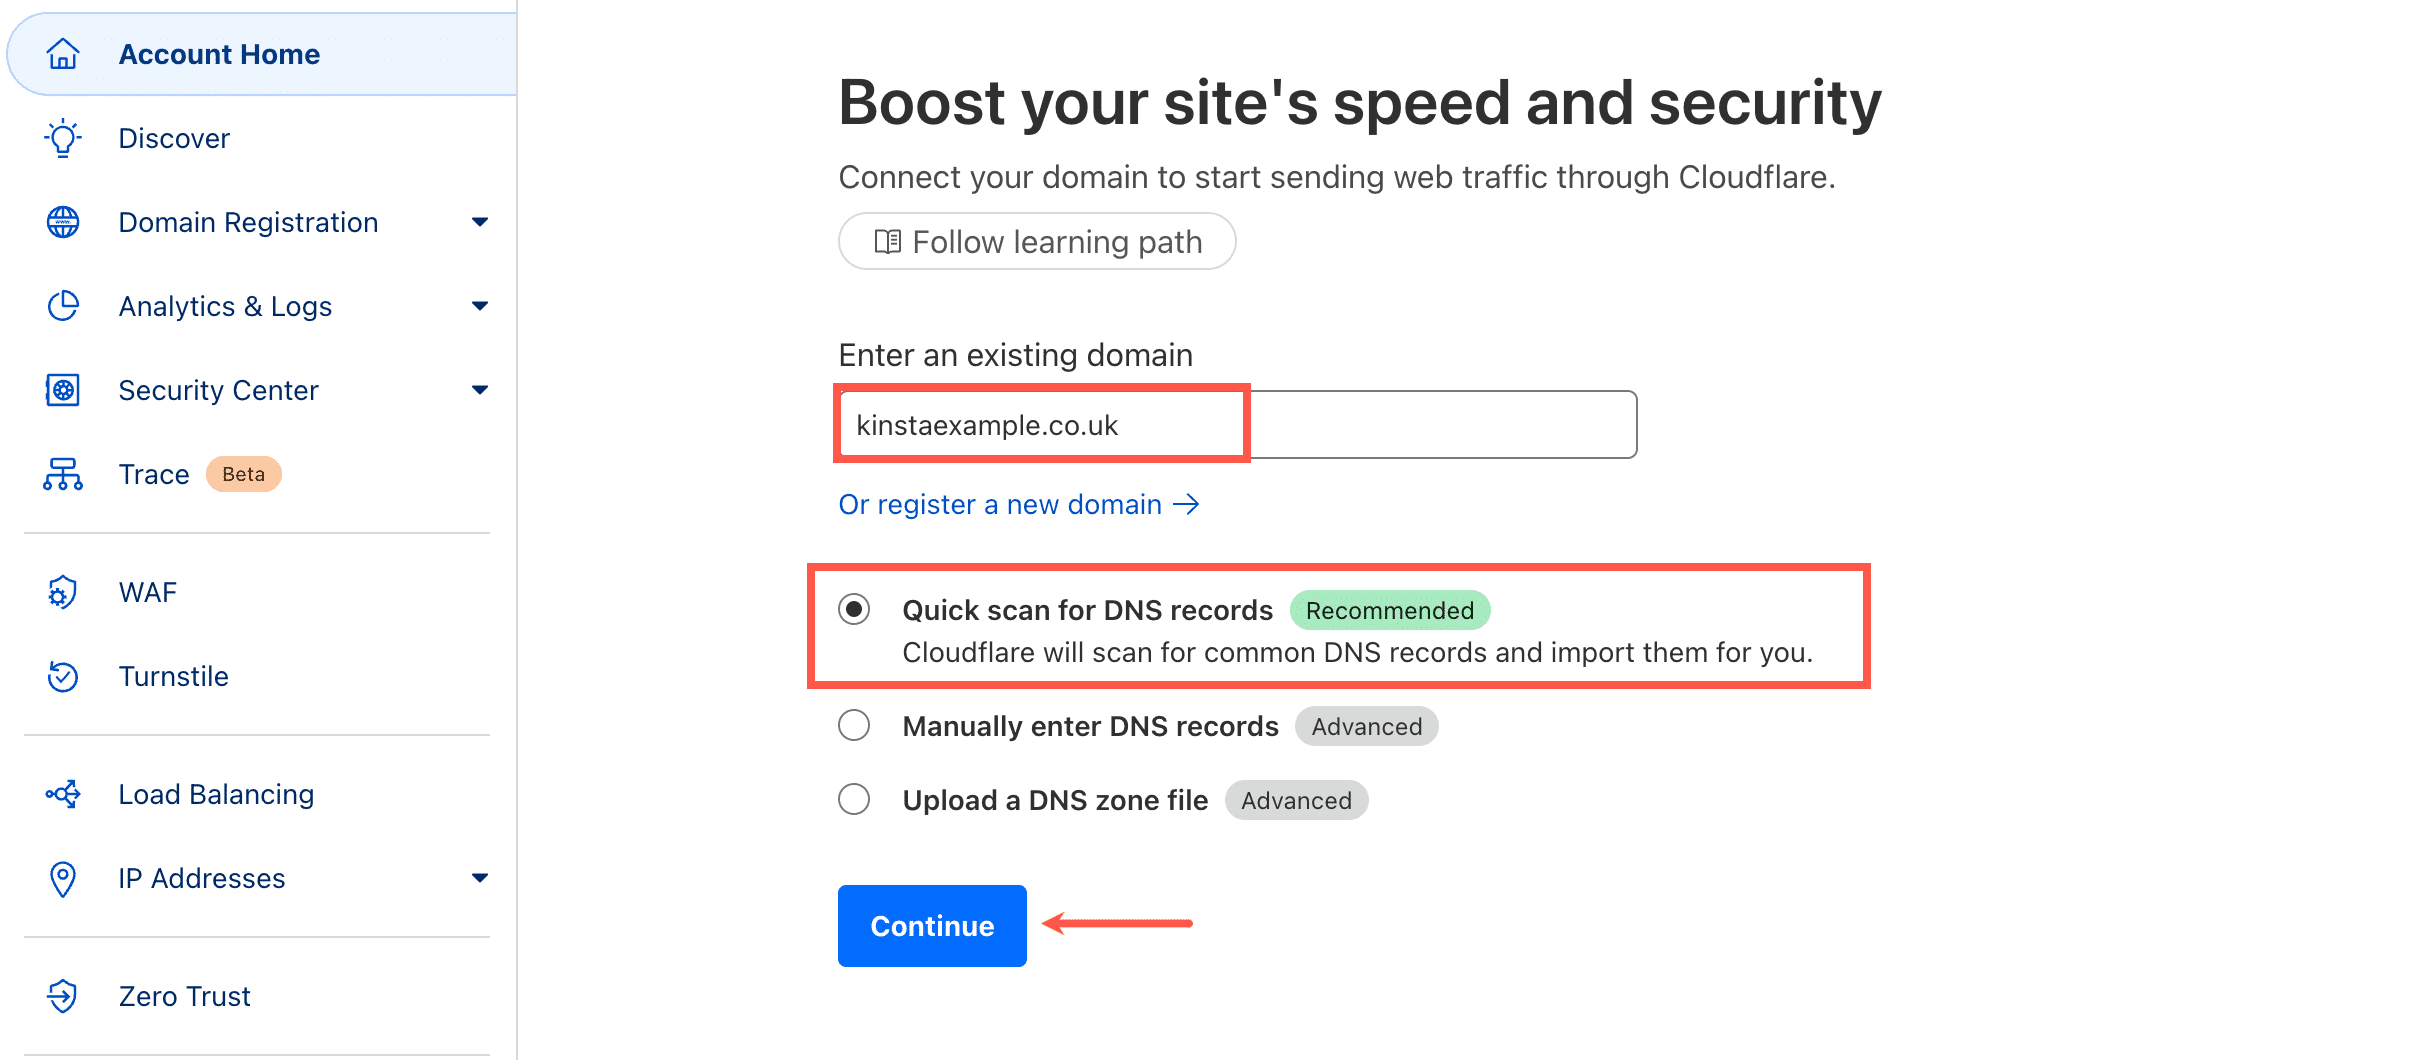
You must then select the required Cloudflare plan for your domain (no minimum plan is required for this to work with Kinsta).
2. Check your DNS records
Cloudflare will attempt to pull in DNS records for your domain. Double-check these to make sure all of your domain’s DNS records were correctly copied over.
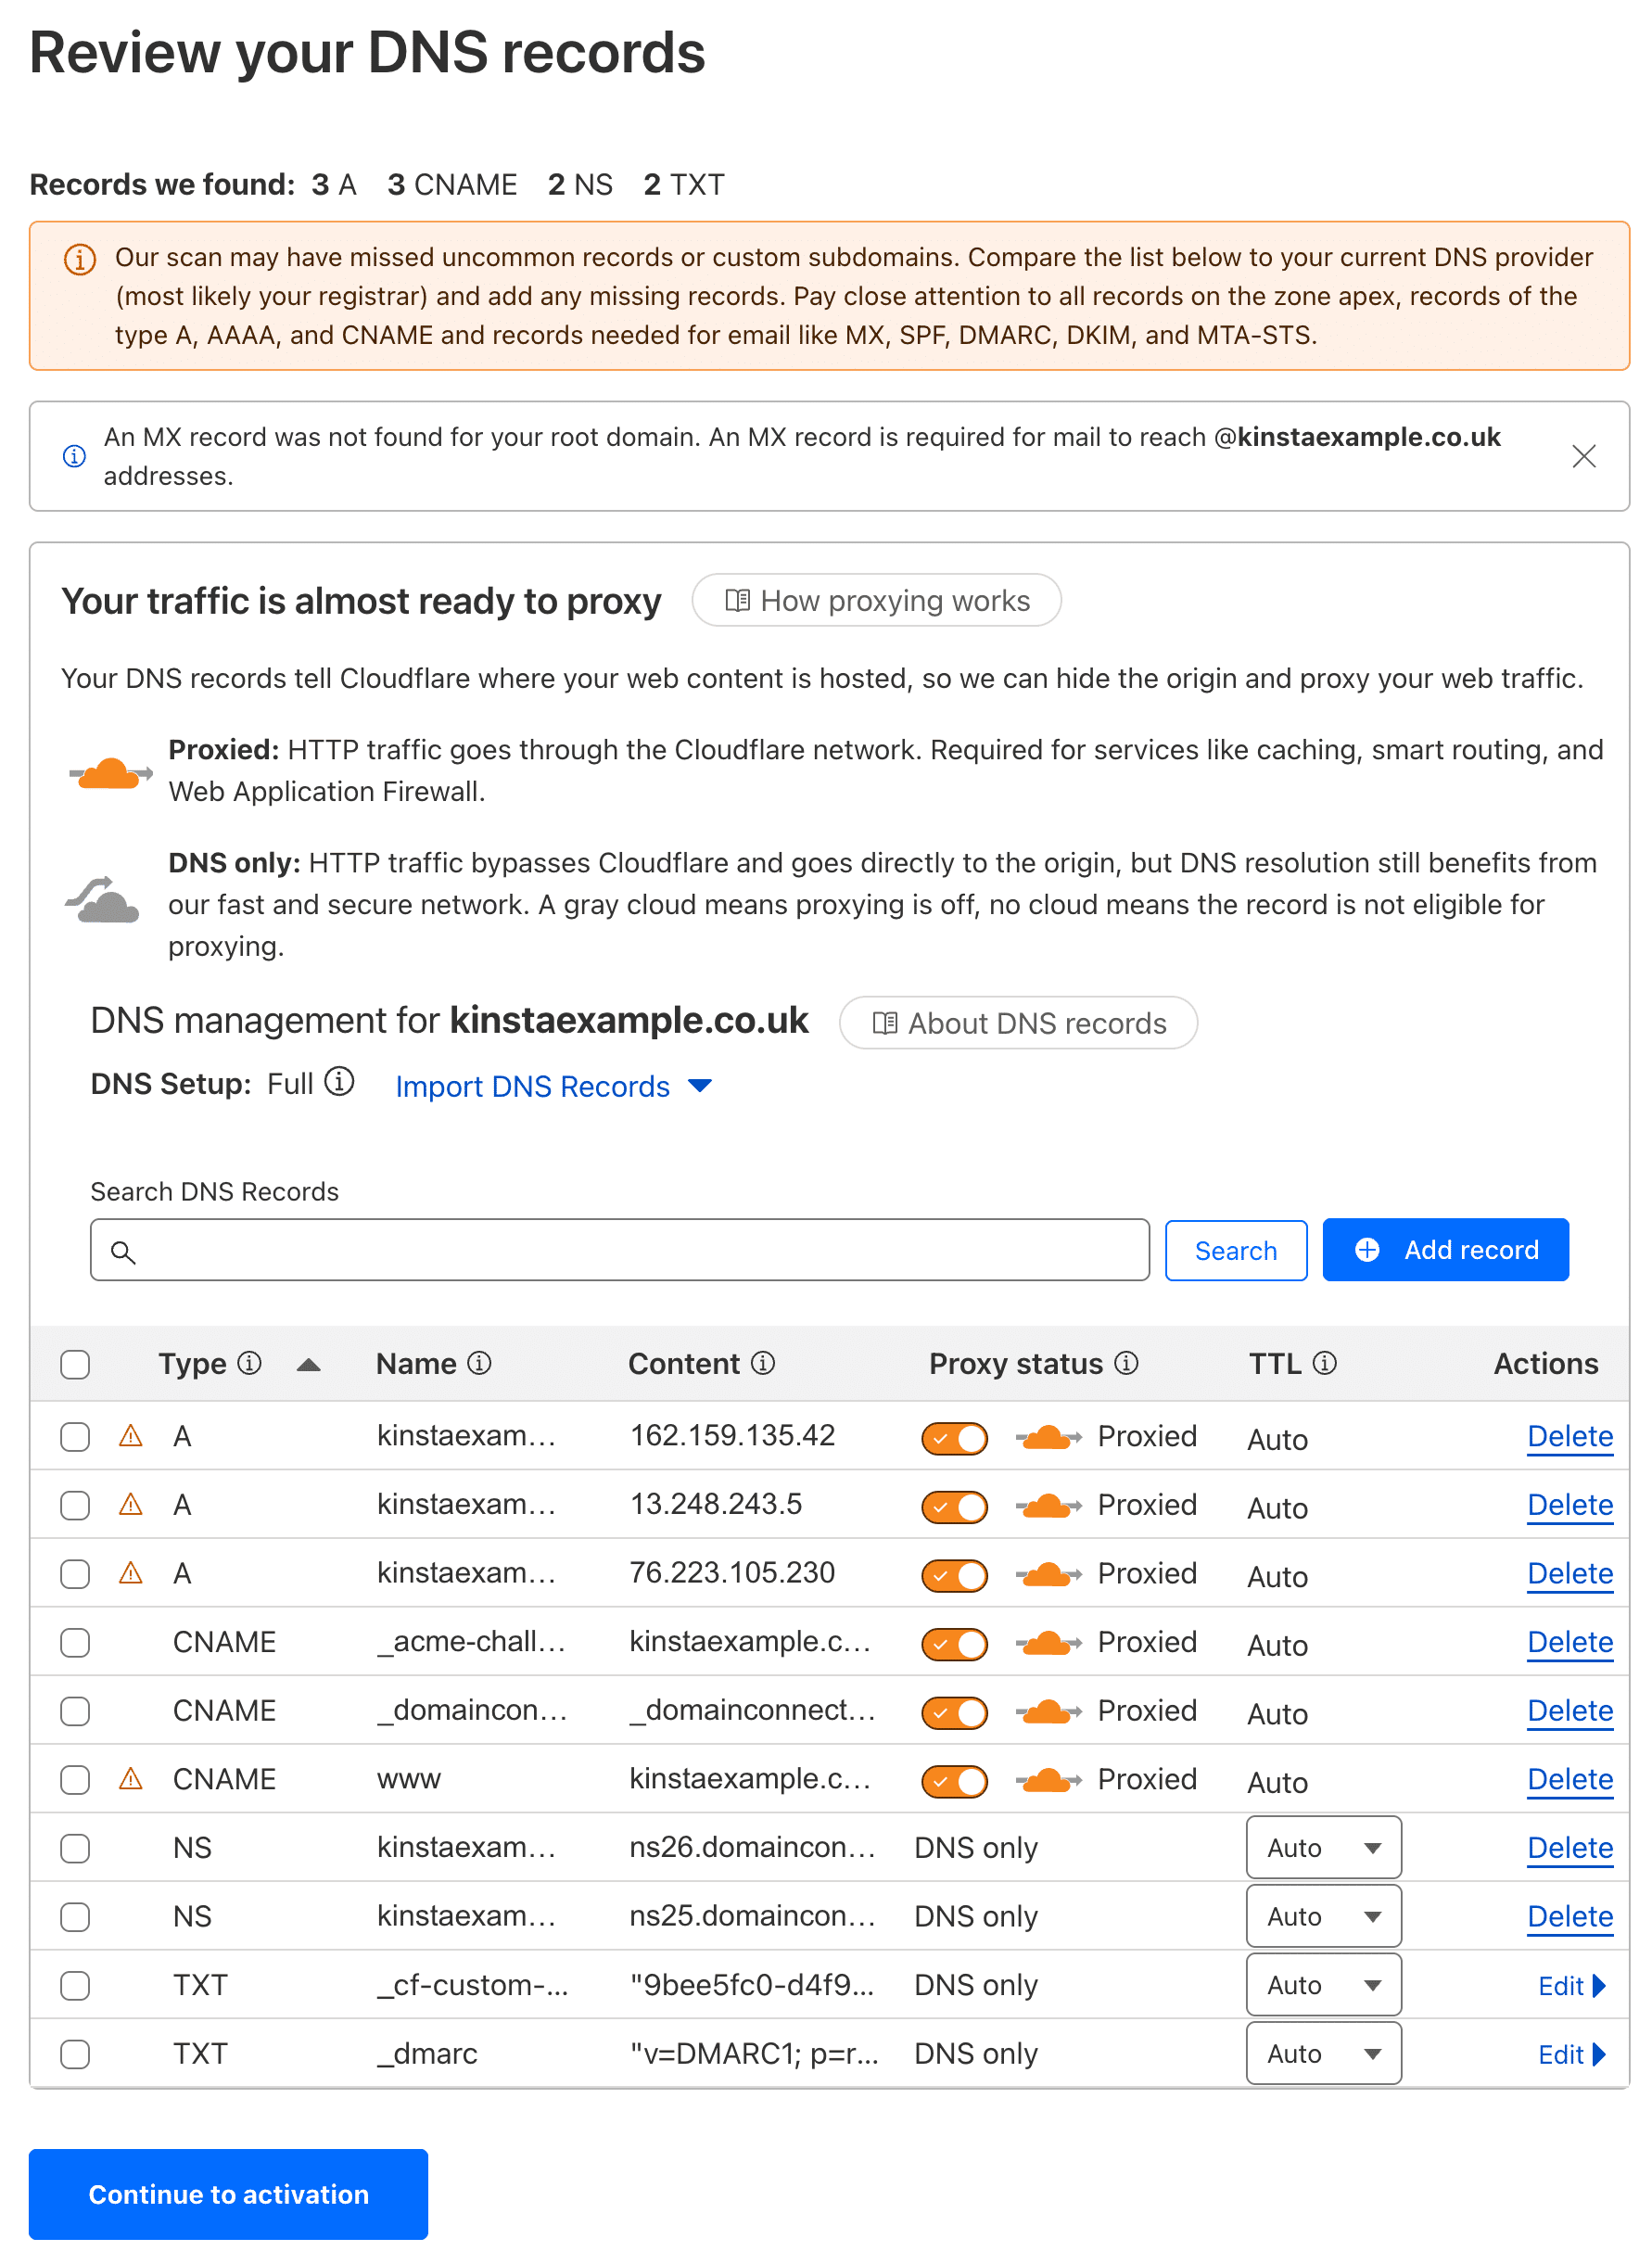
3. Add CNAME records
- Remove all existing A records in Cloudflare DNS
- Add a CNAME record for the root/apex domain, pointing to [sitename].hosting.kinsta.cloud. The [sitename] must be the Database name from the Database access section of your site’s Info page.

Add a new CNAME record to your domain in Cloudflare. - If you already have a CNAME for www, point that to [sitename].hosting.kinsta.cloud. If you do not have a CNAME for www, create one pointing to [sitename].hosting.kinsta.cloud.
- Be sure the orange cloud (proxy) is enabled for both CNAME records, and click Continue to activation.
4. Update your domain’s name servers
At your domain registrar, update your domain’s name servers to point to the ones provided in your Cloudflare account.
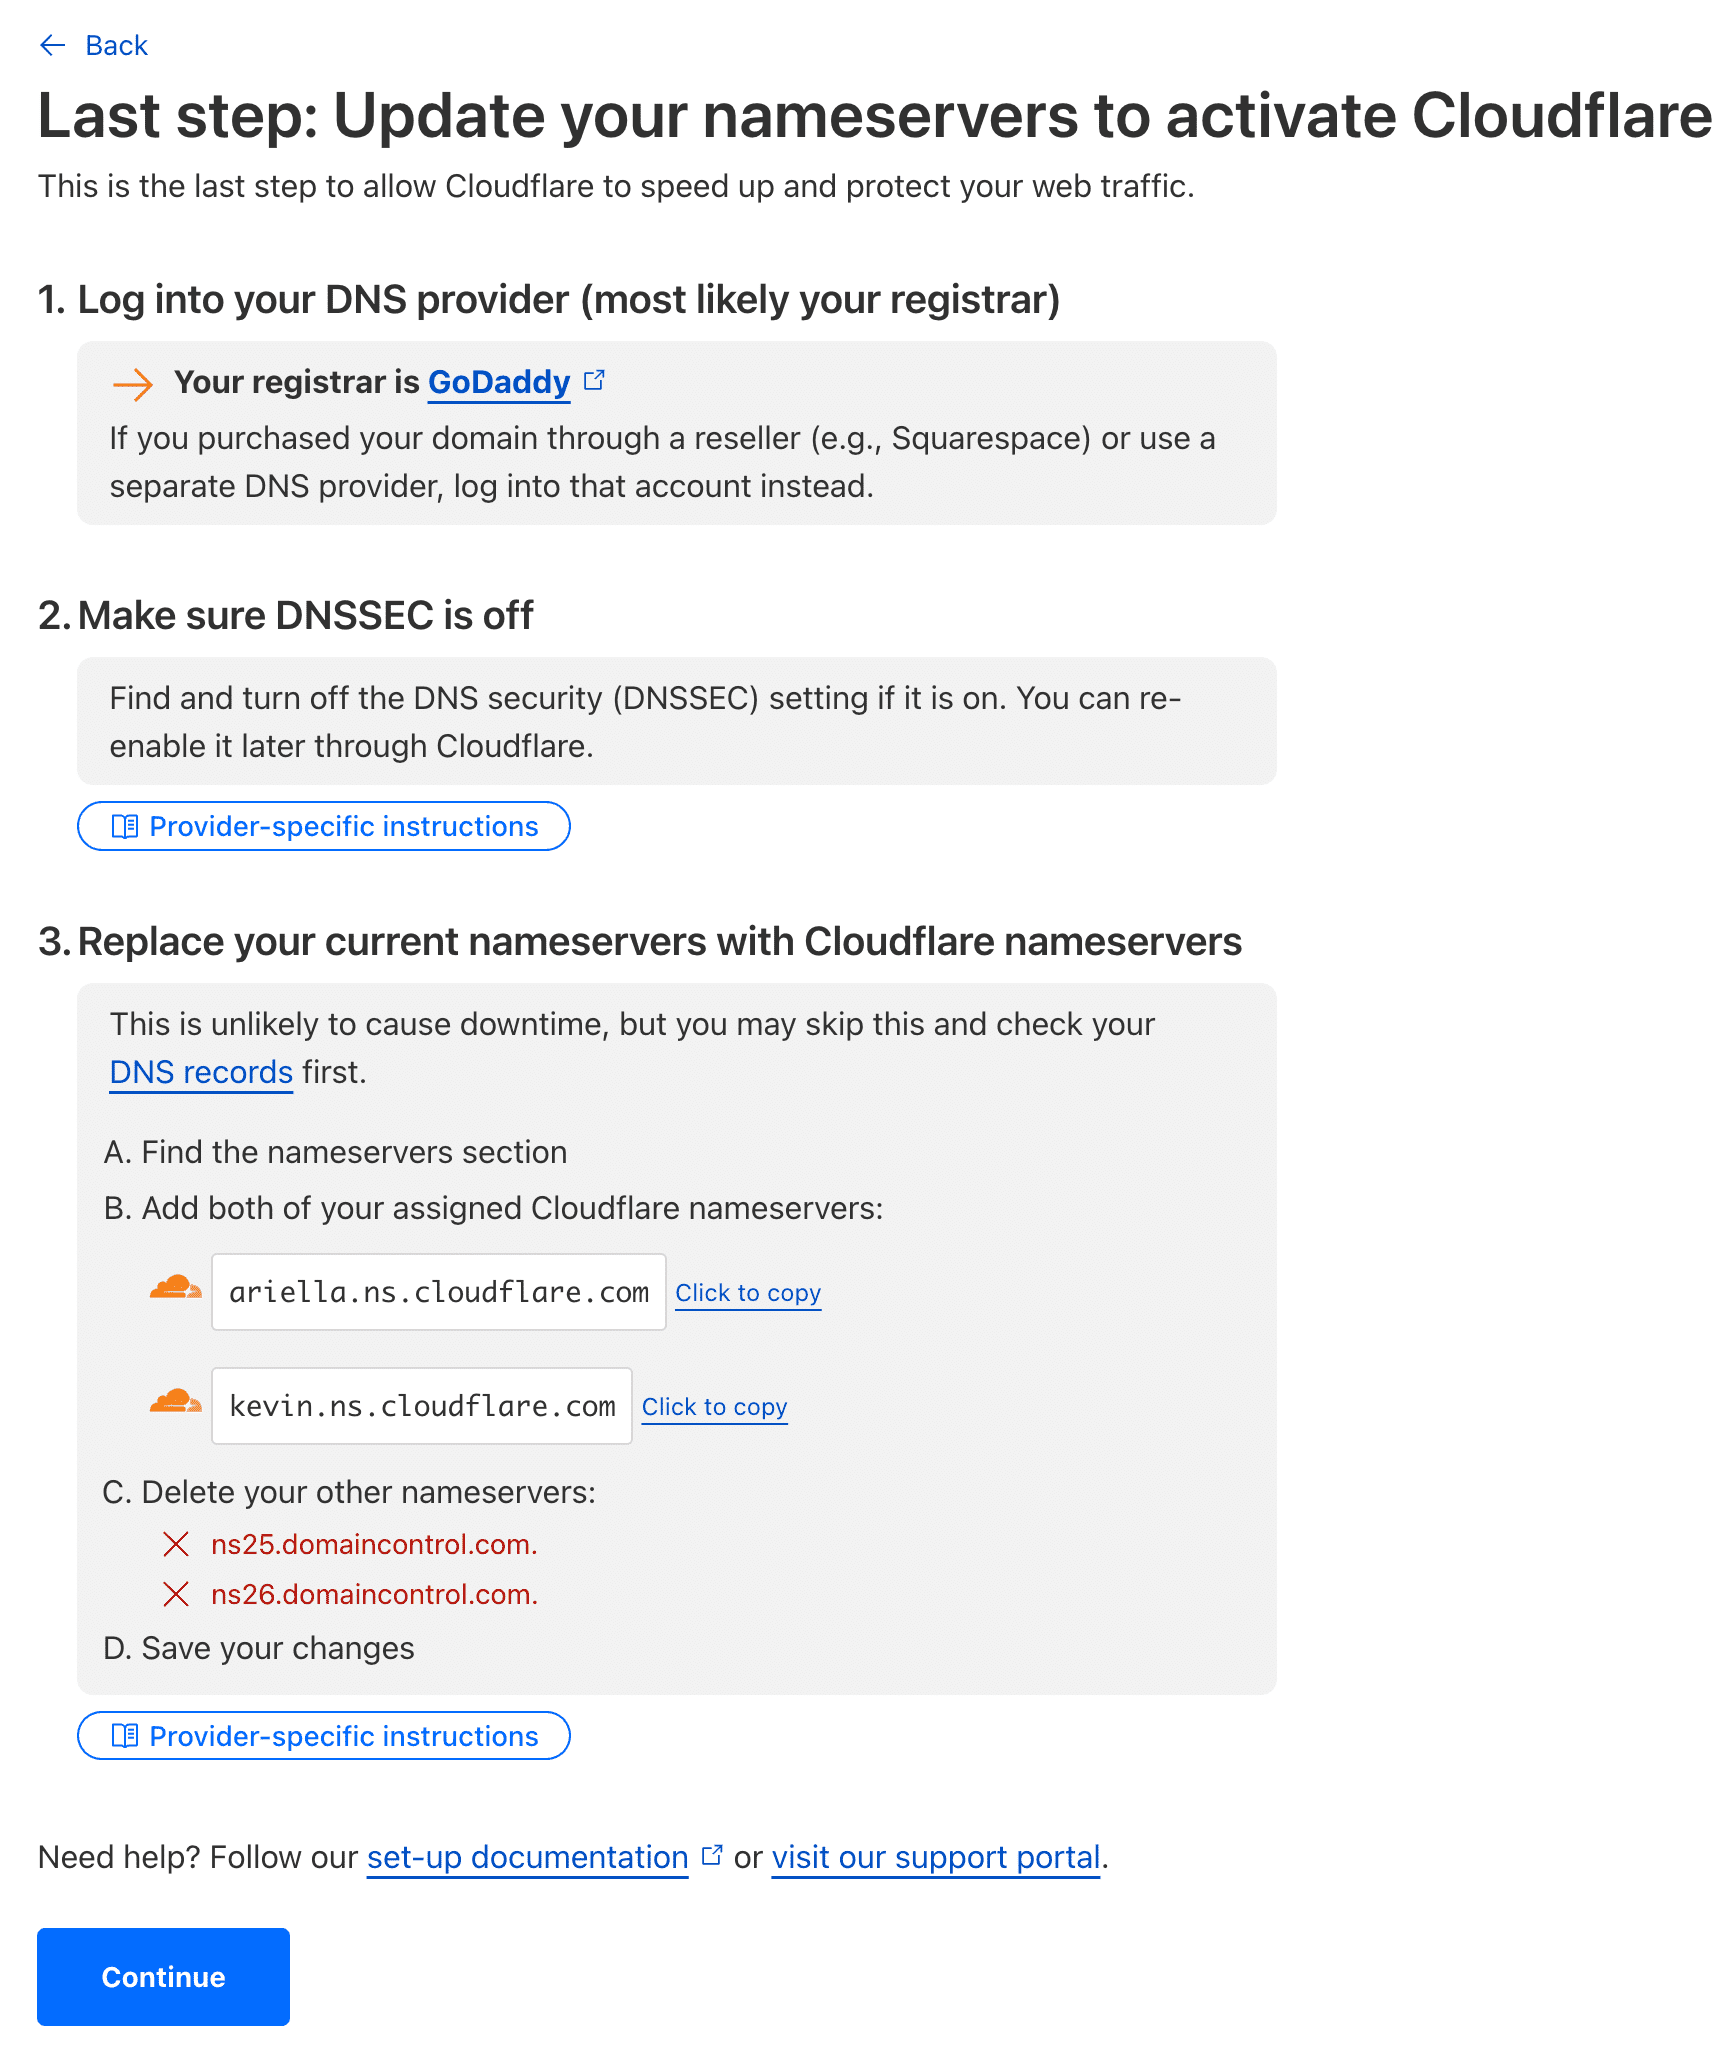
During the propagation period, your site should remain up without any downtime. The domain’s status in MyKinsta may change to “We’re checking to see if your domain’s DNS records point to Kinsta.” This is normal and should resolve itself once propagation is complete.
Cloudflare WordPress plugin
The Cloudflare plugin isn’t required but is recommended. Features include:
- Fix for WordPress comments appearing from the same IP address
- Automatic cache purging
- Header rewrite to prevent a redirect loop when Cloudflare’s Universal SSL is enabled
- Ability to change settings on Cloudflare account from within the plugin itself (cache purge, security level, image optimization, etc.)
- View analytics such as total visitors, bandwidth saved, and threats blocked
- Support for HTTP2/Server Push
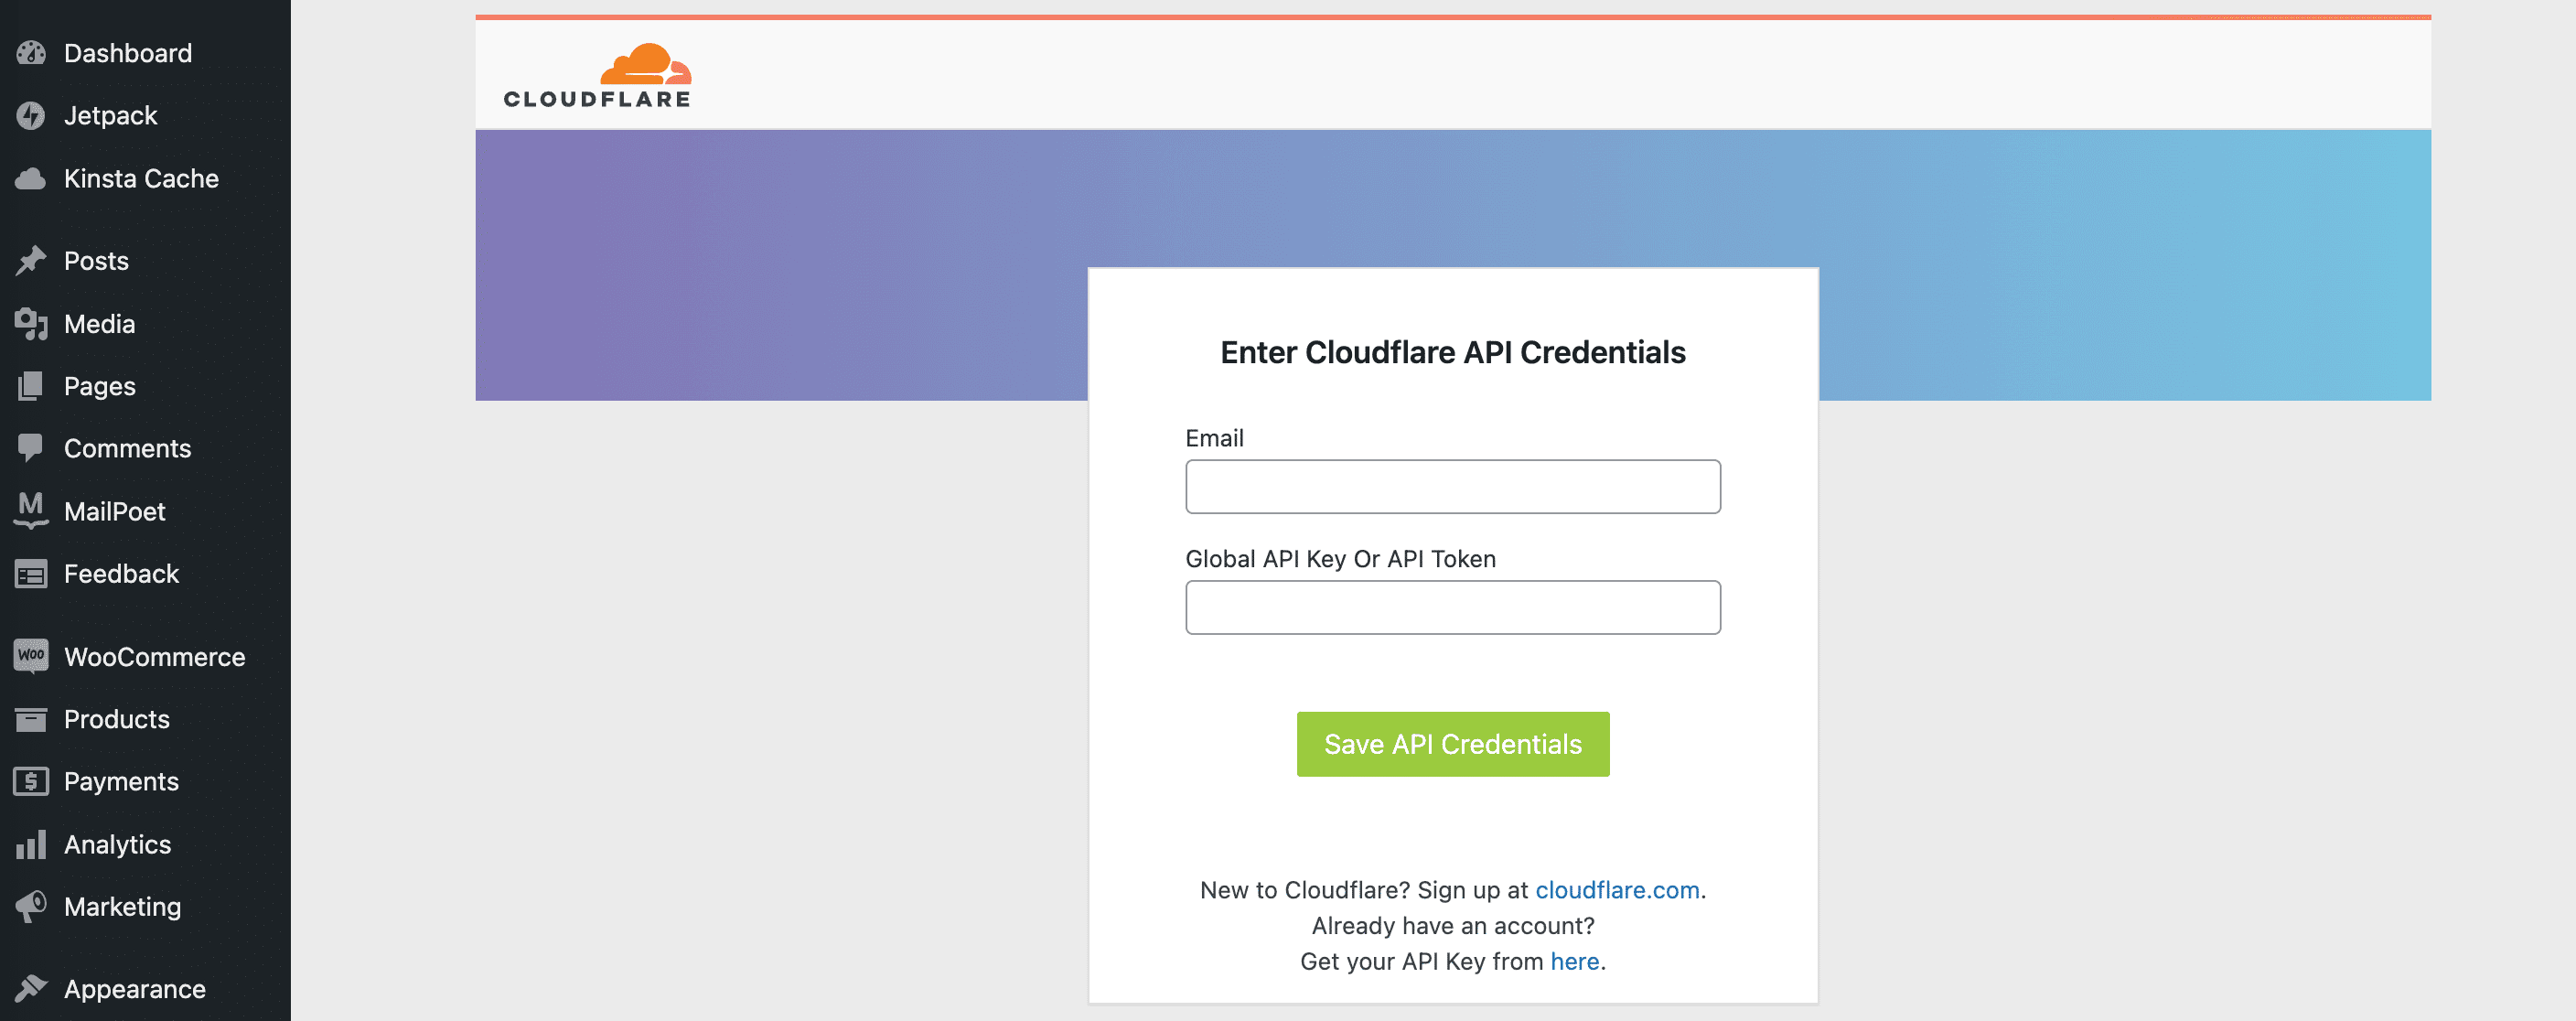
After installing the plugin, you’ll need to enter the email address you use with your Cloudflare account and your API key. You can view your API key on the API Tokens page in your Cloudflare profile. Copy the Global API Key, add it to the plugin settings, and click on Save API Credentials.
Troubleshooting common Cloudflare issues
When adding an extra layer of complexity like a CDN and/or proxy, there may be times when something doesn’t work as expected. Below are some of the most common issues that may arise when using your own Cloudflare account and solutions for those issues.
Changes aren’t showing up on your site
Using your own Cloudflare account means your site will have an additional layer of caching that may need to be cleared. If you’re having trouble seeing changes on your site or a plugin isn’t behaving as expected after installing or reinstalling, be sure you clear cache at all layers, including:
- Plugins (if applicable)
- Themes (if applicable)
- Site/server cache at Kinsta (from either MyKinsta or the Kinsta MU plugin)
- Cache at Cloudflare either in the Cloudflare dashboard or the Cloudflare plugin.
- Browser cache
SSL error
If you see either of the following errors, this is usually caused by having Flexible SSL enabled in Cloudflare settings:
- “ERR_TOO_MANY_REDIRECTS” in Chrome or
- “The page isn’t redirecting properly” (Firefox).
To resolve this issue, make sure your domain’s SSL/TLS encryption mode (SSL/TLS > Overview) in Cloudflare is set to Full.
Advanced settings and compatibility
When you use your own Cloudflare account for your site here at Kinsta, there are a few things to be aware of when it comes to Cloudflare settings and compatibility with Kinsta’s Cloudflare integration. Below we explain some setting behaviors, including caching, Cloudflare apps, and other Cloudflare services and features.
While some setting types give your Cloudflare account first priority (and the ability to override our Kinsta Cloudflare integration settings), this isn’t true for all features. We’ll do our best to go over each here.
If you have any questions about specific Cloudflare settings not answered below, open a new chat with our Support team, and we’ll be happy to check into those for you.
Comparison and compatibility of Cloudflare settings with Kinsta’s Cloudflare integration
| Setting or feature | Your Cloudflare account | Kinsta Cloudflare integration |
|---|---|---|
| APO | This should work as expected.** | You can use APO if you do not use Edge Caching at Kinsta. These two caching methods are incompatible, so you’ll want to use one or the other, not both. |
| Apps | Works. | Apps aren’t used with our Cloudflare integration, but you can use and manage them in your Cloudflare account. |
| Argo Smart Routing | Not supported. | Not enabled. |
| Argo Tiered Cache or Smart Tiered Cache | Settings ignored. | Enabled with Kinsta’s Cloudflare integration and cannot be turned off or overwritten by settings in your Cloudflare account. This does not work with IP Geolocation. |
| Argo Tunnel | Not supported. | Not supported. |
| Bot Management | This should work as expected. | Not enabled, but can be enabled and managed in your Cloudflare account. Note: A configuration that is too strict may block legitimate traffic. |
| Brotli | Settings ignored. | Enabled with Kinsta’s Cloudflare integration and cannot be turned off or overwritten by settings in your Cloudflare account. Even if you disable this in your Cloudflare account, Kinsta’s Brotli setting will still be turned on and will keep it enabled for the site. |
| Caching | Works. | Custom caching rules are implemented with our Cloudflare integration. See the Cache Details section below for priority details. |
| Cloudflare Access | This should work as expected.** | Not enabled. |
| Early Hints | Works. | Can be enabled in Cloudflare and in MyKinsta (Sites > sitename > Tools), but there’s no benefit to enabling it in both. |
| Firewall / WAF | Works. | Works. Rules can be in place in both your account and our Cloudflare integration. See the Firewall / WAF Details section below for priority details. |
| Page Rules | Works. | Works, but we don’t set Page Rules for individual sites. Page rules set in your Cloudflare account are applied first in priority. Note: Certain cache-related page Rules may behave unexpectedly. If you run into any issues with those, open a new chat with our Support team to help you troubleshoot any cache-related conflicts. |
| Pages | Not supported. | Cloudflare Pages isn’t compatible with Kinsta’s hosting services. |
| Polish + Webp | Works. | Enabled when Kinsta’s CDN is enabled and Image Optimization is enabled in CDN settings. Can be enabled in Cloudflare and Kinsta’s CDN, but there’s no benefit to enabling it in both. Settings from your Cloudflare account are not applied. |
| Rocket Loader | Works. | Not enabled, but will work if you turn it on in your Cloudflare account (your account’s settings have priority). |
| Railgun | Not supported. | Not supported. |
| SSL | Works. | Free wildcard SSL is installed by default with our Cloudflare integration. You can also upload a custom SSL to Cloudflare (through MyKinsta) if you want. |
| Signed Exchanges (SXGs) | This should work as expected. | Not enabled, but can be enabled and managed in your Cloudflare account. Note: When combined with performance plugins that preload resources, this may interfere with some analytics tools like Google’s mobile speed test. |
| Waiting Room | This should work as expected.** | Not enabled, but can be enabled in your Cloudflare account. |
| Websocket | Not supported. | Not supported. |
| Workers | Works.* | Compatible as long as the worker script doesn’t transform the site’s URL in such a way that it prevents it from loading the domain(s) added to the site in MyKinsta. Traffic goes through your Cloudflare account’s Worker as the first priority. |
* It works, but due to the nature of Workers, Kinsta cannot control how your Worker code manipulates the original request or response. This could lead to an error returned from your Worker code directly (not from the Kinsta container).
** Cloudflare has stated APO should work, but it hasn’t been tested by Kinsta.
Cache details
You can have your own cache rules in your Cloudflare account, and these should generally work fine with Kinsta’s cache rules. However, there is potential for conflicts, depending on the rules you set in your account.
Cache purging should work both in your Cloudflare account and through MyKinsta (Tools > Clear cache). Note: With an additional layer of cache, you may need to clear cache in multiple places when making changes to your site.
If unexpected cache behavior is seen, open a new chat with our Support team and provide your exact Cloudflare cache settings so we can review and advise.
Firewall / WAF details
The Firewall / WAF settings in your Cloudflare account are applied first, followed by settings in our Cloudflare integration. This means if we block an IP address, your account’s settings cannot override that, and the request will be blocked by our Cloudflare integration.
You can block an IP address in your Cloudflare account, and it will be blocked and will not make it to our Cloudflare integration. So, you can tighten your firewall / WAF settings beyond what we have configured with our Cloudflare integration, but you cannot loosen settings or allow IP addresses that Kinsta has blocked. To learn more about how Kinsta protects your site, refer to Kinsta Firewall.
JavaScript challenges
JavaScript challenges in Cloudflare challenge visitor traffic to determine if it should be allowed to access your site.
To enable JavaScript challenges within Cloudflare, select your domain, open Security > Settings > Bot traffic, and toggle Bot Fight Mode to on.
