Bunny
Bunny provides a range of services to enhance your website’s performance and security, including a global CDN, DNS management, caching, storage zones, and video delivery solutions.
Once you’ve launched your site at Kinsta, if you would like to use Bunny’s CDN instead of Kinsta’s CDN, this guide shows you how.
If you haven’t already signed up for Bunny, head on over to the Bunny signup page to get started.
Bunny offers several ways to integrate its CDN with your WordPress site. The setup method you choose determines how traffic is routed, how Bunny Shield works, and whether your CDN is branded under your own domain.
- Method 1: Full DNS (nameserver) integration (recommended). By pointing your domain’s nameservers to Bunny, Bunny manages your DNS and routes all website traffic through its global edge network.
- Setup: Requires moving DNS to Bunny.
- Shield: Bunny Shield protects all site traffic, not just static assets.
- Benefits: Maximum performance, full-site caching, and enhanced security.
- Limitations: More advanced setup.
- Method 2: Custom CDN Hostname. You can create a branded CDN URL by adding a CNAME record in your DNS (for example, cdn.example.com) that points to your Bunny Pull Zone.
- Setup: Add one CNAME record in your DNS provider.
- Shield: Bunny Shield protects your origin for static assets only.
- Benefits: Branded CDN domain, full SSL support, and origin protection.
- Limitations: Doesn’t cache full site traffic.
- Method 3:Plugin Setup. The simplest option is to connect Bunny using the Bunny.net WordPress plugin.
- Setup: No DNS changes needed.
- Shield: Bunny Shield protects your origin for static assets only.
- Benefits: Quick setup and easy performance boost.
- Limitations: Uses Bunny’s shared hostname and doesn’t cache full site traffic.
We recommend using the full DNS (nameserver) integration method, as it offers the highest level of performance and protection for your entire site. In comparison, the custom CDN hostname and plugin methods only protect and accelerate your site’s static assets. Additionally, the plugin setup uses Bunny’s shared CDN hostname instead of one associated with your own domain.
Method 1: Full DNS (nameserver) integration (recommended)
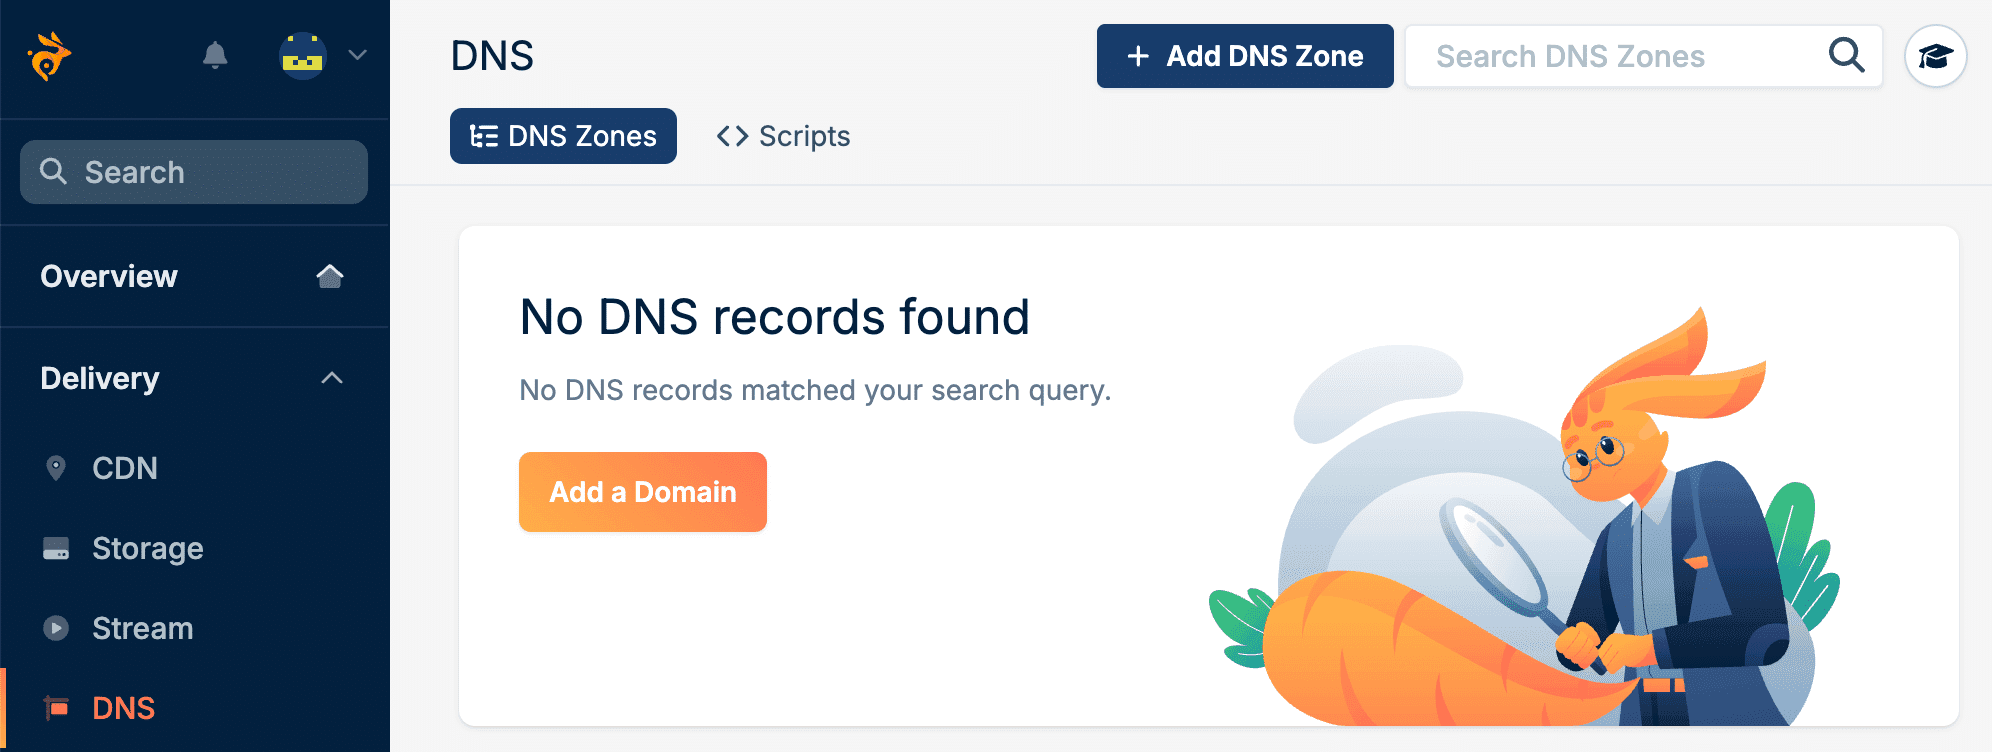
Set up your DNS in Bunny
Log in to Bunny, click DNS, and then click Add a Domain.
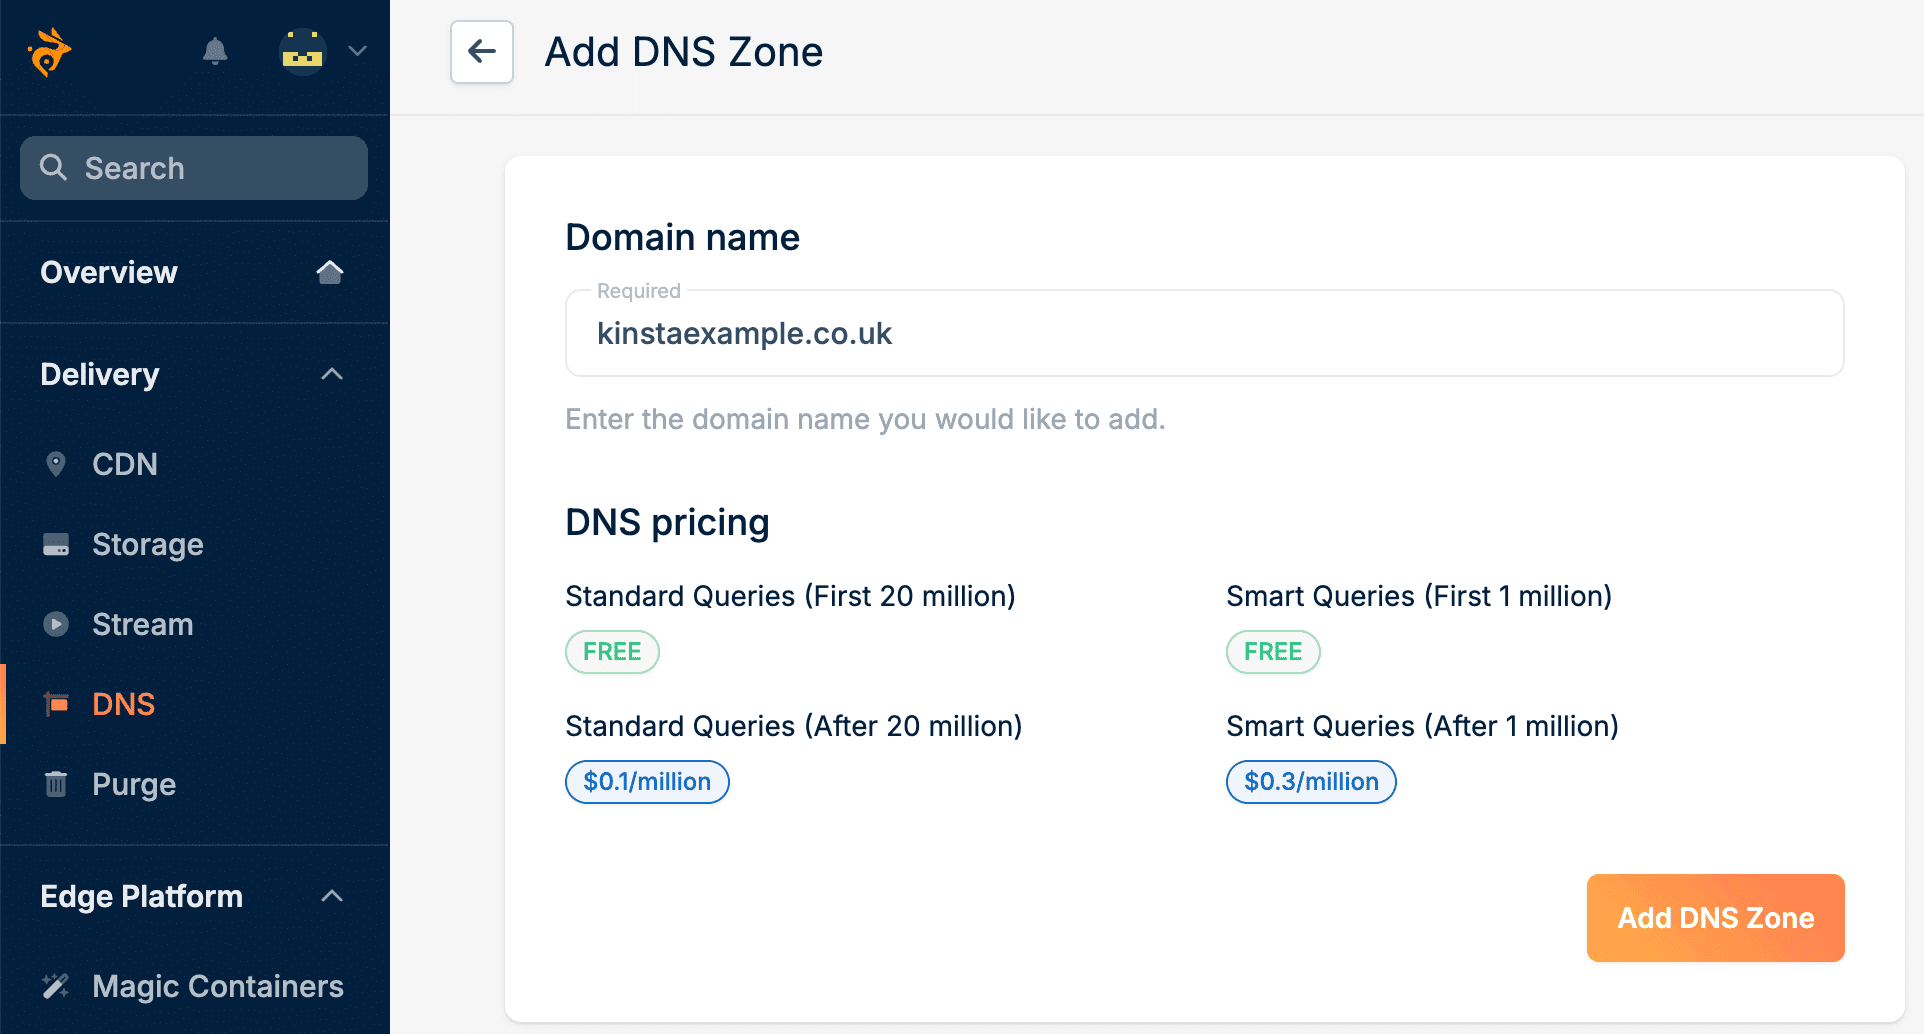
Enter your domain name and click Add DNS Zone.
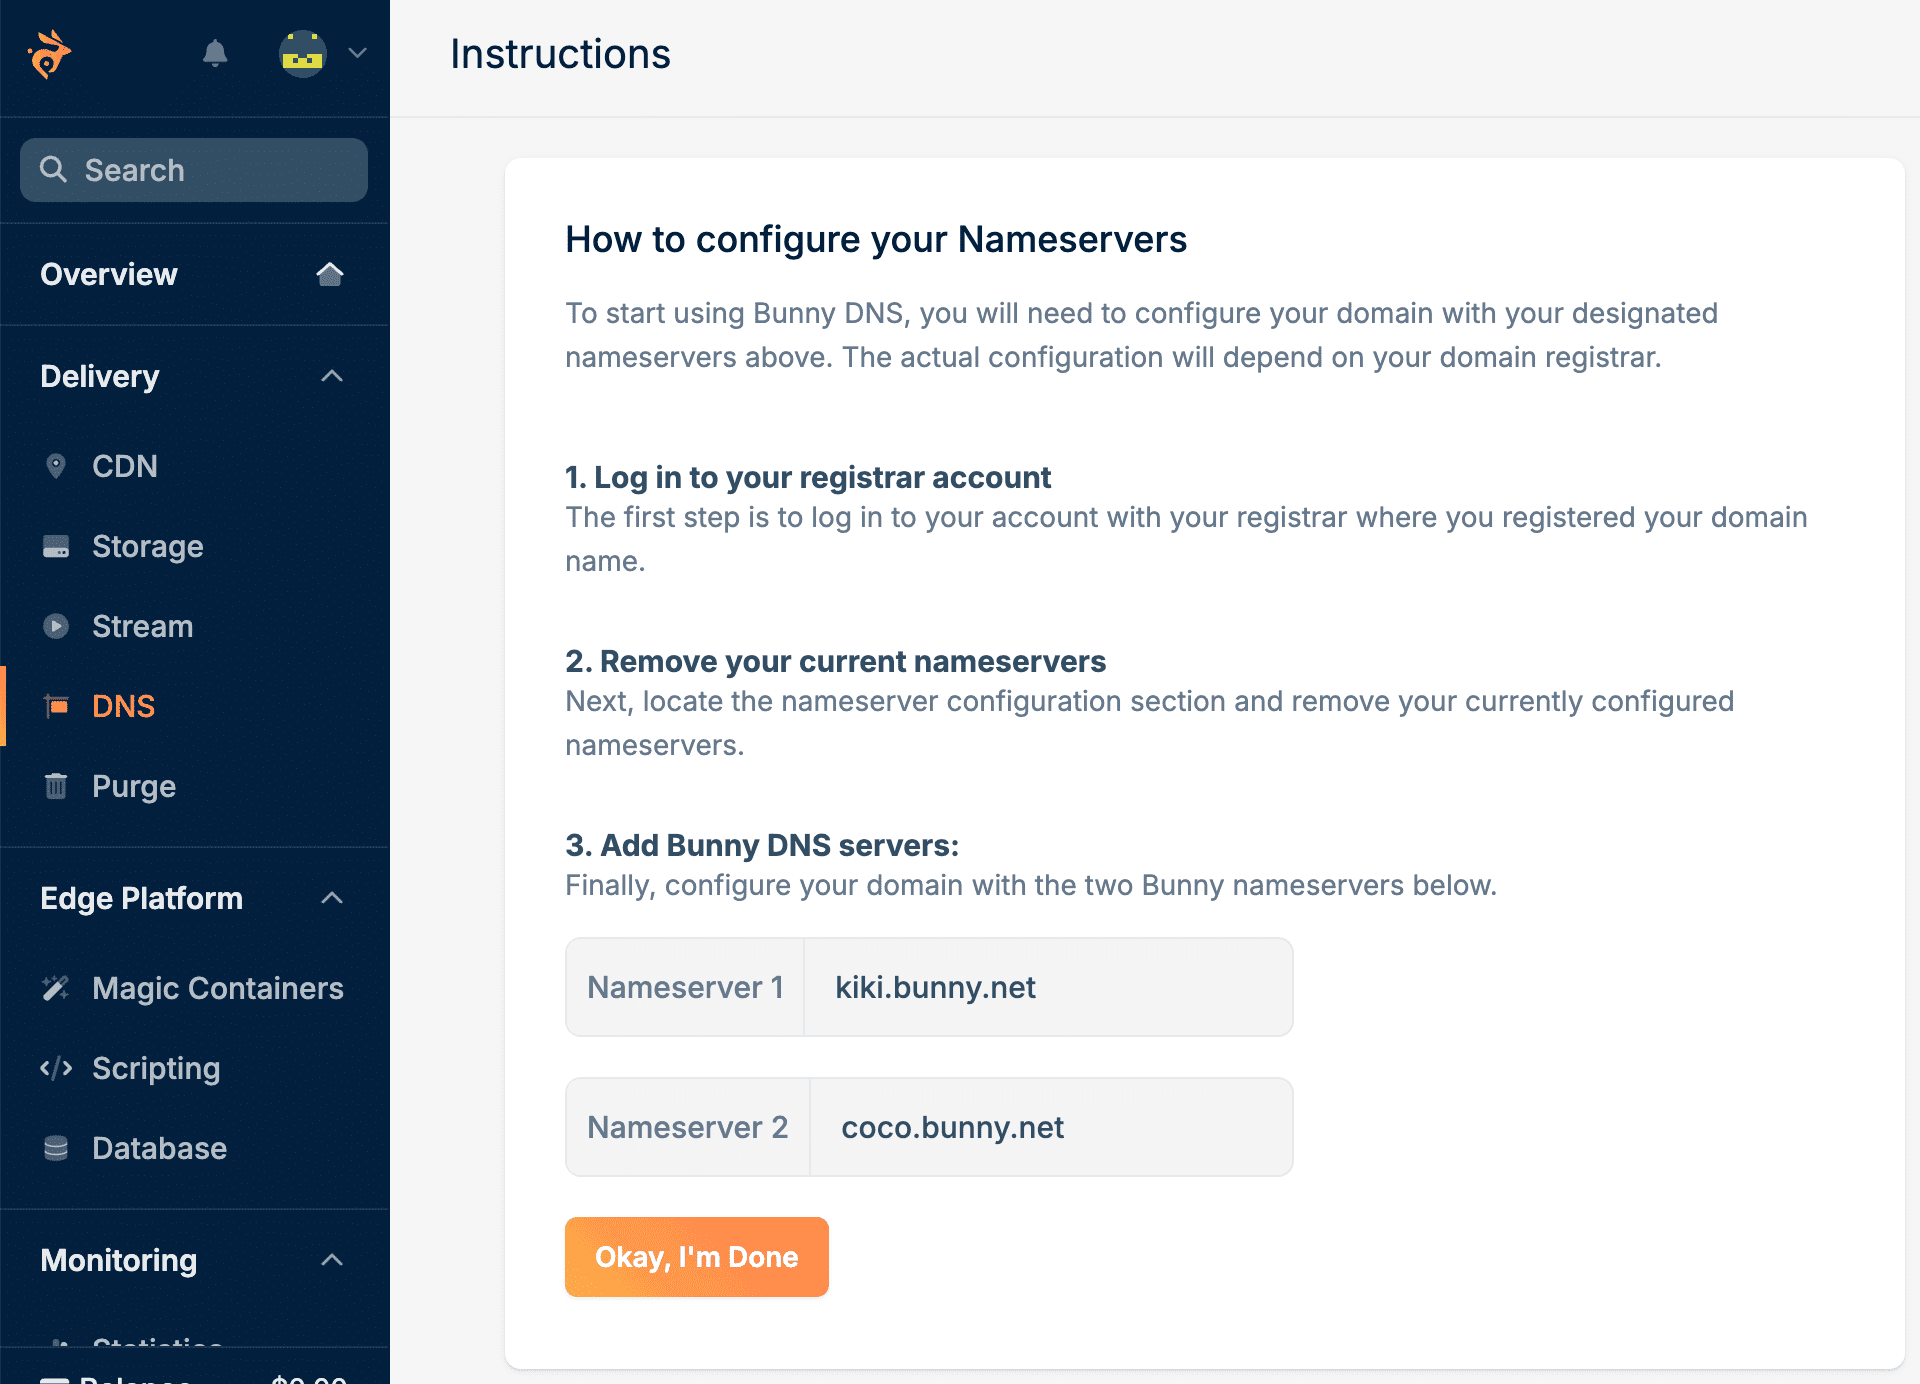
Update your nameservers
In a new browser tab, log in to your domain registrar. If you’re unsure how to do that with your registrar, check their support documentation or contact their support team for assistance.
Before updating your name servers, take note of or capture screenshots of your existing DNS records, so you can manually add them to Bunny later on. Copy each of the name servers from Bunny and paste them into your registrar. Be sure to either overwrite the existing name servers or delete them and add the new ones. Click Okay, I’m Done.
Add your DNS records
Within DNS records, add each of your DNS records from your domain registrar.
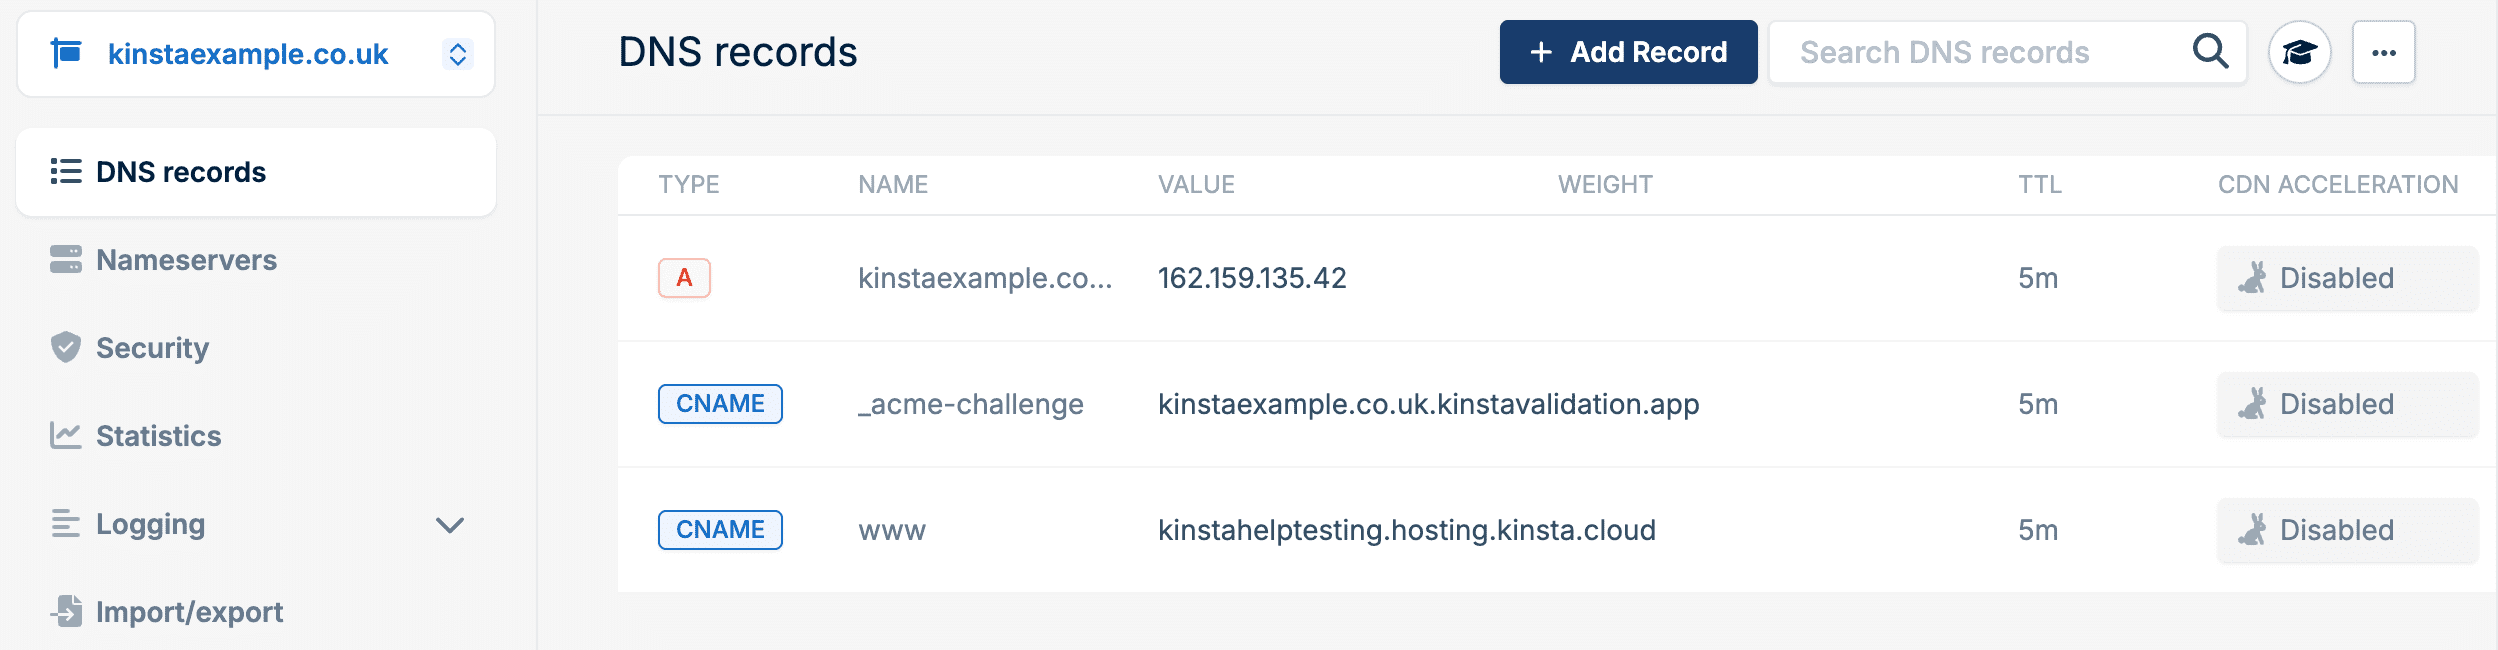
Allow for DNS to propagate the name server change. This usually happens within 24 hours, but in some cases it may take 48–72 hours. For information on how to verify that your website is correctly configured, refer to Bunny’s knowledge base.
Method 2: Custom CDN Hostname
Create a Pull Zone in Bunny
Within Bunny, navigate to CDN and click Create Your First Pull Zone.

Add a Pull Zone Name and Origin URL, select the other settings as required, and click Add Pull Zone. For more information about these settings, refer to Bunny’s knowledge base.

Add a custom hostname
In Bunny, click on the pull zone you set up in the previous step, then click Hostnames. Add a custom hostname for your site and click Add Hostname.

Add the CNAME record to your DNS
When you add the hostname, Bunny provides you with the details for the CNAME record to add to your DNS records at your domain registrar. Log in to your domain registrar and add this record. Make sure the CNAME record is set as non-proxied (proxy disabled, DNS only). Once you’ve added the record, click Verify & Activate SSL in Bunny. It may take a few minutes for the DNS to propagate.

For information on how to verify that your website is correctly configured, refer to Bunny’s knowledge base.
Method 3: Use the Bunny.net WordPress plugin
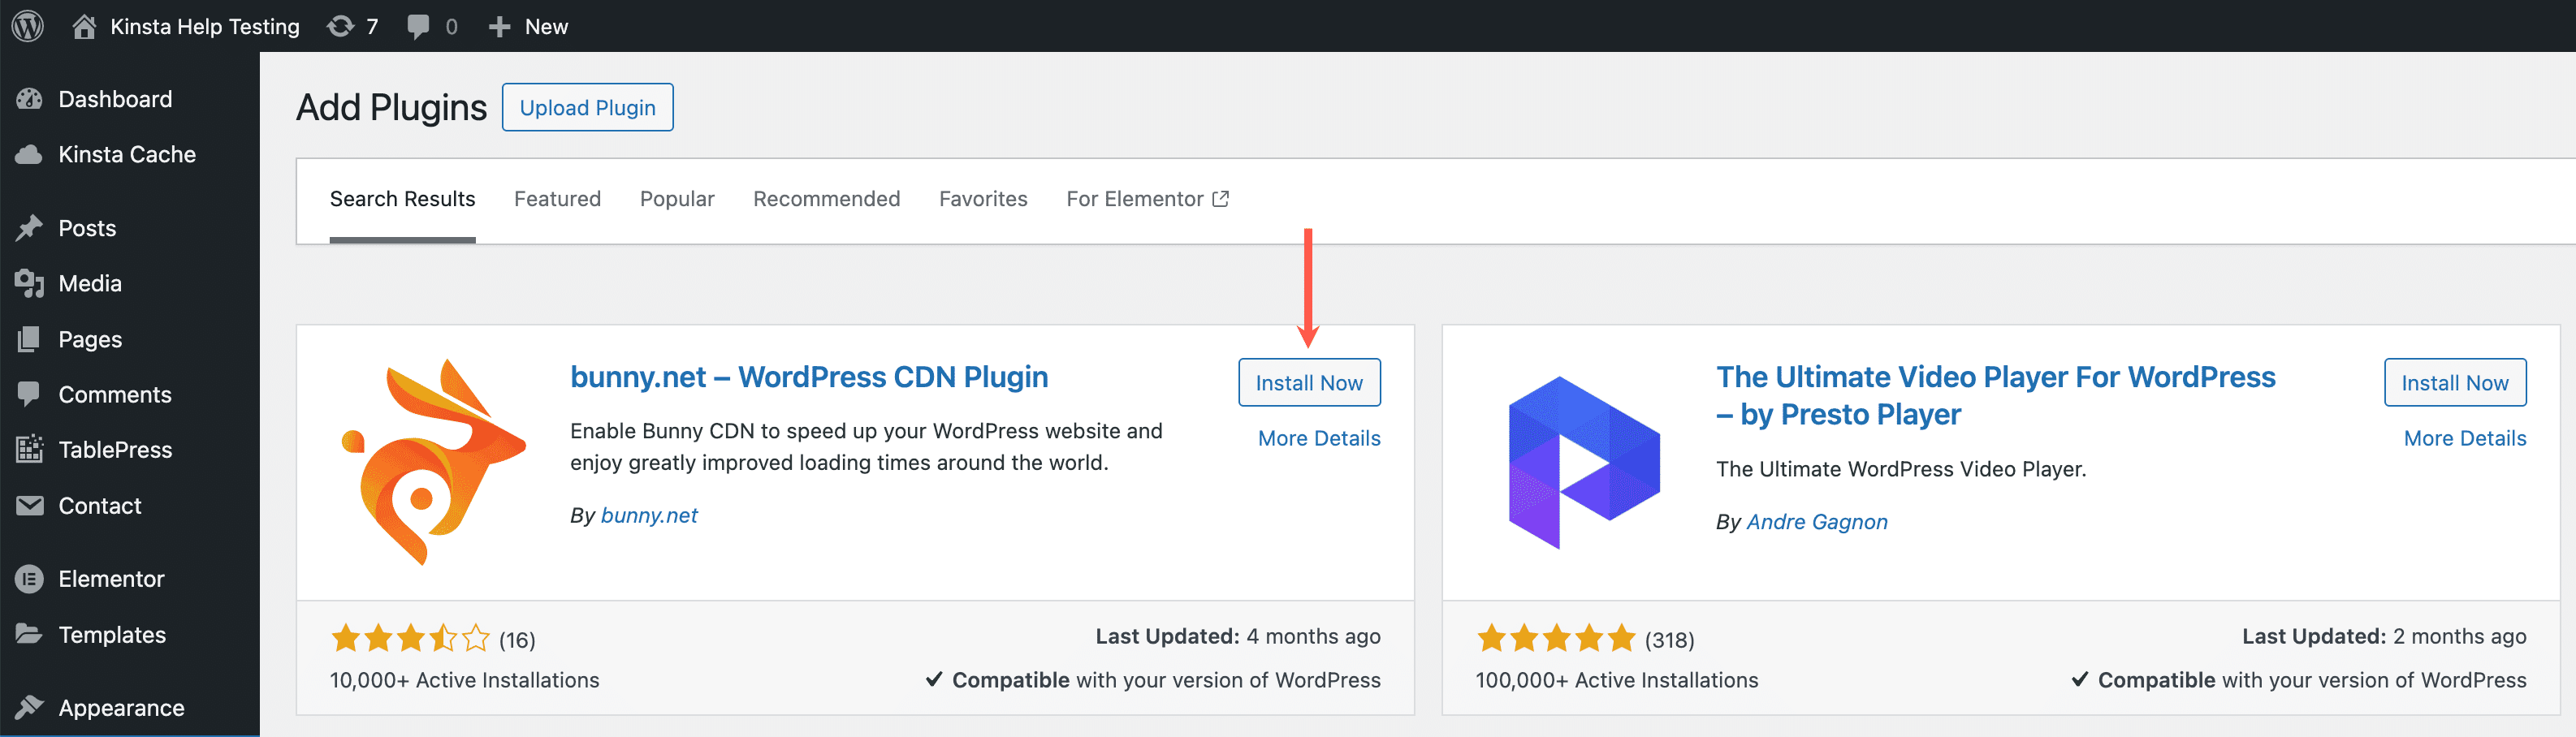
Install the bunny.net WordPress plugin
On the WordPress Dashboard for the website you want to add Bunny to, navigate to Plugins > Add New and search for “bunny.net”. Install and activate “bunny.net – WordPress CDN Plugin”.
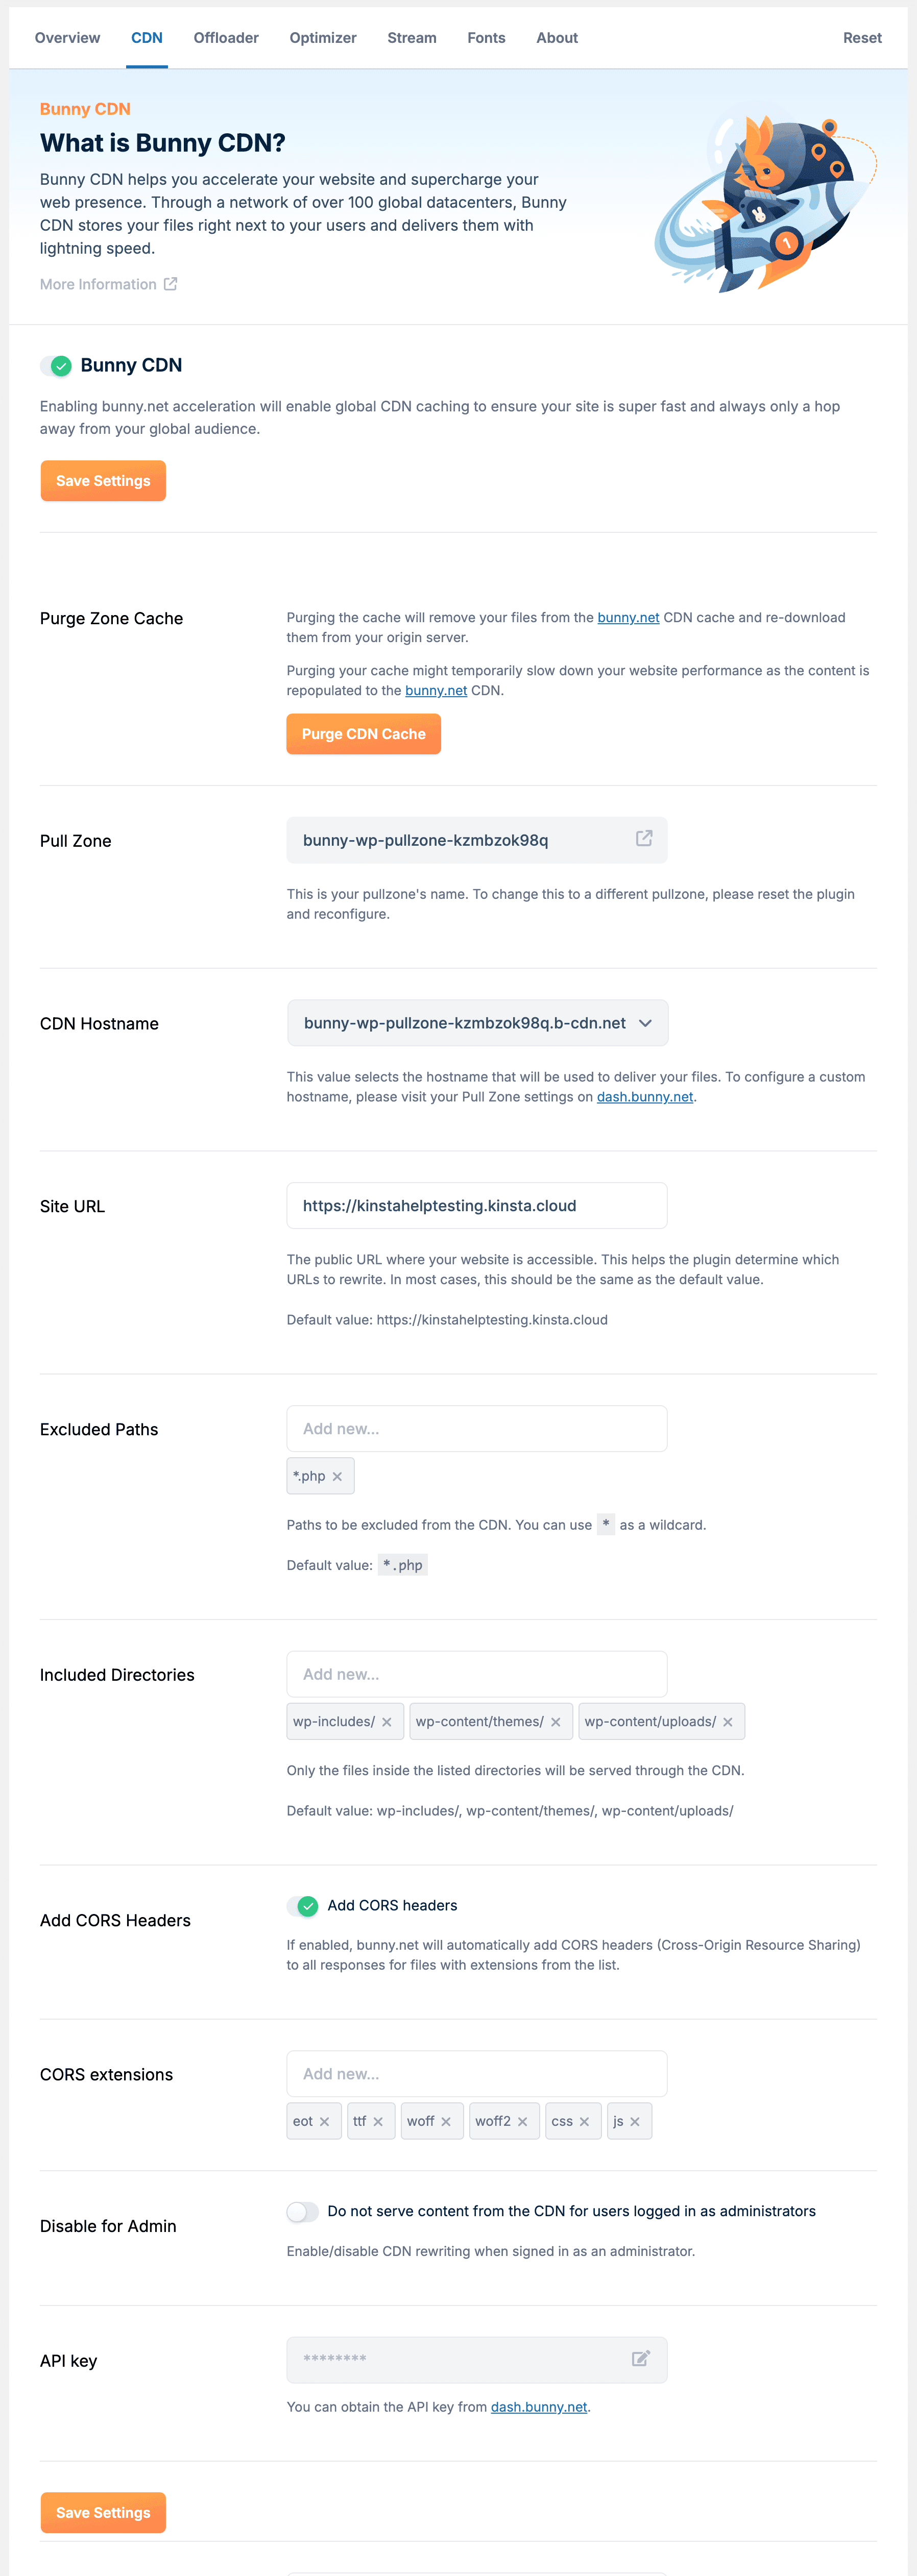
Configure the bunny.net plugin
In your WordPress dashboard, go to the bunny.net plugin, log in, and click Integration Wizard.

Confirm your site’s URL and go back to the Overview page. Bunny is now set up as your CDN provider. For information on how to verify that your website is correctly configured, refer to Bunny’s knowledge base.
You can purge the CDN cache, exclude paths, include directories, and manage various other settings within the WordPress plugin or on the Bunny.net dashboard.
Clear the CDN cache
To clear your CDN cache in the Bunny dashboard, click CDN, select your pull zone, and click Purge Cache. You can also install and use the bunny.net plugin to clear the cache, as this connects to your Bunny account to retrieve your site’s details.

To perform a full cache purge, click Purge.

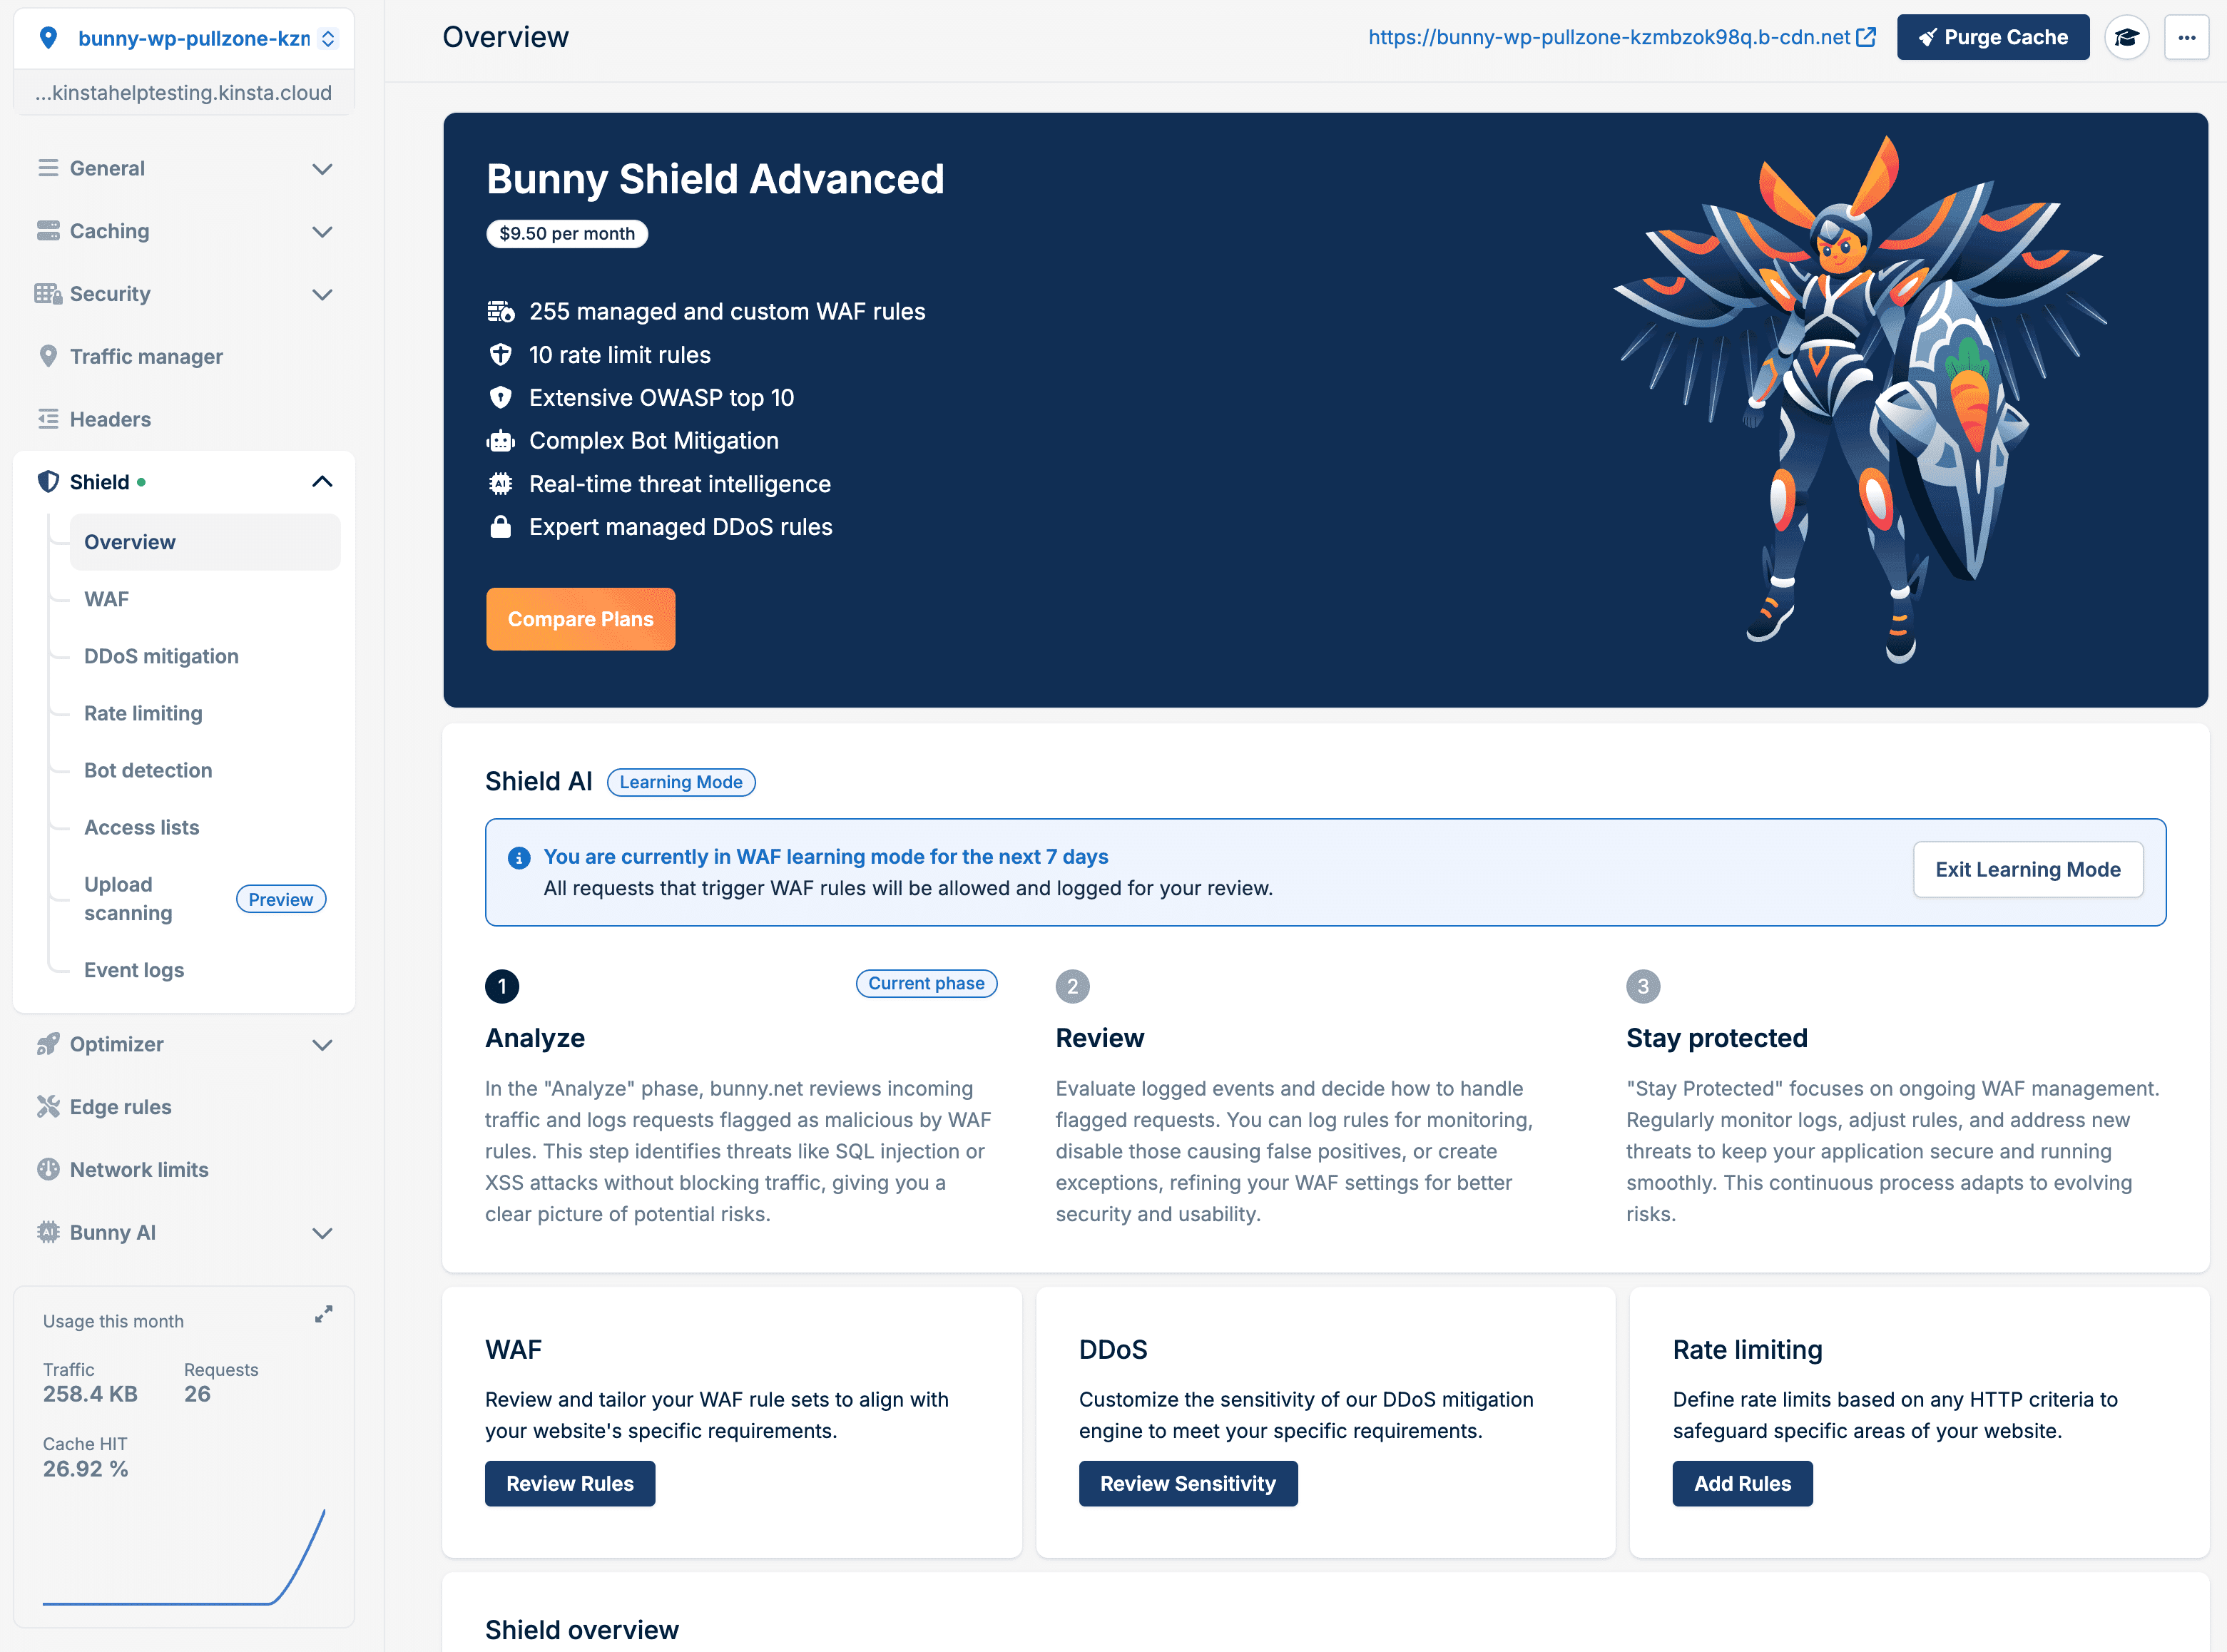
Bunny Shield
You can also set up and configure Bunny Shield within the Bunny dashboard. It includes a Web Application Firewall (WAF), DDoS mitigation, Rate limiting, Bot detection, and access lists.