IP Geolocation
At Kinsta, it’s possible to use IP Geolocation to tailor the content shown on your website to visitors in different areas of the world.
IP Geolocation functionality is built right into MyKinsta. You can direct traffic based on location, giving you flexibility and granting your visitors a customized experience.
What is IP Geolocation?
IP Geolocation, or internet geolocation, is a form of geolocation used to determine a computer’s physical location by identifying its IP address.
Thanks to information gathered through IP Geolocation, you’re able to set up rules that automatically send visitors to different subdomains or pages of your site based on their physical location. This introduces infinite flexibility to your site, and it lets you decide exactly what each user should see, all based on where they are.
What’s more, by pairing the power of IP Geolocation with that of an edge-based cache system like Cloudflare, you can noticeably decrease your time to first byte (TTFB) by automatically sending users through caches situated near their own physical locations.
You should be aware that IP Geolocation is not as accurate as other methods of geolocation such as GPS. In fact, users could thwart IP Geolocation targeting attempts by disabling geolocation in their browser or through the use of an IP-cloaking service like a virtual private network (VPN).
Having said that, IP Geolocation is certainly an invaluable tool for serving your visitors, as catered, personalized experiences have become vital to engagement and conversion.
Common uses of IP Geolocation
The three most common implementations of IP Geolocation include:
- Redirection based on the visitor’s detected location
- Page cache differentiation based on the visitor’s detected location
- Blocking traffic from specific geographic locations
Let’s take a look at these use cases more closely.
Location-based redirection
Let’s say you have a website at example.com. Imagine that you build a new page specifically targeting visitors from the UK, and you wish to have all visitors from the UK redirected to example.com/uk/. This can be accomplished easily with the MyKinsta Geolocation tool.
It’s possible to expand this arrangement as needed too. For instance, you could set up the following arrangement for visitors from different locales:
- Rule 1: Visitors from the UK redirected to example.com/uk/
- Rule 2: Visitors from the United States (US) and Canada redirected to example.com/us/
- Rule 3: Visitors from Mexico redirected to example.com/mx/
- Rule 4: Visitors from India redirected to example.com/in/
- Rule 5: Visitors from Australia redirected to example.com/aus/
- No rule triggered: All other visitors to remain at example.com
Location-based cache differentiation
Some plugins and themes include features that detect the visitor’s location and customize the content, such as language or currency, based on the visitor’s location. IP Geolocation can be harnessed to build separate caches for each country, displaying custom content and improving load times for visitors from that area.
Let’s consider an example. Imagine that your website, example.com, displays pricing in euros (€), British pounds (£), and US dollars ($).
You set up a plugin to automatically switch between these three currencies based on the visitor’s detected location. Then, you would use IP Geolocation rules to build three separate cache buckets to make it possible to display the right currency based on location while simultaneously continuing to use our server caching to keep the site fast and scalable.
- Rule 1: Cache visitors from the US in cache bucket 1. Website configured by the user to display US dollars.
- Rule 2: Cache visitors from the UK in cache bucket 2. Website configured by the user to display British pounds.
- No rule triggered: Cache bucket 3 if for all other visitors. Website configured by the user to display Euros for all other visitors.
With this IP Geolocation setup, you can enjoy the added benefit of automated sales tax calculation for every shopper based on their location.
The less work your customers have to do when buying from you, the better. This includes saving them the effort of accurately calculating their purchase totals on their own.
Location-based traffic denial (geo-blocking)
Blocking site traffic based on geography, also known as geo-blocking, is the simplest use case to understand.
If your business is restricted to selling to visitors from a specific country, you can contact the Kinsta support team to set up geolocation-based blocking with server-side rules to limit site access to visitors from a single country.
You can either deliver a 403 Forbidden message to all other visitors or redirect them to a landing page of your choosing.
Combining IP Geolocation functionality
It is also possible to combine multiple types of IP Geolocation-based rules to implement a more granular control. For example, the following configuration could be accommodated:
- Rule 1: Visitors from the USA redirected to example.com/us/
- Rules 2, 3, and 4: Separate cache buckets created for visitors from the USA, Canada, and Europe
- Rule 5: Visitors from another country where the advertised service is not available blocked entirely
IP Geolocation and WordPress
WordPress has long offered plugins that can facilitate IP Geolocation functionality. Some, like IP Geolocation Country Redirect or GeoTargetingWP, focus on helping you guide traffic around your site based on visitors’ locations. Others offer a broader spread of IP Geolocation features aimed at boosting marketing efforts, such as the CF Geo Plugin.
So why build this functionality into MyKinsta? Why not simply let customers use a plugin for their IP Geolocation needs?
Well, for one, plugins need to be maintained. To be sure your site continues working smoothly, you’ll have to watch for updates to the plugin and fully understand the release notes before updating to each new version. And there’s always the risk of an update breaking some aspect of your site.
Additionally, plugins can introduce inherent security risks to your site. Because plugins are maintained by third-party authors, it’s possible that malicious scripts could be introduced through a plugin to your site, wiping out your web presence and even your stored data.
Although plugins can bring some amazing functionality to your site, we generally advise keeping your total plugins to a minimum. Only install plugins from developers you trust, with established histories of frequent, well-documented updates.
As you can imagine, it’s better to have a trusted source handle your IP Geolocation preferences. By having IP Geolocation functionality built right into MyKinsta, you’re able to set your geolocation requirements right on your instance’s server, where it will be protected from client-side security risks.
When IP Geolocation is enabled for country level, the following IP-based location data is passed to PHP and made available to the $_SERVER variable:
GEOIP_COUNTRY_CODEGEOIP_COUNTRY_CODE3GEOIP_COUNTRY_NAME
When Geolocation is enabled for country and city level, the following IP-based location data is passed to PHP and made available to the $_SERVER variable:
GEOIP_CITYGEOIP_CITY_CONTINENT_CODEGEOIP_CITY_COUNTRY_CODEGEOIP_CITY_COUNTRY_CODE3GEOIP_CITY_COUNTRY_NAMEGEOIP_COUNTRY_CODEGEOIP_COUNTRY_CODE3GEOIP_COUNTRY_NAMEGEOIP_LATITUDEGEOIP_LONGITUDEGEOIP_POSTAL_CODEGEOIP_REGION
These can be used to write custom PHP snippets based on IP Geolocation.
IP Geolocation and Nginx
All sites hosted at Kinsta run on Nginx servers. Nginx is an open-source web server that’s known for its manifold capabilities that include a reverse proxy, load balancer, and HTTP cache, in addition to its speed.
One of the benefits Nginx servers offer is the use of precompiled MaxMind GeoIP2 databases for our GeoIP module. The module handles both HTTP and TCP/UDP traffic, allowing you to create flexible rules based on your visitors’ IP addresses.
MaxMind’s GeoIP2 databases are updated constantly, and all requests are scanned for fraudulent activity or sensitive data (e.g. GDPR-related requests from EU-based visitors).
You can read more about Nginx’s GeoIP module in their official documentation.
How to set up IP Geolocation in MyKinsta
You can add IP Geolocation to your sites in MyKinsta. The process is quick, simple, and highly customizable.
Enabling the Geolocation tool
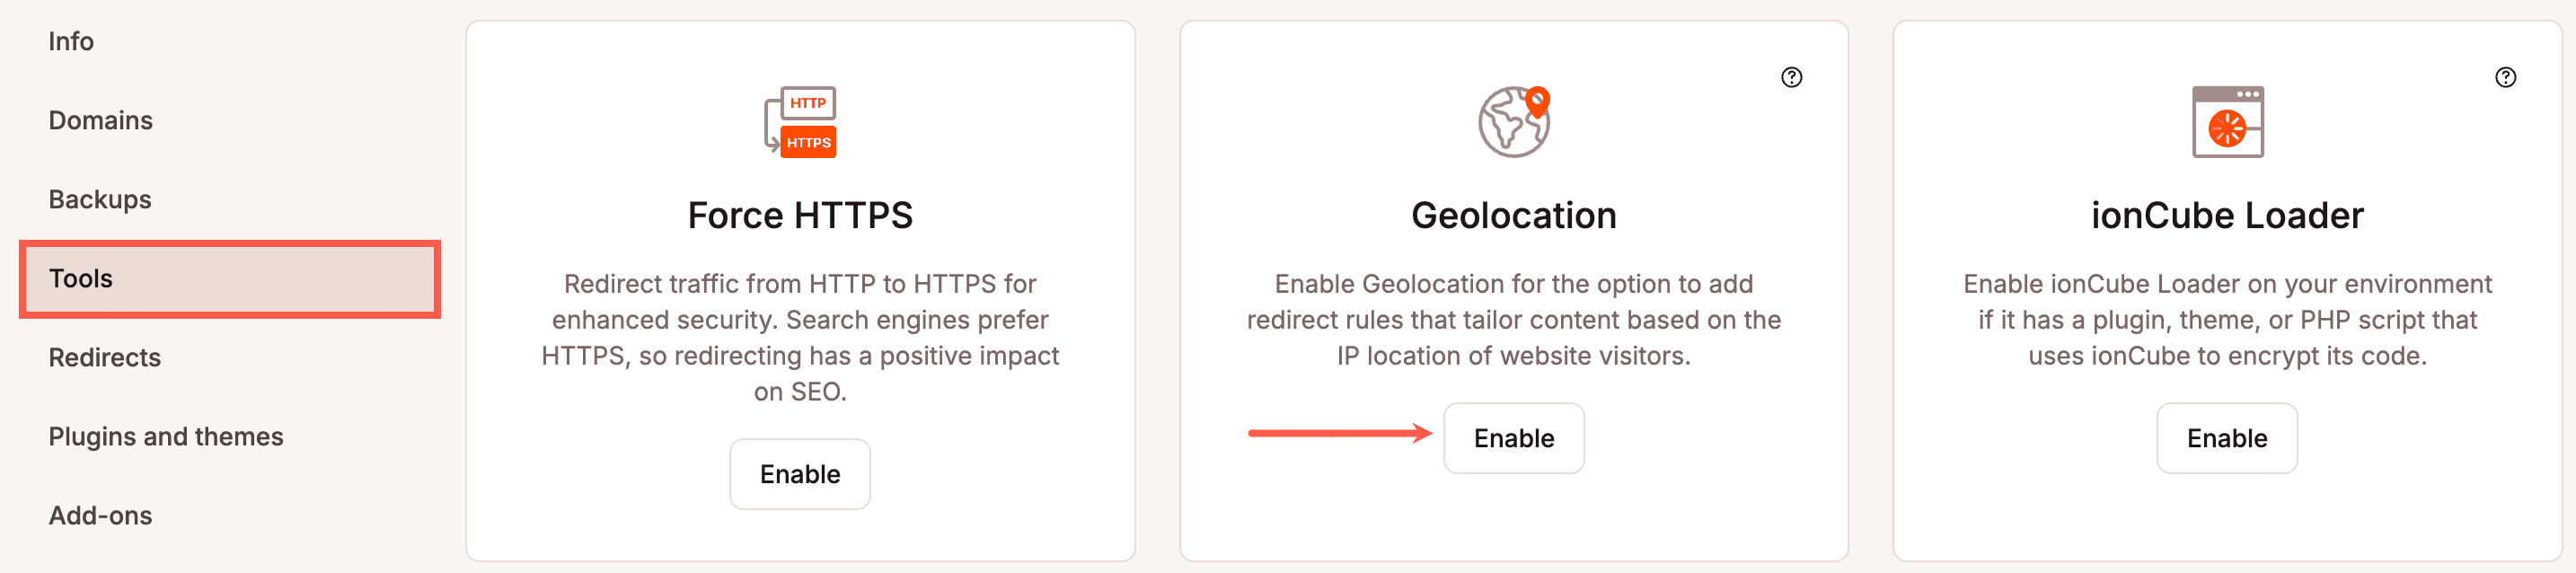
To get started, log in to MyKinsta and navigate to Sites > sitename > Tools. Find Geolocation in the list of tools and click Enable.
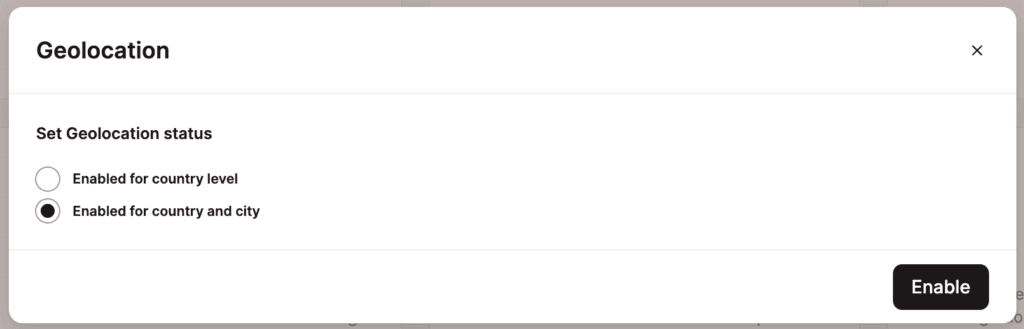
You’ll be shown a modal/pop-up with two options:
- Enabled for country level: Enable IP Geolocation at the country level.
- Enabled for country and city: Enable IP Geolocation at both the country and city level.
These options allow you to enable Kinsta’s geolocation feature for your site. Select the option you prefer, then click the Enable button:
After a few moments, you’ll be returned to the Tools page and shown a success message. IP Geolocation is now enabled for your Kinsta-hosted site, and you can now specify which visitors see which pages.
How to add IP Geolocation rules and redirects in MyKinsta
Once you’ve enabled IP Geolocation for your site, you’ll have the option to control your inbound traffic through the addition of redirect rules in MyKinsta.

Go to Redirects and select Add redirect rule:
A modal/pop-up titled Add redirect rule will appear. This is where you’ll define your redirect’s parameters:
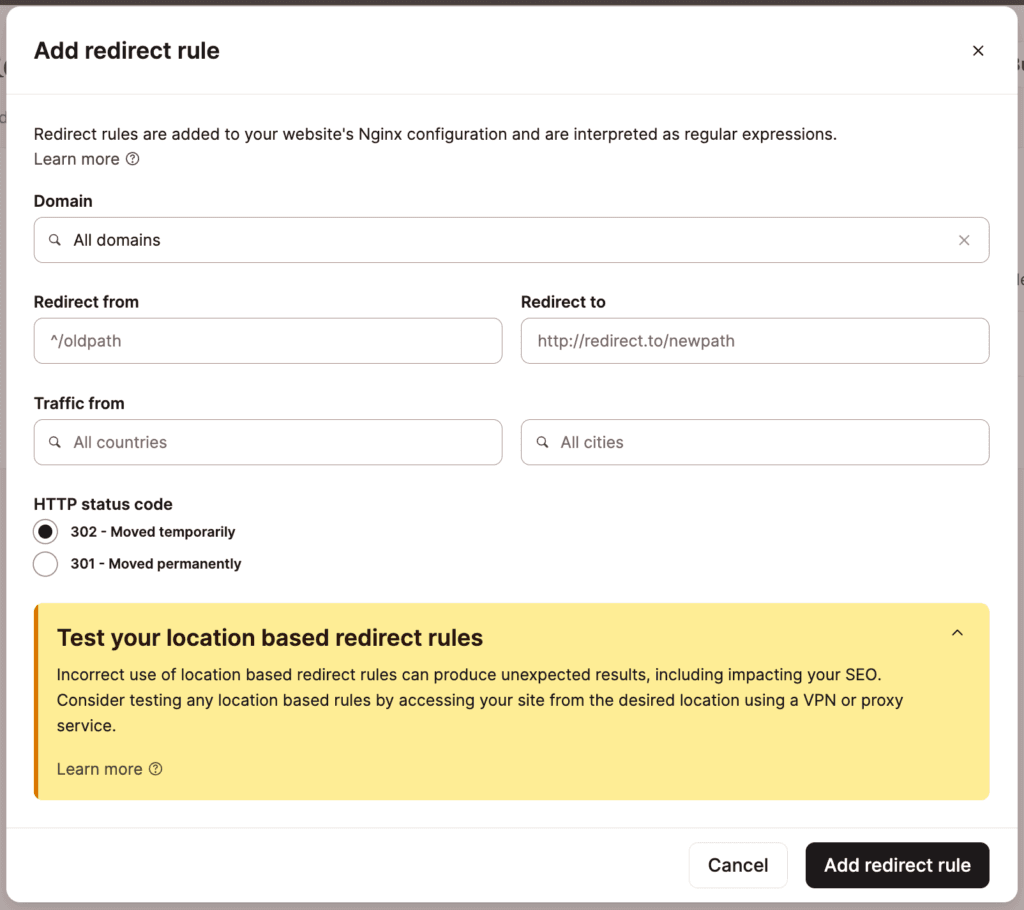
Here, you’ll fill out all the fields to redirect your traffic:
- Domain: Pick the domain for which you’re adding the redirect. To add the redirect to all domains within this site, leave this with the default option (“All domains”).
- Redirected from: Enter the page or directory you want traffic redirected from. You can use regex in this field.
- Redirected to: Enter the page or directory to which you want traffic rerouted.
- Traffic from: Choose the country (and city, if you enabled country/city-level IP Geolocation) of the traffic you want to redirect.
- HTTP status code: Decide whether the redirect will be temporary (302) or permanent (301). You can find more details in the Best Practices for Implementing IP Geolocation section below.
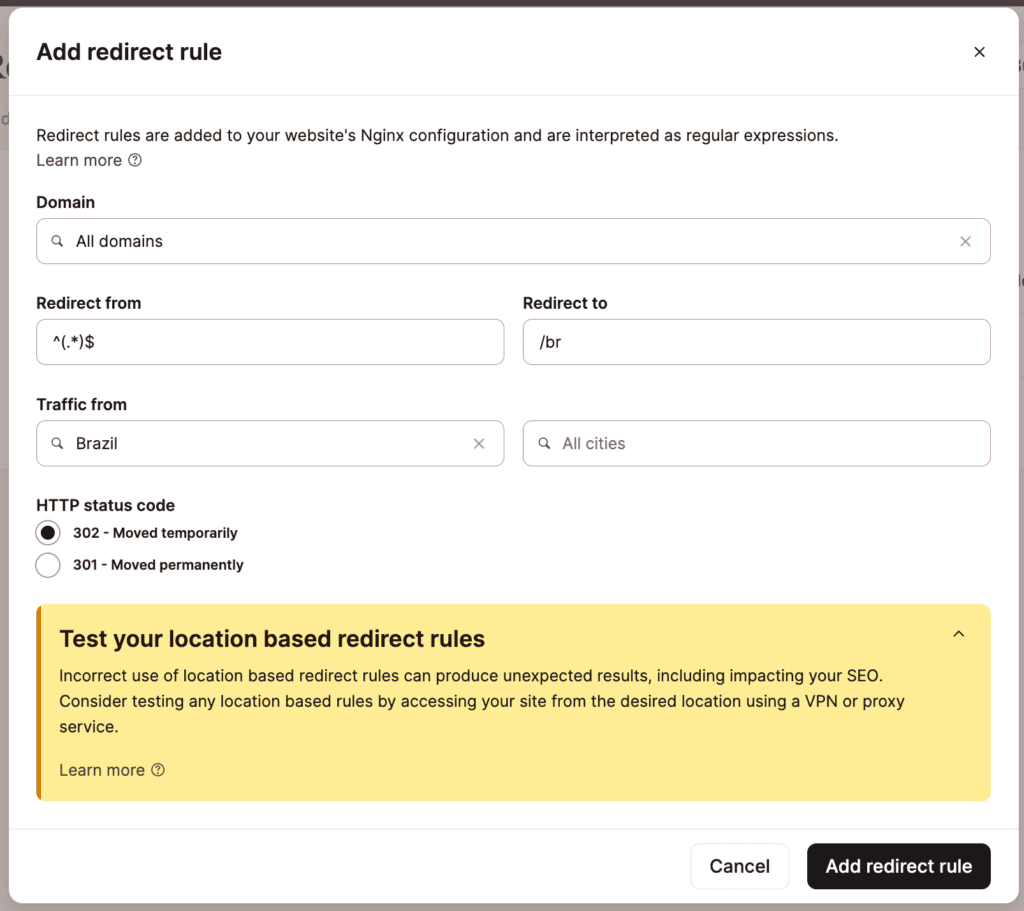
Once you’re done filling out the modal, click Add redirect rule at the bottom.
And voilà: you’re now taking full advantage of IP Geolocation and successfully redirecting traffic coming from that location to a specific area of your site!
You can edit any rules you’ve created from this Redirects page as well.
Check out our article on adding and managing redirects for more information about adding redirect rules in MyKinsta.
Best practices for implementing IP Geolocation
Incorrect use of redirect rules can produce unexpected results, impacting your SEO and user experience. To avoid this, we recommend adhering to the following best practices for redirect rules.
1. Start on staging
Implement your redirect rules on your staging server before touching your live server settings. This will give you an opportunity to spot redirect issues before they become your users’ problems.
2. Look for plugin conflicts
Some WordPress plugins may automatically set cookies with their own redirects, so you could encounter conflicts when pairing these plugins with the MyKinsta Geolocation feature.
Test your plugins and their settings on staging before pushing your redirects live to your production site.
3. Use 302 for location redirects
Google recommends utilizing 302 redirects (rather than 301) for location-based redirects or relocations on your site. See our list of 300 redirect status codes for more details.
4. Test from various locations
Check your location-based rules by accessing your site from another geographic location using a VPN or proxy service. This will let you experience your site (including your redirects) as your international users would.
5. Avoid blocking search bots
Search engines generally crawl from the country in which they’re based. According to Deepcrawl, Google and Bing‘s search bots crawl from the US, while Baidu crawls from China and Yandex from Russia.
Blocking these search engines with a faulty location-based redirect can have a negative impact on your SEO. Once you’ve decided which search engines you want accessing your site, carefully double-check your redirect rules to ensure you’re not blocking them.
Suppose you were to add a redirect funneling US-based users visiting your non-English pages to their English pages. This could mean that Google and Bing’s bots are also redirected, preventing them from being able to crawl and index your non-English pages and resulting in those pages being excluded from search results.
Note that redirects on a city level will not impact these bots — only country-level redirects. If you’re not sure which country a search engine hails from, you can perform a reverse DNS lookup to check the origin and authenticity of a crawler.
It’s also worth noting that most search engines have a zero cloaking policy, so it’s important to avoid making special rules for search bots (i.e. redirecting users but not bots).
6. Make your redirects visible
Just as important as not blocking search bots is making your redirects visible to them. There are a few ways to do this:
- Generate an XML sitemap to highlight all the pages you want indexed for each language version. This sitemap should be submitted to Google Search Console, Bing Webmaster Tools, and any other search engine you wish to target. You can then use the tools provided by each search engine to review crawling and indexing issues with your site.
- Use the Inspect URL tool in Google Search Console to check if individual pages are eligible to be crawled and indexed.
- Use the site search Google search operator to check whether your pages have been indexed. You can do this by affixing “site:” to your domain or subdomain in your search (e.g. site:example.com/pt/ would return all indexed URLs with this path).
- Implement hreflang attributes to highlight all language versions of your pages. You can utilize the International Targeting report in Google Search Console to monitor any issues with your hreflang setup.
- Create Google Search Console properties for each country path and use the Country Targeting tool to set specific countries to target (not recommended if you target multiple countries with the same language).
7. Don’t rely on cookies
While cookies can be useful to your visitors, it’s important to remember that not everyone uses them. Some visitors may even be utilizing a VPN for work or personal reasons, which can negate native cookies and interfere with your location detection efforts.
What’s more, cookies are sometimes ignored by search bots, dampening your SEO efforts. For these reasons, we recommend avoiding relying on cookies for redirects.
Additionally, Googlebot and Bingbot don’t save cookies, so keep this in mind if you do plan to use cookies as part of your solution.
Summary
Setting up IP Geolocation for your sites is a breeze with MyKinsta. Specifically, you can enable the IP Geolocation feature at the country or country/city level with just a few clicks. Then, you can set up location-based redirects that best suit your needs.
If you have any questions, our Support team is here for you 24/7.