Staging Environments
Each WordPress install at Kinsta can have its own free WordPress staging environment, completely separate from the live production site. This is great for testing new WordPress versions, plugins, code, and general development work. Create a dev site in minutes and share it with your team.
If you want to add additional staging environments, need a staging environment that more closely matches your live environment, or need to do resource-intensive site testing or development, check out our Premium staging environment add-on.
Standard vs. Premium staging
You can add up to 5 Premium staging environments, which include more resources and more features than Standard environments. The following table shows the differences between our Standard and Premium staging:
| Premium | Standard | |
| PHP threads | Same as your live environment | 2 |
| PHP memory limit | Same as your live environment | Same as your live environment |
| PHP memory per thread | Same as your live environment | The maximum number of threads on a standard staging environment is 2, and the memory per thread matches the live environment. For example, if the live environment has a memory pool of 2GB with 4 PHP threads, each thread would have a memory limit of 512MB. In the standard staging environment, this would be 2 PHP threads, each with a 512MB memory limit. This is only applicable to plans that have access to the PHP performance add-on. |
| CPU | 12 | 1 |
| RAM | 8 GB | 8 GB |
| CDN | Yes | No |
| Edge caching | Yes, can be enabled | No |
Find out more about our Premium staging environments add-on.
Create a WordPress Standard or Premium staging environment
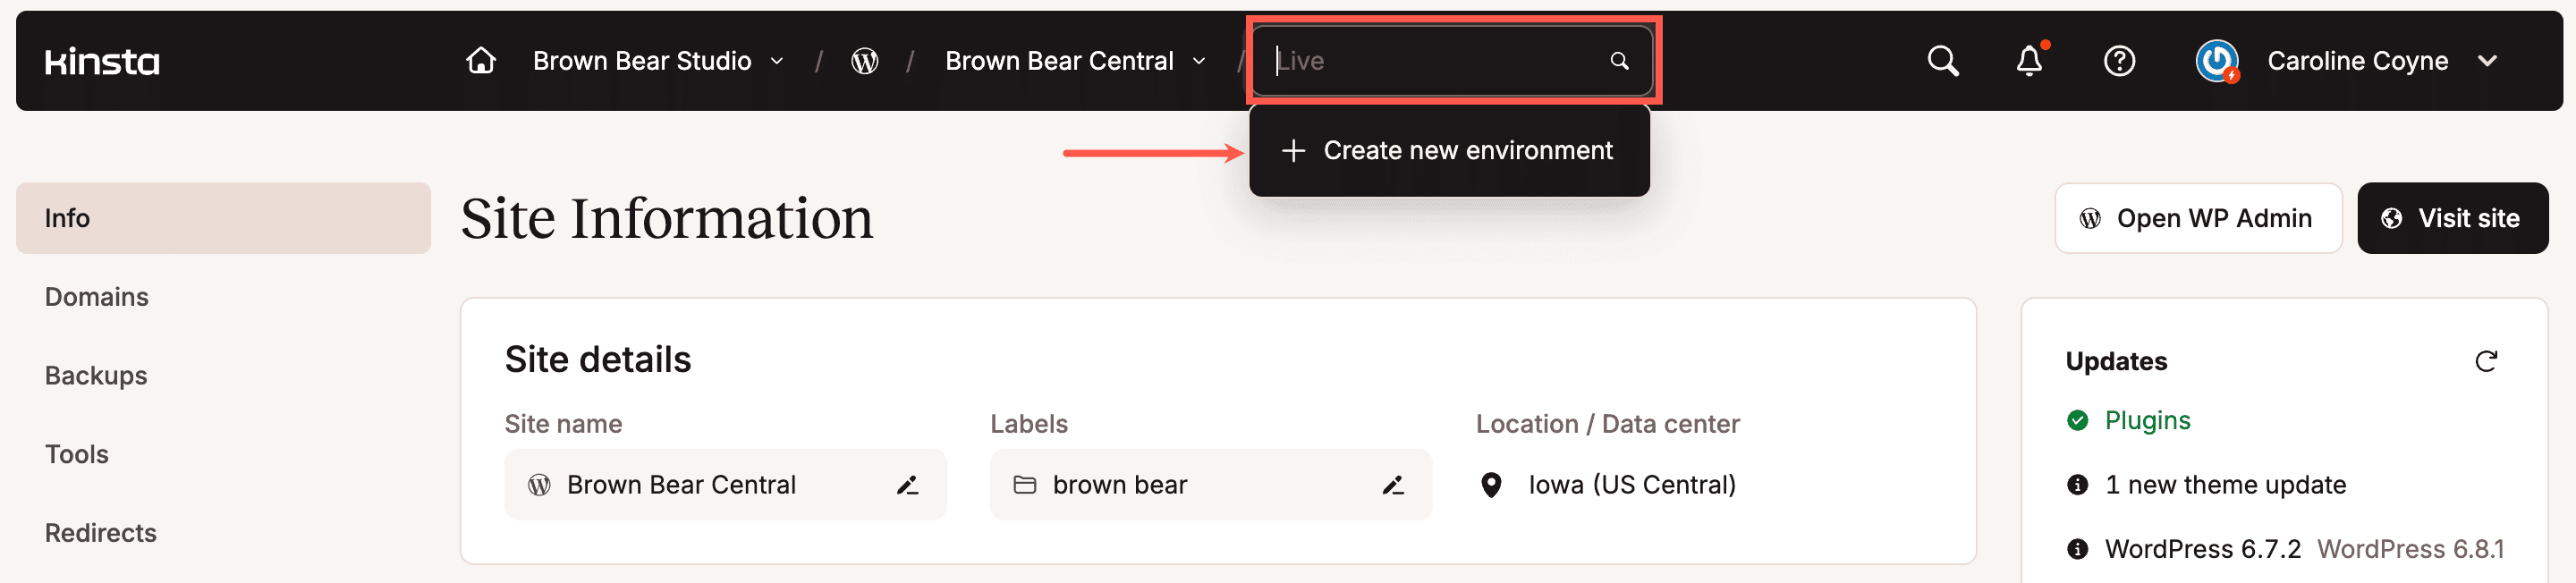
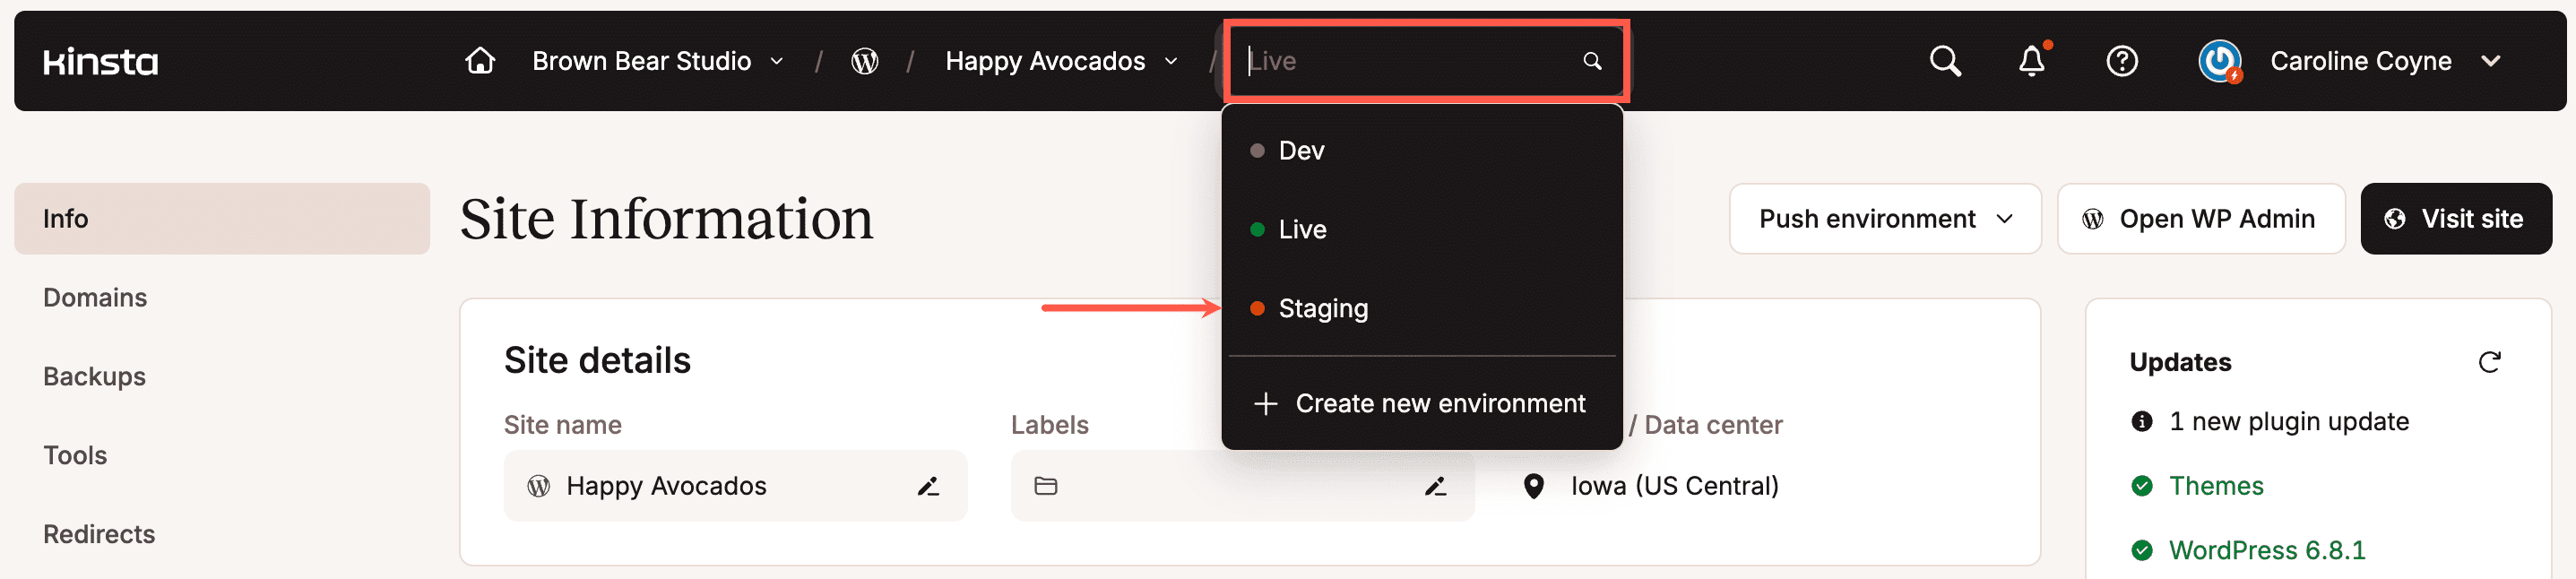
We’ve made creating a WordPress staging site as easy as possible. In MyKinsta, click on WordPress Sites in the left navigation. You’ll see a list of your sites/installs. Select the site you want to create a staging environment for, click the environment type, for example, Live, and select Create new environment. You can also click the Jump to or search box and select Create new environment.
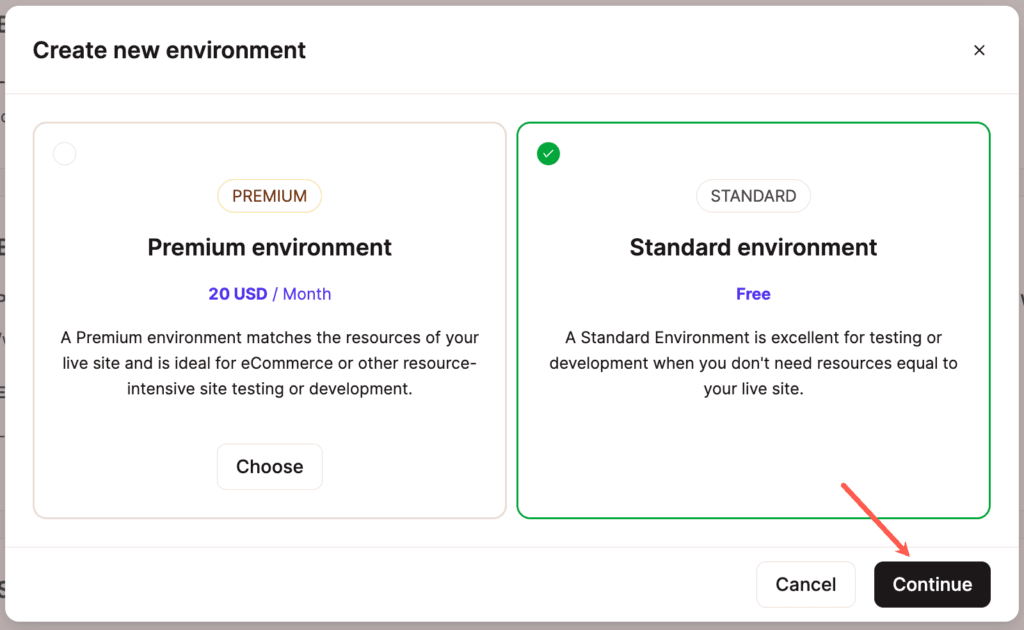
In the Create new environment modal/pop-up that appears, select Standard or Premium environment and click Continue.
Next, you’ll be prompted to select the type of environment you want to create. There are three options.
- Clone an Existing Environment: This option allows you to clone an existing environment (live or any Premium staging environment) to the new staging environment.
- Install new WordPress: This option installs a fully functional blank WordPress site, ready for you to use immediately.
- Empty environment (Without WordPress): This option installs all the necessary software to run a WordPress site (web server, PHP, MySQL, etc.) but does not install WordPress itself. This is a good option for users migrating to Kinsta with Duplicator or setting up a Bedrock/Trellis installation with a custom file structure.
Option One – Clone an existing environment
The Clone an existing environment option allows you to clone any existing environment (live or Premium staging environment) to the new staging environment.
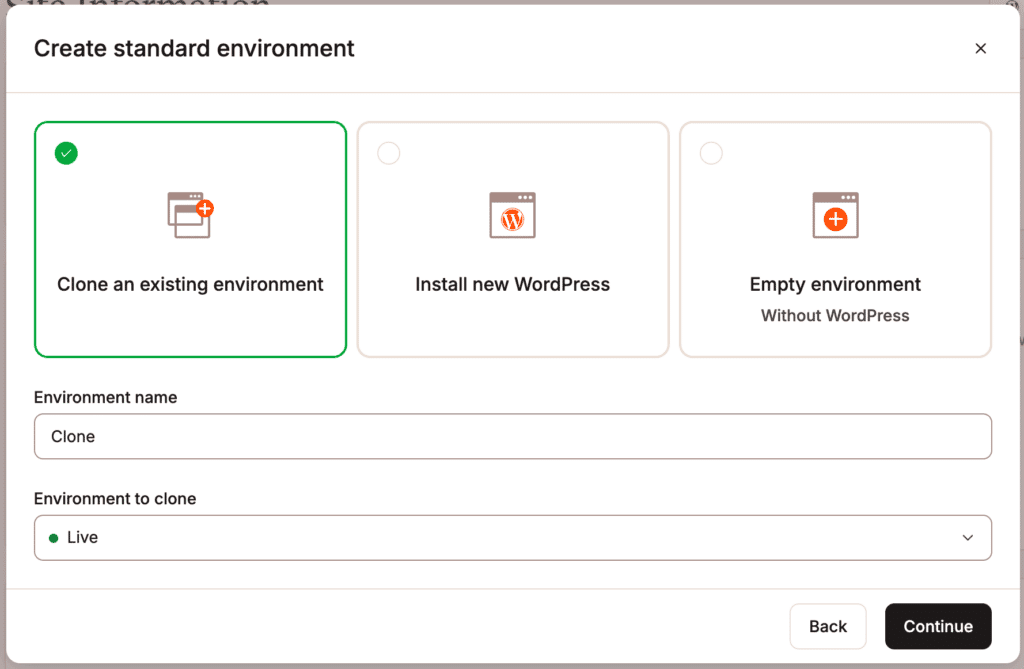
- Environment name: Enter a name for the staging environment name; this must be between 3 and 12 characters long.
- Environment to clone: Choose an existing environment to clone to the new staging environment.
Option Two – Install new WordPress
The Install new WordPress option includes several fields to customize your site. Here’s what you need to know about each field.
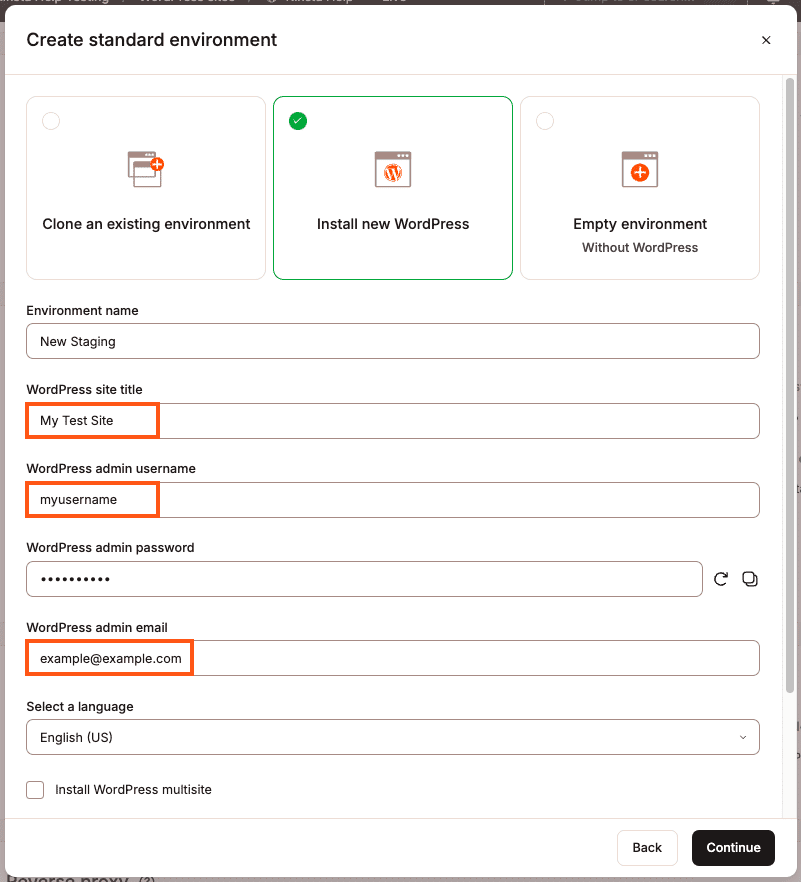
- Environment name: Enter a name for the staging environment name; this must be between 3 and 12 characters long.
- WordPress site title: This allows you to set the site title for your WordPress site. Depending on your theme, it will be visible to site visitors in the browser tab and other places. You can change the site title in WordPress settings after site creation.
- WordPress admin username: You will use this to log in to your WordPress installation. You will be able to add additional users later on. We recommend choosing something other than “admin” for the username for maximum security.
- WordPress admin password: You will use this password to log in to your installation. We automatically enforce strong passwords to protect users. You can use the generate new password option (reload icon) if you want a new one. Here’s how you can change your WordPress password later on.
- WordPress admin email: WordPress uses the admin email address to send important notifications.
- Select a language: Select the language you would like to use in WordPress. You don’t have to write content in the same language as your WordPress interface, so feel free to choose your native tongue, even if you are writing content in English.
- Install WordPress multisite: Select this box if you would like to create a WordPress Multisite installation. Once selected, you may choose between a Subdomain or Subdirectory install.
- Install WooCommerce: If you are creating an ecommerce website, WooCommerce is the most popular ecommerce plugin out there. Check this box to install it automatically.
- Install Yoast SEO: Yoast SEO is the most popular SEO plugin for WordPress, with over 3 million installs and a 5 out of 5-star rating. Check this box to install it automatically.
- Install Easy Digital Downloads: If you are creating a site to sell digital products, Easy Digital Downloads is a complete eCommerce solution for selling digital products. Check this box to install it automatically.
Option Three – Empty environment (Without WordPress)
The Empty environment option is helpful for users who need a blank environment for Duplicator migration or custom Bedrock/Trellis installation testing.
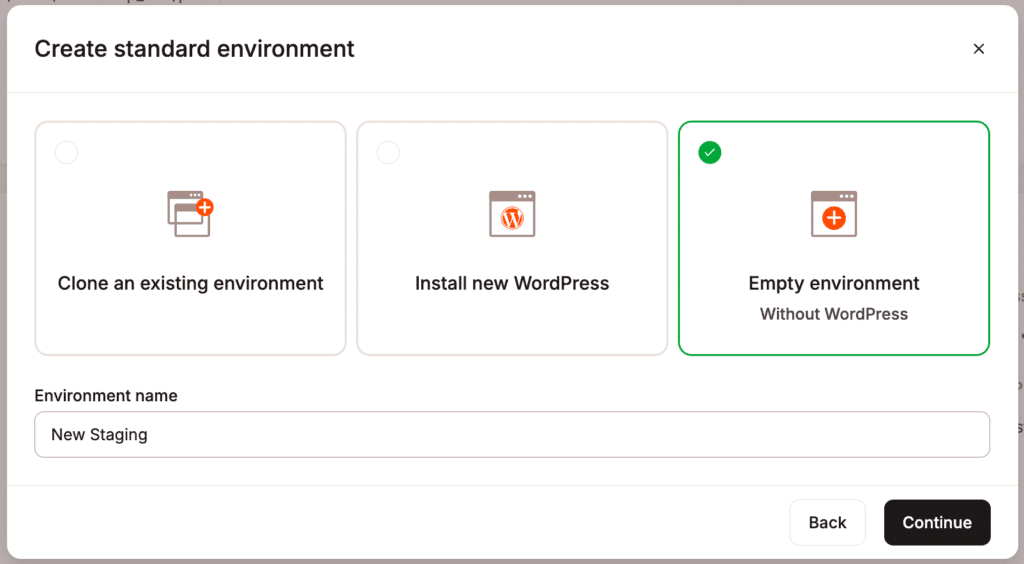
- Environment name: Enter a name for the staging environment name; this must be between 3 and 12 characters long.
Creating the staging environment
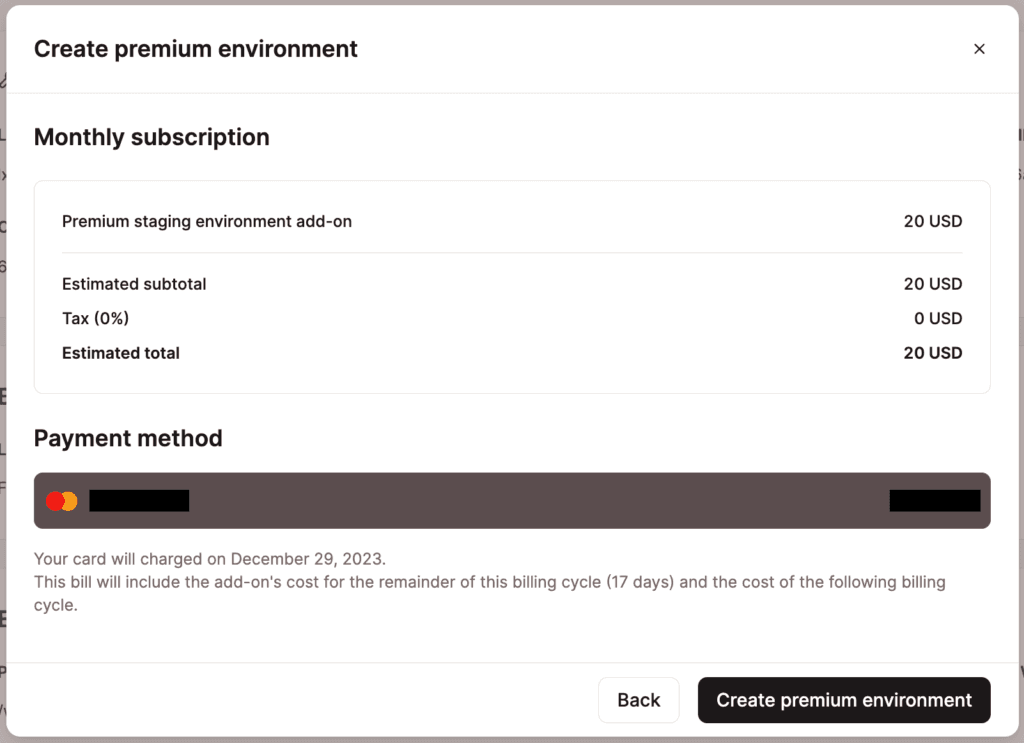
When you’re ready, click Continue. If you’re creating a Premium staging environment, confirm the recurring subscription and click Create premium environment.
Accessing your staging environment
Creating the new environment may take a few minutes. When it’s ready, within the site, click the environment type, for example, Live, and select the staging environment. You can also click the Jump to or search box to select the environment.
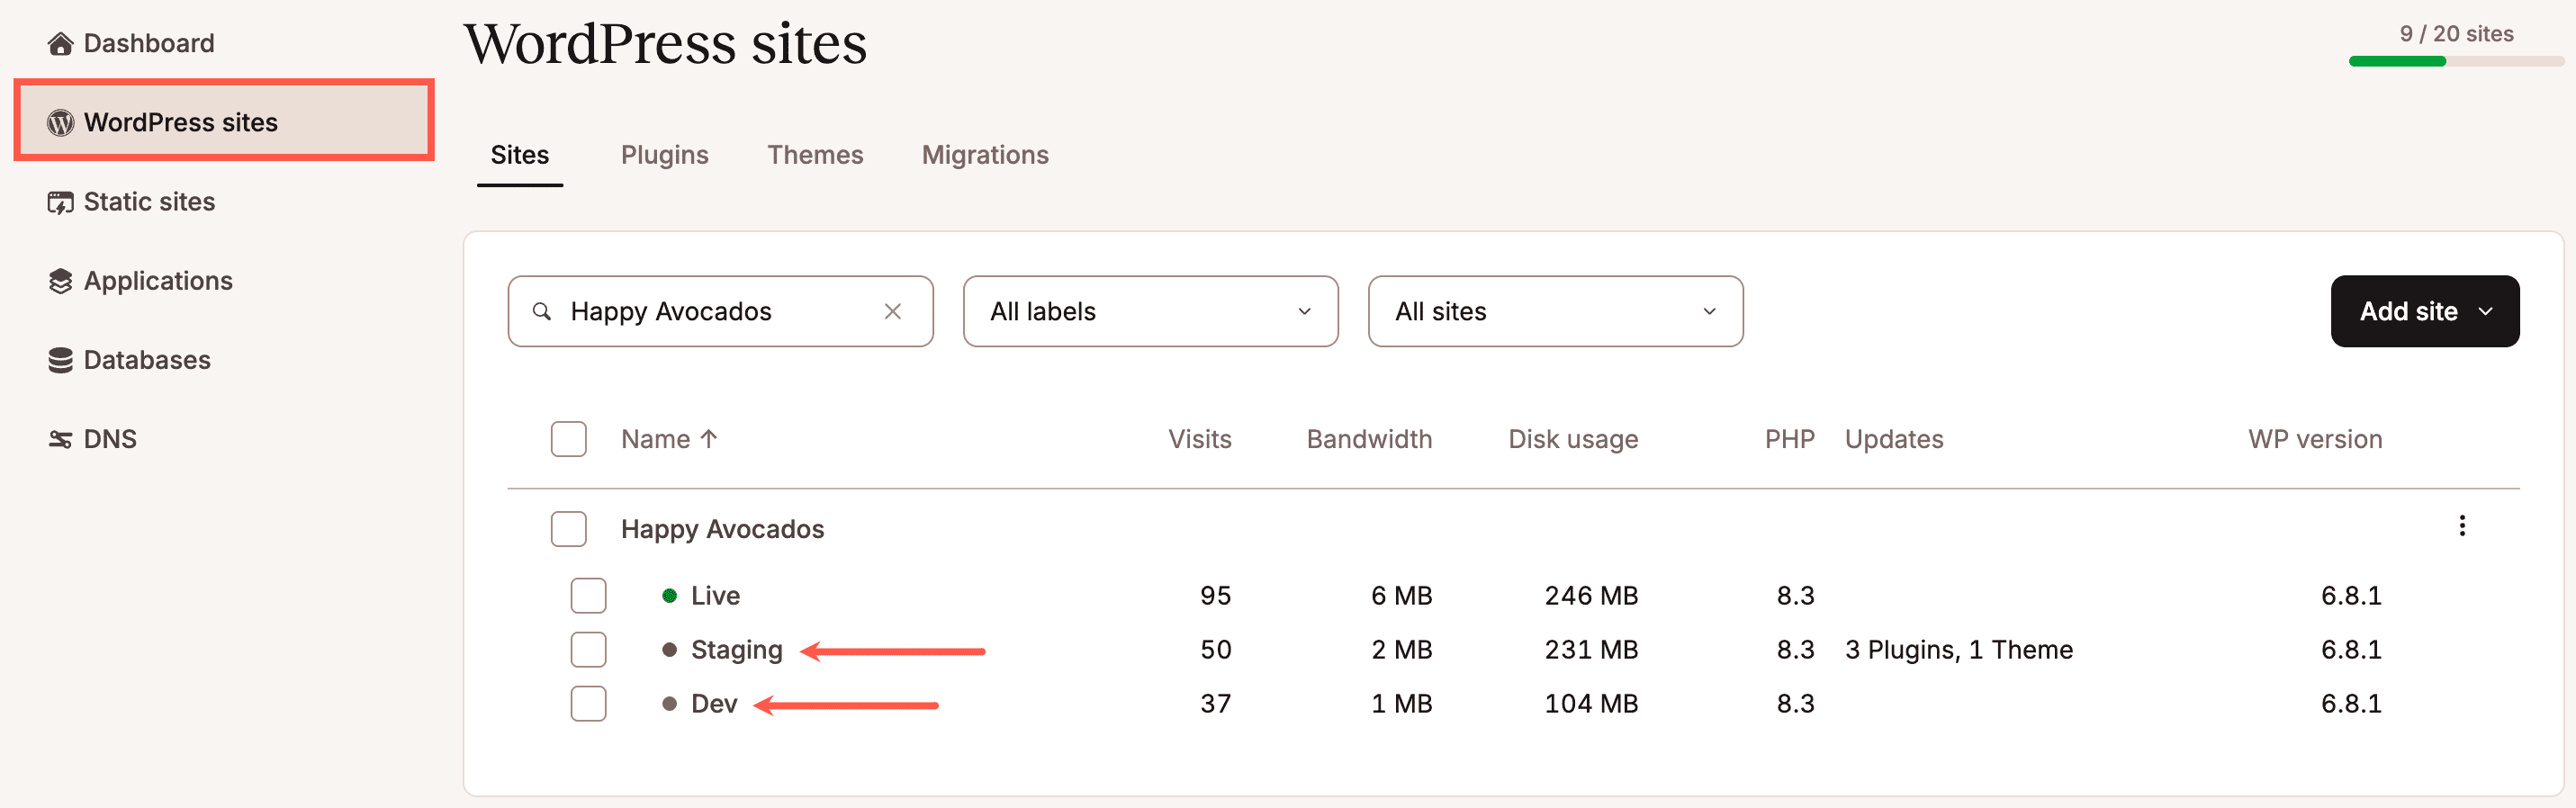
You can also access the staging environment from the WordPress Sites list.
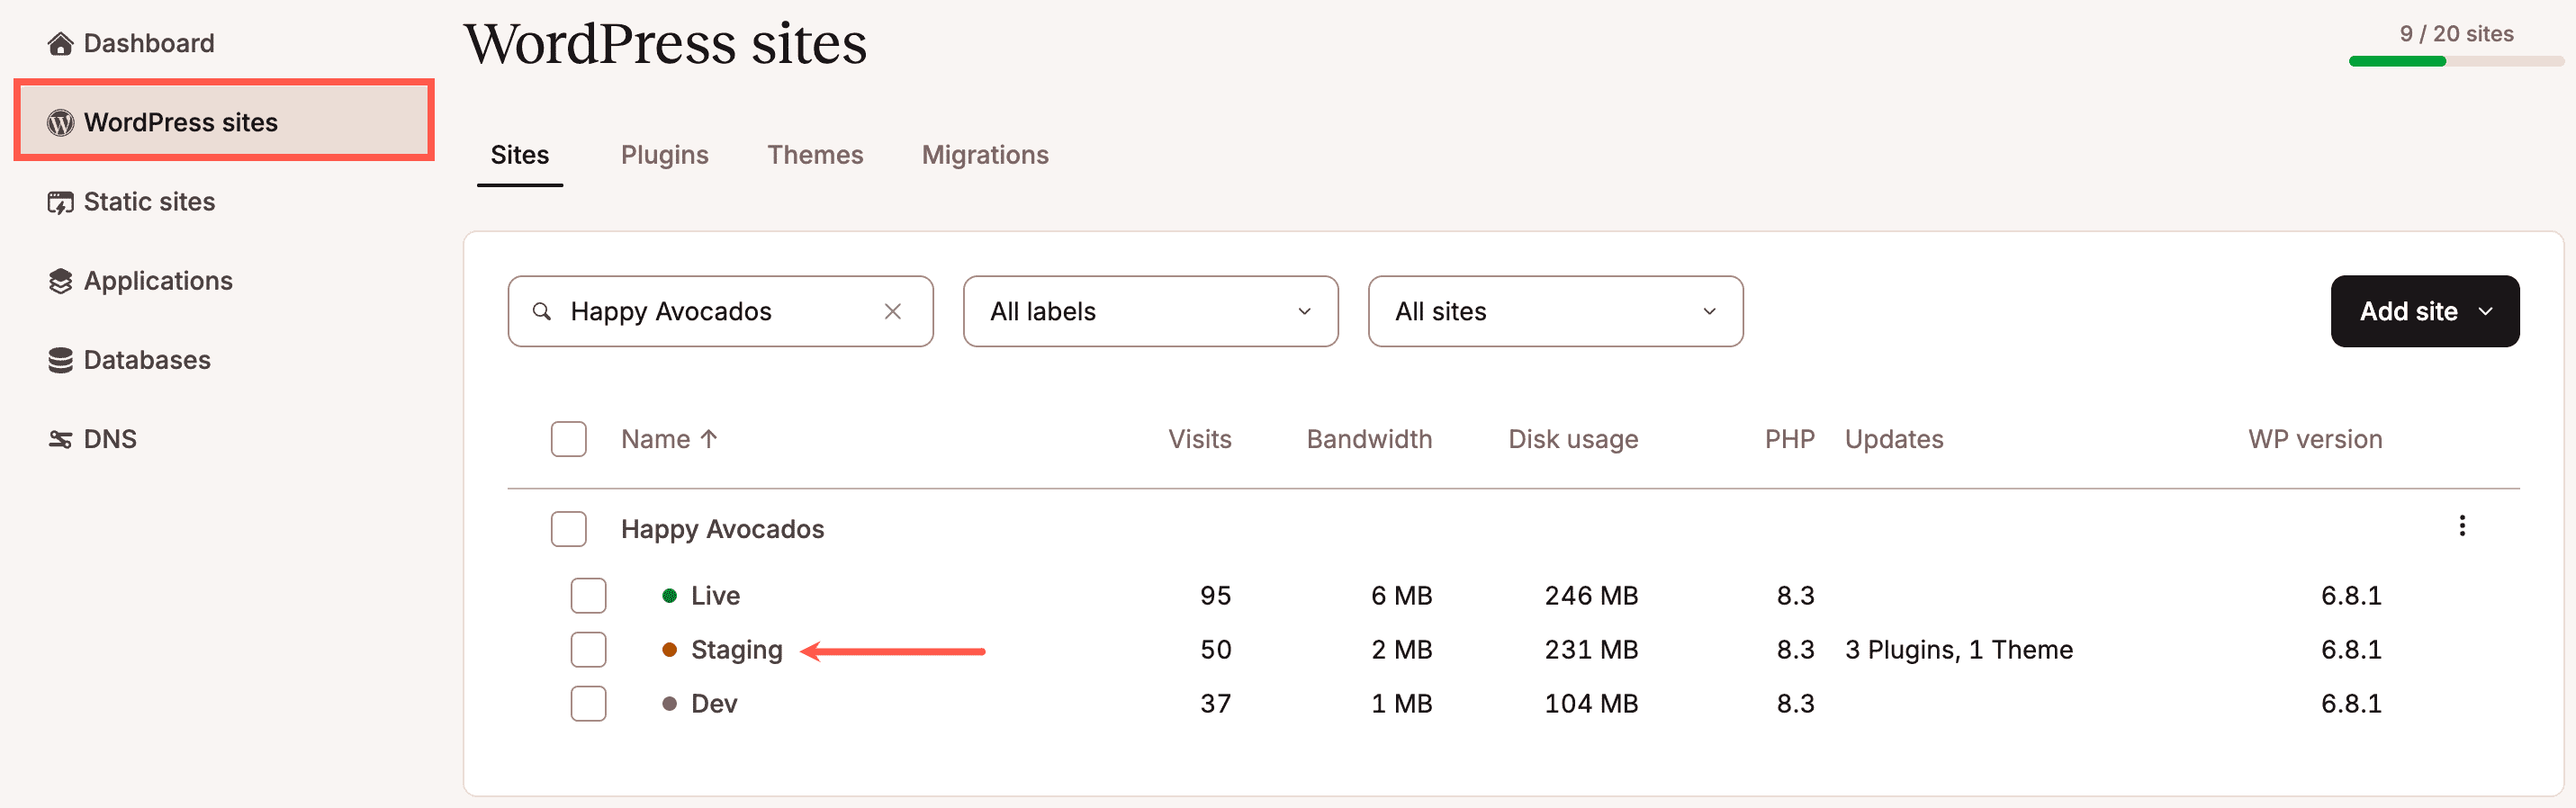
Each environment has a color-coded circle by its name: green for Live, black for Standard staging, and orange for Premium staging. You will then have a separate control panel with connection information, DNS, backups, tools, and plugins for your staging environment.
To quickly visit your staging site, go to the Domains tab in your staging environment and click on the Open URL link. You can also quickly get to your staging site’s WordPress admin by clicking on the Open WordPress admin link.
URL structure and domain
The default URL structure of your staging environment follows this format:
- Standard: https://stg-sitename-environmentname.kinsta.cloud
- Premium: https://env-sitename-environmentname.kinsta.cloud
If you have an older staging site, your URL may look like one of these:
- https://staging-sitename-environmentname.kinsta.cloud
- https://staging-sitename.kinsta.cloud
- https://staging-sitename.kinsta.com
You can also add a custom domain to your staging site if you prefer to use a custom domain.
Additional notes
If you have SSL enabled on your live site and clone the site to staging, SSL will also be enabled on your staging site.
You can launch phpMyAdmin from right within MyKinsta. On the Info tab, click on the Open phpMyAdmin link. The URL structure for phpMyAdmin staging follows this format:
https://mysqleditor-stg-sitename-environmentname.kinsta.cloud
Refresh the staging environment
If you make changes to your live site after creating the staging environment and want to reflect these changes in staging, you can use a selective push to update your staging environment. This way, you don’t need to delete and recreate the staging environment, saving time and retaining any staging backups.
Push environment to live
When you’re ready to push your staging environment to live, follow the steps within Push Environments. You can also push any live or staging environment to any other site.
Delete and refresh staging environment
If you need to remove your staging site, go to WordPress Sites and select the staging environment you want to remove. Scroll to the bottom of the page and click Delete environment.
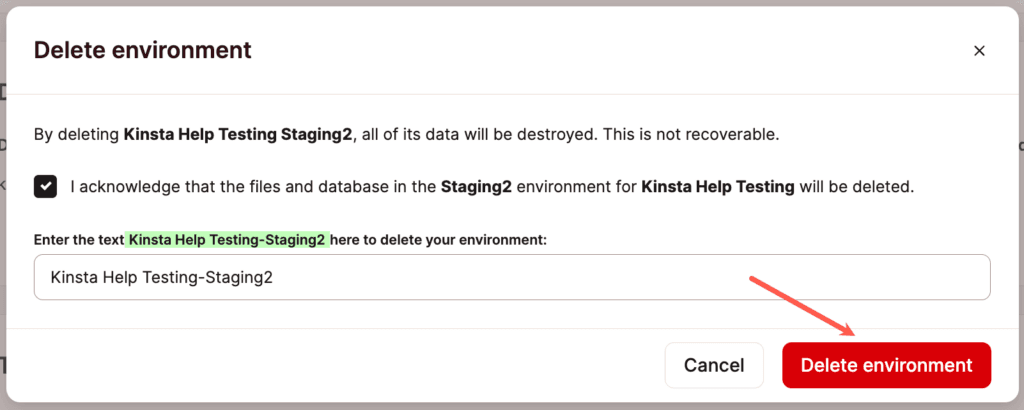
In the modal/pop-up that appears, confirm you understand what will be deleted, type the site name followed by a dash and the word “staging” (SITENAME-environmentname) in the field provided, then click Delete environment.
To refresh your staging environment, delete it, create a new one, and choose Option 1 – Clone an Existing Environment. This newly cloned staging environment will contain the most recent version of your production database and files for testing.
Alternatively, you can restore a backup from your production site to staging. The benefit of this method is that if you’ve added a custom domain, it won’t be deleted, and you won’t need to add it each time you refresh staging.
Restore a WordPress backup to staging
You can restore your WordPress site from a backup directly to your existing staging environment. Check out how to restore a WordPress backup to staging. Note: All staging backups will remain intact when restoring a live backup to staging.
Restart staging environment
In certain situations, we may stop a staging environment as part of a server troubleshooting process. If you notice your staging environment has been stopped and you see a 501 not implemented, a 502 error, or a 521 error when visiting your site, you can restart the staging environment in MyKinsta by going to your site’s Info page and clicking Start Staging Environment.

If you cannot restart your staging environment or don’t see the button in MyKinsta, please open a new chat with our Support team for further assistance.
Remove a staging environment
Once you’re through with your testing or development, you can remove the staging environment. Deleting a Premium staging environment add-on cancels the add-on.
If you remove the premium staging environment add-on and you’re in the first 30 days of your WordPress Hosting plan, a prorated fee for the add-on will be added to your next invoice for the time period it was enabled. If your WordPress Hosting plan has been active for more than 30 days, you will receive a prorated credit for the add-on fees to your Account Balance for the remaining days of the current billing period. The credit is automatically used to offset money owed to Kinsta on your next invoice. For more information, refer to our WordPress Hosting Money-Back Guarantee.
In MyKinsta, click WordPress Sites and select the environment you want to remove.
Scroll to the bottom of the page and click Delete environment.
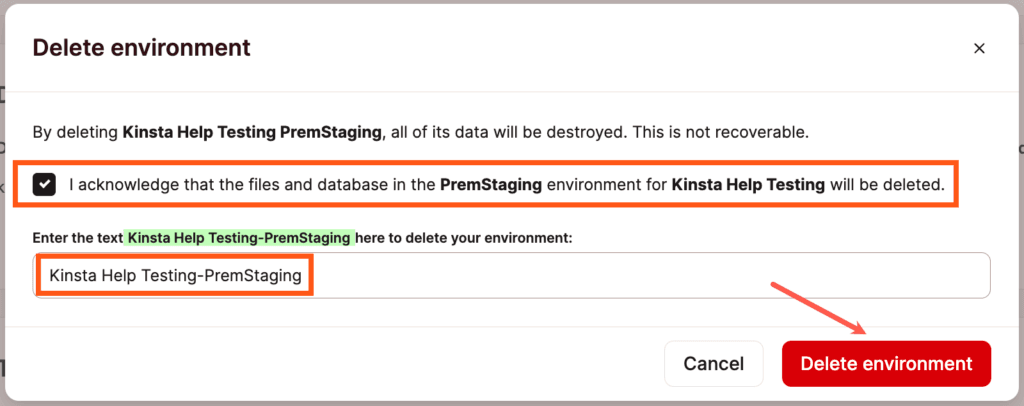
In the modal/pop-up that appears, confirm you understand what will be deleted, enter the site name followed by a dash and the environment name (SITENAME-EnvironmentName) in the field provided, then click Delete environment.
If you’re using a Premium staging environment, once the staging environment has been deleted, the add-on subscription is automatically removed from Company > My Plan in MyKinsta.
Important notes
When you use the staging environment, there are several important things to be aware of.
1. Page cache settings for staging sites
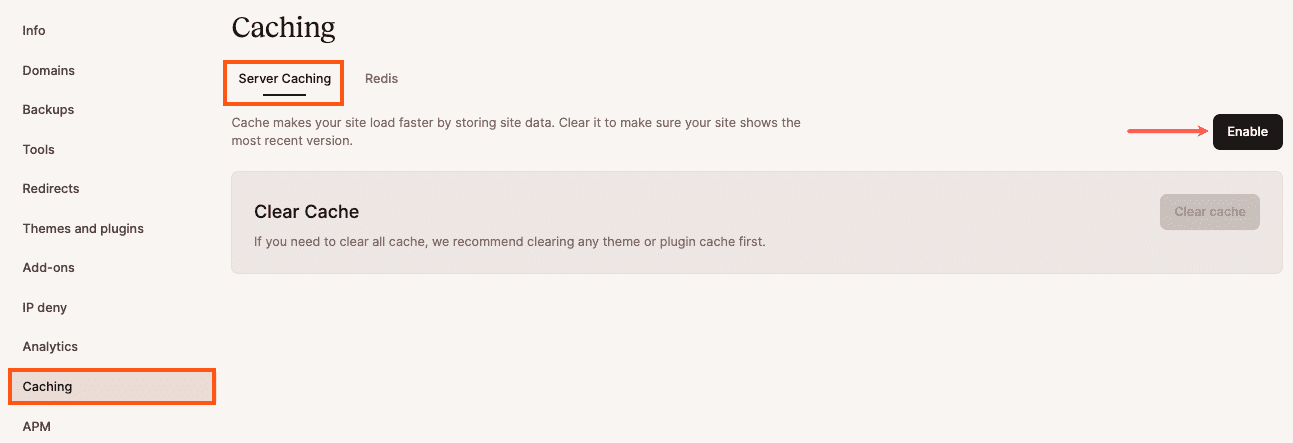
Because staging environments are for development purposes, debugging, and testing, Kinsta’s full-page caching and OPcache are disabled by default. If you run website speed tests, you will see higher-than-average load times since the pages aren’t being served from the cache. If you want to enable caching on a staging site within the staging environment, click Caching > Server Caching > Enable. When caching is enabled on a staging site, Clear cache will be enabled and can be used to clear the cache. If you have a Premium staging environment, you can also enable CDN and edge caching.
2. Staging environment credentials
If the staging environment is a clone of your production site, your WordPress admin login credentials will be the same for both your live and staging sites unless you change them after creating your staging environment.
3. SEO
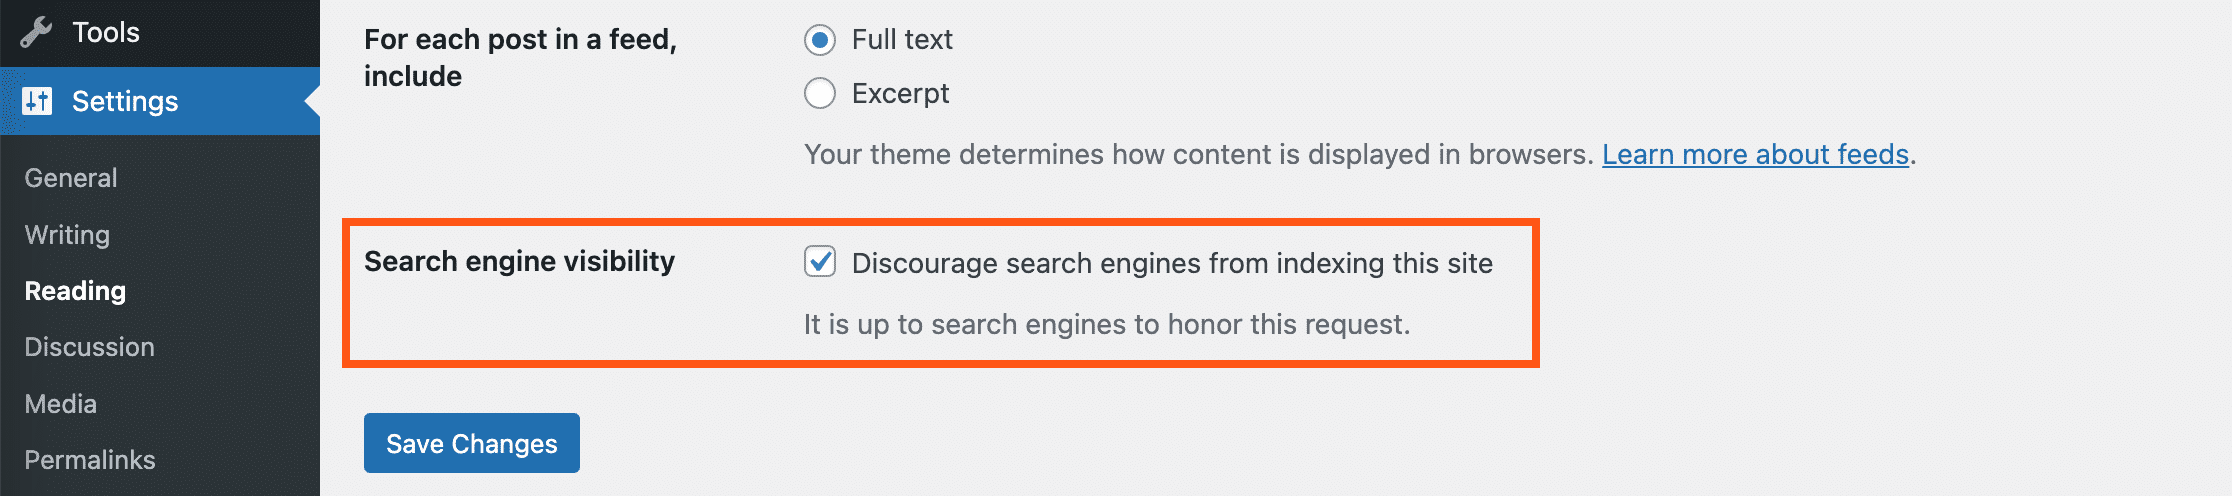
By default, indexing is turned off for Staging sites, so they don’t harm the SEO on your live/production site. This is done with the combination of a WordPress setting and an HTTP header that we automatically add.
You can see the WordPress setting by going to Settings > Reading in your staging site’s WordPress dashboard. The option to discourage search engines from indexing the site is checked beside Search Engine Visibility.
Kinsta temporary URLs and staging URLs also have a robot-restricting X-Robots-Tag: noindex, nofollow, nosnippet, noarchive HTTP header, meaning the temporary URLs won’t be indexed by the search engines. These headers cannot be removed from Kinsta temporary URLs or staging URLs. If you need these headers removed from the staging site, you’ll need to add a custom domain to it.
4. Plugins
If you use social scheduling plugins such as CoSchedule or Social Networks Auto Poster, it is recommended that you deactivate these plugins on your staging site. Otherwise, they might start sharing to social networks using your staging URL, which will look something like: https://stg-sitename-environmentname.kinsta.cloud. This could then skew your analytics.
Some plugins, like the Jetpack plugin, will automatically run in staging mode on Kinsta staging environments. You will see a message: “You are running Jetpack on a staging server.” While in staging mode, your staging site will act like your production site in virtually all ways, except no data is passed up to WordPress.com, and you cannot disconnect the staging site (to prevent an issue that would lead to problems with your production site).
Plugins licensed by domain name may require a custom domain (instead of a Kinsta staging subdomain) to work properly. Note: once you’ve added a custom domain name to your staging site, you may need to update the settings where you manage your plugin license or contact your plugin’s support team.
5. Make note of your login URL
If you clone your site to staging and use a WordPress plugin that changes your default login URL, the custom part of the URL will get copied over to the staging site. Example: http://stg-sitename-environmentname.kinsta.cloud/yourcustomlogin
6. Staging should be used for development/testing only
The Standard staging environment only has 2 PHP threads, has no option to enable Kinsta’s CDN, and may go to sleep after 24 hours of inactivity. Accordingly, it should be used for development and testing only. Staging environments (Standard and Premium) aren’t designed to be used for live production sites, and there may be things that don’t function correctly. Kinsta is not responsible if you try to use a staging environment for a live site.
7. Disk space excluded from the plan total
To give you as much space as possible, staging sites are excluded from our reporting when calculating your total disk space usage. Only live sites count against your disk space usage.
8. CDN bandwidth usage included in your plan
CDN bandwidth usage from Premium Staging environments is included in your total CDN bandwidth calculation.
9. Cron jobs
Server cron jobs from the live environment are not active in the staging environment (even if you clone your live site to staging), so the live site’s cron jobs won’t fire on the staging environment. Additionally, if you modify the crontab in your staging environment and push staging to your live environment, it will overwrite your live environment’s crontab.
10. Multisite
If you’re running a WordPress multisite network, it may or may not work with our staging environment, depending on how your multisite is set up.
- If it’s a subdirectory multisite (example.com, example.com/subsite1, example.com/subsite2), or a subdomain multisite (example.com, subsite1.example.com, subsite2.example.com), it will work fine with our staging environment. All subdomains are covered by Kinsta’s free SSL certificate.
- If it’s a domain-mapped multisite (loads different subsites at completely different domains, e.g. example.com, example1.com, example2.com), it won’t work without significant manual setup.
- Option 1: Turn off domain mapping and go back to the standard subdirectory/subdomain setup. Do a search and replace in the database manually.
- Option 2: Set up staging subdomains for each live domain, add all those to the staging site, and manually run a search and replace in the database.
11. Email
Staging environments have mail-sending (transactional email) enabled by default. If you make an order on the staging site, you will receive related emails from the staging site. If you do not wish to have transactional emails sent from your staging environment, you can use a plugin like Disable Emails to stop the site from sending emails.
FAQ
What is prorating?
When we prorate a service like the Premium staging environment add-on, it means you will be charged based on how long the service was in use for that monthly billing cycle.
Proration example
You have a new feature to roll out on your site and want to test it with the full power of your plan. You create a Premium staging environment, add the new feature, and test for 1 hour. Everything looks great, so you push the change to your live environment and delete the Premium staging environment.
- 1 month of a Premium staging environment is $20.
- Based on a 30-day month, this billing cycle has 720 hours total.
30 * 24 = 720 - Each hour of use is $0.03.
$20 / 720 = $0.03 - Your next invoice will include the $0.03 due for the 1 hour a Premium staging environment was added to your plan.
Proration example
You purchase a Premium staging environment in the middle of your monthly billing cycle and use it through the end of that cycle. You will be charged for half a month of use (approximately $10, prorated to the second).
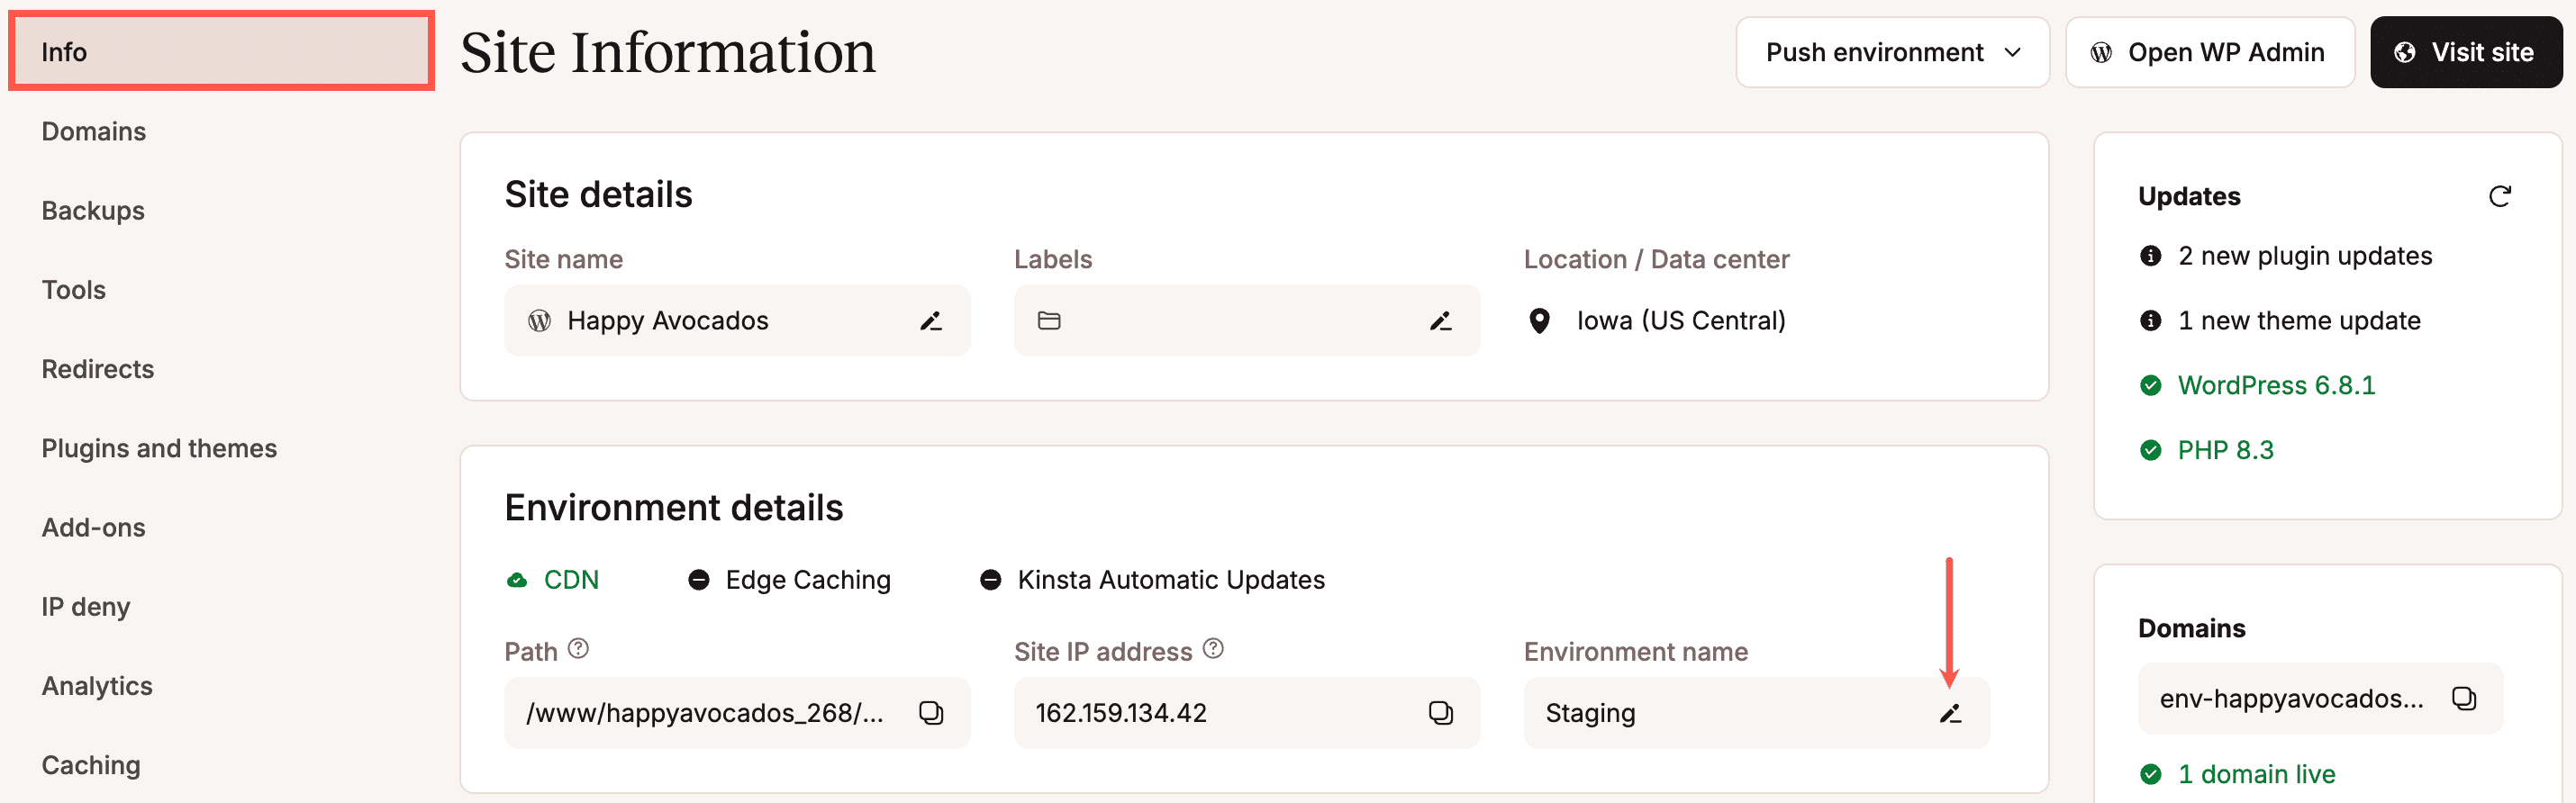
Can I change the name of a staging environment?
Yes. Switch to the environment you want to rename, and on the Info page, click the edit icon (pencil) in the Environment name field.
Enter the new name and click Rename environment.
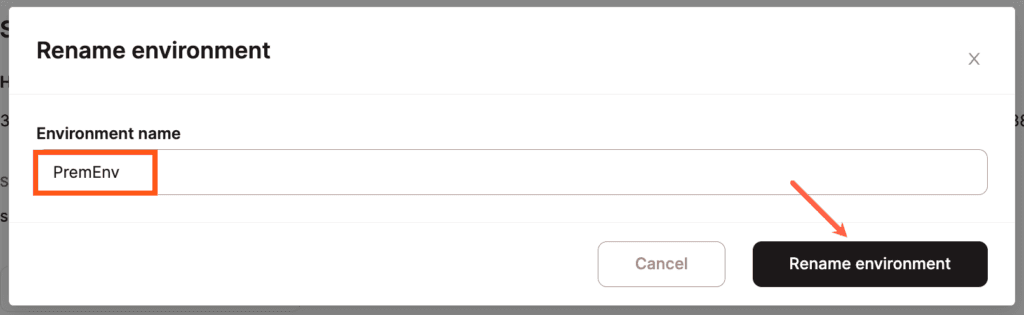
This will change the name of the environment shown in the Environment selector but will not affect the kinsta.cloud domain generated during the initial environment creation.
Can I restore a backup to a staging environment?
Yes, but you must create a Standard or Premium staging environment first. In the past, it was possible to create a staging environment automatically when restoring a backup. With the introduction of Premium Staging Environments, you’ll first need to create the staging environment before restoring a backup.
You can also push changes from your live site to your staging site, and if you only want to update certain files or database tables you can do a selective push.
Who has access to Premium staging environments?
Site developers and site administrators have access to Premium staging environments that have been created but cannot create or delete a Premium staging environment. Only a company owner or company administrator can create or delete a Premium staging environment.
Does staging use up my disk space?
No. To give you as much space as possible, staging sites are excluded from our reporting when calculating your total disk space usage. Only live sites count against your disk space limit.
If I test a plugin on the staging environment and push only the files to live, will it create the corresponding database tables for the plugin?
If you install a plugin on your staging site that’s never been installed on the live site, pushing only the files from staging to live will not create the database tables for that plugin.
This also means that any settings you’ve configured in the plugin will not be pushed to live (unless the settings are saved in a file outside of the database, like in a JSON file, for instance).
Depending on how the plugin is coded, enabling (first disabling if necessary) the plugin on the live site may create the database structure.
If I push only the files to live, does this mean the old database (in staging) will not overwrite the live one, and only the files will be overwritten?
Yes, when pushing only the files, this means that the database on the live site remains unchanged, and only files on the live site will be overwritten.
Does this mean that I can work on design changes on my staging site and push those to live without losing any new subscribers or customers on my live site?
Yes, as long as your changes are made only to files (no changes made in the WordPress dashboard — including plugin, theme, or customizer settings), you can safely push those to live without pushing the database. When you push the changes to live, select Files and make sure Database is not selected.
Can I exclude or synchronize WooCommerce orders or data when pushing from staging to live?
Yes, when you push staging to live with a selective push, you can push files only so your database is not overwritten, or you can selectively push database tables and exclude the required WooCommerce tables. For information about what is included in each WooCommerce database table, refer to the WooCommerce Database Description. If you’re unsure which tables to push, we recommend working with a developer.
Can I push only one site from staging to live if I have a Multisite?
Yes, when you push staging to live with a selective push, you can choose to push only the database tables for one of the subsites. To find out what database tables are included in WordPress, refer to A Beginner’s Guide to WordPress Database: What It Is and How to Access It. In the files, the plugins and themes folders are shared across all sites, but the uploads folder can be separated by site; therefore, you can choose to only push the uploads for the required subsite. If you’re unsure which tables or files to push, we recommend working with a developer.
Can I use selective push to change my site’s PHP version?
Yes, you can use staging to test and push a new PHP version to your live environment, but it isn’t strictly necessary to push from staging to live to update your PHP version. Here’s a brief overview of how you would change the PHP version without pushing from staging to live:
- Create a staging site.
- Go to the staging site and change the PHP version on the staging site.
- If everything is okay and working as expected on the staging site (be sure to test your site thoroughly), switch the PHP version on the live site.
I made CSS changes in the WordPress dashboard and pushed files. Why am I not seeing my changes, even after clearing all of the cache?
Depending on the type of change made and where that information is stored, you may need to push the database or make those changes manually on the live site. For instance, if you added or edited CSS in a block or widget in the WordPress dashboard, that would probably be saved to the database.
If you make changes to something in the WordPress dashboard, with the exception of changes made with the Theme Editor (Appearance > Theme Editor), that information is usually stored in the database.
Note: Any changes to the live site’s database since the staging site was created will be lost, including but not limited to: comments, new content, purchases on ecommerce sites, sign-ups on membership sites, and forum posts. In this case, we recommend making the same changes manually on the live site rather than pushing the database.
How does selective push work with a multisite network?
If you use selective push to only push the files, it will work fine, regardless of the type of multisite network. If you push just the database or the database and files, it may or may not work, depending on how your multisite is set up:
- If it’s a subdirectory multisite (example.com, example.com/subsite1, example.com/subsite2), push to live will work as expected.
- If it’s a subdomain multisite (example.com, subsite1.example.com, subsite2.example.com), it will work fine, provided the subsites don’t require HTTPS.
- If it’s a domain-mapped multisite (loads different subsites at completely different domains, e.g., example.com, example1.com, example2.com), it won’t work without significant manual setup.
- Option 1: Turn off domain mapping and go back to the standard subdirectory/subdomain setup. Do a search and replace in the database manually.
- Option 2: Set up staging subdomains for each live domain, add all those to the staging site, and run a search and replace in the database manually to update each domain after pushing staging to live.