WordPress Hosting Plans
This article contains all the information you need about Kinsta’s WordPress Hosting plans, including how Kinsta counts WordPress install, how to add a new plan, manage multiple plans, switch your plan, and request a custom or agency plan.
If you’re thinking of leaving Kinsta or need to remove a WordPress plan, refer to Cancel WordPress Plan.
How Kinsta counts WordPress installs
Kinsta offers a variety of WordPress hosting plans to meet our customers’ different needs. Each plan, from Single 35k to WP 60 and beyond, has its own unique combination of metrics like monthly visits, SSD storage, and CDN bandwidth.
For many of our customers like web design and development agencies, the most important plan metric is the number of WordPress installs.
What is a WordPress install?
When you choose your Kinsta plan, you can choose a single-site or multiple-site plan. The multiple-site plans support a certain number of WordPress installs. As an example, our WP 2 plan supports two WordPress installs, while our WP 80 plan features 80 WordPress installs.
On our hosting platform, a WordPress install or “site” consists of two environments – live and staging – both of which support a single installation of WordPress Core software in their respective MySQL databases. You can also purchase Kinsta’s Premium Staging Environment add-on for $20/month per environment (prorated). You can purchase up to 5 premium staging add-ons.
We do not allow for the creation of additional databases in PHPMyAdmin, command line, or any other method. In other words, the only way to create an additional database at Kinsta is to add a new site or WordPress install.
WordPress installs vs domains
WordPress is capable of operating in two different modes – single-site and multisite.
WordPress single-site mode
In the default single-site mode, you can map domain.com and www.domain.com to resolve to a single WordPress site. If you want your site to be accessible over other domains like old-domain.com and www.old-domain.com, you can use redirect rules on your webserver to accomplish that. For example, if you want your Kinsta site to be accessible over domain.com, www.domain.com, old-domain.com, and www.old-domain.com, you can add all four domains to your Kinsta site and set up an automatic 301 redirect to your primary domain with our Force HTTPS tool.
We do not count each domain as an individual WordPress install because each domain resolves to the same WordPress install. All verified domains at Kinsta are automatically protected by our Cloudflare integration, which includes free SSL certificates with wildcard support. Kinsta currently enables TLS 1.2 and TLS 1.3 on all SSL certificates, both of which are secure and supported by all major browsers.
WordPress multisite mode
WordPress also includes a multisite mode, which allows you to create additional subsites that reside in the same MySQL database as your primary site. At Kinsta, we permit WordPress multisite configurations on all plans except the Single 35k plan. With WordPress multisite, you can host domain, subdomain, and subdirectory subsites in a single WordPress install.

For example, all five of the domains below can be hosted in a single WordPress install on Kinsta when you use multisite mode.
- domain.com (domain)
- www.domain.com (subdomain)
- domain.com/es/ (subdirectory)
- Fr.domain.com (subdomain)
- Another-domain.com (domain)
In multisite mode, the main site and all subsites utilize the same resources, including high-performance C3D CPUs, RAM, and PHP threads. Kinsta provides plans capable of supporting hundreds of WordPress installations, with each installation benefiting from dedicated resources.
For instance, our WP 120 plan accommodates 120 WordPress installs, with each one allocated 12 PHP threads. In contrast, attempting to host 120 subsites on a WP 10 plan would mean all sites sharing 4 PHP threads.
It’s worth noting that WordPress multisites come with limitations regarding plugin and theme flexibility, making them less suitable for scenarios requiring multiple unique WordPress sites.
First month free
If you’re considering hosting your site with Kinsta, you can sign up for our Single 35k or WP 2 plan and enjoy the first 30 days free, whether you choose monthly or annual billing. Billing begins in the second month, setting your ongoing monthly or annual billing date.
If you subscribe to any add-ons, they will also be free for the first 30 days of your WordPress Hosting plan or for as long as the free period is active. This excludes the dedicated server add-on and expedited migrations and is subject to the following limitations:
- Disk space add-on – 2 x 20GB of additional disk space
- WordPress site add-on – 2 additional sites
- Premium staging environment add-on – 2 premium staging environments
- PHP performance – 1 x 512MB added to the total memory pool.
To remove these restrictions, you’ll need to end the free period and begin your plan’s billing cycle. Contact our Billing team to start payments before the first free month ends.
Overages are still applicable during your first free month. If you exceed your plan’s limits, overage charges will be applied and billed at the end of the month when your plan renews. If you cancel your plan within the first free month, any accrued overages will be charged at the time of cancellation. If overage notifications are enabled, you’ll receive an email notification when you reach 80% and 100% of your plan’s usage.
Billing begins in your second month and you will be charged for the plan and any add-ons from this date. For example, if you sign up for a Single 35k plan on 1 September and add the Premium staging environment add-on on 15 September, the add-on is free until 30 September, when your free period ends. If you upgrade to a plan that doesn’t include the first month free, the add-on becomes chargeable from the date you switch plans. If you no longer require the add-on, you can cancel it before your plan renews or before you switch, and you will not be charged for the time the add-on was active during the free period.
You have the flexibility to switch plans at any time. If you switch from the Single 35k plan to the WP 2 plan within the first 30 days, your free period will continue for the remainder of the 30 days. If you upgrade to a plan that doesn’t include the first month free, the free period will end, and billing will start from the date of the switch. However, you’ll still qualify for our 30-day Money-Back Guarantee, which will begin from the date you switch plans. If you switch back to a plan that includes the first month free, the free month won’t be reinstated, but the Money-Back Guarantee will remain valid for 30 days from when you first switched to a plan without a free month. For example, if you sign up for a Single 35k plan on 15 September and then switch to a Single 315k plan on 1 Oct, the free month ends, but the money-back guarantee period starts. If you then switch to a WP 2 plan on 20 October, the money-back guarantee still applies until 30 October.
Please note the free month offer applies only to the first WordPress plan you subscribe to. If you cancel your WordPress plan during the free month period, it will be terminated immediately, and you won’t be eligible to start another plan with a free month.
Add a new plan
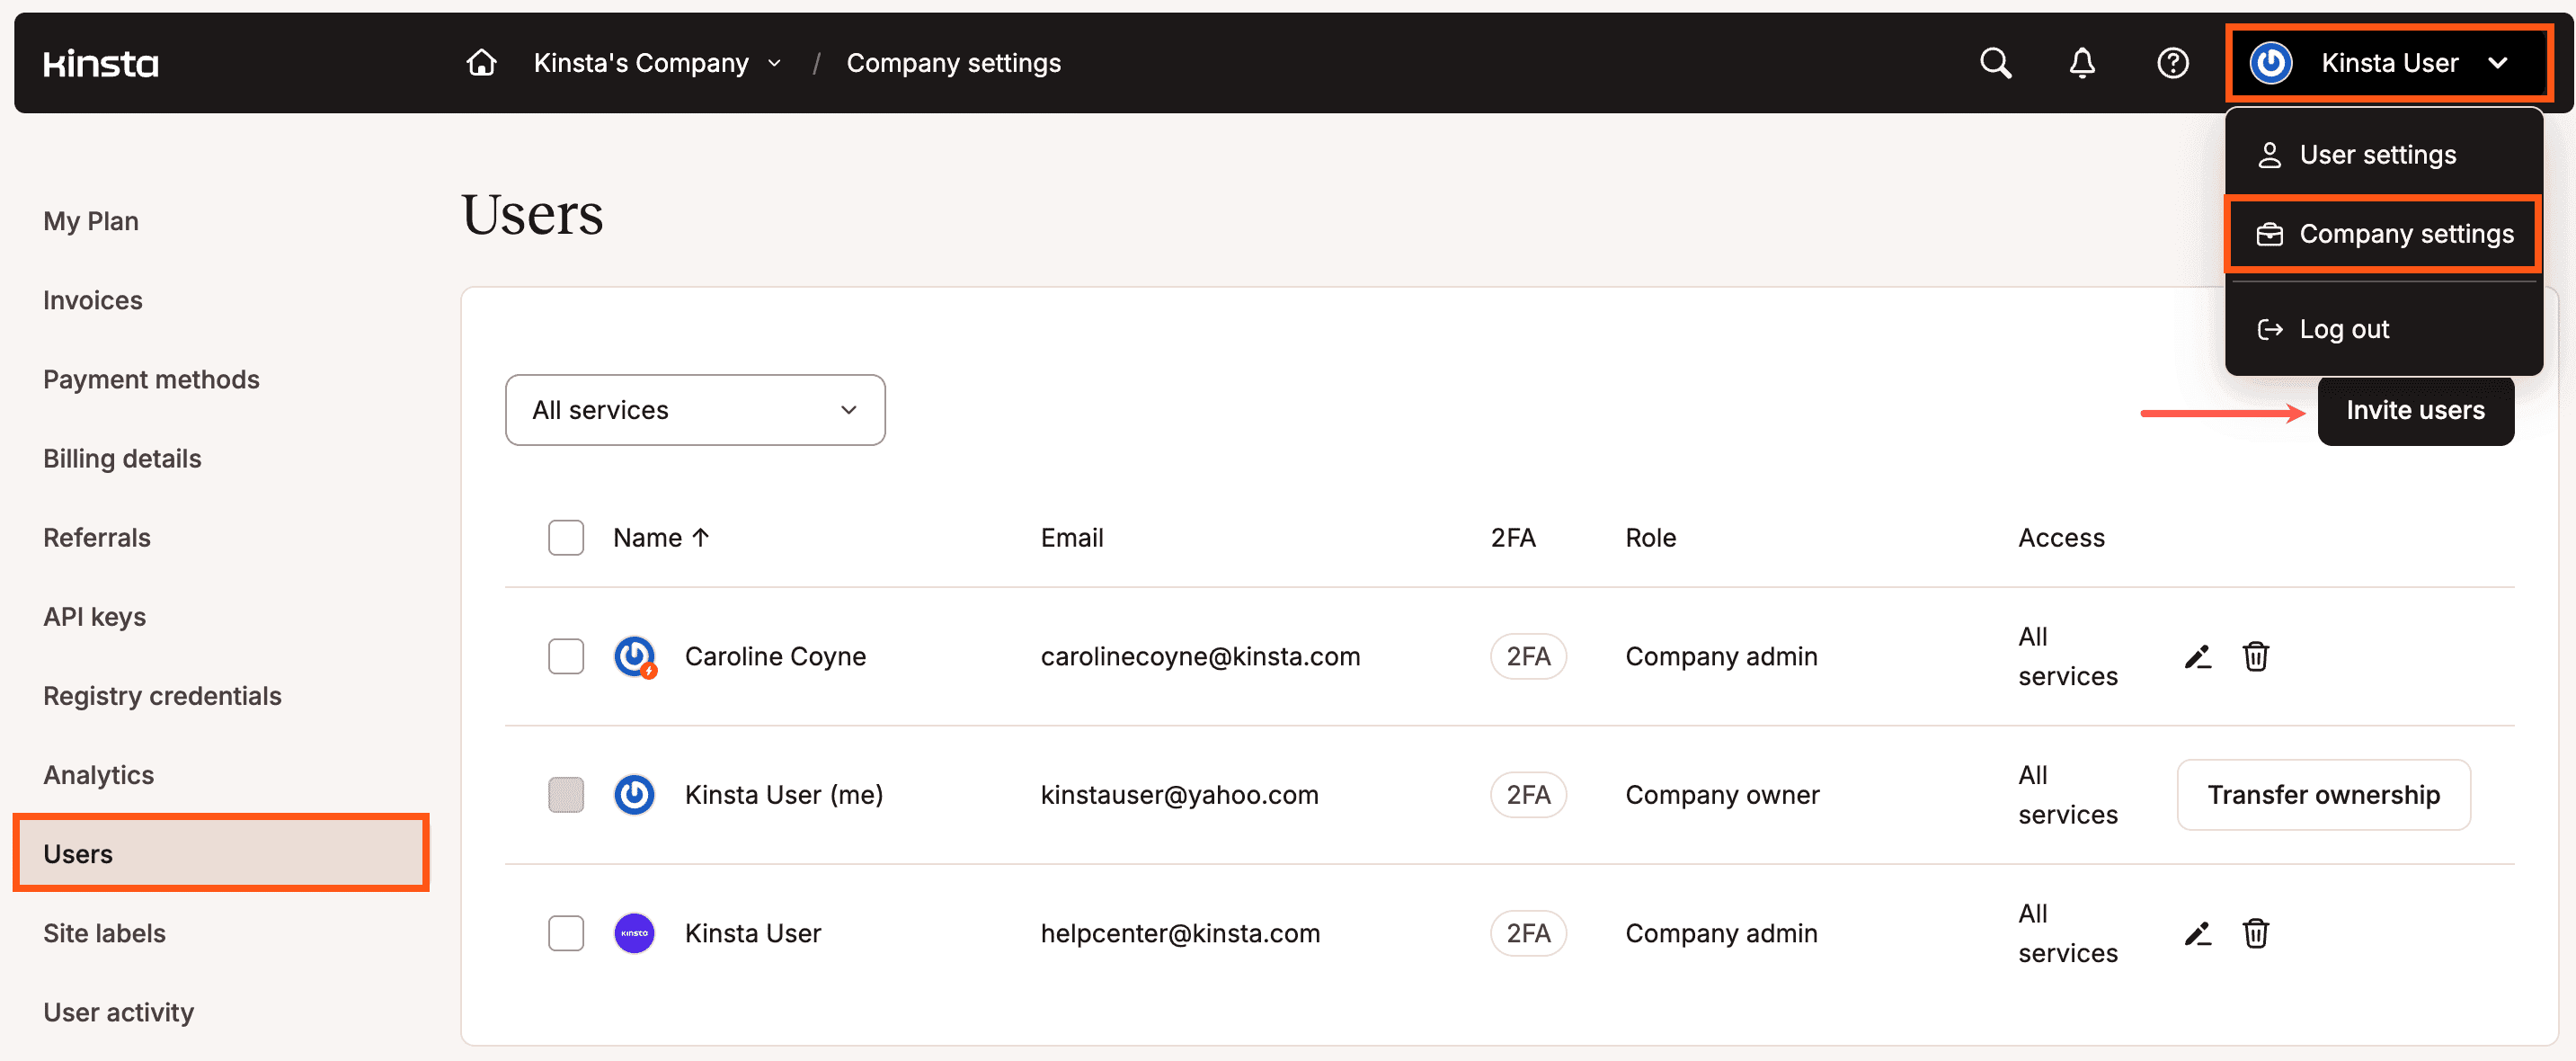
- In MyKinsta, click your username > Company settings > My Plan.

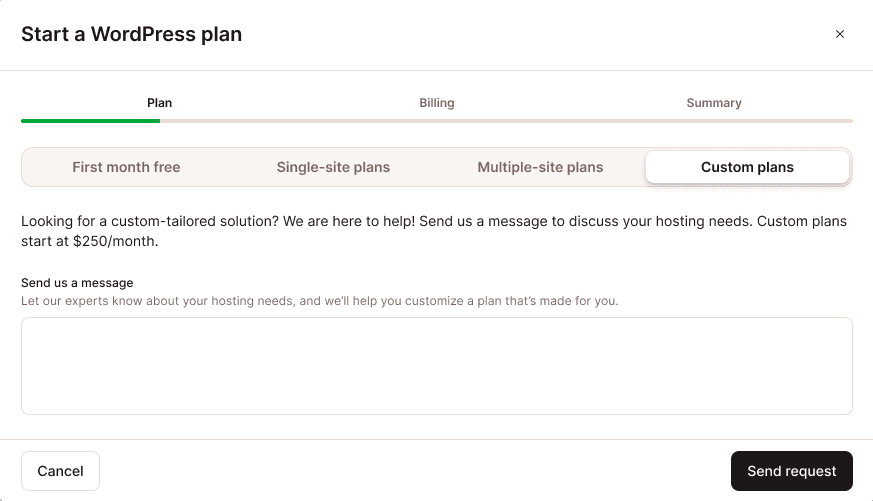
Go to the Plans & subscriptions page in MyKinsta. - Click Start WordPress Plan in the WordPress site section. Choose First month free, Single-site plans, Multiple-site plans, or Custom plans. Then choose Monthly or Yearly, select your WordPress plan, and click Continue.

Start a new WordPress plan in MyKinsta. - Complete the Billing and Summary steps, adding a new payment method if needed.
When a new payment method is added, we place a $1 temporary hold on your card to verify it’s valid. This hold should be released within 24 hours, but in rare cases may last longer.
Disk space add-on
All hosting plans at Kinsta include a set amount of SSD disk space, you can check your total disk space usage on the Resource usage chart on the Dashboard in MyKinsta. If you exceed your plan’s disk space allocation, we charge an overage fee. With our disk space add-on, you can increase your hosting plan’s storage space without upgrading your plan or incurring overage fees.
Add disk space
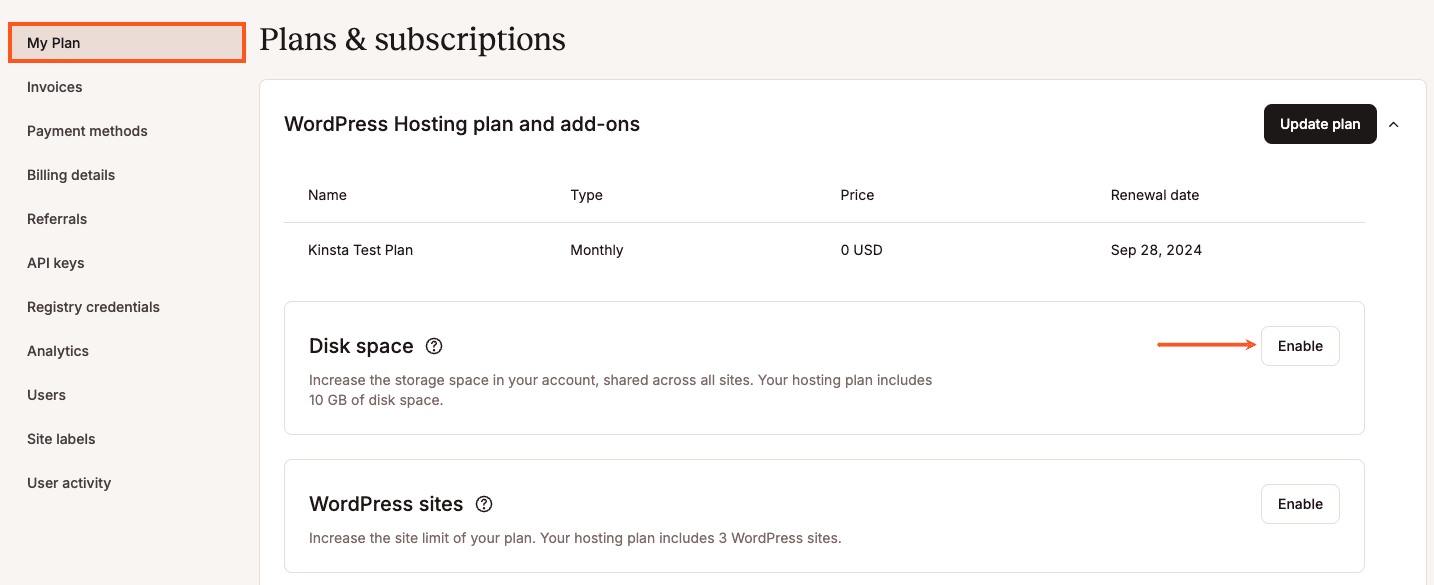
To add the disk space add-on, within MyKinsta, click your username > Company settings > My Plan, and within Disk space, click Enable. You can also enable the disk space add-on within Add-Ons.
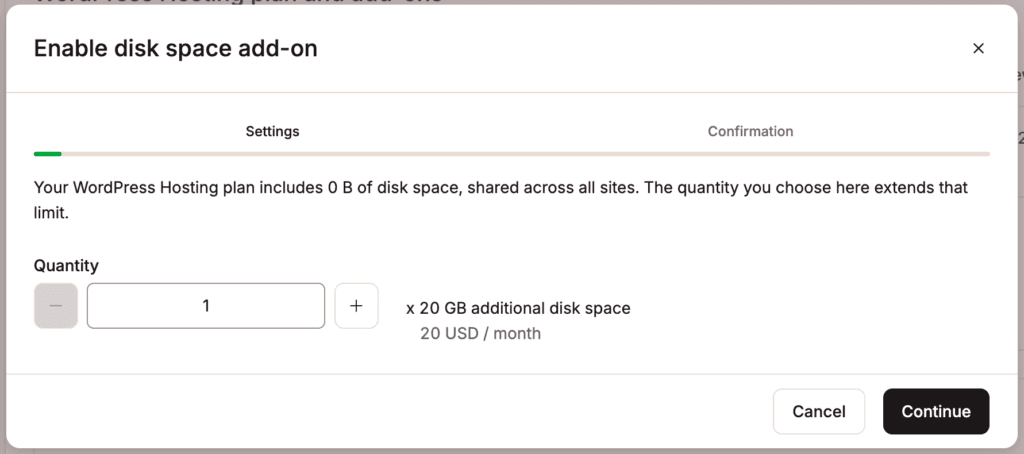
The disk space add-on can be purchased in 20 GB increments at $20/month per hosting plan. You can purchase as many of these add-ons as you want. Choose how much additional disk space you would like to add, and click Continue.
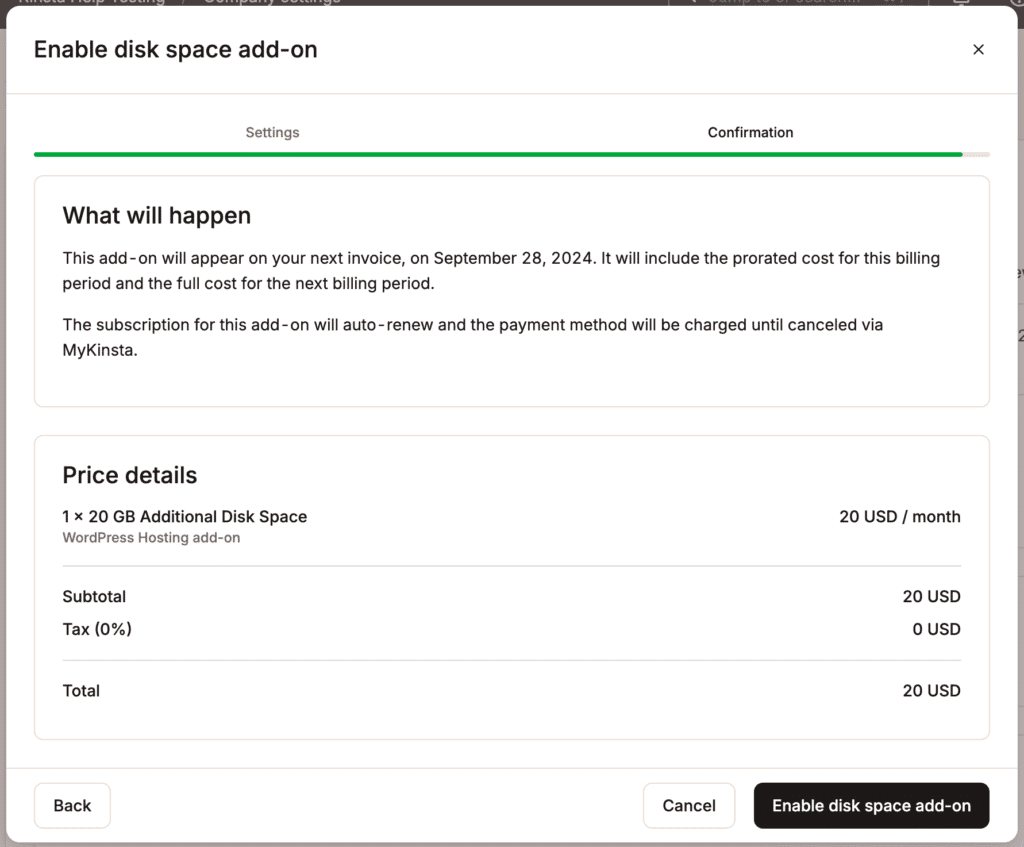
Review the price details and click Enable disk space add-on.
Change the amount of disk space
To change the disk space site add-on, within MyKinsta, click your username > Company settings > My Plan, and within Disk space, click Change.
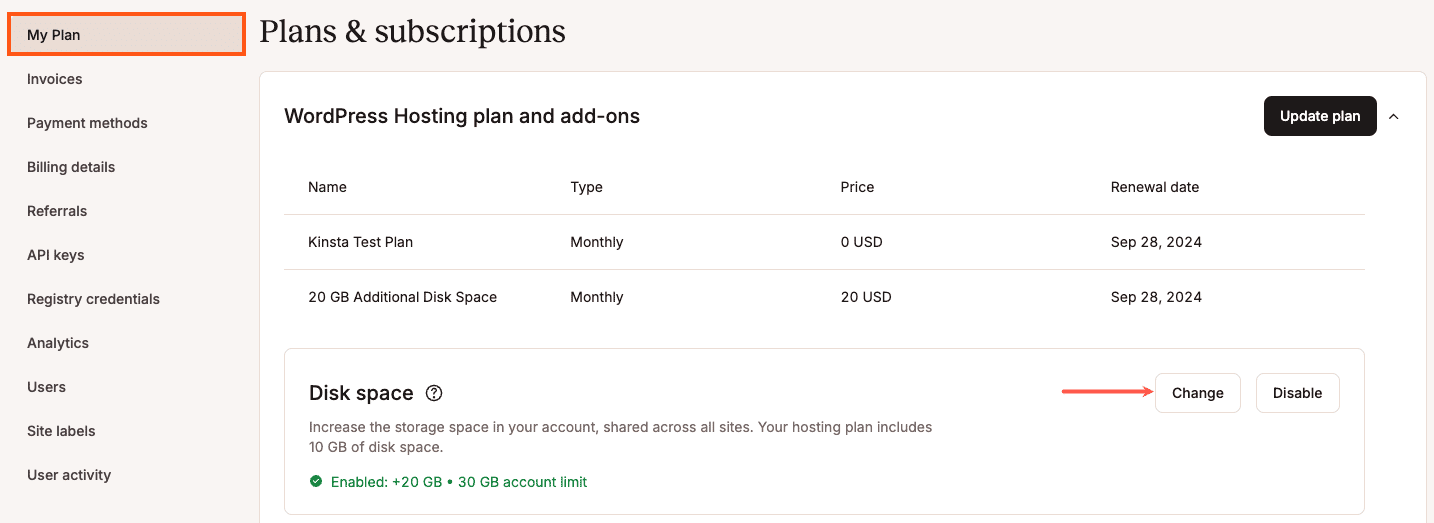
Increase or decrease the quantity and click Continue.
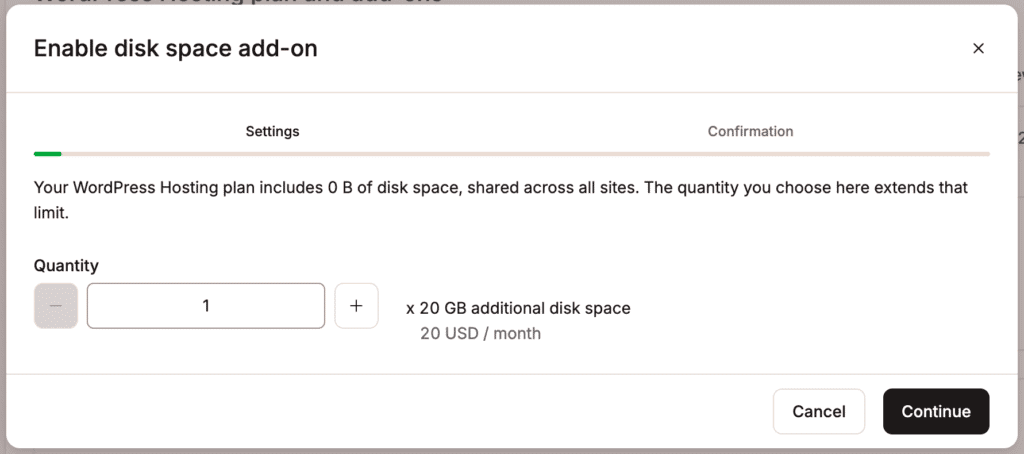
If you increase or decrease the disk space, the new price details are shown. If you change the quantity to zero, the add-on is disabled. To confirm the changes, click Change disk space add-on.
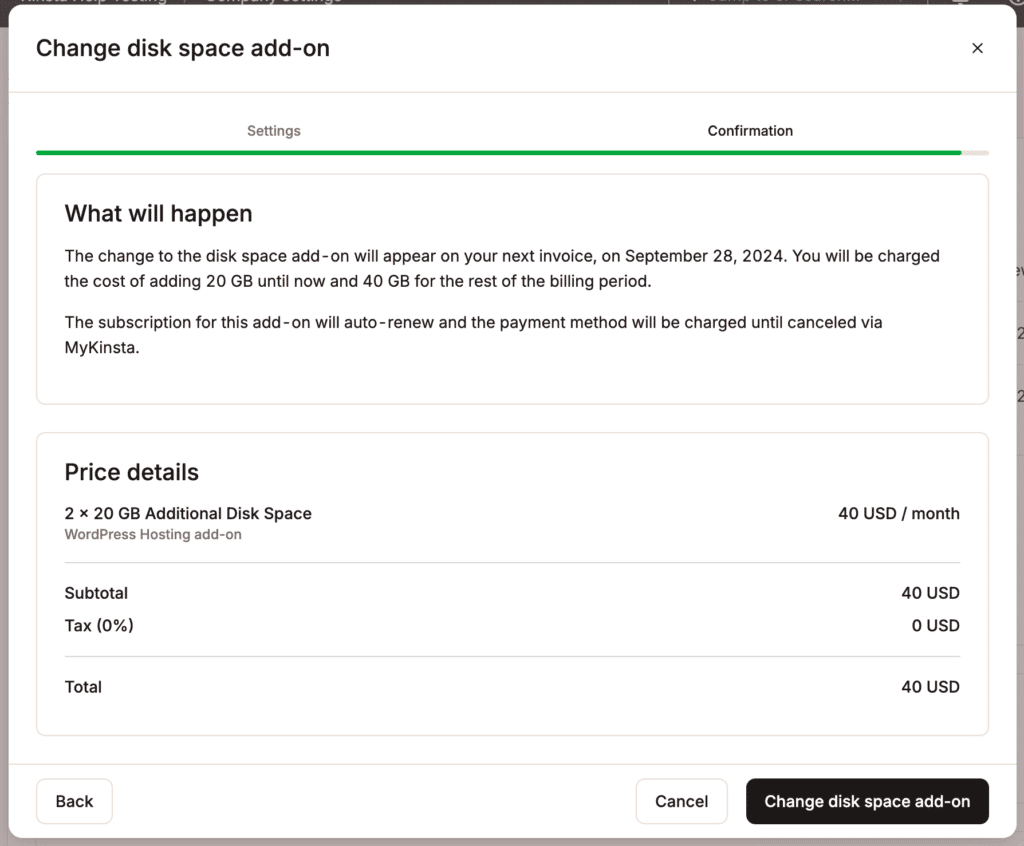
If you reduce the quantity or change it to zero, and you’re in the first 30 days of your WordPress Hosting plan, a prorated fee for the add-on will be added to your next invoice for the time period it was enabled. If your WordPress Hosting plan has been active for more than 30 days, you will receive a prorated credit for the add-on fees to your Account Balance for the remaining days of the current billing period. The credit is automatically used to offset money owed to Kinsta on your next invoice. For more information, refer to our WordPress Hosting Money-Back Guarantee.
Disable the disk space add-on
To disable the Disk space add-on, within MyKinsta, click your username > Company settings > My Plan, and within Disk space, click Disable.
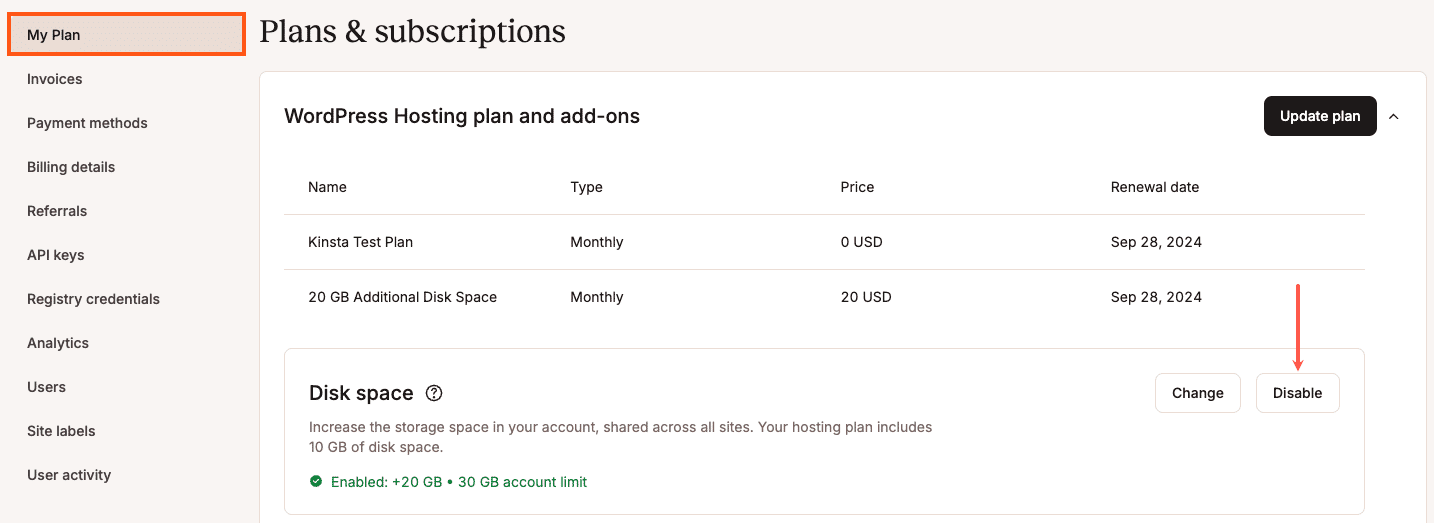
To confirm you want to disable the add-on, click Disable.

If you disable the disk space add-on and you’re in the first 30 days of your WordPress Hosting plan, a prorated fee for the add-on will be added to your next invoice for the time period it was enabled. If your WordPress Hosting plan has been active for more than 30 days, you will receive a prorated credit for the add-on fees to your Account Balance for the remaining days of the current billing period. The credit is automatically used to offset money owed to Kinsta on your next invoice. For more information, refer to our WordPress Hosting Money-Back Guarantee.
WordPress site add-on
The WordPress site add-on allows you to increase the number of sites in your plan without upgrading the plan. Each additional site includes a staging environment and is charged at $30 per month. The add-on does not include additional disk space. Resources like visits, disk space, and CDN usage are shared across all sites within the plan. For example, with a WP 2 plan, if you purchase the add-on for an additional site, the 70,000 visits, 20GB of disk space, and 250GB of CDN usage will be distributed among all three sites.
When you upgrade or change your plan, any site add-ons you have will be retained, even if the new plan includes more sites by default. For example, if you’re on the Single 35k plan with a site add-on and you upgrade to the WP 2 plan, which includes two sites, the site add-on will still apply, giving you a total of three sites. If you no longer require the site add-on, you must disable it.
Add sites
To add a site, within MyKinsta, click your username > Company settings > My Plan, and within WordPress sites, click Enable.
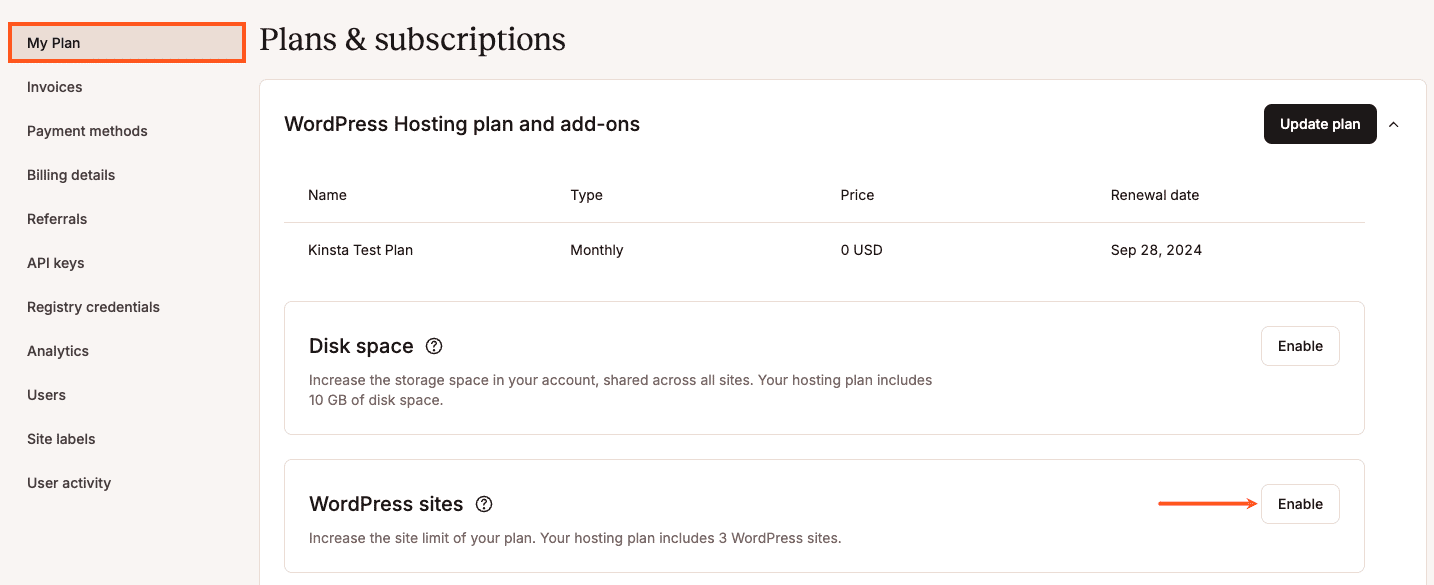
Enter the number of additional WordPress sites you want to add, and click Continue.
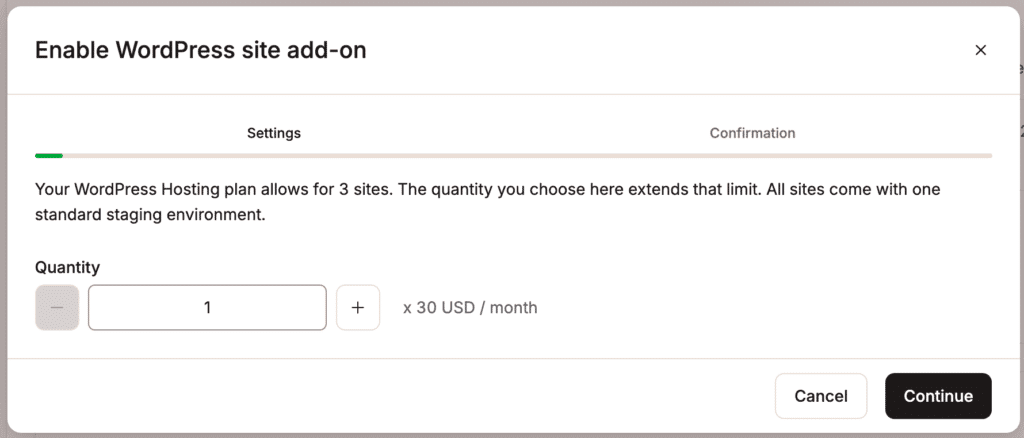
Review the price details and click Enable WordPress site add-on.
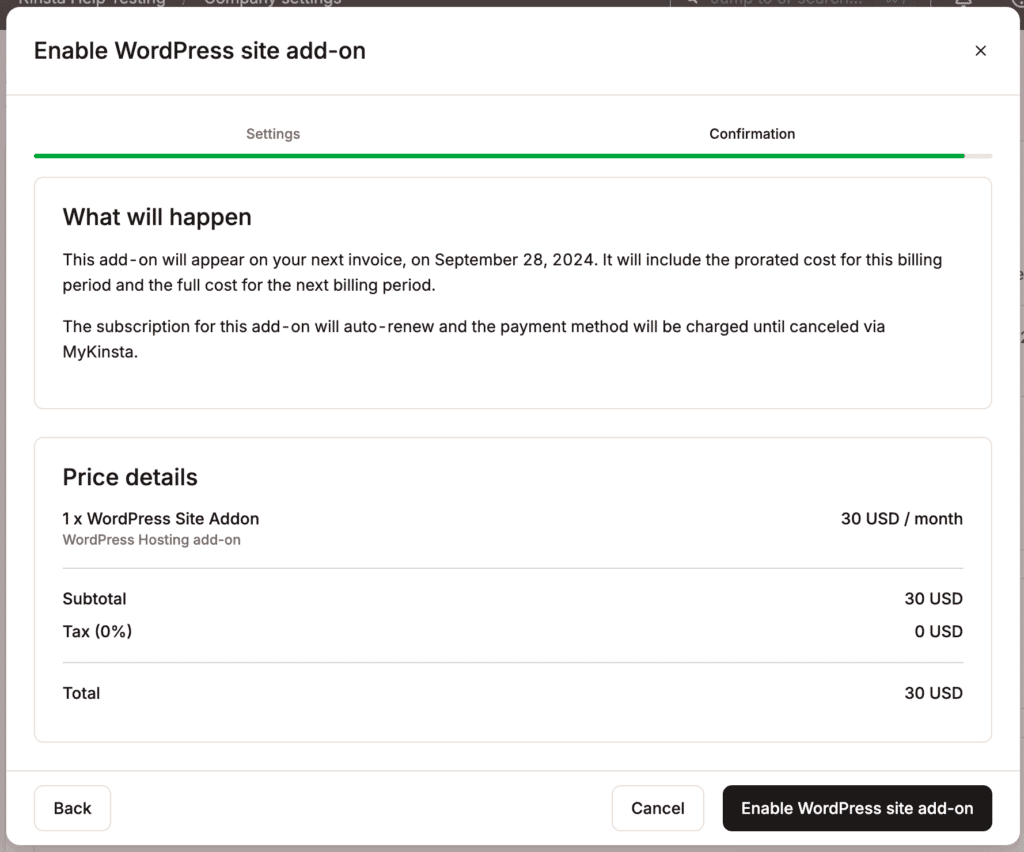
WordPress site add-ons are automatically prorated, and the subscription will appear on your next billing cycle.
Change the number of sites
If you want to reduce the number of sites within the WordPress site add-on, you must first delete the sites you no longer need within WordPress Sites > sitename > Info > Delete site. Deleting a site removes all sites, databases, and staging environments for that site.
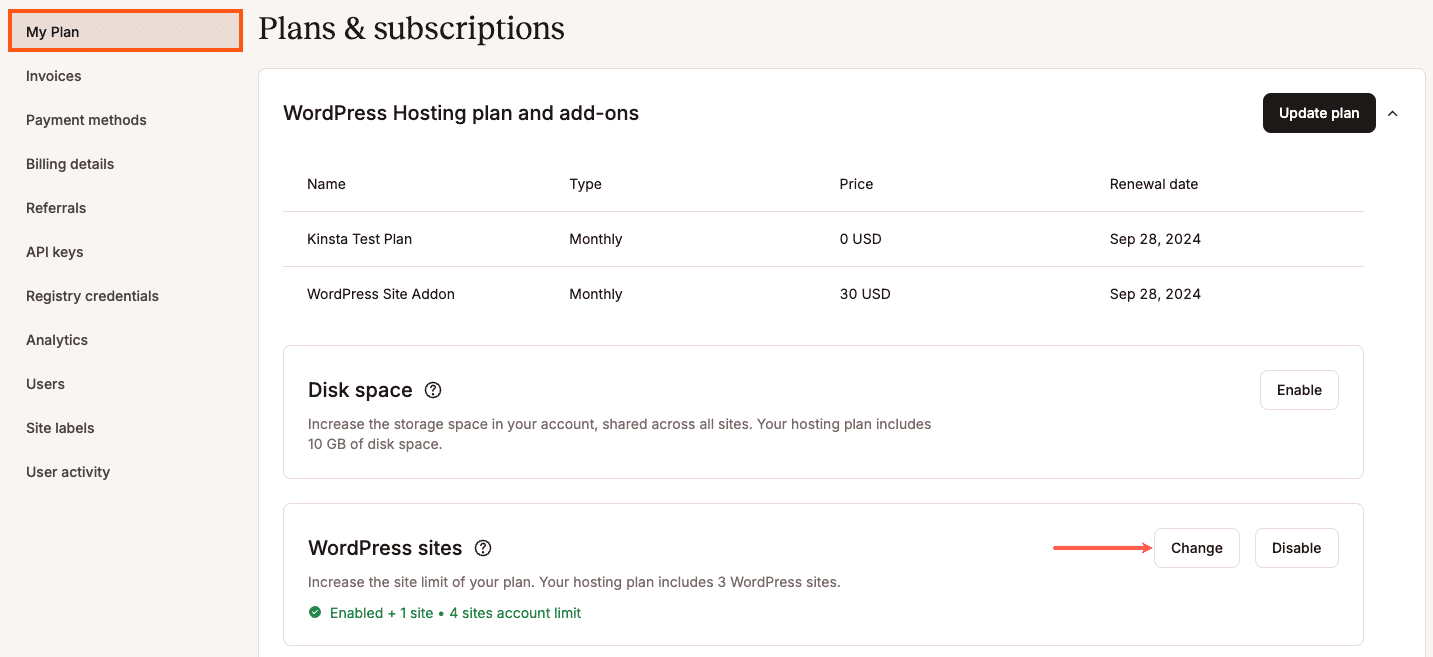
To change the WordPress site add-on, within MyKinsta, click your username > Company settings > My Plan, and within WordPress sites, click Change.
Increase or decrease the quantity and click Continue.
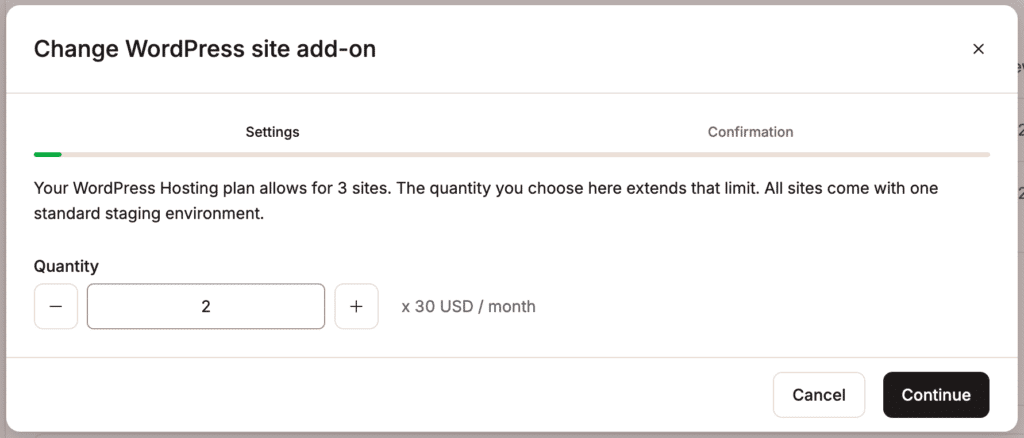
If you increase or decrease the number of sites, the new price details are shown. If you change the quantity to zero, the add-on is disabled. To confirm the changes, click Change WordPress site add-on.
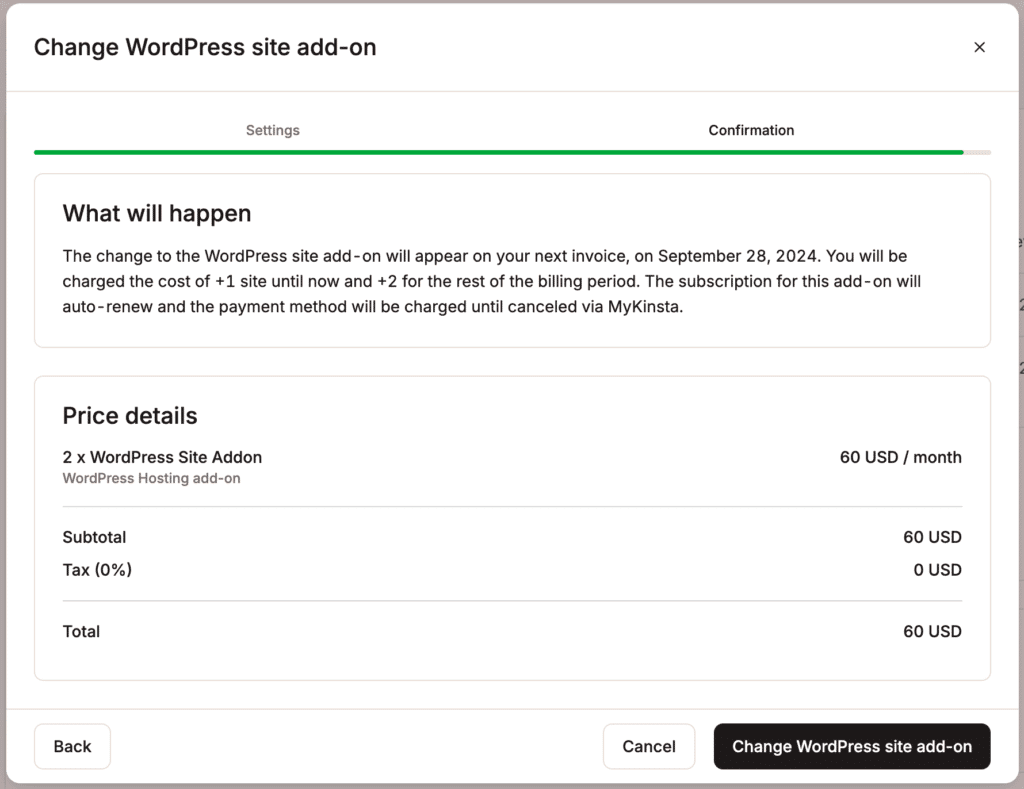
If you reduce the number of sites or change the quantity to zero, and you’re in the first 30 days of your WordPress Hosting plan, a prorated fee for the add-on will be added to your next invoice for the time period it was enabled. If your WordPress Hosting plan has been active for more than 30 days, you will receive a prorated credit for the add-on fees to your Account Balance for the remaining days of the current billing period. The credit is automatically used to offset money owed to Kinsta on your next invoice. For more information, refer to our WordPress Hosting Money-Back Guarantee.
Disable the WordPress site add-on
If you want to disable the WordPress site add-on, you must first delete the sites you no longer need within WordPress Sites > sitename > Info > Delete site. Deleting a site removes all sites, databases, and staging environments for that site.
To disable the WordPress site add-on, within MyKinsta, click your username > Company settings > My Plan, and within WordPress sites, click Disable.
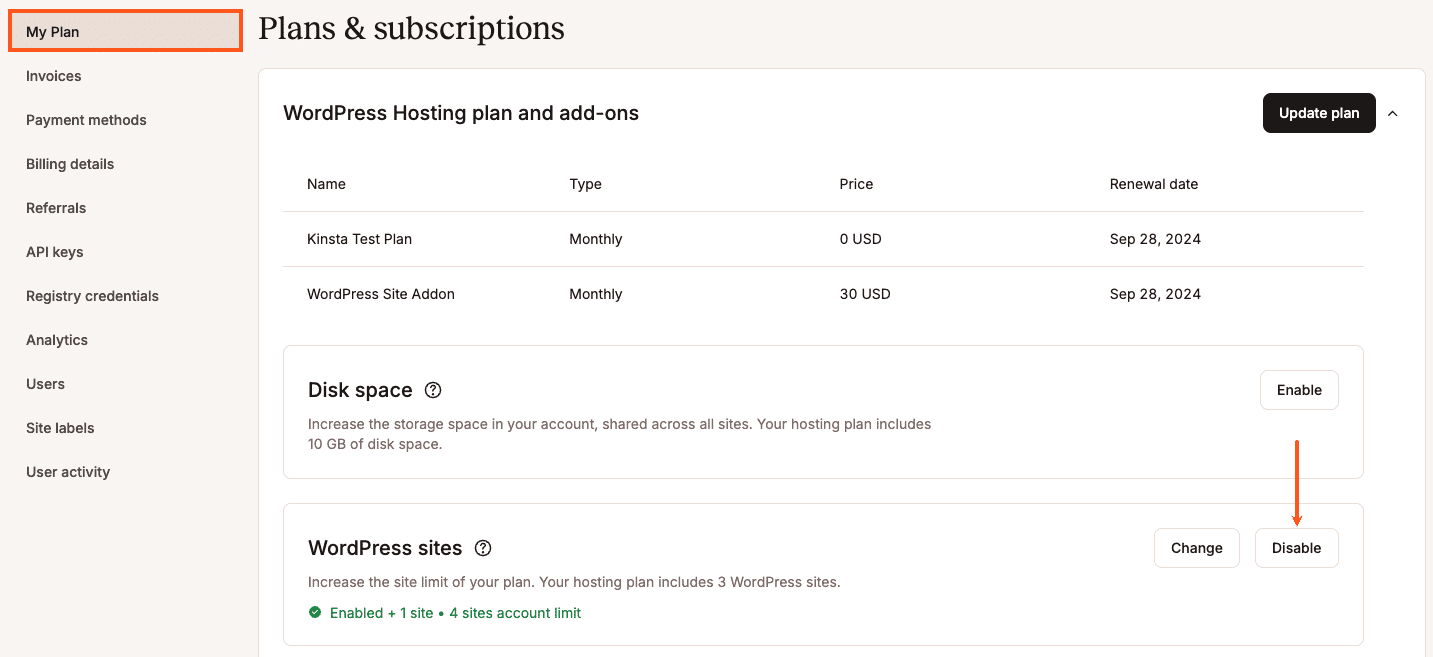
To confirm you want to disable the add-on, click Disable.

If you disable the WordPress site add-on and you’re in the first 30 days of your WordPress Hosting plan, a prorated fee for the add-on will be added to your next invoice for the time period it was enabled. If your WordPress Hosting plan has been active for more than 30 days, you will receive a prorated credit for the add-on fees to your Account Balance for the remaining days of the current billing period. The credit is automatically used to offset money owed to Kinsta on your next invoice. For more information, refer to our WordPress Hosting Money-Back Guarantee.
Multiple plans
While you can’t have multiple WordPress Hosting plans under a single MyKinsta company, there are two ways you can manage multiple plans:
Option 1: Create multiple companies
You can create multiple companies and add a new plan within that company.

Option 2: Create separate accounts and grant user access
You can create a completely separate account by signing up on the plans page with a different email address. You can then invite your first user to your second account’s company.
Switch your plan
Whether you want to upgrade or downgrade, switching your Managed WordPress Hosting plan at Kinsta is easy. Usually, it can be done with a few clicks in MyKinsta without reaching out to our Billing team.
There is no downtime involved, and everything is automatically prorated down to the second. Follow the steps below.
There are a multitude of reasons why you might need to upgrade or downgrade your hosting plan. Here are a few common examples:
- You want to take advantage of Kinsta’s annual discount (two months free).
- You need more disk space or are launching additional WordPress sites.
- You have a very demanding site and need additional PHP threads as recommended by our support team.
- Your website has become popular, and you need to increase your visitor count limit.
- You’re no longer working with a client and don’t need as large of a plan.
- You’re shutting down sites and are under the limits included in your current plan.
- You’re on Kinsta’s legacy plans and want to switch to our new plans based on visitor counts. (Note: once you switch from our legacy plans to our new plans, you can’t switch back).
System is prorated
Our system is prorated, which means we calculate the unused time on the old plan and the remaining time on the new plan within the monthly or annual billing period. We use Stripe as our payment provider, and the prorated amount is calculated down to the second. You can, in fact, upgrade or downgrade multiple times in a month, and everything is automated on our end.
If you’re currently on a plan with a free first month and you switch to a plan without a free month, the free period will end, and you’ll be charged from the date of the switch. However, you’ll still be eligible for the 30-day Money-Back Guarantee.
Upgrades are not applied retroactively
Important note about overages: When you upgrade plans, your new plan takes effect immediately from the time you make the change. If you’ve incurred any overages before upgrading, those overages will still be applied to your next invoice. This is because when you upgrade plans, your new plan is only in force going forward from the moment you make the change. The new upgraded plan is not applied retroactively.
For example, let’s say you register for the Single 35k plan ($35 per month / basically $1.17 per day / allows 35k visits). Over the next 30 days, you get 100,000 visits, which results in an overage of 65k visits. On the 30th day, you upgrade to the Single 125k plan. We would credit you $1.17 for the remainder of the Single 35k plan and charge you $3 for one day on the Single 125k plan. So, before considering any overage, the total cost would have been $36.93 ($33.93 for 29 days on the Single 35k plan, $3 for one day on the Single 125k plan). You would then still be responsible for the one-time overage of 65k visits, which comes out to $32.50 ($0.50 / 1,000 visits).
Monthly plans
Proration example 1
You sign up for a WP 5 monthly account and then decide to switch to a WP 10 monthly account 10 days into your current period. As long as the difference in the final amount due is lower than $100, no payments are made at this time; the additional cost will be added to your next invoice. If the total amount due is increased by more than $100, we may charge the amount automatically.
- The WP 5 plan is $115 USD/month, and the WP 10 plan is $225 USD/month.
- 10 days were used under the WP 5 plan (for this example, in a 30 day month), and 20 days under the WP 10 plan.
- This means you have 20 days of the WP 5 plan that will be credited for the time remaining in your current billing term in the amount of $76.67.
Calculation: $115 / 30 * 20 = $76.67
- And 20 days of your new WP 10 plan that will be due in the amount of $150.
Calculation: $225 / 30 * 20 = $150
- The total amount of this upgrade for the remaining 20 days in your current billing term would be $73.33.
Calculation: $150 – $76.67 = $73.33
- As plans are always paid for in advance, your next invoice will contain the balance due from your upgrade and also the full price of next month’s WP 10 plan, which is $225 for a total of $298.33.
The total paid amount at the beginning of your new period is $298.33.
Calculation:
- Unused time on WP 5 (20 days) = -$76.67
- Remaining time on WP 10 (20 days) = $150
- Price for 1 month of WP 10 = $225
- Total: $298.33
Proration example 2
You sign up for a WP 2 monthly account and then decide to downgrade to a Single 35k monthly account 13 days into your current period. Your next invoice(s) will be reduced by any credit amounted.
- The WP 2 plan is $70 USD/month, and the Single 35k plan is $35 USD/month.
- 13 days were used under the WP 2 plan (for this example, in a 30 day month), and 17 days under the Single 35k plan.
- This means you have 17 unused days of the WP 2 plan that will be credited for the time remaining in your current billing term in the amount of $39.67.
Calculation: $70 / 30 * 17 = $39.67
- And 17 days of your new Single 35k plan that will be due in the amount of $19.83.
Calculation: $35 / 30 * 17 = $19.83
- The total credit amount of this downgrade for the remaining 17 days in your current billing term would be $19.84.
Calculation: $19.83 – $39.67 = -$19.84
- As plans are always paid for in advance, your next invoice will apply the credit from your downgrade toward your next month’s Single 35k renewal, which is $35, for a total due of $15.16.
The total paid amount at the beginning of your new period is $15.16.
Calculation:
- Unused time on WP 2 (17 days) = -$39.67
- Remaining time on Single 35k (17 days) = $19.83
- Price for 1 month of Single 35k = $35
- Total: $15.16
Annual plans
When switching from a monthly to an annual plan or an annual to a monthly plan, your existing plan is closed, and a new plan with a new billing date is started; this includes any add-ons.
The system automatically calculates a credit based on the remaining time on your current plan and applies it toward the amount due for the new plan. If the credit amount exceeds the amount due, the remaining credits are automatically used to offset money owed to Kinsta on your next invoice.
Credits have no intrinsic or cash value, are not redeemable for cash, and are non-refundable.
How to switch hosting plans
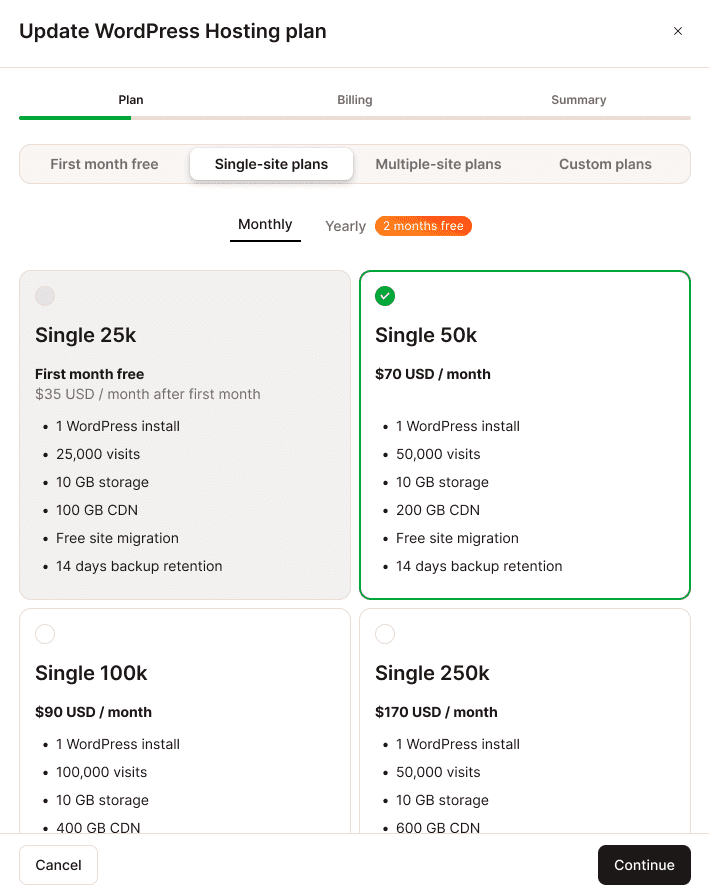
In MyKinsta, click your username > Company settings > My Plan > Update plan.

Select the plan you want to switch to. Note: You’ll see both the monthly plans and annual plans (with the two free months discount already applied).
If you’re subscribed to a custom plan, you’ll see a form to send a custom plan change. Simply include the desired plan in your message, and our Billing team will gladly assist you with the switch. Additionally, we offer a 15% discount on all plans for charities, nonprofits, and open-source projects. If you’re transitioning to one of these plans, our Billing team will handle the switch and apply the discount manually for you.
Once you’ve selected your new plan, click Update. Your new plan limits (number of sites, visitors, disk space, etc.) will then be reflected in MyKinsta. Note: You may need to refresh your screen.
If you have any questions regarding switching plans, please contact our Account Management team.
If you’re concerned the changes are taking too long, please contact our Support team.
Custom WordPress Hosting plan
Kinsta’s plans and pricing structure are based on the needs of our customers, from small to large, and can accommodate the vast majority of use cases. However, we understand that a fixed Managed WordPress Hosting plan may not always be the best fit.
As we always listen to customer feedback, we understood we needed to be more nimble with our plans. That’s why for Managed WordPress Hosting, you can request a custom plan offer from our sales team.
How Kinsta’s plans and pricing structures work
To determine if you require a custom plan, you first need to understand how Kinsta’s plans and pricing structure work with some key metrics that make up a WordPress hosting plan. You can also watch the following video, which explains our WordPress plans and pricing structure:
- Number of WordPress installs: A WordPress install can be anything, from a small blog to a large multisite and everything in between. Kinsta supports almost any WordPress use case.
- Monthly visits: This is a big indicator of the amount of work Kinsta’s server needs to perform to keep your site running, stable, and fast. We use a server-based measurement method to calculate the number of visits your site gets.
- SSD storage: This is the disk space that’s needed to host all your website files and databases combined (here’s how to check disk usage in WordPress).
When you’re considering disk space, you usually think of it as a fixed quantity rather than a dynamic metric. When comparing it to visits, for example, if your site doesn’t get updated that frequently, you won’t likely need much disk space. The same thing could be said if you have many sites (or installs) that won’t likely affect your total disk space usage that much because any change has a relatively smaller impact on it. You can customize any standard hosting plan’s SSD storage limit by adding any amount of disk space add-ons. - PHP threads: PHP threads determine how many simultaneous uncached requests your site can handle at any given time. Depending on the complexity and popularity of your site(s), you might need more of these.
All of these metrics are equally important when determining which WordPress hosting plan is right for you. But the metric with the highest requirement suggests the best plan to choose. This way, we can ensure we can accommodate all your current needs.
For example, if you 2 sites that gets ~100k visits per month. Our WP 2 plan could be a good fit because it offers 2 WordPress installs. This plan has a monthly visits limit of 50,000. Although we don’t charge for occasional and unplanned traffic surges, your site generates traffic that regularly goes over that monthly visit allowance, making the WP 2 plan too little for you. That is why you should opt for our WP 5 plan, which is capped at 100k monthly visits, even though this plan has room for up to 5 WordPress installs.
Custom plans
If none of our current plans seem to be a good fit for you, you can request a WordPress custom plan tailored to your exact needs.
To request a custom plan, open a new ticket with our Account Management team and let us know what you need. Your Account Manager will create a custom hosting plan proposal for you to review. You can access and view it online via a private link or as a PDF file. Your proposal will contain a detailed overview of your custom plan’s specifications and pricing, as well as an overview of what we considered to determine the custom plan’s price.
If you’re happy with the proposal, reply and confirm it with your Account Manager, and they’ll send you details on what to do next to get started with your new custom plan.
All custom plan proposals have an expiration date. If we don’t hear back from you after you receive the proposal, it will expire, and you’ll need to request a new one with your account executive.
Reseller or white label plans
While we do not currently offer reseller plans that include a billing system, we have an affiliate program for all of our services, a referral program for all of our paid services, and an Agency Partner Program for Managed WordPress Hosting.
Kinsta’s Affiliate program
As a Kinsta affiliate, you can earn commissions for every referral for the following services: Managed WordPress Hosting, Application Hosting, and Database Hosting.
Kinsta’s Referral program
Kinsta’s customer referral program lets you earn credits by referring others to Kinsta with a referral link. As soon as your referrals begin using and paying for any of Kinsta’s services, your credits begin accruing. Those credits are applied to your next invoice and lower the amount due.
WordPress Agency Partner program
With Kinsta’s Agency Partner program, you can resell hosting while you build, manage, and launch client sites. You can also use a standard plan for reselling without joining the Agency Partner Program. For example, if you’re a small agency with 5 clients, you can sign up for a WP 5 plan and resell our hosting services to your clients with that plan.
Legacy plans – October 2024
We’ve updated our WordPress Hosting plan names and the way we calculate visits as of November 2024 to streamline our plans and provide you with more flexible options. We’ve also reduced our overage fees. The following tables show the changes we’ve made to the plans and overages:
Single-site plans
| New plan name | Old plan name | New no. of visits | Old no. of visits | New CDN bandwidth | Old CDN bandwidth |
|---|---|---|---|---|---|
| Single 35k | Starter | 35,000 | 25,000 | 125 GB | 100 GB |
| Single 65k | N/A New plan | 65,000 | N/A New plan | 250 GB | N/A New plan |
| Single 125k | Business 1 single | 125,000 | 100,000 | 500 GB | 400 GB |
| Single 315k | Business 2 single | 315,000 | 250,000 | 750 GB | 600 GB |
| Single 500k | Business 3 single | 500,000 | 400,000 | 1 TB | 800 GB |
| Single 750k | Business 4 single | 750,000 | 600,000 | 1.5 TB | 1.2 TB |
| Single 1.25M | Enterprise 1 single | 1,250,000 | 1,000,000 | 2.5 TB | 2 TB |
| Single 1.9M | Enterprise 2 single | 1,900,000 | 1,500,000 | 3.75 TB | 3 TB |
| Single 2.5M | Enterprise 3 single | 2,500,000 | 2,000,000 | 5 TB | 4 TB |
| Single 3.15M | Enterprise 4 single | 3,150,000 | 2,500,000 | 7.5 TB | 6 TB |
Multiple-site plans
| New plan name | Old plan name | New no. of visits | Old no. of visits | New CDN bandwidth | Old CDN bandwidth |
|---|---|---|---|---|---|
| WP 2 | Pro | 70,000 | 50,000 | 250 GB | 200 GB |
| WP 5 | Business 1 | 125,000 | 100,000 | 500 GB | 400 GB |
| WP 10 | Business 2 | 315,000 | 250,000 | 750 GB | 600 GB |
| WP 20 | Business 3 | 500,000 | 400,000 | 1 TB | 800 GB |
| WP 40 | Business 4 | 750,000 | 600,000 | 1.5 TB | 1.2 TB |
| WP 60 | Enterprise 1 | 1,250,000 | 1,000,000 | 2.5 TB | 2 TB |
| WP 80 | Enterprise 2 | 1,900,000 | 1,500,000 | 3.75 TB | 3 TB |
| WP 120 | Enterprise 3 | 2,500,000 | 2,000,000 | 5 TB | 4 TB |
| WP 150 | Enterprise 4 | 3,125,000 | 2,500,000 | 7.5 TB | 6 TB |
| Agency 20 | Agency 1 | 500,000 | 400,000 | 1 TB | 800 GB |
| Agency 40 | Agency 2 | 750,000 | 600,000 | 1.5 TB | 1.2 TB |
| Agency 60 | Agency 3 | 1,250,000 | 1,000,000 | 2.5 TB | 2 TB |
Overages
| Overage type | New overage fee | Previous overage fee |
| Visits | $0.50/1,000 visits | $1/1,000 visits |
| Bandwidth | $0.50/1 GB | $1/1 GB |
| CDN | $0.05/1 GB | $0.10/1 GB |
Legacy bandwidth plans – November 2017
We moved to a visitor-based pricing model in November 2017. For those of you still on our legacy bandwidth-based hosting plans, see the details below regarding account changes, upgrades, etc.
You can still upgrade and downgrade between the bandwidth-model plans from within MyKinsta.
Changes to plans
Below is a summary of the changes to our plans that were made since we introduced visitor-based pricing in 2017:
- Business 1 plan previously had 1 install and 5 GB SSD. It is now WP 3 bandwidth and has 3 installs and 30 GB SSD.
- Business 2 plan previously had 5 installs. It is now WP 5 bandwidth and has 5 installs.
- Business 3 plan previously had 15 installs. It is now WP 20 bandwidth and has 20 installs.
- Business 4 plan previously had 20 installs. It is now WP 40 bandwidth and has 40 installs.
- Enterprise 1 plan previously had 40 installs. It is now WP 60 bandwidth and has 60 installs.
- Enterprise 2 plan previously had 60 installs. It is now WP 80 bandwidth and has 80 installs.
Plan details
Below are additional details for each legacy bandwidth-model plan.
Legacy business plans
| Details | Business 1 | Business 2 | Business 3 | Business 4 |
|---|---|---|---|---|
| New name | WP 3 bandwidth | WP 10 bandwidth | WP 20 bandwidth | WP 40 bandwidth |
| Price | $115 | $225 | $340 | $450 |
| # of installs | 3 | 10 | 20 | 40 |
| Server bandwidth | 50 GB | 100 GB | 200 GB | 400 GB |
| Disk space | 30 GB | 40 GB | 50 GB | 60 GB |
| PHP threads | 4 | 4 | 6 | 6 |
| Backup retention | 14 days | 14 days | 20 days | 20 days |
| CDN included | 200 GB free | 300 GB free | 500 GB free | 500 GB free |
Legacy enterprise plans
| Details | Enterprise 1 | Enterprise 2 | Enterprise 3 | Enterprise 4 |
|---|---|---|---|---|
| New name | WP 60 bandwidth | WP 80 bandwidth | WP 120 bandwidth | WP 150 bandwidth |
| Price | $675 | $1,000 | $1,350 | $1,650 |
| # of installs | 60 | 80 | 120 | 150 |
| Server bandwidth | 600 GB | 900 GB | 1200 GB | 1500 GB |
| Disk space | 100 GB | 150 GB | 200 GB | 250 GB |
| PHP threads | 8 | 8 | 16 | 16 |
| Backup retention | 30 days | 30 days | 30 days | 30 days |
| CDN included | 1 TB free | 1 TB free | 1 TB free | 1 TB free |
Bandwidth overage: $0.50/GB
CDN overage: $0.05/GB
CDN bandwidth
All legacy bandwidth-based clients are receiving the same amount of free CDN bandwidth as the visitor-based plans.