
Search Engine Optimization (SEO) has changed drastically over the past decade. Businesses now have to take new and unique approaches to win the never-ending race to the top of Search Engine Results Pages (SERPs) And, as the importance of having an online presence in the market increases, more people look for ways to improve their SEO strategy.
In this in-depth guide, we will share 60 WordPress SEO tips that helped Kinsta grow traffic by over 280%, to more than 4 Million monthly sessions (we dive into these numbers in the last part of this article).
We’re sure these tips will help you skyrocket traffic on your WordPress site and dominate your competition. There’s a lot to cover, so let’s start!
What Is SEO?
SEO, short for Search Engine Optimization, refers to a set of strategies and tactics that focus on driving more traffic from Search Engines through higher rankings in SERPs (Search Engine Result Pages).
Is WordPress Good for SEO?
WordPress is flexible, not only as a CMS but also thanks to plugins. Plugins open up infinite possibilities to add enhanced features to websites. Unlike many other CMSs and website builders, WordPress doesn’t have to master every possible feature but rather leaves it up to third parties to create plugins, who specialize in whatever feature their plugins offer. This also opens up the competition, meaning that you may have several options when it comes to which plugin you use.
For this reason, there are plenty of excellent SEO plugins that can help you achieve everything required to fully optimize your website.
60 WordPress SEO Tips to Enhance Your Site’s Performance
Now let’s focus on 60 WordPress SEO tips to optimize your website effectively. These tips have been divided into the 9 essential areas you can see listed below. By following the best practices in each section, you’ll be able to optimize your WordPress site and improve your visibility in search engine results.
- On-Page SEO
- Off-Page SEO
- Technical SEO
- UX Design
- Content Optimization
- Image Optimization
- Social and Video
- Local SEO
- Tracking
On-Page SEO
1. Install an SEO Plugin
If you’re using WordPress, an SEO plugin can help you optimize your website for the search engines, making it easy to add the SEO elements that Google needs to understand your pages, which allows you to influence how they appear in the search results.
In terms of popularity, the free Yoast SEO plugin for WordPress is a winner, but it’s not the only one! Check out our Rank Math vs Yoast SEO in-depth comparison, for example, or browse through our curated list of the best SEO plugins for more inspiration.
At Kinsta, we use Yoast SEO, and that’s why you’ll notice several screenshots/images of it in this SEO guide.
A good SEO plugin enables you to:
- Write better content with page and keyword analysis.
- Edit your meta descriptions.
- Automatically generate XML sitemaps.
- Enable breadcrumbs.
- Add social and schema markup.
It provides a multitude of other optimization options as well. Yoast has over five million installations, with an impressive five-star rating. You can download the free plugin from the WordPress repository, or follow the steps below to install it from within your WordPress dashboard.
Step 1: Search for Yoast SEO
Under the Plugins section of your WordPress dashboard, select Add New. There, search for Yoast SEO:
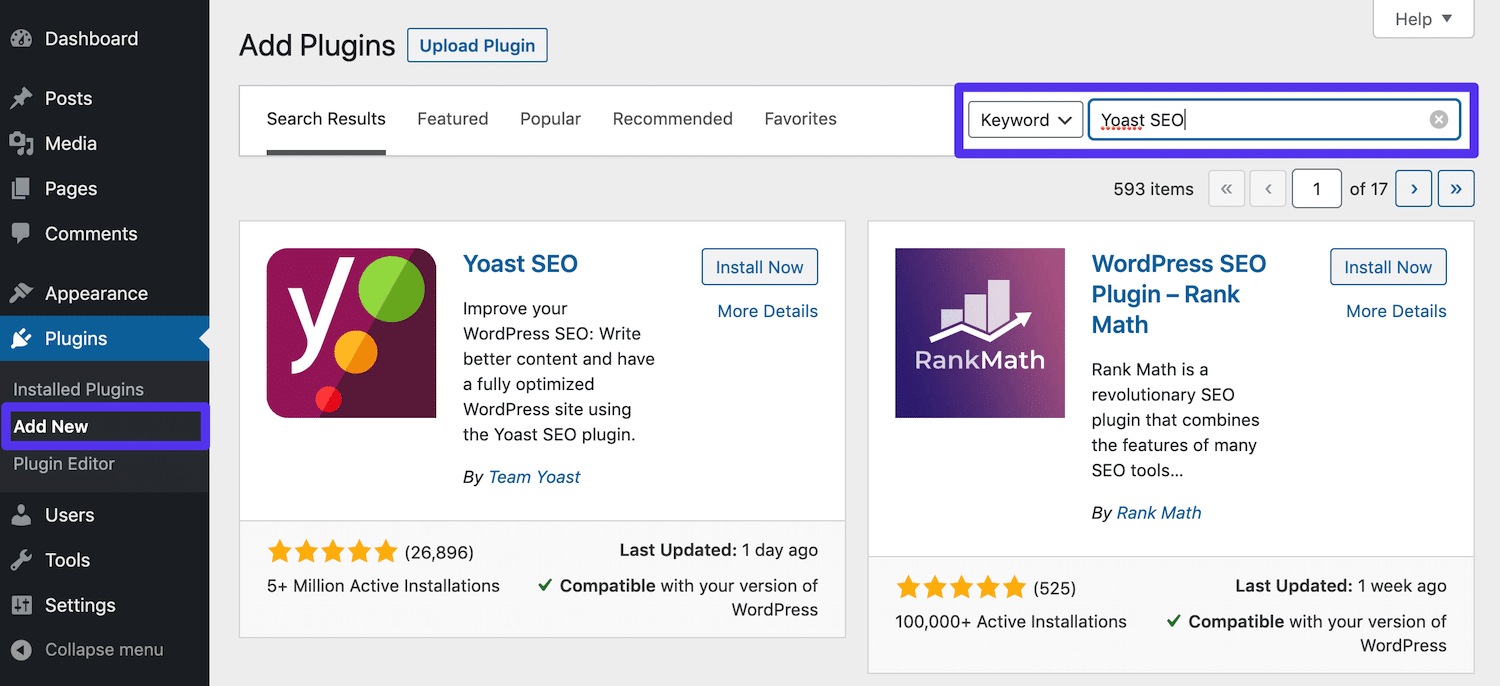
You’ll see a card with the plugin’s name on it, along with an Install Now button.
Step 2: Install and Activate the Plugin
Click on the Install Now button, and it will be replaced with a blue Activate button:
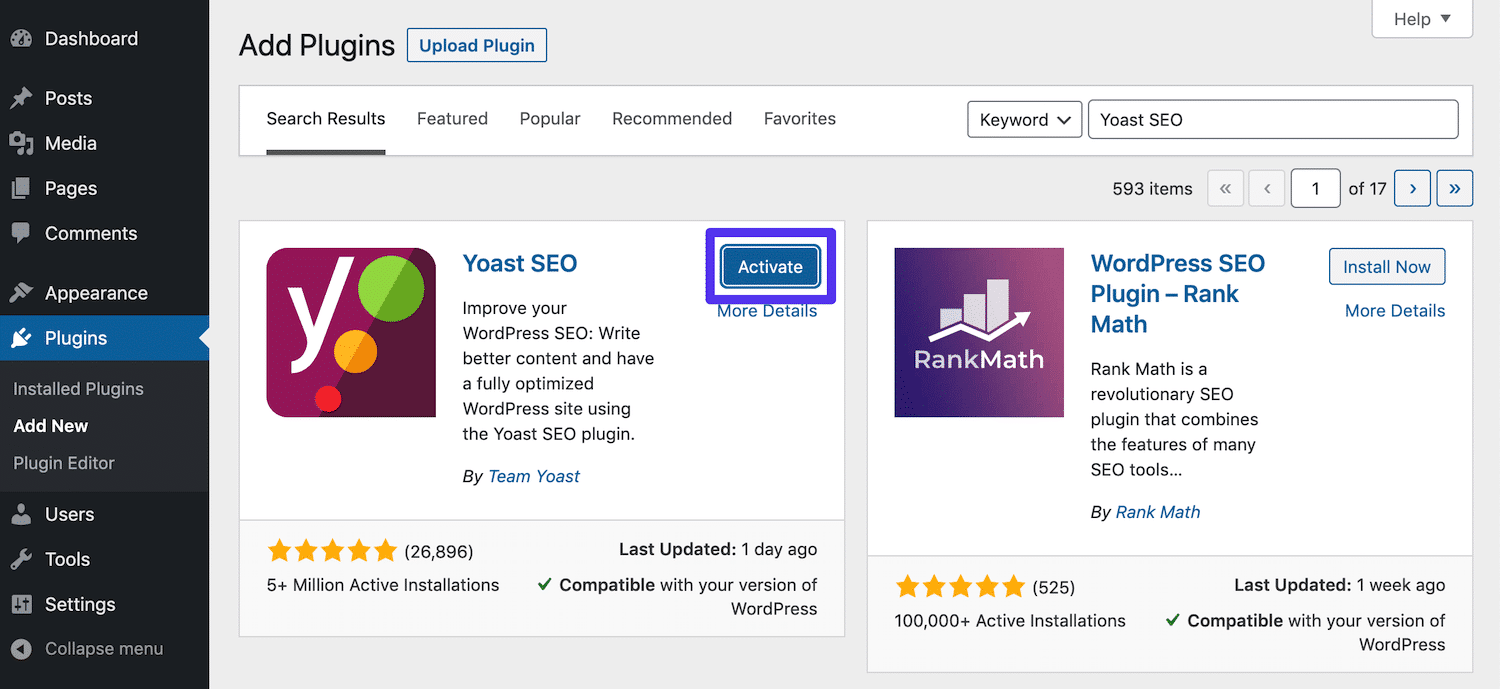
This will enable Yoast’s functionalities on your site.
Step 3: Access the Plugin’s Settings
Once the plugin is activated, you’ll see a new SEO section in your sidebar:
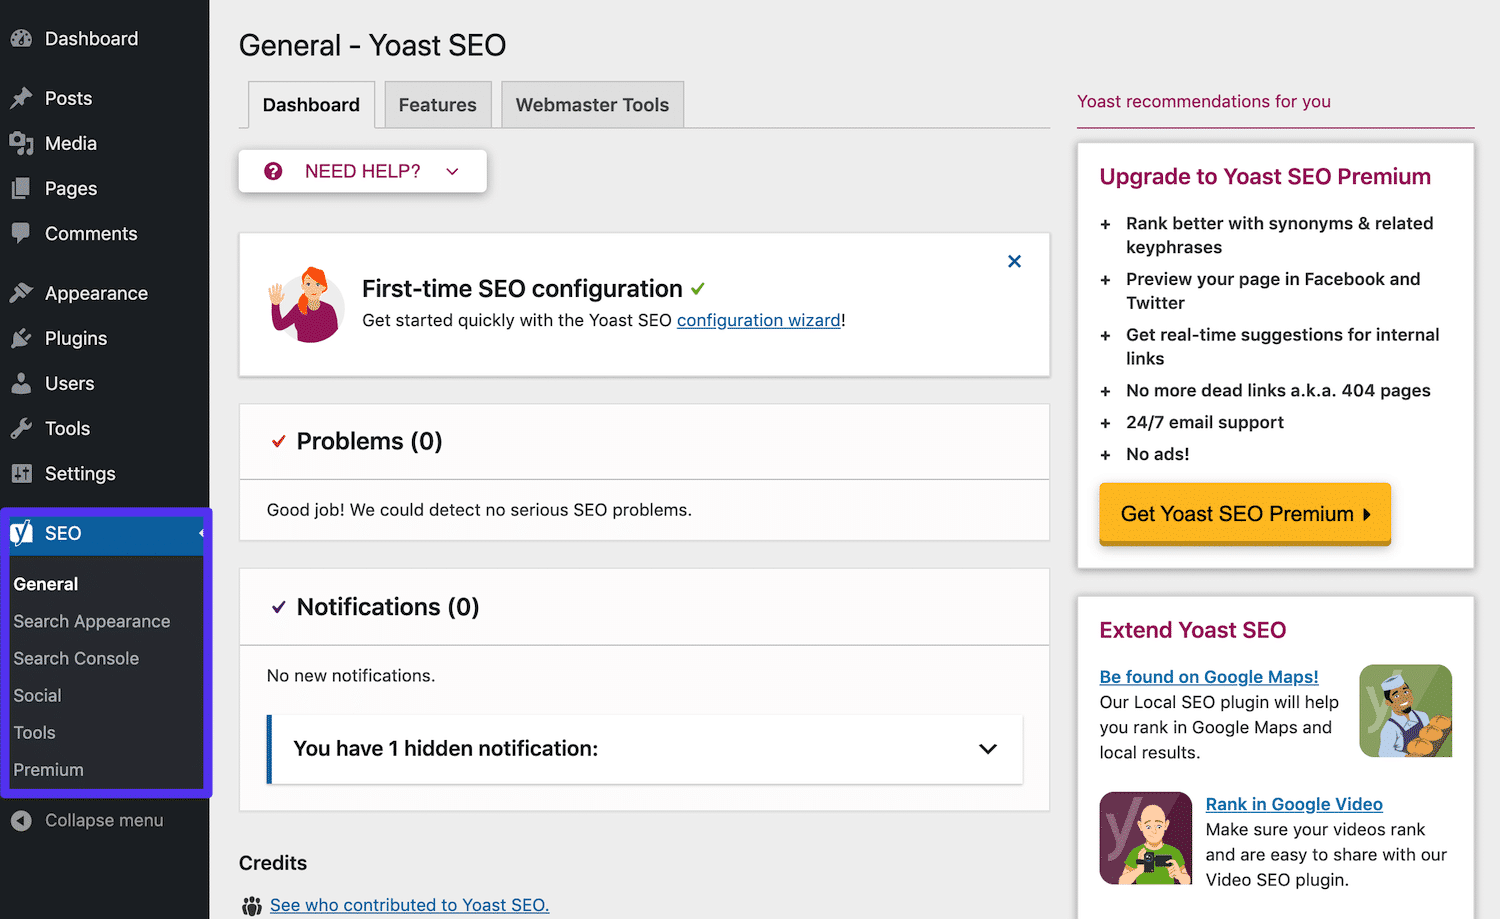
Here you can access Yoast’s settings to optimize your WordPress site. We’ll refer back to this area in other sections of this post.
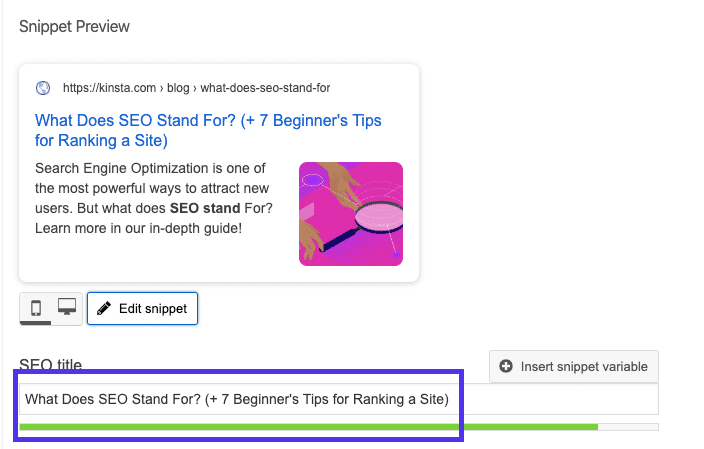
2. Optimize Your Title Tags
Include your main keyword in your blog post or page title tag. In the past, SEO experts recommended even placing your keyword at the beginning of the title whenever possible, as this would carry more weight in search engines.
Now, this approach is slowly losing advocates. Although having important keywords early on in title tags is still important, things are now moving towards more complex scenarios where click-through rate (CTR) optimization should be considered on top of keyword relevancy.
Some have reported seeing 20 percent increases in their CTRs, by simply making minor tweaks to their titles.
For example, we’ve placed our keyword “WordPress SEO” close to the very beginning of the title of this blog post, not only to get a little SEO boost, but mainly to make it clear to readers what the blog post is about, hence improving our click-through rate.
Title Tags Best Practices
Titles are limited by pixels, meaning Google will only show the first 600 pixels. Many SEO plugins use character counts, which is a close approximation.
Split-testing your titles (also called A/B testing) can be another effective way to increase your CTR and help Google see your content as more relevant. Some tools allow you to A/B test title tags and meta descriptions to improve your CTR.
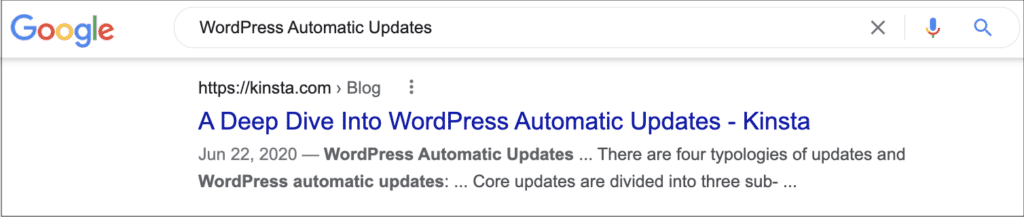
Another factor to consider is whether or not to use your company name at the end of your title tags. In some cases, Google may decide to change your title tags, and the most common updates relate to adding the site name to the end of the title.
For example, the title tag for the article shown below is “A Deep Dive Into WordPress Automatic Updates.” However, as you can see, our brand has been added to the title in Google’s search results.

Including your company name will eat into your character limits, so keep this in mind to avoid your title tags being cut short in the search results.
Adding Title Tags in WordPress
You can manually set a title tag in the Yoast SEO plugin, as seen below. Remember that Google has a viewable limit of around 65 characters on desktop. If you go over that, searchers may not see your full title on SERPs:
3. Write Meta Descriptions to Increase Click-Through Rate
Meta descriptions do not affect your SEO when it comes to rankings. However, they do affect your CTR. A well-written meta description can entice users to click on your post, instead of the one above or below it in SERPs.
The higher your CTR, the more traffic you get. If users don’t bounce back to Google, it provides a strong signal that your content was a hit, meaning Google is more likely to rank your pages higher. So, in a sense, meta descriptions can indirectly affect your SEO.
Check Out Our Video Guide to Writing Better Meta Descriptions:
Previously, meta descriptions were limited to around 156 characters. Google updated this in December 2017 to 320 characters, but then reverted the change to between 150 to 170 characters. Anything over that might not be visible in SERPs.
Also, it’s wise to include your main keyword in your meta description. Google will highlight the search term in bold when displaying it in search results.
For example, let’s say you search for “WordPress hosting” in Google.
We have a blog post with “WordPress hosting” in the meta description, so Google bolds this keyword relevant to your search term.
By including your main keyword in your meta description, you can stand out a little bit more:

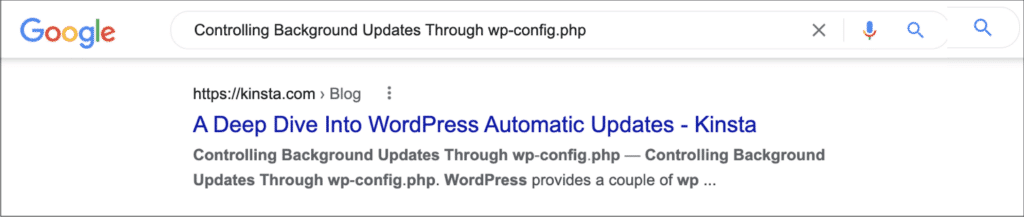
Remember, however, that Google sometimes automatically rewrites meta descriptions based on the search queries, meaning what you input isn’t necessarily what will always show up in SERPs. For example, in this case, Google chose to rewrite the meta description by pulling in other text from the page that matched the search query.
As you can see below, the meta description for this page changes when a different query is used:
This isn’t necessarily a bad thing. Google is constantly testing its search results, so the rewrites usually help users see that the page is relevant to their search.
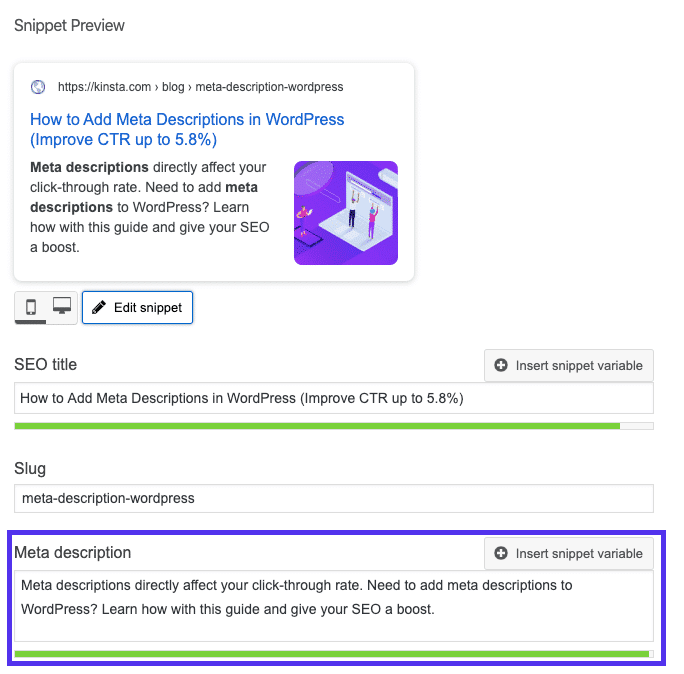
Adding Meta Descriptions in WordPress
You can set your meta description manually in the Yoast SEO plugin by clicking on the Edit Snippet button below the editor:
Check Out Our Video Guide to Adding Meta Descriptions in WordPress:
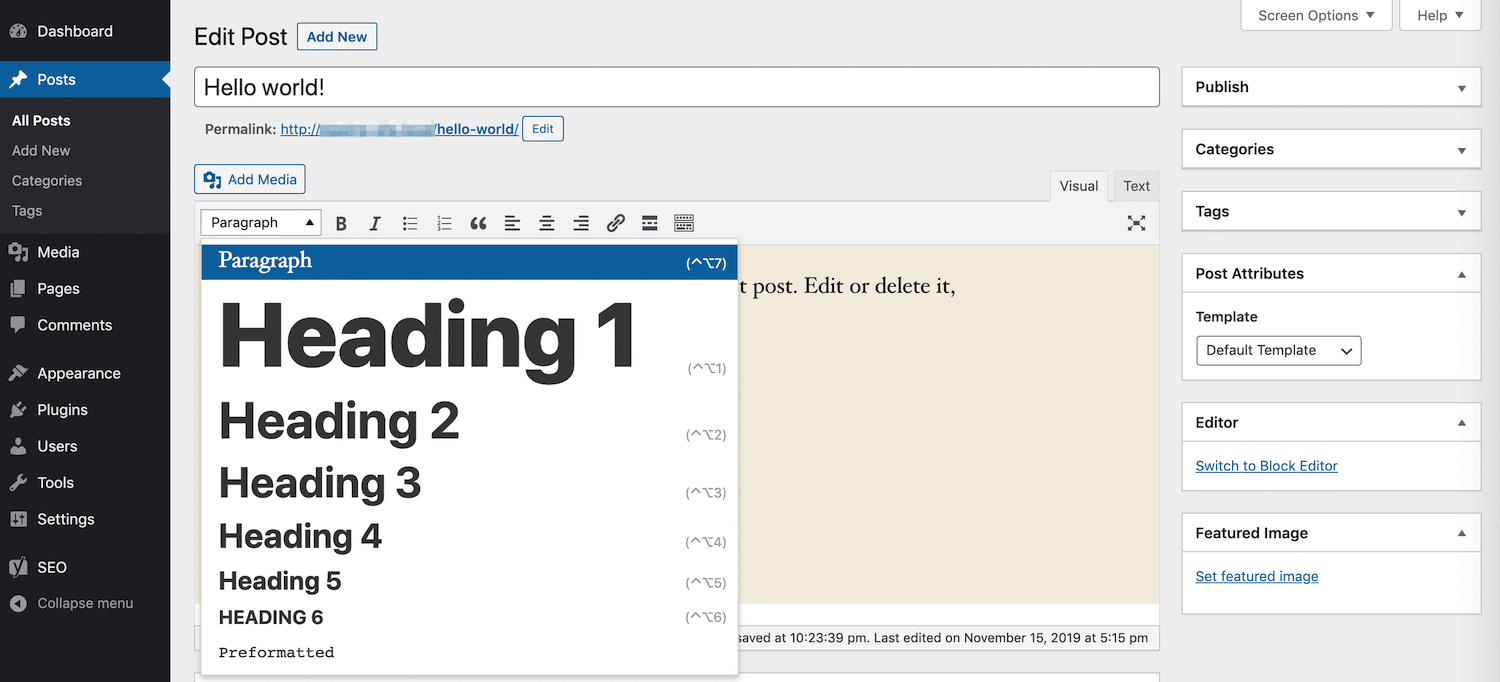
4. Use Proper Heading Tags
The Google crawler (Googlebot) checks HTML header tags (H1, H2, H3, etc.) to determine the relevancy of your site’s content. Generally, the best practice is to have a single H1 tag per post or page and then multiple H2s and H3s underneath that.
Think of this as a hierarchy of importance. The H1 tag is your most crucial header and should contain your main keyword. Additional headers could also include your keyword or long-tail variations of it.
However, don’t abuse headers. These should just be used to split up your content to make it easier for visitors to read, not as a means to stuff keywords into prominent places in your pages.
Adding Headers in WordPress
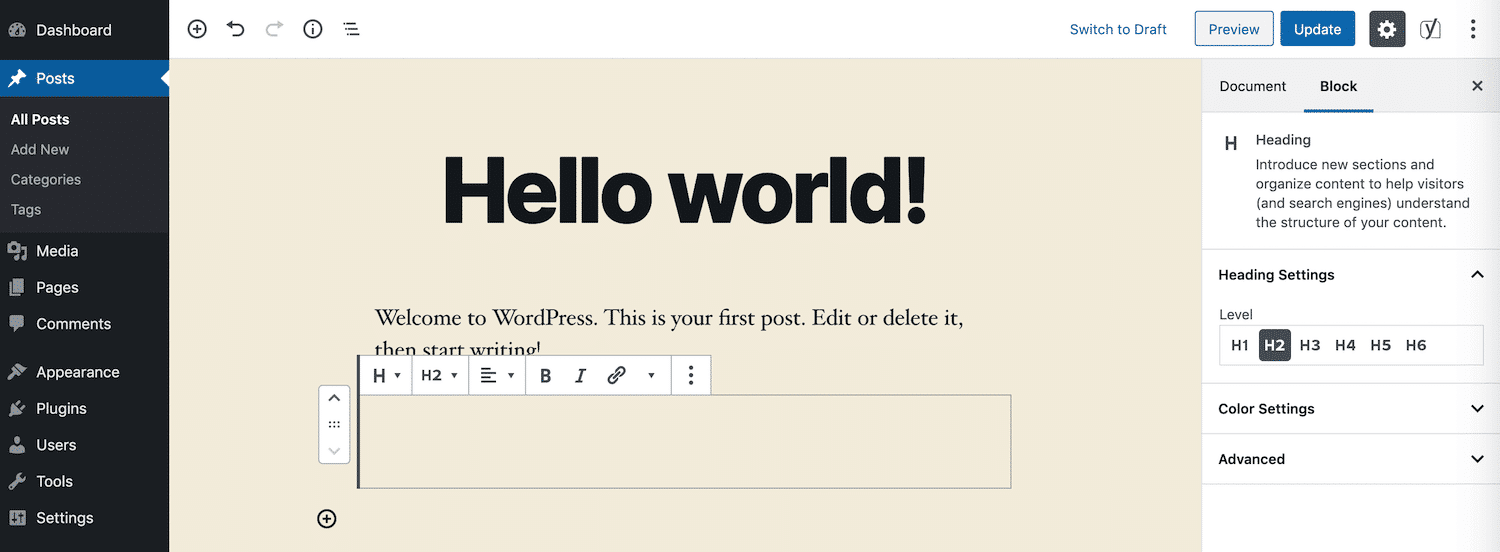
Most WordPress themes, if coded properly, will automatically assign the title of your page or post as the H1 header. You can then set other headers (H2, H3, H4, etc.) within your post or page.
You can create a header in the Classic Editor using the dropdown in the visual editor:
This automatically assigns the selected text the HTML tags that Google will need to read your headers. In the Block Editor, you can use the header block to achieve the same effect:
Of course, you can always add the HTML tags manually as well.
5. Pay Attention to Long-form Content
Before we start, let’s clarify this SEO myth first: content length is not a ranking factor in any way, shape, or form.
It doesn’t make sense to force an article to be 2,500 words just because your competitors have posts of a similar length. It’s safe to assume your readers want quick and organized answers to their questions.
A great example of this can be found in most recipe websites. Readers are generally only interested in the ingredients and cooking method, but this is often buried below huge walls of text that go into great detail about how the recipe brings nostalgic memories from the writer’s past, usually with the sole intention of increasing the word count.
The truth is you’re not going to rank higher by filling your article with fluff.
So what’s the appeal of long-form content and why should you create it? The answer is that it may improve your ranking indirectly.
First of all, long-form content tends to be more comprehensive, which means you’ve likely covered many sub-topics that could help position you as an authority on the topic.
Another advantage of long-form content is that you will likely not only rank for your target keywords, but also for many other long-tail keyword variations.
Sometimes this extends to cover hundreds of popular search terms and phrases. The traffic from all the long-tail variations will very likely be higher than your main keyword, making more extensive content a win-win.
And, as you can probably tell, we’ve seen the same results here at Kinsta. Otherwise, we wouldn’t spend this much time publishing content as long as this post!
However, while long-form content may work well for some websites, it doesn’t always make sense. For example, If you run a news site, you’ll probably want to push out content quickly to make sure you’re keeping up with events as they unfold.
6. Craft Key Pages to Build Your Credibility
There are a few key pages that every quality WordPress website should have. If yours is missing them, you run the risk of looking less-than-credible to your visitors.
E-E-A-T (Experience, Expertise, Authoritativeness, and Trust) is a concept highlighted in Google’s Search Quality Raters’ Guidelines and has become a focus for SEOs in recent years. The general idea is that websites should be built with EEAT in mind, showing that they are experts in their niche while demonstrating authority and trust.
Google has also talked publicly about how websites affected by its core updates should focus on EEAT, showing how important the concept is to Google’s algorithms.
If you don’t already, you should have the following pages on your site (at a minimum):
- An About Page. This should provide some basic information about your brand, mission, and what you have to offer visitors. It often helps frame this content as a narrative by describing how your brand came to be.
- A Contact Page. Displaying a physical address (if your business has one), phone number, email, and other relevant contact details show users there’s a real person behind your site. It also makes it easy for them to reach out to you with questions about your products or services, which can help you land sales.
- A Disclosure Page, Privacy Policy, and Terms and Conditions. The legal pages needed for your website will vary somewhat depending on the type of content you produce. If you provide any advice (such as through blog posts) or incorporate affiliate links, a Disclosure page is ideal. Any site that collects user data should be GDPR compliant and/or CCPA compliant. If you sell products or services online, you’ll want to list your Terms and Conditions.
Besides these pages, adding social proof to your site can also be a great SEO tip to increase your trustworthiness. Links to your social media accounts and testimonials and reviews from clients, customers, or users are ideal.
Off-Page SEO
7. Build Quality Backlinks
In the early days of search engines, backlinks were the main signal for ranking web pages in Google. Each link would pass value (known as PageRank) to the linked page, which Google would use to gauge how much authority a webpage had.
The problem with that approach was it was easy to manipulate, leading to a wave of spam that so called SEO professionals generated in an attempt to rank higher in the search results.
Link farming, for example, when groups of websites link to each other to boost their backlink counts, was one of those strategies. An influx of article distribution sites also appeared, where different variations of the same article would be posted, with the sole purpose of building links.
As a result, Google launched and tweaked several algorithms over the years to identify and penalize websites using these tactics. This was the catalyst that helped shift the role of an SEO away from simply trying to game the system, to actually building quality websites.
While links are still important today, their influence on rankings has been greatly reduced. Google now also uses hundreds of other signals to decide which pages should rank.
In Duy Nguyen’s (from Google’s search quality team) own words: “backlinks as a signal has a lot less significant impact compared to when Google Search first started out many years ago.”
But that doesn’t mean SEOs should disregard backlinks completely. An upward trend in the number of domains linking to your site is still a good indication of how popular it is. But the quality of the linking sites is much more important than the quantity of links coming in.
Search engines can easily evaluate the quality and relevance of backlinks, so you won’t get far using shady tactics to increase your numbers. In an ideal scenario, your content should be so exceptional and trustworthy that it would attract links naturally.
But this is no easy feat, so we’ve added some tips below that will help you to encourage others to link to you.
An excellent tool to get an overview of your backlink profile is Ahrefs. You can see the total number of backlinks to your site, the number of referring domains, organic ranking keywords, and more. This platform’s backlink notifications are also helpful.
In the example below, you can see that our blog post about solid-state drive (SSD) appears in a high-authority Hubspot page:

Now that we’ve established that quality, not quantity, is what matters when it comes to backlinks, you can put into practice the actions below to help you create partnerships between your business and others that are relevant to your niche.
Participate in Third-Party Podcasts to Earn Links
A reliable way to generate new, quality inbound links is to get interviewed on podcasts that cover topics you’re experienced in and speak to audiences that align with your customers.
How would this generate incoming links to your website?
Almost every podcast has a dedicated page for each episode with show notes, guest names, and some links to resources mentioned during the episode.
This is a standard approach for podcasters because links allow listeners/viewers to dig deeper and learn more about the guest(s) and their business.
Build Stronger Social Signals Leveraging Inbound Links
A little tip: share the pages that link to your site on your social media channels. This will help you build social signals for them on their page, building up their page authority. Links from sites with higher page authority are also beneficial to your SEO, so it’s a win-win.
In other words, you can help yourself by sharing content from third parties that have taken the time to link to you. Never be afraid of reaching out to other content writers and asking them to mention your fantastic post on their blog.
Check Out Our Video Guide to Optimizing Links:
Find sites linking to your competitors
Getting other sites to link to your content can be very difficult. But the chances are, sites similar to yours have already spent time doing just this, so taking a look under the hood to see which sites are linking to them can help uncover opportunities where you can build links in the same way.
Some freemium tools can help you with this, like SpyFu, to check a few sites each day before hitting the paywall. Other tools like Ahrefs can also help you see all links pointing to specific pages or whole domains.
8. Qualify Your Outbound Links
It’s sometimes necessary to highlight the relationship between your website and the websites you link to. For example, if you’re including affiliate links within your content to earn commission from the linked site, the links should not pass SEO value, since they are seen as unnatural. The same goes for sponsored banners that link to other sites.
The following ‘rel’ attributes can be used in the <a> tag to provide hints to search engines about how they should handle the links.
Dofollow Links
While dofollow is not a link ‘rel’ attribute, the term has become widely used when referring to standard links.
By default, every link you create is a dofollow link. Google crawls these types of links when analyzing your site. These links help build authority which affects your rankings since link juice is passed from the linking page.
You may have heard people say that you need more backlinks. If so, they were probably referring to dofollow links from other high-authority sites.
Nofollow Links
Nofollow links contain the ‘rel’ attribute of ‘nofollow,’ as seen below:
<a href="https://kinsta.com" rel="nofollow">my link</a>The Nofollow attribute hints to search engine crawlers to ignore these links. That is not to say that nofollow links aren’t necessary, though. They can still generate traffic, even if they don’t pass authority and influence your rankings.
Nofollow links are often used when a link is placed at the request of the linked website. This is because links pass value between pages, so it should occur naturally. Manipulating sites to link to you is against Google’s guidelines, so ignoring this could cause your site to be penalized.
Generally, a natural backlink profile includes a good ratio between dofollow and nofollow links.
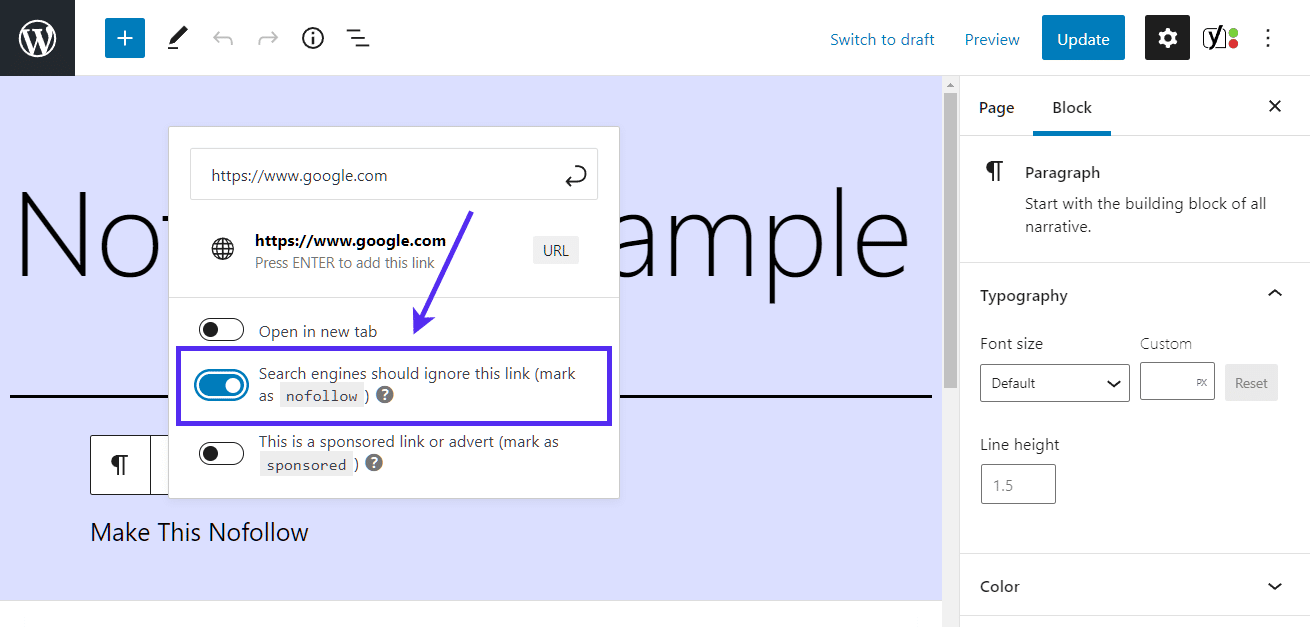
Adding Nofollow Links in WordPress
You can read our tutorial on different ways to add nofollow links in WordPress, but here’s the quick answer, in case you’re looking for one.
After opening your post in the Gutenberg Editor and highlighting the anchor text you want to include the link in, click on the link icon and the menu bar below will appear.
All you have to do then is switch on the option labeled Search engines should ignore this link (mark as nofollow):
Sponsored Links
Sponsored links contain the ‘rel’ attribute of ‘sponsored,’ as seen below. This is used to show when a link is sponsored.
<a href="https://kinsta.com" rel="sponsored">my link</a>Sponsored links are often used as part of paid campaigns, where the goal of the sponsored link should be about driving traffic rather than passing value from the linking page. It is against Google’s guidelines to pay for links that pass value, so it’s important to make sure any sponsored links use the sponsored link attribute.
UGC Links
As seen below, UGC links, or User Generated Content links, contain the ‘rel’ attribute of ‘ugc.’
<a href="https://kinsta.com" rel="ugc">my link</a>UGC links are used to show when users have created a link. These are often added to links placed in comments on blog posts or forums where users can add links.
9. Add Sponsored Attribute in Affiliate Links
A lot of bloggers use affiliate links on their websites. Affiliate links are generally used when you want to track a commission or referral of a product or signup between websites.
Unfortunately, Google usually frowns upon affiliate links that don’t include the necessary ‘rel’ attribute. Some sites have even been penalized for having a lot of affiliate links. To safely use affiliate links, they should always include the “sponsored” attribute.
How To Keep Track of Your Affiliate Links in WordPress
A great way to always make sure your affiliate links use the sponsored attribute is to use a plugin such as Pretty Links or ThirstyAffiliates.
Google has also said it’s OK to use the nofollow attribute for affiliate links, so it is unnecessary to update your links if you already have this in place.
Pretty Links enables you to create easy and short affiliate links that include the sponsored attribute and redirect with a 301. Simply go to Pretty Links > Options in your dashboard to enable these settings:
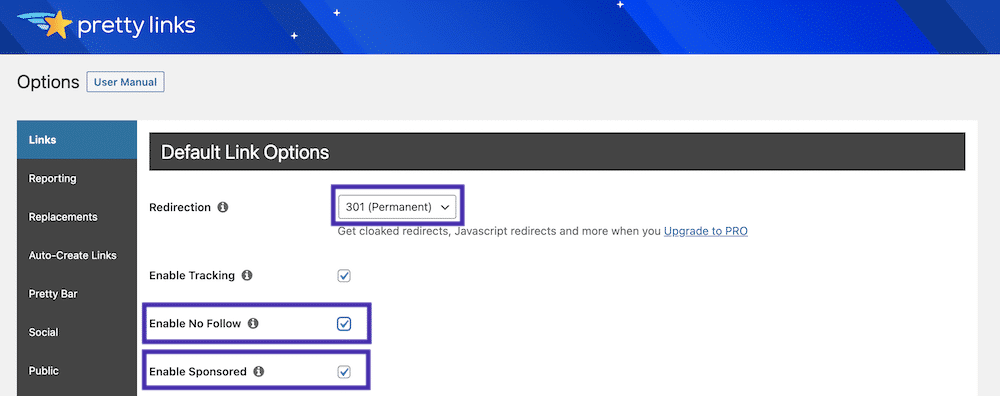
You can select the relevant redirect type from the dropdown and select the Enable No Follow and Sponsored checkboxes to make all of your affiliate links include the nofollow and sponsored attributes. Adding the nofollow attribute will ensure all search engines understand that it’s not a natural link.
10. Create an Internal Linking Strategy
Internal links point from one page or post on your site to another page or post on the same site. They’re not only key to SEO but also to site navigation.
Usually, you’ll incorporate them when referring to other content you have written or linking to your landing pages.
Moz has a great article on why internal links are important, but in short:
- They help people navigate within your website, leading to more content being consumed, resulting in more time being spent on your site.
- They help to establish a hierarchy of your information and structure your site.
- They help spread authority throughout your website, by passing value through links.
An SEO tip we always recommend is adding at least three to five internal links to each post or page you write. Depending upon the length of your content, you may add even more.
Adding Internal Links in WordPress
Follow the steps below to incorporate internal links in WordPress.
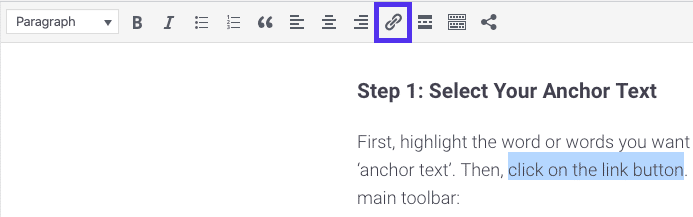
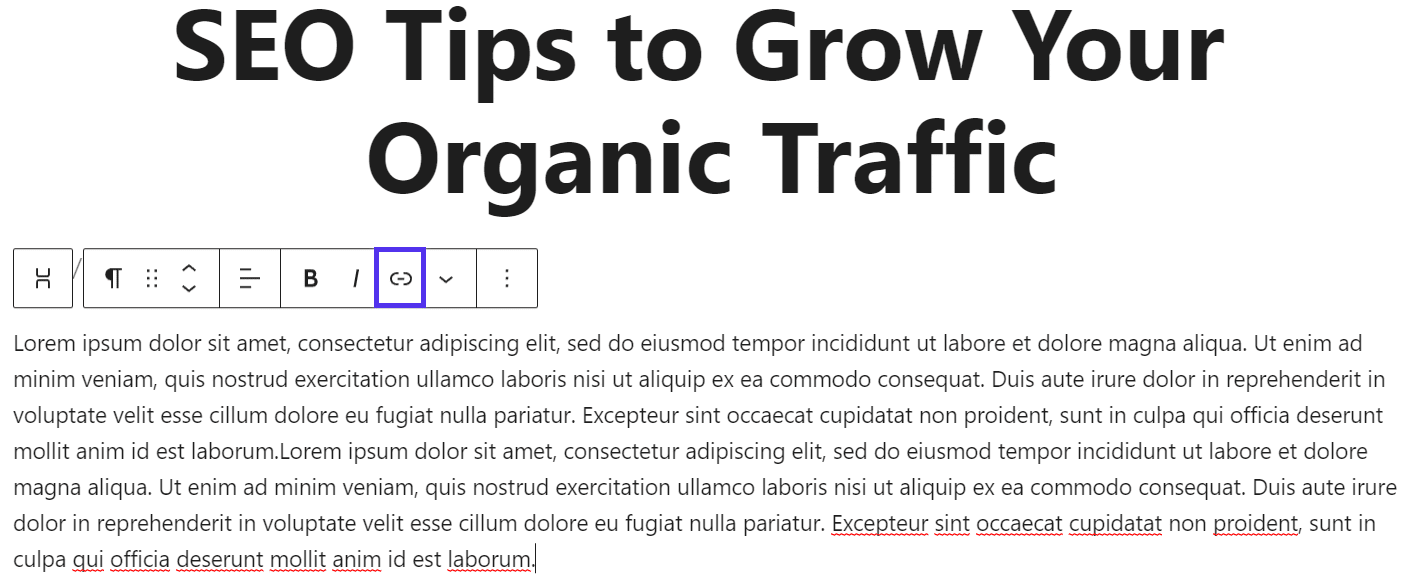
Step 1: Select Your Anchor Text
First, highlight the word or words you want to add your link to, also known as your ‘anchor text.’ Then, click on the link button. In the Classic Editor, you’ll find it in the main toolbar:
In the Block Editor, you can find it in the small toolbar at the top of your paragraph block:
Regardless of which editor you’re using, you’ll see a small text box appear when you click on the link button.
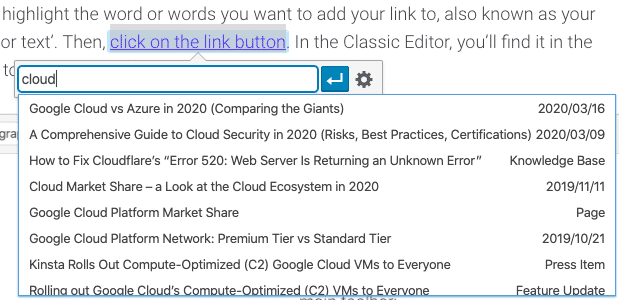
Step 2: Search for Internal Content to Link to
In the text box, start typing the title of the internal post or page you want to link to. WordPress will supply search results suggesting available content. If you’re using the Classic Editor, it looks like this:
In the Block Editor, you’ll see the following:
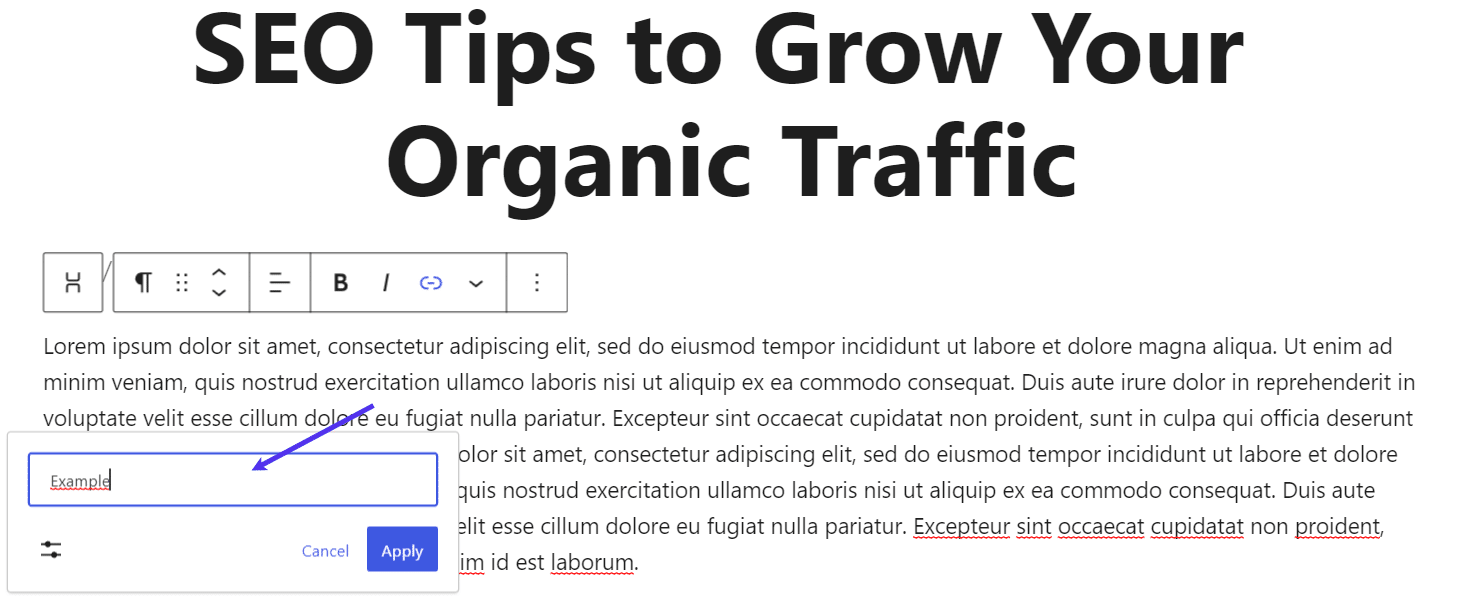
For both, you’ll need to click on the title of the post or page to add the link.
11. Fix Broken Links
Nobody likes broken links, including Google. They lead to a bad user experience and break the flow of link juice, which could affect how well your pages rank in the search results.
There are three main types of broken links:
- Broken outbound links: links on your website that point out to other websites
- Broken internal links: links that point from one of your pages to another page on your website
- Broken inbound links: links from other websites that point to your pages
Broken Outbound and Internal Links
There are a few ways you can find and fix broken links on your site. The first is to check for them in Google Search Console. This is yet another reason why you should be using this platform. To find broken links in Google Search Console, check for errors in the Coverage section and invalid crawl requests in the Settings section (more on this in the Crawl Errors tip).
Some tools (free and paid) will scan your site for broken links. For example, Online Broken Link Checker is a free tool that crawls your pages and provides details of any broken links that it comes across.
Ahrefs has a broken link checker that gives examples of broken outbound links on a website. While it only provides a sample of up to 10 outbound broken links, it tells you how many broken links were discovered, along with the percentage of dofollow links, so this can help you understand the extent of your broken links. However, you’ll need to sign up for a paid plan to see them all.

You can also use a crawler to crawl pages on your website, like Google crawls your pages. This helps you to spot any crawling issues caused by broken links. Screaming Frog offers a free tool that allows you to do just this, with a paid version for additional features. While this crawler is very powerful, it’s an advanced tool, so if you’re new to the SEO scene you might want to read up on how to use it.

There are broken link plugins for WordPress as well. However, we don’t recommend these, as they tend to hurt your site’s performance.
Broken Inbound Links
Finding and fixing broken links that point to your website can be a bit more challenging since you have no control over how external sites link you. The Ahrefs broken link checker (mentioned above) also provides examples of up to 10 broken inbound links, but the paid tools offer a lot more data. This can be well worth the monthly costs, particularly for larger sites that have been around for a while and therefore stand a higher chance of building up a list of broken links over time.

Once you have a list of broken links, you can either reach out to the linking sites and ask them to update the link, or simply add 301 redirects from the broken URLs to the correct URLs (or to appropriate pages on your website). This will restore the flow of link juice, giving your pages an instant boost that can help to improve how they rank in search.
12. Don’t Be Afraid to Link to External Resources
Like adding internal links, you should also link to pages on other websites to provide your visitors with extra context around the topics you cover. For example, you might link to a detailed guide about a specific topic that you don’t cover on your site. By adding links that reference external content, you’re giving your readers the means to research further into different topics, making your content a great resource and worthy of ranking highly in the search results.
This can also be a great way to start conversations with other brands. If you link to another company in your post, shoot them a quick email or tweet after publishing it and ask for a share. If they share it over their social profiles, their posts can send more traffic your way. We use this approach a lot ourselves.
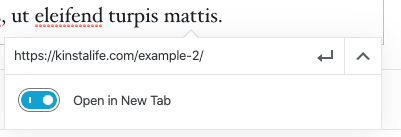
We recommend adding at least two external links within each piece of content. When doing so, a nice little trick to keep people on your site is to make the link open in a new tab or window.
Some people might argue that they don’t like this, but it can help encourage users to come back and browse your site later on, when they might have otherwise forgotten about you.
Adding External Links in WordPress
In the Block Editor, you can set a link to open in a new tab by clicking on it, then clicking on the dropdown arrow and toggling the switch:
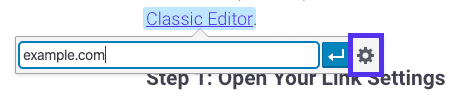
Follow the quick steps below to make a link open in a new tab or window in the Classic Editor.
Step 1: Open Your Link Settings
Open your post or page in the Classic Editor, then navigate to the link you want to modify. Just like in the Block Editor, click on it to access the link settings:

Select the pencil icon to edit the link.
Step 2: Select the ‘Open link in a new tab’ Checkbox
Next, click on the gear icon to access additional settings:
Under the URL and Link Text fields, you’ll see a checkbox labeled Open link in a new tab. Select it to apply this feature to your link:
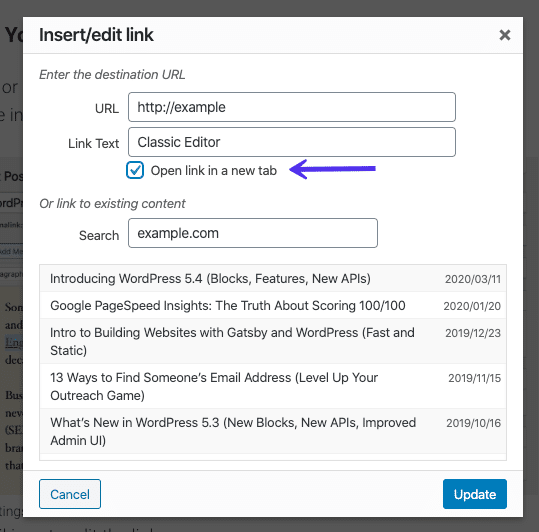
This will add the target="_blank" element to your link’s HTML tag. The result will look like this:
<a href="https://kinsta.com" target="_blank">Kinsta</a>You can incorporate this manually in the text editor if needed.
13. Incorporate Anchor Links in Longer Content
You’ve probably come across anchor links, especially if you read a lot of long blog posts. These links enable you to jump around to different parts of the post.
We use them on the Kinsta blog to create a table of contents for some of our articles:
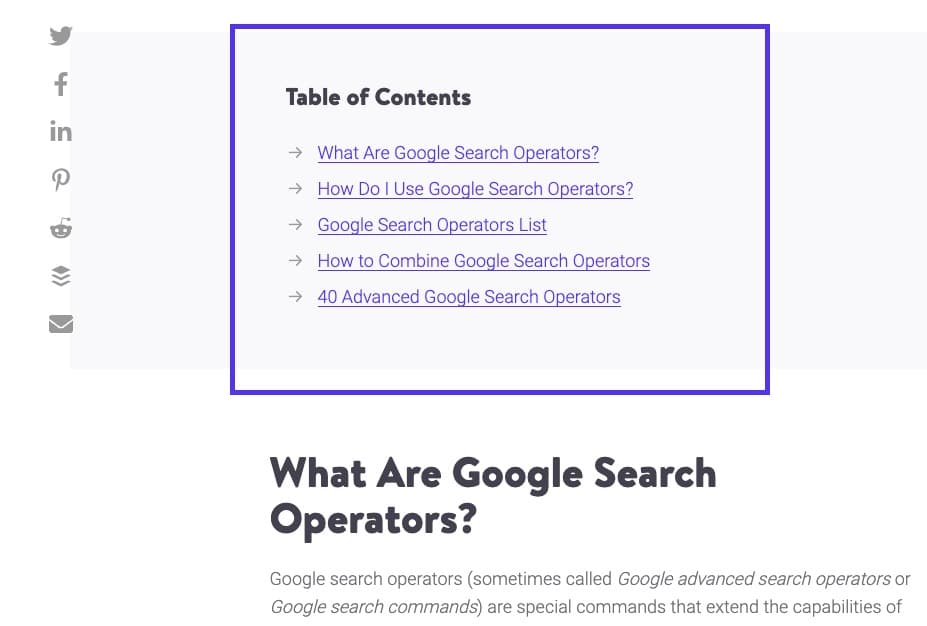
Anchor links are excellent for improving user experience, as they enable readers to get right to the answers they’re looking for. In a lengthy post where some readers may need a portion of your content’s information, this is very helpful and prevents excessive scrolling.
Additionally, your anchor links may also appear under your posts’ titles on SERPs, in the form of Google Site Links, as seen below:
Users looking for precise information which may have passed on your headline might click on one of your Site Links.
This can help you generate more organic traffic. Check out our complete guide to learn how to create anchor links for your posts.
14. Create a Useful Site Footer
Footer links are an essential part of your website, as they appear on every page, so make sure they include links to your key pages that can help your users better navigate your site while showing search engines which pages are most important to you.
Earlier, we covered how creating key pages can help improve both Google’s and your users’ perception of your E-E-A-T. Users expect to find links to these crucial pages in your footer, so including them is a good start.
It’s also important to remember that links pass value between pages, so as footer links are site-wide, including a link here sends a clear signal to Google that these pages are important to you.
If you look at our footer, you will see a mix of company links, which point to our About, Contact, Privacy Policy, etc., along with other important links.
Removing Default Links in WordPress
If you scroll down to the bottom of your website, you may find a couple of credits that you didn’t put there. One will likely be the standard “Powered by WordPress” link applied to every WordPress site. The other is often a credit that points back to the theme developer’s site:
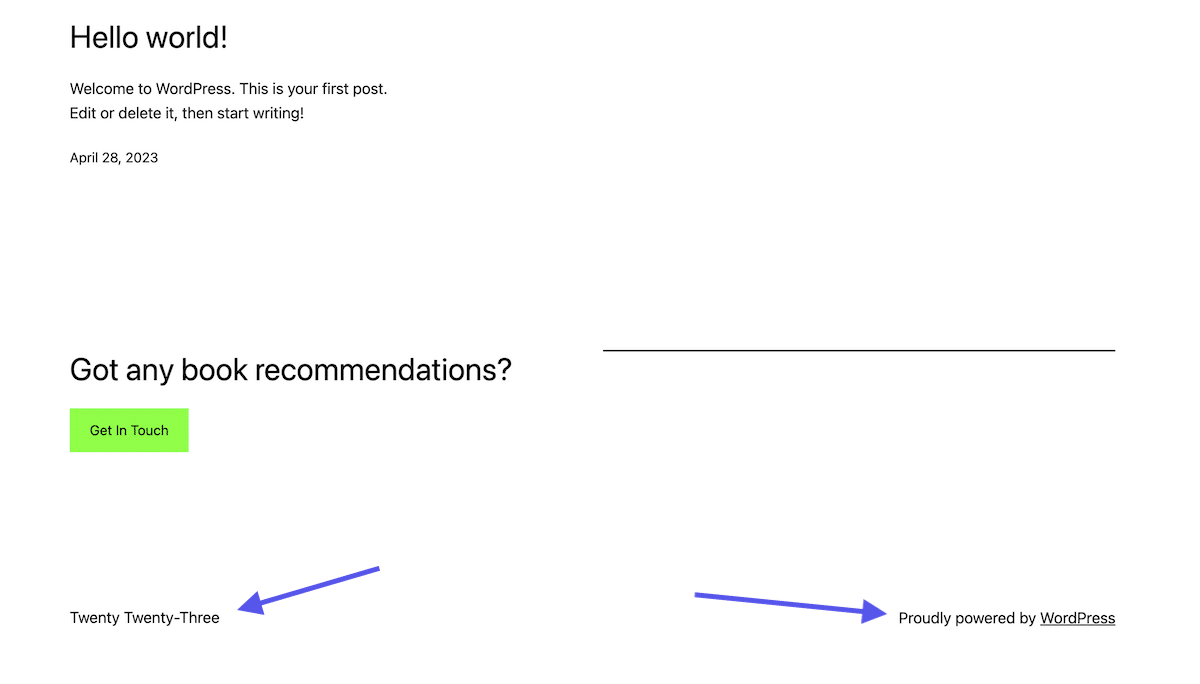
While these links aren’t incorporated with bad intentions, they don’t look particularly professional. Plus, as we’ve seen throughout this post, links have a significant impact on your SEO. Removing unnecessary links from your site is a best practice.
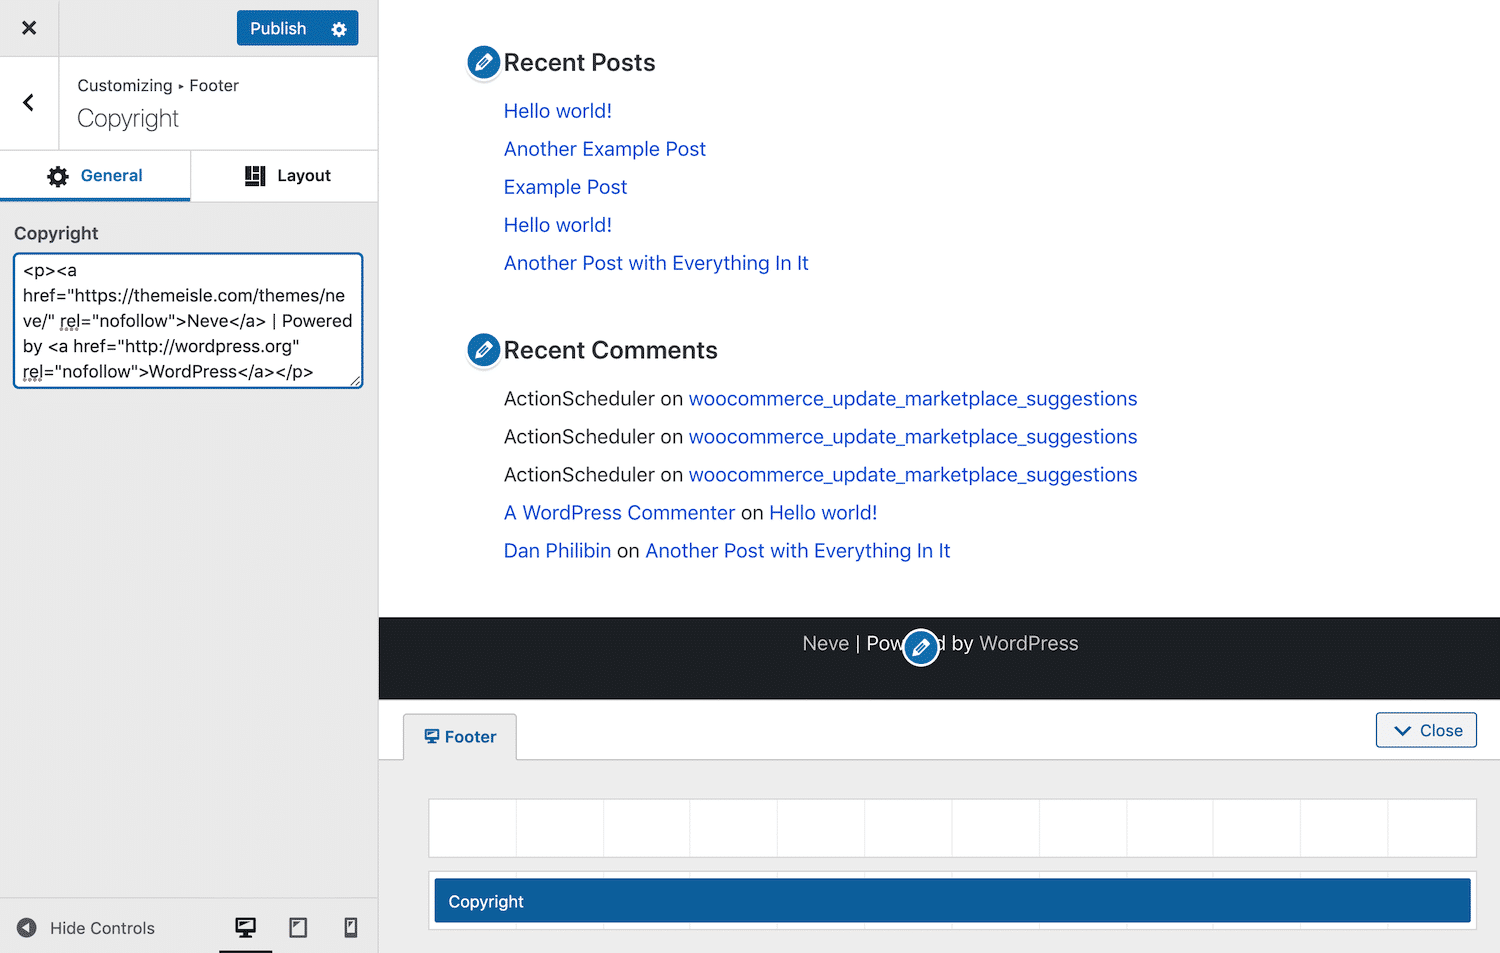
You can check out our guide to removing the “Powered by WordPress” link from your footer. As for any theme credits that may be included, you might be able to delete them via the Customizer:
Alternatively, you may be able to remove this link by editing your theme’s footer.php file. However, this can be a little trickier, so it’s best to stick with the Customizer if possible.
15. Consider Negative SEO
Negative SEO is a crucial topic, as many people don’t know how to deal with it.
Typically with SEO, you want to get backlinks from other sites, which helps build up your domain and page authority. But manipulating links is against Google’s guidelines, so you could wind up with a link penalty if your site is flagged as involved in link schemes.
This is where negative SEO comes in. Anyone can link to your website, so if someone can make it appear as if you are manipulating the search results by adding many links, your website could be hit with a link penalty. This could cause your website to lose traffic or be excluded from the search results.
This is why you should be monitoring your backlink profile. You can quickly investigate if you see any sudden spikes in backlinks or links using unusual, often adult-themed anchor text.
For instance, a business discovered over 200,000 low-quality backlinks pointing to its site in one case. It took over two years to clean up the mess:

At first, this doesn’t seem fair, as you can’t stop someone from creating a bad backlink to your site. To rectify this, Google and Bing provided Disavow tools, giving website owners a way to highlight URLs and domains that search engines should ignore to protect themselves.
Technical SEO
16. Choose Your Preferred Domain
This is a two-sided tip:
www vs non-www
If you are just launching your website, the very first question you might have is whether you should include www in your domain or not. Some people are under the impression that this will affect your site’s SEO.
Put simply, there is no SEO benefit to having www in your domain. It will not influence your rankings in any way. But that’s not to say you should always go with a non-www address. There are a couple of reasons you might still want to use it:
- Using www as part of your domain used to be the standard. This isn’t necessarily true anymore. Even we don’t use www here at Kinsta. You still might see sites incorporating it simply because changing it can be complicated and cause issues. Many older brands continue to use it.
- Large companies with a lot of traffic might want to use www due to Domain Name System (DNS) records. Naked (non-www) domains technically can’t have a CNAME record to redirect traffic for failovers. However, there are workarounds to this issue.
When it comes down to it, using a www vs a non-www domain is more a matter of personal preference. Perhaps you prefer shorter URLs, in which case you could go with a naked domain.
Remember, no matter which version you choose, you should set up redirects so that only one version is accessible. For example, if you visit www.kinsta.com, it simply redirects to kinsta.com.
Previously, you could set your preferred domain to appear in search results via Google Search Console. However, the platform discontinued this option in 2019. Now it can determine which version you prefer based on the information it gathers from your site, such as Schema markup.
Submitting a sitemap is helpful as well. Make sure to keep reading to see how to do it properly.
Avoid Duplicate URLs
As mentioned above, you should only allow one version of your URLs to be accessed, with redirects in place to divert users and crawlers to the correct URL. This goes further when considering other factors, like the casing used in your URLs. For example, the following URLs will likely load the same content, meaning search engines could index them both as two separate pages.
kinsta.com/about-us/
kinsta.com/About-Us/
The same goes for URLs that end with and without a trailing slash. For example:
kinsta.com/about-us/
kinsta.com/about-us
And also based on the protocol. For example:
https://kinsta.com/about-us/
http://kinsta.com/about-us/
This is bad for SEO because each duplicate version is effectively competing with the original.
Redirects
Redirecting any duplicate URLs to the originals will ensure all ranking signals go to a single version, giving it a better chance of showing up in the search results.
Redirect rules ensure anyone accessing the wrong version is directed to the correct version.
Check Out Our Video To Learn How To Add Redirects to Your Site:
If you want to make sure Google knows which page to use, you can add canonical tags to your site manually or with a plugin.
17. Set Up Friendly URLs
Sometimes, the URL of a new page you’re about to publish on your site is not ideal in terms of SEO and needs to be optimized.
For example, this URL slug is generic and doesn’t describe the page.
https://kinstalife.com/blog/blog-post-11/
Google prefers URLs that are short and relevant to the page’s content (e.g. the page title):
https://kinstalife.com/blog/wordpress-seo/
There are other best practices when it comes to URL structure that you need to follow:
- Your URLs should be easily interpreted by users (avoid page IDs and non-descriptive words).
- Always go with lowercase letters.
- Use hyphens to separate words.
- Articles, linking verbs and other symbols are usually expendable from your URL.
Check out our guide to URLs to learn more about optimizing your page URLs.
Creating Friendly URLs in WordPress
By default, WordPress creates messy permalinks (URL structures) that simply are not very clean (learn how to change your site’s URL).
You can change to a Post name permalink structure by clicking on Permalinks under the Settings menu in your WordPress dashboard. Select Post name and click on Save Changes:
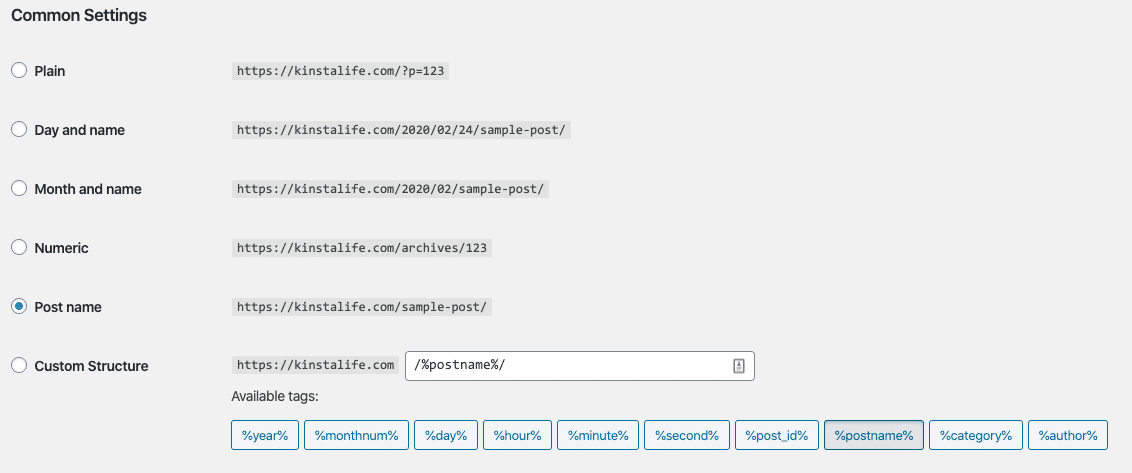
However, it is important to note that changing your permalink structure after posts go live can break all of your previous links.
If you are changing the permalink structure on an older site, make sure to redirect previous URLs to the new ones by taking advantage of the redirects feature in MyKinsta or leveraging a third-party plugin such as Permalink Manager Lite.
If you’re on a different host, make sure to redirect previous URLs to the new permalink by editing the .htaccess file.
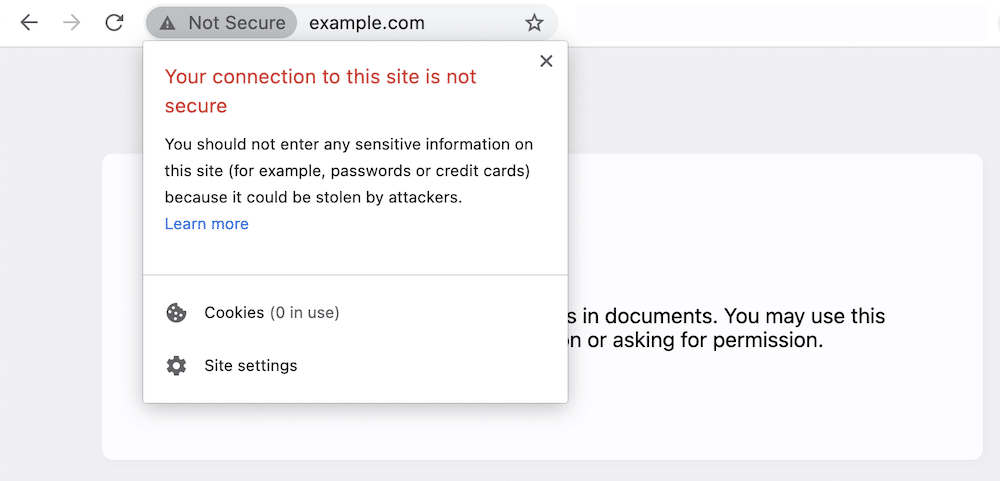
18. Install an SSL Certificate
Google has officially said that HTTPS is a ranking factor. That’s not something new. HTTPS is also one of Google’s Page Experience metrics (more on this later).
To use it, you’ll need to install an SSL certificate on your site. While this may only be a small ranking factor, HTTPS has become the internet standard. Sites that don’t use SSL certificates can expect to see warnings in Chrome, Firefox, and other browsers highlighting that the website connection is not secure.
Installing an SSL Certificate in WordPress
At Kinsta, all sites are automatically protected by our Cloudflare integration, which includes free SSL certificates with wildcard support. This means you don’t have to manually configure an SSL on Kinsta.
However, if you’re on a different host and haven’t yet installed an SSL certificate on your site, check out our in-depth HTTP to HTTPS migration guide.
19. Set Up an XML Sitemap
XML sitemaps are used by search engines such as Google, Bing, and Yandex, to understand the hierarchy and structure of your site and ensure better crawling. Sitemaps aren’t required, but apart from the above, creating one allows you to access more reporting data about your site.
That’s why we always recommend utilizing an XML sitemap file. It will provide a clear picture of your site’s structure to search engines which, among other things, will increase your chances to score Google sitelinks.
Adding an XML Sitemap in WordPress
The Yoast SEO plugin can generate your sitemap files for you automatically. Follow the steps below to enable or verify this feature.
Step 1: Turn on the XML Sitemap Setting
We’ll assume you already have Yoast SEO installed, as described earlier in this post. Navigate to SEO > General in your WordPress dashboard to generate your sitemap file. Make sure the XML sitemaps switch is toggled On:
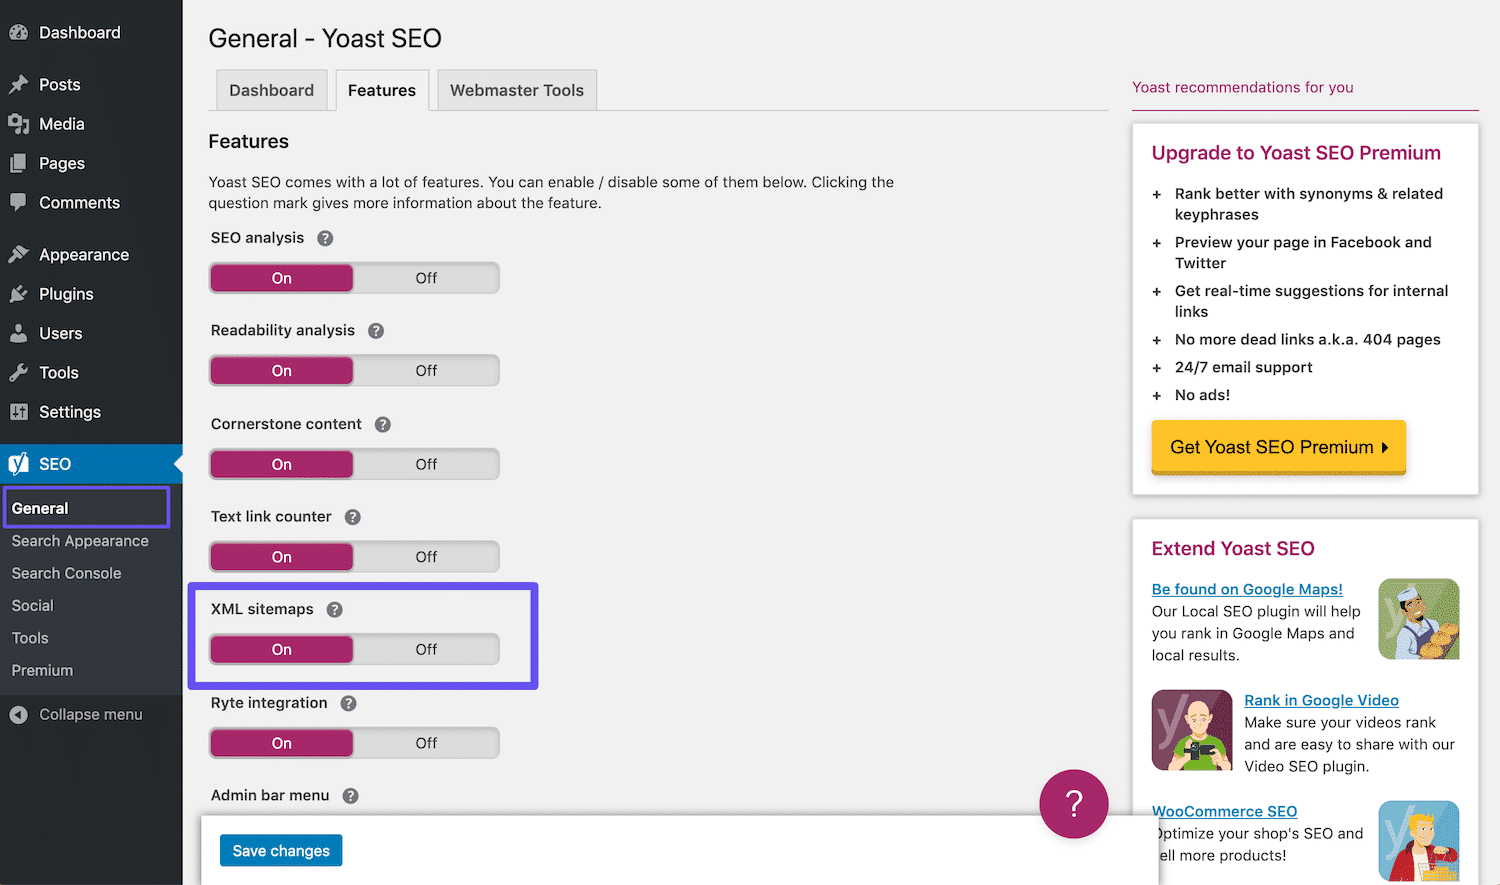
This should automatically create your sitemap without any extra effort from you.
Step 2: Test Your Sitemap
It’s always wise to double-check that automatically-generated files have indeed been successfully created. You can view your sitemap index by appending sitemap_index.xml to your domain, like so:
https://domain.com/sitemap_index.xml
The result should look something like the image below:
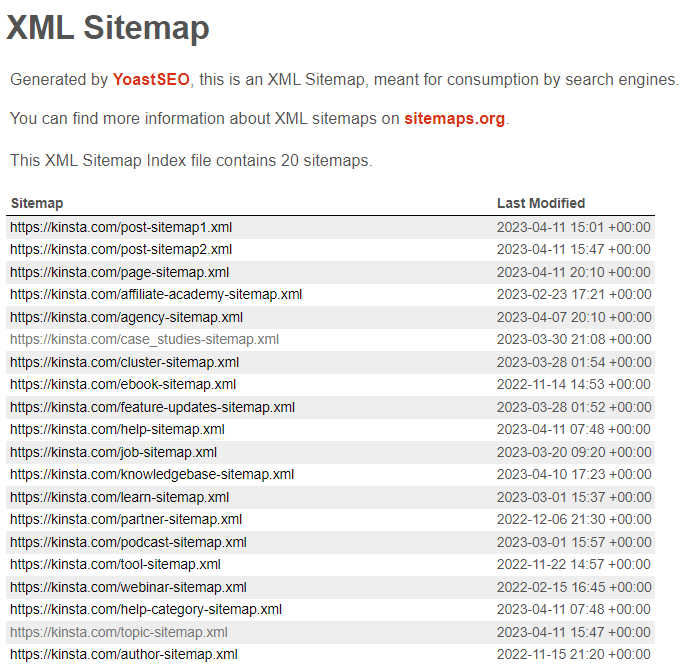
You can then click any of the sitemaps within your index, which will allow you to see the URLs referenced in each file.
We will go into more detail further below about submitting this file to Google and Bing for faster indexing and crawling. You can also check out our deep dive into using a WordPress sitemap.
20. Submit Your Sitemap to Google Search Console
Once you have an XML sitemap file, it’s recommended to submit it to Google Search Console so that you can access additional data on the status of your site. We will assume you have a Google Search Console account already. For more info, check out this more in-depth post on how to submit your site to search engines.
In Google Search Console, click on Sitemaps under the Index section. Then input the location of your sitemap file as we described earlier, and click on Submit:

You’ll then see how many pages/posts have been submitted and indexed. Google will now automatically crawl your sitemap file regularly.
21. Submit Your Sitemap to Bing Webmaster Tools
Like with Google Search Console, we also recommended you submit your site using Bing Webmaster Tools.
You can sign up using your Google account, plus it’s now also possible to verify Bing Webmaster Tools if you’re already verified in Google Search Console using the associated Google account.
Simply log in, click Sitemaps in the side menu, click the Submit sitemap button, and add your sitemap index URL.

You can also submit URLs using Bing’s URL Submission API, which is part of the Bing Webmaster API. You can do this in two ways: using an API Key or OAuth 2.0.
Once everything is set, you’ll be able to submit your URLs in batches, which is great for businesses that create hundreds of new URLs per day (like news sites).
Check Out Our Video Guide to SEO Monitoring:
22. Request Crawling for Faster Indexing
Typically, when you publish content on your site, Google will determine the crawl rate it indexes your content. This could be anywhere from a few minutes to hours or days.
However, there’s a way to encourage Google to index individual pages using the Request Indexing tool in Google Search Console.
This handy tool can be useful when testing how your pages are ranked after making updates to a page. It’s worth noting that there’s often a delay, so don’t expect to see your updated pages indexed instantly.
Google often advises users not to rely on the Request Indexing feature. Googlebot is pretty good at naturally discovering new pages by crawling sites and XML sitemaps, so if your pages aren’t being indexed, there may be other page issues at play.
In Google Search Console, click on the URL Inspection option under Overview in the sidebar, enter the URL of the page you want to request for indexing, then click “Enter” to confirm.

A wise SEO tip is to periodically check your most visited pages using the URL Inspection tool to identify indexing errors and ensure that your pages can be displayed correctly in search results.
After Google Search Console processes your request, you should receive a confirmation message that looks like this:

23. Check for Crawl Errors
Crawl errors occur when crawlers (search engines, bots, etc.) cannot reach a page. This can happen for any number of reasons, from broken links (more on this in our Broken Links tip), caused by links being set up incorrectly, or content being removed without redirects in place, to server errors, where your server was unable to respond to the crawl request.
A great way to check for crawl errors is to head over to your Google Search Console account. Here will find the Page indexing report, which provides details of any errors that Google encountered while crawling your site.

Clicking through on any error types will take you to some examples of the URLs that encountered the error. You can then click the inspect URL icon beside each link to learn more about how Google discovered the URL.
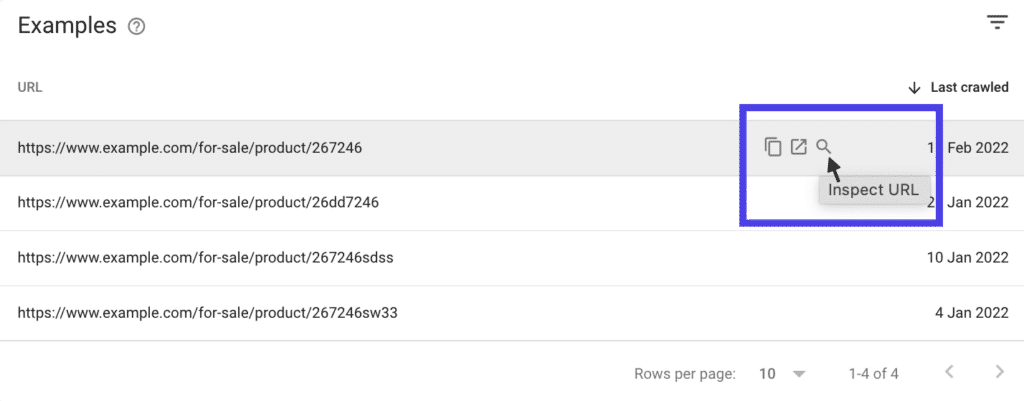
This will give you clues about where Google first saw the broken link, via the referring page.
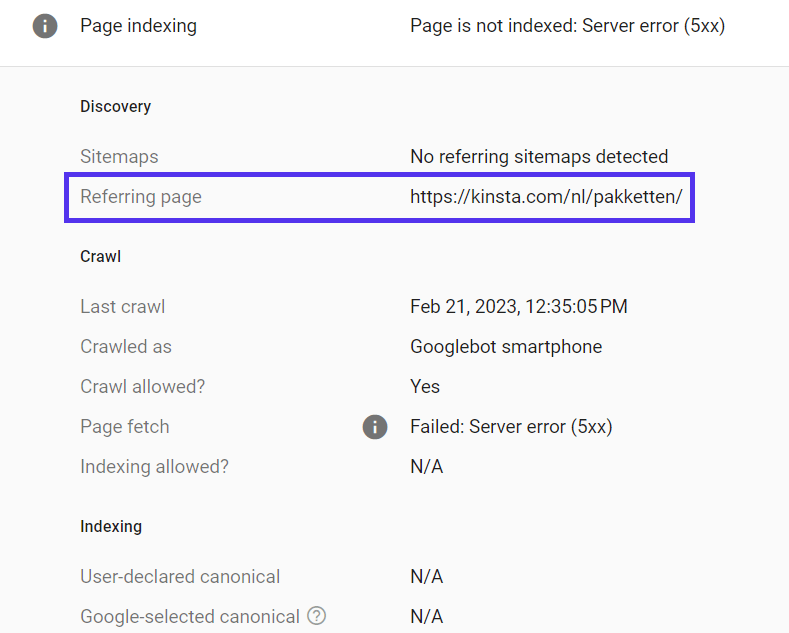
You can now either contact the site with the broken link and request they update it or update it yourself if the link is coming from a page on your site. Another option is to add a 301 redirect from the broken URL to the correct URL.
Google Search Console also has another helpful tool that highlights other crawl errors. Click Settings from the menu on the left, then click Open Report under Crawling.

Under the By Response section, you will find a breakdown of crawl request types. Click through and review any related errors for more information about the error.
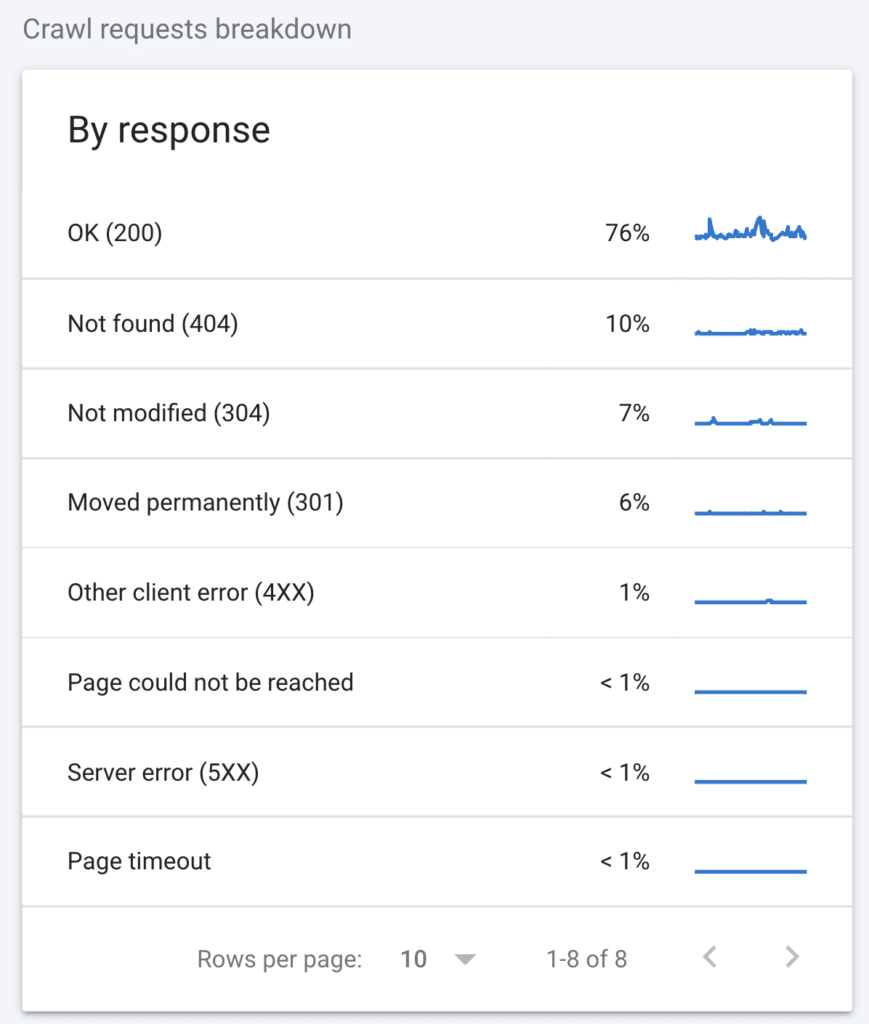
For example, we would want to look at everything except OK (200) and Not modified (304), which are standard crawl requests.
As before, you can now Inspect the URLs to learn more about what caused the errors to fix them.
24. Check if Google Can Crawl Your Pages
Crawling is the key to indexing, and indexing is the key to ranking. If Google can’t crawl your pages, they won’t be indexed, meaning they won’t show up in the search results.
Luckily, the URL Inspection Tool in Google Search Console can help (again) as it allows you to check whether a page was correctly crawled and indexed.
This provides details, including how Google first discovered the URL, when it was last crawled, and the user detected canonical and Google-selected canonical.
To check a page, enter the URL into the search box at the top of the page.

25. Review What Google Crawled
You can also review how Google rendered the HTML of an indexed page. This allows you to check whether your content and links were indexed correctly.
After using the URL Inspection Tool in Google Search Console, simply click View Crawled Page to see the HTML, then either copy it to review in a text editor, or use the search tool to check for specific content or links to make sure they show up.

The screenshot tab in the tool provides a snapshot of how the page was rendered, but it only shows above the fold. An excellent tip to see the fully rendered page is copying and pasting the HTML into an HTML testing tool. This helps you see what Google could crawl and can therefore help highlight any issues with crawling.

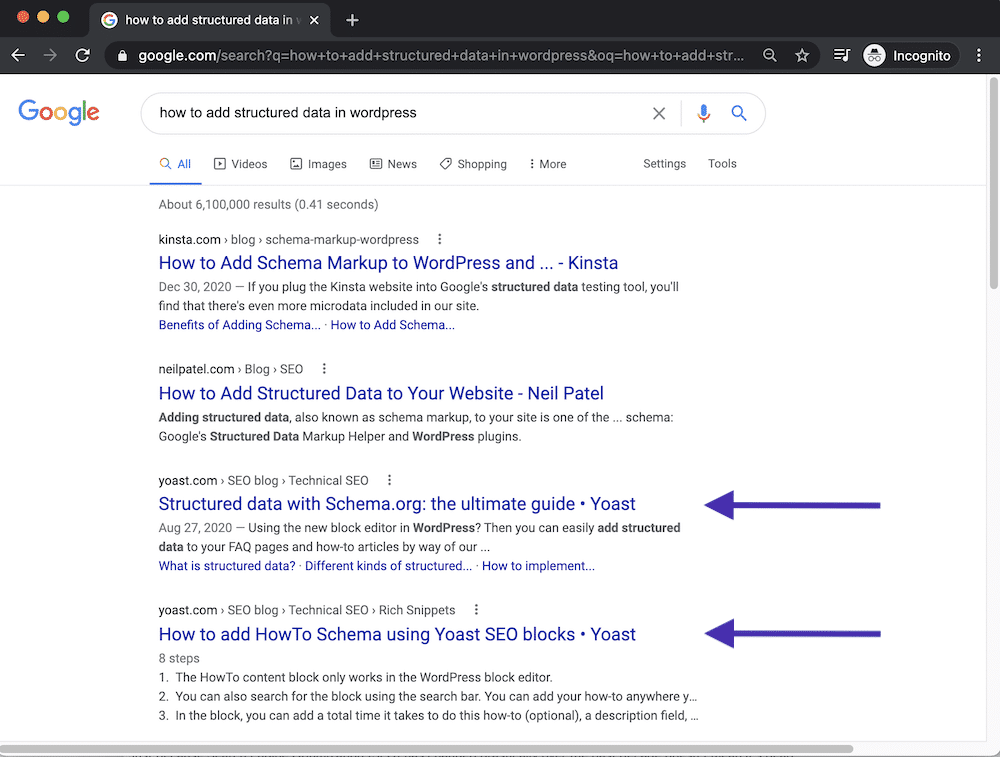
26. Use Structured Data
You may have heard the terms ‘structured data’ or ‘schema markup’ being thrown around the web. Structured data is additional code that helps search engines deliver more and better data to visitors through featured snippets.
If you’ve ever seen a star rating next to a review on a SERP, you’ve seen the results of structured data. This can help you achieve special spots on SERPs, which have the power to increase your CTR dramatically.
And considering that for only 6% of consumers, the star rating doesn’t impact the decision to know more about a company and make business with it (according to a study by BrightLocal), it’s essential to use this piece of structured data.
Another critical reason to use structured data is that it can help Google better understand what your business does and how it fits into the web.
This can help to trigger your brand knowledge panel, which can boost your CTR for brand searches and allow your WordPress website to be featured in other entity-specific search results, like competitor carousels.
Adding Structured Data in WordPress
Many WordPress themes have schema markup coded, but some don’t. You can test your website or blog post with Google’s Schema Markup Validator:

Generally, you want to see zero errors and some results on the right side of the screen. If it’s completely blank, that means your site doesn’t have any schema markup added to it.
Yoast SEO has some structured data built-in. In WordPress admin, under the SEO menu, click Search Appearance. Fill in your Organization name and upload your Organization logo. Once you have saved the changes, you will have the Organization schema setup, which should be visible in Google’s Schema Markup Validator tool.
Yoast also adds structured data to your pages, meaning all blog posts should appear with the schema Article.
If you want to add another schema markup to your WordPress site, we recommend the free Schema plugin. This will automatically add the necessary code. You can then run another test in Google’s Schema Markup Validator.
27. Conduct Regular SEO Audits
A great way to instantly check on how well your site is optimized is to do a quick SEO audit. There are great free and premium tools out there to help you.
SeoSiteCheckup is a free tool with over 50 checks to let you know how you’re doing. While this tool is pretty basic, it can help you get started.
Other SEO tools, including Ahrefs and Semrush, allow you to schedule weekly site audits, which can help you quickly spot any issues that may cause problems when it comes to SEO.
28. De-Index Duplicate Content
It might sound silly to have two identical copies of the same content, but it happens more often than you might think. For example, one common reason for this is when a staging site is indexed by Google.
Unfortunately, having multiple copies of your content indexed can lead to serious SEO problems. While Google doesn’t formally penalize you for having duplicate posts or pages, it can still impact your rankings.
The main problem is that when presented with two identical pieces of content, Google doesn’t know which one to rank. Hypothetically, this means that your staging site could start appearing in place of your actual web pages, which would be awkward.
De-Indexing in WordPress
The simplest way to take care of duplicate content is to de-index your staging site. WordPress allows you to do so quickly. Just navigate to Settings > Reading on your staging site, and select the checkbox next to Discourage search engines from indexing this site:
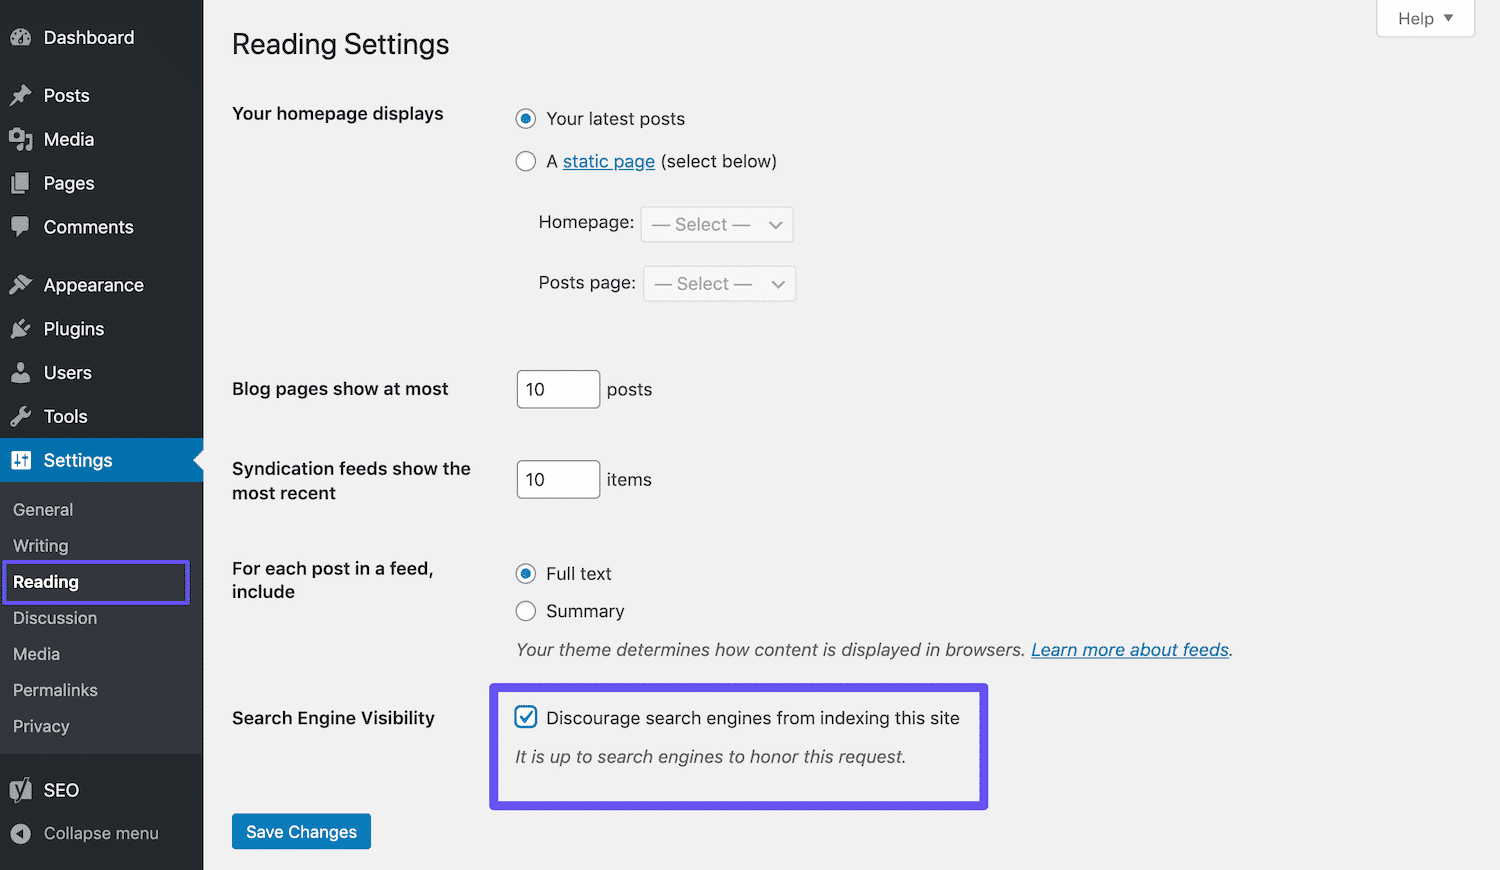
If you’re using a Kinsta staging environment, you can rest assured it will be automatically set up not to be indexed by search engines.
Other examples of duplicate content mentioned earlier in this post include www vs non-www, where both versions of a URL can be accessed, and the use of parameters in URLs, which change the URL without changing the content.
To prevent this type of duplicate content, the general rule is to use a self-referencing canonical tag on every page, highlighting the preferred version of your URLs. For example, this page contains the following canonical in the <head>:
<link rel="canonical" href="https://kinsta.com/blog/wordpress-seo/">Another valuable SEO tip is to add redirect rules to your WordPress .htaccess file to ensure that users and bots are always redirected to your canonical URLs.
29. Remove Unnecessary Redirects
Redirects can be very useful when you want to send users and crawlers to a different URL. But in most cases, when working on your own site, they should be used as a short-term solution: ideally, your links should always point to resolved URLs.
Throughout the life of a website, it’s normal that there will have been many changes, some major, to things like URLs being updated, pages removed, entire sections changed, etc. So we can expect that redirects will have been used to plug any gaps and prevent 404s. These redirects will likely be invisible to the untrained eye.
The problem is that every time a user is redirected, performance takes a small hit. Combine these with additional redirects (known as redirect chains), and you can quickly cause page load time to shoot up, leading to a bad experience for your users, which can result in lower rankings in Google.
Some common redirects include:
- Internal links that include/exclude a trailing slash: for example, if you visit kinsta.com/blog, you will be redirected to kinsta.com/blog/. We, therefore, make sure all internal links to our pages include a trailing slash, avoiding any unnecessary redirects.
- Www vs non-www: Ideally, pages on your domain should always either use www or non-www. For example, if you use www, redirect to www.yourdomain.com or simply yourdomain.com.
- Uppercase vs lowercase: ideally, if uppercase characters are used in your URLs, they should redirect to the lowercase version. This means it’s important to always use lowercase URLs when linking internally.
- Redirecting sitewide links: if any of your navigation or footer links contain an unnecessary redirect, it will result in them appearing on every page on your website. These should be higher up on your priority list.
If you host your website with Kinsta, you can learn more about redirect rules in our documentation, in order to avoid these common unnecessary redirects.
There are some great tools that can help you easily spot unnecessary redirects. Ahrefs is a paid tool that allows you to schedule site crawls, which help to highlight any issues that happen on your site. The Redirects report detects all redirects, providing all the details you need to find the redirecting link in order to update it.
Equally, the Screaming Frog crawler includes a redirect chains report that can help you find and fix redirects.
UX Design
30. Optimize for Page Experience
Google’s Page Experience metric is a set of signals that Google focuses on when reviewing web pages, enabling its algorithms to understand how users perceive your pages, based on page speed, interactivity, visual stability, and security. This includes the Core Web Vitals (more on this in the Improve Your Core Web Vitals section).
Page experience is used as a ranking signal for mobile and desktop rankings. To check your page experience scores, navigate to the Page Experience section in Google Search Console.
The mobile and desktop charts have been split into separate reports, allowing you to check whether your pages have good page experience scores across each device. If your site scores well on mobile, but poorly on desktop, your pages will only benefit from the ranking boost in mobile search results, and vice versa.
The signals considered when evaluating Page Experience include Core Web Vitals, Mobile-friendliness, HTTPS, and intrusive interstitials. If the percentage of pages scored as ‘Good’ is low, you would want to check each of these signals to investigate the cause.
For More Information, Check Out Our Video Guide on User Experience (UX):
31. Improve Your Core Web Vitals
The Core Web Vitals represent a group of measurable performance indicators that analyze how well a website functions from a user experience perspective. They’re based on these factors:
- Loading performance
- Page interactivity
- Visual stability
- Actual data from Google Chrome.
Core Web Vitals also looks at how mobile-friendly your pages are, whether they use HTTPS, and if they contain intrusive interstitials.
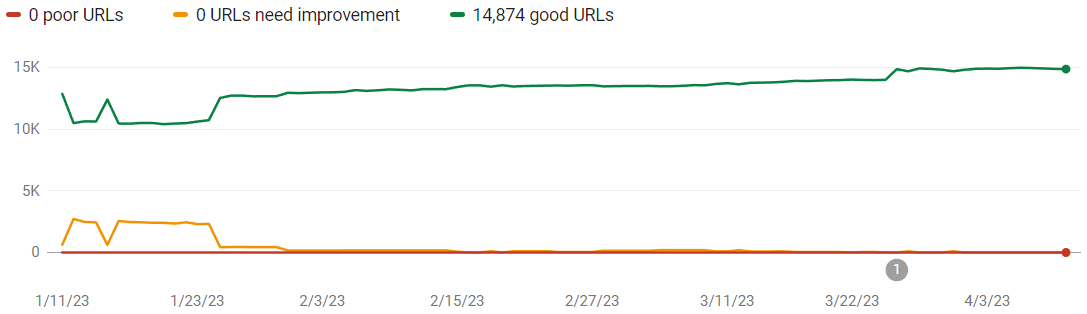
You can check how well your pages perform using the Core Web Vitals report in Google Search Console, which grades pages as ‘Good,’ ‘Needs Improvement,’ or ‘Poor.’
What Are the Core Web Vitals Metrics?
The report is made up of 3 factors:
- Largest Contentful Paint (LCP) measures the time it takes to load the main content on a web page.
- Interaction to Next Paint (INP): This replaced First Input Delay (FID) in 2024 to measures interactivity.
- Cumulative Layout Shift (CLS) analyzes how pages load and whether shifts in the layout could inadvertently cause users to click other elements on a page.
This marks a significant step in how Google is shifting towards including User Experience in its ranking algorithms.
How To Check Your Core Web Vitals
The Core Web Vitals report uses field data to show page performance based on actual user data. While it’s not currently possible to check all pages on a site, you will find example pages, and selecting a page from the list of results often provides further results for other similar pages.
Google’s other developer tools, including Lighthouse and PageSpeed Insights, also allow you to check Core Web Vitals for any page, using lab data, which can help pinpoint issues.
However, these tools base the results on data from your machine and internet speeds, which may not reflect your users’ experience.
Google began incorporating Core Web Vitals into its ranking algorithms in May 2021, meaning that your better-performing pages will now have a ranking boost, while poorly-performing pages may see a drop in positions.
The report provides both Mobile and Desktop results, so getting good scores for both will mean your pages get the ranking boost in both mobile and desktop search results.
How To Improve Core Web Vitals
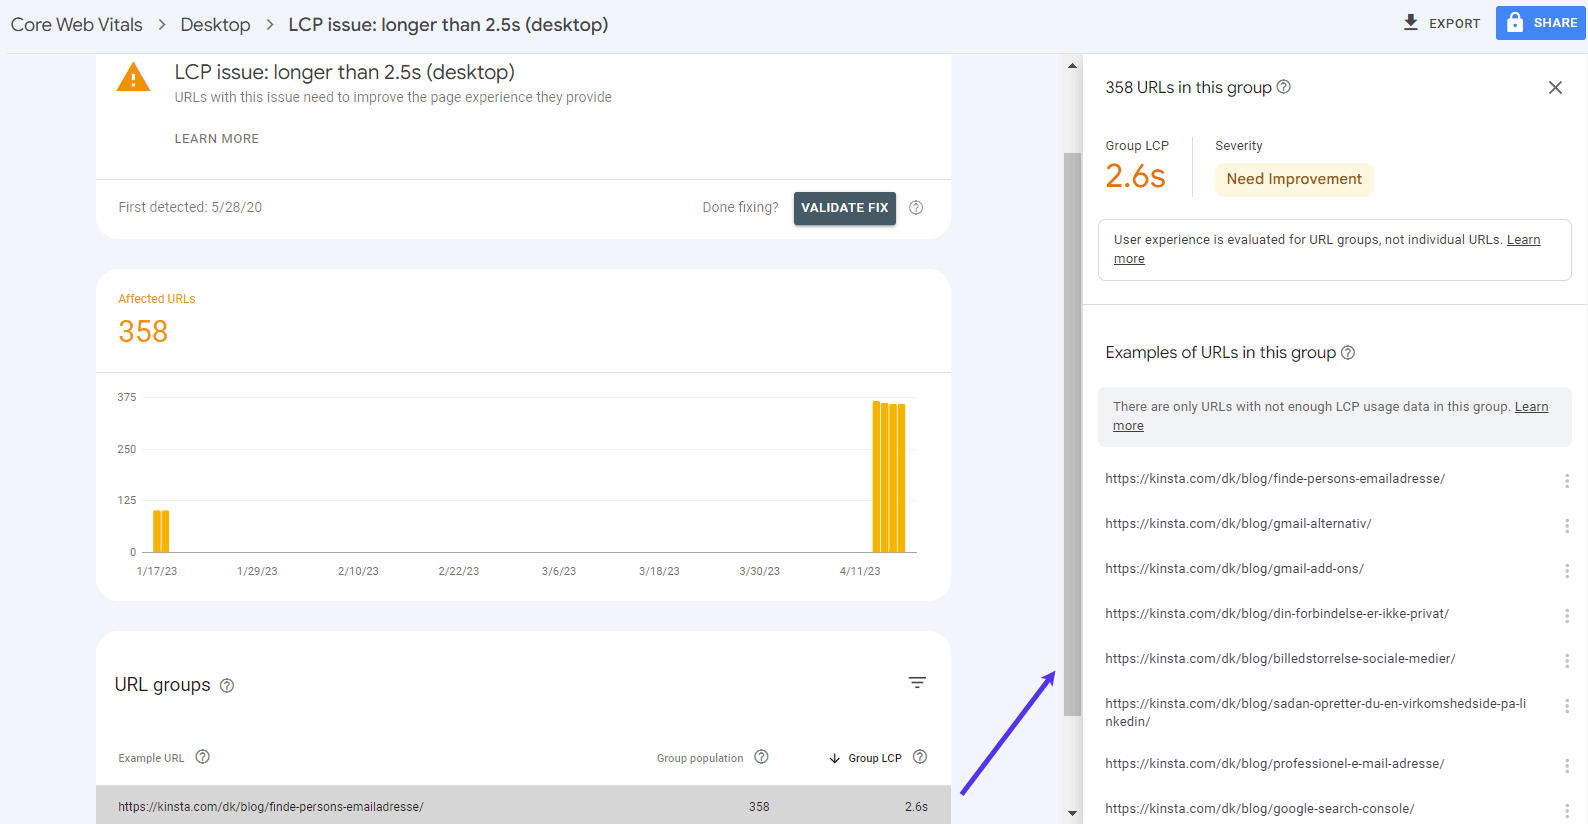
The Core Web Vitals report allows us to see how pages perform against each of the evaluated metrics, so this is where we can see what Google considers as ‘Good,’ ‘Needs Improvement,’ and ‘Poor.’
As with all of the reports available in GSC, only a sample of URLs is provided, but this gives us a pretty good idea of the types of pages that have issues. For example, it may be that many of the blog posts on a website are being flagged as ‘Poor.’ On closer inspection, it becomes apparent that all blog posts include a ‘related posts section’ that’s negatively affecting the LCP.
LCP issues may be more challenging to spot. That’s why we listed out some of the most common causes of poor LCP and how to fix them.
Additional Tools to Debug Issues
You can use Google developer tools, such as Lighthouse and Google PageSpeed Insights, to dig into the reasons behind the low-scoring URLs.
Once you believe they have been sufficiently improved, you can use the ‘Validate Fix’ button in Google Search Console to re-evaluate the URLs.
It’s worth noting that it can take some time for the results of your updates to show up in your Core Web Vitals report, so don’t panic if you don’t see results straight away.
Make sure to check out our in-depth guide on optimizing your site for Google’s Core Web Vitals for more details.
32. Optimize Your Website’s Speed
Website speed is massive when it comes to SEO. Google announced way back in 2010 that it does affect your rankings. Plus, page speed matters to your visitors. Here are a few stats to prove the point:
- One in four visitors abandon a website if it takes more than four seconds to load.
- 46% of users don’t revisit poorly performing websites.
- Website owners have a mere five seconds to engage visitors before they consider leaving.
- 74% of users accessing a mobile site would leave if it took longer than five seconds to load.
- Every one-second delay in page load time could lead to $1.6 billion in annual losses for online merchants as big as Amazon.
You can quickly improve your site’s speed by implementing a CDN, using a fast theme, and optimizing your site accordingly. However, these strategies can only get you so far.
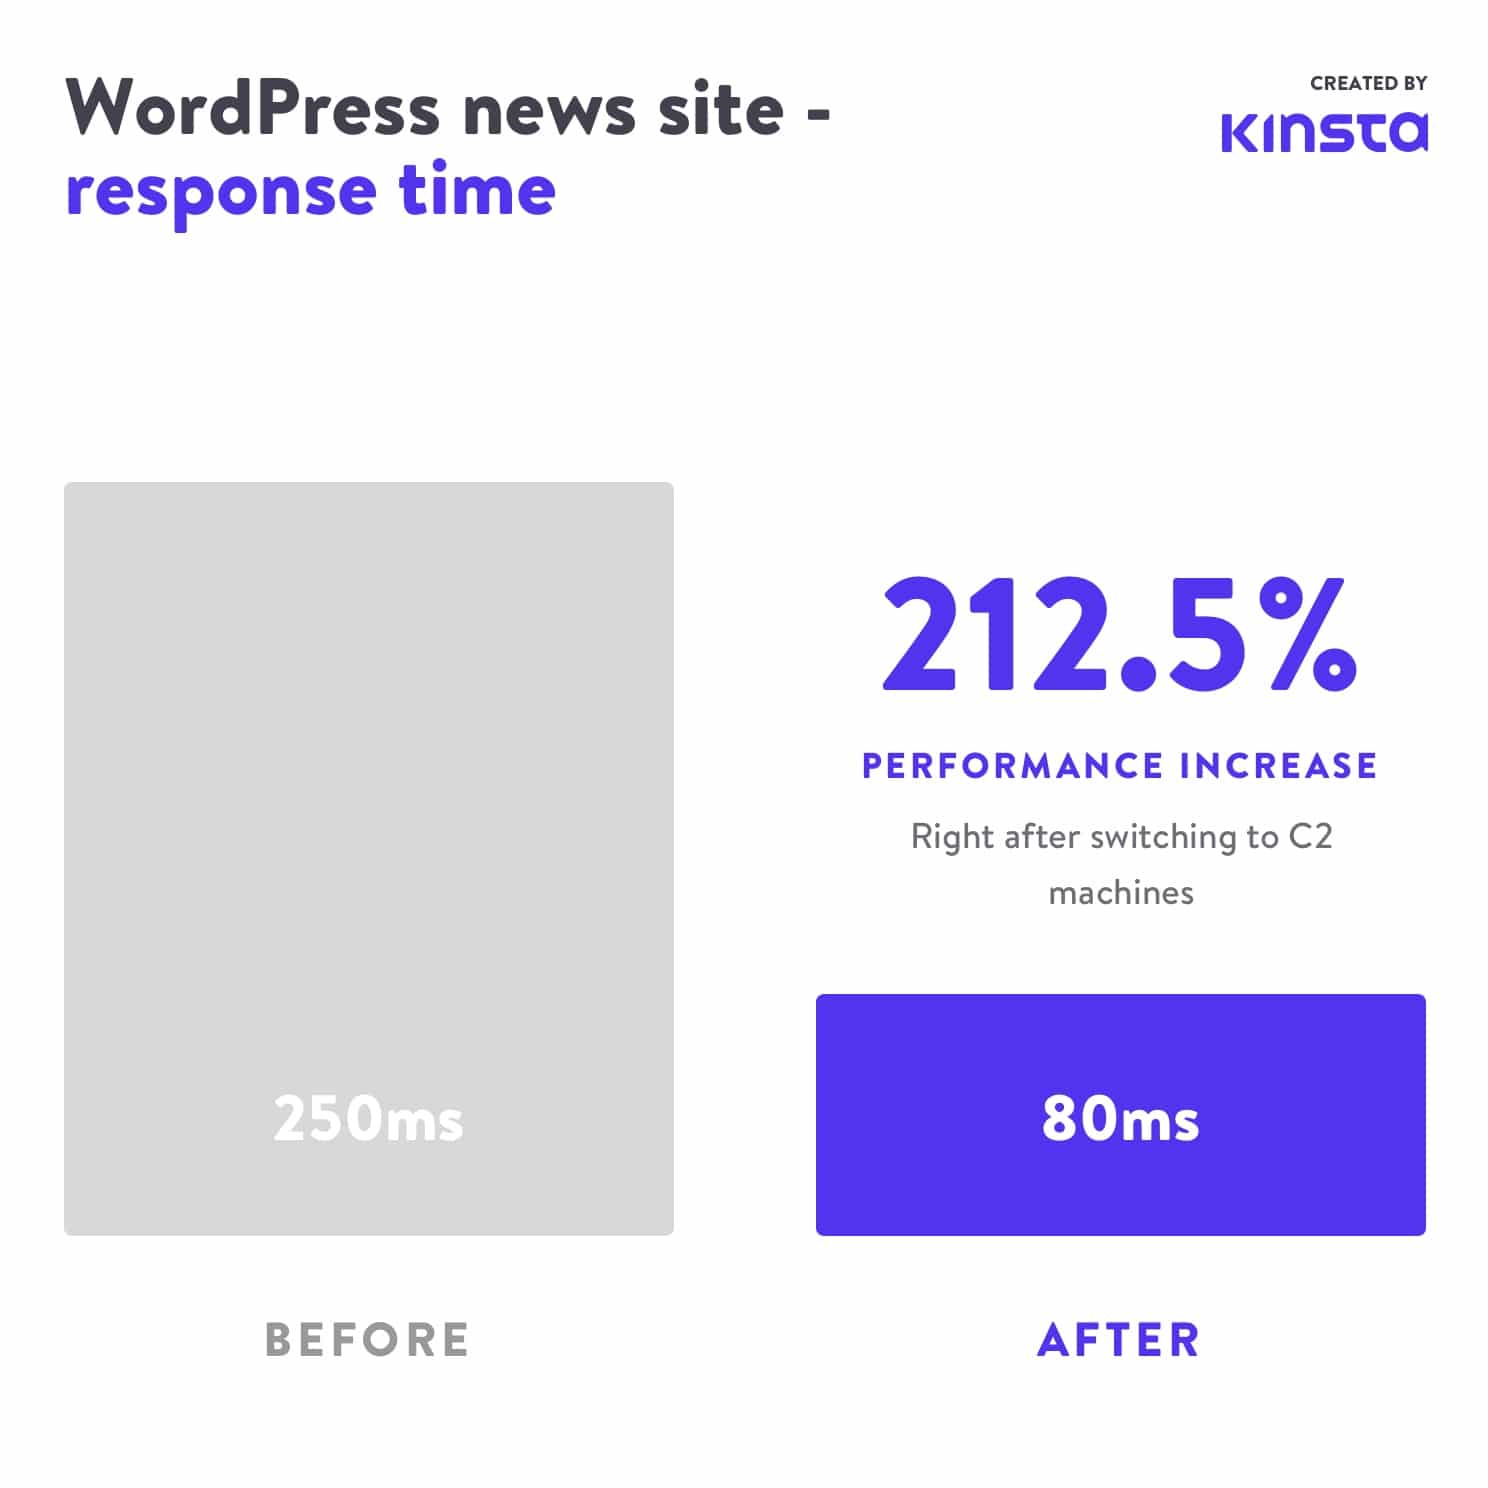
Your web host plays a considerable role in your site’s speed, so investing in quality hosting providers is key. For example, some of our customers saw more than a 200 percent increase in site speed after switching to Kinsta:
If you need a new hosting plan, consider checking out ours.
33. Ensure That Your Site Is Mobile Responsive
Google announced the testing of its mobile-first indexing strategy in 2016. Google’s ranking algorithms now primarily use the mobile version of a site’s content to rank pages, meaning mobile is more critical than ever.
If you don’t have a responsive site yet, drop everything you’re doing and get on that fixed immediately. You can use the Lighthouse extension for Google Chrome to see if your current site is performing well.
Lighthouse can test the mobile version of your site and presents a report similar to this one:
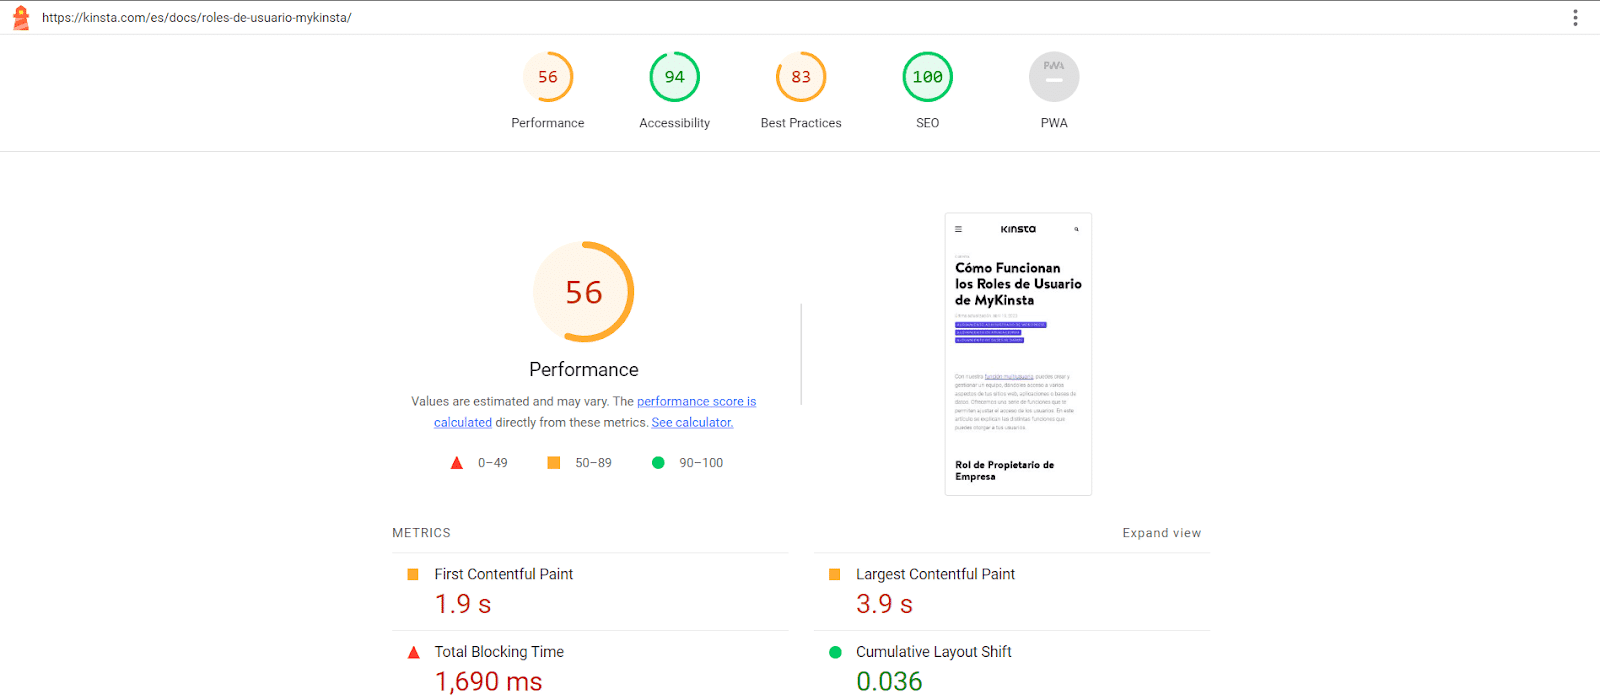
You can check:
- The overall performance of your pages (how quickly they are loading).
- The accessibility of your WordPress site (how well it’s set up for people with disabilities).
- SEO tips (how it’s being crawled by search engines and displayed in search results).
- Best practices suggestions (how your WordPress site is doing in terms of security).
It’s also helpful to check Google Analytics to see how much traffic your site gets from mobile devices, as well as Google Search Console.
34. Use a Short Brand Domain
Your website’s address is a big deal. It often represents users’ first impressions of your site or even your entire brand. For that reason alone, it’s essential to consider when selecting your site’s domain name.
We’ve written an entire post on choosing your domain, but some essential tips include:
- Choose something relatively short and easy to remember.
- Incorporate keywords (if it makes sense to).
- Make your domain sound like a brand name.
- Avoid using Exact Match Domains (EMDs).
This last tip is crucial for your site’s SEO. EMDs are domains that exactly match the keyword the site is trying to rank for.
For example, if we were trying to use an EMD, our site address might be cloudhosting.com.
While this used to be an effective SEO tip, it created many problems. Sites were able to rise to the top of SERPs because their domains indicated that they were highly relevant to users’ searches, but the quality of many of those websites was deficient.
To accommodate this, Google applied changes to its algorithm that made EMDs a moot point. Having an EMD is only helpful if your site also has high-quality content.
35. Use Short URLs
Google likes sites that are clean, organized, and structured. This includes using short URLs. They can also help improve your CTR.
A study by Rebrandly showed that engagement increases by 39% with shortened URLs. Therefore, keeping your URLs as short as possible can be an enormous competitive advantage.
Shortening a URL in WordPress
Remember, WordPress automatically creates a URL for your posts based on their titles. For this post, we ended up with the following:
https://kinsta.com/blog/wordpress-seo
Follow the steps below to shorten a URL for a WordPress post or page.
Step 1: Find the Permalink Setting
In both the Classic and Block Editors, you’ll find a permalink setting that enables you to edit your post’s ‘slug’ or the portion of the URL that appears after the final backslash (/). In the Classic Editor, it appears directly underneath the post’s title:
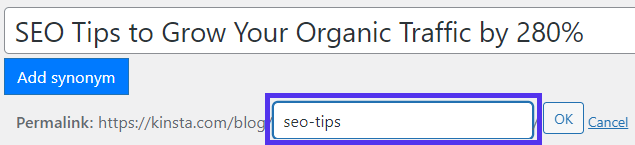
Click on the Edit button to enable the slug field.
In the Block Editor, you can find this option in the Document tab of the right-hand sidebar under Permalink, or at the top of your heading block:
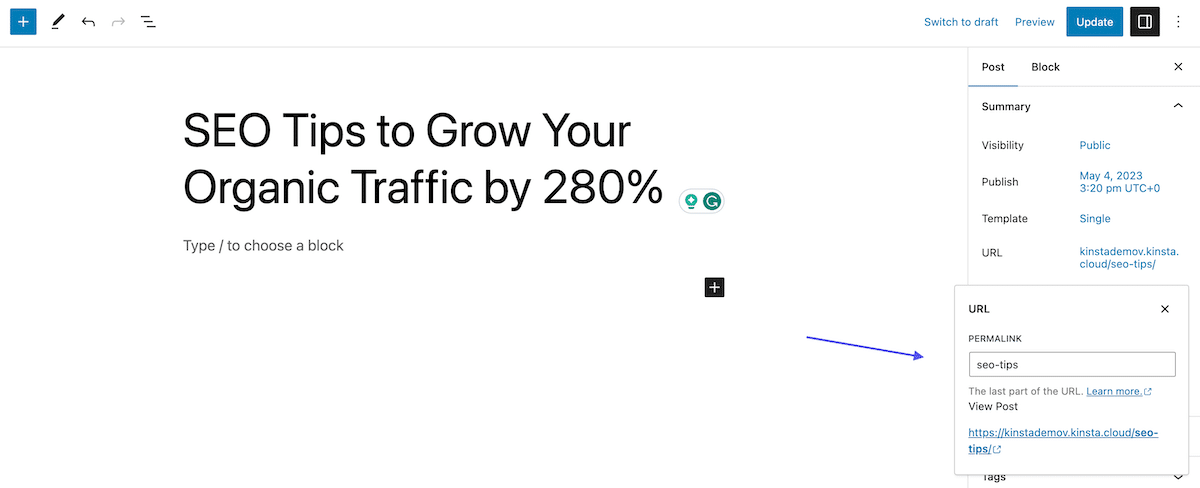
The necessary text field will already be visible.
Step 2: Edit Your Post’s Slug
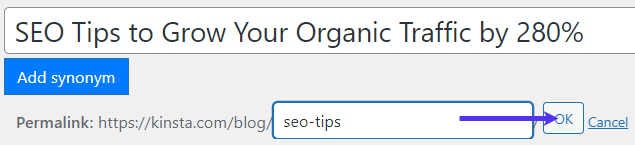
Next, simply type in the new slug for your post. Remember to separate words with hyphens. Also, each post and page on your site must have a unique URL, so you can’t repeat slugs you’ve already used. Doing so will cause WordPress to automatically append ‘-1’ to your slug.
In the Classic Editor, click on the OK button once you’re done to save your new permalink:
The Block Editor will save your new URL automatically after you finish typing it in.
36. Reduce Your Bounce Rate
When it comes to websites, ‘bouncing’ is when users access a page of your site but immediately navigate away from it. A high bounce rate is usually considered a bad thing because it means that visitors aren’t sticking around long enough to convert.
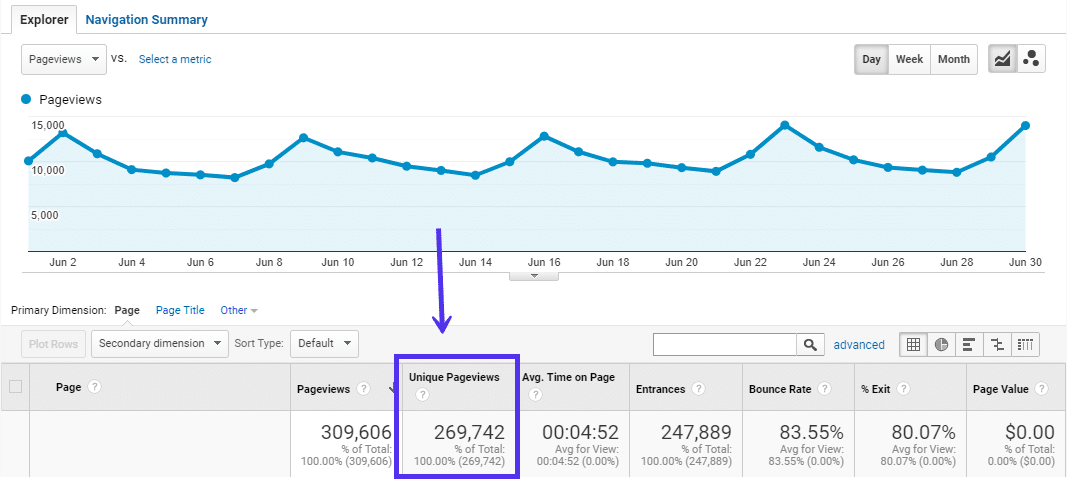
You can view your pages’ bounce rates in Google Analytics. Simply navigate to Behavior > Overview and look beneath the main graph.
Now a few essential comments on bounce rate.
It’s important to note that the bounce rate is not a direct ranking factor for Google or other search engines. Also, the bounce rate is strictly related to the type of site you’re looking at. For example, news-focused sites have some of the highest bounce rates in the market, but that’s not a problem per se, as their main goal is to provide a news piece.
However, a high bounce rate could indicate other underlying issues on your site that might be affecting your SEO.
Users bounce away for a lot of different reasons. Sometimes it’s due to confusing site navigation, misleading headlines or links, excessive ads, or even simple mistakes where visitors click on a link or button by accident.
This can make it hard to pin down what you should do to improve your bounce rate. To get you started, we’ve written not one but two posts on the topic:
- How to Display Dynamic Sidebars and Widgets to Reduce Bounce Rate
- How to Reduce Bounce Rate On Your Site (18 Tips)
You can also use a session recording tool to watch how users interact with your site.
This can be useful in revealing issues and blocking factors that you were never aware of, particularly as you’re likely to be very familiar with how your site works, giving you tunnel vision. Clarity is a free tool from Microsoft that automatically tracks users, allowing you to look at heat maps and recordings to understand better how your users navigate your pages and interact with your site.
37. Account for Dwell Time
‘Dwell time’ refers to how long searchers spend on a website they found on a SERP before returning to view other results. While Google has denied that dwell time is a direct ranking factor, it’s a clear sign of whether a user found the answer to their question.
If Google has this data and can track what searches a user went on to make after visiting your site, it’s hard to believe they wouldn’t use this to determine the quality of the search result.
Of course, increasing your pages’ dwell time isn’t exactly a cut-and-dried process, but there are several strategies you can try. For starters, make sure to always place important information above the fold where it’s easy to find.
‘The fold’ refers to the point on your page where users have to scroll down to see the rest of your content.
For example, on our home page, the main navigation menu and a Call to Action (CTA) button that encourages visitors to view our plans, features, and Client stories are positioned above the fold:

Speaking of navigation, making sure yours is clear and easy to understand can also help to increase your dwell time.
Additionally, you’ll want to cut down on distractions that users may find annoying. Popups and auto-rolling videos are two features that have proven to steer visitors right back to the SERPs they came from.
Finally, make sure to answer the questions your users are searching for. You can check which queries your pages rank for in Google Search Console’s Search results report to understand the intent behind them. You just need to make sure the page does a great job of answering them.
Content Optimization
Check Out Our Video Guide to Content Optimization:
38. Do Keyword Research
Keywords are still alive and well. That’s why ranking matters. Remember, as we mentioned before, Google is still a computer algorithm. It has to look at something to calculate rankings, and keywords are still a big part.
This is an example of a brand new site that grew from 0 to 260K+ monthly visits with less than 30 articles:
How did they do it? They found a good niche and did strategic keyword research. There are many great tools out there to help you with this. A few of our favorites are Semrush, Ahrefs, and KWFinder. The trick is finding a good keyword with search volume while not picking something too competitive.
Also, don’t forget about multilingual SEO! Keywords in other languages are sometimes a lot less competitive. The English market is very saturated when it comes to content marketing.
For example, in English, let’s look up the term “marketing strategies.” We can see that it has a global volume of around 48,000 searches per month. If you look at SERPs for this term, you’ll see that trying to rank for it means going up against huge domains with high domain authority:

In other words, “marketing strategies” will be hard to rank for. If you’re not a big brand with lots of authority, you probably won’t try to tackle this keyword.
However, if you consider the same term in Spanish, “estrategias de marketing,” you can see the search volume is still respectable, at around 35,000 per month, and competing against the sites that rank for this term is much more realistic:

That is now something you could tackle. When it comes to other languages, you will find that many search terms are simply easier to rank for.
Read more about the benefits of translating your website further down, and be sure to check out our in-depth multilingual guide to start dominating the SERPs in other languages.
39. Always Target a Main Keyword
It is important to remember that Google is still a computer algorithm when it comes to SEO. For that reason, keywords still matter.
You should write for your visitors and customers, but write smart.
You can write for your audience while still keeping SEO best practices in mind. Remember, alternative search engines such as Bing and Yahoo rely even more on what some may call ‘outdated’ SEO practices.
Whenever you write a blog post or publish a page on your site, you should always have a main keyword in mind. Don’t just craft a post for the sake of pushing out more content. We’ll talk more about keyword research further below.
Setting the Main Keyword in WordPress
Using the Yoast SEO plugin, you can easily set the main keyword you want to write about. In the image below, you can see that Yoast SEO analyzes the keyword density and is reporting that it is a bit low for the post:
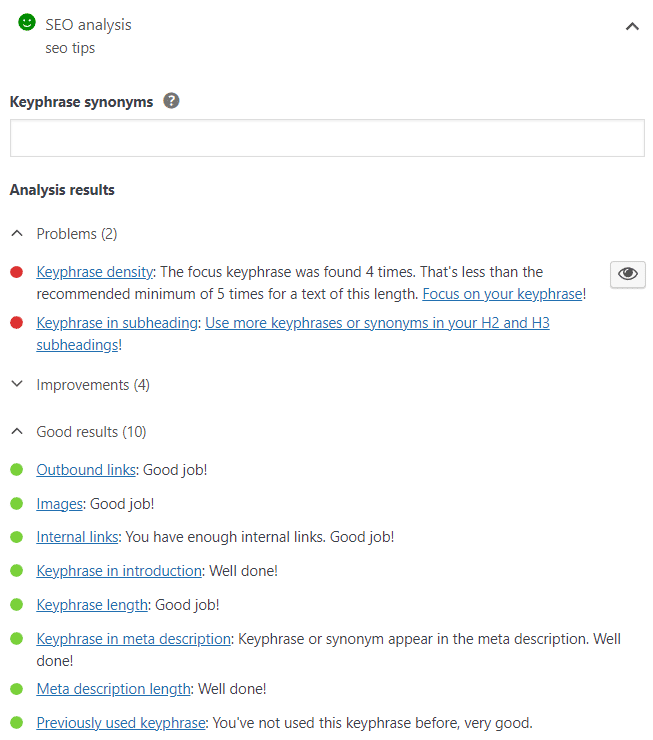
While keyword/keyphrase density is by no means a ranking factor, it can still help you when it comes to making sure your content includes your target keywords.
40. Include Your Main Keyword in the First Paragraph
The first paragraph of any post or page is significant. If possible, we recommended adding your main keyword within the opening. The reason is that Google crawls content from top to bottom, and if it finds your keyword quickly, it’s more likely to deem your article as relevant to that topic.
It’s also a matter of correctly “setting the scene” for your readers right from the start and improving your bounce rate by delivering the content they were expecting to see.
In WordPress, the Yoast SEO plugin checks for this to ensure that you are keeping up with this best practice:
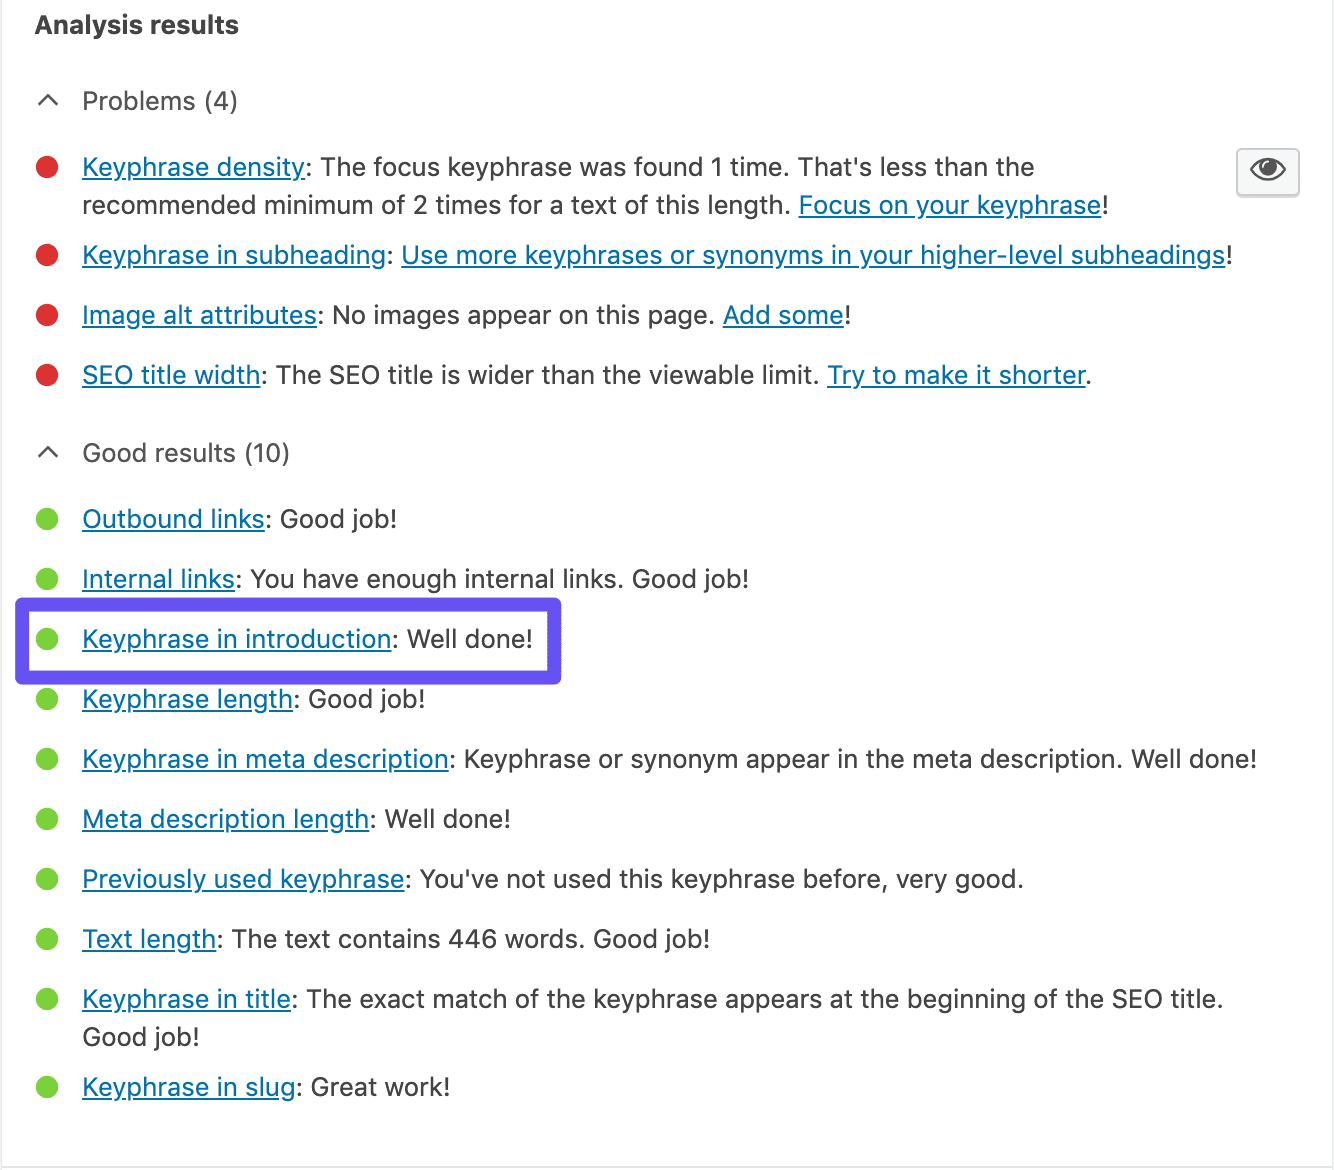
With all of this said, remember that your content should always sound natural and make sense. Work your keyword naturally into your opening, rather than simply stuffing it into your first paragraph for SEO’s sake.
Google Passage Ranking
It’s also worth noting that Google can index individual passages within pages, rather than simply indexing full pages.
This means Google is paying more attention to specific sections within your posts and pages, making it easier to surface specific content without considering the page’s primary focus.

41. Avoid Keyword Cannibalization
Keyword cannibalization occurs when two or more of a site’s pages compete for the same keyword. While this can sometimes result in both pages ranking, it’s usually easier to focus all of your efforts on a single page, rather than diluting page authority across multiple pages. This, in theory, will help one version rank even higher.
If you’re lucky enough to have more than one-page ranking in the first two positions, you can count your luck and move on to review another keyword.
In the example below, we can see Yoast ranking with 2 results. By combining these two pages and the signals that go with them, they could stand a better chance of moving up in the rankings:
Keyword cannibalization can also lead to unstable rankings, causing your page’s position to fluctuate, as it may be unclear to search engines which is the most relevant page to be used. This means one page may rank well for a few days, then the other page may take its place, but in a lower position.
How To Check Keyword Cannibalization
There are several ways to check whether keyword cannibalization is causing issues for your site. Using a tool like Ahrefs will allow you to check if more than one page ranks for your target keywords.
You can quickly see any ranking shifts, where different pages jump in and out of the rankings.
You could also use Google Search Console to see when multiple pages rank for the exact keywords.
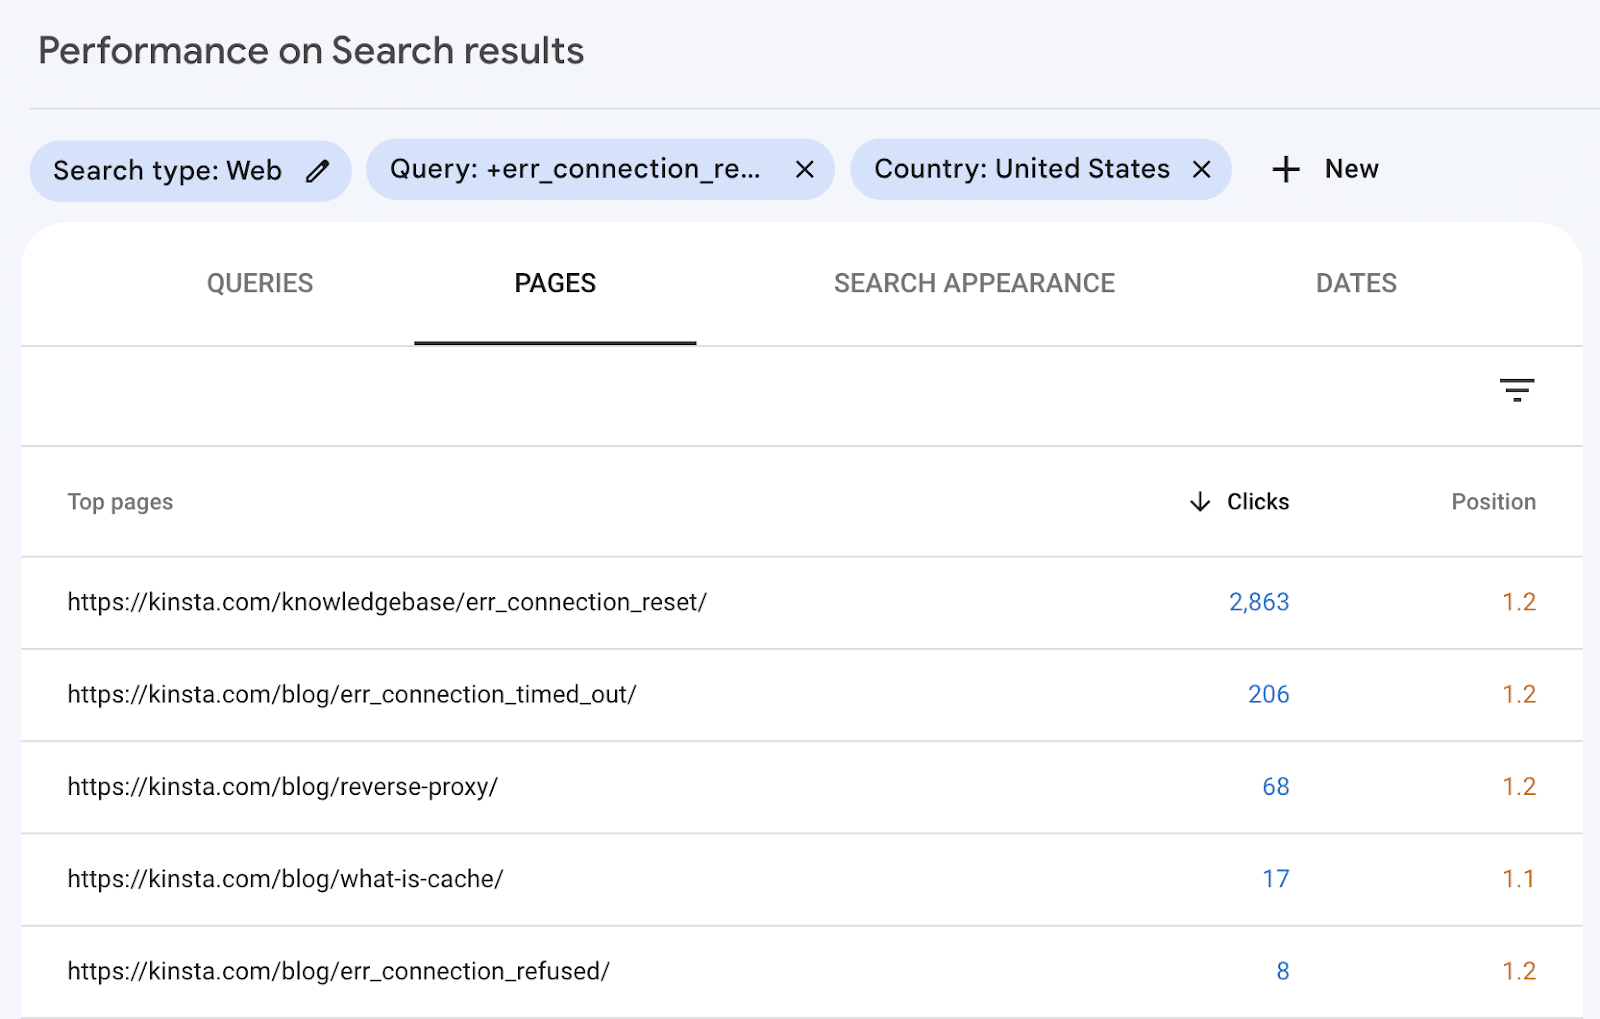
In the Search Results section, select the ‘Queries’ tab, then filter Rows by Position, where Position is smaller than 20. This will show the first two pages in Google’s results.
Next, select ‘Clicks,’ ‘Impressions,’ and ‘Average Position,’ then review high impression keywords with a position greater than 1.
By clicking each keyword and selecting the ‘Pages’ tab, you can reveal whether more than one page ranks for the selected query.
You may want to add your target country to the filters at the top, particularly if you have your content translated into other languages.
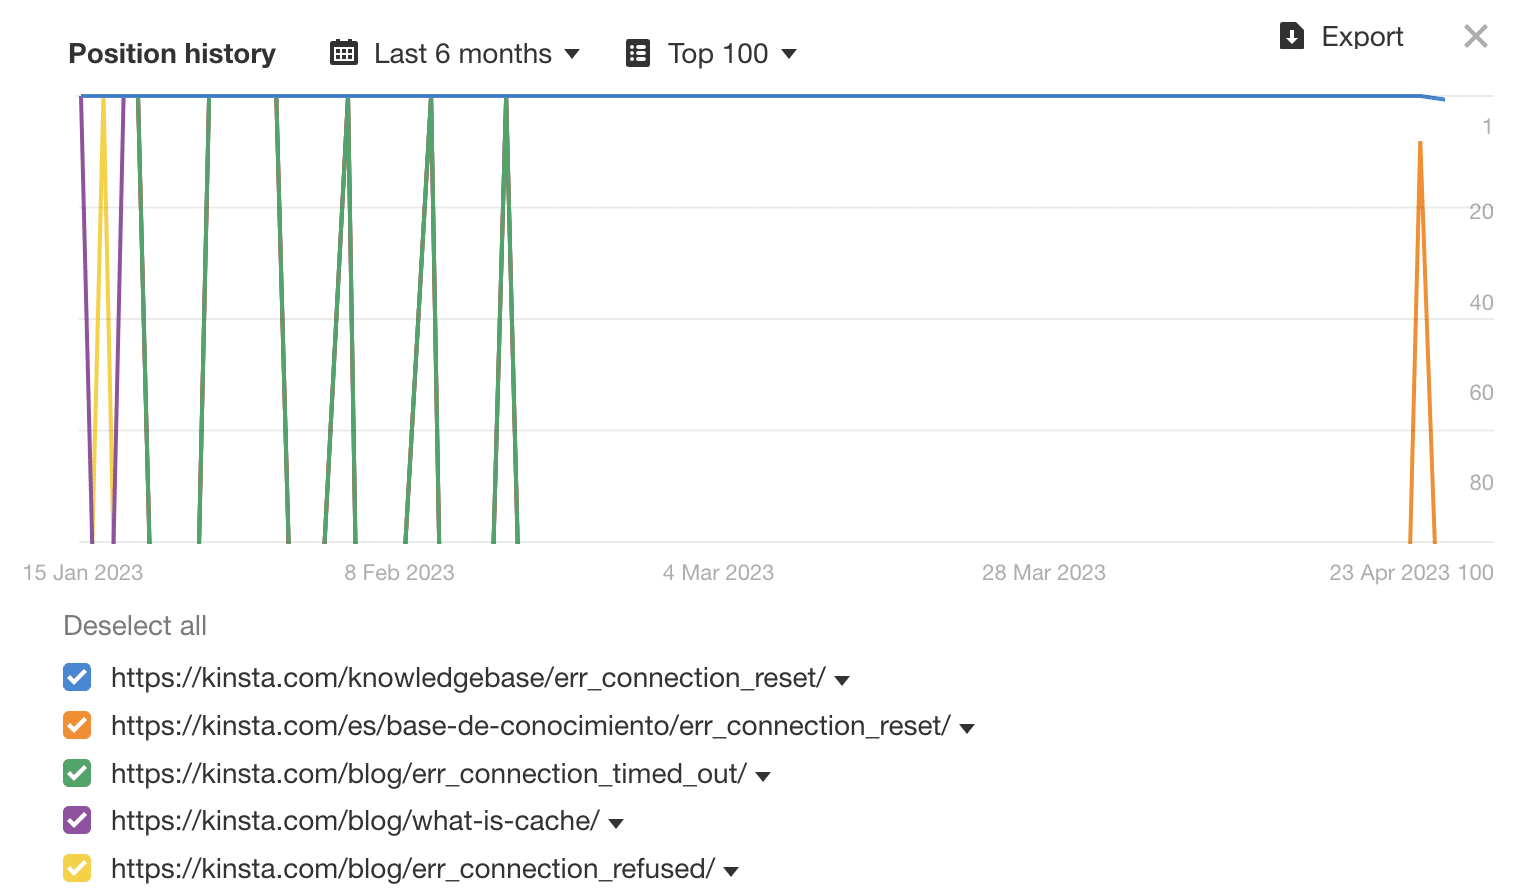
Below, you can see we have several pages ranking for the query ‘err_connection_reset.’ Armed with this data, we may decide to merge the content into one ‘super’ page, or review the content to avoid targeting the keyword on one of the ranking pages.
42. Publish Evergreen Content
Evergreen content can be vital as an SEO tip for long-term organic traffic. This term refers to content that is always relevant, no matter when you read it.
Usually, when it comes to publishing evergreen content, the writer has to update the posts occasionally. After all, most industries change slightly over time.
One of the main advantages of evergreen content is that you can share it repeatedly and keep building up backlinks and social signals for it. If you choose to publish evergreen content vs news, it’s wise to go for the long-term play.
43. Update Old Content
As we’ve hinted at a few times throughout this article, updating old content is a solid SEO tip that we use and recommend.
Google considers content ‘freshness’ when ranking results, so going through your posts and modifying them to reflect better your industry changes can significantly boost your visibility.
Yoast SEO can identify content that you may want to update. Posts you’ve marked as Cornerstone Content that hasn’t been edited in the last six months will appear under a Stale Cornerstone Content link in your Posts list.
Alternatively, you may want to look into the free online tool, Animalz Revive:
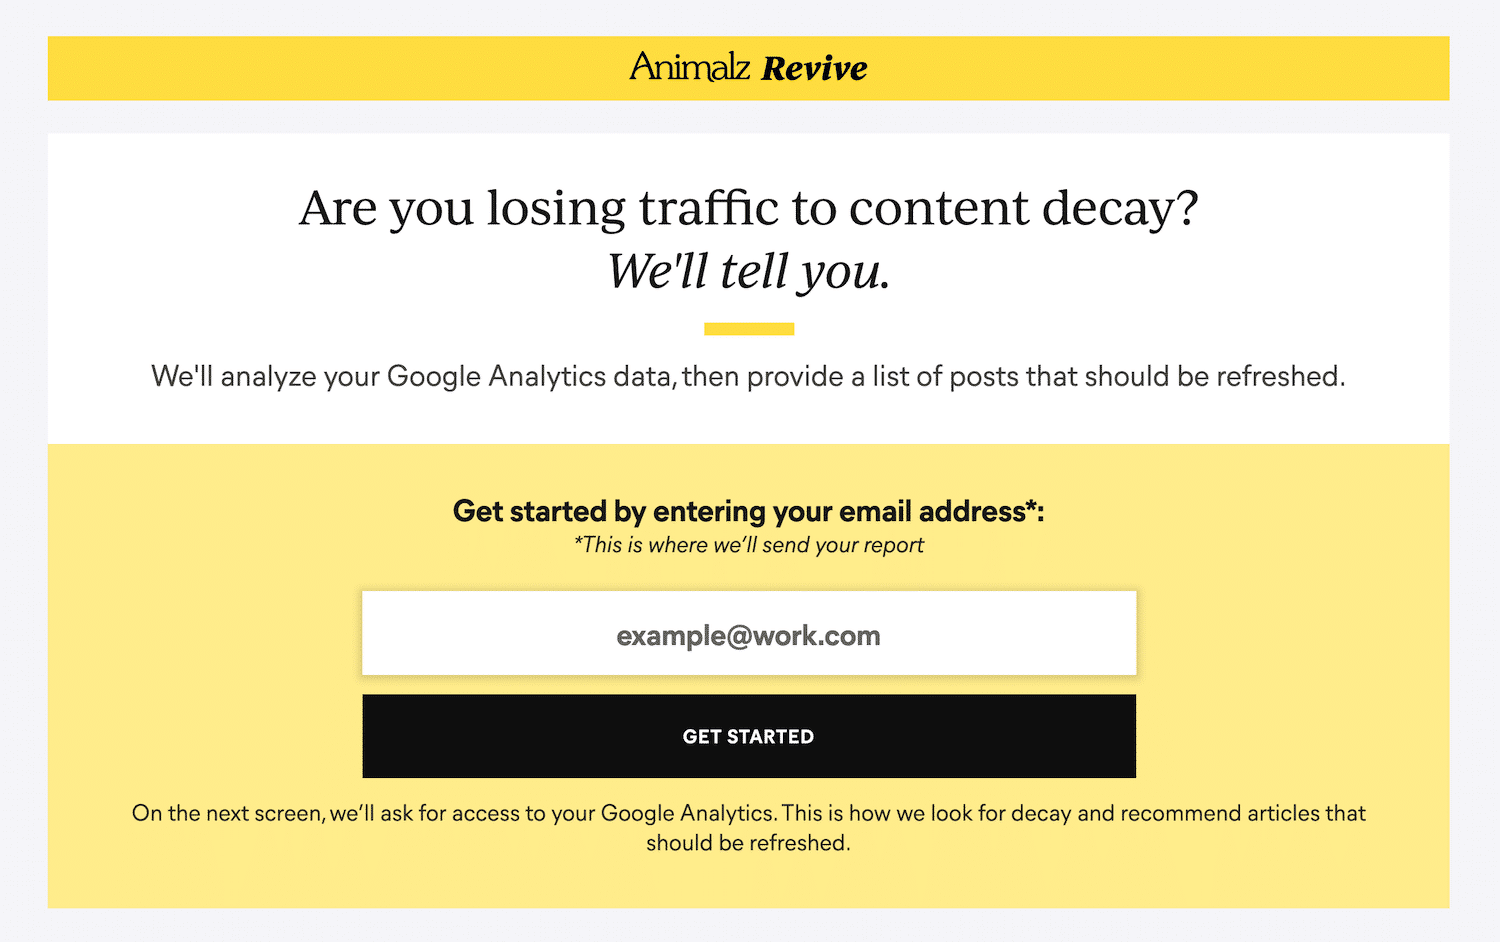
Simply type in your URL and allow the tool access to your Google Analytics. It will then highlight posts you can update to improve your SEO.
44. Practice Content Pruning
On a similar note, you can also practice ‘content pruning,’ which involves removing dated content from your site if it can’t be updated and improved. This can be a pretty scary process. After all, deleting content you worked hard to create probably goes against your instincts.
However, it’s better to have less content of high quality than to have a lot of posts that aren’t relevant or valuable to visitors. This will also require less ‘crawl budget’, or how many pages on your site that Google crawls within a given period.
Content pruning is an art, and we’re not recommending that you go ahead and delete half of your site’s posts. However, you may want to read this case study from HubSpot, in which they removed 3,000 posts from their blog.
This will give you an idea of the work involved and how this practice can improve SEO. Remember to create 301 redirects for removed content, so visitors don’t get lost.
45. Consider Content Hubs and Taxonomies
Modern search engines don’t evaluate individual pages in isolation. They assess your entire site’s depth on a given topic.
This is what SEOs refer to as topical authority: Google’s ability to recognize your site as a comprehensive, reliable source on a subject, based on how many related subtopics you cover and how well those pieces connect to each other.
A site with 15 well-linked articles on WordPress performance, covering caching, CDNs, server response time, image optimization, and Core Web Vitals, will tend to outrank a site with one very long page on the same topic. Depth and coverage, signaled through structure, matters.
The practical way to build topical authority in WordPress is through content hubs and taxonomies. This strategy is optional, but developing a meaningful taxonomy can help your users (and of course Google) understand the relationship between your pages, demonstrating your expertise across the topics that you cover.
Another great advantage of having this structure is that it creates a network of links between your content, which helps to spread authority throughout your pages through links.
We do just that on our website. Our content is organized into clusters and topic pages. For example, we have clusters focused on WordPress, Hosting, and Application Development. They each have multiple topic pages associated with them.
Let’s look at our SEO cluster. As you scroll down the page, you can see different topic pages like YouTube SEO, Image Optimization, and SEO Tools. Each of these pages serves as an umbrella for a series of articles. By the way, this post you’re reading is associated with the SEO Strategy topic page, which is linked at the top of the post.
Want to know how to execute this strategy? Start with these two steps:
Step 1: Enable Category Indexing in WordPress
A lot of WordPress themes don’t show category descriptions by default. Following the steps below will enable you to index your categories and display them on your site.
The first thing you’ll want to do is navigate to SEO > Search Appearance and click on the Taxonomies tab:
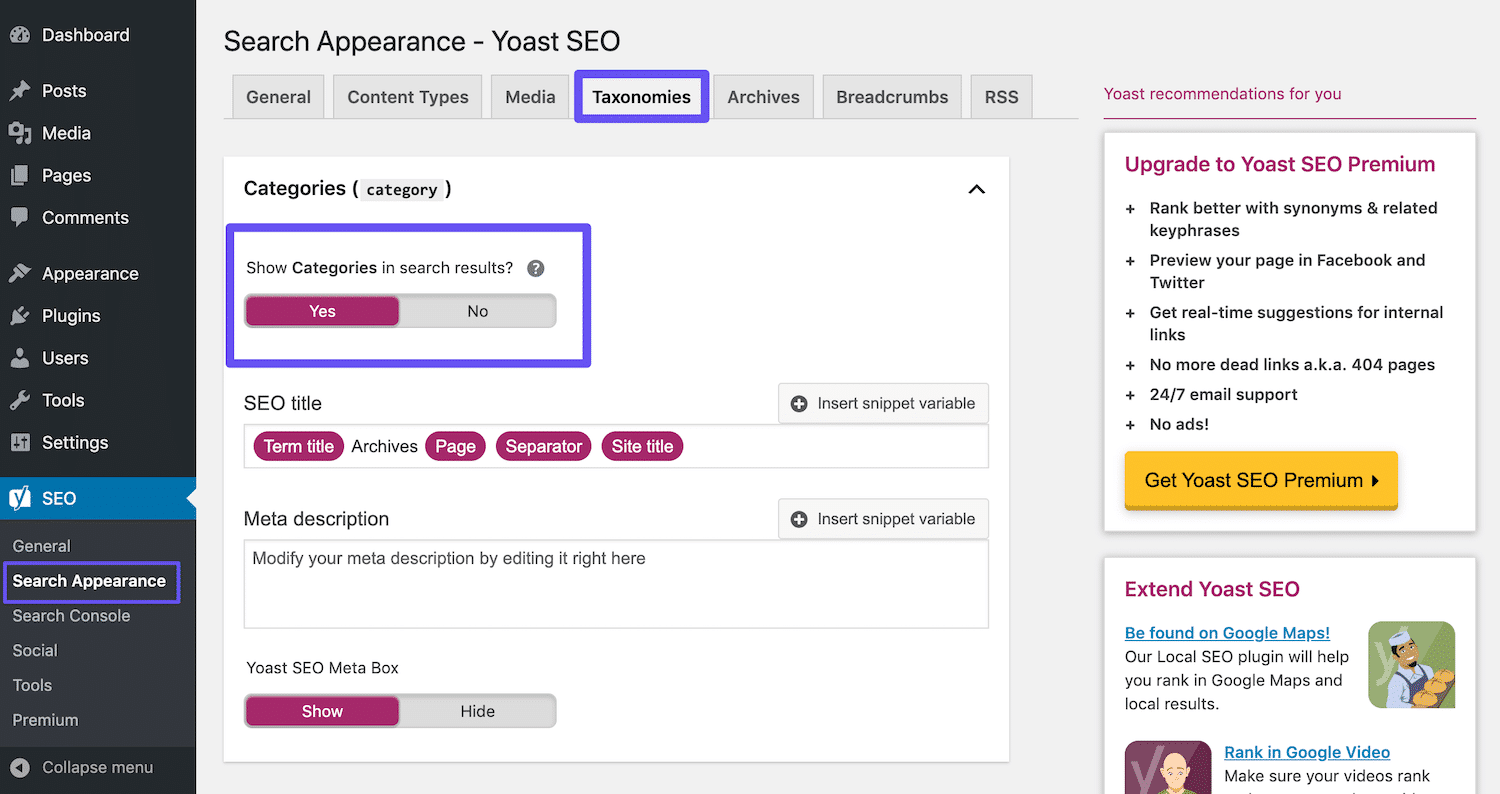
You should then check to make sure that the Show Categories in search results option is enabled.
Step 2: Create your Categories
It’s important to create categories that make sense for your content. Start by exporting a list of blog posts into a spreadsheet, then start grouping posts that follow similar topics. You will probably tweak the category names as you go through this process, then once you have your final list, you can get to work creating them.
Step 3: Write Category Descriptions
Finally, enter your category description under the specific post category you want to index. You can do this by navigating to Posts > Categories and clicking on Edit under the relevant category:
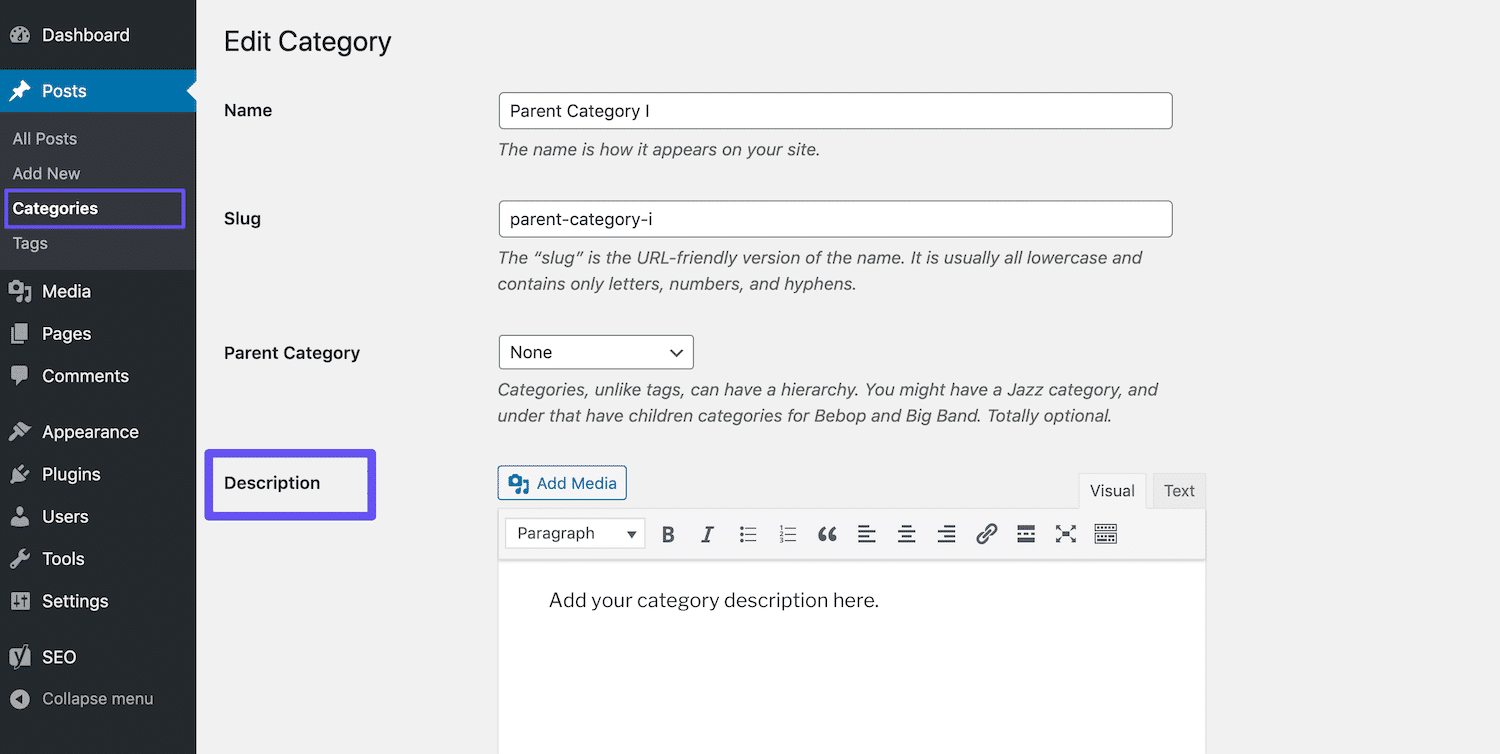
Make sure to click on the Update button when you’re done.
Learn more about taxonomies in our Guide.
46. Get Your Content Into Google Featured Snippets
Have you ever seen a box appear at the top of a Google SERP, in the form of a list, table, or paragraph, often accompanied by one or more images? These are called featured snippets, and they can help your page jump to the top of Google’s search results, into ‘position zero.’
Here’s an example of a featured snippet:
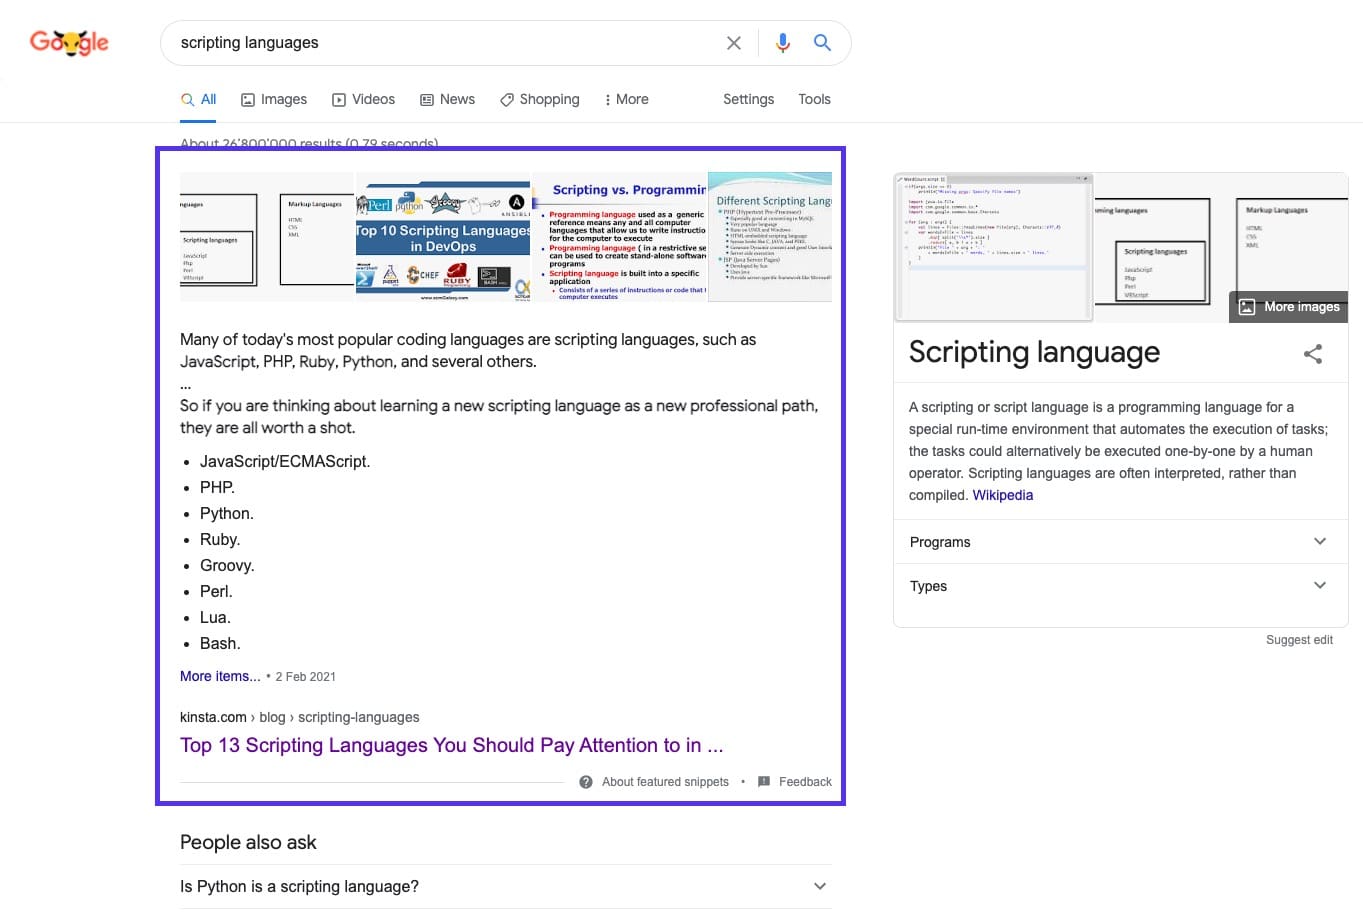
Featured snippets take up more space than the traditional blue link and description. This can positively affect the number of clicks your page gets, so earning featured snippets is a great way to drive more traffic to your WordPress website.
The question is, how do you optimize your pages for featured snippets?
The first thing to highlight is that several studies found in most cases, pages must first rank on page one of Google’s search results to be eligible for a featured snippet.
You can build a list of opportunity keywords to target by digging into your Queries report in Google Search Console and filtering by position, including all queries you already rank for in positions 1 to 10. Be sure to select your target country. The more impressions each query has, the more traffic you’re likely to get if you move into position zero.
Check Google to make sure your page is ranking in the position shown. If a featured snippet already appears for another website, it will give you an idea of what you’re up against.
Unfortunately, there’s no magic recipe to get your content into featured snippets. However, from our personal experience, we found the following can help:
- Add schema markup to help Google understand what your content is about and how it fits into your website
- Use header tags (<H1> – <H6>), bulleted lists, and numbered lists effectively
- Structure your posts in an organized fashion
- Keep your paragraphs short – featured snippets tend to be around 40 – 50 words in length
- Use questions as headings and answer them below (questions often trigger featured snippets)
- Use high-quality images and videos
Follow these tips, and you should be on the right path!
47. Optimize Your Content for Google Discover
Google Discover is Android’s content suggestion service. It’s a feed of content that Google thinks users will find relevant, based on their search history and other content they’ve read. As we mentioned before, mobile traffic is growing like crazy, so optimizing your posts for this platform can only help you.
Since Google Discover isn’t search-based, keyword research and optimization won’t help you get your posts into users’ feeds. There are, however, several actionable steps you can take to improve your chances, all of which we’ve discussed in this post:
- Create high-quality content.
- Optimize your headline (clickbait may do better here).
- Use images and videos in your posts (1,200px wide, avoid using logo).
- Mix your content types and try different styles of stories like listicles, Q&A, trending topics. Create evergreen content, as well as new, timely posts.
- Build trust with your content by incorporating social proof.
- Translate your content.
- Have a mobile-friendly site.
- Understand and enhance E.E.A.T. signals (Experience, Expertise, Authoritativeness, and Trustworthiness).
When it comes to the images you include in your posts, you may also want to consider enabling large image use for Google Discover. Statistics show that this leads to increased CTR, page view duration, and user satisfaction. You’ll need to opt-in to Google’s program using this form to use large images.

You can track how much traffic Google Discover is sending to your website, along with the pages appearing, by heading to the Discover report in Google Search Console.
Image Optimization
Check Out Our Video Guide to Image Optimization:
48. Name Your Image Files Wisely
This is one thing that a lot of website owners do wrong. Your image filenames are important! With a few correct best SEO practices, you can see a nice boost both on SERPs and in Google Image Search.
Some guidelines include:
- Always name your image files with actual words related to your content before uploading them. For example, instead of DC0000.jpg, name the image seo-tips.jpg.
- Always include hyphens between words in the image file names. For example, if you were to name a file seo_tips.jpg or seotips.jpg, Google won’t be able to read it. It only reads files with hyphens containing individual words, so you will want to name the image seo-tips.jpg.
- Include your main keyword if applicable, at least for your featured image. We always use our main keywords in our blog posts’ featured images.
- Keep your filenames lowercase. This keeps your image URLs clean and will retain consistency for all of your URLs.
These are pretty straightforward rules to implement for future file uploads.
49. Add Alt Text to Your Images
ALT text refers to the ALT attribute or alternative text applied to images on your site. ALT tags are used by screen readers for visually impaired users, providing extra context for images. Search engines also use them to understand better image content and how they relate to the content around them.
For example, if someone was using the Dragon Naturally Speaking software, ALT text could help them navigate the page better. When viewing your site’s HTML, you can spot alt attributes within <img> tags, like so:
<img src="image.jpg" alt="image description" title="image title"/>You should always add ALT text to your images. If you haven’t done so yet, you can go back and do it now.
Add Alt Text in WordPress
With WordPress, you don’t need to know any code to add ALT text. You can simply type it in by selecting an image in your Media Library or clicking on an image within the WordPress editor.
In the Block Editor, you’ll find the Alt Text (Alternative Text) field in the Block tab of the sidebar under Image Settings:
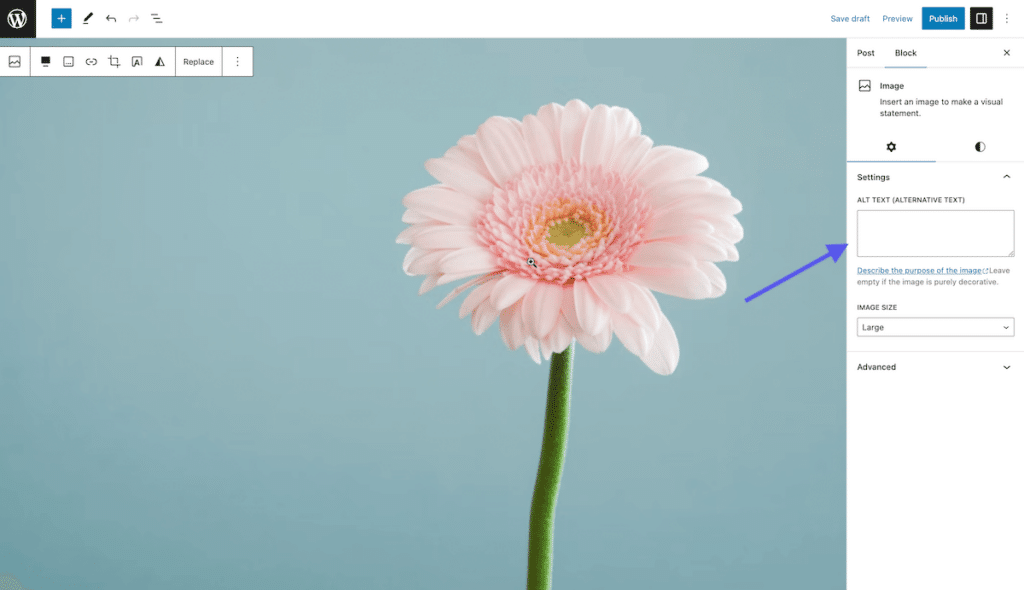
To add ALT text in the Classic Editor, follow the steps below.
Step 1: Open the Image Settings
First, open your post or page in the Classic Editor. Then, click on the image you want to add ALT text. You’ll see a toolbar appear above it:

Click on the pencil icon to open the image settings.
Step 2: Add ALT Text in the Relevant Field
If you’re running the latest version of WordPress, the Alternative Text field should be the first one in the resulting window:
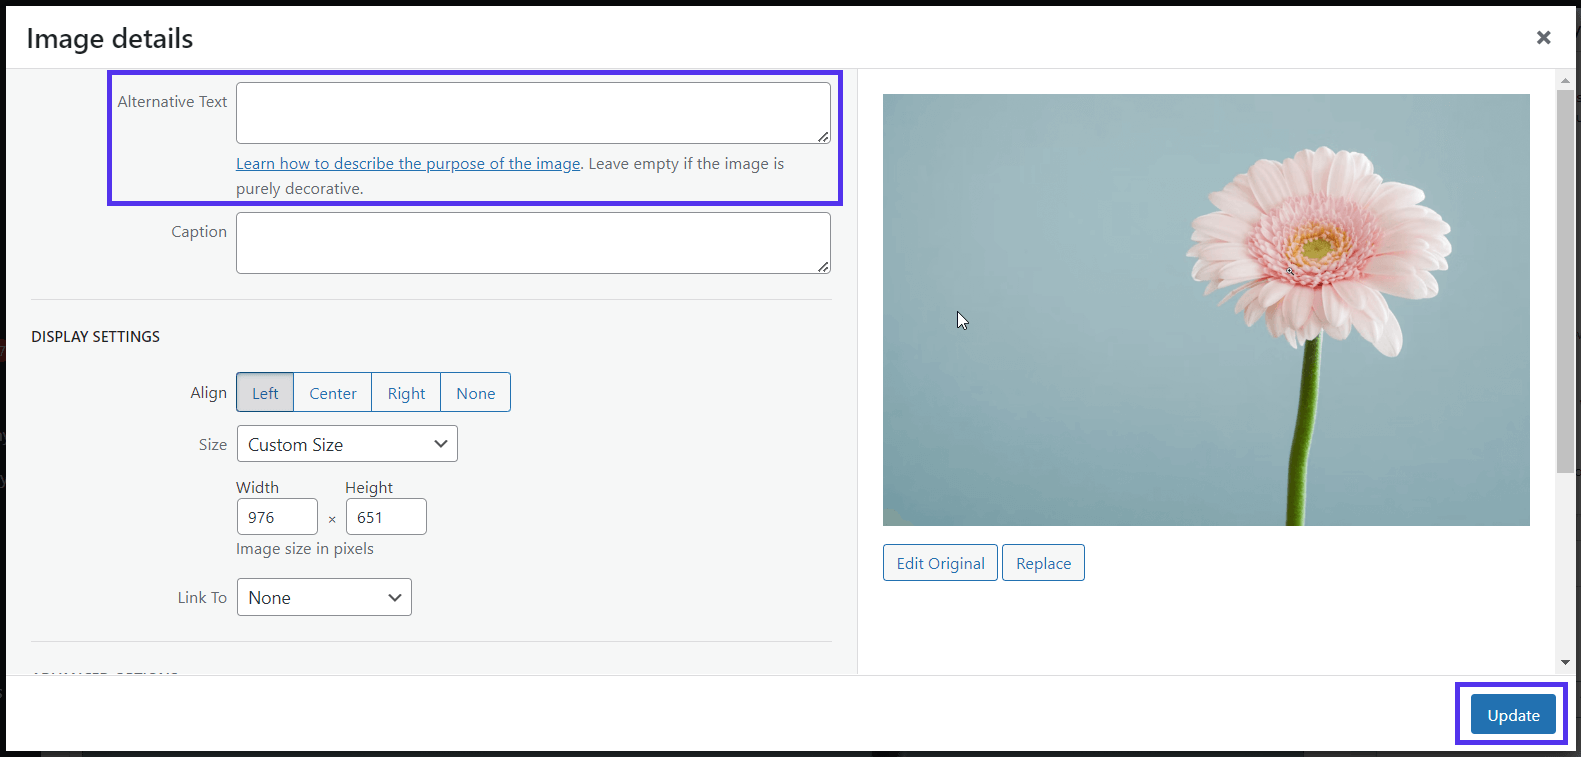
Click on the blue Update button when you’re done.
Usually, it is beneficial to add your main keyword if it applies to the image. However, don’t just add your main keyword as an ALT text across all your images. As with all things SEO, do things in moderation. Google doesn’t like spamming.
50. Use High-Quality Images
We’ve already mentioned how images can help drive traffic to your site via Google Image Search. Visual content such as featured images, screenshots, graphs, and charts can also help break up your text and clarify content.
In other words, adding images and graphics to your content benefits your site in a few ways:
- Your images can rank in Google Image Search, to generate more organic traffic for your site.
- Images can help demonstrate your posts’ relevancy to search engine crawlers.
- Visuals make your content more interesting, more appealing, and reader-friendly.
Try to keep your images below 100KB to avoid them causing your page load time to lag. Make sure to use the correct image size when uploading images. Huge images resized by the browser often add unnecessary page load time.
Google now supports the use of high-quality images, which is an excellent opportunity to spruce up your visual content. You may want to consider updating some of your older content by replacing less-than-ideal images with high-resolution versions.
51. Make Sure Images Are Accessible If Using CDN
Traffic from images can add up significantly over time, so it is essential to verify that search engines can crawl your images. According to data from Jumpshot, Google Images made up over 22 percent of web searches.
If you’re using a CDN, you want to ensure that your images aren’t blocked by your CDN provide’s robots.txt. For users of the Yoast SEO plugin, you will want to add the following code to the bottom of your functions.php file.
Replace, of course, the domain and CDN domain with your own:
function wpseo_cdn_filter( $uri ) {
return str_replace( 'http://yourdomain.com', 'http://cdn.yourdomain.com', $uri );
}
add_filter( 'wpseo_xml_sitemap_img_src', 'wpseo_cdn_filter' );
Some websites claimed their images were being de-indexed (as seen below).
Check out our Guide to Image Optimization to learn more about how to get your images showing up in search.
We also recommend watching this Search Central Lightning Talk from John Mueller at Google, offering lots of useful tips for best practice image optimization:
Kinsta customers can enjoy the high-performance free Kinsta CDN powered by Cloudflare’s global network with 300+ PoPs.
One of the CDN advantages they have is Lossless and Lossy image optimization, features that, when enable, convert all the PNG, GIF and JPEG images on your site to WebP format to improve website speed.
52. Don’t Index Image Attachment Pages
Whenever you upload an image and insert it into a post or page, it creates a separate attachment page on which the image resides. If you aren’t careful, Google might start indexing these pages, and since they have no value, it can be a waste of the crawl budget.
For instance, if someone clicks on an image attachment page in search results, all they’ll see is the image – not the content in the post. This will likely result in them leaving immediately, causing your bounce rate to go up.
Fixing Attachment Redirects in WordPress
If you notice this on your site, the Yoast SEO plugin has a redirect option to fix it. Simply navigate to SEO > Search Appearance, and click on the Media tab:
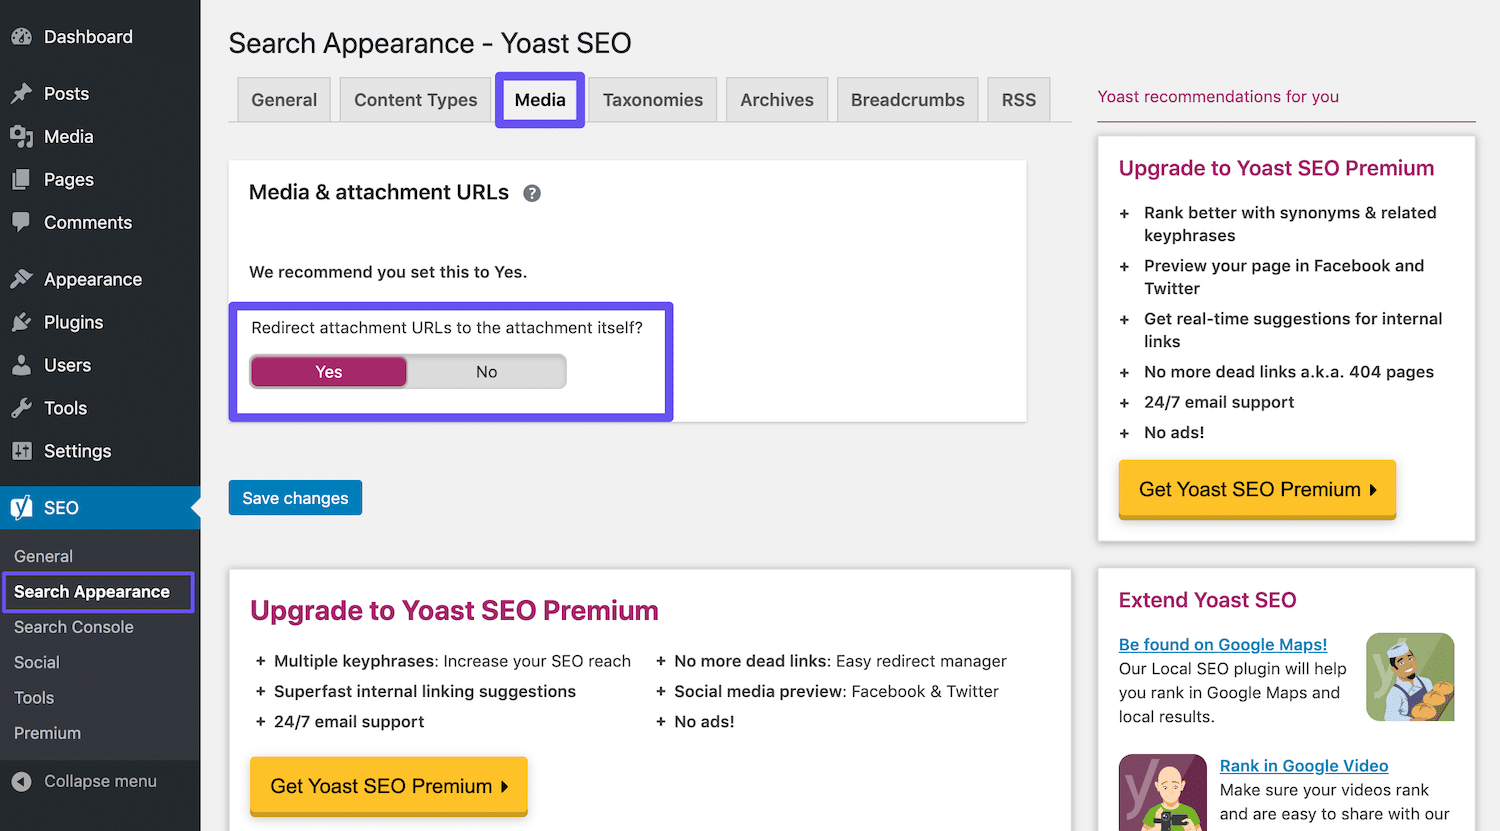
Now enable the ‘Redirect attachment URLs to the attachment itself’ option.
Social and Video
53. Claim Your Social Profiles
It’s wise to claim all of your social media profiles ASAP. Typically, businesses should do this immediately after launching their website. Most backlinks from social media profiles are nofollow, meaning they won’t help your SEO, but they can still send you a lot of traffic.
Another significant advantage of this strategy is that social media profile pages can often rank in SERPs. This can be huge for branding, as it allows you to have more control over the first search results that your visitors will see. Let’s take Kinsta, for example.
If you Google “Kinsta,” you can see that our Twitter, Instagram, and Youtube profiles all rank on the first page. If you’re very active on Twitter, you may also qualify for a special search result featuring your 3 most recent Tweets, as seen in the Kinsta brand SERP. Using social media profiles can be an instant win for your brand and require minimal effort.
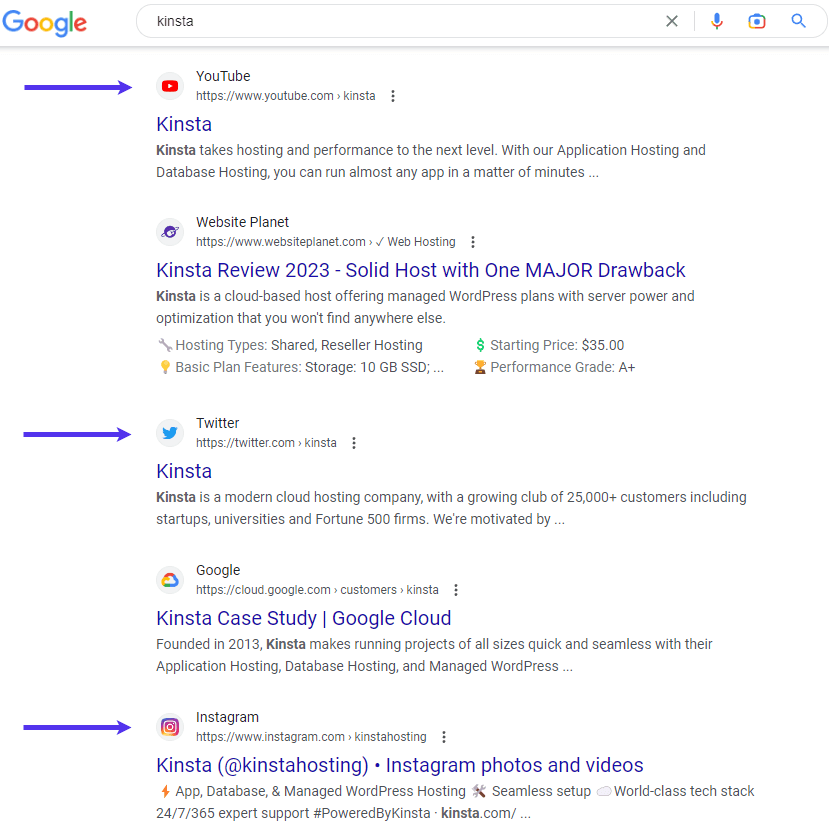
You can use a free tool like Namechk to see which names are available across all social media networks. Make sure to claim all of yours today. As a side note, check out this guide if you still need a little help coming up with a name for your blog.
54. Utilize Social Signals
‘Social signals’ include online activity related to your brand that doesn’t happen on your site itself. This includes tweets, shares, upvotes, and other similar indications of your brand’s quality.
Do social signals affect SEO? The answer, unfortunately, is not black and white. However, we have seen firsthand that they can temporarily affect your rankings in SERPs, based on our experiences with Reddit and Y Combinator, for example.
In the past, we have seen posts trending on these sites immediately start ranking on page one of Google. After they’re no longer trending, these posts’ rankings tend to fluctuate and eventually settle down to where they’re going to rank more long term.
What causes this to happen? Our theory is that the combination of the mass amount of traffic and social signals causes Google to deem these posts as very relevant, therefore bumping them up in the SERPs. Many SEO specialists will debate this, but we have seen this happen firsthand quite a few times.
Below is an example of something we wrote with decent keyword volume that skyrocketed in SERPs the very next day, which appears to be because we were able to gain a lot of social traffic to it:

The biggest takeaway is simply that shares, social signals, and more traffic most likely influence your rankings, one way or another. Creating a buzz around a piece of content helps to get it in front of more people, which often leads to more links, as others reference your content from their content. So we recommend taking advantage of social media as much as you can.
55. Specify Social Markup
In WordPress, the Yoast SEO plugin also allows you to add social markup. This helps Google connect these to your website, which is used to feed your brand’s knowledge panel. Simply list your social media profiles to associate them with your website using structured data.
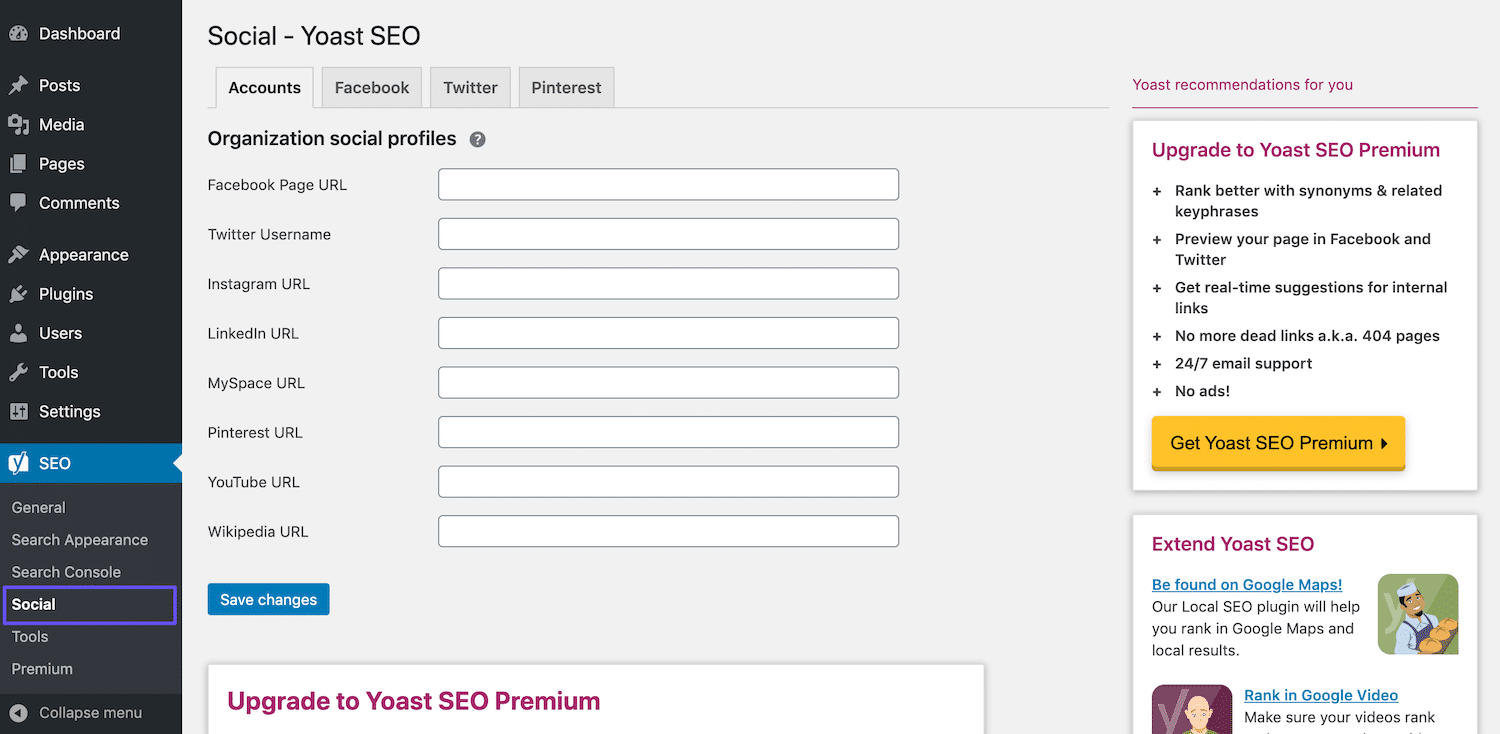
Open Graph Tags
You may have seen thumbnails on Facebook or Twitter when sharing a blog post from your site. Those are automatically generated using Open Graph (OG) tags. Like title tags and meta descriptions, OG tags provide information about the content shared on social media platforms.
Below is an example of a Kinsta blog post shared on Facebook:

Fortunately, Yoast comes to the rescue again. We recommend going into the Social options in Yoast SEO and filling out all the available fields.
You can also change settings such as the default thumbnail that shows up when your website is shared (the og:image), and the type of thumbnail that Twitter uses:
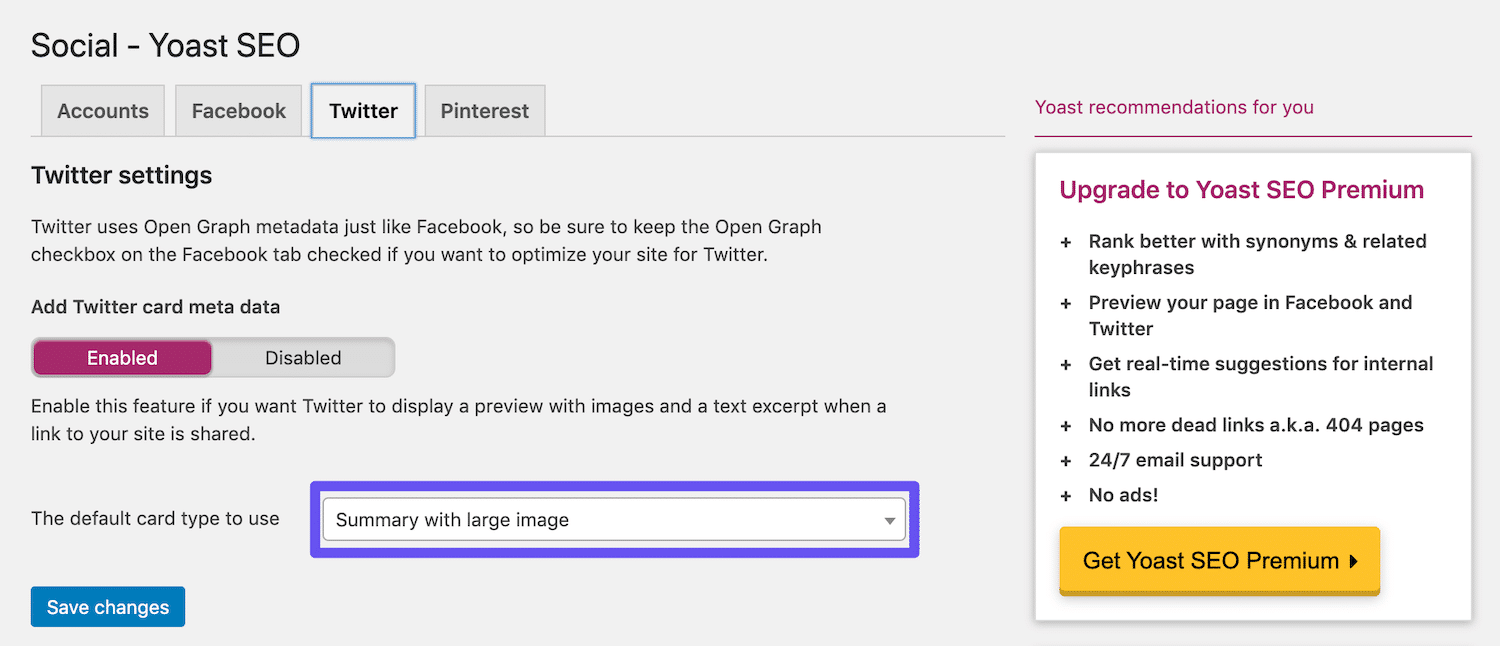
This is an example of the code automatically added for you by the Yoast SEO plugin. I’m using this blog post on SEO:
<meta property="og:locale" content="en_US" />
<meta property="og:type" content="article" />
<meta property="og:title" content="What Does SEO Stand For? (+ 7 Beginner's Tips for Ranking a Site)" />
<meta property="og:description" content="Search Engine Optimization is one of the most powerful ways to attract new users. But what does SEO stand For? Learn more in our in-depth guide!" />
<meta property="og:url" content="https://kinsta.com/blog/what-does-seo-stand-for/" />
<meta property="og:site_name" content="Kinsta Managed WordPress Hosting" />
<meta property="article:publisher" content="https://www.facebook.com/kinstahosting" />
<meta property="article:tag" content="seo" />
<meta property="article:tag" content="WordPress" />
<meta property="article:section" content="Business Growth Strategies" />
<meta property="article:published_time" content="2019-07-01T07:40:12+00:00" />
<meta property="article:modified_time" content="2020-03-04T17:00:23+00:00" />
<meta property="og:updated_time" content="2020-03-04T17:00:23+00:00" />
<meta property="og:image" content="https://kinsta.com/wp-content/uploads/2019/07/what-does-seo-stand-for.png" />
<meta property="og:image:secure_url" content="https://kinsta.com/wp-content/uploads/2019/07/what-does-seo-stand-for.png" />
<meta property="og:image:width" content="1460" />
<meta property="og:image:height" content="730" />
<meta name="twitter:card" content="summary_large_image" />
<meta name="twitter:description" content="Search Engine Optimization is one of the most powerful ways to attract new users. But what does SEO stand For? Learn more in our in-depth guide!" />
<meta name="twitter:title" content="What Does SEO Stand For? (+ 7 Beginner's Tips for Ranking a Site)" />
<meta name="twitter:site" content="@kinsta" />
<meta name="twitter:image" content="https://kinsta.com/wp-content/uploads/2019/07/what-does-seo-stand-for.png" />
<meta name="twitter:creator" content="@matteoduo" />
Facebook and Google use OG tags to pull in information, while Twitter uses its own meta information, known as Twitter Cards. You can check this guide if you need to regenerate thumbnails.
56. Take Advantage of Videos
There are two parts to this tip:
- Repurposing content into video format and including related videos in content
- Optimizing video visibility using structured data to surface them in video searches better
Repurposing Written Content in Video Assets
YouTube is a Google-owned platform that has snowballed in recent years, moving up to take the second spot in the Top 100 Most Visited Websites by Search Traffic. This means that adding video versions of your content will help you target new visitors across a new channel.
If you think about it, people like to consume content differently.
Some are happy to read through long blog posts, while others prefer to watch video content. If you offer your users both options, as we do on our blog and Kinsta’s YouTube channel, you can target a wider audience.
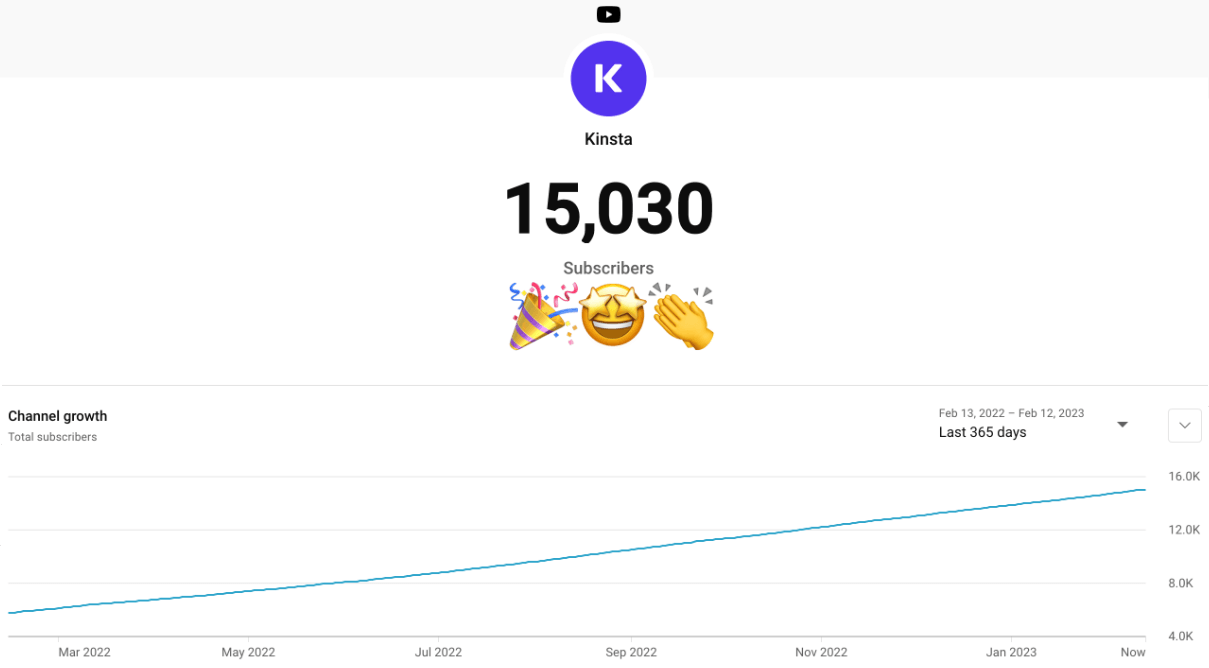
Optimizing videos for YouTube (known as YouTube SEO) is a different discipline that you can read more about in our Guide to YouTube SEO.
Optimizing Videos for Video Search
The Video tab in Google allows you to search for video content. While Google is pretty good at pulling videos in from web pages, you can encourage Google to include your videos (or other people’s videos you’ve embedded in your pages) by providing more context using the VideoObject Schema.
The VideoObject schema can be used to feed Google with more details about your videos, including the title, description, and thumbnail image.
We have found that the videos we include, together with structured data, often perform well in Google’s video results, particularly for keywords we also rank well for in Google Search.
Local SEO
57. Use Local SEO Techniques
Local SEO is crucial, especially for small businesses. There’s much more to it than we can cover in this post alone. One quick tip is that you should immediately register your WordPress site with Google Business Profile and Bing Places.
These are both completely free and will help you show up in SERPs for location-specific searches. For example, below we searched for “Italian restaurant” in New York:
Bing now allows you to use your Google My Business information to create a Bing Places account, saving you lots of time and making it a no-brainer to get listed.
Check out this in-depth local SEO guide from the folks over at TheSiteEdge. This is a great way to get started and stay ahead of your local competition.
58. Translate Your Website
Adding additional languages to your site can be a massive game-changer for SEO and traffic. Neil Patel experimented with this and saw a 47 percent increase in traffic after translating his site into 82 languages.
Of course, this won’t work for everyone, and success depends on your business and geographical location. However, it’s something to think about.
At Kinsta, we’ve translated our site into 9 additional languages and have seen a 107 percent increase in organic traffic in the last year because of it:
When it comes to implementing this on your website, Google won’t penalize you for duplicate content, but you must have the correct hreflang and canonical tags in place.
In the example below, the tags highlight the URL for the English version of the page but also show that there’s a Spanish version. This helps search engines to understand which version of a page is the most appropriate for their users, based on the user’s browser language settings. You will also notice the “x-default” hreflang attribute, which shows which version should be used if you don’t have a translated version available in the user’s language.
English Version
<link rel="canonical" href="https://kinsta.com" />
<link rel="alternate" href="https://kinsta.com" hreflang="x-default" />
<link rel="alternate" href="https://kinsta.com/es" hreflang="es" />
Spanish Version
<link rel="canonical" href="https://kinsta.com/es" />
<link rel="alternate" href="https://kinsta.com" hreflang="x-default" />
<link rel="alternate" href="https://kinsta.com/es" hreflang="es" />
There are plugins you can use to translate your content and translation services such as Weglot.
Remember, no automatic translation tool will ever beat having an actual person translate it for you. We recommend hiring a native speaker or using a professional translation service.
Tracking
59. Keep an Eye on Google Analytics
The best way to know how well your SEO is performing is to set up a free account with Google Analytics. Check out our guide to GA4 to learn more about how it works and how you can get it set up on your website.
One of the first things you should do is link your Google Analytics account with your Google Search Console account. This allows you to pull your GSC data into your GA reports.
To do this, first, make sure you’ve selected the appropriate account and property, then click on the gear icon labeled Admin. In the Property column, under Product Links, click on the option Search Console Links. Then just follow the steps to link both platforms.
This integration makes two new reports available:
- Google Organic Search Traffic: shows landing pages with associated Search Console and Analytics metrics.
- Google Organic Search Queries: shows search queries and associated Search Console metrics.
One of the most important sections of Google Analytics (and the one you should really pay attention to) is the Reports Snapshot.
This report brings together compact versions of many essential reports in one neat dashboard. It’s a quick way to get an overview of your site’s performance and answer questions like:
- How many users are currently active on your site?
- Which pages are being accessed the most?
- What are your top-selling products?
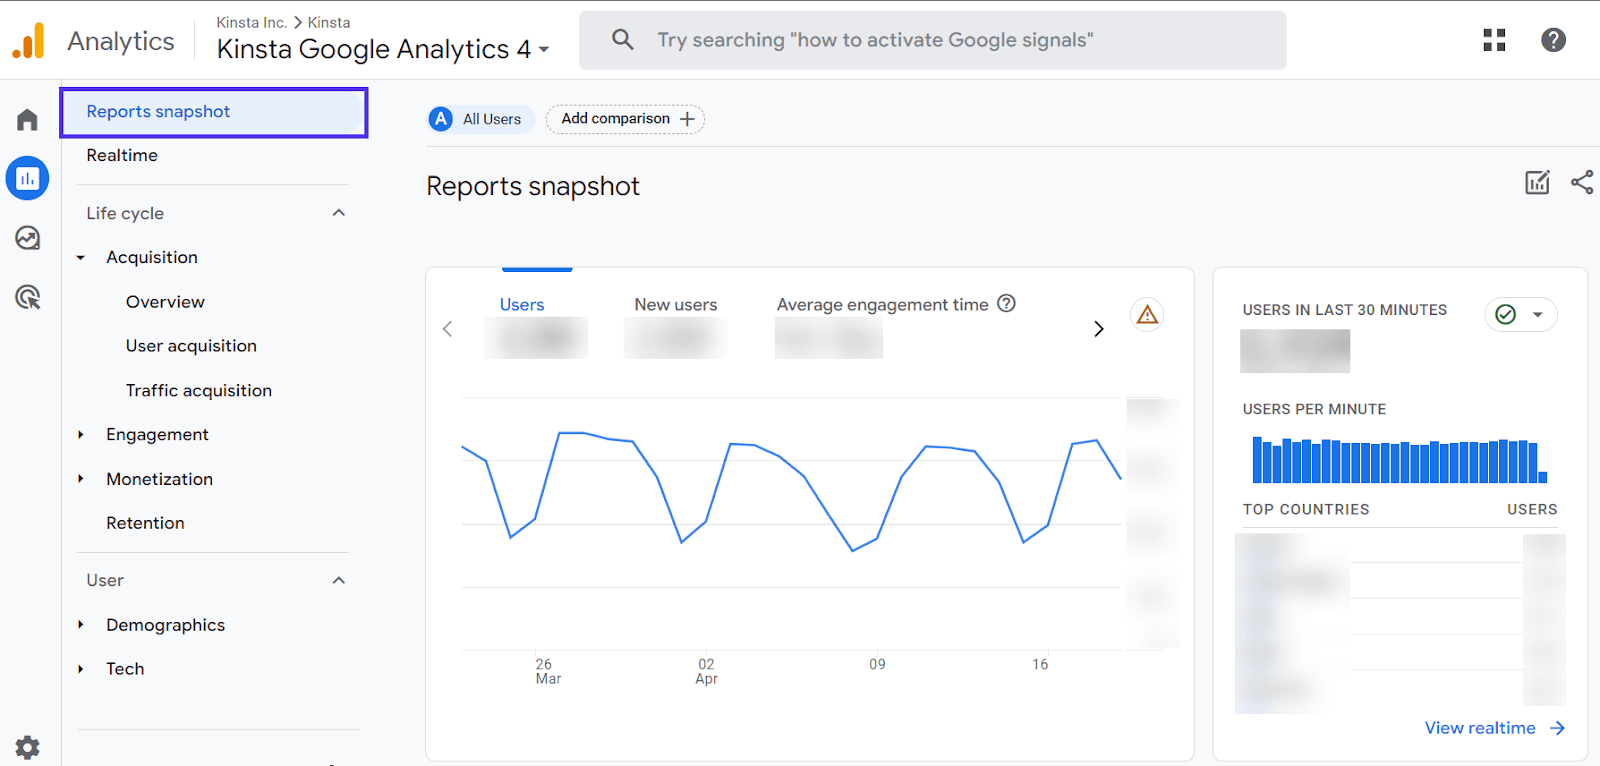
You can also check the Traffic Acquisition report to see which channels are directing traffic to your site. Your focus here can be the Organic Search channel since the percentage of users that arrive via this channel will give you a pretty good idea of how effective your SEO efforts have been.
Next to the magnifying glass icon, type “Organic Search” and hit Enter. Then click on the plus icon, type Session source, and select it. You’ll see detailed info on traffic that comes from Google, Bing, Yahoo, and other search engines.
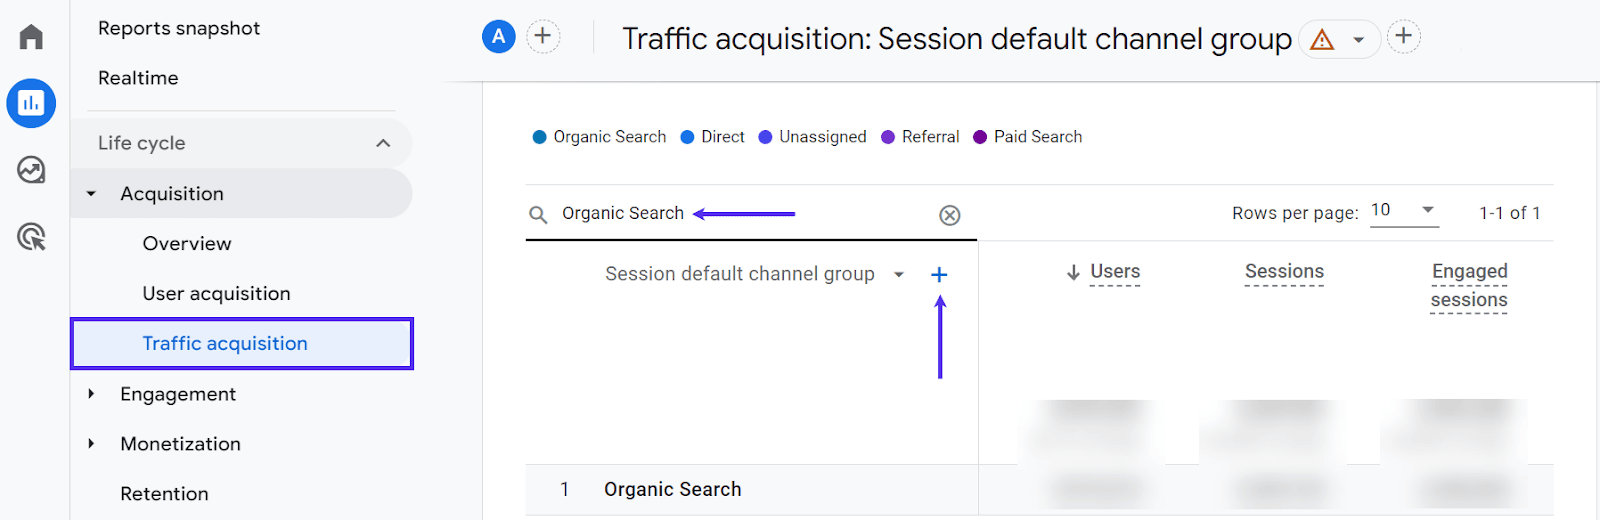
By the way, if you’re an attentive reader, you’ve probably noticed that all the screenshots we used above are from Google Analytics 4 (GA4). This is because the old version of Google Analytics (Universal Analytics) will be sunset on July 1, 2023, meaning that it will no longer process your data (the data you need to make important business decisions!).
And in case you really don’t want to use GA4, you can always test some alternatives, like Matomo, Clicky, and Fathom Analytics.
60. Track Your Keyword Rankings
Tracking your keyword rankings is also an important SEO tip. This allows you to monitor the progress of your main keywords in SEO campaigns. If you spend time optimizing your posts, you also need to monitor their progress long-term.
A great strategy that we have had success with is to monitor your keywords appearing at the very top of the second page on Google results. Spend some time adding content and images, building backlinks, and other strategies we’ve mentioned in this post. This should help bump these posts to the first page.
Google Search Console is great for understanding what keywords your website already ranks for, so head over to the Search results report.

Another great tool to track rankings in any country on different devices is AccuRanker. We highly recommend working with AccuRanker as it’s a great tool:
This will help you keep an eye on how your keywords perform over time.
WordPress SEO Tips: Our Results
SEO includes the strategies, tactics, and methods to help web content rank higher in search engines such as Google, Bing, and Yahoo. Better positions on SERPs result in more organic traffic and higher conversions.
There are two sides to SEO. The first is the technical part, which involves playing to search engines’ ranking algorithms. The second involves more of a natural branding strategy for online businesses.
For businesses, coming out on top with SEO depends on delivering a high-quality website experience with awesome content, fast pages, and a secure website. This winning comes by following the essential ingredients of SEO best practices.
Just how well does SEO work?
Well, the proof is always in the pudding!
Because we’re SEO fans (true fanatics, yeah? 😅), we’ve kept it as our North Star since our early days of publishing. You’ll find below how much our organic traffic has evolved and grown. And by organic, we mean only traffic generated from search engines (excluding social media, paid advertising, etc.).

Below, you can see the overall upward trend in organic growth that we’ve seen over the last 5 years.
While traffic is always going to be affected by seasonal trends, unforeseen events (we’ve all become more familiar with those in recent years!), and the usual onslaught of Google algorithm updates that are constantly moving the goalposts, we’re extremely proud of the progress we’ve made to bring us to where we are today.
Here are a few additional screenshots to provide you with a richer comparison.
As you can see, we grew our organic traffic by 287% in just 3 years:

And, if we compare against two years ago, that’s a 73% organic growth increase:

Year-over-year growth was also positive in 2022, with organic traffic increasing by more than 10%:

The first quarter of 2023 has already started with some record breaking months, so you can expect another nice graph in our 2024 addition!
In true eating your own dog food spirit, we achieved all of this growth and more than 4 Million monthly sessions by implementing the strategies outlined in this very SEO guide.
AI SEO: What You Need to Know Right Now
The SEO landscape looks different today than it did just a few years ago. AI Overviews now appear prominently across Google search results, summarizing answers before users even reach the organic listings.
ChatGPT and Perplexity have become genuine discovery tools, with more users turning to them as starting points rather than going straight to Google.
The question is no longer “what will AI do to SEO?” because that future is already here. The good news: the fundamentals haven’t changed. Fast pages, strong content, solid technical setup, and real expertise are still exactly what you need.
But there are new layers worth understanding.
Optimizing for AI Search (GEO)
Generative Engine Optimization, or GEO, is the practice of making your content visible inside AI-generated answers: on Google, ChatGPT, Perplexity, and similar platforms.
Where traditional SEO earns you a ranked link, GEO earns you a citation inside an AI response. The tactics overlap heavily with good SEO practice. AI systems cite content that is clear, direct, factual, and well-structured.
A few things that specifically improve your chances:
- Answer questions directly and early. AI tools pull from content that gives clear answers without making readers search for them.
- Use descriptive, well-organized headers. Structure helps AI crawlers navigate your content as much as it helps human readers.
- Build genuine E-E-A-T signals. Author bios with credentials, original research, and links from trusted sources all signal trustworthiness to AI systems.
- Keep your structured data up to date. Schema markup (covered in tip #26) helps AI systems identify what type of content they’re reading and who produced it.
One newer development to keep an eye on: llms.txt is an emerging, experimental standard, modeled on robots.txt, that aims to signal to AI crawlers what content on your site is available and how to interpret it.
In practice, this involves placing a plain text file at your domain root (yoursite.com/llms.txt) with a structured summary of key pages. Some SEO tools have started to support generating it automatically. That said, its real-world impact is still unclear, and many SEO experts argue it currently has little to no effect, so it’s best viewed as a low-effort experiment rather than an established best practice.
AI-Generated Content
Using AI tools to assist with content production is now standard practice across the industry.
Google has confirmed that AI-generated content isn’t against its guidelines, as long as it isn’t created purely to manipulate rankings. In practice, this means AI-assisted content that is accurate, original, and genuinely useful can perform well.
Low-quality bulk-generated content, on the other hand, is still treated as thin content regardless of how it was produced.
If you use AI in your workflow, a few things to keep in mind:
- Always have a human review and edit AI-produced drafts, especially for factual claims, statistics, or anything time-sensitive.
- Add original perspective where possible: first-hand experience, proprietary data, or a unique angle. This is what separates your content from the thousands of other AI-assisted posts covering the same topic.
- Focus on content quality over trying to appear “human-written.” Detection tools are imperfect and increasingly irrelevant. What matters is whether the content is genuinely useful to readers.
Summary
SEO is critical to the success of any business, and it all starts with choosing the right hosting provider for you.
In this post, we’ve shared plenty of WordPress SEO tips we’ve used to achieve more than 4 Million monthly sessions. By implementing as many of them as possible on your site, we’re 100% confident you’ll be able to boost your organic traffic and SEO rankings.
SEO is an ongoing “game” with plenty of aspects to watch. That’s why learning WordPress SEO tips can help you set your business up for success.
FAQs
What Is On-Page SEO?
On-Page SEO refers to optimizations that a website has control over. This includes things like optimizing title tags, meta descriptions, header tags, and internal linking.
What Is Off-Page SEO?
Off-Page SEO refers to optimizations that can be carried out on other websites to help improve a different website. This includes things like social media signals and links from other websites.
What Is Technical SEO?
Technical SEO refers to optimizations that help crawlers crawl and index web pages more efficiently. This includes things like page speed, XML sitemaps, and canonicalization.
What Is Local SEO?
Local SEO refers to optimizations that help a website to gain visibility in the local search results. This includes things like adding a Google Business Profile and creating content that’s relevant to a specific location.
What Is UX Design?
User Experience Design relates to improving how users interact with and navigate a website, considering what it is they want to achieve and making sure the processes to reaching their goals are as simple as possible. This includes things like testing user journeys to make sure the path to conversion is direct without any unnecessary steps.

Head of Content at Kinsta and Content Marketing Consultant for WordPress plugin developers. Connect with Matteo on Twitter.

